Thank you for choosing T5 as your preferred safety app. The T5 was originally designed as a proactive safety app intended to identify and prevent risks and hazards. It also aims to simplify the overall safety process, eliminate paperwork and save time for its users. The T5 has been designed to utilise the time saving features of Apple and Android personal devices providing as much automation as possible for the user. This makes the app both simple and quick to use whilst maintaining the accuracy of information derived from automatic capture. Users familiar with Apple and Android devices should have no trouble navigating the T5 user interface. Don’t be fooled into thinking that because of the apps simplicity it is gimmicky and not an effective safety tool. This could not be further from the truth. The app fulfils all the basic requirements of traditional Take5’s, Hazard Reports, Prestart Checks, Safety Observations and Incident Reports. It removes the need to reproduce commonly used information, it removes the paperwork and it removes the legwork from the equation thereby speeding up the entire process. You will not lose important detail or overview; in fact quite the opposite, overview and information accuracy will be increased because of combined app and device efficiencies. The T5 app is essentially five modules in one app. When you purchase the T5 you have purchased a multi-faceted five-function safety app. All five modules are connected as they share the same information from the “User Profile” however they perform completely separate reporting functions. The ‘5’ in each of the apps titles is taken from the traditional term “to take 5 minutes”. Each app has been developed with the mindset that it should take no longer than 5 minutes to complete and send to its intended recipients and even less once the user becomes familiar with the app. Thank you. We hope the T5 safety app is able to assist in your organisations compliance by reporting your workplace hazards and risks and keeping your people safe.
NB: This manual has used iPhone images to depict the operation of the T5’s application screens. They are very similar to the Android device screens and operate in the same way or in a very like manner. Any differences may be due to the devices operating systems, i.e., when entering text, but T5 operations should be almost identical for most devices.
4
Opening the T5 App for the first time
This manual assumes the app has been downloaded from iTunes or Google Play and has been successfully installed on your Apple or Android device and the T5 icon is present on your device screen ready for use. It also assumes the user is familiar with using an apple or android personal device Open the T5 app by pressing the T5 icon on your device.
The first time you open the app it will open into the user profile screen. This is where the device owner or T5 users personal and work information is captured. This information is important to each of the reports produced by the app and contains data that will be automatically entered into each of the reports, i.e. date, time, user name, recipients, etc. removing the need to re-enter this information in every report.
5
The User Profile
The User Profile is where each user enters their personal and work information. The majority of the fields in the User Profile are mandatory and unless completed the app will not allow the user to proceed…
The next 4 screen shots show the required fields to be populated.
Please note that the email addresses shown in this screen are used to send reports to the user and supervisor.
The phone numbers with the yellow touchable phone icons can allow a user to contact their supervisor or emergency services from the User Profile screen.
6
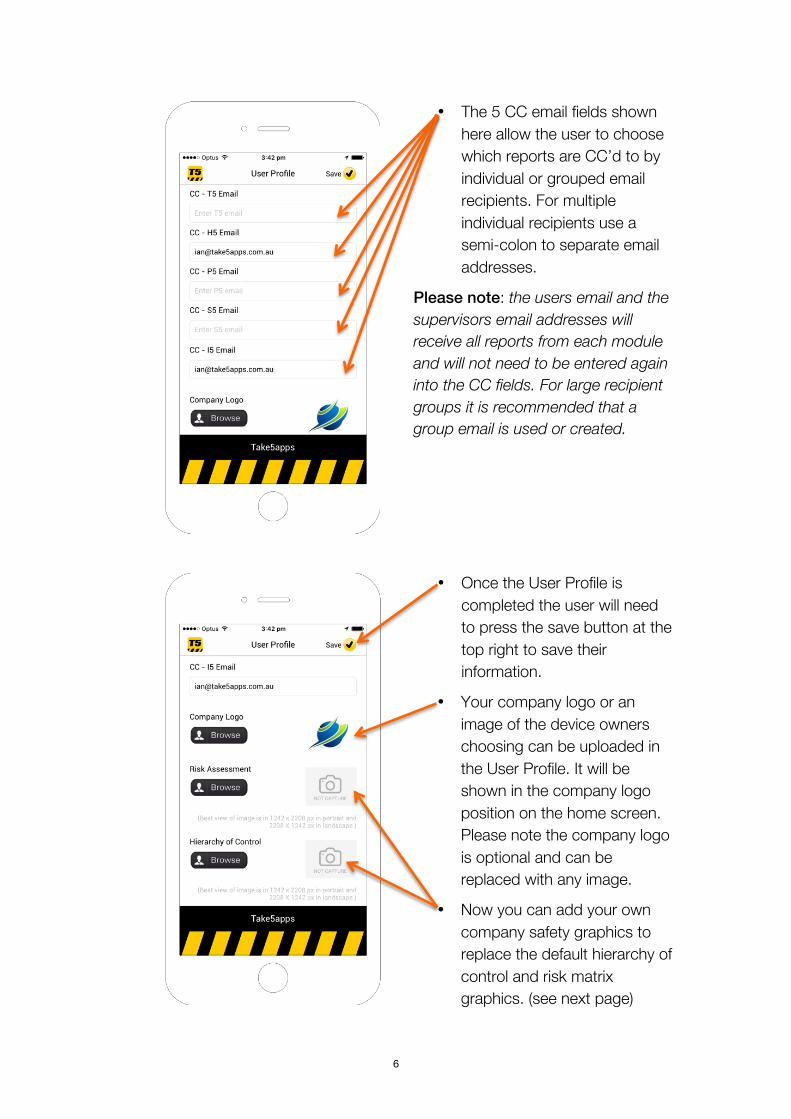
• The 5 CC email fields shown here allow the user to choose which reports are CC’d to by individual or grouped email recipients. For multiple individual recipients use a semi-colon to separate email addresses.
Please note: the users email and the supervisors email addresses will receive all reports from each module and will not need to be entered again into the CC fields. For large recipient groups it is recommended that a group email is used or created.
• Once the User Profile is completed the user will need to press the save button at the top right to save their information.
• Your company logo or an image of the device owners choosing can be uploaded in the User Profile. It will be shown in the company logo position on the home screen. Please note the company logo is optional and can be replaced with any image.
• Now you can add your own company safety graphics to replace the default hierarchy of control and risk matrix graphics. (see next page)
7
Safety Graphics
Once the User Profile is completed, and on the first time the T5 module is opened, the user will be treated to the Risk Matrix and the Hierarchy of Controls as a prompt and recommendation of ranking that can be consulted when assessing the risks and hazards associated with a task.
They will not show again unless the user wishes to view them. They are accessible from the home screen by touching the yellow hazard triangle in the bottom left of the home screen.
(Please see picture of home screen on the next page.)
Viewing these graphics is now easier utilising the swipe function.
It is now possible to replace the hierarchy and risk matrix graphics with your own company safety graphics. We are acutely aware that different businesses have different ways or ranking hazards and risks.
Please Note: If you choose to replace either or both of the T5 Risk Assessment or Hierarchy default graphics you will not be able to revert back to the T5 default graphics. Replacing them is permanent. You can however replace your own graphics with new or updated risk or hierarchy safety graphcis of your choosing. Finally, to prevent any possibility of the app crashing all graphics inserted into the T5 profile should be located on the device.
8
The Home Screen
The home screen is the main menu to the T5’s 3 safety apps. Once the initial ‘User Profile’ is completed the app will open to this screen from then on.
• The icon at the top left always shows the screen or app you are in. Touching the icon will return you to the home screen.
• The icon at the top right gives the user access to the ‘User Profile’ to edit should any details change.
• The module icons on the left (T5, H5, P5, S5 and I5) open each corresponding module.
• The yellow hazard triangle opens the ‘Safety Graphics.
The company logo has no clickable function on the Home Screen except as a visual aid or a personal image. It can be added, changed or deleted from the ‘User Profile’. The companies logo does not have to be used any graphic or photo can be used and is totally at the discretion of the user.
The company name (also entered in the ‘User Profile’) will appear in the black bar above the yellow and black stripes on all app screens.
9
T5 – Take5
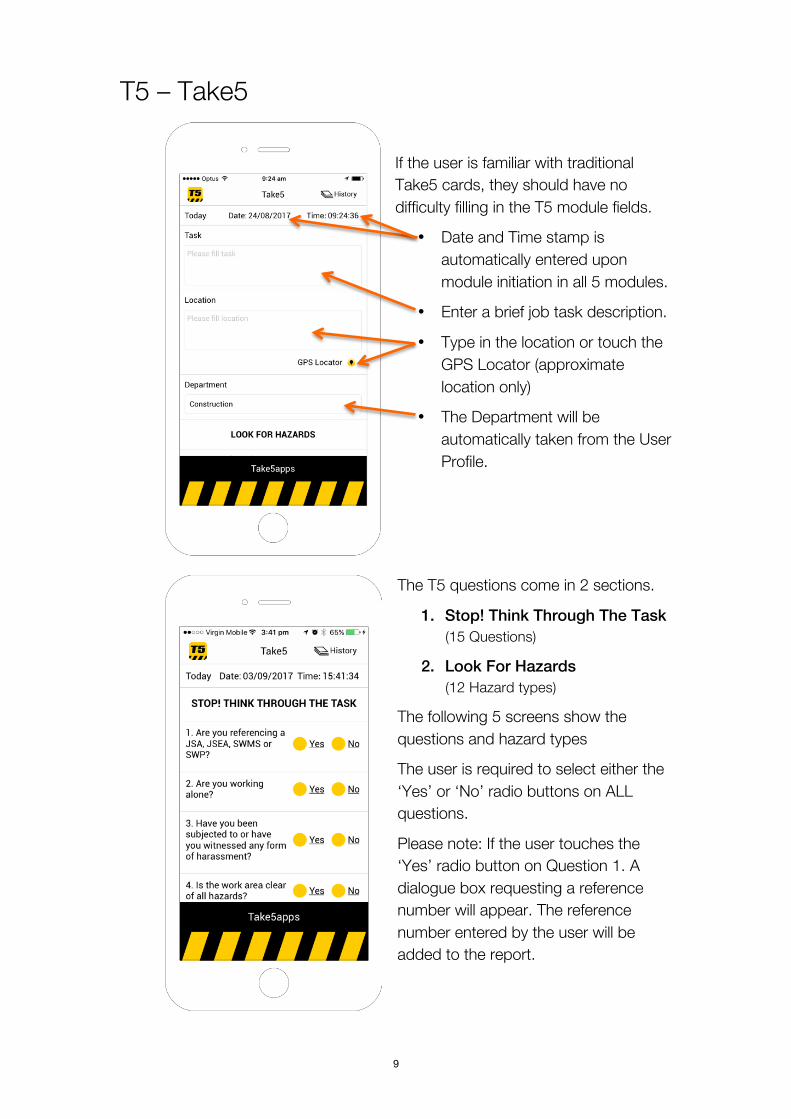
If the user is familiar with traditional Take5 cards, they should have no difficulty filling in the T5 module fields.
• Date and Time stamp is automatically entered upon module initiation in all 5 modules.
• Enter a brief job task description.
• Type in the location or touch the GPS Locator (approximate location only)
• The Department will be automatically taken from the User Profile.
The T5 questions come in 2 sections.
1. Stop! Think Through The Task (15 Questions)
2. Look For Hazards (12 Hazard types)
The following 5 screens show the questions and hazard types
The user is required to select either the ‘Yes’ or ‘No’ radio buttons on ALL questions.
Please note: If the user touches the ‘Yes’ radio button on Question 1. A dialogue box requesting a reference number will appear. The reference number entered by the user will be added to the report.
10
If any of the questions are answered in the negative a dialogue box requesting more information will appear.
This information will be added to the report.
11
In the “LOOK FOR HAZARDS” section - if any of the hazards are answered in the affirmative a dialogue box will appear (as shown below left) requesting more information.
This information will be added to the report.
12
• Once ALL questions and hazard types have been answered the user will then be able to submit the T5 report by pressing the submit button.
The T5 data will be compiled into an email report addressed to the recipients specified in the ‘User Profile’.
13
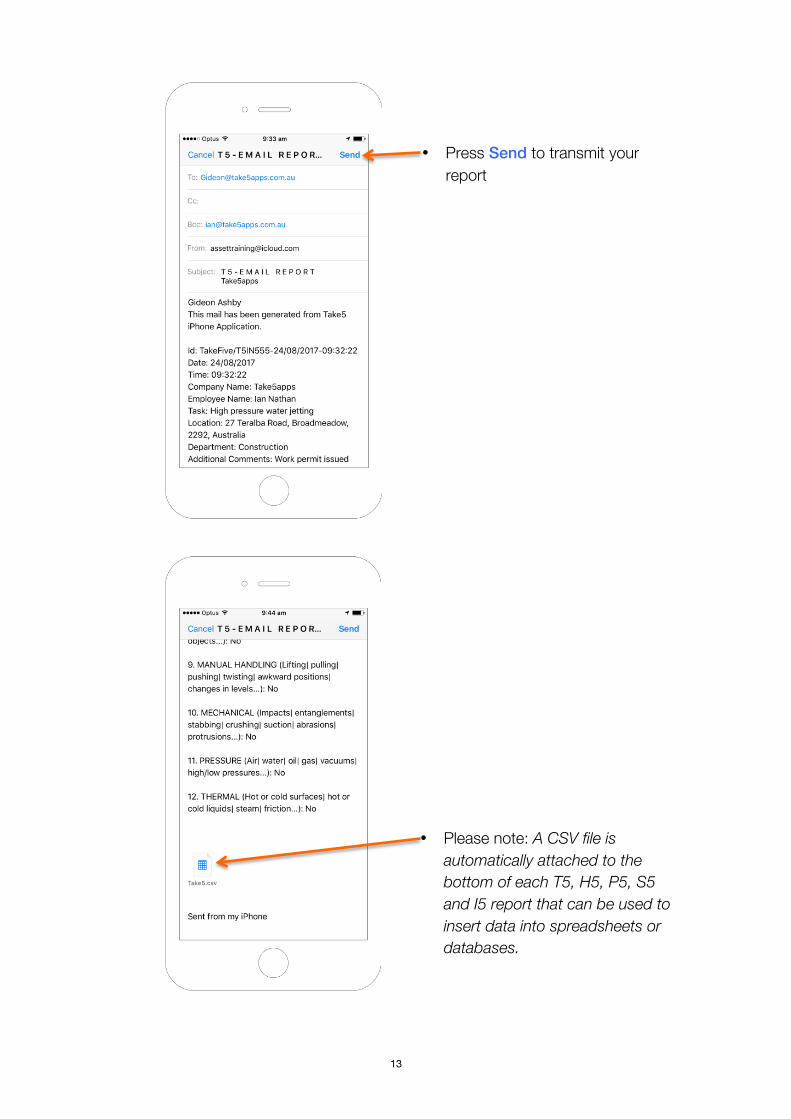
• Press Send to transmit your report
• Please note: A CSV file is automatically attached to the bottom of each T5, H5, P5, S5 and I5 report that can be used to insert data into spreadsheets or databases.
14
H5 - Hazard5
The H5 is one of the simplest of the 5 modules and is perfect for reporting on the spot hazards. A small hazard like a hole can be completed, with photo and sent in less than a minute.
As with the T5 the date and time stamp is automatic.
The only information the user need enter or select is…
• a brief hazard description • a hazard ranking • the immediate action taken • site name • the shift (day or night) • the exact location • take a couple of photos (5) • and Submit
That’s it.
The 5 screen shots in the H5 section show the entire H5 process.
15
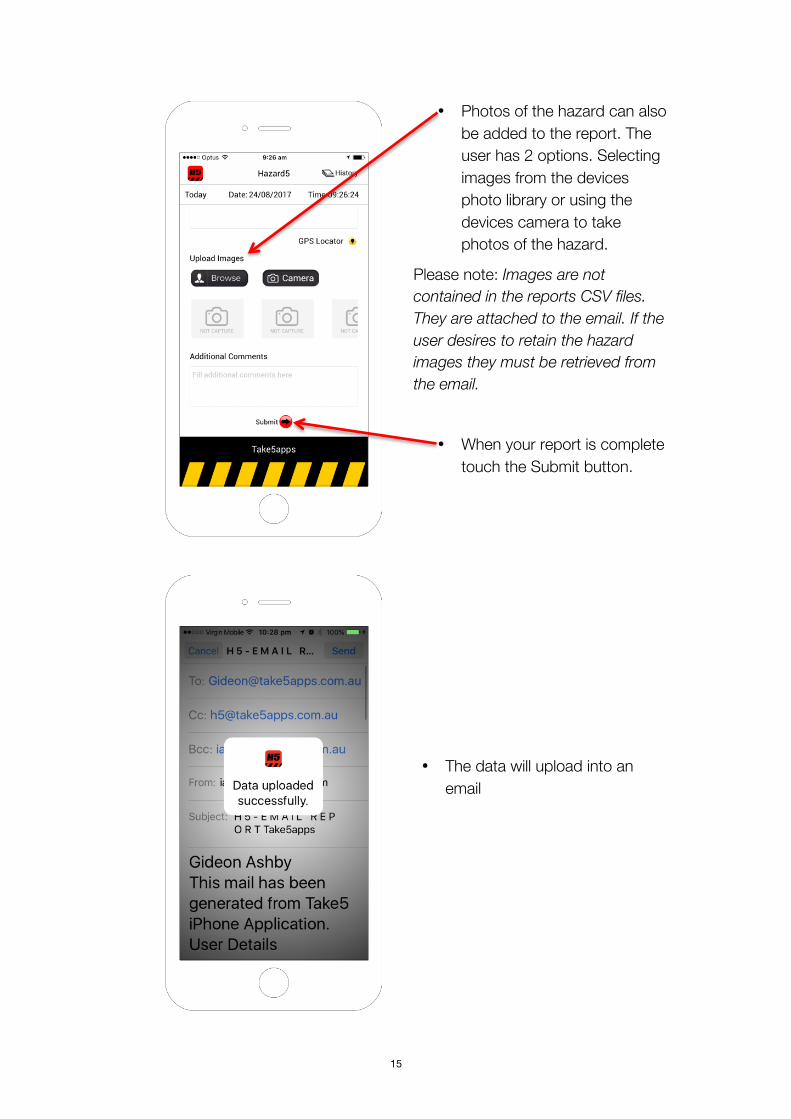
• Photos of the hazard can also be added to the report. The user has 2 options. Selecting images from the devices photo library or using the devices camera to take photos of the hazard.
Please note: Images are not contained in the reports CSV files. They are attached to the email. If the user desires to retain the hazard images they must be retrieved from the email.
• When your report is complete touch the Submit button.
• The data will upload into an email
16
• Send your report. The CSV will be automatically attached as it is with the T5 report.
Please note: Once at the email stage, you can add more recipients in addition to your profile pre-assigned recipients or edit your email prior to sending.
17
P5 – Prestart5
The P5 is a simple generic prestart vehicle and equipment checklist.
As with the other modules, it is date and time stamped is automatically.
Two of the initial vehicle/equipment description fields have drop down lists to choose from (the Vehicle / Equipment Type and the YOM) while the other fields require data entry.
Once you get to the checklist it is all radio buttons until you get to the final description and comment fields.
• The P5 also utilises the GPS Locator button
18
Press radio buttons to select. All checklist items are mandatory.
19
20
• As with the H5 hazard report the P5 allows you to take up to five photos of any vehicle or equipment damage and automatically attaches them to your email report.
• The final two fields allow for additional comments to be added to the P5 report. While all of the radio buttons are mandatory the two text fields are optional.
• As with all modules, pressing the submit button is all that is required to forward your report to its intended recipients.
21
• Processing report and creating csv file for the email
• Press ‘Send’ to send your report and the CSV file will be automatically attached as with all module reports.
Please note: You can edit your email prior to sending if necessary.
22
S5 – SafetyCheck5
The S5 is our SafetyCheck module, which is an app version of the traditional safety observation card. This module is perfect for checking that a job is going according to plan and that everyone is working safely and being treated appropriately. It can be completed by any T5 user be they workers, on-site personnel, leading hands or site managers. A Safety Check can be completed, with evidential photo and sent in minutes to multiple recipients.
Apart from…
• The task/job being performed; and
• How many workers are performing the task
…all you need to do is complete the check list and based on your results select whether or not you believe this task requires further investigation and select whether or not you believe the task was performed safely.
Then submit. Simple.
23
• The location of the task can be manually added or automatically using the GPS locator
• SafetyCheck photos are also added to the email report.
Please note: Images are not contained in the reports CSV files. They are attached to the email. If the user desires to retain the hazard images they must be retrieved from the email.
24
• Finalising the SafetyCheck, the reporter classifies their report by determining whether they consider their observation to be SAFE or UNSAFE; and then…
• Determine whether or not further investigation is required.
• Add any additional comments to support their findings; and finally
• Submit their report
• Once you pressed submit S5 processes your information preparing your email to send to your pre-determined recipients
25
• Send your email to your designated recipients. Remember you can always add more recipients or add any details you may have missed prior to sending if you wish.
26
I5 – Incident5
The I5 is the first reactive safety module of the T5 app and is our version of the incident report/notification. It is excellent for capturing those incidents when you are off site or at a remote location when something unexpected happens and you need to capture basic detail right then and there. This is where this module shines in its practicality.
As with all the modules the I5’s date and time stamp is automatic reducing the amount of required data entry.
The I5 has most of the traditional incident report fields.
• The I5 uses radio buttons to enable quick classification of incident type, injury severity, damage severity and immediate response actions taken.
It also has predetermined fields to prompt the incident reporter to capture the relevant incident information that will act as the basis of a full investigation should it be required.
The beauty of the I5, as is common to all the reports, is that predetermined recipients can receive the report almost instantaneously regardless of their location and without the incident reporter having to find everyone’s email address.
27
• Damage Severity allow a user to give an estimated cost to the vehicle or equipment damage.
• Damage details.
• Allows a user to record the details of a third party driver or equipment owner
• Types of initial incident response
28
• Actions taken and recommendations going forward
• Incident location or GPS auto entry
• Photos
• When your report is complete touch the Submit button.
29
• The data will upload into an email
• Press send to email the report to your predetermined recipients
30
History
All five T5 modules (T5, H5, P5, S5 & I5) have a History section where each app’s reports are stored for review, re-emailing or deleting. All module histories operate in the same way.
• To access the History of a particular module enter the module you wish to review.
• Touch the History button at the top right of the screen.
31
• Once inside the app history a list of your prior reports will appear and an ‘Edit’ button will replace the History button at the top right of your screen.
• To view any of the reports simply
touch on the report you wish to review.
When choosing to review reports all modules are displayed in a similar format showing
• time stamp; and • date stamp
at the top of the report and then allowing the user to step through the content of the report to review its entire content except for the CSV file.
To retrieve or get another copy of the reports CSV file the user will need to re-email the report which will recreate the CSV file attaching itself to the bottom of the recreated email report.
32
Pressing the edit button (top image on previous page 31) changes the appearance of your history list by adding…
• 2 new icons at the top of the screen (email & delete icons)
• and radio buttons to your history report list
This allows the user to select one or more of the shown reports.
• The radio buttons on the left give the ability to select single or multiple reports and to re-email or delete from the historical records.
33
Summary That covers just about everything there is to know about the T5 Safety App Version 5’s functionality. We hope you find the app useful and should the T5 User Manual fail to cover any aspect of the T5 Safety Apps functionality please contact Take5apps through either the websites contact form or via email – [email protected]. Any technical issues with the app should be reported via the same email address. All technical difficulties or software failures will be assessed and amended by our development team as soon as possible. Take5apps thanks you for choosing the T5 Safety App and hopes the app assists you in keeping your workplace free from work related risks and hazards.
34
FAQ’s 1. Can I re-email or delete my historical reports?
Yes – Please see page 24 - History
2. How do I get back to the home screen? The icon in the top left hand corner of the screen acts as both the back button and/or the home button depending on where you are located in the T5 app, touching this icon will eventually return you to the home screen.
3. Can I add our company logo? Yes – At the bottom of the profile section where the users and distribution details are entered is provision for you to upload your company logo, which will be displayed on the T5’s home page. Please see page 6
4. Is there any additional cost to email the reports? No - The only costs incurred by the T5 is the initial purchase price and the cost of email. Most businesses already have a data plan in place for their business email. Therefore the cost of your T5, H5 and P5 email reports will be negligible.
5. Can I change some of the questions on the T5 or P5? Not yet - This has been raised and discussed with our development team. For all the questions to be editable it will require a major rebuild so it isn't an option at this stage. We have tried to keep all the safety and pre-start check questions as generic as possible and have discussed adding a couple of "other" type editable questions to the end of the lists in the next version for those items specific to individual companies.
6. Are we able to bulk purchase for companies or large project groups? Yes - Both Apple and Google have purchase programs available that allow organisations to purchase, manage and distribute their apps to their personnel or personal devices without losing their licensing for the apps they purchase. This allows the purchaser to maintain their ownership of their apps and effectively manage and distribute and even recall their apps from personal devices to redistribute to another. a. Apple - Volume Purchase Program for Business (VPP) - http://www.apple.com/business/vpp/
b. Google for Work | Android - https://www.google.com/work/android/