1. INTRODUCING THE T9 FORENSIC FIREWIRE BRIDGE .......................... 3 2. HOW TO USE THIS MANUAL ..................................................................... 3
2.1 Conventions Used In This Manual .................................................................... 4 2.1.1 Conventions for Disk Capacity and Transfer Rates ................................................... 4
3. QUICK START ............................................................................................. 5 3.1 T9 Kit & Accessories ........................................................................................ 5 3.2 Learning to Navigate the T9 Screens & Menus ................................................ 7 3.3 Quick Start Card ............................................................................................... 8 3.3.1 Connecting a FireWire Device to the T9 .................................................................... 9
4. USEFUL INFORMATION ........................................................................... 10 4.1 About FireWire/SBP-2 LUNs (Logical Units) .................................................. 10 4.2 About Apple’s Target Disk Mode .................................................................... 10 4.3 T9 Startup Sequence ...................................................................................... 11 4.4 Information Stored Internally by the T9........................................................... 12
5. REFERENCE ............................................................................................. 13 5.1 Physical Layout & Controls ............................................................................. 13 5.1.1 LEDs ......................................................................................................................... 13 5.1.2 LCD and Buttons ...................................................................................................... 13 5.1.3 LCD Contrast ............................................................................................................ 13 5.2 Menus and Options ........................................................................................ 14 5.2.1 Main Menu: Show Status ......................................................................................... 15 5.2.2 Main Menu: Device Info ............................................................................................ 16 5.2.3 Main Menu: Device LUN Info ................................................................................... 17 5.2.4 Main Menu: Bridge Info ............................................................................................ 18
6. TROUBLESHOOTING AND SUPPORT .................................................... 20 6.1 Troubleshooting Common Problems .............................................................. 20 6.1.1 Power Supply Issues ................................................................................................ 20 6.1.2 Suggestions for Troubleshooting Common Problems. ............................................ 20 6.1.3 FireWire/1394 Device Compatibility ......................................................................... 21
7. SUPPORT .................................................................................................. 22 7.1 Your Tableau Reseller .................................................................................... 22 7.2 Warranty Issues .............................................................................................. 22 7.3 Online Support Resources ............................................................................. 22
1. Introducing the T9 Forensic FireWire Bridge The Tableau T9 Forensic FireWire Bridge is a hardware write-blocker for use with FireWire storage devices. The T9 is designed specifically to facilitate the forensically-sound acquisition of FireWire storage devices, ensuring that all data can be read faithfully from the FireWire storage device while ensuring that no changes are made to the storage device itself. FireWire storage devices can present unique issues for the forensic practitioner, and the T9 incorporates technology to address a number of these issues: Multi-LUN support. The T9 supports FireWire/1394 devices which reveal multiple LUNs. When a multi-LUN device is detected, the T9 prompts the user to select a specific LUN. This is particularly useful when trying to image multi-LUN devices from operating systems like Microsoft Windows which don't have multi-LUN support for FireWire devices. FireWire and USB host-side interfaces. The T9 supports FireWire800, FireWire400, and USB 2.0 host-side interfaces. So, even if the host computer doesn't have a FireWire port it is still possible to acquire a FireWire device through the T9 using the USB host-side interface. Information reporting. The T9 incorporates an LCD interface through which the user can see the make, model, and serial number of the attached FireWire device, particularly useful when documenting each acquisition. Software compatibility. The T9 is compatible with Tableau's standard write-blocker detection schemes, so 3rd party software products like EnCase® from Guidance Software correctly report the write-blocked status of the acquisition. Performance. The T9 natively supports both FireWire800/1394B and FireWire400/1394A devices. When using FireWire800 combined with the most efficient imaging software the T9 can achieve throughput on the order of 60-65 MBytes/sec.
2. How to Use This Manual This manual is divided into four main sections:
Quick Start. Quick information for setting up and using the T9. Useful Information. Highlights key areas worth understanding when using the T9. Reference. A detailed, menu-by-menu guide to the operation of the T9. Troubleshooting and Support. Ways to resolve common problems.
We suggest you begin with the Quick Start and Useful Information sections. These sections are shorter than the complete Reference, and will generally give you enough information to get started with the T9. When you are ready to understand the T9 in more detail, the Reference section will give you detailed information about the many capabilities of the T9. The Troubleshooting and Support section is a brief list of solutions for common problems when using the T9. However, if you find yourself having trouble with the T9, please visit the Tableau web site (www.tableau.com) where you will find up-to-date guidance and answers to frequently asked questions.
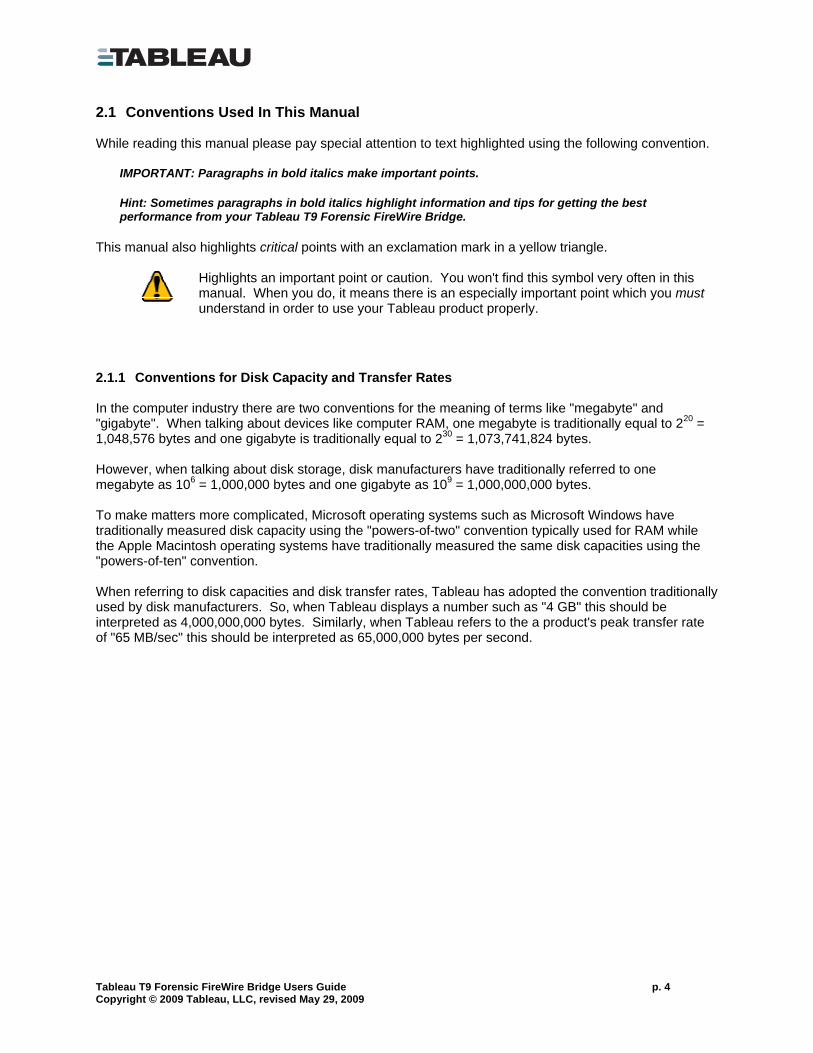
2.1 Conventions Used In This Manual While reading this manual please pay special attention to text highlighted using the following convention.
IMPORTANT: Paragraphs in bold italics make important points.
Hint: Sometimes paragraphs in bold italics highlight information and tips for getting the best performance from your Tableau T9 Forensic FireWire Bridge.
This manual also highlights critical points with an exclamation mark in a yellow triangle.
Highlights an important point or caution. You won't find this symbol very often in this manual. When you do, it means there is an especially important point which you must understand in order to use your Tableau product properly.
2.1.1 Conventions for Disk Capacity and Transfer Rates In the computer industry there are two conventions for the meaning of terms like "megabyte" and "gigabyte". When talking about devices like computer RAM, one megabyte is traditionally equal to 220 = 1,048,576 bytes and one gigabyte is traditionally equal to 230 = 1,073,741,824 bytes. However, when talking about disk storage, disk manufacturers have traditionally referred to one megabyte as 106 = 1,000,000 bytes and one gigabyte as 109 = 1,000,000,000 bytes. To make matters more complicated, Microsoft operating systems such as Microsoft Windows have traditionally measured disk capacity using the "powers-of-two" convention typically used for RAM while the Apple Macintosh operating systems have traditionally measured the same disk capacities using the "powers-of-ten" convention. When referring to disk capacities and disk transfer rates, Tableau has adopted the convention traditionally used by disk manufacturers. So, when Tableau displays a number such as "4 GB" this should be interpreted as 4,000,000,000 bytes. Similarly, when Tableau refers to the a product's peak transfer rate of "65 MB/sec" this should be interpreted as 65,000,000 bytes per second.
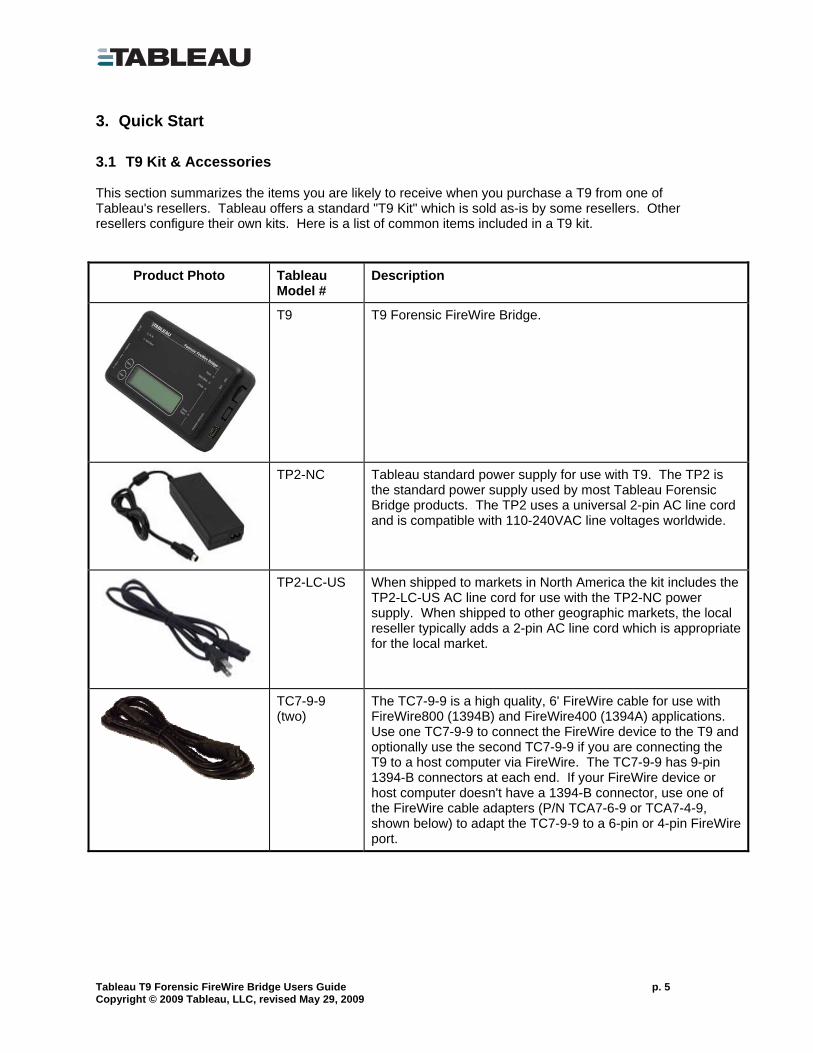
3.1 T9 Kit & Accessories This section summarizes the items you are likely to receive when you purchase a T9 from one of Tableau's resellers. Tableau offers a standard "T9 Kit" which is sold as-is by some resellers. Other resellers configure their own kits. Here is a list of common items included in a T9 kit.
Product Photo Tableau Model #
Description
T9 T9 Forensic FireWire Bridge.
TP2-NC Tableau standard power supply for use with T9. The TP2 is the standard power supply used by most Tableau Forensic Bridge products. The TP2 uses a universal 2-pin AC line cord and is compatible with 110-240VAC line voltages worldwide.
TP2-LC-US When shipped to markets in North America the kit includes the TP2-LC-US AC line cord for use with the TP2-NC power supply. When shipped to other geographic markets, the local reseller typically adds a 2-pin AC line cord which is appropriate for the local market.
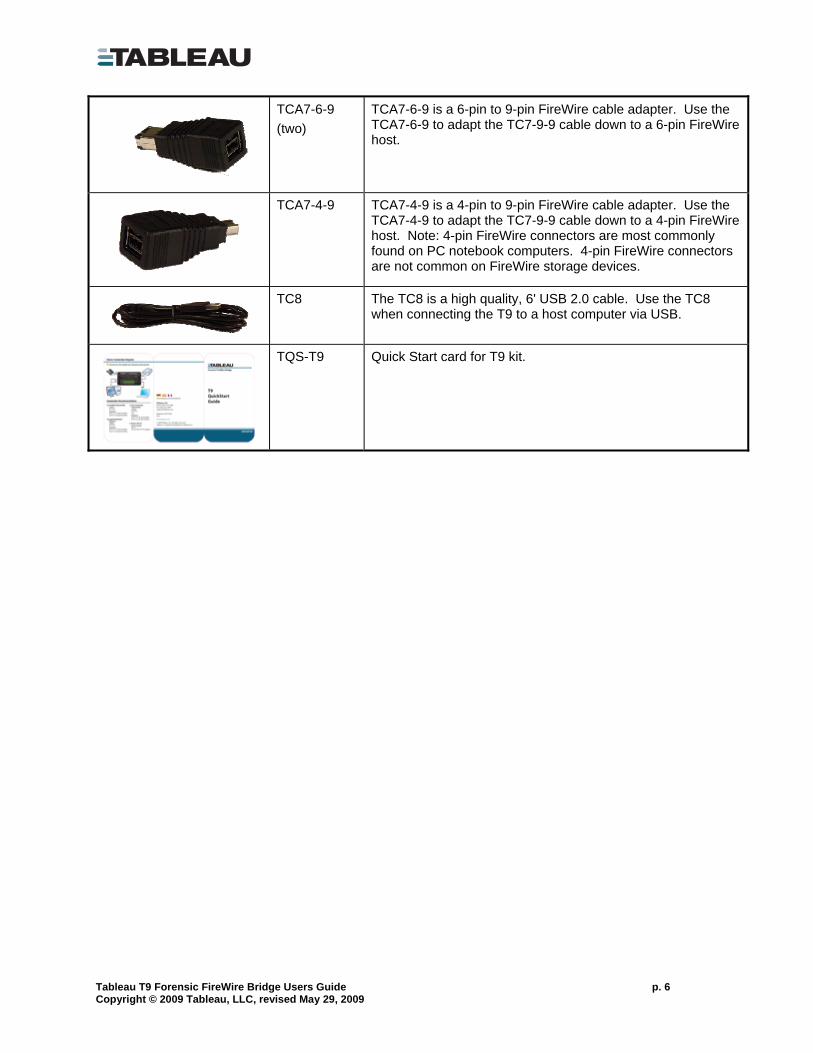
TC7-9-9 (two)
The TC7-9-9 is a high quality, 6' FireWire cable for use with FireWire800 (1394B) and FireWire400 (1394A) applications. Use one TC7-9-9 to connect the FireWire device to the T9 and optionally use the second TC7-9-9 if you are connecting the T9 to a host computer via FireWire. The TC7-9-9 has 9-pin 1394-B connectors at each end. If your FireWire device or host computer doesn't have a 1394-B connector, use one of the FireWire cable adapters (P/N TCA7-6-9 or TCA7-4-9, shown below) to adapt the TC7-9-9 to a 6-pin or 4-pin FireWire port.
TCA7-6-9 is a 6-pin to 9-pin FireWire cable adapter. Use the TCA7-6-9 to adapt the TC7-9-9 cable down to a 6-pin FireWire host.
TCA7-4-9 TCA7-4-9 is a 4-pin to 9-pin FireWire cable adapter. Use the TCA7-4-9 to adapt the TC7-9-9 cable down to a 4-pin FireWire host. Note: 4-pin FireWire connectors are most commonly found on PC notebook computers. 4-pin FireWire connectors are not common on FireWire storage devices.
TC8 The TC8 is a high quality, 6' USB 2.0 cable. Use the TC8 when connecting the T9 to a host computer via USB.
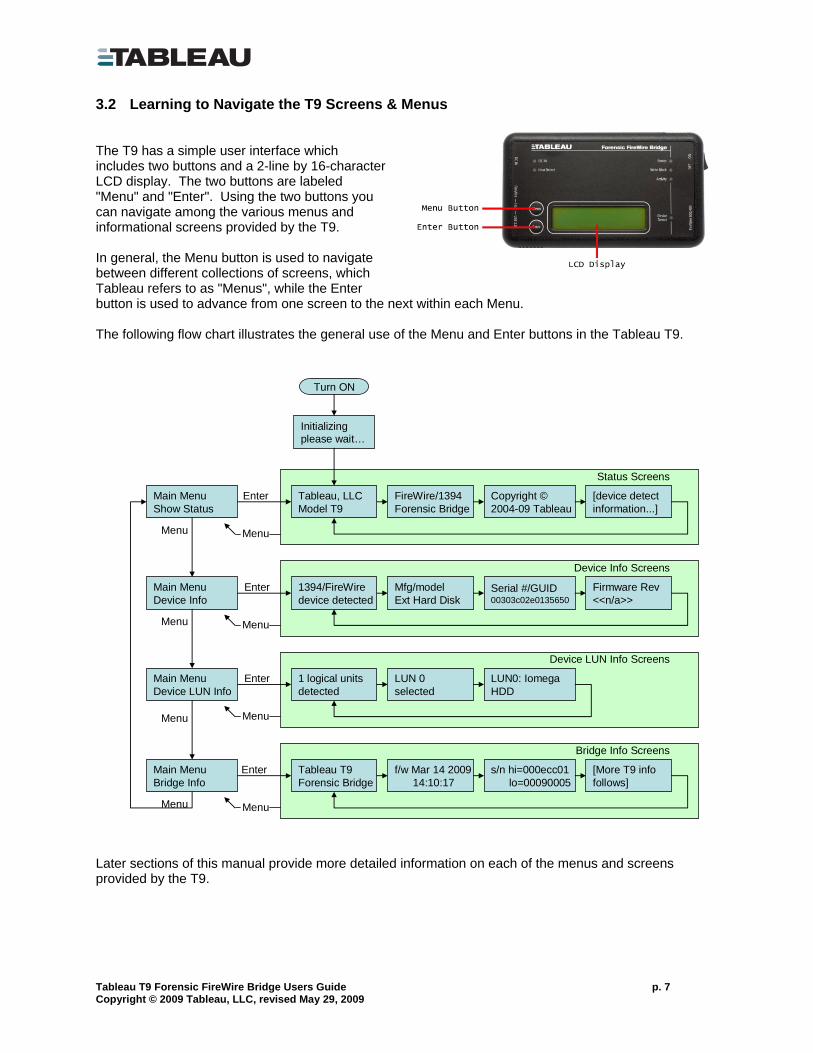
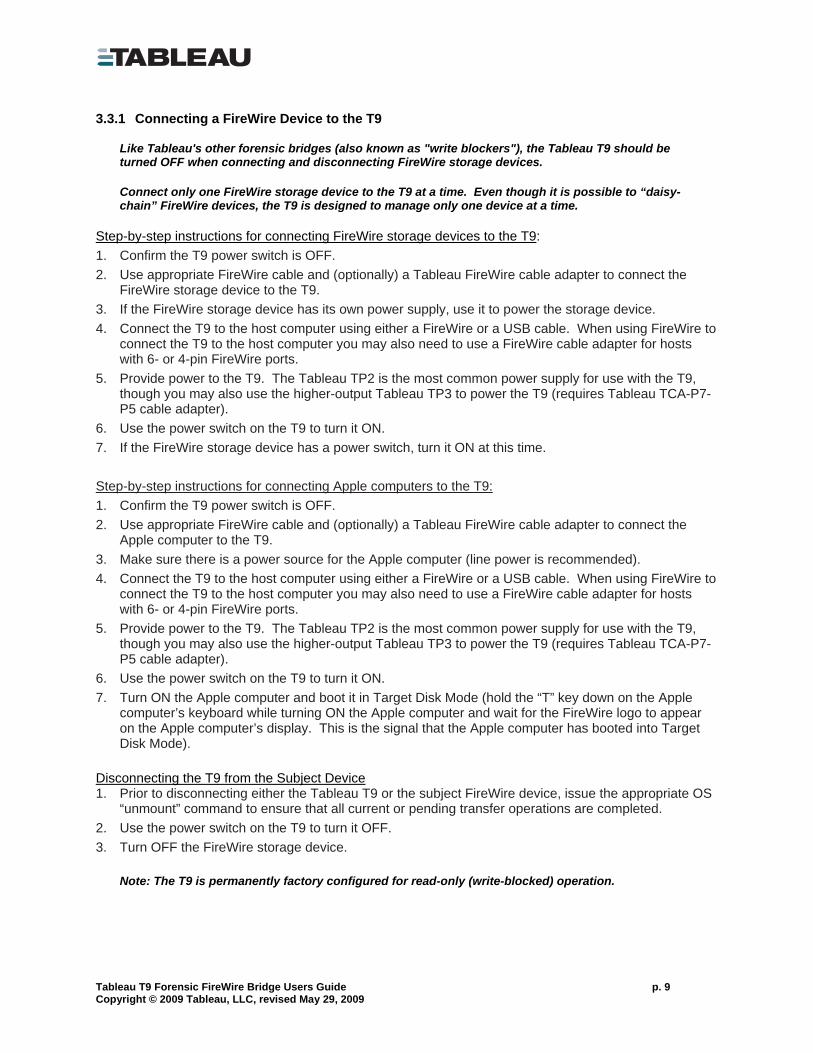
3.2 Learning to Navigate the T9 Screens & Menus The T9 has a simple user interface which includes two buttons and a 2-line by 16-character LCD display. The two buttons are labeled "Menu" and "Enter". Using the two buttons you can navigate among the various menus and informational screens provided by the T9. In general, the Menu button is used to navigate between different collections of screens, which Tableau refers to as "Menus", while the Enter button is used to advance from one screen to the next within each Menu. The following flow chart illustrates the general use of the Menu and Enter buttons in the Tableau T9.
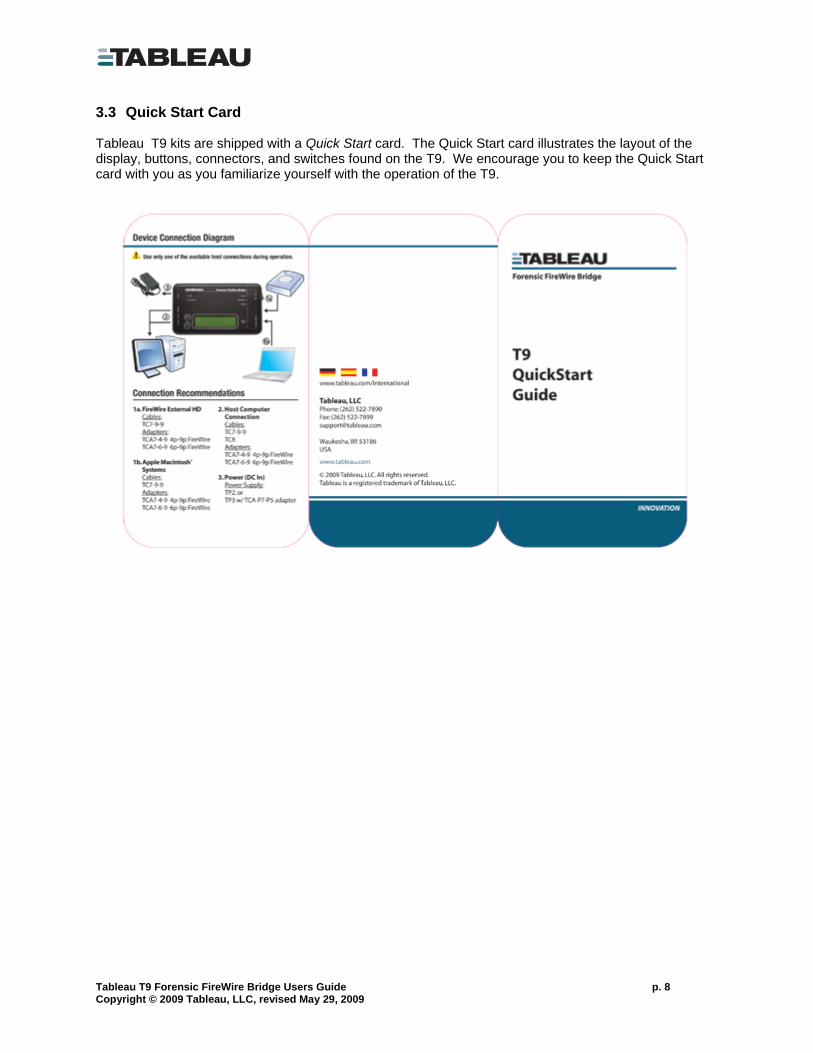
3.3 Quick Start Card Tableau T9 kits are shipped with a Quick Start card. The Quick Start card illustrates the layout of the display, buttons, connectors, and switches found on the T9. We encourage you to keep the Quick Start card with you as you familiarize yourself with the operation of the T9.
Like Tableau's other forensic bridges (also known as "write blockers"), the Tableau T9 should be turned OFF when connecting and disconnecting FireWire storage devices.
Connect only one FireWire storage device to the T9 at a time. Even though it is possible to “daisy-chain” FireWire devices, the T9 is designed to manage only one device at a time.
Step-by-step instructions for connecting FireWire storage devices to the T9: 1. Confirm the T9 power switch is OFF. 2. Use appropriate FireWire cable and (optionally) a Tableau FireWire cable adapter to connect the
FireWire storage device to the T9. 3. If the FireWire storage device has its own power supply, use it to power the storage device. 4. Connect the T9 to the host computer using either a FireWire or a USB cable. When using FireWire to
connect the T9 to the host computer you may also need to use a FireWire cable adapter for hosts with 6- or 4-pin FireWire ports.
5. Provide power to the T9. The Tableau TP2 is the most common power supply for use with the T9, though you may also use the higher-output Tableau TP3 to power the T9 (requires Tableau TCA-P7-P5 cable adapter).
6. Use the power switch on the T9 to turn it ON. 7. If the FireWire storage device has a power switch, turn it ON at this time. Step-by-step instructions for connecting Apple computers to the T9: 1. Confirm the T9 power switch is OFF. 2. Use appropriate FireWire cable and (optionally) a Tableau FireWire cable adapter to connect the
Apple computer to the T9. 3. Make sure there is a power source for the Apple computer (line power is recommended). 4. Connect the T9 to the host computer using either a FireWire or a USB cable. When using FireWire to
connect the T9 to the host computer you may also need to use a FireWire cable adapter for hosts with 6- or 4-pin FireWire ports.
5. Provide power to the T9. The Tableau TP2 is the most common power supply for use with the T9, though you may also use the higher-output Tableau TP3 to power the T9 (requires Tableau TCA-P7-P5 cable adapter).
6. Use the power switch on the T9 to turn it ON. 7. Turn ON the Apple computer and boot it in Target Disk Mode (hold the “T” key down on the Apple
computer’s keyboard while turning ON the Apple computer and wait for the FireWire logo to appear on the Apple computer’s display. This is the signal that the Apple computer has booted into Target Disk Mode).
Disconnecting the T9 from the Subject Device 1. Prior to disconnecting either the Tableau T9 or the subject FireWire device, issue the appropriate OS
“unmount” command to ensure that all current or pending transfer operations are completed. 2. Use the power switch on the T9 to turn it OFF. 3. Turn OFF the FireWire storage device.
Note: The T9 is permanently factory configured for read-only (write-blocked) operation.
4. Useful Information The following sections provide information regarding the operation and usage of the T9 which you will likely find useful.
4.1 About FireWire/SBP-2 LUNs (Logical Units) A LUN is typically a single storage device or a collection of storage devices – like a RAID – which is managed and presented to the user as a single storage device. Sometimes, a single FireWire “node” will have more than one LUN internally. The most common example of this is seen with Apple computers running in Target Disk Mode. In Target Disk Mode the Apple computer presents each internal device as a separate LUN on its FireWire interface. For example, an Apple MacBook Pro might present the following LUNs: LUN 0 = Internal CD/DVD drive LUN 1 = Internal hard disk In this situation a forensic examiner would likely want to image LUN 1, the MacBook Pro’s internal hard disk. Unfortunately, the LUN number assigned to the internal hard disk(s) may not be the same for all Apple computers, so a little trial-and-error may be involved in deducing which LUN numbers are of interest for a given Apple computer or other FireWire storage device. If a FireWire storage device has multiple LUNs of interest it is necessary to capture forensic images of the LUNs one at a time. After each LUN has been imaged, turn the Tableau T9 OFF then ON again to reset it. When the T9 prompts for the desired LUN, the user should select the next LUN in sequence. After imaging the newly selected LUN this process can be repeated, thereby imaging all LUNs of interest.
4.2 About Apple’s Target Disk Mode Target Disk Mode is a special boot mode which has been supported by most Apple computers since Apple incorporated FireWire into its computers in the 1990’s. In Target Disk Mode the Apple computer does not boot an operating system as it would in normal operation. Instead, in Target Disk Mode the Apple computer boots into a mode in which it emulates a FireWire storage device (possibly with multiple LUNs – see previous section). Target Disk Mode is a great tool for forensic practitioners as it provides a way to read (or write) the contents of the computer’s internal storage devices without having to disassemble the computer itself. However, because Target Disk Mode is a read-write mode, it is still necessary to use forensically sound practices to image the system (i.e., protecting the computer with a hardware write blocker like the Tableau T9).
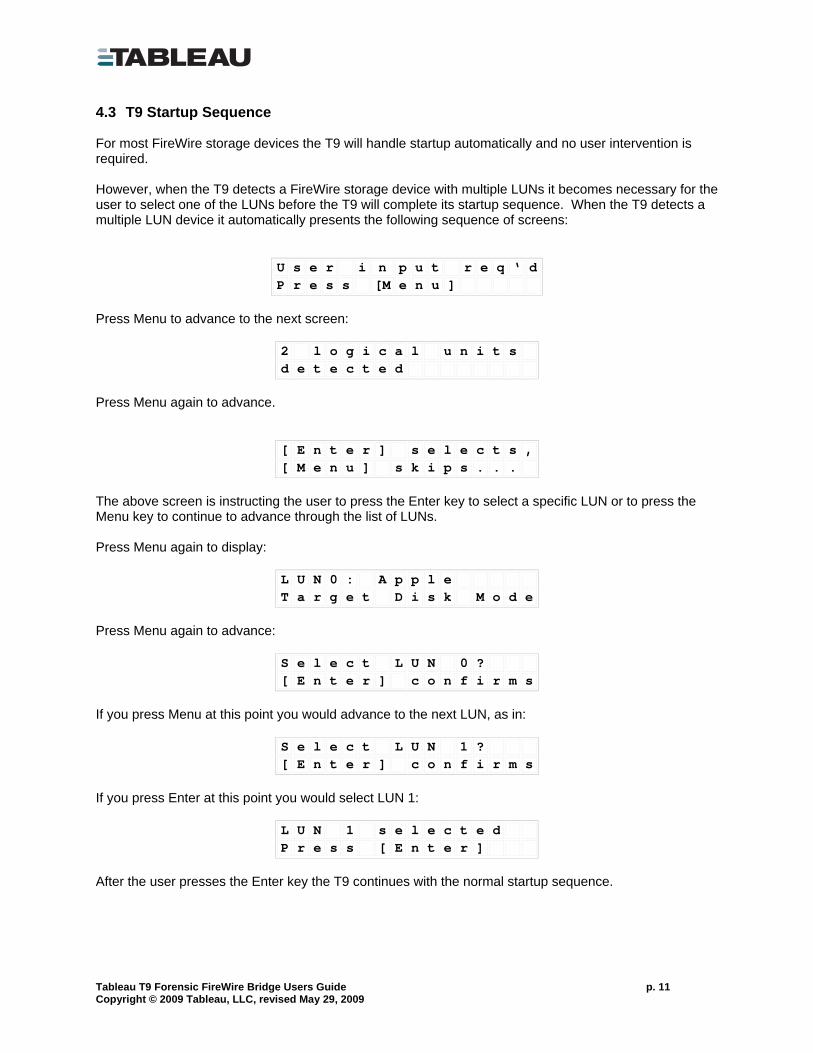
4.3 T9 Startup Sequence For most FireWire storage devices the T9 will handle startup automatically and no user intervention is required. However, when the T9 detects a FireWire storage device with multiple LUNs it becomes necessary for the user to select one of the LUNs before the T9 will complete its startup sequence. When the T9 detects a multiple LUN device it automatically presents the following sequence of screens:
U s e r i n p u t r e q ‘ dP r e s s [M e n u ]
Press Menu to advance to the next screen:
2 l o g i c a l u n i t sd e t e c t e d
Press Menu again to advance.
[ E n t e r ] s e l e c t s ,[ M e n u ] s k i p s . . .
The above screen is instructing the user to press the Enter key to select a specific LUN or to press the Menu key to continue to advance through the list of LUNs. Press Menu again to display:
L U N 0 : A p p l eT a r g e t D i s k M o d e
Press Menu again to advance:
S e l e c t L U N 0 ?[ E n t e r ] c o n f i r m s
If you press Menu at this point you would advance to the next LUN, as in:
S e l e c t L U N 1 ?[ E n t e r ] c o n f i r m s
If you press Enter at this point you would select LUN 1:
L U N 1 s e l e c t e dP r e s s [ E n t e r ]
After the user presses the Enter key the T9 continues with the normal startup sequence.
4.4 Information Stored Internally by the T9 Some forensic and security applications require that the user be aware of the kinds of information which can be stored by the T9. In some cases, users want to know what, if any information is preserved by the unit from one acquisition to the next. In other cases, users in security-sensitive environments need to be able to "sanitize" equipment before that equipment may be removed from a secure environment. The T9 has two separate non-volatile memories. Both non-volatile memories are used to store the T9's firmware and serial number. The firmware can be updated using the Tableau Firmware Update utility (available from Tableau's web site). These two memory devices are never used to record any user-specific or acquisition-specific information.
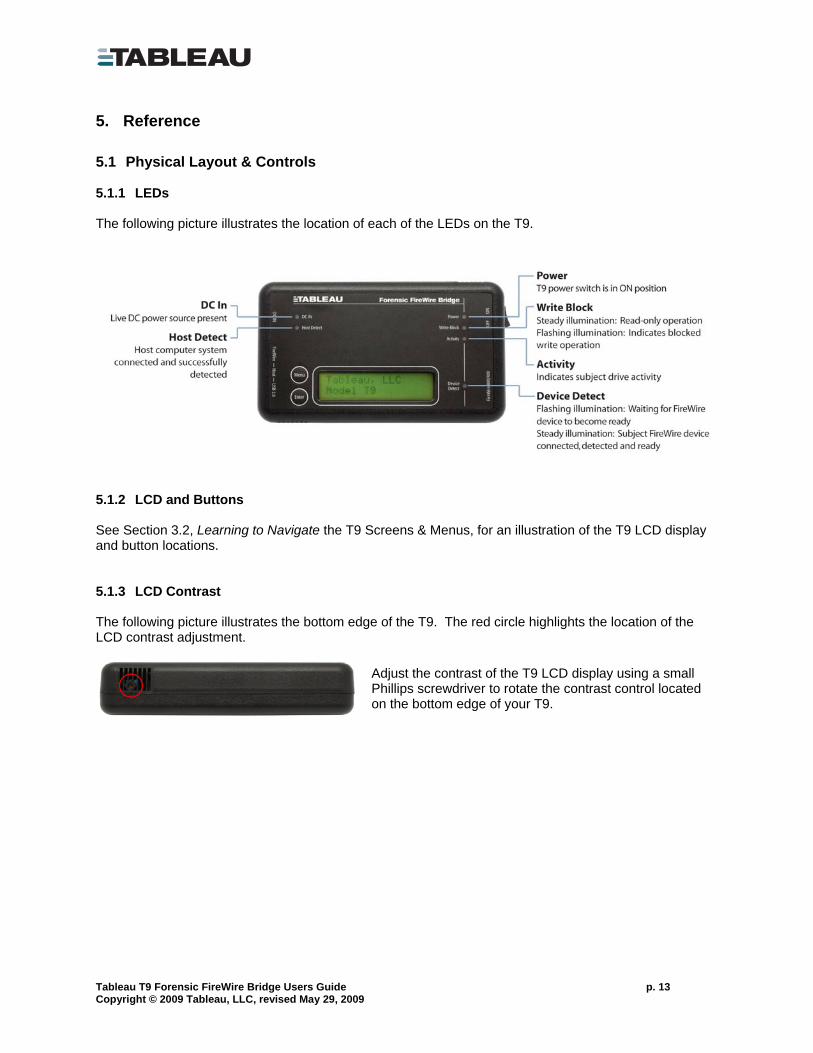
5.1 Physical Layout & Controls 5.1.1 LEDs The following picture illustrates the location of each of the LEDs on the T9.
5.1.2 LCD and Buttons See Section 3.2, Learning to Navigate the T9 Screens & Menus, for an illustration of the T9 LCD display and button locations. 5.1.3 LCD Contrast The following picture illustrates the bottom edge of the T9. The red circle highlights the location of the LCD contrast adjustment.
Adjust the contrast of the T9 LCD display using a small Phillips screwdriver to rotate the contrast control located on the bottom edge of your T9.
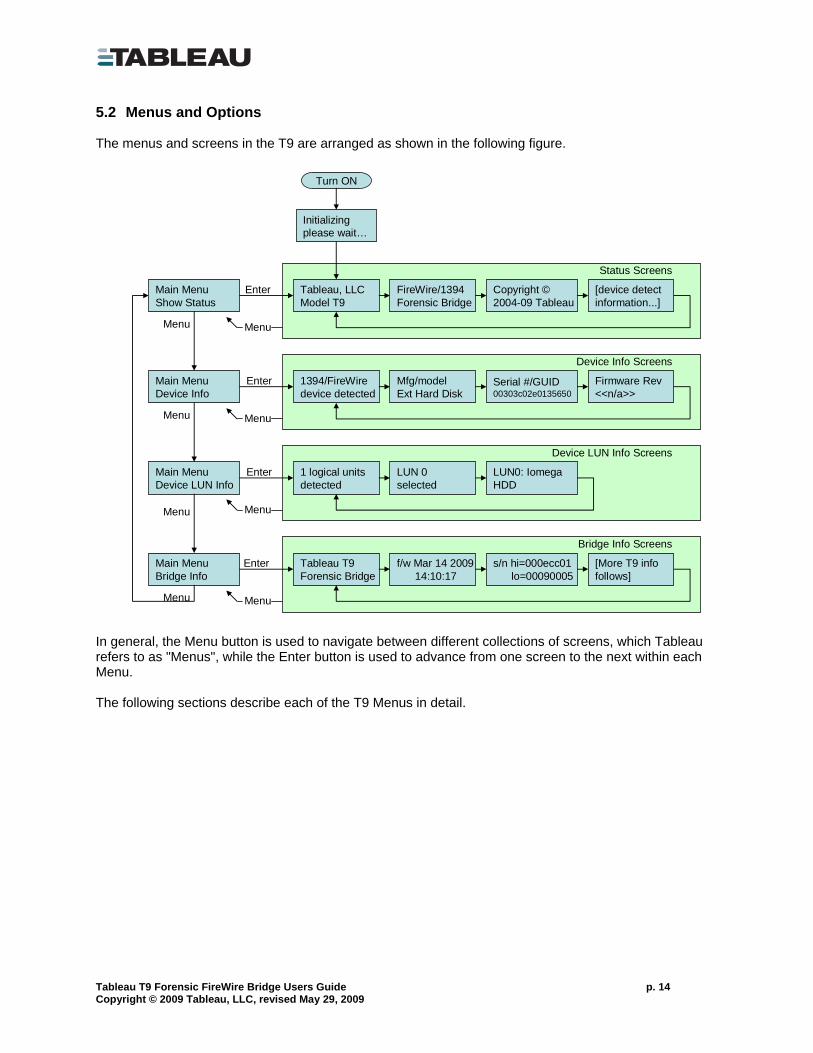
5.2 Menus and Options The menus and screens in the T9 are arranged as shown in the following figure.
In general, the Menu button is used to navigate between different collections of screens, which Tableau refers to as "Menus", while the Enter button is used to advance from one screen to the next within each Menu. The following sections describe each of the T9 Menus in detail.
5.2.1 Main Menu: Show Status When first turned ON the T9 display defaults to a “Status Loop”. In this loop the T9 cycles through a sequence of informational screens, automatically advancing from screen to screen every two seconds. If the T9 is turned ON with no FireWire device attached to it, or if the T9 has not yet detected the attached FireWire device, it displays the following four screens: Status loop screen #1:
T a b l e a u , L L CM o d e l T 9
Status loop screen #2:
F i r e W i r e / 1 3 9 4F o r e n s i c B r i d g e
Once the T9 has detected a FireWire device it inserts the following informational screens in place of screen #4 as shown above. Status loop screen #4a:
1 3 9 4 / F i r e W i r ed e v i c e d e t e c t e d
Status loop screen #4b shows the make and model of the attached FireWire device. (In this view the make/model information is frequently too long for the T9 display and will be truncated.)
M f g / m o d e lA A P L F i r e W i r e T a
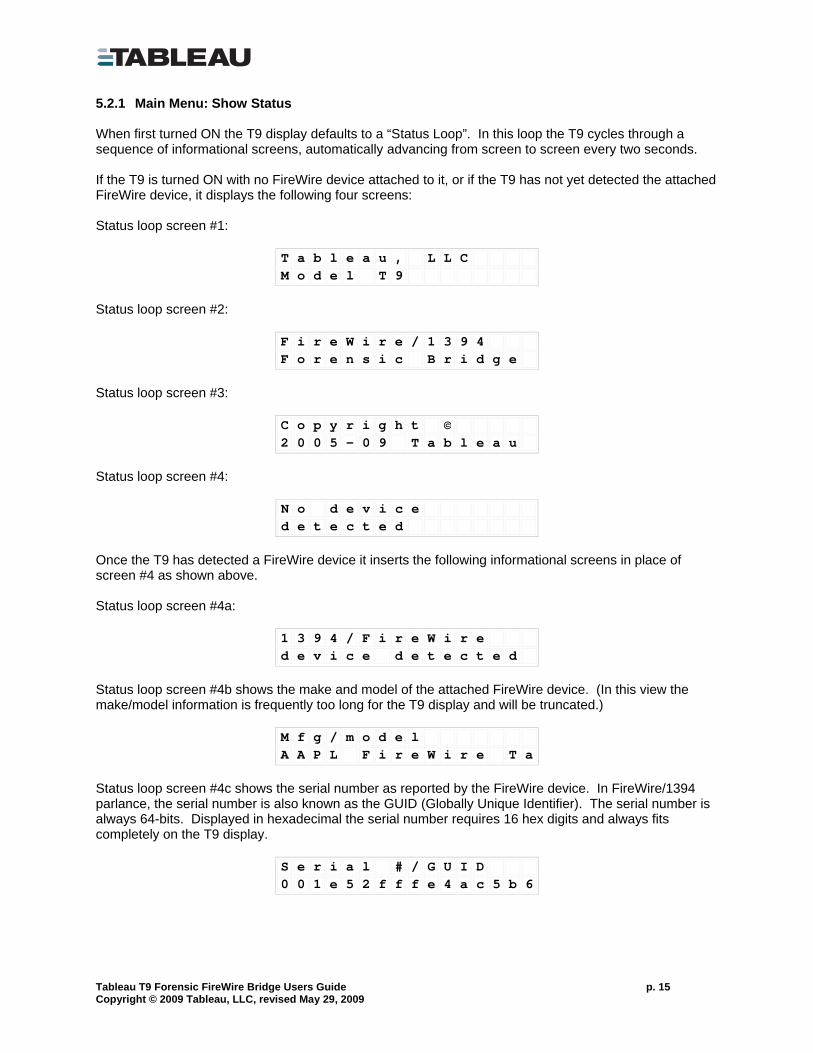
Status loop screen #4c shows the serial number as reported by the FireWire device. In FireWire/1394 parlance, the serial number is also known as the GUID (Globally Unique Identifier). The serial number is always 64-bits. Displayed in hexadecimal the serial number requires 16 hex digits and always fits completely on the T9 display.
S e r i a l # / G U I D0 0 1 e 5 2 f f f e 4 a c 5 b 6
Status loop screen #4d shows the capacity, in sectors, of the attached FireWire device.
S e c t o r C o u n t2 3 4 , 4 4 1 , 6 4 8
Whenever the T9 is in the Status Loop you can press the Enter button to advance to the next status screen. 5.2.2 Main Menu: Device Info By pressing Menu repeatedly you can advance to the “Device Info” screens.
M a i n M e n uD e v i c e I n f o
Press the Enter button to view the first Device Info screen. The Device Info screens display information similar to that displayed during the Status Loop when a device is detected. Unlike the Status Loop the Device Info screens do not advance automatically every two seconds, making it easier for you to write down/copy on-screen information. Device Info screen #1:
1 3 9 4 / F i r e W i r ed e v i c e d e t e c t e d
Device Info screen #2:
M f g / m o d e lA A P L F i r e W i r e T a
Device Info screen #3:
S e r i a l # / G U I D0 0 1 e 5 2 f f f e 4 a c 5 b 6
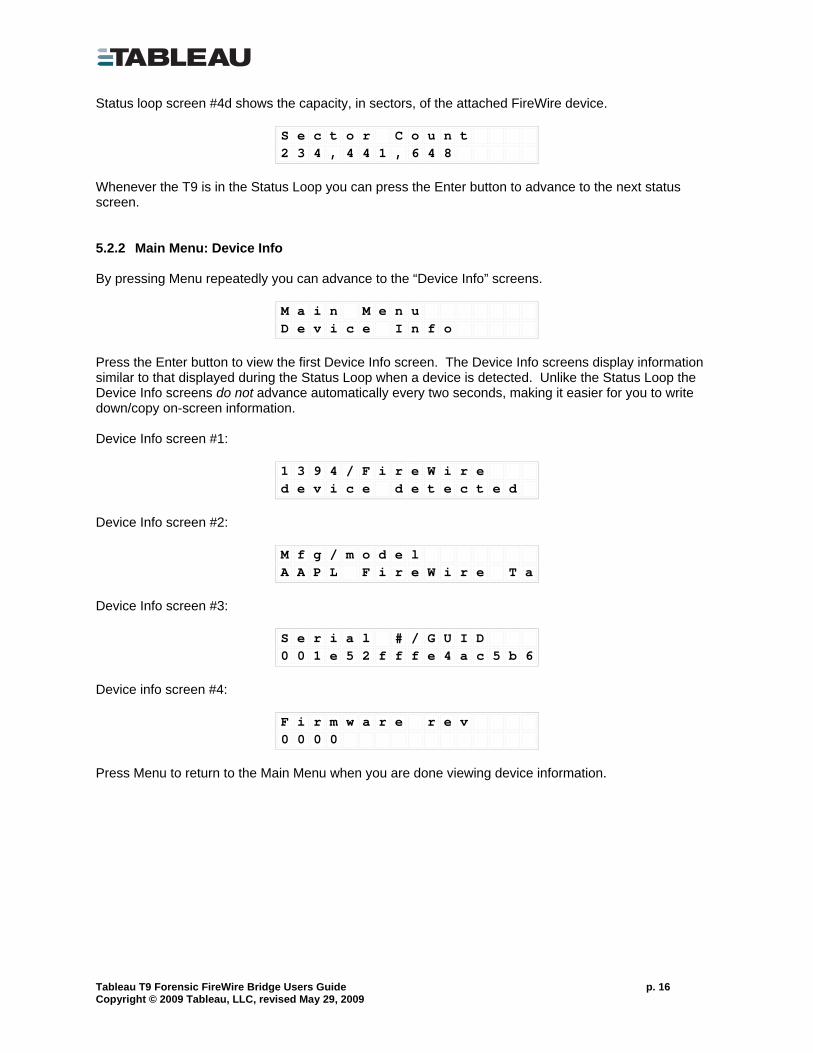
Device info screen #4:
F i r m w a r e r e v0 0 0 0
Press Menu to return to the Main Menu when you are done viewing device information.
5.2.3 Main Menu: Device LUN Info By pressing Menu repeatedly you can advance to the “Device LUN Info” screens.
M a i n M e n uD e v i c e L U N I n f o
Press the Enter button to view each Device LUN Info screen. These screens provide additional device information when dealing with multi-LUN FireWire devices. Device LUN Info Screen #1 shows the count of LUNs (logical units) reported by the FireWire device.
2 l o g i c a l u n i t sd e t e c t e d
Device LUN Info Screen #2 reports the number of the LUN selected during the T9 initialization sequence. It is useful to note that LUNs usually begin with #0. So, in the following example the screen is indicating that the second LUN (i.e., LUN #1) was selected by the operator.
L U N 1s e l e c t e d
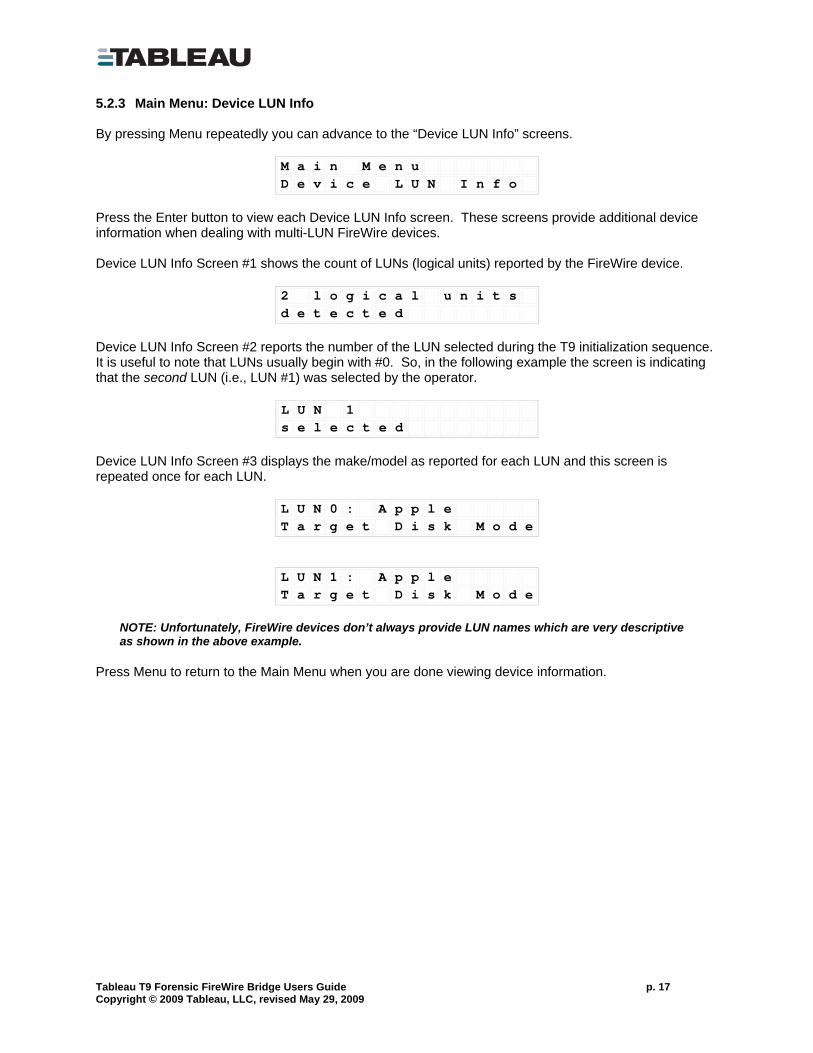
Device LUN Info Screen #3 displays the make/model as reported for each LUN and this screen is repeated once for each LUN.
L U N 0 : A p p l eT a r g e t D i s k M o d e
L U N 1 : A p p l eT a r g e t D i s k M o d e
NOTE: Unfortunately, FireWire devices don’t always provide LUN names which are very descriptive as shown in the above example.
Press Menu to return to the Main Menu when you are done viewing device information.
5.2.4 Main Menu: Bridge Info By pressing Menu repeatedly you can advance to the “Bridge Info” screens.
M a i n M e n uB r i d g e I n f o
Press the Enter button to view the first Bridge Info screen. These screens provide information about the T9 Forensic Bridge itself. Bridge Info screen #1:
T a b l e a u T 9F o r e n s i c B r i d g e
Bridge Info screen #2 shows the date and time of the firmware currently loaded in the T9:
f / w A p r 2 2 0 0 9 1 6 : 0 6 : 2 4
Bridge Info screen #3 shows the Tableau serial number of the T9:
s / n h i = 0 0 0 e c c 0 1 l o = 0 0 0 9 0 0 0 5
The next four screens show the state of the DIP switches in the T9. Tableau forensic bridges have always incorporated DIP switches to give the user the ability to set the operating mode of the bridge. Switch #1 is reserved and should be left in the OFF position.
S W 1 O f f . . S w i t c h n o t u s e d
Switch #2 controls whether the T9 reports its write-protect status to the host computer/operating system. Switch #2 is provided for compatibility with old/obsolete operating systems. At this time Tableau does not recommend changing the setting of Switch #2 when working with modern operating systems.
S W 2 O f f . . R e p o r t W r t p r o t e c t
Switch #3 controls whether the T9 reports errors for write attempts to the host computer/operating system. Switch #3 is provided for compatibility with old/obsolete operating systems. At this time Tableau does not recommend changing the setting of Switch #3 when working with modern operating systems.
S W 3 O f f . . R e p o r t W r t e r r o r S
Note: The T9 is always in forensic/read-only mode. Switches #2 and #3 merely affect how the T9 reports its write-protect status to the host computer.
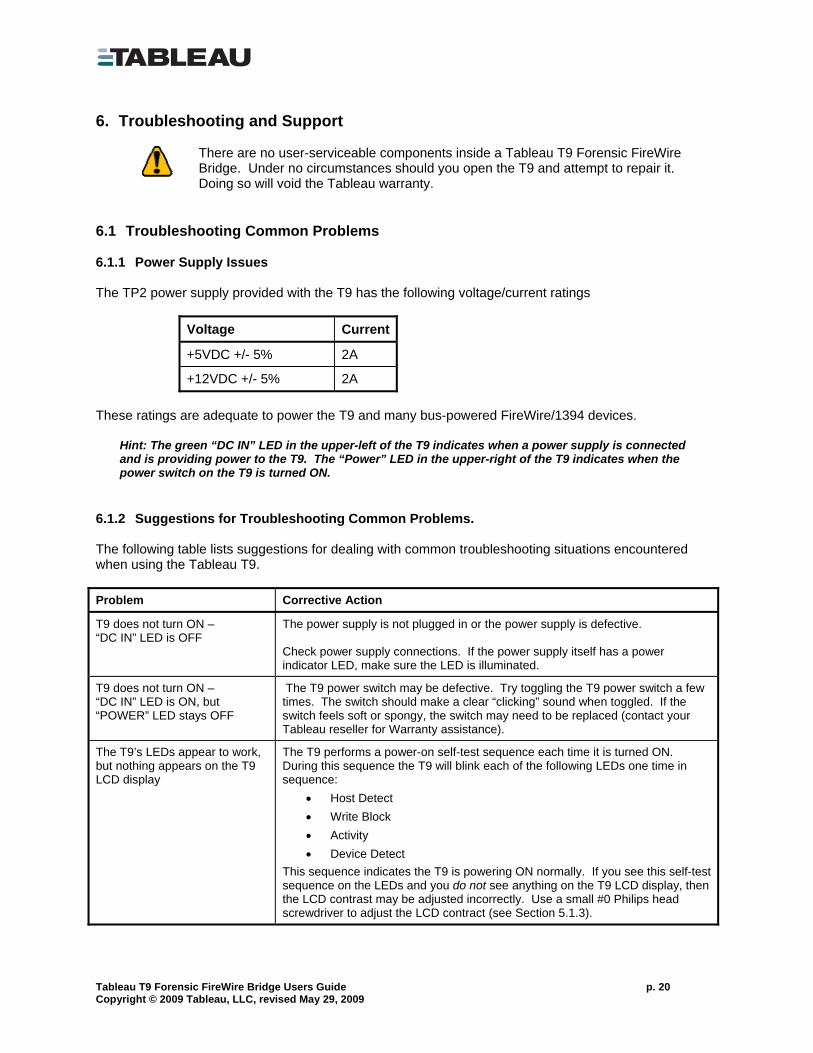
There are no user-serviceable components inside a Tableau T9 Forensic FireWire Bridge. Under no circumstances should you open the T9 and attempt to repair it. Doing so will void the Tableau warranty.
6.1 Troubleshooting Common Problems 6.1.1 Power Supply Issues The TP2 power supply provided with the T9 has the following voltage/current ratings
Voltage Current
+5VDC +/- 5% 2A
+12VDC +/- 5% 2A These ratings are adequate to power the T9 and many bus-powered FireWire/1394 devices.
Hint: The green “DC IN” LED in the upper-left of the T9 indicates when a power supply is connected and is providing power to the T9. The “Power” LED in the upper-right of the T9 indicates when the power switch on the T9 is turned ON.
6.1.2 Suggestions for Troubleshooting Common Problems. The following table lists suggestions for dealing with common troubleshooting situations encountered when using the Tableau T9. Problem Corrective Action
T9 does not turn ON – “DC IN” LED is OFF
The power supply is not plugged in or the power supply is defective. Check power supply connections. If the power supply itself has a power indicator LED, make sure the LED is illuminated.
T9 does not turn ON – “DC IN” LED is ON, but “POWER” LED stays OFF
The T9 power switch may be defective. Try toggling the T9 power switch a few times. The switch should make a clear “clicking” sound when toggled. If the switch feels soft or spongy, the switch may need to be replaced (contact your Tableau reseller for Warranty assistance).
The T9’s LEDs appear to work, but nothing appears on the T9 LCD display
The T9 performs a power-on self-test sequence each time it is turned ON. During this sequence the T9 will blink each of the following LEDs one time in sequence:
This sequence indicates the T9 is powering ON normally. If you see this self-test sequence on the LEDs and you do not see anything on the T9 LCD display, then the LCD contrast may be adjusted incorrectly. Use a small #0 Philips head screwdriver to adjust the LCD contract (see Section 5.1.3).
If the Tableau Firmware Update software is interrupted in the middle of a firmware update, non-volatile memory in the T9 may be corrupted. If this happens it will be necessary to return the T9 to Tableau for repair (contact your Tableau reseller for Warranty assistance).
T9 does not detect a bus-powered FireWire/1394 device
Some bus-powered FireWire/1394 devices draw too much power to be powered successfully by the T9. If you have a FireWire/1394 device with options to be AC line-powered or bus-powered, always use AC line-power if possible.
T9 detects device (“Device Detect” LED is ON) but Windows does not assign a drive letter to the device.
There are numerous reasons why Microsoft Windows may not assign a drive letter to a storage device. Here are some of the most common when working with a Tableau T9:
• The device does not have any partitions recognizable by Windows. This is common if you are using the T9 with a FireWire/1394 storage device formatted by an Apple computer. Windows does not have built-in file system drivers for many of the file systems which are commonly used by Apple computers.
• The device has recognizable partitions, but the disk was not unmounted cleanly. Windows can detect whether a storage volume was unmounted before power-down. If Windows detects a storage device/volume which was not unmounted properly it may require that the volume be “cleaned” before the operating system will assign a drive letter. When using a write-blocker like the T9 Windows will be unable to clean a volume which was not or improperly unmounted, and thus Windows will refuse to assign a drive letter to the volume.
NOTE: In most cases, even though Windows may be unable/unwilling to assign a drive letter to a storage device/volume, it is generally still possible to image the storage device completely as a Physical Drive.
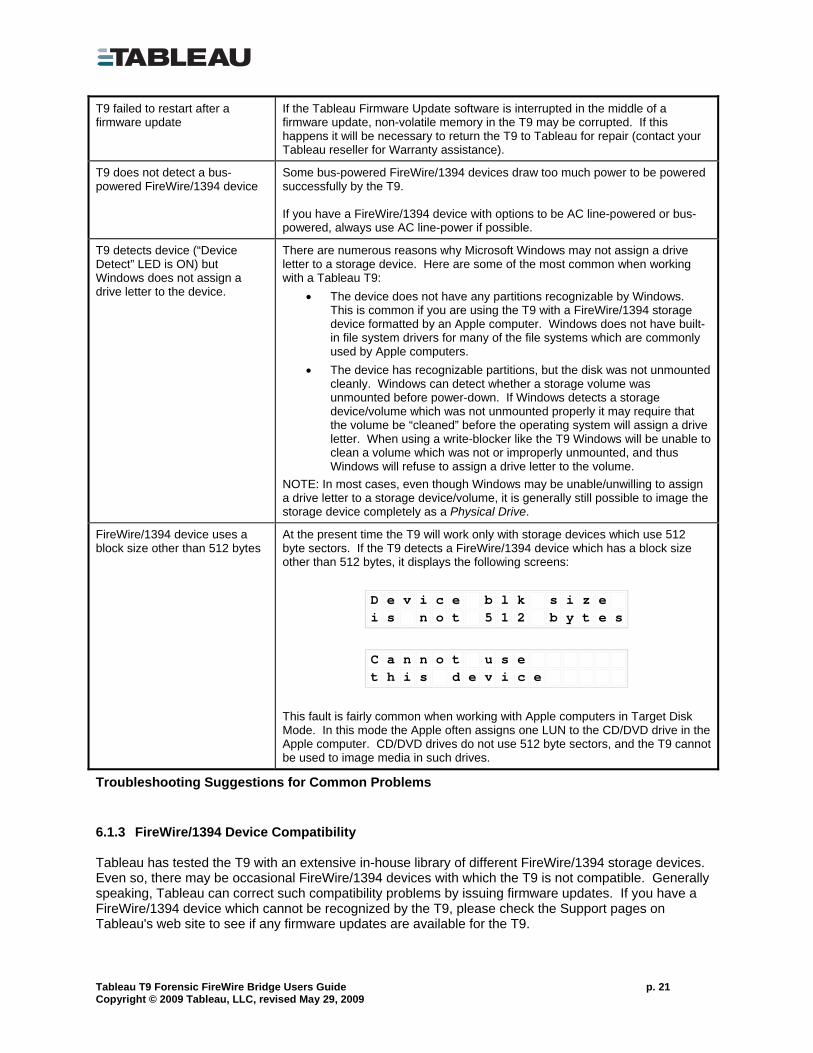
FireWire/1394 device uses a block size other than 512 bytes
At the present time the T9 will work only with storage devices which use 512 byte sectors. If the T9 detects a FireWire/1394 device which has a block size other than 512 bytes, it displays the following screens:
D e v i c e b l k s i z e i s n o t 5 1 2 b y t e s
C a n n o t u s e t h i s d e v i c e
This fault is fairly common when working with Apple computers in Target Disk Mode. In this mode the Apple often assigns one LUN to the CD/DVD drive in the Apple computer. CD/DVD drives do not use 512 byte sectors, and the T9 cannot be used to image media in such drives.
Troubleshooting Suggestions for Common Problems 6.1.3 FireWire/1394 Device Compatibility Tableau has tested the T9 with an extensive in-house library of different FireWire/1394 storage devices. Even so, there may be occasional FireWire/1394 devices with which the T9 is not compatible. Generally speaking, Tableau can correct such compatibility problems by issuing firmware updates. If you have a FireWire/1394 device which cannot be recognized by the T9, please check the Support pages on Tableau's web site to see if any firmware updates are available for the T9.
7.1 Your Tableau Reseller Tableau works with a number of quality resellers who focus on the specific needs of the computer forensics community. Tableau’s resellers are an integral part of Tableau’s support network, and we strongly encourage you to contact your Tableau reseller first when seeking support for Tableau products.
7.2 Warranty Issues If you believe you may have a defective Tableau product you must contact your Tableau reseller to obtain a Return Merchandise Authorization (RMA).
7.3 Online Support Resources If you have problems using the T9 Forensic FireWire Bridge and, we encourage you to visit the support pages on Tableau's web site.
http://www.tableau.com/support Here you will find answers to common questions, information regarding specific compatibility issues and firmware updates for your T9 Forensic FireWire Bridge. E-mail support for the T9 Forensic FireWire Bridge is available through:
[email protected] We are sorry, but Tableau does not provide technical support by phone.