Lab Guidance .......................................................................................................... 3Module 1 - Introduction to the AWS Console (15 minutes).............................................. 10
Introduction........................................................................................................... 11Solution Overview and Lab Validation ................................................................... 12Overview of Amazon Web Services and NSX solution components.......................17Amazon Web Services Management Console access ............................................19Review of Amazon Web Services inventory........................................................... 23Conclusion............................................................................................................. 30
Module 2 - Verify Application Functionality (15 minutes) ................................................ 31Introduction........................................................................................................... 32Review security policies ........................................................................................ 33WordPress application validation .......................................................................... 41Perform port scan of the application environment ................................................ 48Conclusion............................................................................................................. 53
Module 3 - Introduction to NSX Management Components (30 minutes) .......................54Introduction........................................................................................................... 55Perform log in to NSX Cloud Services Manager ..................................................... 56Review configured AWS account and inventory .................................................... 60Perform log in to NSX Manager ............................................................................. 67Review NSX Manager User Interface ..................................................................... 70Conclusion............................................................................................................. 77
Module 4 - Securing Applications with NSX (60 minutes)................................................ 78Introduction........................................................................................................... 79Deploy NSX Cloud Gateway in Amazon Web Services...........................................81Create Logical Groupings and Firewall Policies...................................................... 91Applying Tags to the Application Instances ......................................................... 123Installation of NSX Agent .................................................................................... 133Validate NSX Deployment ................................................................................... 145Validation of WordPress application functionality................................................ 158Perform security scan of application environment .............................................. 163Quarantine Policy ................................................................................................ 167Traffic Visibility .................................................................................................... 181Conclusion........................................................................................................... 189
HOL-1822-01-NET
Page 1HOL-1822-01-NET
Lab Overview -HOL-1822-01-NET -
VMware NSX Cloud -Secure Native Workloads
in AWS
HOL-1822-01-NET
Page 2HOL-1822-01-NET
Lab GuidanceNote: It will take more than 120 minutes to complete this lab. You shouldexpect to only finish 2-3 of the modules during your time. The modules areindependent of each other so you can start at the beginning of any moduleand proceed from there. You can use the Table of Contents to access anymodule of your choosing.
The Table of Contents can be accessed in the upper right-hand corner of theLab Manual.
VMware NSX Cloud provides customers the ability to abstract and manage Networkingand Security policies in Public Cloud environments such as Amazon Web Services (AWS).
Through a scenario of an application deployed in AWS with minimal security, we willexplore how VMware NSX Cloud provides the capability of bringing an existing AWSVirtual Private Cloud (VPC) under NSX management and micro-segmentation to nativeEC2 instances running in AWS.
Lab Module List:
• Module 1 - Introduction to the AWS Console (15 minutes) (Basic) In thismodule we will log in to the AWS console and view the inventory of resources thathave been created.
• Module 2 - Verify Application Functionality (15 minutes) (Basic) In thismodule we will review the configured application environment, verify applicationfunctionality, and review configured security policies and posture.
• Module 3 - Introduction to NSX Management Components (30 minutes)(Basic) In this module we will explore the NSX Manager and NSX Cloud ServicesManager capabilities and configuration.
• Module 4 - Securing Applications with NSX (60 minutes) (Advanced) In thismodule we will configure and validate the installation of NSX in the AWSenvironment to secure the WordPress application.
Lab Captains:
• Brian Heili, Staff Systems Engineer, USA• Puneet Chawla, Solutions Architect, USA
This lab manual can be downloaded from the Hands-on Labs Document site found here:
This lab may be available in other languages. To set your language preference and havea localized manual deployed with your lab, you may utilize this document to help guideyou through the process:
This session may contain product features that are currently underdevelopment.
This session/overview of the new technology represents no commitment fromVMware to deliver these features in any generally available product.
Features are subject to change, and must not be included in contracts,purchase orders, or sales agreements of any kind.
Technical feasibility and market demand will effect final delivery.
Pricing and packaging for any new technologies or features discussed orpresented have not been determined.
• “These features are representative of feature areas under development. Featurecommitments are subject to change, and must not be included in contracts,purchase orders, or sales agreements of any kind. Technical feasibility and marketdemand will affect final delivery.”
1. The area in the RED box contains the Main Console. The Lab Manual is on the tabto the Right of the Main Console.
2. A particular lab may have additional consoles found on separate tabs in the upperleft. You will be directed to open another specific console if needed.
3. Your lab starts with 90 minutes on the timer. The lab can not be saved. All yourwork must be done during the lab session. But you can click the EXTEND toincrease your time. If you are at a VMware event, you can extend your lab timetwice, for up to 30 minutes. Each click gives you an additional 15 minutes.Outside of VMware events, you can extend your lab time up to 9 hours and 30
minutes. Each click gives you an additional hour.
Alternate Methods of Keyboard Data Entry
During this module, you will input text into the Main Console. Besides directly typing itin, there are two very helpful methods of entering data which make it easier to entercomplex data.
HOL-1822-01-NET
Page 5HOL-1822-01-NET
Click and Drag Lab Manual Content Into Console ActiveWindow
You can also click and drag text and Command Line Interface (CLI) commands directlyfrom the Lab Manual into the active window in the Main Console.
Accessing the Online International Keyboard
You can also use the Online International Keyboard found in the Main Console.
1. Click on the Keyboard Icon found on the Windows Quick Launch Task Bar.
<div class="player-unavailable"><h1 class="message">An error occurred.</h1><div class="submessage"><ahref="http://www.youtube.com/watch?v=xS07n6GzGuo" target="_blank">Try watching this video on www.youtube.com</a>, or enableJavaScript if it is disabled in your browser.</div></div>
HOL-1822-01-NET
Page 6HOL-1822-01-NET
Click once in active console window
In this example, you will use the Online Keyboard to enter the "@" sign used in emailaddresses. The "@" sign is Shift-2 on US keyboard layouts.
1. Click once in the active console window.2. Click on the Shift key.
Click on the @ key
1. Click on the "@ key".
Notice the @ sign entered in the active console window.
HOL-1822-01-NET
Page 7HOL-1822-01-NET
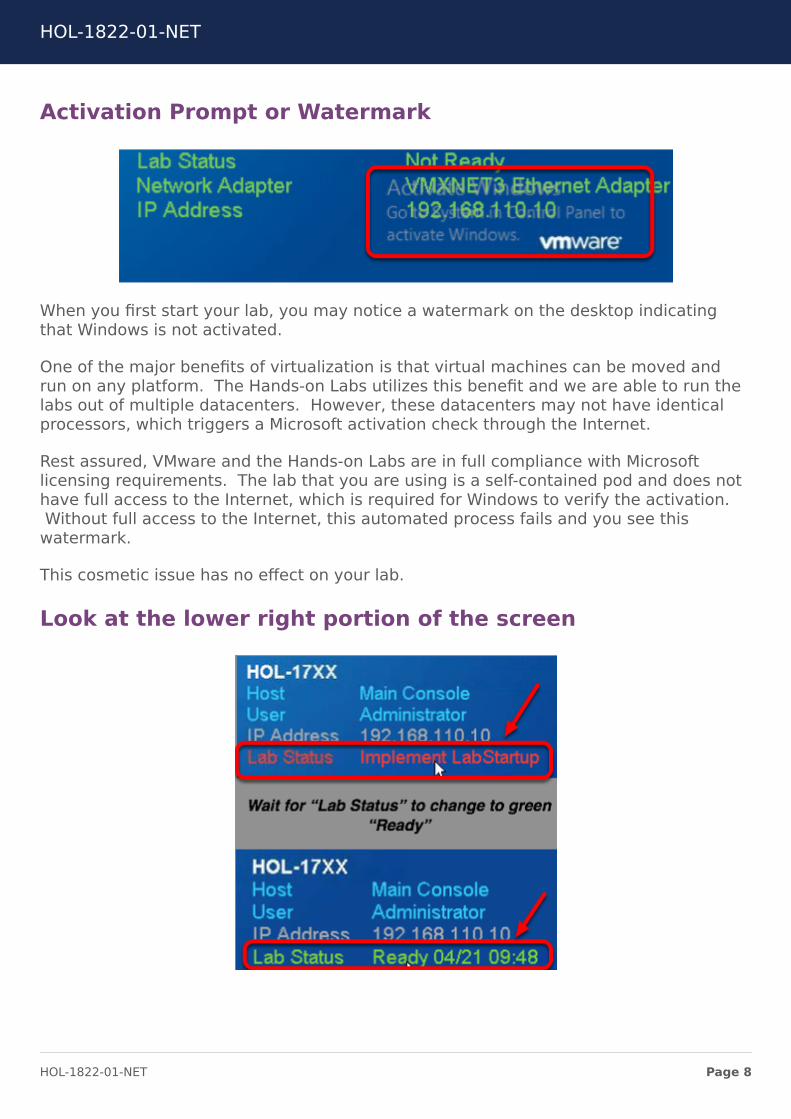
Activation Prompt or Watermark
When you first start your lab, you may notice a watermark on the desktop indicatingthat Windows is not activated.
One of the major benefits of virtualization is that virtual machines can be moved andrun on any platform. The Hands-on Labs utilizes this benefit and we are able to run thelabs out of multiple datacenters. However, these datacenters may not have identicalprocessors, which triggers a Microsoft activation check through the Internet.
Rest assured, VMware and the Hands-on Labs are in full compliance with Microsoftlicensing requirements. The lab that you are using is a self-contained pod and does nothave full access to the Internet, which is required for Windows to verify the activation.Without full access to the Internet, this automated process fails and you see this
watermark.
This cosmetic issue has no effect on your lab.
Look at the lower right portion of the screen
HOL-1822-01-NET
Page 8HOL-1822-01-NET
Please check to see that your lab is finished all the startup routines and is ready for youto start. If you see anything other than "Ready", please wait a few minutes. If after 5minutes your lab has not changed to "Ready", please ask for assistance.
HOL-1822-01-NET
Page 9HOL-1822-01-NET
Module 1 - Introduction tothe AWS Console (15
minutes)
HOL-1822-01-NET
Page 10HOL-1822-01-NET
IntroductionThe NSX management and control plane components, as well as a 2-tier WordPressapplication have been provisioned in Amazon Web Services. We will examine thecomponent inventory.
This Module contains the following lessons:
• Lab Overview and Validation• Overview of Amazon Web Services and NSX solution components• Amazon Web Services Management Console access• Review of Amazon Web Services inventory
HOL-1822-01-NET
Page 11HOL-1822-01-NET
Solution Overview and Lab ValidationThis lab includes many pre-configured items that are necessary for future lessons. Wewill examine a brief overview of the configured solution and review the functionality ofthe configured lab environment.
The configurations that will be reviewed include:
• Lab topology• Lab provisioning status• Address and account information
Solution Overview
As companies move workloads to public cloud providers they require a way to extendtheir SDDC network and security policies into these environments, while allowing nativeworkloads to run. VMware NSX Cloud provides companies with the ability to extendenterprise security, compliance and governance.
NSX provides solutions for the top Networking and Security challenges companies facein public cloud environments:
• Inconsistent Network & Security Policies: NSX provides consistentconstructs and policies across public clouds, using one UI and API entry point.
• Security Policies are Cloud Specific: Each cloud provider supports their ownunique requirements for policy definition that can be static and do not spanvirtual environments, regions, or across clouds. NSX supports dynamic securitypolicies based on VM attributes, which can also span environments, regions, andpublic clouds.
• Lack of Traffic Visibility: NSX provides traffic visibility using widely adoptedtechnologies such as syslog, IPFIX, port mirroring, etc. Additional NSX tools suchas Traceflow continue to work in public cloud environments.
• Operational Tools and Processes: Existing tools and processes that just workwith NSX can be leveraged across different public clouds, providing operationalconsistency.
HOL-1822-01-NET
Page 12HOL-1822-01-NET
Solution Components
The solution consists of the following components, each of which will be explored inupcoming lessons:
• Central Management Plane - NSX Manager and NSX Cloud Services Manager• Central Control Plane - NSX Controllers• Cloud Gateway - NSX Cloud Gateway• Data Plane - NSX Agent installed in each AWS EC2 instance• Public Cloud Infrastructure - Amazon Web Services public cloud infrastructure
and hypervisor
HOL-1822-01-NET
Page 13HOL-1822-01-NET
Lab Topology
The picture depicts the environment that is provisioned and used during the lessons ofthis lab. The environment explores the scenario of a developer deploying a 2-tierWordPress application in Amazon Web Services (AWS), including the use of native AWScapabilities such as Elastic Load Balancer to provide load balancing between a pair ofweb servers. The application deployment lacks security policies that match thecompany corporate standards, and it will be necessary to use NSX to apply consistentpolicies to the application environment.
The deployment of VMware NSX Cloud requires one Management VPC and one or moreCompute VPCs. The NSX Central Management Plane (NSX Manager and Cloud Services
HOL-1822-01-NET
Page 14HOL-1822-01-NET
Manager) and Central Control Plane (NSX Controller) components have been pre-configured.
Lab provisioning status page
The AWS portion of the lab provisioning is currently completing. A webpage has beenprovided that displays the status of the lab resources that are being provisioned on AWSas part of this lab startup.
NOTE: The resources provisioned in Amazon Web Services are accessible only from theMain Console of the HOL environment.
The lab provisioning can be expected to take 10-15 minutes.
Open Google Chrome
1. Click on the Chrome Icon on the Windows Quick Launch Task Bar.
Account Information Homepage
HOL-1822-01-NET
Page 15HOL-1822-01-NET
The Chrome homepage has been set to the Account Information and lab provisioningstatus page.
1. Type the Email Address you used to sign up for the lab.2. Type VMware1! for the Password.3. Click Login.
Lab Provisioning Complete
The AWS Account Information page will display when the provisioning process iscomplete. This process can take 10 - 15 minutes. We will refer back to this pagefrequently in the lab modules.
HOL-1822-01-NET
Page 16HOL-1822-01-NET
Overview of Amazon Web Services andNSX solution componentsWe will review the Amazon Web Services and NSX components that have beenconfigured in the lab environment.
Management VPC
In the Management VPC in AWS, the following components have been configured:
AWS Services
• Internet Gateway• Management subnet• Route Table• VPC Peering with Compute VPC• AWS Security Groups
In the Compute VPC in AWS, the following components have been configured:
AWS Services
• Internet Gateway• Uplink subnet• Management subnet• Downlink subnet• Route Table• VPC Peering with Management VPC• AWS Security Groups
2-tier WordPress application components
• nmap-01a instance• wordpress-web-01a instance• wordpress-web-02a instance• wordpress-db-01a instance• Elastic Load Balancer for web instances
The NSX Cloud Gateway depicted will be deployed as part of the lab exercises.
HOL-1822-01-NET
Page 18HOL-1822-01-NET
Amazon Web Services ManagementConsole accessAll application and NSX component instances for this lab are running in Amazon WebServices. Throughout this lab it will be necessary to access the AWS managementconsole to verify inventory and configurations. This lesson will establish access to theAWS management console.
Accessing AWS Management Console
1. Click on the Account Information tab that was previously opened. If this tabwas closed open another tab and click on the Account Info bookmark.
Locate the AWS Management Console URL
1. Click the Console URL to open a new browser tab and connect to the AWSManagement Console.
HOL-1822-01-NET
Page 19HOL-1822-01-NET
Log in to the AWS Console
1. Type vmware_hol_user for the AWS Management User Name.2. Type or copy the Password from the Account Information page.3. Click the Sign In button.
AWS Management Console
HOL-1822-01-NET
Page 20HOL-1822-01-NET
The AWS management console page will appear.
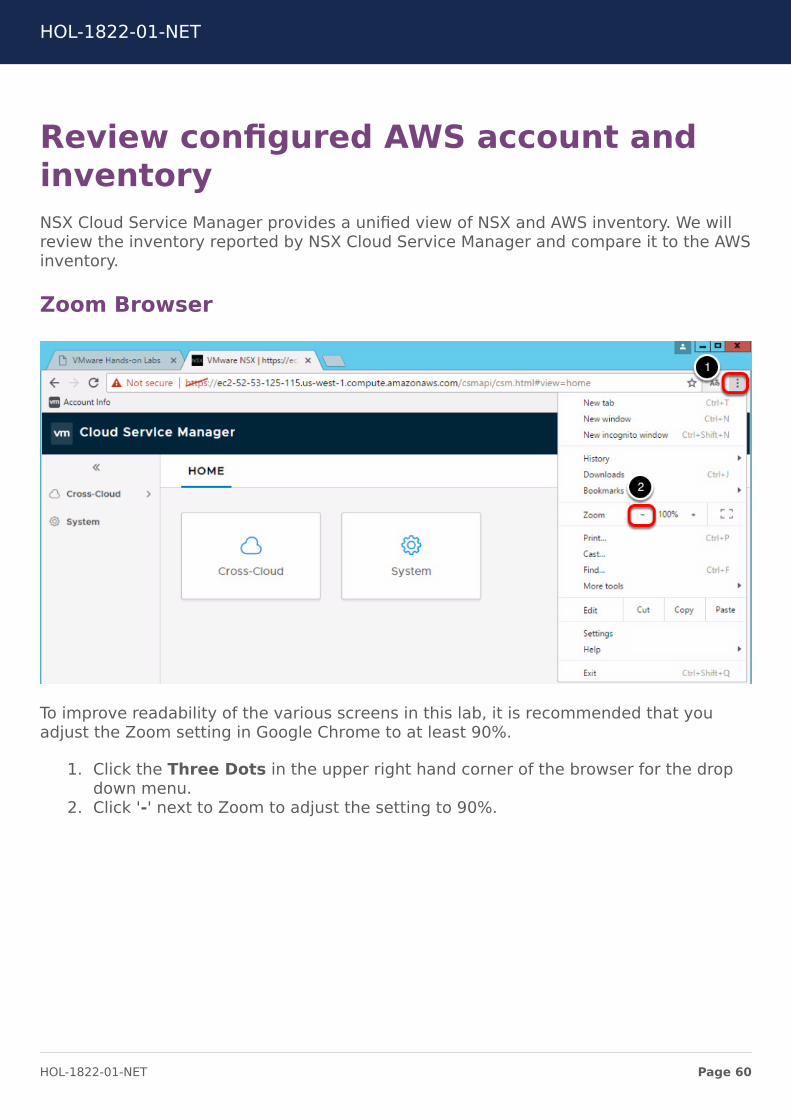
Zoom Browser
To improve readability of the various screens in this lab, it is recommended that youadjust the Zoom setting in Google Chrome to at least 90%.
1. Click the Three Dots in the upper right hand corner of the browser for the dropdown menu.
2. Click '-' next to Zoom to adjust the setting to 90%.
HOL-1822-01-NET
Page 21HOL-1822-01-NET
Select Region
Verify that the console is viewing North California region resources. If a different regionis selected the lab resources will not be displayed.
1. Click the Region Name to the left of Support in the upper right.2. Select US West (N. California).
HOL-1822-01-NET
Page 22HOL-1822-01-NET
Review of Amazon Web ServicesinventoryIn this lesson we will review the Amazon Web Services and NSX components that arepart of the solution:
Please Note: Some AWS inventory screens may show delete, terminated,detached, etc entries that differ from the screenshots. These are items fromthe previous lab deployment that have been removed, but not yet clearedfrom, the AWS UI.
HOL-1822-01-NET
Page 23HOL-1822-01-NET
Review Configured Virtual Private Clouds
1. Click Services in the upper left corner of the AWS management console.2. Click VPC under Network & Content Delivery.
HOL-1822-01-NET
Page 24HOL-1822-01-NET
Click Your VPCs
1. Click Your VPCs under VPC Dashboard on the left.
Review Configured VPCs
There are multiple VPCs configured in this AWS Region. In particular, there is aManagement VPC for management and control plane components, and a Compute VPCwhere the application instances are deployed. The VPC IDs will be different for each labpod.
HOL-1822-01-NET
Page 25HOL-1822-01-NET
Click Peering Connections
1. Click on Peering Connections under VPC Dashboard on the left.
Review Configured Peering Connection
There is an active VPC peering connection between the Management and ComputeVPCs, allowing traffic to flow between VPCs.
HOL-1822-01-NET
Page 26HOL-1822-01-NET
Click Security Groups
1. Click on Security Groups on the left under Security.
Review Configured Security Groups
There are Security Groups configured for the Management and Compute VPCs to allowEC2 instances to communicate.
Click EC2
HOL-1822-01-NET
Page 27HOL-1822-01-NET
1. Click Services in the upper left corner of the AWS console.2. Click EC2 under Compute.
Click Instances
1. Click Instances under EC2 Dashboard on the left.
Review NSX EC2 Instances
There are three EC2 instances running that comprise the NSX solution:
• nsxmgr-01a: NSX Manager• nsxc-01a: NSX Central Control Plane• nsxcsm-01a: NSX Cloud Service Manager
HOL-1822-01-NET
Page 28HOL-1822-01-NET
Review WordPress Application EC2 Instances
There are four EC2 instances running that comprise the 2-tier WordPress applicationplus an instance running nmap for security scans later in the lab.
• WordPress Web Servers (2)• MySQL Database Server• Nmap Security Scanner
View the Configured Load Balancer
1. Click Load Balancers under Load Balancing on the left. You may need to scrolldown.
Web Load Balancer
As part of the application deployment, the developer has created a load balancer for theweb-tier instances. We will see this load balancer in action during applicationfunctionality verification.
HOL-1822-01-NET
Page 29HOL-1822-01-NET
ConclusionThis completes Module 1. We have reviewed the components of the solution that aredeployed in Amazon Web Services, successfully logged in to the AWS managementconsole, and reviewed the AWS inventory.
Congratulations, you've finished Module 1
Proceed to Module 2 for validation the application functionality. You may also proceed toany other module of interest.
• Module 1 - Introduction to the AWS Console (15 minutes) (Basic) In thismodule we will log in to the AWS console and view the inventory of resources thathave been created.
• Module 2 - Verify Application Functionality (15 minutes) (Basic) In thismodule we will review the configured application environment, verify applicationfunctionality, and review configured security policies and posture.
• Module 3 - Introduction to NSX Management Components (30 minutes)(Basic) In this module we will explore the NSX Manager and NSX Cloud ServicesManager capabilities and configuration.
• Module 4 - Securing Applications with NSX (60 minutes) (Advanced) In thismodule we will configure and validate the installation of NSX in the AWSenvironment to secure the WordPress application.
HOL-1822-01-NET
Page 30HOL-1822-01-NET
Module 2 - VerifyApplication Functionality
(15 minutes)
HOL-1822-01-NET
Page 31HOL-1822-01-NET
IntroductionIn the lab scenario, a 2-tier WordPress application has been deployed by an applicationdeveloper in to Amazon Web Services. An additional instance has been deployed in AWSto simulate a possible hacker attempting to scan the application instances forvulnerabilities.
This Module contains the following lessons:
• Review security policies• WordPress application validation• Perform port scan of the application environment
Application Diagram
HOL-1822-01-NET
Page 32HOL-1822-01-NET
Review security policiesWe will look at the security policies that were applied to the WordPress application whenthe developer deployed it. Since NSX has not been deployed, the security policies thatare applied are what have been configured in Amazon Web Services.
Open Google Chrome
1. Click on the Chrome Icon on the Windows Quick Launch Task Bar.
Account Information Homepage
The Chrome homepage has been set to the Account Information and lab provisioningstatus page. If you've completed the previous lesson you can click on the accountinformation tab that is open and proceed to the next step.
1. Type the Email Address you used to sign up for the lab.2. Type VMware1! for the Password.3. Click Login.
HOL-1822-01-NET
Page 33HOL-1822-01-NET
Lab Provisioning Complete
The AWS Account Information page will display when the provisioning process iscomplete. This process can take 10 - 15 minutes. We will refer back to this pagefrequently in the lab modules.
Locate the AWS Management Console URL
1. Click the Console URL to open a new browser tab and connect to the AWSManagement Console.
HOL-1822-01-NET
Page 34HOL-1822-01-NET
Log in to the AWS Console
1. Type vmware_hol_user for the AWS Management User Name.2. Type or copy the Password from the Account Information Page.3. Click the Sign In button.
Zoom Browser
To improve readability of the various screens in this lab, it is recommended that youadjust the Zoom setting in Google Chrome to at least 90%.
HOL-1822-01-NET
Page 35HOL-1822-01-NET
1. Click the Three Dots in the upper right hand corner of the browser for the dropdown menu.
2. Click '-' next to Zoom to adjust the setting to 90%.
Select Region
Verify that the console is viewing North California region resources.
1. Click the Region Name to the left of Support in the upper right.2. Select US West (N. California).
HOL-1822-01-NET
Page 36HOL-1822-01-NET
Navigate to EC2 Dashboard
1. Click Services in the upper left corner of the AWS console.2. Click EC2 under Compute.
Navigate to the Deployed Instances
1. Click Instances under EC2 Dashboard on the left.
HOL-1822-01-NET
Page 37HOL-1822-01-NET
Select the wordpress-web-01a Instance
1. Select the wordpress-web-01a instance.
Open the Inbound Rules
1. Click view inbound rules at the bottom of the screen in the Description tab forthat instance. This instance has been configured with an AWS Security Group forthe Compute-VPC.
HOL-1822-01-NET
Page 38HOL-1822-01-NET
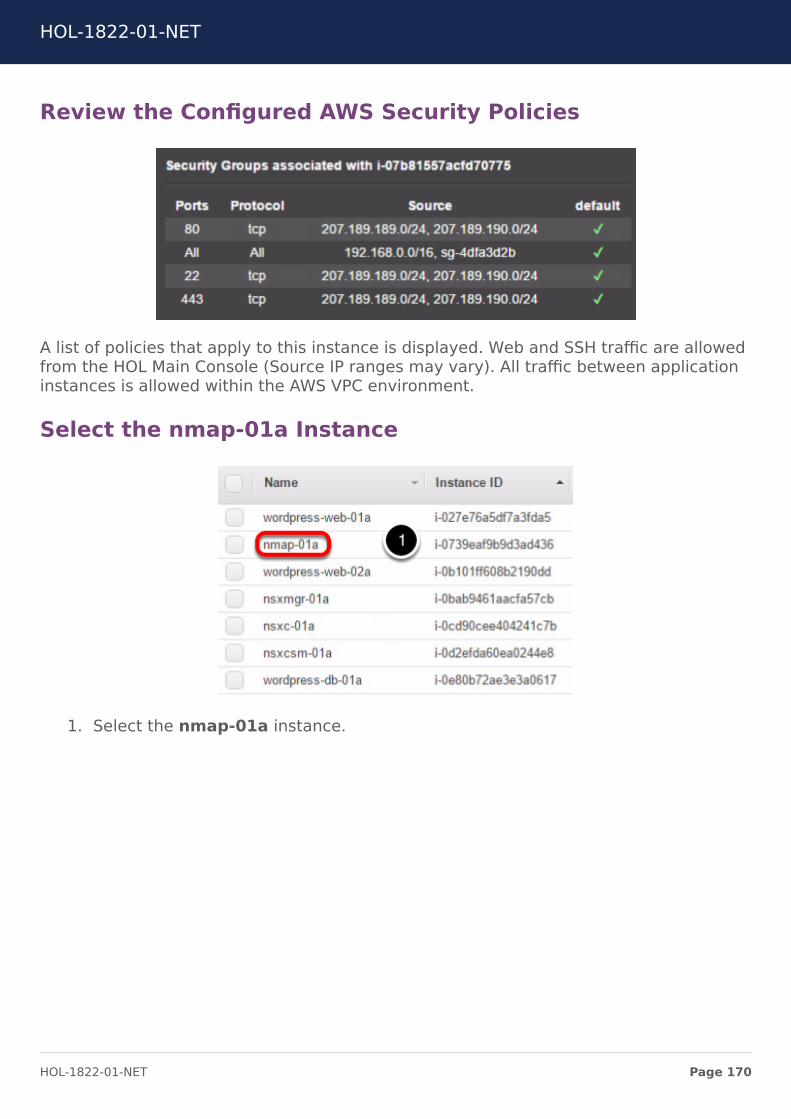
Review the Configured AWS Security Policies
A list of policies that apply to this instance is displayed. Web and SSH traffic are allowedfrom the HOL Main Console (Source IP ranges may vary). All traffic between applicationinstances is allowed within the AWS VPC environment.
Select the wordpress-db-01a Instance
1. Select the wordpress-db-01a instance. Make sure wordpress-web-01a is notalso selected.
HOL-1822-01-NET
Page 39HOL-1822-01-NET
Open the Inbound Rules
1. Click view inbound rules at the bottom of the screen in the Description tab forthat instance. This instance has also been configured with an AWS Security Groupfor the Compute-VPC.
Review the Configured AWS Security Policies
A list of policies that apply to this instance is displayed. Like the wordpress-web-01ainstance, Web and SSH traffic are allowed from the HOL Main Console (Source IP rangesmay vary). All traffic between application instances is allowed within the AWS VPCenvironment.
HOL-1822-01-NET
Page 40HOL-1822-01-NET
WordPress application validationA 2-tier WordPress application has been deployed by a developer in Amazon WebServices. NSX will be used to secure this application in upcoming lessons. We willvalidate the pre-NSX functionality of the application.
Accessing AWS Management Console
1. Click on the Account Information tab that was previously opened. If this tabwas closed open another tab and click on the Account Info bookmark.
Locate the WordPress Application Information
1. Click on the WordPress Application Elastic Load Balancer DNS Name link toopen a new browser tab and connect to the WordPress application.
HOL-1822-01-NET
Page 41HOL-1822-01-NET
Verify WordPress Application is Functioning
Verify that the WordPress application is functioning. The IP address of the serverpresenting the page is noted. You can refresh the browser a few times to see the ServerIP address change to the other web server (172.16.10.10 and 172.16.10.11).
Note: Scrolling down in the browser will display the blog posts depicted in the screenshot.
Open Account Information Page
1. Click on the Account Information tab that was previously opened. If this tabwas closed open another and click on the Account Info bookmark.
HOL-1822-01-NET
Page 42HOL-1822-01-NET
Locate Web Server Information
1. Locate the Wordpress-web-01a Instance Public IP Address that will be usedto log in to the instance.
Open PuTTY in the Main Console
1. Click on the PuTTY Icon on the Windows Quick Launch Task Bar.
HOL-1822-01-NET
Page 43HOL-1822-01-NET
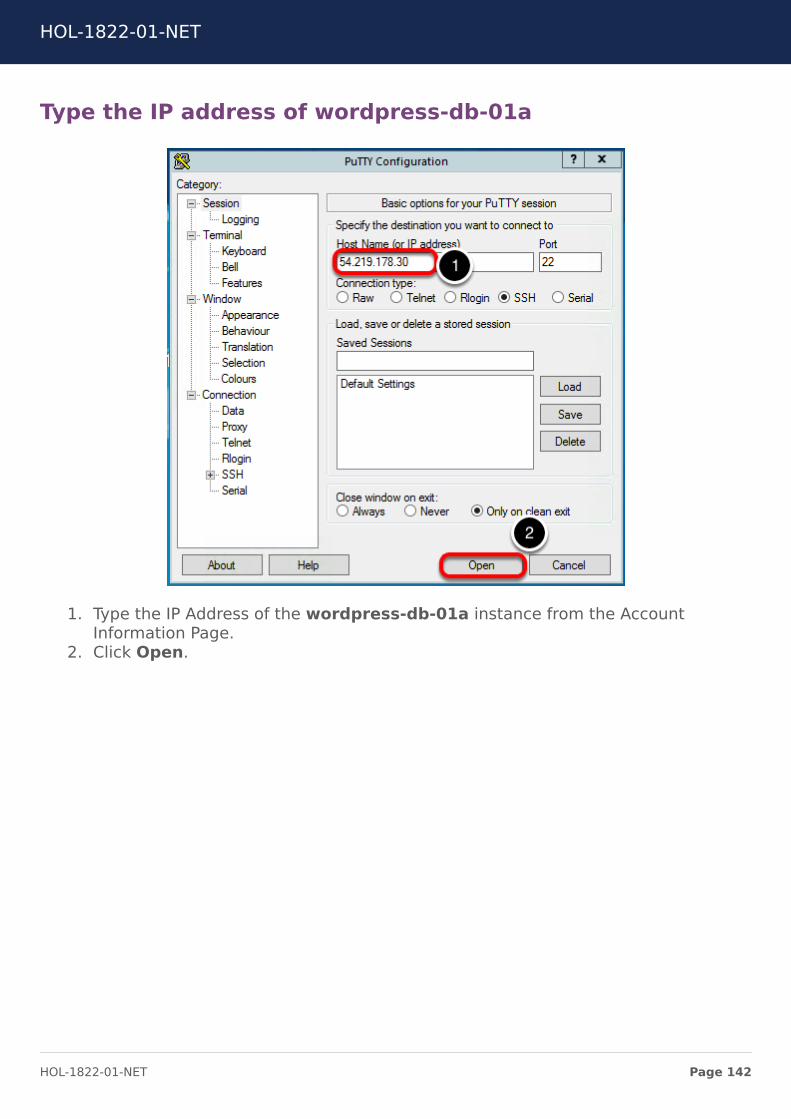
Type the IP Address for the wordpress-web-01a Instance
1. Type the IP Address of the wordpress-web-01a instance from the AccountInformation Page.
2. Click Open.
HOL-1822-01-NET
Page 44HOL-1822-01-NET
Verify Connection
The first time connecting to the instance will result in a confirmation window to verifythe connection.
1. Click Yes.
Test Connectivity to wordpress-web-02a Instance
1. Type the following command to test the connectivity between the wordpress-web-01a and wordpress-web-02a instances:
ping -c 5 172.16.10.11
HOL-1822-01-NET
Page 45HOL-1822-01-NET
Instance is Reachable
The pings are successful since the AWS security policy is allowing all traffic betweeninstances.
Test Connectivity to wordpress-db-01a Instance
1. Type the following command to test the connectivity between the wordpress-web-01a and wordpress-db-01a instances:
ping -c 5 172.16.10.20
HOL-1822-01-NET
Page 46HOL-1822-01-NET
Instance is Reachable
The pings are successful since the AWS security policy is allowing all traffic betweeninstances.
HOL-1822-01-NET
Page 47HOL-1822-01-NET
Perform port scan of the applicationenvironmentTo simulate a potential hacker, an Ubuntu Linux instance has been configured withnmap to perform a port scan of the application environment in Amazon Web Services.We will scan the IP subnet where the application instances are deployed and review theopen ports.
Nmap Instance Log In
1. Click on the Account Information tab that was previously opened. If this tabwas closed open another tab and click on the Account Info bookmark.
Locate the nmap-01a Information
1. Locate the nmap-01 instance Public IP Address that will be used to log in tothe nmap port scanner instance.
Open PuTTY
HOL-1822-01-NET
Page 48HOL-1822-01-NET
1. Click on the PuTTY Icon on the Windows Quick Launch Task Bar. If the previousPuTTY session is still open, click on the PuTTY Icon in the upper left corner ofthat window and select New Session.
Enter the IP Address of the nmap-01a Instance
1. Type the IP Address of the nmap-01a instance from the Account InformationPage.
2. Click Open.
HOL-1822-01-NET
Page 49HOL-1822-01-NET
Verify Connection
The first time connecting to the instance will result in a confirmation window to verifythe connection.
1. Click Yes.
Run nmap Scan of the Application IP Subnet Range
1. Type the following command to start the nmap scan:
nmap -F -Pn -T5 --open 172.16.10.10-20
To speed up the scan time and reduce clutter, the nmap scanner is using the followingoptions:
• -F to perform a fast scan for fewer ports• -Pn to turn off ping checks• -T5 to turn on the fastest timing template• --open to only display open or possibly open ports• 172.16.10.10-20 to only scan a small range of IP addresses
HOL-1822-01-NET
Page 50HOL-1822-01-NET
Scan Results of the Web Tier
The wordpress-web-01a and wordpress-web-02a instances at 172.16.10.10 and172.16.10.11 have ports 80 and 22 open.
HOL-1822-01-NET
Page 51HOL-1822-01-NET
Scan Results of the DB Tier
The wordpress-db-01a instance at 172.16.10.20 has ports 80, 3306 and 22 open. As adatabase instance, we don't want to have port 80 open, and we only want port 3306open to the web instances.
HOL-1822-01-NET
Page 52HOL-1822-01-NET
ConclusionThis completes Module 2. We have validated that the developer's WordPress applicationis functioning within AWS, including the load balancer. Through the review of thesecurity policies that were applied in AWS we discovered the application is exposed tothe Internet and potentially malicious attacks. Lastly, we used a common securityscanner to validate the open ports and discovered a port on the database server thatshouldn't be open.
Congratulations, you've finished Module 2
Proceed to Module 3 for an Introduction to the NSX Management Components. You mayalso proceed to any other module of interest.
• Module 1 - Introduction to the AWS Console (15 minutes) (Basic) In thismodule we will log in to the AWS console and view the inventory of resources thathave been created.
• Module 2 - Verify Application Functionality (15 minutes) (Basic) In thismodule we will review the configured application environment, verify applicationfunctionality, and review configured security policies and posture.
• Module 3 - Introduction to NSX Management Components (30 minutes)(Basic) In this module we will explore the NSX Manager and NSX Cloud ServicesManager capabilities and configuration.
• Module 4 - Securing Applications with NSX (60 minutes) (Advanced) In thismodule we will configure and validate the installation of NSX in the AWSenvironment to secure the WordPress application.
HOL-1822-01-NET
Page 53HOL-1822-01-NET
Module 3 - Introduction toNSX Management
Components (30 minutes)
HOL-1822-01-NET
Page 54HOL-1822-01-NET
IntroductionAs part of the VMware NSX Cloud solution, separate instances are deployed in AmazonWeb Services to support the Management and Operations User Interface for thesolution. These instances are:
• NSX Cloud Services Manager• NSX Manager
NSX Cloud Services Manager manages the complete lifecycle of deployed NSXcomponents in AWS and provides a unified view between NSX Manager and the AWSinventory. Other functions of NSX Cloud Services Manager include:
• NSX Cloud Gateway deployment and upgrades• NSX Agent upgrades via the NSX Cloud Gateway• Backup/Restore
NSX Manager provides the graphical user interface (GUI) and the REST APIs for creating,configuring, and monitoring NSX components such as the NSX controllers and logicalswitches. NSX Manager is the management plane for the NSX eco-system. It provides anaggregated view and is the centralized network management component of NSX. Itprovides a method for monitoring and troubleshooting workloads attached to virtualnetworks created by NSX. It provides configuration and orchestration of:
• Logical networking components - logical switching and routing• Networking and Edge services• Security services and distributed firewall
This Module contains the following lessons:
• Perform log in to NSX Cloud Services Manager• Review configured AWS account and inventory• Perform log in to NSX Manager• Review NSX Manager User Interface
HOL-1822-01-NET
Page 55HOL-1822-01-NET
Perform log in to NSX Cloud ServicesManagerOne function of the NSX Cloud Services Manager is to provide a unified view of theinventory between NSX and Amazon Web Services. In this lesson we will log in to theNSX Cloud Services Manager.
Open Google Chrome
1. Click on the Chrome Icon on the Windows Quick Launch Task Bar.
Account Information Homepage
The Chrome homepage has been set to the Account Information and lab provisioningstatus page. If you've completed the previous lesson you can click on the accountinformation tab that is open and proceed to the next step.
1. Type the Email Address you used to sign up for the lab.
HOL-1822-01-NET
Page 56HOL-1822-01-NET
2. Type VMware1! for the Password.3. Click Login.
Lab Provisioning Complete
The AWS Account Information page will display when the provisioning process iscomplete. This process can take 10 - 15 minutes. We will refer back to this pagefrequently in the lab modules.
NSX Cloud Services Manager Account Information
1. Click on the NSX Cloud Services Manager DNS Name link to open a newbrowser tab and connect to the NSX Cloud Services Manager console.
HOL-1822-01-NET
Page 57HOL-1822-01-NET
Certificate Validation
The hands-on lab environments are built on-demand, so the certificates are not yettrusted. In a production deployment, a trusted certificate would be generated and usedto secure connectivity. To continue the log in process:
1. Click Advanced.2. Click Proceed link.
HOL-1822-01-NET
Page 58HOL-1822-01-NET
Log in to NSX Cloud Services Manager
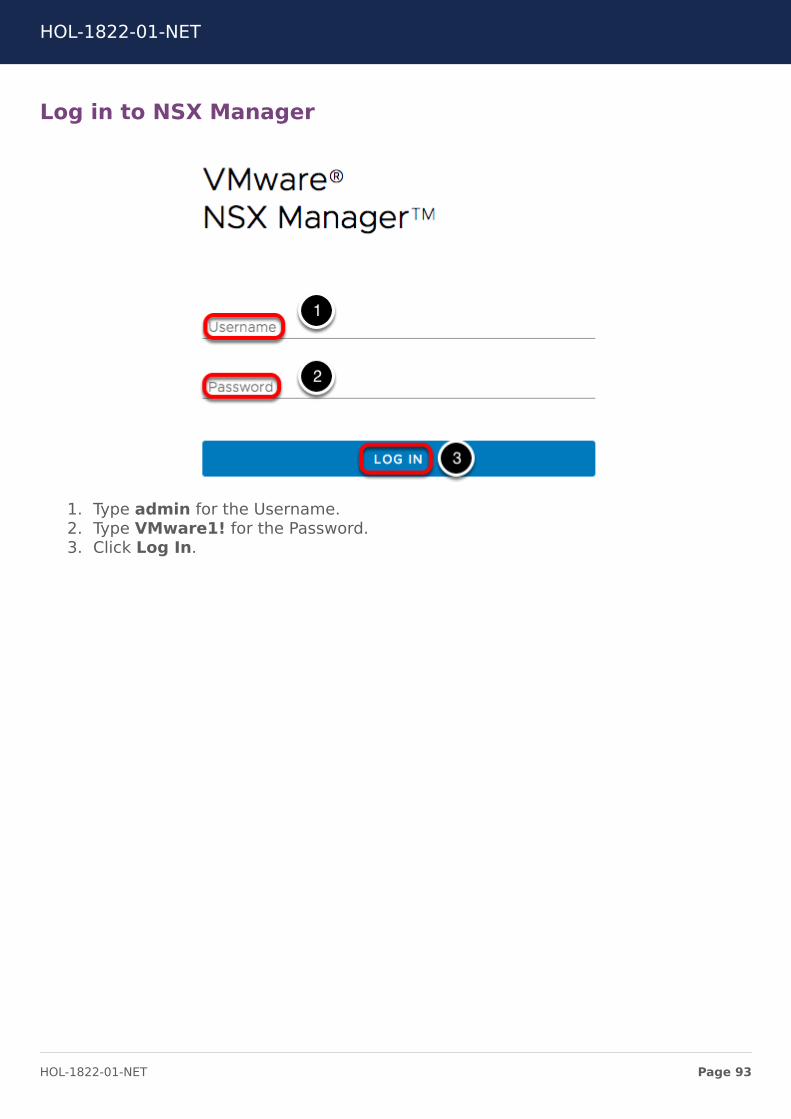
1. Type admin for the Username.2. Type VMware1! for the Password.3. Click Log In.
HOL-1822-01-NET
Page 59HOL-1822-01-NET
Review configured AWS account andinventoryNSX Cloud Service Manager provides a unified view of NSX and AWS inventory. We willreview the inventory reported by NSX Cloud Service Manager and compare it to the AWSinventory.
Zoom Browser
To improve readability of the various screens in this lab, it is recommended that youadjust the Zoom setting in Google Chrome to at least 90%.
1. Click the Three Dots in the upper right hand corner of the browser for the dropdown menu.
2. Click '-' next to Zoom to adjust the setting to 90%.
HOL-1822-01-NET
Page 60HOL-1822-01-NET
CSM Configuration and Inventory
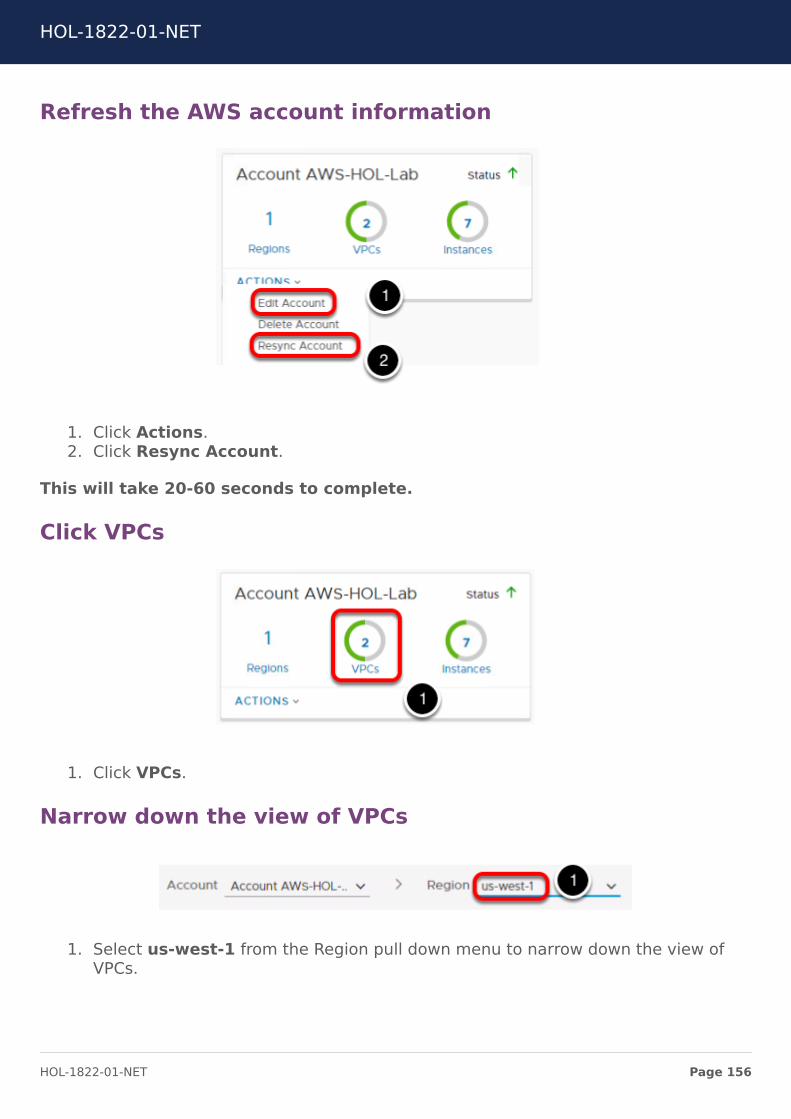
1. Click Cross-Cloud.
Review AWS Account Information
The AWS account information has been configured in Cloud Services Manager. Thisinformation will be different for each lab pod.
Review Number of Configured VPCs
HOL-1822-01-NET
Page 61HOL-1822-01-NET
There are 2 VPCs configured in this AWS account.
Review Number of Configured Instances
There are 7 instances running in this AWS account.
Click VPCs
1. Click VPCs.
Narrow down the view of VPCs
1. Select us-west-1 from the Region pull down menu to narrow down the view ofVPCs.
HOL-1822-01-NET
Page 62HOL-1822-01-NET
Review VPCs
These are the two VPCs we saw in the AWS inventory in previous lessons.
• Compute-VPC• Management-VPC
Management VPC Deployment Indication
The Management VPC includes an icon that shows NSX management components areinstalled in this VPC.
Management VPC Instances
1. Click Instances in the Management-VPC.
HOL-1822-01-NET
Page 63HOL-1822-01-NET
Compare Management VPC Instances to AWS Inventory
The NSX components that were reported in the AWS inventory are listed.
Click VPCs
1. Click VPCS at the top of the screen to go back to the list of VPCs.
HOL-1822-01-NET
Page 64HOL-1822-01-NET
Confirm VPC is not Managed by NSX
The Compute VPC reports a Status of "NSX Managed - No." Later in this lab we willdeploy NSX components in this VPC to manage the running AWS EC2 instances.
Click Instances
1. Click Instances in the Compute-VPC.
HOL-1822-01-NET
Page 65HOL-1822-01-NET
Confirm Instances are not Managed by NSX
The AWS EC2 instances for the 2-tier WordPress application that were reported in theAWS inventory are listed. The NSX State circle is not green because NSX componentshave not been deployed.
HOL-1822-01-NET
Page 66HOL-1822-01-NET
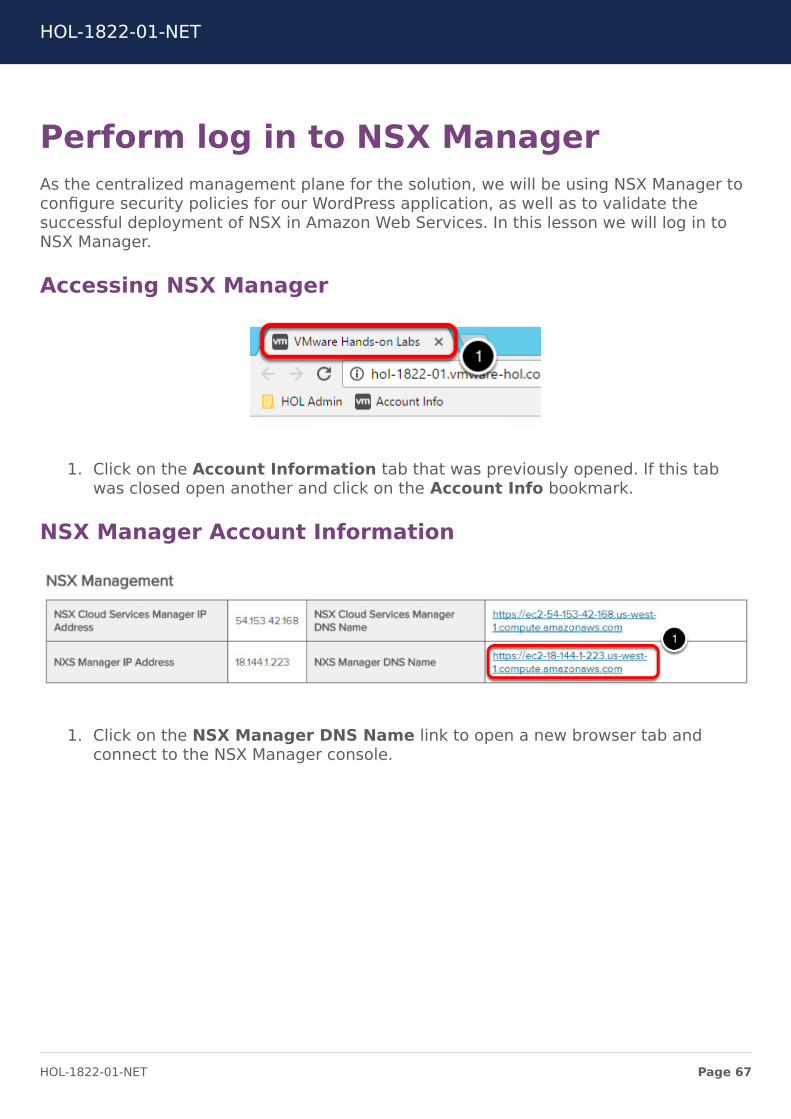
Perform log in to NSX ManagerAs the centralized management plane for the solution, we will be using NSX Manager toconfigure security policies for our WordPress application, as well as to validate thesuccessful deployment of NSX in Amazon Web Services. In this lesson we will log in toNSX Manager.
Accessing NSX Manager
1. Click on the Account Information tab that was previously opened. If this tabwas closed open another and click on the Account Info bookmark.
NSX Manager Account Information
1. Click on the NSX Manager DNS Name link to open a new browser tab andconnect to the NSX Manager console.
HOL-1822-01-NET
Page 67HOL-1822-01-NET
Certificate Validation
The hands-on lab environments are built on-demand, so the certificates are not yettrusted. In a production deployment, a trusted certificate would be generated and usedto secure connectivity. To continue the log in process:
1. Click Advanced.2. Click Proceed link.
HOL-1822-01-NET
Page 68HOL-1822-01-NET
Log in to NSX Manager
1. Type admin for the Username.2. Type VMware1! for the Password.3. Click Log In.
HOL-1822-01-NET
Page 69HOL-1822-01-NET
Review NSX Manager User InterfaceIn preparation for the deployment of NSX in Amazon Web Services to manage ourapplication, we will walk through several of the NSX Manager User Interface screens toview the current configuration of the lab environment, validate that the NSXmanagement infrastructure is functional, and get familiar with the new HTML5 interface.
Click Dashboard
1. Click Dashboard.
HOL-1822-01-NET
Page 70HOL-1822-01-NET
Management Cluster Status is Up
The status of the Management Cluster (NSX Manager) is reported. The ManagerConnection reports as Up.
HOL-1822-01-NET
Page 71HOL-1822-01-NET
Controller Cluster Status is Up
Scrolling down below the Management Cluster status, we see the the status of theController Cluster (NSX Manager) is reported as Up.
HOL-1822-01-NET
Page 72HOL-1822-01-NET
Click Fabric
1. Click Fabric on the left.
Review Fabric Status
As a fresh deployment of NSX, the Fabric inventory will be empty.
1. Click each of the options at the top of the screen, starting with Hosts and endingwith Transport Nodes, to validate that each is empty.
We will return to this inventory in upcoming lessons to validate that the NSX deploymentis operational.
HOL-1822-01-NET
Page 73HOL-1822-01-NET
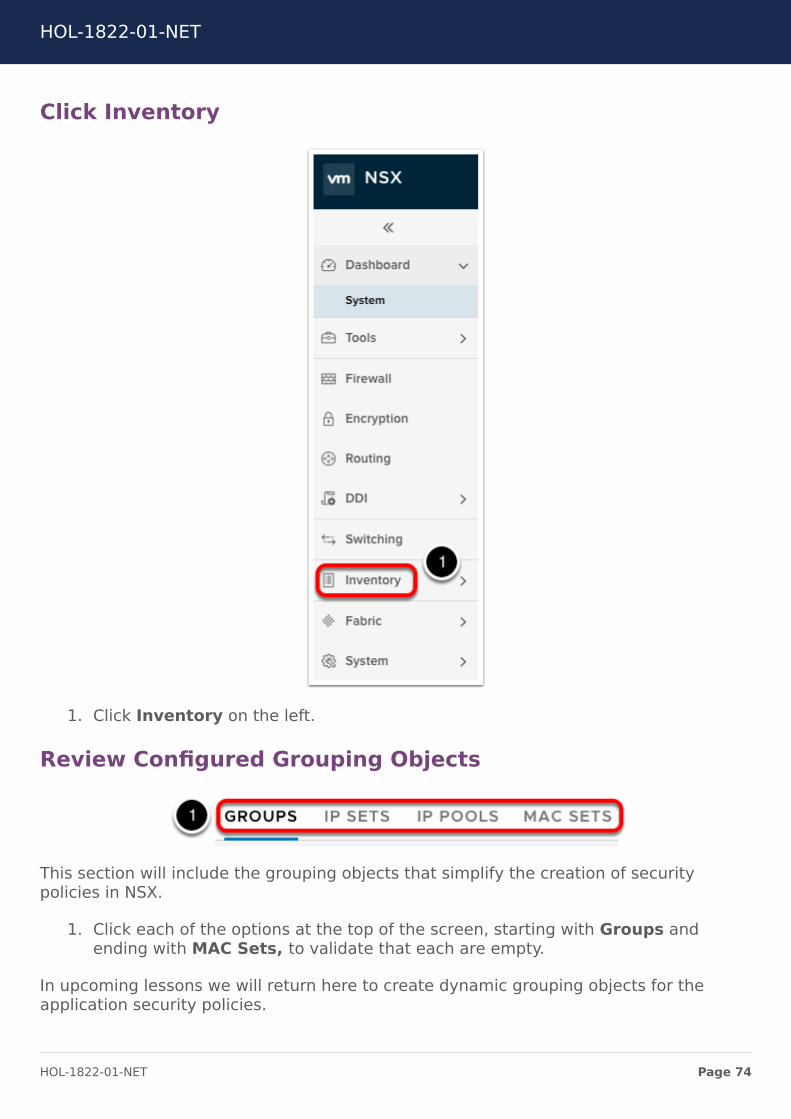
Click Inventory
1. Click Inventory on the left.
Review Configured Grouping Objects
This section will include the grouping objects that simplify the creation of securitypolicies in NSX.
1. Click each of the options at the top of the screen, starting with Groups andending with MAC Sets, to validate that each are empty.
In upcoming lessons we will return here to create dynamic grouping objects for theapplication security policies.
HOL-1822-01-NET
Page 74HOL-1822-01-NET
Click Firewall
1. Click Firewall on the left.
Review Default Firewall Policy Configured
The default NSX firewall policy has been deployed. We will return to this screen in anupcoming lesson to configure the application security policies.
HOL-1822-01-NET
Page 75HOL-1822-01-NET
Click Switching
1. Click Switching on the left.
Confirm Logical Switch Inventory is Empty
No Logical Switches have been created. We will create a new logical switch in anupcoming lesson to attach our application instances.
HOL-1822-01-NET
Page 76HOL-1822-01-NET
ConclusionThis completes Module 3. We have logged into the NSX Cloud Services Manager (CSM)that is deployed in Amazon Web Services. The NSX CSM acts as the operations userinterface for the VMware NSX Cloud solution. We also reviewed the AWS inventory fromwithin NSX CSM. We have also logged into the NSX Manager that is deployed in AmazonWeb Services. We reviewed the inventory of NSX objects to confirm only the defaults arepresent and to get familiarity with the new HTML5 interface.
Congratulations, you've finished Module 3
Proceed to Module 4 to secure the application environment with NSX. You may alsoproceed to any other module of interest.
• Module 1 - Introduction to the AWS Console (15 minutes) (Basic) In thismodule we will log in to the AWS console and view the inventory of resources thathave been created.
• Module 2 - Verify Application Functionality (15 minutes) (Basic) In thismodule we will review the configured application environment, verify applicationfunctionality, and review configured security policies and posture.
• Module 3 - Introduction to NSX Management Components (30 minutes)(Basic) In this module we will explore the NSX Manager and NSX Cloud ServicesManager capabilities and configuration.
• Module 4 - Securing Applications with NSX (60 minutes) (Advanced) In thismodule we will configure and validate the installation of NSX in the AWSenvironment to secure the WordPress application.
HOL-1822-01-NET
Page 77HOL-1822-01-NET
Module 4 - SecuringApplications with NSX (60
minutes)
HOL-1822-01-NET
Page 78HOL-1822-01-NET
IntroductionSecuring the WordPress application in Amazon Web Services (AWS) requires securitypolicies for the instances that will be NSX managed. NSX provides a distributed firewallwith logical grouping capabilities to simplify configuration and provide consistency.
After the Central Management Plane (NSX Manager and NSX Cloud Services Manager)and Central Control Plane (NSX Controllers) have been deployed in the ManagementVPC, the following steps are required to secure instances in AWS:
1. An NSX Cloud Gateway is deployed in each Compute VPC with instances to bemanaged by NSX.
2. A Cloud Administrator will create Logical Networks and Security Policies using theNSX Manager UI or APIs.
3. A Cloud Administrator will generate a set of tags in NSX Cloud Services Manager.4. A Developer will apply the tags to their instances in AWS for consumption of NSX
policies at the time of instance creation.5. The NSX Agent is installed on each AWS instance to be managed by NSX.
This Module contains the following lessons that will result in the securing of theWordPress application:
• Deploy NSX Cloud Gateway in Amazon Web Services• Create Logical Groupings and Firewall Policies• Applying Tags to the Application Instances• Installation of NSX Agent• Validate NSX Deployment• Validation of WordPress Application Functionality• Perform Security Scan of Application Environment• Quarantine Policy• Traffic Visibility
HOL-1822-01-NET
Page 79HOL-1822-01-NET
Required Security Policies
The WordPress application requires the following security policies:
• Allow HTTP (80) from the Internet to the Web instances.• Allow MySQL (3306) from the Web instances to the DB instance.• Allow SSH (22) from the Internet to all instances for management.• Block everything else.
The nmap instance is outside the scope of the security policies, and is provided as a toolto assess the security posture of the application in this lab.
HOL-1822-01-NET
Page 80HOL-1822-01-NET
Deploy NSX Cloud Gateway in AmazonWeb ServicesNSX needs to be deployed to provide security policies for the application instances inAmazon Web Services. The first step is to deploy the NSX Cloud Gateway in theCompute VPC where the application instances are deployed.
As an Edge Transport Node in NSX, the NSX Cloud Gateway provides the followingservices in each VPC it is deployed:
• Proxy (local) control plane for NSX Agents• Stateful services such as NAT and Edge Firewall• Host and push NSX Agent software• Polls Amazon Web Services Tags
Open Google Chrome
1. Click on the Chrome Icon on the Windows Quick Launch Task Bar.
HOL-1822-01-NET
Page 81HOL-1822-01-NET
Account Information Homepage
The Chrome homepage has been set to the Account Information and lab provisioningstatus page. If you've completed the previous lesson you can click on the accountinformation tab that is open and proceed to the next step.
1. Type the Email Address you used to sign up for the lab.2. Type VMware1! for the Password.3. Click Login.
HOL-1822-01-NET
Page 82HOL-1822-01-NET
Lab Provisioning Complete
The AWS Account Information page will display when the provisioning process iscomplete. This process can take 10 - 15 minutes. We will refer back to this pagefrequently in the lab modules.
NSX Cloud Services Manager Account Information
1. Click on the NSX Cloud Services Manager DNS Name link to open a newbrowser tab and connect to the NSX Cloud Services Manager console.
HOL-1822-01-NET
Page 83HOL-1822-01-NET
Certificate Validation
The hands-on lab environments are built on-demand, so the certificates are not yettrusted. In a production deployment, a trusted certificate would be generated and usedto secure connectivity. To continue the log in process:
1. Click Advanced.2. Click Proceed link.
HOL-1822-01-NET
Page 84HOL-1822-01-NET
Log in to NSX Cloud Services Manager
1. Type admin for the Username.2. Type VMware1! for the Password.3. Click Log In.
HOL-1822-01-NET
Page 85HOL-1822-01-NET
Zoom Browser
To improve readability of the various screens in this lab, it is recommended that youadjust the Zoom setting in Google Chrome to at least 90%.
1. Click the Three Dots in the upper right hand corner of the browser for the dropdown menu.
2. Click '-' next to Zoom to adjust the setting to 90%.
CSM Configuration and Inventory
1. Click Cross-Cloud.
HOL-1822-01-NET
Page 86HOL-1822-01-NET
Click VPCs
1. Click VPCs to return to the view of Management-VPC and Compute-VPC.
Narrow down the view of VPCs
1. Select us-west-1 from the Region pull down menu to narrow down the view ofVPCs.
Click Actions Pull-Down Menu
1. Click Actions in the Compute-VPC box.2. Click Deploy NSX Cloud Gateway.
The NSX Cloud Gateway supports a High Availability (HA) deployment model. To reducethe amount of time it takes to complete the lab, we will not configure HA.
1. Uncheck the Enable HA for NSX Cloud Gateway box.2. Select your Availability Zone. Note: If the wrong availability zone is selected,
the subnet menus for steps 3-5 will be empty.3. Select nsx-uplink-subnet for the Uplink Subnet.4. Select nsx-downlink-subnet for the Downlink Subnet.5. Select nsx-compute-mgmt-subnet for the Management Subnet.6. Click Deploy.
HOL-1822-01-NET
Page 89HOL-1822-01-NET
NSX Cloud Gateway Begins Deployment
The deployment process begins for this VPC. It can take approximately 5 minutesto complete. The deployment progress screen will report on the actions beingcompleted in the process.
Deployment of the NSX Cloud Gateway provides the local control plane for NSX policiesin our VPC, as well as an installation location for the NSX Agents that will be deployed inan upcoming lesson.
Continue to the next lesson to configure logical groupings and firewall policies while theNSX Cloud Gateway deployment completes. We will then return to NSX Cloud ServicesManager to verify completion.
HOL-1822-01-NET
Page 90HOL-1822-01-NET
Create Logical Groupings and FirewallPoliciesNSX is able to leverage contextual information about workloads to create dynamicpolicy groups. This provides a greatly simplified operational model for security policymanagement. In this lesson we will create several dynamic security groups to simplifypolicy management.
Accessing NSX Manager
1. Click on the Account Information tab that was previously opened. If this tabwas closed open another and click on the Account Info bookmark.
NSX Manager Account Information
1. Click on the NSX Manager DNS Name link to open a new browser tab andconnect to the NSX Manager console.
HOL-1822-01-NET
Page 91HOL-1822-01-NET
Certificate Validation
The hands-on lab environments are built on-demand, so the certificates are not yettrusted. In a production deployment, a trusted certificate would be generated and usedto secure connectivity. To continue the log in process:
1. Click Advanced.2. Click Proceed link.
HOL-1822-01-NET
Page 92HOL-1822-01-NET
Log in to NSX Manager
1. Type admin for the Username.2. Type VMware1! for the Password.3. Click Log In.
HOL-1822-01-NET
Page 93HOL-1822-01-NET
Click Groups in the Inventory Menu
1. Click Inventory.2. Click Groups.
Create Web Group
1. Click Groups at the top of the screen.
HOL-1822-01-NET
Page 94HOL-1822-01-NET
2. Click Add.
Group Name is Web
1. Type Web for the group Name.2. Click Membership Criteria.
The three NSGroups have been successfully created.
These will be used in the firewall policies that we will create next.
HOL-1822-01-NET
Page 100HOL-1822-01-NET
Click Firewall
1. Click Firewall on the left side.
Select Default Layer3 Section
1. Click Default Layer3 Section if it isn't already selected (outlined with a bluebox).
HOL-1822-01-NET
Page 101HOL-1822-01-NET
Add a new section above
1. Click Add Section.2. Click Add Section Above.
HOL-1822-01-NET
Page 102HOL-1822-01-NET
Section name will be wordpress-app
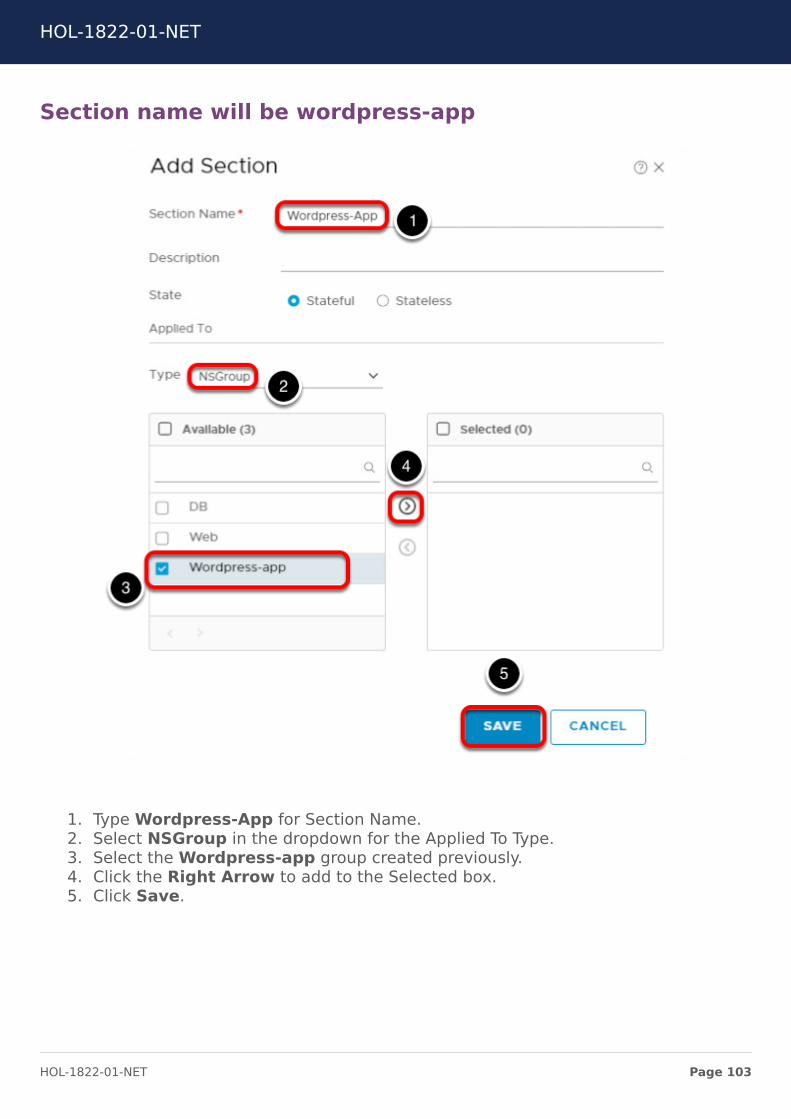
1. Type Wordpress-App for Section Name.2. Select NSGroup in the dropdown for the Applied To Type.3. Select the Wordpress-app group created previously.4. Click the Right Arrow to add to the Selected box.5. Click Save.
HOL-1822-01-NET
Page 103HOL-1822-01-NET
Click on newly created section
Now we have a firewall section for our WordPress Application.
1. Click the Wordpress-App Section and make sure it is highlighted with a bluebox.
Add a new rule below
1. Click Add Rule.2. Click Add Rule Below.
Hover the mouse pointer over name and click the pencil
1. Move the mouse pointer to the blank area under Name.2. Click the Pencil.
HOL-1822-01-NET
Page 104HOL-1822-01-NET
Rule name is Any to Web
1. Type Any to Web for the Rule Name.2. Click Ok.
Hover the mouse pointer over destinations and click thepencil
1. Move the mouse pointer to the blank area under Destinations.2. Click the Pencil.
HOL-1822-01-NET
Page 105HOL-1822-01-NET
Select the Web group as the destination
1. Select NSGroup from the pulldown menu.2. Select the Web group.3. Click the Right Arrow to move it to the Selected box.4. Click OK.
Hover the mouse pointer over services and click the pencil
HOL-1822-01-NET
Page 106HOL-1822-01-NET
1. Move the mouse pointer to the blank area under Services.2. Click the Pencil.
Select the HTTP service
1. Type http.2. Select HTTP.3. Click the Right Arrow to move it to the Selected box.4. Click OK.
Add a new rule below
1. Click Add Rule.
HOL-1822-01-NET
Page 107HOL-1822-01-NET
2. Click Add Rule Below.
Hover the mouse pointer over name and click the pencil
1. Move the mouse pointer to the blank area under Name.2. Click the Pencil.
Rule name is Web to DB
1. Type Web to DB for the Rule Name.2. Click Ok.
HOL-1822-01-NET
Page 108HOL-1822-01-NET
Hover the mouse pointer over sources and click the pencil
1. Move the mouse pointer to the blank area under Sources.2. Click the Pencil.
HOL-1822-01-NET
Page 109HOL-1822-01-NET
Select the Web group as the source
1. Select NSGroup from the pulldown menu.2. Select the Web group.3. Click the Right Arrow to move it to the Selected box.4. Click OK.
HOL-1822-01-NET
Page 110HOL-1822-01-NET
Hover the mouse pointer over destinations and click thepencil
1. Move the mouse pointer to the blank area under Destinations.2. Click the Pencil.
HOL-1822-01-NET
Page 111HOL-1822-01-NET
Select the DB group as the destination
1. Select NSGroup from the pulldown menu.2. Select the DB group.3. Click the Right Arrow to move it to the Selected box.4. Click OK.
HOL-1822-01-NET
Page 112HOL-1822-01-NET
Hover the mouse pointer over services and click the pencil
1. Move the mouse pointer to the blank area under Services.2. Click the Pencil.
Select the MySQL service
1. Type MYSQL.2. Select MySQL.
HOL-1822-01-NET
Page 113HOL-1822-01-NET
3. Click the Right Arrow to move it to the Selected box.4. Click OK.
Add another rule below
1. Click Add Rule.2. Click Add Rule Below.
Hover the mouse pointer over name and click the pencil
1. Move the mouse pointer to the blank area under Name.2. Click the Pencil.
Group name is Allow SSH
1. Type Allow SSH for the Rule Name.2. Click Ok.
HOL-1822-01-NET
Page 114HOL-1822-01-NET
Hover the mouse pointer over destinations and click thepencil
1. Move the mouse pointer to the blank area under Destinations.2. Click the Pencil.
HOL-1822-01-NET
Page 115HOL-1822-01-NET
Select the wordpress-app group as the destination
1. Select NSGroup from the pulldown menu.2. Select the Wordpress-app group.3. Click the Right Arrow to move it to the Selected box.4. Click OK.
HOL-1822-01-NET
Page 116HOL-1822-01-NET
Hover the mouse pointer over services and click the pencil
1. Move the mouse pointer to the blank area under Services.2. Click the Pencil.
Select the SSH service
1. Type SSH.2. Select SSH.
HOL-1822-01-NET
Page 117HOL-1822-01-NET
3. Click the Right Arrow to move it to the Selected box.4. Click OK.
Add another rule below
1. Click Add Rule.2. Click Add Rule Below.
Hover the mouse pointer over name and click the pencil
1. Move the mouse pointer to the blank area under Name.2. Click the Pencil.
Rule name is Deny All
HOL-1822-01-NET
Page 118HOL-1822-01-NET
1. Type Deny All for the Rule Name.2. Click Ok.
Hover the mouse pointer over action and click the pencil
1. Move the mouse pointer to the blank area under Action.2. Click the Pencil.
Select the option to drop the traffic
1. Select Drop from the Action drop down menu.2. Click OK.
HOL-1822-01-NET
Page 119HOL-1822-01-NET
Click Save
1. Click Save. Note: You may need to scroll back up to the top.
Save the section
1. Click Save.
Review the configured policies
HOL-1822-01-NET
Page 120HOL-1822-01-NET
The security policies for the WordPress application have been created. We are allowingHTTP traffic from the internet to our Web servers, MySQL (port 3306) traffic from theWeb servers to the DB server, and SSH traffic to all of our servers. Everything else isdenied (dropped).
We leveraged the NSGroups that we created earlier to simplify the source, destination,and firewall section configuration.
Next we will return to NSX Cloud Services Manager to check on the deployment progressof our NSX Cloud Gateway.
Return to NSX Cloud Services Manager
1. Select the NSX Cloud Services Manager browser tab in Google Chrome thatwas opened previously. Note: The order of browser tabs may differ if you havecompleted previous Modules.
HOL-1822-01-NET
Page 121HOL-1822-01-NET
NSX Cloud Gateway Deployment is Completed
1. Click Finish when deployment is complete.
Compute-VPC is NSX Managed
The Compute-VPC now reports as NSX Managed with a Cloud Gateway deployed.
HOL-1822-01-NET
Page 122HOL-1822-01-NET
Applying Tags to the ApplicationInstancesNSX-specific Amazon Web Services Tags are used to indicate where the EC2 instance'snetwork interface should be logically "attached" in NSX. During attachment, securitypolicies are pushed. Prior to enabling the NSX Agent on the WordPress applicationinstances in AWS, we will configure the Tag on their network interfaces.
Accessing AWS Management Console
1. Click on the Account Information tab that was previously opened. If this tabwas closed open another tab and click on the Account Info bookmark.
Locate the AWS Management Console URL
1. Click the Console URL to open a new browser tab and connect to the AWSManagement Console.
HOL-1822-01-NET
Page 123HOL-1822-01-NET
Log in to the AWS Console
1. Type vmware_hol_user for the AWS Management User Name.2. Type or copy the Password from the Account Information Page.3. Click the Sign In button.
HOL-1822-01-NET
Page 124HOL-1822-01-NET
Select Region
Verify that the console is viewing North California region resources.
1. Click the Region Name to the left of Support in the upper right.2. Select US West (N. California).
HOL-1822-01-NET
Page 125HOL-1822-01-NET
Navigate to EC2 Instances
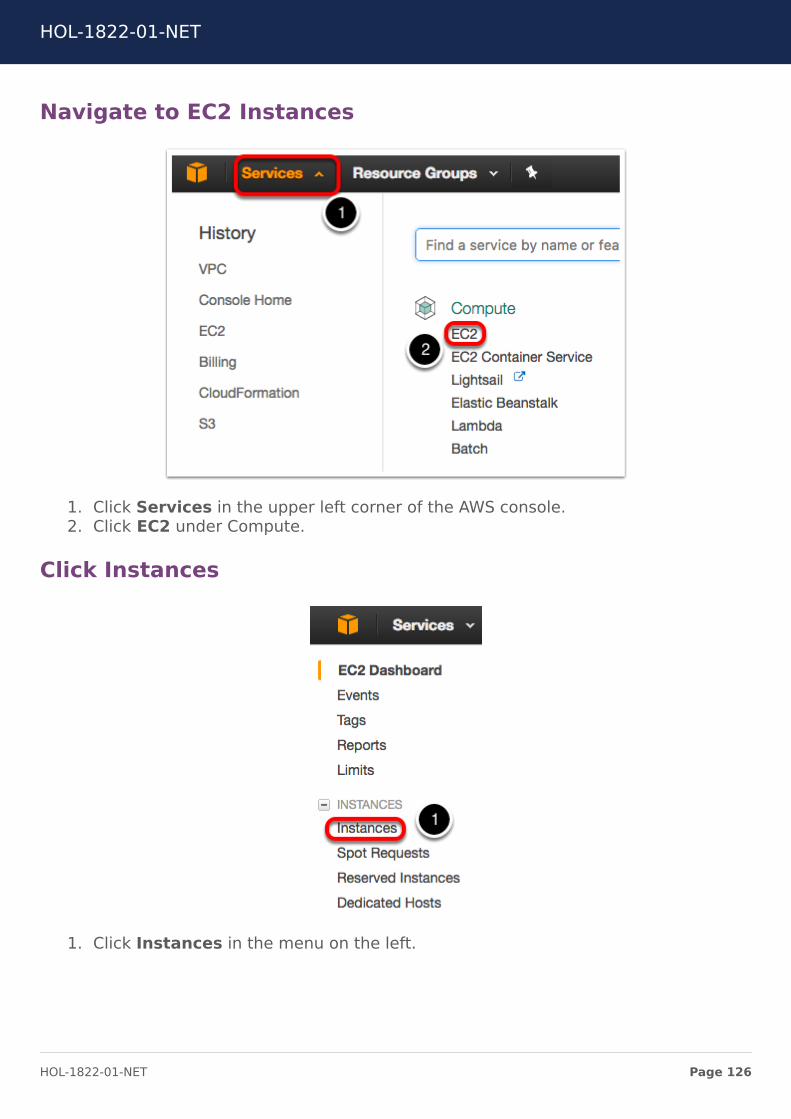
1. Click Services in the upper left corner of the AWS console.2. Click EC2 under Compute.
Click Instances
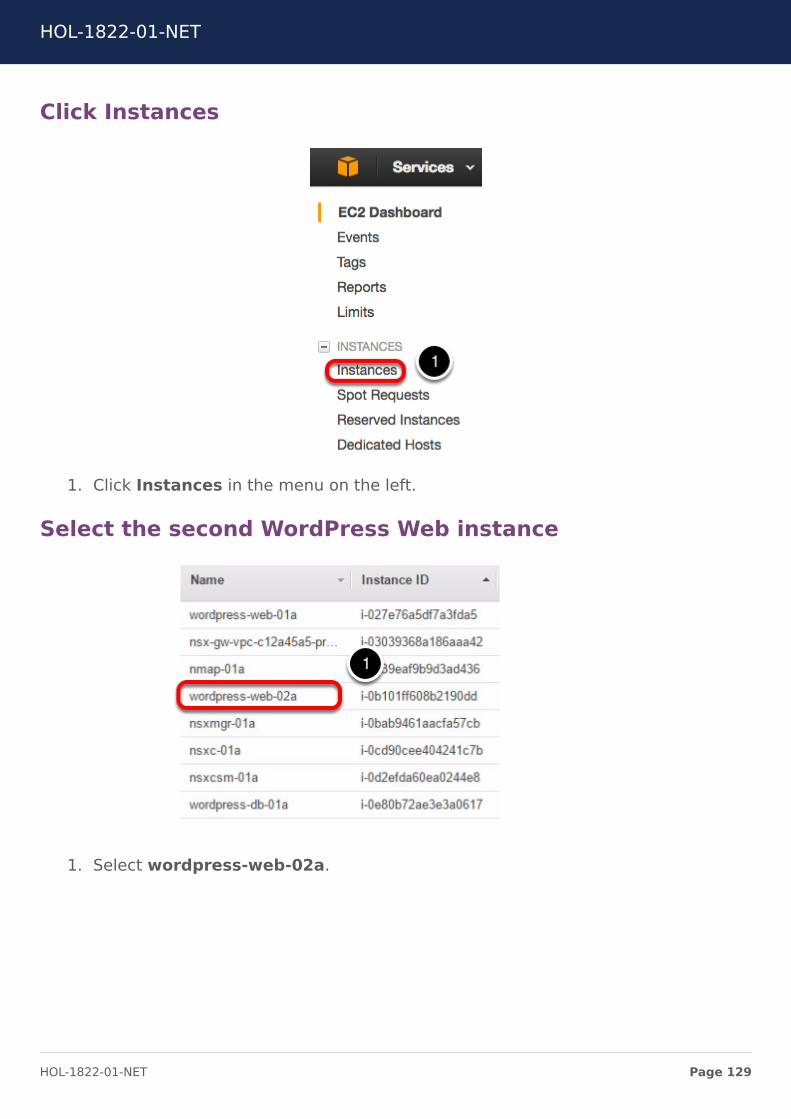
1. Click Instances in the menu on the left.
HOL-1822-01-NET
Page 126HOL-1822-01-NET
Widen the Name Column
1. Move the mouse over the column divider and then click and drag right to expandthe Name column.
Select the first WordPress Web instance
1. Select wordpress-web-01a.
HOL-1822-01-NET
Page 127HOL-1822-01-NET
Click the Tags tab for this instance
1. Click the Tags tab below the list of EC2 instances.2. Click Add/Edit Tags.
Click Create Tag
1. Click Create Tag.2. Type nsx:network under Key.3. Type default under Value.4. Click Save.
HOL-1822-01-NET
Page 128HOL-1822-01-NET
Click Instances
1. Click Instances in the menu on the left.
Select the second WordPress Web instance
1. Select wordpress-web-02a.
HOL-1822-01-NET
Page 129HOL-1822-01-NET
Click the Tags tab for this instance
1. Click the Tags tab below the list of EC2 instances.2. Click Add/Edit Tags.
Click Create Tag
1. Click Create Tag.2. Type nsx:network under Key.3. Type default under Value.4. Click Save.
HOL-1822-01-NET
Page 130HOL-1822-01-NET
Click Instances
1. Click Instances in the menu on the left.
Select the WordPress DB instance
1. Select wordpress-db-01a.
HOL-1822-01-NET
Page 131HOL-1822-01-NET
Click the Tags tab for this instance
1. Click the Tags tab below the list of EC2 instances.2. Click Add/Edit Tags.
Click Create Tag
1. Click Create Tag.2. Type nsx:network under Key.3. Type default under Value.4. Click Save.
Summary
We have applied the NSX-specific AWS Tag to the WordPress application instances. Oncethe NSX Agent is deployed, this tag will "attach" the instances to the default NSX LogicalSwitch that was created during the NSX Cloud Gateway deployment. Security policieswill also be applied to these instances.
HOL-1822-01-NET
Page 132HOL-1822-01-NET
Installation of NSX AgentTo continue the process of securing the WordPress Application instances, the NSX Agentmust be deployed on each of the instances. The NSX Agent provides the data planefunctions within each Amazon Web Services instance where it is installed. This includes:
• Distributed firewall enforcement engine• Tunnel endpoint for overlay networking
A best practice would be to include the agent in the "gold master" images that are usedin an organization's Amazon Web Services environment. The NSX Agent can also beinstalled in existing deployed, or brownfield, instances.
The NSX Agent will be deployed on each of the WordPress application instances via ascript.
Install on First Web Instance
1. Click on the Account Information tab that was previously opened. If this tabwas closed open another tab and click on the Account Info bookmark.
Locate Instance Information
1. Locate the Wordpress-web-01a Instance Public IP address that will be usedto log in to the instance.
HOL-1822-01-NET
Page 133HOL-1822-01-NET
Open PuTTY
1. Click on the PuTTY Icon on the Windows Quick Launch Task Bar. If thewordpress-web-01a PuTTY session (172.16.10.10) is still open, select that windowfrom the task bar and skip ahead to Enable the NSX Agent.
Type the IP Address of wordpress-web-01
1. Type the IP Address of the wordpress-web-01a instance from the AccountInformation Page.
2. Click Open.
HOL-1822-01-NET
Page 134HOL-1822-01-NET
Verify Connection
The first time connecting to the instance will result in a confirmation window to verifythe connection.
1. Click Yes.
Install the NSX Agent
1. Type the following command to start the NSX Agent installation script:
./install_agent.sh
HOL-1822-01-NET
Page 135HOL-1822-01-NET
NSX Agent has been installed
The NSX Agent installation can take 3-5 minutes to complete. Once installationis complete, the NSX Agent starts and reports a status of OK.
Install on Second Web Instance
1. Click on the Account Information tab that was previously opened. If this tabwas closed open another tab and click on the Account Info bookmark.
HOL-1822-01-NET
Page 136HOL-1822-01-NET
Locate Instance Information
1. Locate the Wordpress-web-02a Instance Public IP address that will be usedto log in to the instance.
Open PuTTY
1. Switch to the PuTTY window and click on the PuTTY Icon in the upper left of theopen PuTTY session.
2. Select New Session.
HOL-1822-01-NET
Page 137HOL-1822-01-NET
Type the IP address of wordpress-web-02a
1. Type the IP Address of the wordpress-web-02a instance from the AccountInformation Page.
2. Click Open.
HOL-1822-01-NET
Page 138HOL-1822-01-NET
Verify Connection
The first time connecting to the instance will result in a confirmation window to verifythe connection.
1. Click Yes.
Install the NSX Agent
1. Type the following command to start the NSX Agent installation script:
./install_agent.sh
HOL-1822-01-NET
Page 139HOL-1822-01-NET
NSX Agent has been installed
The NSX Agent installation can take 3-5 minutes to complete. Once installationis complete, the NSX Agent starts and reports a status of OK.
Install on DB Instance
1. Click on the Account Information tab that was previously opened. If this tabwas closed open another tab and click on the Account Info bookmark.
HOL-1822-01-NET
Page 140HOL-1822-01-NET
Locate Instance Information
1. Locate the Wordpress-db-01a Instance Public IP address that will be used tolog in to the instance.
Open PuTTY
1. Switch to the PuTTY window and click on the PuTTY Icon in the upper left of theopen PuTTY session.
2. Select New Session.
HOL-1822-01-NET
Page 141HOL-1822-01-NET
Type the IP address of wordpress-db-01a
1. Type the IP Address of the wordpress-db-01a instance from the AccountInformation Page.
2. Click Open.
HOL-1822-01-NET
Page 142HOL-1822-01-NET
Verify Connection
The first time connecting to the instance will result in a confirmation window to verifythe connection.
1. Click Yes.
Install the NSX Agent
1. Type the following command to start the NSX Agent installation script:
./install_agent.sh
HOL-1822-01-NET
Page 143HOL-1822-01-NET
NSX Agent has been installed
The NSX Agent installation can take 3-5 minutes to complete. Once installationis complete, the NSX Agent starts and reports a status of OK..
HOL-1822-01-NET
Page 144HOL-1822-01-NET
Validate NSX DeploymentFollowing the deployment of the NSX components in the Compute-VPC, we will walkthrough the NSX configuration in NSX Manager and NSX Cloud Services Manager toverify operation.
Log in to NSX Manager
Select the NSX Manager browser tab in Google Chrome that was opened previously. Ifthis browser tab has been closed open a new browser tab using the NSX Manager URLfrom the Account Information browser tab.
Note: If the page has timed out enter admin for the username and VMware1! for thepassword and click Log In to continue.
1. Click on the NSX Manager DNS Name link to open a new browser tab andconnect to the NSX Manager console.
HOL-1822-01-NET
Page 145HOL-1822-01-NET
Click Fabric
1. Click Fabric on the left.
Click Edges
1. Click Edges at the top.
HOL-1822-01-NET
Page 146HOL-1822-01-NET
A Newly Created Edge Node
A new Edge node has been created.
Note: You may need to refresh the browser if nothing is displayed.
Click Edge Clusters
1. Click Edge Clusters at the top.
A Newly Created Edge Cluster
A new Edge Cluster has been created.
Note: You may need to refresh the browser if nothing is displayed.
Click Transport Nodes
1. Click Transport Nodes at the top.
HOL-1822-01-NET
Page 147HOL-1822-01-NET
A Newly Created Transport Node
A new Transport Node has been created (the newly deployed Cloud Gateway).
Note: You may need to refresh the browser if nothing is displayed.
Click Switching
1. Click Switching on the left.
HOL-1822-01-NET
Page 148HOL-1822-01-NET
Click Switches
1. Click Switches at the top.
Switch Inventory Changes
Two Logical Switches are created, and there are 4 Logical Ports on the Default LogicalSwitch.
Note: You may need to refresh the browser if nothing is displayed.
HOL-1822-01-NET
Page 149HOL-1822-01-NET
Click Groups under Inventory
1. Click Inventory.2. Click Groups.
Click the Wordpress-app NSGroup
HOL-1822-01-NET
Page 150HOL-1822-01-NET
1. Click Wordpress-app.
Group membership
The Wordpress-app group has 3 Virtual Machines as effective members.
1. Click 3 next to Virtual Machine.
HOL-1822-01-NET
Page 151HOL-1822-01-NET
The WordPress instances are listed as members
The WordPress application instances are all present as effective members of this group(criteria was VM name contains 'wordpress').
Open AWS Management Console
Select the AWS Console tab in Chrome that was opened previously. If this browser tabhas been closed open a new browser tab using the AWS Console URL link from theAccount Information browser tab, vmware_hol_user for the User Name and type orcopy the password from the Account Information Page.
Note: If the AWS Console page has timed out enter vmware_hol_user for the UserName and VMware1!! for the Password to continue.
HOL-1822-01-NET
Page 152HOL-1822-01-NET
Navigate to EC2 Dashboard in AWS Console
1. Click Services in the upper left corner of the AWS console.2. Click EC2 under Compute.
Click Instances
1. Click Instances under EC2 Dashboard on the left.
HOL-1822-01-NET
Page 153HOL-1822-01-NET
New Instance for NSX Cloud Gateway
A new EC2 Instance has been created for the NSX Cloud Gateway.
Click Security Groups
1. Click on Security Groups on the left under Network & Security.
HOL-1822-01-NET
Page 154HOL-1822-01-NET
NSX Cloud Gateway Security Groups in AWS
Several new AWS Security Groups were created for application instances and to controltraffic in/out of the NSX Cloud Gateway.
Log in to NSX Cloud Services Manager
Select the NSX Cloud Services Manager browser tab in Google Chrome that was openedpreviously. If this browser tab has been closed open a new browser tab using the NSXCloud Services Manager URL from the Account Information browser tab.
Note: If the page has timed out enter admin for the username and VMware1! for thepassword and click Log In to continue.
CSM Configuration and Inventory
1. Click the VPC-AWS Console tab.2. Click Accounts at the top of the screen.
HOL-1822-01-NET
Page 155HOL-1822-01-NET
Refresh the AWS account information
1. Click Actions.2. Click Resync Account.
This will take 20-60 seconds to complete.
Click VPCs
1. Click VPCs.
Narrow down the view of VPCs
1. Select us-west-1 from the Region pull down menu to narrow down the view ofVPCs.
HOL-1822-01-NET
Page 156HOL-1822-01-NET
Click Instances
1. Click Instances in the Compute-VPC.
WordPress instances are managed by NSX
1. Our Wordpress application instances report as managed by NSX.2. The nmap-01 instance did not receive an AWS Tag or an NSX Agent install.
HOL-1822-01-NET
Page 157HOL-1822-01-NET
Validation of WordPress applicationfunctionalityPrior to NSX deployment, the 2-tier WordPress application running in Amazon WebServices was left wide open to the Internet and several unneeded ports were exposed aspotential attack surfaces. This lesson will revisit the application functionality and testbasic connectivity.
Account Information
1. Click on the Account Information tab that was previously opened. If this tabwas closed open another and click on the Account Info bookmark.
Locate the WordPress Application Information
1. Click on the WordPress Application Elastic Load Balancer DNS Name link toopen a new browser tab and connect to the WordPress application.
HOL-1822-01-NET
Page 158HOL-1822-01-NET
Refresh WordPress site to validate functionality
Verify that the WordPress application is functioning. The IP address of the serverpresenting the page is noted.
1. Refresh the browser a few times to see the Server IP address change to theother web server (172.16.10.10 and 172.16.10.11).
Open Account Information Page
1. Click on the Account Information tab that was previously opened. If this tabwas closed open another and click on the Account Info bookmark.
HOL-1822-01-NET
Page 159HOL-1822-01-NET
Locate Web Server Information
1. Locate the Wordpress-web-01a Instance Public IP address that will be usedto log in to the instance.
Open PuTTY
1. Click on the PuTTY Icon on the Windows Quick Launch Task Bar. If the previousPuTTY session is still open, click on the PuTTY Icon in the upper left corner ofthat window and select New Session.
HOL-1822-01-NET
Page 160HOL-1822-01-NET
Type the IP Address of wordpress-web-01a
1. Type the IP Address of the wordpress-web-01a instance.2. Click Open.
Test connectivity to wordpress-web-02a
1. Type the following command to test the connectivity between the wordpress-web-01a and wordpress-web-02a instances:
ping -c 5 172.16.10.11
HOL-1822-01-NET
Page 161HOL-1822-01-NET
Instance is not reachable via ICMP
The pings are unsuccessful. This matches the security policy we configured in NSX.
Test connectivity to wordpress-db-01a
1. Type the following command to test the connectivity between the wordpress-web-01a and wordpress-db-01a instances:
ping -c 5 172.16.10.20
Instance is not reachable via ICMP
The pings are unsuccessful. This matches the security policy we configured in NSX.
HOL-1822-01-NET
Page 162HOL-1822-01-NET
Perform security scan of applicationenvironmentWe will revisit the Ubuntu Linux instance with nmap to perform a port scan of theapplication environment in Amazon Web Services. We will scan the IP subnet where theapplication instances are deployed and review the open ports following the deploymentof NSX in the environment to ensure the unneeded ports are closed.
Nmap Instance Log In
1. Click on the Account Information tab that was previously opened. If this tabwas closed open another tab and click on the Account Info bookmark.
Locate the nmap-01a Information
1. Locate the nmap-01a Public IP Address that will be used to log in to the nmapport scanner instance.
Open PuTTY
HOL-1822-01-NET
Page 163HOL-1822-01-NET
1. Click on the PuTTY Icon on the Windows Quick Launch Task Bar. If the previousPuTTY session is still open, click on the PuTTY Icon in the upper left corner ofthat window and select New Session.
Type the IP Address of nmap-01a
1. Type the IP Address of the nmap-01a instance from the Account InformationPage.
2. Click Open.
Run nmap scan
1. Type the following command to start the nmap scan:
nmap -F -Pn -T5 --open 172.16.10.10-20
HOL-1822-01-NET
Page 164HOL-1822-01-NET
To speed up the scan time and reduce clutter, the nmap scanner is using the followingoptions:
• -F to perform a fast scan for fewer ports• -Pn to turn off ping checks• -T5 to turn on the fastest timing template• --open to only display open or possibly open ports• 172.16.10.10-20 to only scan a small range of IP addresses
Web instance results
The wordpress-web-01a and wordpress-web-02a instances at 172.16.10.10 and172.16.10.11 have ports 80 and 22 open, as expected with the configured NSX securitypolicies.
HOL-1822-01-NET
Page 165HOL-1822-01-NET
DB Instance results
Based on the configured NSX security policies, the wordpress-db-01a instance at172.16.10.20 only reports port 22 as being open to the nmap instance.
Note: Leave the nmap-01a PuTTY session open for the next lesson.
HOL-1822-01-NET
Page 166HOL-1822-01-NET
Quarantine PolicyNSX Cloud provides the capability to detect and quarantine rogue instances in a VPC.For example, if a person with malicious intent forcibly stops the NSX Agent on an NSXmanaged instance, the compromised instance will be quarantined using the defaultSecurity Group in Amazon Web Services (AWS). NSX Cloud uses AWS Security Groups inconjunction with the VPC’s Quarantine Policy. During the deployment of the NSX CloudGateway in a previous lesson, NSX Cloud created additional Security Groups in AWS andmodified the default Security Group to limit access. You can enable or disableQuarantine Policy on a per-VPC basis.
We'll be demonstrating this feature by turning on the Quarantine policy and observingthe EC2 instance Security Group changes in the AWS management console. We will alsoobserve that the EC2 instance without the NSX Agent loses connectivity.
When Quarantine Policy is enabled:
• Un-managed instances are assigned the default Security Group and arequarantined. The default Security Group limits the outbound traffic and stops allinbound traffic.
• Un-managed instances can become NSX-Managed VMs when you install the NSXAgent on the instance and tag them in AWS with nsx:network. In the defaultscenario, NSX will assign the vm-overlay-sg or vm-underlay-sg Security Groups toallow appropriate inbound/outbound traffic.
• An NSX-Managed instance can still be assigned the default Security Group and bequarantined if a threat is detected on the instance, for example, if the NSX Agentis stopped on the instance. This lesson will demonstrate this behavior.
• Any manual changes to the Security Groups will be reverted to the NSX-determined Security Group within 120 seconds.
• An instance can be moved out of quarantine by assigning vm-override-sg as theonly Security Group for the instance. NSX Cloud does not auto-change the vm-override-sg Security Group and allows SSH and RDP access to the instance.Removing the vm-override-sg Security Group will again cause the instanceSecurity Group(s) to revert to the NSX-Managed Security Group(s).
Open AWS Management Console
Select the AWS Console tab in Chrome that was opened previously. If this browser tabhas been closed open a new browser tab using the AWS Console URL link from theAccount Information browser tab, vmware_hol_user for the User Name and type orcopy the Password from the Account Information Page. Enter this sameinformation if the console has timed out.
HOL-1822-01-NET
Page 167HOL-1822-01-NET
Navigate to EC2 Dashboard in AWS Console
1. Click Services in the upper left corner of the AWS console.2. Click EC2 under Compute.
Click Instances
1. Click Instances under EC2 Dashboard on the left.
HOL-1822-01-NET
Page 168HOL-1822-01-NET
Select the wordpress-web-01a Instance
1. Select the wordpress-web-01a instance.
Open the Inbound Rules
1. Click view inbound rules at the bottom of the screen in the Description tab forthat instance. This instance has been configured with an AWS Security Group forthe Compute-VPC.
HOL-1822-01-NET
Page 169HOL-1822-01-NET
Review the Configured AWS Security Policies
A list of policies that apply to this instance is displayed. Web and SSH traffic are allowedfrom the HOL Main Console (Source IP ranges may vary). All traffic between applicationinstances is allowed within the AWS VPC environment.
Select the nmap-01a Instance
1. Select the nmap-01a instance.
HOL-1822-01-NET
Page 170HOL-1822-01-NET
Open the Inbound Rules
1. Click view inbound rules at the bottom of the screen in the Description tab forthat instance. This instance has been configured with an AWS Security Group forthe Compute-VPC.
Review the Configured AWS Security Policies
A list of policies that apply to this instance is displayed. Web and SSH traffic are allowedfrom the HOL Main Console (Source IP ranges may vary). All traffic between applicationinstances is allowed within the AWS VPC environment.
Note: The nmap-01a instance currently has SSH (port 22) allowed inbound.Later in this lesson we will observe a Security Group change as a result ofQuarantine Policy which will remove SSH access to this instance.
Log in to NSX Cloud Services Manager
Select the NSX Cloud Services Manager browser tab in Google Chrome that was openedpreviously. If this browser tab has been closed open a new browser tab using the NSXCloud Services Manager URL from the Account Information browser tab.
HOL-1822-01-NET
Page 171HOL-1822-01-NET
Note: If the page has timed out enter admin for the username and VMware1! for thepassword and click Log In to continue.
Zoom Browser
The next few steps to enable Quarantine Policy perform better with the browser zoomset to 100% to improve readability. It is recommended that you adjust the Zoom settingin Google Chrome back to 100%. Note: You'll be prompted to change the zoomsetting back to 90% following the Quarantine Policy setting steps.
1. Click the Three Dots in the upper right hand corner of the browser for the dropdown menu.
2. Click '+' next to Zoom to adjust the setting to 100%.
CSM Configuration and Inventory
HOL-1822-01-NET
Page 172HOL-1822-01-NET
1. Click the VPC-AWS Console tab.2. Click VPCS at the top of the screen.
Edit Quarantine
1. Click Actions in the Compute-VPC.2. Click Edit Quarantine.
Turn on Quarantine
1. Click Default Quarantine slider to On.2. Click Save.
HOL-1822-01-NET
Page 173HOL-1822-01-NET
Zoom Browser
To improve readability of the various screens in this lab, it is recommended that youadjust the Zoom setting in Google Chrome to at least 90%.
1. Click the Three Dots in the upper right hand corner of the browser for the dropdown menu.
2. Click '-' next to Zoom to adjust the setting to 90%.
Open AWS Management Console
Select the AWS Console tab in Chrome that was opened previously. If this browser tabhas been closed open a new browser tab using the AWS Console URL link from theAccount Information browser tab, vmware_hol_user for the User Name and type orcopy the Password from the Account Information Page. Enter this sameinformation if the console has timed out.
HOL-1822-01-NET
Page 174HOL-1822-01-NET
Navigate to EC2 Dashboard in AWS Console
1. Click Services in the upper left corner of the AWS console.2. Click EC2 under Compute.
Click Instances
1. Click Instances under EC2 Dashboard on the left.
HOL-1822-01-NET
Page 175HOL-1822-01-NET
Select the wordpress-web-01a Instance
1. Select the wordpress-web-01a instance.
Open the Inbound Rules
1. Click view inbound rules at the bottom of the screen in the Description tab forthat instance. This instance has been changed to the vm-underlay-sg AWSSecurity Group for the Compute-VPC.
Review the Configured AWS Security Policies
HOL-1822-01-NET
Page 176HOL-1822-01-NET
A list of policies that apply to this instance is displayed. Turning on Quarantine moves allinstances that are NSX Managed to the vm-underlay-sg Security Group. This SecurityGroup allows all traffic to the instance from the AWS network, but NSX Cloud is enforcingsecurity policy to each instances as was configured earlier in the lesson.
Select the nmap-01a Instance
1. Select the nmap-01a instance.
Open the Inbound Rules
Since this instance does not have the NSX Agent installed, the quarantine policy hasmoved the instance to the default AWS Security Group for the Compute-VPC. Now we'lllook closer at the default Security Group changes.
HOL-1822-01-NET
Page 177HOL-1822-01-NET
Click Security Groups
1. Click on Security Groups on the left under Network & Security.
Select the Compute VPC Default Security Group
1. Select the DEFAULT-nsx-compute-security-group security group.
Click Inbound
1. Click the Inbound tab to view the inbound rules. The only rule is allowing alltraffic within the same (default) security group. This blocks our SSH connection.In a production environment a bastion or jump host would be needed in the samesecurity group to restore access to quarantined instances.
HOL-1822-01-NET
Page 178HOL-1822-01-NET
Click Outbound
1. Click the Outbound tab to view the outbound rules. The rules are setup to allowcommunication to the NSX Cloud Gateway so the instance could install the NSXAgent.
Verify nmap-01a SSH connection is lost
The PuTTY window for nmap-01a will now be unresponsive and an connection errormessage may appear.
HOL-1822-01-NET
Page 179HOL-1822-01-NET
Refresh WordPress site to validate functionality
Verify that the WordPress application is functioning. The IP address of the serverpresenting the page is noted.
1. Click the tab with the Wordpress application. If the tab was closed, re-open byselecting the link the the Account Info page.
2. Refresh the browser a few times to verify the application is still functioning.
Turning on the Quarantine Policy in the Compute-VPC has successfully quarantined theinstance that was not properly managed by NSX, without impacting the Wordpressapplication.
HOL-1822-01-NET
Page 180HOL-1822-01-NET
Traffic VisibilityNSX provides additional operational tools to give visibility into the traffic occurring in anapplication environment running in Amazon Web Services. We will look at some of thetraffic statistic aggregation features of NSX.
Log in to NSX Manager
Select the NSX Manager browser tab in Google Chrome that was opened previously. Ifthis browser tab has been closed open a new browser tab using the NSX Manager URLfrom the Account Information browser tab.
Note: If the page has timed out enter admin for the username and VMware1! for thepassword and click Log In to continue.
Click Firewall
1. Click Firewall on the left side.
HOL-1822-01-NET
Page 181HOL-1822-01-NET
Firewall Statistics
1. The Stats column displays the packets, bytes and number of sessions for eachrule.
HOL-1822-01-NET
Page 182HOL-1822-01-NET
Click Switching
1. Click Switching.
Click Logical Ports for Default Switch
1. Click 4 under Logical Ports.
HOL-1822-01-NET
Page 183HOL-1822-01-NET
Click on a Logical Port
Here we see the 3 WordPress application instances that we enabled NSX for security,plus the uplink port.
1. Click the first Logical Port listed with "Cloud" prefix
HOL-1822-01-NET
Page 184HOL-1822-01-NET
Click Monitor
Additional information about this port is available.
1. Click Monitor.
HOL-1822-01-NET
Page 185HOL-1822-01-NET
Port Statistics
NSX provides traffic statistics for this WordPress application instance.
HOL-1822-01-NET
Page 186HOL-1822-01-NET
Click Begin Tracking
1. Click Begin Tracking to start the switch port statistic tracking feature (it opens anew browser tab).
HOL-1822-01-NET
Page 187HOL-1822-01-NET
Track Switch Port Statistics
NSX provides near-real time statistic tracking for this switch port. You can switch over tothe WordPress website broswer tab and refresh the page a few times to generate trafficand then review this page.
HOL-1822-01-NET
Page 188HOL-1822-01-NET
ConclusionThis completes Module 4, and the Hands-On Lab. The WordPress application that wasdeployed in Amazon Web Services has been successfully secured by installing NSXcomponents in Amazon Web Services and applying consistent security policies to theapplication instances.
Congratulations, you've finished Module 4 and the Hands-On Lab!
Follow the instructions at the end of this lesson to end the lab. You may also proceed toany other module of interest.
• Module 1 - Introduction to the AWS Console (15 minutes) (Basic) In thismodule we will log in to the AWS console and view the inventory of resources thathave been created.
• Module 2 - Verify Application Functionality (15 minutes) (Basic) In thismodule we will review the configured application environment, verify applicationfunctionality, and review configured security policies and posture.
• Module 3 - Introduction to NSX Management Components (30 minutes)(Basic) In this module we will explore the NSX Manager and NSX Cloud ServicesManager capabilities and configuration.
• Module 4 - Securing Applications with NSX (60 minutes) (Advanced) In thismodule we will configure and validate the installation of NSX in the AWSenvironment to secure the WordPress application.
How to End Lab
To end your lab click on the END button.
HOL-1822-01-NET
Page 189HOL-1822-01-NET
ConclusionThank you for participating in the VMware Hands-on Labs. Be sure to visithttp://hol.vmware.com/ to continue your lab experience online.