20

2
Table of Contents3 Getting Started3 Materials3 Required Tools4 Read Me4 Safety Warning & Caution5 Safety Guidelines6 Installation6 PCM Removal7 Pulsar Installation9 Controls9 Steering Wheel Controls9 Accelerator Pedal Controls10 Power Levels10 Levels Explained10 In-Dash Level Indicators11 Changing Power Levels (2015-2018)12 Changing Power Levels (2019)13 Tire Size13 Tire Size Explained13 2015-2018 Tire Size15 2019 Tire Size16 Axle Ratio16 Axle Ratio Explained16 2015-2018 Axle Ratio18 2019 Axle Ratio19 FAQs

3
Flat Head Screw Driver1/2 Drive Ratchet10mm Socket8mm Socket
Required Tools
MaterialsGetting Started
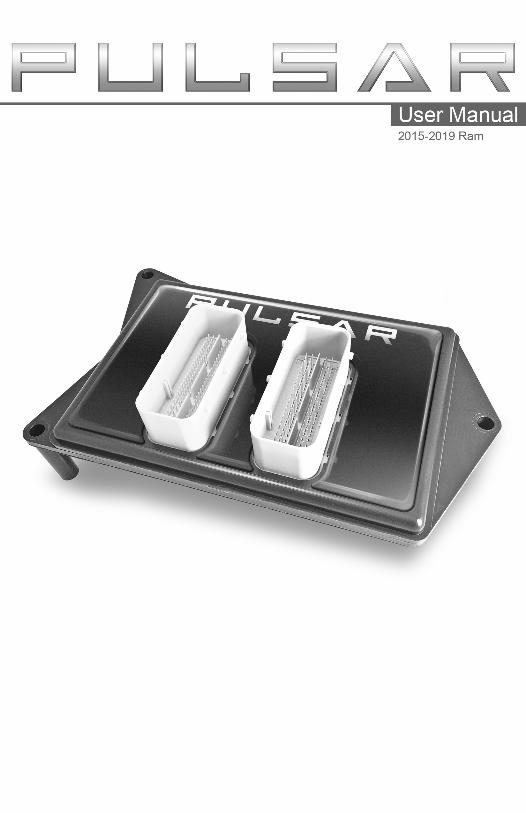
Pulsar Module
3x - Washer
3x - Bolt

4
Safety Warning & CautionRead MeThroughout this User Manual you will see important messages regarding your safety or the protection of your vehicle. These messages are designated by the words WARNING, CAUTION, or NOTICE.
A WARNING indicates a hazardous situation which, if not avoided, will result in death or serious injury.
A CAUTION indicates a hazardous situation which, if not avoided, could result in minor or moderate injury.
NOTICEA NOTICE indicates a condition that could cause damage to the product or your vecicle.
The product you have purchased is a high-performance product. As such, it does present some risks of which you should be fully aware. Do not use this product until you have carefully read the following safety information and the Owner Agreement.
WARNING: Prior to use, read the User Manual. Misuse of the
device could result in traffic accidents, death or serious injury, and/or damage to your vehicle. POWERTEQ IS NOT RESPONSIBLE FOR AND
SHALL HAVE NO LIABILITY TO YOU FOR ANY CLAIMS ARISING OUT OR OR RELATING TO ANY MISAPPLICATION OF THE DEVICE, CUSTOM TUNES,
IMPROPER USE OF CALIBRATIONS, MALFUNCTION OR LACK OF LEGAL COMPLIANCE FOR CUSTOM PROGRAMS CREATED BY THIRD PARTIES.
WARNING
CAUTION

5
Safety Guidelines
Before using device, read and understand the user manual, including these additional safety instructions. Failure to do so could result in
DEATH or SERIOUS INJURY.
• Do not exceed legal speed limits on public roadways. Violating traffic laws is dangerous and could result in injury or vehicle damage or both.
• Use any enhanced speed capabilities of this product only in closed circuit, legally sanctioned racing environments expressly for this purpose. Violating traffic laws is dangerous and could result in injury or vehicle damage or both.
• Do not operate the device while driving. Distracted driving could result in traffic accidents, death or serious injury, and/or damage to your vehicle.
• Always perform all adjustments or changes while stopped. Changing a setting while driving can interfere with your attention to roadway conditions and could result in injury or vehicle damage or both.
• Do not stack products. “Stacking” performance-enhancing devices or other improper installation can cause power train failure on the road. Other products may have features incompatible with your device. Follow all installation and operating instructions.
• Some modifications may affect other parts of your vehicle. For example, if you remove/adjust the speed limiter in your vehicle, be sure your tires and other components are rated for the increased speeds they will have to withstand. Not doing so can lead to loss of vehicle control. Modify the speed limiter only for use in closed circuit, legally sanctioned racing environments, not for use on public roadways.
WARNING
NOTE: The stickers included in some products apply to products that have recieved CARB exemption for emissions compliance.
This product may meet the emissions compliance requirements of the California Air Resources Board and Federal Environment Protection Agency. If so, it is legal for sale and use on pollution-controlled vehicles operated on public streets and highways. The device must be installed and operated according to the instruction provided in this user manual. Inluded with these compliant products is a sticker for you to keep in your vehicle. You can either adhere it somewhere on the vehicle (e.g., the inside end of driver’s door) or simply store it in your glove box. The purpose of these stickers is to inform anyone who may have questions regarding the use of this product and how it affects emissions. For example, it would be something to show an emissions technician if questioned when taking your vehicle in for an emissions check to let him/her know the product is CARB emissions compliant.
6
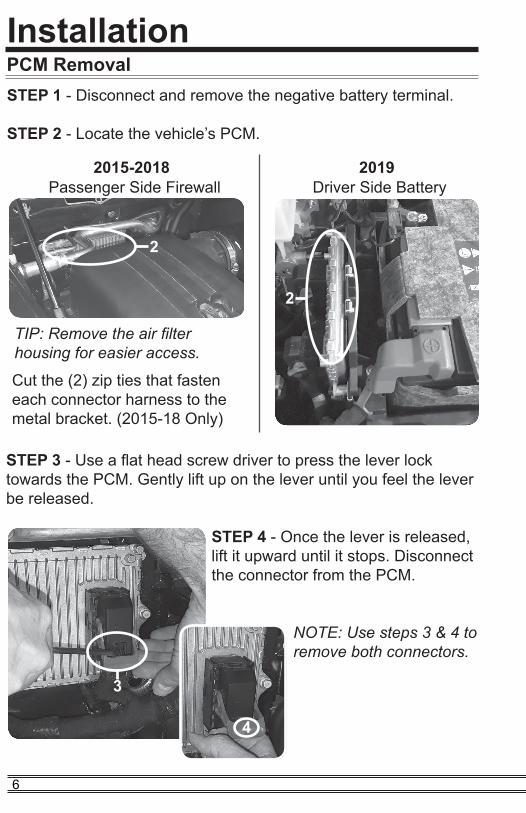
STEP 1 - Disconnect and remove the negative battery terminal.
STEP 2 - Locate the vehicle’s PCM.
STEP 3 - Use a flat head screw driver to press the lever lock towards the PCM. Gently lift up on the lever until you feel the lever be released.
STEP 4 - Once the lever is released, lift it upward until it stops. Disconnect the connector from the PCM.
NOTE: Use steps 3 & 4 to remove both connectors.
3
4
PCM RemovalInstallation
2
2015-2018 2019
2
Passenger Side Firewall Driver Side Battery
TIP: Remove the air filter housing for easier access.
Cut the (2) zip ties that fasten each connector harness to the metal bracket. (2015-18 Only)

7
STEP 5 - Use a 10mm (8mm for 2019) socket to loosen the 3 screws that fasten the PCM to the bracket. (For 2019 only, remove the grounding cable lug and set aside.)
TIP: Hold the PCM with your other hand to prevent it from falling after the last screw is removed.
TIP: Place the stock screws into a zip lock bag and store it in the glove box.
STEP 6 - Orient Pulsar and the PCM as shown. The three holes (A,B, & C) will be used to fasten the assembly to the bracket.
STEP 7 - Align and insert the Pulsar’s bottom side connectors with the ECM connectors.
STEP 8 - While on a flat surface, apply enough pressure to fully seat the connectors. The top of the PCM connectors should sit flush with the Pulsar enclosure.
8
AC
B
7 7
Pulsar Installation

8
STEP 9 - Align the Pulsar assembly holes with the threaded holes on the vehicle mounting bracket. Insert the provided bolts (w/washers) and fasten the assembly to the bracket using the 10mm socket wrench. Tighten until snug.
(For 2019 only, install the ground cable lug (removed in step 5)between the supplied washer and plastic housing.)
STEP 10 - Gently insert the truck harness connectors into the Pulsar connectors. Push the lever down until it locks into place.
STEP 11 - Re-install the air intake. (2015-18 Only)
STEP 12 - Reconnect the negative battery terminal.
9
9
9
10 10
12
Pulsar Installation Cont’d

9
Accelerator Pedal Controls
ControlsSteering Wheel ControlsPulsar power levels and Option menus are navigated using the right-side steering wheel buttons. Refer to the information below to better understand how these buttons are utilized.
Power Levels15-18 Function 2019
RES+ Level Up SET+SET- Level Down SET-
CANCEL View Level CANC
Option Menus15-18 Function 2019RES+ Level Up SET+SET- Level Down SET-
CANCEL Enter Options CANC
The accelerator pedal position is used to change the Tire Size and Axle Ratio values. When prompted to adjust the value displayed on the dash, push the pedal downward/upward to increase/decrease the value. Refer to the following example for more information.
Ratio: 4.10
Dash DisplayPedal Position
Example 2
Units: English Example 3
Units: Metric Example 1
20192015-2018

10
Levels Explained
Power levels are indicated on the vehicle’s in-dash display. Refer to the pics below to determine where the power level is viewed on your vehicle. (The Pulsar device utilizes your radio’s communication signals to interface with the gauge display.)
There are 8 available level options: Level 1 - STOCK Level 3 - FUEL ECONOMY Level 5 - TOW Level 7 - PERFORMANCE*
*Minimum 91 octane fuel recommended.
2015-2018 Dash
Options
2019 Dash
Options
Power Levels
In-Dash Level Indicators
Performance
Ignition orAccessory On
**Option A* Power levels will be viewable as soon as Pulsar is installed. ** In order to view power levels or modify tire size/axle ratios, vehicle display settings will need to be modified.
Level 2 - STOCK MDS-OFF Level 4 - FUEL ECONOMY MDS-OFF Level 6 - TOW MDS-OFF Level 8 - PERFORMANCE MDS-OFF*
*Option BStock
**Option A97SW F
105.9 KNRSSpeedometerVehicle InfoFuel Economy
8878.5mi

11
STEP 1 - Place the ignition into the RUN position.
STEP 2 - Adjust the levels using the RES+ & SET- buttons. The level indicator will show the current power level for 3 seconds.
STEP 3 - If you would like to temporarily view which level you are in, without changing levels, press CANCEL.
Changing Power Levels (2015-2018)
Dash Option BStock
2
This dash display requires that menu settings be modified before Pulsar power levels can be adjusted and viewed.
STEP 1 - Place the ignition into the RUN Position.
STEP 2 - Using the left side buttons, enter the sub menu as shown below. Select the Audio option in the Info Line sub-menu. This will
allow you to view the Pulsar Level while in the Main Menu.
STEP 3 - Return to the main menu. The current radio station will be displayed. To view the current Pulsar power level, press the CANCEL button on the steering wheel. The level will be displayed.
STEP 4 - To modify the power levels, use the RES+ and SET- buttons. The new level will appear in the radio station slot.
97SW F
Trip ATrip BMessages: 0Screen Setup
8878.5mi
Dash Option A
97SW F
105.9 KNRSSpeedometerVehicle InfoFuel Economy
8878.5mi
97SW F
105.9 KNRSSpeedometerVehicle InfoFuel Economy
8878.5mi
Screen Setup
OdometerInfo Line
8878.5mi
Info Line
Time Audio
8878.5mi
97SW F
_StockSpeedometerVehicle InfoFuel Economy
8878.5mi
3

12
For 2019 vehicles, the dash display settings will need to be modified prior to adjusting and viewing Pulsar power levels.
STEP 1 - Place the ignition into the RUN position.
STEP 2 - Using the left side steering wheel controls, enter the Screen Setup menu.
STEP 3 - Select the Center gauge as shown.
2
Favorite MenusCenter
Upper LeftPress OK to Select
to Exit
3
MPH0
2
Changing Power Levels (2019)
STEP 4 - Scroll through the available options and select the Audio option.(The Pulsar device utilizes your radio’s communication signals to interface with the gauge display.)
STEP 5 - Now that the display settings are complete, press the CANC (Cancel) button located on the right side steering wheel controls.
STEP 6 - To toggle through the levels, press SET+ or SET-.
Trip B DistanceAudio
Menu TitlePress OK to Select
to Exit
4
MUSIC OFFCenter
5
6
6
Economy56

13
Tire Size
2015-2018 Tire Size
The Pulsar allows you to adjust the vehicle’s tire size settings. This feature corrects the speedometer based on tire size inputs.
Tire Size Explained
Dash Option B
Tire Size? Y 2
STEP 1 - With the ignition in the RUN position (Do Not Start), press and hold the CANC (Cancel) button for approximately 5 seconds. The option to modify the Tire Size is displayed.
STEP 2 - Press down on the accelerator pedal to change the N (No) to Y (Yes).
STEP 3 - While the Y (Yes) is displayed, press the RES+ button to select the option.
Dash Option A
97SW F
Tire Size? YSpeedometerVehicle InfoFuel Economy
8878.5mi
2
1
3

14
STEP 5 - With the desired units displayed, press the RES+ button to select the Unit.
STEP 6 - Use the accelerator pedal to adjust the number value, then press the RES+ button to select each value.
Units: English 4
Dia:_5.5” 6
2015-2018 Tire Size Cont’d
97SW F
Units: EnglishSpeedometerVehicle InfoFuel Economy
8878.5mi
4
97SW F
Dia: _5.5”SpeedometerVehicle InfoFuel Economy
8878.5mi
6
Dash Option A Dash Option B
Dash Option A Dash Option B
STEP 4 - Next, use the accelerator pedal to change the measure of units between English and Metric.

15
STEP 1 - With the ignition in the RUN position (DO NOT start), press and hold the CANC (Cancel) button for approximately 5 seconds. The option to modify the Tire Size is displayed on the center gauge. (NOTE: The SET- button allows you to return to the previous option.)
STEP 2 - Press down on the accelerator pedal to change the N (No) to Y (Yes).
STEP 3 - While the Y (Yes) is displayed, press the SET+ button to select the option.
STEP 4 - Next, use the accelerator pedal to change the measure of units between English and Metric.
STEP 5 - With the desired units displayed, press the SET+ button to select the Unit.
STEP 6 - Use the accelerator pedal to adjust the number value, then press the SET+ button to select the displayed value.
Press Brakeand Push Button
to Start
Tire Size? Y1 2
1
3
Dia:_5.5” 4
Size: English 4
Press Brakeand Push Button
to Start
2019 Tire Size

16
Ratio: _.75 4
Dash Option A
97SW F
Ratio: _.75 SpeedometerVehicle InfoFuel Economy
8878.5mi
4
Dash Option B
Axle Ratio ExplainedAxle Ratio
2015-2018 Axle Ratio
Dash Option BAxle Ratio? Y 2
In addition to Tire Size, Pulsar also allows you to correct the speedometer by adjusting the axle ratio settings. To make these adjustments, refer to the following set of instructions based on your vehicle year:
STEP 2 - Press down on the accelerator pedal to change the N (No) to Y (Yes).
STEP 3 - While the Y (Yes) is displayed, press the RES+ steering wheel button to select the option.
STEP 4 - Use the accelerator pedal to adjust the number value, then press the RES+ button to select the displayed value.
Dash Option A
97SW F
Axle Ratio? YSpeedometerVehicle InfoFuel Economy
8878.5mi
2
3
STEP 1 - With the ignition in the RUN position (Do Not Start), press and hold the CANC (Cancel) button for approximately 5 seconds. The option to modify the Tire Size is displayed. If modifying Tire Size, refer to the previous section. If not, select N (No) to skip to Axle Ratio.
17
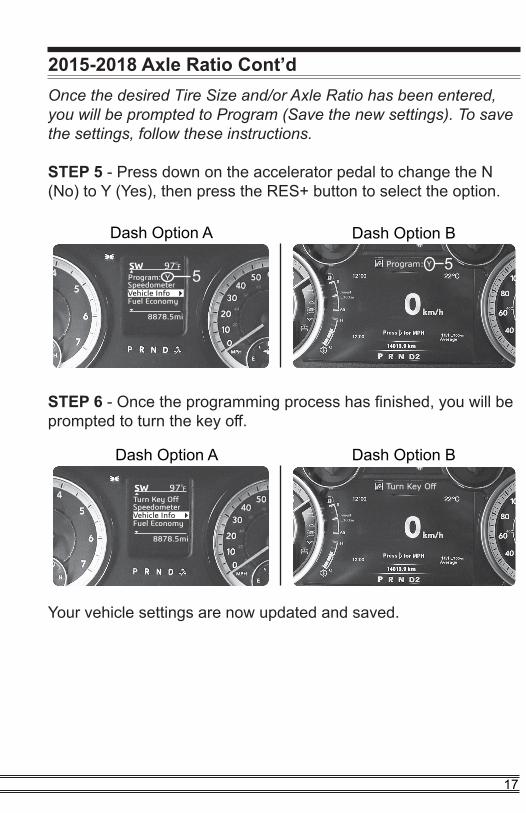
Once the desired Tire Size and/or Axle Ratio has been entered, you will be prompted to Program (Save the new settings). To save the settings, follow these instructions.
STEP 5 - Press down on the accelerator pedal to change the N (No) to Y (Yes), then press the RES+ button to select the option.
STEP 6 - Once the programming process has finished, you will be prompted to turn the key off.
Your vehicle settings are now updated and saved.
2015-2018 Axle Ratio Cont’d
Program: Y 5
Turn Key Off
Dash Option BDash Option A
97SW F
Program: YSpeedometerVehicle InfoFuel Economy
8878.5mi
5
Dash Option BDash Option A
97SW F
Turn Key OffSpeedometerVehicle InfoFuel Economy
8878.5mi

18
STEP 2 - Press down on the accelerator pedal to change the N (No) to Y (Yes).
STEP 3 - While the Y (Yes) is displayed, press the SET+ steering wheel button to select the option.
STEP 4 - Use the accelerator pedal to adjust the number value, then press the SET+ button to select the displayed value.
Once the desired Tire Size and/or Axle Ratio has been entered, you will be prompted to Program (Save the new settings). To save the settings, follow these instructions.
STEP 4 - Press down on the accelerator pedal to change the N (No) to Y (Yes), then press the SET+ button to select the option.
STEP 5 - Once the programming process has finished, you will be prompted to turn the key off. Your vehicle settings are now updated and saved.
Press Brakeand Push Button
to Start
Axle Ratio? Y 3
Ratio: _.75 4
Program? Y 4
2019 Axle RatioSTEP 1 - With the ignition in the RUN position (Do Not Start), press and hold the CANC (Cancel) button for approximately 5 seconds. The option to modify the Tire Size is displayed. If modifying Tire Size, refer to the previous section. If not, select N (No) to skip to Axle Ratio.

19
Question: Why does the power level flicker? Is this normal?Answer: Yes. This is due to the way Pulsar has to “piggy back” onto the existing communication lines.
Question: Can I adjust power levels when cruise control is on?Answer: No. You can’t adjust levels once cruise control has been activated.
Question: Why is the ECO Light still on when I am in a power lever where MDS is disabled?Answer: The ECO light illuminates when the vehicle is being driven economically. The light is not tied directly to MDS functionality. It will still illuminate when Pulsar disables MDS.
FAQs

Copyright© 2018 D10022800_Rev 01_07/23/18
For additional questions not found in the user guide call:Powerteq Technical Support: (801)-476-3343 6:00 am - 5:00 pm MSTTo expedite your support call, please have your Vehicle Information,
Part Number, and Serial Number ready prior to calling Technical Support.


