MWSUG 2011 - Paper TS07 Taming the Interactive SAS ® Environment: Tips and Tricks for VIEWTABLE, The Enhanced Editor and More Roger D. Muller, Ph.D., First Phase Consulting, Carmel, IN Joshua M. Horstman, M.S., First Phase Consulting, Indianapolis, IN Abstract A craftsman is only as good as his tools. As SAS programmers, one of our most important tools is the interactive SAS environment itself. This paper describes a variety of methods to make the SAS environment work more effectively for you. We discuss ways to customize the environment and automate frequently-performed tasks. We describe how to fine-tune and utilize the enhanced editor. Finally, we reveal how to make SAS show you data the way you want to see it in VIEWTABLE, including changing the variable order, subsetting, exporting, sorting, hiding, and more. This paper serves as a basic tutorial for the new user, but even experienced SAS programmers may learn a new trick or two. 1 Introduction The interactive SAS environment, often referred to as the SAS Windowing Environment, is one of the SAS programmer’s most important tools. Far beyond a simple editor, the environment provides the programmer with a set of tools for developing SAS code, exploring and manipulating data, and examining various forms of output generated by SAS. It is highly customizable and includes a host of options and configuration settings that allow it to be adapted to various types of users doing different kinds of work. The default configuration may not be optimal for everyone. In this paper, we describe how you can use the environment more effectively and how you can customize it to improve your productivity. We begin with several high- level features of the SAS Windowing Environment and then drill down into both the Enhanced Editor and the VIEWTABLE facility. 2 Tips for Working in the SAS Windowing Environment 2.1 Creating Custom Taskbar Buttons for Common Tasks The SAS Windowing Environment includes a customizable toolbar. By adding custom buttons to this toolbar, common tasks can be made much more efficient. For example, it is very common that a user might wish to clear the log window and the output window before submitting a program for execution. A custom button allows these tasks to be performed with a single click. To create such a button, being by right-clicking on the toolbar and choosing “Customize…” from the context menu that appears. This will open the “Customize Tools” dialog box (shown below at right). Select the “Customize” tab. This tab shows a list of the toolbar buttons and allows you to customize their appearance, arrangement, and the commands they execute. To add a new button to the list, click the “Add Tool” button (see figure) which looks like a gray rectangle with a blue star. This will add a new entry to the list below.
Transcript
MWSUG 2011 - Paper TS07
Taming the Interactive SAS® Environment: Tips and Tricks for VIEWTABLE, The Enhanced Editor and More
Roger D. Muller, Ph.D., First Phase Consulting, Carmel, IN
Joshua M. Horstman, M.S., First Phase Consulting, Indianapolis, IN
Abstract
A craftsman is only as good as his tools. As SAS programmers, one of our most important tools is the interactive
SAS environment itself. This paper describes a variety of methods to make the SAS environment work more
effectively for you. We discuss ways to customize the environment and automate frequently-performed tasks. We
describe how to fine-tune and utilize the enhanced editor. Finally, we reveal how to make SAS show you data the
way you want to see it in VIEWTABLE, including changing the variable order, subsetting, exporting, sorting, hiding,
and more. This paper serves as a basic tutorial for the new user, but even experienced SAS programmers may learn
a new trick or two.
1 Introduction
The interactive SAS environment, often referred to as the SAS Windowing Environment, is one of the SAS
programmer’s most important tools. Far beyond a simple editor, the environment provides the programmer with a set
of tools for developing SAS code, exploring and manipulating data, and examining various forms of output generated
by SAS. It is highly customizable and includes a host of options and configuration settings that allow it to be adapted
to various types of users doing different kinds of work.
The default configuration may not be optimal for everyone. In this paper, we describe how you can use the
environment more effectively and how you can customize it to improve your productivity. We begin with several high-
level features of the SAS Windowing Environment and then drill down into both the Enhanced Editor and the
VIEWTABLE facility.
2 Tips for Working in the SAS Windowing Environment
2.1 Creating Custom Taskbar Buttons for Common Tasks
The SAS Windowing Environment includes a customizable toolbar. By adding custom buttons to this toolbar,
common tasks can be made much more efficient. For example, it is very common that a user might wish to clear the
log window and the output window before submitting a program for execution. A custom button allows these tasks to
be performed with a single click.
To create such a button, being by right-clicking on
the toolbar and choosing “Customize…” from the
context menu that appears. This will open the
“Customize Tools” dialog box (shown below at right).
Select the “Customize” tab. This tab shows a list of
the toolbar buttons and allows you to customize their
appearance, arrangement, and the commands they
execute. To add a new button to the list, click the “Add Tool” button (see figure) which looks like a gray rectangle with
a blue star. This will add a new entry to the list below.
You can now add a Command, Help text, and Tip
text to the new button by filling in the appropriate
text boxes. For our button, we specified the
command “lst; clear; log; clear; wpgm;”. This is
actually a concatenation of five commands which
switches to the output window, clears it, switches
to the log window, clears it, and then returns to the
enhanced editor.
The Help text specifies the text that will appear in
the status bar at the bottom of the SAS Windowing
Environment when a user hovers the mouse
pointer over the new toolbar button. The Tip text
specifies the text that will appear in small pop-up
over the button itself when the user hovers over
the new button. We specified “Clear log and
output” for both of these.
Next, you can customize the appearance of your
button by selecting an icon. Your tool will not
appear on the toolbar without an icon. Click the
“Change icon” button which appears on the same
row of buttons as the “Add tool” button did. This will present you with hundreds of icons from which to select.
Finally, you can adjust the position of your new button on the toolbar by using the up and down arrows to move it up
and down the list.
Using this technique, you can create a variety of custom buttons to automate that tasks you perform often. To learn
more about the specific commands available for your use, consult the SAS documentation that is specific to your
operating system. For example, the commands available in SAS running on Microsoft Windows are detailed in
Chapter 17 of the SAS 9.3 Companion for Windows (see recommended reading list at end of paper).
2.2 Using and Creating Keyboard Shortcuts
The SAS Windowing Environment comes preconfigured with a variety of
useful keyboard shortcuts. To view a list of the current shortcut
assignments, simply press the F9 key or issue the “keys” command on
the SAS command line. For example, that the F8 key can be used to
submit the current program, the F6 key can be used to switch to the log
window, and the F7 key can be used to switch to the output window.
Keyboard shortcuts can be modified or added by editing their definitions
right from within this same window. There are numerous SAS
commands available for use in keyboard shortcuts. As was described
previously with respect to custom toolbar buttons, the available
commands are specific to the operating system on which SAS is
executing and are detailed in the operating-specific SAS documentation.
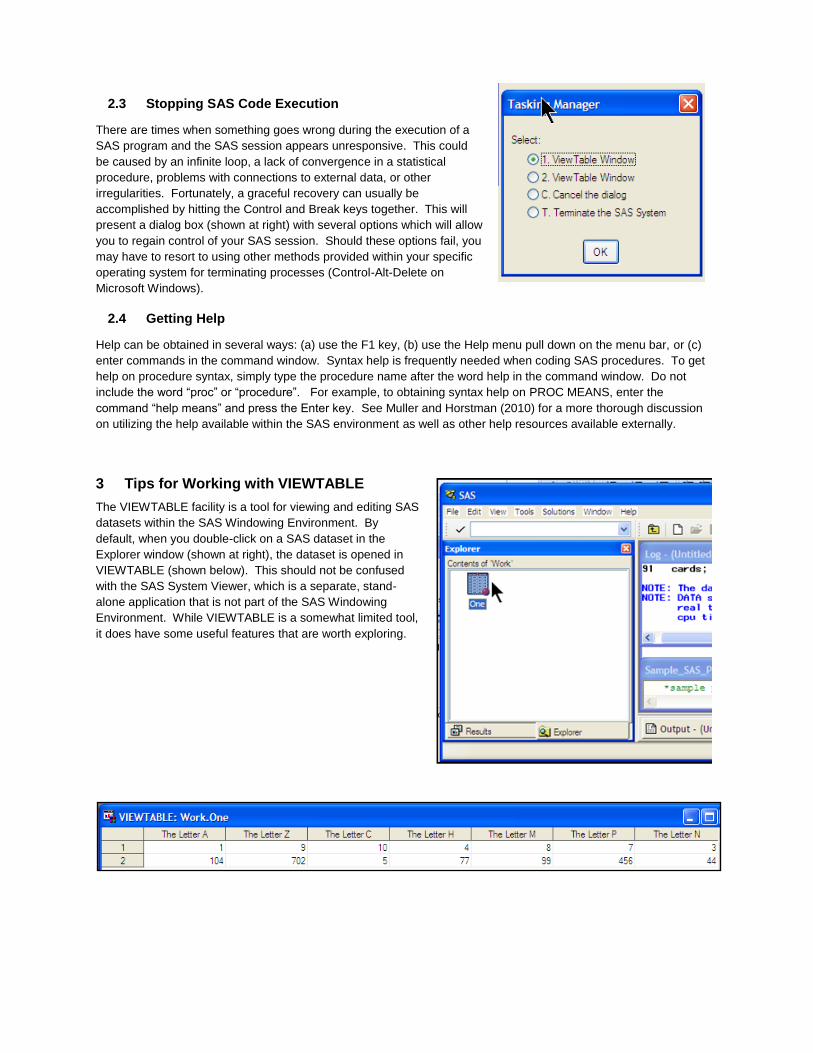
2.3 Stopping SAS Code Execution
There are times when something goes wrong during the execution of a
SAS program and the SAS session appears unresponsive. This could
be caused by an infinite loop, a lack of convergence in a statistical
procedure, problems with connections to external data, or other
irregularities. Fortunately, a graceful recovery can usually be
accomplished by hitting the Control and Break keys together. This will
present a dialog box (shown at right) with several options which will allow
you to regain control of your SAS session. Should these options fail, you
may have to resort to using other methods provided within your specific
operating system for terminating processes (Control-Alt-Delete on
Microsoft Windows).
2.4 Getting Help
Help can be obtained in several ways: (a) use the F1 key, (b) use the Help menu pull down on the menu bar, or (c)
enter commands in the command window. Syntax help is frequently needed when coding SAS procedures. To get
help on procedure syntax, simply type the procedure name after the word help in the command window. Do not
include the word “proc” or “procedure”. For example, to obtaining syntax help on PROC MEANS, enter the
command “help means” and press the Enter key. See Muller and Horstman (2010) for a more thorough discussion
on utilizing the help available within the SAS environment as well as other help resources available externally.
3 Tips for Working with VIEWTABLE
The VIEWTABLE facility is a tool for viewing and editing SAS
datasets within the SAS Windowing Environment. By
default, when you double-click on a SAS dataset in the
Explorer window (shown at right), the dataset is opened in
VIEWTABLE (shown below). This should not be confused
with the SAS System Viewer, which is a separate, stand-
alone application that is not part of the SAS Windowing
Environment. While VIEWTABLE is a somewhat limited tool,
it does have some useful features that are worth exploring.
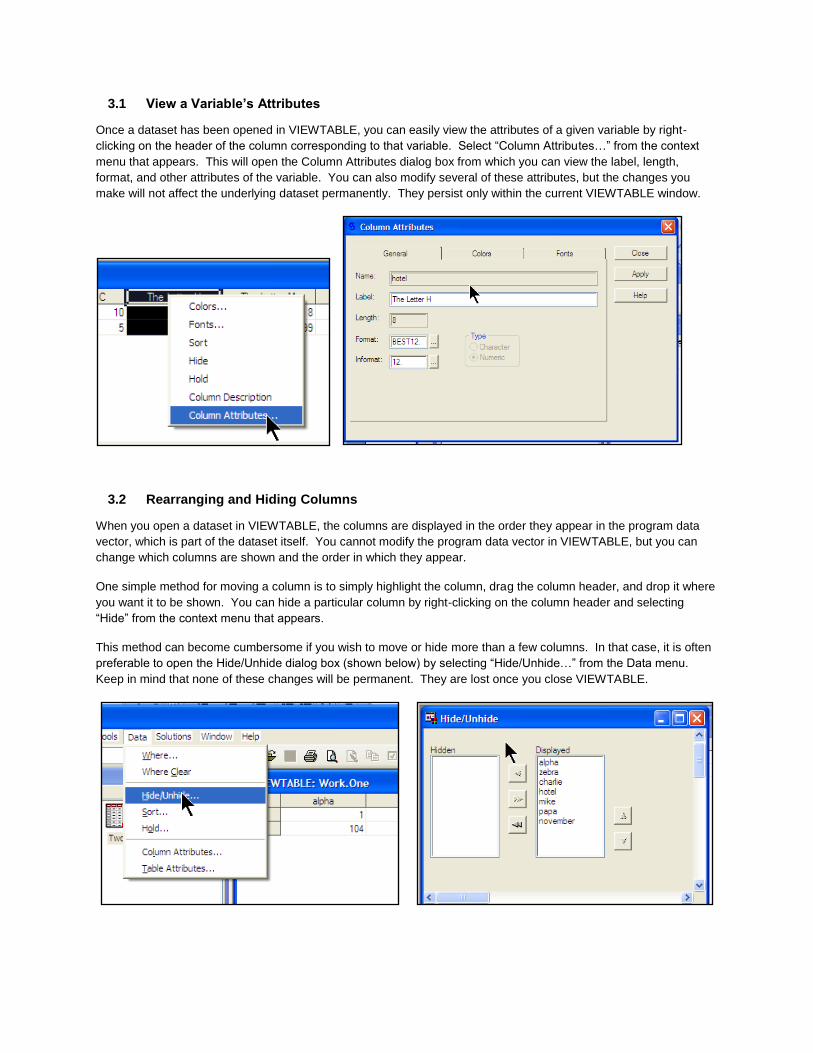
3.1 View a Variable’s Attributes
Once a dataset has been opened in VIEWTABLE, you can easily view the attributes of a given variable by right-
clicking on the header of the column corresponding to that variable. Select “Column Attributes…” from the context
menu that appears. This will open the Column Attributes dialog box from which you can view the label, length,
format, and other attributes of the variable. You can also modify several of these attributes, but the changes you
make will not affect the underlying dataset permanently. They persist only within the current VIEWTABLE window.
3.2 Rearranging and Hiding Columns
When you open a dataset in VIEWTABLE, the columns are displayed in the order they appear in the program data
vector, which is part of the dataset itself. You cannot modify the program data vector in VIEWTABLE, but you can
change which columns are shown and the order in which they appear.
One simple method for moving a column is to simply highlight the column, drag the column header, and drop it where
you want it to be shown. You can hide a particular column by right-clicking on the column header and selecting
“Hide” from the context menu that appears.
This method can become cumbersome if you wish to move or hide more than a few columns. In that case, it is often
preferable to open the Hide/Unhide dialog box (shown below) by selecting “Hide/Unhide…” from the Data menu.
Keep in mind that none of these changes will be permanent. They are lost once you close VIEWTABLE.
3.3 Rearranging column names to alphabetical order (left to right)
The Hide/Unhide dialog box provides an easy way to hide multiple columns and to rearrange them at will. It can also
be used to arrange the columns in alphabetical order by name. This is particularly useful when dealing with a large
and unfamiliar dataset.
To perform this operation, first open the Hide/Unhide dialog box as described above. Next, press the << button to
move all of the columns into the Hidden list (see below). When the columns are moved, they are also alphabetized.
You can then use the >> button to return all of the columns to the Displayed list, and the alphabetical ordering will be
preserved.
Again, these changes only persist while the dataset is open in VIEWTABLE. The underlying dataset is not affected.
To permanently reorder the variables in a dataset requires programming and is commonly done with the RETAIN
statement. If there are a large number of variables, a simple trick can be used to avoid having to type the name of
each variable into the RETAIN statement. Simply export the SAS dataset as an Excel spreadsheet, being sure to
specify the option to use the variable names as column headers. Then, rearrange the column headers as desired,
copy them all to the clipboard, and paste them into your SAS code on the RETAIN statement.
3.4 Displaying Variable Names vs. Variable Labels (and Making it Permanent!)
By default, when a dataset is opened in VIEWTABLE, the top of each column displays the variable label, not the
variable name. There may be times when it is more useful to view the variable names. This can be accomplished by
simply opening the “View” drop-down menu and selecting “Column Names” (shown below). Variable labels can be
restored in a similar manner.
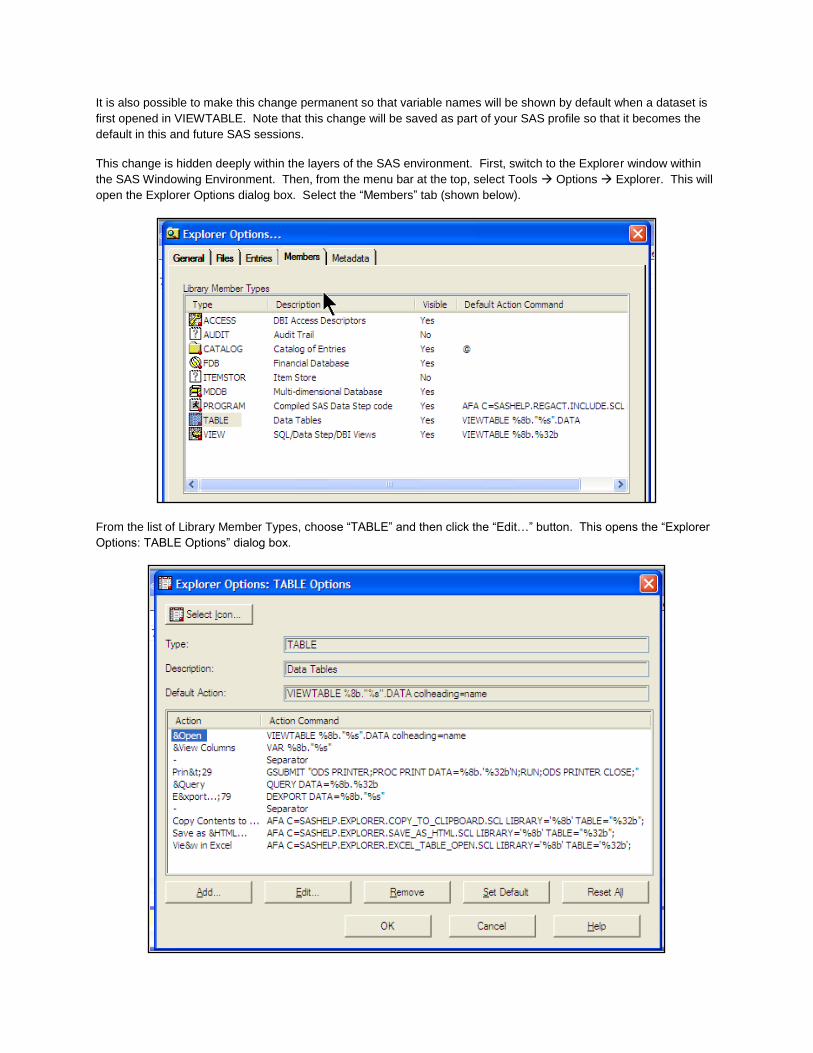
It is also possible to make this change permanent so that variable names will be shown by default when a dataset is
first opened in VIEWTABLE. Note that this change will be saved as part of your SAS profile so that it becomes the
default in this and future SAS sessions.
This change is hidden deeply within the layers of the SAS environment. First, switch to the Explorer window within
the SAS Windowing Environment. Then, from the menu bar at the top, select Tools Options Explorer. This will
open the Explorer Options dialog box. Select the “Members” tab (shown below).
From the list of Library Member Types, choose “TABLE” and then click the “Edit…” button. This opens the “Explorer
Options: TABLE Options” dialog box.
It is necessary to modify the action command associated with the “&Open” action. Click on “&Open” in the Action
column and click the “Edit…” button. This takes you to the “Explorer Options: Edit Action” dialog box.
From here, the Action Command can be edited. The default command is as follows:
VIEWTABLE %8b.'%s'.DATA
Change it to this:
VIEWTABLE %8b.'%s'.DATA colheading=name
You will then need to click OK three times to close the various dialog boxes. After making this change, VIEWTABLE
will show variable names by default when you open a dataset, and you’ll still have the option of toggling between
names and labels as before.
3.5 Subsetting the data.
VIEWTABLE provides a simple point-and-click interface for subsetting the data, etc. To access this facility, select
“Where…” from the Data menu or from the context menu that appears when you right-click anywhere in VIEWTABLE
that is not part of a data column. This will open a dialog box (shown below) that allows one to build simple queries
using WHERE clause syntax.
Notice that the WHERE clause is shown in the bottom portion of the window as it is being constructed.
A very nice feature of this tool is the ability to generate a list of distinct values of a particular variable. As an example,
if we wanted to look up the values that are present for the variable alpha, we could select “LOOKUP distinct values”.
The screen that results from clicking on “<LOOKUP distinct values>” above is shown below:
3.6 Limitations to VIEWTABLE
VIEWTABLE is a handy tool to get a quick “look and see” at some data when building code interactively. However,
its utility is severely limited by the fact that there is no way to save any customizations made to the appearance of the
dataset. If you look at a particular dataset frequently and like to always see the columns arranged in a certain way,
you must perform these steps each time.
3.7 An alternative to VIEWTABLE: SAS Enterprise Guide
The function of VIEWTABLE has been completely superseded by SAS Enterprise Guide in the Microsoft Windows
Environment. Programmers using Microsoft Windows should be encouraged to move on to SAS Enterprise Guide.
SAS Enterprise Guide is a separate application installed by default when PC SAS version 9 for Windows is installed.
While a full exploration of SAS Enterprise Guide is beyond the scope of this paper, its advantages are many: the
ability to make simple or sophisticated queries and sorts; the ability save the code from these queries and sorts so
that they may be reused at a later time; a rich programming environment in which comments and notes are easily
stored; the ability to bring in and run other SAS programs; complete access to the SAS editors for writing code;
controlled execution of branches of code; easier use of macros; and all of this and more can be saved in one file. A
few screen shots are shown below to whet your appetite.
4 Working with the Enhanced Editor
The SAS Windowing Environment includes two different editors that can be used for developing SAS code: the
Program Editor, and the Enhanced Editor. The Enhanced Editor was added in SAS version 8 and includes a variety
of nice features such as automatic color-coding of your code, automatic indentation, and collapsible sections to make
it easier to view the high-level flow of a program file. There are some additional features that are worth a more
detailed look: abbreviations, keyboard macros, and custom color schemes.
4.1 SAS Abbreviations
One great feature of the Enhanced Editor is the ability to define abbreviations. An abbreviations is a user-defined
string that the editor will automatically replace with the pre-defined text of your choice. This is an extremely useful
way to create your own code templates for pieces of syntax that are difficult to remember or cumbersome to type.
For example, if you use PROC FREQ often, you could create an abbreviation called “proc freq” and assign it some
text that constitutes a typical call you might make to PROC FREQ, including the options you normally use:
proc freq data=<dsname>;
tables <varname> / norow nocol nocum nopercent;
run;
To create this abbreviation, make sure you are in the Enhanced Editor window and select “Add Abbreviation…” from
the Tools menu. This will open the Add Abbreviation dialog box. Enter the name of the new abbreviation you wish to
create and the text it should insert.
Press the OK button and you’ve created your abbreviation. To use your abbreviation, simply type the text “proc freq”
in the Enhanced Editor. The editor will prompt you to see if you want to insert the replacement text. If you press
Enter or Tab, the replacement text will be inserted. If you don’t wish to use the abbreviation at that time, just keep
typing. To modify or delete your abbreviations, go to Tools Keyboard Macros Macros. This will open the
Keyboard Macros dialog box. This dialog will also allow you to assign keyboard shortcuts to your abbreviations. For
a more thorough discussion of abbreviations, refer to Ceranowski (2008) and Carpenter (2003).
4.2 Keyboard Macros
SAS abbreviations are really just a special type of keyboard macro. Keyboard macros can be used to store any
sequence of keystrokes and play them back on demand. By assigning a keyboard shortcut to a keyboard macro, you
can dramatically reduce the need to perform repetitious and cumbersome sequences of keystrokes.
For example, if you needed to insert a space at the beginning of each line of a lengthy code file, the traditional
method would be press the space, down arrow, and left arrow keys, in that order, over and over repeatedly until the
bottom of the file is reached. To avoid this drudgery, simply assign those three keystrokes to a keyboard macro and
then assign a shortcut to the macro. The entire file could then be processed by simply holding down the
corresponding keyboard shortcut.
To start recording the keyboard macro, make sure you are in the Enhanced Editor and then select Tools Keyboard
Macros Record New Macro. Recording will begin immediately, so proceed with the keystrokes you wish to record.
When you are finished, select Tools Keyboard Macros Stop Recording. This will open the Save Keyboard
Macro dialog. You can assign a name and provide a description.
If you wish to assign a key, press the “Assign
keys…” button, which will take you to the Assign
Keys dialog box where you can assign a keyboard
shortcut. If you wish to edit or delete your
keyboard macro, select Tools Keyboard Macros
Macros to open the Keyboard Macros dialog
box. For more information on keyboard shortcuts,
refer to Lund (2009) and Carpenter (2003).
4.3 Custom Color Schemes
Once nice feature of the SAS Enhanced Editor is that it
automatically color-codes certain elements within a SAS
program. This can make the code file easier to read
and understand. For example, in the default color
scheme, SAS keywords are colored blue, quoted text is
colored purple, and comments are colored green,
among other things.
The Enhanced Editor also gives you the ability to modify
this color scheme on an element-by-element basis.
This can be a very powerful way to improve the
readability of your code. Notice how the custom color
scheme shown to the right really makes the comments
stand out and helps the reader see the structure of the
code at a glance.
To modify the color scheme, switch to the Enhanced
Editor window and select Tools Options
Enhanced Editor. This will open the Enhanced Editor
Options dialog box. Select the “Appearance” tab as shown below:
4.4 One Last Tip: Selecting Columns of Text
In the Enhanced Editor, you can select a column of text without selecting the entirety of each line. Simply hold down
the ALT key and the left mouse button while dragging the mouse to highlight the desired column of text. Try it!
5 Conclusion
In today’s world, all of us have too much to do and not enough time to do it. We cannot afford to continue working in
inefficient ways. It is necessary that we hone our programming tools to maximize our productivity. In this paper,
we’ve shared a laundry list of assorted tips and tricks that should help the SAS programmer maximize the use of the
tools available in the interactive SAS environment.
6 Recommended Reading
Carpenter, Art. “Creating Display Manager Abbreviations and Keyboard Macros for the Enhanced Editor.” SUGI 28
Proceedings, 2003, Paper 108-28. http://www2.sas.com/proceedings/sugi28/108-28.pdf
Ceranowski, Elizabeth. “SAS Abbreviations are your friends, use the template method to code!” Pharmaceutical
SAS Users Group 2008 Conference Proceedings, Paper SA07.