Page 1
SCIENTIFIC COMMITTEE
THIRTEENTH REGULAR SESSION
Rarotonga, Cook Islands
9 – 17 August 2017
Reconsideration of skipjack otolith microstructural analysis for age and growth estimates in the WCPO
WCPFC-SC13-2017/ SA-IP-08
Tanaka F., S. Ohashi, Y. Aoki and H. Kiyofuji1
1 National Research Institute of Far Seas Fisheries, Japan Fisheries Research and Education Agency
Page 2
Reconsideration of skipjack otolith microstructural analysis for age and
growth estimates in the Western Central Pacific Ocean
Fumiya Tanaka1, Shinpei Ohashi1, Yoshinori Aoki1 and Hidetada Kiyofuji1
1 National Reserach Institute of Far Seas Fisheries Japan Fisheries Research and
Education Agency Shimizu-ku, Shizuoka-shi, Shizuoka 424-8633 Japan
Abstract
Reliable estimate of growth curve of skipjack tuna in the western and central Pacific
Ocean (WCPO) is an important not only to derive accurate spawning biomass estimates
from stock assessment but also to evaluate underlying hypothesis of growth and spawning
ecology of this species in the WCPO. Generally, otolith daily increment has been applied
to estimate growth, however, large measurements errors were reported due to complexity
of otolith microstructure of this species (Sardenne et al., 2015). In this document, we
reconsidered a series of procedure for otolith analysis (e.g. extraction of otolith,
preparation for interpretation of microstructure) targeting juvenile to adult in order to
obtain reliable growth estimates of skipjack tuna in the WCPO.
Page 3
Table of contents
1. Introduction ··················································································· 1
2. Terminology for otolith ····································································· 3
3. Definition of growth stages ································································· 4
4. A series of procedure for otolith treatment (Flow chart) ····························· 5
5. Measurements of specimens ······························································· 6
6. Extraction of otolith ········································································· 7
Employed items ············································································· 7
Procedures for juvenile to young stage (30–120 mm FL) ····························· 8
Procedures for young to adult stage (≧ 120 mm FL) ······························· 12
7. Polishing method ··········································································· 17
Employed items ··········································································· 17
Procedures ················································································· 18
8. Etching method ············································································· 22
Employed items ··········································································· 22
Procedures ················································································· 23
9. Identify and count daily rings ··························································· 27
Employed items ··········································································· 27
Procedures ················································································· 27
Procedure considerations ································································ 29
10. References ··················································································· 32
Page 4
1
1 Introduction
Skipjack tuna Katsuwonus pelamis is a commercially important and highly migratory
species distributing from tropical to temperate waters in the world (Matsumoto et al.,
1984). In the Western Central Pacific Ocean (WCPO), tropical area is the main fishing
ground of skipjack tuna for purse seine operated by various countries and Japanese distant
water pole-and-line fisheries. Near Japanese waters are also important area for the
Japanese small scale coastal troll, offshore and coastal pole-and-line, and offshore purse
seines.
Estimating age and growth of this species is an important scientific role to assess this
stock accurately because there still remains large uncertainties in the current stock
assessment model (e.g. McKechnie et al., 2016; Ochi et al., 2016).
Generally, counting of daily and yearly rings formed in otolith has been considered
for age determination in various fishes (Jones, 1986). The age determination in skipjack
tuna has been also carried out based on the number of the otolith rings. In the early
juvenile stage [ca. 10–40 mm in Standard Length (SL)], a method polishing the both sides
of the embedded otolith were considered in several studies (Tanabe, 2002; Tanabe et al.,
2003a). Tanabe et al. (2003a) suggested availability of the daily increments of otolith
rings in juvenile skipjack tuna for age determination. From young to adult stages,
following two methods were considered: 1) slicing method (read the micro-increments
on the cross section cut along the transversal axis direction, Adam et al., 1996; Leroy,
2000; Sardenne et al., 2015); 2) etching method (dissolve the distal face of otolith with
10% HCl to expose the micro-increments, Wild and Foreman, 1980; Uchiyama and
Struhsaker, 1981; Wild et al., 1995; Tanabe et al., 2003b; Kayama et al., 2007). Daily
increment formation of otolith used by the slicing method is commonly recognized in
some species of Thunus (Wild and Foreman, 1980; Wild et al., 1995; Stéquert and Conand,
2004; Sardenne et al., 2015). In young to adult skipjack tuna [250–570 mm in Fork
Length (FL)], however, daily increments were not recognized on the marginal zone of
otolith by the slicing method. Moreover, large measurement errors have been reported
due to some complexity of otolith microstructure of this species, leading to the conclusion
that the number of increments of otolith rings is not suitable for the age determination of
skipjack tuna (Adam et al., 1996; Sardenne et al., 2015). On the other hand, etching
method targeting young to adult skipjack tuna (180–710 mm FL) has been validated for
use of daily formation of the microstructures on the marginal zone by observation of
oxytetracycline (OTC) marked otoliths extracted from recaptured individuals (Tanabe et
al., 2003b; Kayama et al., 2007). However, no documents about the procedure for otolith
analysis targeting juvenile to adult skipjack have been reported previously. In addition, it
Page 5
2
is very difficult to expose and identify daily ring of otolith uniformly by the etching
method and it needs experienced technique based on long-term training.
In this document, we reconsidered a series of procedure for otolith analysis (e.g.,
extraction of otolith, exposure, identify and count daily ring) of skipjack tuna targeting
juvenile to adult stages in order to obtain reliable growth estimates of this species in the
WCPO.
Page 6
3
2 Terminology for otolith
Terms used for each part of otolith in skipjack tuna follows Secor et al. (1991), and all
otoliths used in this document indicates sagitta.
Rostrum (Fig. 1A, 2A): Anterior-most projection
Postrostrum (Fig. 1B, 2B): Posterior-most projection
Antirostrum (Fig. 1C, 2C): Anterior projection, located dorsal to the rostrum
Core (Fig. 1D, 2D): Central part (calcified area occurring within the earliest deposited
increment)
Sulcus (Fig. 2E): Sculptured groove along the otolith medial face
Fig. 1. Lateral view of otolith of juvenile skipjack tuna (A: Rostrum; B: Postrostrum; C:
Antirostrum; D: Core).
Fig. 2. Lateral (upper) and medial (lower) views of otolith of adult skipjack tuna (A:
Rostrum; B: Postrostrum; C: Antirostrum; D: Core; E: Sulcus).
Page 7
4
3 Definition of growth stages
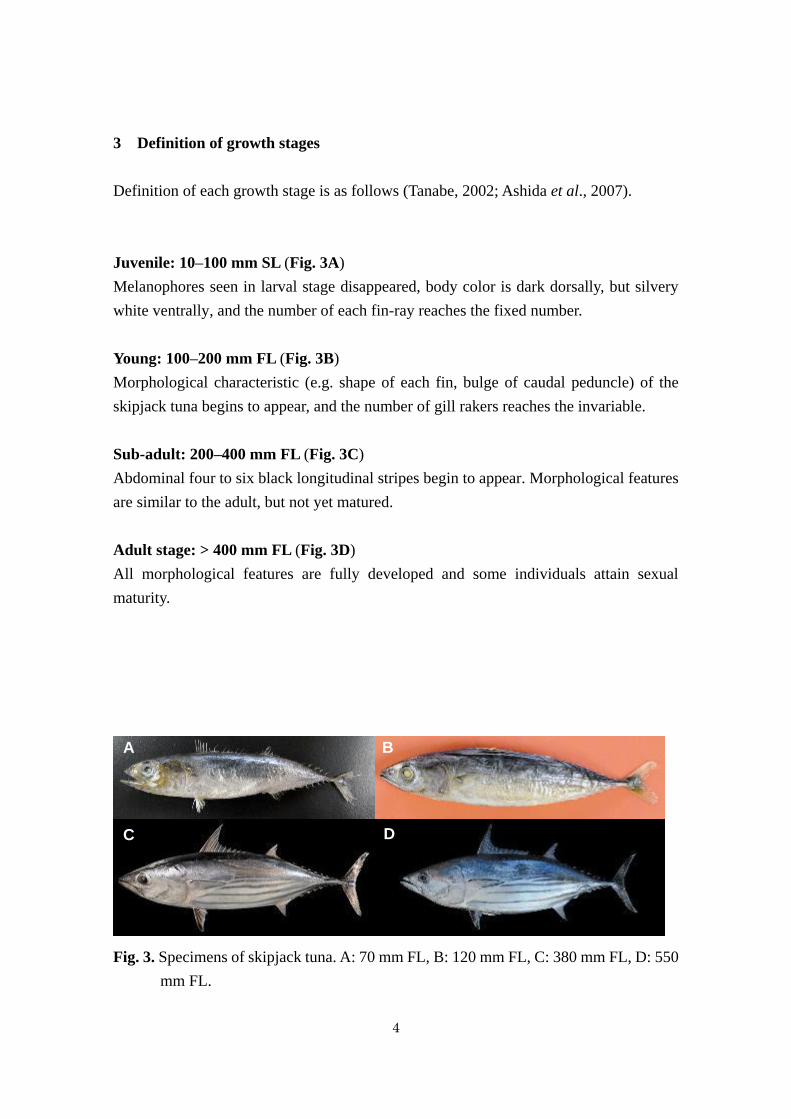
Definition of each growth stage is as follows (Tanabe, 2002; Ashida et al., 2007).
Juvenile: 10–100 mm SL (Fig. 3A)
Melanophores seen in larval stage disappeared, body color is dark dorsally, but silvery
white ventrally, and the number of each fin-ray reaches the fixed number.
Young: 100–200 mm FL (Fig. 3B)
Morphological characteristic (e.g. shape of each fin, bulge of caudal peduncle) of the
skipjack tuna begins to appear, and the number of gill rakers reaches the invariable.
Sub-adult: 200–400 mm FL (Fig. 3C)
Abdominal four to six black longitudinal stripes begin to appear. Morphological features
are similar to the adult, but not yet matured.
Adult stage: > 400 mm FL (Fig. 3D)
All morphological features are fully developed and some individuals attain sexual
maturity.
Fig. 3. Specimens of skipjack tuna. A: 70 mm FL, B: 120 mm FL, C: 380 mm FL, D: 550
mm FL.
A B
C D
Page 8
5
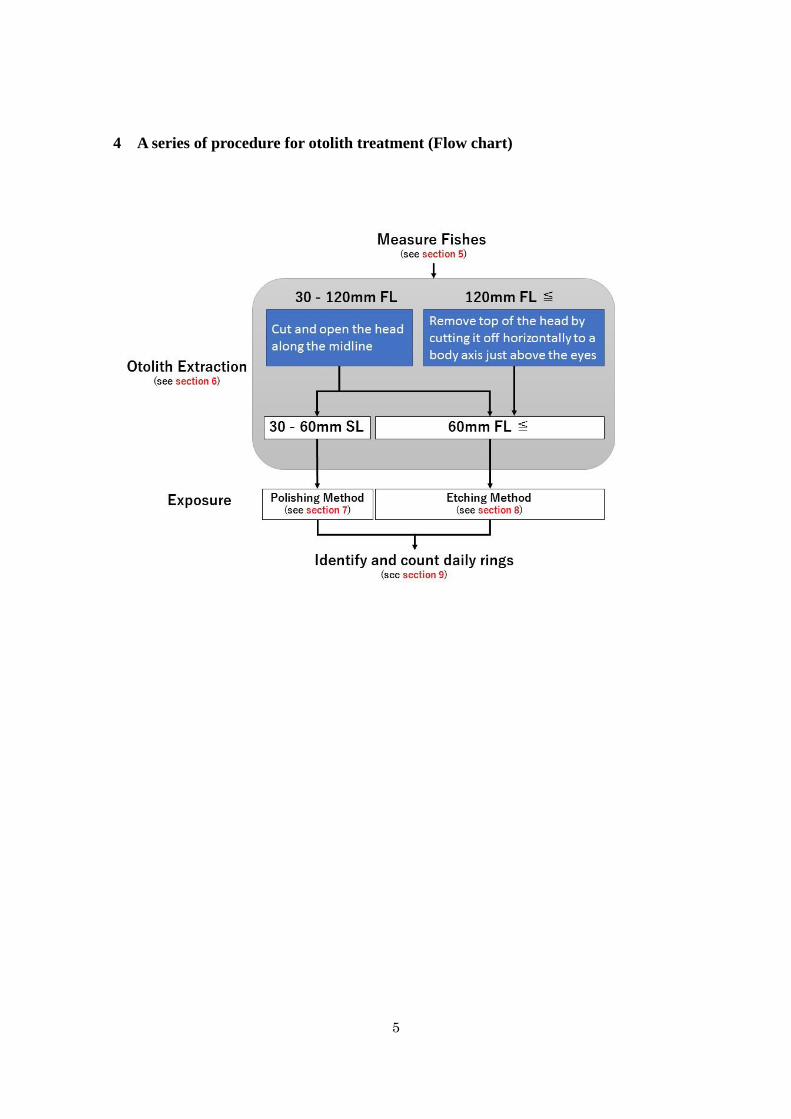
4 A series of procedure for otolith treatment (Flow chart)
Page 9
6
5 Measurements of specimens
For specimens of skipjack tuna, length and weight are measured before extraction of
otolith. Standard length (SL) is measured for juvenile length and fork length (FL) is
measured for young to adult length (Fig. 4).
Fig. 4. Methods of measurement for standard length (SL) and fork length (FL) in skipjack
tuna.
Employed items
Calipers [for small size (Fig. 5A); for large size (Fig. 5B)] and weight scale (Fig. 5C).
Fig. 5. Employed items for measurements of skipjack.
A
B
C
Page 10
7
6 Extraction of otolith
Employed items
Dissecting needle (Fig. 6A), precise tweezers (Fig. 6B), petri dishes (Fig. 6C), clear
microscope slide (Fig. 6D), razor’s edge (Fig. 6E), stereomicroscope and microscope
illuminator (Fig. 6F), quarterfold wiper (Kimtowel) (Fig. 6G), 96-well microplate (Fig.
6H), ethanol (Fig. 6I), and kitchen knife (Fig. 6J).
Fig. 6. Employed items used for otolith extraction.
A
B
C
D
E
F
G
H
I J
Page 11
8
Procedures (30–60 mm SL and 60–120 mm FL)
1. Cut off the head with a razor’s edge, and cut open the head along the midline (Figs.
7, 8).
2. Remove the brains with a dissecting needle and precise tweezers under the
stereomicroscope, and extract otolith from the cranial cavity with precise tweezers
(Fig. 9)
3. Remove incrustation with dissecting needle and precise tweezers under
stereomicroscope and clean the otoliths (Figs. 10, 11).
4. Pick up the cleaned otolith with precise tweezers and put it on 96-well microplate
with a drop of 99% ETOH to make it easy to put and let it dry immediately (Fig. 12).
Procedure considerations
・Be careful not to pinch an otolith strongly with precise tweezers.
・Remove brains carefully while confirming the position of the otoliths.
Page 12
9
Figures
Fig. 7. Position to separate head and body (left), and showing cutting line of the head
along the midline (right).
Fig. 8. Head cut open along the midline.
Fig. 9. Position of otolith and brain in skull.
otolith
brains
Page 13
10
Fig. 10. Otolith with incrustation.
Fig. 11. Cleaned otolith.
Page 14
11
Fig. 12. The picture of putting otolith in a 96-well microplate with a drop of 99 % ethanol.
Page 15
12
Procedures for young to adult stages (≧ 120 mm FL)
1. Cut off the head with a kitchen knife and remove the top of the head by cutting it off
horizontally to a body axis just above the eyes (Fig. 13).
2. Hold the head as facing the snout and remove the brains carefully using precise
tweezers (Fig. 14).
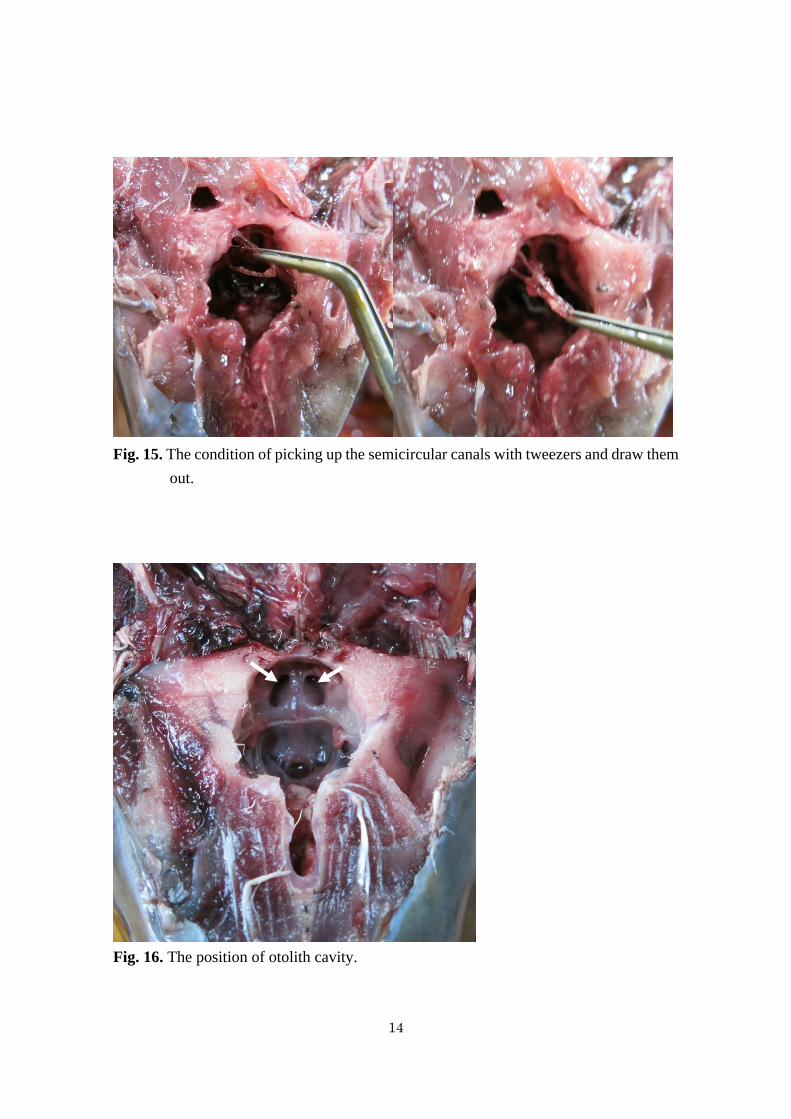
3. After removing the brains, a part of the semicircular canals is exposed. Pick up the
semicircular canals with precise tweezers and draw them out carefully (Figs. 15, 16).
4. Keep a removed otolith in a meshed plate with water temporarily (Fig. 17).
5. Remove incrustation with a dissecting needle and precise tweezers under the
stereomicroscope (Fig. 18) and clean the otoliths (Fig. 19).
6. Pick up the cleaned otolith with precise tweezers and put them in a 96-well microplate,
and then let them dry at ambient temperature (Fig. 20).
Procedure considerations
・Remove the brains carefully while confirming the position of the semicircular canals.
・Be careful not to pinch rostrum side of otolith with precise tweezers because it breaks
easily.
Page 16
13
Figures
Fig. 13. The pictures of showing the cutting line just above the eyes horizontally to a body
axis.
Fig. 14. Dorsal view of the head after cutting the top of the head off horizontally, showing
position of the brains.
brains
Page 17
14
Fig. 15. The condition of picking up the semicircular canals with tweezers and draw them
out.
Fig. 16. The position of otolith cavity.
Page 18
15
Fig. 17. Removed otolith stored in a meshed plate temporarily.
Fig. 18. Removed otolith (A), semicircular canal (B), asteriscus (C), and lapillus (D).
A
B
C
D
Page 19
16
Fig. 19. Cleaned otolith.
Fig. 20. Cleaned otolith stored in a 96-well microplate.
Page 20
17
7 Polishing method
Employed items
Dissecting needle (Fig. 21A), accurate tweezers (Fig. 21B), clear microscope slide (Fig.
21C), stereomicroscope (Fig. 21D), enamel resin, enamel diluent (Fig. 21E), polishing
paper (grit size: 9μm, 3μm, 1μm) (Fig. 21F), and optical microscope (Fig. 21G).
Fig. 21. Employed items used for polishing.
A
B
C D
E F G
Page 21
18
Procedures
1. Mix enamel resin and enamel diluent in the ratio of 1 to 2. Henceforth, it is called
mixed enamel resin (MixER).
2. Use a dissecting needle covered with MixER and pick up an otolith with MixER’s
viscosity (Fig. 22). Put the otolith on a clear microscope slide as dropping MixER
from the dissecting needle.
3. Put the otolith with the medial (sulcus) side up by a dissecting needle and precise
tweezers under a stereomicroscope, and embed it completely in MixER on the clear
microscope slide (Fig. 23). The mounted otolith needs to be set for one day.
4. After MixER completely dried, polish the mesial aspect of otolith with polishing
paper at grit size of 9μm (Fig. 24).
5. Finish polishing when the sulcus disappears and the surface becomes smooth.
Subsequently, polish the otolith with polishing papers at grit sizes of 1-3μm for finish
(Fig. 25). The time recommended for polishing every step is approximately 30
minutes.
6. Dissolve the MixER with a few drops of enamel diluent and turn the otolith over under
a stereomicroscope using a dissecting needle and precise tweezers. After that, mount
the otolith and let it dry again.
7. Polish the other side of otolith with the same procedure as 5.
8. Finish the polishing procedure when the daily rings between the core and the edge
can be observed. Cover the polished surface with MixER (Fig. 26).
Procedure considerations
・The degree of polishing should be frequently confirmed under the optical microscope.
・When turning the otolith over after polishing one surface, it is important to wait until
the MixER completely dissolves and confirm if the otolith moves easily in order to
prevent it from breaking.
Page 22
19
Figures
Fig. 22. Otolith attaching the tip of a dissecting needle with MixER.
Fig. 23. Otolith embedded in MixER on a clear microscope slide.
otolith
otolith
Page 23
20
Fig. 24. Polishing an embedded otolith with polishing paper.
Fig. 25. The otolith polished with polishing paper (left: before polishing, center: in the
middle of polishing, right: after polished).
polishing paper
Page 24
21
Fig. 26. Otolith completely polished on the both sides.
Page 25
22
8 Etching method
Employed items
Dissecting needle (Fig. 27A), precise tweezers (Fig. 27B), clear microscope slide (Fig.
27C), enamel resin, enamel diluent (Fig. 27D), distilled water (Fig. 27E), optical
microscope (Fig. 27F), 1 mol/l HCl (Fig. 27G), Kimwipes (Fig. 27H), resin mold (Fig.
27I), bamboo skewer (Fig. 27J), and epoxy resin (Fig. 27K).
Fig. 27. Employed items used for etching.
A
B
C D E
F G H I
J K
Page 26
23
Procedures
1. Drop enamel resin onto clear microscope slide and put otolith lateral side (no sulcus
face) up on there (Fig. 28). A half day is needed for enamel resin to be fixed.
2. After enamel resin completely dried, touch only around the core with a bamboo
skewer soaked in HCL (1 mol/l) under an optical microscope and dissolve it (Fig. 29).
After that, touch around the core with Kimwipes soaked in distilled water with precise
tweezers in order to stop dissolution. Repeat these procedures until the daily rings
between core and the fifth ring can be observed (Fig. 30).
3. Put the tip of bamboo skewer soaked in HCL (1 mol/l) on medial and marginal zones
until rings can be observed (Fig. 31).
4. Finish the etching procedure when the rings between the core and the edge along the
growth axis can be observed (Fig. 32). Dissolve the enamel resin on the clear
microscope slide with several drops of enamel diluent, subsequently remove otolith
from the clear microscope slide.
5. Put the otolith etched side down on the resin mold in the center and embed in epoxy
resin (Fig. 33).
6. After the epoxy resin completely dried, remove the epoxy-resin block embedding an
otolith from a resin mold.
Procedure considerations
・Be careful to avoid adhering enamel resin on the side for etching.
・ The degree of the dissolution should be carefully confirmed under the optical
microscope every time.
・The otolith after etching should be removed when the enamel resin is completely
resolved to prevent it from breaking.
Page 27
24
Figures
Fig. 28. The otolith on a clear microscope slide dropped in enamel resin.
Fig. 29. Bamboo skewer soaked in HCL (1 mol/l) touching only around the core.
Bamboo skewer
Page 28
25
Fig. 30. The conditions of around the core before (left) and after etching (right).
Fig. 31. The conditions of medial (left) and marginal (right) zones after etching.
Page 29
26
Fig. 32. Anterior half of otolith after etching.
Fig. 33. Otolith embedded in epoxy resin on an epoxy mold.
core
Page 30
27
9 Identify and count daily rings
Employed items
Light microscope (BX60-33; Olympus Optical), Charge coupled device (CCD)-camera
(CS-580; Olympus Optical), image editing software (Adobe Photoshop), otolith-
measurement system (ARP/W).
Procedures
1. With a CCD camera, take photographs of the otoliths that were treated in polishing
and etching methods (Fig. 34). Set the magnification of the light microscope to be
x25-50.
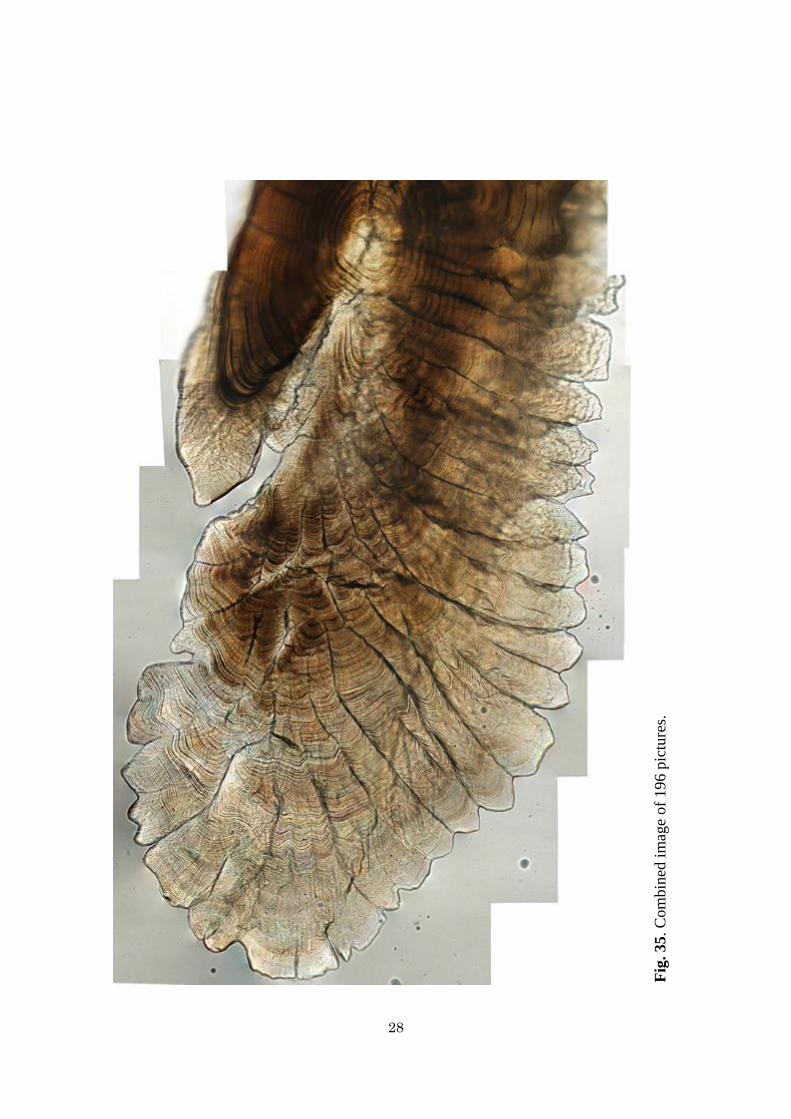
2. Bind pictures to make one full picture using image editing software (e.g., Adobe
Photoshop) (Fig. 35).
3. Count the number of daily increments between the nucleus and the rostrum edge by
using an otolith measurement system (ARP/W).
Fig. 34. Photographs of daily rings from a core to edge.
Page 31
28
Fig
. 3
5. C
om
bin
ed i
mag
e of
196 p
ictu
res.
Page 32
29
Procedure considerations
Skipjack otoliths are known to have following three different increment patterns between
core and rostrum edge (Tanabe et al., 2003b; Kayama et al., 2007, Fig. 36): central area
(C) for larval stage, medial area (MD) for juvenile to young stages, marginal area (MG)
for the young to adult stages. In central area, daily periodicity in increment deposition
during the first five days after hatching is validated in larval skipjack tuna (Radtke, 1983).
The first fifth to seventh increments are usually formed as clear narrow daily ring, but the
first one is sometimes obscure (Fig. 37). Distance from a core to the first increments is
approximately 6–12 μm (Tanabe et al., 2003a). Hence, when the distance is longer than
15 μm, the first increment must be dismissed. In the medial area (ca. 10th–80th
increments), interval of each increment is wider than the previous ones (Fig. 38). Sub-
daily increments are usually observed in this area, including transitional period from the
medial to marginal areas (Fig. 39). In the marginal area, increments are usually formed
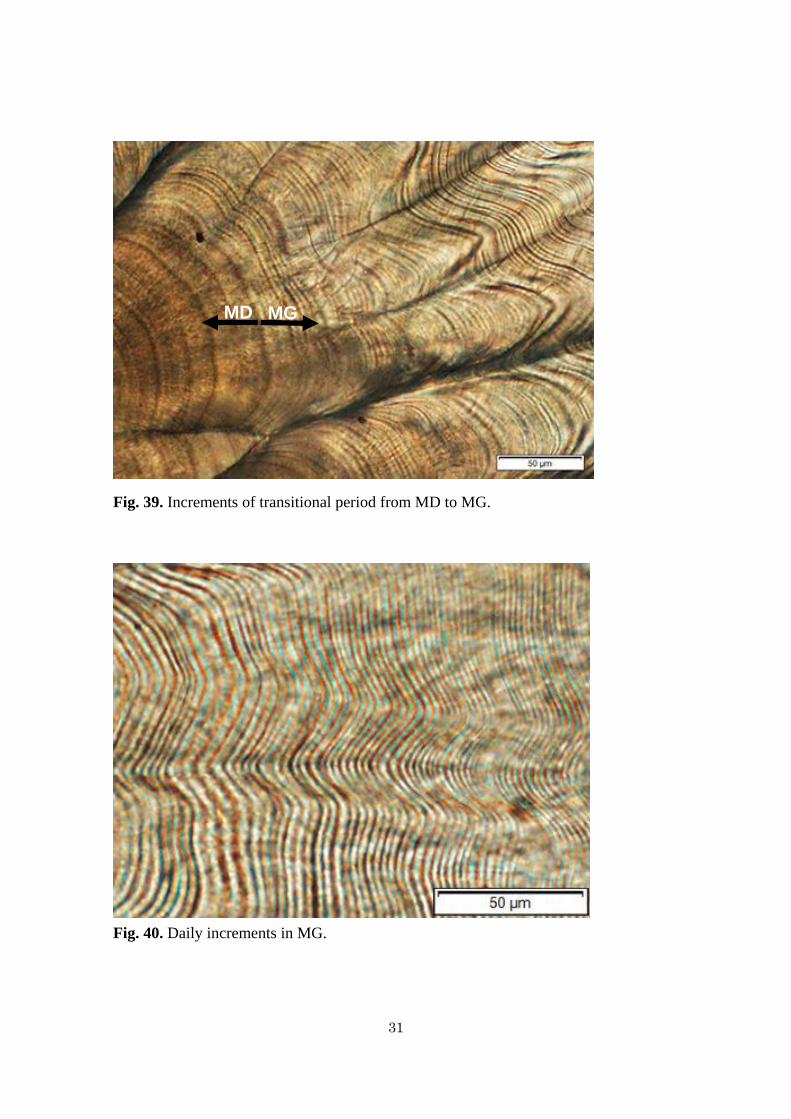
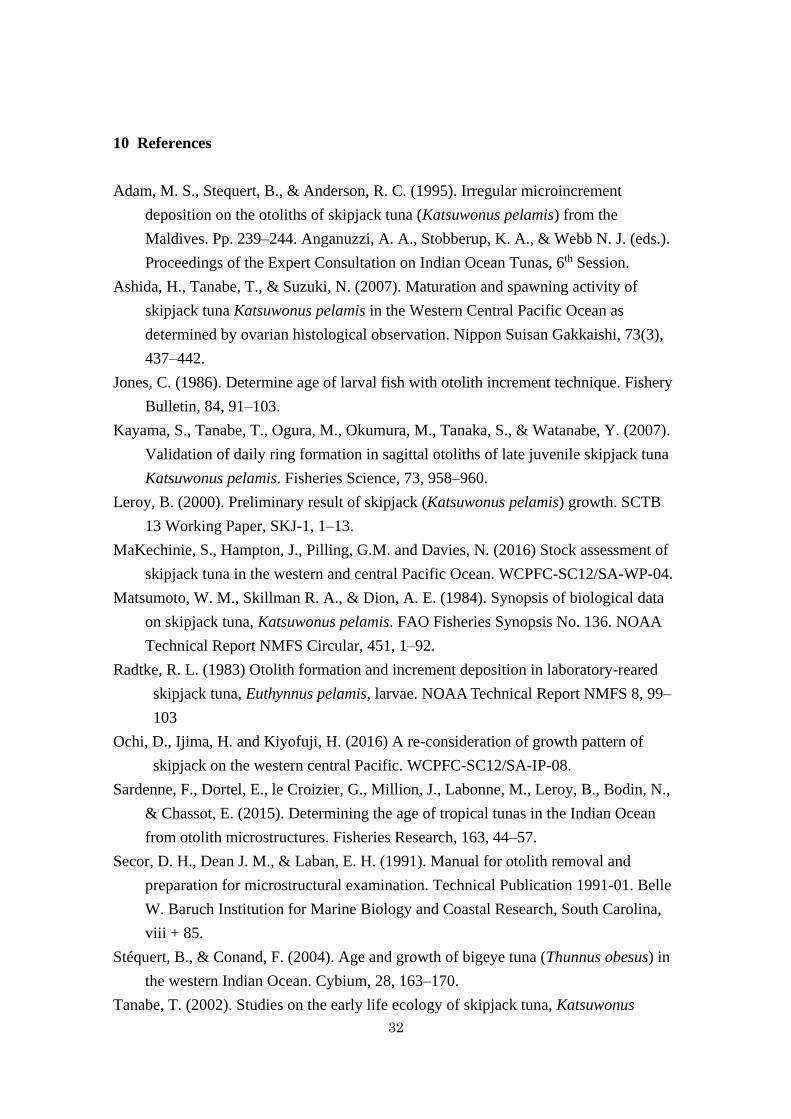
as clear but extremely narrow bands (Fig. 40).
Fig. 36. Microstructures of three different areas in a sagittal otolith of adult skipjack
tuna (416 mm FL). C: central area; MD: medial area; MG: marginal area.
C MD MG
Page 33
30
Fig. 37. First to seventh increments (white circle).
Fig. 38. Daily (D) and sub-daily (SD) rings in MD.
D SD
D D
D D
SD
SD
SD
Page 34
31
Fig. 39. Increments of transitional period from MD to MG.
Fig. 40. Daily increments in MG.
MD MG
Page 35
32
10 References
Adam, M. S., Stequert, B., & Anderson, R. C. (1995). Irregular microincrement
deposition on the otoliths of skipjack tuna (Katsuwonus pelamis) from the
Maldives. Pp. 239–244. Anganuzzi, A. A., Stobberup, K. A., & Webb N. J. (eds.).
Proceedings of the Expert Consultation on Indian Ocean Tunas, 6th Session.
Ashida, H., Tanabe, T., & Suzuki, N. (2007). Maturation and spawning activity of
skipjack tuna Katsuwonus pelamis in the Western Central Pacific Ocean as
determined by ovarian histological observation. Nippon Suisan Gakkaishi, 73(3),
437–442.
Jones, C. (1986). Determine age of larval fish with otolith increment technique. Fishery
Bulletin, 84, 91–103.
Kayama, S., Tanabe, T., Ogura, M., Okumura, M., Tanaka, S., & Watanabe, Y. (2007).
Validation of daily ring formation in sagittal otoliths of late juvenile skipjack tuna
Katsuwonus pelamis. Fisheries Science, 73, 958–960.
Leroy, B. (2000). Preliminary result of skipjack (Katsuwonus pelamis) growth. SCTB
13 Working Paper, SKJ-1, 1–13.
MaKechinie, S., Hampton, J., Pilling, G.M. and Davies, N. (2016) Stock assessment of
skipjack tuna in the western and central Pacific Ocean. WCPFC-SC12/SA-WP-04.
Matsumoto, W. M., Skillman R. A., & Dion, A. E. (1984). Synopsis of biological data
on skipjack tuna, Katsuwonus pelamis. FAO Fisheries Synopsis No. 136. NOAA
Technical Report NMFS Circular, 451, 1–92.
Radtke, R. L. (1983) Otolith formation and increment deposition in laboratory-reared
skipjack tuna, Euthynnus pelamis, larvae. NOAA Technical Report NMFS 8, 99–
103
Ochi, D., Ijima, H. and Kiyofuji, H. (2016) A re-consideration of growth pattern of
skipjack on the western central Pacific. WCPFC-SC12/SA-IP-08.
Sardenne, F., Dortel, E., le Croizier, G., Million, J., Labonne, M., Leroy, B., Bodin, N.,
& Chassot, E. (2015). Determining the age of tropical tunas in the Indian Ocean
from otolith microstructures. Fisheries Research, 163, 44–57.
Secor, D. H., Dean J. M., & Laban, E. H. (1991). Manual for otolith removal and
preparation for microstructural examination. Technical Publication 1991-01. Belle
W. Baruch Institution for Marine Biology and Coastal Research, South Carolina,
viii + 85.
Stéquert, B., & Conand, F. (2004). Age and growth of bigeye tuna (Thunnus obesus) in
the western Indian Ocean. Cybium, 28, 163–170.
Tanabe, T. (2002). Studies on the early life ecology of skipjack tuna, Katsuwonus
Page 36
33
pelamis, in the tropical western-north Pacific. Bulletin of Japan Fisheries Research
and Education Agency, 3, 63–132.
Tanabe, T., Kayama, S., & Ogura, M. (2003b). Precise age determination of young to
adult skipjack tuna (Katsuwonus pelamis) with validation of otolith daily
increment. In 16th Meeting of the Standing Committee on Tuna and Billfish
SCTB16-SKJ-8.
Tanabe, T., Kayama, S., Ogura, M., & Tanaka, S. (2003a). Daily increment formation in
otoliths of juvenile skipjack tuna Katsuwonus pelamis. Fisheries Science, 69, 731–
737.
Uchiyama, J. H., & Struhsaker, P. (1981). Age and growth of skipjack tuna,
Katsuwonus pelamis, and yellowfin tuna, Thunnus albacares, as indicated by daily
growth increment of sagittae. Fishery Bulletin, 79, 151–162.
Wild, A., & Foreman, T. J. (2000). The relationship between otolith increments and
time for yellowfin and skipjack tuna marked with tetracycline. Inter-American
Tropical Tuna Commission, Bulletin 17(7), 509–560.
Wild, A., Wexler, J. B., & Foreman, T. J. (1995). Extended studies of increment
deposition rates in otoliths of yellowfin and skipjack tunas. Bulletin of Marine
Science, 57, 555–562.