38
BCM Rls 6.0 Backup & Restore Task Based Guide

BCM Rls 6.0
Backup & Restore
Task Based Guide
Backup & Restore
2 NN40011-029 Issue 1.2 BCM Rls 6.0
Copyright © 2010 Avaya Inc. All Rights Reserved. Notices
While reasonable efforts have been made to ensure that the information in this document is complete and accurate
at the time of printing, Avaya assumes no liability for any errors. Avaya reserves the right to make changes and
corrections to the information in this document without the obligation to notify any person or organization of such
changes.
Documentation disclaimer
Avaya shall not be responsible for any modifications, additions, or deletions to the original published version of
this documentation unless such modifications, additions, or deletions were performed by Avaya. End User agree to
indemnify and hold harmless Avaya, Avaya’s agents, servants and employees against all claims, lawsuits, demands
and judgments arising out of, or in connection with, subsequent modifications, additions or deletions to this
documentation, to the extent made by End User.
Link disclaimer
Avaya is not responsible for the contents or reliability of any linked Web sites referenced within this site or
documentation(s) provided by Avaya. Avaya is not responsible for the accuracy of any information, statement or
content provided on these sites and does not necessarily endorse the products, services, or information described or
offered within them. Avaya does not guarantee that these links will work all the time and has no control over the
availability of the linked pages.
Warranty
Avaya provides a limited warranty on this product. Refer to your sales agreement to establish the terms of the
limited warranty. In addition, Avaya’s standard warranty language, as well as information regarding support for
this product, while under warranty, is available to Avaya customers and other parties through the Avaya Support
Web site: http://www.avaya.com/support
Please note that if you acquired the product from an authorized reseller, the warranty is provided to you by said
reseller and not by Avaya.
Licenses
THE SOFTWARE LICENSE TERMS AVAILABLE ON THE AVAYA WEBSITE,
HTTP://SUPPORT.AVAYA.COM/LICENSEINFO/ ARE APPLICABLE TO ANYONE WHO DOWNLOADS,
USES AND/OR INSTALLS AVAYA SOFTWARE, PURCHASED FROM AVAYA INC., ANY AVAYA
AFFILIATE, OR AN AUTHORIZED AVAYA RESELLER (AS APPLICABLE) UNDER A COMMERCIAL
AGREEMENT WITH AVAYA OR AN AUTHORIZED AVAYA RESELLER. UNLESS OTHERWISE
AGREED TO BY AVAYA IN WRITING, AVAYA DOES NOT EXTEND THIS LICENSE IF THE
SOFTWARE WAS OBTAINED FROM ANYONE OTHER THAN AVAYA, AN AVAYA AFFILIATE OR AN
AVAYA AUTHORIZED RESELLER, AND AVAYA RESERVES THE RIGHT TO TAKE LEGAL ACTION
AGAINST YOU AND ANYONE ELSE USING OR SELLING THE SOFTWARE WITHOUT A LICENSE. BY
INSTALLING, DOWNLOADING OR USING THE SOFTWARE, OR AUTHORIZING OTHERS TO DO SO,
YOU, ON BEHALF OF YOURSELF AND THE ENTITY FOR WHOM YOU ARE INSTALLING,
DOWNLOADING OR USING THE SOFTWARE (HEREINAFTER REFERRED TO INTERCHANGEABLY
AS "YOU" AND "END USER"), AGREE TO THESE TERMS AND CONDITIONS AND CREATE A
BINDING CONTRACT BETWEEN YOU AND AVAYA INC. OR THE APPLICABLE AVAYA AFFILIATE
("AVAYA").
Copyright
Except where expressly stated otherwise, no use should be made of the Documentation(s) and Product(s) provided
by Avaya. All content in this documentation(s) and the product(s) provided by Avaya including the selection,
arrangement and design of the content is owned either by Avaya or its licensors and is protected by copyright and
other intellectual property laws including the sui generis rights relating to the protection of databases. You may not
modify, copy, reproduce, republish, upload, post, transmit or distribute in any way any content, in whole or in part,
including any code and software. Unauthorized reproduction, transmission, dissemination, storage, and or use
without the express written consent of Avaya can be a criminal, as well as a civil offense under the applicable law.
Third Party Components
Certain software programs or portions thereof included in the Product may contain software distributed under third
party agreements ("Third Party Components"), which may contain terms that expand or limit rights to use certain
portions of the Product ("Third Party Terms"). Information regarding distributed Linux OS source code (for those
Products that have distributed the Linux OS source code), and identifying the copyright holders of the Third Party
Components and the Third Party Terms that apply to them is available on the Avaya Support Web site:
http://support.avaya.com/Copyright.
Trademarks
The trademarks, logos and service marks ("Marks") displayed in this site, the documentation(s) and product(s)
provided by Avaya are the registered or unregistered Marks of Avaya, its affiliates, or other third parties. Users
are not permitted to use such Marks without prior written consent from Avaya or such third party which may own
the Mark. Nothing contained in this site, the documentation(s) and product(s) should be construed as granting, by
implication, estoppel, or otherwise, any license or right in and to the Marks without the express written permission
of Avaya or the applicable third party. Avaya is a registered trademark of Avaya Inc. All non-Avaya trademarks
are the property of their respective owners.

Backup & Restore
NN40011-029 Issue 1.2 BCM Rls 6.0 3
Downloading documents
For the most current versions of documentation, see the Avaya Support. Web site: http://www.avaya.com/support
Contact Avaya Support
Avaya provides a telephone number for you to use to report problems or to ask questions about your product. The
support telephone number is 1-800-242-2121 in the United States. For additional support telephone numbers, see
the Avaya Web site: http://www.avaya.com/support
Copyright © 2010 ITEL, All Rights Reserved
The copyright in the material belongs to ITEL and no part of the material may be reproduced in any form without the prior written permission of a duly authorised representative of ITEL.

Backup & Restore
4 NN40011-029 Issue 1.2 BCM Rls 6.0
Table of Contents
Backup & Restore ............................................................. 5
Overview .................................................................................................. 5
About Backups ......................................................................................... 5
Optional Component Description ....................................................................... 6 Backup File Size ................................................................................................ 6 Backup Locations............................................................................................... 6
Flow Chart ................................................................................................ 8
Performing Immediate Backups ................................................................ 9
Accessing Backup & Restore in Element Manager ........................................... 9 Backup to the BCM .......................................................................................... 12 Backup to Personal Computer ......................................................................... 14 Backup to Network Folder ............................................................................... 17 Backup to a USB Storage Device .................................................................... 19 Backup to FTP Server ..................................................................................... 21 Backup to SFTP Server ................................................................................... 23
Scheduled Backups ................................................................................ 26
Performing a Scheduled Backup ..................................................................... 27
Timestamp Backup Files ........................................................................ 29
Restore ................................................................................................... 30
Restore Options ............................................................................................... 31 Performing a Restore ....................................................................................... 32
To Restore the Factory Configuration ..................................................... 34
Avaya Documentation Links .......................................... 38

Backup & Restore
NN40011-029 Issue 1.2 BCM Rls 6.0 5
Backup & Restore
Overview
The BCM programming can be backed up and restored on an immediate or scheduled basis. You can view the backup schedule and change it as required. The restore operation can be performed on a demand only basis. You can back up data to different locations, including:
The BCM hard drive.
Remote resources.
A USB storage device.
Note: Whichever destination you choose, a copy of the most recent backup always remains on the BCM. You can use this to restore your BCM without transferring a backup from an external device or server.
About Backups
Backups collect the configuration settings and the data generated during the normal operation of the BCM system. Examples of configuration settings include:
IP configuration details.
Telephony programming.
SNMP settings.
Call Detail Recording settings.
BCM schedules (for example, the backup schedule, and the log retrieval schedule).
Greetings.
Prompts.
Examples of data generated during normal operations include:
Voicemail messages.
Call Detail Records.
Faxes.
Envelope information.

Backup & Restore
6 NN40011-029 Issue 1.2 BCM Rls 6.0
Optional Component Description
When performing a backup, there are various options that can be selected or de-selected. If the backup file and backup operation time are a consideration, these options can be omitted during the backup to save time and space. Attribute Description
Call Detail Recording Includes CDR logs containing call information.
CallPilot Configuration Includes Voicemail and Contact Centre information.
CallPilot Messages Includes Voicemail and Contact Centre configuration, and Voicemail and Contact Centre messages.
IP Music Includes files used for Music on Hold played via the on-board Music Manager.
Backups can take some time if there are lots of VoiceMail messages to be included within the backup process.
The backups can be stored at various locations.
Note: It is recommended that you back up BCM data, on a regular basis. In particular, you should perform a backup of the BCM before you undertake major configuration changes and before you apply a software update or upgrade.
You can restore data to the same system or to a different system, at the same software release level. The BCM checks the software release level of the destination system and will provide a warning if an incompatible software release is detected. Backup and restore operations are performed by only one operator at a time to avoid conflicts with other operations. All passwords and database records included with your backup file are encrypted. You can schedule backup operations to occur at specified times, and save a record of the backup schedule that you set.
Backup File Size
Backups can vary in time and size. A basic set up could produce a backup file of 4MB or more. For example, a system with 50 hours of voicemail may take 30 minutes to save to the BCM and produce a file of at least 1 GB.
Backup Locations
The BCM can be backed up to the locations outlined in the following table. The table lists the destinations to which you can back up configuration and application data. Each backup operation, regardless of destination, replaces the BCM’s own copy of the backup.

Backup & Restore
NN40011-029 Issue 1.2 BCM Rls 6.0 7
Destination Description
BCM For an immediate backup, saves data to the hard drive of the BCM, You cannot specify a path. Each backup rewrites any pre-existing backup of the same type.
My Computer For an immediate backup, saves data to any accessible location on the client PC on which the BCM Element Manager is installed. You can specify a name for the backup, so that the pre-existing backup is not automatically overwritten.
Network Folder Saves data to a shared network folder. The remote server must provide a Microsoft Windows-like shared file resource and a user account with rights to create and write files in the destination location. You cannot browse the network directories to select the best destination folder, but you can specify a directory by identifying the path.
USB Storage Device
Saves backup files to a USB storage device. The files will be written to the top directory level. You cannot specify a path to a different directory on the storage device. Each backup overwrites any pre-existing backup of the same type. A USB storage device must be formatted as FAT32.
FTP Server Saves backup data to a File Transfer Protocol server. Credentials and backup data are sent without encryption. The remote server must provide an FTP server application and a user account with rights to allow the BCM to create and write files in the destination location. You cannot browse the FTP server to select the best destination folder, but you can specify a directory by identifying the path.
SFTP Server Saves backup data to an SFTP server. This method sends encrypted login credentials and backup data. You must set up the remote SFTP server to allow the BCM to communicate with the SFTP server. The BCM system can generate a public SSH key, which you must install on the remote SFTP server. For information about SSH keys, see the chapter BCM Security.
Note: Before you back up BCM data, make sure that the BCM has appropriate access to the shared resource on which you will store the data. You must set full access permissions on the shared resource.

Backup & Restore
8 NN40011-029 Issue 1.2 BCM Rls 6.0
Flow Chart
Use the flow chart below to determine which sections of the guide to use.
Which operation do you wish to perform?
Will the Backup be Immediate or Scheduled?
Refer to the Performing Immediate Backups section
of this guide.
Refer to the Restore section of this guide.
Refer to the Scheduled Backups section of this
guide.
Restore Backup
Scheduled Immediate

Backup & Restore
NN40011-029 Issue 1.2 BCM Rls 6.0 9
Performing Immediate Backups
Immediate backups can be sent to the following storage locations:
The BCM itself.
The Client PC running Element Manager.
Network folder.
A USB storage device inserted into the USB port of the BCM.
An FTP server.
A SFTP sever.
Note: A backup operation will interrupt CallPilot services if CallPilot Components are included in the backup. You can exclude these components from the backup if you want to perform a backup that does not affect the system, or include them and perform a backup at a time when the system is typically not in use.
Accessing Backup & Restore in Element Manager
1. To access the Business Element Manager application from the Start
Menu, navigate to Start, Programs, Avaya, Business Communications Manager, Business Element Manager.

Backup & Restore
10 NN40011-029 Issue 1.2 BCM Rls 6.0
2. Alternatively, double-click on the Business Element Manager desktop icon.
3. You will be presented with the Element Manager interface.
4. Open the Network Elements folder and select the IP Address of the BCM.
5. Enter the User Name of the BCM in the User Name field, by default this is nnadmin. Then enter the Password in the Password field, by default the password is PlsChgMe!. Click the Connect button.

Backup & Restore
NN40011-029 Issue 1.2 BCM Rls 6.0 11
6. A warning screen will appear, read the warning and click OK.
7. You will be presented with the Element Manager interface.
Backup & Restore
12 NN40011-029 Issue 1.2 BCM Rls 6.0
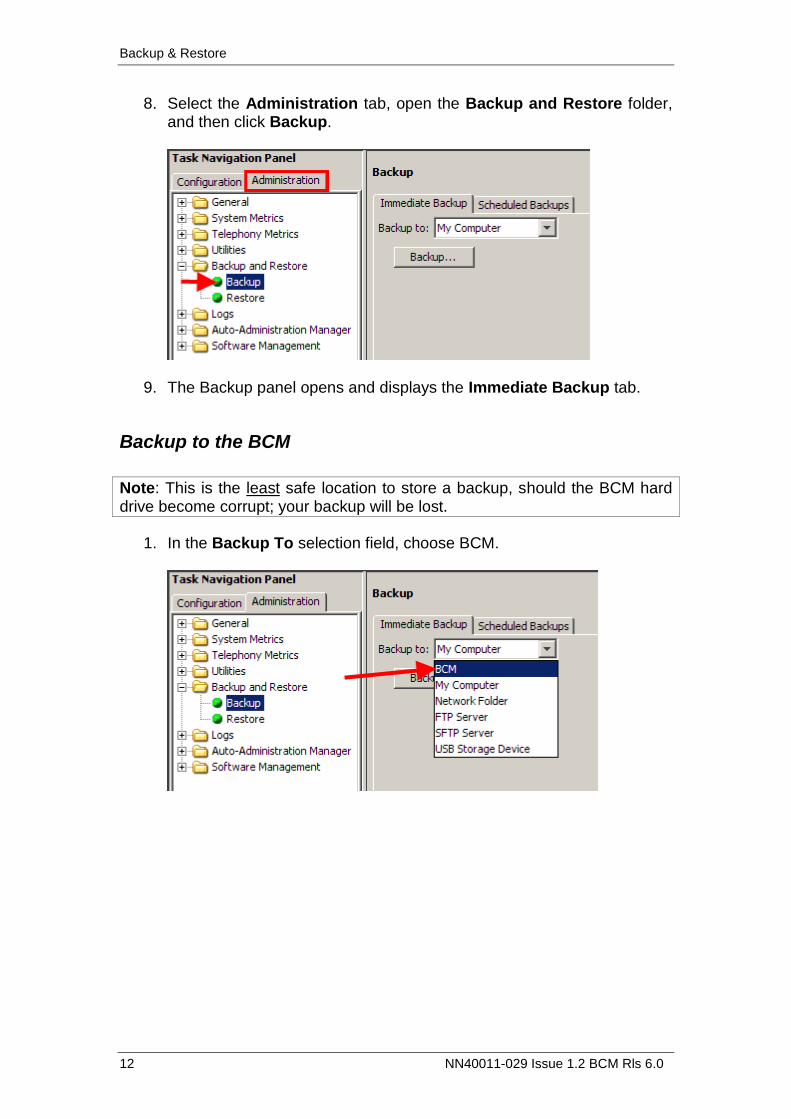
8. Select the Administration tab, open the Backup and Restore folder, and then click Backup.
9. The Backup panel opens and displays the Immediate Backup tab.
Backup to the BCM
Note: This is the least safe location to store a backup, should the BCM hard drive become corrupt; your backup will be lost.
1. In the Backup To selection field, choose BCM.
Backup & Restore
NN40011-029 Issue 1.2 BCM Rls 6.0 13
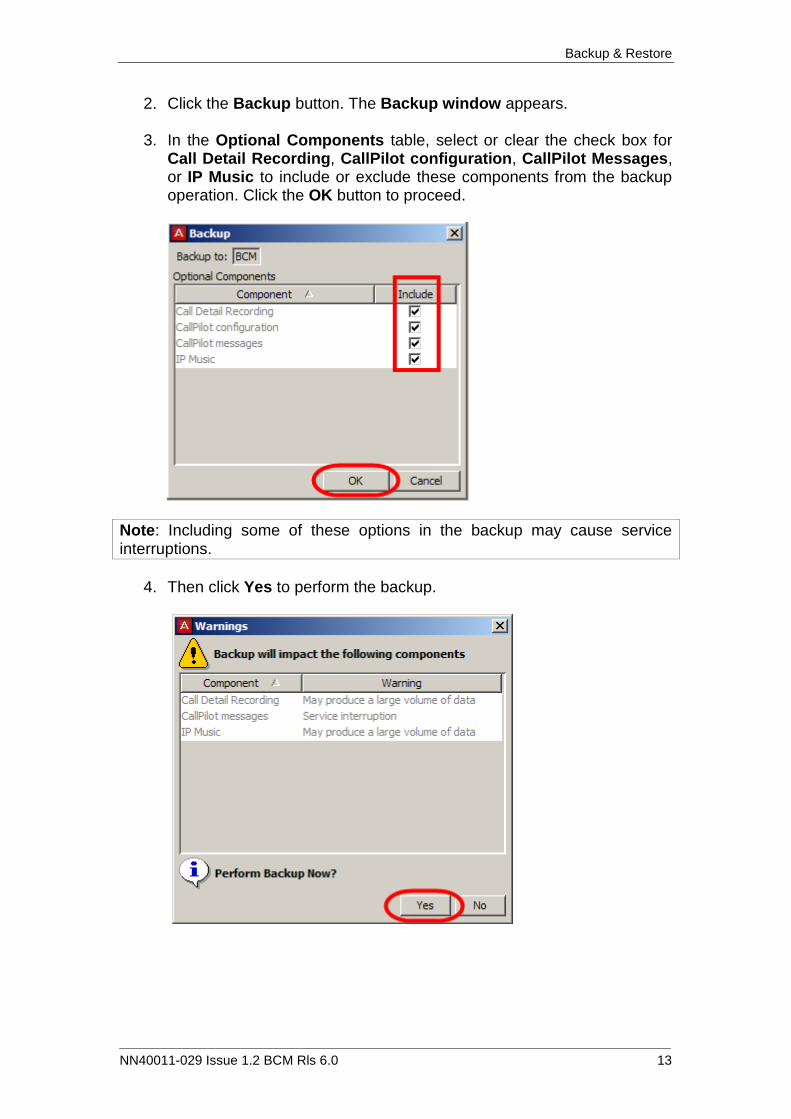
2. Click the Backup button. The Backup window appears.
3. In the Optional Components table, select or clear the check box for Call Detail Recording, CallPilot configuration, CallPilot Messages, or IP Music to include or exclude these components from the backup operation. Click the OK button to proceed.
Note: Including some of these options in the backup may cause service interruptions.
4. Then click Yes to perform the backup.

Backup & Restore
14 NN40011-029 Issue 1.2 BCM Rls 6.0
5. A progress window opens.
6. When the backup is complete, the Backup Complete message appears Click the OK button.
Backup to Personal Computer
1. Select the Administration tab, open the Backup and Restore folder, and then click Backup.
2. The Backup panel opens and displays the Immediate Backup tab.

Backup & Restore
NN40011-029 Issue 1.2 BCM Rls 6.0 15
3. In the Backup To selection field, select My Computer.
4. Click the Backup button. The Backup window opens.
5. In the Optional Components table, select or clear the check box for Call Detail Recording, CallPilot configuration, CallPilot Messages, or IP Music to include or exclude these components from the backup operation. Click the OK button to proceed.
Note: including some of these options in the backup may cause service interruptions.

Backup & Restore
16 NN40011-029 Issue 1.2 BCM Rls 6.0
7. Then click Yes to proceed.
6. When the Backup files are ready to be transferred, a Browse window appears prompting for a location on your computer. Select a location, enter a file name, and click Save.

Backup & Restore
NN40011-029 Issue 1.2 BCM Rls 6.0 17
7. A progress window opens. When the backup is complete, the Backup Complete message appears. Click the OK button.
Backup to Network Folder
Note: Ensure that the target location is a shared file on a networked PC The Shared file should have full read/write permissions. For example:
1. Select the Administration tab, open the Backup and Restore folder,
and then click Backup.
2. The Backup panel opens and displays the Immediate Backup tab.
3. Select Network Folder from the Backup to dropdown box.
4. Configure the Network Folder attributes.

Backup & Restore
18 NN40011-029 Issue 1.2 BCM Rls 6.0
Attribute Action
Network Folder
Enter the hostname or IP address of the network folder and the resource name. For example, enter \\<server>\<resource>.
User Name Enter the user name associated with the network folder.
Password Enter the password associated with the network folder.
Directory Enter the path to the subdirectory (optional).
5. Click the Backup button. The Backup window opens.
6. In the Optional Components table, select or clear the check box for
Call Detail Recording, CallPilot configuration, CallPilot Messages, or IP Music to include or exclude these components from the backup operation. Click the OK button to proceed.
Note: including some of these options in the backup may cause service interruptions.
7. Then click Yes to perform the backup.

Backup & Restore
NN40011-029 Issue 1.2 BCM Rls 6.0 19
8. A progress window opens. When the backup is complete, the Backup
Complete message appears Click the OK button.
Backup to a USB Storage Device
1. Insert a USB storage device into the USB slot on the front of the BCM.
2. Select the Administration tab, open the Backup and Restore folder,
and then click Backup. The Backup panel opens and displays the Immediate Backup tab.
3. Select USB Storage Device from the Backup to dropdown box.
4. Click the Backup button. The Backup window opens.

Backup & Restore
20 NN40011-029 Issue 1.2 BCM Rls 6.0
5. In the Optional Components table, select or clear the check box for Call Detail Recording, CallPilot configuration, CallPilot Messages, or IP Music to include or exclude these components from the backup operation. Click the OK button to proceed.
Note: including some of these options in the backup may cause service interruptions.
6. Then click Yes to perform the backup.

Backup & Restore
NN40011-029 Issue 1.2 BCM Rls 6.0 21
7. A progress window opens. When the backup is complete, the Backup Complete message appears. Click the OK button.
Backup to FTP Server
1. Select the Administration tab, open the Backup and Restore folder,
and then click Backup. The Backup panel opens and displays the Immediate Backup tab.
2. Select FTP Server from the Backup to dropdown box.

Backup & Restore
22 NN40011-029 Issue 1.2 BCM Rls 6.0
3. Configure the FTP Server attributes.
Attribute Action
FTP Server Enter the hostname or IP address of the FTP server.
User Name Enter the user name associated with the FTP server.
Password Enter the password associated with the FTP server.
Directory Enter the path to the subdirectory (optional).
4. Click the Backup button. The Backup window opens.
5. In the Optional Components table, select or clear the check box for
Call Detail Recording, CallPilot configuration, CallPilot Messages, or IP Music to include or exclude these components from the backup operation. Click the OK button to proceed.
Note: including some of these options in the backup may cause service interruptions.

Backup & Restore
NN40011-029 Issue 1.2 BCM Rls 6.0 23
6. Then click Yes to perform the backup.
7. A progress window opens. When the backup is complete, the Backup
Complete message appears. Click the OK button.
Backup to SFTP Server
1. Select the Administration tab, open the Backup and Restore folder,
and then click Backup. The Backup panel opens and displays the Immediate Backup tab.

Backup & Restore
24 NN40011-029 Issue 1.2 BCM Rls 6.0
2. Select SFTP Server from the Backup to dropdown box.
3. Configure the SFTP Server attributes.
Attribute Action
SFTP Server Enter the hostname or IP address of the SFTP server.
User Name Enter the user name associated with the SFTP server.
Password Enter the Password associated with the SFTP server.
Directory Enter the path to the subdirectory (optional).
4. Click the Backup button. The Backup window opens.

Backup & Restore
NN40011-029 Issue 1.2 BCM Rls 6.0 25
5. In the Optional Components table, select or clear the check box for Call Detail Recording, CallPilot configuration, CallPilot Messages, or IP Music to include or exclude these components from the backup operation. Click the OK button to proceed.
Note: including some of these options in the backup may cause service interruptions.
6. Then click Yes to perform the backup.

Backup & Restore
26 NN40011-029 Issue 1.2 BCM Rls 6.0
8. A progress window opens. When the backup is complete, the Backup Complete message appears. Click the OK button.
Scheduled Backups
You can create scheduled backups in order to perform backups at a date and time that you choose. For example, you can choose a date and time during which the business is closed. This will avoid disrupting the normal work-day routine and may allow your backup file to transfer more quickly. You can create a schedule for a single backup operation or for operations that recur on a regular basis. You can view existing scheduled backups, as well as modify and delete them. Scheduled Backups can be performed to the following locations:
The BCM itself.
Network folder.
A USB storage device inserted into the USB port of the BCM.
An FTP server.
A SFTP sever. For the specific details of each backup type, please refer to the relevant sub-section of the Performing an Immediate Backup section of this guide.
Backup & Restore
NN40011-029 Issue 1.2 BCM Rls 6.0 27
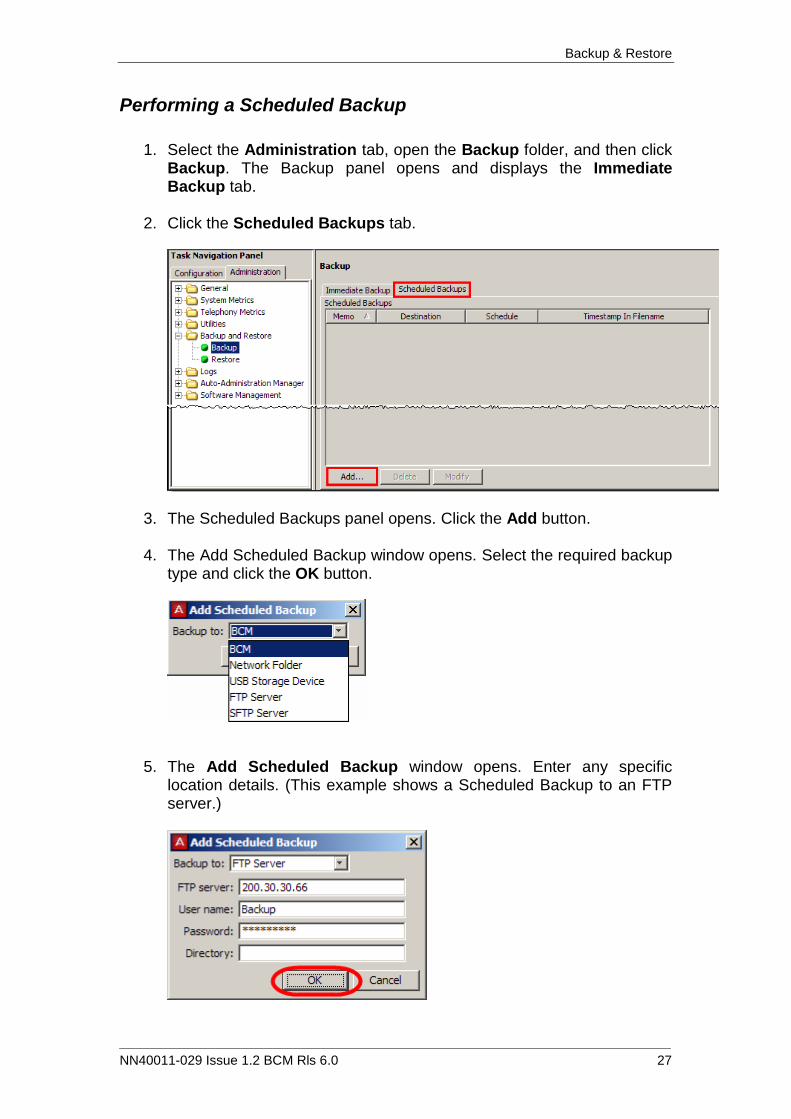
Performing a Scheduled Backup
1. Select the Administration tab, open the Backup folder, and then click Backup. The Backup panel opens and displays the Immediate Backup tab.
2. Click the Scheduled Backups tab.
3. The Scheduled Backups panel opens. Click the Add button. 4. The Add Scheduled Backup window opens. Select the required backup
type and click the OK button.
5. The Add Scheduled Backup window opens. Enter any specific location details. (This example shows a Scheduled Backup to an FTP server.)

Backup & Restore
28 NN40011-029 Issue 1.2 BCM Rls 6.0
6. In the Optional Components table, select or clear the check box for Call Detail Recording, CallPilot configuration, CallPilot Messages, or IP Music to include or exclude these components from the backup operation.
7. Next, configure the Schedule Recurrence and additional details, which determine when the backup operations will be performed. Click OK when finished.

Backup & Restore
NN40011-029 Issue 1.2 BCM Rls 6.0 29
8. You now have the option of verifying the connection details, dependant on the backup location. Click Test Connection to verify the backup location, or Continue to bypass this operation.
9. The results of the connection test will be displayed. If the test has failed, re-enter the location details entered earlier.
10. The Scheduled Backup is displayed in the Scheduled Backups table,
which also shows whether the Timestamp option was selected (refer to the Timestamp Backup Files section of this guide for more information).
Timestamp Backup Files
When creating a backup, some options allow you to include a timestamp in the Backup filename. This adds the creation date and time to any new backup file, and is a tick box option when selecting which elements to backup.
Note: This option is available on USB, FTP, SFTP and Network Folder options only.

Backup & Restore
30 NN40011-029 Issue 1.2 BCM Rls 6.0
Files without the timestamp will appear as follows:
Files with a timestamp appear as follows:
Note: This option is also available on the BCM Logs.
Restore
You can restore the BCM data using Element Manager. The restore software determines compatibility with the backup file. Incompatible backups cannot be restored at all.
Note: Compatible backups may have incompatible sub-components which must be excluded from a Restore operation. This situation can occur if your BCM software is upgraded and a component changes the data that it includes in the backup. New backups should be made after any change to your BCM software to avoid this situation.
However, it may be possible to recover data for components that have not changed from backups made prior to your software upgrade. Restore operations are available to one user at a time, and on demand only; they cannot be scheduled. You can retrieve the most recent backup file that you want to use for the restore operation from the BCM or from an external storage location.

Backup & Restore
NN40011-029 Issue 1.2 BCM Rls 6.0 31
Restore Options
You can select the components for which you want to restore configuration or application data. Optional components
You can restore configuration or application data for the following optional components:
Activity Reporter.
Alarm Settings.
Auto Administration Manager.
Call Data Recording.
CallPilot Configuration.
CallPilot Messages.
Core Telephony.
Data Services + Network interfaces.
Date and Time.
Doorphone.
IP Music.
IP Telephony.
LAN CTE.
Media Services Manager.
QOS Monitor.
Scheduling.
Security.
Survivable Remote Gateway.
Note: A restore operation is a service affecting operation. A number of services running on the BCM system are stopped and then restarted using the restored configuration or application data. A reboot is required if you choose to restore the Keycodes component. It takes several minutes before Voicemail is working again.

Backup & Restore
32 NN40011-029 Issue 1.2 BCM Rls 6.0
Performing a Restore
Use the following procedure to restore a previous configuration the BCM.
1. Select the Administration tab, open the Backup & Restore folder, and then click on Restore.
2. The Restore panel opens. In the Restore from drop down list, select
one of the following to restore from:
BCM.
My Computer.
Network Folder.
FTP Server.
SFTP Server.
USB Storage Device.
Factory Default (refer to the Restore to Factory Configuration section of this guide).

Backup & Restore
NN40011-029 Issue 1.2 BCM Rls 6.0 33
3. Select the location for the Backup file. You may need to enter further locations and security details so that the BCM can access the backup file.
4. The backup file detail box appears. If all details are correct, click OK.
5. The Select Components to Restore window opens. From the open window select the optional components that you want to include from the backup file. Click the OK button when ready.

Backup & Restore
34 NN40011-029 Issue 1.2 BCM Rls 6.0
6. A warning window opens and displays information about components that will be affected by the restore operation. If OK, click Yes to continue.
7. A progress window opens. When the operation is complete, the Restore complete window opens. Click the OK button.
8. The BCM will then reboot.
To Restore the Factory Configuration
Your BCM is delivered with a backup file that was created at the factory. This file can be a helpful starting point if you decide to completely re-configure your BCM and would like to erase the settings programmed on your device. Although you can select individual components to restore, it is recommended that you restore all components when using this option.
Note: For alternative methods of resetting the BCM to default states, refer to the BCM Command Line Interface section of the of the respective model Hardware and Installation guide.

Backup & Restore
NN40011-029 Issue 1.2 BCM Rls 6.0 35
1. Click the Administration tab. Open the Backup and Restore folder, and then click Restore.
2. The Restore panel opens.
3. In the Restore from selection field, select Factory Default.
4. Click the Restore button.
5. The Backup File detail box appears. Click OK to continue.

Backup & Restore
36 NN40011-029 Issue 1.2 BCM Rls 6.0
6. The Select Components to Restore window opens. It is recommended that for this operation you leave all components selected. Alternatively, select the optional components that you want to include from the backup archive. Click the OK button when ready.
7. A warning window opens and displays information about components
that will be affected by the restore operation. Click the Yes button to proceed.

Backup & Restore
NN40011-029 Issue 1.2 BCM Rls 6.0 37
8. A progress window opens. When the operation is complete, the Restore complete window opens. Click the OK button.
9. The BCM will then reboot.

Backup & Restore
38 NN40011-029 Issue 1.2 BCM Rls 6.0
Avaya Documentation Links
Administration and Security guide


