TASKE is a registered trademark of TASKE Technology Inc.MITEL and SX-200 are registered trademarks of Mitel Corporation.
All other trademarks and registered trademarks are the property of their respective owners.
The TASKE Software License
1. GRANT OF LICENSE
TASKE Technology grants to you, the end user, the right to use one copy of the TASKE ToolBoxprograms (the “SOFTWARE”) on a single terminal that is connected to a single computer (witha single CPU). You may not copy the SOFTWARE or otherwise use it on more than onecomputer or computer terminal at the same time UNLESS you have purchased a TASKENetwork ToolBox, in which case you are limited to the number of simultaneous users as calledfor in your network license.
2. COPYRIGHT
The SOFTWARE is owned by TASKE and is protected by U.S. and Canadian copyright laws andinternational treaty provisions. Therefore, you must treat the SOFTWARE like any othercopyrighted material (such as a book or musical recording) EXCEPT that you may either a) makea copy of the SOFTWARE solely for backup or archival purposes or b) transfer the SOFTWAREto a single hard disk provided that you keep the original solely for backup or archival purposes.
3. OTHER RESTRICTIONS
You may not RENT or LEASE the SOFTWARE, but you may transfer the SOFTWARE with theaccompanying written materials on a permanent basis provided that you retain no copies and therecipient agrees to the terms of this Agreement. You may not reverse engineer, decompile ordisassemble the SOFTWARE.
4. LIMITED WARRANTY
TASKE warrants that a) the SOFTWARE will perform substantially in accordance with theaccompanying printed materials for a period of 365 days from the date of receipt, and b) anyhardware accompanying the SOFTWARE will be free of defects in materials and workmanshipunder normal use and service for 90 days from the date of receipt.
5. CUSTOMER REMEDIES
TASKE’S entire liability and your exclusive remedy shall be, at TASKE’S option, either a) return ofthe price paid or b) repair and replacement of the SOFTWARE or hardware that does not meetTASKE’S Limited Warranty and which is returned to TASKE with a copy of the receipt ofpurchase. The Limited Warranty is VOID if failure of the SOFTWARE or hardware has resultedfrom accident, abuse or misapplication. Any replacement SOFTWARE will be warranted for theremainder of the original warranty period OR 30 days, whichever is longer.
6. NO OTHER WARRANTIES
TASKE disclaims all other warranties, either express or implied, including but not limited to impliedwarranty of merchantability and fitness for a particular purpose, with respect to the SOFTWARE,the accompanying written materials, and any accompanying hardware.
7. NO LIABILITY FOR CONSEQUENTIAL DAMAGES
In no event shall TASKE or its suppliers be liable for any damages whatsoever (including,without limitation, damages for loss of business profits, business interruption, or other pecuniaryloss) arising out of the use or inability of this TASKE product, even if TASKE has been advisedof such damages.
The TASKE Environment................................................................................................................................1
Network Considerations...................................................................................................................................1A Word about TCP/IP ....................................................................................................................................1
CHAPTER 2: TASKE SOFTWARE LOCK AND LICENSING.................................. 3Unlocking the TASKE Software.....................................................................................................................3Software Lock Driver Software ......................................................................................................................3Software License Files ...................................................................................................................................3Registering Your Software .............................................................................................................................3Upgrading TASKE Software ..........................................................................................................................4Downloading Files from the TASKE Web Site...............................................................................................4
CHAPTER 3: TOOLBOX INSTALLATION FOR SERVER ....................................... 5Overview.......................................................................................................................................................5Requirements.................................................................................................................................................5Assumptions ..................................................................................................................................................6
Software Lock Installation...............................................................................................................................8ECP and EPP Parallel Ports ...........................................................................................................................8
Software Installation........................................................................................................................................9Before You Begin ..........................................................................................................................................9If You are Upgrading .....................................................................................................................................9Installing the TASKE ToolBox Server Software ...........................................................................................10
CHAPTER 4: TOOLBOX INSTALLATION FOR SUPERVISOR/CLIENT ............... 17Overview.....................................................................................................................................................17Requirements...............................................................................................................................................17Assumptions ................................................................................................................................................18
Software Installation......................................................................................................................................18Before You Begin ........................................................................................................................................18If You are Upgrading ...................................................................................................................................18Installing the TASKE ToolBox Client Software............................................................................................19
Configuring Microsoft Software....................................................................................................................29Configuring a Parallel Port Under Windows 95............................................................................................29Adding File & Printer Services under Windows 95/98..................................................................................30Windows 95/98 Sharing and Permissions .....................................................................................................31Windows NT Sharing and Permissions.........................................................................................................32Mapping a Network Drive............................................................................................................................33
APPENDIX C: TASKE VOICE TOOLBOX ............................................................. 34Installing Dialogic Boards............................................................................................................................34Installing ONS Ports from the PBX..............................................................................................................36
This Installation guide provides instructions for installing the TASKE ToolBox software.And describes how to configure a TASKE Server and network connected PCs. You’ll findinstallation procedures specific to each type of install (server and client).
This guide also contains detailed reference information about the Microsoft networkenvironment and the interface to the host PBX system.
The TASKE EnvironmentThe TASKE ToolBox may be installed in a client-server (network) configuration. In anetwork configuration, the TASKE system comprises a network server and one or moreclient PCs. The installation procedures in this guide refer to the functional units in theTASKE environment as described below.
TASKE Server The TASKE Server is connected to the host PBX system. The TASKE ACDToolBox (which includes the TASKE ACD Collector program) collects raw PBX data andstores it in a format that can be shared by other TASKE programs.
When you install TASKE software, the ServerPath path refers to the location of TASKEdata, regardless of whether it resides on the TASKE Server or on a network-connected fileserver.
TASKE Client PC Although a TASKE Client PC has all the functionality of a TASKEServer, it isn’t connected directly to the host PBX system. However, the ACD Collectorprogram running on a TASKE Client PC can share TASKE data through a networkconnection.
Network ConsiderationsThe TASKE ACD ToolBox supports two types of networking software: MicrosoftNetworking (recommended) and Novell Netware. The installation procedures in this guideassume that you’re using Microsoft Networking Windows 95, Windows 98, and WindowsNT all come with Microsoft Networking services built into the operating system.
A Word about TCP/IPThe installation procedures in this guide also assume that TCP/IP is installed, configured,and working properly on all PCs in the TASKE network the TASKE ACD ToolBox usesport number 5200 to communicate with other TASKE programs. Please verify that port 5200isn’t being used on your network.
If you have to test the operation of TCP/IP to ensure that it is working properly, try thefollowing:
• At each of the PCs running TASKE Call Center Management Tools, 'ping127.0.0.1', which is the local host address (referring to the machine thatyou are sitting at). If this doesn’t work, reinstall and configure the localTCP/IP stack.
• At each PC having a network connection to the TASKE Server, ping theTASKE Server. If you can do this, TCP/IP should be working properly.
The software described in this guide is provided under a license agreement with TASKETechnology, Inc. The software may be used or distributed only in accordance with the termsof your license agreement.
Unlocking the TASKE SoftwareTASKE Technology Inc. administers the legal use of TASKE software through softwarelocks, Administration disks, and license files. This section explains how the software lockand license files work together.
Software Lock Driver SoftwareWindows 95, Windows 98, and Windows NT do not allow applications to communicatedirectly with the hardware of the machine. All requests must be done through the operatingsystem and the drivers. Therefore, a driver must be installed in order for TASKE tocommunicate with the software lock. This driver (Sentinel) is copied to the TASKE Serverautomatically when you install the TASKE ToolBox.
When you install the TASKE ToolBox, you are prompted to specify a path (ExePath), whichthe computer will use to locate TASKE ToolBox programs and files. The Sentinel drivers forthe software lock are copied into subdirectories of the directory you specify. By default, theinstallation script creates a target directory called “taske” on drive c: and copies theprograms and files there. For example, if you accept c:\taske as the ExePath, the drivers forthe software lock are copied to the c:\taske\Sentinel directory.
Software License FilesThe TASKE ToolBox checks for the presence of two software license files in conjunctionwith the software lock to regulate the use of TASKE Software. The two files are calledTASKELCK.INI and TASKELCK.LIS. The contents of these license files and the I.D.number that’s programmed into the software lock determine which software features andfunctions will be made available to you via the TASKE ToolBox.
License files are shipped on the Administration disk. When you install the TASKE ToolBox,the installation script prompts you for the location of these license files. Typically, you willonly need to confirm the default path, a: (assuming drive a: is mapped to the floppy diskdrive). The installation script copies the license files from the floppy disk to the TASKEServer automatically, saving them to the taske directory.
Registering Your SoftwarePlease take a few minutes to complete and submit your registration card. Registering yoursoftware will allow you to qualify for free software upgrades. You will also be put on ourmailing list so that you can stay informed of new releases and other important informationrelated to TASKE Call Center Management Tools.
Upgrading TASKE SoftwareIf you are upgrading from a previous release of TASKE software, we recommend that youdownload the latest software from the TASKE web site (www.taske.com). The software isavailable in self-extracting, compressed-file format. You may download a single file(recommended if you have a fast connection to the Internet) or download a number ofsmaller compressed files one at a time (recommended if you have a slow or undependableconnection).
After downloading the files, you will have to contact TASKE Technology Inc. for newlicense files. When you contact TASKE Technology Inc. for new licensing information,please have your software Lock Number on hand. New licensing information is providedelectronically through email or on a new Administration disk through ground mail.
Tip: You are eligible to receive free upgrades if your TASKE software is under warranty. Ifyour software warranty has expired, you must contact your dealer to renew your warrantybefore new license files can be provided.
If you receive new license files via email, copy the new files to a floppy disk this disk willbecome your new Administration disk. The new disk will replace previous versions of theAdministration disk. The new disk may be used with your existing software lock (dongle).
Downloading Files from the TASKE Web SiteTo download and decompress files obtained from the TASKE web site:
1. Using your favorite web browser, go to the download area of the TASKEweb site (www.taske.com).
2. Click the file that you would like to download. Your browser will promptyou to open or save the file.
3. Save the file to a temporary area on your computer’s hard disk. Yourbrowser will start downloading the selected file.
4. If you are downloading several smaller files, repeat Step 3 until all thefiles you need have been downloaded.
5. Decompress the downloaded files:
In the Windows Explorer, double-click each of the downloaded files oneat a time. This starts the self-extraction process. Several directoriesnamed Disk1, Disk2, Disk3, etc. will be created in the directory whereyour compressed files have been saved.
If you downloaded one file, you must run the WinZip program, in order toallow Winzip to create all of the subdirectories required for the TASKEToolBox install to function properly. If you do not run the WinZipapplication to unzip the downloaded file, the unzip will fail.
________________________TASKE ACD ToolBox Installation Guide 5Chapter 3: ToolBox Installation for Server
OverviewThis chapter describes the options and steps to follow while installing the TASKE serversoftware on a computer running Windows 95, 98, or NT 4.0. The TASKE software can beinstalled from the TASKE Call Centre Management Tools CD-ROM or from files that havebeen downloaded from the TASKE web site.
After installing the TASKE ToolBox, certain file and directory access permissions must beproperly configured for the TASKE software to communicate with the TASKE Server. Youmust:
• Set up directory sharing on the taske directory.
The following directories need to be shared on the TASKE Server. Note that not all of thesedirectories will exist, depending on which server component you select to install.
• SiteData (stores all the PBX data, summaries, and database for the ACD ToolboxServer)
• SignData (stores the database for the Wall Sign Server)
• VoiceData (stores the database and sound files for the Voice Server).
IMPORTANT: Ensure that all other programs are shut down before installing the TASKEsoftware.
It is not possible to install this software without your licensing information. During theinstallation you are requested to insert a disk named License Info, or be able to provide thedirectory Path where this information resides.
If you are upgrading from version 3.10.XXX of the TASKE ACD ToolBox, the softwareconverts these files to the PBX format. This procedure can take several hours depending onthe quantity and size of PBX data files. However, the TASKE ACD Collector continues tocollect records during the conversion process.
Please ensure your system has the necessary hardware configuration recommended byTASKE for use with the TASKE ACD ToolBox and Voice ToolBox applications.
RequirementsPlease ensure your system has the necessary hardware configuration recommended byTASKE for use with the TASKE Toolbox and TASKE Voice Toolbox applications.
• The host PBX system has been configured to support TASKE software (refer toAppendix A)
________________________TASKE ACD ToolBox Installation Guide 7• The host PBX system and the TASKE Server have been connected (refer to Appendix
A)
If you are installing the TASKE software in a network environment (i.e. you are installingTASKE Call Center Management Tools on a number of network-connected computers), weadditionally assume that the following software has been installed, configured, and tested oneach PC:
• Microsoft file and printer sharing services
• TCP/IP network protocol services
If you are installing the TASKE database on a network-connected file server, we assumethat:
• the file server has sufficient capacity for the TASKE database
• a logical network drive has been mapped to the file server (ServerPath directory) fromthe TASKE Standalone PC or TASKE Server (see “Mapping a Network Drive” inAppendix B)
• Installing the DigiBoard serial communications card.
• Installing the TASKE Software Lock.
DigiBoard InstallationA Digi board is an intelligent serial communication card inserted into a spare slot on a PC'smotherboard. TASKE recommends the use of Digi "smart cards" (ex. XE series) with theACD ToolBox for the following reasons.
• they provide additional communication ports, without using system IRQs
• they have an onboard processor for buffering data
• they are supported by Windows For Workgroups, Windows 95, and Windows NT
To install a Digi board and its software drivers, please refer to the Digi installation guideprovided by the manufacturer of the board.
Software Lock InstallationThe software lock is a blue adapter connected to the printer port on the TASKE machine andconnected to the telephone switch. The male end of the software lock (the end with pins)connects to the parallel (printer) port on the back of the TASKE Server or Standalonemachine.
If there is a printer already connected to the printer port on the PC, you must disconnect theprinter, plug the software lock into the printer port, and plug the printer cable into thefemale end (end without pins) of the software lock. This setup is illustrated below.
TASKE Machine
Printer
Software Lock
Printer Cable
Important: The software lock (dongle) must remain connected to the TASKE Server as longas TASKE Call Center Management Tools are being used.
ECP and EPP Parallel PortsThe TASKE ToolBox requires a standard parallel port for the software lock to functionproperly. Most Pentium systems include an on-board, high performance Parallel Portconfigured through the system's CMOS settings. The following sections discuss the stepsrequired to configure the hardware and operating system software as a standard parallel port.
Hardware Configuration
To disable extended bidirectional (i.e. ECP port) functionality and force the port to emulate astandard printer port, you must disable the ECP port functionality through the system'sCMOS settings. Although each system is different, the option can usually be found underChipset Features Setup or Peripherals Configuration. Ensure the Port Type or Port Modeis set to Normal, AT, or SPP. It should not be configured as ECP or EPP.
Note: If you require more information about configuring the port via CMOS settings, refer tothe hardware documentation that came with your computer.
________________________TASKE ACD ToolBox Installation Guide 9Note Configuring the hardware alone in Windows 95 may not enable the software lock tofunction properly. Configuring the Windows 95 operating system software may be required.For instructions about how to configure the parallel port under Windows 95, see AppendixB.
Note: Bi-directional printers (such as the HP 5 Laserjet series) connected to the softwarelock can fool the operating system into thinking the lock is not present. In the event a bi-directional printer printer is connected to the TASKE Server, TASKE recommends that thebi-directional functionality of the printer be disabled.
Software InstallationFollow the procedure below to install TASKE ACD ToolBox software and the TASKEdatabase from the TASKE Call Center Management Tools CD-ROM, or from files that havebeen downloaded from the TASKE web site.
Before You BeginTo ensure a successful, first-time installation, verify that the TASKE Server has at least 4GB of free disk space on the target hard drive (for storing TASKE programs and TASKEdata), and have the following items on hand:
• TASKE Call Center Management Tools CD-ROM, or decompressed files from theTASKE web site.
• Administration floppy disk.
Important: The readme.txt file on the CD-ROM contains important, last-minuteinformation about TASKE Call Center Management Tools. Before you start the installationprocedure, please review the readme.txt file it can be opened on the CD-ROM using atext editor.
If You are UpgradingWhen you install the TASKE ToolBox, any existing program files are overwritten. Althoughthe installation procedure has no effect on the TASKE database, it is a good idea to back upthe data if you are about to upgrade from a previous release of TASKE ToolBox software.
Note: If you are installing a Network version, you must shut down all TASKEToolBox software on each TASKE Client and TASKE Server and install the softwareon the TASKE Server first. The ACD Collector must be shutdown before beginningand the computer must be re-booted when the installation is complete.
1. If you haven’t done so already, install the software lock (dongle) asillustrated previously.
2. If any applications are running on your computer, close them now.
3. Insert the TASKE Call Center Management Tools CD-ROM and clickInstall when the Autorun dialog box opens.OrIf you have files from the TASKE web site, open the Disk1 directory in thetemporary area on your computer’s local hard drive, then double-click theSetup.exe program icon.
Once the setup program is launched, the Welcome dialog box appears. This is a reminder toclose any programs currently running on your PC before continuing the installation of theTASKE Setup program.
4. Choose the Next > button to allow the TASKE ToolBox installation toproceed.
The Software License Agreement dialog box appears.
5. Once you have read the Software License Agreement, if you agree, selectthe Next > button.
The Setup Information dialog box appears. Be sure to read the Setup information, andfollow the directions it contains.
6. Once you have read the Setup Information, select the Next > button.
The Operating System Requirements dialog box appears. Make sure you have therecommended requirements before continuing with the installation.
7. Once you have read the System Requirements, select the Next > button.
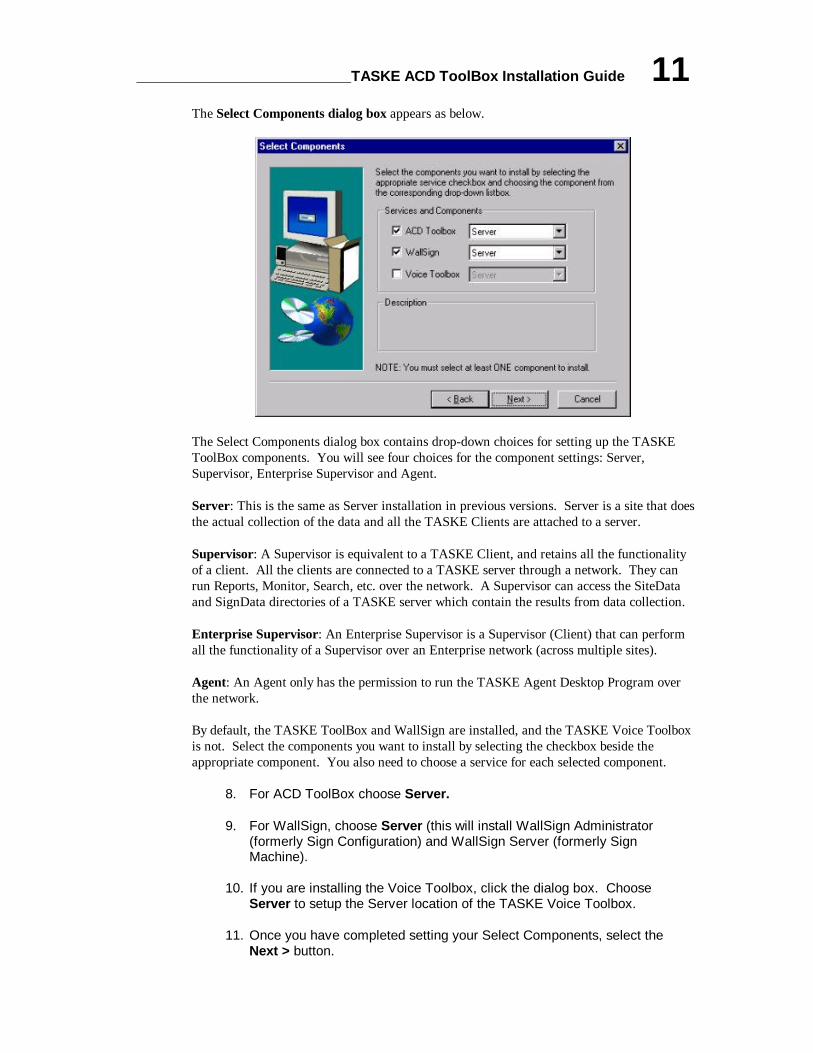
The Select Components dialog box contains drop-down choices for setting up the TASKEToolBox components. You will see four choices for the component settings: Server,Supervisor, Enterprise Supervisor and Agent.
Server: This is the same as Server installation in previous versions. Server is a site that doesthe actual collection of the data and all the TASKE Clients are attached to a server.
Supervisor: A Supervisor is equivalent to a TASKE Client, and retains all the functionalityof a client. All the clients are connected to a TASKE server through a network. They canrun Reports, Monitor, Search, etc. over the network. A Supervisor can access the SiteDataand SignData directories of a TASKE server which contain the results from data collection.
Enterprise Supervisor: An Enterprise Supervisor is a Supervisor (Client) that can performall the functionality of a Supervisor over an Enterprise network (across multiple sites).
Agent: An Agent only has the permission to run the TASKE Agent Desktop Program overthe network.
By default, the TASKE ToolBox and WallSign are installed, and the TASKE Voice Toolboxis not. Select the components you want to install by selecting the checkbox beside theappropriate component. You also need to choose a service for each selected component.
8. For ACD ToolBox choose Server.
9. For WallSign, choose Server (this will install WallSign Administrator(formerly Sign Configuration) and WallSign Server (formerly SignMachine).
10. If you are installing the Voice Toolbox, click the dialog box. ChooseServer to setup the Server location of the TASKE Voice Toolbox.
11. Once you have completed setting your Select Components, select theNext > button.
The Locate TASKE License Files dialog box appears. You need to provide the Path whereyour licensing information resides. By default, the Install program populates the text boxwith “a:\” as License Files are shipped on a 3.5” floppy disk.
12. Insert the disk labeled "License Info" into floppy drive A.
13. Once you have completed setting your License files location, select theNext > button.
The Select Destination Directory dialog box appears. By default, the Destination directoryis populated with c:\taske To change the install to a different directory, click on the Browsebutton and choose the directory you would like the TASKE software to be installed in.When you enter the Path where the files are to be stored, ensure there is plenty of disk spaceon the selected drive.
14. Once you have completed setting your Destination directory, select theNext > button.
The Select SiteData Directory dialog box appears. The Site Data Destination directory is ashared path located on the network that points to your ACD ToolBox Server PC. Thissetting specifies the location of the PBX database, and data files. If the directory is notspecified correctly, client copies of the TASKE ToolBox will not be able to connect to theTASKE database to receive any real-time or historical information.
This setting by default will be set to a local directory, and should be installed locally, on the<c:> drive.
15. Enter the path for the SiteData directory. It should be c:\taske\SiteData
To change the path to a different directory, click on the Browse button and choose thedirectory your TASKE database and site data are installed in.
16. Once you have completed setting your Site Data Destination directory,select the Next > button.
The Share SiteData Directory dialog box appears. For clients to connect to the SiteDatadirectory, the directory must be shared. The TASKE ToolBox install can perform thisfunction when the directory is created.
17. If you would like the Site Data Destination directory to be shared, selectthe Create Share button. When your settings are complete, select theNext > button.
________________________TASKE ACD ToolBox Installation Guide 13The Select SignData Directory dialog box appears. The SignData directory is a sharedpath located on the network that points to your WallSign Server PC. This setting specifiesthe location of the Sign Server configuration files. If the directory is not specified correctly,client copies of the TASKE WallSign will not be able to connect to the TASKE Sign Serverand configure any readerboards.
This setting by default will be set to a local directory, and should be installed locally, on the<c:> drive.
18. Enter the path for the SignData directory. It should be c:\taske\SignData
To change the path to a different directory, click on the Browse button and choose thedirectory your TASKE database and sitedata are installed in.
19. Once you have completed setting your SignData Destination directory,select the Next > button.
The Share SignData Directory dialog box appears. For clients to connect to the SignDatadirectory, the directory must be shared. The TASKE ToolBox install can perform thisfunction when the directory is created.
20. If you would like the Sign Data Destination directory to be shared, selectthe Create Share button. When your settings are complete, select theNext > button.
If you chose to install the TASKE Voice ToolBox, the Select VoiceData Directory dialog boxappears.
The VoiceData directory is a shared path located on the network that points to your TASKEVoice Server PC. This setting specifies the location of the Voice Server configuration files.If the directory is not specified correctly, client copies of the TASKE Voice tools will not beable to connect to the TASKE Voice Server and configure any of the voice channels.
This setting by default will be set to a local directory, and should be installed locally, on the<c:> drive.
21. Enter the path for the VoiceData directory. It should bec:\taske\VoiceDataPath
To change the path to a different directory, click on the Browse button and choose thedirectory your TASKE voicedata is installed in.
22. Once you have completed setting your VoiceData Destination directory,select the Next > button.
The Share VoiceData Directory dialog box appears. For clients to connect to theVoiceData directory, the directory must be shared. The TASKE ToolBox install can performthis function when the directory is created.
23. If you would like the Voice Data Destination directory to be shared,select the Create Share button. When your settings are complete,select the Next > button.
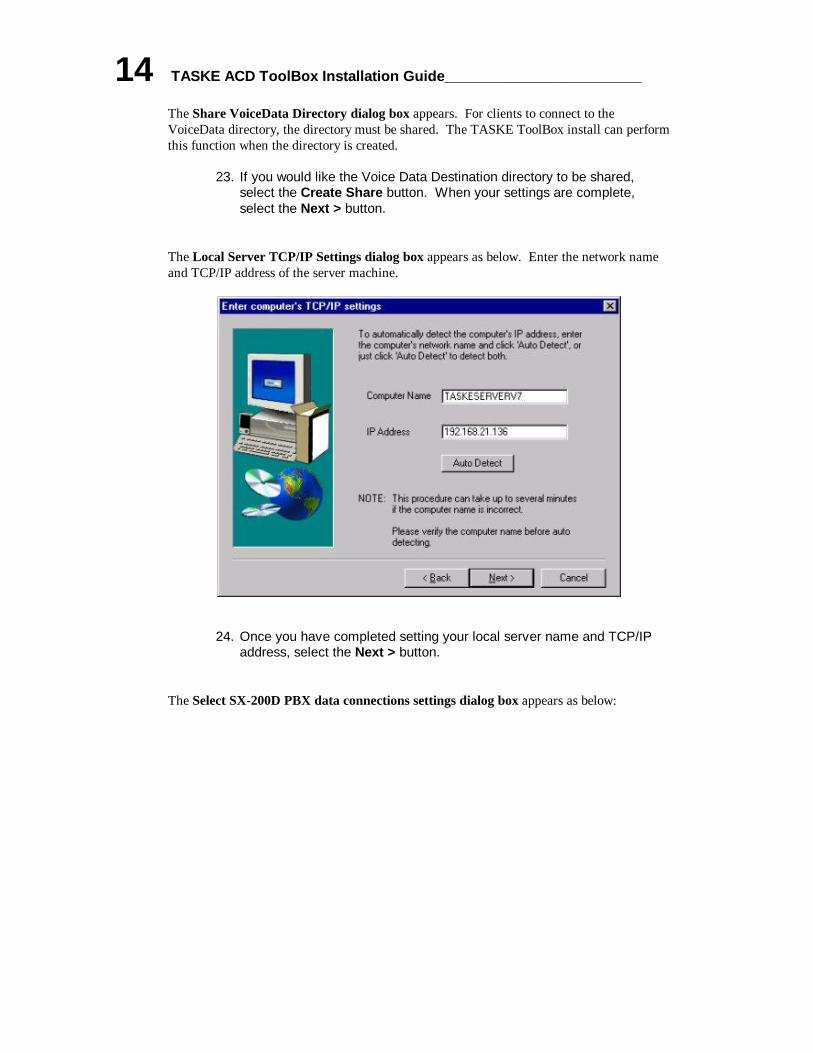
The Local Server TCP/IP Settings dialog box appears as below. Enter the network nameand TCP/IP address of the server machine.
24. Once you have completed setting your local server name and TCP/IPaddress, select the Next > button.
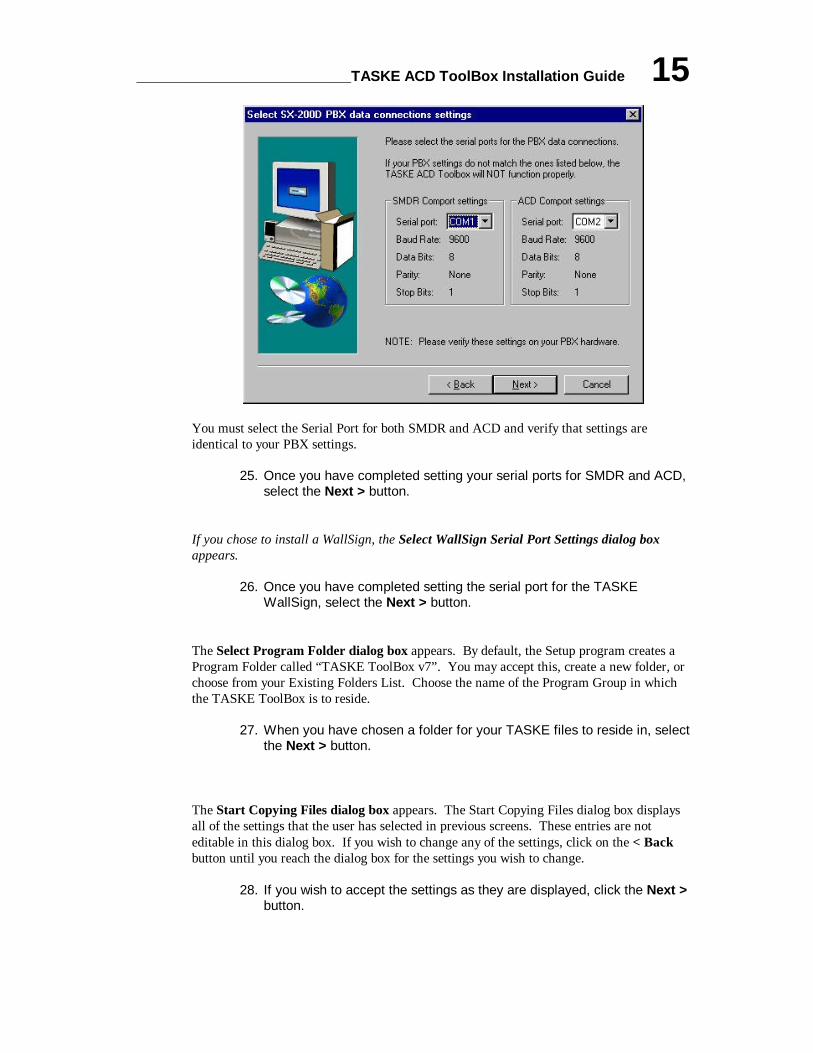
The Select SX-200D PBX data connections settings dialog box appears as below:
You must select the Serial Port for both SMDR and ACD and verify that settings areidentical to your PBX settings.
25. Once you have completed setting your serial ports for SMDR and ACD,select the Next > button.
If you chose to install a WallSign, the Select WallSign Serial Port Settings dialog boxappears.
26. Once you have completed setting the serial port for the TASKEWallSign, select the Next > button.
The Select Program Folder dialog box appears. By default, the Setup program creates aProgram Folder called “TASKE ToolBox v7”. You may accept this, create a new folder, orchoose from your Existing Folders List. Choose the name of the Program Group in whichthe TASKE ToolBox is to reside.
27. When you have chosen a folder for your TASKE files to reside in, selectthe Next > button.
The Start Copying Files dialog box appears. The Start Copying Files dialog box displaysall of the settings that the user has selected in previous screens. These entries are noteditable in this dialog box. If you wish to change any of the settings, click on the < Backbutton until you reach the dialog box for the settings you wish to change.
28. If you wish to accept the settings as they are displayed, click the Next >button.
The File Copying Progress dialog box appears. The File Copying Progress dialog boxdisplays the progress of the files being installed. You are not prompted for anything duringthis process.
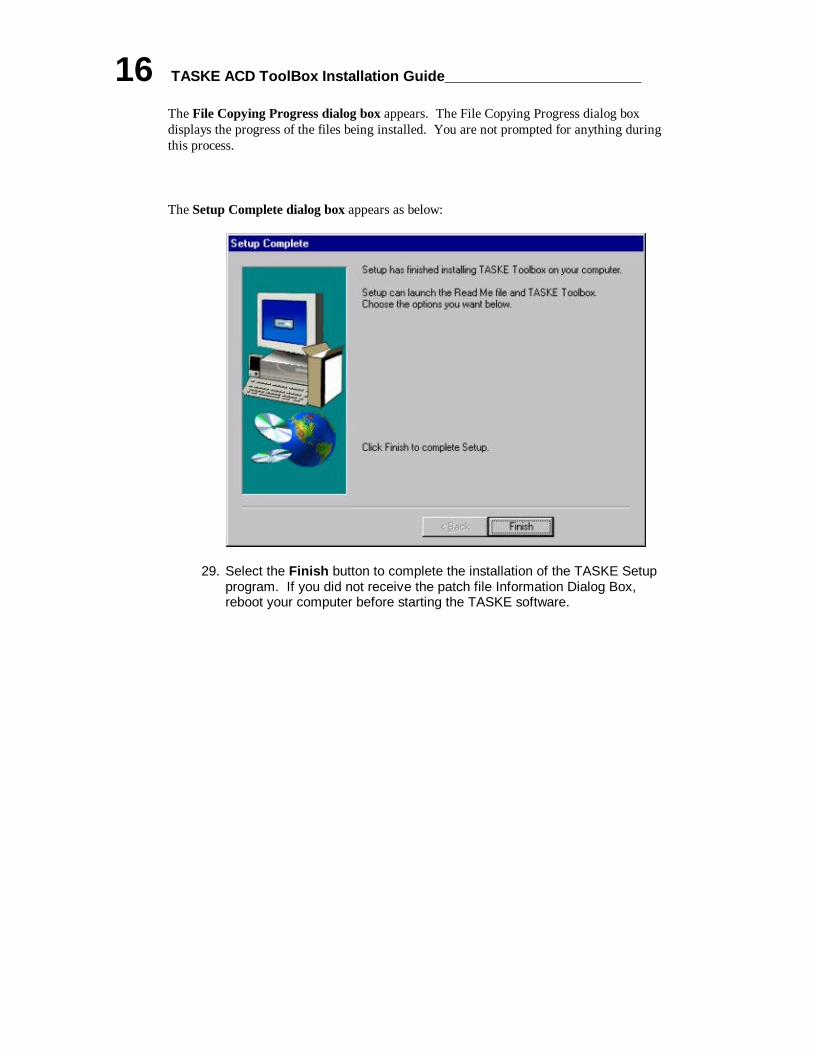
The Setup Complete dialog box appears as below:
29. Select the Finish button to complete the installation of the TASKE Setupprogram. If you did not receive the patch file Information Dialog Box,reboot your computer before starting the TASKE software.
OverviewThis chapter describes the options and steps to follow while installing the TASKE ACDToolBox client software on a network-connected computer running Windows 95, 98, or NT.
RequirementsTASKE ACD ToolBox client software may be installed on a computer running MicrosoftWindows 95, Windows 98, or Windows NT 4.0 (with Service Pack 3 or later). For optimumperformance, the computer should be equipped with a standard color monitor, mouse,keyboard, and the following software and hardware (or better):
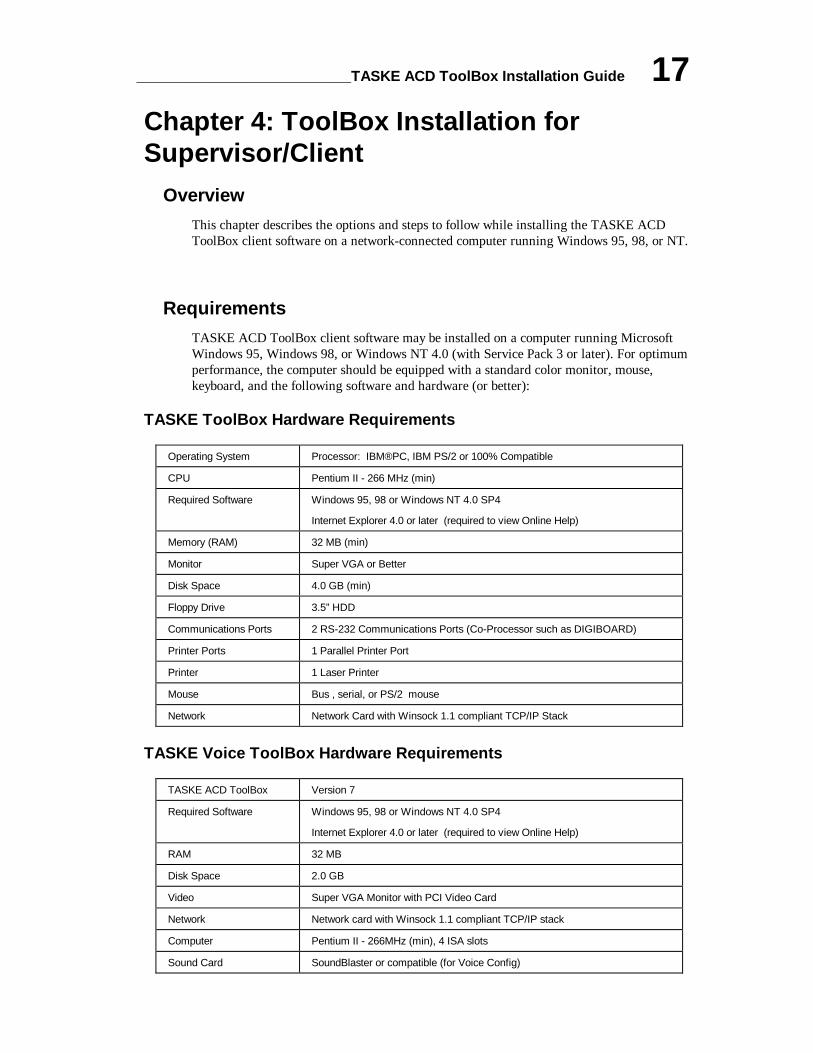
TASKE ToolBox Hardware Requirements
Operating System Processor: IBM®PC, IBM PS/2 or 100% Compatible
CPU Pentium II - 266 MHz (min)
Required Software Windows 95, 98 or Windows NT 4.0 SP4
Internet Explorer 4.0 or later (required to view Online Help)
Memory (RAM) 32 MB (min)
Monitor Super VGA or Better
Disk Space 4.0 GB (min)
Floppy Drive 3.5” HDD
Communications Ports 2 RS-232 Communications Ports (Co-Processor such as DIGIBOARD)
Printer Ports 1 Parallel Printer Port
Printer 1 Laser Printer
Mouse Bus , serial, or PS/2 mouse
Network Network Card with Winsock 1.1 compliant TCP/IP Stack
TASKE Voice ToolBox Hardware Requirements
TASKE ACD ToolBox Version 7
Required Software Windows 95, 98 or Windows NT 4.0 SP4
Internet Explorer 4.0 or later (required to view Online Help)
RAM 32 MB
Disk Space 2.0 GB
Video Super VGA Monitor with PCI Video Card
Network Network card with Winsock 1.1 compliant TCP/IP stack
Computer Pentium II - 266MHz (min), 4 ISA slots
Sound Card SoundBlaster or compatible (for Voice Config)
• the TASKE software lock (dongle) is installed on the TASKE Server (see “Installing theTASKE Software Lock” in Section 3).
• Microsoft file and printer sharing services and TCP/IP network protocol services havebeen installed and tested on the client PC (see “Network Considerations” in Section 1).
• a logical network drive has been mapped to the TASKE database (ServerPath directory)from the Desktop Sign PC (see “Mapping a Network Drive” in Appendix B).
Software InstallationFollow the procedure below to install TASKE ACD ToolBox client software from theTASKE Call Center Management Tools CD-ROM, or from files that have been downloadedfrom the TASKE web site.
Before You BeginTo ensure a successful, first-time installation, have the following items on hand:
• TASKE Call Center Management Tools CD-ROM, or decompressed files from theTASKE web site.
• Administration floppy disk.
Important: The readme.txt file on the CD-ROM contains important, last-minuteinformation about TASKE Call Center Management Tools. Before you start the installationprocedure, please review the readme.txt file it can be opened on the CD-ROM using atext editor.
If You are UpgradingWhen you install the TASKE ACD ToolBox client software, any existing program files onthe client PC are overwritten.
1. If any applications are running on the client PC, close them now.
2. Insert the TASKE Call Center Management Tools CD-ROM and clickInstall when the Autorun dialog box opens.OrIf you have files from the TASKE web site, open the Disk1 directory inthe temporary area on your computer’s local hard drive, then double-clickthe Setup.exe program icon.
If this is a first time installation, or if you are performing an upgrade and the license filescan not be found, you are requested to provide licensing information. If licensinginformation is required, the dialog box illustrated below appears.
You need to provide the Path where your licensing information resides.
3. Insert the disk labeled "License Info" into floppy drive A.
4. Type the drive letter A:\.
5. Select the Next > button.
Note If you are not presented with the screen illustrated above, then the TASKE softwarehas already read your licensing information from the previous installation and lets youproceed.
The Welcome dialog box appears.
This is a reminder to close any programs currently running on your PC before continuing theinstallation of the TASKE Setup program.
6. Choose the Next > button to allow the TASKE ToolBox installation toproceed.
The Software License Agreement dialog box appears.
7. Once you have read the Software License Agreement, if you agree,select the Next > button.
The Setup Information dialog box appears.
Be sure to read the Setup information, and follow the directions it contains.
8. Once you have read the Setup Information, select the Next > button.
The Operating System Requirements dialog box appears. Make sure you have therecommended requirements before continuing with the installation.
9. Once you have read the System Requirements, select the Next > button.
The Select Components dialog box appears as below:
The Select Components dialog box contains drop-down choices for setting up the TASKEToolBox components. You will see four choices for the component settings: Server,Supervisor, Enterprise Supervisor and Agent.
Server: This is the same as Server installation in previous versions. Server is a site that doesthe actual collection of the data and all the TASKE Clients are attached to a server.
________________________TASKE ACD ToolBox Installation Guide 21Supervisor: A Supervisor is equivalent to a TASKE Client, and retains all the functionalityof a client. All the clients are connected to a TASKE server through a network. They canrun Reports, Monitor, Search, etc. over the network. A Supervisor can access the SiteDataand SignData directories of a TASKE server which contain the results from data collection.
Enterprise Supervisor: An Enterprise Supervisor is a Supervisor (Client) that can performall the functionality of a Supervisor over an Enterprise network (across multiple sites).
Agent: An Agent only has the permission to run the TASKE Agent Desktop Program overthe network.
By default, the ACD ToolBox and WallSign are installed, and the Voice Toolbox is not.Select the components you want to install by selecting the checkbox beside the appropriatecomponent. You also need to choose a service for each selected component.
10. For ACD ToolBox choose Supervisor.
11. For WallSign, choose Client.
12. If you are installing the Voice Toolbox, click the dialog box. Choose Clientto setup the TASKE Voice Toolbox.
13. Once you have completed setting your Select Components, select theNext > button.
The Select Destination Directory dialog box appears. By default, the Destination directoryis populated with c:\taske To change the install to a different directory, click on the Browsebutton and choose the directory you would like the TASKE software to be installed in.When you enter the Path where the files are to be stored, ensure there is plenty of disk spaceon the selected drive.
13. Once you have completed setting your Destination directory, select theNext > button.
The Select SiteData Directory dialog box appears. The Site Data Destination directory is ashared path located on the network that points to your ACD ToolBox Server PC. Thissetting specifies the location of the PBX database, and data files. If the directory is notspecified correctly, client copies of the TASKE ToolBox will not be able to connect to theTASKE database to receive any real-time or historical information.
14. This setting should be \\“NameofTaskeServerMachine”\SiteData
To change the path to a different directory, click on the Browse button and choose thedirectory your TASKE database and site data are installed in.
15. Once you have completed setting your Site Data Destination directory,select the Next > button.
The Select SignData Directory dialog box appears. The SignData directory is a sharedpath located on the network that points to your WallSign Server PC. This setting specifiesthe location of the Sign Server configuration files. If the directory is not specified correctly,client copies of the TASKE WallSign will not be able to connect to the TASKE Sign Serverand configure any readerboards.
16. This setting should be \\“NameofTaskeServerMachine”\SignData
To change the path to a different directory, click on the Browse button and choose thedirectory your TASKE database and site data are installed in.
17. Once you have completed setting your Sign Data Destination directory,select the Next > button.
If you chose to install the TASKE Voice ToolBox, the Select VoiceData Directory dialog boxappears.
The VoiceData directory is a shared path located on the network that points to your TASKEVoice Server PC. This setting specifies the location of the Voice Server configuration files.If the directory is not specified correctly, client copies of the TASKE Voice tools will not beable to connect to the TASKE Voice Server and configure any of the voice channels.
18. Enter the path for the VoiceData directory. It should be\\“NameofTaskeServerMachine”\VoiceData
To change the path to a different directory, click on the Browse button and choose thedirectory your TASKE voice data is installed in.
19. Once you have completed setting your VoiceData Destination directory,select the Next > button.
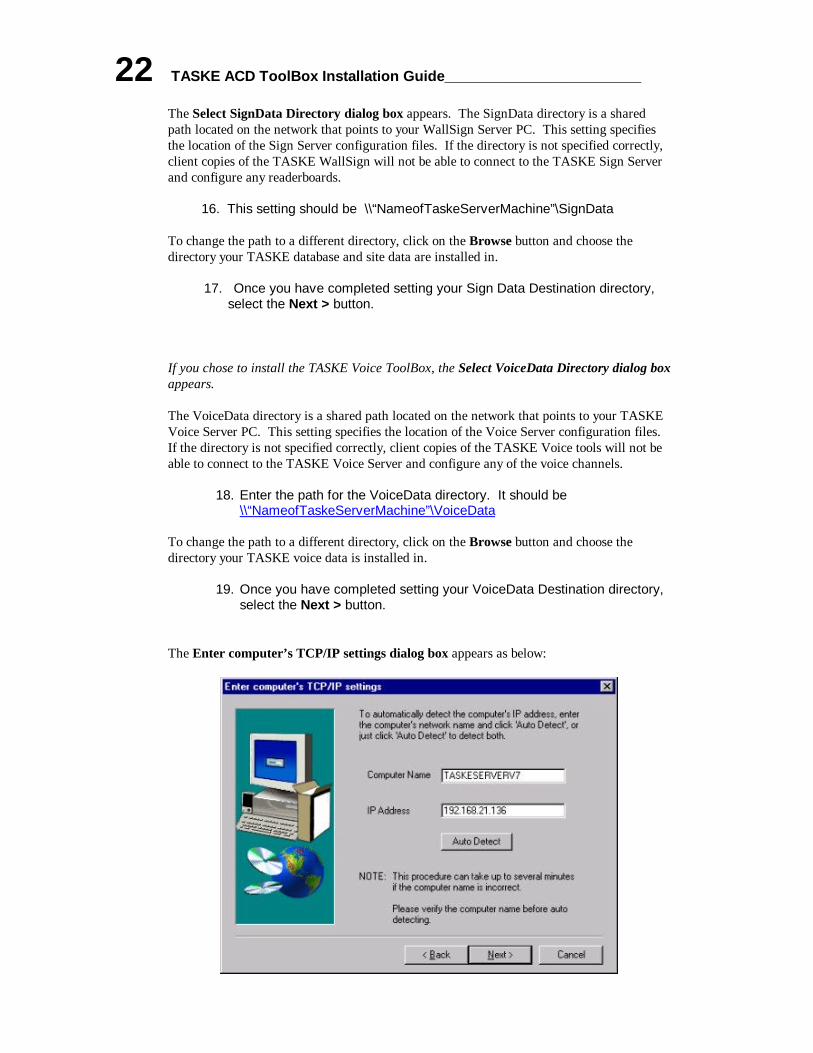
The Enter computer’s TCP/IP settings dialog box appears as below:
________________________TASKE ACD ToolBox Installation Guide 23The computer’s TCP/IP setting specifies the name of the computer, and its TCP/IP address.Enter the name and TCP/IP address of your computer. If you enter the incorrectinformation, or are not sure of the information, click the “Auto Detect” button. This willforce the TASKE ToolBox setup to find the correct information before proceeding.
20. Once you have completed setting your Server Name and TCP/IPaddress, select the Next > button.
If you chose to install a Wallsign, the Remote Wall Sign Server TCP/IP settings dialog boxappears.
21. Once you have completed setting your WallSign Server Name andTCP/IP address, select the Next > button.
If you chose to install the Voice ToolBox, the Remote Voice Server TCP/IP settings dialogbox appears.
22. Once you have completed setting your Voice Server Name and TCP/IPaddress, select the Next > button.
The Select Program Folder dialog box appears. By default, the Setup program creates aProgram Folder called “TASKE ToolBox v7”. You may accept this, create a new folder, orchoose from your Existing Folders List. Choose the name of the Program Group in whichthe TASKE ToolBox is to reside.
23. When you have chosen a folder for your TASKE files to reside in, selectthe Next > button.
The Start Copying Files dialog box appears. The Start Copying Files dialog box displaysall of the settings that the user has selected in previous screens. These entries are noteditable in this dialog box. If you wish to change any of the settings, click on the < Backbutton until you reach the dialog box for the settings you wish to change.
24. If you wish to accept the settings as they are displayed, click the Next >button.
The File Copying Progress dialog box appears. The File Copying Progress dialog boxdisplays the progress of the files being installed. You are not prompted for anything duringthis process.
25. Select the Finish button to complete the installation of the TASKE Setupprogram. If you did not receive the patch file Information Dialog Box,reboot your computer before starting the TASKE software.
This appendix describes the hardware configuration and programming required of theMITEL 200 system to support TASKE Call Center Management Tools. PBX programmingis required for both the TASKE ToolBox and the TASKE Voice ToolBox.
TASKE ToolBox PBX ConfigurationThis overview is intended to show you the necessary hardware connectivity andprogramming for the MITEL SX-200 PBX. The PBX must be programmed with specificsettings in order for the TASKE Software to receive the necessary SMDR and Agent ShiftSummary data records. The VT100 ACD Monitor is optional.
The hardware requirements for connectivity with the SX-200 are as follows.
• A TASKE PC with an Available Comport (or 2 if using the VT100 ACD MonitorOption)
• RS-232 Cable (or 2 if using the VT100 ACD Monitor Option)
• An Asyncronous Dataset for SMDR And Agent Shift Summary Data Records
• An Asyncronous Dataset for VT100 ACD Monitor (Optional)
• A SX-200® PBX with a DNIC Line Card with the ACD Option
MITEL SX-200 ConnectivityFIGURE 1-1: SX-200 Connectivity, shows the connections between the MITEL SX-200PBX and the TASKE PC.
Programming Required For Dataset ConnectionsThe following 5 Dataset Connections forms must be programmed.
1. Class of Service - Setting SMDR Recording Options
2. System Options - Setting ACD Option for SMDR Records, disable 5 digit SMDR.
3. Trunk Groups - Setting Outgoing SMDR Recording Options
4. Directed I/O - Setting SMDR and Agent Shift Records to the dataset connected toTASKE.
5. ACD Reports - Setting Agent Shift Records to Enabled
1. Class Of Service
The Class of Service is Form 03 - COS Define. The option name SMDR - Record IncomingCalls must be enabled for all COS of services. All Class Of Services must be set in the entirePBX switch.
2. System Options
The Systems Options is Form 04 - System Options/System Timers. The option ACD Reportsmust be enabled. The option 5-Digit SMDR must be disabled because the TASKE ToolBoxis using 4-Digit numbering.
3. Trunk Options
The Trunk Options is Form 16 - Trunk Groups. The softkey SMDR/NO SMDR must beenabled to SMDR.
4. Directed I/O
The Directed I/O is Form 34 - Directed I/O. For the Dataset #1, the softkey SMDR must beenabled with a printout type option of Autoprint and a printout guaranteed set to NO. Thesoftkey ACD AGT SUM must be enabled with a printout type option of Autoprint and aprintout guaranteed set to NO.
NOTE The LDN for the Dataset used for the SMDR/Agent Shift should not have anyDirected I/O set.
This directs SMDR and ACD Agent Summary records (also called ACD Agent ShiftRecords) to the dataset connected to the sComOptions comport of the TASKE ACDToolBox.
5. ACD Reports
You must login to the Maintenance Terminal with the correct USERNAME andPASSWORD. The softkey ACD_REPORTS must be selected followed by the softkeyfunction SET. The ACD Report parameter AGENT_SHIFT must be enabled and can beverified as enabled by the softkey function SHOW.
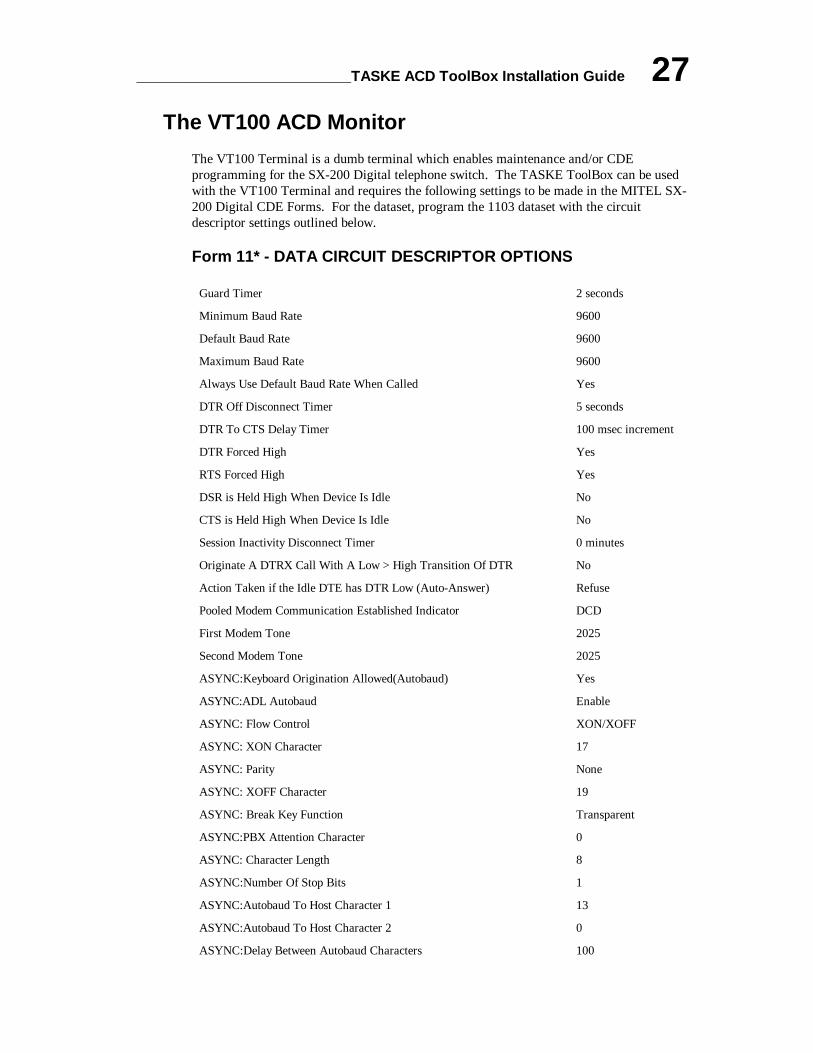
The VT100 Terminal is a dumb terminal which enables maintenance and/or CDEprogramming for the SX-200 Digital telephone switch. The TASKE ToolBox can be usedwith the VT100 Terminal and requires the following settings to be made in the MITEL SX-200 Digital CDE Forms. For the dataset, program the 1103 dataset with the circuitdescriptor settings outlined below.
Form 11* - DATA CIRCUIT DESCRIPTOR OPTIONS
Guard Timer 2 seconds
Minimum Baud Rate 9600
Default Baud Rate 9600
Maximum Baud Rate 9600
Always Use Default Baud Rate When Called Yes
DTR Off Disconnect Timer 5 seconds
DTR To CTS Delay Timer 100 msec increment
DTR Forced High Yes
RTS Forced High Yes
DSR is Held High When Device Is Idle No
CTS is Held High When Device Is Idle No
Session Inactivity Disconnect Timer 0 minutes
Originate A DTRX Call With A Low > High Transition Of DTR No
Action Taken if the Idle DTE has DTR Low (Auto-Answer) Refuse
Pooled Modem Communication Established Indicator DCD
A VT100 Terminal can be connected to the TASKE ToolBox via the dataset to a computercomport. The TASKE ToolBox can receive VT100 Terminal information through either theTASKE Sign program or the TASKE VT100 Terminal program. If only one VT100Terminal dataset is attached to the computer, only one program can use the VT100 Terminaldataset at once. If two VT100 Terminal datasets are attached to the TASKE ToolBox, boththe TASKE Sign program and the VT100 Terminal program can each have their ownindividual VT100 Terminal dataset.
The TASKE ToolBox has two programs working with the VT100 Terminal. The TASKEVT100 Terminal program emulates a dumb terminal but instead uses the PC computer. Allcommands and functions are available. The TASKE Sign program works the same as theTASKE VT100 Terminal program except does more. The TASKE Sign program uses theVT100 Terminal to update the reader board variables. TASKE needs the VT100 Terminal tobe in either the System Activity screen or the Group Summary screen. The VT100 Terminaldisplays green on the display when TASKE is accessing the VT100 Terminal for the TASKESign variables.
The TASKE ToolBox has settings which are needed for VT100 Terminal connectivity. TheTASKE INI File Editor allows you to set various options. Under the comports folder is thepulldown section "Choose Service" The settings VT100 and Sign VT100 can be set to theproper comport, baud rate, data bit, parity and stop bits. The VT100 is the setting for theTASKE VT100 program. The SIGN VT100 is the setting for the VT100 Terminal for theTASKE Sign program. Under the TASKE Sign folder is the TASKE Sign Settings sectionwhich has a checkbox for the Use System Screen. If the checkbox is enabled, the VT100Terminal must be in the System Activity screen in order for the TASKE Sign program toupdate reader board variables, otherwise, you must be in the Group Summary screen.
Note If the VT100 Terminal seems to have text missing, use the Control - W command torefresh the screen.
Once everything is connected, you can get into the VT100 Terminal by pressing enter a fewtimes. The welcome message appears followed by the menu options. Select option 1 for theVT100 Terminal. Type ACD MON followed by the password 1000. You can do maintenanceor change CDE programming. If you are using the TASKE Sign program then make sureyou are in the right screen (System Activity or Group Summary screen).
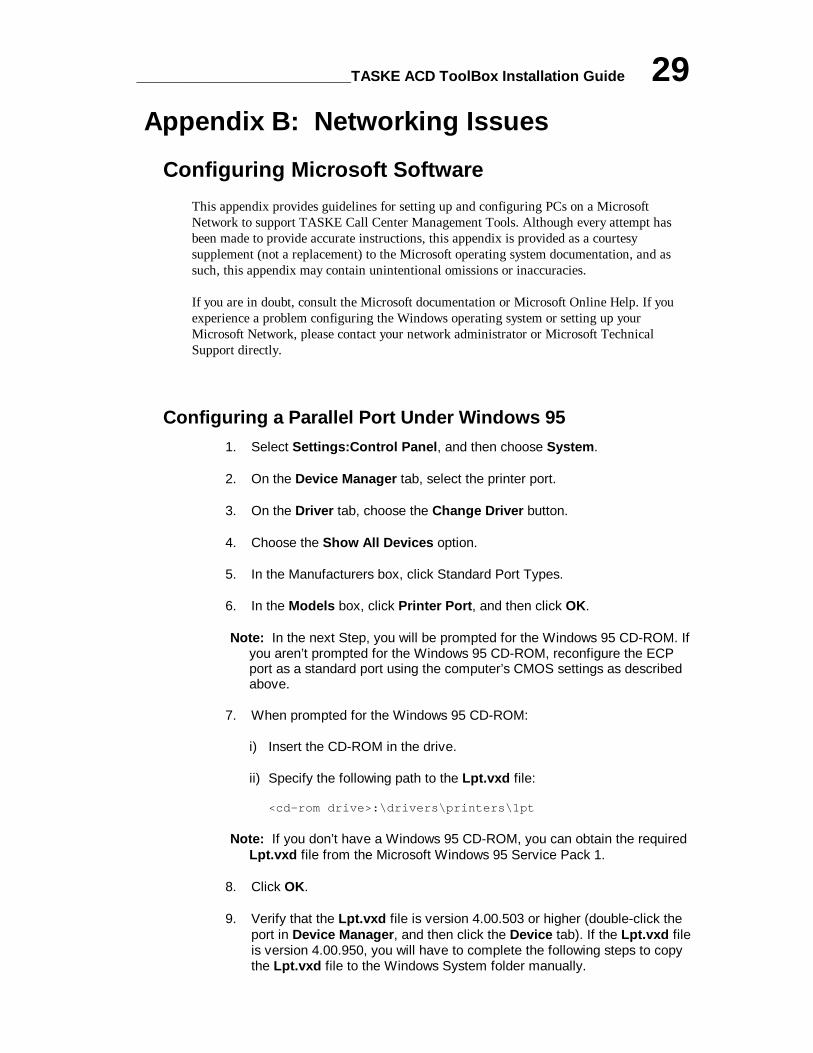
Configuring Microsoft SoftwareThis appendix provides guidelines for setting up and configuring PCs on a MicrosoftNetwork to support TASKE Call Center Management Tools. Although every attempt hasbeen made to provide accurate instructions, this appendix is provided as a courtesysupplement (not a replacement) to the Microsoft operating system documentation, and assuch, this appendix may contain unintentional omissions or inaccuracies.
If you are in doubt, consult the Microsoft documentation or Microsoft Online Help. If youexperience a problem configuring the Windows operating system or setting up yourMicrosoft Network, please contact your network administrator or Microsoft TechnicalSupport directly.
Configuring a Parallel Port Under Windows 951. Select Settings:Control Panel, and then choose System.
2. On the Device Manager tab, select the printer port.
3. On the Driver tab, choose the Change Driver button.
4. Choose the Show All Devices option.
5. In the Manufacturers box, click Standard Port Types.
6. In the Models box, click Printer Port, and then click OK.
Note: In the next Step, you will be prompted for the Windows 95 CD-ROM. Ifyou aren’t prompted for the Windows 95 CD-ROM, reconfigure the ECPport as a standard port using the computer’s CMOS settings as describedabove.
7. When prompted for the Windows 95 CD-ROM:
i) Insert the CD-ROM in the drive.
ii) Specify the following path to the Lpt.vxd file:
<cd-rom drive>:\drivers\printers\1pt
Note: If you don’t have a Windows 95 CD-ROM, you can obtain the requiredLpt.vxd file from the Microsoft Windows 95 Service Pack 1.
8. Click OK.
9. Verify that the Lpt.vxd file is version 4.00.503 or higher (double-click theport in Device Manager, and then click the Device tab). If the Lpt.vxd fileis version 4.00.950, you will have to complete the following steps to copythe Lpt.vxd file to the Windows System folder manually.
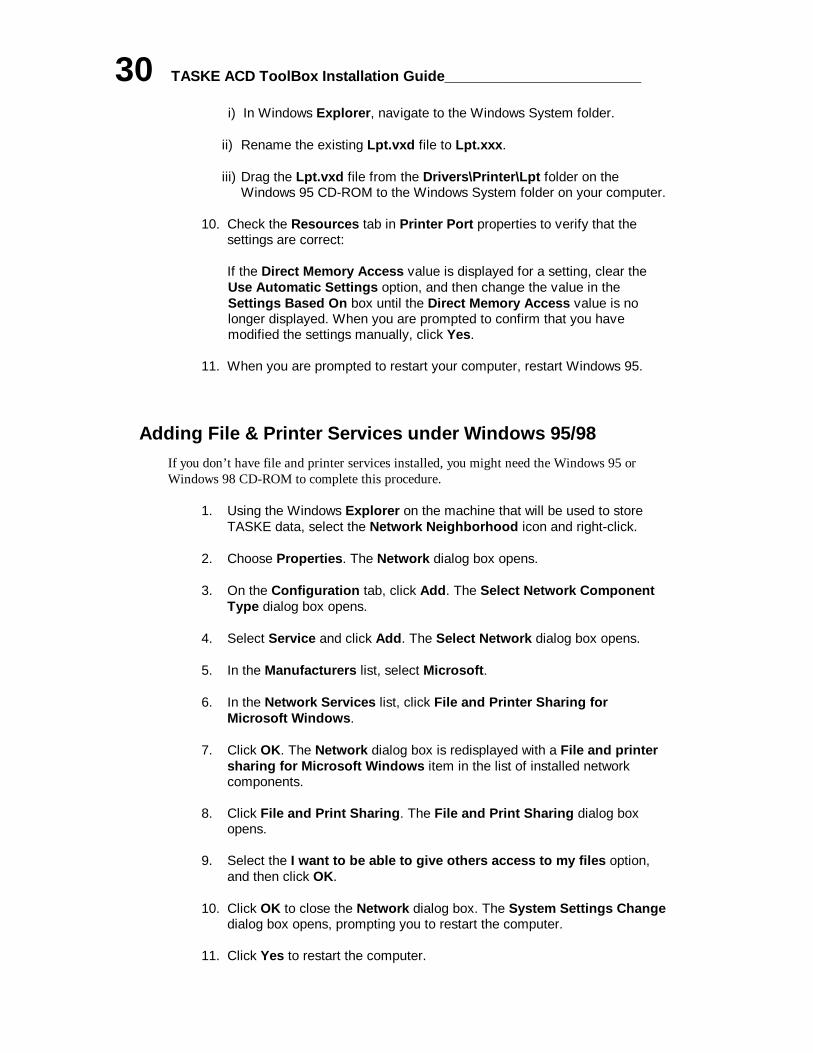
i) In Windows Explorer, navigate to the Windows System folder.
ii) Rename the existing Lpt.vxd file to Lpt.xxx.
iii) Drag the Lpt.vxd file from the Drivers\Printer\Lpt folder on theWindows 95 CD-ROM to the Windows System folder on your computer.
10. Check the Resources tab in Printer Port properties to verify that thesettings are correct:
If the Direct Memory Access value is displayed for a setting, clear theUse Automatic Settings option, and then change the value in theSettings Based On box until the Direct Memory Access value is nolonger displayed. When you are prompted to confirm that you havemodified the settings manually, click Yes.
11. When you are prompted to restart your computer, restart Windows 95.
Adding File & Printer Services under Windows 95/98If you don’t have file and printer services installed, you might need the Windows 95 orWindows 98 CD-ROM to complete this procedure.
1. Using the Windows Explorer on the machine that will be used to storeTASKE data, select the Network Neighborhood icon and right-click.
2. Choose Properties. The Network dialog box opens.
3. On the Configuration tab, click Add. The Select Network ComponentType dialog box opens.
4. Select Service and click Add. The Select Network dialog box opens.
5. In the Manufacturers list, select Microsoft.
6. In the Network Services list, click File and Printer Sharing forMicrosoft Windows.
7. Click OK. The Network dialog box is redisplayed with a File and printersharing for Microsoft Windows item in the list of installed networkcomponents.
8. Click File and Print Sharing. The File and Print Sharing dialog boxopens.
9. Select the I want to be able to give others access to my files option,and then click OK.
10. Click OK to close the Network dialog box. The System Settings Changedialog box opens, prompting you to restart the computer.
11. Click Yes to restart the computer.
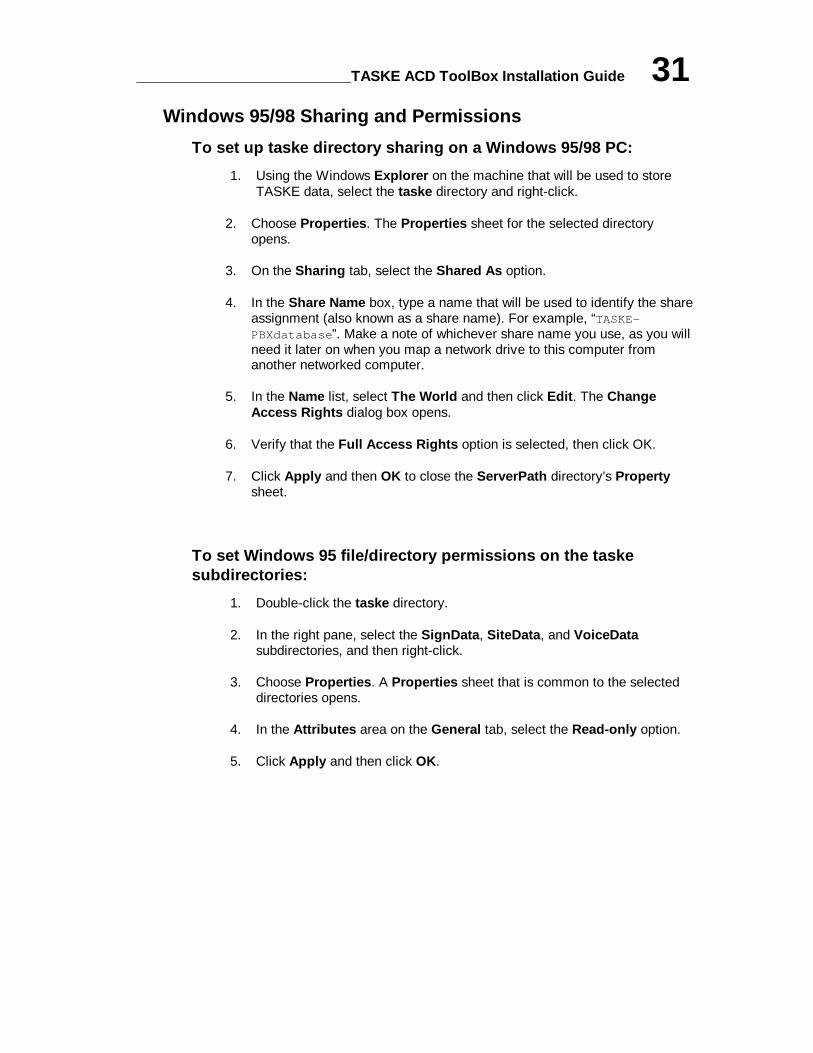
________________________TASKE ACD ToolBox Installation Guide 31Windows 95/98 Sharing and Permissions
To set up taske directory sharing on a Windows 95/98 PC:
1. Using the Windows Explorer on the machine that will be used to storeTASKE data, select the taske directory and right-click.
2. Choose Properties. The Properties sheet for the selected directoryopens.
3. On the Sharing tab, select the Shared As option.
4. In the Share Name box, type a name that will be used to identify the shareassignment (also known as a share name). For example, “TASKE-PBXdatabase”. Make a note of whichever share name you use, as you willneed it later on when you map a network drive to this computer fromanother networked computer.
5. In the Name list, select The World and then click Edit. The ChangeAccess Rights dialog box opens.
6. Verify that the Full Access Rights option is selected, then click OK.
7. Click Apply and then OK to close the ServerPath directory’s Propertysheet.
To set Windows 95 file/directory permissions on the taskesubdirectories:
1. Double-click the taske directory.
2. In the right pane, select the SignData, SiteData, and VoiceDatasubdirectories, and then right-click.
3. Choose Properties. A Properties sheet that is common to the selecteddirectories opens.
4. In the Attributes area on the General tab, select the Read-only option.
To set up taske directory sharing on a Windows NT PC:
1. Using the Windows NT Explorer on the machine that will be used to storeTASKE data, select the ServerPath directory and chooseFile:Properties. The property sheet for the ServerPath directory opens.
2. Click the Sharing tab.
3. Select the Share As option, and in the Share Name box, type a namethat you will use to identify the share assignment (also known as a sharename). For example, “TASKE-PBXdatabase”. Make a note of whichevershare name you use, as you will need it later on when you map a networkdrive to this computer from another networked computer.
4. Click Permissions. The Access Through Share Permissions dialogbox opens.
5. In the Name list, verify that Everyone is permitted Full Control. If adifferent value is displayed, select Full Control in the Type of Controlbox.
6. Click OK to close the Access Through Share Permissions dialog box.
7. Click Apply and then click OK to close the ServerPath directory’sProperty sheet.
To set Windows NT file/directory permissions on the taskesubdirectories:
1. Double-click the ServerPath directory.
2. Select the User subdirectory and right-click.
3. Choose Properties.
4. On the Security tab, click the Permissions button. The DirectoryPermissions dialog box opens.
5. Verify that the Replace Permissions on Existing Files option isselected.
6. Select the line corresponding to Everyone.
7. In the Type of Access box, choose Special Directory Access.
8. In the Special Directory Access dialog box, select the Read option clear all other options.
9. Click OK until all dialog boxes have been closed.
________________________TASKE ACD ToolBox Installation Guide 3310. Select the ACD subdirectory and right-click.
11. Repeat Steps 3 through 7 for the ACD subdirectory.
12. In the Special Directory Access dialog box, select the Read option andthe Write option clear all other options.
13. Click OK until all dialog boxes have been closed.
14. Repeat Steps 10 through 13 for the LOGS and SMDR subdirectories.
Mapping a Network DriveAll network-connected PCs running TASKE software need access to the TASKE database.When you install TASKE software on a network-connected PC, you are required to specifywhere the TASKE data files reside.
When you installed the TASKE ACD ToolBox, you defined the ServerPath, which points tothe TASKE database. The procedure below explains how to map a network drive to theServerPath directory.
Perform this procedure on the PC requiring access to the TASKE database.
To map a drive to the taske directory:
1. Using Windows Explorer, choose Tools:Map Network Drive. The MapNetwork Drive dialog box opens.
2. In the Drive box, select an unused, logical drive letter (e.g. T).
3. In the Path box, enter the logical network node name of the computerwhere the TASKE data resides and include the share name that youassigned previously to the ServerPath directory (e.g.\\TASKEFILESERVER\TASKE-PBXdatabase).
The TASKE Voice ToolBox currently supports the following four models of Dialogic VoiceBoards.
• D/41D (full-size card)
• D/41H (half-size card)
• Dialog/4 (half-size card)
• D/41E (UK full-size card)
The installation procedures are the same for the D/41D, D/41H, and Dialog/4, while theD/41E requires different installation procedures.
Dialogic D/41D, D/41H, and Dialog/4
The following steps provide a quick overview of the Quick Installation card.
Note If you have purchased the D/41D card, make certain there is enough space in thecomputer's case for the card and ensure there is not interfere with the proper cooling of theCPU. A Quick Installation card is included with both versions of the Dialogic voice cardsand should be read carefully. The reference card explains how to configure and install thevoice card in a PC.
1. If you are installing 1 voice card, ensure that JP7 has a jumper installedacross its two pins. If you are installing multiple voice cards, removejumper JP7 from all but one of the voice cards.
2. The D/41D and D/41H voice cards require a single hardware interruptrequest line (IRQ), with the default being IRQ 3.
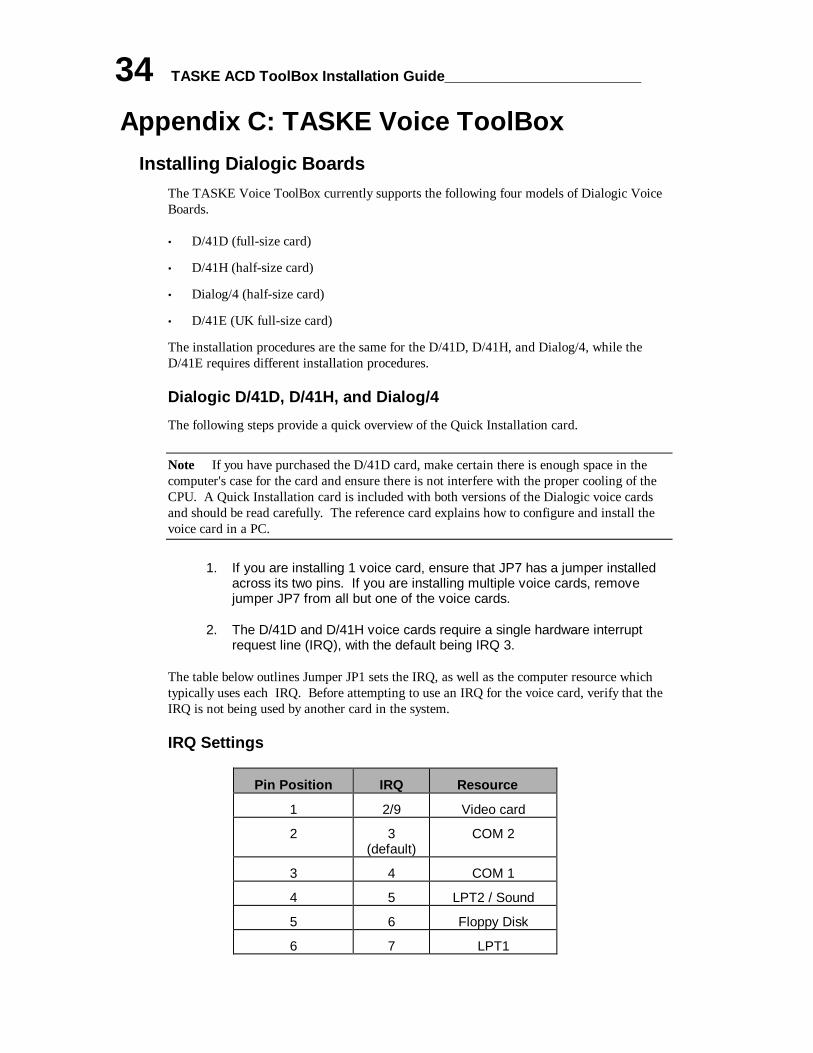
The table below outlines Jumper JP1 sets the IRQ, as well as the computer resource whichtypically uses each IRQ. Before attempting to use an IRQ for the voice card, verify that theIRQ is not being used by another card in the system.
IRQ Settings
Pin Position IRQ Resource
1 2/9 Video card
2 3(default)
COM 2
3 4 COM 1
4 5 LPT2 / Sound
5 6 Floppy Disk
6 7 LPT1
________________________TASKE ACD ToolBox Installation Guide 353. Each voice card requires a section of the computer's upper memory for
proper functioning. To set the memory upper address for a card, both thebase memory address and the offset memory address must be specified.
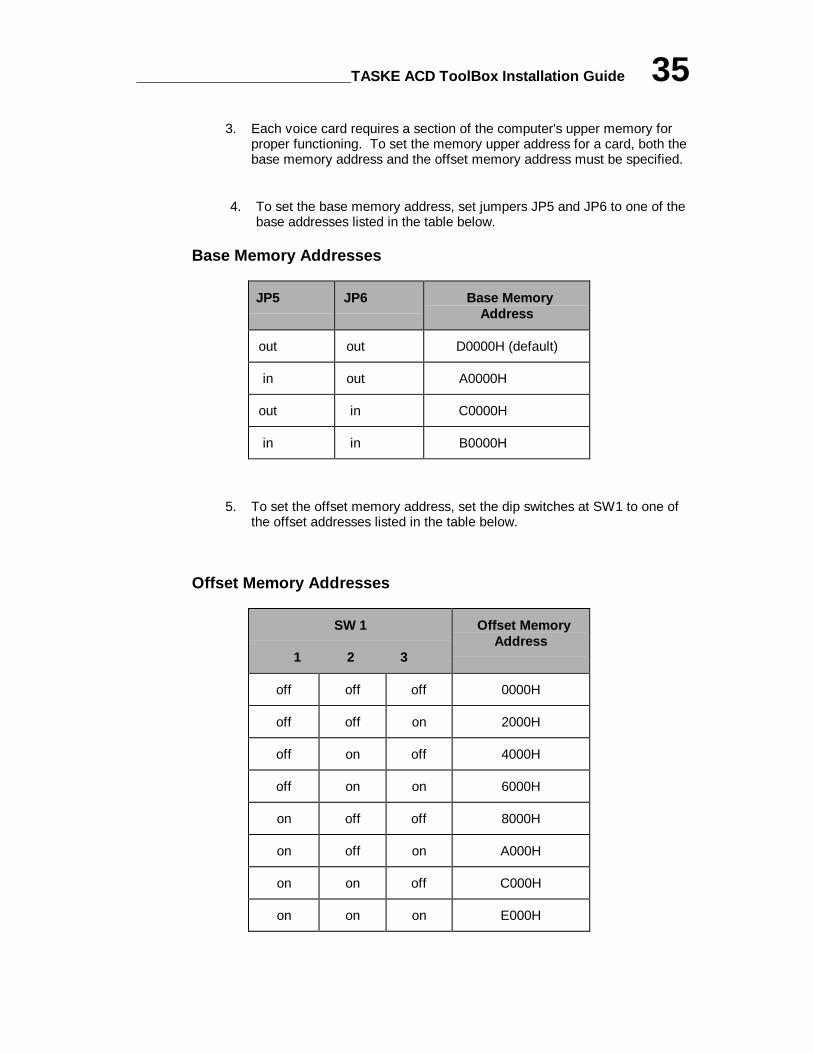
4. To set the base memory address, set jumpers JP5 and JP6 to one of thebase addresses listed in the table below.
Base Memory Addresses
JP5 JP6 Base MemoryAddress
out out D0000H (default)
in out A0000H
out in C0000H
in in B0000H
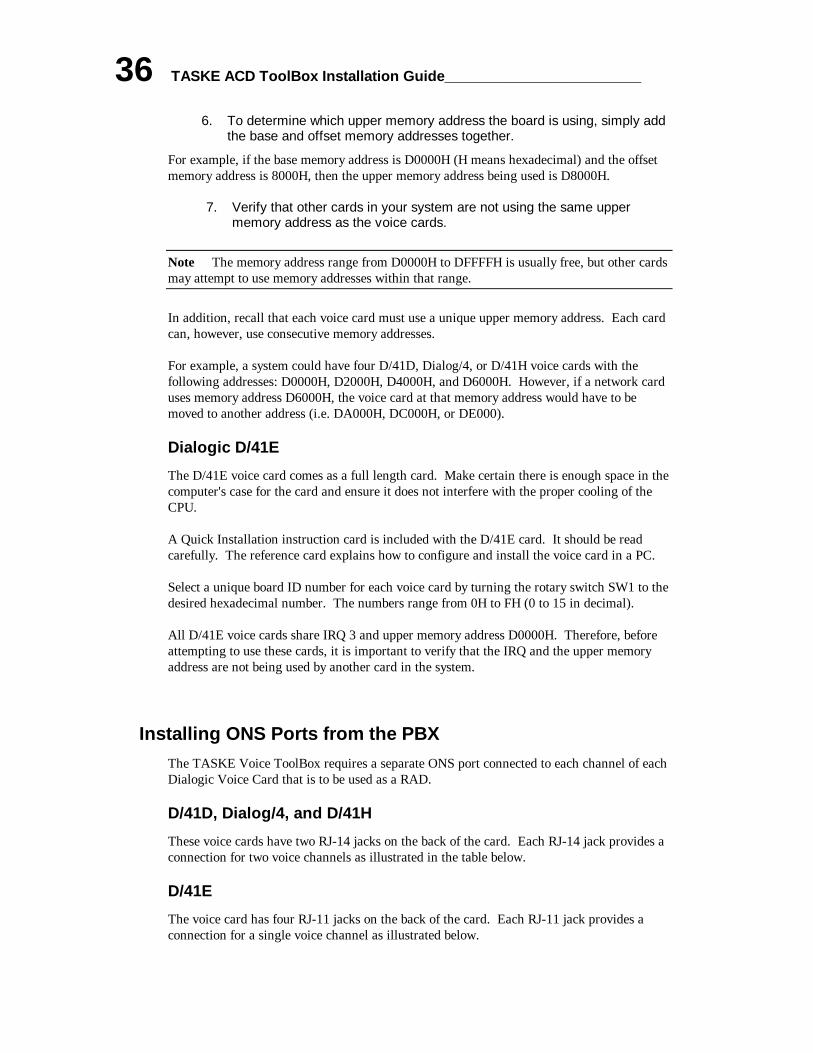
5. To set the offset memory address, set the dip switches at SW1 to one ofthe offset addresses listed in the table below.
6. To determine which upper memory address the board is using, simply addthe base and offset memory addresses together.
For example, if the base memory address is D0000H (H means hexadecimal) and the offsetmemory address is 8000H, then the upper memory address being used is D8000H.
7. Verify that other cards in your system are not using the same uppermemory address as the voice cards.
Note The memory address range from D0000H to DFFFFH is usually free, but other cardsmay attempt to use memory addresses within that range.
In addition, recall that each voice card must use a unique upper memory address. Each cardcan, however, use consecutive memory addresses.
For example, a system could have four D/41D, Dialog/4, or D/41H voice cards with thefollowing addresses: D0000H, D2000H, D4000H, and D6000H. However, if a network carduses memory address D6000H, the voice card at that memory address would have to bemoved to another address (i.e. DA000H, DC000H, or DE000).
Dialogic D/41E
The D/41E voice card comes as a full length card. Make certain there is enough space in thecomputer's case for the card and ensure it does not interfere with the proper cooling of theCPU.
A Quick Installation instruction card is included with the D/41E card. It should be readcarefully. The reference card explains how to configure and install the voice card in a PC.
Select a unique board ID number for each voice card by turning the rotary switch SW1 to thedesired hexadecimal number. The numbers range from 0H to FH (0 to 15 in decimal).
All D/41E voice cards share IRQ 3 and upper memory address D0000H. Therefore, beforeattempting to use these cards, it is important to verify that the IRQ and the upper memoryaddress are not being used by another card in the system.
Installing ONS Ports from the PBXThe TASKE Voice ToolBox requires a separate ONS port connected to each channel of eachDialogic Voice Card that is to be used as a RAD.
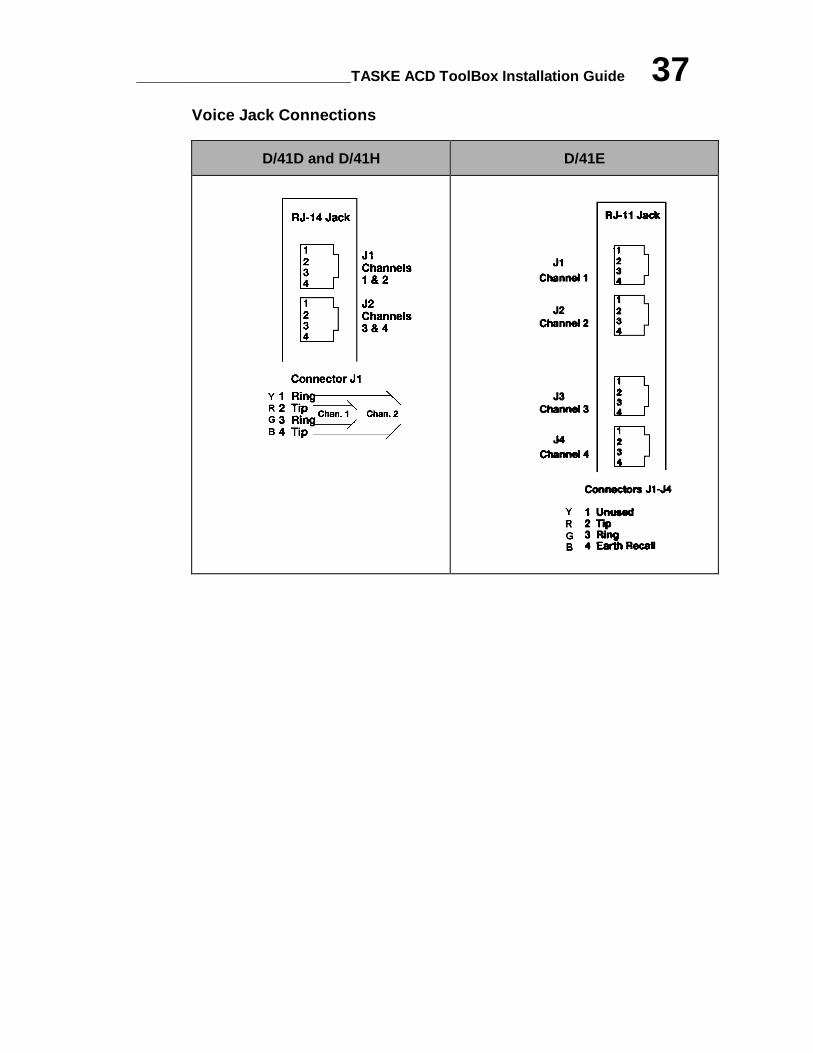
D/41D, Dialog/4, and D/41H
These voice cards have two RJ-14 jacks on the back of the card. Each RJ-14 jack provides aconnection for two voice channels as illustrated in the table below.
D/41E
The voice card has four RJ-11 jacks on the back of the card. Each RJ-11 jack provides aconnection for a single voice channel as illustrated below.
________________________TASKE ACD ToolBox Installation Guide 37Voice Jack Connections