18


EENN
GGLL
IISS
HH
2 / Fabrik C
TC Support InteractiveThe TC Support Interactive website www.tcsupport.tc is an online support andinformation center. At the site you can find answers to specific questions regarding TCsoftware and hardware. All known issues are stored in a database searchable byproduct, category, keywords, or phrases. Under the section "My Stuff" you can login tocheck the status of your questions, download materials such as product manuals,software updates and new presets.This site has been specifically designed to meet the needs of our users. We constantlyupdate the database and you will find the site to be a huge resource of information.Browse through Q&A's and discover new aspects of your TC product.If you can't find an answer online, you have the option of submitting a question to ourtechnical support staff who will then reply to you by e-mail. The TC Support Team ison constant alert to help you in any way they can.
Contact DetailsAlternatively, you may contact the TC Electronic distributor in your area, or write to:
TC ELECTRONIC A/SCustomer SupportSindalsvej 34Risskov DK-8240Denmark
USA:TC Electronic, Inc.5706 Corsa Avenue, Suite 107Westlake Village, CA 91362www.tcelectronic.com
© BY TC ELECTRONIC A/S 2006. ALL PRODUCT AND COMPANY NAMES ARETRADEMARKS OF THEIR RESPECTIVE OWNERS. VST IS A TRADEMARK OFSTEINBERG AG, AUDIO UNITS IS A TRADEMARK OF APPLE COMPUTER, INC. ALLSPECIFICATIONS SUBJECT TO CHANGE WITHOUT NOTICE. ALL RIGHTSRESERVED. TC ELECTRONIC IS A TC GROUP COMPANY.

Fabrik C / 3
EENN
GGLL
IISS
HH
Table of ContentsContact & Support Information . . . . . . . . . . . . . . . . . . . . . . . . . . . . . . . . . . . . . . . . .2
Table Of Contents . . . . . . . . . . . . . . . . . . . . . . . . . . . . . . . . . . . . . . . . . . . . . . . . . . .3
System Requirements . . . . . . . . . . . . . . . . . . . . . . . . . . . . . . . . . . . . . . . . . . . . . . . .4
Getting Started . . . . . . . . . . . . . . . . . . . . . . . . . . . . . . . . . . . . . . . . . . . . . . . . . . . . .4
Introduction . . . . . . . . . . . . . . . . . . . . . . . . . . . . . . . . . . . . . . . . . . . . . . . . . . . . . . .5
Overview . . . . . . . . . . . . . . . . . . . . . . . . . . . . . . . . . . . . . . . . . . . . . . . . . . . . . . . . .6
Full-band or 3-band compression . . . . . . . . . . . . . . . . . . . . . . . . . . . . . . . . . . . . . . .7
Signal Flow . . . . . . . . . . . . . . . . . . . . . . . . . . . . . . . . . . . . . . . . . . . . . . . . . . . . . . .8
EQ Section . . . . . . . . . . . . . . . . . . . . . . . . . . . . . . . . . . . . . . . . . . . . . . . . . . . . . . . .9
Filter Types . . . . . . . . . . . . . . . . . . . . . . . . . . . . . . . . . . . . . . . . . . . . . . . . . . . . . .10
Compression 3-band mode :
Source page . . . . . . . . . . . . . . . . . . . . . . . . . . . . . . . . . . . . . . . . . . . . . . . . . . . . .12
Gain page . . . . . . . . . . . . . . . . . . . . . . . . . . . . . . . . . . . . . . . . . . . . . . . . . . . . . . .12
Compression page . . . . . . . . . . . . . . . . . . . . . . . . . . . . . . . . . . . . . . . . . . . . . . . . .13
Level page . . . . . . . . . . . . . . . . . . . . . . . . . . . . . . . . . . . . . . . . . . . . . . . . . . . . . . .13
Compression Full-band mode . . . . . . . . . . . . . . . . . . . . . . . . . . . . . . . . . . . . . . . . .14
Parameter adjust - compression pages . . . . . . . . . . . . . . . . . . . . . . . . . . . . . . . . . .14
The Limiter . . . . . . . . . . . . . . . . . . . . . . . . . . . . . . . . . . . . . . . . . . . . . . . . . . . . . .15
De-Esser . . . . . . . . . . . . . . . . . . . . . . . . . . . . . . . . . . . . . . . . . . . . . . . . . . . . . . . .15
Preset Management . . . . . . . . . . . . . . . . . . . . . . . . . . . . . . . . . . . . . . . . . . . . . . . .16
A/B Compare function . . . . . . . . . . . . . . . . . . . . . . . . . . . . . . . . . . . . . . . . . . . . . . .18
EENN
GGLL
IISS
HH
4 / Fabrik C
System RequirementsMacDesktop, iBook or PowerBookG4 or G5, 733MHz or betterMacOS 10.3.6 or higher512 MB Ram or more
PCDesktop or laptopPentium 4, 1.4 GHz or betterWindows XP or higher512 MB Ram or more
Works with all PowerCore devices
VST, Audio Units or RTAS*) compatible application such as Logic, Nuendo, Live orDigital Performer
*) RTAS (Pro Tools) is supported via the VST to RTAS adapter from FXpansion (optional).
More info on www.tcsupport.tc.
Getting StartedScroll Wheel SupportIf you are using a host application that supports this feature, all parameters supportscrolling on both Windows XP and Mac OS X. Simply place the mouse over aparameter value field and use the Scroll Wheel to increment/decrement the associatedparameter-value.
Key CommandsIn most host applications, Plug-Ins support keyboard commands for certain functions.The following key commands are available for all Plug-In parameters:
Key Commands in Mac OSFine Adjust = AppleReset To Default = AltContext Key = Control + Mouse Button
Key Commands In WindowsFine Adjust = AltReset To Default = Shift & ControlContextual Menu = Right Mouse Button
Fabrik C / 5
EENN
GGLL
IISS
HH
IntroductionCongratulations on the purchase of your Fabrik C plug-in. Fabrik C is based on theinnovative Meta Intuitive Navigation Technology (MINT™) that redefines the way youuse professional audio plug-ins for professional results. We have integrated a simpleyet highly effective and intuitive approach to working with audio, and the result is auser-interface with few handles that are effective but simple to use. Often peoplethink that if you want to create professional results the process has to be tedious andcomplex – we don’t agree. The Fabrik plug-ins introduce a new way of working withaudio, and they build on proven and award-winning TC technology, ensuring thehighest level of audio quality.
Fabrik C is a full-blown channel strip plug-in with EQ, De-Esser, 3-band Compressorand Limiter in one single plug-in. With MINT™ you have total control of all theparameters, using only a few dedicated knobs. The EQ section is a 4-band parametricEQ with high/low-pass filters – choose between 4 different filter types. Based on no-nonsense design, the De-Esser is controlled using on a single fader. With a built in 3-band intelligent compression technique the Compressor is not justone of the best compressors available, - it also gives you the means to avoid bad sideeffects compared to traditional compression. Combined with the Limiter thecompression section can be used in a musical way without worrying about overshoots.
With MINT™ you don’t need to read a lengthy manual to get going– just use your ears.
Main features• Novel UI design – built-in MINT™ (Meta Intuitive Navigation Technology)
• Three main sections with TC technology: EQ, de-esser and compressor
• Intuitive and easy control over dedicated parameters – Instant gratification
• 4-band parametric EQ
• Scalable de-esser
• 3-band/full band compressor
• Limiter
• Control many parameters with few knobs
• Based on proven and award winning TC Technology
• Windows XP and Mac OS X support
• VST, AU and RTAS* support
• 24/96 supported
• 48 bit double precision
EENN
GGLL
IISS
HH
6 / Fabrik C
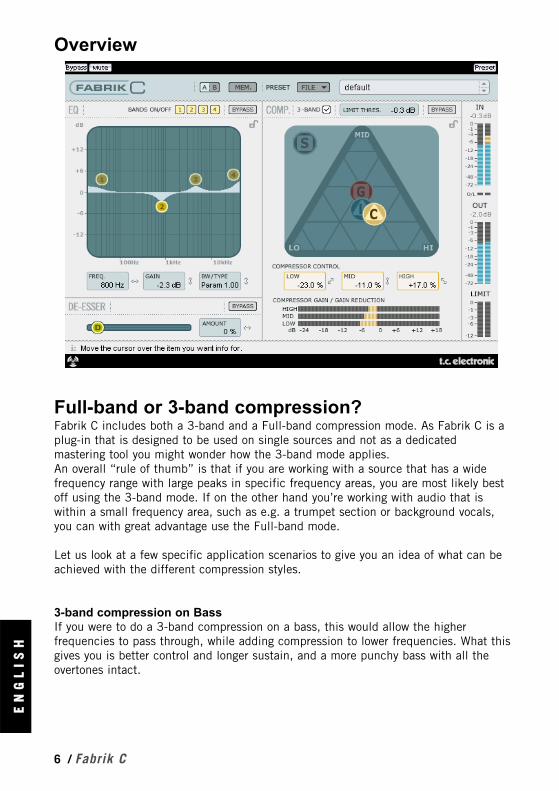
Overview
Full-band or 3-band compression?Fabrik C includes both a 3-band and a Full-band compression mode. As Fabrik C is aplug-in that is designed to be used on single sources and not as a dedicatedmastering tool you might wonder how the 3-band mode applies.An overall “rule of thumb” is that if you are working with a source that has a widefrequency range with large peaks in specific frequency areas, you are most likely bestoff using the 3-band mode. If on the other hand you’re working with audio that iswithin a small frequency area, such as e.g. a trumpet section or background vocals,you can with great advantage use the Full-band mode.
Let us look at a few specific application scenarios to give you an idea of what can beachieved with the different compression styles.
3-band compression on BassIf you were to do a 3-band compression on a bass, this would allow the higherfrequencies to pass through, while adding compression to lower frequencies. What thisgives you is better control and longer sustain, and a more punchy bass with all theovertones intact.

Fabrik C / 7
EENN
GGLL
IISS
HH
3-band compression on grouped sourcesIf you have grouped several sources and want to do a “global” compression on thissection, the 3-band mode can be very effective. It will give you more transparency inyour overall mix as you can do independent compression to each of the threefrequency bands.
Full-band compression on vocalsYou probably know that “in-your-face” kind of airy vocal that you hear on some tracks?The way to get that effect is by using a full-band compressor on you vocal track,slowing the attack time, and speeding up the release time. It’s pretty simple when youknow how to do it.
Full-band compression on GuitarIt’s amazing how some tonal instruments can get a very percussive quality to themwhen the right type of effect is applied. Using a full-band compressor on a rhythmguitar will give you a sound that is sharp, sweaty, funky and really emphasizes therhythmic and percussive qualities of your track.
LimiterThe Limiter is used to prevent overloads occurring at extreme and occasional peaks inthe source material, - peaks that may not be caught and attenuated sufficiently in theCompressor. As the Limiter can be used to limit the extreme, the Compressor can beused to apply a much more “musical” and gentle compression.
EQ SectionThe Fabrik C EQ section is a 4-band parametric EQ that gives you full control overhigh- and low-pass filters. Four filter types are available offering Notch, Parametric,Shelving and Cut. If you are looking for a razor sharp filter, use the Notch filter whichhas a range as low as 0.01 of an octave. For a more gentle approach go for theshelving filter that sports a variable slope with a range from 3dB/oct over 6 and 9 to12dB/oct. The Cut filter can be switched between a flat amplitude maximum of 12dBto an octave, and a flat group delay type. For a natural and “well behaved” bandwidth,apply the parametric EQ.
De-EsserA De-Esser is a compressor type used to reduce only specific sibilant frequencies.Typically the “s” sounds can be far too dominant in a vocal track and the track wouldtherefore often benefit from being processed by a De-Esser.
Headroom To avoid internal clipping and secure ease of use, all processing is done in the 48 bitdomain, and is not truncated to 24 bit before the output of the Limiter.

EENN
GGLL
IISS
HH
8 / Fabrik C
Signal Flow - 3-band mode
This is a schematic overview of the signals flow through the algorithm in 3-bandmode. As illustrated - the signal first passes the 4 band parametric EQ. Then thesignal is split into lo-, mid- and hi-bands for individual compression. Cross-over frequencies between the bands are set by the selected Source type. After the Make-up Gain section, the signal passes the Limiter.
Signal Flow - Full-band mode
The signal flow in Full-band mode is similar to 3-band mode. The difference liessolely in the Full-band compression as opposed to the split-filter and 3 compressionbands found in 3-band mode.
Parametric
EQ
Make-up
Gain
Limiter
Comp
In Level
Comp/
De-Esser
Parametric
EQ
Comp/
De-Esser Make-up
Gain
Limiter
3 band
Split
Filter
+Mid
Lo
Comp
In Level
Hi
Fabrik C / 9
EENN
GGLL
IISS
HH
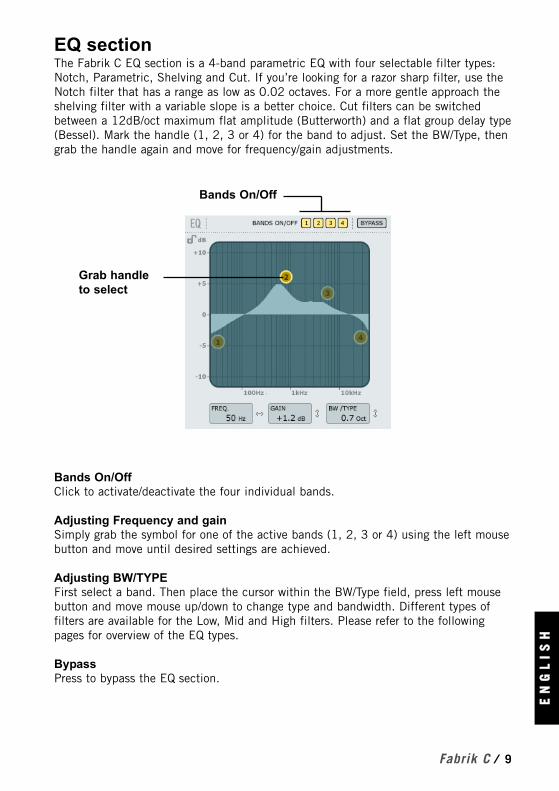
EQ sectionThe Fabrik C EQ section is a 4-band parametric EQ with four selectable filter types:Notch, Parametric, Shelving and Cut. If you’re looking for a razor sharp filter, use theNotch filter that has a range as low as 0.02 octaves. For a more gentle approach theshelving filter with a variable slope is a better choice. Cut filters can be switchedbetween a 12dB/oct maximum flat amplitude (Butterworth) and a flat group delay type(Bessel). Mark the handle (1, 2, 3 or 4) for the band to adjust. Set the BW/Type, thengrab the handle again and move for frequency/gain adjustments.
Bands On/OffClick to activate/deactivate the four individual bands.
Adjusting Frequency and gainSimply grab the symbol for one of the active bands (1, 2, 3 or 4) using the left mousebutton and move until desired settings are achieved.
Adjusting BW/TYPEFirst select a band. Then place the cursor within the BW/Type field, press left mousebutton and move mouse up/down to change type and bandwidth. Different types offilters are available for the Low, Mid and High filters. Please refer to the followingpages for overview of the EQ types.
BypassPress to bypass the EQ section.
Bands On/Off
Grab handle to select
EENN
GGLL
IISS
HH
10 / Fabrik C
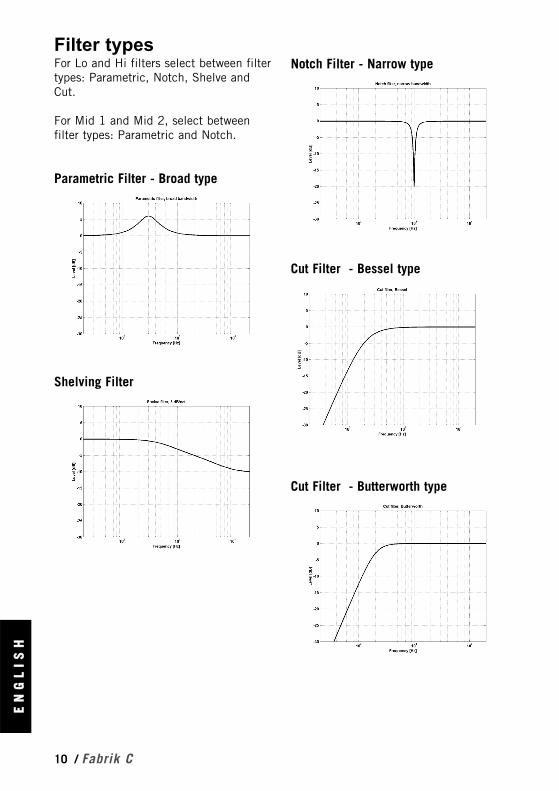
Filter typesFor Lo and Hi filters select between filtertypes: Parametric, Notch, Shelve andCut.
For Mid 1 and Mid 2, select betweenfilter types: Parametric and Notch.
Parametric Filter - Broad type
Shelving Filter
Notch Filter - Narrow type
Cut Filter - Bessel type
Cut Filter - Butterworth type
Fabrik C / 11
EENN
GGLL
IISS
HH
TypeRange for the Notch filter:Lo Gain : -inf; -97dB to 0dBMid1 Gain : -inf; -97dB to 0dBMid2 Gain : -inf; -97dB to 0dBHi Gain : -inf; -97dB to 0dB
Range for the Notch filter: Lo BW : 0.02oct to 1octMid1 BW : 0.02oct to 1octMid2 BW : 0.02oct to 1octHi BW : 0.02oct to 1oct
Range for the Parametric filter:Lo BW : 0.1oct to 4octMid1 BW : 0.1oct to 4octMid2 BW : 0.1oct to 4octHi BW : 0.1oct to 4oct
Range for the Shelve filter:Lo BW : 3dB/oct to 12dB/octHi BW : 3dB/oct to 12dB/oct
Range for the Cut filter:Lo BW : Bessel or ButterworthHi BW : Bessel or Butterworth
Bandwidth/Q - Key-Values:BW Q0.5 - 2.870.7 - 2.041.0 - 1.41
FreqRange - Lo band : 20Hz to 20kHzRange - Mid1 band : 20Hz to 20kHzRange - Mid2 band : 20Hz to 20kHzRange - Hi band : 20Hz to 40kHz
GainSelect the band, click on the Gain fieldthen drag the mouse vertically to changethe value.
Range for the Parametric, Shelve and Cuttype:Lo Gain : -12dB to +12dBMid1 Gain : -12dB to +12dBMid2 Gain : -12dB to +12dBHi Gain : -12dB to +12dB
EENN
GGLL
IISS
HH
12 / Fabrik C
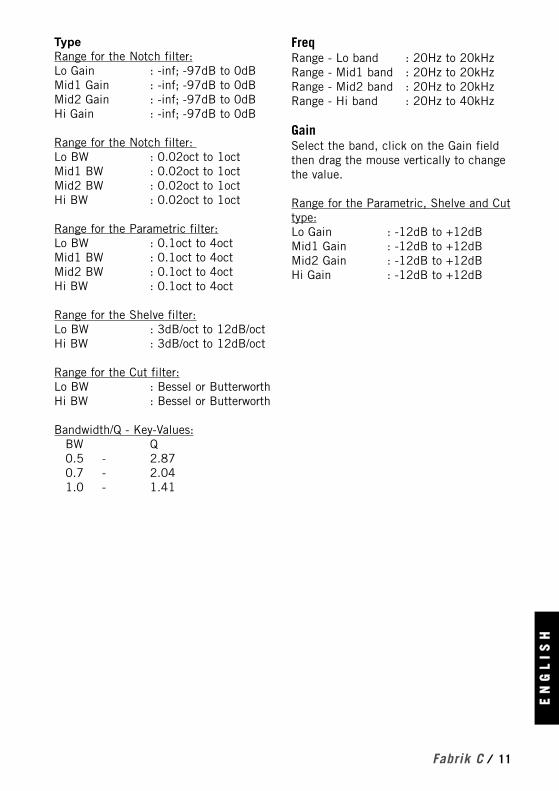
Gain ControlThe Gain settings are very important.The higher set In Gain the harder thesignal meets the Compressor Threshold.
• Grab the “G” and move the symbol invertical and horizontal directions to setboth In Gain and Make up gain with justone handle.
The Threshold is automatically set whenthe Source type is selected, however, theGain parameters determine how hard thesignal meets the Threshold.
Depending on how the Compressorparameters are set, the level will change.The Make Up Gain parameter is used tocompensate for this level change.
In Gain Range: -18 to +18dBMake Up Gain: -18 to +18dB
Compression3-band and Full-band modesGain page
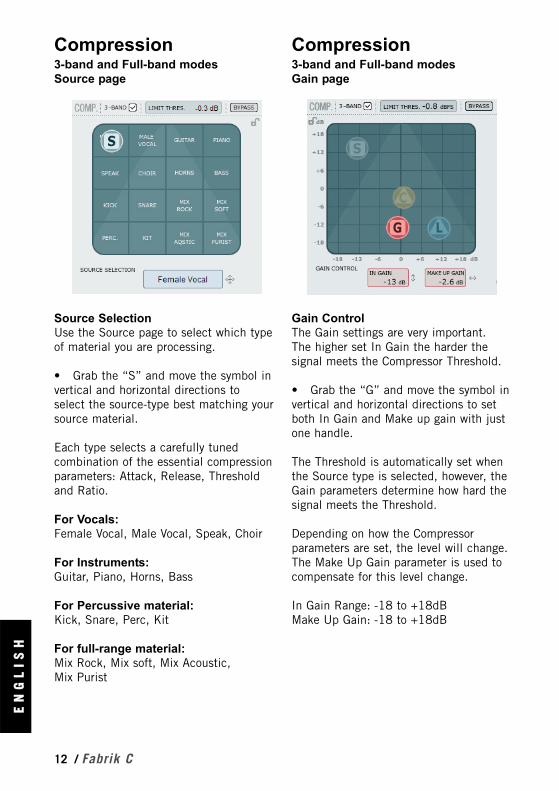
Source SelectionUse the Source page to select which typeof material you are processing.
• Grab the “S” and move the symbol invertical and horizontal directions toselect the source-type best matching yoursource material.
Each type selects a carefully tunedcombination of the essential compressionparameters: Attack, Release, Thresholdand Ratio.
For Vocals:Female Vocal, Male Vocal, Speak, Choir
For Instruments:Guitar, Piano, Horns, Bass
For Percussive material:Kick, Snare, Perc, Kit
For full-range material:Mix Rock, Mix soft, Mix Acoustic, Mix Purist
Compression3-band and Full-band modesSource page
Fabrik C / 13
EENN
GGLL
IISS
HH
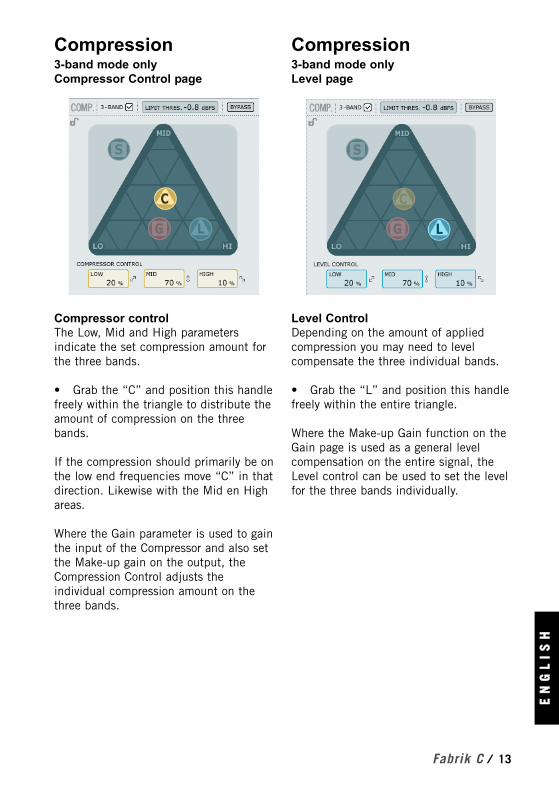
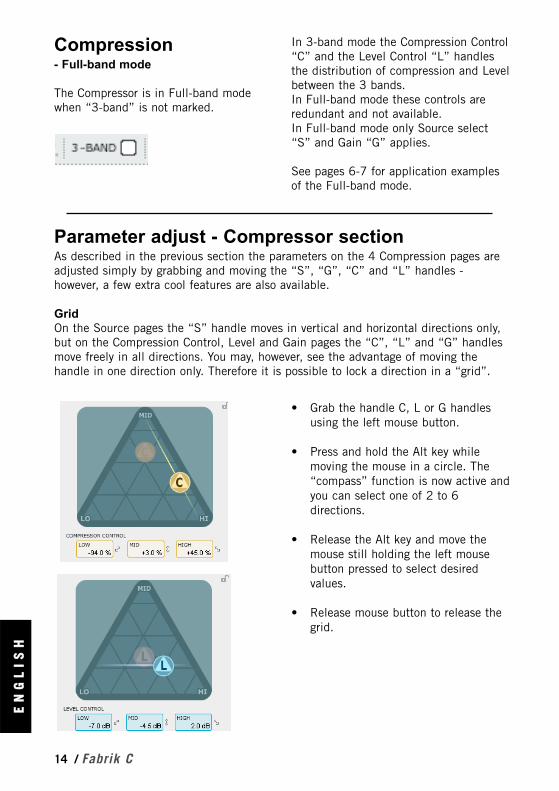
Compressor controlThe Low, Mid and High parametersindicate the set compression amount forthe three bands.
• Grab the “C” and position this handlefreely within the triangle to distribute theamount of compression on the threebands.
If the compression should primarily be onthe low end frequencies move “C” in thatdirection. Likewise with the Mid en Highareas.
Where the Gain parameter is used to gainthe input of the Compressor and also setthe Make-up gain on the output, theCompression Control adjusts theindividual compression amount on thethree bands.
Compression3-band mode onlyCompressor Control page
Level ControlDepending on the amount of appliedcompression you may need to levelcompensate the three individual bands.
• Grab the “L” and position this handlefreely within the entire triangle.
Where the Make-up Gain function on theGain page is used as a general levelcompensation on the entire signal, theLevel control can be used to set the levelfor the three bands individually.
Compression3-band mode onlyLevel page
EENN
GGLL
IISS
HH
14 / Fabrik C
• Grab the handle C, L or G handlesusing the left mouse button.
• Press and hold the Alt key whilemoving the mouse in a circle. The“compass” function is now active andyou can select one of 2 to 6directions.
• Release the Alt key and move themouse still holding the left mousebutton pressed to select desiredvalues.
• Release mouse button to release thegrid.
Parameter adjust - Compressor sectionAs described in the previous section the parameters on the 4 Compression pages areadjusted simply by grabbing and moving the “S”, “G”, “C” and “L” handles -however, a few extra cool features are also available.
GridOn the Source pages the “S” handle moves in vertical and horizontal directions only,but on the Compression Control, Level and Gain pages the “C”, “L” and “G” handlesmove freely in all directions. You may, however, see the advantage of moving thehandle in one direction only. Therefore it is possible to lock a direction in a “grid”.
Compression- Full-band mode
The Compressor is in Full-band modewhen “3-band” is not marked.
In 3-band mode the Compression Control“C” and the Level Control “L” handlesthe distribution of compression and Levelbetween the 3 bands.In Full-band mode these controls areredundant and not available.In Full-band mode only Source select“S” and Gain “G” applies.
See pages 6-7 for application examplesof the Full-band mode.
Fabrik C / 15
EENN
GGLL
IISS
HH
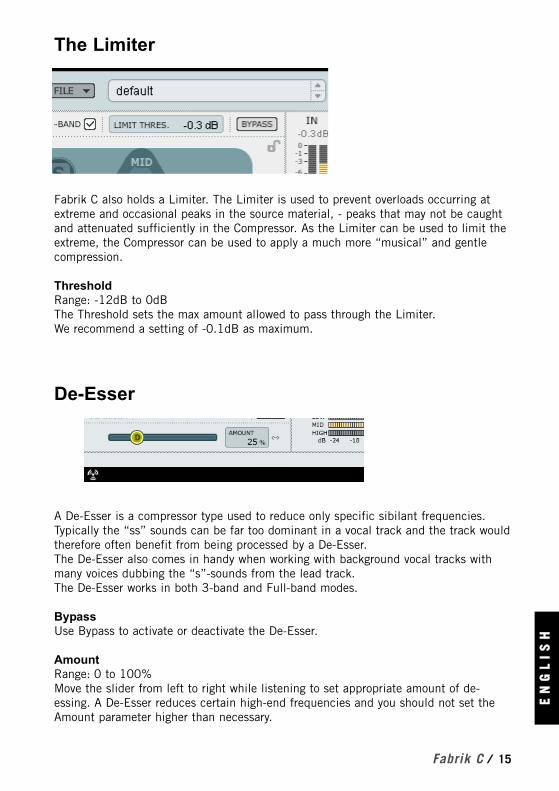
The Limiter
Fabrik C also holds a Limiter. The Limiter is used to prevent overloads occurring atextreme and occasional peaks in the source material, - peaks that may not be caughtand attenuated sufficiently in the Compressor. As the Limiter can be used to limit theextreme, the Compressor can be used to apply a much more “musical” and gentlecompression.
ThresholdRange: -12dB to 0dBThe Threshold sets the max amount allowed to pass through the Limiter.We recommend a setting of -0.1dB as maximum.
De-Esser
A De-Esser is a compressor type used to reduce only specific sibilant frequencies.Typically the “ss” sounds can be far too dominant in a vocal track and the track wouldtherefore often benefit from being processed by a De-Esser.The De-Esser also comes in handy when working with background vocal tracks withmany voices dubbing the “s”-sounds from the lead track.The De-Esser works in both 3-band and Full-band modes.
BypassUse Bypass to activate or deactivate the De-Esser.
AmountRange: 0 to 100%Move the slider from left to right while listening to set appropriate amount of de-essing. A De-Esser reduces certain high-end frequencies and you should not set theAmount parameter higher than necessary.

EENN
GGLL
IISS
HH
16 / Fabrik C
Preset ManagementFabrik’s comprehensive file based preset architecture makes archiving presets asimple process. This allows you to organize your presets the way you find mostcomfortable for your workflow, and to exchange presets with other users. Presets aresaved as discrete files on your hard drive. Once a preset is saved into the defaultlocation, it will automatically appear in the 'File' menu every time you use the Plug-In.The files can then be organized into sub-folders, where you can delete, rearrange orcreate your own sub-folders to accommodate your needs. For example, you couldcreate preset folders for projects, customers or by application, such as 'Clean Up'.
NOTE: A folder will not appear in the Preset File Menu unless it has at least onepreset inside!
Preset File MenuPressing the 'File' button will open the File menu. The following options are availablefrom the File menu.
Loading a PresetBy selecting 'Load', you can navigate to any folder on the system that you have readaccess to, including any shared folder. By default, these will be loaded from thedefault location for Fabrik C presets. Only presets located in the default file locationwill appear in Fabrik C pop-up preset menu.
Saving a PresetBy selecting 'Save', you can save your preset to any folder on the system that youhave write access to, including any shared folder. By default, presets are saved tothe default location for the Fabrik C presets.
Section-Lock function at recallIt is possible to lock any of the three sections in the plug-in when recalling a preset.This way it is possible to e.g. keep the current EQ setting and only load the De-Essand Compression settings from the preset you are about to recall.
To lock/unlockSimply click in the pad-lock symbols in the relevant sections:
Unlocked - Locked

Fabrik C / 17
EENN
GGLL
IISS
HH
Default Preset LocationsThe following locations will describe where you can find the Fabrik C presets, whichare stored in a folder unique to each plug-in:
OS X preset paths:Factory presets:\Library\Application Support\TC Electronic\Fabrik C\Presets
User presets:~\Library\Application Support\TC Electronic\Fabrik C\Presets~ \ Refers to your user folder: Users \ Your Name
WINDOWS preset paths:Factory presets:~\TC Electronic\Fabrik C\Presets
User presets:My Documents\TC Electronic\Fabrik C\Presets(~ \ Refers to the path for your System Hard Drive \ Program Files)
• To delete a file, simply move it to the 'Trash' or 'Recycle bin'.• To create a new sub-folder that appears in the Plug-In menu, simply create a new
folder in the Plug-In folder that resides in the PRESETS folder of the Fabrik Cdefault preset location.
NOTE: A folder will not appear in the Preset File Menu unless it has at least one preset inside!
EENN
GGLL
IISS
HH
18 / Fabrik C
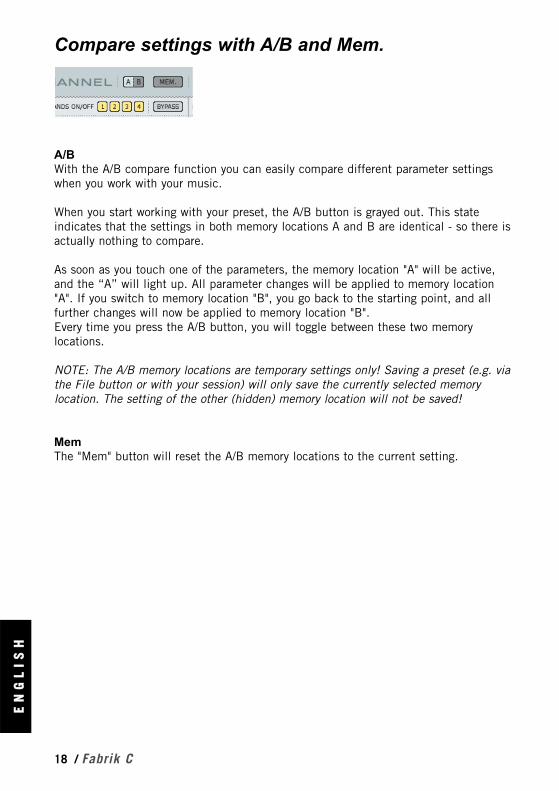
Compare settings with A/B and Mem.
A/BWith the A/B compare function you can easily compare different parameter settingswhen you work with your music.
When you start working with your preset, the A/B button is grayed out. This stateindicates that the settings in both memory locations A and B are identical - so there isactually nothing to compare.
As soon as you touch one of the parameters, the memory location "A" will be active,and the “A” will light up. All parameter changes will be applied to memory location"A". If you switch to memory location "B", you go back to the starting point, and allfurther changes will now be applied to memory location "B". Every time you press the A/B button, you will toggle between these two memorylocations.
NOTE: The A/B memory locations are temporary settings only! Saving a preset (e.g. viathe File button or with your session) will only save the currently selected memorylocation. The setting of the other (hidden) memory location will not be saved!
MemThe "Mem" button will reset the A/B memory locations to the current setting.


