Page 1
1
TC-V102, TC-V102-ARM,
TC-V201, TC-V300-J1800
Cloud Client
Quick User Manual
Disclaimer:
The illustrations or descriptions given herein are for your information only and may be subject to
change due to future version update or technology upgrade.
Some options can be different for ARM version (TC-V102-ARM) and for x86 version (TC-V102,
TC-V201, TC-V300-J1800).
The latest firmware can be found on ftp://ftp.asm.cz/XtendLan
Page 2
2
Index
1. Introduction to the OS version .................................................................................................. 3
2. Traditional Desktop ................................................................................................................... 4
2.1 Applications ........................................................................................................................ 4
2.1.1 Control ..................................................................................................................... 4
2.1.2 Network .................................................................................................................... 5
2.1.3 Display ..................................................................................................................... 9
2.1.4 Sound ..................................................................................................................... 12
2.1.5 Mouse ..................................................................................................................... 14
2.1.6 Keyboard ................................................................................................................ 15
2.1.7 User Password ........................................................................................................ 16
2.1.8 Screen Lock ............................................................................................................ 17
2.1.9 Nettool .................................................................................................................... 18
2.1.10 Date/Time ............................................................................................................. 23
2.1.11 CCCM Agent ........................................................................................................ 25
2.1.12 Browser ................................................................................................................ 26
2.1.13 Service .................................................................................................................. 27
2.1.14 Start up ................................................................................................................. 28
2.1.15 Remote Desktop ................................................................................................... 28
2.1.16 Storage Device Manager ...................................................................................... 31
2.1.17 Cloud Client ......................................................................................................... 34
2.1.18 ICA Global Setting ............................................................................................... 35
2.1.19 Security ................................................................................................................ 37
2.1.20 Power Manager .................................................................................................... 38
2.1.21 Switch Desktop .................................................................................................... 40
2.1.22 Fonts ..................................................................................................................... 40
2.2 Connection Manager ......................................................................................................... 41
3. “Zero Client” Desktop ............................................................................................................ 48
3.1 Startup wizard ................................................................................................................... 48
3.1.1 Summary ................................................................................................................ 49
3.1.2 Language & Keyboard ........................................................................................... 49
3.1.3 Date & Time ........................................................................................................... 49
3.1.4 Network .................................................................................................................. 49
3.1.5 Cloud Service ......................................................................................................... 49
3.2 Connection & Use ............................................................................................................. 50
3.2.1 Log On ................................................................................................................... 50
3.2.2 Application Management ....................................................................................... 52
3.3 Control Center ........................................................................................................... 56
3.3.1 System Information ................................................................................................ 58
3.3.2 Cloud Service ......................................................................................................... 59
3.3.3 Network .................................................................................................................. 66
3.3.4 Audio ...................................................................................................................... 67
Page 3
3
3.3.5 Date & Time ........................................................................................................... 69
3.3.6 Language & Keyboard ........................................................................................... 70
3.3.7 Mouse ..................................................................................................................... 73
3.3.8 Display ................................................................................................................... 74
3.3.9 CCCM Agent .......................................................................................................... 76
3.3.10 Security ................................................................................................................ 77
3.3.11 Certificate Manager .............................................................................................. 78
3.3.12 User Password ...................................................................................................... 81
3.3.13 Power Manager .................................................................................................... 82
3.3.14 Remote Assistance ............................................................................................... 83
3.3.15 Network Diagnosis ............................................................................................... 85
3.3.16 Logs Viewer ......................................................................................................... 87
3.3.17 Switch Desktop .................................................................................................... 89
4. Instruction of System Hotkeys ................................................................................................ 90
5. Firmware Update..................................................................................................................... 90
1. Introduction to the OS version
Running an embedded operating system, this multi-purpose cloud client supports Citrix ICA
protocol, through which Citrix virtualized applications can be delivered. Moreover, it also
supports RDP, VMware Horizon View.
Main features:
1. Supporting Citrix ICA/HDX, Microsoft RDP and VMware PCoIP;
2. Allowing centralized management, centralized maintenance and centralized monitoring;
3. Easy system upgrade and feature expansion;
4. Effective protection from data theft and virus intrusion;
5. Concise and human-oriented user interface to facilitate easy operations by non-professional
users.
6. Contain the traditional desktop and the zero client desktop, It is convenient for user to use in
different scene.
Page 4
4
2. Traditional Desktop
2.1 Applications
2.1.1 Control
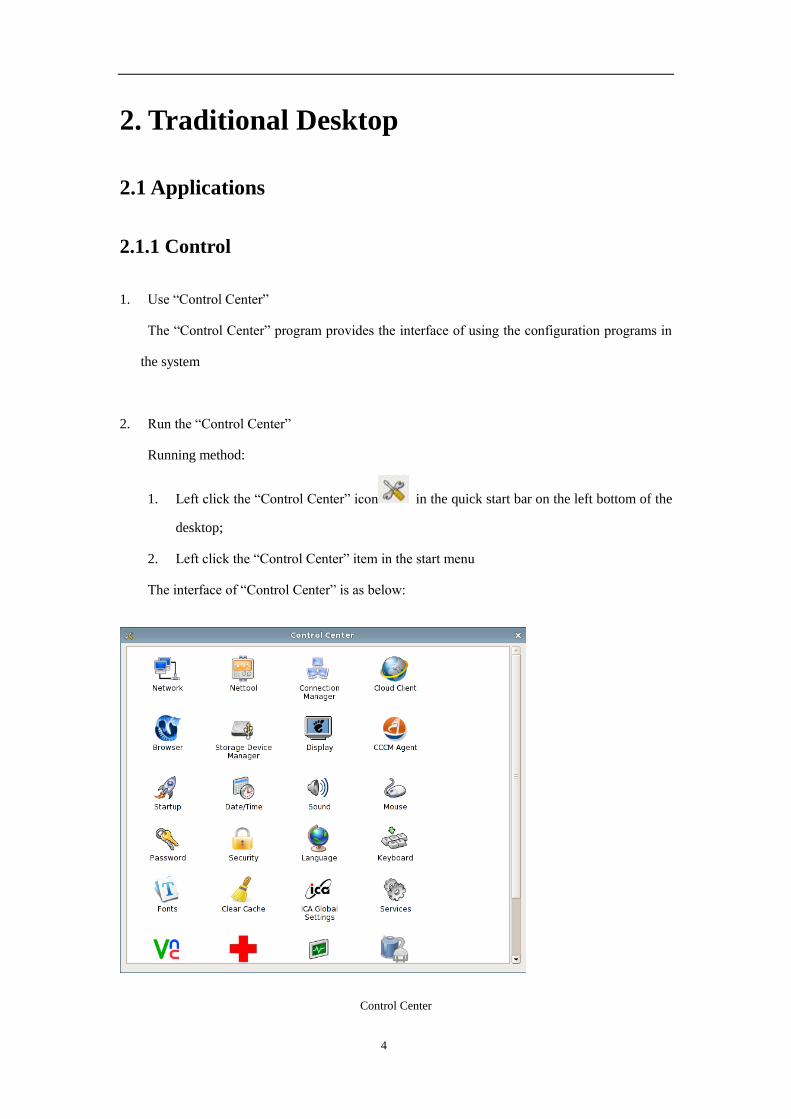
1. Use “Control Center”
The “Control Center” program provides the interface of using the configuration programs in
the system
2. Run the “Control Center”
Running method:
1. Left click the “Control Center” icon in the quick start bar on the left bottom of the
desktop;
2. Left click the “Control Center” item in the start menu
The interface of “Control Center” is as below:
Control Center
Page 5
5
3. Run the programs in the control center
Select the program, double click it or press enter to run it
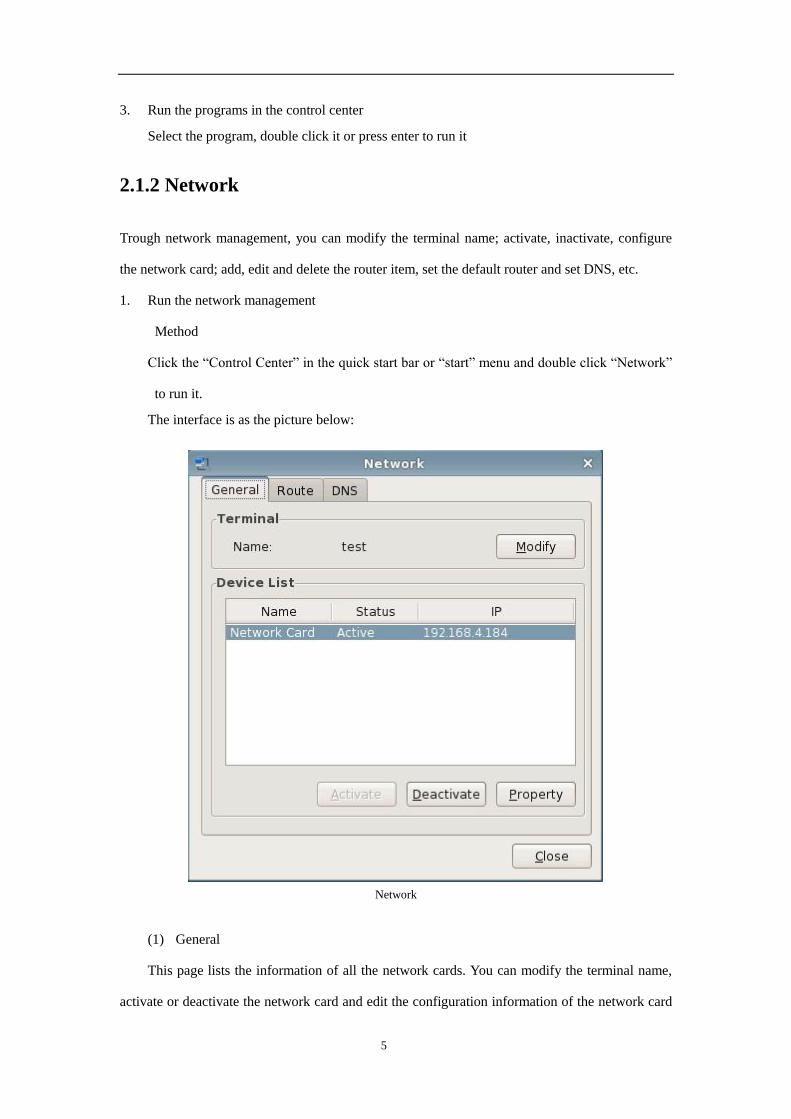
2.1.2 Network
Trough network management, you can modify the terminal name; activate, inactivate, configure
the network card; add, edit and delete the router item, set the default router and set DNS, etc.
1. Run the network management
Method
Click the “Control Center” in the quick start bar or “start” menu and double click “Network”
to run it.
The interface is as the picture below:
Network
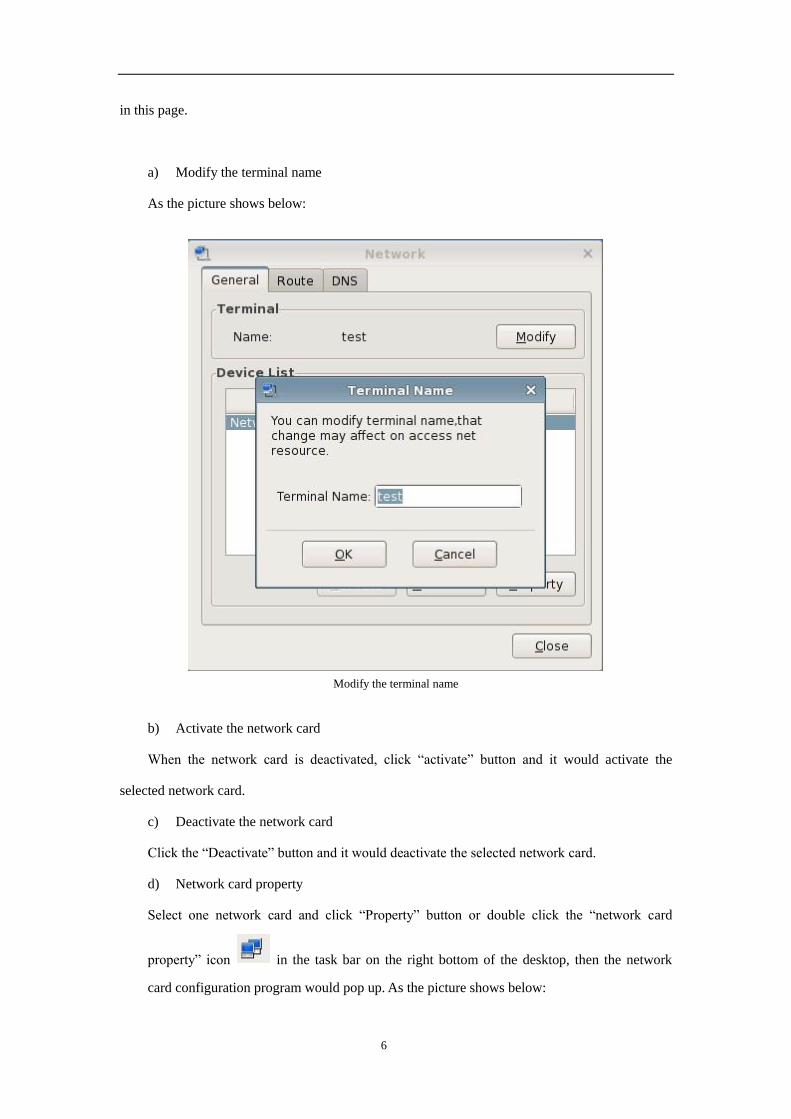
(1) General
This page lists the information of all the network cards. You can modify the terminal name,
activate or deactivate the network card and edit the configuration information of the network card
Page 6
6
in this page.
a) Modify the terminal name
As the picture shows below:
Modify the terminal name
b) Activate the network card
When the network card is deactivated, click “activate” button and it would activate the
selected network card.
c) Deactivate the network card
Click the “Deactivate” button and it would deactivate the selected network card.
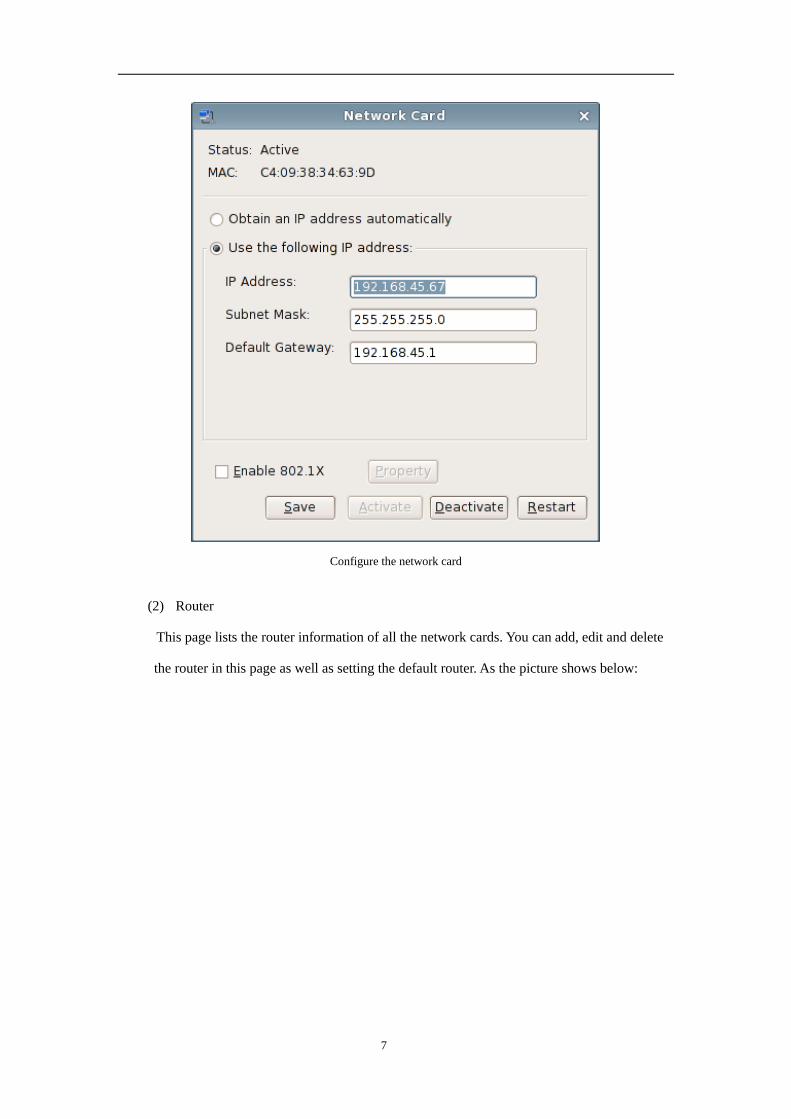
d) Network card property
Select one network card and click “Property” button or double click the “network card
property” icon in the task bar on the right bottom of the desktop, then the network
card configuration program would pop up. As the picture shows below:
Page 7
7
Configure the network card
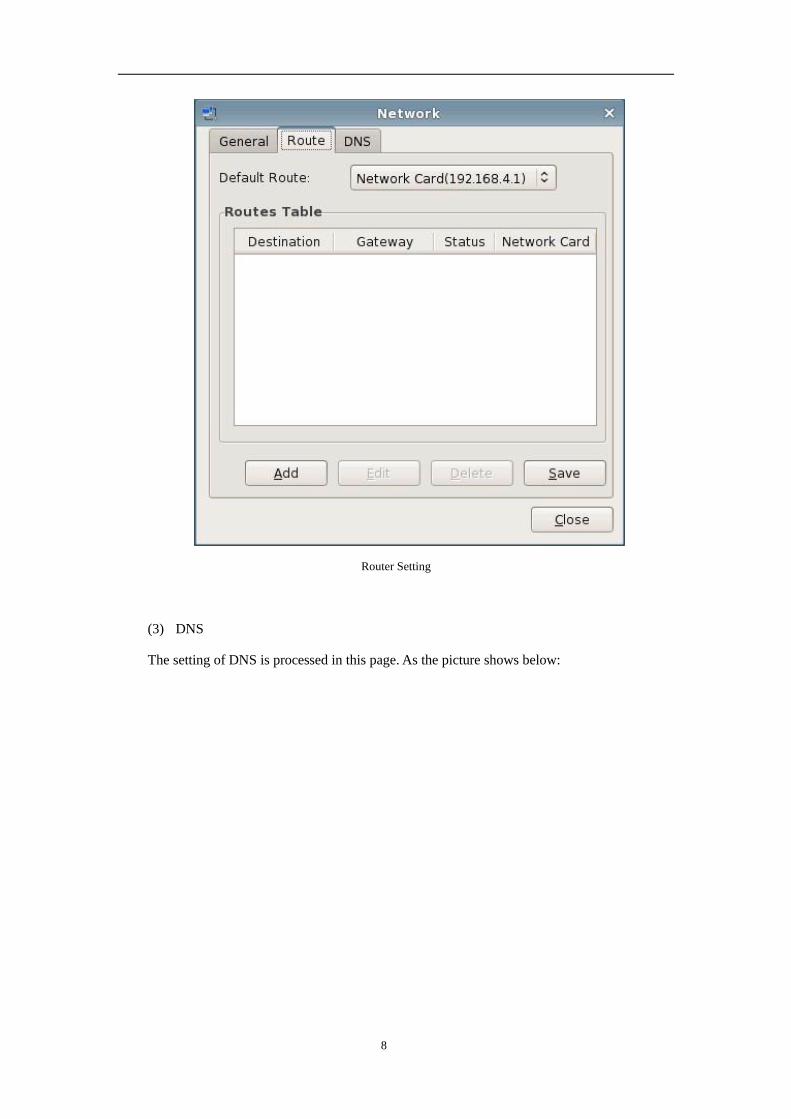
(2) Router
This page lists the router information of all the network cards. You can add, edit and delete
the router in this page as well as setting the default router. As the picture shows below:
Page 8
8
Router Setting
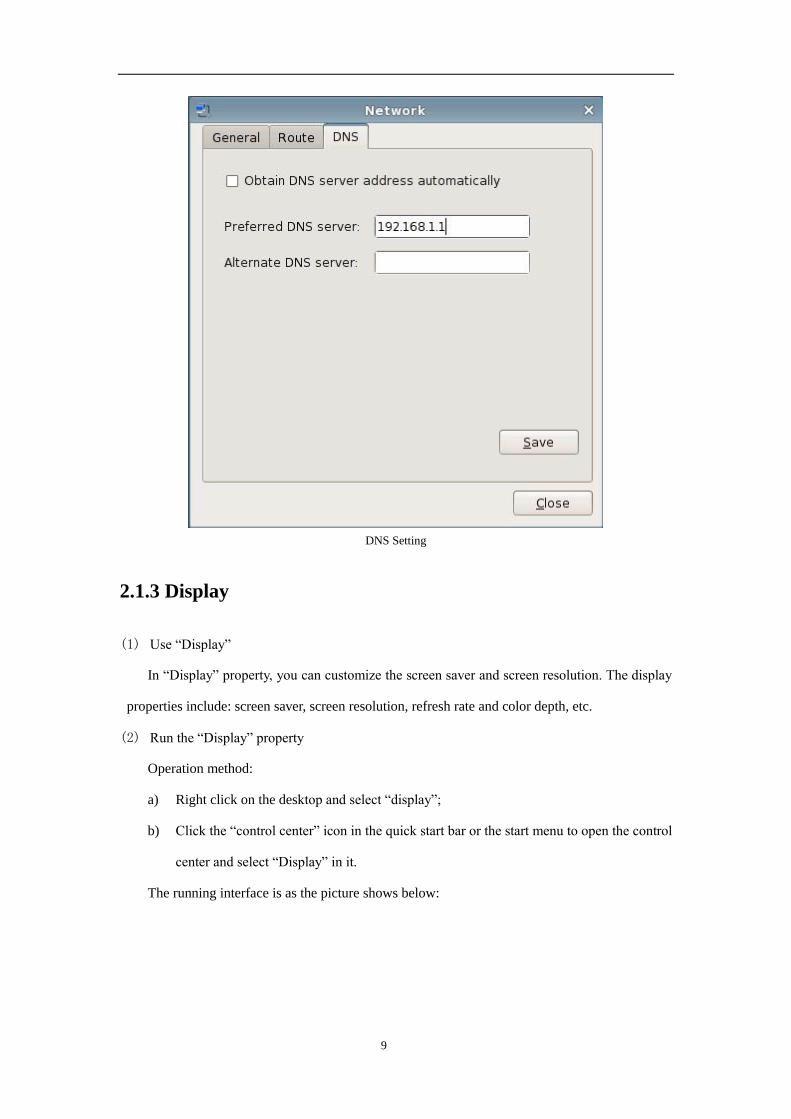
(3) DNS
The setting of DNS is processed in this page. As the picture shows below:
Page 9
9
DNS Setting
2.1.3 Display
(1) Use “Display”
In “Display” property, you can customize the screen saver and screen resolution. The display
properties include: screen saver, screen resolution, refresh rate and color depth, etc.
(2) Run the “Display” property
Operation method:
a) Right click on the desktop and select “display”;
b) Click the “control center” icon in the quick start bar or the start menu to open the control
center and select “Display” in it.
The running interface is as the picture shows below:
Page 10
10
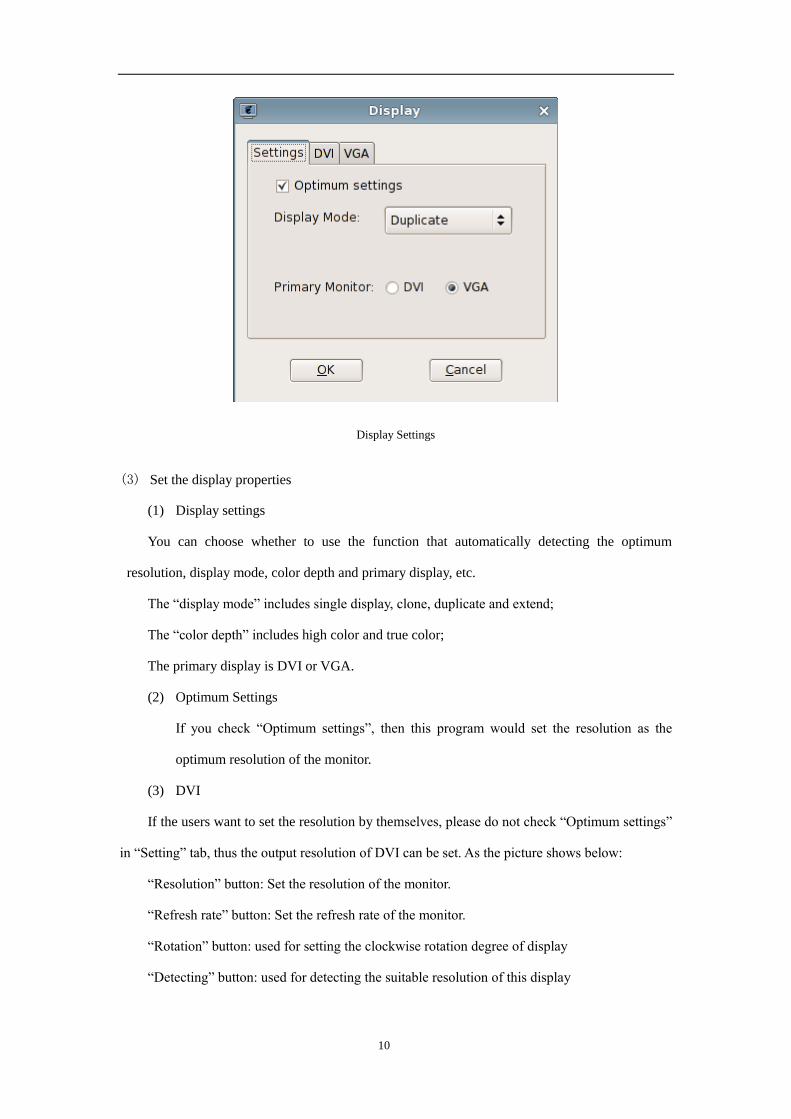
Display Settings
(3) Set the display properties
(1) Display settings
You can choose whether to use the function that automatically detecting the optimum
resolution, display mode, color depth and primary display, etc.
The “display mode” includes single display, clone, duplicate and extend;
The “color depth” includes high color and true color;
The primary display is DVI or VGA.
(2) Optimum Settings
If you check “Optimum settings”, then this program would set the resolution as the
optimum resolution of the monitor.
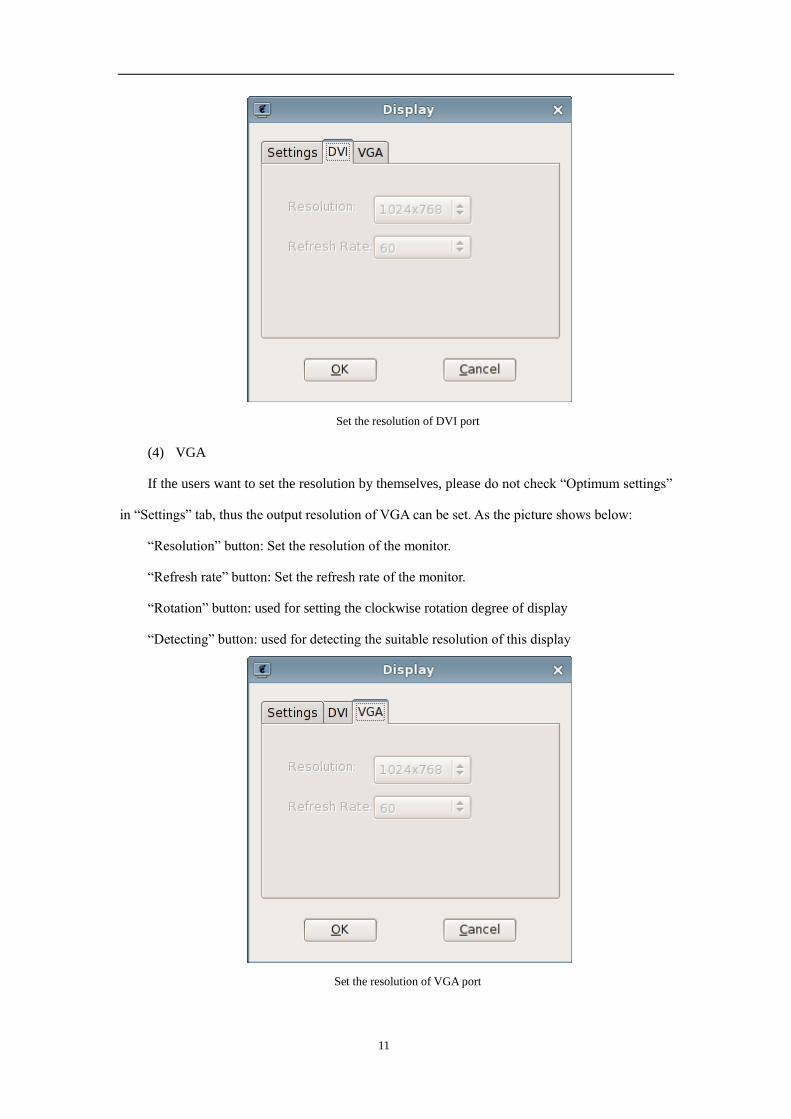
(3) DVI
If the users want to set the resolution by themselves, please do not check “Optimum settings”
in “Setting” tab, thus the output resolution of DVI can be set. As the picture shows below:
“Resolution” button: Set the resolution of the monitor.
“Refresh rate” button: Set the refresh rate of the monitor.
“Rotation” button: used for setting the clockwise rotation degree of display
“Detecting” button: used for detecting the suitable resolution of this display
Page 11
11
Set the resolution of DVI port
(4) VGA
If the users want to set the resolution by themselves, please do not check “Optimum settings”
in “Settings” tab, thus the output resolution of VGA can be set. As the picture shows below:
“Resolution” button: Set the resolution of the monitor.
“Refresh rate” button: Set the refresh rate of the monitor.
“Rotation” button: used for setting the clockwise rotation degree of display
“Detecting” button: used for detecting the suitable resolution of this display
Set the resolution of VGA port
Page 12
12
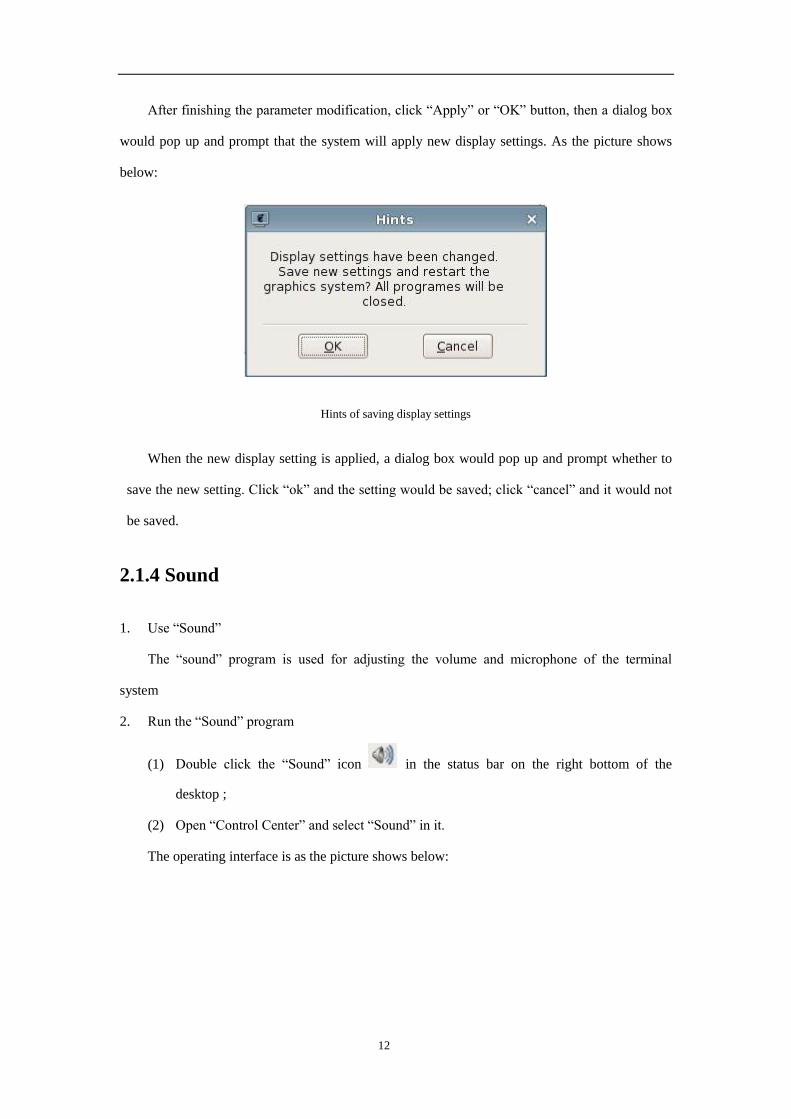
After finishing the parameter modification, click “Apply” or “OK” button, then a dialog box
would pop up and prompt that the system will apply new display settings. As the picture shows
below:
Hints of saving display settings
When the new display setting is applied, a dialog box would pop up and prompt whether to
save the new setting. Click “ok” and the setting would be saved; click “cancel” and it would not
be saved.
2.1.4 Sound
1. Use “Sound”
The “sound” program is used for adjusting the volume and microphone of the terminal
system
2. Run the “Sound” program
(1) Double click the “Sound” icon in the status bar on the right bottom of the
desktop ;
(2) Open “Control Center” and select “Sound” in it.
The operating interface is as the picture shows below:
Page 13
13
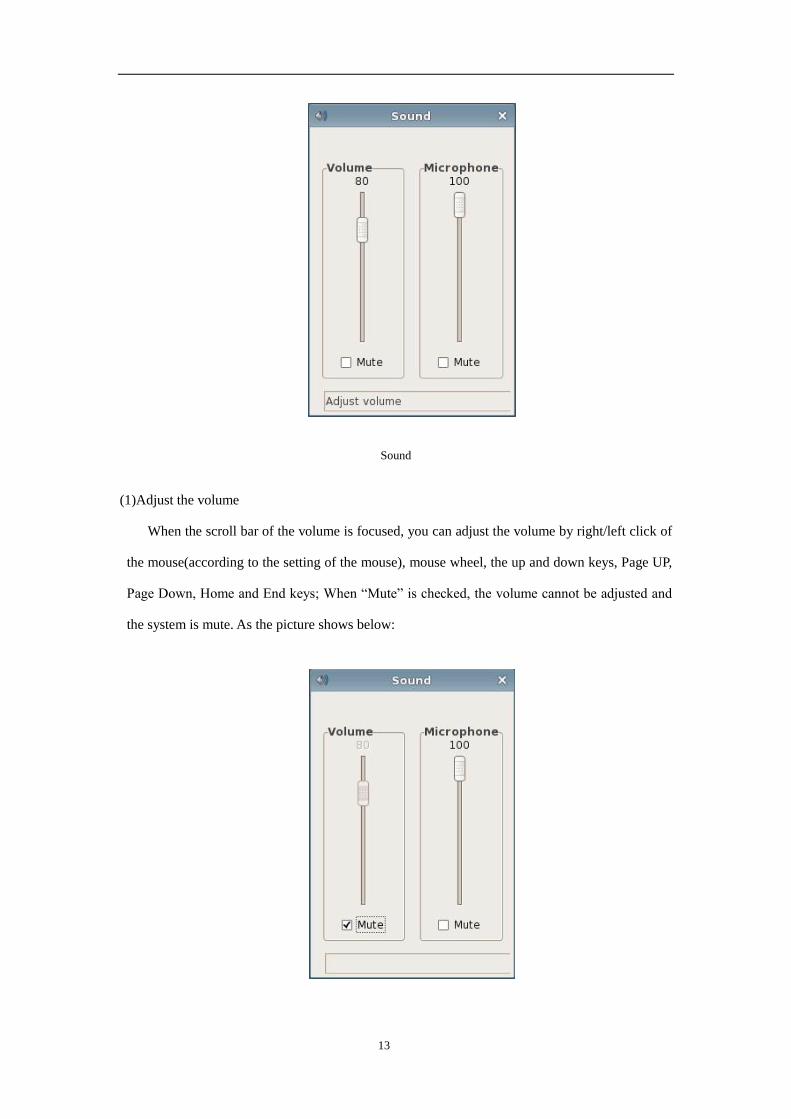
Sound
(1)Adjust the volume
When the scroll bar of the volume is focused, you can adjust the volume by right/left click of
the mouse(according to the setting of the mouse), mouse wheel, the up and down keys, Page UP,
Page Down, Home and End keys; When “Mute” is checked, the volume cannot be adjusted and
the system is mute. As the picture shows below:
Page 14
14
Mute of Volume
(2)Adjust the volume of microphone
When the scroll bar of the microphone is focused, you can adjust the microphone volume by
right/left click of the mouse (according to the setting of the mouse), mouse wheel, the up and
down keys, Page UP, Page Down, Home and End keys; When “Mute” is checked, the volume of
the microphone cannot be adjusted and the system is mute. As the picture shows below:
Mute of Microphone
2.1.5 Mouse
1. Use “Mouse”
The “Mouse” property program is used for switching the left and right button of the mouse
and mouse speed
2. Run “Mouse” program
Open control center and select “Mouse”.
The operating interface is as the picture shows below:
Page 15
15
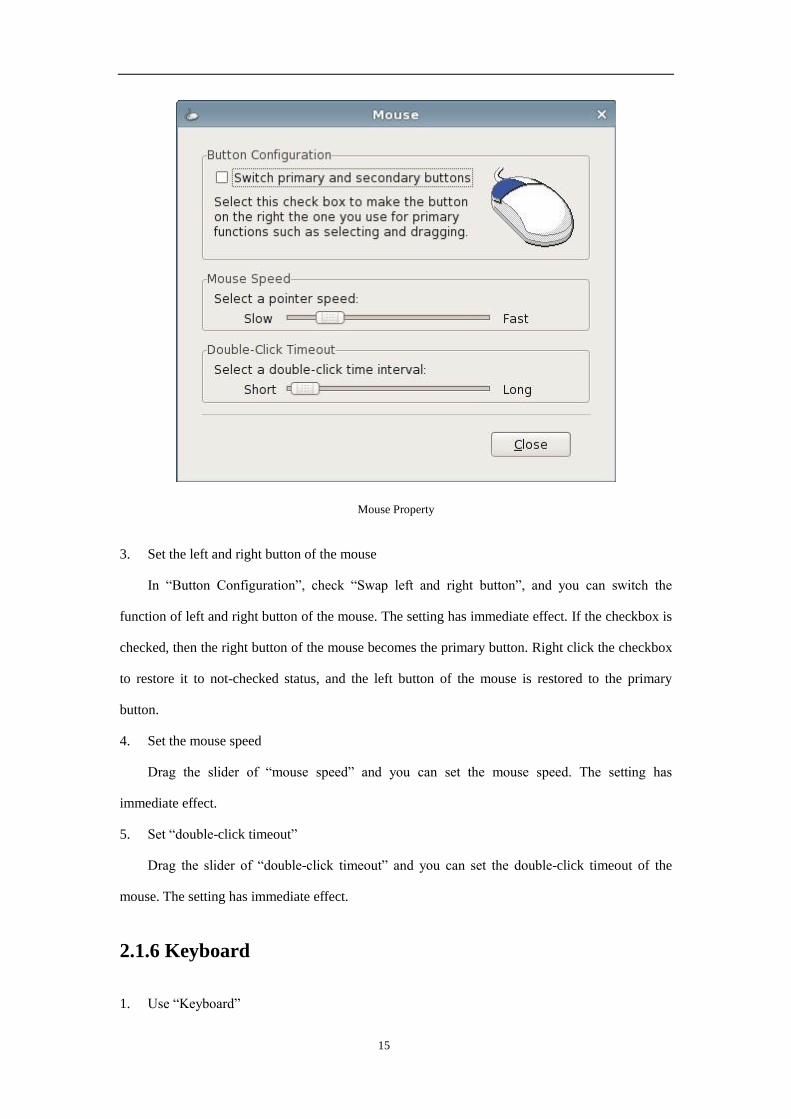
Mouse Property
3. Set the left and right button of the mouse
In “Button Configuration”, check “Swap left and right button”, and you can switch the
function of left and right button of the mouse. The setting has immediate effect. If the checkbox is
checked, then the right button of the mouse becomes the primary button. Right click the checkbox
to restore it to not-checked status, and the left button of the mouse is restored to the primary
button.
4. Set the mouse speed
Drag the slider of “mouse speed” and you can set the mouse speed. The setting has
immediate effect.
5. Set “double-click timeout”
Drag the slider of “double-click timeout” and you can set the double-click timeout of the
mouse. The setting has immediate effect.
2.1.6 Keyboard
1. Use “Keyboard”
Page 16
16
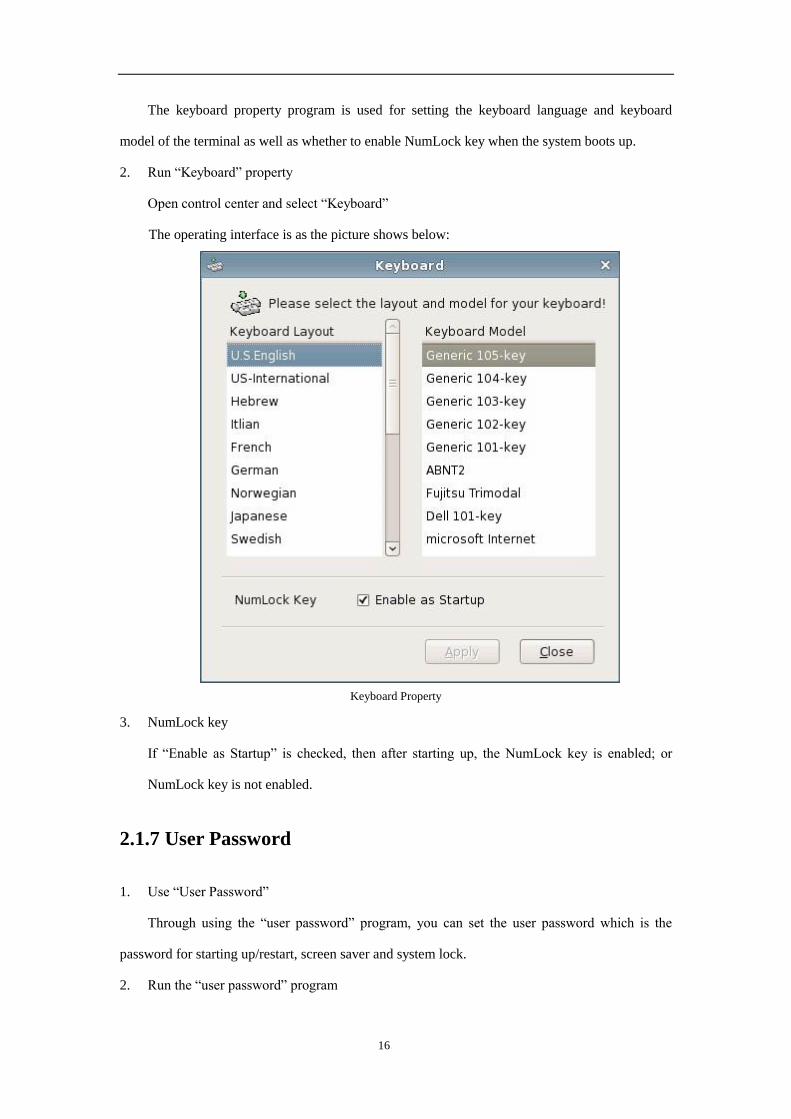
The keyboard property program is used for setting the keyboard language and keyboard
model of the terminal as well as whether to enable NumLock key when the system boots up.
2. Run “Keyboard” property
Open control center and select “Keyboard”
The operating interface is as the picture shows below:
Keyboard Property
3. NumLock key
If “Enable as Startup” is checked, then after starting up, the NumLock key is enabled; or
NumLock key is not enabled.
2.1.7 User Password
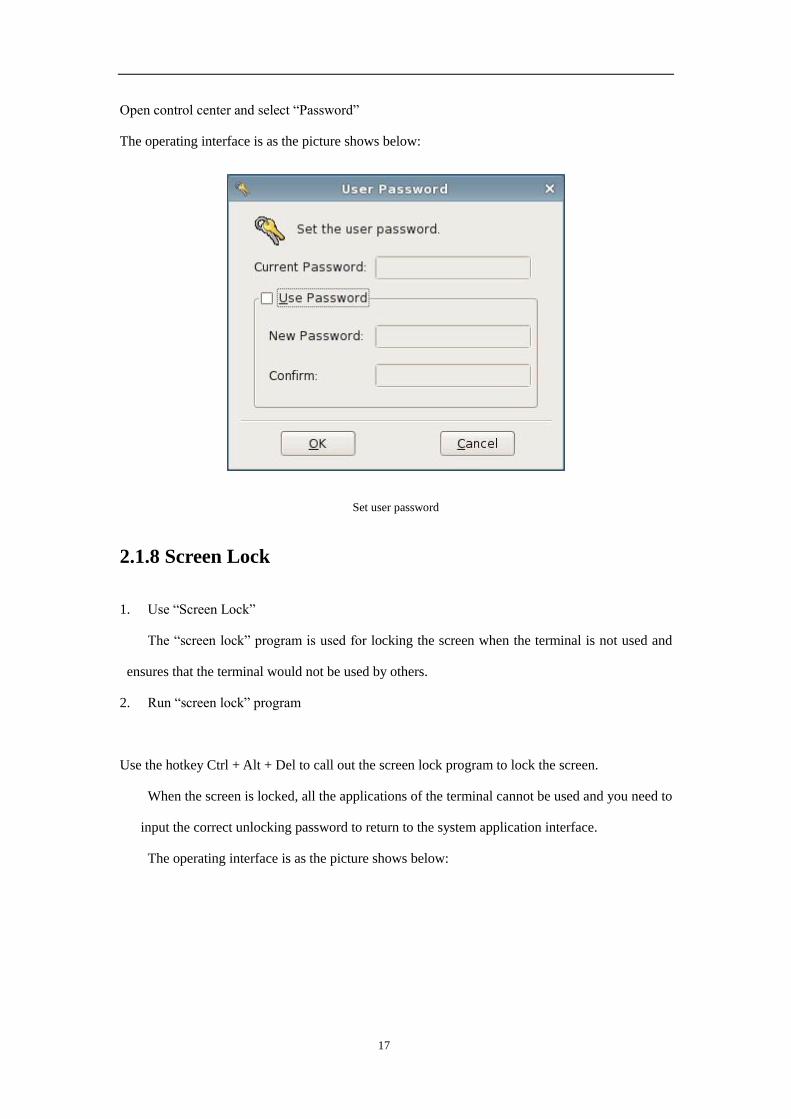
1. Use “User Password”
Through using the “user password” program, you can set the user password which is the
password for starting up/restart, screen saver and system lock.
2. Run the “user password” program
Page 17
17
Open control center and select “Password”
The operating interface is as the picture shows below:
Set user password
2.1.8 Screen Lock
1. Use “Screen Lock”
The “screen lock” program is used for locking the screen when the terminal is not used and
ensures that the terminal would not be used by others.
2. Run “screen lock” program
Use the hotkey Ctrl + Alt + Del to call out the screen lock program to lock the screen.
When the screen is locked, all the applications of the terminal cannot be used and you need to
input the correct unlocking password to return to the system application interface.
The operating interface is as the picture shows below:
Page 18
18
Unlock the screen
If the password input is wrong, a prompt dialog box would pop up and the screen would keep
locked.
2.1.9 Nettool
1. Use “Nettool”
The “Nettool” program is used for checking the network status The basic function of the
“Nettool” program: system information, devices information, ping operation, net status checking,
trace route, scan port, lookup, and who is domain.
2. System information. As the picture shows below:
System information
3. Devices information. As the follow picture shows:
Page 19
19
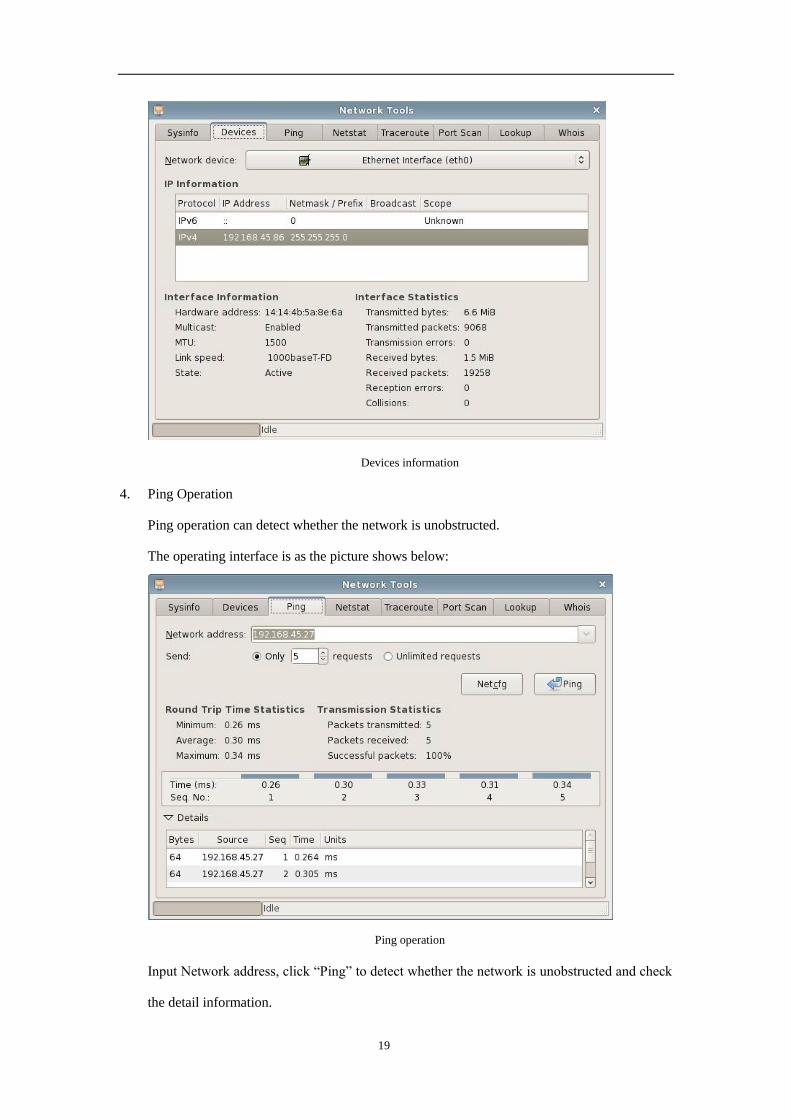
Devices information
4. Ping Operation
Ping operation can detect whether the network is unobstructed.
The operating interface is as the picture shows below:
Ping operation
Input Network address, click “Ping” to detect whether the network is unobstructed and check
the detail information.
Page 20
20
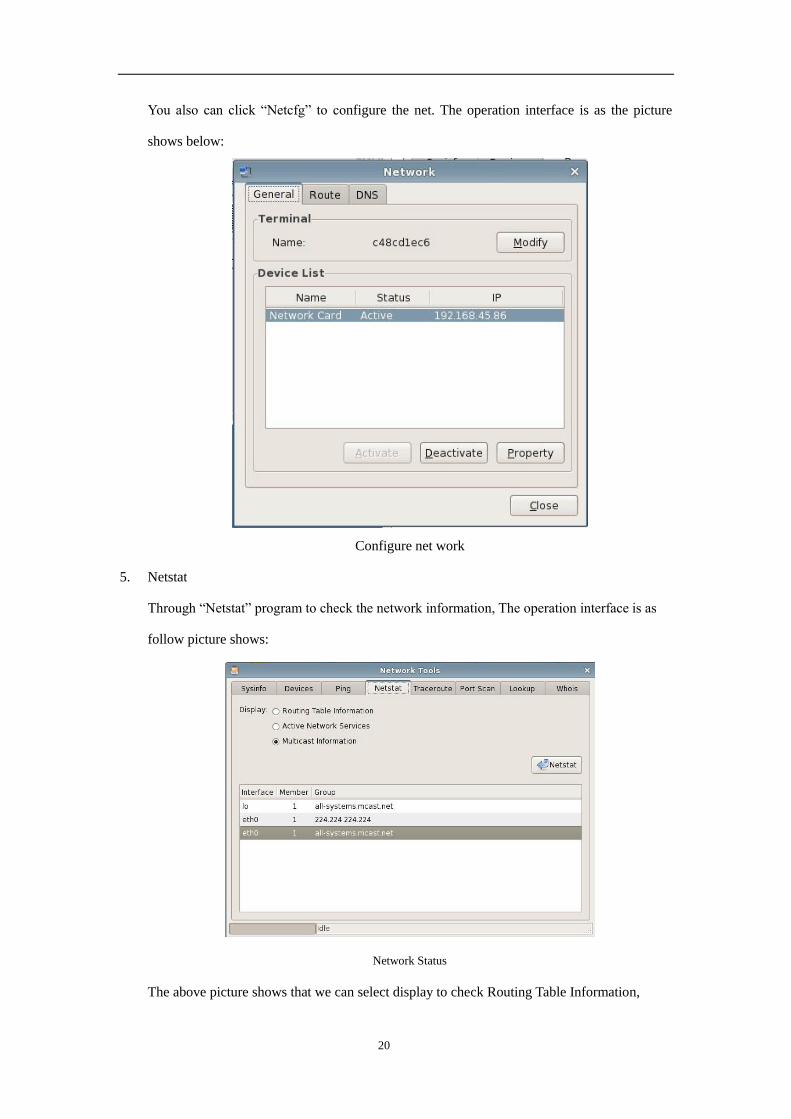
You also can click “Netcfg” to configure the net. The operation interface is as the picture
shows below:
Configure net work
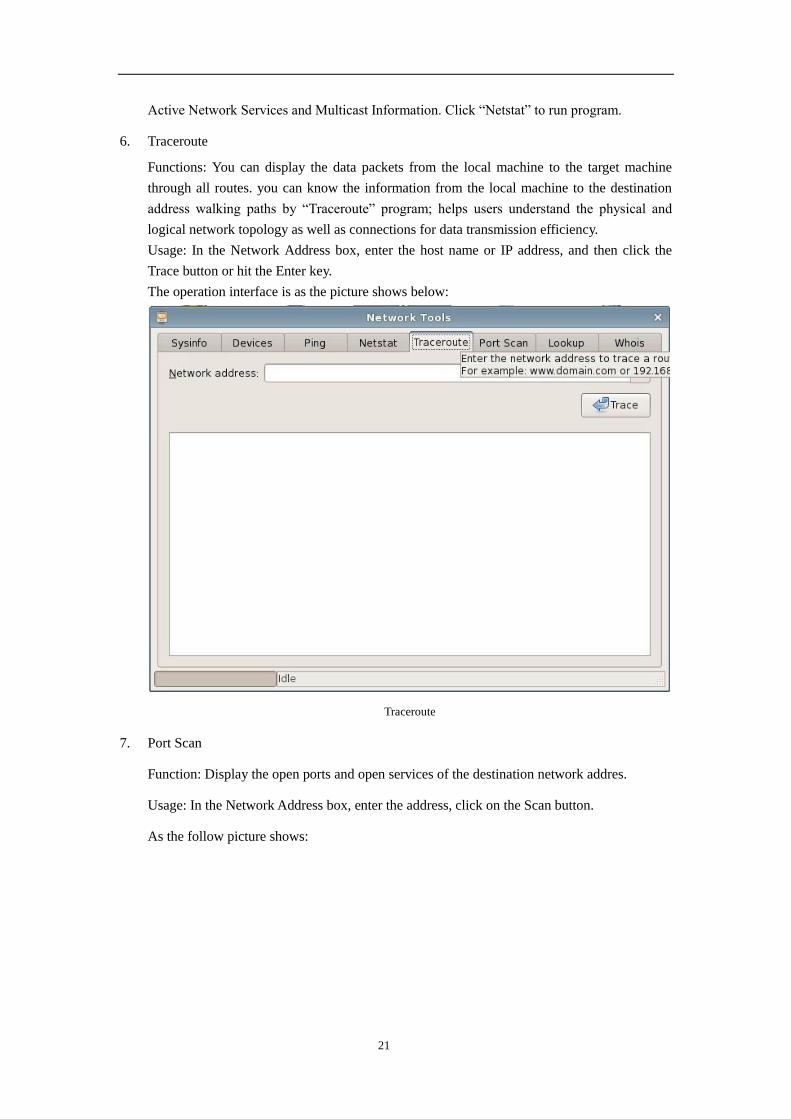
5. Netstat
Through “Netstat” program to check the network information, The operation interface is as
follow picture shows:
Network Status
The above picture shows that we can select display to check Routing Table Information,
Page 21
21
Active Network Services and Multicast Information. Click “Netstat” to run program.
6. Traceroute
Functions: You can display the data packets from the local machine to the target machine
through all routes. you can know the information from the local machine to the destination
address walking paths by “Traceroute” program; helps users understand the physical and
logical network topology as well as connections for data transmission efficiency.
Usage: In the Network Address box, enter the host name or IP address, and then click the
Trace button or hit the Enter key.
The operation interface is as the picture shows below:
Traceroute
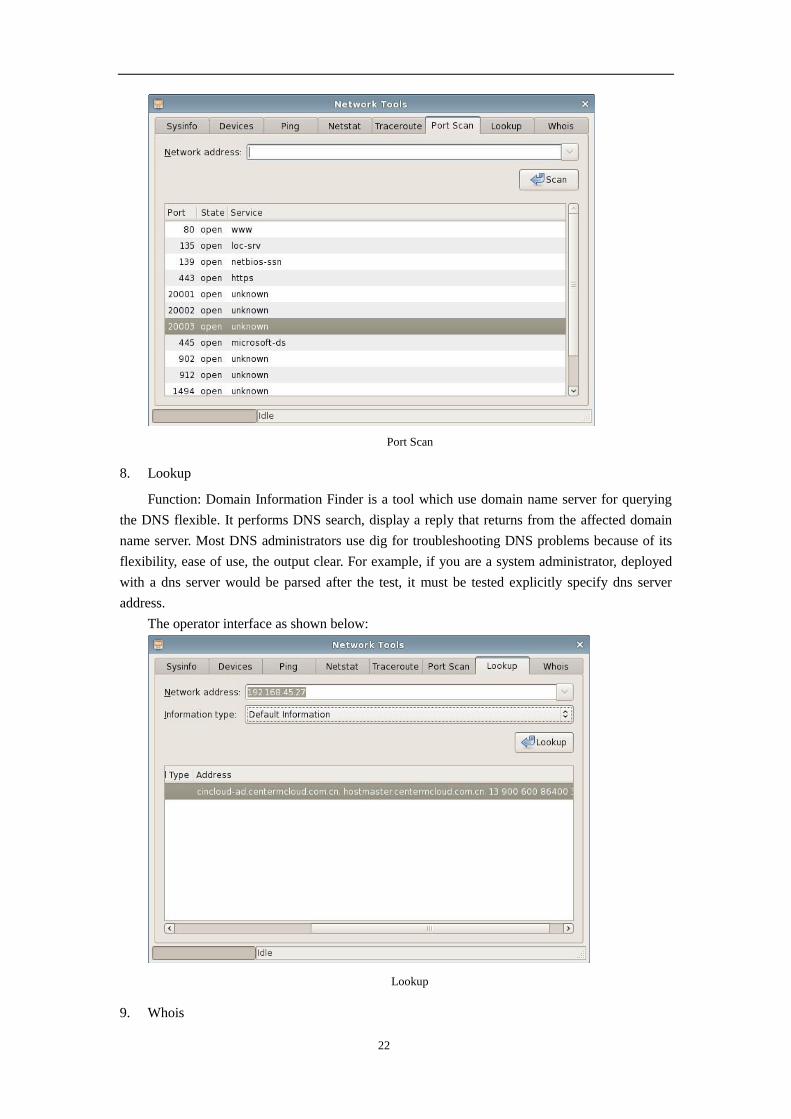
7. Port Scan
Function: Display the open ports and open services of the destination network addres.
Usage: In the Network Address box, enter the address, click on the Scan button.
As the follow picture shows:
Page 22
22
Port Scan
8. Lookup
Function: Domain Information Finder is a tool which use domain name server for querying
the DNS flexible. It performs DNS search, display a reply that returns from the affected domain
name server. Most DNS administrators use dig for troubleshooting DNS problems because of its
flexibility, ease of use, the output clear. For example, if you are a system administrator, deployed
with a dns server would be parsed after the test, it must be tested explicitly specify dns server
address.
The operator interface as shown below:
Lookup
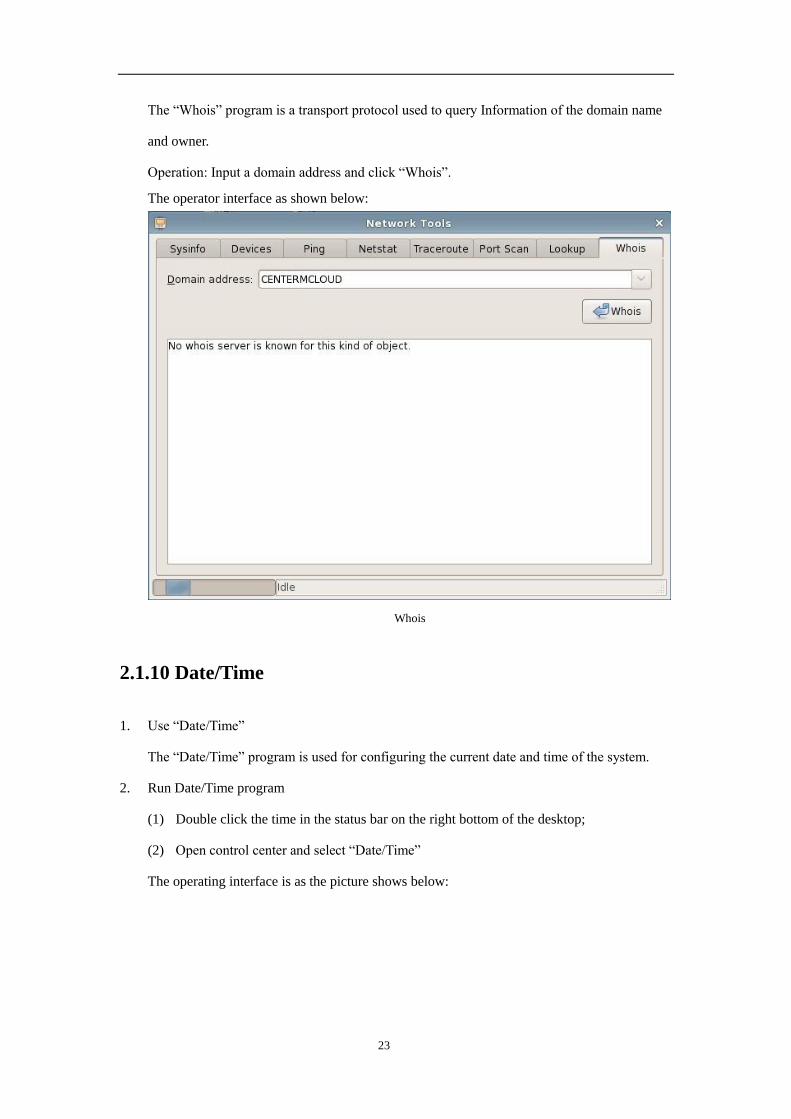
9. Whois
Page 23
23
The “Whois” program is a transport protocol used to query Information of the domain name
and owner.
Operation: Input a domain address and click “Whois”.
The operator interface as shown below:
Whois
2.1.10 Date/Time
1. Use “Date/Time”
The “Date/Time” program is used for configuring the current date and time of the system.
2. Run Date/Time program
(1) Double click the time in the status bar on the right bottom of the desktop;
(2) Open control center and select “Date/Time”
The operating interface is as the picture shows below:
Page 24
24
Date/Time
3. Configure the current date/time of the system
You can adjust the time area, year, month and date in date adjusting bar and adjust hour,
minute and second in time adjusting bar. After clicking “ok”, the time parameters are saved;
if you click “cancel”, then the parameters would not be saved.
4. Automatic time synchronization with the server.
Click button “Timesync”, The operating interface is as the picture shows below:
Page 25
25
Input the server address, click “Update now” and “OK”.
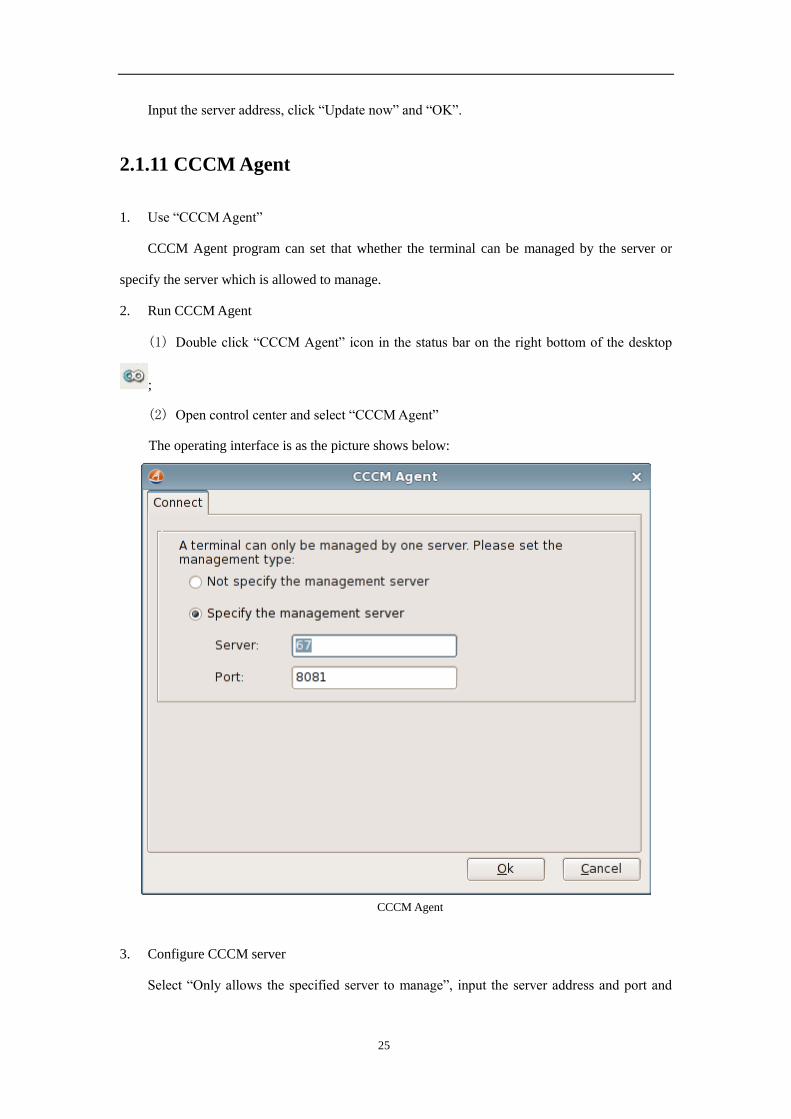
2.1.11 CCCM Agent
1. Use “CCCM Agent”
CCCM Agent program can set that whether the terminal can be managed by the server or
specify the server which is allowed to manage.
2. Run CCCM Agent
(1) Double click “CCCM Agent” icon in the status bar on the right bottom of the desktop
;
(2) Open control center and select “CCCM Agent”
The operating interface is as the picture shows below:
CCCM Agent
3. Configure CCCM server
Select “Only allows the specified server to manage”, input the server address and port and
Page 26
26
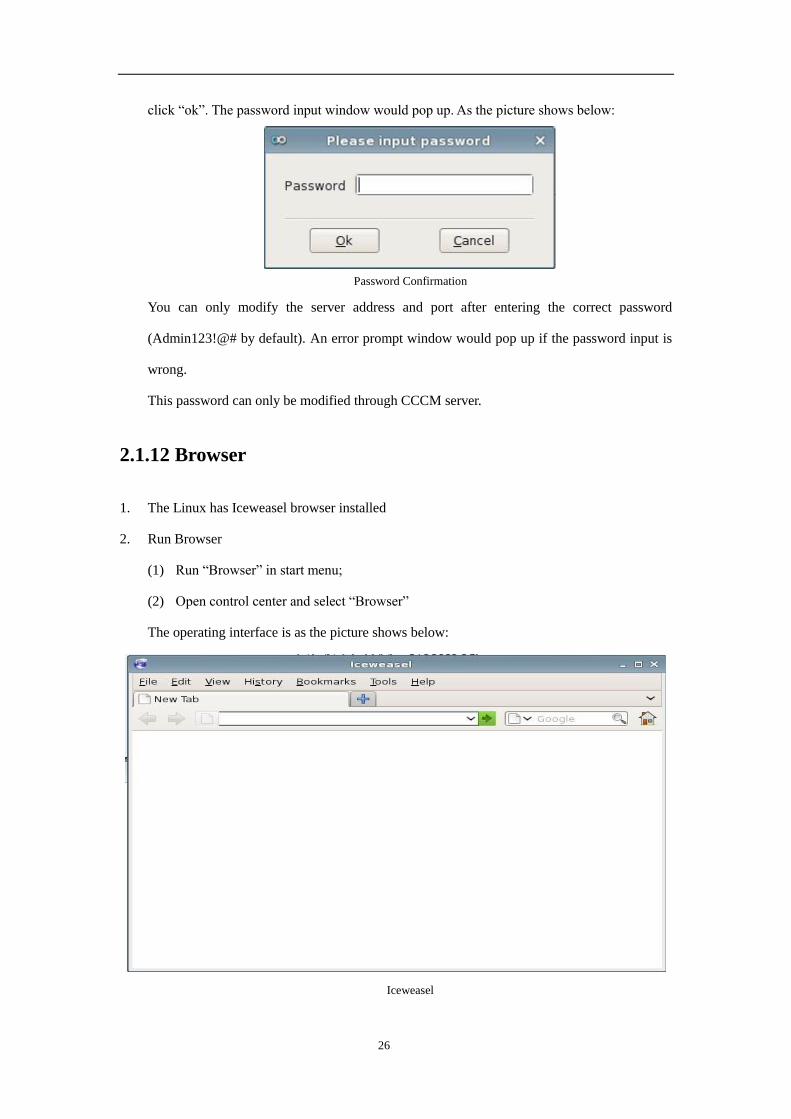
click “ok”. The password input window would pop up. As the picture shows below:
Password Confirmation
You can only modify the server address and port after entering the correct password
(Admin123!@# by default). An error prompt window would pop up if the password input is
wrong.
This password can only be modified through CCCM server.
2.1.12 Browser
1. The Linux has Iceweasel browser installed
2. Run Browser
(1) Run “Browser” in start menu;
(2) Open control center and select “Browser”
The operating interface is as the picture shows below:
Iceweasel
Page 27
27
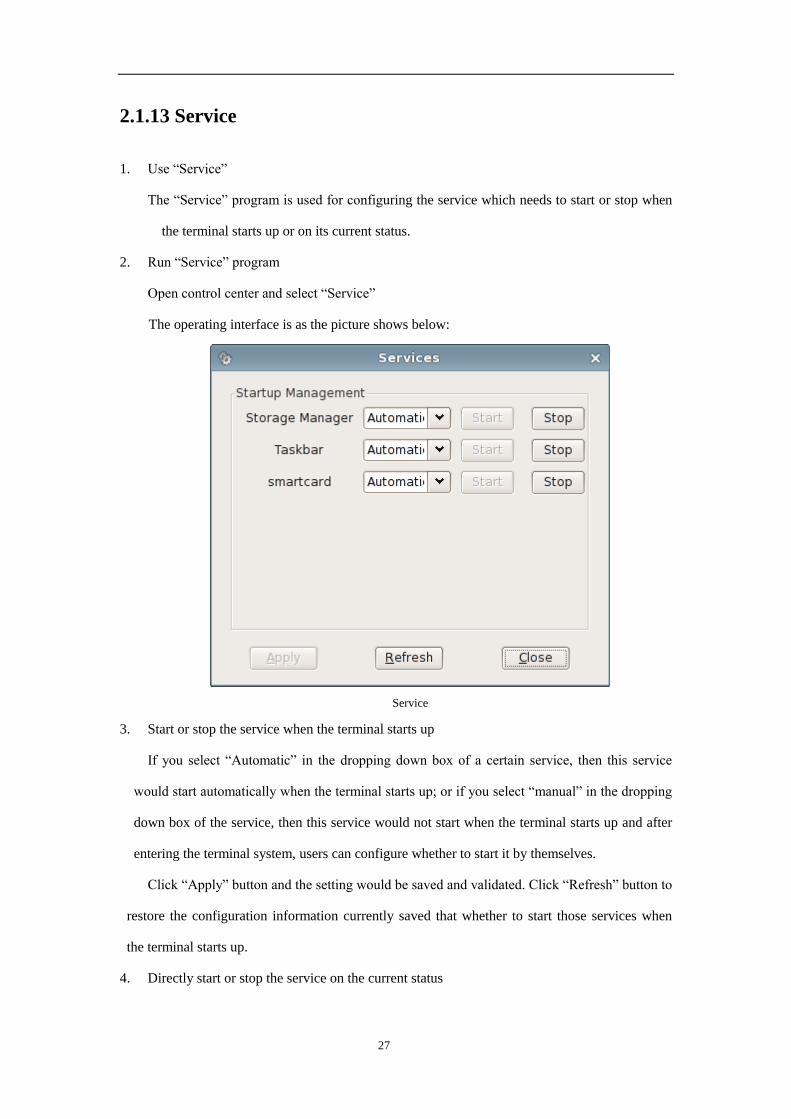
2.1.13 Service
1. Use “Service”
The “Service” program is used for configuring the service which needs to start or stop when
the terminal starts up or on its current status.
2. Run “Service” program
Open control center and select “Service”
The operating interface is as the picture shows below:
Service
3. Start or stop the service when the terminal starts up
If you select “Automatic” in the dropping down box of a certain service, then this service
would start automatically when the terminal starts up; or if you select “manual” in the dropping
down box of the service, then this service would not start when the terminal starts up and after
entering the terminal system, users can configure whether to start it by themselves.
Click “Apply” button and the setting would be saved and validated. Click “Refresh” button to
restore the configuration information currently saved that whether to start those services when
the terminal starts up.
4. Directly start or stop the service on the current status
Page 28
28
The “Start” and “Stop” buttons after each service are used for configuring whether to “start”
or “Stop” a certain service on current status.
When the corresponding “start” button of one service is gray, the “Stop” button is valid; vice
versa.
If you want to start (or stop) one certain service directly under current status, you can click
the corresponding “start” (or stop) button of this service and it can be validated at once.
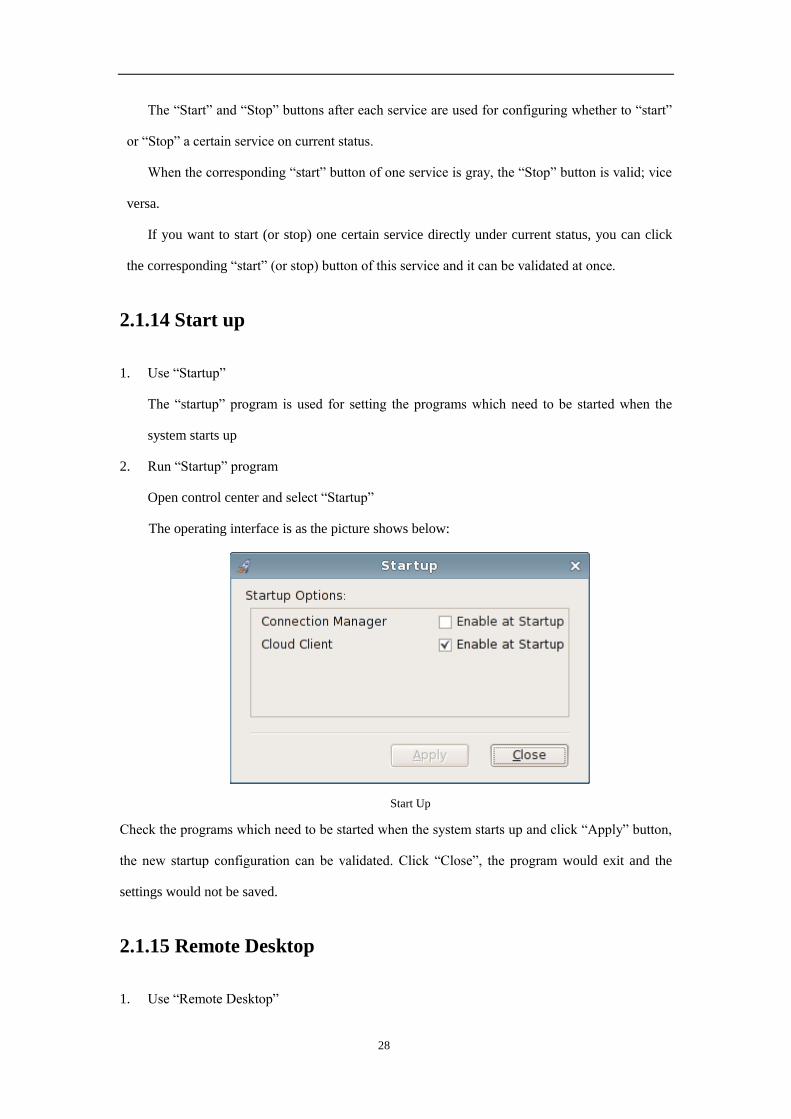
2.1.14 Start up
1. Use “Startup”
The “startup” program is used for setting the programs which need to be started when the
system starts up
2. Run “Startup” program
Open control center and select “Startup”
The operating interface is as the picture shows below:
Start Up
Check the programs which need to be started when the system starts up and click “Apply” button,
the new startup configuration can be validated. Click “Close”, the program would exit and the
settings would not be saved.
2.1.15 Remote Desktop
1. Use “Remote Desktop”
Page 29
29
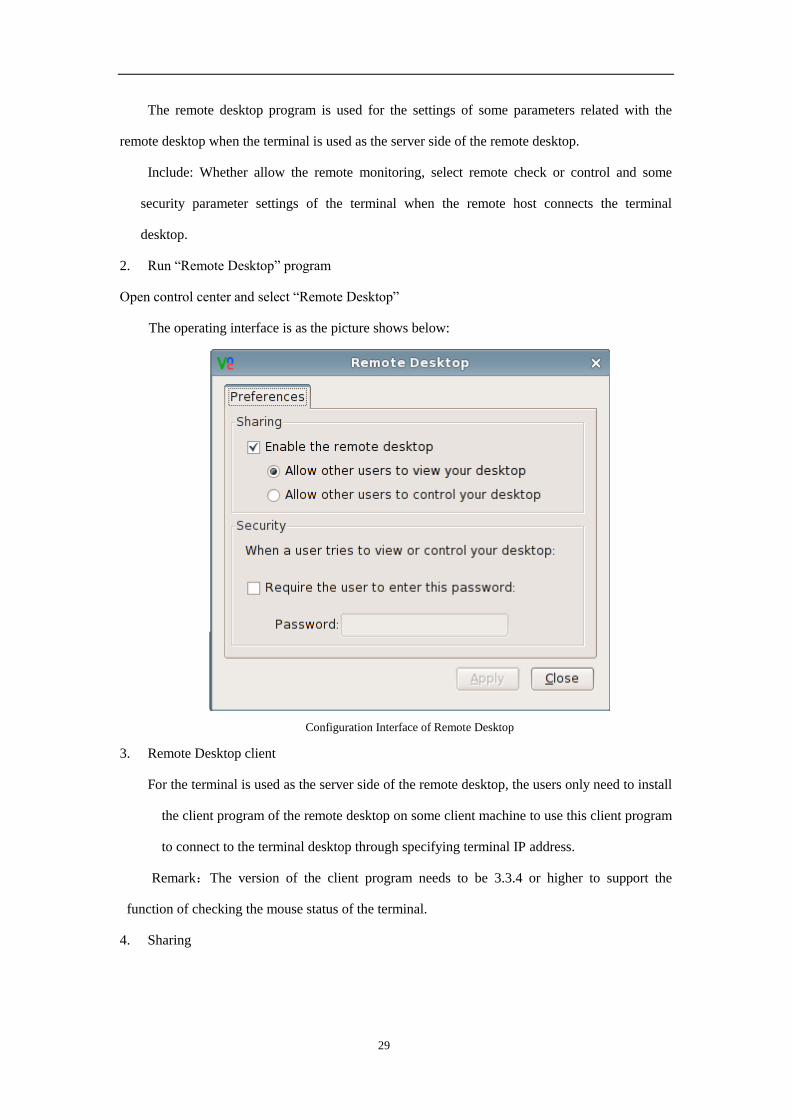
The remote desktop program is used for the settings of some parameters related with the
remote desktop when the terminal is used as the server side of the remote desktop.
Include: Whether allow the remote monitoring, select remote check or control and some
security parameter settings of the terminal when the remote host connects the terminal
desktop.
2. Run “Remote Desktop” program
Open control center and select “Remote Desktop”
The operating interface is as the picture shows below:
Configuration Interface of Remote Desktop
3. Remote Desktop client
For the terminal is used as the server side of the remote desktop, the users only need to install
the client program of the remote desktop on some client machine to use this client program
to connect to the terminal desktop through specifying terminal IP address.
Remark:The version of the client program needs to be 3.3.4 or higher to support the
function of checking the mouse status of the terminal.
4. Sharing
Page 30
30
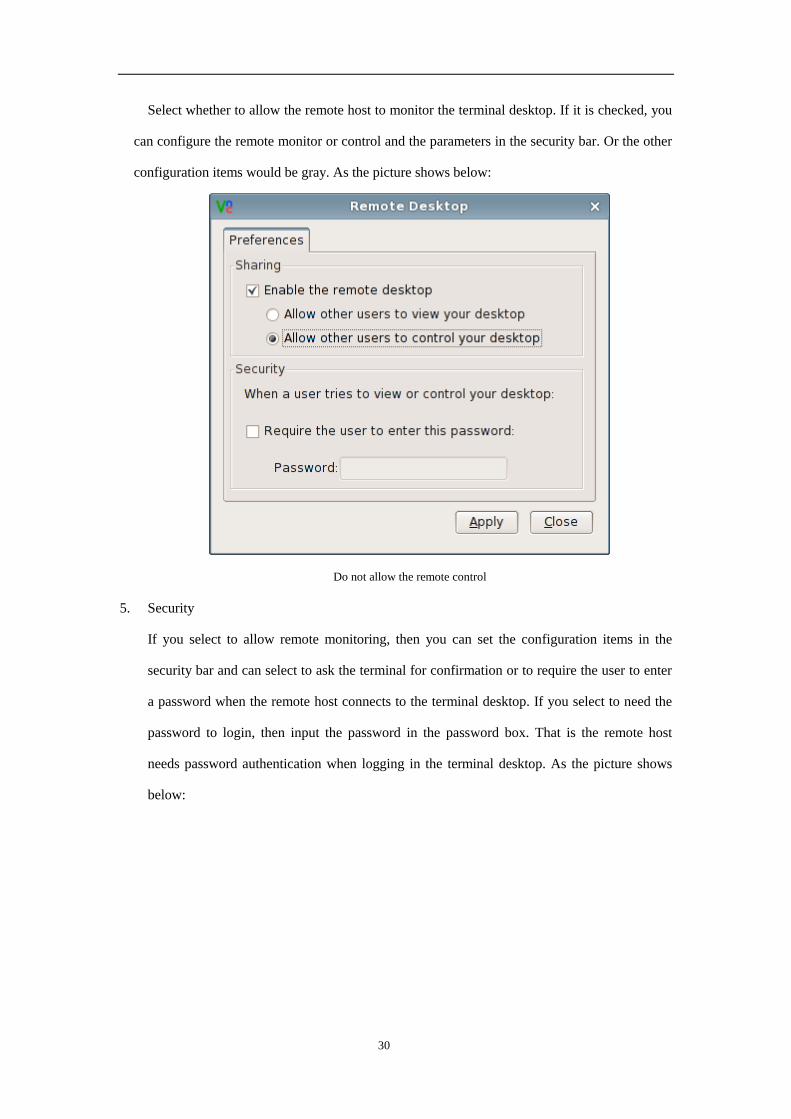
Select whether to allow the remote host to monitor the terminal desktop. If it is checked, you
can configure the remote monitor or control and the parameters in the security bar. Or the other
configuration items would be gray. As the picture shows below:
Do not allow the remote control
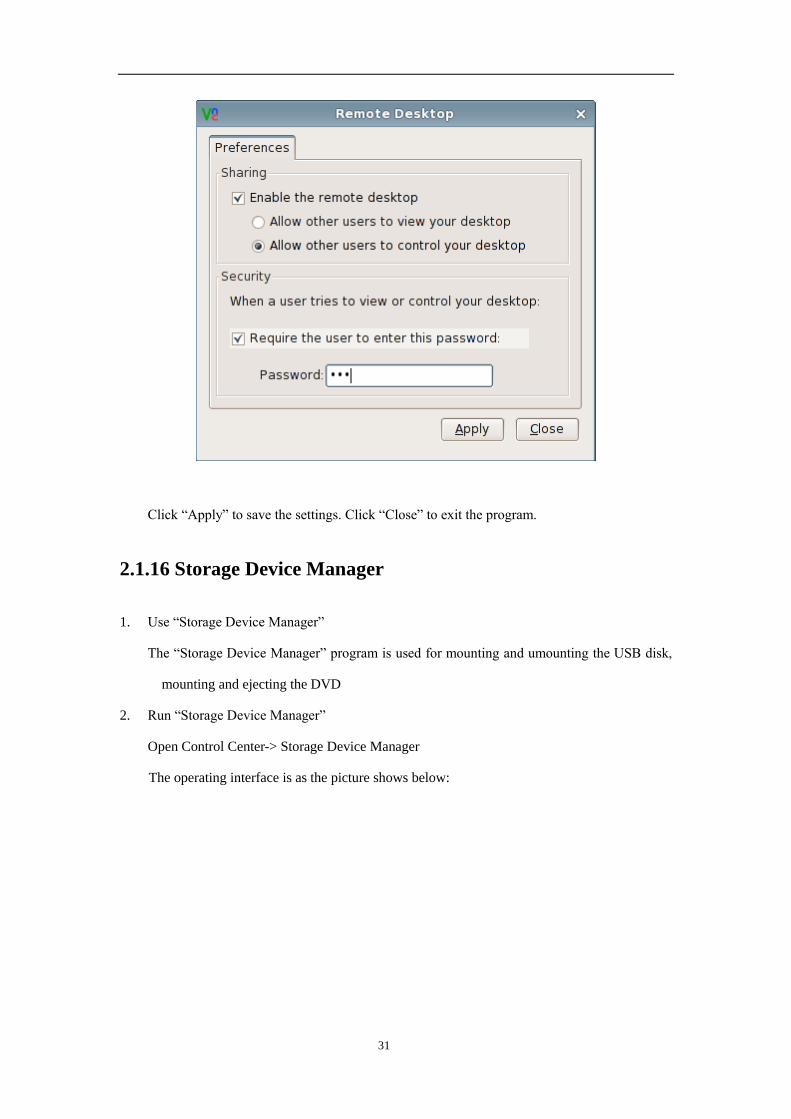
5. Security
If you select to allow remote monitoring, then you can set the configuration items in the
security bar and can select to ask the terminal for confirmation or to require the user to enter
a password when the remote host connects to the terminal desktop. If you select to need the
password to login, then input the password in the password box. That is the remote host
needs password authentication when logging in the terminal desktop. As the picture shows
below:
Page 31
31
Click “Apply” to save the settings. Click “Close” to exit the program.
2.1.16 Storage Device Manager
1. Use “Storage Device Manager”
The “Storage Device Manager” program is used for mounting and umounting the USB disk,
mounting and ejecting the DVD
2. Run “Storage Device Manager”
Open Control Center-> Storage Device Manager
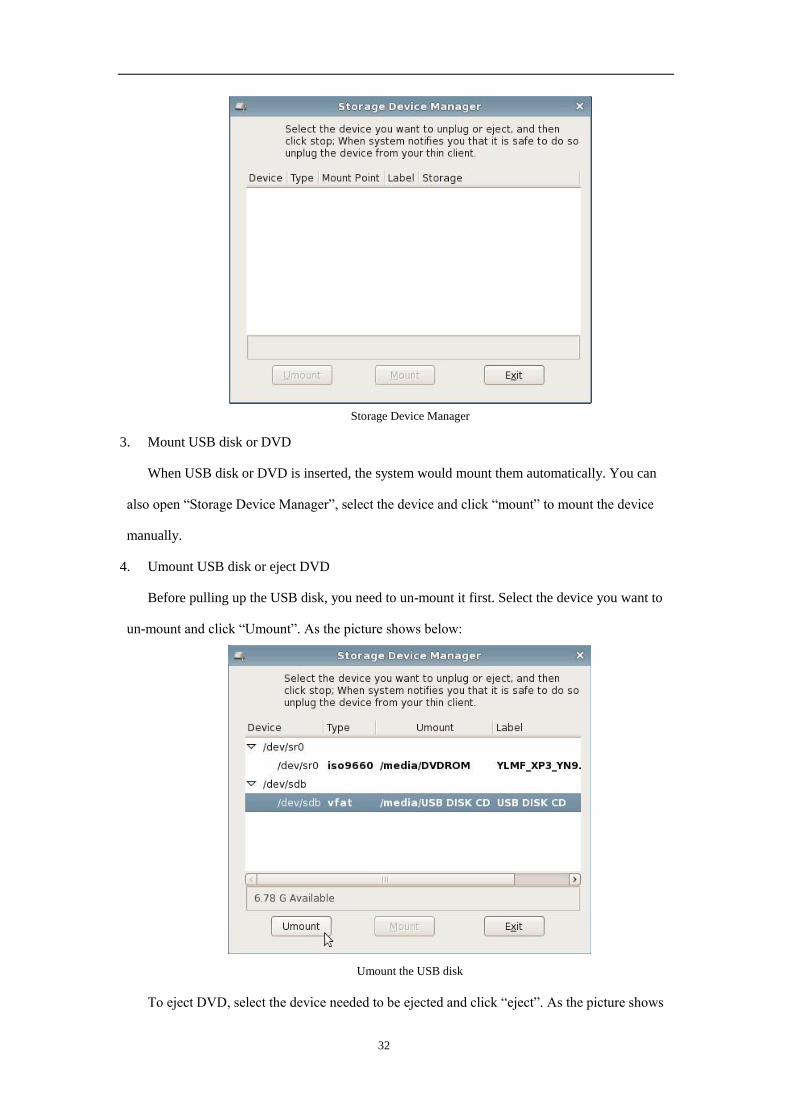
The operating interface is as the picture shows below:
Page 32
32
Storage Device Manager
3. Mount USB disk or DVD
When USB disk or DVD is inserted, the system would mount them automatically. You can
also open “Storage Device Manager”, select the device and click “mount” to mount the device
manually.
4. Umount USB disk or eject DVD
Before pulling up the USB disk, you need to un-mount it first. Select the device you want to
un-mount and click “Umount”. As the picture shows below:
Umount the USB disk
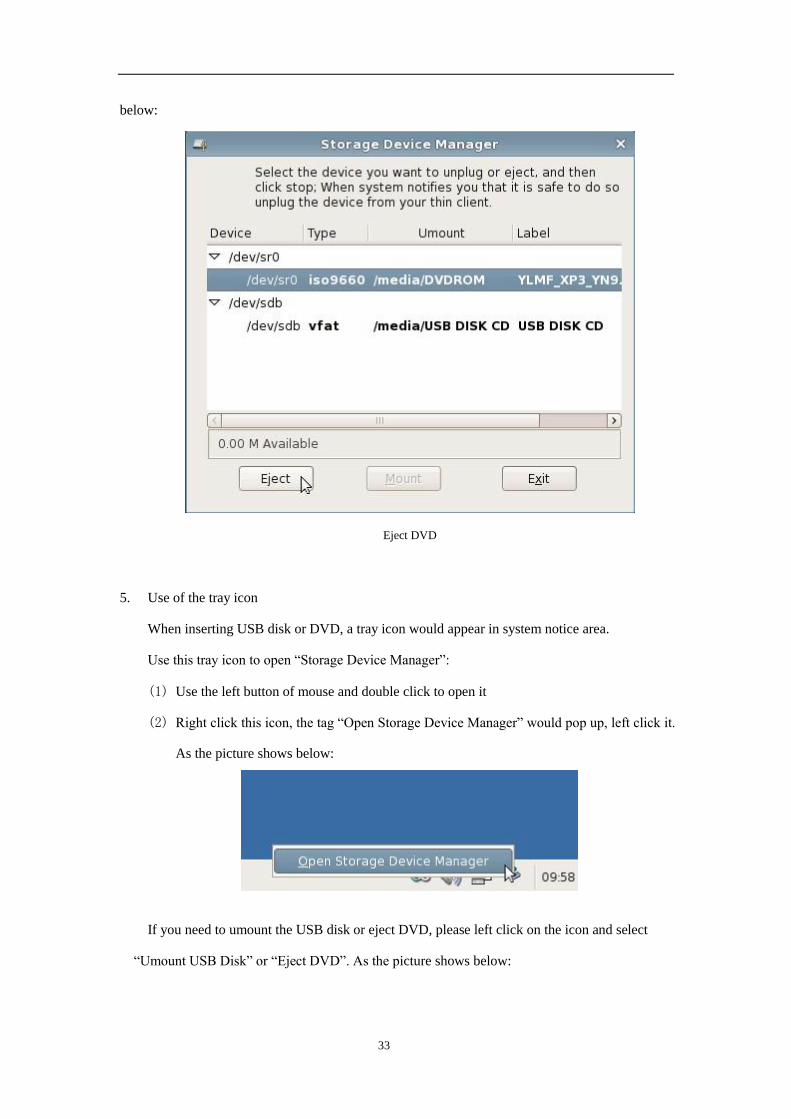
To eject DVD, select the device needed to be ejected and click “eject”. As the picture shows
Page 33
33
below:
Eject DVD
5. Use of the tray icon
When inserting USB disk or DVD, a tray icon would appear in system notice area.
Use this tray icon to open “Storage Device Manager”:
(1) Use the left button of mouse and double click to open it
(2) Right click this icon, the tag “Open Storage Device Manager” would pop up, left click it.
As the picture shows below:
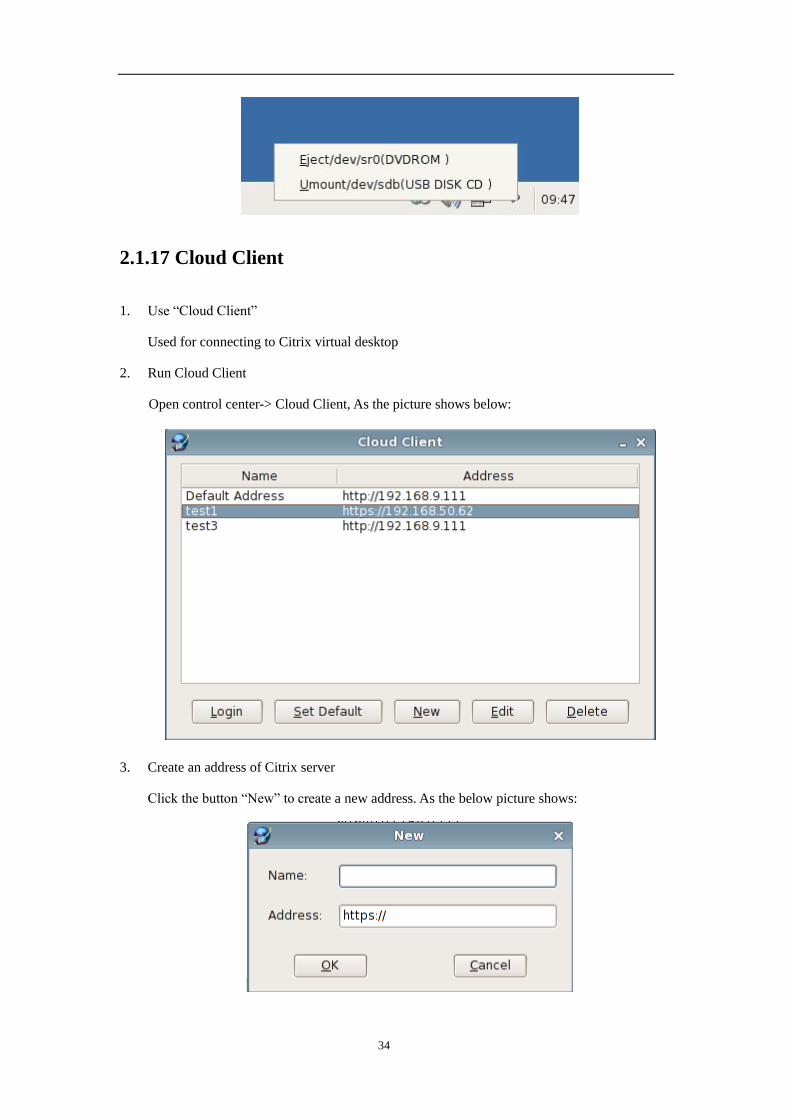
If you need to umount the USB disk or eject DVD, please left click on the icon and select
“Umount USB Disk” or “Eject DVD”. As the picture shows below:
Page 34
34
2.1.17 Cloud Client
1. Use “Cloud Client”
Used for connecting to Citrix virtual desktop
2. Run Cloud Client
Open control center-> Cloud Client, As the picture shows below:
3. Create an address of Citrix server
Click the button “New” to create a new address. As the below picture shows:
Page 35
35
Input the name and address and click “OK” to complete creating.
4. Set an address to default
Selected an item and click “Set Default” to set the selected item to default address. And the
next time power on the Terminal, the client will auto connect to the address and log into the Citrix
server.
5. Edit and delete an address
Select an item, click “edit” or “delete” to edit or delete item.
6. Connect and login in
Select an item and click Login, to connect and log into the server.
2.1.18 ICA Global Setting
1. Use“ICA Global Setting”
ICA global setting is used for setting the device mapping and hotkeys of ICA connection
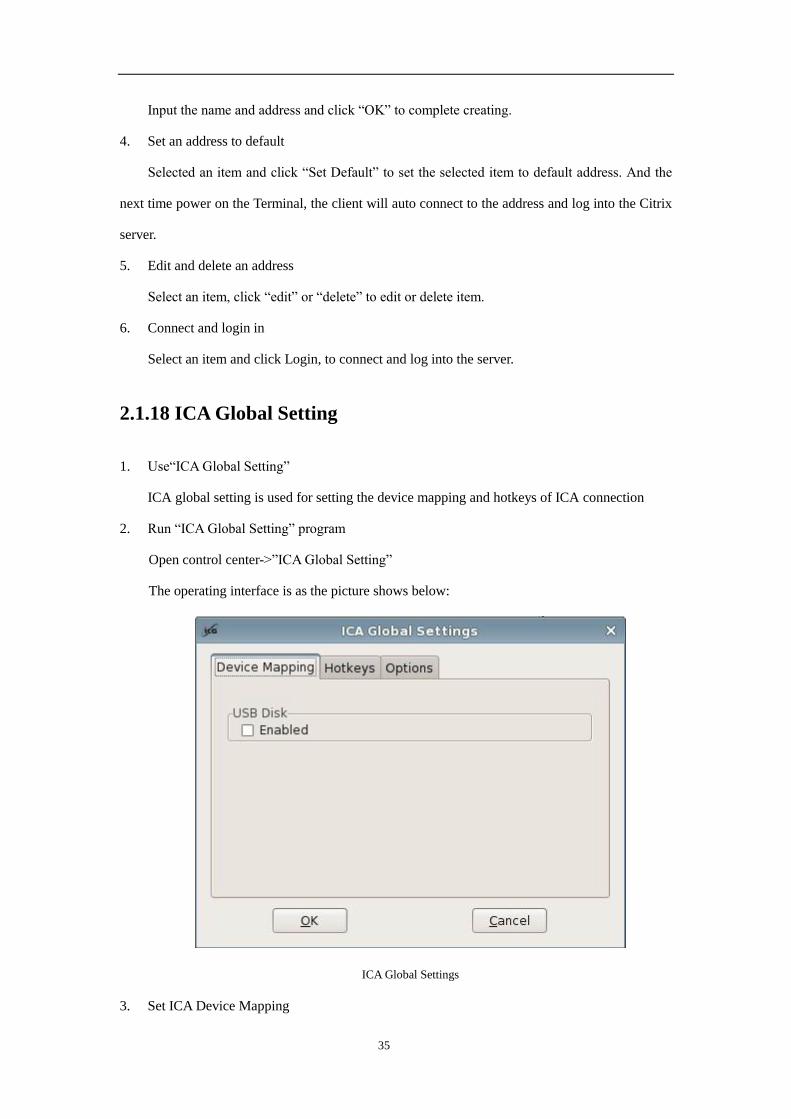
2. Run “ICA Global Setting” program
Open control center->”ICA Global Setting”
The operating interface is as the picture shows below:
ICA Global Settings
3. Set ICA Device Mapping
Page 36
36
In device mapping interface, you can select whether to map USB disk and serial port. The
setting would take effect when connecting at next time.
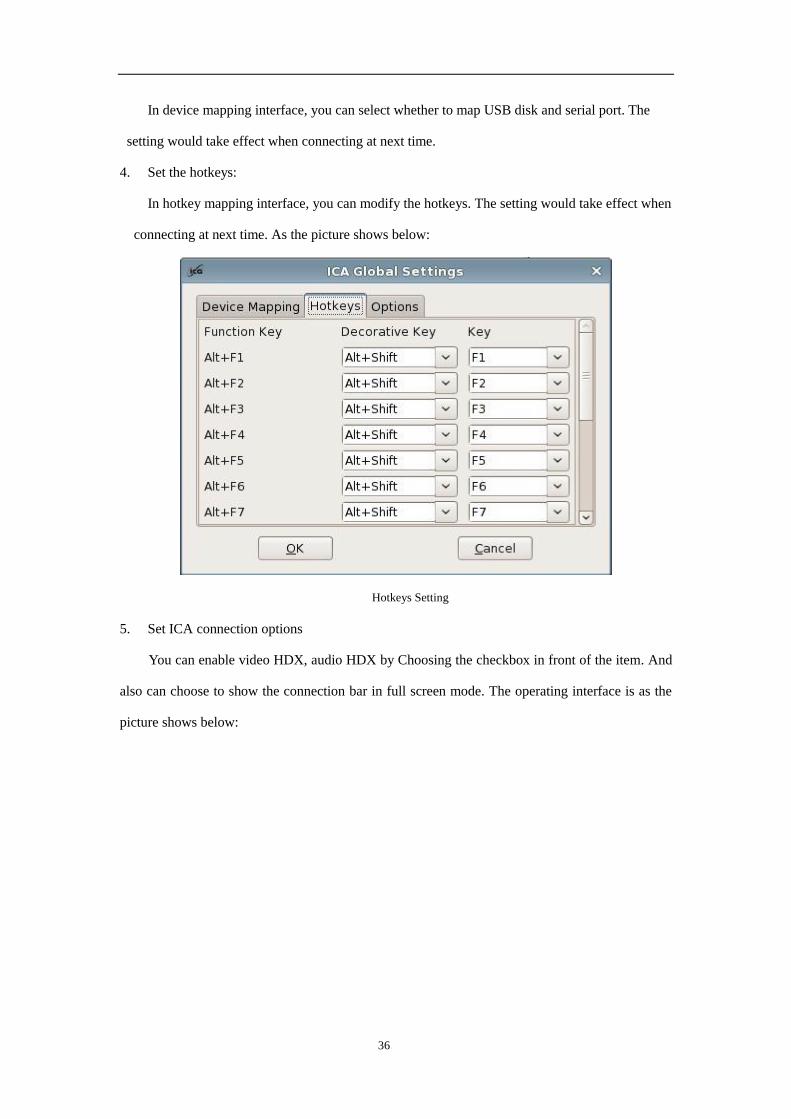
4. Set the hotkeys:
In hotkey mapping interface, you can modify the hotkeys. The setting would take effect when
connecting at next time. As the picture shows below:
Hotkeys Setting
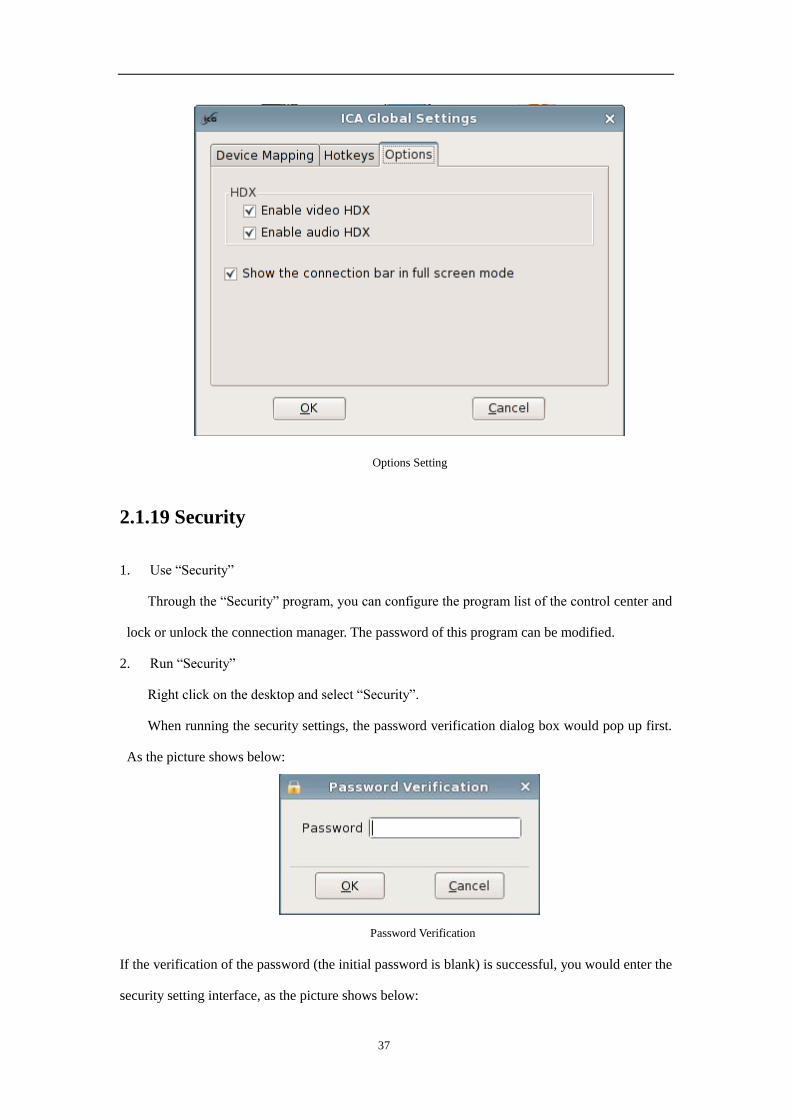
5. Set ICA connection options
You can enable video HDX, audio HDX by Choosing the checkbox in front of the item. And
also can choose to show the connection bar in full screen mode. The operating interface is as the
picture shows below:
Page 37
37
Options Setting
2.1.19 Security
1. Use “Security”
Through the “Security” program, you can configure the program list of the control center and
lock or unlock the connection manager. The password of this program can be modified.
2. Run “Security”
Right click on the desktop and select “Security”.
When running the security settings, the password verification dialog box would pop up first.
As the picture shows below:
Password Verification
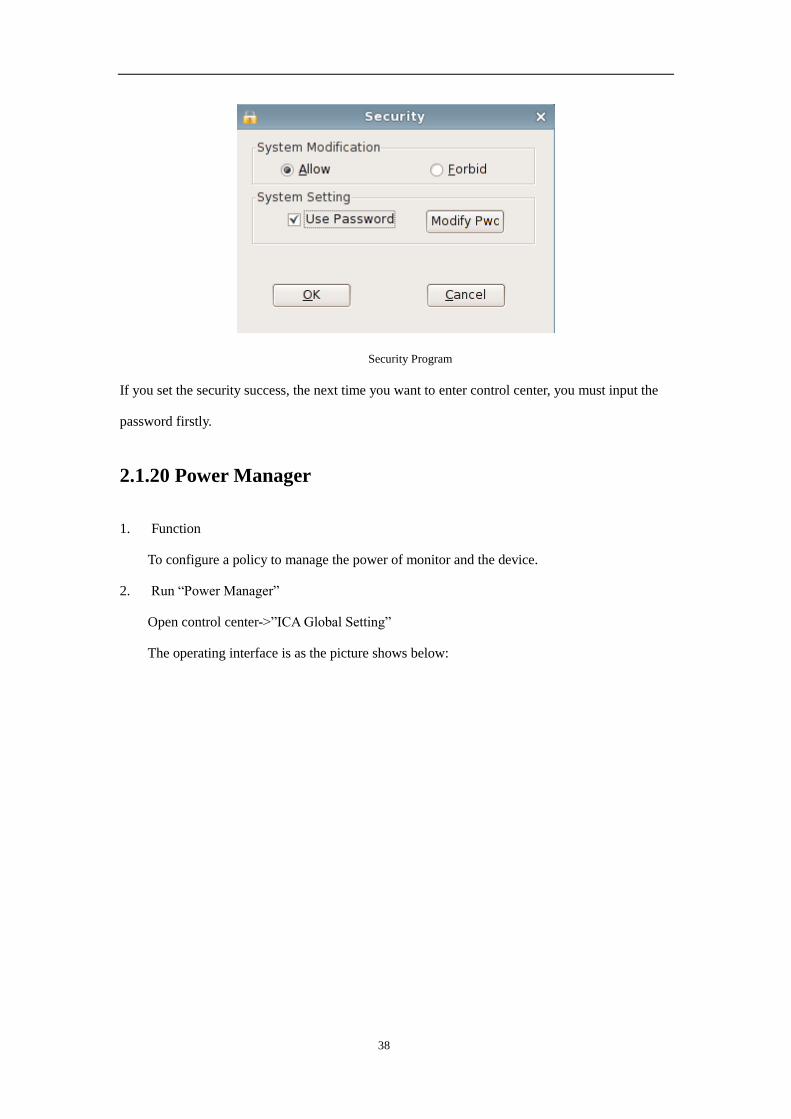
If the verification of the password (the initial password is blank) is successful, you would enter the
security setting interface, as the picture shows below:
Page 38
38
Security Program
If you set the security success, the next time you want to enter control center, you must input the
password firstly.
2.1.20 Power Manager
1. Function
To configure a policy to manage the power of monitor and the device.
2. Run “Power Manager”
Open control center->”ICA Global Setting”
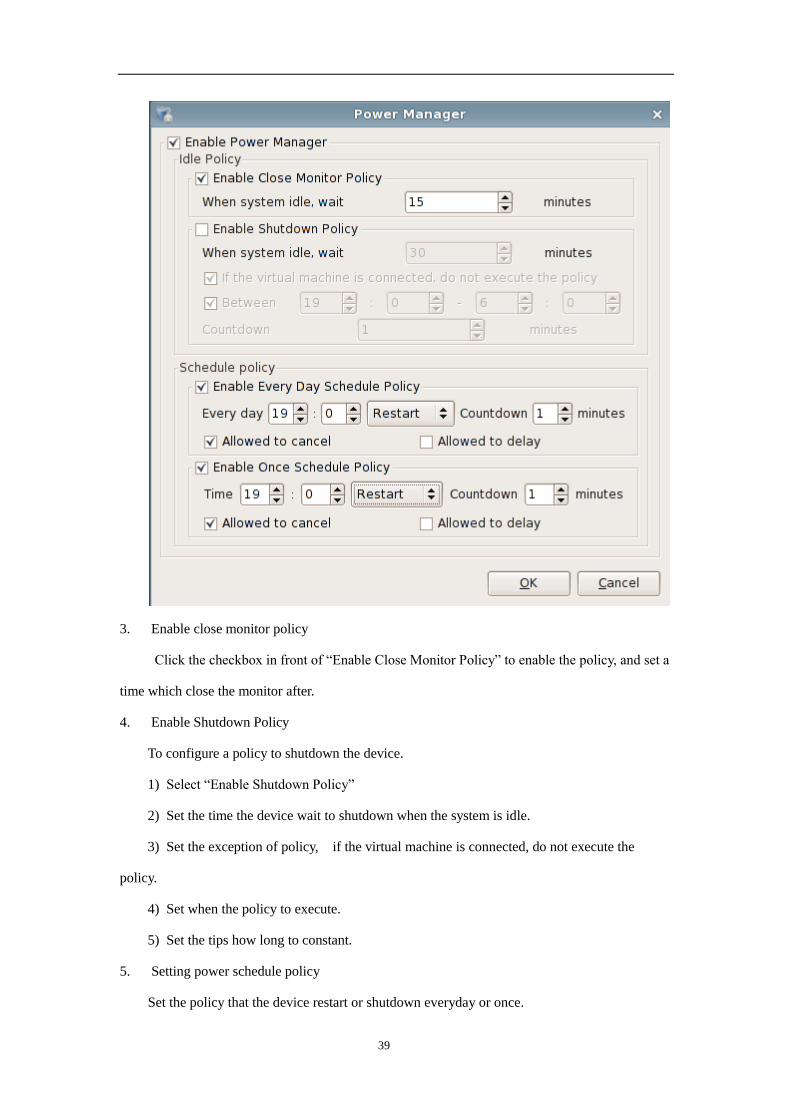
The operating interface is as the picture shows below:
Page 39
39
3. Enable close monitor policy
Click the checkbox in front of “Enable Close Monitor Policy” to enable the policy, and set a
time which close the monitor after.
4. Enable Shutdown Policy
To configure a policy to shutdown the device.
1) Select “Enable Shutdown Policy”
2) Set the time the device wait to shutdown when the system is idle.
3) Set the exception of policy, if the virtual machine is connected, do not execute the
policy.
4) Set when the policy to execute.
5) Set the tips how long to constant.
5. Setting power schedule policy
Set the policy that the device restart or shutdown everyday or once.
Page 40
40
2.1.21 Switch Desktop
1. Function
To Switch the traditional desktop to “Zero Client” Desktop.
2. Run “Switch Desktop”
Double click “Switch Desktop” in control center.
A dialog box will be shown. Click “OK” to switch to “Zero client” Desktop.
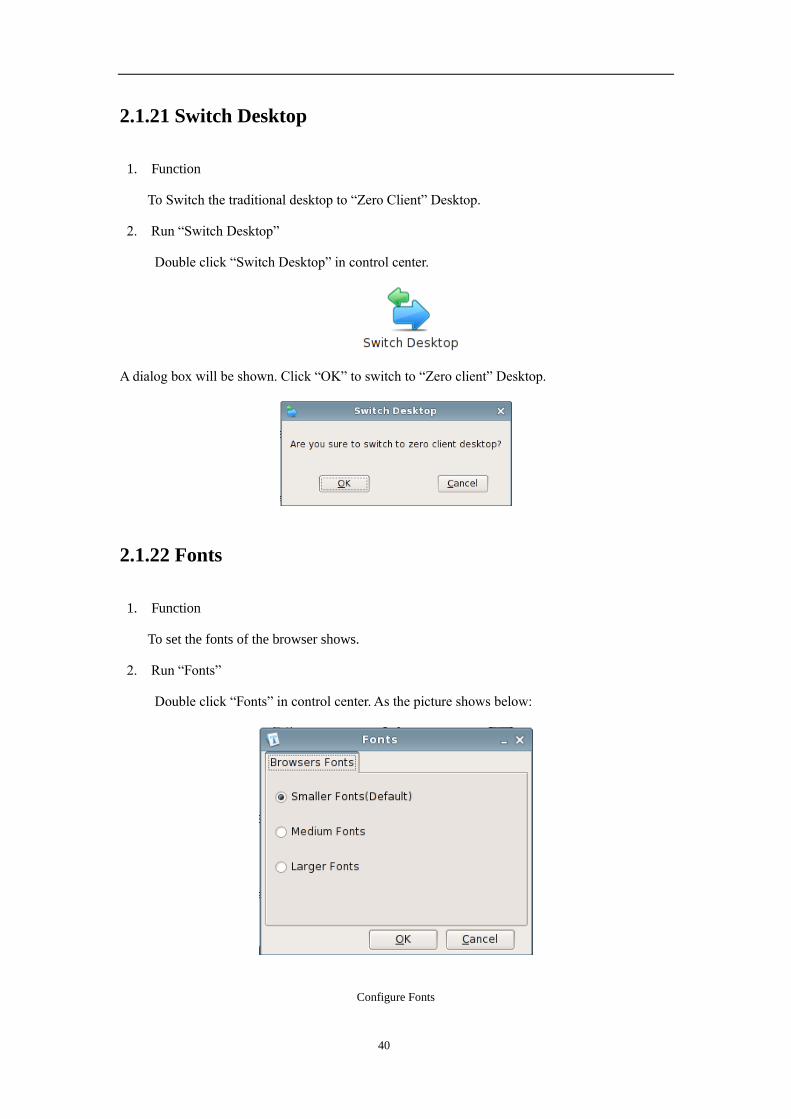
2.1.22 Fonts
1. Function
To set the fonts of the browser shows.
2. Run “Fonts”
Double click “Fonts” in control center. As the picture shows below:
Configure Fonts
Page 41
41
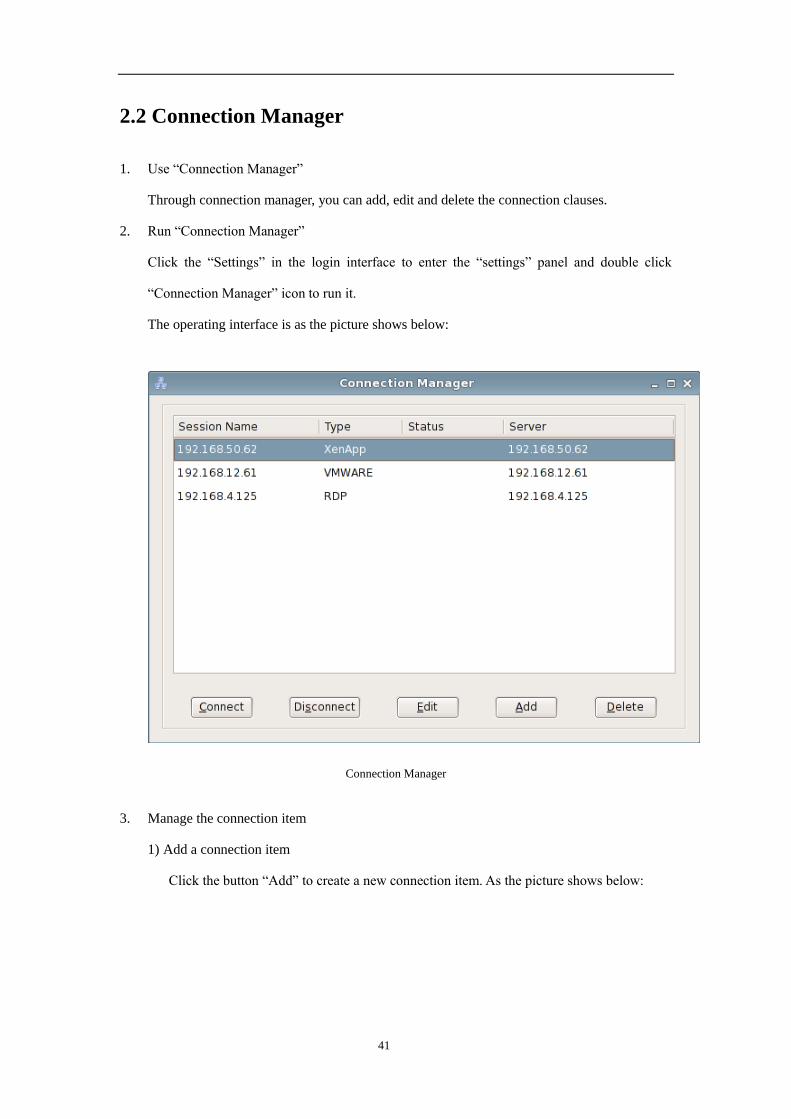
2.2 Connection Manager
1. Use “Connection Manager”
Through connection manager, you can add, edit and delete the connection clauses.
2. Run “Connection Manager”
Click the “Settings” in the login interface to enter the “settings” panel and double click
“Connection Manager” icon to run it.
The operating interface is as the picture shows below:
Connection Manager
3. Manage the connection item
1) Add a connection item
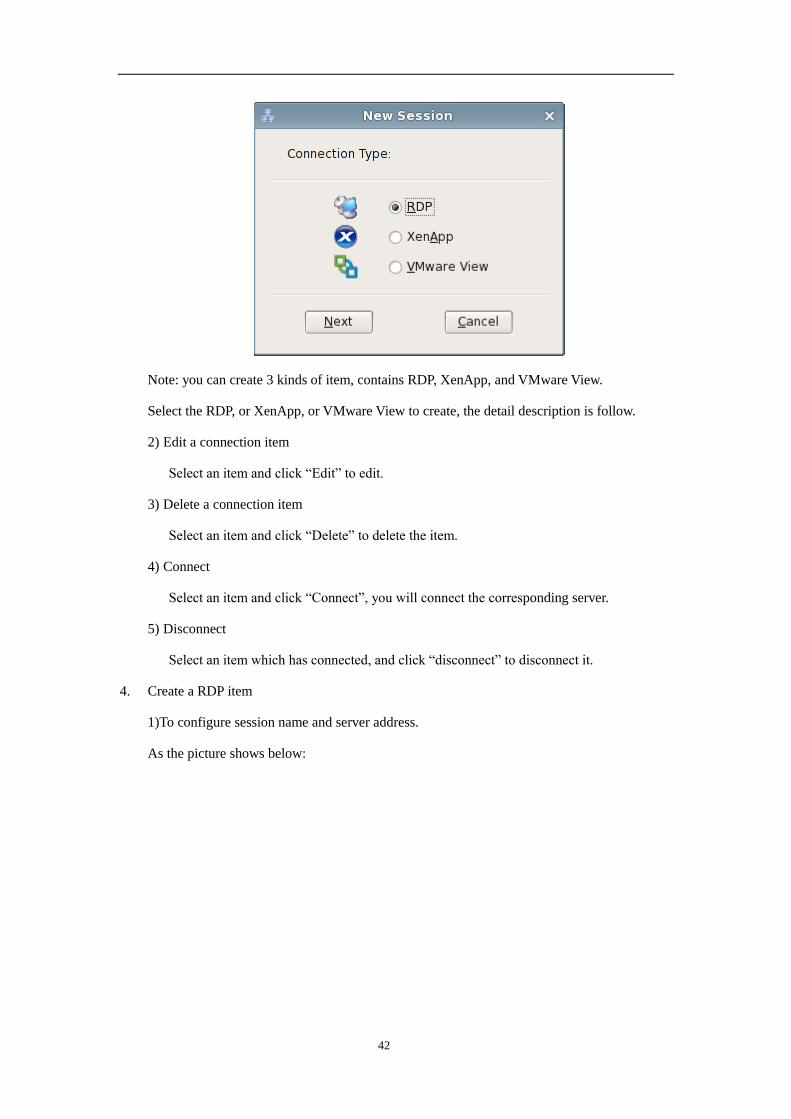
Click the button “Add” to create a new connection item. As the picture shows below:
Page 42
42
Note: you can create 3 kinds of item, contains RDP, XenApp, and VMware View.
Select the RDP, or XenApp, or VMware View to create, the detail description is follow.
2) Edit a connection item
Select an item and click “Edit” to edit.
3) Delete a connection item
Select an item and click “Delete” to delete the item.
4) Connect
Select an item and click “Connect”, you will connect the corresponding server.
5) Disconnect
Select an item which has connected, and click “disconnect” to disconnect it.
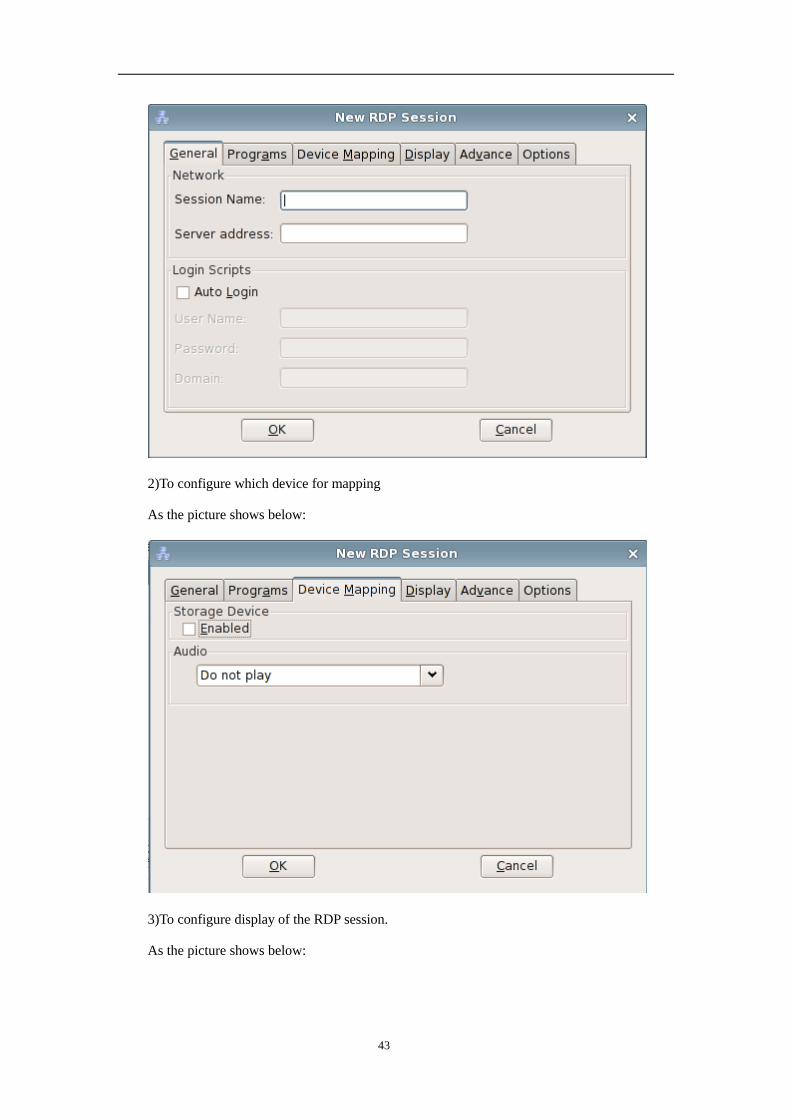
4. Create a RDP item
1)To configure session name and server address.
As the picture shows below:
Page 43
43
2)To configure which device for mapping
As the picture shows below:
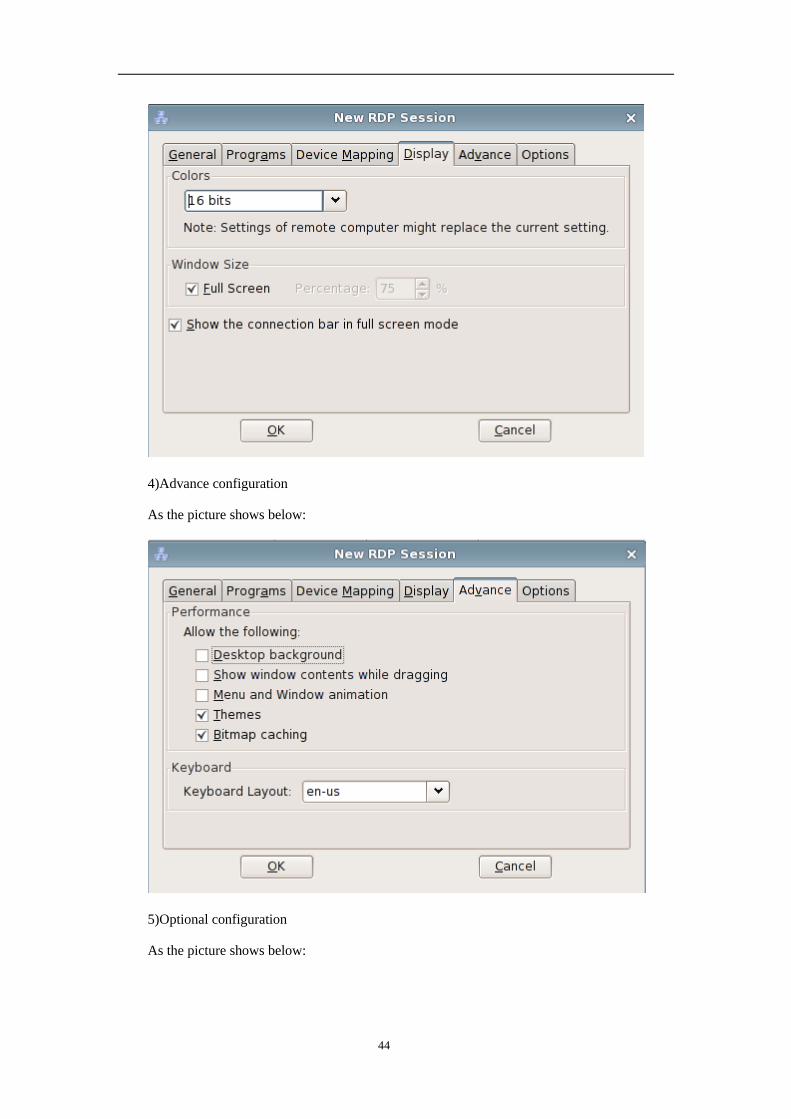
3)To configure display of the RDP session.
As the picture shows below:
Page 44
44
4)Advance configuration
As the picture shows below:
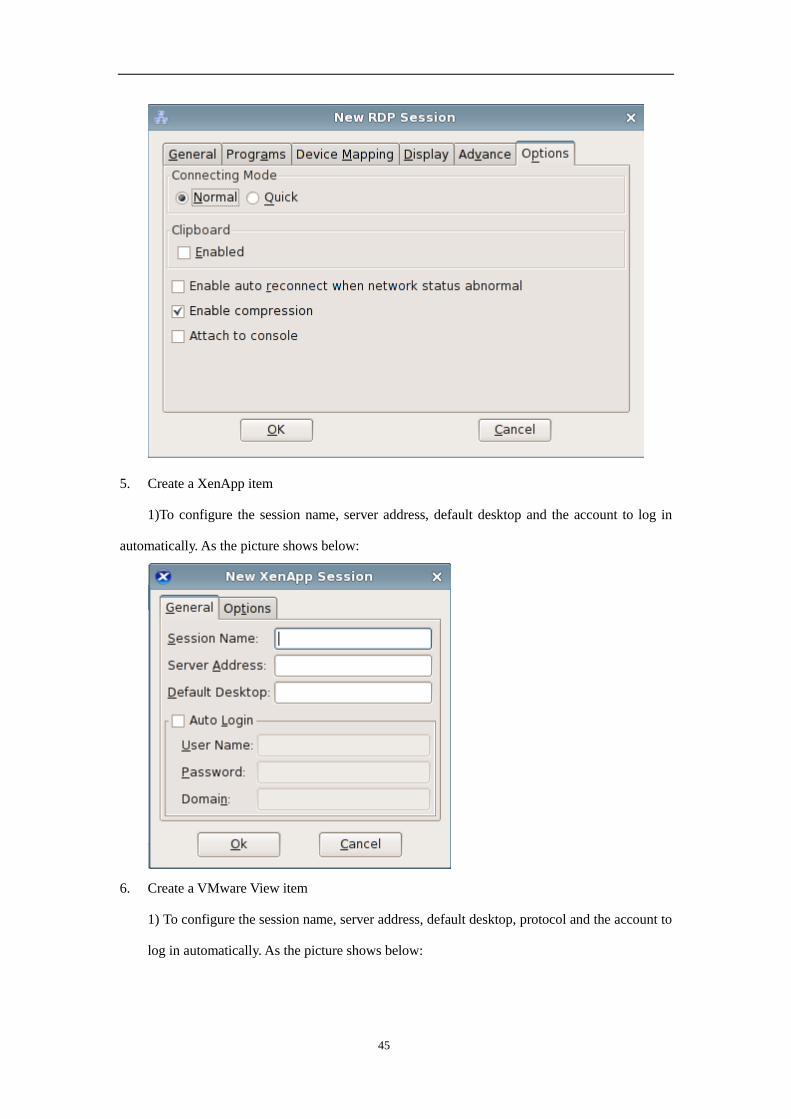
5)Optional configuration
As the picture shows below:
Page 45
45
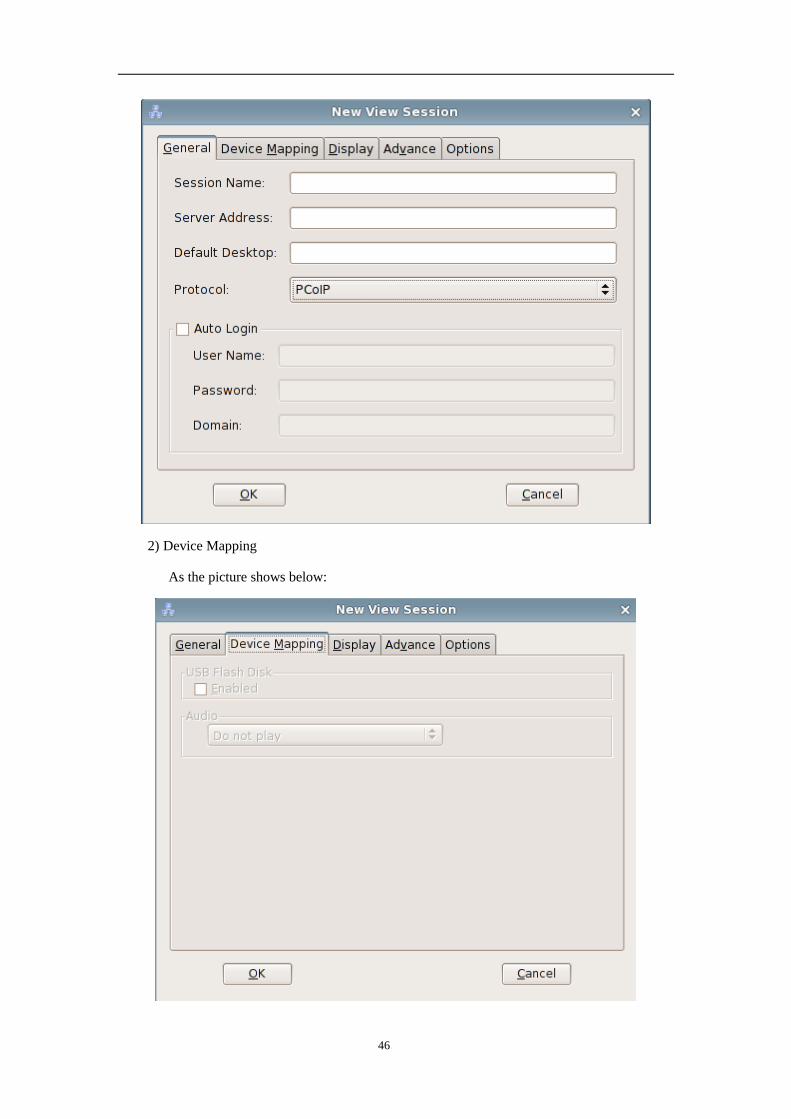
5. Create a XenApp item
1)To configure the session name, server address, default desktop and the account to log in
automatically. As the picture shows below:
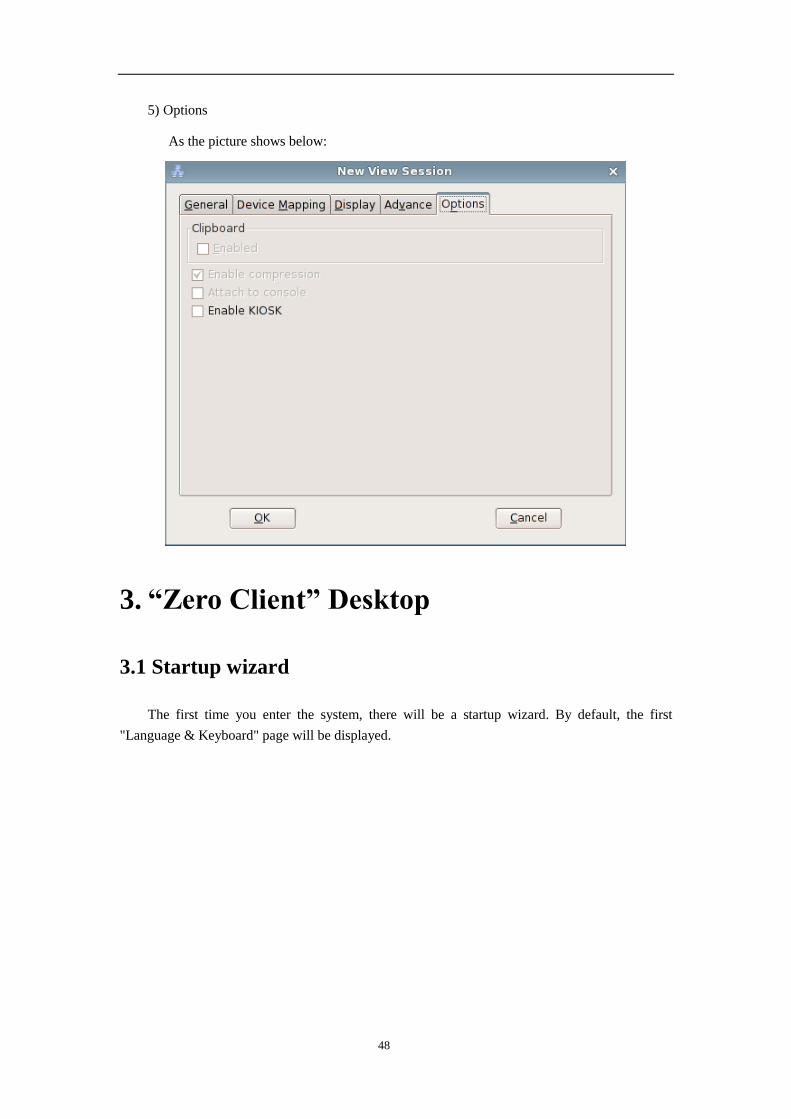
6. Create a VMware View item
1) To configure the session name, server address, default desktop, protocol and the account to
log in automatically. As the picture shows below:
Page 46
46
2) Device Mapping
As the picture shows below:
Page 47
47
3) Display
As the picture shows below:
4) Advance
As the picture shows below:
Page 48
48
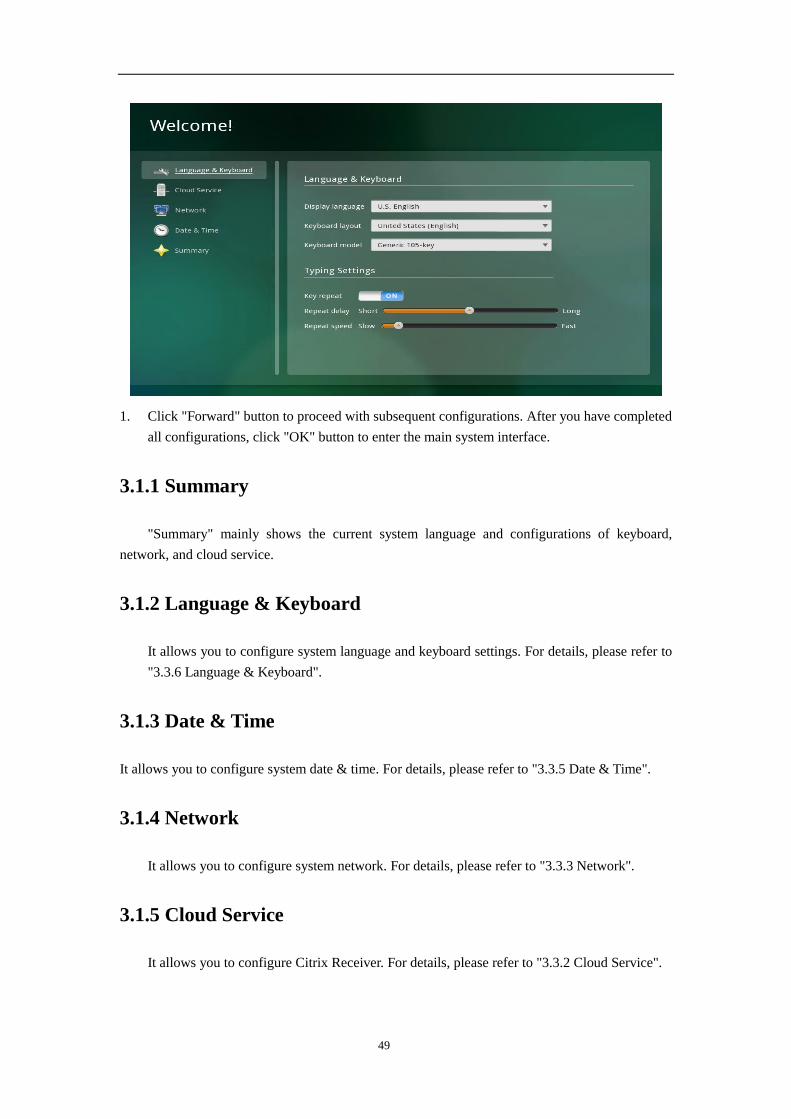
5) Options
As the picture shows below:
3. “Zero Client” Desktop
3.1 Startup wizard
The first time you enter the system, there will be a startup wizard. By default, the first
"Language & Keyboard" page will be displayed.
Page 49
49
1. Click "Forward" button to proceed with subsequent configurations. After you have completed
all configurations, click "OK" button to enter the main system interface.
3.1.1 Summary
"Summary" mainly shows the current system language and configurations of keyboard,
network, and cloud service.
3.1.2 Language & Keyboard
It allows you to configure system language and keyboard settings. For details, please refer to
"3.3.6 Language & Keyboard".
3.1.3 Date & Time
It allows you to configure system date & time. For details, please refer to "3.3.5 Date & Time".
3.1.4 Network
It allows you to configure system network. For details, please refer to "3.3.3 Network".
3.1.5 Cloud Service
It allows you to configure Citrix Receiver. For details, please refer to "3.3.2 Cloud Service".
Page 50
50
3.2 Connection & Use
3.2.1 Log On
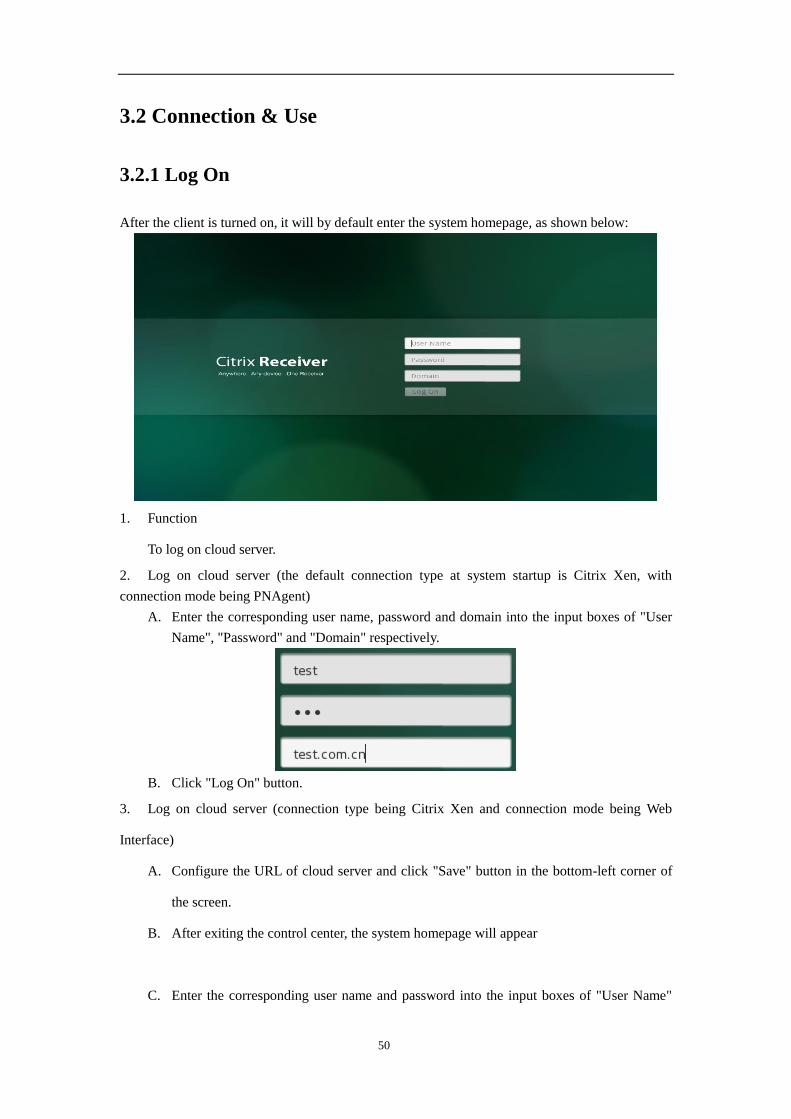
After the client is turned on, it will by default enter the system homepage, as shown below:
1. Function
To log on cloud server.
2. Log on cloud server (the default connection type at system startup is Citrix Xen, with
connection mode being PNAgent)
A. Enter the corresponding user name, password and domain into the input boxes of "User
Name", "Password" and "Domain" respectively.
B. Click "Log On" button.
3. Log on cloud server (connection type being Citrix Xen and connection mode being Web
Interface)
A. Configure the URL of cloud server and click "Save" button in the bottom-left corner of
the screen.
B. After exiting the control center, the system homepage will appear
C. Enter the corresponding user name and password into the input boxes of "User Name"
Page 51
51
and "Password" respectively.
D. Click "Log On" button.
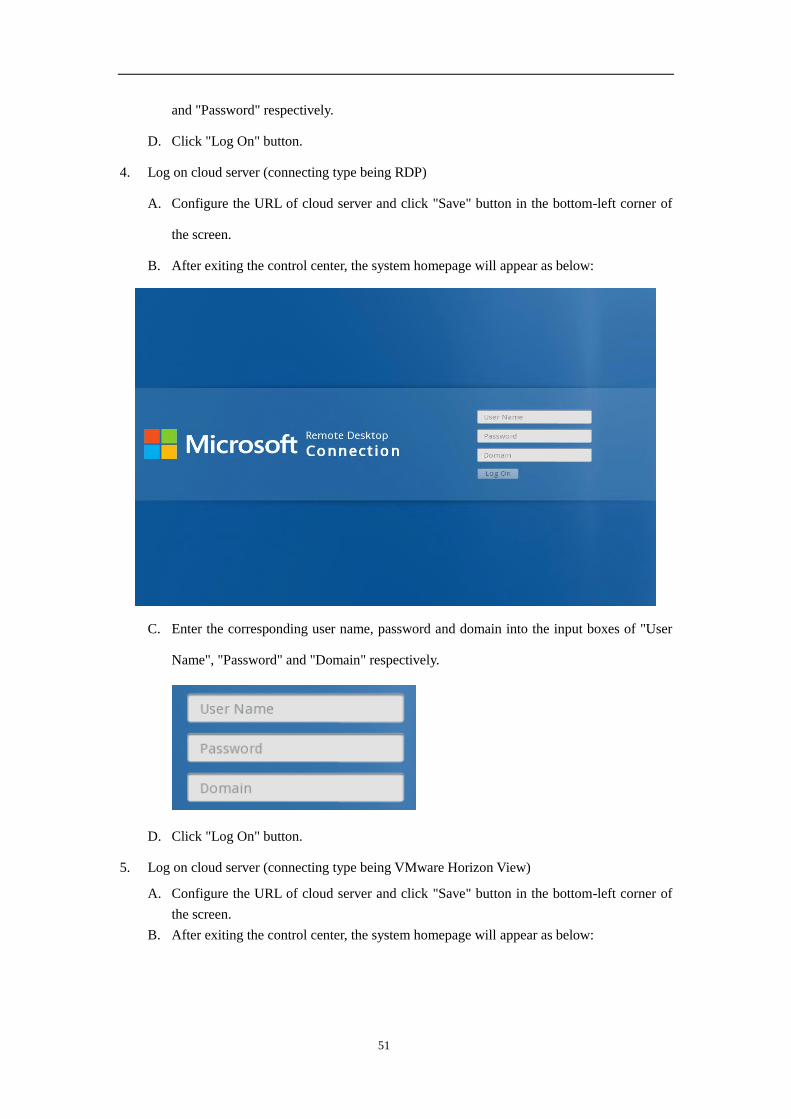
4. Log on cloud server (connecting type being RDP)
A. Configure the URL of cloud server and click "Save" button in the bottom-left corner of
the screen.
B. After exiting the control center, the system homepage will appear as below:
C. Enter the corresponding user name, password and domain into the input boxes of "User
Name", "Password" and "Domain" respectively.
D. Click "Log On" button.
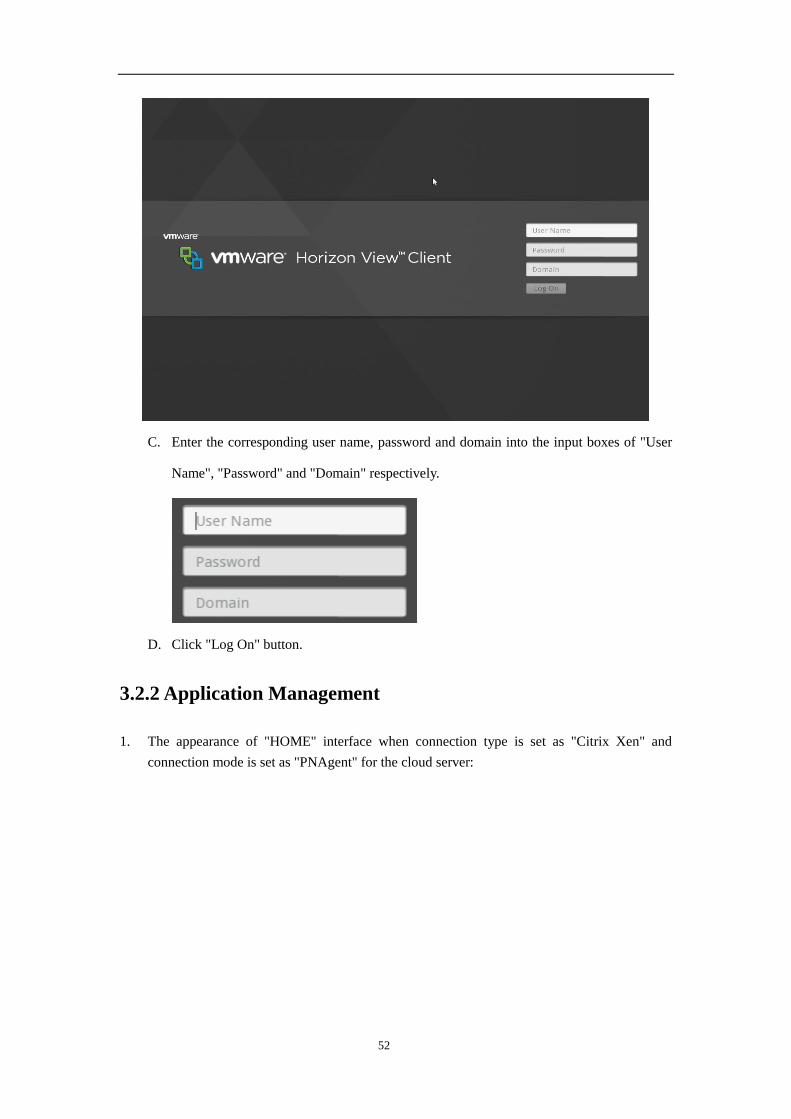
5. Log on cloud server (connecting type being VMware Horizon View)
A. Configure the URL of cloud server and click "Save" button in the bottom-left corner of
the screen.
B. After exiting the control center, the system homepage will appear as below:
Page 52
52
C. Enter the corresponding user name, password and domain into the input boxes of "User
Name", "Password" and "Domain" respectively.
D. Click "Log On" button.
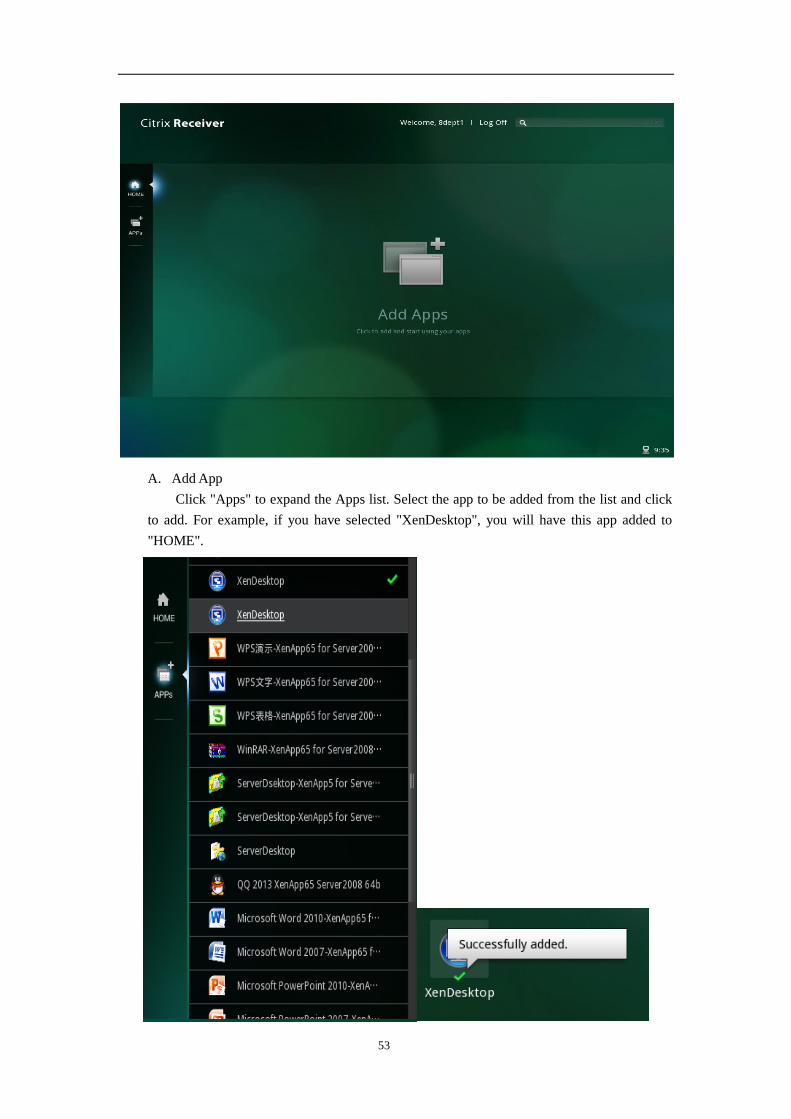
3.2.2 Application Management
1. The appearance of "HOME" interface when connection type is set as "Citrix Xen" and
connection mode is set as "PNAgent" for the cloud server:
Page 53
53
A. Add App
Click "Apps" to expand the Apps list. Select the app to be added from the list and click
to add. For example, if you have selected "XenDesktop", you will have this app added to
"HOME".
Page 54
54
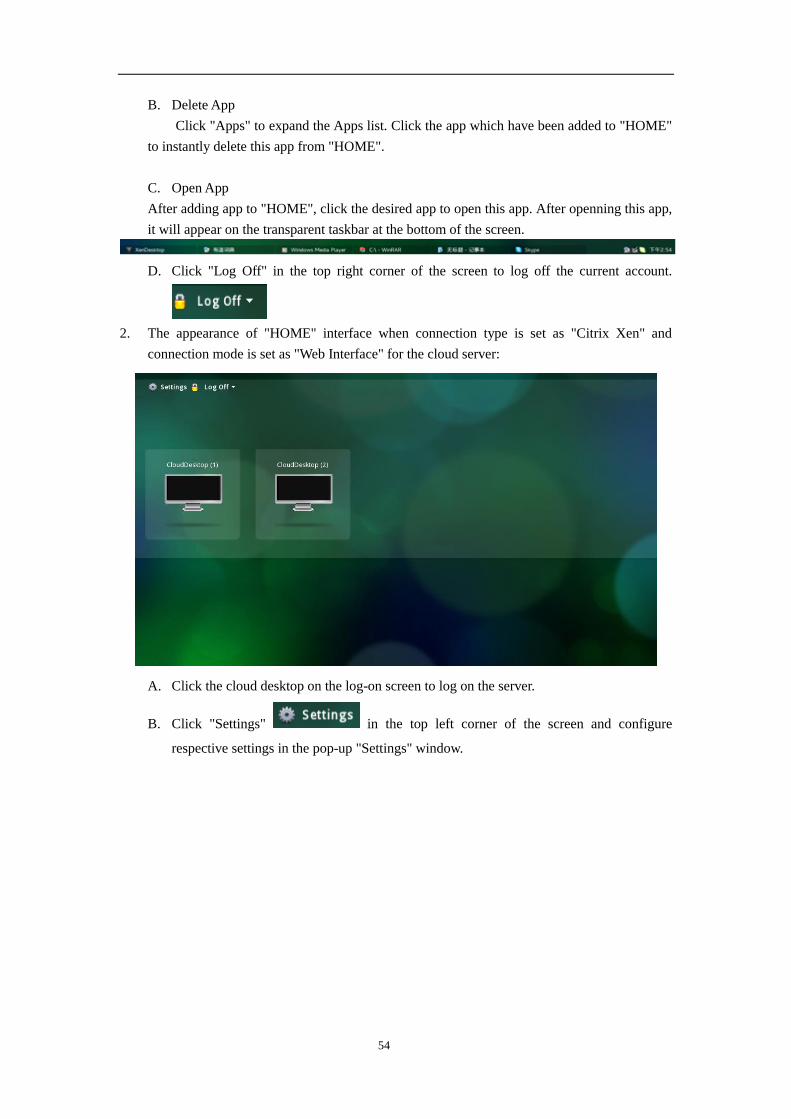
B. Delete App
Click "Apps" to expand the Apps list. Click the app which have been added to "HOME"
to instantly delete this app from "HOME".
C. Open App
After adding app to "HOME", click the desired app to open this app. After openning this app,
it will appear on the transparent taskbar at the bottom of the screen.
D. Click "Log Off" in the top right corner of the screen to log off the current account.
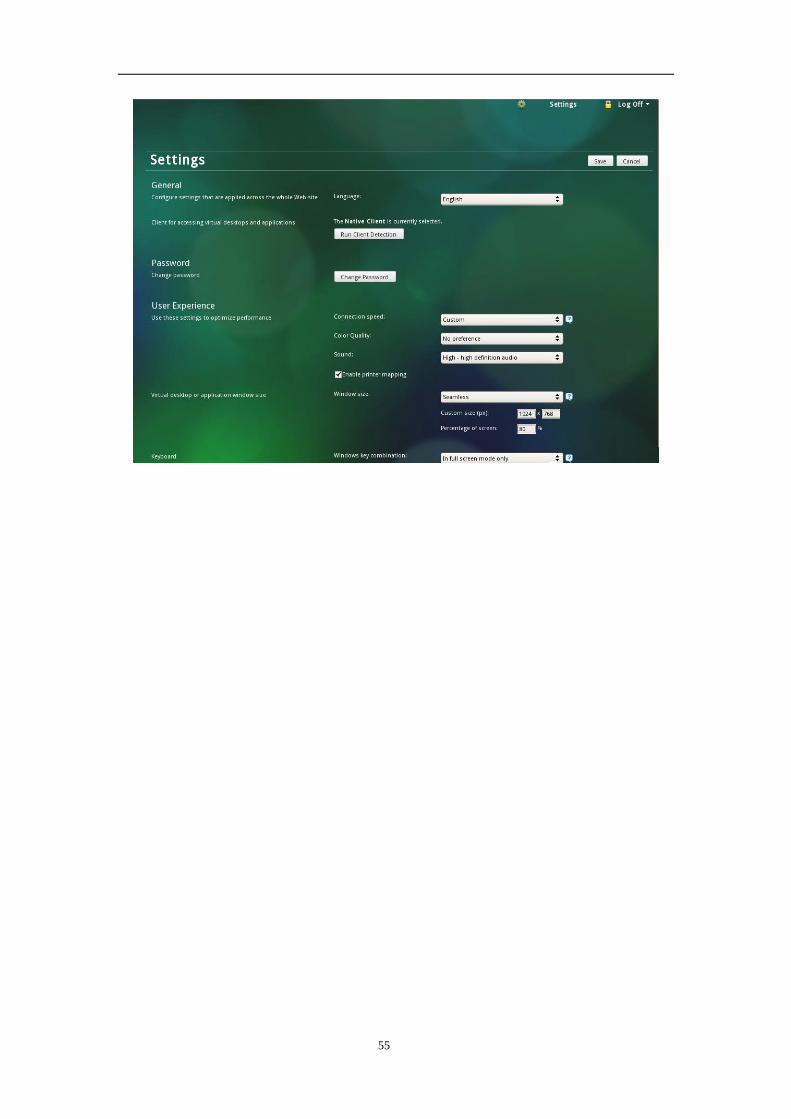
2. The appearance of "HOME" interface when connection type is set as "Citrix Xen" and
connection mode is set as "Web Interface" for the cloud server:
A. Click the cloud desktop on the log-on screen to log on the server.
B. Click "Settings" in the top left corner of the screen and configure
respective settings in the pop-up "Settings" window.
Page 56
56
C. Click the drop-down button next to "Log Off" to disconnect or reconnect:
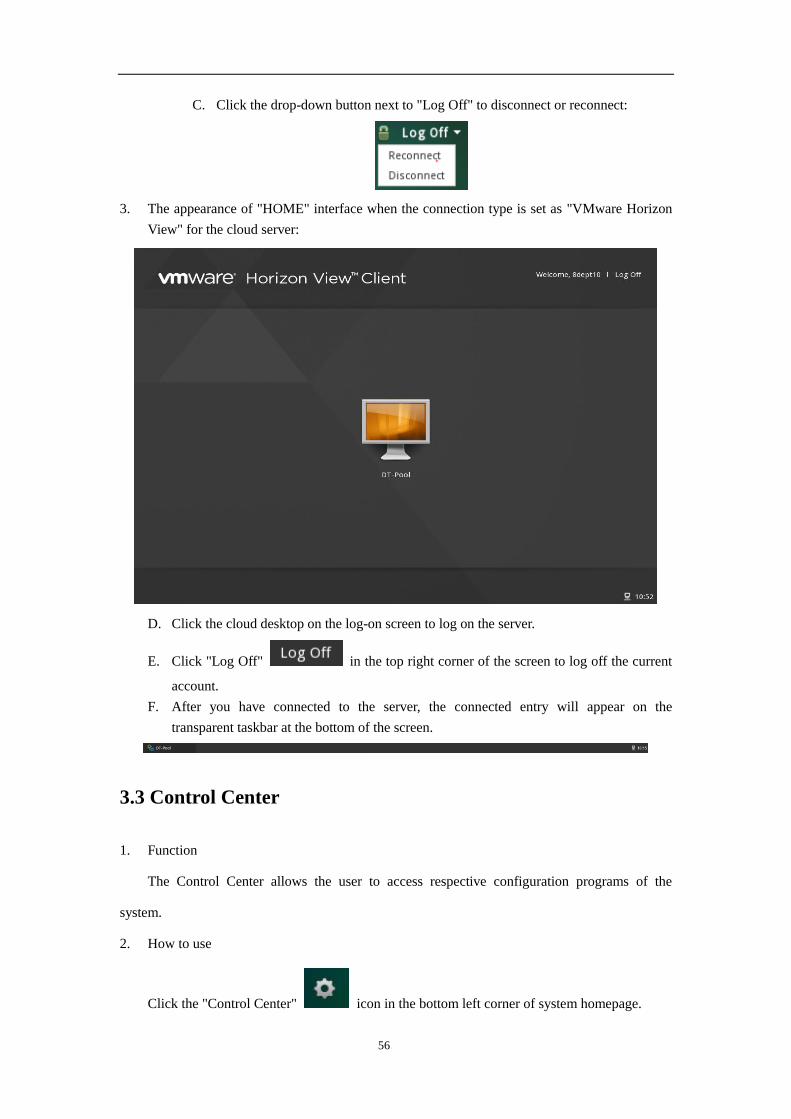
3. The appearance of "HOME" interface when the connection type is set as "VMware Horizon
View" for the cloud server:
D. Click the cloud desktop on the log-on screen to log on the server.
E. Click "Log Off" in the top right corner of the screen to log off the current
account.
F. After you have connected to the server, the connected entry will appear on the
transparent taskbar at the bottom of the screen.
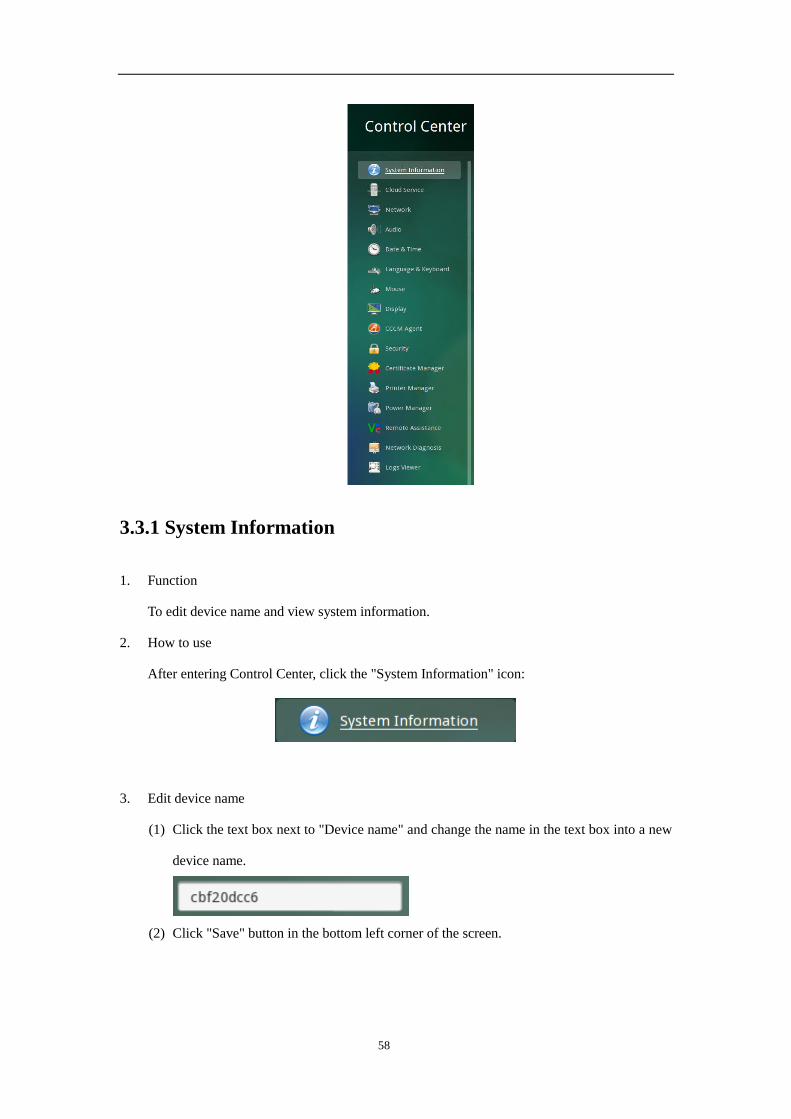
3.3 Control Center
1. Function
The Control Center allows the user to access respective configuration programs of the
system.
2. How to use
Click the "Control Center" icon in the bottom left corner of system homepage.
Page 57
57
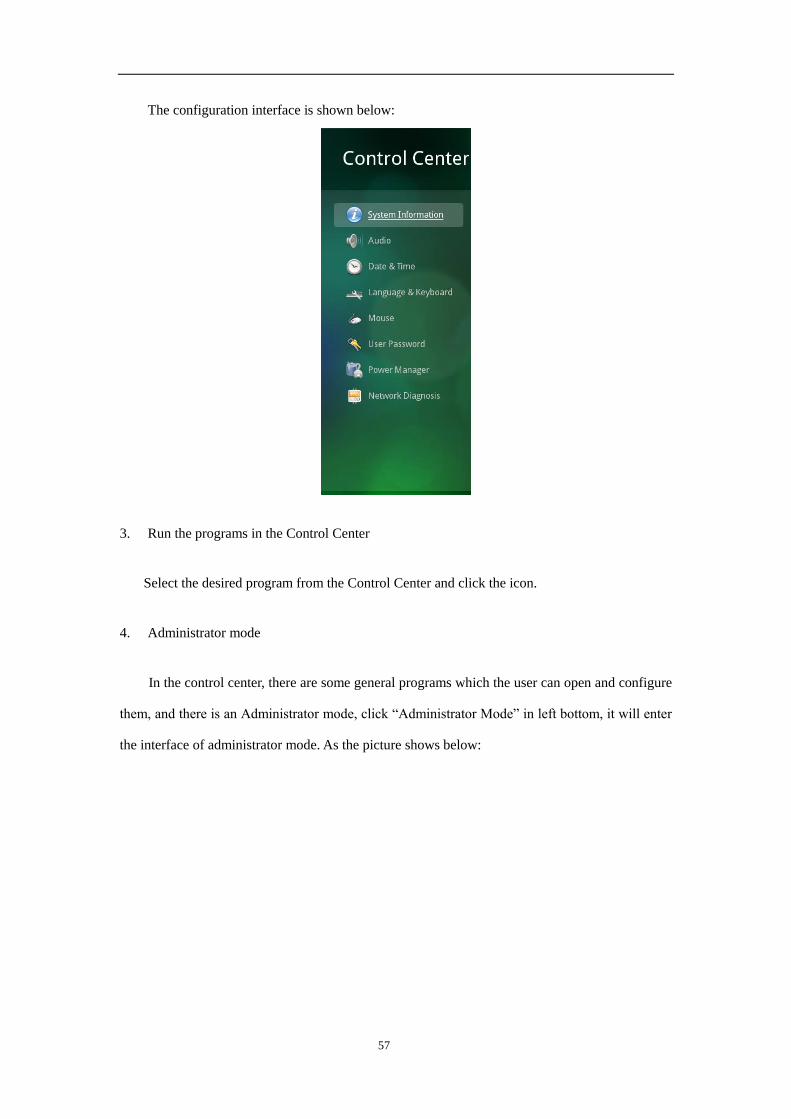
The configuration interface is shown below:
3. Run the programs in the Control Center
Select the desired program from the Control Center and click the icon.
4. Administrator mode
In the control center, there are some general programs which the user can open and configure
them, and there is an Administrator mode, click “Administrator Mode” in left bottom, it will enter
the interface of administrator mode. As the picture shows below:
Page 58
58
3.3.1 System Information
1. Function
To edit device name and view system information.
2. How to use
After entering Control Center, click the "System Information" icon:
3. Edit device name
(1) Click the text box next to "Device name" and change the name in the text box into a new
device name.
(2) Click "Save" button in the bottom left corner of the screen.
Page 59
59
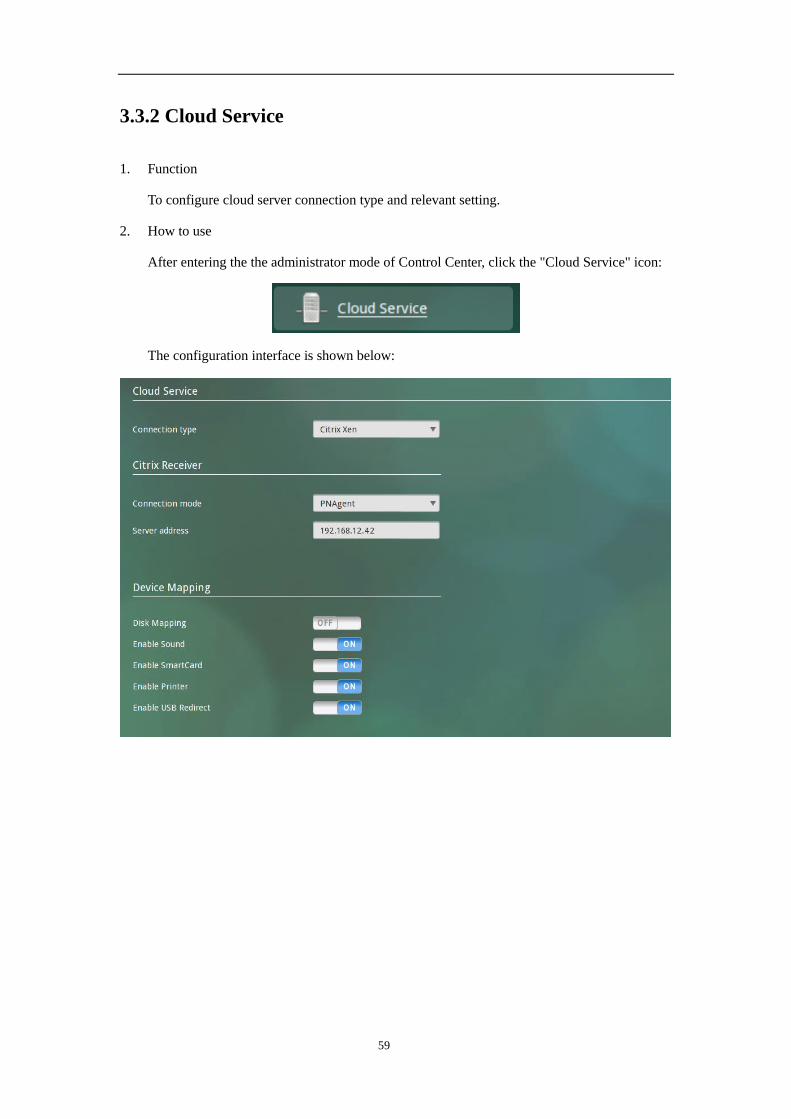
3.3.2 Cloud Service
1. Function
To configure cloud server connection type and relevant setting.
2. How to use
After entering the the administrator mode of Control Center, click the "Cloud Service" icon:
The configuration interface is shown below:
Page 60
60
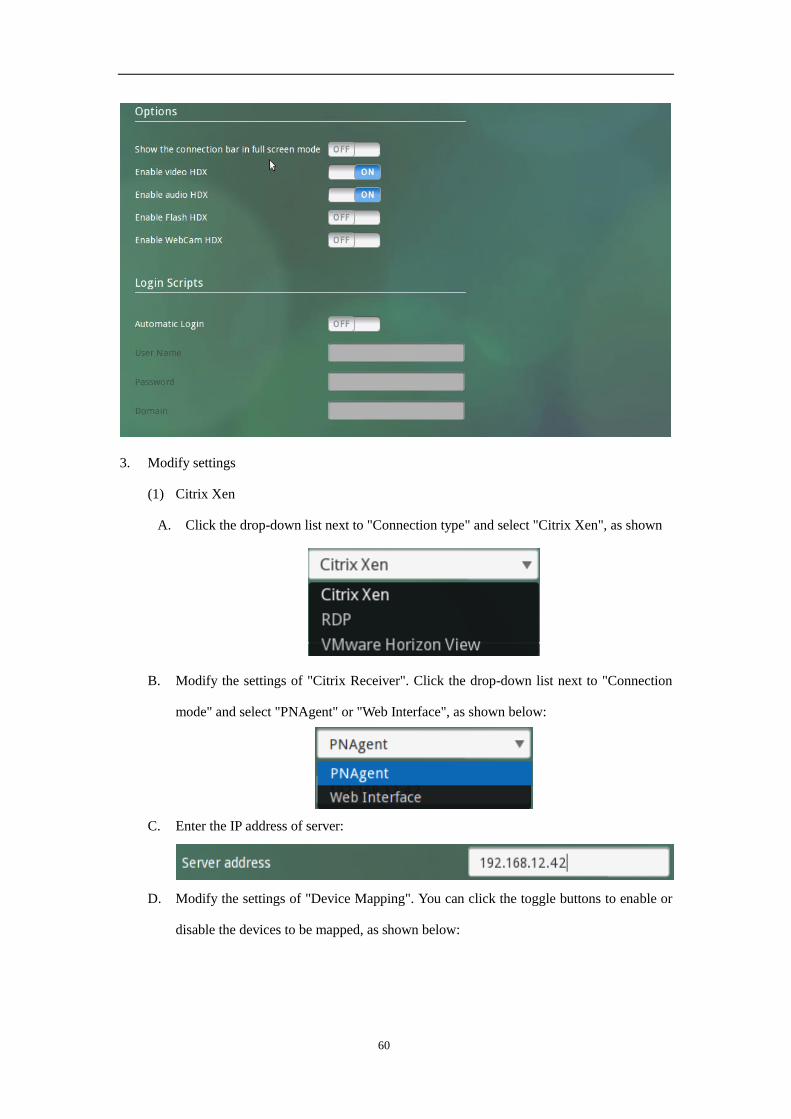
3. Modify settings
(1) Citrix Xen
A. Click the drop-down list next to "Connection type" and select "Citrix Xen", as shown
B. Modify the settings of "Citrix Receiver". Click the drop-down list next to "Connection
mode" and select "PNAgent" or "Web Interface", as shown below:
C. Enter the IP address of server:
D. Modify the settings of "Device Mapping". You can click the toggle buttons to enable or
disable the devices to be mapped, as shown below:
Page 61
61
E. Modify the settings of "Options". You can click the toggle buttons to enable or disable
relevant features, as shown below:
F. When the connection type is set as "PNAgent", you can determine to enable or disable
automatic login. Click the toggle button of "Automatic Login" to enable or disable this
feature. In the meantime, you will need to enter the user name, password and domain, as
shown below:
G. Click "Save" button in the bottom left corner of the screen.
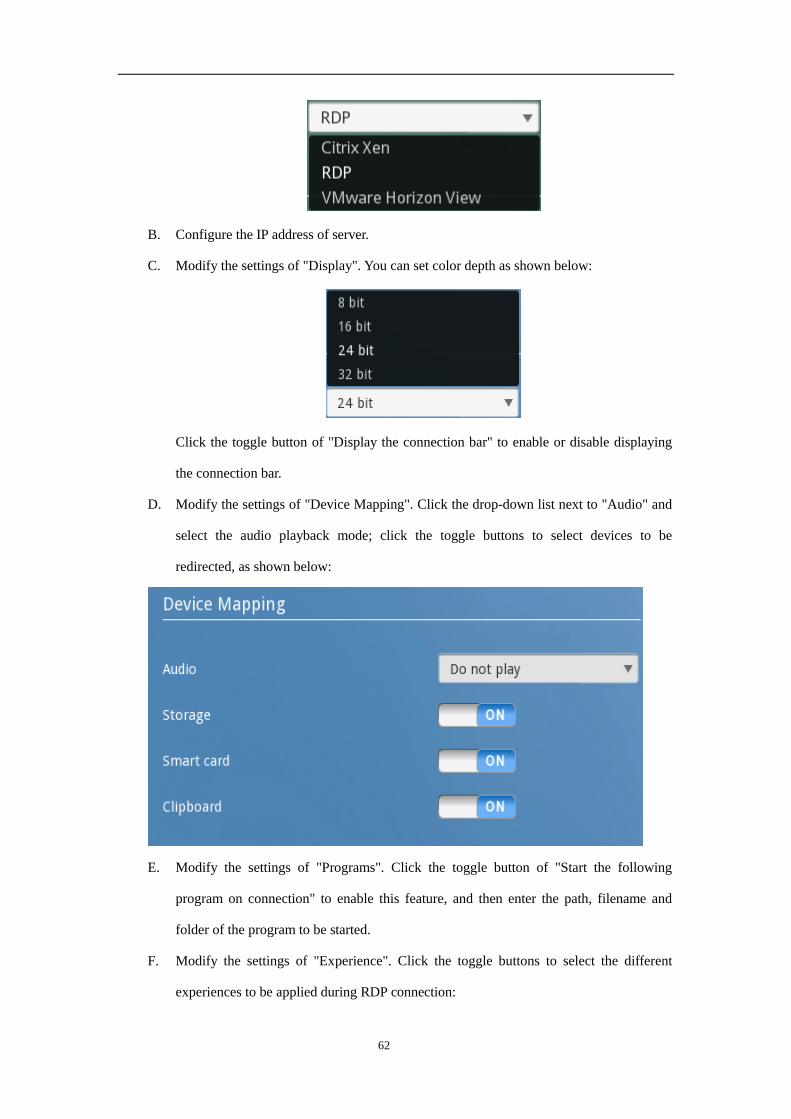
(2) RDP
A. Click the drop-down list next to "Connection mode" and select "RDP", as shown below:
Page 62
62
B. Configure the IP address of server.
C. Modify the settings of "Display". You can set color depth as shown below:
Click the toggle button of "Display the connection bar" to enable or disable displaying
the connection bar.
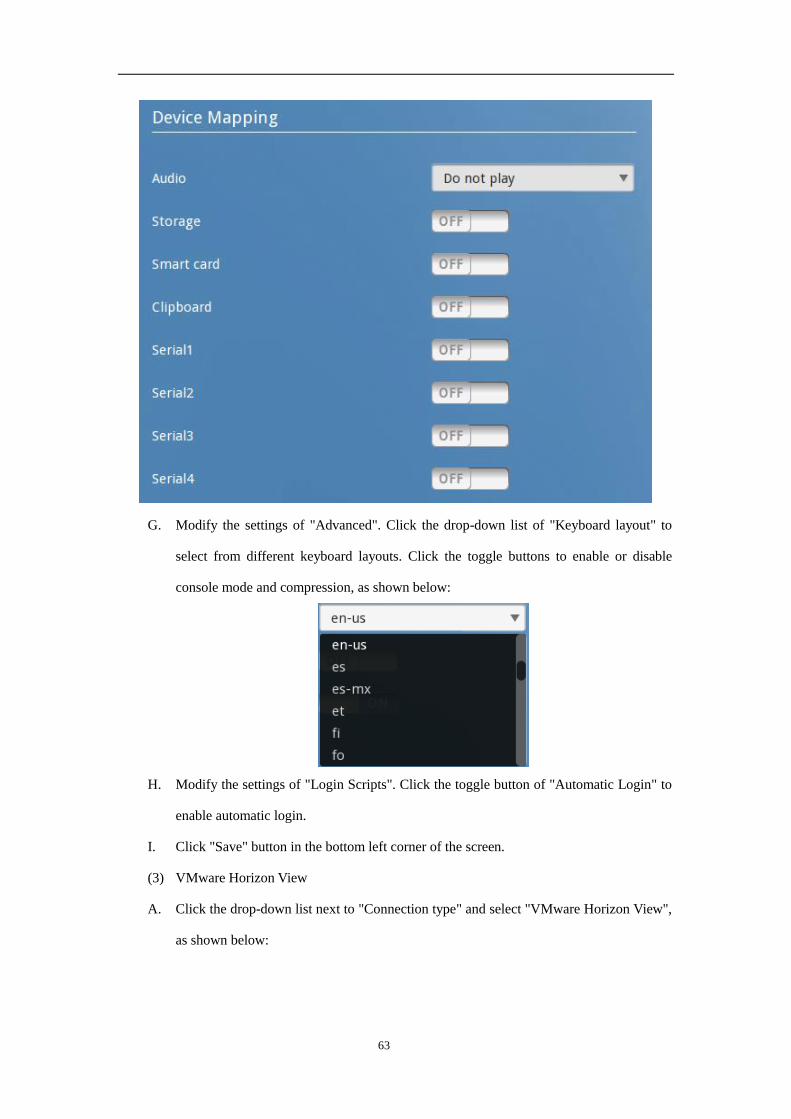
D. Modify the settings of "Device Mapping". Click the drop-down list next to "Audio" and
select the audio playback mode; click the toggle buttons to select devices to be
redirected, as shown below:
E. Modify the settings of "Programs". Click the toggle button of "Start the following
program on connection" to enable this feature, and then enter the path, filename and
folder of the program to be started.
F. Modify the settings of "Experience". Click the toggle buttons to select the different
experiences to be applied during RDP connection:
Page 63
63
G. Modify the settings of "Advanced". Click the drop-down list of "Keyboard layout" to
select from different keyboard layouts. Click the toggle buttons to enable or disable
console mode and compression, as shown below:
H. Modify the settings of "Login Scripts". Click the toggle button of "Automatic Login" to
enable automatic login.
I. Click "Save" button in the bottom left corner of the screen.
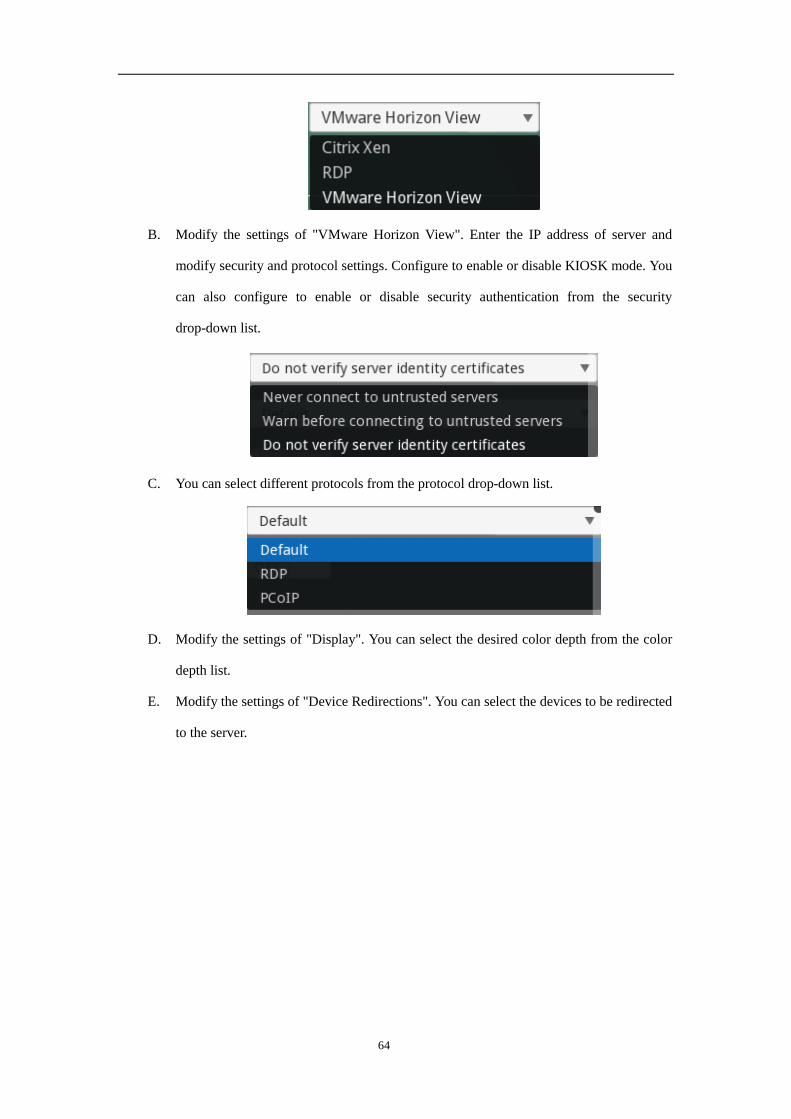
(3) VMware Horizon View
A. Click the drop-down list next to "Connection type" and select "VMware Horizon View",
as shown below:
Page 64
64
B. Modify the settings of "VMware Horizon View". Enter the IP address of server and
modify security and protocol settings. Configure to enable or disable KIOSK mode. You
can also configure to enable or disable security authentication from the security
drop-down list.
C. You can select different protocols from the protocol drop-down list.
D. Modify the settings of "Display". You can select the desired color depth from the color
depth list.
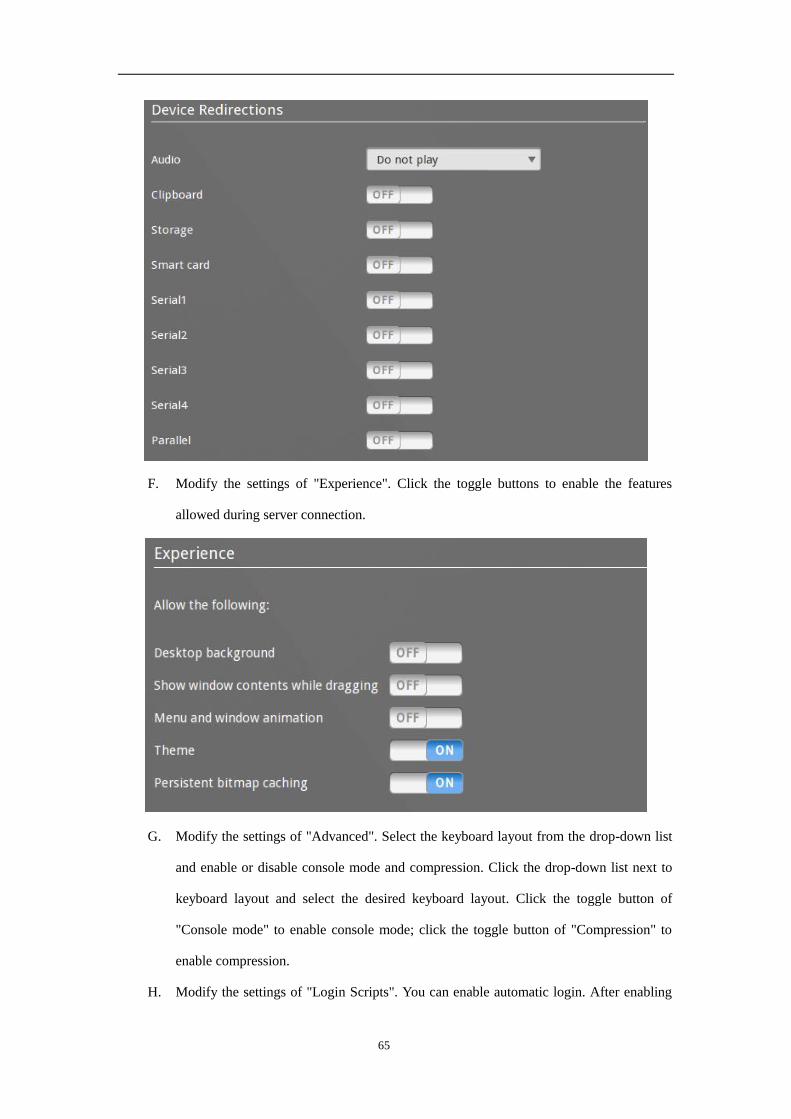
E. Modify the settings of "Device Redirections". You can select the devices to be redirected
to the server.
Page 65
65
F. Modify the settings of "Experience". Click the toggle buttons to enable the features
allowed during server connection.
G. Modify the settings of "Advanced". Select the keyboard layout from the drop-down list
and enable or disable console mode and compression. Click the drop-down list next to
keyboard layout and select the desired keyboard layout. Click the toggle button of
"Console mode" to enable console mode; click the toggle button of "Compression" to
enable compression.
H. Modify the settings of "Login Scripts". You can enable automatic login. After enabling
Page 66
66
this feature, the system will automatically log on the server every time the client is
turned on.
I. Click "Save" button in the bottom left corner of the screen.
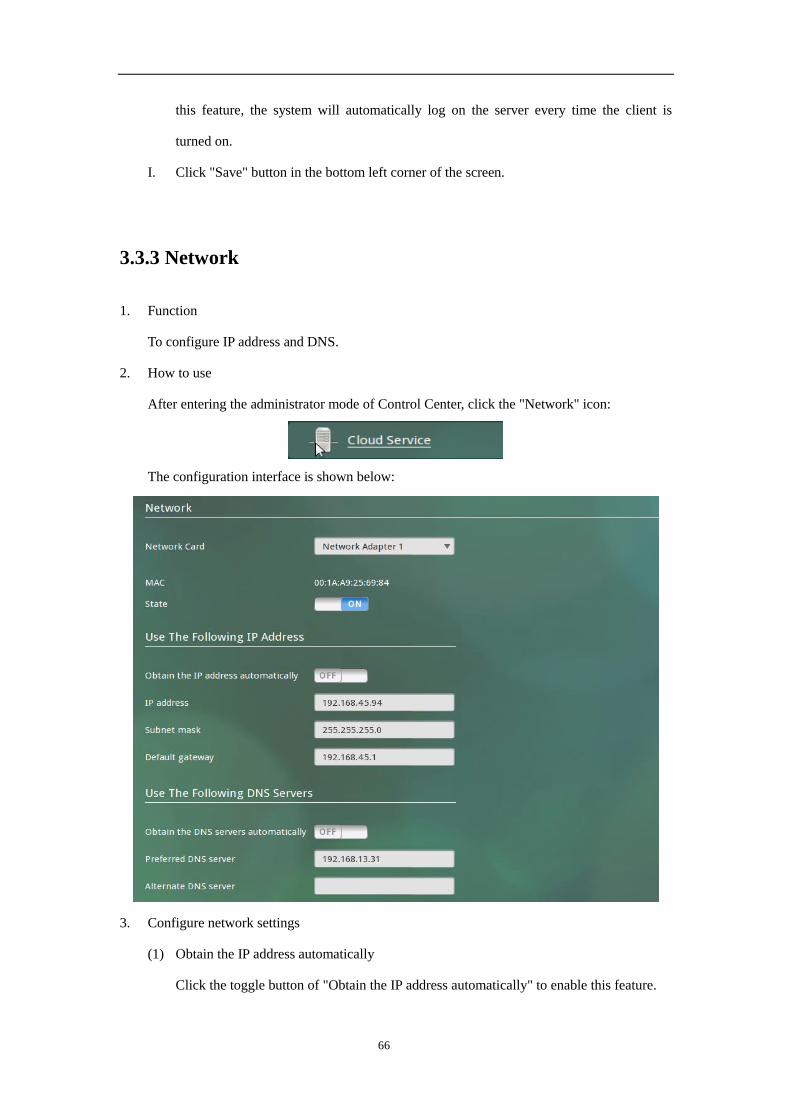
3.3.3 Network
1. Function
To configure IP address and DNS.
2. How to use
After entering the administrator mode of Control Center, click the "Network" icon:
The configuration interface is shown below:
3. Configure network settings
(1) Obtain the IP address automatically
Click the toggle button of "Obtain the IP address automatically" to enable this feature.
Page 67
67
(2) Obtain the DNS servers automatically
Click the toggle button of "Obtain the DNS servers automatically" to enable this feature.
(3) Configure IP address manually
A、 Click the toggle button of "Obtain the IP address automatically" to disable this feature.
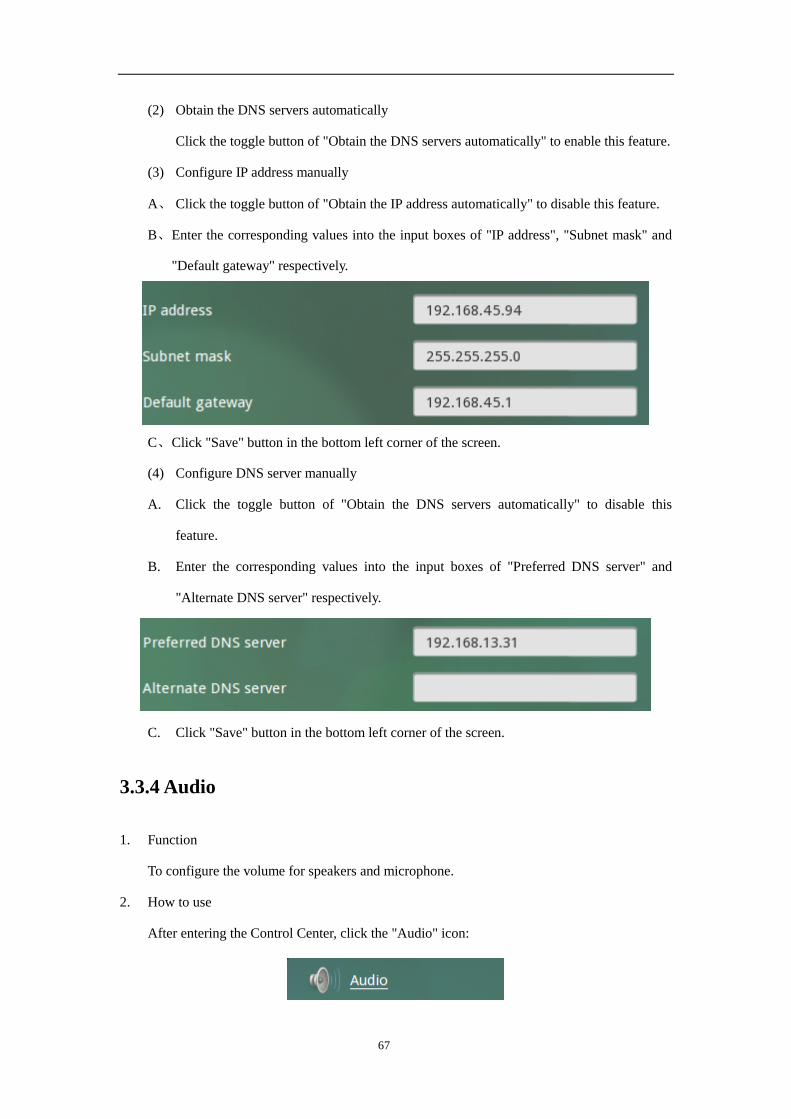
B、 Enter the corresponding values into the input boxes of "IP address", "Subnet mask" and
"Default gateway" respectively.
C、 Click "Save" button in the bottom left corner of the screen.
(4) Configure DNS server manually
A. Click the toggle button of "Obtain the DNS servers automatically" to disable this
feature.
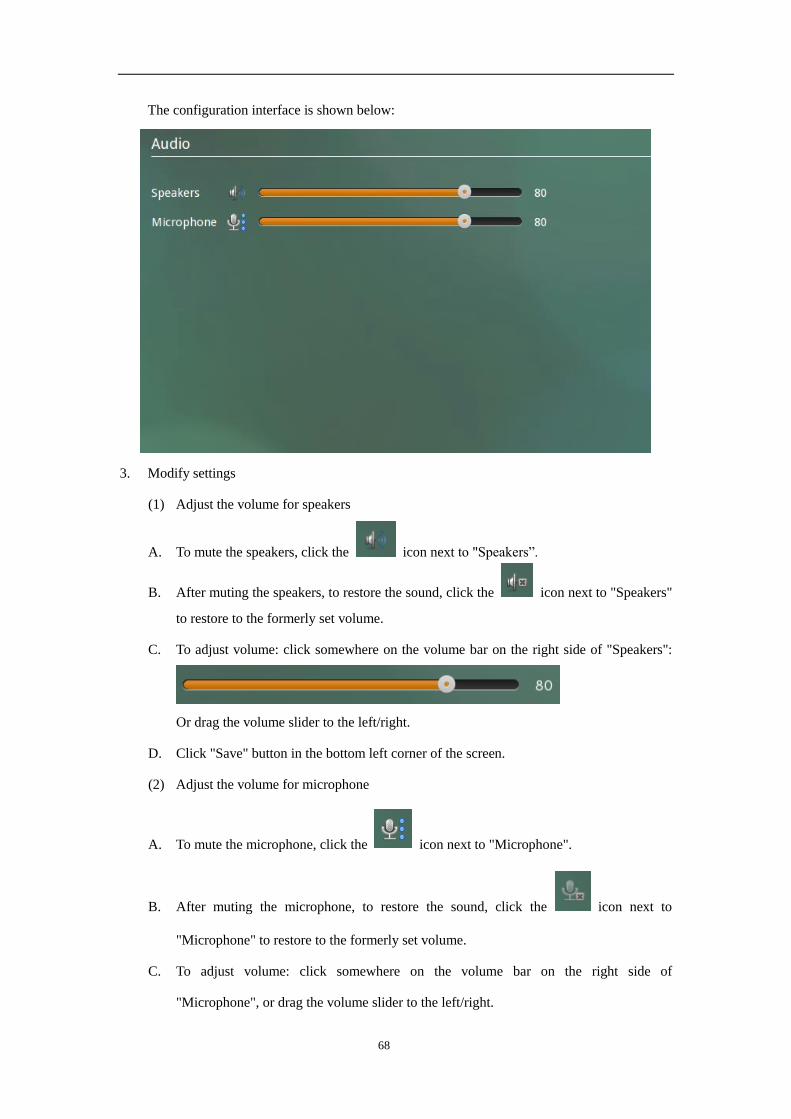
B. Enter the corresponding values into the input boxes of "Preferred DNS server" and
"Alternate DNS server" respectively.
C. Click "Save" button in the bottom left corner of the screen.
3.3.4 Audio
1. Function
To configure the volume for speakers and microphone.
2. How to use
After entering the Control Center, click the "Audio" icon:
Page 68
68
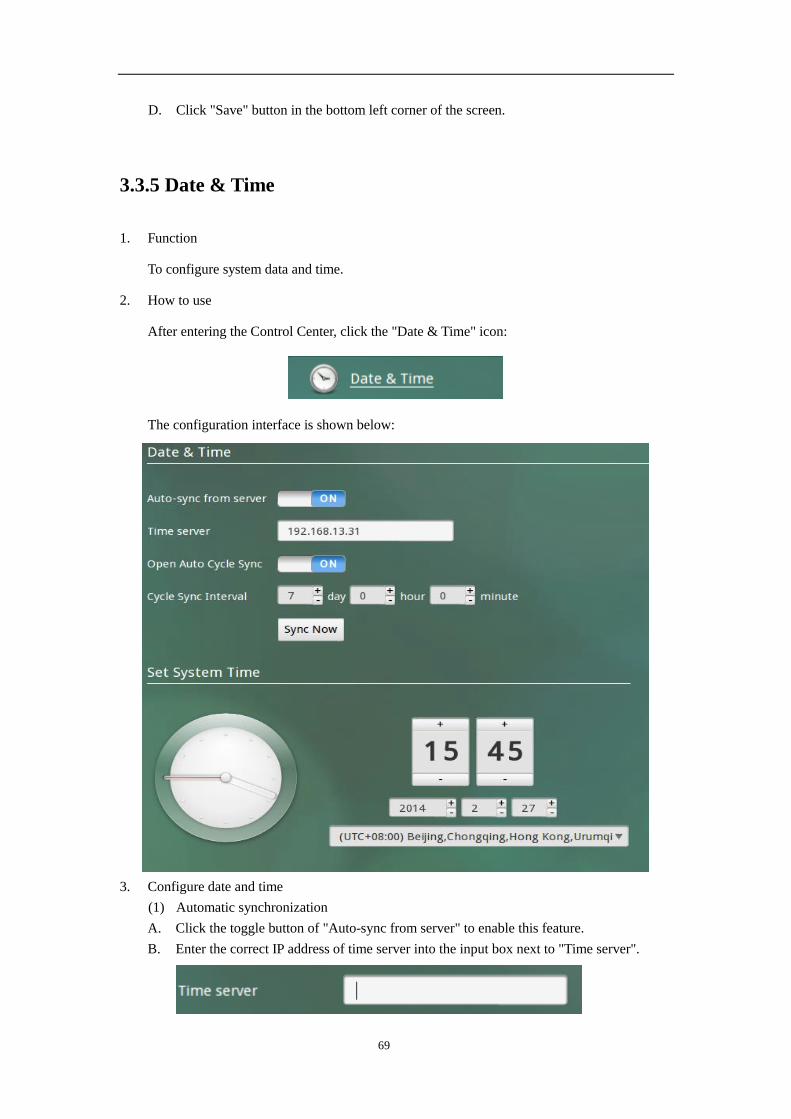
The configuration interface is shown below:
3. Modify settings
(1) Adjust the volume for speakers
A. To mute the speakers, click the icon next to "Speakers”.
B. After muting the speakers, to restore the sound, click the icon next to "Speakers"
to restore to the formerly set volume.
C. To adjust volume: click somewhere on the volume bar on the right side of "Speakers":
Or drag the volume slider to the left/right.
D. Click "Save" button in the bottom left corner of the screen.
(2) Adjust the volume for microphone
A. To mute the microphone, click the icon next to "Microphone".
B. After muting the microphone, to restore the sound, click the icon next to
"Microphone" to restore to the formerly set volume.
C. To adjust volume: click somewhere on the volume bar on the right side of
"Microphone", or drag the volume slider to the left/right.
Page 69
69
D. Click "Save" button in the bottom left corner of the screen.
3.3.5 Date & Time
1. Function
To configure system data and time.
2. How to use
After entering the Control Center, click the "Date & Time" icon:
The configuration interface is shown below:
3. Configure date and time
(1) Automatic synchronization
A. Click the toggle button of "Auto-sync from server" to enable this feature.
B. Enter the correct IP address of time server into the input box next to "Time server".
Page 70
70
C. Click the "Sync Now" button.
(2) Periodic synchronization
A. After completing A and B in the first step, do not click "Sync Now" button.
B. Click the toggle button of "Open Auto Cycle Sync" to enable this feature.
C. Enter the interval to be set in the input boxes on the right side of "Cycle Sync Interval".
D. Click "Save" button in the bottom left corner of the screen.
(3) Manual configuration
A. Click the toggle button of "Auto-sync from server" to disable this feature.
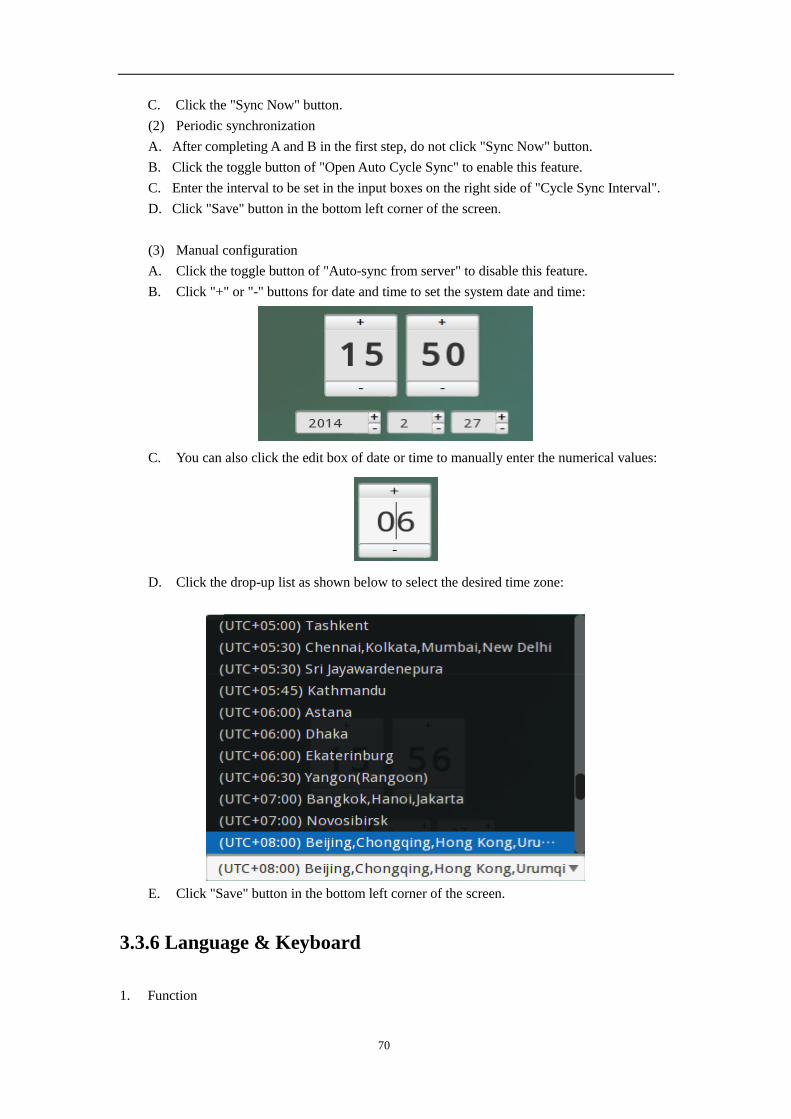
B. Click "+" or "-" buttons for date and time to set the system date and time:
C. You can also click the edit box of date or time to manually enter the numerical values:
D. Click the drop-up list as shown below to select the desired time zone:
E. Click "Save" button in the bottom left corner of the screen.
3.3.6 Language & Keyboard
1. Function
Page 71
71
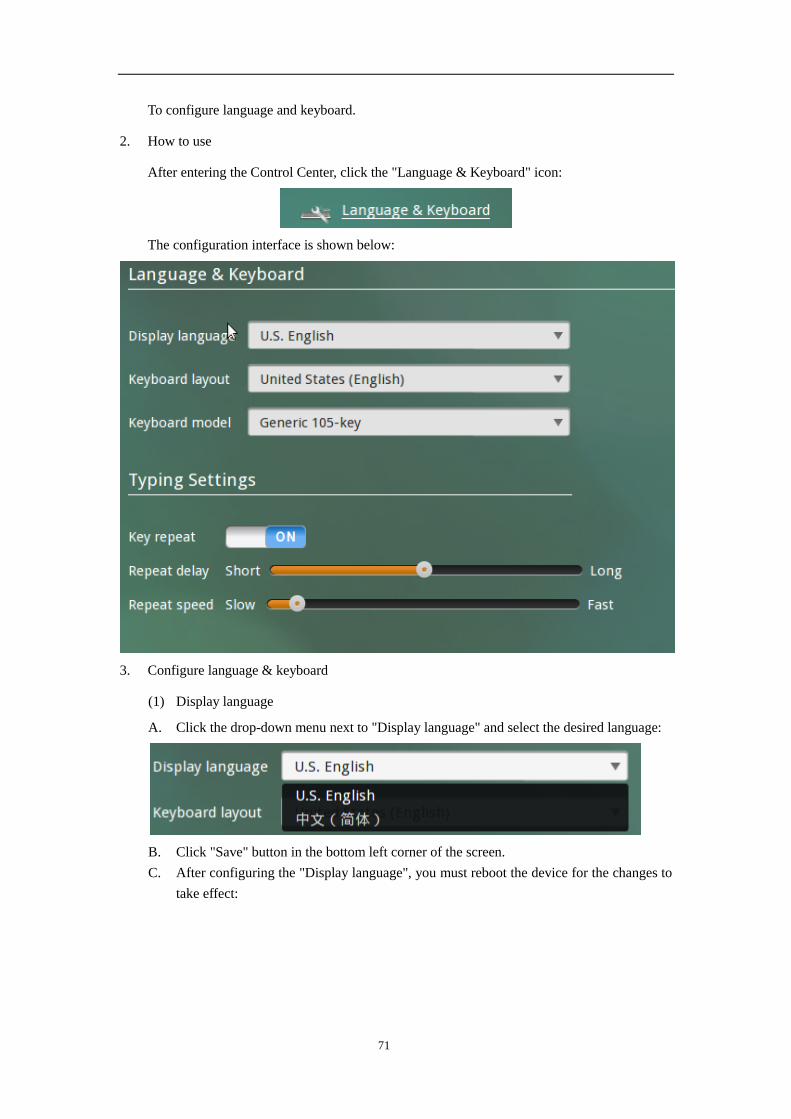
To configure language and keyboard.
2. How to use
After entering the Control Center, click the "Language & Keyboard" icon:
The configuration interface is shown below:
3. Configure language & keyboard
(1) Display language
A. Click the drop-down menu next to "Display language" and select the desired language:
B. Click "Save" button in the bottom left corner of the screen.
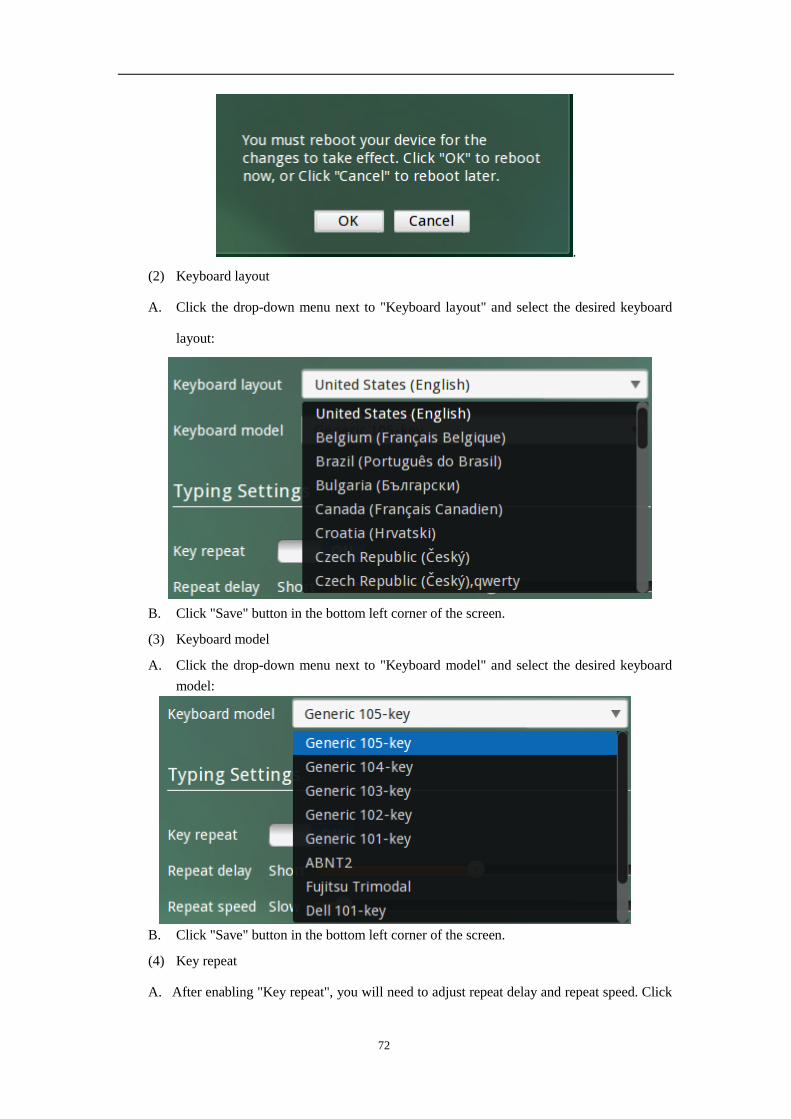
C. After configuring the "Display language", you must reboot the device for the changes to
take effect:
Page 72
72
.
(2) Keyboard layout
A. Click the drop-down menu next to "Keyboard layout" and select the desired keyboard
layout:
B. Click "Save" button in the bottom left corner of the screen.
(3) Keyboard model
A. Click the drop-down menu next to "Keyboard model" and select the desired keyboard
model:
B. Click "Save" button in the bottom left corner of the screen.
(4) Key repeat
A. After enabling "Key repeat", you will need to adjust repeat delay and repeat speed. Click
Page 73
73
somewhere on the scroll bar to complete the configuration, or drag the scroll bar slider to
the left/right.
B. Click "Save" button in the bottom left corner of the screen.
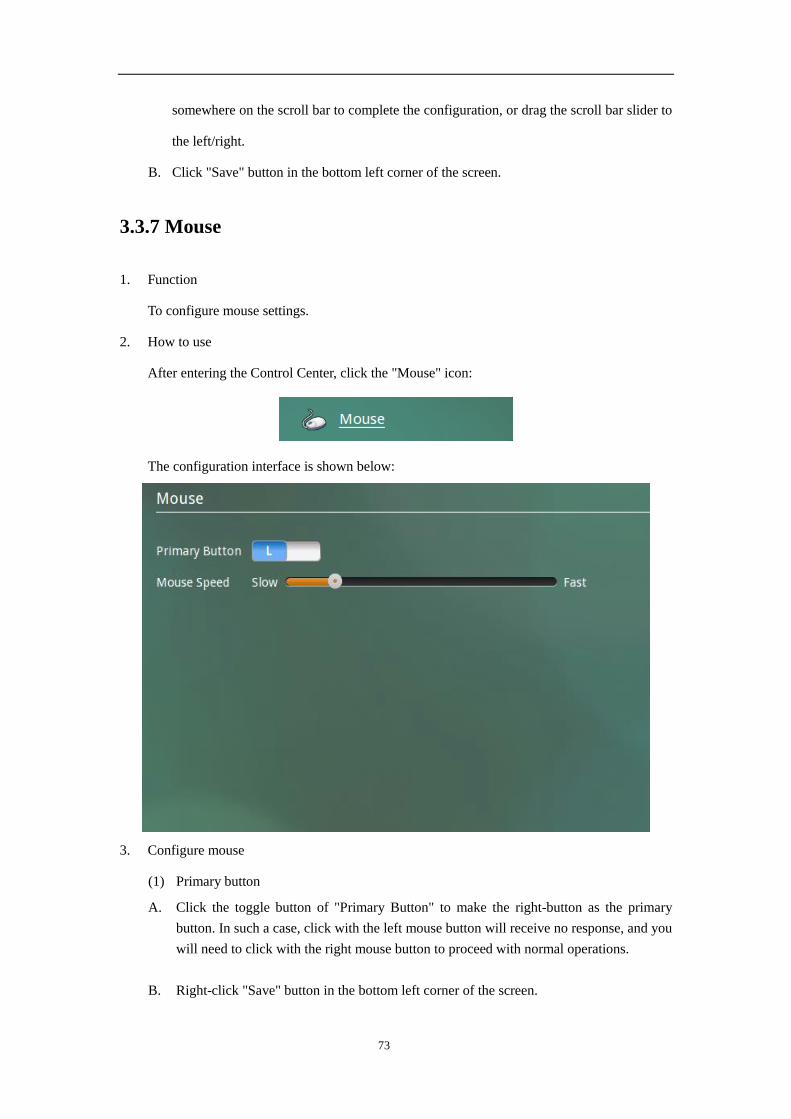
3.3.7 Mouse
1. Function
To configure mouse settings.
2. How to use
After entering the Control Center, click the "Mouse" icon:
The configuration interface is shown below:
3. Configure mouse
(1) Primary button
A. Click the toggle button of "Primary Button" to make the right-button as the primary
button. In such a case, click with the left mouse button will receive no response, and you
will need to click with the right mouse button to proceed with normal operations.
B. Right-click "Save" button in the bottom left corner of the screen.
Page 74
74
(2) Mouse speed
A. To adjust the mouse speed: click somewhere on the speed bar, or drag the speed bar
slider to the left/right.
B. Click "Save" button in the bottom left corner of the screen.
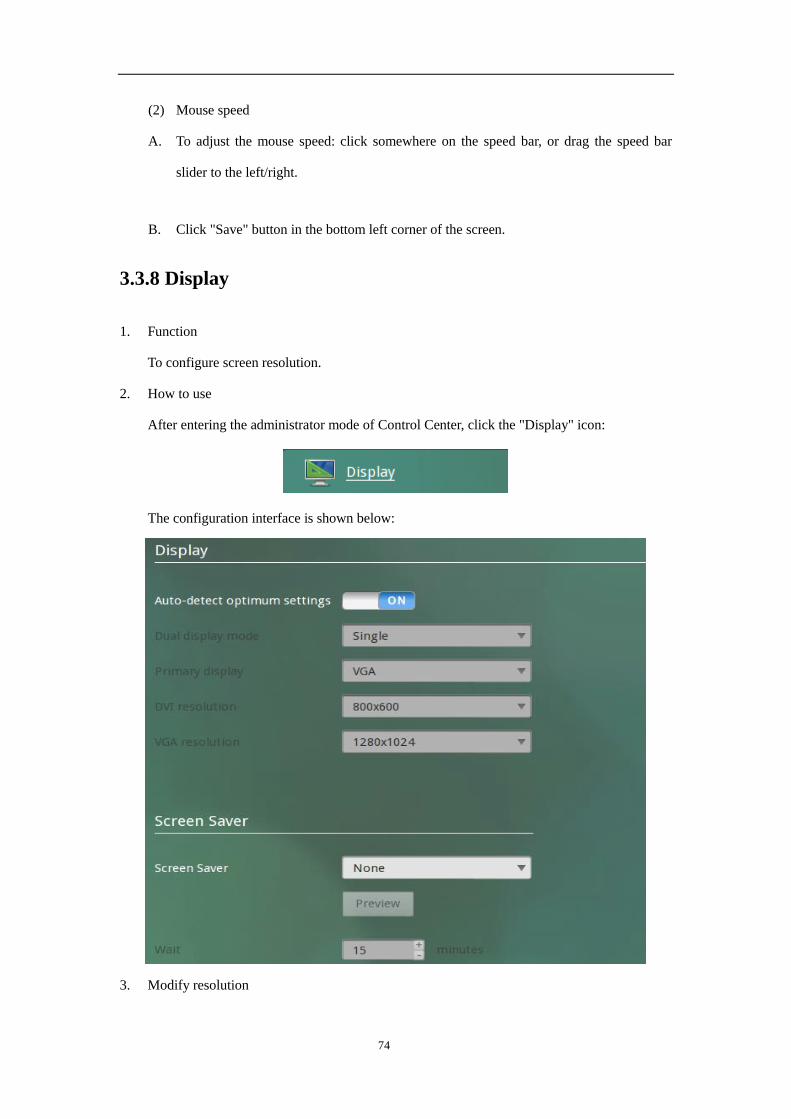
3.3.8 Display
1. Function
To configure screen resolution.
2. How to use
After entering the administrator mode of Control Center, click the "Display" icon:
The configuration interface is shown below:
3. Modify resolution
Page 75
75
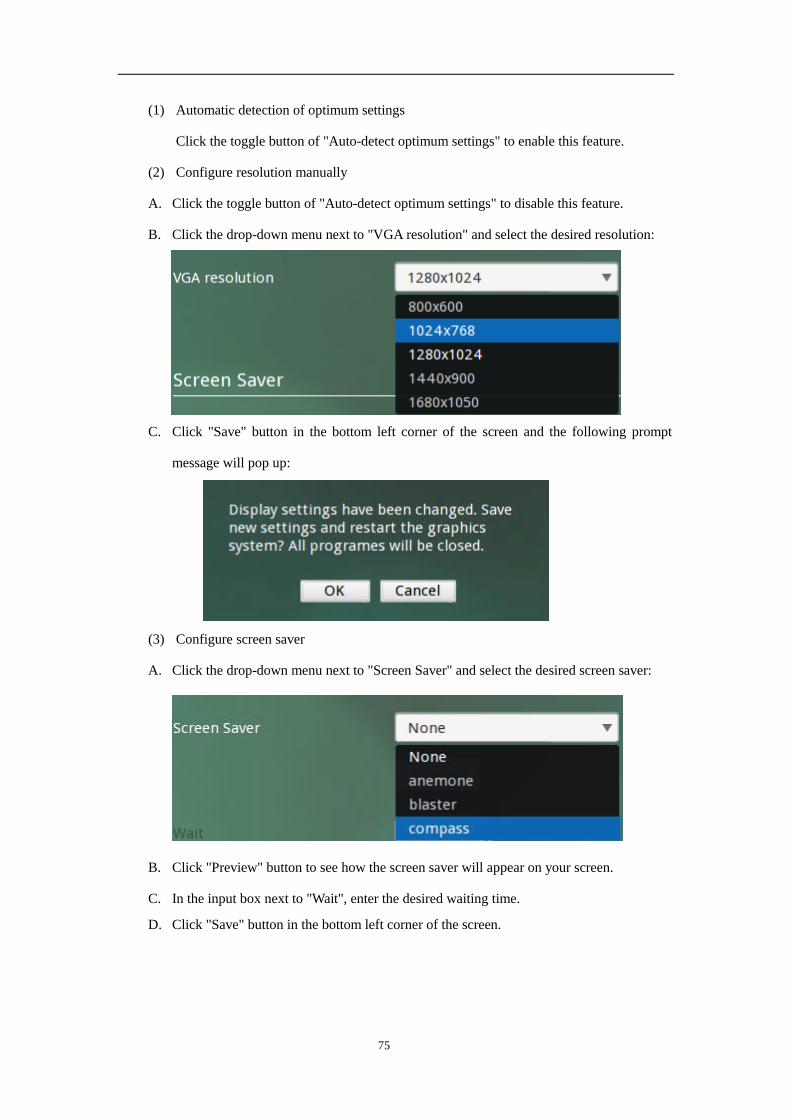
(1) Automatic detection of optimum settings
Click the toggle button of "Auto-detect optimum settings" to enable this feature.
(2) Configure resolution manually
A. Click the toggle button of "Auto-detect optimum settings" to disable this feature.
B. Click the drop-down menu next to "VGA resolution" and select the desired resolution:
C. Click "Save" button in the bottom left corner of the screen and the following prompt
message will pop up:
(3) Configure screen saver
A. Click the drop-down menu next to "Screen Saver" and select the desired screen saver:
B. Click "Preview" button to see how the screen saver will appear on your screen.
C. In the input box next to "Wait", enter the desired waiting time.
D. Click "Save" button in the bottom left corner of the screen.
Page 76
76
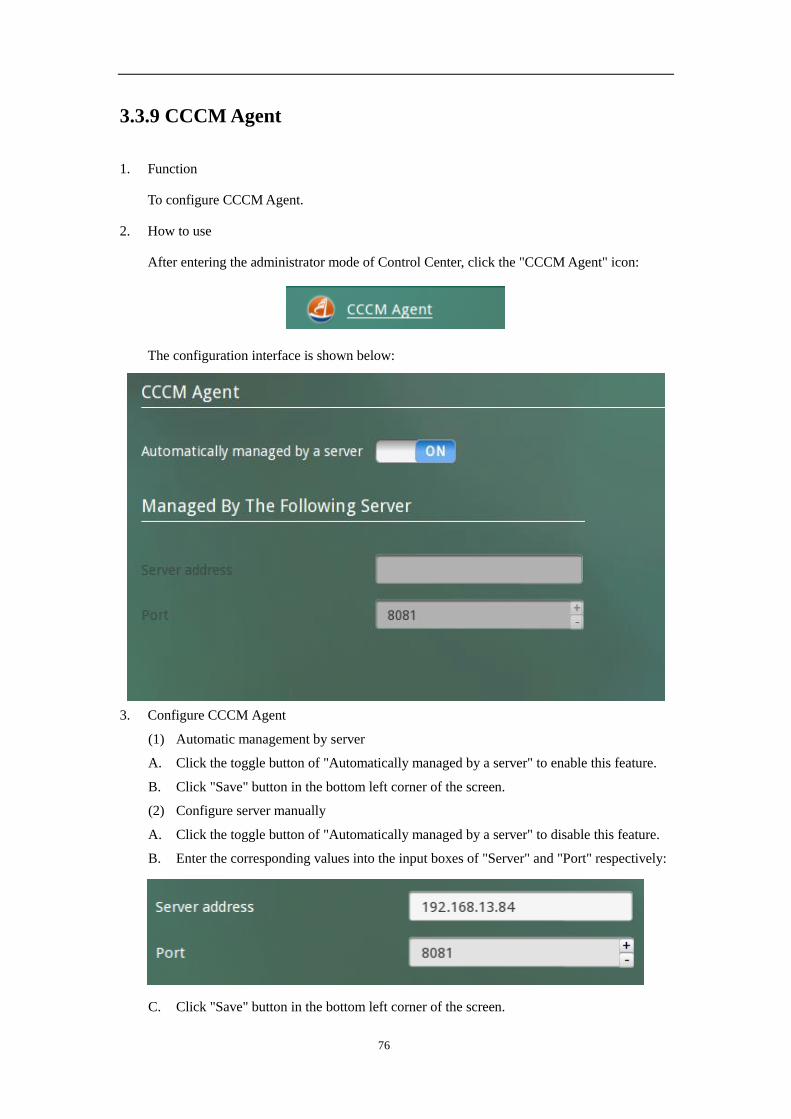
3.3.9 CCCM Agent
1. Function
To configure CCCM Agent.
2. How to use
After entering the administrator mode of Control Center, click the "CCCM Agent" icon:
The configuration interface is shown below:
3. Configure CCCM Agent
(1) Automatic management by server
A. Click the toggle button of "Automatically managed by a server" to enable this feature.
B. Click "Save" button in the bottom left corner of the screen.
(2) Configure server manually
A. Click the toggle button of "Automatically managed by a server" to disable this feature.
B. Enter the corresponding values into the input boxes of "Server" and "Port" respectively:
C. Click "Save" button in the bottom left corner of the screen.
Page 77
77
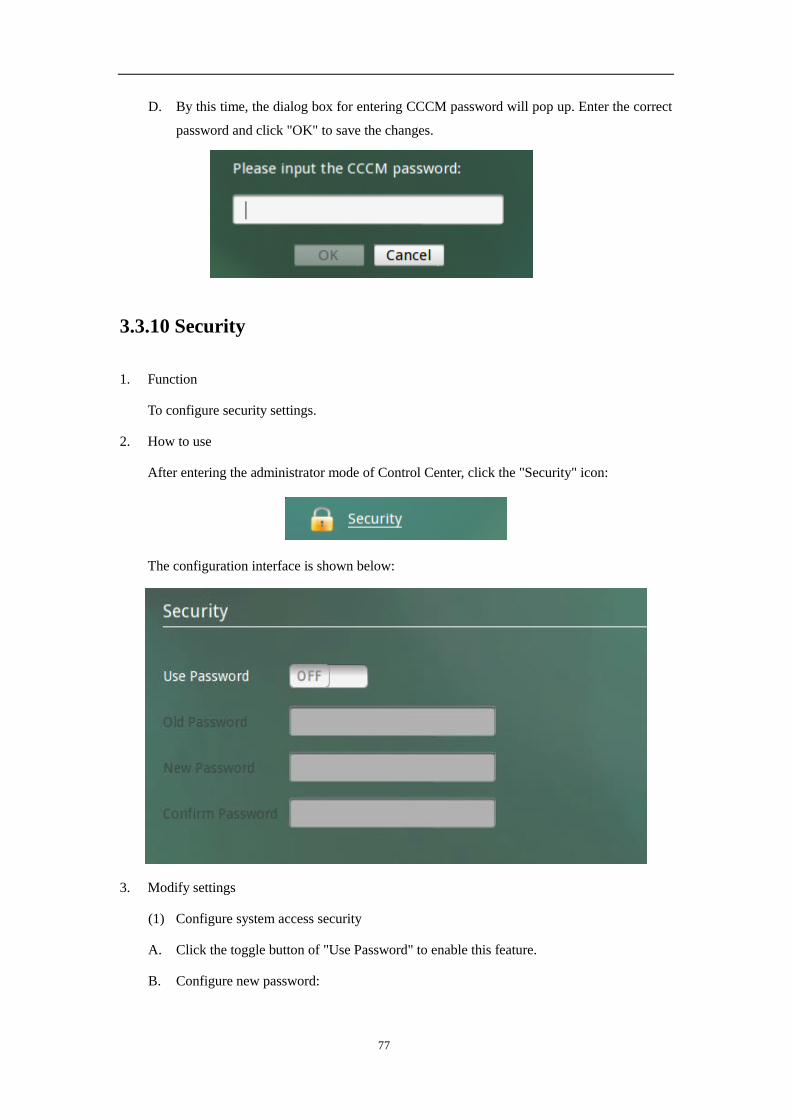
D. By this time, the dialog box for entering CCCM password will pop up. Enter the correct
password and click "OK" to save the changes.
3.3.10 Security
1. Function
To configure security settings.
2. How to use
After entering the administrator mode of Control Center, click the "Security" icon:
The configuration interface is shown below:
3. Modify settings
(1) Configure system access security
A. Click the toggle button of "Use Password" to enable this feature.
B. Configure new password:
Page 78
78
C. Click "Save" button in the bottom left corner of the screen.
D. When you click the "Control Center" icon to enter the Control Center again, you will be
prompted to enter the security password:
(2) Disable system access security setting
A. Click the toggle button of "Use Password" to disable this feature.
B. Enter the password configured previously:
C. Click "Save" button in the bottom left corner of the screen.
D. When you enter the Control Center again, you won't need to enter the password.
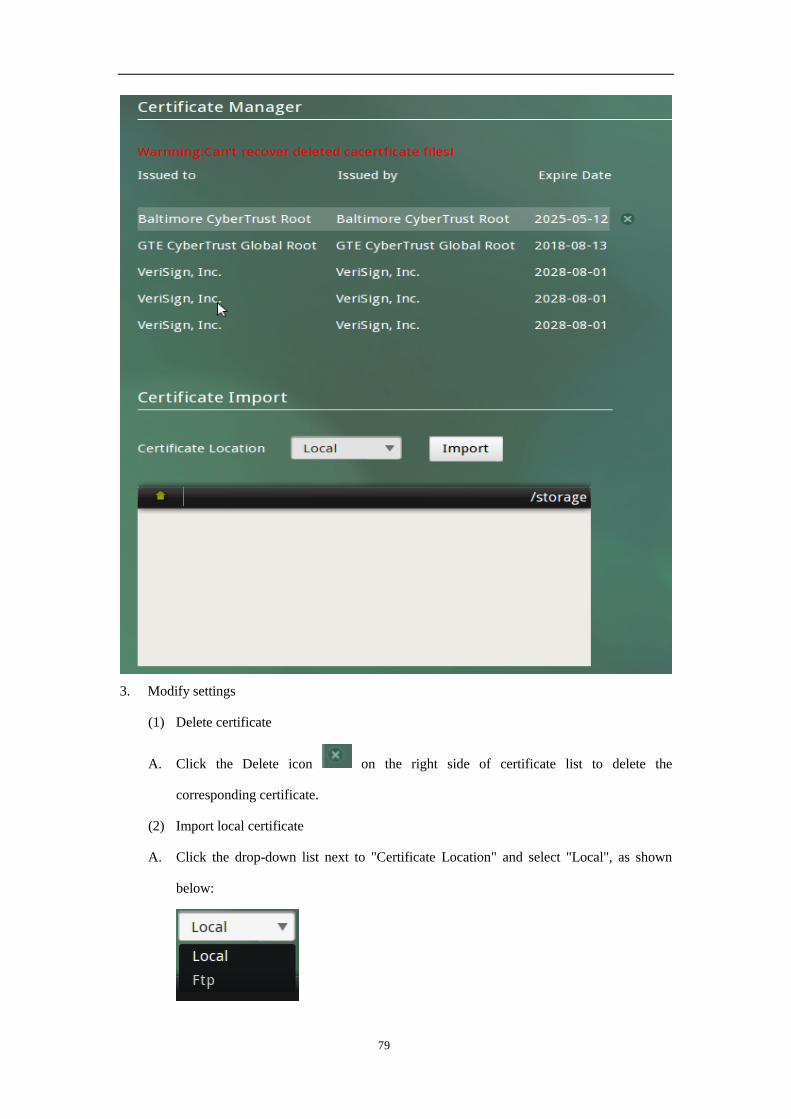
3.3.11 Certificate Manager
1. Function
To configure Certificate Manager.
2. How to use
After entering the administrator mode of Control Center, click the "Certificate Manager"
icon:
The configuration interface is shown below:
Page 79
79
3. Modify settings
(1) Delete certificate
A. Click the Delete icon on the right side of certificate list to delete the
corresponding certificate.
(2) Import local certificate
A. Click the drop-down list next to "Certificate Location" and select "Local", as shown
below:
Page 80
80
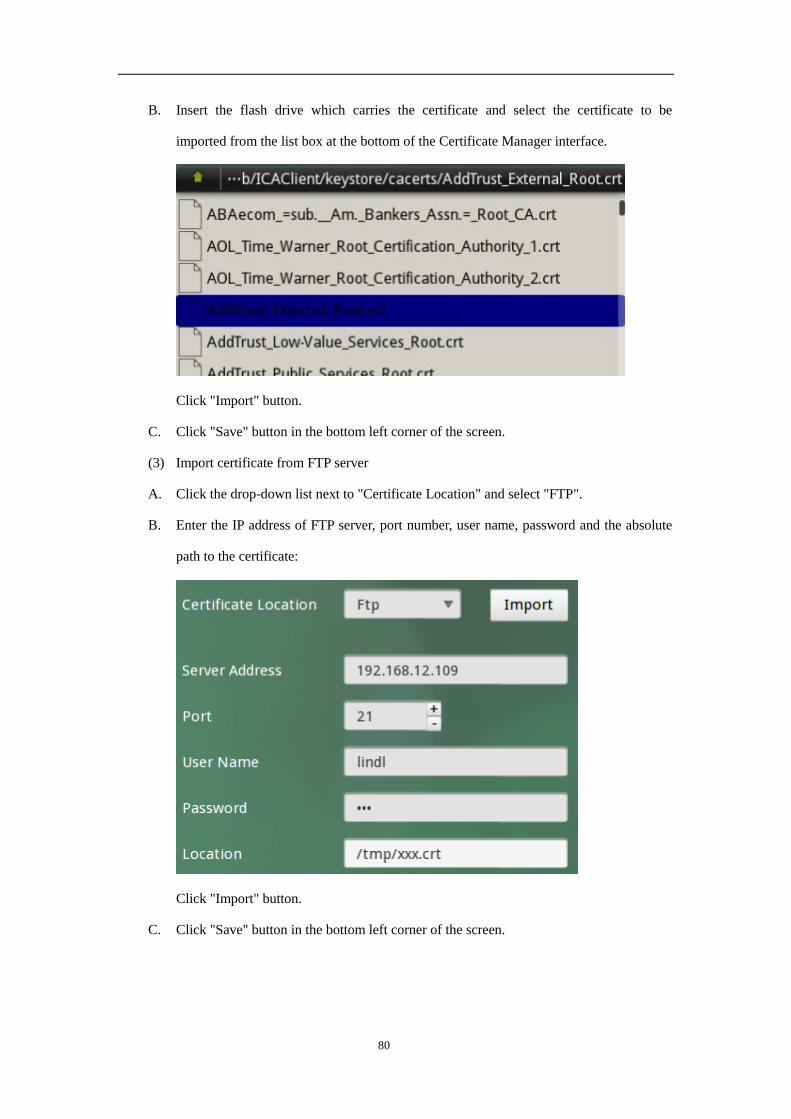
B. Insert the flash drive which carries the certificate and select the certificate to be
imported from the list box at the bottom of the Certificate Manager interface.
Click "Import" button.
C. Click "Save" button in the bottom left corner of the screen.
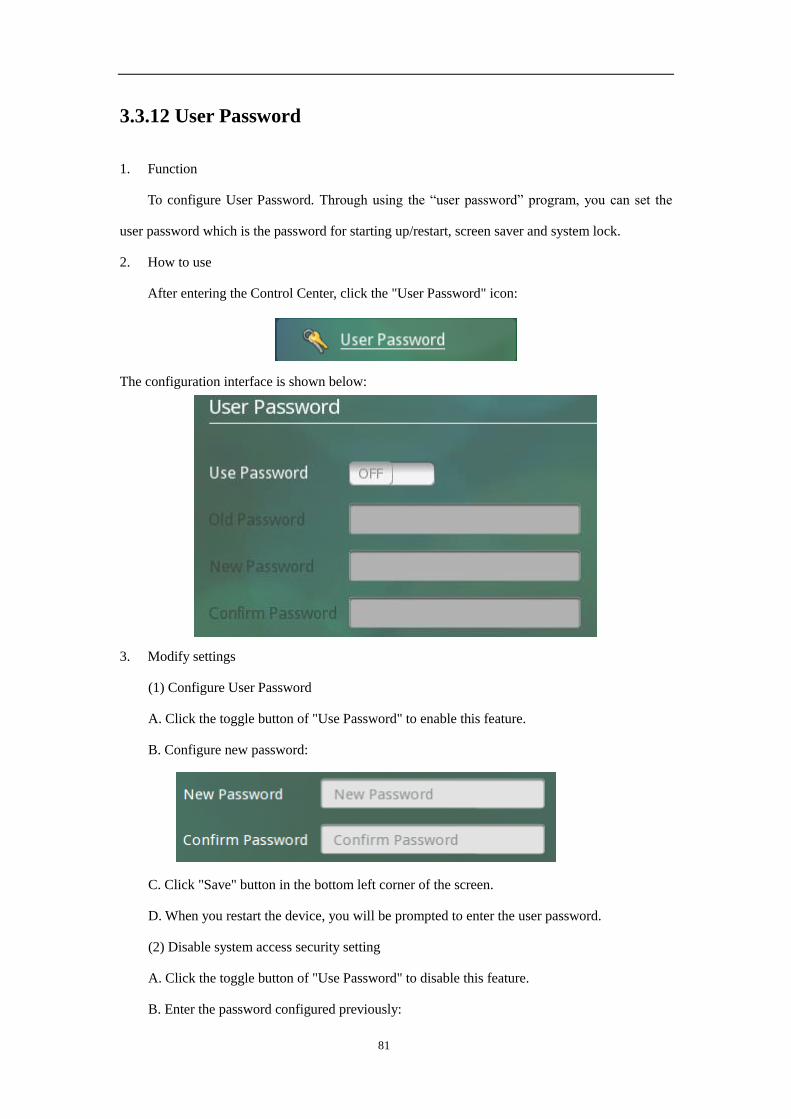
(3) Import certificate from FTP server
A. Click the drop-down list next to "Certificate Location" and select "FTP".
B. Enter the IP address of FTP server, port number, user name, password and the absolute
path to the certificate:
Click "Import" button.
C. Click "Save" button in the bottom left corner of the screen.
Page 81
81
3.3.12 User Password
1. Function
To configure User Password. Through using the “user password” program, you can set the
user password which is the password for starting up/restart, screen saver and system lock.
2. How to use
After entering the Control Center, click the "User Password" icon:
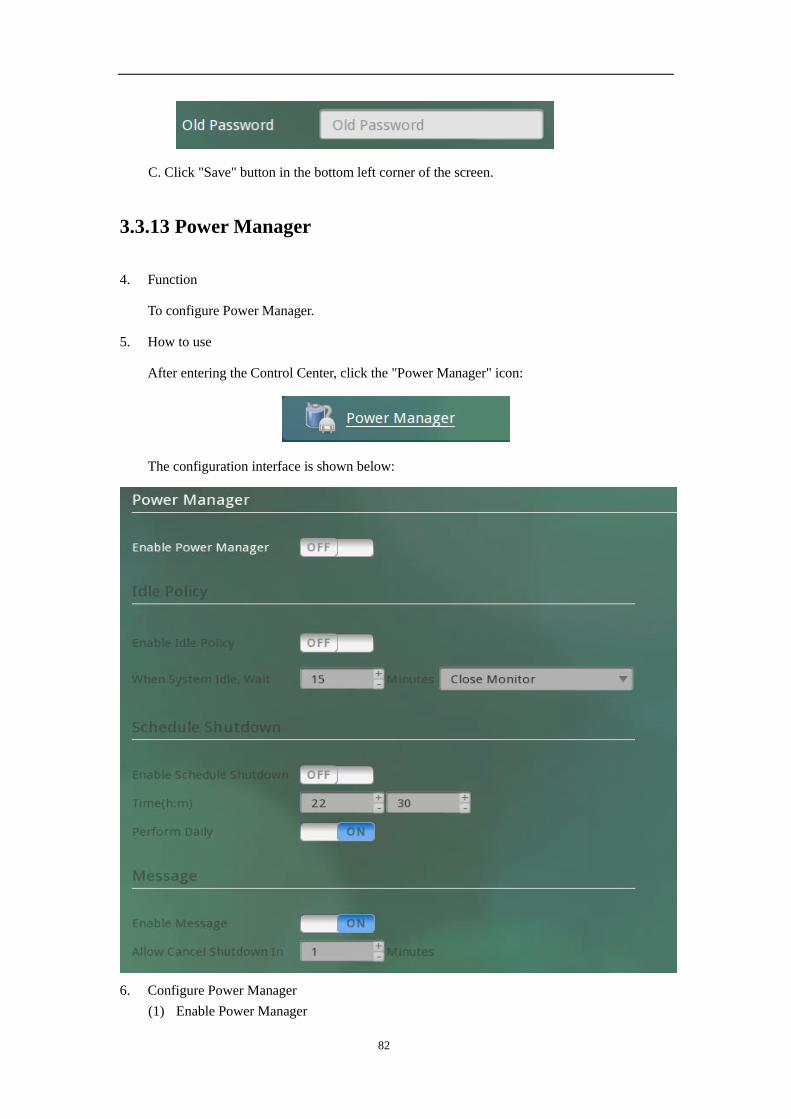
The configuration interface is shown below:
3. Modify settings
(1) Configure User Password
A. Click the toggle button of "Use Password" to enable this feature.
B. Configure new password:
C. Click "Save" button in the bottom left corner of the screen.
D. When you restart the device, you will be prompted to enter the user password.
(2) Disable system access security setting
A. Click the toggle button of "Use Password" to disable this feature.
B. Enter the password configured previously:
Page 82
82
C. Click "Save" button in the bottom left corner of the screen.
3.3.13 Power Manager
4. Function
To configure Power Manager.
5. How to use
After entering the Control Center, click the "Power Manager" icon:
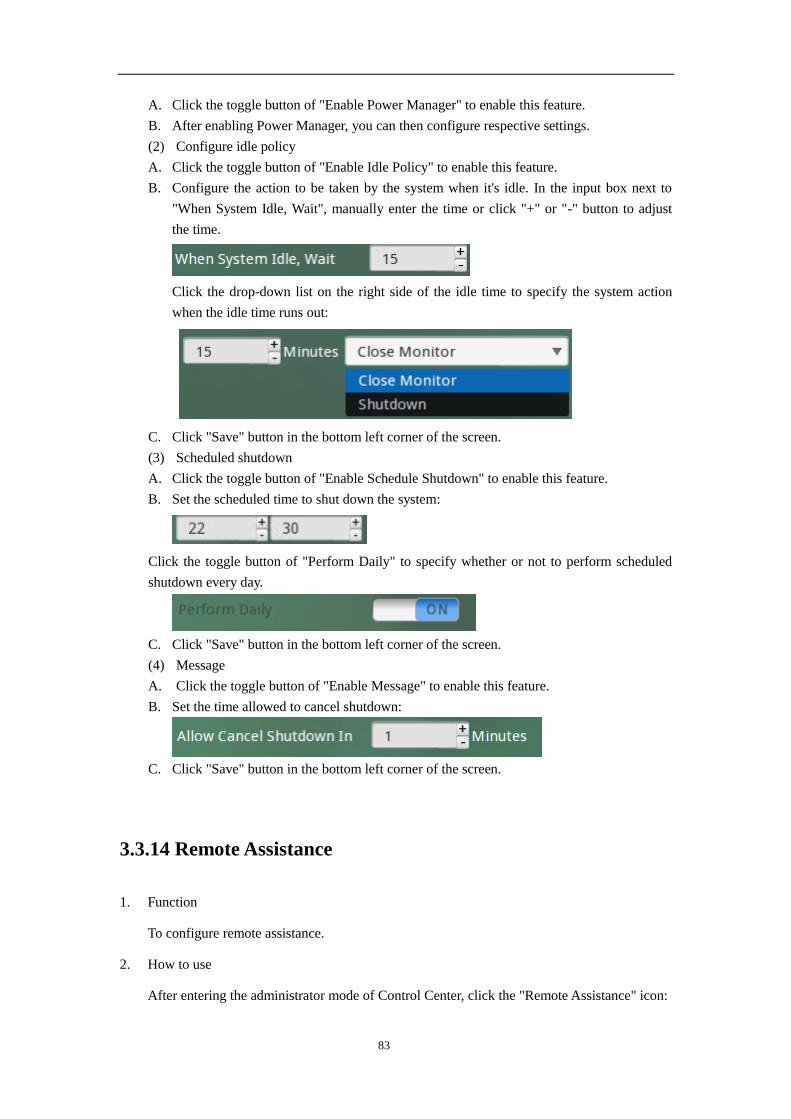
The configuration interface is shown below:
6. Configure Power Manager
(1) Enable Power Manager
Page 83
83
A. Click the toggle button of "Enable Power Manager" to enable this feature.
B. After enabling Power Manager, you can then configure respective settings.
(2) Configure idle policy
A. Click the toggle button of "Enable Idle Policy" to enable this feature.
B. Configure the action to be taken by the system when it's idle. In the input box next to
"When System Idle, Wait", manually enter the time or click "+" or "-" button to adjust
the time.
Click the drop-down list on the right side of the idle time to specify the system action
when the idle time runs out:
C. Click "Save" button in the bottom left corner of the screen.
(3) Scheduled shutdown
A. Click the toggle button of "Enable Schedule Shutdown" to enable this feature.
B. Set the scheduled time to shut down the system:
Click the toggle button of "Perform Daily" to specify whether or not to perform scheduled
shutdown every day.
C. Click "Save" button in the bottom left corner of the screen.
(4) Message
A. Click the toggle button of "Enable Message" to enable this feature.
B. Set the time allowed to cancel shutdown:
C. Click "Save" button in the bottom left corner of the screen.
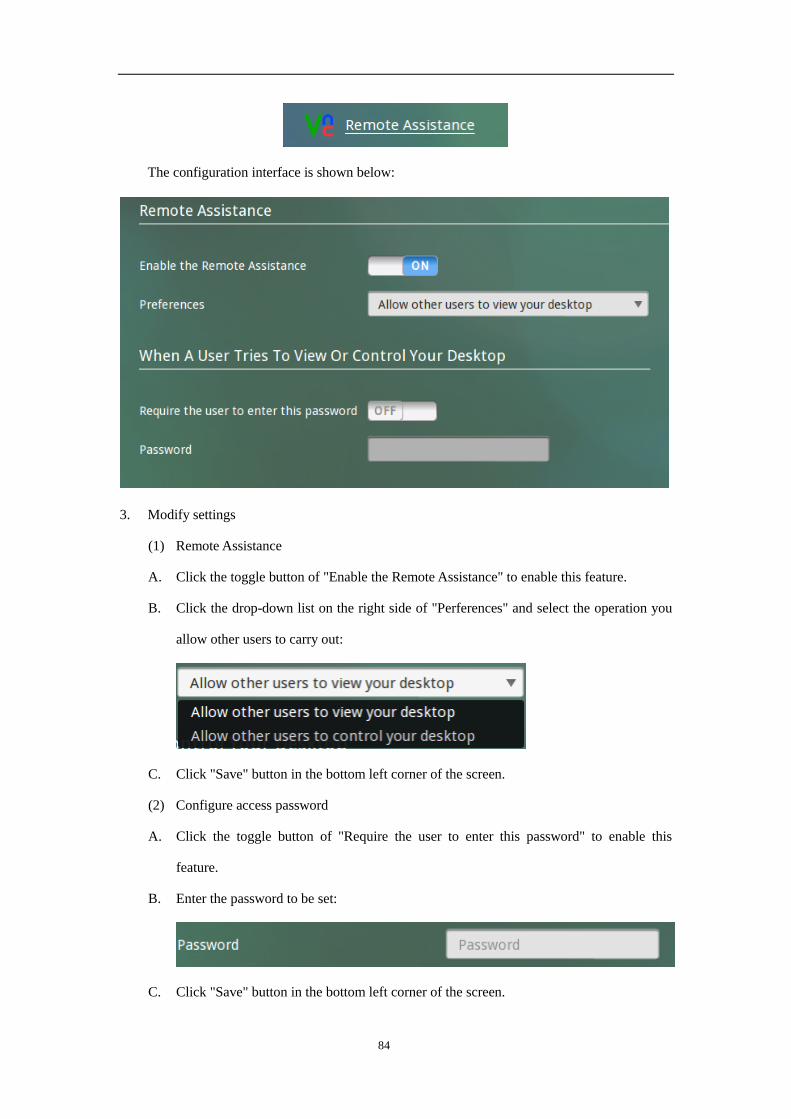
3.3.14 Remote Assistance
1. Function
To configure remote assistance.
2. How to use
After entering the administrator mode of Control Center, click the "Remote Assistance" icon:
Page 84
84
The configuration interface is shown below:
3. Modify settings
(1) Remote Assistance
A. Click the toggle button of "Enable the Remote Assistance" to enable this feature.
B. Click the drop-down list on the right side of "Perferences" and select the operation you
allow other users to carry out:
C. Click "Save" button in the bottom left corner of the screen.
(2) Configure access password
A. Click the toggle button of "Require the user to enter this password" to enable this
feature.
B. Enter the password to be set:
C. Click "Save" button in the bottom left corner of the screen.
Page 85
85
D. In such a case, other users need to enter the preset password in order to access the local
computer.
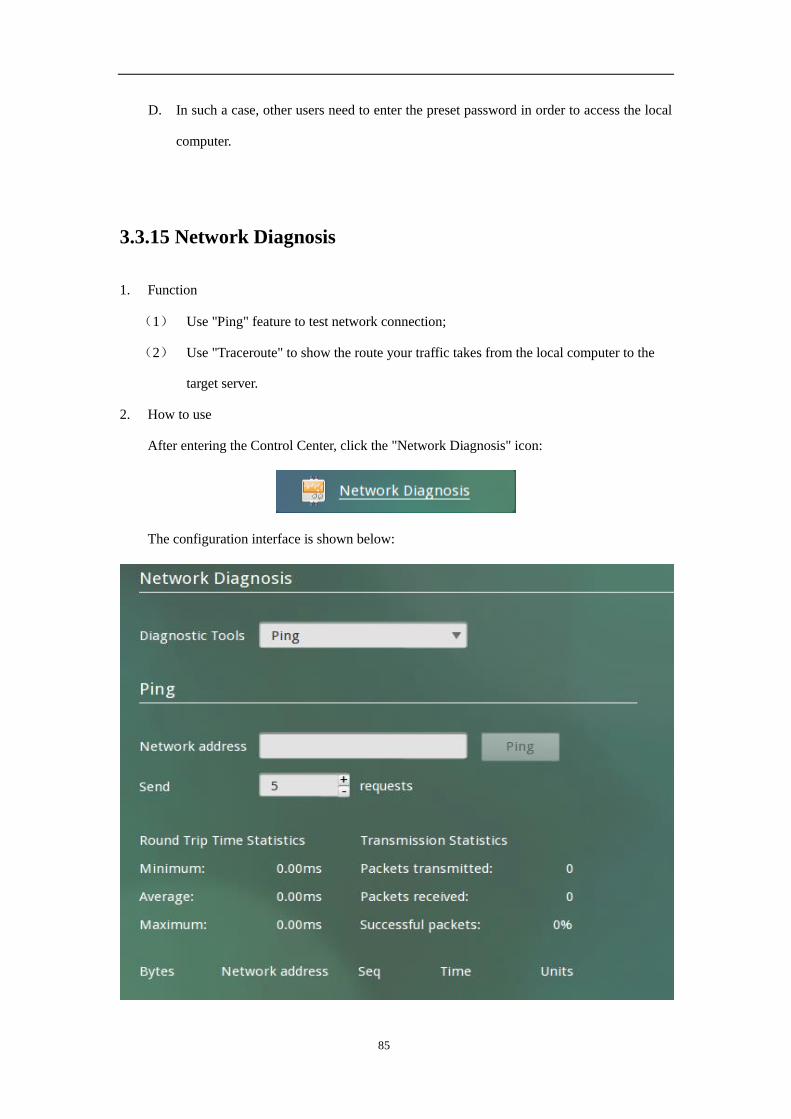
3.3.15 Network Diagnosis
1. Function
(1) Use "Ping" feature to test network connection;
(2) Use "Traceroute" to show the route your traffic takes from the local computer to the
target server.
2. How to use
After entering the Control Center, click the "Network Diagnosis" icon:
The configuration interface is shown below:
Page 86
86
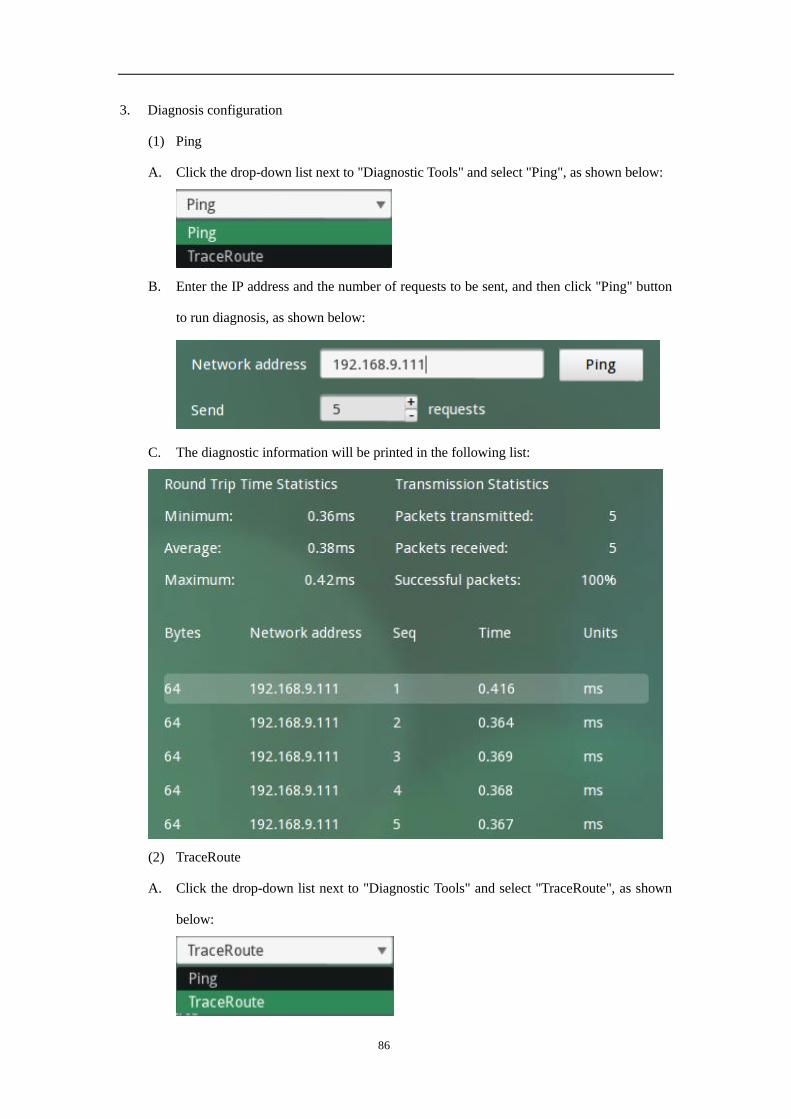
3. Diagnosis configuration
(1) Ping
A. Click the drop-down list next to "Diagnostic Tools" and select "Ping", as shown below:
B. Enter the IP address and the number of requests to be sent, and then click "Ping" button
to run diagnosis, as shown below:
C. The diagnostic information will be printed in the following list:
(2) TraceRoute
A. Click the drop-down list next to "Diagnostic Tools" and select "TraceRoute", as shown
below:
Page 87
87
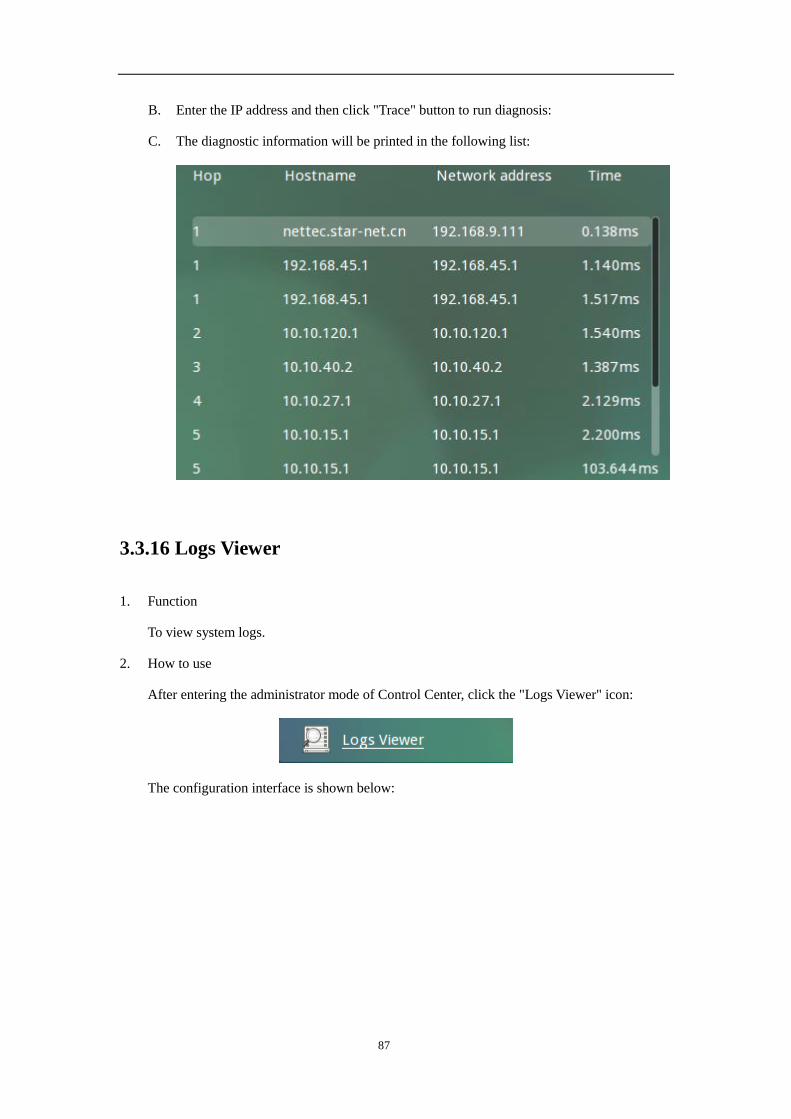
B. Enter the IP address and then click "Trace" button to run diagnosis:
C. The diagnostic information will be printed in the following list:
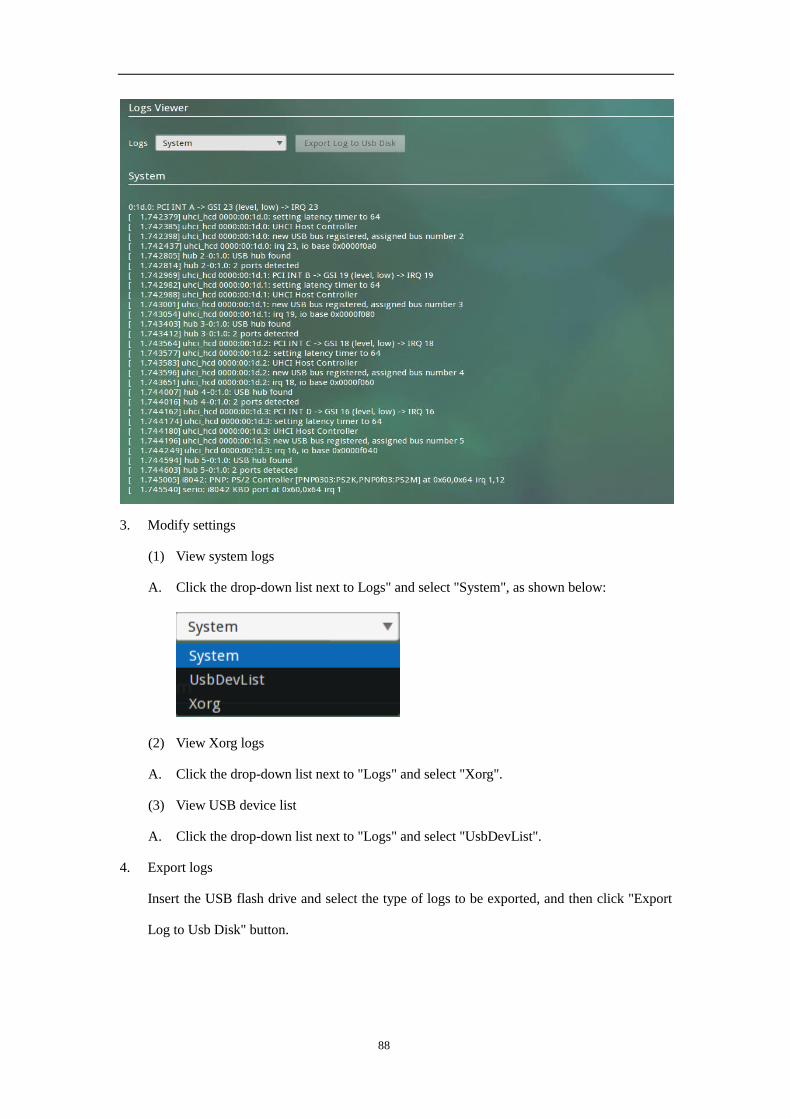
3.3.16 Logs Viewer
1. Function
To view system logs.
2. How to use
After entering the administrator mode of Control Center, click the "Logs Viewer" icon:
The configuration interface is shown below:
Page 88
88
3. Modify settings
(1) View system logs
A. Click the drop-down list next to Logs" and select "System", as shown below:
(2) View Xorg logs
A. Click the drop-down list next to "Logs" and select "Xorg".
(3) View USB device list
A. Click the drop-down list next to "Logs" and select "UsbDevList".
4. Export logs
Insert the USB flash drive and select the type of logs to be exported, and then click "Export
Log to Usb Disk" button.
Page 89
89
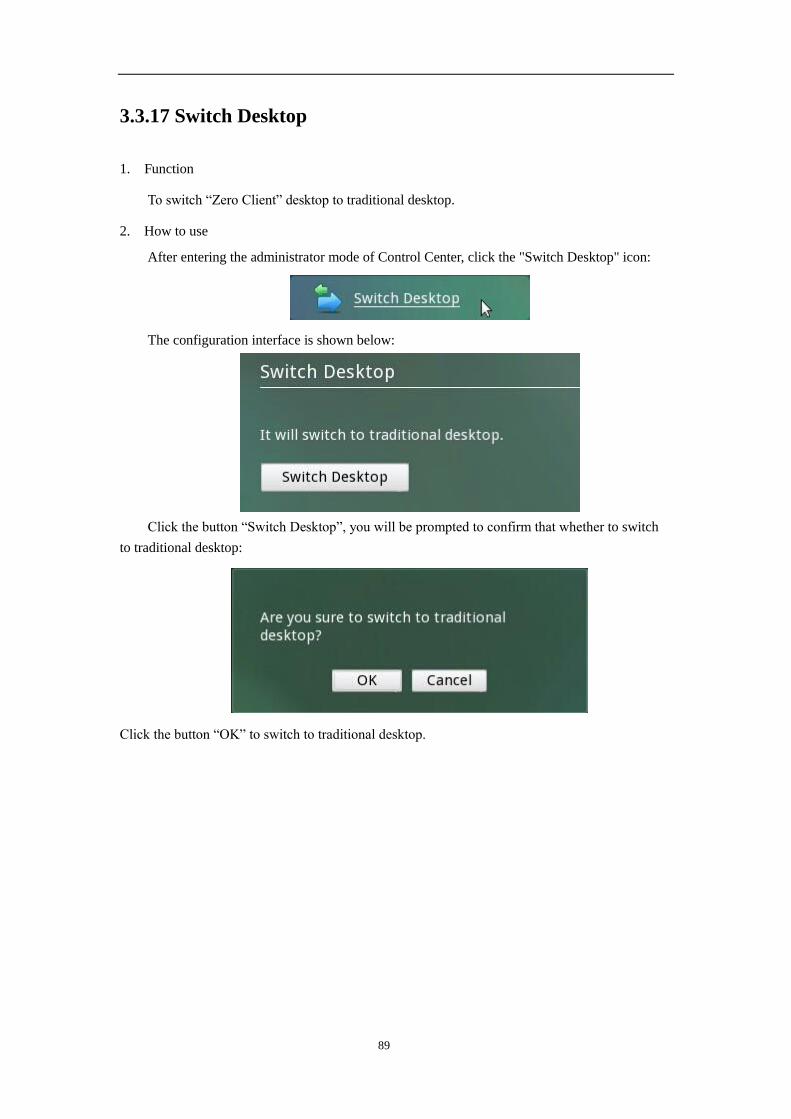
3.3.17 Switch Desktop
1. Function
To switch “Zero Client” desktop to traditional desktop.
2. How to use
After entering the administrator mode of Control Center, click the "Switch Desktop" icon:
The configuration interface is shown below:
Click the button “Switch Desktop”, you will be prompted to confirm that whether to switch
to traditional desktop:
Click the button “OK” to switch to traditional desktop.
Page 90
90
4. Instruction of System Hotkeys
The system provides hotkeys for some applications and functions.
Hotkey Function
Ctrl+Alt+S Restore the default configuration of the display parameters
Ctrl+Alt+Del Lock the screen
Ctrl+Tab (or Alt+Tab) Switch the windows on the desktop
Ctrl+Alt+C Call out the control center
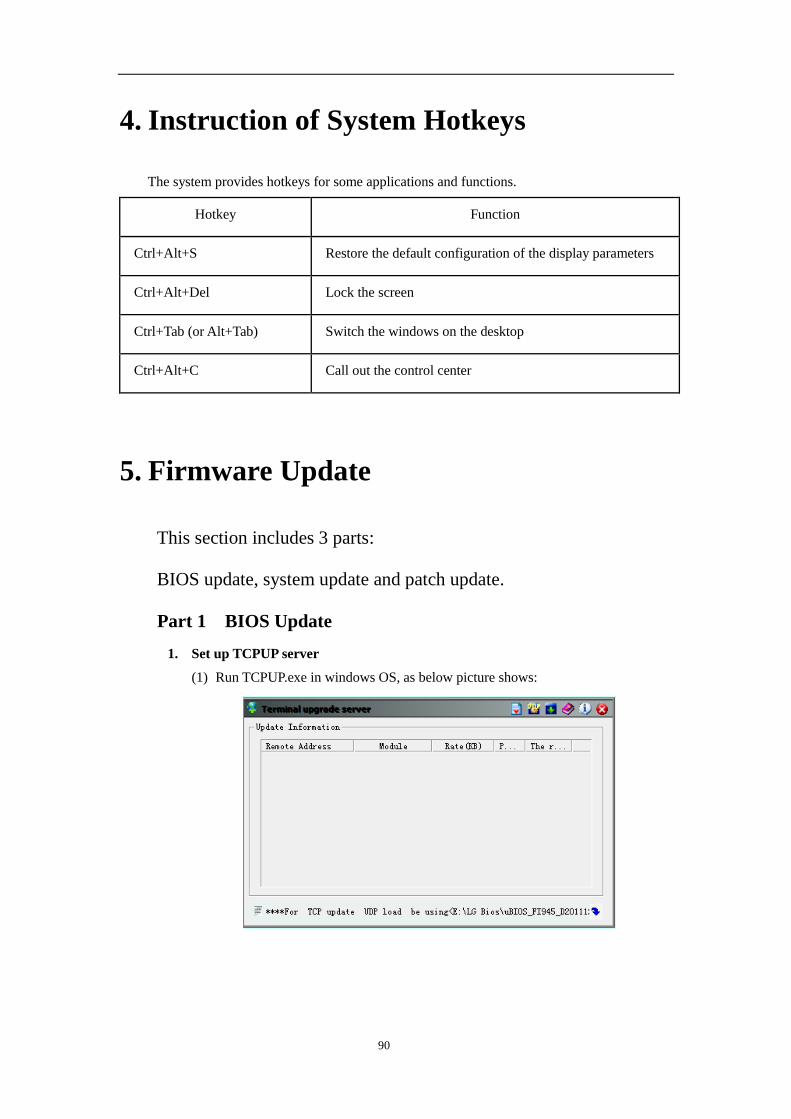
5. Firmware Update
This section includes 3 parts:
BIOS update, system update and patch update.
Part 1 BIOS Update
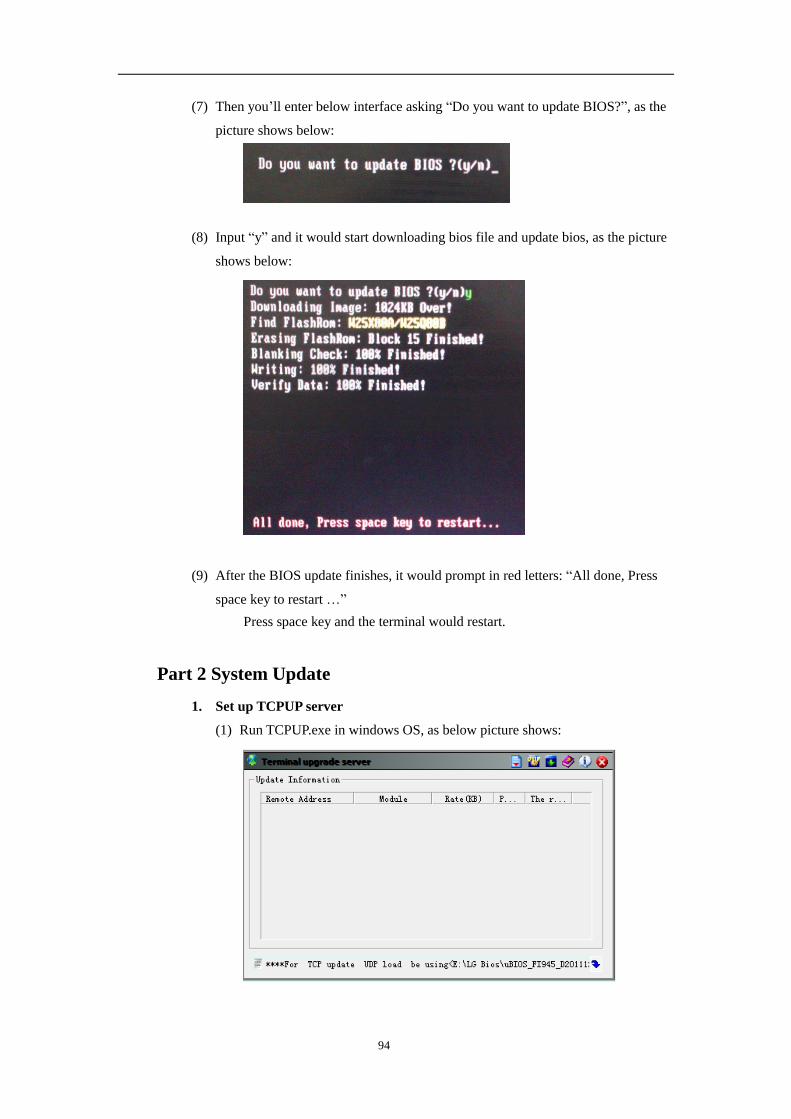
1. Set up TCPUP server
(1) Run TCPUP.exe in windows OS, as below picture shows:
Page 91
91
(2) Click the button on the top right and you will enter the file selecting
interface, as the picture shows below:
(Note: it allows only one kind of update file to be selected here at the
same time, you can only select the “System File”, or only select the “BIOS File”,
or only select the “Patch File”.)
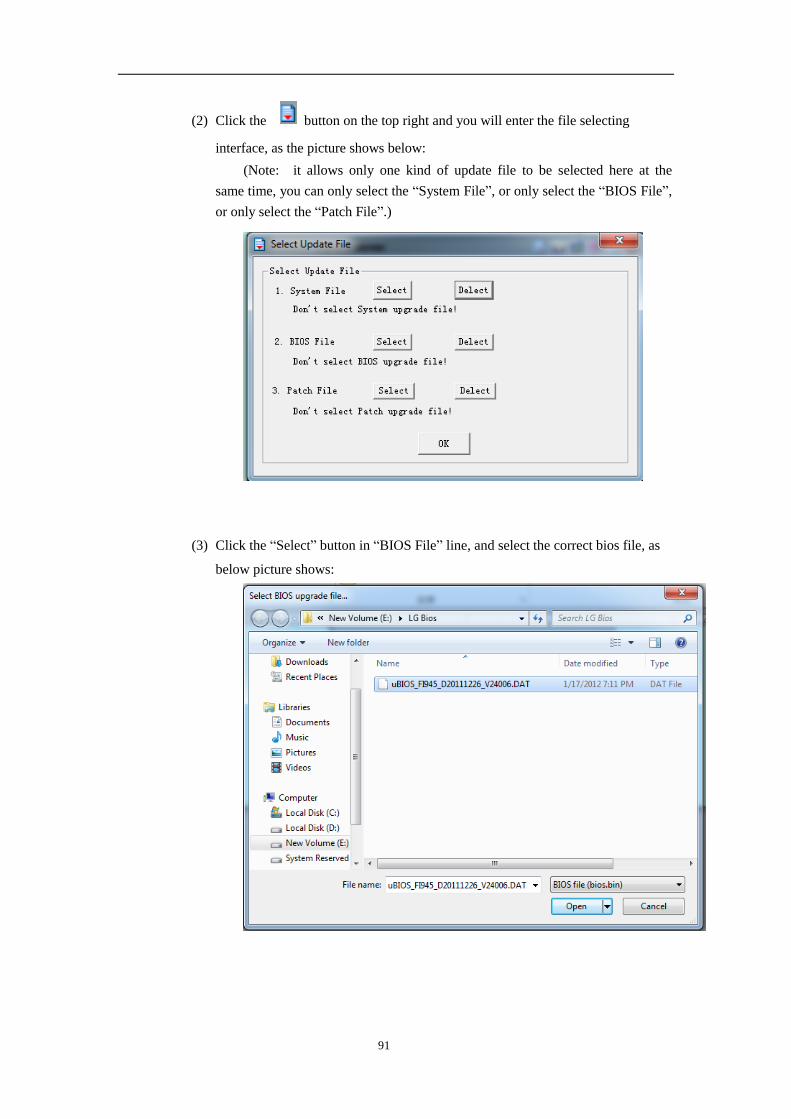
(3) Click the “Select” button in “BIOS File” line, and select the correct bios file, as
below picture shows:
Page 92
92
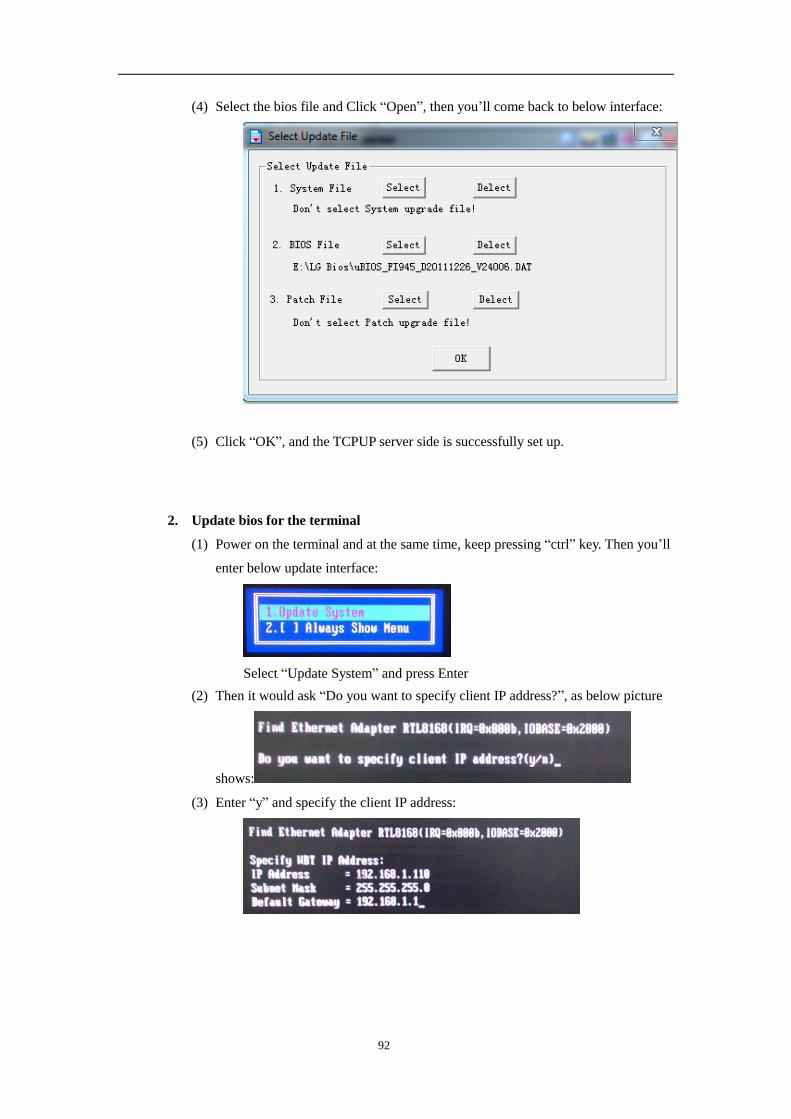
(4) Select the bios file and Click “Open”, then you’ll come back to below interface:
(5) Click “OK”, and the TCPUP server side is successfully set up.
2. Update bios for the terminal
(1) Power on the terminal and at the same time, keep pressing “ctrl” key. Then you’ll
enter below update interface:
Select “Update System” and press Enter
(2) Then it would ask “Do you want to specify client IP address?”, as below picture
shows:
(3) Enter “y” and specify the client IP address:
Page 93
93
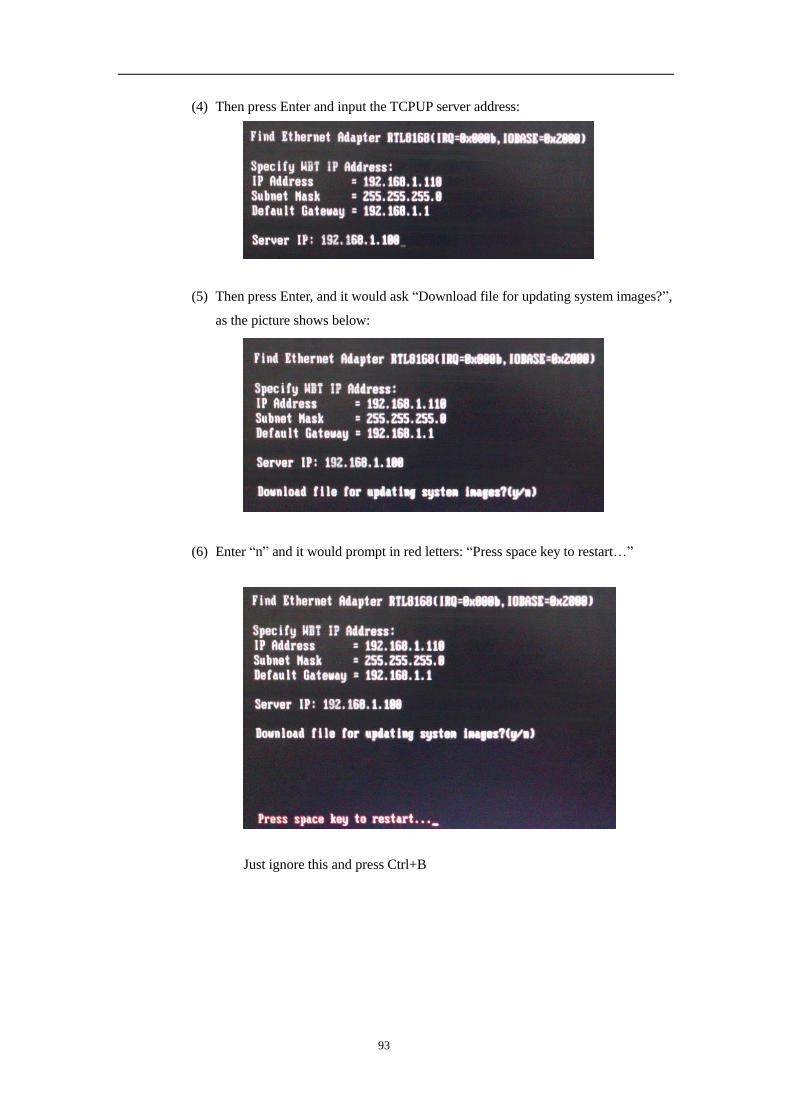
(4) Then press Enter and input the TCPUP server address:
(5) Then press Enter, and it would ask “Download file for updating system images?”,
as the picture shows below:
(6) Enter “n” and it would prompt in red letters: “Press space key to restart…”
Just ignore this and press Ctrl+B
Page 94
94
(7) Then you’ll enter below interface asking “Do you want to update BIOS?”, as the
picture shows below:
(8) Input “y” and it would start downloading bios file and update bios, as the picture
shows below:
(9) After the BIOS update finishes, it would prompt in red letters: “All done, Press
space key to restart …”
Press space key and the terminal would restart.
Part 2 System Update
1. Set up TCPUP server
(1) Run TCPUP.exe in windows OS, as below picture shows:
Page 95
95
(2) Click the button on the top right and you will enter the file selecting
interface, as the picture shows below:
(3) Click the “Delete” button in “Bios File” line to delete the selected BIOS
file :
Page 96
96
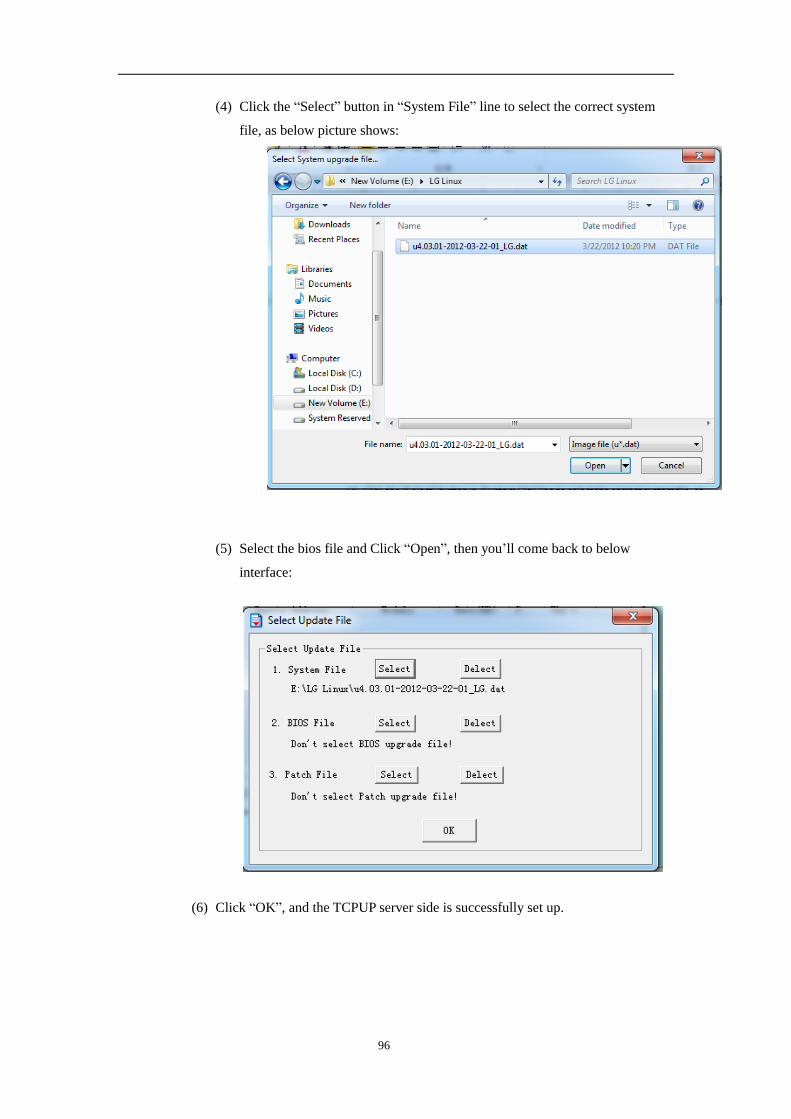
(4) Click the “Select” button in “System File” line to select the correct system
file, as below picture shows:
(5) Select the bios file and Click “Open”, then you’ll come back to below
interface:
(6) Click “OK”, and the TCPUP server side is successfully set up.
Page 97
97
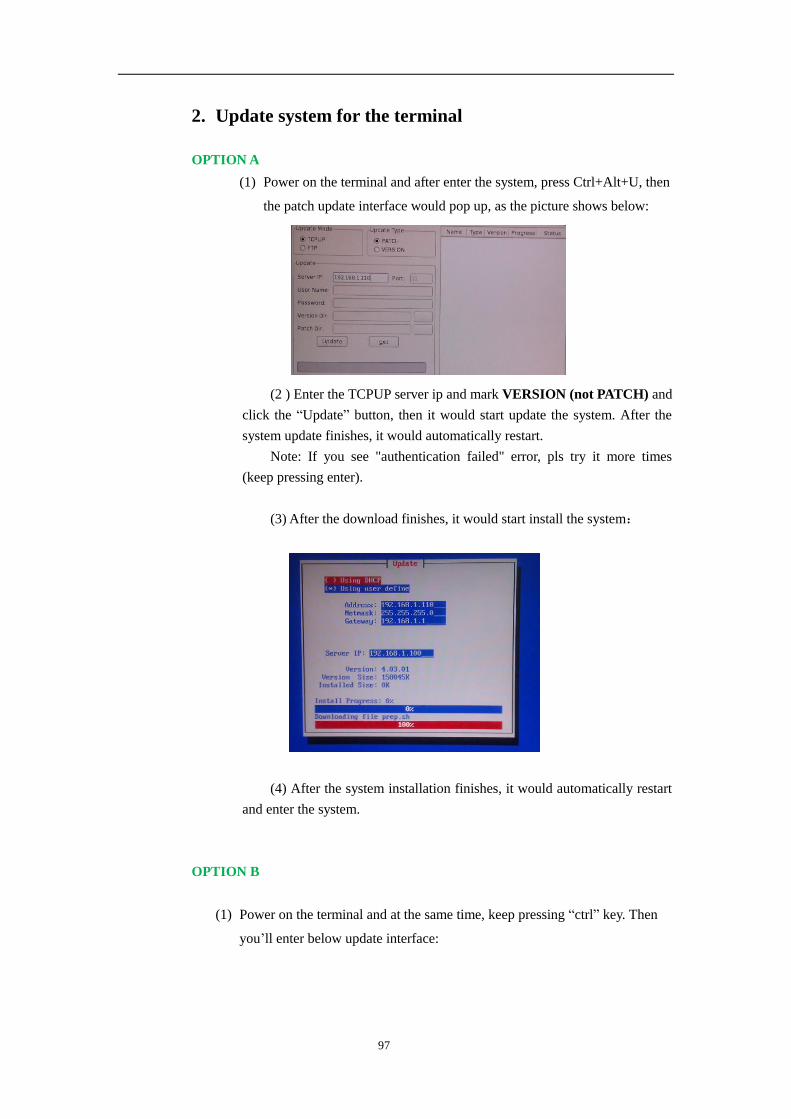
2. Update system for the terminal
OPTION A
(1) Power on the terminal and after enter the system, press Ctrl+Alt+U, then
the patch update interface would pop up, as the picture shows below:
(2 ) Enter the TCPUP server ip and mark VERSION (not PATCH) and
click the “Update” button, then it would start update the system. After the
system update finishes, it would automatically restart.
Note: If you see "authentication failed" error, pls try it more times
(keep pressing enter).
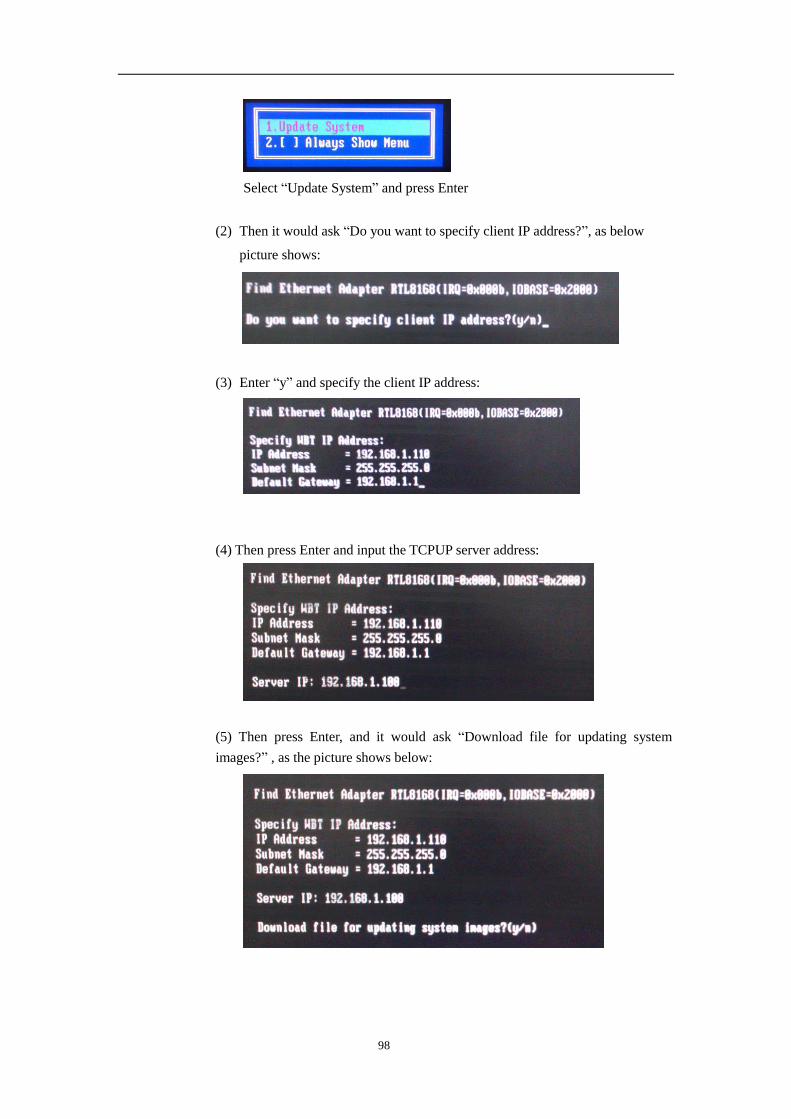
(3) After the download finishes, it would start install the system:
(4) After the system installation finishes, it would automatically restart
and enter the system.
OPTION B
(1) Power on the terminal and at the same time, keep pressing “ctrl” key. Then
you’ll enter below update interface:
Page 98
98
Select “Update System” and press Enter
(2) Then it would ask “Do you want to specify client IP address?”, as below
picture shows:
(3) Enter “y” and specify the client IP address:
(4) Then press Enter and input the TCPUP server address:
(5) Then press Enter, and it would ask “Download file for updating system
images?” , as the picture shows below:
Page 99
99
(7) Input “y” and it would start downloading the system:
(8) After the download finishes, it would start install the system:
(9) After the system installation finishes, it would automatically restart and enter the
system.
Part 3 Patch Update
3 Set up TCPUP server
(1) Run TCPUP.exe in windows OS, as below picture shows:
Page 100
100
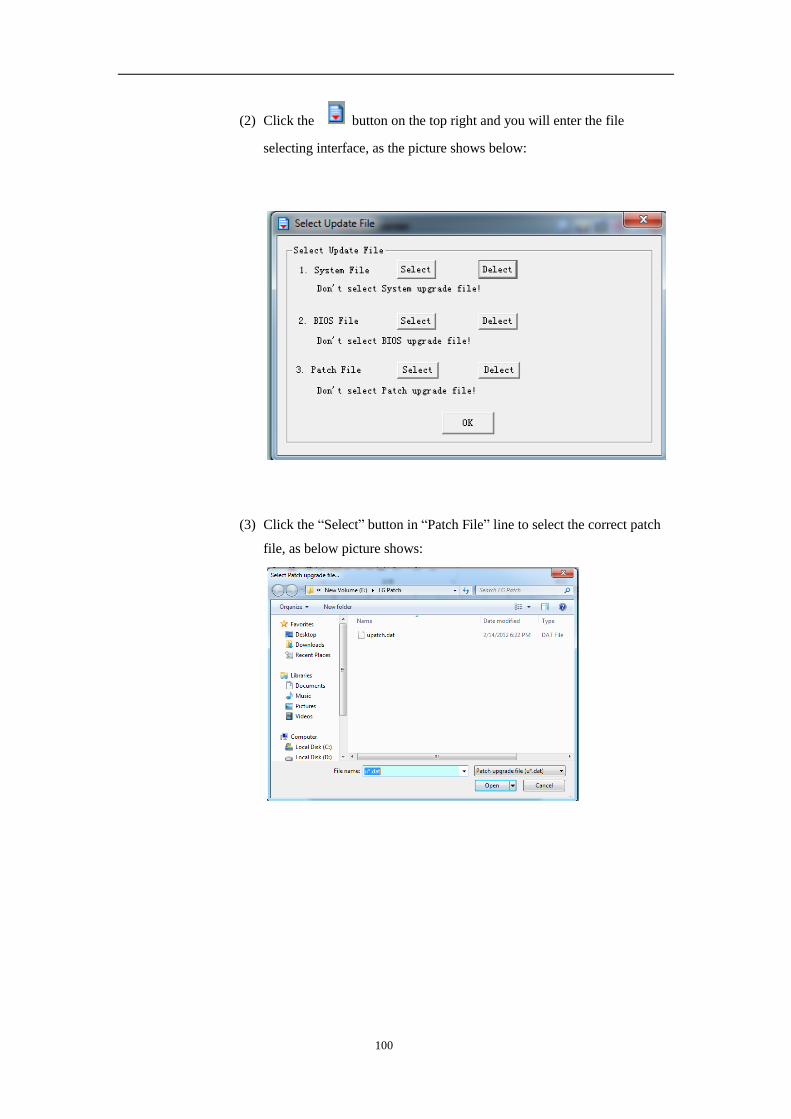
(2) Click the button on the top right and you will enter the file
selecting interface, as the picture shows below:
(3) Click the “Select” button in “Patch File” line to select the correct patch
file, as below picture shows:
Page 101
101
(4) Select the patch file and Click “Open”, then you’ll come back to below
interface:
(5) Click “OK”, and the TCPUP server side is successfully set up.
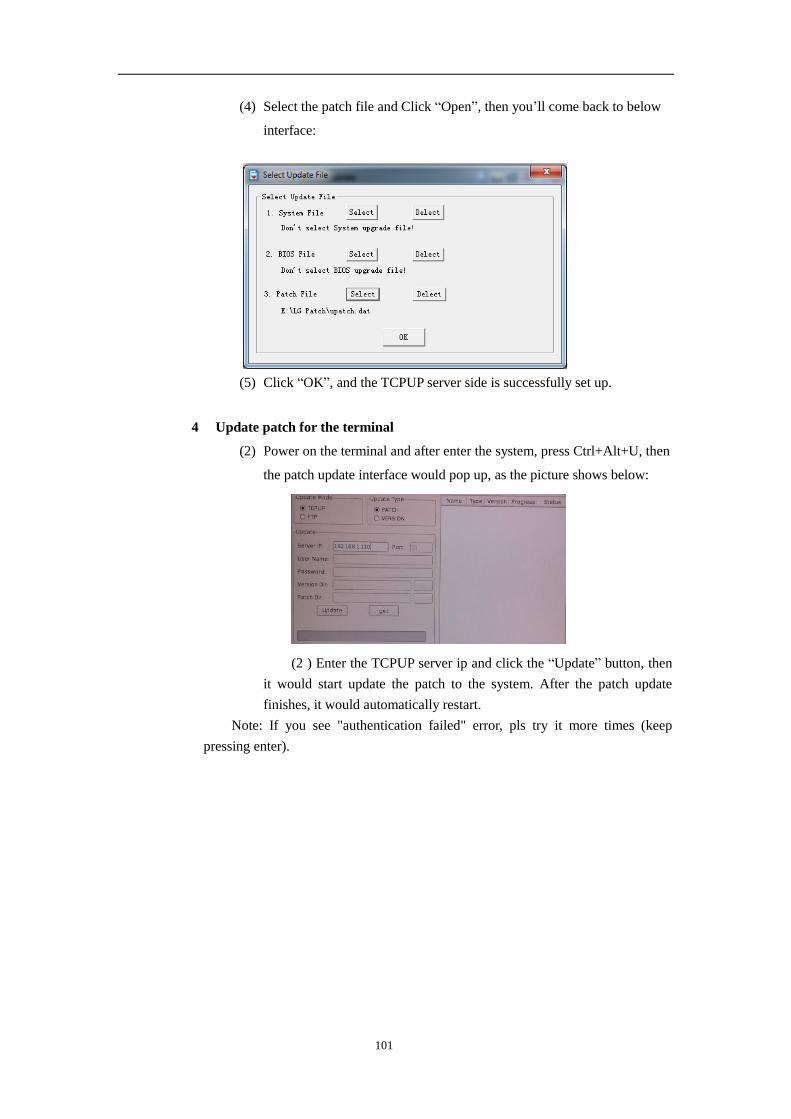
4 Update patch for the terminal
(2) Power on the terminal and after enter the system, press Ctrl+Alt+U, then
the patch update interface would pop up, as the picture shows below:
(2 ) Enter the TCPUP server ip and click the “Update” button, then
it would start update the patch to the system. After the patch update
finishes, it would automatically restart.
Note: If you see "authentication failed" error, pls try it more times (keep
pressing enter).