18
Teacher/Mentor Institute Hands-On Session: Building a Robot Carolyn Bauer July 30-31, 2015
| Date post: | 31-Dec-2015 |
| Category: |
Documents |
| Upload: | abel-wiggins |
| View: | 215 times |
| Download: | 0 times |
Teacher/Mentor Institute
Hands-On Session:Building a Robot
Carolyn Bauer
July 30-31, 2015

Overview
Quick and simplified exposure to what your student team will experience Engineering Design choices Building decisions Limited schedule & materials
We hope that this will make you a better coach and mentor!
Page 2
Multiple 3 Minute Matches
Frustrations Working as a team

Caveats
This guide has a suggested procedure for building your robot. You may vary from this procedure so long as you: Do not endanger yourself or anyone else Do not permanently attach anything to the
Returnable Kit parts Do not attach any duct or electrical tape to the
Returnable Kit parts Do not damage the room or furniture in any way Clean up after yourself
Page 3

Be courteous to our hosts!
Please DO NOT scratch the tables, other furniture or floors, or snag any carpet or furniture fabric
Please use the Drill Block when drilling
Keep a ceiling tile protector between your work and the furniture or floor
Page 4

Platform (1)
Construct/Attach: Plywood base Motors Skid
Make sure the platform is stable and can roll in various directions. Page 5

Platform (2)
Attach Cortex
Page 6

Wheels
Attach hubs to wheels
Attach hubs to motor shafts
Attach motor to platform with pipe strap – on ends of motors
Page 7

Connect Motors to Cortex (1)
BEST requires the use of motor ports 2-9 Motor Ports 1 & 10 – Built-in motor controller.
Not allowed by BEST. Motor Ports 2-9 – Require external Motor
Controller. Balance motors between ports 1-5 and 6-10
Motor Ports 1-5 share same overload circuit protection
Motor Ports 6-10 share same overload circuit protection.
Use Screw Terminal Motor Interface cablesPage 8

Connect Motors to Cortex (2)
Cortex Motor Port Motor Controller Screw Terminal
Block Motor wires with
Quick Connects Motor Tabs
Page 9

Create Program, While Loop, and Arcade Function
easyC: File … New Competition Project
Use Field Control Competition Project
Operator Control tab Joystick … Arcade- 2 motor
into while loop Forward/Reverse Channel: 2 Rotate Channel: 1 Left Motor, Right Motor:
(look where you plugged these in to the Cortex.)
Page 10
JoystickAnalogDeadband => before Arcade instruction Add Deadband for both Channel 1 and Channel 2 to make wheels
easier to control with Joystick

Test Drive
1. Go to Build and Download menu. Compile your program. Fix any errors.
2. Connect USB cable between laptop and Cortex. Download your program to Cortex.
3. Tether joystick and Cortex – Connect them with USB cable.4. Turn on Cortex first, then joystick. Wait for ROBOT and
JOYSTICK lights to turn green.5. Test each wheel motor forward and backward. If either wheel
moves in the wrong direction, go back into the program, check or uncheck the box to reverse direction, and try again.
6. Untether the Joystick and Cortex. Turn them off. Insert the 2 VEXNet keys and turn them back on.
7. Drive the platform without the tether.
Page 11

Arm
Build and attach A-frame to hold arm
Make and attach an arm that is the right size to: Reach to the ground Be pulled down by
the winch
Page 12

Winch and Motor
Build and attach winch Mount and attach winch motor Wire winch motor to Cortex Edit your program to include winch motor Test Add spool and string to winch and test
again
Page 13

Claw and Servo
Disconnect the servo from Cortex.
Design and assemble claw, including servo. Make sure it can move properly.
Remember to assemble it so that its starting position coincides with the servo’s “zero” position.
Reconnect the servo to the Cortex. Turn Cortex on and test claw.
Page 14
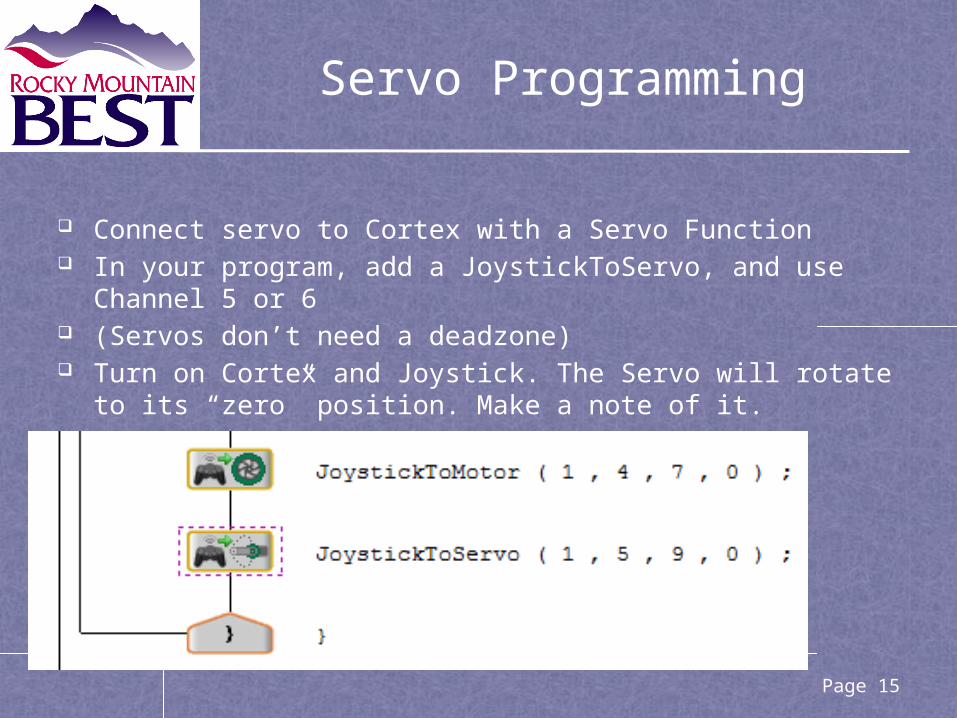
Servo Programming
Connect servo to Cortex with a Servo Function In your program, add a JoystickToServo, and use Channel 5 or
6 (Servos don’t need a deadzone) Turn on Cortex and Joystick. The Servo will rotate to its “zero”
position. Make a note of it.
Page 15

Mount the Claw
Attach the claw to the end of the arm.
Make sure it reaches to the ground and can open and close.
You may need to add a servo extension between the servo controller and the servo.
Page 16

The Competition
Two robot teams per 3 minute match - multiple matches.
Game Field: Bounded by PVC Small & big balls Two buckets (one per
team) Score by placing balls in
your bucket. Small balls = 1 point each Big balls = 2 points each
Page 17
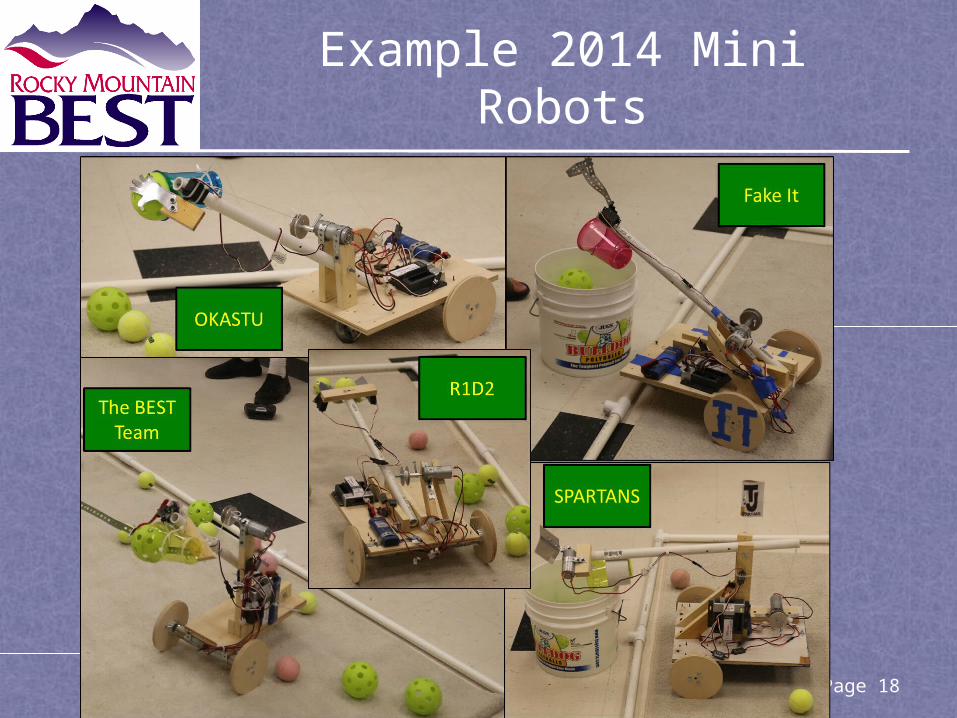
Example 2014 Mini Robots
Page 18


