5/11/2016 1 Teaching Percussion from the Podium In a sentence or less! How to Teach from the Podium The first time you address a new topic it will take a few minutes, which is the same for any instrument. Alternate methods are possible for introducing new content prior to getting on the podium which minimize wasted time: Lessons, worksheets, youtube links, peer teaching, etc. Learning the content isn’t hard, finding ways to use it is. The challenge isn’t in teaching it from the podium but rather reinforcing it through scenarios that are presented in band literature. Here’s a couple strategies for accomplishing this in a sentence or less: 1) “Buzz words” and “Buzz Phrases.” 2) Environmental print big enough to read from the podium.
Transcript
5/11/2016
1
Teaching Percussion from the PodiumIn a sentence or less!
How to Teach from the Podium The first time you address a new topic it will take a few minutes, which is the same for any instrument. Alternate methods are possible for introducing new content prior to getting on the podium which minimize wasted time:
Lessons, worksheets, youtube links, peer teaching, etc.
Learning the content isn’t hard, finding ways to use it is. The challenge isn’t in teaching it from the podium but rather reinforcing it through scenarios that are presented in band literature.
Here’s a couple strategies for accomplishing this in a sentence or less:1) “Buzz words” and “Buzz Phrases.”2) Environmental print big enough to read from the podium.
5/11/2016
2
What to TeachWhen determining percussion content in a pedagogical context 4 questions come to mind that help frame my teaching:
1) How do I hit it? (technique)2) Where do I hit it? (tone and color)3) What do I hit it with? (articulation and timbre)4) “HOW” do I hit? (dynamics and articulations)
These 4 questions set us up with simple bits of information that can be used in a plethora of contexts to solve the hardest problems for percussionists that are so often dismissed.
5/11/2016
3
The Baton IS the Stick
… Even When It Is Wrong!
5/11/2016
4
Holding the StickMy steps:
1) Make a “T” with pointer finger and thumb on stick2) Wrap fingers around the rest, face palm down3) Stick should exit the bottom corner of the palm4) Squeeze just the front fulcrum5) Squeeze just the back fingers
2 locations of contact:1) front fulcrum2) back fingers
My Indicators of Proper Matched Grip
Left Hand (palm-down)
4 Adjustable Variables for Technical Instruction:1) Palm Position2) Finger Position3) Which fingers create the fulcrum4) Elbow
Ideal results:1) Palm should face down2) Stick exits outer corner of hand3) Fulcrum between point/thumb or P/T/M4) Arms to stick create 120 degree angles
Position of Arms to Sticks
5/11/2016
5
Marimba-Keyboards (Up-Close)
Marimba-Keyboards (Far-Away)
5/11/2016
6
Snare Drum (Far Away)
Timpani (Up-Close)
5/11/2016
7
Timpani (Far-Away)
Bass Drum (Close Up)
5/11/2016
8
Bass Drum (Far Away)
Triangle (Up-Close)
5/11/2016
9
Rule #1: Matched Grip Works on EverythingEmbouchures:
1) French2) matched3) Traditional
All good for somethings, but no other instrument is required to learn several embouchures in 5th grade.
Focus and master musical concepts with matched and translation will be easy
Yes, Tone is a Thing Here… Tone is determined in percussion by WHERE you hit something. We refer to this concept as playing areas or zones.
You can hit any percussion instrument anywhere and you’ll get all kinds of different sounds. The concept of playing areas exists to decrease the number of options by selecting the areas with consistent and useful sonic responses.
There are too many instruments to entirely list them here.
I can knock out most of them with this next rule!
5/11/2016
10
Rule #2: If there is a membrane, it has these 3 playing areas The membrane is divided into 3 playing areas we use to measure where to play on the head and they all have consistent timbral responses.
1) Center – Stuffy, “node”, non-resonant, punchy2) Between and rim – “Normal” playing area on every membrane, full sound3) Rim – just off the rim, Thin sound, “tinny”, nasal sound, quiet playing
Every membrane has the same playing areas, what changes is which one you choose based on the instrument you’re hitting.
The color options is always the same, the factor to be determined is which is the appropriate color for this moment or characteristic of this instruments sound.
Playing Areas and Tone
1) On the rim – Thin, ringy, “tinny
2) Between rim and center of the drum – “normal” sound, full tone.
3) Center of the drum (NODE) – Dead, “stuffy”, punchy.
Player Stands Here
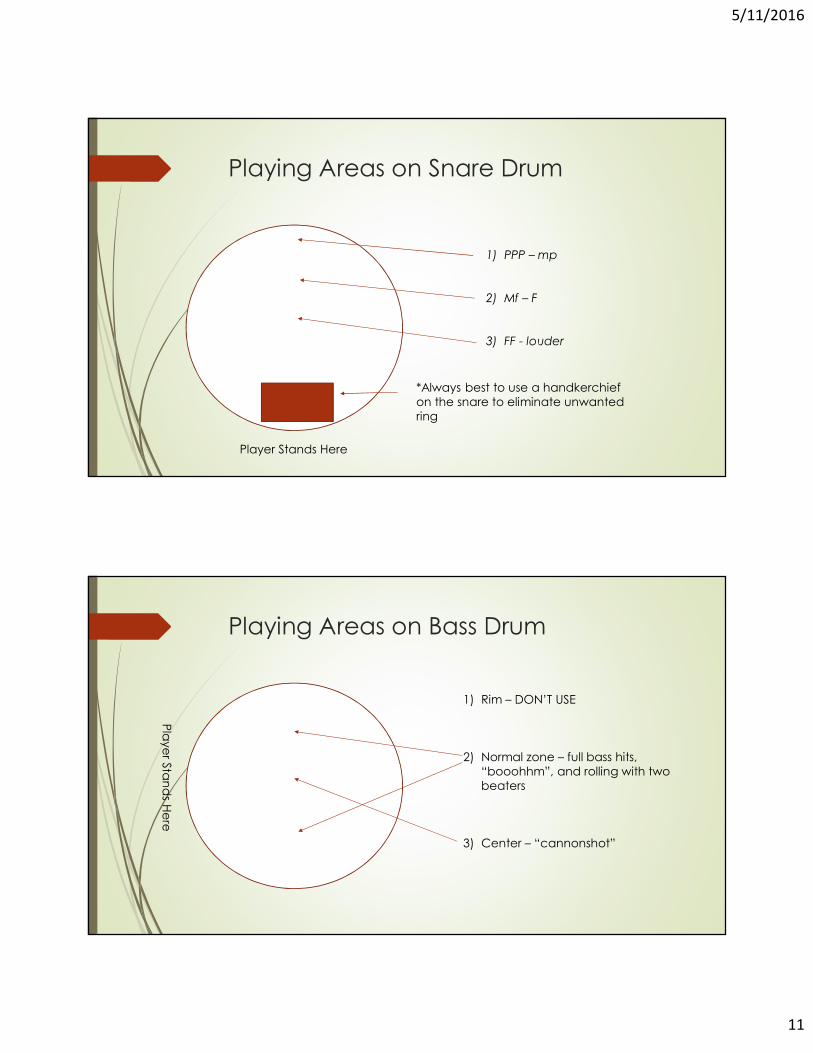
5/11/2016
11
Playing Areas on Snare Drum
1) PPP – mp
2) Mf – F
3) FF - louder
*Always best to use a handkerchief on the snare to eliminate unwanted ringPlayer Stands Here
Playing Areas on Bass Drum1) Rim – DON’T USE
2) Normal zone – full bass hits, “booohhm”, and rolling with two beaters
3) Center – “cannonshot”
Player Stands Here
5/11/2016
12
Playing Areas on Timpani1) Rim – Do not use.
2) Normal zone – Slightly closer to the rim than on previous instruments
3) Center – Do not use.
Playing Areas on Tambourine
1) PPP – mp: 2 fingers
2) Mf – F: use 4-5 fingers
3) FF – louder: 5 fingers/fist/palm
5/11/2016
13
Using This On The PodiumStudents and Teacher must have the same lingo.
Everything is visible in percussion, and before your ears develop to our sounds you have to rely on your eyes. - students are the same! They should rely on these concepts as much as you in the beginning of their training.
If you say you can’t “see” it from the podium I would suggest taking a quick step left or right
Rule #3: “Color” is bought and Diversified by Options Color is going to be determined by two very controllable variables:
1) What you decide to hit.2) What you decide to hit it with
Big instruments in public schools tend to have one option which for the most part works. If you can have a piccolo snare drum and a regular concert drum you should be fine on every thing else.
For auxiliary instruments always try to have two options that have a high and low relationship. 6” inch triangle and an 8” inch triangle (don’t get a 4 or 3”). What it is made of extremely important, but in terms of the “color” conversation, having the two options is more important first.
5/11/2016
14
The Spectrum of ImplementsArticulation Material ImplementSoftest Cotton Cotton
- FeltYarn Soft Yarn- Medium Yarn
Medium - Hard YarnCord Soft Cord- Medium Cord- Hard CordRubber Soft Rubber
Hard - Medium Rubber- Hard RubberPlastic Soft Plastic- Medium Plastic- Hard Plastic
Harsh Metal All Metals
The implement determines the general articulation or the cutting ability and the timbre.The weight of the implement determines the depth of the sound.- heavy yarn will be fuller then lightTwo rules of thumb:1) “Wood on metal will never settle.”2) “Metal on wood is never good.”
Still pretty esoteric?
How about this?Membrane Wood Metal Exception
Material Implement Timpani Bass Drum Toms Marimba Wood block vibraphone Glock XylophoneCotton H/M/S Cotton X X X- H/M/S Felt x x XYarn Soft Yarn [then wood] [then wood] X- Medium Yarn X- Hard Yarn XCord Soft Cord X X X X- Medium Cord X X X X- Hard Cord X X X xRubber Soft Rubber X X X X X- Medium Rubber X X X X X- Hard Rubber X X X X XPlastic Soft Plastic X X X X- Medium Plastic X X X X- Hard Plastic X X X XMetal All Metals X
5/11/2016
15
Using this from the PodiumThis is a generic organization of information, go through your own things to highlight what you have so you have your “implement spectrum.”
Then make sure it is visible
2 strategies (to get you started):1) If the part is in unison with another member of the band, try to match the tone, color, articulation with the doubled part. When you’re discussing it with the wind players you owe it to the percussionists to have the same conversation.2) If the part is alone, [to yourself] describe the texture of the specific section of music. Is it ethereal? Is it pointilistic? Bright? Dark? Long and connect? Disjunct and harsh?
- Determine the descriptors and head to your table! Makes some choices.- Most important thing is to EXPERIMENT. You don’t build a vocabulary of these sounds unless you try to use them constantly.
Dynamics and Articulation Dynamics are easily solved But there is a bit more to articulation than just the mallet choice.
For wind players these can be two different topics Dynamics are achieved by wind Articulations are accomplished with the tongue.
To a percussionist, everything happens above the drum, in the air, right before we hit it. Better put:
Dynamics are determined by the number of inches above the drum you strike it. Articulations are determined by the motion with which you use to do so.
5/11/2016
16
Rule #4: Dynamics and Articulations are seen above the drum. First thing:Gravity is always the initial motion we use. It produces the fullest sound and is most natural for the student.
From there……Dynamics = inchesArticulation = motion
Dynamics on All PercussionDynamic Height in inchesPPP(-) 1(-)” PP 2”P 3”MP 4”MF 6”F 7-8”FF 9-12”FFF (+) 12-15(+)”
Dynamic will always correlate with stick height.Anything written ppp and softer is “felt” not “heard.” Definitely a real sound and yes, it should be noticeable whether or not it was played. - use the weight of the mallet combined with the weight of the arm. Dynamics fff or louder are 100% fictional, these dynamics are achieved with “energy”.- look like you are playing real loud
5/11/2016
17
Snare Drum Dynamics Since all the playing areas are useful on the snare drum lets compartmentalize our options for better control:
The height of stroke will ALWAYS determine the volume. The location of where your are playing at will ALWAYS determine your tone.
Tambourine is exactly the same, just with your fingers.
1) PPP – mp2) Mf – F3) FF - louder
Articulation!...there’s a bit more to it. The implement chart is 90% of the articulation discussion. Trust it.
However, within each implement on my spectrum… there is another spectrum of articulations based on “HOW” you hit the instrument with it. A soft mallet can have some articulation if you want it and a hard mallet can in have less.
You can never over come the material though, hard plastic is hard plastic and yarn will never sound good on a xylophone.
5/11/2016
18
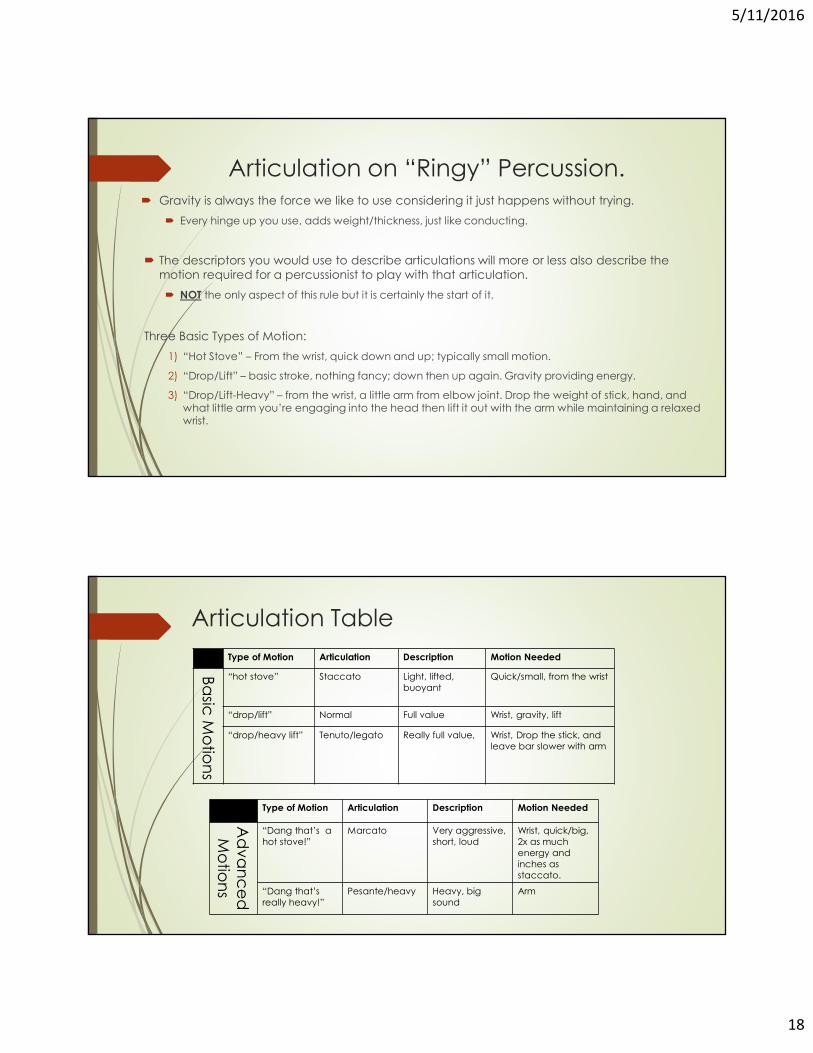
Articulation on “Ringy” Percussion. Gravity is always the force we like to use considering it just happens without trying.
Every hinge up you use, adds weight/thickness, just like conducting.
The descriptors you would use to describe articulations will more or less also describe the motion required for a percussionist to play with that articulation. NOT the only aspect of this rule but it is certainly the start of it.
Three Basic Types of Motion:1) “Hot Stove” – From the wrist, quick down and up; typically small motion.2) “Drop/Lift” – basic stroke, nothing fancy; down then up again. Gravity providing energy.3) “Drop/Lift-Heavy” – from the wrist, a little arm from elbow joint. Drop the weight of stick, hand, and what little arm you’re engaging into the head then lift it out with the arm while maintaining a relaxed wrist.
Articulation TableType of Motion Articulation Description Motion NeededBasic Motions
“hot stove” Staccato Light, lifted, buoyant Quick/small, from the wrist
“drop/lift” Normal Full value Wrist, gravity, lift“drop/heavy lift” Tenuto/legato Really full value, Wrist, Drop the stick, and leave bar slower with arm
Type of Motion Articulation Description Motion NeededAdvancedMotions
“Dang that’s a hot stove!” Marcato Very aggressive, short, loud Wrist, quick/big, 2x as much energy and inches as staccato. “Dang that’s really heavy!” Pesante/heavy Heavy, big sound Arm
5/11/2016
19
The RulesRule #1: Matched works on everything!
Rule #2: If it has a membrane there are only three playing zones
Rule #3: “Color” is bought and diversified by options
Rule #4: Dynamics and articulations are seen above the drum.
ReviewTechnical issues (Rule #1)
- resolved with matched grip knowledge on both your part and the student’s. Characteristic Tone (Rule #2)
- resolved with utilizing the appropriate playing area “Color” (Rule #3)
- resolved by having options and determining the proper implement and instrument for the specific moment of music. Articulation Execution (Rule #4)
- Determined by implement choice and the motion you employ with it.Volume (Rule #4)
- Determined by the number of inches above the drum you begin your stroke assuming gravity is the force.
5/11/2016
20
Special Thanks to…Mike GolemoArizona State UniversityRieman MusicJ.B. Smith Simone MancuosoTrae BlancoChristian LopezBob MeunierJacqi MeunierPaul BrizziMembers of the ASU Percussion StudioMember of Spring 2016 Perc Methods Course
All of You
Consistently Colorful Triangle Playing 2 different sounds can come out of a triangle:
1) Brighter, more defined pitch (strike motion is perpendicular to triangle).2) Dark and more overtones (strike motion is parallel to triangle)
Roll in the bottom closed corner Hold triangle high enough that conductor can be seen through the hole Allows student to aim and not miss their entrance.
Dark-overtones
brighter, clearer pitch
Roll here
5/11/2016
21
A “Good” Crash A good crash isn’t up to chance and it truly doesn’t take hours and hours of practice to become somewhat predictably competent at it. Every good crash has 4 variables:
1) Base plate (typically the non-dominant hand)2) Moving plate (dominant hand)3) Distance between them 4) An angle which will create the flam
Inches between plates + angle = dynamic Larger angle = louder crash Experiment with these variables for consistency
Thicker cymbals = more articulate Bigger cymbals = louder, darker
Students PerspectiveR
LSteps for a good crash:1) Line the plates up like in image above (be sure to overlap!)2) Base/bottom plate does not move3) Moving/top plate DROPS onto base (angle creates a flam)4) Lift5) To mute: pull plates to belly or chest