48
Shooting 2011 1 © copyright Basketball WA Teaching Shooting Fundamentals 2011
Shooting 2011
1 © copyright Basketball WA
Teaching Shooting Fundamentals 2011
Shooting 2011
2 © copyright Basketball WA
TABLE OF CONTENTS
SECTION A
Introduction Shooting Technique and building this important fundamental skill pg 2
Stance and Head Position pg 3
Hand and Ball Position: pg 4
Follow Through: pg 5
Shooting Analogies: pg 6
Summary of Shot Technique – Check list for coaches and players pg 7
Jump Shooting pg 8
Lay-up Technique pg 9
SECTION B
Drills to teach shooting pg 10
SECTION C
Shooting Drills Completed away from the Basket for technique: pg 10 – 11
SECTION D
Shooting Drills - Follow Through pg 12 – 15
SECTION E
Shooting Drills - Footwork, Rhythm and Legs pg 16 - 20
SECTION F
Shooting Drills – Competitive pg 21 - 32
SECTION G
Shooting Drills – Conditioning pg 33 – 35
SECTION H
Lay-Ups - teaching the fundamentals pg 36 - 38
SECTION I
Lay-Up – Drills pg 39 - 44
SECTION J
National Shooting Competition pg 45 - 47
A special thank you to Serene Maisey from PANDASNAP PHOTOGRAPHY for taking various photos
and to make this document come to life.
Shooting 2011
3 © copyright Basketball WA
Shooting Technique and Building this important fundamental skill
This document is written for Basketball WA in an effort to educate and teach shot technique and the detail involved in
teaching this important fundamental skill. Young athletes need to learn the detail involved in shooting the ball so that they
establish this fundamental skill across their lifetime and can learn to shoot with greater consistency and speed when this
fundamental skill becomes second nature.
There are many and varied different ways to shoot the ball. This document is a collaboration of knowledge and observations
of some of the best coaches and players in the game. This includes what some would consider the master of shooting, Eddie
Palubinskas and how he mastered his shot which is greatly influenced many people’s thoughts on shooting throughout
Australia and abroad.
Shooting takes time to master and it is vital you learn the detail of correct shooting technique and fundamentals before you
learn bad habits that will take a lifetime to fix. Equally once you have mastered your technique you must learn to practice at
game speed to ensure you can finish under game like conditions this includes fatigue and distractions. Many players are
great shooters at practice but are unable to transfer this to a game. The most important thing is to master the detail of your
shot. Every coach will tell you something different and you must take control and take on board the points that suit your
style. At the end of the day you need to become your own best coach and develop an effective and efficient technique that
will work for you.
Once you have your technique mastered practice makes perfect and practice at game speed and under fatigue and with
other distractions is important. The most important thing is to build your confidence in your shot and again this will only
happen once you have mastered an effective technique.
I have broken this down for you in the following areas:
Stance and Head Position
Hand and Ball Positioning
Follow Through
“You can practice shooting eight hours a day, but if your
technique is wrong, then all you become is very good at
shooting the wrong way. Get the fundamentals down and
the level of everything you do will rise.”
--Michael Jordan
A special thank you to Serene Maisey from PANDASNAP PHOTOGRAPHY for taking various photos and to
make this document come to life.
Shooting 2011
4 © copyright Basketball WA
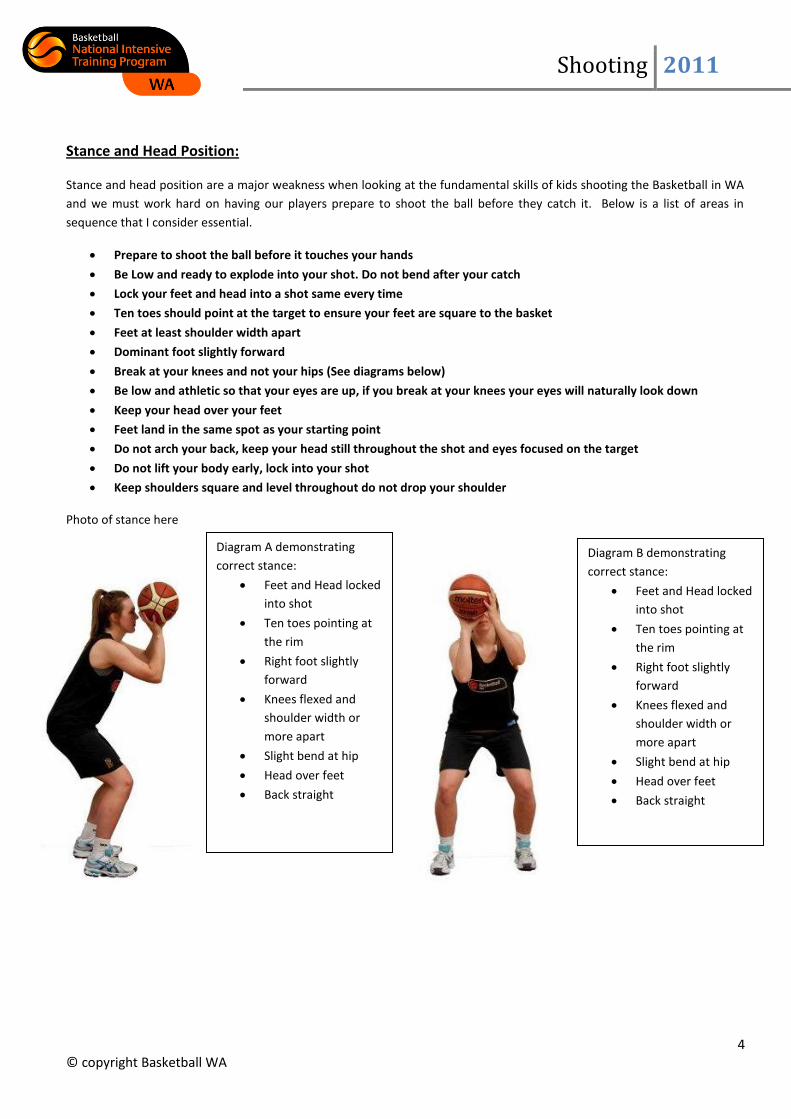
Stance and Head Position:
Stance and head position are a major weakness when looking at the fundamental skills of kids shooting the Basketball in WA
and we must work hard on having our players prepare to shoot the ball before they catch it. Below is a list of areas in
sequence that I consider essential.
Prepare to shoot the ball before it touches your hands
Be Low and ready to explode into your shot. Do not bend after your catch
Lock your feet and head into a shot same every time
Ten toes should point at the target to ensure your feet are square to the basket
Feet at least shoulder width apart
Dominant foot slightly forward
Break at your knees and not your hips (See diagrams below)
Be low and athletic so that your eyes are up, if you break at your knees your eyes will naturally look down
Keep your head over your feet
Feet land in the same spot as your starting point
Do not arch your back, keep your head still throughout the shot and eyes focused on the target
Do not lift your body early, lock into your shot
Keep shoulders square and level throughout do not drop your shoulder
Photo of stance here
Diagram A demonstrating
correct stance:
Feet and Head locked
into shot
Ten toes pointing at
the rim
Right foot slightly
forward
Knees flexed and
shoulder width or
more apart
Slight bend at hip
Head over feet
Back straight
Diagram B demonstrating
correct stance:
Feet and Head locked
into shot
Ten toes pointing at
the rim
Right foot slightly
forward
Knees flexed and
shoulder width or
more apart
Slight bend at hip
Head over feet
Back straight
Shooting 2011
5 © copyright Basketball WA
Hand and Ball Position:
After correct stance is established all the extra unnecessary movement is taken out of the shot providing the athlete lock
their feet and head in and jump straight up and down. It is essential then that correct hand and ball position is established. In
the early stages of shooting have players break down and correct themselves to establish correct positioning. Once they
establish and understand the movement it will eventually become second nature for all players and the ball will sit naturally
in correct position without adjustment.
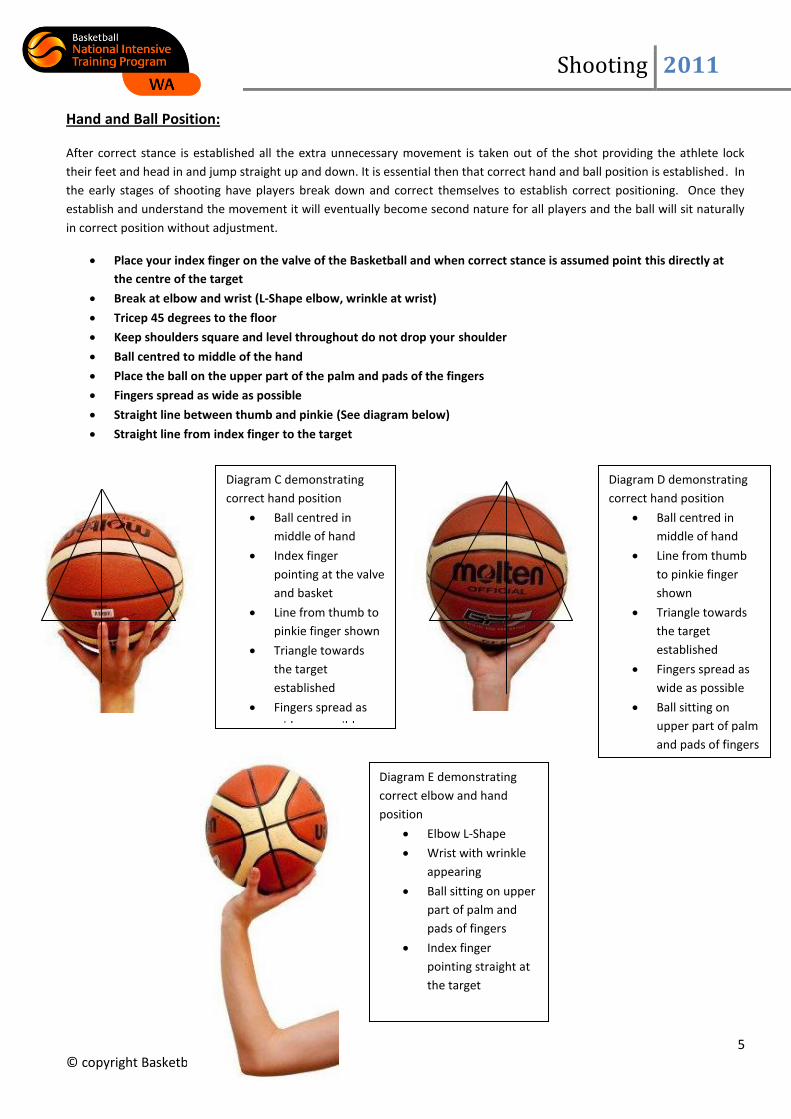
Place your index finger on the valve of the Basketball and when correct stance is assumed point this directly at
the centre of the target
Break at elbow and wrist (L-Shape elbow, wrinkle at wrist)
Tricep 45 degrees to the floor
Keep shoulders square and level throughout do not drop your shoulder
Ball centred to middle of the hand
Place the ball on the upper part of the palm and pads of the fingers
Fingers spread as wide as possible
Straight line between thumb and pinkie (See diagram below)
Straight line from index finger to the target
Diagram C demonstrating
correct hand position
Ball centred in
middle of hand
Index finger
pointing at the valve
and basket
Line from thumb to
pinkie finger shown
Triangle towards
the target
established
Fingers spread as
wide as possible
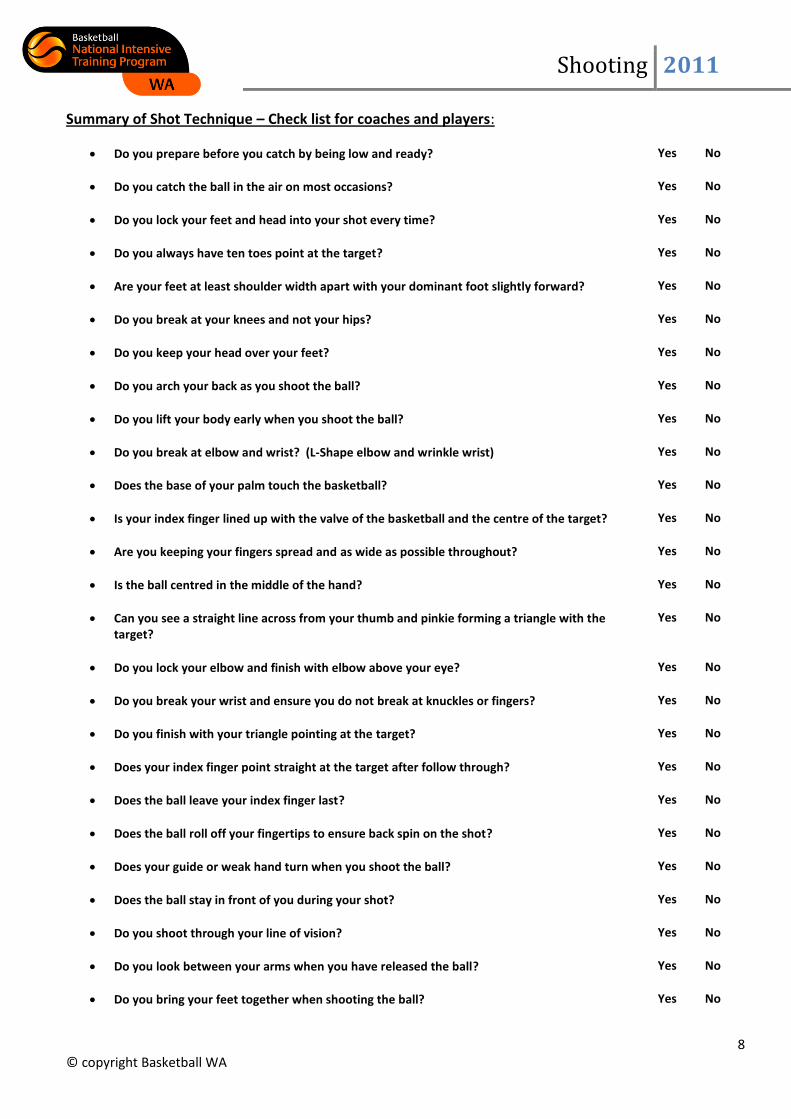
Diagram E demonstrating
correct elbow and hand
position
Elbow L-Shape
Wrist with wrinkle
appearing
Ball sitting on upper
part of palm and
pads of fingers
Index finger
pointing straight at
the target
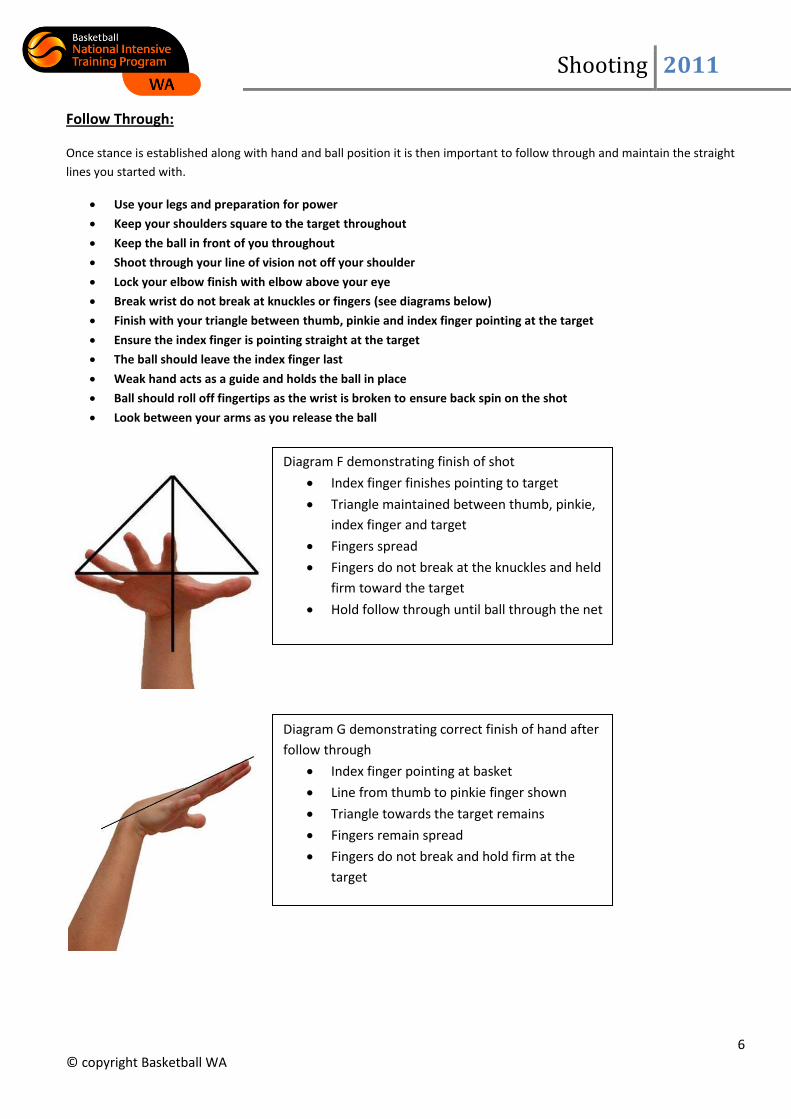
Diagram D demonstrating
correct hand position
Ball centred in
middle of hand
Line from thumb
to pinkie finger
shown
Triangle towards
the target
established
Fingers spread as
wide as possible
Ball sitting on
upper part of palm
and pads of fingers
Shooting 2011
6 © copyright Basketball WA
Follow Through:
Once stance is established along with hand and ball position it is then important to follow through and maintain the straight
lines you started with.
Use your legs and preparation for power
Keep your shoulders square to the target throughout
Keep the ball in front of you throughout
Shoot through your line of vision not off your shoulder
Lock your elbow finish with elbow above your eye
Break wrist do not break at knuckles or fingers (see diagrams below)
Finish with your triangle between thumb, pinkie and index finger pointing at the target
Ensure the index finger is pointing straight at the target
The ball should leave the index finger last
Weak hand acts as a guide and holds the ball in place
Ball should roll off fingertips as the wrist is broken to ensure back spin on the shot
Look between your arms as you release the ball
Diagram G demonstrating correct finish of hand after
follow through
Index finger pointing at basket
Line from thumb to pinkie finger shown
Triangle towards the target remains
Fingers remain spread
Fingers do not break and hold firm at the
target
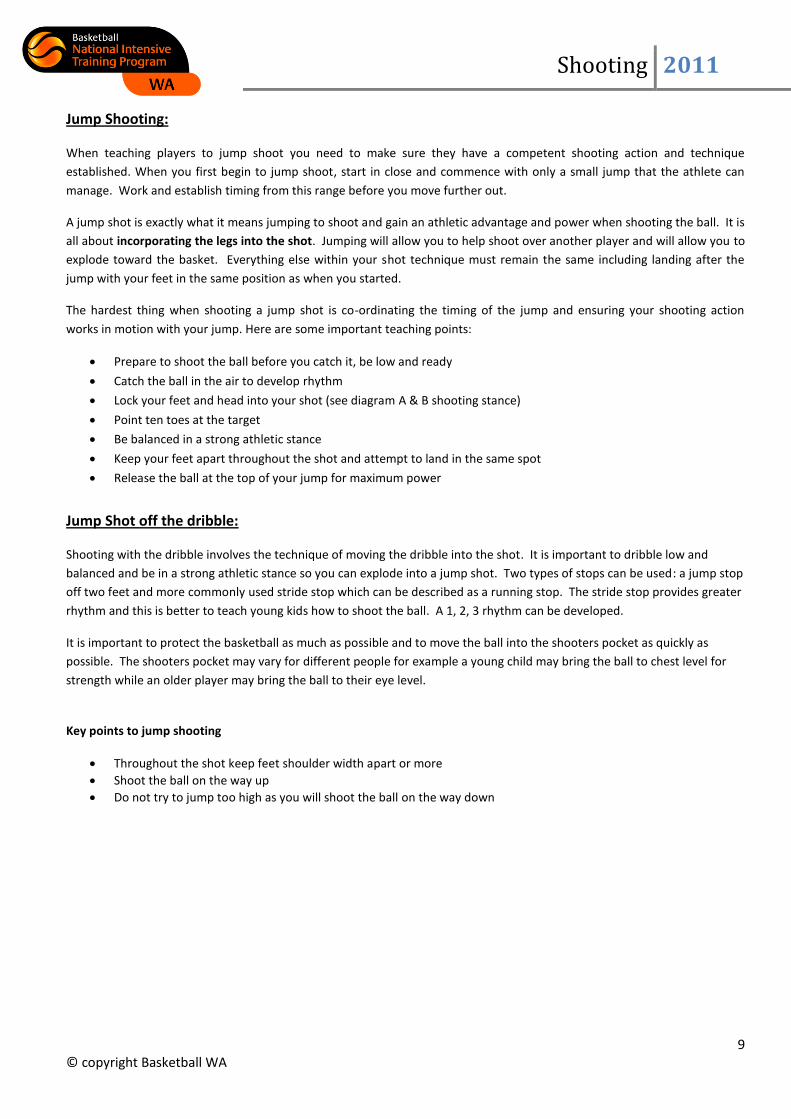
Diagram F demonstrating finish of shot
Index finger finishes pointing to target
Triangle maintained between thumb, pinkie,
index finger and target
Fingers spread
Fingers do not break at the knuckles and held
firm toward the target
Hold follow through until ball through the net

Shooting 2011
7 © copyright Basketball WA
Shooting Analogies:
‘Shooters are made not born’
BEEF
B – is for Balance
E – is for Eyes on the target
E – is for Elbow which sits under the ball (It does not need to be in a straight line under the ball)
F – is for Follow Through
FEEL
F – is for Finger- index finger in middle E – is for Eye- focus on the target E – is for Elbow- needs to get under the ball- if it is in front or behind you do not get the wrist L shape and no wrinkle L – is for Lock- full extension- snap of wrist and no breakage of fingers in follow through
If you have ever shot a rifle, shot gun or B-B gun you would have noticed that you naturally brought the gun stock up to your shoulder and pointed the barrel down the target line in line with your dominant eye and you would have your trigger finger on the trigger ready to fire when you are 'ready'. Notice also that you do not pull the trigger until you have the target, the peep sight at the end of the barrel and your eye all in the 'line of fire'. I also call this the correct 'shot pocket' when prepping to shoot. Compare this process to the free-throw attempt. You pick up the ball (usually with the dribbling hand to partner with the guide hand), the set the ball in your comfort zone 'shot pocket', which may or may not be scientifically correct. Let's compare. When you pick up a rifle and you are ready to shoot, you do not hold the barrel of the gun near the hip or above the head or in front of the stomach. You brace the stock with the shoulder and align all other parameters (peep-sight, barrel, eye and target) before shooting. =Eddie Palubinskas
‘You miss one hundred percent of the shots you don’t take’
Three and One-Half Balls Fit in the Target To help your confidence it is important to know that the basket is big. The basket is so big that three and one half balls can fit in the target. This surprises most players. You can get on a ladder and fit three balls side by side over the target and have enough space to fit and turn your hand between each ball. Realising that the basket is so big should give a psychological boost to your confidence.
Keep follow-through up until the ball goes through the target
‘Up, Down, Kiss, In’
When shooting off the backboard this is a simple rule to ensure success. Shoot it up then ensure it is on
the downward arc when it hits the backboard making it a softer shot as it kisses the glass so it will go in.
Shooting 2011
8 © copyright Basketball WA
Summary of Shot Technique – Check list for coaches and players:
Do you prepare before you catch by being low and ready?
Yes No
Do you catch the ball in the air on most occasions?
Yes No
Do you lock your feet and head into your shot every time?
Yes No
Do you always have ten toes point at the target?
Yes No
Are your feet at least shoulder width apart with your dominant foot slightly forward?
Yes No
Do you break at your knees and not your hips?
Yes No
Do you keep your head over your feet?
Yes No
Do you arch your back as you shoot the ball?
Yes No
Do you lift your body early when you shoot the ball?
Yes No
Do you break at elbow and wrist? (L-Shape elbow and wrinkle wrist)
Yes No
Does the base of your palm touch the basketball?
Yes No
Is your index finger lined up with the valve of the basketball and the centre of the target?
Yes No
Are you keeping your fingers spread and as wide as possible throughout?
Yes No
Is the ball centred in the middle of the hand?
Yes No
Can you see a straight line across from your thumb and pinkie forming a triangle with the target?
Yes No
Do you lock your elbow and finish with elbow above your eye?
Yes No
Do you break your wrist and ensure you do not break at knuckles or fingers?
Yes No
Do you finish with your triangle pointing at the target?
Yes No
Does your index finger point straight at the target after follow through?
Yes No
Does the ball leave your index finger last?
Yes No
Does the ball roll off your fingertips to ensure back spin on the shot?
Yes No
Does your guide or weak hand turn when you shoot the ball?
Yes No
Does the ball stay in front of you during your shot?
Yes No
Do you shoot through your line of vision?
Yes No
Do you look between your arms when you have released the ball?
Yes No
Do you bring your feet together when shooting the ball? Yes No
Shooting 2011
9 © copyright Basketball WA
Jump Shooting:
When teaching players to jump shoot you need to make sure they have a competent shooting action and technique
established. When you first begin to jump shoot, start in close and commence with only a small jump that the athlete can
manage. Work and establish timing from this range before you move further out.
A jump shot is exactly what it means jumping to shoot and gain an athletic advantage and power when shooting the ball. It is
all about incorporating the legs into the shot. Jumping will allow you to help shoot over another player and will allow you to
explode toward the basket. Everything else within your shot technique must remain the same including landing after the
jump with your feet in the same position as when you started.
The hardest thing when shooting a jump shot is co-ordinating the timing of the jump and ensuring your shooting action
works in motion with your jump. Here are some important teaching points:
Prepare to shoot the ball before you catch it, be low and ready
Catch the ball in the air to develop rhythm
Lock your feet and head into your shot (see diagram A & B shooting stance)
Point ten toes at the target
Be balanced in a strong athletic stance
Keep your feet apart throughout the shot and attempt to land in the same spot
Release the ball at the top of your jump for maximum power
Jump Shot off the dribble:
Shooting with the dribble involves the technique of moving the dribble into the shot. It is important to dribble low and
balanced and be in a strong athletic stance so you can explode into a jump shot. Two types of stops can be used: a jump stop
off two feet and more commonly used stride stop which can be described as a running stop. The stride stop provides greater
rhythm and this is better to teach young kids how to shoot the ball. A 1, 2, 3 rhythm can be developed.
It is important to protect the basketball as much as possible and to move the ball into the shooters pocket as quickly as
possible. The shooters pocket may vary for different people for example a young child may bring the ball to chest level for
strength while an older player may bring the ball to their eye level.
Key points to jump shooting
Throughout the shot keep feet shoulder width apart or more
Shoot the ball on the way up
Do not try to jump too high as you will shoot the ball on the way down
Shooting 2011
10 © copyright Basketball WA
Lay Up Technique:
The lay-up is one of the first shots you should learn. While it appears easy when you watch a player perform this skill correctly it is not as easy as it looks. Most kids have difficulty understanding the correct footwork for balance and execution of a lay-up. A player must be able to execute a lay-up using either hand and eventually progress to be able to make a reverse lay-up.
When completing a lay-up dribble toward the basket and move slightly to one side of the hoop to create the correct angle. If
you're on the right side, dribble right-handed, pick the ball up on your right foot (half step) as you progress to the basket and
then step with your left foot (inside foot) and explode toward the basket shooting with your right hand. As you raise your right
hand, your right knee should also elevate and lift toward the basket. Pretend there is a string attached to your right hand and
your right knee. Reverse this form if shooting from the left side. It is best to go directly toward the basket, with your head up
and eyes focused on the backboard. Go up strong and straight to the hoop. Initially shoot the ball over hand utilising key
teaching points for shooting, not under hand or as many people wish to call it a finger roll. Don't shy away if there is a
defender, just go strong to the hoop. You may get fouled and get a three point chance. Utilise the top corner of the backboard
to ensure you make your shot.
Key points to teach
Right Hand Lay Up Shoot the ball off the left foot, right knee up. Jump off the inside foot
Left Hand Lay Up Shoot the ball off the right foot, left knee up. Jump off the inside foot
Position of Ball Keep it under your chin and shoot over hand until you perfect your technique
Hands Two hands on the ball to the height of jump. Non-shooting arm to protect shot
Teaching Lay-Ups these drills are presented later in the document starting on page ??.
1. Off one step 2. Off two steps 3. Off pass from coach 4. Off one dribble 5. From three point line 6. From half way line 7. From end line
Shooting 2011
11 © copyright Basketball WA
SECTION B: Drills to teach shooting:
I have put together a number drills to teach shooting. This is a ongoing living document and I will add more as they come to
hand or as I learn them from other coaches - that is the beauty of Basketball you never stop learning. I have placed the drills
in order of how I would teach shooting fundamentals to young players from the very beginning. You will see many of the
drills are very basic but I believe all are important in teaching shooting fundamentals. I have detailed as many teaching
points as possible early on for coaches to use to pick up on problem areas in players shots. As the drills progress I have
focused the teaching points more toward the specific drill. Please do not lose sight of the overall emphasis points of ensuring
the feet and head are locked into the shot and everything is then designed to stay straight and completed with rhythm.
As you will notice there is a large amount of detail and teaching points used. Teaching shooting I believe should always be
from the ground up so always introduce one or two teaching points rather than everything all at once. Also, only ever correct
one or two things and work on these rather than throw more and more teaching points at your players. At best they will
more than likely remember one particular area and focus on this anyway.
SECTION C: Shooting drills completed away from the basket for technique:
Mass Shooting Drill
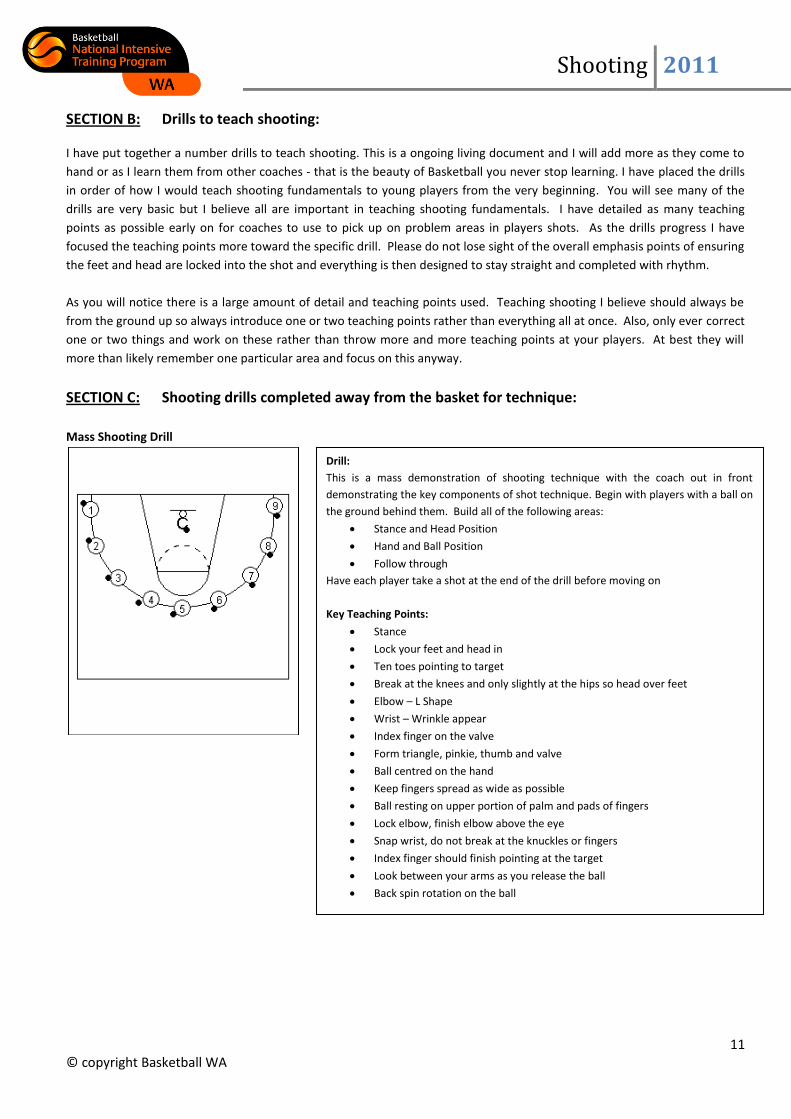
Drill:
This is a mass demonstration of shooting technique with the coach out in front
demonstrating the key components of shot technique. Begin with players with a ball on
the ground behind them. Build all of the following areas:
Stance and Head Position
Hand and Ball Position
Follow through
Have each player take a shot at the end of the drill before moving on
Key Teaching Points:
Stance
Lock your feet and head in
Ten toes pointing to target
Break at the knees and only slightly at the hips so head over feet
Elbow – L Shape
Wrist – Wrinkle appear
Index finger on the valve
Form triangle, pinkie, thumb and valve
Ball centred on the hand
Keep fingers spread as wide as possible
Ball resting on upper portion of palm and pads of fingers
Lock elbow, finish elbow above the eye
Snap wrist, do not break at the knuckles or fingers
Index finger should finish pointing at the target
Look between your arms as you release the ball
Back spin rotation on the ball
Shooting 2011
12 © copyright Basketball WA
Against the wall Shooting:
Pair Shooting:
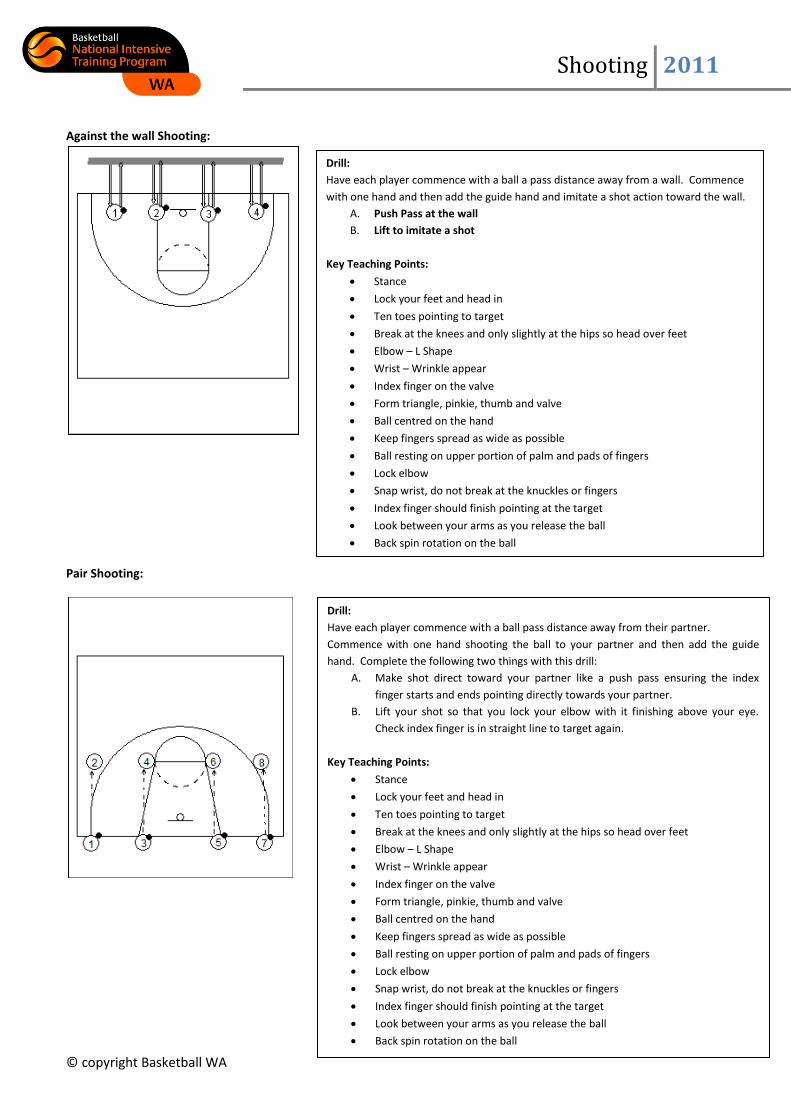
Drill:
Have each player commence with a ball a pass distance away from a wall. Commence
with one hand and then add the guide hand and imitate a shot action toward the wall.
A. Push Pass at the wall
B. Lift to imitate a shot
Key Teaching Points:
Stance
Lock your feet and head in
Ten toes pointing to target
Break at the knees and only slightly at the hips so head over feet
Elbow – L Shape
Wrist – Wrinkle appear
Index finger on the valve
Form triangle, pinkie, thumb and valve
Ball centred on the hand
Keep fingers spread as wide as possible
Ball resting on upper portion of palm and pads of fingers
Lock elbow
Snap wrist, do not break at the knuckles or fingers
Index finger should finish pointing at the target
Look between your arms as you release the ball
Back spin rotation on the ball
Drill:
Have each player commence with a ball pass distance away from their partner.
Commence with one hand shooting the ball to your partner and then add the guide
hand. Complete the following two things with this drill:
A. Make shot direct toward your partner like a push pass ensuring the index
finger starts and ends pointing directly towards your partner.
B. Lift your shot so that you lock your elbow with it finishing above your eye.
Check index finger is in straight line to target again.
Key Teaching Points:
Stance
Lock your feet and head in
Ten toes pointing to target
Break at the knees and only slightly at the hips so head over feet
Elbow – L Shape
Wrist – Wrinkle appear
Index finger on the valve
Form triangle, pinkie, thumb and valve
Ball centred on the hand
Keep fingers spread as wide as possible
Ball resting on upper portion of palm and pads of fingers
Lock elbow
Snap wrist, do not break at the knuckles or fingers
Index finger should finish pointing at the target
Look between your arms as you release the ball
Back spin rotation on the ball

Shooting 2011
13 © copyright Basketball WA
SECTION D: Shooting Drills with an emphasis on Follow Through
On Back Shooting Drill (Follow Through)
Knee Shooting
Drill:
Have a player lie on their back and shoot the Basketball. This drill is designed with an
emphasis on correct follow though and backspin rotation on the ball. Generally when a
player completes this drill will automatically use backspin due to lying down as the ball
will roll of a players finger tips allowing the player to feel and understand back spin
rotation. Use shooting hand by itself and then add the guide hand.
Key Teaching Points:
Lye straight on the ground
Elbow – L Shape
Wrist – Wrinkle appear
Index finger on the valve
Form triangle
Ball centred on the hand
Ball resting on upper portion of palm and pads of fingers
Lock elbow to finish high
Snap wrist, do not break at the knuckles or fingers
Back spin rotation on the ball
Feel the ball leaving the finger tips
Drill:
Once players have shot the ball on the back they should progress to their knees’. This
drill is designed to emphasise correct follow though and backspin rotation on the ball. It
keeps the legs totally out of the shot and works on the players’ arm action when
shooting the ball. An emphasis on correct follow through should be worked on here.
Key Teaching Points:
Kneel so knees are shoulder width apart
Elbow – L Shape
Wrist – Wrinkle appear
Keep shoulders square to the target throughout
Index finger on the valve
Form triangle
Ball centred on the hand
Ball resting on upper portion of palm and pads of fingers
Lock elbow, finish above the eye
Snap wrist, do not break at the knuckles or fingers
Back spin rotation on the ball
Look between your arms as you release the ball.
Shooting 2011
14 © copyright Basketball WA
Chair Shooting
Form Shooting: (Without Ball, One Hand, One Hand plus Guide Hand)
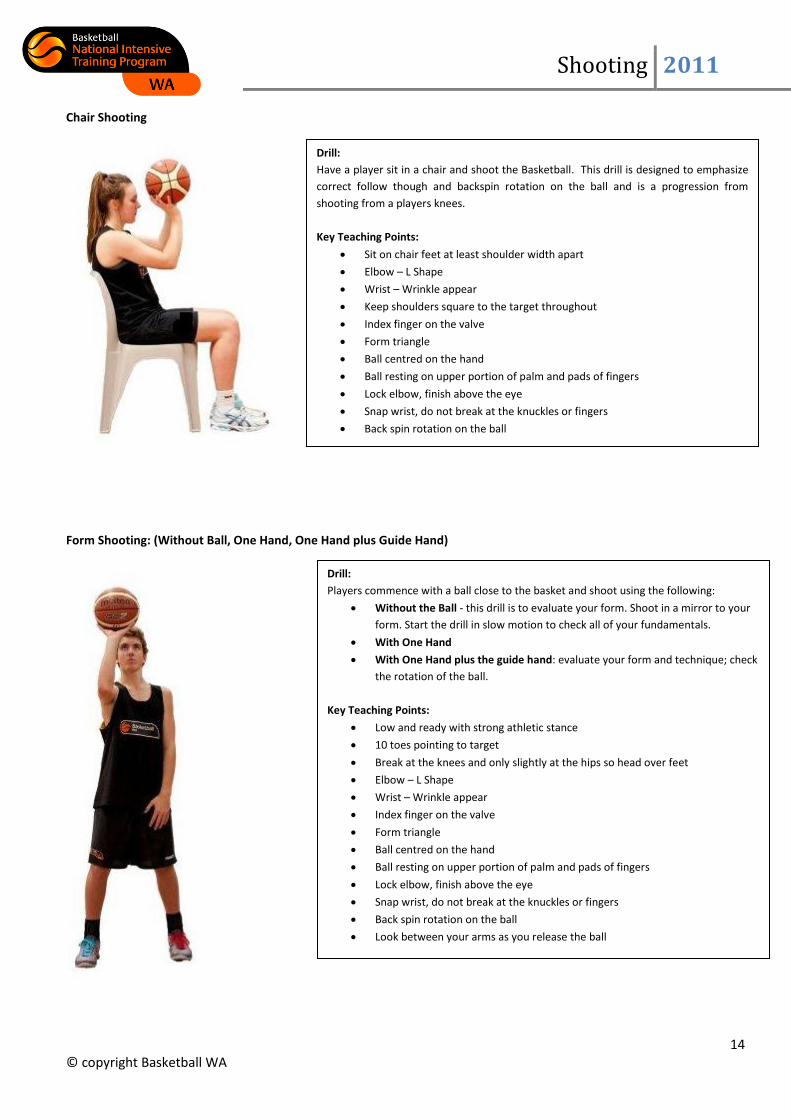
Drill:
Players commence with a ball close to the basket and shoot using the following:
Without the Ball - this drill is to evaluate your form. Shoot in a mirror to your
form. Start the drill in slow motion to check all of your fundamentals.
With One Hand
With One Hand plus the guide hand: evaluate your form and technique; check
the rotation of the ball.
Key Teaching Points:
Low and ready with strong athletic stance
10 toes pointing to target
Break at the knees and only slightly at the hips so head over feet
Elbow – L Shape
Wrist – Wrinkle appear
Index finger on the valve
Form triangle
Ball centred on the hand
Ball resting on upper portion of palm and pads of fingers
Lock elbow, finish above the eye
Snap wrist, do not break at the knuckles or fingers
Back spin rotation on the ball
Look between your arms as you release the ball
Drill:
Have a player sit in a chair and shoot the Basketball. This drill is designed to emphasize
correct follow though and backspin rotation on the ball and is a progression from
shooting from a players knees.
Key Teaching Points:
Sit on chair feet at least shoulder width apart
Elbow – L Shape
Wrist – Wrinkle appear
Keep shoulders square to the target throughout
Index finger on the valve
Form triangle
Ball centred on the hand
Ball resting on upper portion of palm and pads of fingers
Lock elbow, finish above the eye
Snap wrist, do not break at the knuckles or fingers
Back spin rotation on the ball
Shooting 2011
15 © copyright Basketball WA
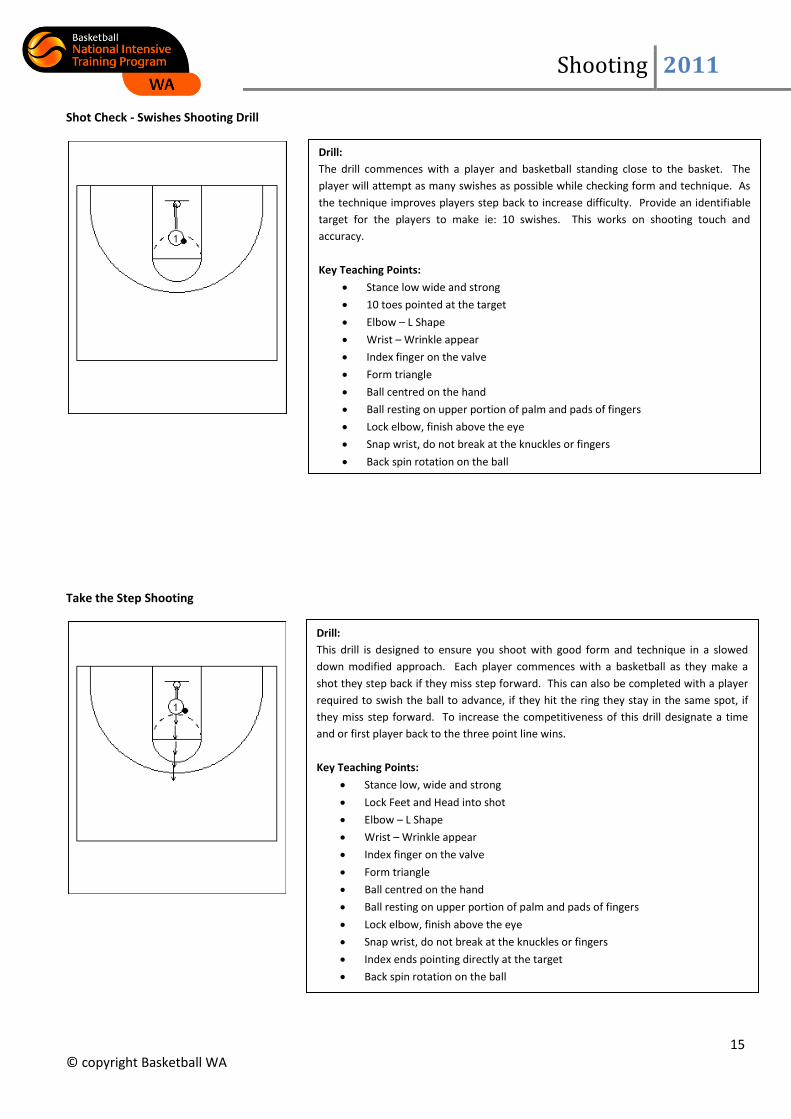
Shot Check - Swishes Shooting Drill
Take the Step Shooting
Drill:
This drill is designed to ensure you shoot with good form and technique in a slowed
down modified approach. Each player commences with a basketball as they make a
shot they step back if they miss step forward. This can also be completed with a player
required to swish the ball to advance, if they hit the ring they stay in the same spot, if
they miss step forward. To increase the competitiveness of this drill designate a time
and or first player back to the three point line wins.
Key Teaching Points:
Stance low, wide and strong
Lock Feet and Head into shot
Elbow – L Shape
Wrist – Wrinkle appear
Index finger on the valve
Form triangle
Ball centred on the hand
Ball resting on upper portion of palm and pads of fingers
Lock elbow, finish above the eye
Snap wrist, do not break at the knuckles or fingers
Index ends pointing directly at the target
Back spin rotation on the ball
Drill:
The drill commences with a player and basketball standing close to the basket. The
player will attempt as many swishes as possible while checking form and technique. As
the technique improves players step back to increase difficulty. Provide an identifiable
target for the players to make ie: 10 swishes. This works on shooting touch and
accuracy.
Key Teaching Points:
Stance low wide and strong
10 toes pointed at the target
Elbow – L Shape
Wrist – Wrinkle appear
Index finger on the valve
Form triangle
Ball centred on the hand
Ball resting on upper portion of palm and pads of fingers
Lock elbow, finish above the eye
Snap wrist, do not break at the knuckles or fingers
Back spin rotation on the ball
Shooting 2011
16 © copyright Basketball WA
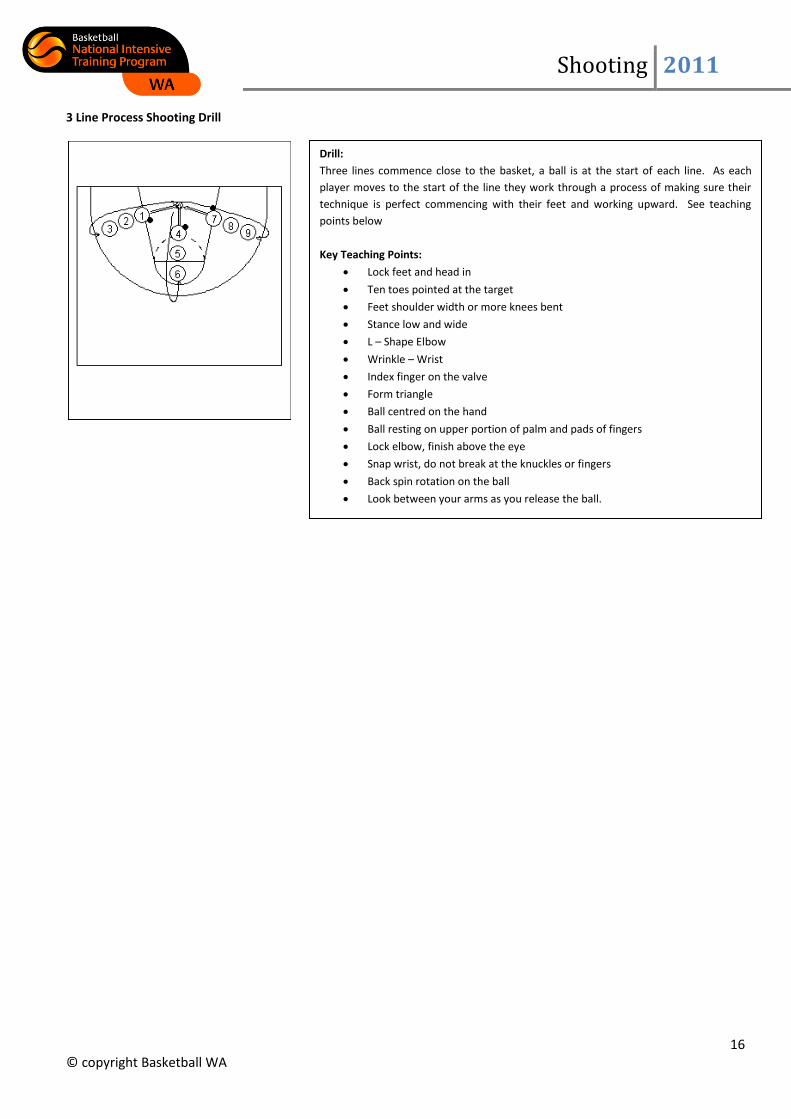
3 Line Process Shooting Drill
Drill:
Three lines commence close to the basket, a ball is at the start of each line. As each
player moves to the start of the line they work through a process of making sure their
technique is perfect commencing with their feet and working upward. See teaching
points below
Key Teaching Points:
Lock feet and head in
Ten toes pointed at the target
Feet shoulder width or more knees bent
Stance low and wide
L – Shape Elbow
Wrinkle – Wrist
Index finger on the valve
Form triangle
Ball centred on the hand
Ball resting on upper portion of palm and pads of fingers
Lock elbow, finish above the eye
Snap wrist, do not break at the knuckles or fingers
Back spin rotation on the ball
Look between your arms as you release the ball.

Shooting 2011
17 © copyright Basketball WA
SECTION E: Shooting Drills with an emphasis on footwork, rhythm and incorporating your legs into
your shot
Full Court Rhythm Shooting Drill (1,2,3)
3 Toss Shooting Drill
Drill:
This drill is designed to teach each player to bring their legs into their shot and to shoot
with rhythm. Each player commences with a ball on the baseline. Each player will toss
the ball in the air and then chase after it, let it bounce, catch in the air ready to shoot
the ball again. Once they shoot it into the air they chase it and the same process occurs
again. This happens all the way down court. Catching in stance and having rhythm is
essential to becoming a great shooter.
Key Teaching Points:
Prepare to shoot the ball early
Stay low and in stance
Catch the ball in the air
Ten toes pointing at the target
Lock feet and head into shot
Shoot the ball with good rhythm and timing 1,2,3
eg: Right handed shooter, 1 = left, 2 = right, 3 = shot.
Drill:
Each player commences with a basketball as shown on diagram on left. Players toss the
ball out in front with back spin and then chase it, catch it in the air, ready to shoot the
ball. On the third toss out in front players shoot the ball. This drill is designed to teach
footwork and shooting rhythm.
Key Teaching Points:
Prepare to shoot the ball before catching
Catch the ball in the air
Ten toes pointed at the target
Establish strong, low, wide, athletic stance
Catch in a rhythm (right hand shooter = left, right, shot - 1,2,3)
Stay low throughout the drill
Check index finger is pointed at the target
L-Shape and wrinkle
On third catch explode into shot
Power from legs
Lock elbow so it finishes above the eye
Snap wrist keep fingers spread and pointed to the target

Shooting 2011
18 © copyright Basketball WA
Bounce Drill
Corner Bounce Drill
Drill:
Drill commences with a shooter, rebounder and a basketball. Player 1 starts on the edge
of the keyway. To start player 1 sprints and touches the 3 point line with their foot turns
to receive the ball and catch and shoot. Each shooter should be given a target of made
shots or a time limit to complete the drill.
Key Teaching Points:
Catching the ball in the air, low, wide and in stance
Ten toes pointed at the target
Shooting with rhythm (1,2,3)
Lock feet and head into shot
Land on the same spot
Index finger pointed at target
Look between your arms
Elbow above your eye
Back spin rotation of the ball
Drill:
Drill commences with one line at half way with two basketballs. Player 1 in the line who
does not have a ball sprints to the corner of the court, touches the corner with their foot
and then sprints back to receive the ball off a straight cut as diagrammed. Player 1 will
then catch and shoot the basketball, rebound and return to the line. Player 2 on making
the pass will then sprint to the opposite corner and the drill continues in this fashion.
Add the following to the drill:
Catch and Drive (See Individual Offence)
Catch, Fake and Drive (See Individual Offence)
On Ball Screen with passer coming to set an On Ball Screen
(See also On Ball Screens)
Key Teaching Points:
Preparation for shot low and ready
Catch the ball in the air
Lock feet and head into shot
Catch both on inside foot or outside foot, perfect both
Ten toes pointed at the target
Rhythm and timing on the shot (1,2,3)
All other shooting teaching points emphasised.
Shooting 2011
19 © copyright Basketball WA
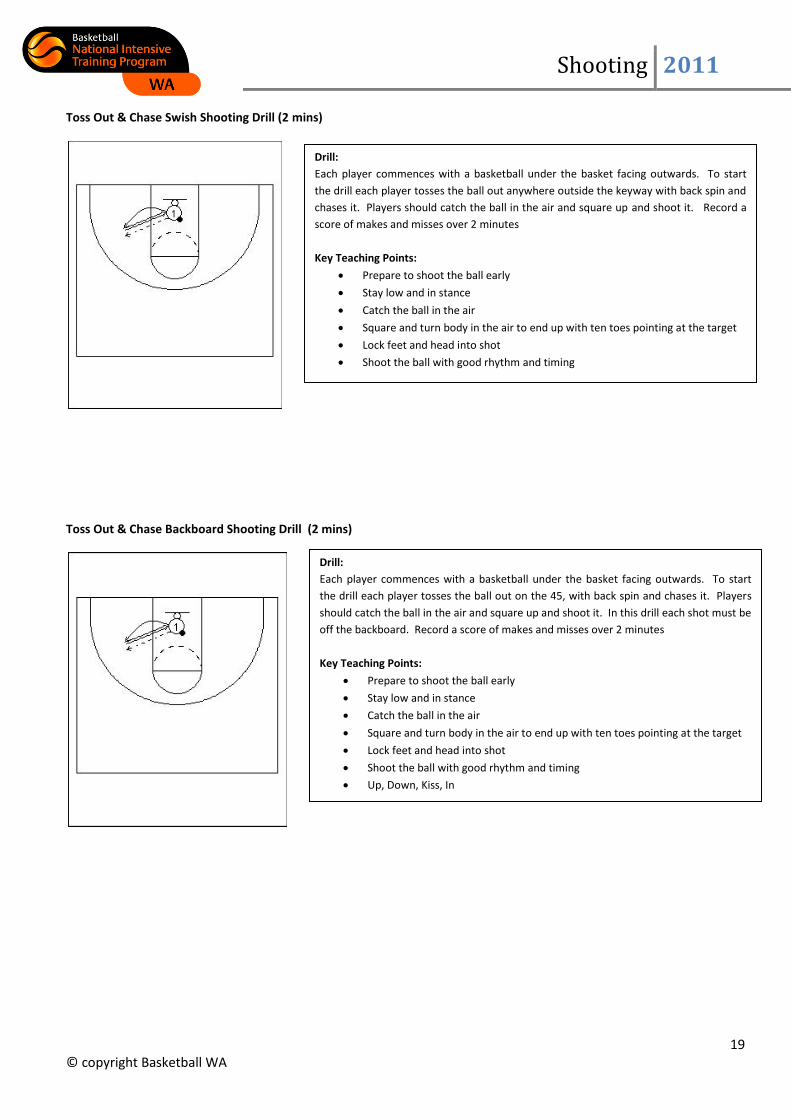
Toss Out & Chase Swish Shooting Drill (2 mins)
Toss Out & Chase Backboard Shooting Drill (2 mins)
Drill:
Each player commences with a basketball under the basket facing outwards. To start
the drill each player tosses the ball out on the 45, with back spin and chases it. Players
should catch the ball in the air and square up and shoot it. In this drill each shot must be
off the backboard. Record a score of makes and misses over 2 minutes
Key Teaching Points:
Prepare to shoot the ball early
Stay low and in stance
Catch the ball in the air
Square and turn body in the air to end up with ten toes pointing at the target
Lock feet and head into shot
Shoot the ball with good rhythm and timing
Up, Down, Kiss, In
Drill:
Each player commences with a basketball under the basket facing outwards. To start
the drill each player tosses the ball out anywhere outside the keyway with back spin and
chases it. Players should catch the ball in the air and square up and shoot it. Record a
score of makes and misses over 2 minutes
Key Teaching Points:
Prepare to shoot the ball early
Stay low and in stance
Catch the ball in the air
Square and turn body in the air to end up with ten toes pointing at the target
Lock feet and head into shot
Shoot the ball with good rhythm and timing
Shooting 2011
20 © copyright Basketball WA
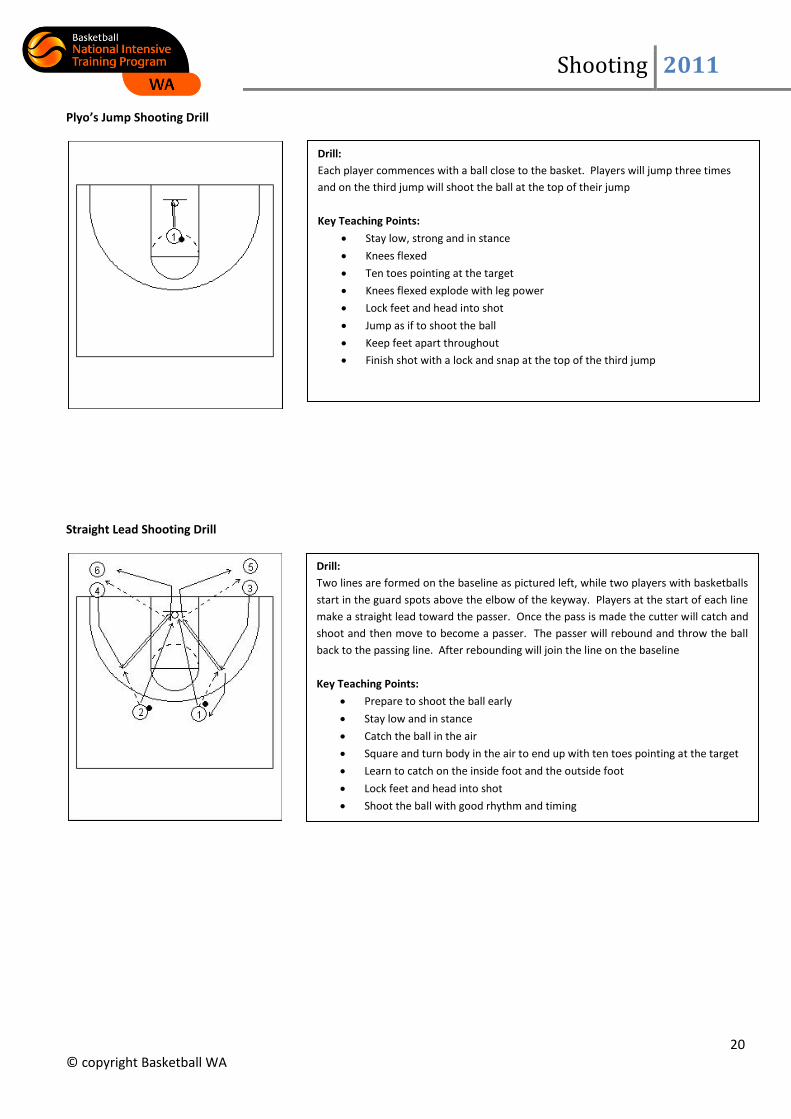
Plyo’s Jump Shooting Drill
Straight Lead Shooting Drill
Drill:
Two lines are formed on the baseline as pictured left, while two players with basketballs
start in the guard spots above the elbow of the keyway. Players at the start of each line
make a straight lead toward the passer. Once the pass is made the cutter will catch and
shoot and then move to become a passer. The passer will rebound and throw the ball
back to the passing line. After rebounding will join the line on the baseline
Key Teaching Points:
Prepare to shoot the ball early
Stay low and in stance
Catch the ball in the air
Square and turn body in the air to end up with ten toes pointing at the target
Learn to catch on the inside foot and the outside foot
Lock feet and head into shot
Shoot the ball with good rhythm and timing
Drill:
Each player commences with a ball close to the basket. Players will jump three times
and on the third jump will shoot the ball at the top of their jump
Key Teaching Points:
Stay low, strong and in stance
Knees flexed
Ten toes pointing at the target
Knees flexed explode with leg power
Lock feet and head into shot
Jump as if to shoot the ball
Keep feet apart throughout
Finish shot with a lock and snap at the top of the third jump
Shooting 2011
21 © copyright Basketball WA
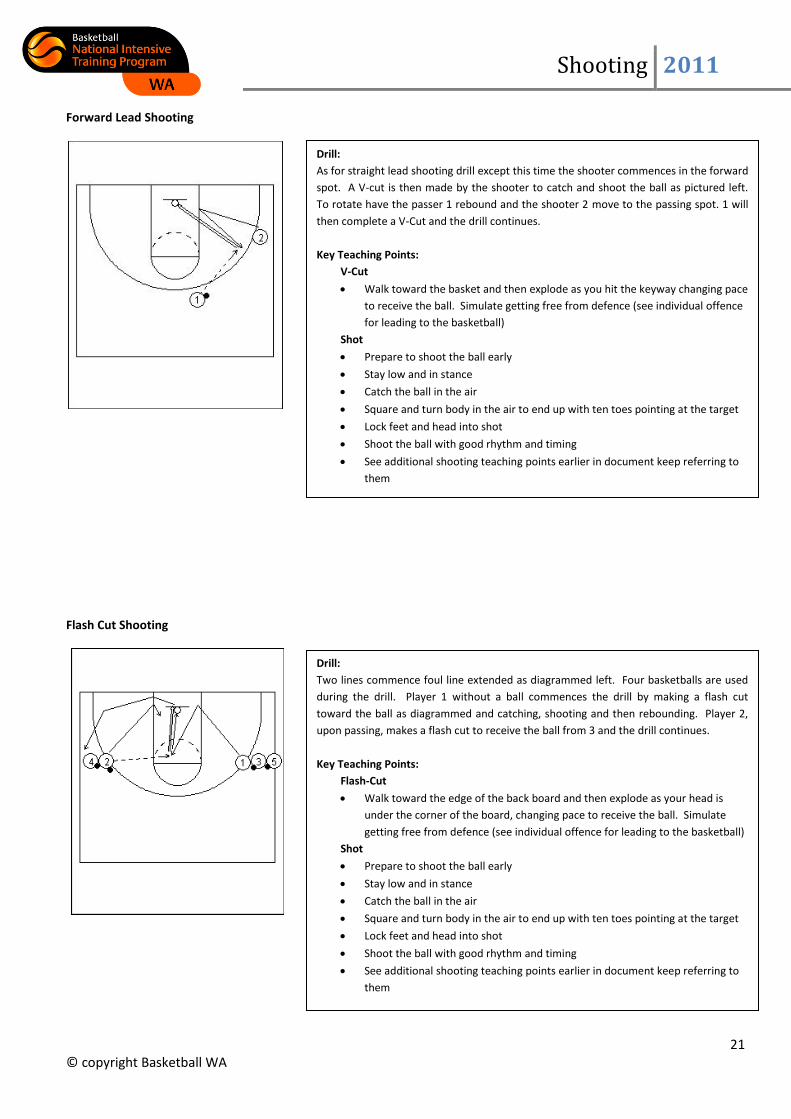
Forward Lead Shooting
Flash Cut Shooting
Drill:
As for straight lead shooting drill except this time the shooter commences in the forward
spot. A V-cut is then made by the shooter to catch and shoot the ball as pictured left.
To rotate have the passer 1 rebound and the shooter 2 move to the passing spot. 1 will
then complete a V-Cut and the drill continues.
Key Teaching Points:
V-Cut
Walk toward the basket and then explode as you hit the keyway changing pace
to receive the ball. Simulate getting free from defence (see individual offence
for leading to the basketball)
Shot
Prepare to shoot the ball early
Stay low and in stance
Catch the ball in the air
Square and turn body in the air to end up with ten toes pointing at the target
Lock feet and head into shot
Shoot the ball with good rhythm and timing
See additional shooting teaching points earlier in document keep referring to
them
Drill:
Two lines commence foul line extended as diagrammed left. Four basketballs are used
during the drill. Player 1 without a ball commences the drill by making a flash cut
toward the ball as diagrammed and catching, shooting and then rebounding. Player 2,
upon passing, makes a flash cut to receive the ball from 3 and the drill continues.
Key Teaching Points:
Flash-Cut
Walk toward the edge of the back board and then explode as your head is
under the corner of the board, changing pace to receive the ball. Simulate
getting free from defence (see individual offence for leading to the basketball)
Shot
Prepare to shoot the ball early
Stay low and in stance
Catch the ball in the air
Square and turn body in the air to end up with ten toes pointing at the target
Lock feet and head into shot
Shoot the ball with good rhythm and timing
See additional shooting teaching points earlier in document keep referring to
them

Shooting 2011
22 © copyright Basketball WA
SECTION F: Competitive Shooting Drills
Rapid Fire Shooting Drill
Chair Relocate Shooting Drill (2 mins)
Drill:
A chair and rebounder are needed to complete the drill. The shooter commences mid
range with the chair on the edge of the keyway as diagrammed. The shooter will sprint
touch the chair and relocate away to receive pass for a shot. This is repeated for 2
minutes and makes and misses should be recorded
Key Teaching Points:
Flare cut away from the chair
Prepare to shoot the ball early
Stay low and in stance
Catch the ball in the air
Ten toes pointing at the target
Lock feet and head into shot
Shoot the ball with good rhythm and timing
Ensure good back spin on the ball
See additional shooting teaching points earlier in document keep referring to
these
Drill:
The drill commences with a shooter, rebounder and passer. Player 2 (passer) and Player
3 (rebounder) commence with basketballs. Player 1 the shooter relocates side to side
receiving passes from Player 2 and catches and shoots the Basketball. An identified
score and or time limit should be provided as a target for each player.
Key Teaching Points:
Prepare to shoot the ball early
Stay low and in stance
Catch the ball in the air
Square and turn body in the air to end up with ten toes pointing at the target
Lock feet and head into shot
Shoot the ball with good rhythm and timing
See additional shooting teaching points earlier in document keep referring to
them
Shooting 2011
23 © copyright Basketball WA
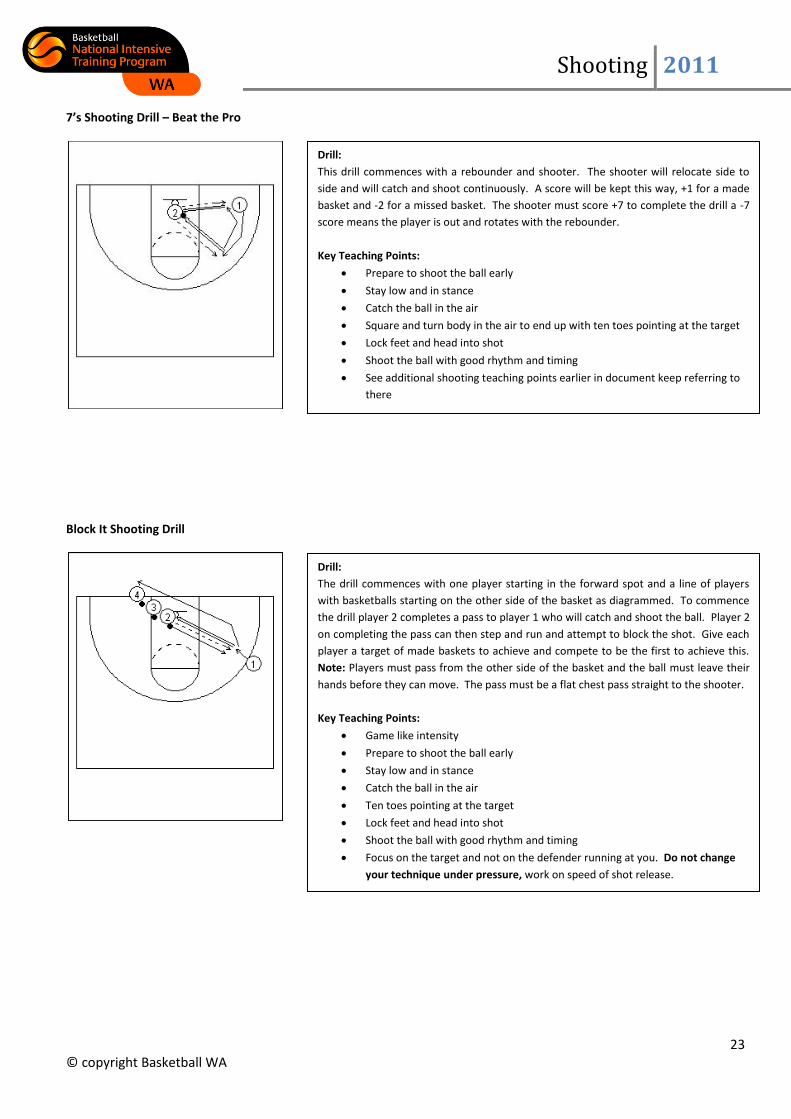
7’s Shooting Drill – Beat the Pro
Block It Shooting Drill
Drill:
This drill commences with a rebounder and shooter. The shooter will relocate side to
side and will catch and shoot continuously. A score will be kept this way, +1 for a made
basket and -2 for a missed basket. The shooter must score +7 to complete the drill a -7
score means the player is out and rotates with the rebounder.
Key Teaching Points:
Prepare to shoot the ball early
Stay low and in stance
Catch the ball in the air
Square and turn body in the air to end up with ten toes pointing at the target
Lock feet and head into shot
Shoot the ball with good rhythm and timing
See additional shooting teaching points earlier in document keep referring to
there
Drill:
The drill commences with one player starting in the forward spot and a line of players
with basketballs starting on the other side of the basket as diagrammed. To commence
the drill player 2 completes a pass to player 1 who will catch and shoot the ball. Player 2
on completing the pass can then step and run and attempt to block the shot. Give each
player a target of made baskets to achieve and compete to be the first to achieve this.
Note: Players must pass from the other side of the basket and the ball must leave their
hands before they can move. The pass must be a flat chest pass straight to the shooter.
Key Teaching Points:
Game like intensity
Prepare to shoot the ball early
Stay low and in stance
Catch the ball in the air
Ten toes pointing at the target
Lock feet and head into shot
Shoot the ball with good rhythm and timing
Focus on the target and not on the defender running at you. Do not change
your technique under pressure, work on speed of shot release.

Shooting 2011
24 © copyright Basketball WA
3, 2, 1 Shooting drill
Make 3 Shooting Drill
Drill:
The drill commences with 2 balls and a rebounder, passer and shooter. The shooter
completes a series of 3 shots starting with a lay-up then a mid-range jump shot and then
a three point shot. This routine is continued for 2 minutes and score collated. A lay-up is
worth one point, mid-range jump shot 2 points and the three point shot is worth 3.
Key Teaching Points:
Complete this drill with game like intensity
Prepare to shoot the ball early
Stay low and in stance
Catch the ball in the air
Square and turn body in the air to end up with ten toes pointing at the target
Lock feet and head into shot
Shoot the ball with good rhythm and timing
Shoot off correct foot with your lay-up
Take as many shots as possible in 2 minutes
Drill:
The drill commences with three players shooting and two rebounding. Three balls start
with the shooters. The aim of the drill is to make three baskets in a row to score a point
for your team or for you individually. Once you have made three shots in a row the
shooter must then rotate with a rebounder.
Key Teaching Points:
Game like intensity
Consistent shot technique and form
Simulated game like pressure to make shots in a row
Prepare to shoot the ball early
Stay low and in stance
Catch the ball in the air
Square and turn body in the air to end up with ten toes pointing at the target
Lock feet and head into shot
Shoot the ball with good rhythm and timing

Shooting 2011
25 © copyright Basketball WA
Spot Shooting Drill
Pick Up Drill
Drill:
A rebounder, shooter and a ball are required to commence the drill. You can position
the spots or cones on the floor wherever you like. The shooter will take between five
and ten shots at each of the spots on the floor
Key Teaching Points:
Game like intensity
Prepare to shoot the ball early
Stay low and in stance
Catch the ball in the air
Ten toes pointing at the target
Lock feet and head into shot
Work on consistent tecnique
Shoot the ball with good rhythm and timing
Ensure straight lines towards the target
Drill:
Drill commences with a shooter (1) and a rebounder (2). Two basketballs are placed on
each of the block areas on the edge of the keyway. The shooter must sprint pick up a
basketball and make a shot. They must then sprint pick up the other ball and make a
shot. The rebounder must rebound and place each ball back in the original starting
position. An identified target or time should be given and a score recorded.
Key Teaching Points:
Game like intensity
Prepare to shoot the ball early
Stay low and in stance
Picking up the ball means you are already low
Do not lift your body early
Do not arch your back during your shot
Ten toes pointing at the target
Lock feet and head into shot
Shoot the ball with good rhythm and timing
Shooting 2011
26 © copyright Basketball WA
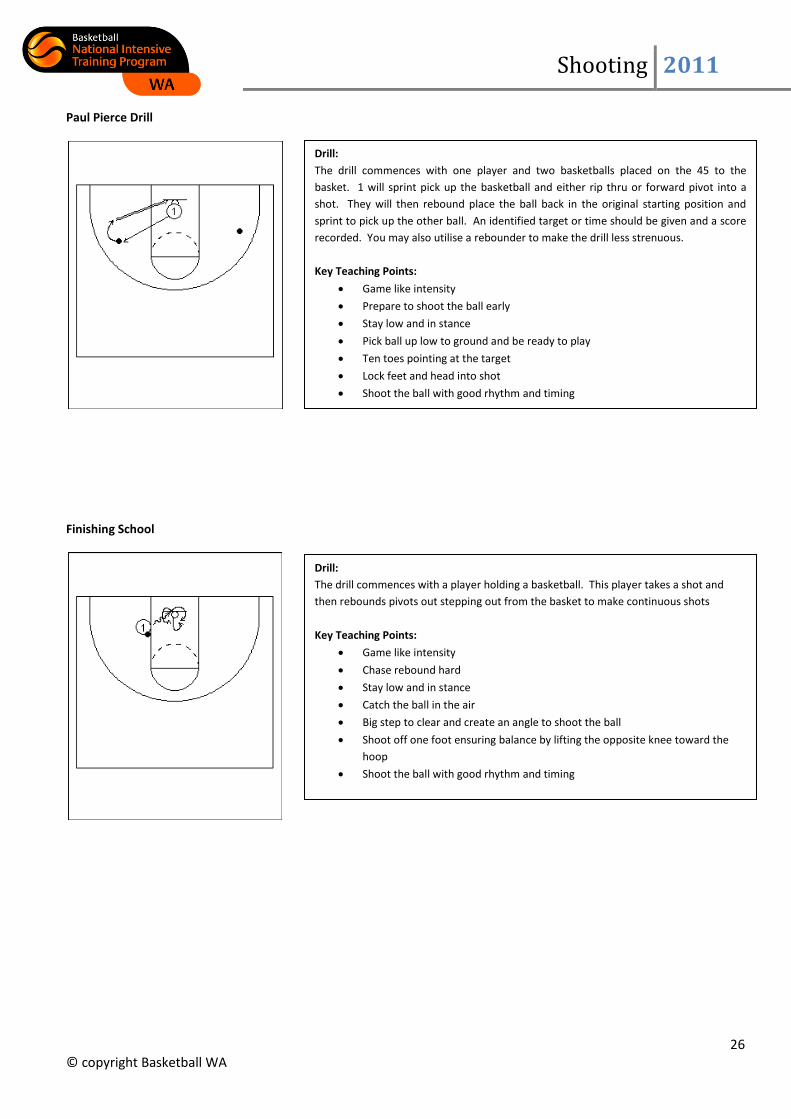
Paul Pierce Drill
Finishing School
Drill:
The drill commences with a player holding a basketball. This player takes a shot and
then rebounds pivots out stepping out from the basket to make continuous shots
Key Teaching Points:
Game like intensity
Chase rebound hard
Stay low and in stance
Catch the ball in the air
Big step to clear and create an angle to shoot the ball
Shoot off one foot ensuring balance by lifting the opposite knee toward the
hoop
Shoot the ball with good rhythm and timing
Drill:
The drill commences with one player and two basketballs placed on the 45 to the
basket. 1 will sprint pick up the basketball and either rip thru or forward pivot into a
shot. They will then rebound place the ball back in the original starting position and
sprint to pick up the other ball. An identified target or time should be given and a score
recorded. You may also utilise a rebounder to make the drill less strenuous.
Key Teaching Points:
Game like intensity
Prepare to shoot the ball early
Stay low and in stance
Pick ball up low to ground and be ready to play
Ten toes pointing at the target
Lock feet and head into shot
Shoot the ball with good rhythm and timing
Shooting 2011
27 © copyright Basketball WA
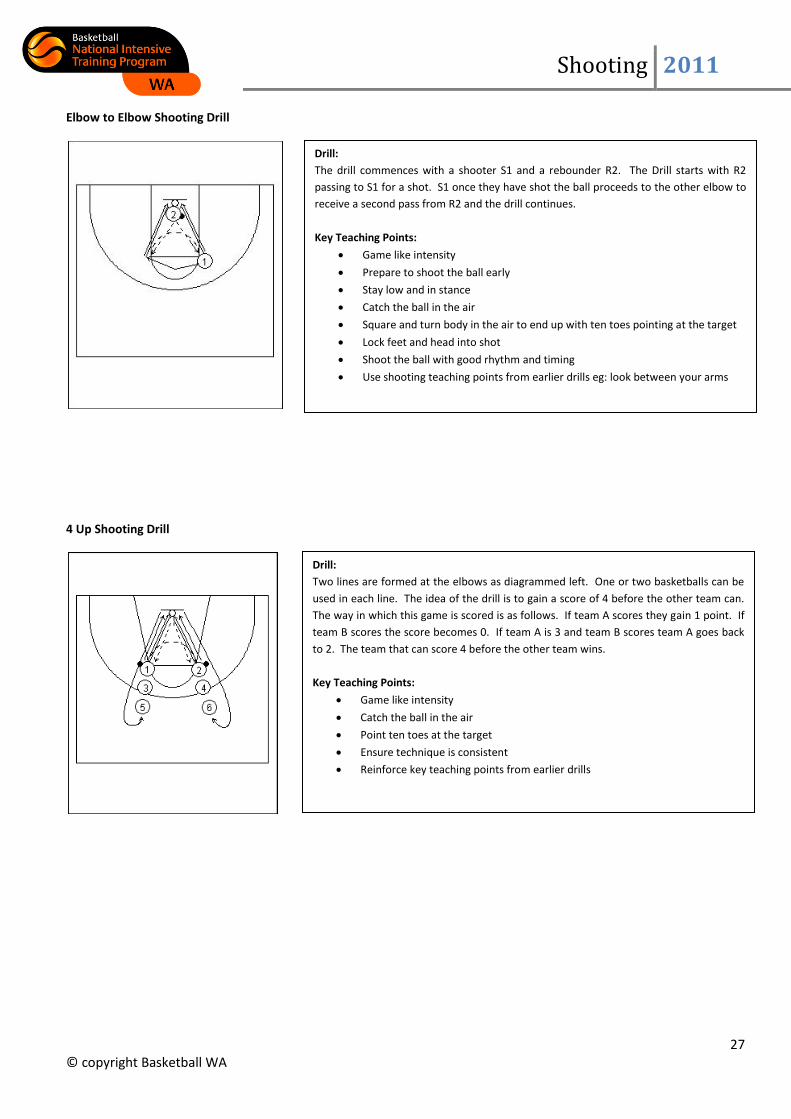
Elbow to Elbow Shooting Drill
4 Up Shooting Drill
Drill:
Two lines are formed at the elbows as diagrammed left. One or two basketballs can be
used in each line. The idea of the drill is to gain a score of 4 before the other team can.
The way in which this game is scored is as follows. If team A scores they gain 1 point. If
team B scores the score becomes 0. If team A is 3 and team B scores team A goes back
to 2. The team that can score 4 before the other team wins.
Key Teaching Points:
Game like intensity
Catch the ball in the air
Point ten toes at the target
Ensure technique is consistent
Reinforce key teaching points from earlier drills
Drill:
The drill commences with a shooter S1 and a rebounder R2. The Drill starts with R2
passing to S1 for a shot. S1 once they have shot the ball proceeds to the other elbow to
receive a second pass from R2 and the drill continues.
Key Teaching Points:
Game like intensity
Prepare to shoot the ball early
Stay low and in stance
Catch the ball in the air
Square and turn body in the air to end up with ten toes pointing at the target
Lock feet and head into shot
Shoot the ball with good rhythm and timing
Use shooting teaching points from earlier drills eg: look between your arms

Shooting 2011
28 © copyright Basketball WA
Gaze Drill
Swing Shooting Drill
Drill:
The drill commences with a passer (P2) and shooter (S1). S1 starts under the basket and
makes a forward lead to either wing to receive a pass from P1. S1 must catch and shoot
and then rebound and pass back to P2. The drill continues with S1 sprinting the
opposite forward spot to complete the same action.
Key Teaching Points:
Game like intensity
Catch the ball in the air
Square and turn body in the air to end up with ten toes pointing at the target
Ensure technique is consistent
Lock feet and head into shot
Shoot the ball with good rhythm and timing
Reinforce key teaching points from earlier drills
Drill:
Players commence the drill in two lines on the edge of the keyway as diagrammed. Two
basketballs are required. Players circle around the basket to designated spots to receive
the ball and catch and shoot. Once a player has taken their shot they rebound and pass
back to the line they received it from. The passer at the same time circles around the
initial shooter to receive the ball and shoot. Shots are completed in close to the basket,
from the block, mid post area, elbows and the three point line
Key Teaching Points:
Game like intensity
Catch the ball in the air
Square and turn body in the air to end up with ten toes pointing at the target
Ensure technique is consistent
Lock feet and head into shot
Shoot the ball with good rhythm and timing
Reinforce key teaching points from earlier drills
Shooting 2011
29 © copyright Basketball WA
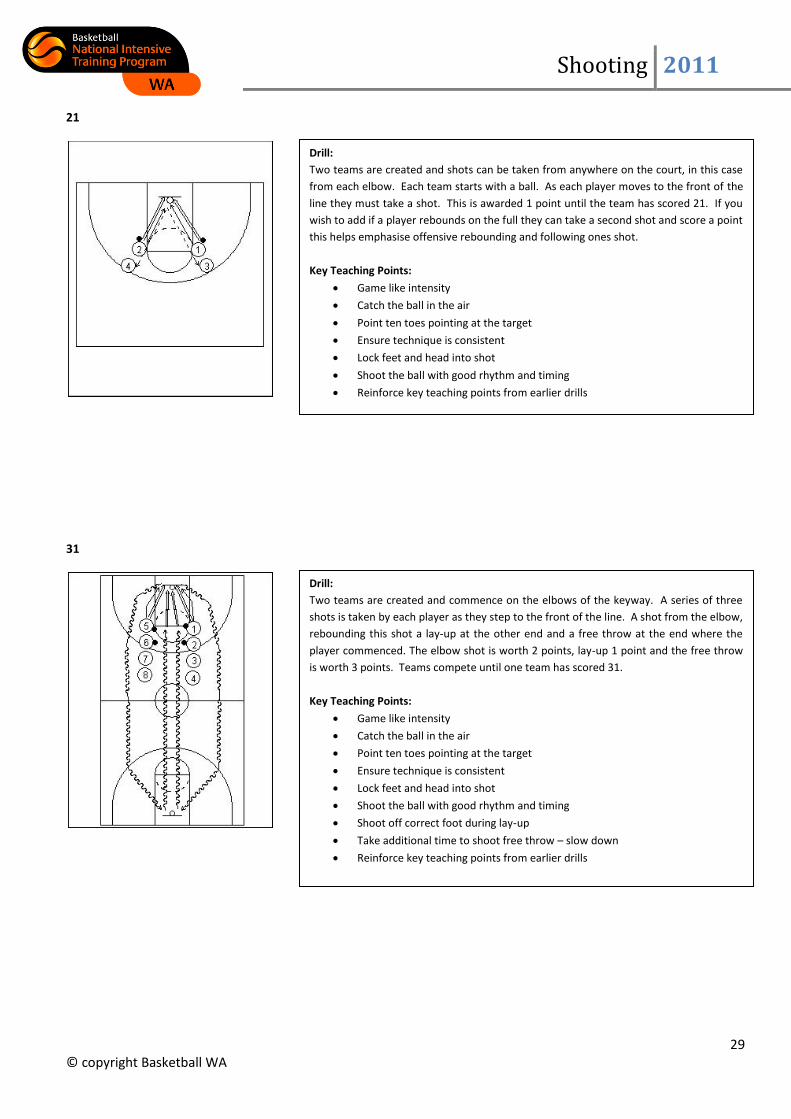
21
31
Drill:
Two teams are created and shots can be taken from anywhere on the court, in this case
from each elbow. Each team starts with a ball. As each player moves to the front of the
line they must take a shot. This is awarded 1 point until the team has scored 21. If you
wish to add if a player rebounds on the full they can take a second shot and score a point
this helps emphasise offensive rebounding and following ones shot.
Key Teaching Points:
Game like intensity
Catch the ball in the air
Point ten toes pointing at the target
Ensure technique is consistent
Lock feet and head into shot
Shoot the ball with good rhythm and timing
Reinforce key teaching points from earlier drills
Drill:
Two teams are created and commence on the elbows of the keyway. A series of three
shots is taken by each player as they step to the front of the line. A shot from the elbow,
rebounding this shot a lay-up at the other end and a free throw at the end where the
player commenced. The elbow shot is worth 2 points, lay-up 1 point and the free throw
is worth 3 points. Teams compete until one team has scored 31.
Key Teaching Points:
Game like intensity
Catch the ball in the air
Point ten toes pointing at the target
Ensure technique is consistent
Lock feet and head into shot
Shoot the ball with good rhythm and timing
Shoot off correct foot during lay-up
Take additional time to shoot free throw – slow down
Reinforce key teaching points from earlier drills

Shooting 2011
30 © copyright Basketball WA
Blasone Drill
Titan Drill
Drill
Player 1 and 2 at the start of each line commence drill without a ball. 3 and 4 second in
line commence with a ball. Player 1 and 2 sprint to point of the target and then plant
outside foot (closest sideline) and open to the ball. Imagine defender in front plant foot
inside their feet and seal for Ball. Ball is passed to 1 and 2 who shoot the ball. Play first
to 15 made baskets then repeat but after opening to ball sprint for mid range shot X 15
and then three point shot X 10
Key Teaching Points
Game like intensity
Catch the ball in the air
Point ten toes pointing at the target
Ensure technique is consistent
Lock feet and head into shot
Shoot the ball with good rhythm and timing
Reinforce key teaching points from earlier drills
Drill
Players commence in three lines as diagrammed. Each player at the front of the line
shoots the ball, rebounds throws it back to next person in line. They then sprint to half
way and then join the end of the line.
Emphasis
Run hard between shots
Prepare to shoot the ball before you catch
Catch the ball in the air
Index finger
Break at knees, elbow and wrist
Do not break at knuckles or fingers
Keep fingers spread
Lock elbow
Back spin rotation of ball
Shooting 2011
31 © copyright Basketball WA
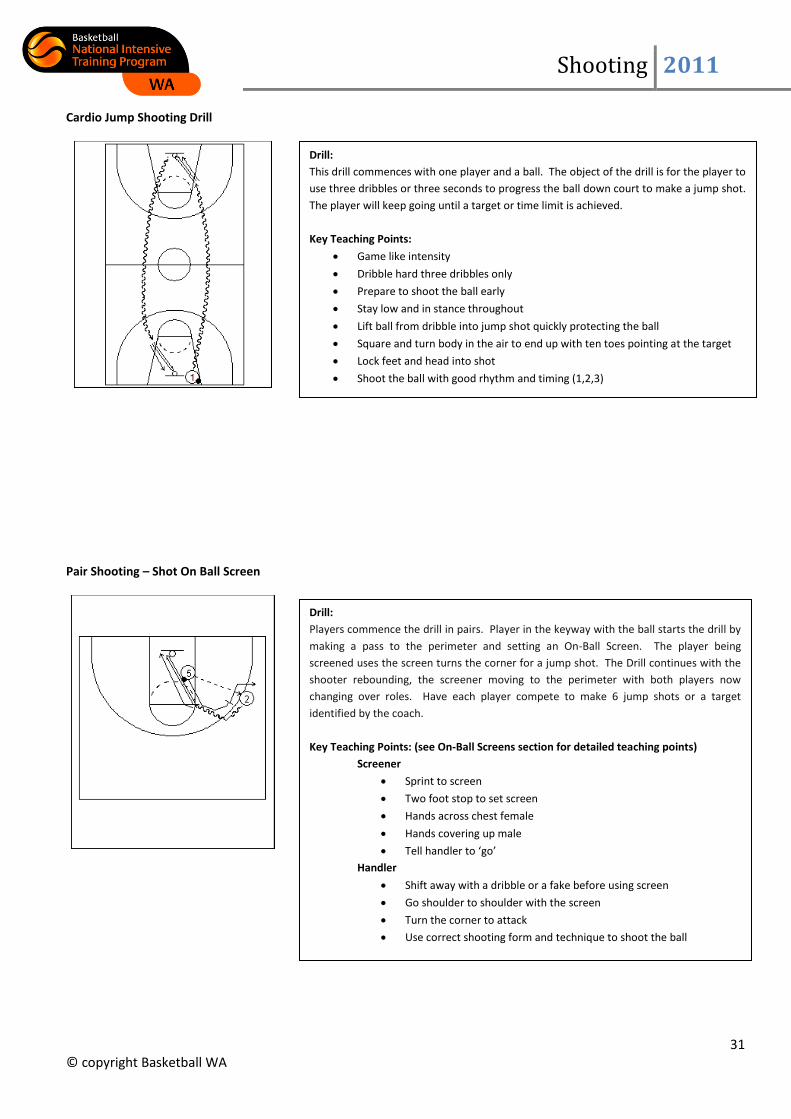
Cardio Jump Shooting Drill
Pair Shooting – Shot On Ball Screen
Drill:
This drill commences with one player and a ball. The object of the drill is for the player to
use three dribbles or three seconds to progress the ball down court to make a jump shot.
The player will keep going until a target or time limit is achieved.
Key Teaching Points:
Game like intensity
Dribble hard three dribbles only
Prepare to shoot the ball early
Stay low and in stance throughout
Lift ball from dribble into jump shot quickly protecting the ball
Square and turn body in the air to end up with ten toes pointing at the target
Lock feet and head into shot
Shoot the ball with good rhythm and timing (1,2,3)
Drill:
Players commence the drill in pairs. Player in the keyway with the ball starts the drill by
making a pass to the perimeter and setting an On-Ball Screen. The player being
screened uses the screen turns the corner for a jump shot. The Drill continues with the
shooter rebounding, the screener moving to the perimeter with both players now
changing over roles. Have each player compete to make 6 jump shots or a target
identified by the coach.
Key Teaching Points: (see On-Ball Screens section for detailed teaching points)
Screener
Sprint to screen
Two foot stop to set screen
Hands across chest female
Hands covering up male
Tell handler to ‘go’
Handler
Shift away with a dribble or a fake before using screen
Go shoulder to shoulder with the screen
Turn the corner to attack
Use correct shooting form and technique to shoot the ball
Shooting 2011
32 © copyright Basketball WA
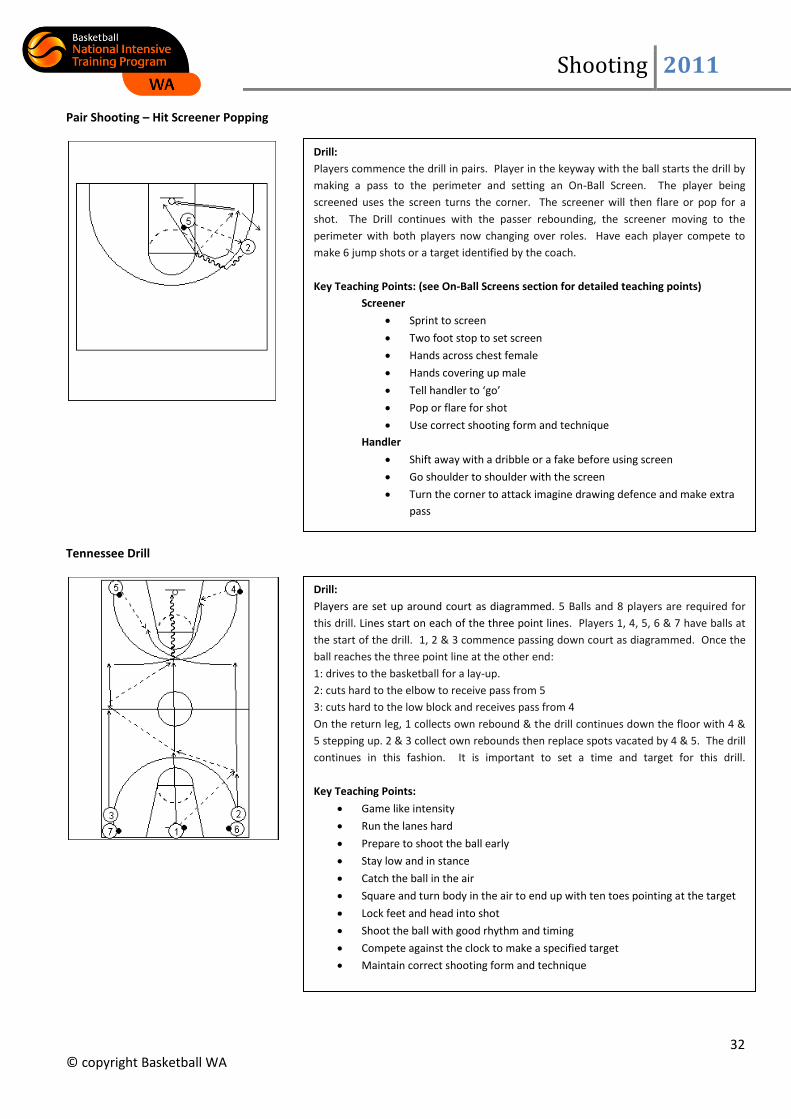
Pair Shooting – Hit Screener Popping
Tennessee Drill
Drill:
Players are set up around court as diagrammed. 5 Balls and 8 players are required for
this drill. Lines start on each of the three point lines. Players 1, 4, 5, 6 & 7 have balls at
the start of the drill. 1, 2 & 3 commence passing down court as diagrammed. Once the
ball reaches the three point line at the other end:
1: drives to the basketball for a lay-up.
2: cuts hard to the elbow to receive pass from 5
3: cuts hard to the low block and receives pass from 4
On the return leg, 1 collects own rebound & the drill continues down the floor with 4 &
5 stepping up. 2 & 3 collect own rebounds then replace spots vacated by 4 & 5. The drill
continues in this fashion. It is important to set a time and target for this drill.
Key Teaching Points:
Game like intensity
Run the lanes hard
Prepare to shoot the ball early
Stay low and in stance
Catch the ball in the air
Square and turn body in the air to end up with ten toes pointing at the target
Lock feet and head into shot
Shoot the ball with good rhythm and timing
Compete against the clock to make a specified target
Maintain correct shooting form and technique
Drill:
Players commence the drill in pairs. Player in the keyway with the ball starts the drill by
making a pass to the perimeter and setting an On-Ball Screen. The player being
screened uses the screen turns the corner. The screener will then flare or pop for a
shot. The Drill continues with the passer rebounding, the screener moving to the
perimeter with both players now changing over roles. Have each player compete to
make 6 jump shots or a target identified by the coach.
Key Teaching Points: (see On-Ball Screens section for detailed teaching points)
Screener
Sprint to screen
Two foot stop to set screen
Hands across chest female
Hands covering up male
Tell handler to ‘go’
Pop or flare for shot
Use correct shooting form and technique
Handler
Shift away with a dribble or a fake before using screen
Go shoulder to shoulder with the screen
Turn the corner to attack imagine drawing defence and make extra
pass
Shooting 2011
33 © copyright Basketball WA
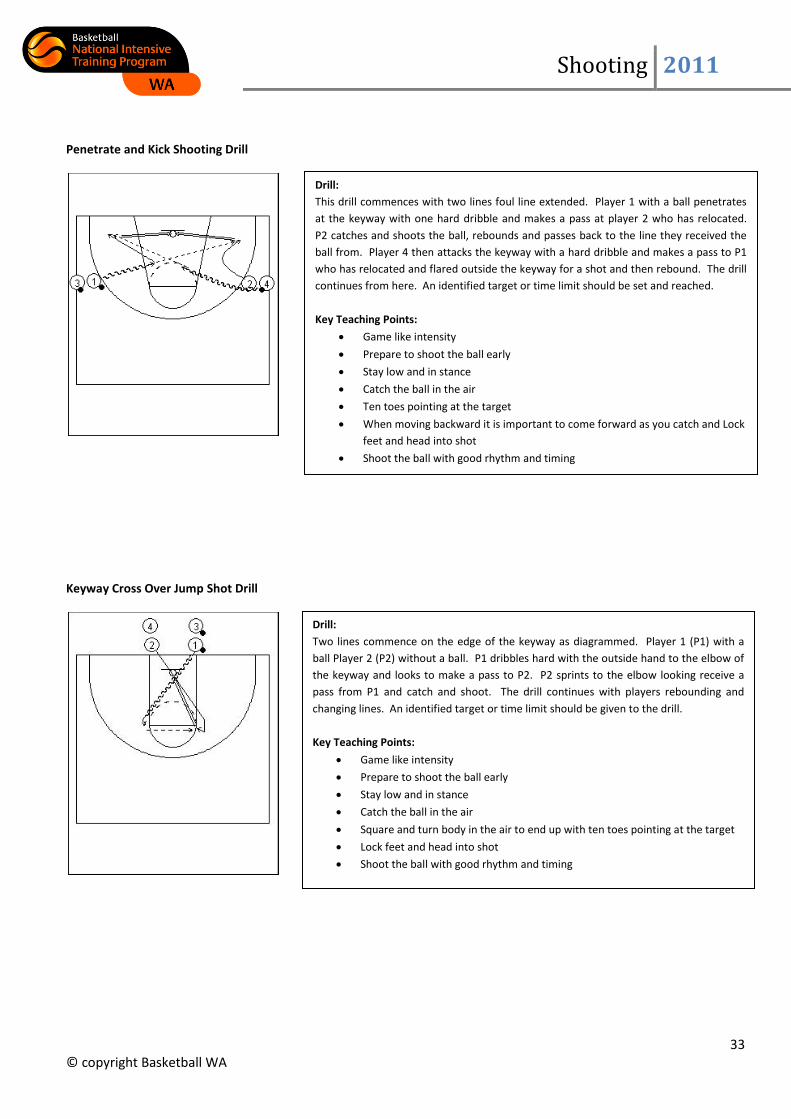
Penetrate and Kick Shooting Drill
Keyway Cross Over Jump Shot Drill
Drill:
This drill commences with two lines foul line extended. Player 1 with a ball penetrates
at the keyway with one hard dribble and makes a pass at player 2 who has relocated.
P2 catches and shoots the ball, rebounds and passes back to the line they received the
ball from. Player 4 then attacks the keyway with a hard dribble and makes a pass to P1
who has relocated and flared outside the keyway for a shot and then rebound. The drill
continues from here. An identified target or time limit should be set and reached.
Key Teaching Points:
Game like intensity
Prepare to shoot the ball early
Stay low and in stance
Catch the ball in the air
Ten toes pointing at the target
When moving backward it is important to come forward as you catch and Lock
feet and head into shot
Shoot the ball with good rhythm and timing
Drill:
Two lines commence on the edge of the keyway as diagrammed. Player 1 (P1) with a
ball Player 2 (P2) without a ball. P1 dribbles hard with the outside hand to the elbow of
the keyway and looks to make a pass to P2. P2 sprints to the elbow looking receive a
pass from P1 and catch and shoot. The drill continues with players rebounding and
changing lines. An identified target or time limit should be given to the drill.
Key Teaching Points:
Game like intensity
Prepare to shoot the ball early
Stay low and in stance
Catch the ball in the air
Square and turn body in the air to end up with ten toes pointing at the target
Lock feet and head into shot
Shoot the ball with good rhythm and timing
Shooting 2011
34 © copyright Basketball WA
SECTION G: Conditioning Shooting Drills
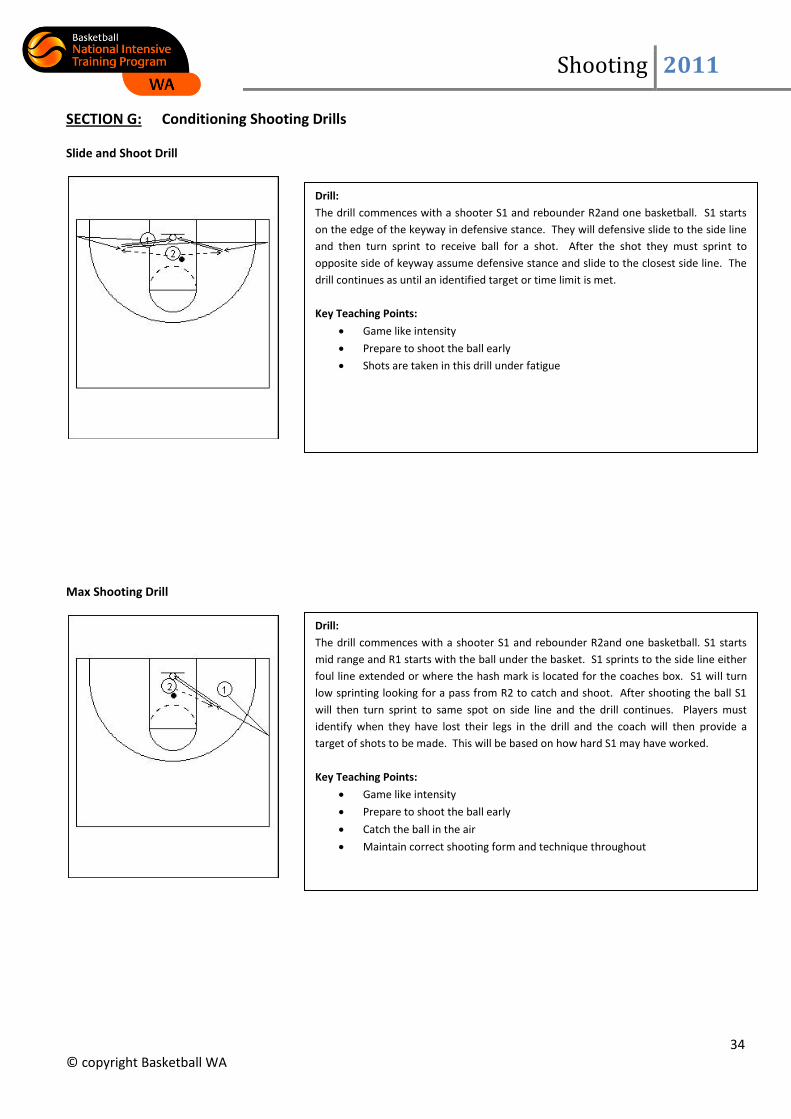
Slide and Shoot Drill
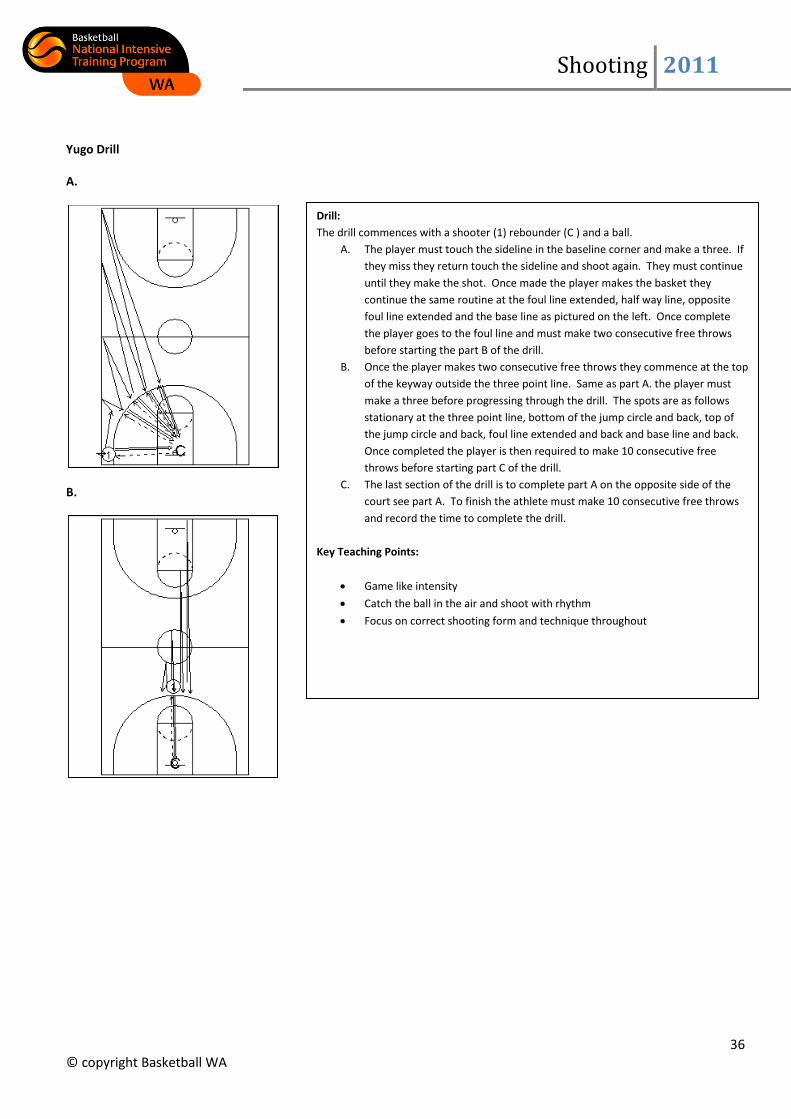
Max Shooting Drill
Drill:
The drill commences with a shooter S1 and rebounder R2and one basketball. S1 starts
on the edge of the keyway in defensive stance. They will defensive slide to the side line
and then turn sprint to receive ball for a shot. After the shot they must sprint to
opposite side of keyway assume defensive stance and slide to the closest side line. The
drill continues as until an identified target or time limit is met.
Key Teaching Points:
Game like intensity
Prepare to shoot the ball early
Shots are taken in this drill under fatigue
Drill:
The drill commences with a shooter S1 and rebounder R2and one basketball. S1 starts
mid range and R1 starts with the ball under the basket. S1 sprints to the side line either
foul line extended or where the hash mark is located for the coaches box. S1 will turn
low sprinting looking for a pass from R2 to catch and shoot. After shooting the ball S1
will then turn sprint to same spot on side line and the drill continues. Players must
identify when they have lost their legs in the drill and the coach will then provide a
target of shots to be made. This will be based on how hard S1 may have worked.
Key Teaching Points:
Game like intensity
Prepare to shoot the ball early
Catch the ball in the air
Maintain correct shooting form and technique throughout

Shooting 2011
35 © copyright Basketball WA
Torture Shooting Drill
Caporn 20 minute drill
Drill:
The drill commences with a Shooter 1 and a Rebounder 2. 1 will shoot continuously
completing the following circuit. 2 must rebound and pass back to 1 as quickly as
possible to keep 1 active. 1 will take a step each time and catch the ball in the air as
they progress around the circuit. 1 will complete the following:
A. Bottom hash mark to bottom hash mark around and back twice
B. Mid Range baseline shot to baseline shot around and back twice
C. Three Point Shot baseline shot to baseline shot around and back twice
Key Teaching Points:
Game like intensity
Prepare to shoot the ball early
Catch the ball in the air
Maintain correct shooting form and technique throughout
Drill:
The drill commences with a player and a ball. The drill starts with a player shooting from
behind the three point line and rebounding their own shot. If they make the shot they
stay and attempt to make another until they make three in a row which earns them 1
point. Once they make three in a row they must dribble hard to the other end and
attempt to make three in a row again. If the player misses at any time they must dribble
hard to the other end and start again. This drill continues for 20 minutes and the
number of 3 X 3 point shots in a row is recorded.
Key Teaching Points:
Game like intensity
Chase rebound
Focus on correct shooting form and technique throughout
Shooting 2011
36 © copyright Basketball WA
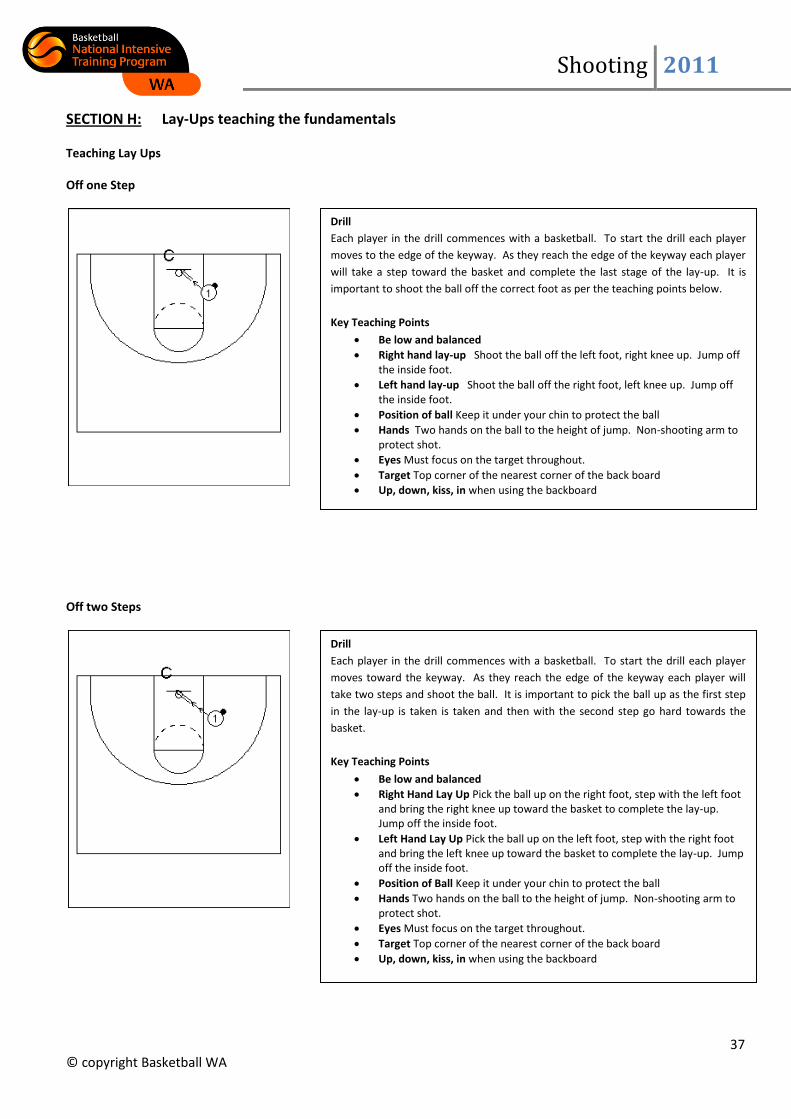
Yugo Drill
A.
B.
Drill:
The drill commences with a shooter (1) rebounder (C ) and a ball.
A. The player must touch the sideline in the baseline corner and make a three. If
they miss they return touch the sideline and shoot again. They must continue
until they make the shot. Once made the player makes the basket they
continue the same routine at the foul line extended, half way line, opposite
foul line extended and the base line as pictured on the left. Once complete
the player goes to the foul line and must make two consecutive free throws
before starting the part B of the drill.
B. Once the player makes two consecutive free throws they commence at the top
of the keyway outside the three point line. Same as part A. the player must
make a three before progressing through the drill. The spots are as follows
stationary at the three point line, bottom of the jump circle and back, top of
the jump circle and back, foul line extended and back and base line and back.
Once completed the player is then required to make 10 consecutive free
throws before starting part C of the drill.
C. The last section of the drill is to complete part A on the opposite side of the
court see part A. To finish the athlete must make 10 consecutive free throws
and record the time to complete the drill.
Key Teaching Points:
Game like intensity
Catch the ball in the air and shoot with rhythm
Focus on correct shooting form and technique throughout
Shooting 2011
37 © copyright Basketball WA
SECTION H: Lay-Ups teaching the fundamentals
Teaching Lay Ups
Off one Step
Off two Steps
Drill
Each player in the drill commences with a basketball. To start the drill each player
moves to the edge of the keyway. As they reach the edge of the keyway each player
will take a step toward the basket and complete the last stage of the lay-up. It is
important to shoot the ball off the correct foot as per the teaching points below.
Key Teaching Points
Be low and balanced
Right hand lay-up Shoot the ball off the left foot, right knee up. Jump off the inside foot.
Left hand lay-up Shoot the ball off the right foot, left knee up. Jump off the inside foot.
Position of ball Keep it under your chin to protect the ball
Hands Two hands on the ball to the height of jump. Non-shooting arm to protect shot.
Eyes Must focus on the target throughout.
Target Top corner of the nearest corner of the back board
Up, down, kiss, in when using the backboard
Drill
Each player in the drill commences with a basketball. To start the drill each player
moves toward the keyway. As they reach the edge of the keyway each player will
take two steps and shoot the ball. It is important to pick the ball up as the first step
in the lay-up is taken is taken and then with the second step go hard towards the
basket.
Key Teaching Points
Be low and balanced
Right Hand Lay Up Pick the ball up on the right foot, step with the left foot and bring the right knee up toward the basket to complete the lay-up. Jump off the inside foot.
Left Hand Lay Up Pick the ball up on the left foot, step with the right foot and bring the left knee up toward the basket to complete the lay-up. Jump off the inside foot.
Position of Ball Keep it under your chin to protect the ball
Hands Two hands on the ball to the height of jump. Non-shooting arm to protect shot.
Eyes Must focus on the target throughout.
Target Top corner of the nearest corner of the back board
Up, down, kiss, in when using the backboard
Shooting 2011
38 © copyright Basketball WA
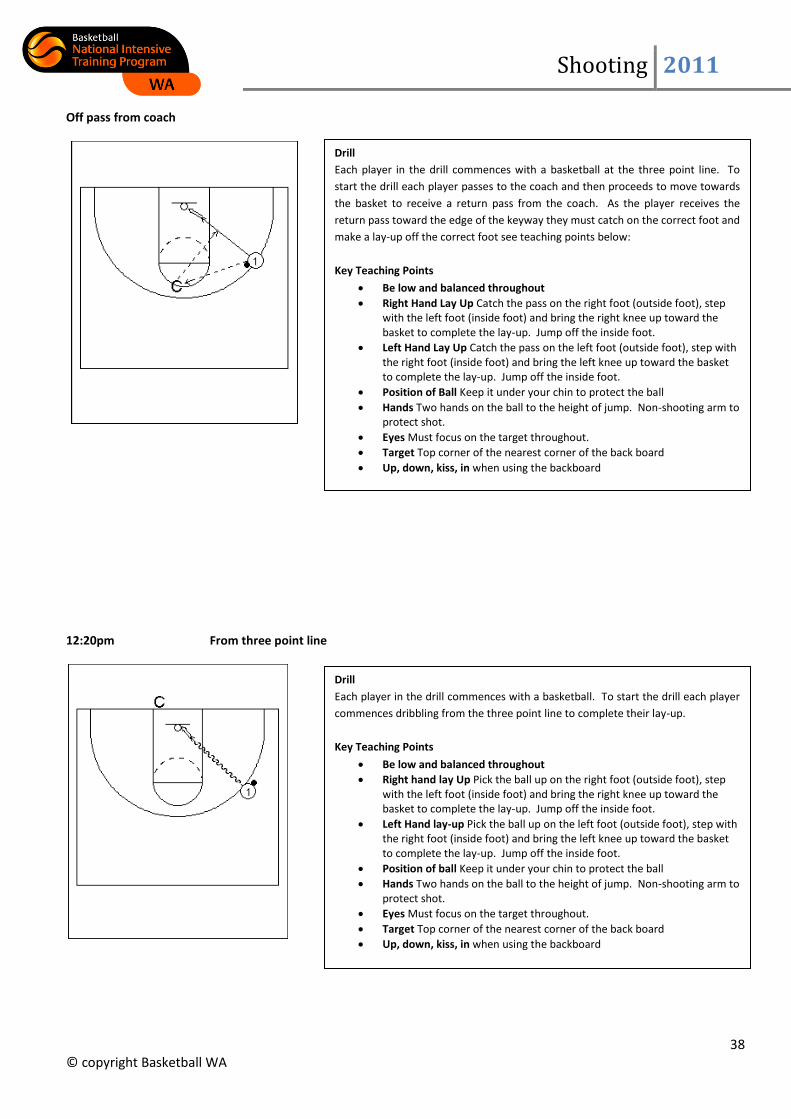
Off pass from coach
12:20pm From three point line
Drill
Each player in the drill commences with a basketball at the three point line. To
start the drill each player passes to the coach and then proceeds to move towards
the basket to receive a return pass from the coach. As the player receives the
return pass toward the edge of the keyway they must catch on the correct foot and
make a lay-up off the correct foot see teaching points below:
Key Teaching Points
Be low and balanced throughout
Right Hand Lay Up Catch the pass on the right foot (outside foot), step with the left foot (inside foot) and bring the right knee up toward the basket to complete the lay-up. Jump off the inside foot.
Left Hand Lay Up Catch the pass on the left foot (outside foot), step with the right foot (inside foot) and bring the left knee up toward the basket to complete the lay-up. Jump off the inside foot.
Position of Ball Keep it under your chin to protect the ball
Hands Two hands on the ball to the height of jump. Non-shooting arm to protect shot.
Eyes Must focus on the target throughout.
Target Top corner of the nearest corner of the back board
Up, down, kiss, in when using the backboard
Drill
Each player in the drill commences with a basketball. To start the drill each player
commences dribbling from the three point line to complete their lay-up.
Key Teaching Points
Be low and balanced throughout
Right hand lay Up Pick the ball up on the right foot (outside foot), step with the left foot (inside foot) and bring the right knee up toward the basket to complete the lay-up. Jump off the inside foot.
Left Hand lay-up Pick the ball up on the left foot (outside foot), step with the right foot (inside foot) and bring the left knee up toward the basket to complete the lay-up. Jump off the inside foot.
Position of ball Keep it under your chin to protect the ball
Hands Two hands on the ball to the height of jump. Non-shooting arm to protect shot.
Eyes Must focus on the target throughout.
Target Top corner of the nearest corner of the back board
Up, down, kiss, in when using the backboard
Shooting 2011
39 © copyright Basketball WA
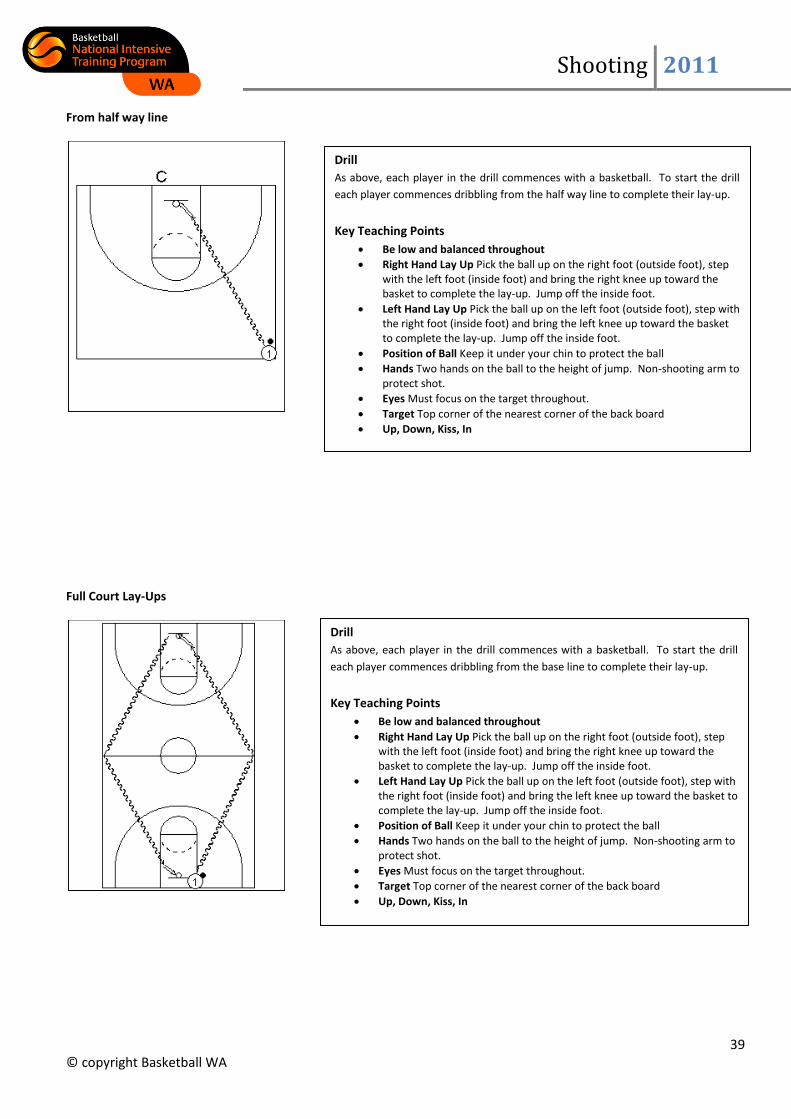
From half way line
Full Court Lay-Ups
Drill
As above, each player in the drill commences with a basketball. To start the drill
each player commences dribbling from the half way line to complete their lay-up.
Key Teaching Points
Be low and balanced throughout
Right Hand Lay Up Pick the ball up on the right foot (outside foot), step with the left foot (inside foot) and bring the right knee up toward the basket to complete the lay-up. Jump off the inside foot.
Left Hand Lay Up Pick the ball up on the left foot (outside foot), step with the right foot (inside foot) and bring the left knee up toward the basket to complete the lay-up. Jump off the inside foot.
Position of Ball Keep it under your chin to protect the ball
Hands Two hands on the ball to the height of jump. Non-shooting arm to protect shot.
Eyes Must focus on the target throughout.
Target Top corner of the nearest corner of the back board
Up, Down, Kiss, In
Right Hand Lay Up Shoot the ball off the Left Foot, Right Knee Up. Jump off the inside foot.
Left Hand Lay Up Shoot the ball off the Right Foot, Left Knee Up. Jump off the inside foot.
Position of Ball Keep it under your chin
Hands Two hands on the ball to the height of jump. Non-shooting arm to protect shot.
Drill
As above, each player in the drill commences with a basketball. To start the drill
each player commences dribbling from the base line to complete their lay-up.
Key Teaching Points
Be low and balanced throughout
Right Hand Lay Up Pick the ball up on the right foot (outside foot), step with the left foot (inside foot) and bring the right knee up toward the basket to complete the lay-up. Jump off the inside foot.
Left Hand Lay Up Pick the ball up on the left foot (outside foot), step with the right foot (inside foot) and bring the left knee up toward the basket to complete the lay-up. Jump off the inside foot.
Position of Ball Keep it under your chin to protect the ball
Hands Two hands on the ball to the height of jump. Non-shooting arm to protect shot.
Eyes Must focus on the target throughout.
Target Top corner of the nearest corner of the back board
Up, Down, Kiss, In
Shooting 2011
40 © copyright Basketball WA
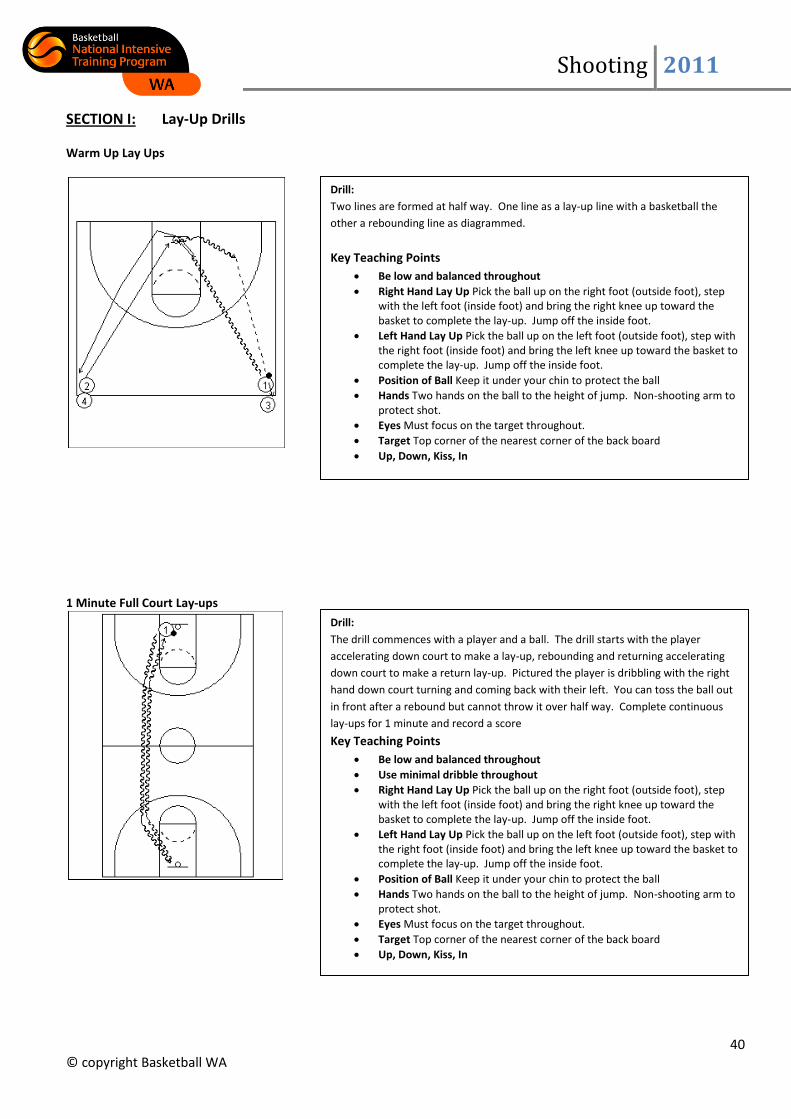
SECTION I: Lay-Up Drills Warm Up Lay Ups
1 Minute Full Court Lay-ups
Drill:
Two lines are formed at half way. One line as a lay-up line with a basketball the
other a rebounding line as diagrammed.
Key Teaching Points
Be low and balanced throughout
Right Hand Lay Up Pick the ball up on the right foot (outside foot), step with the left foot (inside foot) and bring the right knee up toward the basket to complete the lay-up. Jump off the inside foot.
Left Hand Lay Up Pick the ball up on the left foot (outside foot), step with the right foot (inside foot) and bring the left knee up toward the basket to complete the lay-up. Jump off the inside foot.
Position of Ball Keep it under your chin to protect the ball
Hands Two hands on the ball to the height of jump. Non-shooting arm to protect shot.
Eyes Must focus on the target throughout.
Target Top corner of the nearest corner of the back board
Up, Down, Kiss, In
Drill:
The drill commences with a player and a ball. The drill starts with the player
accelerating down court to make a lay-up, rebounding and returning accelerating
down court to make a return lay-up. Pictured the player is dribbling with the right
hand down court turning and coming back with their left. You can toss the ball out
in front after a rebound but cannot throw it over half way. Complete continuous
lay-ups for 1 minute and record a score
Key Teaching Points
Be low and balanced throughout
Use minimal dribble throughout
Right Hand Lay Up Pick the ball up on the right foot (outside foot), step with the left foot (inside foot) and bring the right knee up toward the basket to complete the lay-up. Jump off the inside foot.
Left Hand Lay Up Pick the ball up on the left foot (outside foot), step with the right foot (inside foot) and bring the left knee up toward the basket to complete the lay-up. Jump off the inside foot.
Position of Ball Keep it under your chin to protect the ball
Hands Two hands on the ball to the height of jump. Non-shooting arm to protect shot.
Eyes Must focus on the target throughout.
Target Top corner of the nearest corner of the back board
Up, Down, Kiss, In
Shooting 2011
41 © copyright Basketball WA
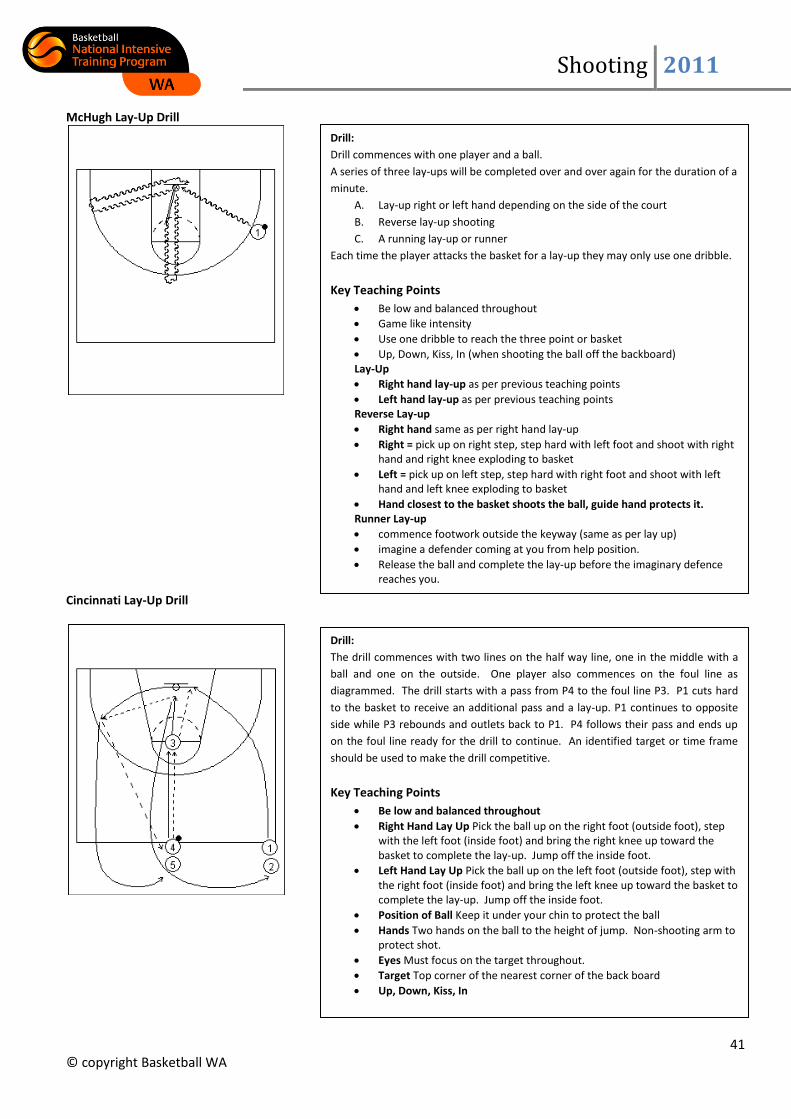
McHugh Lay-Up Drill
Cincinnati Lay-Up Drill
Drill:
The drill commences with two lines on the half way line, one in the middle with a
ball and one on the outside. One player also commences on the foul line as
diagrammed. The drill starts with a pass from P4 to the foul line P3. P1 cuts hard
to the basket to receive an additional pass and a lay-up. P1 continues to opposite
side while P3 rebounds and outlets back to P1. P4 follows their pass and ends up
on the foul line ready for the drill to continue. An identified target or time frame
should be used to make the drill competitive.
Key Teaching Points
Be low and balanced throughout
Right Hand Lay Up Pick the ball up on the right foot (outside foot), step with the left foot (inside foot) and bring the right knee up toward the basket to complete the lay-up. Jump off the inside foot.
Left Hand Lay Up Pick the ball up on the left foot (outside foot), step with the right foot (inside foot) and bring the left knee up toward the basket to complete the lay-up. Jump off the inside foot.
Position of Ball Keep it under your chin to protect the ball
Hands Two hands on the ball to the height of jump. Non-shooting arm to protect shot.
Eyes Must focus on the target throughout.
Target Top corner of the nearest corner of the back board
Up, Down, Kiss, In
Drill:
Drill commences with one player and a ball.
A series of three lay-ups will be completed over and over again for the duration of a
minute.
A. Lay-up right or left hand depending on the side of the court
B. Reverse lay-up shooting
C. A running lay-up or runner
Each time the player attacks the basket for a lay-up they may only use one dribble.
Key Teaching Points
Be low and balanced throughout
Game like intensity
Use one dribble to reach the three point or basket
Up, Down, Kiss, In (when shooting the ball off the backboard) Lay-Up
Right hand lay-up as per previous teaching points
Left hand lay-up as per previous teaching points Reverse Lay-up
Right hand same as per right hand lay-up
Right = pick up on right step, step hard with left foot and shoot with right hand and right knee exploding to basket
Left = pick up on left step, step hard with right foot and shoot with left hand and left knee exploding to basket
Hand closest to the basket shoots the ball, guide hand protects it. Runner Lay-up
commence footwork outside the keyway (same as per lay up)
imagine a defender coming at you from help position.
Release the ball and complete the lay-up before the imaginary defence reaches you.
Shooting 2011
42 © copyright Basketball WA
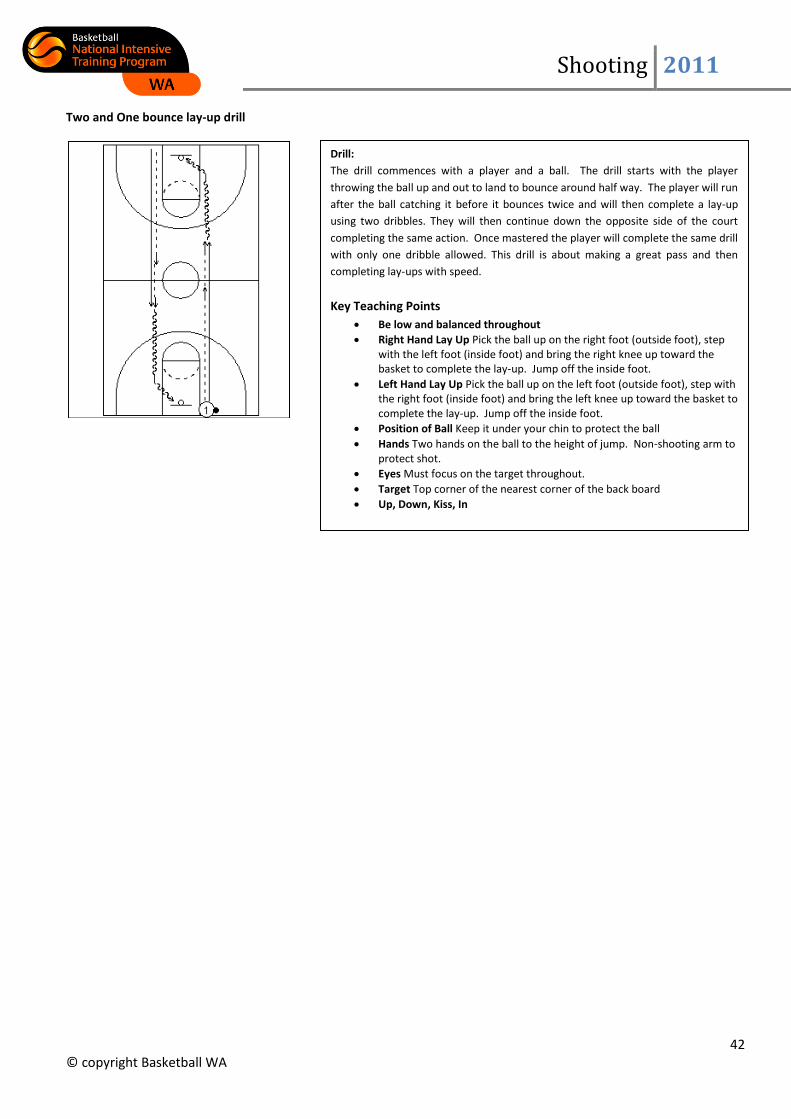
Two and One bounce lay-up drill
Drill:
The drill commences with a player and a ball. The drill starts with the player
throwing the ball up and out to land to bounce around half way. The player will run
after the ball catching it before it bounces twice and will then complete a lay-up
using two dribbles. They will then continue down the opposite side of the court
completing the same action. Once mastered the player will complete the same drill
with only one dribble allowed. This drill is about making a great pass and then
completing lay-ups with speed.
Key Teaching Points
Be low and balanced throughout
Right Hand Lay Up Pick the ball up on the right foot (outside foot), step with the left foot (inside foot) and bring the right knee up toward the basket to complete the lay-up. Jump off the inside foot.
Left Hand Lay Up Pick the ball up on the left foot (outside foot), step with the right foot (inside foot) and bring the left knee up toward the basket to complete the lay-up. Jump off the inside foot.
Position of Ball Keep it under your chin to protect the ball
Hands Two hands on the ball to the height of jump. Non-shooting arm to protect shot.
Eyes Must focus on the target throughout.
Target Top corner of the nearest corner of the back board
Up, Down, Kiss, In
Shooting 2011
43 © copyright Basketball WA
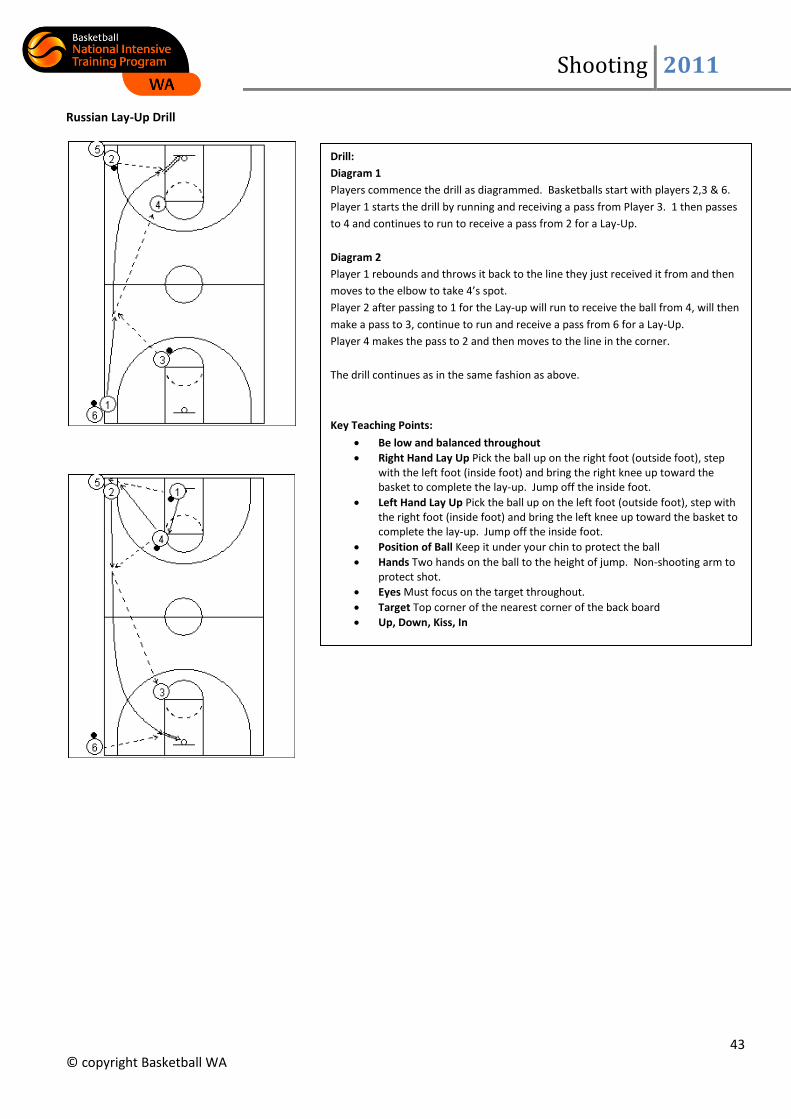
Russian Lay-Up Drill
Drill:
Diagram 1
Players commence the drill as diagrammed. Basketballs start with players 2,3 & 6.
Player 1 starts the drill by running and receiving a pass from Player 3. 1 then passes
to 4 and continues to run to receive a pass from 2 for a Lay-Up.
Diagram 2
Player 1 rebounds and throws it back to the line they just received it from and then
moves to the elbow to take 4’s spot.
Player 2 after passing to 1 for the Lay-up will run to receive the ball from 4, will then
make a pass to 3, continue to run and receive a pass from 6 for a Lay-Up.
Player 4 makes the pass to 2 and then moves to the line in the corner.
The drill continues as in the same fashion as above.
Key Teaching Points:
Be low and balanced throughout
Right Hand Lay Up Pick the ball up on the right foot (outside foot), step with the left foot (inside foot) and bring the right knee up toward the basket to complete the lay-up. Jump off the inside foot.
Left Hand Lay Up Pick the ball up on the left foot (outside foot), step with the right foot (inside foot) and bring the left knee up toward the basket to complete the lay-up. Jump off the inside foot.
Position of Ball Keep it under your chin to protect the ball
Hands Two hands on the ball to the height of jump. Non-shooting arm to protect shot.
Eyes Must focus on the target throughout.
Target Top corner of the nearest corner of the back board
Up, Down, Kiss, In
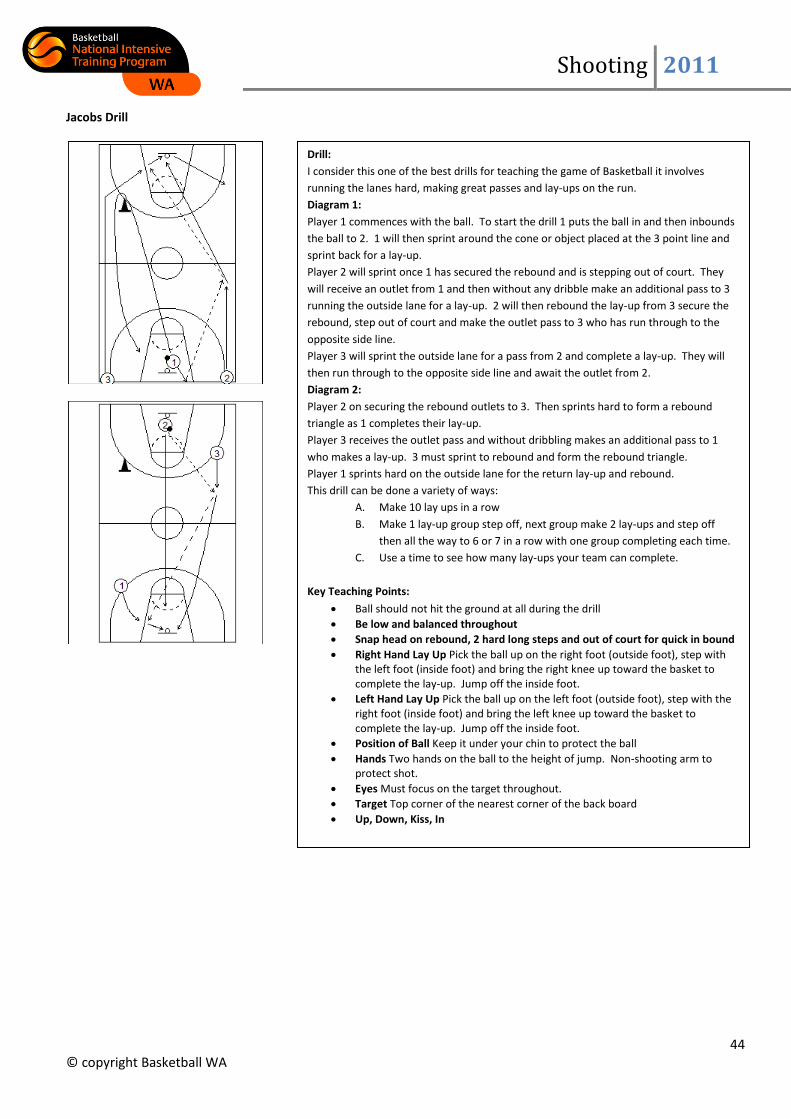
Shooting 2011
44 © copyright Basketball WA
Jacobs Drill
Drill:
I consider this one of the best drills for teaching the game of Basketball it involves
running the lanes hard, making great passes and lay-ups on the run.
Diagram 1:
Player 1 commences with the ball. To start the drill 1 puts the ball in and then inbounds
the ball to 2. 1 will then sprint around the cone or object placed at the 3 point line and
sprint back for a lay-up.
Player 2 will sprint once 1 has secured the rebound and is stepping out of court. They
will receive an outlet from 1 and then without any dribble make an additional pass to 3
running the outside lane for a lay-up. 2 will then rebound the lay-up from 3 secure the
rebound, step out of court and make the outlet pass to 3 who has run through to the
opposite side line.
Player 3 will sprint the outside lane for a pass from 2 and complete a lay-up. They will
then run through to the opposite side line and await the outlet from 2.
Diagram 2:
Player 2 on securing the rebound outlets to 3. Then sprints hard to form a rebound
triangle as 1 completes their lay-up.
Player 3 receives the outlet pass and without dribbling makes an additional pass to 1
who makes a lay-up. 3 must sprint to rebound and form the rebound triangle.
Player 1 sprints hard on the outside lane for the return lay-up and rebound.
This drill can be done a variety of ways:
A. Make 10 lay ups in a row
B. Make 1 lay-up group step off, next group make 2 lay-ups and step off
then all the way to 6 or 7 in a row with one group completing each time.
C. Use a time to see how many lay-ups your team can complete.
Key Teaching Points:
Ball should not hit the ground at all during the drill
Be low and balanced throughout
Snap head on rebound, 2 hard long steps and out of court for quick in bound
Right Hand Lay Up Pick the ball up on the right foot (outside foot), step with the left foot (inside foot) and bring the right knee up toward the basket to complete the lay-up. Jump off the inside foot.
Left Hand Lay Up Pick the ball up on the left foot (outside foot), step with the right foot (inside foot) and bring the left knee up toward the basket to complete the lay-up. Jump off the inside foot.
Position of Ball Keep it under your chin to protect the ball
Hands Two hands on the ball to the height of jump. Non-shooting arm to protect shot.
Eyes Must focus on the target throughout.
Target Top corner of the nearest corner of the back board
Up, Down, Kiss, In
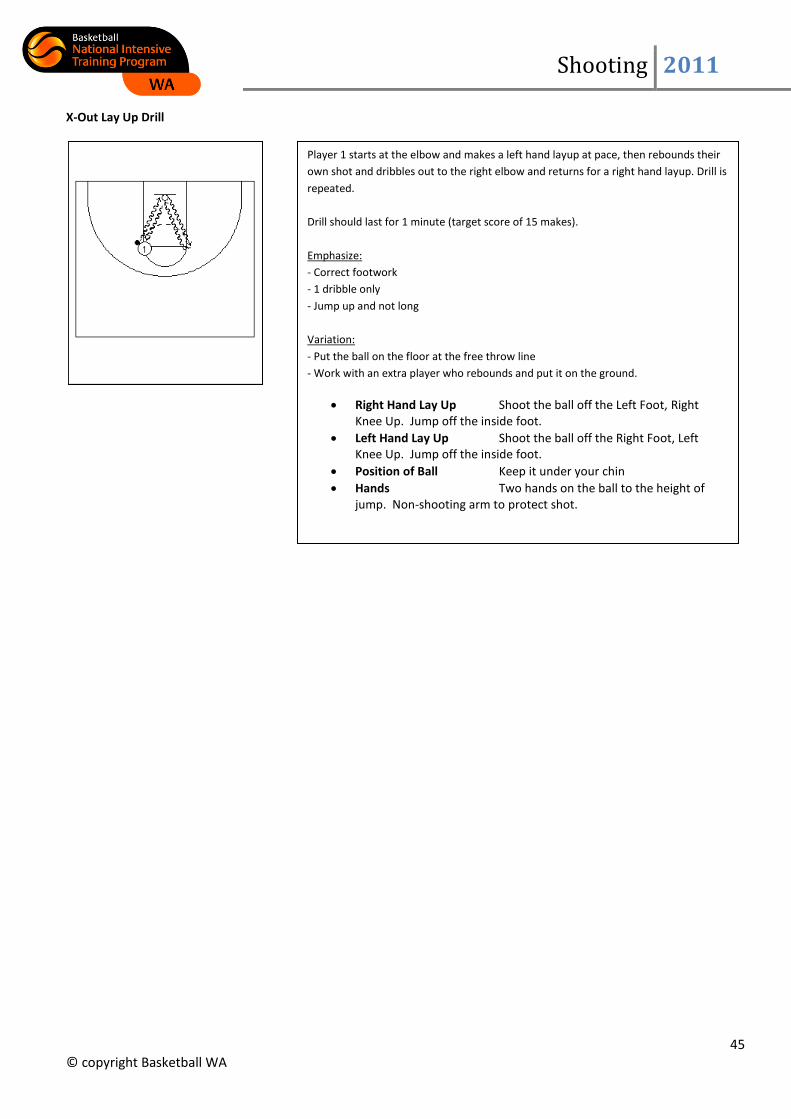
Shooting 2011
45 © copyright Basketball WA
X-Out Lay Up Drill
Player 1 starts at the elbow and makes a left hand layup at pace, then rebounds their
own shot and dribbles out to the right elbow and returns for a right hand layup. Drill is
repeated.
Drill should last for 1 minute (target score of 15 makes).
Emphasize:
- Correct footwork
- 1 dribble only
- Jump up and not long
Variation:
- Put the ball on the floor at the free throw line
- Work with an extra player who rebounds and put it on the ground.
Right Hand Lay Up Shoot the ball off the Left Foot, Right Knee Up. Jump off the inside foot.
Left Hand Lay Up Shoot the ball off the Right Foot, Left Knee Up. Jump off the inside foot.
Position of Ball Keep it under your chin
Hands Two hands on the ball to the height of jump. Non-shooting arm to protect shot.
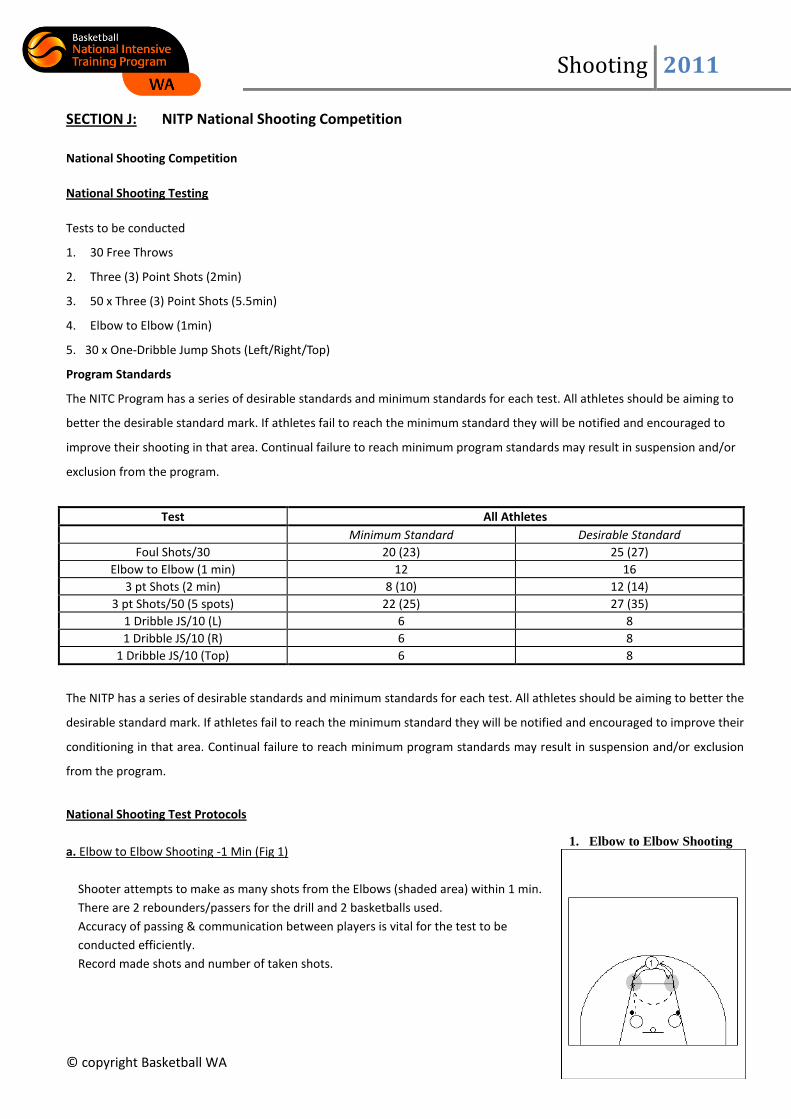
Shooting 2011
46 © copyright Basketball WA
SECTION J: NITP National Shooting Competition
National Shooting Competition
National Shooting Testing
Tests to be conducted
1. 30 Free Throws
2. Three (3) Point Shots (2min)
3. 50 x Three (3) Point Shots (5.5min)
4. Elbow to Elbow (1min)
5. 30 x One-Dribble Jump Shots (Left/Right/Top)
Program Standards
The NITC Program has a series of desirable standards and minimum standards for each test. All athletes should be aiming to
better the desirable standard mark. If athletes fail to reach the minimum standard they will be notified and encouraged to
improve their shooting in that area. Continual failure to reach minimum program standards may result in suspension and/or
exclusion from the program.
Test All Athletes
Minimum Standard Desirable Standard
Foul Shots/30 20 (23) 25 (27)
Elbow to Elbow (1 min) 12 16
3 pt Shots (2 min) 8 (10) 12 (14)
3 pt Shots/50 (5 spots) 22 (25) 27 (35)
1 Dribble JS/10 (L) 6 8
1 Dribble JS/10 (R) 6 8
1 Dribble JS/10 (Top) 6 8
The NITP has a series of desirable standards and minimum standards for each test. All athletes should be aiming to better the
desirable standard mark. If athletes fail to reach the minimum standard they will be notified and encouraged to improve their
conditioning in that area. Continual failure to reach minimum program standards may result in suspension and/or exclusion
from the program.
National Shooting Test Protocols
a. Elbow to Elbow Shooting -1 Min (Fig 1)
Shooter attempts to make as many shots from the Elbows (shaded area) within 1 min.
There are 2 rebounders/passers for the drill and 2 basketballs used.
Accuracy of passing & communication between players is vital for the test to be
conducted efficiently.
Record made shots and number of taken shots.
1. Elbow to Elbow Shooting
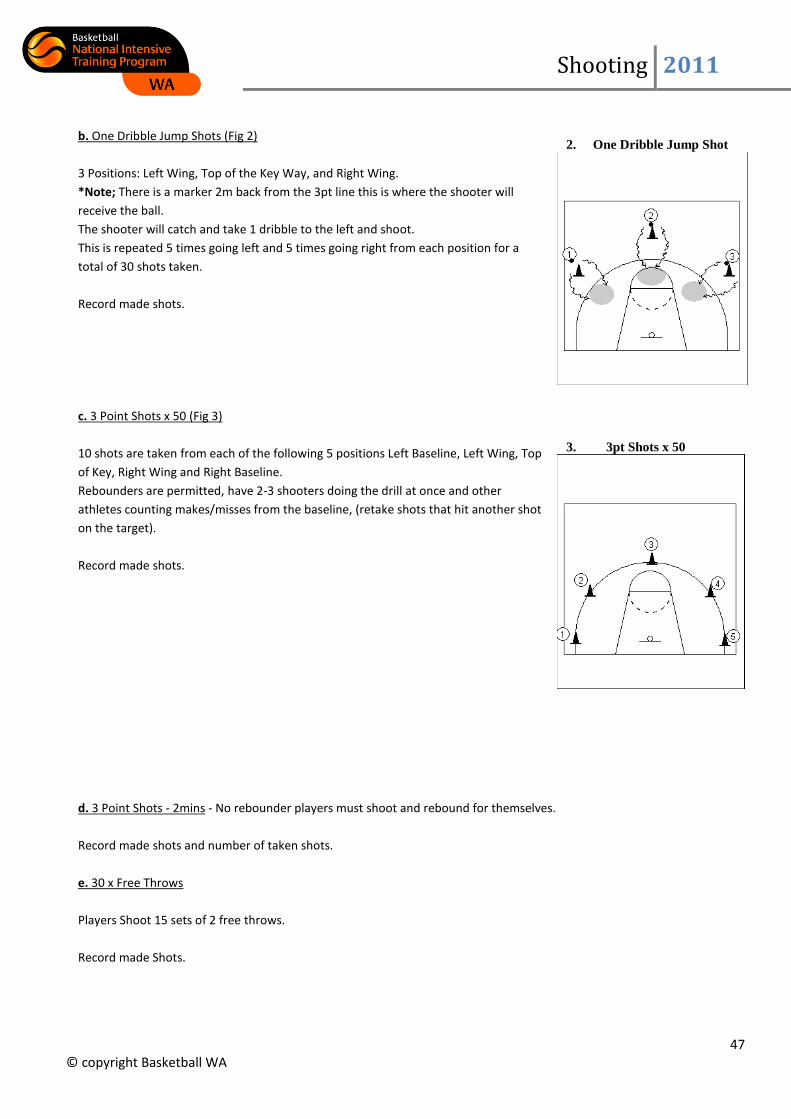
Shooting 2011
47 © copyright Basketball WA
3. 3pt Shots x 50
b. One Dribble Jump Shots (Fig 2)
3 Positions: Left Wing, Top of the Key Way, and Right Wing.
*Note; There is a marker 2m back from the 3pt line this is where the shooter will
receive the ball.
The shooter will catch and take 1 dribble to the left and shoot.
This is repeated 5 times going left and 5 times going right from each position for a
total of 30 shots taken.
Record made shots.
c. 3 Point Shots x 50 (Fig 3)
10 shots are taken from each of the following 5 positions Left Baseline, Left Wing, Top
of Key, Right Wing and Right Baseline.
Rebounders are permitted, have 2-3 shooters doing the drill at once and other
athletes counting makes/misses from the baseline, (retake shots that hit another shot
on the target).
Record made shots.
d. 3 Point Shots - 2mins - No rebounder players must shoot and rebound for themselves.
Record made shots and number of taken shots.
e. 30 x Free Throws
Players Shoot 15 sets of 2 free throws.
Record made Shots.
2. One Dribble Jump Shot
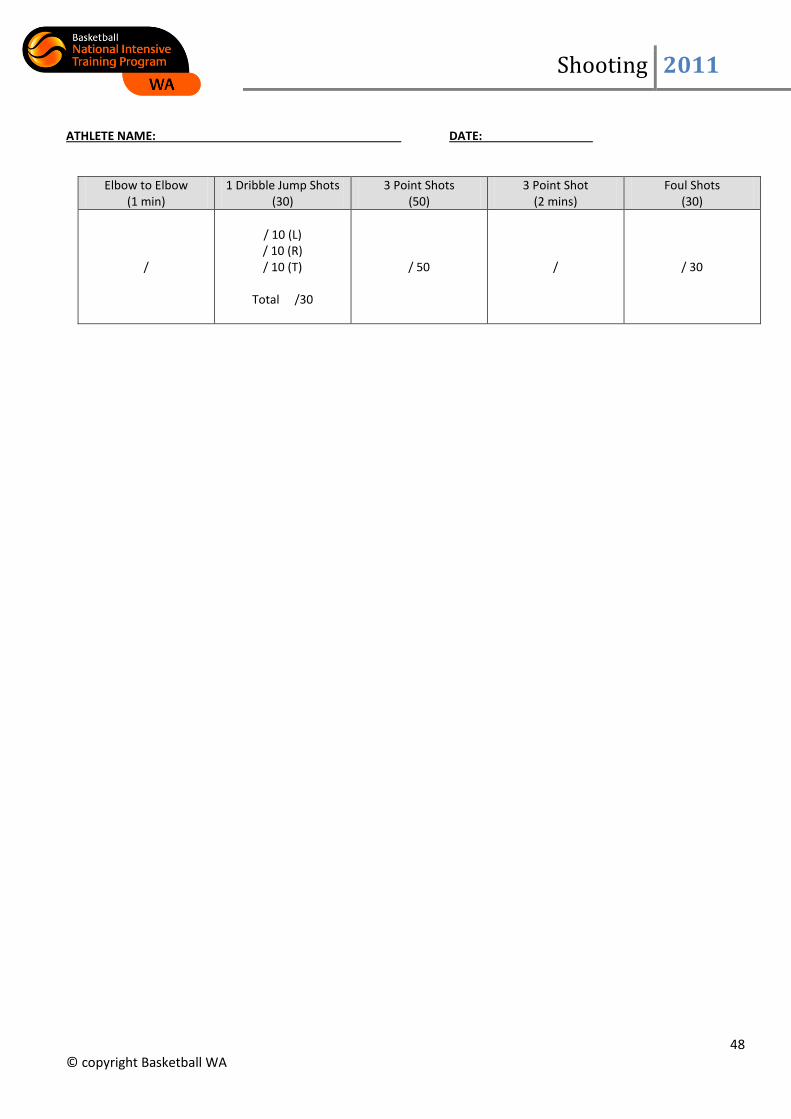
Shooting 2011
48 © copyright Basketball WA
ATHLETE NAME: DATE:
Elbow to Elbow (1 min)
1 Dribble Jump Shots (30)
3 Point Shots (50)
3 Point Shot (2 mins)
Foul Shots (30)
/
/ 10 (L) / 10 (R) / 10 (T)
Total /30
/ 50 / / 30


