TeamViewer Quick Support TeamViewer Unattended Access Install It may be necessary for a Help Desk Technician to connect to your computer in order to help you solve a problem. The Help Desk has provided a tool on the WIC Support Portal to facilitate this connection. Step Action Result 1. Open the WIC Support Portal and click the Phone Assistance icon. The Phone Assistance page is displayed. 2. On the Phone Assistance page, scroll down until you see the TeamViewer icon. Click on the TeamViewer icon. The Roeing Remote Support page is displayed.
Transcript
TeamViewer Quick Support
TeamViewer Unattended Access Install
It may be necessary for a Help Desk Technician to connect to your computer in order to
help you solve a problem. The Help Desk has provided a tool on the WIC Support
Portal to facilitate this connection.
Step Action Result
1. Open the WIC Support Portal and click the Phone Assistance icon. The Phone Assistance page is displayed.
2. On the Phone Assistance page, scroll down until you see the TeamViewer icon. Click on the TeamViewer icon. The Roeing Remote Support page is displayed.
TeamViewer Quick Support
3. Click the Allow Unattended access link. The Open File – Security Warning dialog box is displayed.
4. Click the Run button. The TeamViewer 9 Host Setup dialog box is displayed.
5. Click the Next button. The Environment screen is displayed.
TeamViewer Quick Support
6. Click the Company / Commercial use radio button. Click the Next button. The license Agreement screen is displayed.
7. Click the I accept the terms of the License Agreement check box. Click the Next button. The Installing screen is displayed.
8. You should see the process bar showing it being installed. The setup completion screen is displayed.
TeamViewer Quick Support
9. Click the Next button. The Account Assignment pop up dialog box is displayed asking for your Computer name – This will auto populate. Your Password is INWIC Record your Computer name so that it can be sent in an e-mail to the Roeing Service Desk at the end of this installation of the TeamViewer software. Note: If your computer name does not populate, skip to step 14 below for instructions on how to find your Computer name.
10. Click the Allow and finish button.
TeamViewer Quick Support
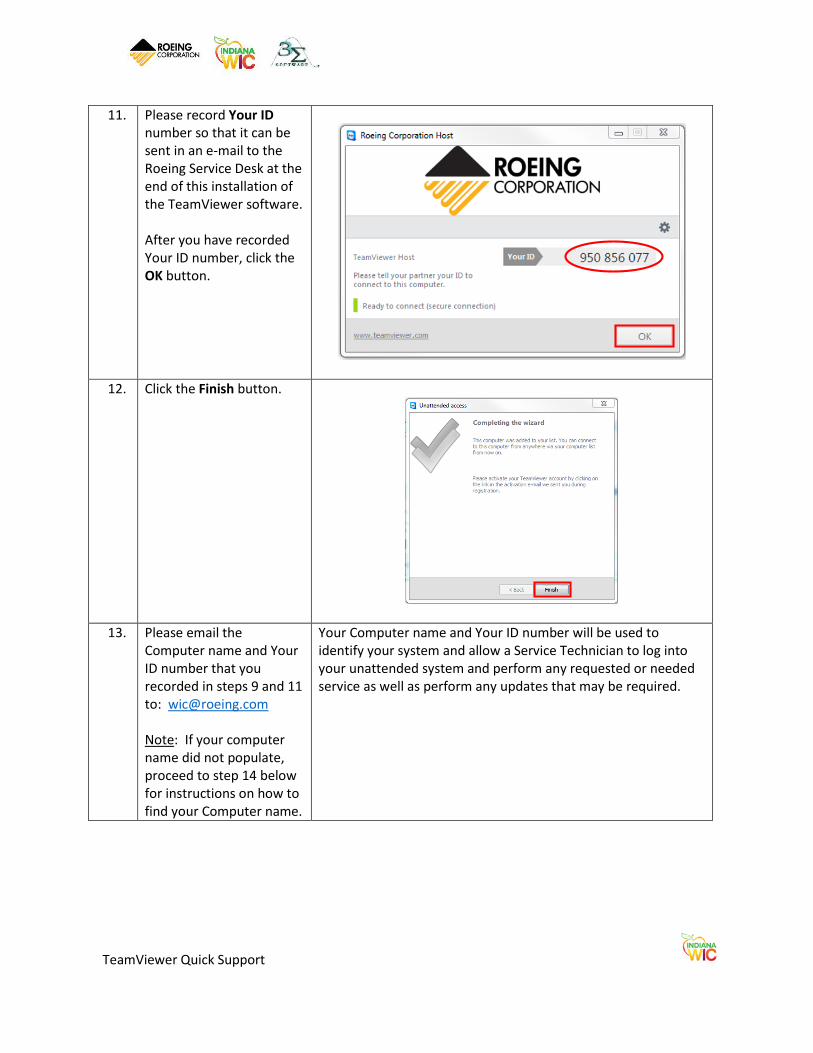
11. Please record Your ID number so that it can be sent in an e-mail to the Roeing Service Desk at the end of this installation of the TeamViewer software. After you have recorded Your ID number, click the OK button.
12. Click the Finish button.
13. Please email the Computer name and Your ID number that you recorded in steps 9 and 11 to: [email protected] Note: If your computer name did not populate, proceed to step 14 below for instructions on how to find your Computer name.
Your Computer name and Your ID number will be used to identify your system and allow a Service Technician to log into your unattended system and perform any requested or needed service as well as perform any updates that may be required.