July 2009 / 1725-47060-001 Rev. A Page 1 Technical Bulletin 43565 Using Polycom ® SoundPoint ® IP and Polycom ® SoundStation ® IP Phones with Asterisk Introduction This document provides introductory information on how to use Polycom ® SoundPoint ® IP phones and Polycom ® SoundStation ® IP conference phones with the Asterisk PBX. It offers answers to frequently asked questions along with feature configuration examples for both Asterisk and Polycom phones. The examples in this document follow the best practices outlined in Configuration File Management on SoundPoint IP Phones, available at http://www.polycom.com/voicedocumentation . For more information, see the following documents: Administrator ’s Guide for the Polycom SoundPoint/SoundStation IP Family, available at http://www.polycom.com/voicedocumentation The Asterisk wiki at http://www.voip-info.org This document assumes you have an installed and functioning Asterisk server. If you do not have a functioning Asterisk server, see one of the following support pages: For Asterisk Business Edition: http://www.digium.com For general Asterisk information: http://www.voip-info.org/wiki-Asterisk In this document, the terms SoundPoint IP phone, SoundStation IP phone, and Asterisk/Asterisk server refer to the following: SoundPoint IP phone—Polycom SoundPoint IP 301, 320, 330, 430, 450, 501, 550, 560, 601, 650, or 670 desktop phone SoundStation IP phone—Polycom SoundStation IP 4000, 6000, or 7000 conference phone Asterisk or Asterisk server—a functioning Asterisk PBX installation The examples in this document were tested with Polycom SIP application release 3.1.3 with bootROM 4.1.0 (both available from http://www.polycom.com/voicedocumentation ) with Asterisk version 1.6.0.1. If there is an issue with a configuration that is specific to a particular software release, the issue is noted.
Transcript
July 2009 / 1725-47060-001 Rev. A Page 1
Technical Bulletin 43565 Using Polycom
® SoundPoint
® IP and
Polycom®
SoundStation® IP Phones with Asterisk
Introduction
This document provides introductory information on how to use Polycom® SoundPoint® IP phones and Polycom® SoundStation® IP conference phones with the Asterisk PBX. It offers answers to frequently asked questions along with feature configuration examples for both Asterisk and Polycom phones. The examples in this document follow the best practices outlined in Configuration File Management on SoundPoint IP Phones, available at http://www.polycom.com/voicedocumentation. For more information, see the following documents:
Administrator’s Guide for the Polycom SoundPoint/SoundStation IP Family, available at http://www.polycom.com/voicedocumentation
The Asterisk wiki at http://www.voip-info.org This document assumes you have an installed and functioning Asterisk server. If you do not have a functioning Asterisk server, see one of the following support pages:
For Asterisk Business Edition: http://www.digium.com
For general Asterisk information: http://www.voip-info.org/wiki-Asterisk In this document, the terms SoundPoint IP phone, SoundStation IP phone, and Asterisk/Asterisk server refer to the following:
SoundPoint IP phone—Polycom SoundPoint IP 301, 320, 330, 430, 450, 501, 550, 560, 601, 650, or 670 desktop phone
SoundStation IP phone—Polycom SoundStation IP 4000, 6000, or 7000 conference phone
Asterisk or Asterisk server—a functioning Asterisk PBX installation The examples in this document were tested with Polycom SIP application release 3.1.3 with bootROM 4.1.0 (both available from http://www.polycom.com/voicedocumentation) with Asterisk version 1.6.0.1. If there is an issue with a configuration that is specific to a particular software release, the issue is noted.
The Asterisk community is the source of much of the material in this document. The topics in this document include:
Creating a Basic Configuration
Using the Messages Key
Adding Line Busy Lamps
Enabling Auto Answer for Intercom
Paging a Group of Extensions
Using the Call Park Feature
Using the Transfer Key
Configuring Idle Display Bitmaps
Remotely Rebooting the Phone to Force a Configuration Reload
Removing Configuration Overrides
Enabling CDP
Assigning VLANs
Additional Resources
Creating a Basic Configuration
The configuration file fragments in the following figure show the basic settings required to configure both Asterisk and the SoundPoint IP or SoundStation IP phones to successfully interoperate. Note that these settings are minimal configurations and only show changes from default factory settings on the phone. If you are not sure of the current settings and their impact on the phone in your configuration, restore the phone to the factory default settings (see Removing Configuration Overrides). To create a basic configuration:
1. For each phone to be connected, define the phone extension number in the Asterisk sip.conf file, as shown in the example below.
Fragment from “sip.conf”
Page 3
In the above example, the extension number 8036 is defined. This extension:
Is defined by the number inside square brackets
Has a SIP registration username of
Has a SIP registration password of
Uses the Asterisk mailbox number in the context
Is an Asterisk type , meaning it is both a user and a peer
Is a host according to Asterisk
Sends DTMF tones as special RTP packets according to RFC2833
Exists in the Asterisk context
Allows RTP traffic to bypass the Asterisk server
Sends a caller ID with text as and a number
2. Define the dial plan in the Asterisk extensions.conf file for the context declared above, as
shown in the example below.
In the above example, the extension number 8036 was added to the dial plan. When someone dials this extension from within the context :
Asterisk will first try to ring the extension 8036 using the SIP channel, waiting up to 25 seconds for the extension to answer.
If the extension is unanswered, Asterisk will direct it to mailbox 8036.
If the extension is busy, Asterisk will direct it to mailbox 8036.
3. Once the Asterisk configuration is complete, configure the SoundPoint IP or SoundStation IP phone. You can do this in one of three ways:
Via a centralized provisioning (or boot) server using configuration files. This method offers the most flexibility. This is the recommended method of configuring Polycom phones and the method that is used throughout this document.
Via the phone’s built-in web server using a web browser. Not all options are available using this method, but you can use this method to configure the phone to register with Asterisk.
Via the phone’s menu system (using the phone’s buttons). Not all options are available using this method, but you can use this method to configure the phone to register with Asterisk.
Fragment from “extensions.conf”
Page 4
4. If you are configuring your SoundPoint IP or SoundStation IP phone to be provisioned from a
boot server, locate the files provided by Polycom in the firmware distribution. There are four configuration files, three systems files, and one language customization directory provided with firmware release SIP 3.1 or later:
000000000000.cfg
000000000000-directory~.cfg
phone1.cfg
sip.cfg
sip.ld
sip.ver
SoundPointIPWelcome.wav
SoundPointIPLocalisation (a sub directory)
5. Using FTP, place all the files listed in step 4 into a directory that is accessible from your phone. Then, do the following:
a. Copy the default 000000000000.cfg file to a file named <mac>.cfg where <mac> is the 12
character MAC address of the phone (which is also the phone’s serial number). This MAC address is printed on a sticker attached to the underside of the phone.
b. Open the <mac>.cfg file with a text editor, and then locate the line starting with the text
. On this line, change the key as shown
in the example below.
c. Copy the default phone1.cfg file to a file named <extension>.cfg where <extension> is the phone’s extension number.
d. Open the <extension>.cfg file with a text editor, and then locate the line starting with the
text On the following line is the registration information the phone requires to
register with Asterisk. Change the keys shown below to match your configuration.
Fragment from “<mac>.cfg”
Page 5
In the following example:
The extension is
The registration username is
The registration password is
If your phone supports more than one line (excluding the SoundStation IP phones) you can also define the registration parameters for the other lines by changing the keys starting with
, , etc.
e. Confirm the phone has power and IP connectivity with the Asterisk server. Then, reboot the
phone using the key combination or by a power cycle.
f. Press the SETUP soft key. (Note: The SETUP soft key disappears when the Welcome screen displays.)
g. Enter the phone administrator password. (The default is 456.)
h. Enable or disable the phone’s DHCP Client.
If you enable the phone’s DHCP client, an IP address and other phone parameters will be supplied by your DHCP server. If you disable the phone’s DHCP client, you must specify the IP address, network mask, and default gateway (use the Asterisk server’s IP address if this is an isolated network). Note that this is a minimum configuration. At this stage you can also specify the DNS Server IP address(es), NTP Server IP address, GMT Offset, Domain Name, and CDP settings (see Enabling CDP).
i. Navigate to Server Menu, and then press the Select key.
j. Set the Server Type to FTP. For other options, see the Administrator’s Guide for the
Polycom SoundPoint/SoundStation IP Family, available at http://www.polycom.com/voicedocumentation.
k. Set the Server Address to the IP address of your FTP server where the previously
described configuration files are located.
l. Set the Server User to a username with the correct permissions to GET files from your FTP server. By default, the Server User is PlcmSpIp.
m. Set the Server Password for the Server User. By default, the Server Password is PlcmSpIp.
n. Set the Provisioning Method to Default. For other options, see the
Administrator’s Guide for the Polycom SoundPoint/SoundStation IP Family, available at http://www.polycom.com/voicedocumentation.
o. Press the Exit key and select Save & Reboot.
The phone will now reboot, access your FTP server, load the configuration files, and register with your Asterisk server.
Using the Messages Key
If you have configured voicemail for an extension, you can configure the Messages key on the phone for one touch access to the voicemail system. To configure the Messages key:
1. In <extension>.cfg, add the lines shown below. (Note: you can change these lines in sip.cfg to update all of the phones).
2. In the Asterisk extensions.conf file, for each extension, add the logic shown below.
If you press the Messages key, the phone will dial itself (the first registration), and Asterisk will check if the dialed extension matches the caller ID. If it does, the call will be sent to the voicemail system, passing the phone’s extension as a parameter.
Adding Line Busy Lamps
Some PBXs have a feature that allows one phone station to indicate the status of many lines using LEDs or other indicators on the phone. This feature, also known as Busy Lamp Feature, is common on key systems. SoundPoint IP phones can simulate this feature using the phone’s presence features and the Asterisk hint option. The following examples show three phones (extensions 8003, 8027, and 8036). Each extension will have the other two lines configured using presence so that a user of that phone can view the status of the other lines.
Fragment from “extensions.conf”
Page 8
To add line busy lamps:
1. Define the extensions in the Asterisk sip.conf file, as shown below.
2. Enable the presence feature on the SoundPoint IP phone.
Fragment from “sip.conf”
Page 9
Open the phone’s sip.cfg file with a text editor. Then, locate the line starting with the text , and then enable the presence feature by setting the key value for that feature to 1,
as shown below.
3. Add the extensions you want to monitor to the phone’s directory, stored in the <mac>-directory.xml file, as shown below.
Fragment from “<mac>-directory.xml”
Fragment from “sip.cfg”
Page 10
In the above example:
The text between and (last name) and and (first name) is
shown on the phone’s LCD display.
The number between and (contact) is the extension number you want to
monitor.
The number between and (speed dial) determines the line appearance to
use for this line indicator. Position 1 is the first free line position available.
The number between and (ring type) is not relevant since these
appearances only represent the status of extensions and do not ring.
The (divert contact) on its own means there is no divert contact and must be
included even though not relevant for this application.
The number between and (auto divert) should be 0 although it is not used
in the application.
The number between and (auto reject) should be 0 although it is not used
in the application.
The number between and (buddy watch) must be 1 to indicate that we
wish to monitor the presence of this entry.
The number between and (buddy block) should be 0 although it is not
used in the application.
An alternative to creating <mac>-directory.xml on the provisioning server is to manually add the entries using the phone’s Directory button and the Add Contact soft key. If you add entries this way, follow the descriptions in the above list to create each monitored contact.
4. In the Asterisk dial plan, add a hint line for each extension you want to monitor. In the example
below, three hint lines are added after the context .
.
.
Fragment from “extensions.cfg”
Page 11
5. Reboot the phones to ensure they use the configured directory entries and have the presence feature enabled. The main line for each phone should be registered and the next two line keys
should show the status of the other lines.
You can check your configuration using the Asterisk commands sip show subscriptions and core show hints, as shown below.
Enabling Auto Answer for Intercom
You can configure the SoundPoint IP or SoundStation IP phones with an Asterisk server to operate like an intercom system. For example, you could dial a specific number and the remote party phone would automatically answer after a short ring. Once answered, the call would connect and you could speak freely in both directions. To enable auto answer for intercom:
1. Modify the Asterisk dial plan.
The following example shows how a simple dial plan looks before you change it. In the example, extension 8027 will ring for 25 seconds and if the user does not answer within that time, the call will forward to a voice mailbox. The call will also forward to a voice mailbox if the extension is busy.
..
Fragment from “sip show sub”
..
Fragment from “core show hints”
Page 12
Since it is unlikely you will always want extension 8027 to automatically answer a call, it is a good idea to assign a separate number for the same physical extension. In the following example, the first digit is changed (from 8027 to 9027). To dial the person on extension 8027, you would dial 8027. To dial them and force them to automatically answer, you would dial 9027. To modify the dial plan, add the additional extension (if desired) and set the
variable, as shown in the example below.
The value of the variable is not important, but it must match the phone
configuration performed in step 2 (below). Ideally, it should be a short descriptive string. (In this example, the value is set to .)
In the above example, when the digits 9027 are dialed, the variable is set, and then Asterisk sends the SIP invite (with the set variable) to extension 8027.
2. Configure the phone to interpret the variable sent by Asterisk, as shown in the example below.
Fragment from “extensions.conf”
Fragment from “extensions.conf”
Page 13
Open the phone’s sip.cfg file with a text editor and locate the line starting with the text . Then, add the key with the value you
set in the Asterisk dial plan in step 1. As well, add the key with a value of 4.
These changes allow the phone to recognize the alert in the invite message sent by Asterisk and to give it an internal ring class of 4. This internal class is used to reference the ring type to use, as shown below.
With an internal ring class of 4, the line starting with is referenced. If the
was set to a value of 3, the line starting with
would have been referenced, prompting the phone to answer without any
ringing at all.
The default setting for (the amount of time the phone will ring before
auto-answering) is 2000 (milliseconds). For the intercom application, the setting is changed for a much shorter ring time of 200 milliseconds.
Paging a Group of Extensions
You can page a group of extensions so that when you dial a single number, a defined group of phones will automatically answer. Then, for example, the caller can make an announcement to all the answered phones. To page a group of extensions:
1. Configure the phones to auto answer as described in Enabling Auto Answer for Intercom, above. Do the following:
Create an alert-info entry for paging.
Fragment from “sip.cfg”
Fragment from “sip.cfg”
Page 14
Add entries for to the line starting with .
Modify the entry in the ringtype, as shown below.
Notice the distinctive ring tone to be played to indicate an imminent page. This
will provide a different ring tone from the intercom application described in the previous section, Enabling Auto Answer for Intercom.
2. Modify the extensions.conf file, as shown below.
With the previous configuration complete, dialing the pager extension number will initiate a call to all the extensions defined in the dial plan (extensions 200, 217, 203 and 205 for this example) and the calls will be placed in a listen-only MeetMe room. Extensions that are busy will be unaffected. All extensions will be disconnected when the caller/pager hangs up. (Note: This requires a working MeetMe installation.)
Using the Call Park Feature
The call park feature may be enabled by setting to a value of 1. However, the
call park feature implemented on Polycom phones does not work with Asterisk. If you use the new Enhanced Feature Keys (EFK) and Configurable Soft Keys features available in 3.1, you can create a custom Park soft key.
Fragment from “extensions.conf”
Fragment from “sip.cfg”
Page 15
To use the call park feature:
1. In sip.cfg, enable the Enhanced Feature Keys feature by changing the key to a value of 1, as shown below.
2. In sip.cfg, create a custom soft key by changing the values of softkey.1, as shown in the
example below. (In the example, extension 700 is used as the parking lot number.)
3. Configure the Asterisk parking lot by updating features.conf, as shown in the example below.
(In the example, extension 700 is used as the parking lot number.)
When the phone is in an active state (that is, the phone has an active call), an extra soft key (the Park soft key) displays. The Park soft key is the leftmost soft key (since ). When you press the Park soft key, a # (Transfer tone) is
sent (via DTMF) followed by the digits 700.
Fragment from “sip.cfg”
Fragment from “sip.cfg”
Fragment from “features.conf”
Page 16
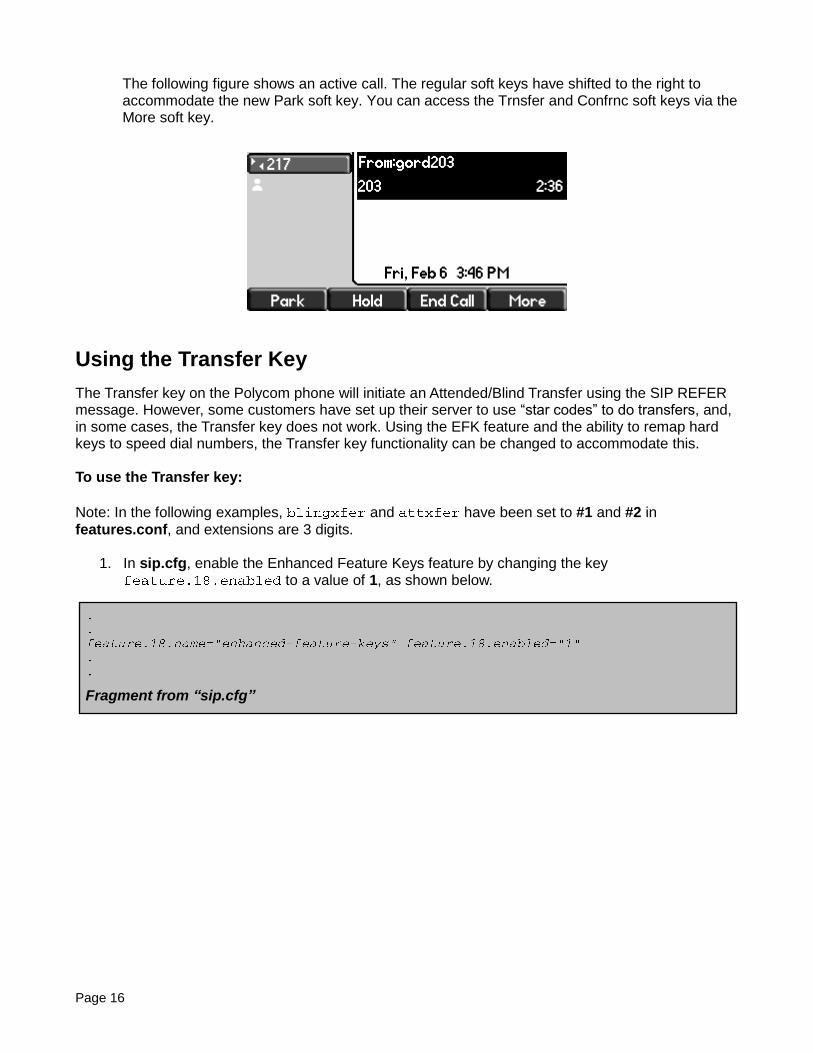
The following figure shows an active call. The regular soft keys have shifted to the right to accommodate the new Park soft key. You can access the Trnsfer and Confrnc soft keys via the More soft key.
Using the Transfer Key
The Transfer key on the Polycom phone will initiate an Attended/Blind Transfer using the SIP REFER message. However, some customers have set up their server to use “star codes” to do transfers, and, in some cases, the Transfer key does not work. Using the EFK feature and the ability to remap hard keys to speed dial numbers, the Transfer key functionality can be changed to accommodate this. To use the Transfer key:
Note: In the following examples, and have been set to #1 and #2 in
features.conf, and extensions are 3 digits.
1. In sip.cfg, enable the Enhanced Feature Keys feature by changing the key to a value of 1, as shown below.
Fragment from “sip.cfg”
Page 17
2. In sip.cfg, define an EFK macro at the end of the file, as shown below.
3. In <mac>-directory.xml, create a Speed Dial with a contact number that is the name of the
macro (in this case, prefixed with a ! sign), as shown in the example
below.
4. In sip.cfg, bind the Transfer key to the macro, as shown below.
Fragment from “sip.cfg”
Fragment from “<mac>-directory.xml”
Fragment from “sip.cfg”
Page 18
In the above example, the value of for was set to IP_650. For other
possible values of , see the Administrator’s Guide for the Polycom SoundPoint/SoundStation IP
Family, available at http://www.polycom.com/voicedocumentation. The above steps bound the Transfer key (keynumber 37) to the function SpeedDial. The function SpeedDial was given an index number of 4. This index number corresponds to the speed dial entry that was created with a contact (the
entry) of . The “ ” indicates that this is an EFK macro name. The entries defined this
macro. The macro prompts for a number using the number 1 (the 1 in the P1N5 string),
as shown in the example below. The number can be up to 5 digits (the 5 in the P1N5 string). (This allows “#1XXX or #2XXX, where XXX is a 3-digit extension. For longer extensions, change P1N5 to P1N<length of an extension>.) This string is then sent using RFC2833 DTMF.
Prefixing the extension number with either #1 or #2 will conduct a blind or attended transfer respectively when you press the Enter soft key.
Configuring Idle Display Bitmaps
You can use the unused screen area on SoundPoint IP phones to display a customizable image (for example, an Asterisk logo).
For detailed information on how to add a background logo and animate it, see the Administrator’s Guide for the Polycom SoundPoint IP/SoundStation IP Family, available at http://www.polycom.com/voicedocumentation.
Remotely Rebooting the Phone to Force a Configuration Reload
You can remotely reboot a SoundPoint IP or SoundStation IP phone by using the SIP NOTIFY method with an event type of check-sync. When the phone receives the SIP message, it will do one of the following (depending on how the phone is configured):
If the key
(in sip.cfg is set to 0, then the phone will check the provisioning server and only reboot if
any of the files listed in <mac>.cfg have changed.
If the key
(in sip.cfg is set to 1, then the phone will always reboot.
When the phone reboots, it will reload its configuration files from the provisioning server. To remotely reboot the phone to force a configuration reload:
1. If you have Asterisk 1.4 or later, you can send a check-sync to the phone from the CLI. In sip_notify.conf, add the lines shown below. (If you have Asterisk 1.6, the lines already exist in sip_notify.conf.)
2. From the CLI command line, add the line shown below (1.6 syntax is used).
Removing Configuration Overrides
Configuration changes made to the SoundPoint IP and SoundStation IP phones via the menu keys or a web browser are stored locally in flash memory and also written back to the boot server (if configured to do so). To delete these settings, you must use the phone’s menu key.
To remove configuration overrides:
1. Press the Menu key on the phone console. 2. Select Settings > Advanced. 3. Enter the administrator password (the default is 456), and then press the Enter soft key. 4. Select Admin Settings > Reset to Default > Reset Local Config. 5. Press the Yes soft key. The phone will restart.
Fragment from “sip_notify.conf”
Page 20
If the phone is configured to also write the information back to the boot server, there will be files on the boot server in the form <mac-address>-phone.cfg. If these files exist, you must remove them, otherwise the phone will reload the overrides when it reboots. Since you must remove these files, an easier and alternative method to remove a phone’s overides is to delete its <mac-address>-phone.cfg file, and then reboot the phone.
Enabling CDP
All SoundPoint IP and SoundStation IP phones support Cisco Discovery Protocol (CDP). CDP does the following:
When using PoE, CDP can help the switch determine how much power is required by the phone to operate. For more information, see the Administrator’s Guide for the Polycom SoundPoint/SoundStation IP Family, available at http://www.polycom.com/voicedocumentation.
CDP can also allocate VLANs. For more information, see Assigning VLANs, below. CDP settings can only be configured through the phone’s menus.
To enable the CDP setting:
1. Press the Menu key on the phone console. 2. Select Settings > Advanced. 3. Enter the administrator password (the default is 456), and then press the Enter soft key. 4. Select Admin Settings > Network Configuration. 5. Scroll to CDP, and then press the Edit key. 6. Use the arrow keys to choose either Enabled or Disabled, and then press the
Ok soft key. 7. Press the Select soft key.
The phone will now use send and receive CDP packets.
Assigning VLANs
VLANs provide segregated voice and data paths and allow security and QoS policies to be optimised for each specific application. The SoundPoint IP and SoundStation IP phones can place their voice traffic into any given VLAN while, at the same time, passing data traffic from any attached PC through the native VLAN of the 802.1q link to the access switch. By default, the voice VLAN is unspecified. This means that voice and data traffic are untagged and transported in the native VLAN. You can assign the voice VLAN in one of three ways:
Manually, using the menus on the phone
Automatically, using DHCP
Automatically, using CDP You cannot specify the VLAN using the configuration files or the phone’s web interface.
If the VLAN is specified by more than one of the above methods, then the allocation will take place in this order: allocation via CDP, manual allocation, and then allocation via DHCP.
To manually assign a VLAN ID: (Note: You can access similar configuration screens by pressing the SETUP soft key during the phone boot process.)
1. Press the Menu key on the phone console. 2. Select Settings > Advanced. 3. Enter the administrator password (the default is 456), and then press the Enter soft key. 4. Select Admin Settings > Network Configuration. 5. Scroll to VLAN ID, and then press the Edit soft key. 6. Enter the VLAN ID, press the Ok soft key, and then press the Exit soft key. 7. Press the Select soft key.
The new voice VLAN is now assigned, but you need to manually reboot the phone so it will operate correctly.
8. Manually reboot the phone.
To automatically assign a VLAN ID using DHCP:
1. Press the Menu key on the phone console. 2. Select Settings > Advanced. 3. Enter the administrator password (the default is 456), and then press the
Enter soft key. 4. Select Admin Settings > Network Configuration. 5. Scroll to DHCP Client and make sure it is Enabled. If it is Disabled, press the Select soft key,
and then use the arrow keys to select Enabled. Then, press the Select soft key. 6. Scroll to VLAN Discovery, and then press the Edit soft key. 7. Use the arrow keys to select either Fixed or Custom (depending on the DHCP option you want
to use). Then, press the Ok soft key. The VLAN Discovery field can be set to one of three values:
Disabled—DHCP discovery of the VLAN is not used.
Fixed—DHCP discovery of the VLAN is enabled and DHCP will look for the ID in DHCP options 128, 144, 157, or 191.
Custom—DHCP discovery of the VLAN is enabled and DHCP will look for the ID in the DHCP option specified in the VLAN ID Opt field.
8. Do one of the following:
If you selected the Fixed option, press the Exit soft key twice, and then go to step 9.
If you selected the Custom option, scroll to VLAN ID Opt, press the Edit soft key, and then enter the DHCP option you want to use to supply the VLAN ID. Then, press the Ok soft key and then press the Exit soft key.
9. Press the Select soft key. 10. Manually reboot the phone.
To automatically assign a VLAN ID using CDP:
Enable CDP. For more information, see Enabling CDP.
Page 22
Additional Resources
Technical Bulletins Refer to the technical bulletins available at
Software Release Matrix A table showing a list of releases, the phones that are supported by each release, the release date, as well as links to the download page for each release and release notes, is available at http://downloads.polycom.com/voice/voip/sip_sw_releases_matrix.html