22
Technical Camera Overview for Hasselblad sales staff and retail partners Technical Camera Overview www.hasselblad.com 1
Technical Camera Overview for Hasselblad sales staff and retail partners
Technical Camera Overview
www.hasselblad.com
1
2
TECHNICAL CAMERA OVERVIEW
Why use a technical camera ..................................................................................................... 3
Movements explained...........................................................................................................................3
Hasselblad HTS 1.5 ..................................................................................................................6
Technical Camera Suppliers .............................................................................................................7
Mounting Accessories .............................................................................................................. 9
Shutter Connectivity.. ..............................................................................................................10
Powering your digital back...................................................................................................................15
H6D Digital capture unit view camera settings....................................................................................18
Contents
The main reason photographers use large format or technical cameras is to access the wide range of camera movements that are then available to them. The most common of these are explained in the following pages. The examples shown are created using a Hasselblad HTS 1.5 Tilt / Shift adapter but the principle and movements apply to view/technical cameras as well. These movements are possible due to the large image circles created by the lenses used, inconjunction with the abillity to move the front plate holding the exposure unit (lens with combined shutter), or the rear plate with the capture unit ( or film back) attached. Normally these two plates are joined via a bellows type arrangement. Modern designs of technical / view cameras may limit the movemtnts to just the front plate and have a smaller bellows unit to keep the camera as compact as is possible to aid field use.
Movements
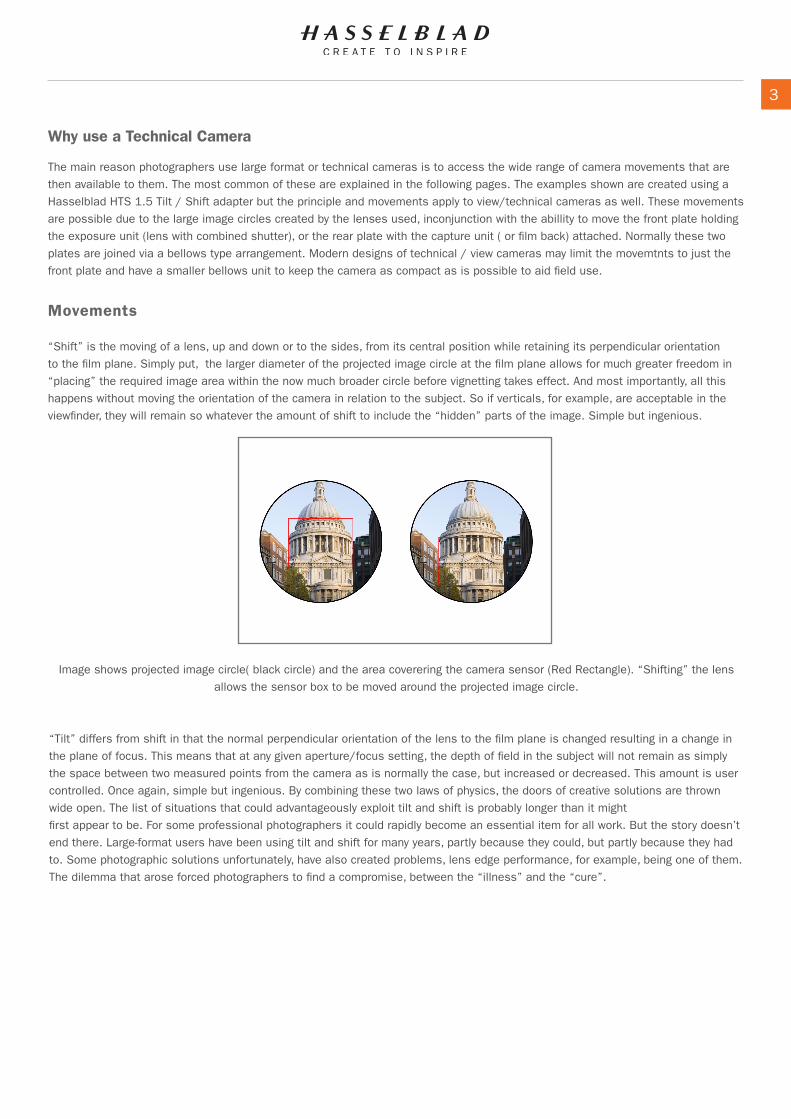
“Shift” is the moving of a lens, up and down or to the sides, from its central position while retaining its perpendicular orientation to the film plane. Simply put, the larger diameter of the projected image circle at the film plane allows for much greater freedom in “placing” the required image area within the now much broader circle before vignetting takes effect. And most importantly, all this happens without moving the orientation of the camera in relation to the subject. So if verticals, for example, are acceptable in the viewfinder, they will remain so whatever the amount of shift to include the “hidden” parts of the image. Simple but ingenious.
Image shows projected image circle( black circle) and the area coverering the camera sensor (Red Rectangle). “Shifting” the lens allows the sensor box to be moved around the projected image circle.
“Tilt” differs from shift in that the normal perpendicular orientation of the lens to the film plane is changed resulting in a change in the plane of focus. This means that at any given aperture/focus setting, the depth of field in the subject will not remain as simplythe space between two measured points from the camera as is normally the case, but increased or decreased. This amount is usercontrolled. Once again, simple but ingenious. By combining these two laws of physics, the doors of creative solutions are thrown wide open. The list of situations that could advantageously exploit tilt and shift is probably longer than it mightfirst appear to be. For some professional photographers it could rapidly become an essential item for all work. But the story doesn’t end there. Large-format users have been using tilt and shift for many years, partly because they could, but partly because they had to. Some photographic solutions unfortunately, have also created problems, lens edge performance, for example, being one of them. The dilemma that arose forced photographers to find a compromise, between the “illness” and the “cure”.
3
Why use a Technical Camera

4
USE OF SHIFTFor perfect parallel vertical lines in an image the camera needs to be parallel with the subject. Tilting the whole camera would produce converging parallel lines. By shifting the lens parallel to the image plane, you can raise or lower the view with-out tilting the camera. If the subject is a building as in this example, the camera should be placed level.The example shown here demonstrayes the shift movement using the HTS 1.5 Tilt / Shift adapter.
Camera positioned level with the ground. The top of the building is outside the area projected on to the sensor (HCD 28mm + HTS).
Camera titlted to include the top of the building resulting in converging verticals in the image.
Camera positioned level with the ground again, the lens shifted “up” 9mm to bring the top of the building into the image with converging verticals.
www.hasselblad.com
5
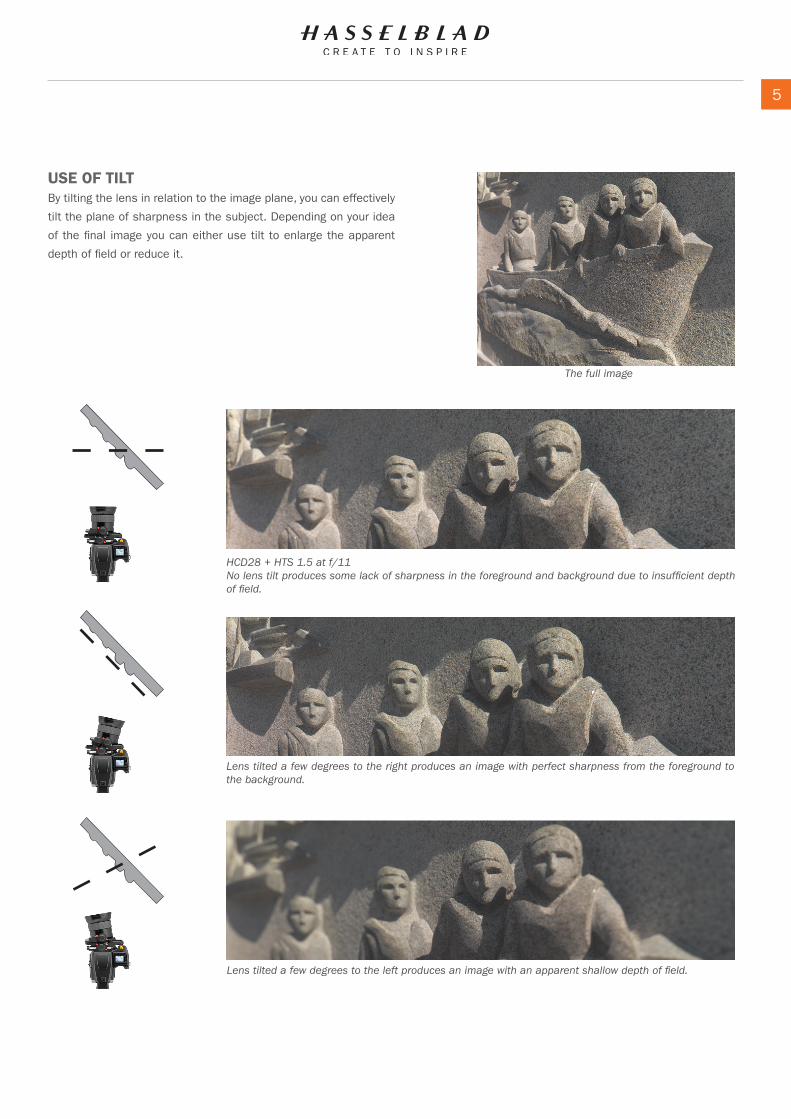
USE OF TILTBy tilting the lens in relation to the image plane, you can effectively
tilt the plane of sharpness in the subject. Depending on your idea
of the final image you can either use tilt to enlarge the apparent
depth of field or reduce it.
The full image
HCD28 + HTS 1.5 at f/11No lens tilt produces some lack of sharpness in the foreground and background due to insufficient depth of field.
Lens tilted a few degrees to the right produces an image with perfect sharpness from the foreground to the background.
Lens tilted a few degrees to the left produces an image with an apparent shallow depth of field.

With the introduction of Digital Lens Corrections where images processed in Phocus are automatically corrected regardless of HTS adapter setting, significant improvements strike the viewer immediately. All calculations and adjustments take place in the back-ground monitored and governed by sensors in the adapter. The sharpness at the edge of the frame, despite the fact that the lens is pushed to its limits, remains stunning.
On the creative front, it has long been standard practice for photographers to break the rules in order to produce images that show something just a little different. Large-format users were well-acquainted with the imaginative possibilities that arose from making the “wrong” camera or lens movements. And now Hasselblad users can enjoy this stimulating freedom as well. Fascinating and captivating
images are easily conjured up and controlled withjust a few slight movements. The combination of large sensors and razor sharp lenses – and now tilt and shift possibilities – Hasselblad has brought some of the creative aspect of former large-format world to the digital medium format. Take a look at this revolutionary accessory, and try it out yourself to see how this product could rapidly become an essential part of your photography toolkit.
The powerful combination of tilt, shift and Digital Lens Corrections can bring new perspectives to your photographic vision and pro-vide a marked change in both the technical and creative aspects of your work.
6
Digital photography has made it easier to use the tilt/shift features of technical cameras in order to achieve a particular photographic expression. Hasselblad solutions can play a large part in this area as all current professional digital solutions from Hasselblad are well adapted for technical camera operation to exploit the best from both worlds.However, technical cameras can be awkward to work with in the field, and the controls to determine the desired focus are not optimal. So in addition to the use of Hasselblad sensor units, ground-breaking developments now allow for tilt/shift work using the HTS 1.5 tilt/shift adapter directly on an H system camera that offers a very user-friendly way to produce very high image quality results.The light and portable HTS 1.5 tilt/shift adapter for H system cameras enlarges the image circle to allow a +/- 18mm shift (half image height) and +/-10 degrees of tilt.The adapter is compatible with six lenses: HCD 24mm, HCD 28mm, HC 35mm, HC 50mm, HC 80mm and HC 100mm and has a mag-nification factor that increases the focal length of each lens by 1.5 times.
H6D with the HTS 1.5 Tilt/Shift adapter and the HCD 28mm lens. For details, please refer to separate datasheet.
HTS 1.5 TILT/SHIFT ADAPTER SOLUTION

7
TECHNICAL CAMERA OPTIONSMany companies manufacture specialist technical cameras. There are four major producers consisting of Alpa, Arca Swiss, Cambo
and Linhof. The camera body itself tends to be fairly simple but with an emphasis placed on high tolerances of engineering. Lenses
are normally supplied by Schneider and Rodenstock. Viewfinders are not through-the-lens types but simple optical constructions. More
modern solutions have seen Apps used on smart phones for framing and composition in conjunction with the camera.
A summary of the four main companies is below.
ALPAwww.alpa.ch
From the Alpa Website“All models of the ALPA range form a common, modular platform that ensures full compatibility. Part of the concept are integrated lenses from 23 to 250 mm focal length, adapters for digital backs, and directly attachable roll-film backs up to 6x9 as well as an extensive range of accessories.”
The Alpa 12 TC
ARCA SWISS
The first Arca Swiss models where made in the 1950’s. They manufac-
ture cameras from the traditional 4x5 and 10x8 models to the R, M
and F line cameras.
The Arca Swiss Rm3di

8
CAMBOwww.cambo.com
Founded in the Netherlands in 1946, Cambo is now known for
its popular Wide RS and DS series cameras.
The Cambo Wide DS
LINHOFwww.linhof.de
Linhof has been producing cameras for over 120 years. Their most
recent offering, The Techno, is designed for Landscape and Architec-
tural photographers.
The Linhof Techno

9
Shutter Type CompatibilityAll professional Hasselblad digital products can be used with large format cameras. All of our sensor units (except the CWD and CFV)
have a sophisticated interface, and allow microprocessor controlled connections to electronic shutters for full control of aperture, shut-
ter and exposure. Alternatively exposure can be triggered by a simple flash sync connection.
A summary is outlined in the table below:
Hasselblad product Connection typeFlash sync with Manual
ShutterFlash sync with Electronic
Shutter 1)
Electronic shutter with full control of Aperture and
Shutter
H6D & CFV-50c Yes Yes Yes
H5D & H5D-MS Yes Yes Yes
H3DII & H3DII-MS Yes Yes Yes
H4D & H4D-MS Yes Yes Yes
CF & CF-MS, CFH Yes Yes Yes
503 CWD & CFV Yes Yes No
CFV-50 Yes Yes Yes1) If using an electronic shutter via flash sync connections, please note it will NOT be possible to control shutter and
aperture values directly from Phocus unless using the Rodenstock eShutter ( Phocus 3.1.15 or later required).
ATTACHING TO LARGE FORMAT CAMERASThe sensor unit from the H3D, H4D, H5D, H6D and the 503 CWD can be removed and mounted on a technical camera platform. CF/CF-MS/CFV/CFH digital backs can also be mounted onto a technical camera platform.Two options are available to attach sensor units to technical cameras. The first is called a ‘Live Video Adapter’ because the only method of composing and focusing the image is via Live Video controls in Phocus. The second is a ‘Sliding Adapter’ that allows the use of a conventional ground glass screen for composition with the ability to then slide the digital unit back in place.These items are not supplied by Hasselblad but are easily obtainable from third party suppliers such as Silvestri. Some examples follow.
The ‘Hasselblad V system sliding back adapter’ is also available in H format mount. Both these adapters are available for popular technical cameras such as Linhof, Sinar, Arca Swiss and Rollei. Often the manufacturer of the technical camera will also be able to supply similar adapters.
Example of Hasselblad V system sliding back adapter
Example of Hasselblad V system Live Video adapter
10
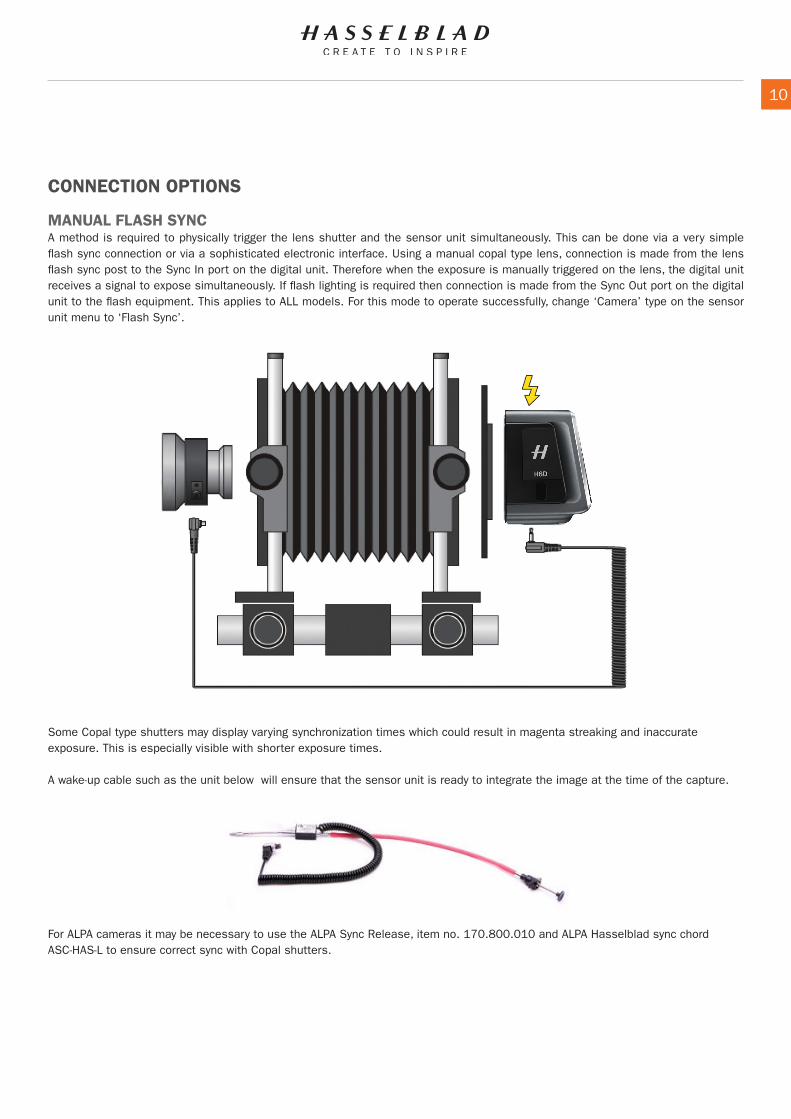
CONNECTION OPTIONS
MANUAL FLASH SYNCA method is required to physically trigger the lens shutter and the sensor unit simultaneously. This can be done via a very simple flash sync connection or via a sophisticated electronic interface. Using a manual copal type lens, connection is made from the lens flash sync post to the Sync In port on the digital unit. Therefore when the exposure is manually triggered on the lens, the digital unit receives a signal to expose simultaneously. If flash lighting is required then connection is made from the Sync Out port on the digital unit to the flash equipment. This applies to ALL models. For this mode to operate successfully, change ‘Camera’ type on the sensor unit menu to ‘Flash Sync’.
Some Copal type shutters may display varying synchronization times which could result in magenta streaking and inaccurate exposure. This is especially visible with shorter exposure times.
A wake-up cable such as the unit below will ensure that the sensor unit is ready to integrate the image at the time of the capture.
For ALPA cameras it may be necessary to use the ALPA Sync Release, item no. 170.800.010 and ALPA Hasselblad sync chord ASC-HAS-L to ensure correct sync with Copal shutters.

11
SCHNEIDER – SHUTTER CONTROL ES
Sync cord
Shutter Control ES# 1001654
Power supply / Charger#1001656
3 rechargeable batteriesNiMH 2200 mAh (AA Size)
FLASH SYNC WITH ELECTRONIC SHUTTERSThe use of an electronic shutter with a flash sync connection may be more convenient as it prevents the user disturbing the lens to adjust exposure settings or allow easier access to make these adjustments. Please note that using an electronic shutter in this way requires a control panel from the manufacturer to allow aperture selection, shutter Speed and capture control.
Three systems are supported by Hasselblad, from Schneider, Rollei and Rodenstock.
These systems comprise a battery, USB or mains powered control unit, connection interface to the electronic shutter / lens, connection interface to a digital capture unit (not used in this case) and flash synchronisation output. The control unit or App will allow the user to select aperture value, shutter speed and trigger the exposure.
The following pages contain connectivity diagrams for Schneider, Rollei and Rodenstock using Flash Sync connections. These use the Shutter Control ES, LensControl S and eShutter 0 respectively. The yellow flash symbol shows where external flash should be connected if needed (the Sync Out port on the sensor unit).
In this case the HxD digital unit is shown, but the same applies for the CF, CFV and CWD products.
Schneider, Rollei and Rodenstock (with the exception of the sync cord) supply all cables and equipment. A summary of all parts needed is
at the end of this document.
12
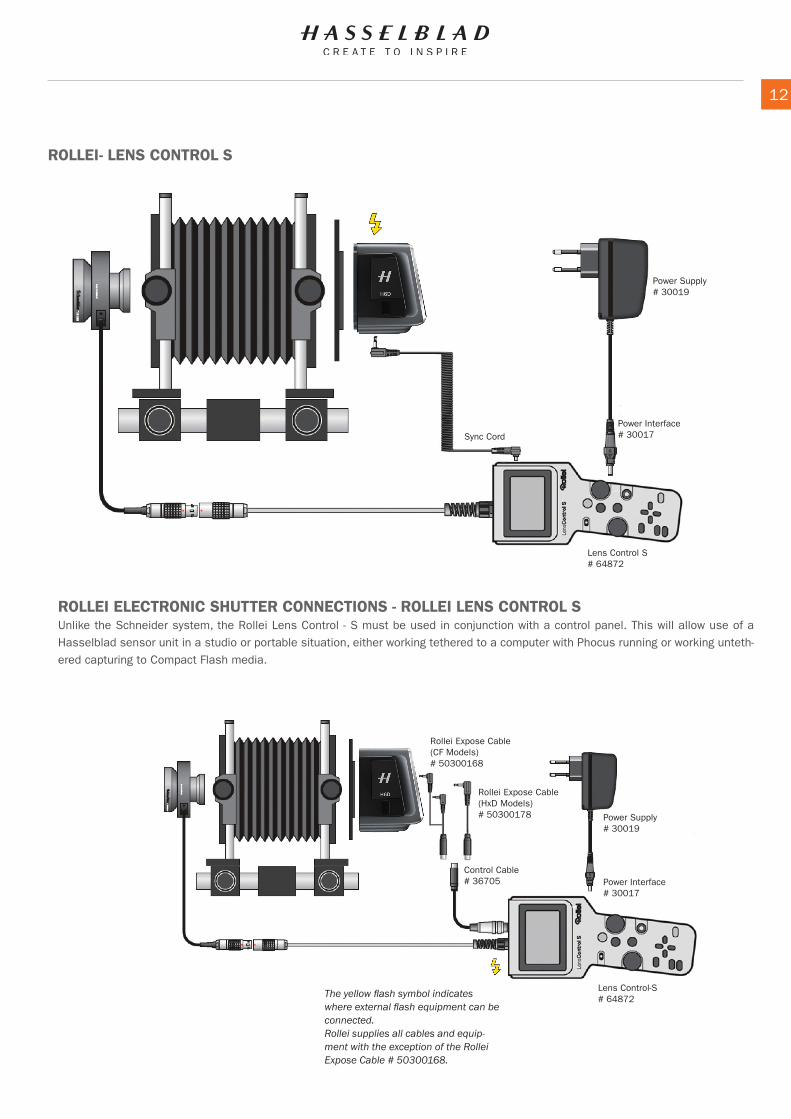
ROLLEI- LENS CONTROL S
Power Supply# 30019
Power Interface# 30017
Lens Control S# 64872
Sync Cord
ROLLEI ELECTRONIC SHUTTER CONNECTIONS - ROLLEI LENS CONTROL SUnlike the Schneider system, the Rollei Lens Control - S must be used in conjunction with a control panel. This will allow use of a Hasselblad sensor unit in a studio or portable situation, either working tethered to a computer with Phocus running or working unteth-ered capturing to Compact Flash media.
Rollei Expose Cable (HxD Models)# 50300178 Power Supply
# 30019
Control Cable# 36705 Power Interface
# 30017
Rollei Expose Cable (CF Models)# 50300168
Lens Control-S# 64872The yellow flash symbol indicates
where external flash equipment can be connected.Rollei supplies all cables and equip-ment with the exception of the Rollei Expose Cable # 50300168.
13
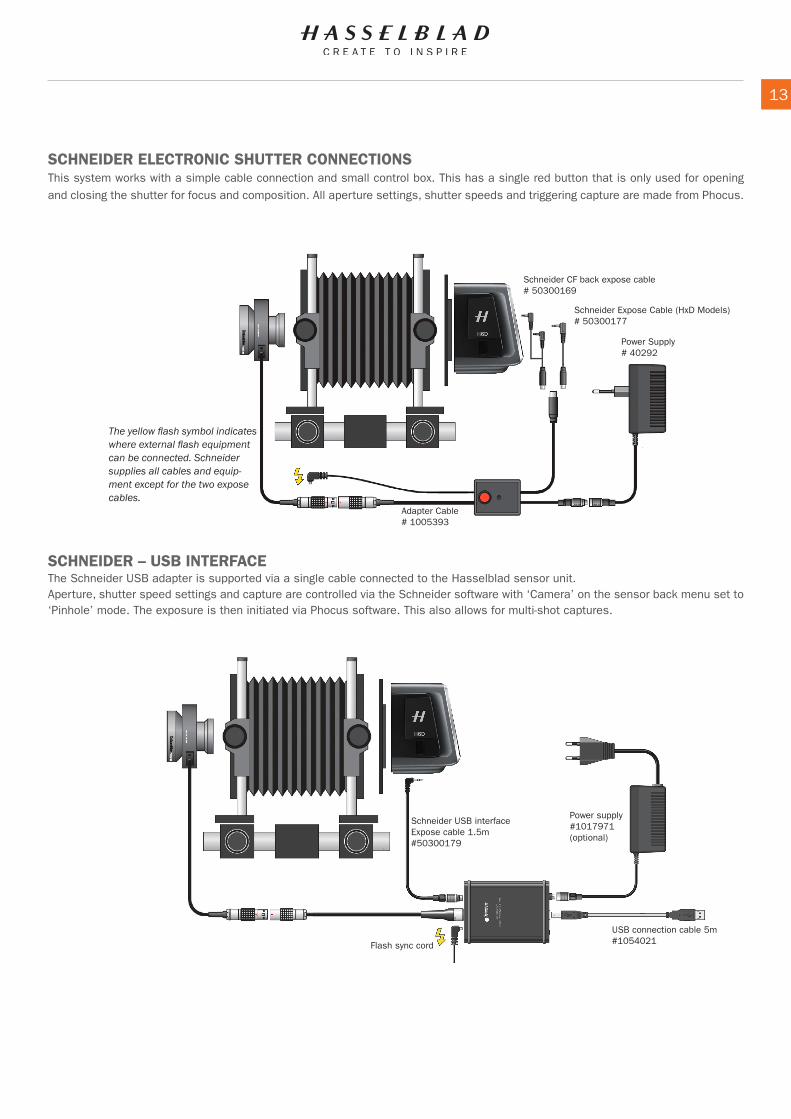
SCHNEIDER ELECTRONIC SHUTTER CONNECTIONSThis system works with a simple cable connection and small control box. This has a single red button that is only used for opening and closing the shutter for focus and composition. All aperture settings, shutter speeds and triggering capture are made from Phocus.
SCHNEIDER – USB INTERFACEThe Schneider USB adapter is supported via a single cable connected to the Hasselblad sensor unit.Aperture, shutter speed settings and capture are controlled via the Schneider software with ‘Camera’ on the sensor back menu set to ‘Pinhole’ mode. The exposure is then initiated via Phocus software. This also allows for multi-shot captures.
Schneider USB interface Expose cable 1.5m#50300179
Power supply#1017971(optional)
USB connection cable 5m#1054021Flash sync cord
Adapter Cable# 1005393
Schneider CF back expose cable # 50300169
Schneider Expose Cable (HxD Models)# 50300177
The yellow flash symbol indicates where external flash equipment can be connected. Schneider supplies all cables and equip-ment except for the two expose cables.
Power Supply# 40292

14
RODENSTOCK eSHUTTER With this shutter connected via USB you will now be able to control it’s aperture and shutter setting from within Phocus (3.1.15 or later). The camera should be configured as “Pin-hole” and a trigger cable connected from camera flash sync socket to eShutter.
The Rodenstock eShutter is a modern, electronically controlled shutter solution. The shutter can be fully controlled from your computer, as well as by iPhone, iPod Touch or iPad and transferred via Wi-Fi or WLAN to the computer. Full information on configuring the eShutter can be found here:http://www.rodenstock-photo.com/Archiv/Rodenstock_eShutter.en_10383.pdf
Image curtesy of Rodenstock

15
XT-20000QC2
External Power solution
GBTiger-50000 mAh
PORTABLE BATTERY SOLUTIONS
BATTERY ADAPTER FOR H4D-60 & H5DTested for all H4D-60 & H5D digital capture units, this battery adapter kit supplies power when used on a tech-nical camera and whenever Firewire power is not avail-able. It uses a Sony™ InfoLithium L type rechargeable
battery and includes ports for flash sync in and out.
The Hasselblad portable battery pack in place with
sync leads attached.
EXTERNAL POWER SOLUTION H6DWhen the Sensor Unit is detached from the H6D camera body, external power will have to be provided to the DC input (A). The input voltage range is 12 to 24 VDC.
A good external power solution is a Laptop Powerbank. This has normally an adjustable output voltage and sufficient power for extended use. One model that has been tested and qualified to work is the “XT-20000QC2 Power Bank” from XTPower. See “https://www.xtpower.de”.
Hasselblad will on request and free of charge supply a DC Cable between the Power Bank and the Camera (Item number 3054180). Please contact your dealer.
An alternative power source for US customers is the “GBTIGER 50000mAh Power Bank” (model: B01N1SHRB1) available from Amazon.com. If using the supplied cables and tips an additional 3.5mm x 1.35mm male plug to 5.5mm x 2.1mm female socket DC power cable will be required.
Note!When using power banks other than the XT-20000QC2, please make sure that the minimum output power before automatic shut-off is equal to or lower than 2.5W. A higher value can turn off the battery when the camera goes to standby mode.
16
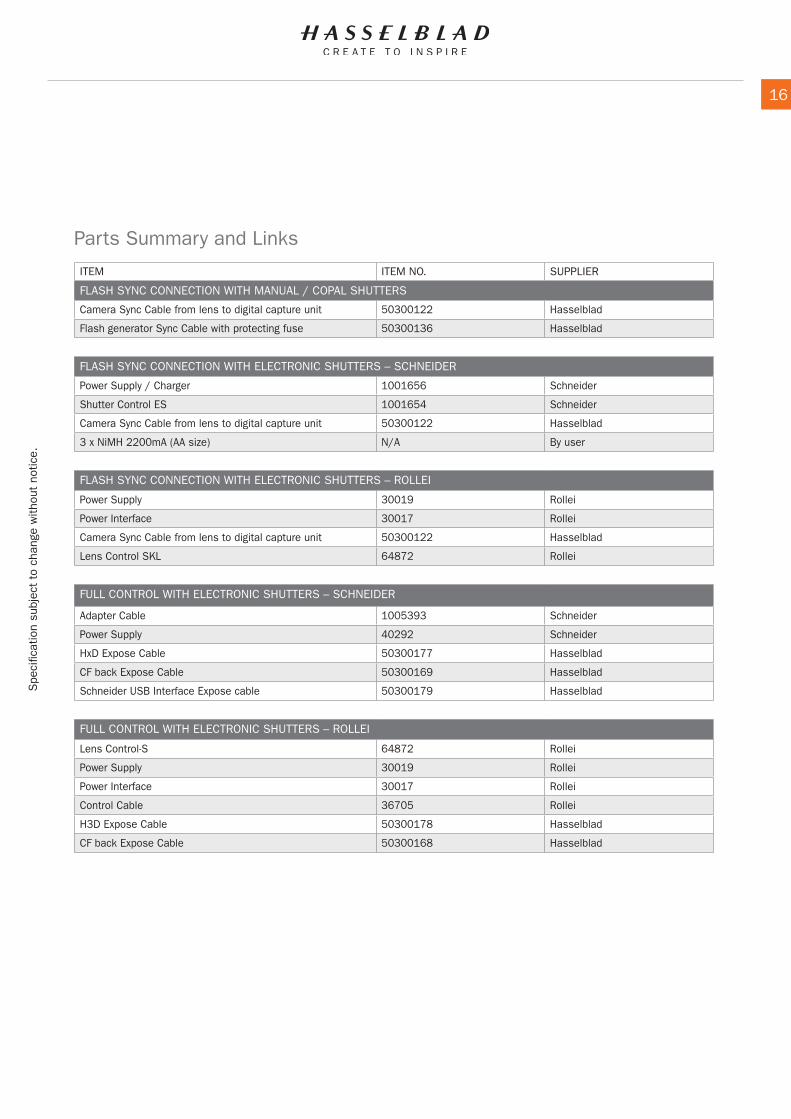
Parts Summary and Links
ITEM ITEM NO. SUPPLIER
FLASH SYNC CONNECTION WITH MANUAL / COPAL SHUTTERS
Camera Sync Cable from lens to digital capture unit 50300122 Hasselblad
Flash generator Sync Cable with protecting fuse 50300136 Hasselblad
FLASH SYNC CONNECTION WITH ELECTRONIC SHUTTERS – SCHNEIDER
Power Supply / Charger 1001656 Schneider
Shutter Control ES 1001654 Schneider
Camera Sync Cable from lens to digital capture unit 50300122 Hasselblad
3 x NiMH 2200mA (AA size) N/A By user
FLASH SYNC CONNECTION WITH ELECTRONIC SHUTTERS – ROLLEI
Power Supply 30019 Rollei
Power Interface 30017 Rollei
Camera Sync Cable from lens to digital capture unit 50300122 Hasselblad
Lens Control SKL 64872 Rollei
FULL CONTROL WITH ELECTRONIC SHUTTERS – SCHNEIDER
Adapter Cable 1005393 Schneider
Power Supply 40292 Schneider
HxD Expose Cable 50300177 Hasselblad
CF back Expose Cable 50300169 Hasselblad
Schneider USB Interface Expose cable 50300179 Hasselblad
FULL CONTROL WITH ELECTRONIC SHUTTERS – ROLLEI
Lens Control-S 64872 Rollei
Power Supply 30019 Rollei
Power Interface 30017 Rollei
Control Cable 36705 Rollei
H3D Expose Cable 50300178 Hasselblad
CF back Expose Cable 50300168 Hasselblad
Spe
cific
atio
n su
bjec
t to
cha
nge
with
out
notic
e.

17H6D VIEW CAMERA SETTINGS

www.hasselblad.com
18
1.1 VIEW CAMERA OPERATION
The Sensor Unit of the H6D camera can be detached and used on other types of cameras, e.g. View Cameras, with an H System magazine interface. This will enable the use of additional functionality such as extended Tilt and Shift using lenses with large image circle.
The current firmware of the H6D camera enables the following modes of operation:
1 Flash Sync Mode2 Pinhole Mode
POWER SOLUTION
When the Sensor Unit is detached from the H6D camera body, external power will have to be provided to the DC input (A). The input voltage range is 12 to 24 VDC.
For those working within a studio environment a DC power supply will give the most satisfactory results. The power supply should deliver between 12 and 24VDC and be able to supply at least 40W (20VDC, 2.0A). It will need to have a 3.5mm x 1.35mm Male plug fitting for connection to the sensor unit.
A good external power solution for field use is a Laptop Powerbank. This has normally an adjustable output voltage and sufficient power for extended use. One model that has been tested and qualified to work is the “XT-20000QC2 Power Bank” from XTPower. See “https://www.xtpower.de”.
Hasselblad will on request and free of charge supply a DC Cable between the XT Power Bank and the Camera (Item number 3054180). Please contact your dealer.
An alternative power source for US customers is the “GBTIGER 50000mAh Power Bank” (model: B01N1SHRB1) available from Amazon.com. If using the supplied cables and tips an additional 3.5mm x 1.35mm male plug to 5.5mm x 2.1mm female socket DC power cable will be required.
Note!When using power banks other than the XT-20000QC2, please make sure that the minimum output power before automatic shut-off is equal to or lower than 2.5W. A higher value can turn off the battery when the camera goes to standby mode.
XT-20000QC2
External Power solution
Power Connection
A
GBTiger-50000mAh

www.hasselblad.com
19
FLASH SYNC MODE
Camera: A View Camera with an H System magazine interface that is fitted with mechanical shutter lens.
Procedure:
1 Detach the Sensor Unit from the H6D camera body. Be careful not to damage the IR filter in front of the sensor.
2 Attach the Sensor Unit to the View Camera. Follow instructions from the manufacturer.
3 Connect the supplied Flash Sync input cable between the flash sync port of the lens and the flash sync input (A) on the Sensor Unit.
4 Connect external power to the DC input socket (B). The Sensor Unit will automatically start.
5 From the Camera Menu, select Camera Body. In the pop-up, select “Flash Sync”. Press Menu button or tap outside pop-up to save and close.
6 When the LED on the Sensor Unit is green, the Sensor Unit is ready for a capture. If it is orange, click any of the buttons below the display to activate the Sensor Unit before capture.
7 Exposure parameters (Aperture and Shutter Speed) are set on the lens and cannot be set on the Sensor Unit.
Control Screen
In Flash Sync Mode, the Control Screen has fewer items than when used on an H camera. From this screen you can change:
● White Balance ● ISO ● Exposure Mode (Manual or Video)
You can also start Live View by tapping the “LV” icon (C). Note that the lens must be open for Live View. Flash Sync Connection
Flash Sync and Power Connections
Control Screen in Flash Sync mode
A
B
Camera Body Settings Menu
ISO
Flash Sync
C

www.hasselblad.com
20
PINHOLE MODE
Pinhole mode can be used when the optical system does not have a flash sync terminal.
Procedure:
1 Detach the Sensor Unit from the H6D camera body. Be careful not to damage the IR filter in front of the sensor.
2 Attach the Sensor Unit to the Camera. Follow instructions from the manufacturer.
3 Connect external power to the DC input socket (A). The Sensor Unit will automatically start.
4 From the Camera Menu, select Camera Body. In the pop-up, select “Pinhole”. Press Menu button or tap outside pop-up to save and close.
5 Exposure time is set on the Control Screen.
Control Screen
In Pinhole Mode, the Control Screen has fewer items than when used on an H camera. From this screen you can change:
● White Balance ● ISO ● Exposure Time ● Exposure Mode (Manual or Video)
An exposure is triggered by pressing the orange button (B). It can be made both from the Control Screen and from the Live View screen.
You can also activate Live View by tapping the “LV” icon (C). When Live View is active, an orange exposure button is shown.
Note!The button in Live View can be dragged to any location by pressing and holding.
Power Connection
Control Screen in Flash Sync mode
Live View in Pinhole mode
A
Camera Body Settings Menu
ISO
Pinhole
2.0sB
C
ISO 100
2.0s [212]
www.hasselblad.com
21
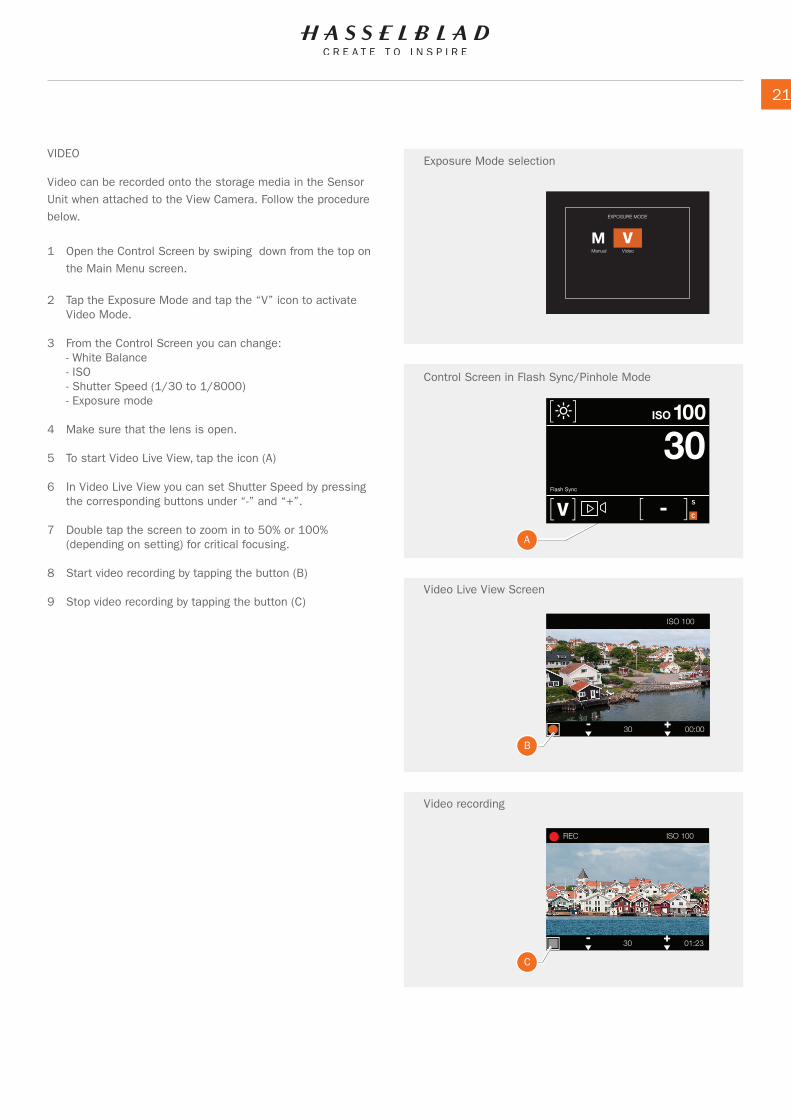
VIDEO
Video can be recorded onto the storage media in the Sensor Unit when attached to the View Camera. Follow the procedure below.
1 Open the Control Screen by swiping down from the top on the Main Menu screen.
2 Tap the Exposure Mode and tap the “V” icon to activate Video Mode.
3 From the Control Screen you can change: - White Balance - ISO - Shutter Speed (1/30 to 1/8000) - Exposure mode
4 Make sure that the lens is open.
5 To start Video Live View, tap the icon (A)
6 In Video Live View you can set Shutter Speed by pressing the corresponding buttons under “-” and “+”.
7 Double tap the screen to zoom in to 50% or 100% (depending on setting) for critical focusing.
8 Start video recording by tapping the button (B)
9 Stop video recording by tapping the button (C)
ISO
Flash sync
EXPOSURE MODE
VideoManual
ISO 100
30 00:00
ISO 100REC
30 01:23
Exposure Mode selection
Control Screen in Flash Sync/Pinhole Mode
Video Live View Screen
Video recording
A
B
C

www.hasselblad.com


