Technical Report NetApp AltaVault Cloud-Integrated Storage Appliances Solution Deployment: AltaVault with Dell NetVault Christopher Wong, NetApp November 2017 | TR-4482 Abstract This solution deployment guide outlines how easy it is to deploy and use a NetApp ® AltaVault ™ cloud-integrated storage appliance with Dell NetVault. AltaVault appliances provide a simple, efficient, and secure way to offsite data to either public or private cloud storage providers. Using advanced deduplication, compression, and encryption, AltaVault enables organizations to eliminate reliance on older, less reliable data protection solutions while improving backup windows and disaster recovery capabilities.
Transcript
Technical Report
NetApp AltaVault
Cloud-Integrated Storage Appliances Solution Deployment: AltaVault with Dell NetVault
Christopher Wong, NetApp
November 2017 | TR-4482
Abstract
This solution deployment guide outlines how easy it is to deploy and use a NetApp®
AltaVault™ cloud-integrated storage appliance with Dell NetVault. AltaVault appliances
provide a simple, efficient, and secure way to offsite data to either public or private cloud
storage providers. Using advanced deduplication, compression, and encryption, AltaVault
enables organizations to eliminate reliance on older, less reliable data protection solutions
while improving backup windows and disaster recovery capabilities.
3.1 Create a Standalone Drive ....................................................................................................................................6
3.2 Create a Library .....................................................................................................................................................8
3.3 Perform a Backup ..................................................................................................................................................9
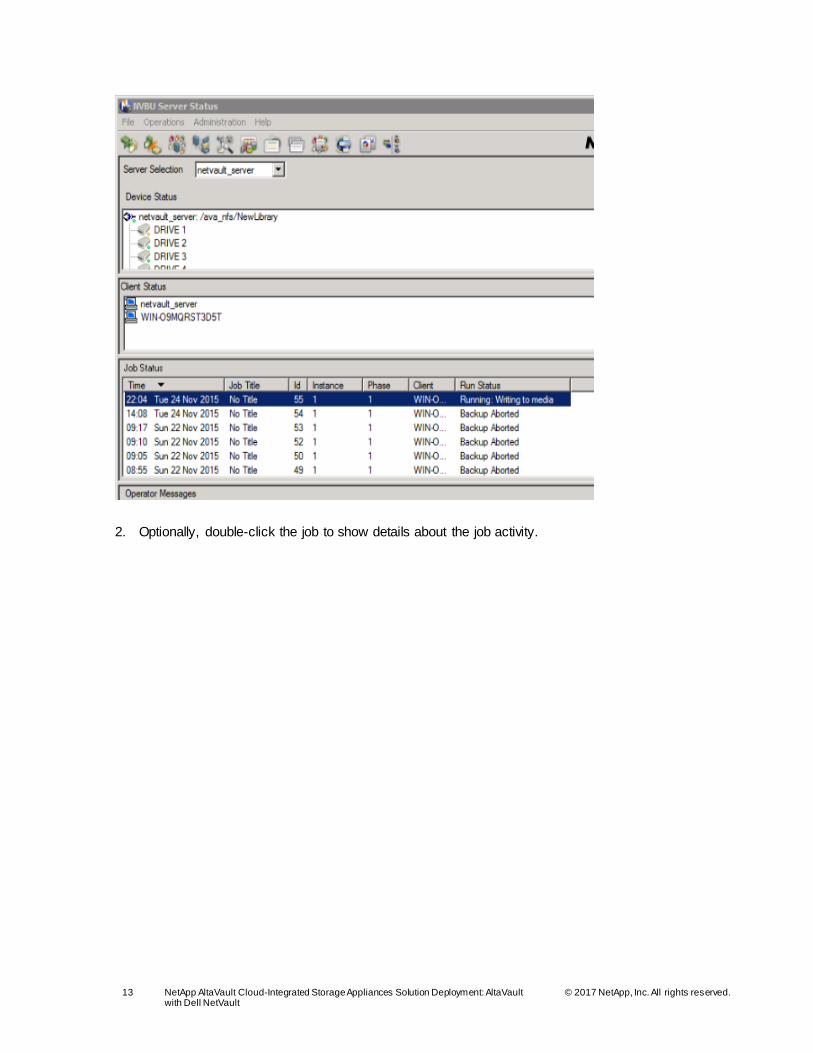
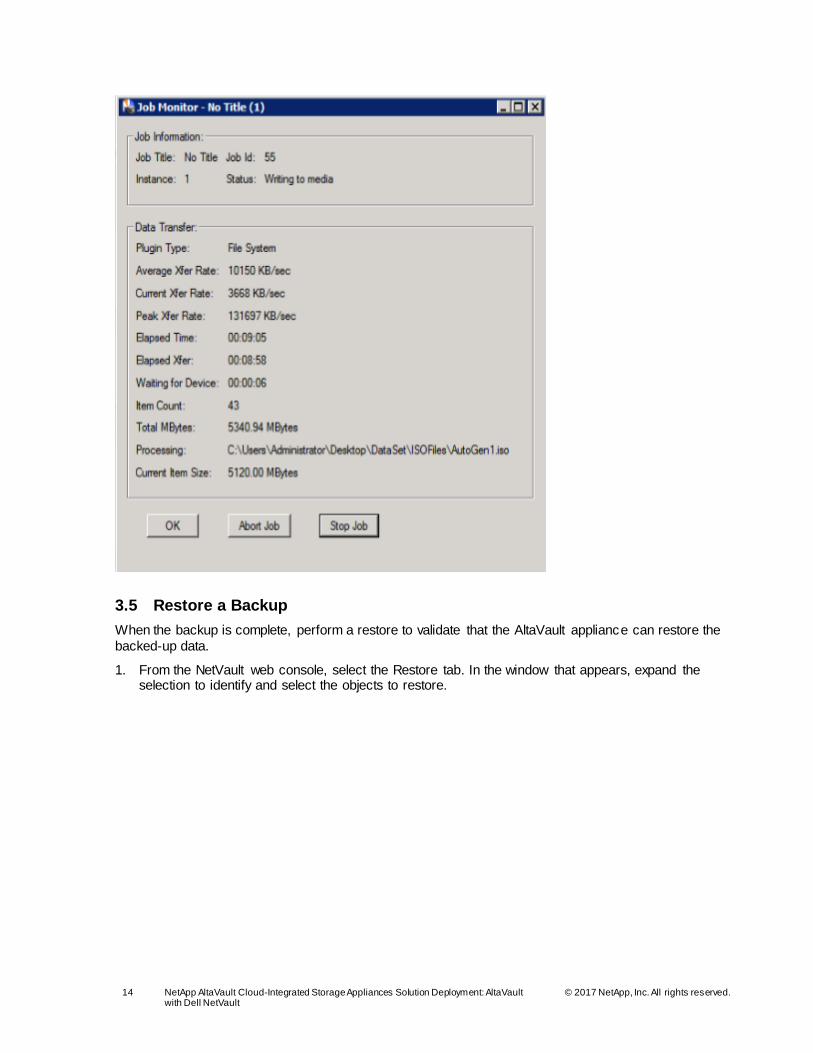
3.4 Monitor the Backup ..............................................................................................................................................12
3.5 Restore a Backup.................................................................................................................................................14
4 Solution Recommendations and Best Practices ....................................................................... 16
4.1 NetVault Best Practices .......................................................................................................................................16
4.2 Windows Best Practices ......................................................................................................................................17
4.3 Solaris Best Practices ..........................................................................................................................................17
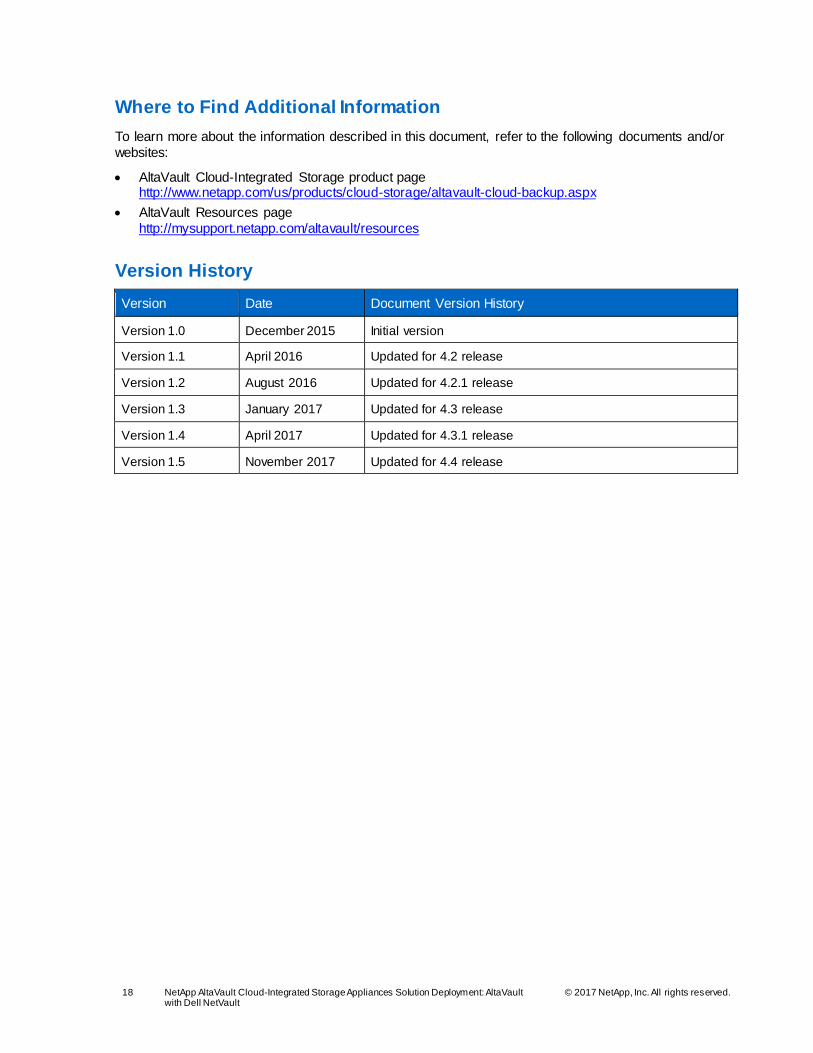
Where to Find Additional Information ............................................................................................. 18
Version History ............................................................................................................................... 18
LIST OF TABLES
Table 1) NetVault best practices. ........................................................................................................................................16
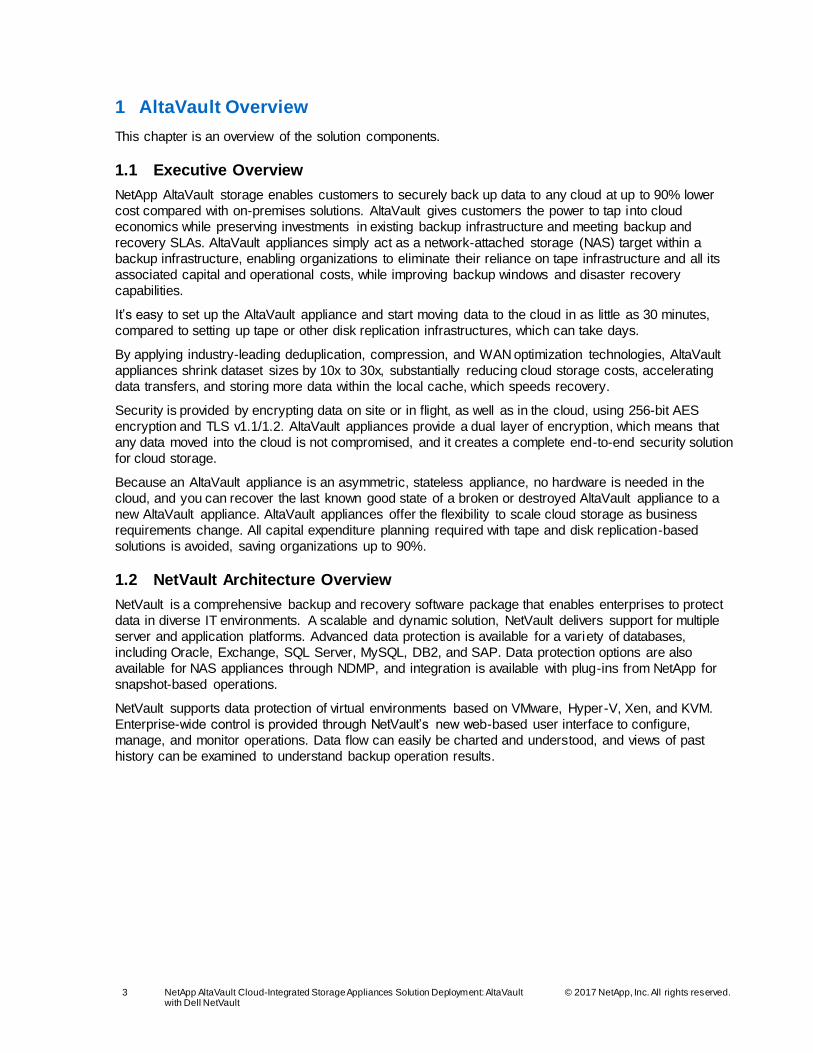
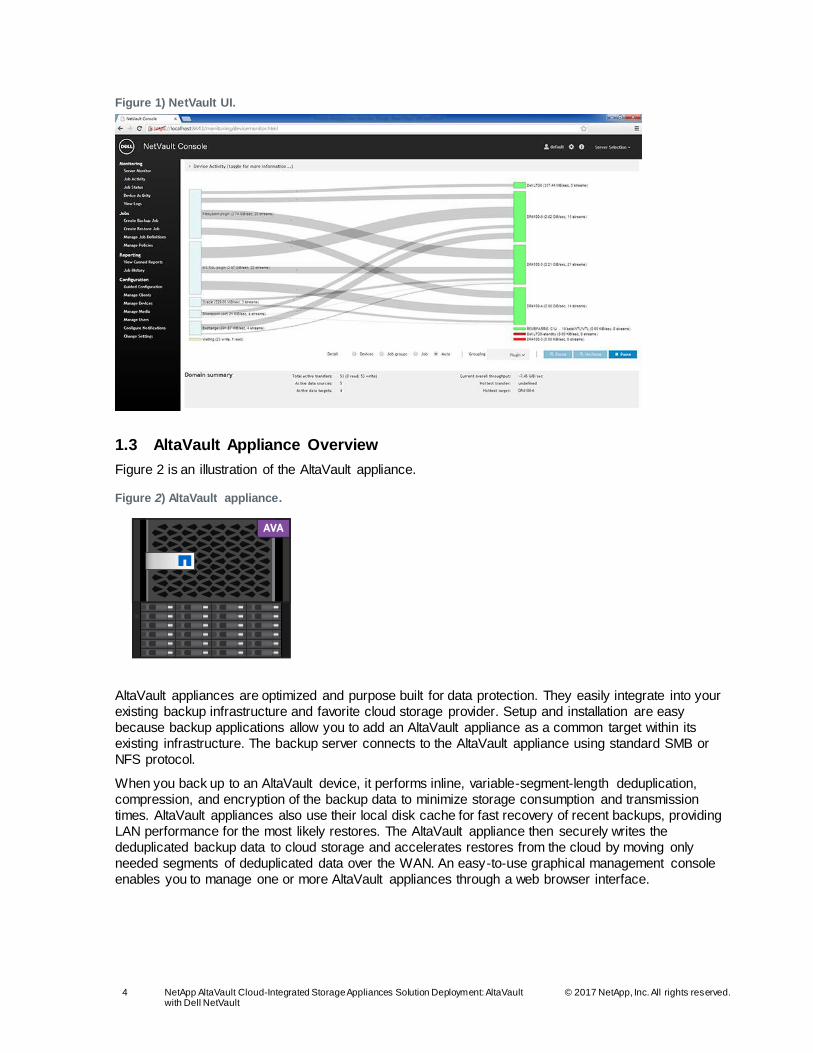
NetVault with AltaVault appliances provides you with a flexible, easy-to-configure-and-use solution that
can be deployed with major cloud storage providers. See the AltaVault Administration Guide for the
detailed steps required to deploy an AltaVault appliance.
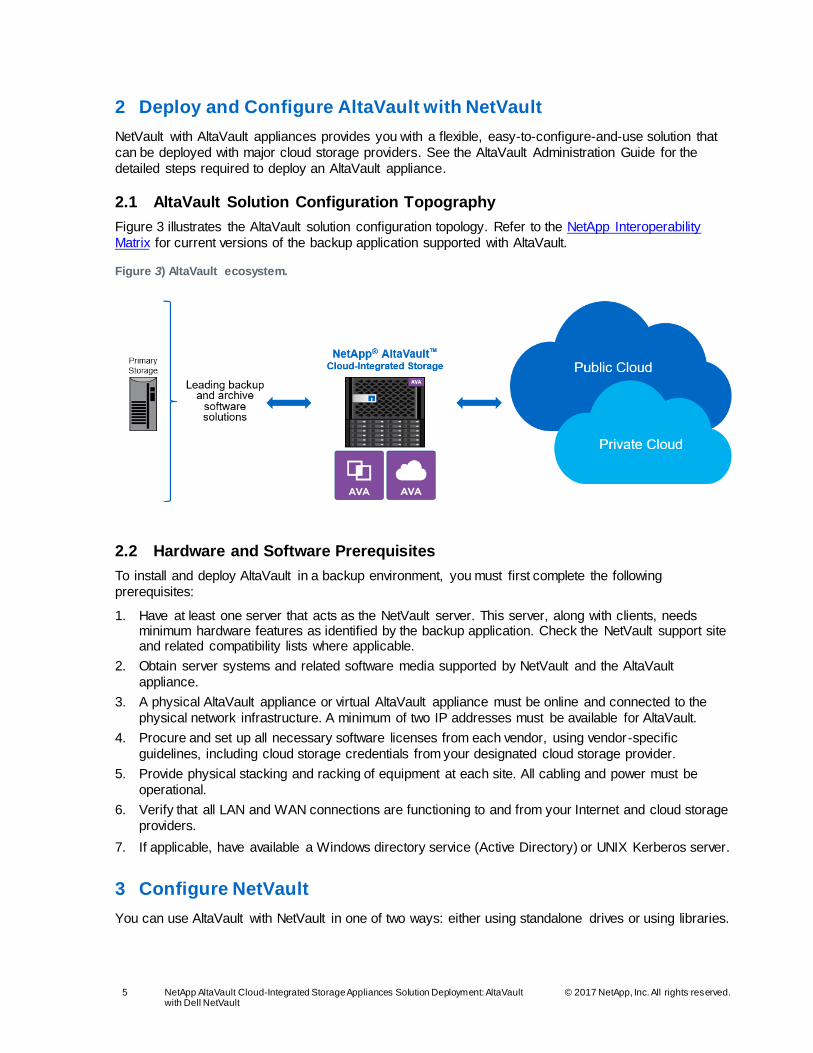
2.1 AltaVault Solution Configuration Topography
Figure 3 illustrates the AltaVault solution configuration topology. Refer to the NetApp Interoperability
Matrix for current versions of the backup application supported with AltaVault.
Figure 3) AltaVault ecosystem.
2.2 Hardware and Software Prerequisites
To install and deploy AltaVault in a backup environment, you must first complete the following
prerequisites:
1. Have at least one server that acts as the NetVault server. This server, along with clients, needs minimum hardware features as identified by the backup application. Check the NetVault support site and related compatibility lists where applicable.
2. Obtain server systems and related software media supported by NetVault and the AltaVault
appliance.
3. A physical AltaVault appliance or virtual AltaVault appliance must be online and connected to the
physical network infrastructure. A minimum of two IP addresses must be available for AltaVault.
4. Procure and set up all necessary software licenses from each vendor, using vendor-specific
guidelines, including cloud storage credentials from your designated cloud storage provider.
5. Provide physical stacking and racking of equipment at each site. All cabling and power must be
operational.
6. Verify that all LAN and WAN connections are functioning to and from your Internet and cloud storage
providers.
7. If applicable, have available a Windows directory service (Active Directory) or UNIX Kerberos server.
3 Configure NetVault
You can use AltaVault with NetVault in one of two ways: either using standalone drives or using libraries.
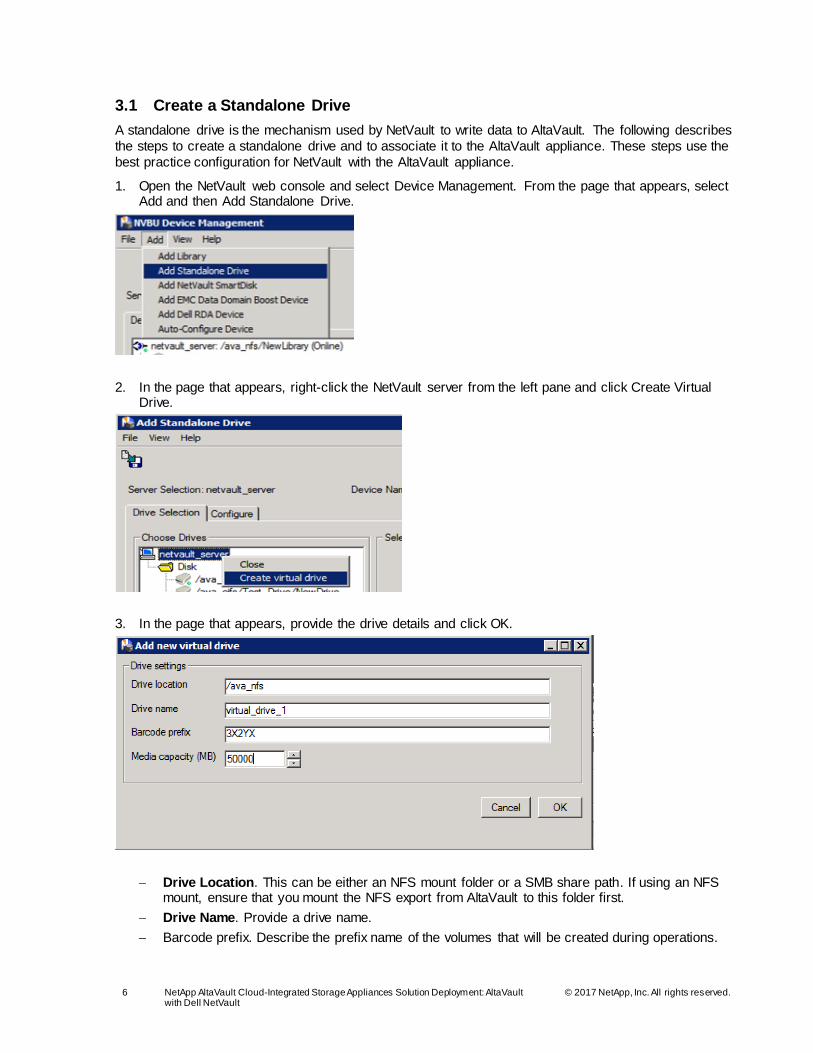
A standalone drive is the mechanism used by NetVault to write data to AltaVault. The following describes
the steps to create a standalone drive and to associate it to the AltaVault appliance. These steps use the
best practice configuration for NetVault with the AltaVault appliance.
1. Open the NetVault web console and select Device Management. From the page that appears, select Add and then Add Standalone Drive.
2. In the page that appears, right-click the NetVault server from the left pane and click Create Virtual Drive.
3. In the page that appears, provide the drive details and click OK.
Drive Location. This can be either an NFS mount folder or a SMB share path. If using an NFS mount, ensure that you mount the NFS export from AltaVault to this folder first.
Drive Name. Provide a drive name.
Barcode prefix. Describe the prefix name of the volumes that will be created during operations.
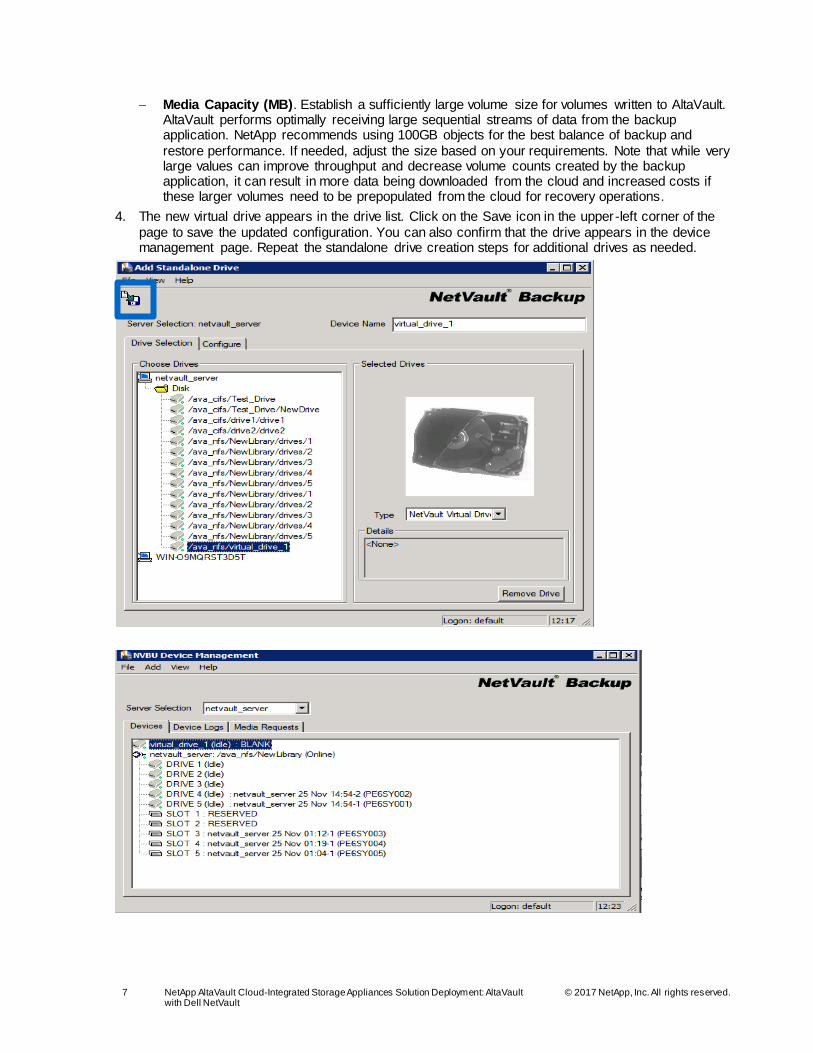
Media Capacity (MB). Establish a sufficiently large volume size for volumes written to AltaVault. AltaVault performs optimally receiving large sequential streams of data from the backup application. NetApp recommends using 100GB objects for the best balance of backup and
restore performance. If needed, adjust the size based on your requirements. Note that while very large values can improve throughput and decrease volume counts created by the backup application, it can result in more data being downloaded from the cloud and increased costs if these larger volumes need to be prepopulated from the cloud for recovery operations.
4. The new virtual drive appears in the drive list. Click on the Save icon in the upper-left corner of the
page to save the updated configuration. You can also confirm that the drive appears in the device management page. Repeat the standalone drive creation steps for additional drives as needed.
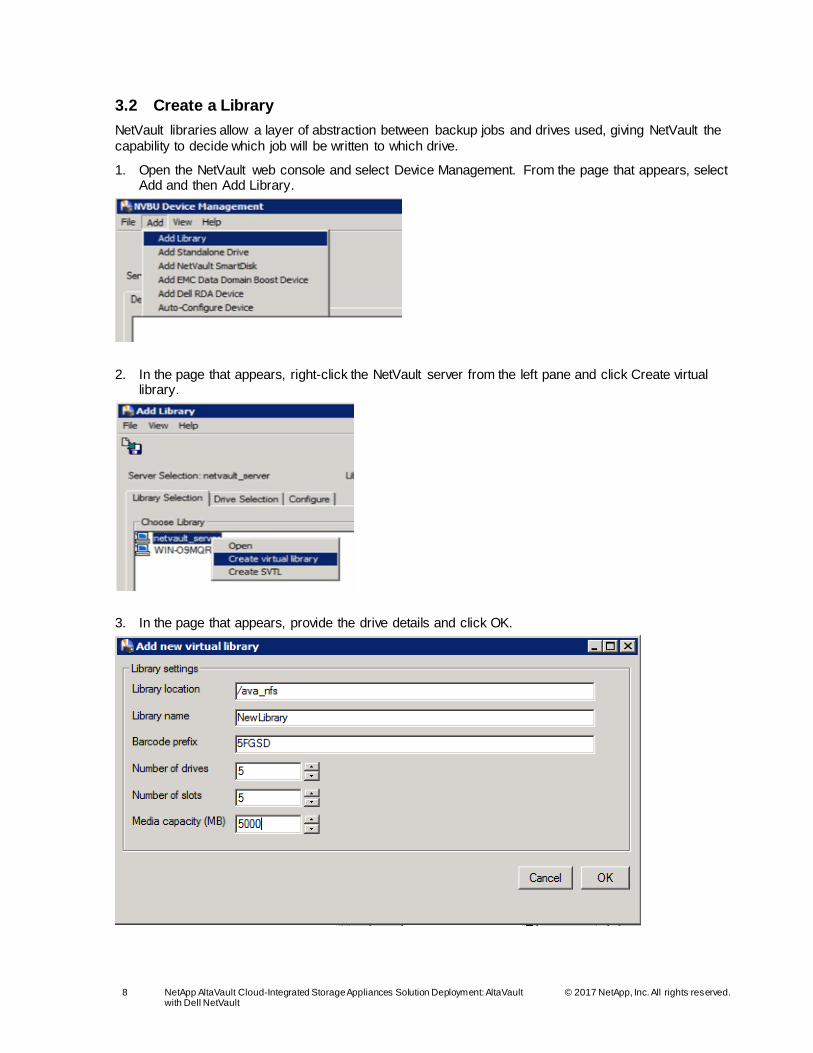
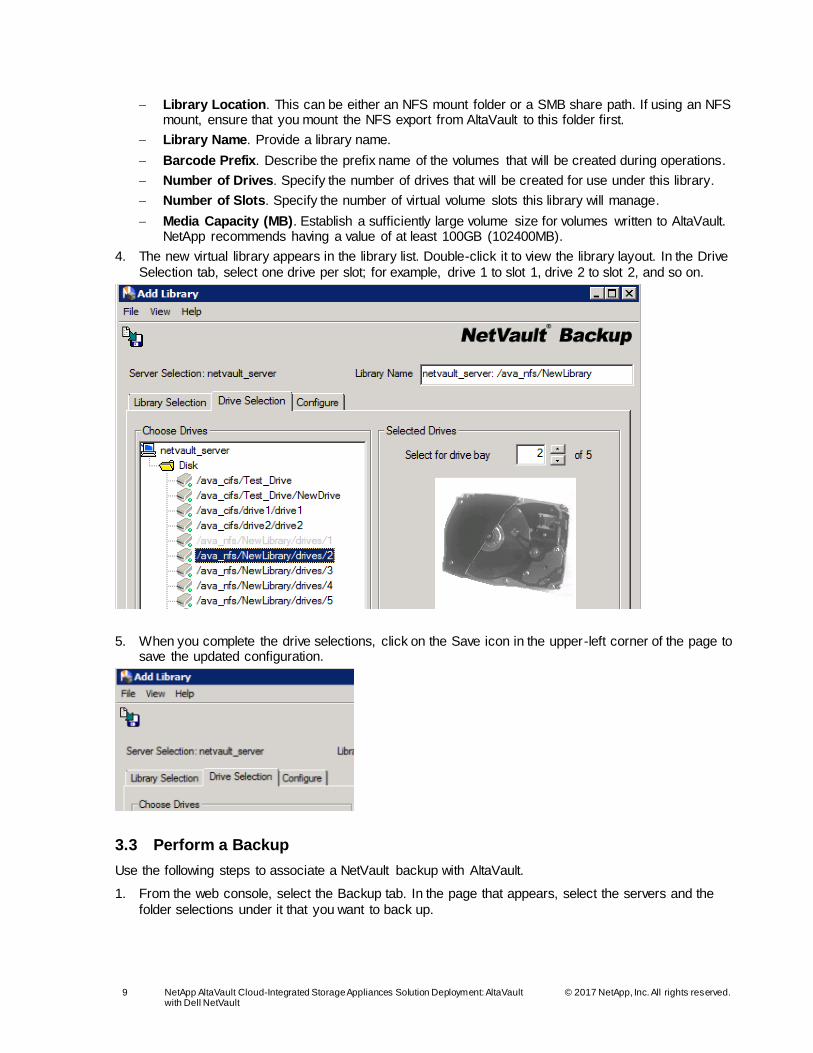
Library Location. This can be either an NFS mount folder or a SMB share path. If using an NFS mount, ensure that you mount the NFS export from AltaVault to this folder first.
Library Name. Provide a library name.
Barcode Prefix. Describe the prefix name of the volumes that will be created during operations.
Number of Drives. Specify the number of drives that will be created for use under this library.
Number of Slots. Specify the number of virtual volume slots this library will manage.
Media Capacity (MB). Establish a sufficiently large volume size for volumes written to AltaVault. NetApp recommends having a value of at least 100GB (102400MB).
4. The new virtual library appears in the library list. Double-click it to view the library layout. In the Drive
Selection tab, select one drive per slot; for example, drive 1 to slot 1, drive 2 to slot 2, and so on.
5. When you complete the drive selections, click on the Save icon in the upper-left corner of the page to save the updated configuration.
3.3 Perform a Backup
Use the following steps to associate a NetVault backup with AltaVault.
1. From the web console, select the Backup tab. In the page that appears, select the servers and the
folder selections under it that you want to back up.
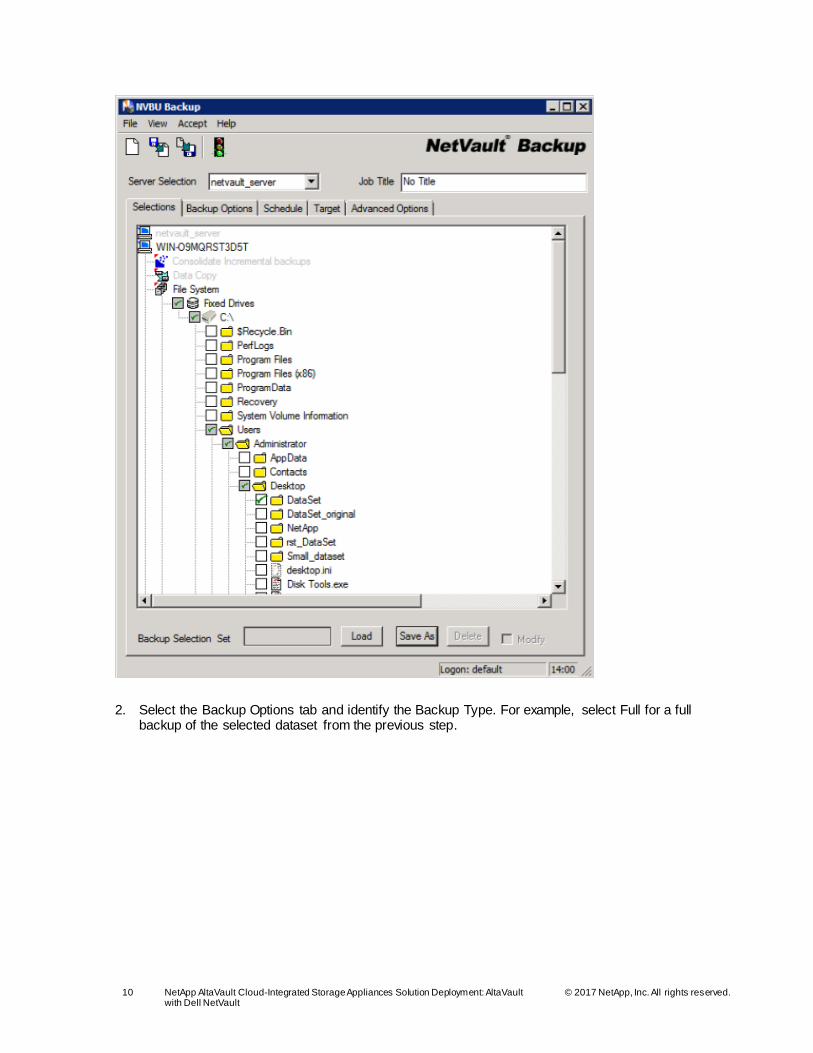
2. Select the Backup Options tab and identify the Backup Type. For example, select Full for a full backup of the selected dataset from the previous step.
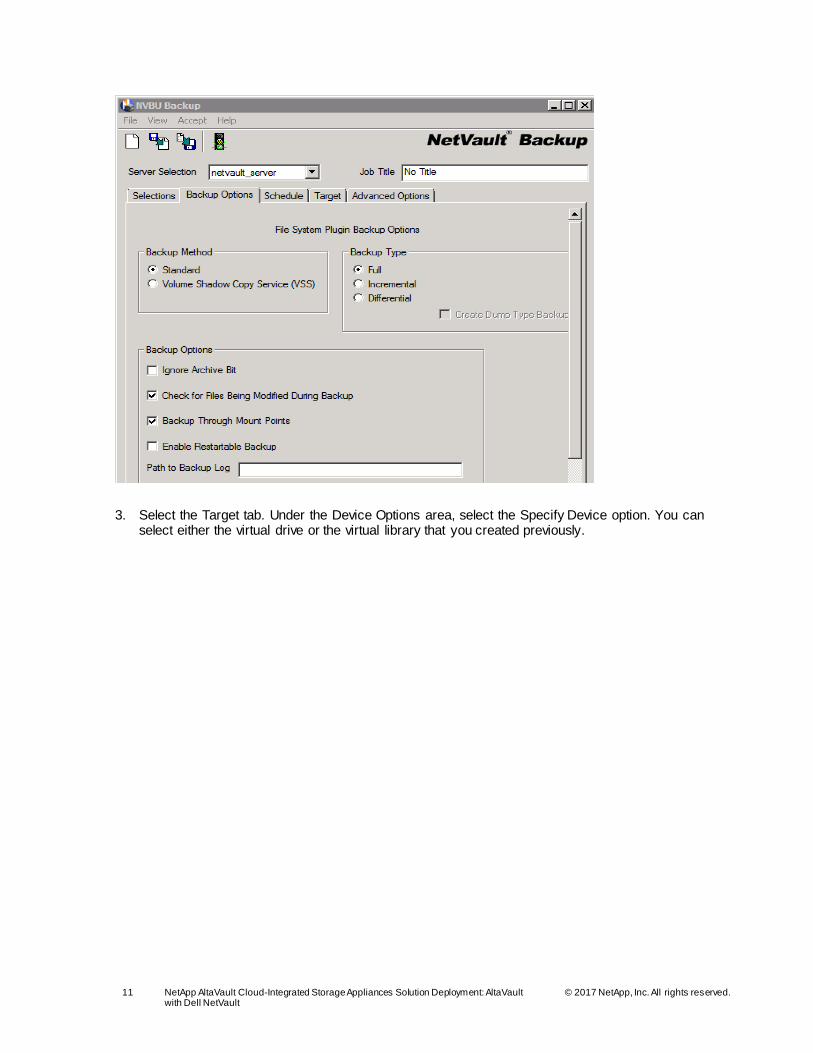
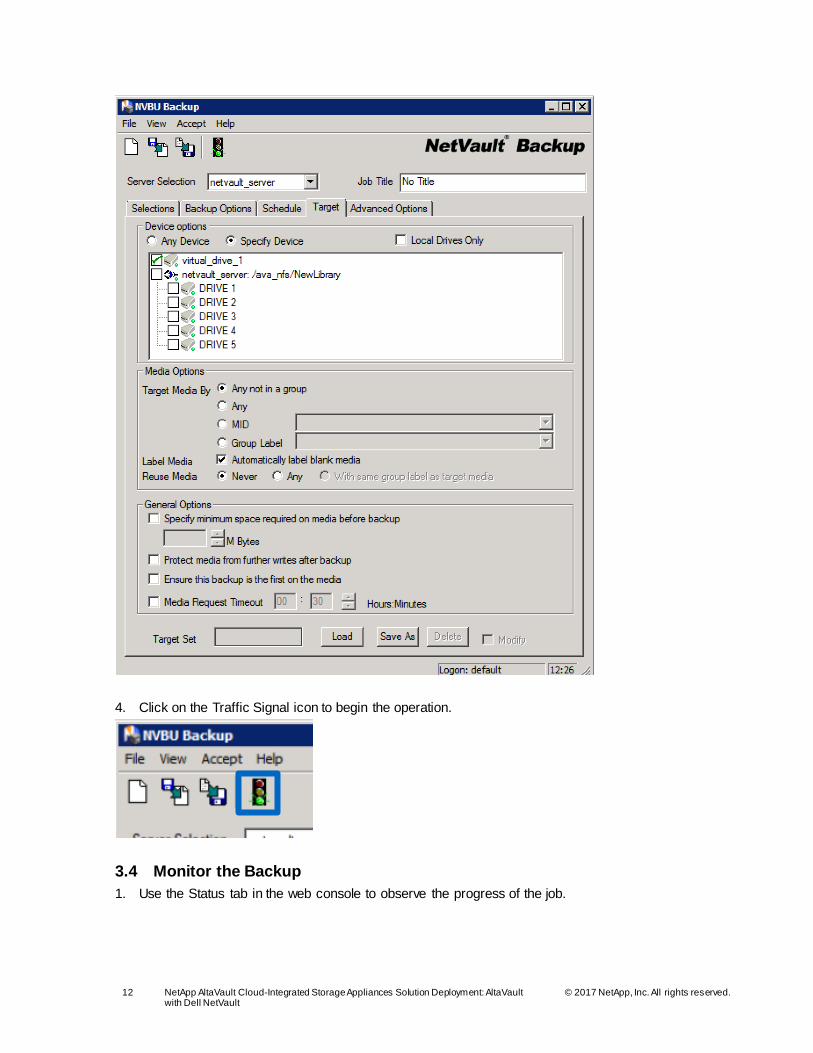
3. Select the Target tab. Under the Device Options area, select the Specify Device option. You can select either the virtual drive or the virtual library that you created previously.
When the backup is complete, perform a restore to validate that the AltaVault appliance can restore the
backed-up data.
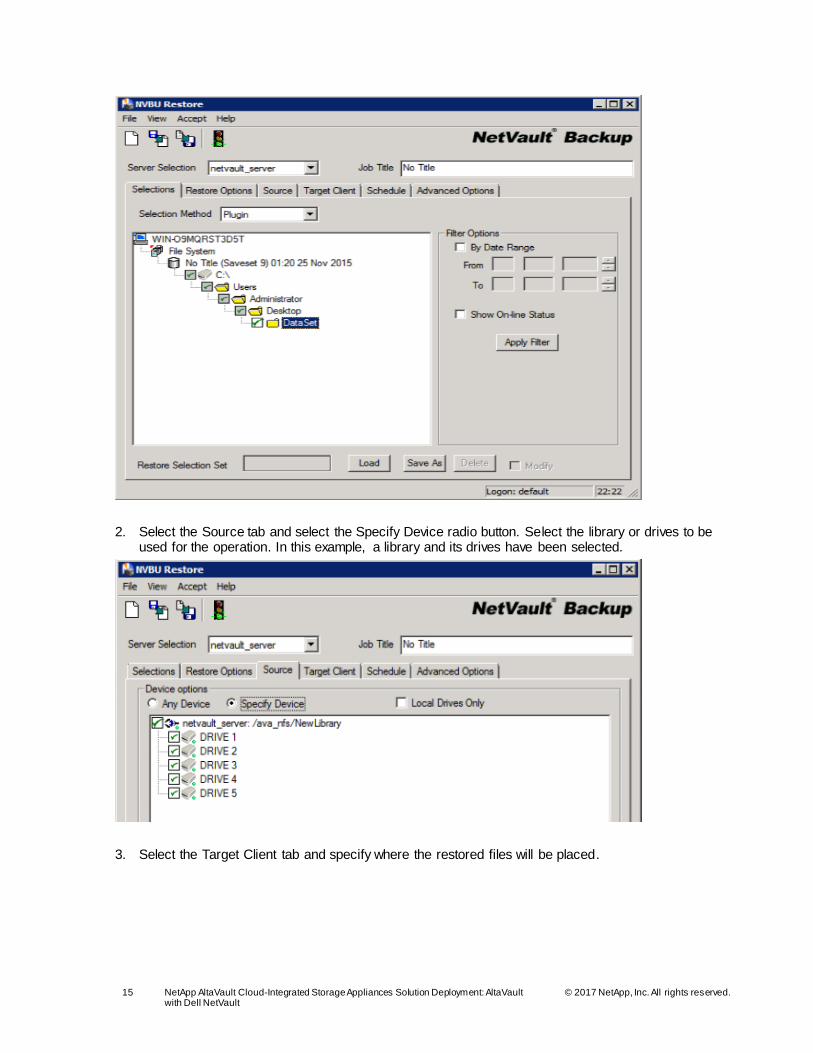
1. From the NetVault web console, select the Restore tab. In the window that appears, expand the selection to identify and select the objects to restore.
2. Select the Source tab and select the Specify Device radio button. Select the library or drives to be used for the operation. In this example, a library and its drives have been selected.
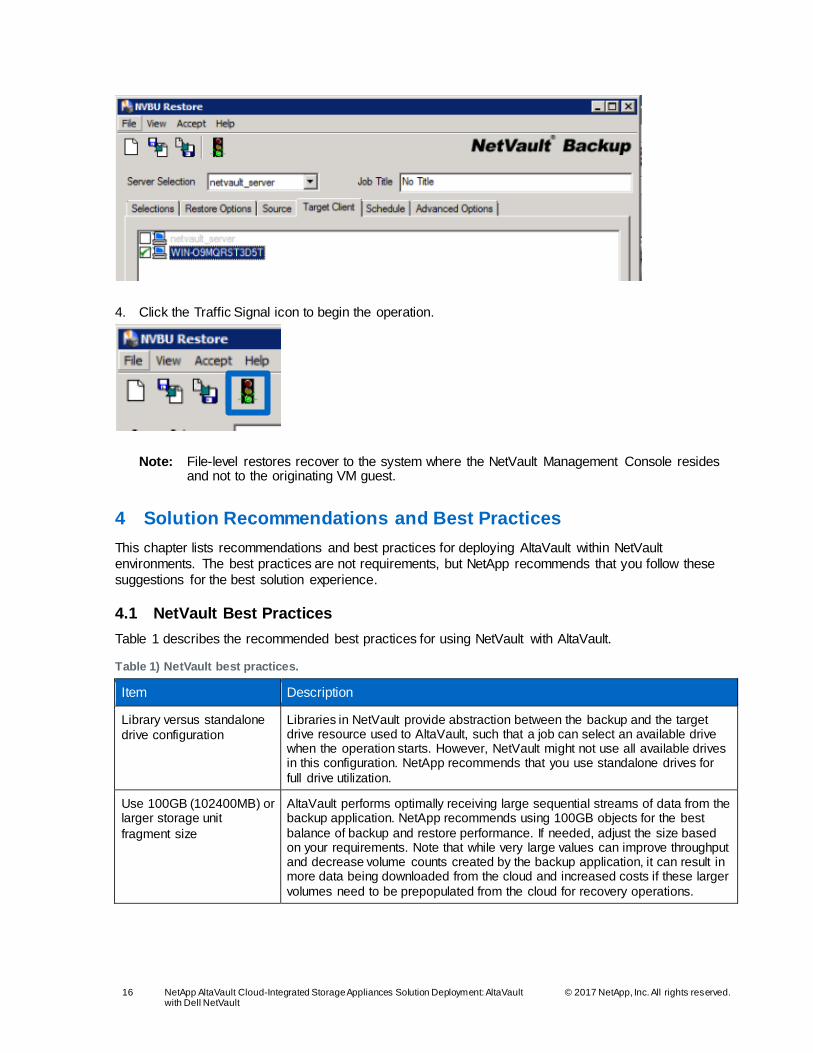
3. Select the Target Client tab and specify where the restored files will be placed.
4. Click the Traffic Signal icon to begin the operation.
Note: File-level restores recover to the system where the NetVault Management Console resides and not to the originating VM guest.
4 Solution Recommendations and Best Practices
This chapter lists recommendations and best practices for deploying AltaVault within NetVault
environments. The best practices are not requirements, but NetApp recommends that you follow these
suggestions for the best solution experience.
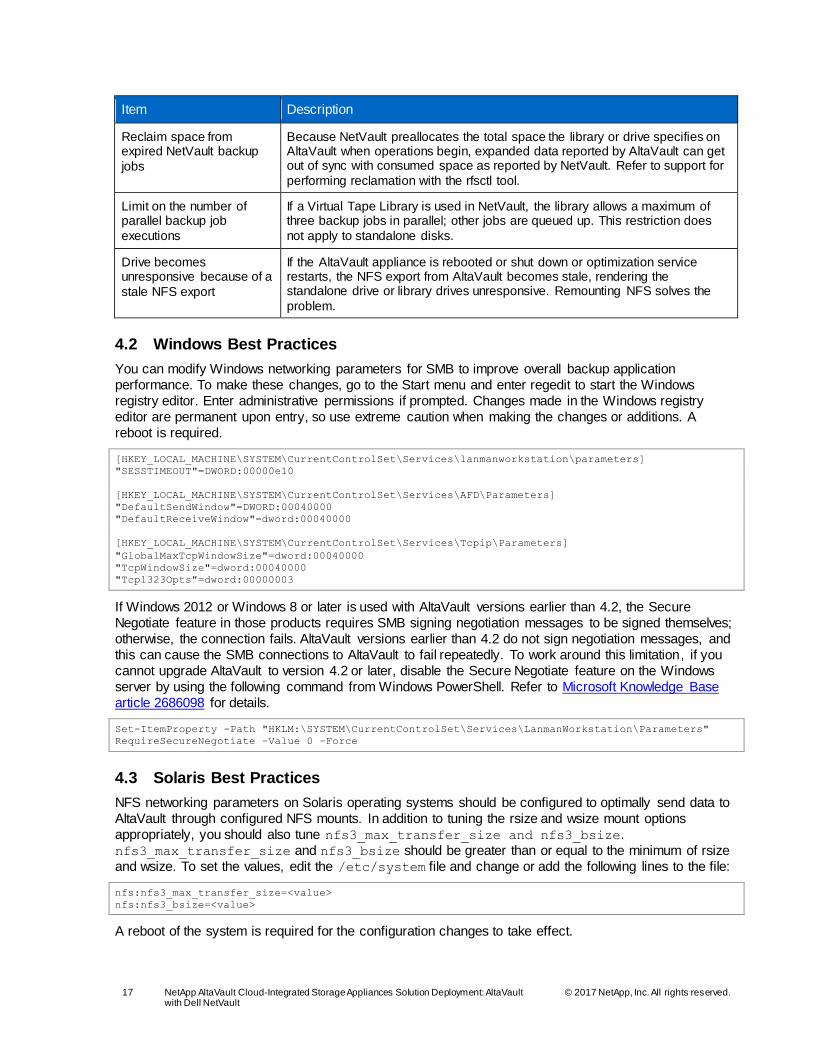
4.1 NetVault Best Practices
Table 1 describes the recommended best practices for using NetVault with AltaVault.
Table 1) NetVault best practices.
Item Description
Library versus standalone
drive configuration
Libraries in NetVault provide abstraction between the backup and the target drive resource used to AltaVault, such that a job can select an available drive when the operation starts. However, NetVault might not use all available drives in this configuration. NetApp recommends that you use standalone drives for
full drive utilization.
Use 100GB (102400MB) or larger storage unit
fragment size
AltaVault performs optimally receiving large sequential streams of data from the backup application. NetApp recommends using 100GB objects for the best
balance of backup and restore performance. If needed, adjust the size based on your requirements. Note that while very large values can improve throughput and decrease volume counts created by the backup application, it can result in more data being downloaded from the cloud and increased costs if these larger
volumes need to be prepopulated from the cloud for recovery operations.
Because NetVault preallocates the total space the library or drive specifies on AltaVault when operations begin, expanded data reported by AltaVault can get out of sync with consumed space as reported by NetVault. Refer to support for
performing reclamation with the rfsctl tool.
Limit on the number of parallel backup job
executions
If a Virtual Tape Library is used in NetVault, the library allows a maximum of three backup jobs in parallel; other jobs are queued up. This restriction does
not apply to standalone disks.
Drive becomes unresponsive because of a
stale NFS export
If the AltaVault appliance is rebooted or shut down or optimization service restarts, the NFS export from AltaVault becomes stale, rendering the standalone drive or library drives unresponsive. Remounting NFS solves the
problem.
4.2 Windows Best Practices
You can modify Windows networking parameters for SMB to improve overall backup application
performance. To make these changes, go to the Start menu and enter regedit to start the Windows
registry editor. Enter administrative permissions if prompted. Changes made in the Windows registry
editor are permanent upon entry, so use extreme caution when making the changes or additions. A
Refer to the Interoperability Matrix Tool (IMT) on the NetApp Support site to validate that the exact product and feature versions described in this document are supported for your specific environment. The NetApp IMT defines the product components and versions that can be used to construct configurations that are supported by NetApp. Specific results depend on each customer’s installation in accordance with
Software derived from copyrighted NetApp material is subject to the following license and disclaimer:
THIS SOFTWARE IS PROVIDED BY NETAPP “AS IS” AND WITHOUT ANY EXPRESS OR IMPLIED WARRANTIES, INCLUDING, BUT NOT LIMITED TO, THE IMPLIED WARRANTIES OF MERCHANTABILITY AND FITNESS FOR A PARTICULAR PURPOSE, WHICH ARE HEREBY DISCLAIMED. IN NO EVENT SHALL NETAPP BE LIABLE FOR ANY DIRECT, INDIRECT, INCIDENTAL, SPECIAL, EXEMPLARY, OR CONSEQUENTIAL DAMAGES (INCLUDING, BUT NOT
LIMITED TO, PROCUREMENT OF SUBSTITUTE GOODS OR SERVICES; LOSS OF USE, DATA, OR PROFITS; OR BUSINESS INTERRUPTION) HOWEVER CAUSED AND ON ANY THEORY OF LIABILITY, WHETHER IN CONTRACT, STRICT LIABILITY, OR TORT (INCLUDING NEGLIGENCE OR OTHERWISE) ARISING IN ANY WAY OUT OF THE USE OF THIS SOFTWARE, EVEN IF ADVISED OF THE POSSIBILITY OF SUCH DAMAGE.
NetApp reserves the right to change any products described herein at any time, and without notice.
NetApp assumes no responsibility or liability arising from the use of products described herein, except as expressly agreed to in writing by NetApp. The use or purchase of this product does not convey a license under any patent rights, trademark rights, or any other intellectual property rights of NetApp.
The product described in this manual may be protected by one or more U.S. patents, foreign patents, or pending applications.
RESTRICTED RIGHTS LEGEND: Use, duplication, or disclosure by the government is subject to
restrictions as set forth in subparagraph (c)(1)(ii) of the Rights in Technical Data and Computer Software clause at DFARS 252.277-7103 (October 1988) and FAR 52-227-19 (June 1987).
Trademark Information
NETAPP, the NETAPP logo, and the marks listed at http://www.netapp.com/TM are trademarks of NetApp, Inc. Other company and product names may be trademarks of their respective owners.