39
Technician Web Portal & Wireless Web Portal Installation and Set-up Guide

Technician Web Portal & Wireless Web Portal
Installation and Set-up Guide
Miracle Service Technician & Wireless Web Portal Installation and Setup Guide | 2
Miracle Service Technician and Wireless Web Portal Installation and Setup Guide Last revised: March 29, 2011 Copyright © 2011 Nexent Innovations Inc. All rights reserved. Miracle Service™ and Nexent Innovations and its related marks, images and symbols are the exclusive properties and trademarks of Nexent Innovations Inc. All other brands, product names, company names, trademarks and service marks are the properties of their respective owners. This document is provided “as is” and Nexent Innovations Inc. (“Nexent”) assumes no responsibility for any typographical, technical, or other inaccuracies in this document. Nexent reserves the right to periodically change information that is contained in this document; however, Nexent makes no commitment to provide any such changes, updates, enhancements, or other additions to this document to you in a timely manner or at all. NEXENT MAKES NO REPRESENTATIONS, WARRANTIES, CONDITIONS, OR COVENANTS, EITHER EXPRESS OR IMPLIED (INCLUDING, WITHOUT LIMITATION, ANY EXPRESS OR IMPLIED WARRANTIES OR CONDITIONS OF FITNESS FOR A PARTICULAR PURPOSE, NON-INFRINGEMENT, MERCHANTABILITY, DURABILITY, TITLE, OR RELATED TO THE PERFORMANCE OR NON-PERFORMANCE OF ANY SOFTWARE REFERENCED HEREIN, OR PERFORMANCE OF ANY SERVICES REFERENCED HEREIN). IN CONNECTION WITH YOUR USE OF THIS DOCUMENTATION, NEITHER NEXENT NOR ITS AFFILIATED COMPANIES AND THEIR RESPECTIVE DIRECTORS, OFFICERS, EMPLOYEES, OR CONSULTANTS SHALL BE LIABLE TO YOU FOR ANY DAMAGES WHATSOEVER BE THEY DIRECT, ECONOMIC, COMMERCIAL, SPECIAL, CONSEQUENTIAL, INCIDENTAL, EXEMPLARY, OR INDIRECT DAMAGES, EVEN IF NEXENT HAS BEEN ADVISED OF THE POSSIBILITY OF SUCH DAMAGES, INCLUDING, WITHOUT LIMITATION, LOSS OF BUSINESS REVENUE OR EARNINGS, LOST DATA, DAMAGES CAUSED BY DELAYS, LOST PROFITS, OR A FAILURE TO REALIZE EXPECTED SAVINGS. Nexent Innovations Inc. Erinpark Commercial Centre 1100 Central Parkway West Unit 3-L Mississauga, Ontario, L5C 4E5 Canada

Miracle Service Technician & Wireless Web Portal Installation and Setup Guide | 3
Table of Contents
TECHICIAN AND WIRELESS WEB PORTAL INSTALLATION & SET-UP GUIDE ....................................5
PREREQUISITE............................................................................................................................................................5
WEB SERVER FILES INSTALLATION.................................................................................................................5
STEP 1 – DOWNLOAD THE INSTALLATION FILE ..........................................................................................................5 STEP 2 – SHARE YOUR M IRACLE SERVICE DATABASE DIRECTORY.........................................................................10 STEP 3 – CONFIGURE THE SECURITY SETTINGS ON THE M IRACLEDB FOLDER........................................................13 STEP 4 – SHARE YOUR INETPUB DIRECTORY...........................................................................................................13 STEP 5 – CONFIGURE THE SECURITY SETTINGS ON THE INETPUB FOLDER...............................................................14
CONFIGURE MICROSOFT INTERNET INFORMATION SERVICE (IIS6) .................................................15
STEP 1 – START INTERNET INFORMATION SERVICES...............................................................................................15 STEP 2 – CONFIGURE THE VIRTUAL DIRECTORY......................................................................................................16
CONFIGURE MICROSOFT INTERNET INFORMATION SERVICE (IIS7) .................................................17
STEP 1 – INSTALL THE IIS7 REQUIRED FEATURES...................................................................................................17 STEP 2 – CONFIGURE THE VIRTUAL DIRECTORY......................................................................................................19 STEP 3- CONFIGURE 32-BIT ENABLE APPLICATION POOL........................................................................................21 STEP 4 – CONFIGURE THE DEFAULT DOCUMENTS...................................................................................................21 STEP 5 – OTHER IIS7 SETTINGS TO CHECK..............................................................................................................21
INSTALL XML COMPONENT ..............................................................................................................................24
STEP 1 – INSTALL XML COMPONENT......................................................................................................................24 STEP 2 – SET DIRECTORY PERMISSION....................................................................................................................24
CONFIGURE THE DATABASE CONNECTION PROPERTIES ......................................................................25
STEP 1 – DATABASE CONNECTION PROPERTIES.......................................................................................................25 STEP 2 – CONFIGURE THE DATABASE PATH ............................................................................................................26 STEP 3 – CONFIGURE THE SECURITY FILE PATH ......................................................................................................26 STEP 4 – CONFIGURE THE CONNECTION USERNAME AND CONNECTION PASSWORD...............................................26
CONFIGURE THE WEB PORTAL SMTP SETTINGS.......................................................................................27
STEP 1 – SMTP SETTINGS .......................................................................................................................................27 STEP 2 – ENTER THE HOST NAME AND SETTINGS....................................................................................................27 STEP 3 – SAVE SETTINGS.........................................................................................................................................27
CONFIGURE THE PDA SETTINGS .....................................................................................................................28
STEP 1 – ENABLE THE PRINT FIELD REPORT............................................................................................................28 STEP 2 – ENABLE PRINT LOGO SETTING..................................................................................................................28 STEP 3 – DEFINE THE RECEIPT FILE PATH................................................................................................................28 STEP 4 – ACTIVATE THE ACCEPT PAYMENT IN FIELD SETTING................................................................................28
CONFIGURE THE OTHER SETTINGS ...............................................................................................................28
STEP 1 – DEFINE THE LOGGING PATH AND FILE NAME............................................................................................28 STEP 2 – DEFINE THE DOCUMENTS PATH.................................................................................................................28 STEP 3 – DEFINE THE TECHNICIAN INVOICES PATH .................................................................................................29 STEP 4 – DEFINE THE SIGNATURE CAPTURE’S VIRTUAL DIRECTORY NAME............................................................29 STEP 5 – DEFINE THE DOCUMENT MANAGER’S VIRTUAL DIRECTORY NAME..........................................................29
CONFIGURE THE GENERAL SETTINGS..........................................................................................................30
STEP 1 – SET-UP ORDER PARTS NOTIFICATION MESSAGE.......................................................................................30 STEP 2 – SET-UP JOB CLOSE NOTIFICATION MESSAGE............................................................................................31

Miracle Service Technician & Wireless Web Portal Installation and Setup Guide | 4
STEP 3 – SET-UP JOB RESCHEDULE NOTIFICATION MESSAGE..................................................................................31 STEP 4 – CONFIGURE E-MAIL ADDRESSES...............................................................................................................32
Sender Address for Order Parts Notification.....................................................................................................32 Recipient Address for Order Parts Notification.................................................................................................32 Recipient Cc Address for Order Parts Notification ...........................................................................................32 Sender Address for Close Job Notification ........................................................................................................32 Recipient Address for Close Job Notification ....................................................................................................33
STEP 4 – ENABLE NEW JOB CREATION ....................................................................................................................33 STEP 5 – MAXIMUM PAGE SIZE ...............................................................................................................................33 STEP 6 – MAXIMUM SEARCH RESULT SIZE ..............................................................................................................33 STEP 7 – PRINT PROGRESS TASK TICKET .................................................................................................................33 STEP 8 – SET SYSTEM DATE AND TIME FORMAT .....................................................................................................33 STEP 9 – SET THE TASK TICKET FORMAT ................................................................................................................33 STEP 10 – DISPLAY EXPENSE PRICE VALUE ............................................................................................................33 STEP 11 – ENABLE TECHNICIAN INVOICING.............................................................................................................33 STEP 12 – DISPLAY AND PRINT INVOICE COMMENTS...............................................................................................34 STEP 13 – DISPLAY AND PRINT NEXT TASK COMMENTS.........................................................................................34 STEP 14 – DISPLAY AND PRINT SERVICE BILLING COMMENTS................................................................................34 STEP 15 – DISPLAY AND PRINT SPECIAL INSTRUCTIONS..........................................................................................34 STEP 16 – ENABLE USE SIGNATURE CAPTURE – TABLET PC ONLY .........................................................................34 STEP 17 – ENABLE USE DOCUMENT MANAGER.......................................................................................................34 STEP 18 – SET RESCHEDULE BUTTON METHOD.......................................................................................................34
CONFIGURE TECHNICIAN ACCESS IN MIRACLE SERVICE .....................................................................35
STEP 1 – OPEN M IRACLE SERVICE ADMINISTRATION APPLICATION........................................................................35 STEP 2 – SELECT SERVICE PREFERENCES (BUTTON 3) .............................................................................................35 STEP 3 – SELECT TECHNICIANS ...............................................................................................................................35 STEP 4 – SET-UP WEB LOGIN ID AND PASSWORD....................................................................................................35 STEP 5 – SET-UP WEB ADMINISTRATOR ..................................................................................................................36 STEP 6 – ENTER BLACKBERRY PIN.........................................................................................................................36
ESTABLISHING THE INTERNET CONNECTION............................................................................................36
TROUBLESHOOTING............................................................................................................................................38

Miracle Service Technician & Wireless Web Portal Installation and Setup Guide | 5
Techician and Wireless Web Portal Installation & Set-up Guide
Installation Overview The Installation and set-up procedure outlined in this document is based on a standard installation of our Miracle Service software and a typical Microsoft® computer system environment. It is intended as a general guide on how to set-up and configure your computer to run the Technician or Wireless Web Portal applications. This guide assumes that you will set up your IIS server and that you have a good understanding of the IIS server. It also assumes you have established an Internet connection and are capable of managing any issues with Internet connectivity. The following is an overview of the Prerequisites for running the Technician and Wireless Web Portal.
Prerequisite 1) Microsoft OS XP Pro, Windows Server 2003 or Windows Server 2008 2) Miracle Service Version 5.1.0.0 or newer. 3) IIS 6.0 or newer must already be installed and running. 4) Verify IIS has no existing application conflicts and is able to run .ASP files. 5) The IIS Web server requires a Static IP address with port 80 assigned to the Miracle Service
Technician or Wireless Web Portal. 6) ASP and ASP.NET features are installed in IIS Features 7) IIS6 Compatibility is installed if IIS7 is used. 8) Windows Internet Explorer 9) Supported Devices: Information on current support devices and operating systems can be
found at: http://www.miracleservice.com/index.php/customer-center/system-requirements-guideline/ Note: Contact Technical Support prior to upgrading any existing devices to ensure operating system is supported.
Web Server Files Installation
Step 1 – Download the Installation File If you received a CD/DVD as part of your installation kit, you can install directly from the CD. If you are downloading the installation file, they can be obtained from our web site at: http://www.miracleservice.com/support/msdownloads5.php The downloaded file is a password protected compressed (zipped) file. If you do not have the password it can be obtained be contacting [email protected].

Miracle Service Technician & Wireless Web Portal Installation and Setup Guide | 6
When you extract the files they will be extracted to one of the following folders: C:\TECHNICIANPORTAL_WP210 – For Technician Web Portal (Desktop Browser) C:\TECHNICIANPORTAL_BP230 – For Wireless Web Portal (Blackberry or PDA Browser) Navigate to the correct extracted folder and run the setup.exe file. Double-click setup.exe.
This will launch the installer for the web portal.

Miracle Service Technician & Wireless Web Portal Installation and Setup Guide | 7
Click NEXT
You can select the Installation Address. It is required that you keep the default install path as defined in the installer. Click Next.

Miracle Service Technician & Wireless Web Portal Installation and Setup Guide | 8
Click Next
During the installation the Technician Portal XML configuration file converter will open. For new installations this can be ignored. Click the red “X” to allow the installation to proceed.

Miracle Service Technician & Wireless Web Portal Installation and Setup Guide | 9
If this is an upgrade you can click the ‘Browse’ button and navigate to the current XML file that contains your unique site configuration information and update it to the latest version. Click Browse and navigate to c:\inetpub\wwwroot\miracleservice\techncianportal\setup and select admintechconfig.xml. Click ‘Update’. This will update the admintechconfig.xml file to the latest version for the current portal. Once this is complete, the installation process will complete.

Miracle Service Technician & Wireless Web Portal Installation and Setup Guide | 10
Click Close.
Step 2 – Share your Miracle Service Database Directory Since the Miracle Service Directory (typically - C:\MiracleDB) will be shared with the Internet Information Service application, you must configure the Miracle Service directory Properties to allow the folder to be shared. To configure the Folder Properties, navigate to the database folder using Windows Explorer. Right click on the folder and select “Sharing and Security”. Once the Properties window is open, select the “Sharing” tab and “Share this folder”.

Miracle Service Technician & Wireless Web Portal Installation and Setup Guide | 11
Next click the “Permissions button.” This will open the window used to define the level of permissions being granted. Select “Everyone” and the check “Full Control” under Allow. The action should automatically check all of the Permission levels below Allow. This would allow Change and Read as well. If this does not happen automatically, manually check Change and Read under Allow as well. Next Select the Security tab. This is where you will set-up sharing the folder with the Internet User for your Web Site. Select ‘Add…’ to add a Group or user name. We will be adding the Internet User to this list. Select ‘Advanced’

Miracle Service Technician & Wireless Web Portal Installation and Setup Guide | 12
Locate the IUSR_Computer where the Computer is the name of the specific computer for the Web server user. If the web site is on a computer called WebServer, then you must locate the IUSR_WebServer. Scroll down the list until you have located the correct IUSR and then select the IUSR and select ‘OK’. IIS7 and Server 2008 Special Considerations: With IIS7 and Server 2008 there are 4 users that are important to configure. These are: IUSR, IIS_IUSR, NETWORK, and NETWORK SERVICE. We recommend giving all of these users read and write access to the MiracleDB folder.
Click OK again on this screen.
Check to ensure you have added the Internet Guest Account for the correct computer. Select this user to configure its Permissions. Once you have selected the user it will be highlighted. Check ‘Read’ and ‘Write’ permissions for this user. Click OK to complete the modification of the permissions.
Miracle Service Technician & Wireless Web Portal Installation and Setup Guide | 13
Step 3 – Configure the Security Settings on the Mir acleDB Folder Once the folder is shared select the Security tab to configure the same users to have sufficient security rights to also read and write to the files in the folder and all sub-folders and files.
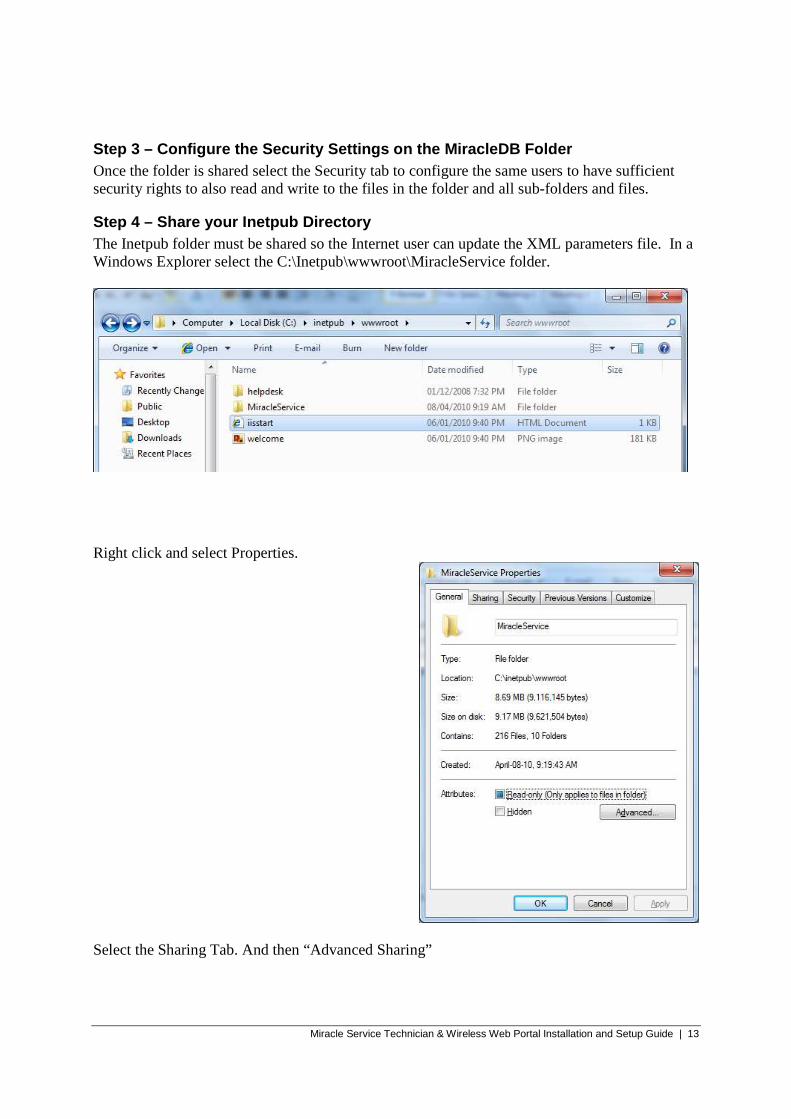
Step 4 – Share your Inetpub Directory The Inetpub folder must be shared so the Internet user can update the XML parameters file. In a Windows Explorer select the C:\Inetpub\wwwroot\MiracleService folder.
Right click and select Properties.
Select the Sharing Tab. And then “Advanced Sharing”

Miracle Service Technician & Wireless Web Portal Installation and Setup Guide | 14
In the Advanced Sharing area you will want to configure the users that will require the rights to update the XML file. With IIS7 and Server 2008 there are 4 users that are important to configure. These are: IUSR, IIS_IUSR, NETWORK, and NETWORK SERVICE. We recommend giving all of these users read and write access to the MiracleService folder. Through our experience we have discovered that combinations of these are often sufficient to set-up and have the Technician Portal function correctly; however, for completeness and to standardize these instructions we are including the recommendation on the full set. Click the ‘Advanced Sharing’ and configure these users to have at least read / write access to this folder and all sub-folders.
Step 5 – Configure the Security Settings on the Ine tpub Folder Once the folder is shared select the Security tab to configure the same users to have sufficient security rights to also read and write to the files in the folder and all sub-folders and files.

Miracle Service Technician & Wireless Web Portal Installation and Setup Guide | 15
Configure Microsoft Internet Information Service (IIS6)
Step 1 – Start Internet Information Services Start the Internet Information Services (IIS) application. It normally resides under administrative tools in your Control Panel. Before starting the IIS you should check the properties of both the IIS Admin and World Wide Web Publishing Services in your Services Tool. It is recommended that you configure the Start-up Type as Automatic for both of these Services.
Once you have verified that the IIS Admin and World Wide Web Publishing Services are running and configured for Automatic Start-up Type, you can open your IIS Service. The IIS Service is located in your Control Panel under Administrative Tools. (Start – Control Panel – Administrative Tools)

Miracle Service Technician & Wireless Web Portal Installation and Setup Guide | 16
Step 2 – Configure the Virtual Directory A Virtual Directory was setup automatically during the installation process. At this time you need to verify the Properties of the directory. When you right click on the Virtual Directory you can select Properties. The following window appears.

Miracle Service Technician & Wireless Web Portal Installation and Setup Guide | 17
Select the “Configuration…” button and then the Options tab. Check to ensure that the Parent Paths is enabled. Also check the Default ASP language and the ASP Script Timeout is 90 seconds. During the set-up you should consider the Session Timeout setting. The Timeout is defaulted at 20 minutes. After 20 minutes the session will timeout and the remote user will need to log back in to the portal. You should modify this to suit your business security concerns and impact on your technicians’ data entry efforts.
Configure Microsoft Internet Information Service (IIS7) Configuring IIS7 is essentially the same as IIS6. While the user interface has changed considerably, the concepts are the same. The other issue with IIS7 is not all of the required feature come installed as standard. This means you will need to install the other necessary features. The following is an overview of some of the important features and changes.
Step 1 – Install the IIS7 Required Features To install the required features go to Programs and Features and run “Turn Windows features on or off”. In the feature list expand the Internet Information Services, then Web Management Tools and finally IIS6 Management Compatibility. Ensure IIS6 Management Compatibility is installed.

Miracle Service Technician & Wireless Web Portal Installation and Setup Guide | 18
Next Expand the World Wide Web Services and then the Application Development Features. In this feature screen make sure that ASP and ASP.NET are installed. When you check ASP and ASP.NET the other features should automatically be checked. These include: .NET Extensibility, ISAPI Extensions and ISAPI Filters.

Miracle Service Technician & Wireless Web Portal Installation and Setup Guide | 19
Step 2 – Configure the Virtual Directory A Virtual Directory was setup automatically during the installation process. At this time you need to verify the Properties of the virtual directory. When you click on the Virtual Directory the following window appears.

Miracle Service Technician & Wireless Web Portal Installation and Setup Guide | 20
Double Click the ASP feature to open the ASP feature window.
Set the Enable Parent Paths to True and click Apply.

Miracle Service Technician & Wireless Web Portal Installation and Setup Guide | 21
Step 3- Configure 32-Bit Enable Application Pool Click the Application Pool (Default App Pool) and select the “Advanced Settings” in the Action pane on the right. Select ‘True’ for the Enable 32-Bit Applications.
Step 4 – Configure the Default Documents Double Click the Default Documents and modify the document list to remove all of the documents except ‘default.asp’.
Step 5 – Other IIS7 Settings to Check IIS7 has many features and settings and every server can be configured differently. Here are a few items to check and confirm the settings.
1) Ensure the Default Web Site is set to port 80. Click on the Default Web Site and then select the ‘Binding’ link in the Action pane in the right window. Verify the Port is set to port 80.

Miracle Service Technician & Wireless Web Portal Installation and Setup Guide | 22
2) Confirm the Physical Path is correct.
Click on the Virtual Directory and select ‘Basic Settings’ in the right Action pane. Review the path to ensure it is pointing to the correct location. It should typically be set to:
C:\Inetpub\wwwroot\MiracleService\TechnicianPortal
3) Convert the Virtual Directory to an Application On some systems, it is necessary to convert the Virtual Directory to an application. In the Internet Information Services (IIS) Manager select the Virtual Directory for the TechnicianPortal. Right click on this folder and if an option is available that says: “Convert to Application”, select this option and allow IIS to convert the folder to an application. Note: if this option is not available and it only show “Add Application”, do not run the Add Application function as it may duplicate this application.
4) For SBS 2008 it may be necessary to disable the compression application for the web environment as SBS 2008 only support a 64 Bit compression module. The following commands can be used to enable or disable the compression on a SBS 2008 server. Enter these commands at a command prompt with it running as administrator.
To Disable the compression: %windir%\system32\inetsrv\appcmd.exe set config -section:system.webServer/httpCompression /-[name='xpress'] To Enable the compression: %windir%\system32\inetsrv\appcmd.exe set config -section:system.webServer/httpCompression /+[name='xpress',doStaticCompression='false',dll='%windir%\system32\inetsrv\suscomp.dll']
5) If you receive a HTTP 503 Error it may be necessary to manually configure some features of the web components as follows: On SBS 2008 and other 64 bit editions of Windows 2008, additional steps are required after installation of Web Components. These steps ensure that the Web Components can run on the 64 bit system with other applications. Warning:
o Back up files before making changes. o Ensure that XML is correctly written. For general information about XML
editing, see article Q12705. o Note that some lines below are wrapped for readability.

Miracle Service Technician & Wireless Web Portal Installation and Setup Guide | 23
o Note that if you edit the lines referring to the "exppw" module, you MUST change both lines. If you do not, browsing to any page will fail with HTTP error 500.
To configure the Web Components:
1. Open a text editor or XML editor with elevated privileges (for instance, from the Start menu right-click Notepad and select Run as Administrator).
In the file %windir%\system32\inetsrv\config\applicationhost.config: o change the line
<add name="PasswordExpiryModule" image="C:\Windows\system32\RpcProxy\RpcProxy.dll" /> to the following <add name="PasswordExpiryModule" image="C:\Windows\system32\RpcProxy\RpcProxy.dll" preCondition="bitness64" />
o Note that the "image" part of the entries will depend on your local installation and you should not change it
2. If Outlook Web Access is installed on the server, perform the following
additional steps (note that the "path" part of the entries will depend on your local installation and you should not change it): In the file %windir%\system32\inetsrv\config\applicationhost.config:
o change the line <filter name="Exchange OWA Cookie Authentication ISAPI Filter" path="C:\Exchange\ClientAccess\owa\auth\owaauth.dll" enabled="true" /> to the following <filter name="Exchange OWA Cookie Authentication ISAPI Filter" path="C:\Exchange\ClientAccess\owa\auth\owaauth.dll" enabled="true" preCondition="bitness64" />
o change the line
<filter name="Exchange ActiveSync ISAPI Filter" path="C:\Exchange\ClientAccess\sync\bin\AirFilter.dll" enabled="true" /> to the following <filter name="Exchange ActiveSync ISAPI Filter" path="C:\Exchange\ClientAccess\sync\bin\AirFilter.dll" enabled="true" preCondition="bitness64" />

Miracle Service Technician & Wireless Web Portal Installation and Setup Guide | 24
o change the line <add name="exppw" image="C:\Program Files\Microsoft\Exchange Server\ClientAccess\Owa\auth\exppw.dll" /> to the following <add name="exppw" image="C:\Program Files\Microsoft\Exchange Server\ClientAccess\Owa\auth\exppw.dll" preCondition="bitness64" />
o change the line
<add name="exppw" /> to the following <add name="exppw" preCondition="bitness64" />
The following are some internet links that may provide more information and background on these settings: http://forums.iis.net/t/1154189.aspx http://www.m86security.com/kb/article.aspx?id=12671
Install XML Component In order to process your web portal functional settings you will need to install a Microsoft XML parsing component.
Step 1 – Install XML Component Download and run the msxml.msi file. For further information regarding this component (MSXML 6.0) please see the following Microsoft article: http://www.microsoft.com/downloads/details.aspx?FamilyID=3144b72b-b4f2-46da-b4b6-c5d7485f2b42&DisplayLang=en
Step 2 – Set Directory Permission The specified XML component requires read and write permissions to the directory that stores the XML configuration file (adminconfig.xml). This file is located in “c:\Inetpub\wwwroot\MiracleService\TECHNICIANPORTAL\”. To set the folder permissions right click on the “TECHNICIANPORTAL” folder and select “Sharing and Security”. Select the “Security” tab and add the Internet user. To review how to set read and write permissions for the Internet user please see “Step 2 - Share your Miracle Service Database Directory” from the “Web Server Files Installation and Setup” section above.

Miracle Service Technician & Wireless Web Portal Installation and Setup Guide | 25
Configure the Database Connection Properties To connect and run this application against an already installed database, the file path must match your existing installation file path. The following provides a step-by-step description to configure the web files to your specific site installation.
Step 1 – Database Connection Properties To proceed, launch the Technician & Web Portal Administrative Interface. The administrative interface is included in the application and can be access by entering the correct Address in your Web Browser. The following is an example of the administrative interface path. http://XXX.XXX.XXX.XXX/setup/h_admintechsetup.asp
The XXX.XXX.XXX.XXX represents the static IP address of the Web Site. Alternatively, this could be a domain name set-up for the Technician & Wireless Portal Web Site. Once you have entered this address you will be presented with the login password window.
The default password is “admin”. Note: this password can be modified by editing the admintechconfig.xml file parameter for the admin password (i.e. <ap>admin</ap>). This file is located in the C:\Inetpub\wwwroot\MiracleService\TechnicianPortal\Setup folder. You can use Notepad to edit this file and the password. Once you have entered the correct password you are presented with the Database Connection Properties window.
Miracle Service Technician & Wireless Web Portal Installation and Setup Guide | 26
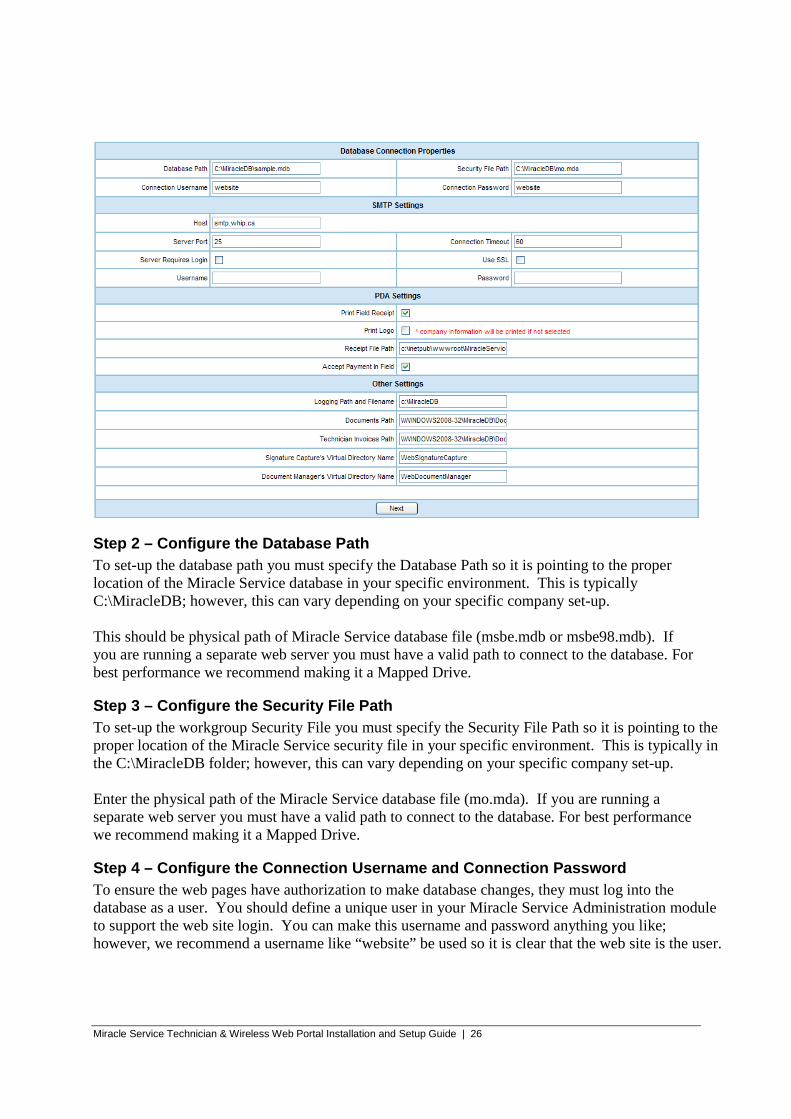
Step 2 – Configure the Database Path To set-up the database path you must specify the Database Path so it is pointing to the proper location of the Miracle Service database in your specific environment. This is typically C:\MiracleDB; however, this can vary depending on your specific company set-up. This should be physical path of Miracle Service database file (msbe.mdb or msbe98.mdb). If you are running a separate web server you must have a valid path to connect to the database. For best performance we recommend making it a Mapped Drive.
Step 3 – Configure the Security File Path To set-up the workgroup Security File you must specify the Security File Path so it is pointing to the proper location of the Miracle Service security file in your specific environment. This is typically in the C:\MiracleDB folder; however, this can vary depending on your specific company set-up. Enter the physical path of the Miracle Service database file (mo.mda). If you are running a separate web server you must have a valid path to connect to the database. For best performance we recommend making it a Mapped Drive.
Step 4 – Configure the Connection Username and Conn ection Password To ensure the web pages have authorization to make database changes, they must log into the database as a user. You should define a unique user in your Miracle Service Administration module to support the web site login. You can make this username and password anything you like; however, we recommend a username like “website” be used so it is clear that the web site is the user.

Miracle Service Technician & Wireless Web Portal Installation and Setup Guide | 27
To set-up the username and password you need to enter the Connection User Name and Connection Password in the Database Connection Properties window. The Connection User Name and Connection Password must be active usernames and passwords set-up in the Miracle Service Administration application. We recommend using a unique Connection User Name such as “WebSite” with a different Connection Password for stronger security. Connection User Name="WebSite" Connection Password="Your%Password"
Configure the Web Portal SMTP Settings To Configure the Web Portal SMTP Settings you must specify the e-mail server you intended to use in the SMTP Setting.
Step 1 – SMTP Settings To proceed, launch the Technician or Wireless Portal Administrative Interface. The administrative interface is included in the application and can be access by entering the correct Address in your Web Browser. The following is an example of the administrative interface path. http://XXX.XXX.XXX.XXX/setup/h_admintechsetup.asp
The XXX.XXX.XXX.XXX represents the static IP address of the Web Site. Alternatively, this could be a domain name set-up for the Technician Portal Web Site. Once you have entered this address you will be presented with the Database Connection Properties window.
Step 2 – Enter the Host Name and Settings Use the standard start -> Programs -> Accessories to find and open the Notepad application. The host name is the name of the SMTP server you will use to transmit your e-mail messages through that are coming from your Website. You will also need to configure the Server Port (which is typically 25) and Connection Timeout (typically 60). If the SMTP server requires a login, you need to check this box and then enter a valid Username and Password for your SMTP e-mail server. You may need to consult with your e-mail administrator or provider to obtain this information.
Step 3 – Save Settings Click “Next” to save the Database Connection Properties and the SMTP Settings.

Miracle Service Technician & Wireless Web Portal Installation and Setup Guide | 28
Configure the PDA Settings (Wireless Web Portal Only) The PDA Settings are for features unique to the Wireless Web Portal application.
Step 1 – Enable the Print Field Report The PDA version has a special mobile printer interface to a Printek mobile printer. When this feature is enabled the Print button is activated at the bottom of the Update screen.
Step 2 – Enable Print Logo Setting The mobile printer has the options to print an onboard logo file or a text version of the company name and address. When this field is checked the logo file stored on the printer will be used.
Step 3 – Define the Receipt File Path When using the mobile printer the receipt file is generated on the server and then delivered to the mobile printer. The path specified is the location where the PDA will search for receipts to print. Note: it is essential that this path be accessible as part of the web server environment.
Step 4 – Activate the Accept Payment in Field Setti ng When this feature is checked it will display fields to enter payment information such as method of payment and a payment reference. For example the Method could be Visa and the reference is the authorization number. Note: the application is not capable of doing the actual credit card authorization processing.
Configure the Other Settings The Other Settings are for features unique to the Wireless Web Portal application.
Step 1 – Define the Logging Path and File Name It is mandatory to enter a logging path and file name in order for the web application to function without error. We recommend setting the path to the Miracle Service database path and the file name to ‘events.txt’. The will ensure an event can be written to a log file. If this is not defined the system will generate a screen error and halt since it is not able to locate the log path and file location.
Step 2 – Define the Documents Path The ‘Documents Path’ must be defines to allow the Web Document Manager to write a file uploaded from a field device to the server. This is a standard documents location for all files uploaded from a field device. It is necessary to use a UNC (Universal Naming Convention) path for this location. We recommend using a ‘documents’ folder in the \MiracleDB folder path.

Miracle Service Technician & Wireless Web Portal Installation and Setup Guide | 29
Step 3 – Define the Technician Invoices Path The Technician Invoices Path is used when a sub-contractor uploads an invoice to the web site for a complete job. This can be the same location as ‘Documents Path’ but is typically a separate location.
Step 4 – Define the Signature Capture’s Virtual Dir ectory Name The Signature Capture’s Virtual Directory Name must be identical to the name configured in the IIS application. We recommend that the default virtual director name be used. This is: ‘WebSignatureCapture’.
Step 5 – Define the Document Manager’s Virtual Dire ctory Name The Document Manager’s Virtual Directory Name must be identical to the name configured in the IIS application. We recommend that the default virtual directory name be used. This is: ‘WebDocumentManager’. Click the Next button to proceed to the General Settings.

Miracle Service Technician & Wireless Web Portal Installation and Setup Guide | 30
Configure the General Settings The General Settings are used to specify the unique messages and e-mail address you would like the Web Portal to use.
Step 1 – Set-up Order Parts Notification Message The Order Parts Notification Message is used in the Portal when a technician enters parts and submits the request to the office. When you are configuring the Order Parts Message, you can specify data values to insert in the message when customizing the Order Parts message. As listed below, the pipe (|) symbol is used to identify keywords. The following keyword can be used to configure your Order Parts Notification message for your specific use.

Miracle Service Technician & Wireless Web Portal Installation and Setup Guide | 31
Ordering Parts Data Value Keywords: |ITEMNO| = identifies the part number |QTY| = identifies the quantity ordered |DATE| = identifies the date required |TECHID| = identifies the tech ID |TECHNAME| = identifies the tech name |BR| = identifies a hard line break Example - "Part(s) Order for Technician ID |TECHID| |BR| Item Number = |ITEMNO|" Part(s) Order for Technician ID CG Item Number = 9999
Step 2 – Set-up Job Close Notification Message The Job Close Notification Message is used in the Portal when a technician hits the Close button on the bottom of the Job Update screen and submits the request to the office to close the Job. When you are configuring the Job Close Notification Message, you can specify data values to insert in the message when customizing the Job Close message. As listed below, the pipe (|) symbol is used to identify keywords. The following keyword can be used to configure your Job Close Notification Message for your specific use. Closing Jobs Data Value Keywords: |TASKNUM| = identifies the task number |TASKID| = identifies the task ID |TECHID| = identifies the tech ID |TECHNAME| = identifies the tech name |BR| = identifies a hard line break Example - "Please close job |TASKNUM| - |TASKID| for |TECHNAME|" Please close job 23-1 for cgalli.
Step 3 – Set-up Job Reschedule Notification Message The Job Reschedule Notification Message is used in the Portal when a technician hits the Reschedule button on the bottom of the Job Update screen and submits the notification to the office that the technician has reschedule the Job. When you are configuring the Job Reschedule Notification Message, you can specify data values to insert in the message when customizing the Job Reschedule message. As listed below, the pipe (|) symbol is used to identify keywords. The following keyword can be used to configure your Job Reschedule Notification Message for your specific use.
Miracle Service Technician & Wireless Web Portal Installation and Setup Guide | 32
Closing Jobs Data Value Keywords: |TASKNUM| = identifies the task number |TASKID| = identifies the task ID |TECHID| = identifies the tech ID |TECHNAME| = identifies the tech name |BR| = identifies a hard line break Example – “|TECHNAME| has rescheduled Task-|TASKNUM|.” cgalli has reschedule Task 23-1.
Step 4 – Configure E-mail Addresses E-mail addresses are required to have the technician portal send its notifications to specific people or groups of people. The following is a brief summary of the purpose of each e-mail address.
Sender Address for Order Parts Notification The sender address is used so the recipient knows who is sending the message. We recommend using an e-mail address specifically set-up that clearly identifies the message is coming from the Portal site. In this case were it is for Order Parts Notification, and possible address would be:
Recipient Address for Order Parts Notification The Recipient Address is the e-mail address where you want the message to be delivered. For the Order Parts Notification with should be the e-mail address for your warehouse or parts manager. Multiple e-mail addresses can be entered using the ‘;” to separate the e-mail addresses. [email protected]; [email protected] …etc.
Recipient Cc Address for Order Parts Notification The Recipient Cc Address is the e-mail address where you want the message copy to be delivered. For the Order Parts Notification with should be the e-mail address for your warehouse or parts manager. Multiple e-mail addresses can be entered using the ‘;” to separate the e-mail addresses. [email protected]; [email protected] …etc.
Sender Address for Close Job Notification The sender address is used so the recipient knows who is sending the message. We recommend using an e-mail address specifically set-up that clearly identifies the message is coming from the Portal site. In this case were it is for Close Job Notification a possible address would be:

Miracle Service Technician & Wireless Web Portal Installation and Setup Guide | 33
Recipient Address for Close Job Notification The Recipient Address is the e-mail address where you want the message to be delivered. For the Close Job Notification with should be the e-mail address for your service dispatcher or coordinator. Ultimately you would like this message to go to the person or group responsible for closing your jobs / tasks in Miracle Service. Multiple e-mail addresses can be entered using the ‘;” to separate the e-mail addresses. [email protected]; [email protected] …etc. Note: this e-mail is only used if the User in Miracle Service does not have an e-mail address configured. By default all Close Job Notifications are sent back to the user that created the job in Miracle Service. This e-mail address is only used if the Miracle Service user does not have an e-mail address configured.
Step 4 – Enable New Job Creation Setting this option will allow users to create and assign new jobs.
Step 5 – Maximum Page Size The maximum page size is a numeric value that determines the number of records to display on a single page. Navigation buttons will be available to view subsequent pages.
Step 6 – Maximum Search Result Size The maximum search result size is a numeric value that determines the number of records returned when performing a search. To improve performance levels we recommend that user’s search using the provided criteria parameters and by specifying a low search result size (i.e. 25).
Step 7 – Print Progress Task Ticket Activating this feature enables the field technician to print a Task Ticket with the most current information that has already been entered in to the system.
Step 8 – Set System Date and Time Format To ensure the web portal will interpret the date and time information correctly as it is entered in the portal and then updated into Miracle Service, it is important to set this format to match your server date and time format.
Step 9 – Set the Task Ticket Format The web portal provides the ability to use a few standard task ticket formats. Use this dropdown to select the format to use.
Step 10 – Display Expense Price Value When this is checked the system will display the Expense Price on the expense screen.
Step 11 – Enable Technician Invoicing If this is check the Technician Invoicing is active. This will allow a new menu option to display called ‘View Completed’. In this area the technician can submit their invoice using the
Miracle Service Technician & Wireless Web Portal Installation and Setup Guide | 34
document manager function. This is used where remote subcontracts are utilized. This will upload their invoices as a document attached to the specific job.
Step 12 – Display and Print Invoice Comments When this is checked the web portal will display invoice comments and allow the technician to enter these comments.
Step 13 – Display and Print Next Task Comments When this is checked the web portal will display the Next task Comments and allow the technician to enter these comments.
Step 14 – Display and Print Service Billing Comment s When this is checked the web portal will display the Service Billing Comments and allow the technician to enter these comments.
Step 15 – Display and Print Special Instructions When this is checked the web portal will display the Special Instructions.
Step 16 – Enable Use Signature Capture – Tablet PC Only (Technician Web Portal Only)
When this is checked the Technician Web Portal is able to receive a signature and will also generate a signed Service Task Ticket and upload this as a .PDF document attached to the task in the Miracle Service document manager. This feature is only available on Tablet PC’s as it uses the Digital Ink technology to capture the signature used on Tablet PC’s.
Step 17 – Enable Use Document Manager (Technician Web Portal Only)
When this is checked the Technician Web Portal has the ability to upload and also view documents stored on the main server. Note: this is only available in the Technician Web Portal version and not the Wireless PDA version. Also the remote device must have the compatible viewer application installed to display the file.
Step 18 – Set Reschedule Button Method (Technician Web Portal Only)
When this is checked the Technician Web Portal will show a Reschedule button beside the Scheduled date instead of the typical Reschedule button on the bottom of the Update screen. This feature is only available on the full Technician Web Portal version and not the Wireless PDA version.
Miracle Service Technician & Wireless Web Portal Installation and Setup Guide | 35
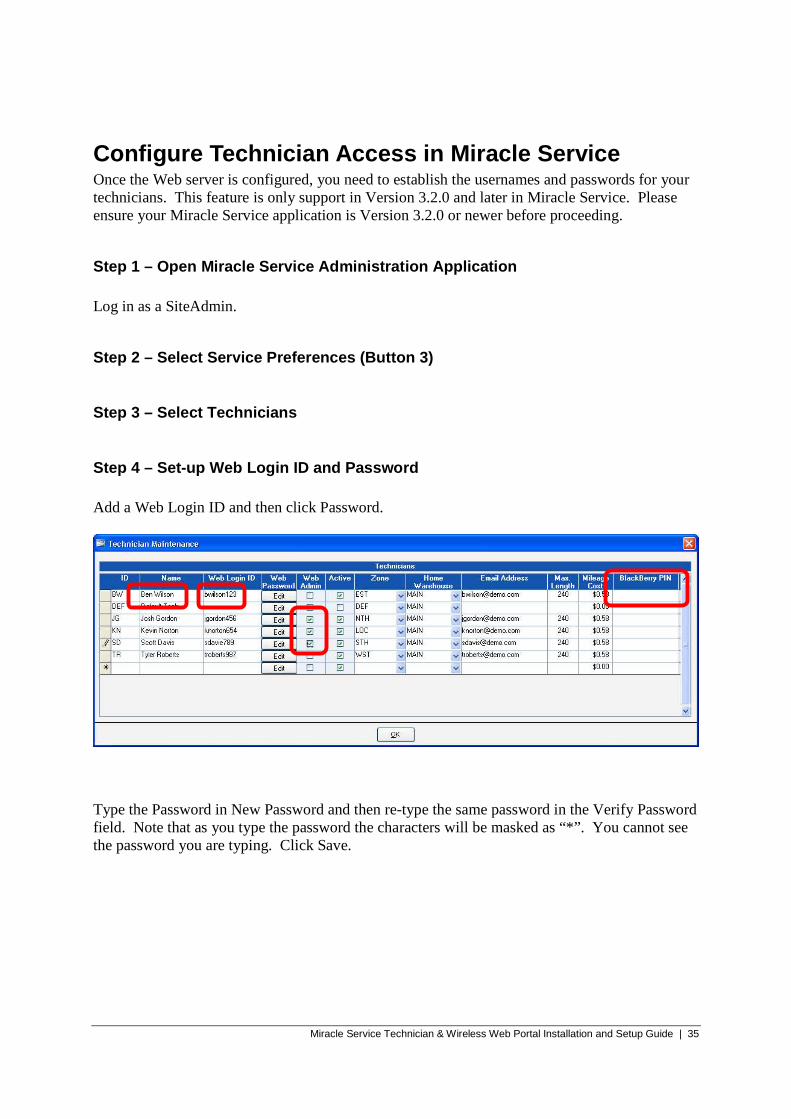
Configure Technician Access in Miracle Service Once the Web server is configured, you need to establish the usernames and passwords for your technicians. This feature is only support in Version 3.2.0 and later in Miracle Service. Please ensure your Miracle Service application is Version 3.2.0 or newer before proceeding.
Step 1 – Open Miracle Service Administration Applic ation Log in as a SiteAdmin.
Step 2 – Select Service Preferences (Button 3)
Step 3 – Select Technicians
Step 4 – Set-up Web Login ID and Password Add a Web Login ID and then click Password.
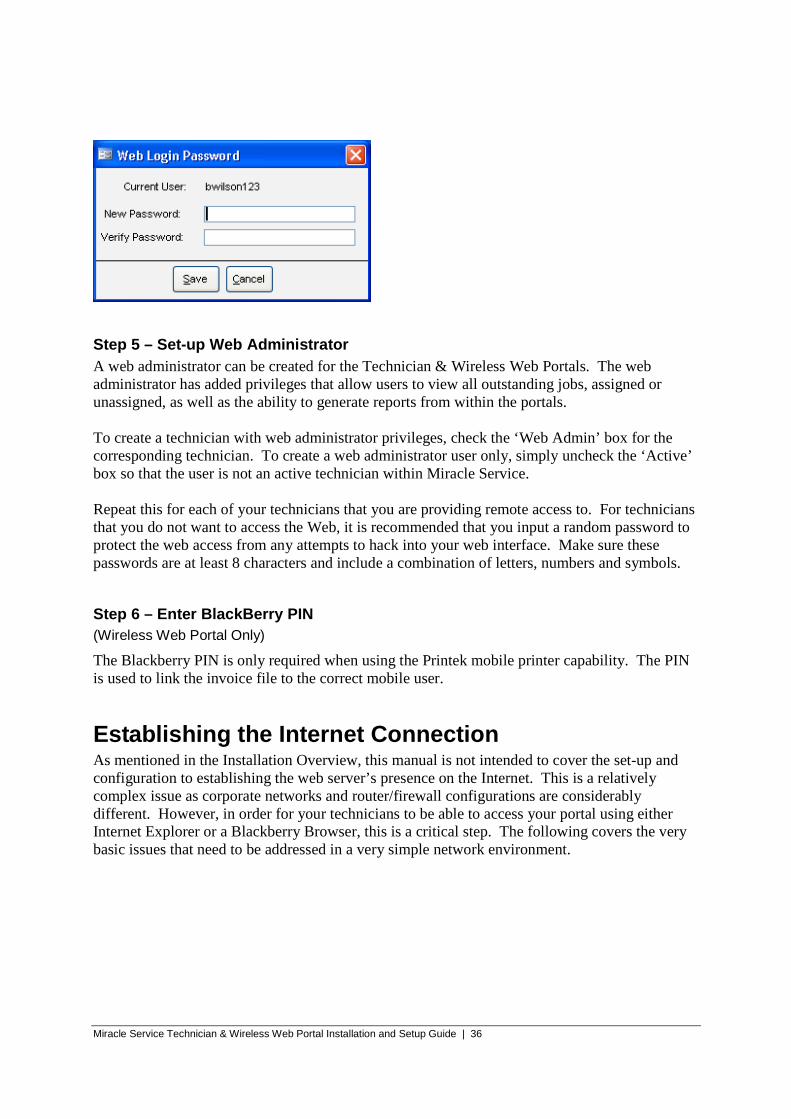
Type the Password in New Password and then re-type the same password in the Verify Password field. Note that as you type the password the characters will be masked as “*”. You cannot see the password you are typing. Click Save.
Miracle Service Technician & Wireless Web Portal Installation and Setup Guide | 36
Step 5 – Set-up Web Administrator A web administrator can be created for the Technician & Wireless Web Portals. The web administrator has added privileges that allow users to view all outstanding jobs, assigned or unassigned, as well as the ability to generate reports from within the portals. To create a technician with web administrator privileges, check the ‘Web Admin’ box for the corresponding technician. To create a web administrator user only, simply uncheck the ‘Active’ box so that the user is not an active technician within Miracle Service. Repeat this for each of your technicians that you are providing remote access to. For technicians that you do not want to access the Web, it is recommended that you input a random password to protect the web access from any attempts to hack into your web interface. Make sure these passwords are at least 8 characters and include a combination of letters, numbers and symbols.
Step 6 – Enter BlackBerry PIN (Wireless Web Portal Only)
The Blackberry PIN is only required when using the Printek mobile printer capability. The PIN is used to link the invoice file to the correct mobile user.
Establishing the Internet Connection As mentioned in the Installation Overview, this manual is not intended to cover the set-up and configuration to establishing the web server’s presence on the Internet. This is a relatively complex issue as corporate networks and router/firewall configurations are considerably different. However, in order for your technicians to be able to access your portal using either Internet Explorer or a Blackberry Browser, this is a critical step. The following covers the very basic issues that need to be addressed in a very simple network environment.

Miracle Service Technician & Wireless Web Portal Installation and Setup Guide | 37
The Web Server is located on a server within your internal network. It is essential to connect the server to an external IP address to ensure your users can access the web server inside of your network. We recommend that you use knowledgeable network designers to set-up the internet connection as there are important network security issues to consider. These issues are different for every corporate network environment. To successfully connect the server to an external IP address you will probably need to configure your Firewall/Router. This typically requires you to establish IP Mapping. This maps your internet network IP address assigned to your server with a specific external Internet IP address. When establishing this connection your Firewall may also require you to set-up a policy to ensure only specific internet data traffic is allowed to pass to your server. You will also need to configure the IIS server to recognize the connection by configuring the port assignment. This is part of the standard IIS configuration. For more details on establishing a Web Server on the Internet we recommend you consult with a data network specialist.
Router
Server
Internet
Public IP Address e.g. 123.123.123.123
Port 80

Miracle Service Technician & Wireless Web Portal Installation and Setup Guide | 38
Troubleshooting Problem Issue Resolution Error Type: (0x8004020F) The event class for this
subscription is in an invalid partition. The problem is due to the SMTP settings on server. The server is not set-up to relay SMTP messages.
Set-up your SMTP Virtual Server to relay messages. See section “Set-up SMTP E-mail Relay”
Web Page not Displaying IIS may not be started or able to run .asp file.
Open your Services and verify that IIS Admin and World Wide Web Publisher started. Create a test file in the wwwroot directory under inetpub. Open the test file using Internet Explorer to verify the site can serve .asp files.
Error 3704 - When the user attempts to update or change a screen, they receive 3704 error message.
The Session is timing out while a user is logged into the web or Blackberry portal.
Either instruct your users to log out of the technician portal if they do not intend to update information immediately, or extend the Session Timeout in the IIS Server settings. See - Define Virtual Directory Properties.
The following error message is generated: Microsoft OLE DB Provider for ODBC Drivers (0x80004005)[Microsoft][ODBC Microsoft Access Driver]General error Unable to open registry key 'Temporary (volatile) Jet DSN for process 0x614 Thread 0x6c0 DBC 0x21dd07c Jet'. (FileName), (LineNumber)
Registry permissions are not set to allow the Internet User access the ODBC Drivers.
This requires you to set the Permissions on the ODCB Registry. 1. Start Registry Editor (Regedt32.exe). 2. Select the following key in the registry: HKEY_LOCAL_MACHINE\SOFTWARE\ODBC 3. On the Security menu, click Permissions. 4. Type the required permissions for the account that is accessing the Web page. 5. Quit Registry Editor.
Error is generated when you attempt to save the Administrative Settings.
The permissions on the XML file are not adequate.
You must add the IUSR to the list of users that can change the admintechconfig.xml file. Add the IUSR for the machine and give that user Full Control permission.

Miracle Service Technician & Wireless Web Portal Installation and Setup Guide | 39
Problem Issue Resolution An error occurred in the execution of this ASP page Error Number =76 Error Description =Path not found Source =Microsoft VBScript runtime error
Logging Path is not set correctly in the inc_writetofile.asp file.
Ensure the following path is set-up on your web server. The logging path is defined as path = "C:\Inetpub\wwwroot\MiracleService\TechnicianPortal\eventslog.txt". This path must be exactly as shown to resolve this error.
Http 503 Error Web Components need to be configured to support 32-Bit enabled applications.
See Step 5 – Other IIS7 Settings to Check point 5) To configure Web Components in this guide.
From our experience almost all problems with the set-up are related to lack of permissions. You need to review all of the permission settings outlined in the document and verify they are set correctly and if in doubt, open the security to determine if that resolves the issue and then close it back down ensuring the application still runs correctly. For other errors and troubleshooting please check the on-line knowledgebase at http://www.miracleservice.com/kb


