• A , , Stereo Graphic Equalizer SH-GE70 OPERATING INSTRUCTIONS • 1B1 [GNl Notes: •Specifications differ according to the area code. •The "EB" area code, for example, indicates United Kingdom specifica- tions. •The "EB" indication is shown on the packing case and serial number tag. Before operating this unit, please read these instructions completely.
Transcript
• A
,
, Stereo Graphic Equalizer
SH-GE70OPERATING INSTRUCTIONS
•
1B1 [GNl
Notes:•Specifications differ according to the area code.•The "EB" area code, for example, indicates United Kingdom specifica-tions.
•The "EB" indication is shown on the packing case and serial number tag.
Before operating this unit, please read these instructions completely.
We want to thank you for selecting this product and towelcome you to the growing family of satisfiedTechnics product owners around the world.We feel certain you will get maximum enjoyment from
this new addition to your home.Please read these operating instructions carefully,and be sure to keep them handy for convenientreference.
Contents• For United Kingdom 2•Suggestions for Safety 3•Accessories 4•Connections 4•Front Panel Controls and Functions 5
For United Kingdom("EB" area code model only)The "EB" indication is shown on the serial number tag.ImportantTHE WIRES IN THIS MAINS LEAD ARE COLOURED IN ACCOR-DANCE WITH THE FOLLOWING CODE.BLUE: NEUTRALBROWN: LIVE
This apparatus was produced to BS 800.
As the colours of the wires in the mains lead of this apparatus maynot correspond with the coloured markings identifying the terminalsin your plug proceed as follows. The wire which is coloured BLUEmust be connected to the terminal which is marked with the letter Nor coloured BLACK.The wire which is coloured BROWN must be connected to theterminal which is marked with the letter L or coloured RED.Under no circumstances must either of the above wires beconnected to the earth terminal of a three pin plug.
-2-
Suggestions for Safety „ * '• Use a standard AC wall outlet1. Use from an AC power source of high voltage, such as for
an air conditioner, is very dangerous.There is the possibility that a fire might be caused by makingsuch a connection.
2. A DC power source cannot be used.Be sure to check the power source carefully, especially on aship or other place where DC is used.
• Grasp the plug when disconnecting the powersupply cord
1. Wet hands are dangerous.A dangerous electric shock may result if the plug is touched bywet hands.
2. Never place heavy items on top of the power supply cord,and never force it to bend sharply.
• AC outlet on rear panel(not equipped for some countries)
1. Any equipment connected here should have the specifiedpower consumption or less.This outlet is exclusively for the connection of other audioequipment, such as a tape deck. Be sure the power consump-tion does not exceed the wattage specified near the AC outlet.
2. Never connect other electrical appliances, such as an ironor toaster.If appliance with a large power consumption is connected, anaccident might occur as a result of overheating.
• Place the unit where it will be well ventilatedPlace this unit at least 10 cm (4") away from wall surfaces, etc.
• Avoid places such as the following:In direct sunlight or in other places where the temperature ishigh.In places where there is excessive vibration or humidity.Such conditions might damage the cabinet and/or other compo-nent parts and thereby shorten the unit's service life.
CAUTION!DO NOT INSTALL OR PLACE THIS UNIT IN A BOOK-CASE, BUILT IN CABINET OR IN ANOTHER CONFINEDSPACE IN ORDER TO KEEP WELL VENTILATED CON-DITION. ENSURE THAT CURTAINS AND ANY OTHERMATERIALS DO NOT OBSTRUCT THE VENTILATIONCONDITION TO PREVENT RISK OF ELECTRIC SHOCKOR FIRE HAZARD DUE TO OVERHEATING.
.
• Be sure to place the unit on a flat, level surfaceIf the surface is inclined, a malfunction may result.
• Never attempt to repair or reconstruct this unitA serious electric shock might occur if this unit is repaired,disassembled or reconstructed by unauthorized persons, or if theinternal parts are accidentally touched.
• Take particular care if children are presentNever permit children to put anything, especially metal, inside thisunit. A serious electric shock or malfunction could occur if articlessuch as coins, needles, screwdrivers, etc. are inserted through theventilation holes, etc. of this unit.
• If water is spilled on the unitBe extremely careful if water is spilled on the unit, because a fire orserious electric shock might occur. Immediately disconnect thepower cord plug, and consult with your dealer.
• Avoid spray-type insecticidesInsecticides might cause cracks or "cloudiness" in the cabinet andplastic parts of this unit. The gas used in such sprays might,moreover, be ignited suddenly.
• Never use alcohol or paint thinnerThese and similar chemicals should never be used, because theymight cause flaking or cloudiness of the cabinet finish.
• Disconnect the power supply cord if the unitwill not be used for a long time
If the unit is left for a long time with the power ON, this will not onlyshorten its useful operation life, but may also cause other troubles.
• If trouble occursIf, during operation, the sound is interrupted or indicators no longerilluminate, or if abnormal odor or smoke is detected, immediatelydisconnect the power cord plug, and contact your dealer or anAuthorized Service Center.
NORSK
ADVARSEL!APPARATET MA IKKE PLASSERES I EN BOKHYLLE,ET INNEBYGGET KABINETT ELLER ET ANNET LUK-KET STED HVOR VENTILASJONSFORHOLDENE ERUTILSTREKKELIGE. S0RG FOR AT GARDINER ELLERLIGNENDE IKKE FORVERRER VENTILASJONSFOR-HOLDENE, SA RISIKO FOR ELEKTRISK SJOKK ELLERBRANN FORARSAKET AV OVERHETING UNNGAS.
SUOMI
VAROITUS!ALA ASENNA TAI LAITA TATA LAITETTA KABINET-TITYYPPISEEN KIRJAKAAPPIIN TAI MUUHUNSULJETTUUN TILAAN, JOTTA TUULETUS ONNISTUI-Sl. VARMISTA, ETTA VERHO TAI MIKAAN MUU MATE-RIAALI El HUONONNA TUULETUSTA, JOTTAVALTETTAISIIN YLIKUUMENEMISESTA JOHTUVASAHKOISKU- TAI TULIPALOVAARA.
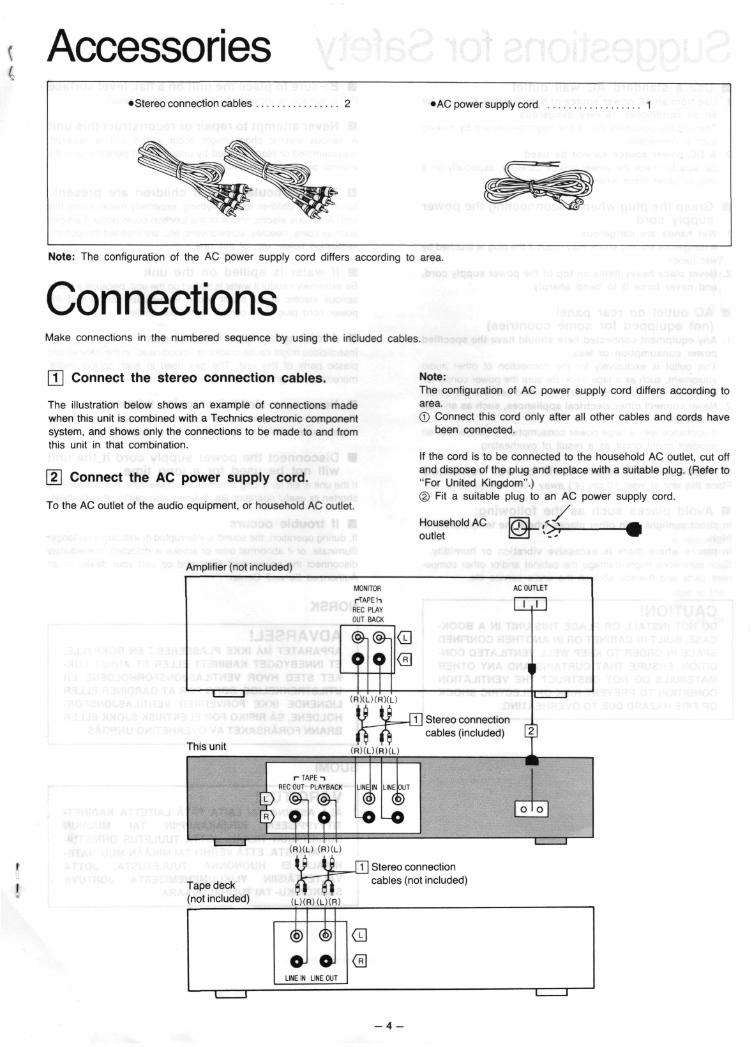
Note: The configuration of the AC power supply cord differs according to area.
ConnectionsMake connections in the numbered sequence by using the included cables
|T1 Connect the stereo connection cables.
The illustration below shows an example of connections madewhen this unit is combined with a Technics electronic componentsystem, and shows only the connections to be made to and fromthis unit in that combination.
\2\ Connect the AC power supply cord.
To the AC outlet of the audio equipment, or household AC outlet.
Note:The configuration of AC power supply cord differs according toarea.Q Connect this cord only after all other cables and cords have
been connected.
If the cord is to be connected to the household AC outlet, cut offand dispose of the plug and replace with a suitable plug. (Refer to"For United Kingdom".)@ Fit a suitable plug to an AC power supply cord.
Front Panel Controls and Functions; fbdunicS SlBreo Gra^ic equalizer SH-GE70
II1,1
i-^n
Control section
Power "standby c!)/on" switch(power JL standby (!) -. on)This switch switches ON and OFF the secondary circuit poweronly. The unit is in the "standby" condition when this switch isset to the standby (!) position. Regardless of the switchsetting, the primary circuit is always "live" as long as thepower cord is connected to an electrical outlet.
•"Power-through" functionDiscs, radio broadcasts, etc. can be heard even if thepower of this unit is switched to standby.Note, however, that the power plug should be leftconnected to the AC outlet.
Equalizer level-control buttons(equalizer level control)These buttons are used for adjustment of the equalizationlevel of the left channel and right channel simultaneously.Upper row: These buttons are used to increase the level of
each sound range (frequency range).Lower row: These buttons are used to reduce the level of
each sound range (frequency range).
Memory mode-select button(memo mode)This button is used to select the equalization memory mode tobe used.manual: Select this mode to program a desired curve to
the unit's memory or to retrieve a curve that youhave programmed.
fixed: Select this mode to retrieve a curve that wasoriginally pre-programmed to the unit's memory.
Memory button (memory)This button is used to program the equalization curve into thememory.
Equalization mode-select button (EQ on/off)This button is used to switch the equalization correctionfunction "EQ on" and "off". Each time a button is pressed, themode changes alternately to one or the other of the followingmodes.EQ on: Select this mode to make an equalization correc-
tion.EQ off: Select this mode if no equalization correction is
desired.Note that the "EQ on" mode is automatically selected if apreset-memory button or an equalizer level-control button ispressed while this button is set to the "EQ off" mode.
[6] Reverse button (reverse)This button is used to reverse the equalization curve shown inthe display.
[7] Display mode-select buttons(display mode)These buttons are used to select the equalization-leveldisplay mode and any of the three types of spectrum displaymode described below.
• Equalization-level display modeEQ level: Select this mode when you want to display the
equalization level.
• Spectrum display modes(spectrum analyzer)
bar: Select this mode when you want a bar-typedisplay.
dot: Select this mode when you want a dot-typedisplay.
peak hold: Select this mode when you want the peak tobe held in the display.
Preset-memory buttons ([Tj-H)These buttons are used to program an equalization curve intothe memory, or to retrieve a curve originally programmed intothe unit's memory.
Recording mode selector(EQ rec M. off m. on)on: Set to this position to make a tape recording of a radio
broadcast or a disc while controlling the frequencyresponse.
off: Set to this position to record without equalizer correc-tion.
Input selector (A source .•. tape)source: Set to this position to listen to the radio or a
compact disc, etc.tape: Set to this position to listen to a tape deck
connected to the back of this unit.
-5-
Front Panel Controls and Functions (continued)
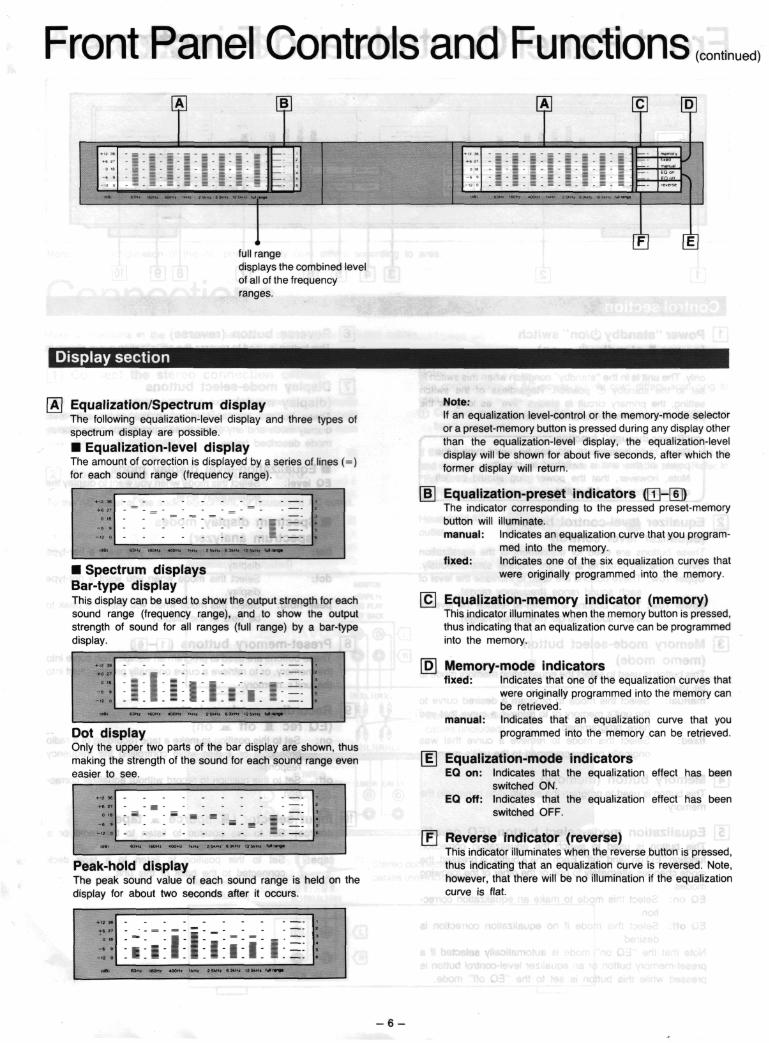
full rangedisplays the combined levelof all of the frequencyranges.
Display section
Equalization/Spectrum displayThe following equalization-level display and three types ofspectrum display are possible.
• Equalization-level displayThe amount of correction is displayed by a series of lines (=)for each sound range (frequency range).
• Spectrum displaysBar-type displayThis display can be used to show the output strength for eachsound range (frequency range), and to show the outputstrength of sound for all ranges (full range) by a bar-typedisplay.
Dot displayOnly the upper two parts of the bar display are shown, thusmaking the strength of the sound for each sound range eveneasier to see.
Peak-hold displayThe peak sound value of each sound range is held on thedisplay for about two seconds after it occurs.
+« 96- -
ii
Note:If an equalization level-control or the memory-mode selectoror a preset-memory button is pressed during any display otherthan the equalization-level display, the equalization-leveldisplay will be shown for about five seconds, after which theformer display will return.
\B\ Equalization-preset indicators (H]-®)The indicator corresponding to the pressed preset-memorybutton will illuminate.manual: Indicates an equalization curve that you program-
med into the memory.fixed: Indicates one of the six equalization curves that
were originally programmed into the memory.
lC\ Equalization-memory indicator (memory)This indicator illuminates when the memory button is pressed,thus indicating that an equalization curve can be programmedinto the memory.
\D\ Memory-mode indicatorsfixed: Indicates that one of the equalization curves that
were originally programmed into the memory canbe retrieved.
manual: Indicates that an equalization curve that youprogrammed into the memory can be retrieved.
[E] Equalization-mode indicatorsEQ on: Indicates that the equalization effect has been
switched ON.EQ off: Indicates that the equalization effect has been
switched OFF.
[F] Reverse indicator (reverse)This indicator illuminates when the reverse button is pressed,thus indicating that an equalization curve is reversed. Note,however, that there will be no illumination if the equalizationcurve is flat.
1 Switch the amplifier ON and Reduce thevolume level of the amplifier.Set the amplifier's tone controls to the centre position, andset the super bass switch (if equipped) to the off position.
Adjust to the desired sound.When the equalizer level-control button corresponding tothe frequency to be adjusted is pressed, the equalizationlevel changes in 2 dB steps.
Set the tape-monitor selector of the amplifierto "Tape" position. (Refer to note)(Refer to the operating instructions of the amplifier forfurther details.)
Switch ON the power switch.
Press the Input selector button.source: Set to this position to listen to the radio or a
compact disc, etc.tape: Set to this position to listen to a tape deck
connected to the back of this unit.
Switch ON the equalization mode-select but-ton.(The "EQ on" equalization-mode indicator will illuminate.)
Press the "EQ level" buttons.(The equalization-level display will appear.)
8 Adjust the volume level of the amplifier.After completing the adjustment select the desired displayby pressing the display mode-select button: "bar", "dot" or"peak hold".
Notes:•To listen or record without the equalization effect, either press the
equalization mode-select button (to the "EQ off" setting) or switchOFF the power of the graphic equalizer.
• Do not attempt to adjust the equalization level during recording.
Recording mode selectoron: Set to this position to make a tape recording of a radio
broadcast or a disc while controlling the frequencyresponse.
off: Set to this position to record without equalizer correction.Note:The equalization switch must be set to the "on" position andthen the input selector must be set to the "source" position,otherwise the frequency response cannot be controlled.This only works for tape decks connected to this unit.
Notes:
•If the amplifier has a recording mode selector and an input selector: (Adjust setting as shown in the figure.)
O O O D ODD D O
(rec selector)phono or tuner
• If your amplifier has terminals (GRAPHIC EQ/EXTERNAL) for connection of other equipment, use of the recording selector isunnecessary.
-7-
Operation (continued)
1
1
Equalization-preset Maiindicators •
"echrucs
DOWW
i |
- »
;
i — i — i - i "•- i -
l — l — l - l "•"• l •>-
^,, _J
1
1
1; i• S
-•
USfcH, l^*-^ 1 EOOC.B3B I rw*» 1 €Q Ml
1 <
Reverse button
2 C
yj
lual Rever1 Equalization-memory
indicator f
1
£Z
• i . i .
_j9 Mefncry Resets
] „«,
se indicator
5
1 1
To program an equalization curve into the memory
As many as six curves can be programmed into and retained bythe memory of this unit. It is convenient to program those curvesthat are frequently used.
1Adjust to the desired equalization curve.(Adjust by following the steps in "To adjust to the desiredtone quality" on page 7.)
2 Press the "memory" button.(The equalization-memory indicator will illuminate.)•To cancel memory programming, press the memory
button once again.
3 Press one of the preset-memory buttons(Q]-[6]), whichever is to be used to make theprogramming to the memory.(The corresponding equalization-preset indicator will illu-minate, and the programming will be made.)
Note:If a new curve is programmed for a number for which a curve isalready programmed in the memory, the previously programmedcurve will be erased.
• To produce a reversed equalization curveThis feature can be used, for example, to listen to the originalsound characteristics of a tape that has been recorded with specialequalization effects by using the graphic equalizer.
First, display the curve used when the recordingwas made.
OThen press the "reverse" button.The reverse indicator will illuminate.
MIn this way, you can instantly produce a curve that is the opposite ofthe curve being displayed.The playback sound will then be corrected by this curve, and willbecome a flat characteristic.
•When this button is pressed again, the curve returns to previouscondition.
This unit has been pre-programmed with six types of typicalequalization curves which are applicable to certain styles of music.
1Press the "memo mode" button.manual: Select this mode when you want to retrieve a
equalization curve that you have programmedinto memory.
fixed: Select this mode when you want to retrieve aequalization curve that was originally program-med into memory as a permanent ("fixed") curve.
(The memory-mode indicator will indicate the selectionmade.)
Press one of the preset-memory buttons,whichever corresponds to the curve to beretrieved.(The corresponding equalization-preset indicator will illu-minate.)
•While in the "fixed" mode, if one of the equalizer level-controlbuttons is pressed, the unit will automatically switch to the"manual" mode.
Note:Curves programmed into the memory will be retained for about twoweeks if the AC power supply cord is unplugged. If curves areerased, they must be programmed again. Note, however, thatcurves originally programmed beforehand into the unit's memoryas permanent curves (the "fixed" curves) will not be erased.
• "MOST RECENT" (recall) memoryThe last position of the EQ level controls (whether in memory oradjusted manually) will be automatically entered into the memorywhen the power is switched OFF. When the power is switched ON,these positions will be recalled.
-9-
Operation (continued)
^
.
"echoic
Dowef
L_
s Stereo Qfaphic Equetoe, SH-SE70
' *
1 1 I I •; : : :•.•_•- 1.1 B. :
~ I ~ I — I - l "» l — l- l ~ I -~ l - l '- I — l
i
SpBCPU"! M»tft»
'*•• :memo moot
1. .
1 I.l.l
1 ' 1 ' 1 '| «,,,„ | _, | «..
: :•: :.m.m. :
• l > l., i . i
fcwo"
6oT
ww
0»W IV*I
12 Memory Besets
li 1 c=— ii
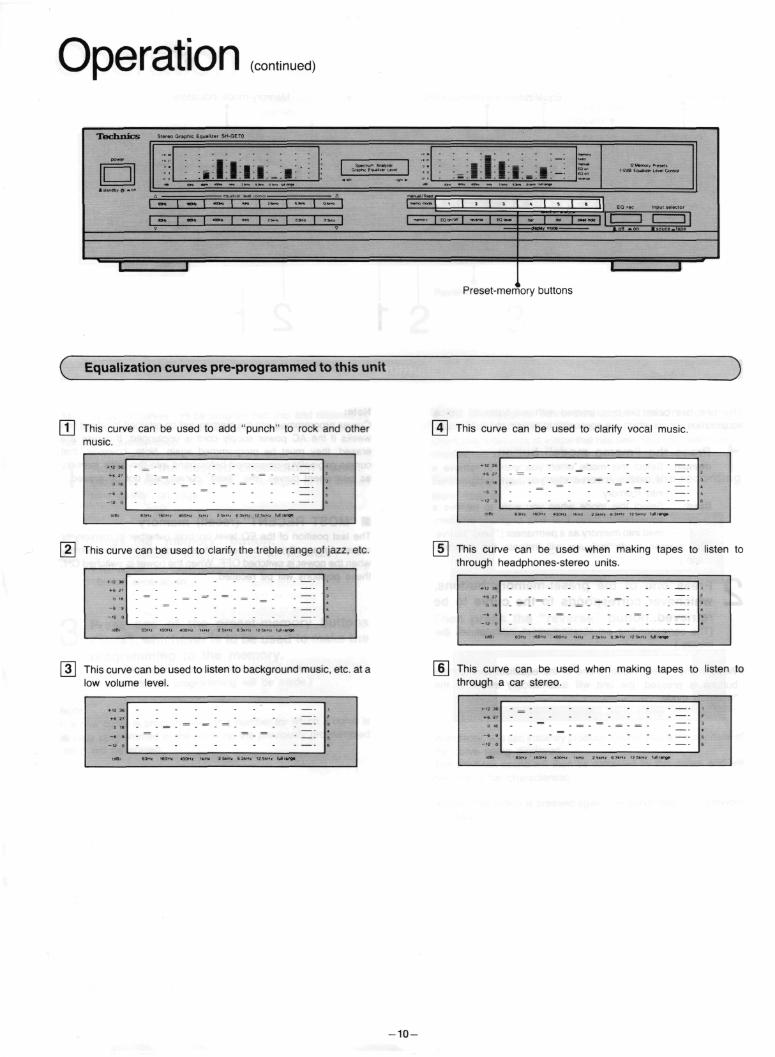
1 1Preset-memory buttons
Equalization curves pre-programmed to this unit
This curve can be used to add "punch" to rock and othermusic.
This curve can be used to clarify the treble range of jazz. etc.
This curve can be used to listen to background music, etc. at alow volume level.
|4| This curve can be used to clarify vocal music.
This curve can be used when making tapes to listen tothrough headphones-stereo units.
This curve can be used when making tapes to listen tothrough a car stereo.
-10-
Troubleshooting GuideBefore requesting service for this unit, check the chart below for a possible cause of the problem you are experiencing. Some simple checks or aminor adjustment on your part may eliminate the problem and restore proper operation.If you are in doubt about some of the check points, or if the remedies indicated in the chart do not solve the problem, refer to the directory ofAuthorized Service Centers (enclosed with this unit) to locate a convenient service center, or consult your Technics dealer for instructions.
Problem
No sound.
Correction is not possible at playback(including recording.)
Probable cause(s)
Incorrect connection.
The equalization mode-select button is set to"EQoff".
The recording mode selector of the equalizer isset to the "off" position.
The input selector of the equalizer is set to the"tape" position.
Suggested remedy
Refer to page 4 and to the OperationInstructions of the amplifier.
Set to "EQ on".
Set it to the "on" position.
Set it to the "source" position.
MaintenanceTo clean this unit, use a soft, dry cloth.If the surfaces are extremely dirty, use a soft cloth, dipped into asoap-and-water solution or a weak detergent solution.Wring the cloth well before wiping the unit.
Wipe once again with a soft, dry cloth.Never use alcohol, paint thinner, or benzine, nor a chemicallytreated cloth to clean this unit.Such chemicals may damage the finish of your unit.