57
CURRICULUM AND ASSESSMENT POLICY STATEMENT (CAPS) TECHNOLOGY GRADES 7-9 FINAL DRAFT
CURRICULUM AND ASSESSMENT POLICY
STATEMENT
(CAPS)
TECHNOLOGY GRADES 7-9
FINAL DRAFT

2
SECTION 1
National Curriculum and Assessment Policy Statement for Technology Grades 7-9
1.1 Background
The National Curriculum Statement Grades R – 12 (NCS) stipulates policy on curriculum and assessment in the
schooling sector.
To improve its implementation, the National Curriculum Statement was amended, with the amendments coming
into effect in January 2011. A single comprehensive Curriculum and Assessment Policy document was
developed for each subject to replace the old Subject Statements, Learning Programme Guidelines and
Subject Assessment Guidelines in Grades R - 12.
The amended National Curriculum Statement Grades R - 12: Curriculum and Assessment Policy (January 2011)
replaces the National Curriculum Statement Grades R - 9 (2002) and the National Curriculum Statement
Grades 10 - 12 (2004).
1.2 Overview
(a) The National Curriculum Statement Grades R – 12 (January 2011) represents a policy statement for
learning and teaching in South African schools and comprises the following:
(i) Curriculum and Assessment Policy documents for each approved school subject as listed in the
policy document National Senior Certificate: A qualification at Level 4 on the National
Qualifications Framework (NQF); and
(ii) The policy document National Senior Certificate: A qualification at Level 4 on the National
Qualifications Framework (NQF).
(b) The National Curriculum Statement Grades R – 12 (January 2011) should be read in conjunction with
the following documents:
(i) An addendum to the policy document, the National Senior Certificate: A qualification at Level 4
on the National Qualifications Framework (NQF), regarding the National Protocol for
Assessment Grade R – 12, published in the Government Gazette, No. 29467 of 11 December
2006; and
(ii) An addendum to the policy document, the National Senior Certificate: A qualification at Level 4
on the National Qualifications Framework (NQF), regarding learners with special needs,
published in the Government Gazette, No.29466 of 11 December 2006.
(c) The Subject Statements, Learning Programme Guidelines and Subject Assessment Guidelines for
Grades R - 9 and Grades 10 - 12 are repealed and replaced by the Curriculum and Assessment Policy
documents for Grades R – 12 (January 2011).
(d) The sections on the Curriculum and Assessment Policy as contemplated in Chapters 2, 3 and 4 of this
document constitute the norms and standards of the National Curriculum Statement Grades R – 12 and
therefore, in terms of section 6A of the South African Schools Act, 1996 (Act No. 84 of 1996,) form the
basis for the Minister of Basic Education to determine minimum outcomes and standards, as well as the
processes and procedures for the assessment of learner achievement to be applicable to public and
independent schools.
1.3 General aims of the South African Curriculum
(a) The National Curriculum Statement Grades R - 12 gives expression to what is regarded to be
knowledge, skills and values worth learning. It will ensure that learners acquire and apply knowledge and

3
skills in ways that are meaningful to their own lives. In this regard, the curriculum promotes the idea of
grounding knowledge in local contexts, while being sensitive to global imperatives.
(b) The National Curriculum Statement Grades R - 12 serves the purposes of:
equipping learners, irrespective of their socio-economic background, race, gender, physical ability
or intellectual ability, with the knowledge, skills and values necessary for self-fulfilment, and
meaningful participation in society as citizens of a free country;
providing access to higher education;
facilitating the transition of learners from education institutions to the workplace; and
providing employers with a sufficient profile of a learner‟s competences.
(c) The National Curriculum Statement Grades R - 12 is based on the following principles:
Social transformation; ensuring that the educational imbalances of the past are redressed, and that
equal educational opportunities are provided for all sections of our population;
Active and critical learning; encouraging an active and critical approach to learning, rather than rote
and uncritical learning of given truths;
High knowledge and high skills; the minimum standards of knowledge and skills to be achieved at
each grade are specified and sets high, achievable standards in all subjects;
Progression; content and context of each grade shows progression from simple to complex;
Human rights, inclusivity, environmental and social justice; infusing the principles and practices of
social and environmental justice and human rights as defined in the Constitution of the Republic of
South Africa. The National Curriculum Statement Grades 10 – 12 (General) is sensitive to issues of
diversity such as poverty, inequality, race, gender, language, age, disability and other factors;
Valuing indigenous knowledge systems; acknowledging the rich history and heritage of this country
as important contributors to nurturing the values contained in the Constitution; and
Credibility, quality and efficiency; providing an education that is comparable in quality, breadth and
depth to those of other countries.
(d) The National Curriculum Statement Grades R - 12 aims to produce learners that are able to:
identify and solve problems and make decisions using critical and creative thinking;
work effectively as individuals and with others as members of a team;
organise and manage themselves and their activities responsibly and effectively;
collect, analyse, organise and critically evaluate information;
communicate effectively using visual, symbolic and/or language skills in various modes;
use science and technology effectively and critically showing responsibility towards the environment
and the health of others; and
demonstrate an understanding of the world as a set of related systems by recognising that problem
solving contexts do not exist in isolation.
(e) Inclusivity should become a central part of the organisation, planning and teaching at each school. This
can only happen if all teachers have a sound understanding of how to recognise and address barriers to
learning, and how to plan for diversity.

4
1.4 Time Allocation
1.4.1 Foundation Phase
(a) The instructional time for subjects in the Foundation Phase is as indicated in the table
below:
Subject Time allocation per
week (hours)
I. Home Language
II. First Additional Language
III. Mathematics
IV. Life Skills
Beginning Knowledge
Arts and Craft
Physical Education
Health Education
6
4 (5)
7
6
1 (2)
2
2
1
(b) Instructional time for Grades R, 1 and 2 is 23 hours. For Grade 3, First Additional Language is
allocated 5 hours and Beginning Knowledge is allocated 2 hours as indicated by the hours in
brackets in the table above.
1.4.2 Intermediate Phase
(a) The table below shows the subjects and instructional times in the Intermediate Phase.
Subject Time allocation per
week (hours)
I. Home Language
II. First Additional Language
III. Mathematics
IV. Science and Technology
V. Social Sciences
VI. Life Skills
Creative Arts
Physical Education
Religion Studies
6
5
6
3.5
3
4
1.5
1.5
1
5
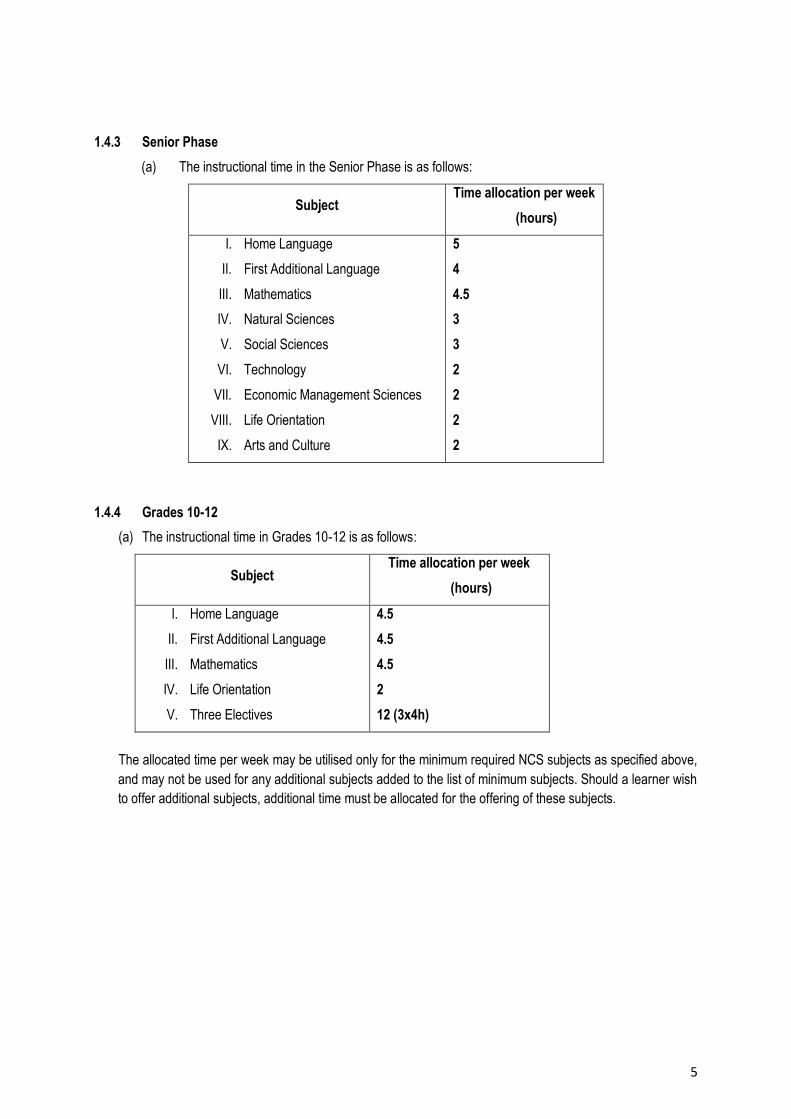
1.4.3 Senior Phase
(a) The instructional time in the Senior Phase is as follows:
Subject Time allocation per week
(hours)
I. Home Language
II. First Additional Language
III. Mathematics
IV. Natural Sciences
V. Social Sciences
VI. Technology
VII. Economic Management Sciences
VIII. Life Orientation
IX. Arts and Culture
5
4
4.5
3
3
2
2
2
2
1.4.4 Grades 10-12
(a) The instructional time in Grades 10-12 is as follows:
Subject Time allocation per week
(hours)
I. Home Language
II. First Additional Language
III. Mathematics
IV. Life Orientation
V. Three Electives
4.5
4.5
4.5
2
12 (3x4h)
The allocated time per week may be utilised only for the minimum required NCS subjects as specified above,
and may not be used for any additional subjects added to the list of minimum subjects. Should a learner wish
to offer additional subjects, additional time must be allocated for the offering of these subjects.

6
SECTION 2
INTRODUCTION TO TECHNOLOGY
2.1 Purpose
Technology education was introduced into the South African curriculum in recognition of the need to produce
engineers, technicians and artisans needed in modern society, and the need to develop a technologically literate
population for the modern world. The subject stimulates learners to be innovative and develops their creative and
critical thinking skills. It teaches them to manage time and material resources effectively, and provides
opportunities for collaborative learning and nurtures teamwork. These skills provide a solid foundation for many
FET subjects, as well as for the world of work.
In this context Technology can be defined as:
the use of knowledge, skills and resources to meet people’s needs and wants by developing practical
solutions to problems, taking social and environmental factors into consideration.
2.2 Aim
The Technology subject contributes towards learners’ technological literacy by giving them opportunities
to:
Develop and apply specific design skills to solve technological problems.
Understand the concepts and knowledge used in Technology Education and use them responsibly and
purposefully.
Appreciate the interaction between peoples‟ values and attitudes, technology, society and the environment.
The intention is to introduce learners to the basics needed in Civil Technology, Mechanical Technology,
Electrical Technology and Engineering Graphics & Design. Together with this aspect, evaluation skills that will
be fostered, and the introduction of the design and production of products will be useful in other FET subjects
that use these skills – like Consumer Studies, and Design. It is expected that Technology Education should
provide learners with some experience to help them with some career oriented subject choices at the end of
Grade 9.
GET: NATURAL SCIENCES AND TECHNOLOGY:
GRADE 4- 6
GET: TECHNOLOGY: GRADE 7- 9
ACADEMIC FIELDS
ME
CH
AN
ICA
L
TE
CH
NO
LO
GY
EL
EC
TR
ICA
L
TE
CH
NO
LO
GY
EN
GIN
EE
RIN
G
GR
AP
HIC
S A
ND
DE
SIG
N
CIV
IL
TE
CH
NO
LO
GY
PH
YS
ICA
L S
CIE
NC
ES
DE
SIG
N
HET: TERTIARY QUALIFICATIONS
Technician; Artisan; Engineer; Architect; Quantity Surveyor
FET: TECHNOLOGY STUDY FIELDS: GR 10 -12

7
Key issues to teach: 1. problem solving using the design
process 2. practical skills 3. knowledge and application of
knowledge.
2.3 Unique features and scope
The Technology subject gives learners the opportunity to learn:
by solving problems in creative ways
while using authentic contexts that are rooted in real situations
outside the classroom
by combining thinking and doing in a way that links abstract concepts to concrete understanding
to work collaboratively with others
while doing practical projects using a variety of technological skills (investigating, designing, making,
evaluating, and communicating) that suit different learning styles
to evaluate existing products and processes, and to evaluate their own products
to use and engage with knowledge in a purposeful way
to deal with inclusivity, human rights, social and environmental issues in their tasks
to use a variety of life skills in authentic contexts (such as decision making, critical and creative thinking,
cooperation, problem solving and needs identification)
while creating more positive attitudes, perceptions and aspirations towards technology-based careers
2.4 Topics and core content areas in Technology
The table below indicates the main topics in the Technology curriculum.
1. THE DESIGN PROCESS SKILLS:
o investigation
o design
o make
o evaluation
o communication
2. STRUCTURES
3. PROCESSING OF MATERIALS
4. MECHANICAL SYSTEMS AND CONTROL
5. ELECTRICAL SYSTEMS AND CONTROL
6. TECHNOLOGY, SOCIETY AND THE ENVIRONMENT
7. IMPACT OF TECHNOLOGY
8. BIAS IN TECHNOLOGY
There are four core content areas in Technology in Grades 7 - 9. These are
STRUCTURES PROCESSING MECHANICAL and ELECTRICAL SYSTEMS & CONTROL
These four content areas form the basis of the four strands which must be done each year in every grade. The
recommended approach will be to introduce the required knowledge followed by practical work in which the
knowledge is applied. In all cases, the teaching will be structured using the Design Process as the backbone for
the methodology.
Some of these elements will be assessed formally each term.
As learning progresses, learners must be made aware of the interrelationship between technology, society and
the environment. Wherever applicable, learners should be aware of different coexisting knowledge systems. They

8
should know how indigenous cultures have used specific materials and processes to satisfy needs, and be
aware of indigenous intellectual property rights. Learners should be able to consider the impact of technology,
both positively and negatively, on people‟s lives. Learners should be aware of bias in technology and be able to
express opinions that explain how certain groups within society might be favoured or disadvantaged by products
of technology.
2.5 The importance of design in Technology education
No product has ever been manufactured that did not undergo development through design. Technology
education is an introduction to a range of careers that work in similar ways. All tend to use the Design Process
as they develop solutions to problems, needs or wants. The country needs informed, critical consumers.
A key element to teach is the ability to design.
With many similar products on the market, design excellence is a key element in attracting consumers.
“Whether it is style on the outside or innovative technology on the inside, cutting-edge design is now more than
ever vital in keeping a company or product competitive. Is it ergonomically sound? Will it stand up to repeated use
or resist abuse? Is it designed to be fit-for- purpose? Will the consumer see value in it? Will it be safe to produce
and use? Is it environmentally friendly? Will it impact negatively on certain groups?” Ref: The Design
Encyclopaedia
Some careers that use design
a civil engineer designs a bridge
an architect designs a house
a textile designer develops a textile for a specific
purpose
an electrician designs the electrical wiring for a home
a dietician designs a diet for refugees with
malnutrition
a mechanical engineer designs a machine to lift a
load
a structural engineer designs the support system
for the roof of a stadium.
All these designers need to have:
an understanding of the problem, need or opportunity
knowledge of the Design Process
knowledge of types and properties of suitable materials, and how to use them optimally
the ability to calculate the quantities and costs of the materials needed
knowledge of the conventions / building codes
an ability to sketch initial ideas on paper
the ability to draw working drawings in sufficient detail for the task
the practical skills required to create a solution
the ability to work safely using appropriate tools
the ability to present the solution effectively to the client / customer.
N.B. All electric circuits must be battery powered in the GET Band – Max 9V dc.

9
Criteria for teaching and assessing design features: originality and Aesthetics elements value for money/cost effectiveness fit for purpose and suitability of materials ease of manufacture safety and ergonomics environmental impact bias towards or against a group.
2.6 Teaching methodology (how tasks will be approached).
N.B: As the learners progress through a task, they must be taught the associated knowledge and the skills
needed to design and create a solution.
Knowledge is important BUT the learners must show that they can use the knowledge, and not just memorise it.
The Design Process (Investigating, Designing, Making, Evaluating and Communicating - IDMEC) forms the
backbone of the subject and should be used to structure the delivery of all the learning aims. Learners should be
exposed to problems, needs or opportunities as a starting point. They should then engage in a systematic
process that allows them to develop solutions that solve problems, rectify design issues and satisfy needs.
Investigating in this subject involves finding out about contexts and needs, investigating or evaluating existing
products in relation to key design aspects and performing practical tests to develop understanding of particular
aspects of the content areas or determining the fitness-for-purpose of products. While doing investigations,
learners should be provided with opportunities to explore values and attitudes and develop informed opinions that
can help them to make compromises and value judgements. Investigating can happen at any point in the Design
Process. It should not be seen as something that must be completed before designing begins.
Designing, making and evaluating. These skills
should not be seen as separate - they are inter-related.
Evaluation skills, for example, are used to choose
ideas. At this level, learners should be introduced to key
aspects of design. These should be used to evaluate
both existing and designed products against
predetermined criteria. When making, learners should
be encouraged to continue to reflect on their progress against these criteria and to modify their solutions based
on problems encountered. As learners progress they should be able to demonstrate increasing accuracy and
skill, better organisation and safer working practices.
Communicating should also be seen as integral to the overall process. Learners should be recording and
presenting progress in written and graphical forms on an ongoing basis. Their presentations should show
increasing use of media, levels of formality and use of conventions as they progress through the phase.
In Grade 9, Technology will be developed as an extension to the groundwork laid previously, and in preparation
for the technical and engineering fields of the FET, as well as learners who may be inspired to become engineers.
Note on drawing:
In the GET band, drawing is separated into three possible fields:
learners draw free-hand sketches as part of the DESIGN phase
learners develop working drawings as part of the making stage using formal draughting techniques in line
with conventions
learners draw artistic impressions as part of the communication stage - using artistic techniques
including perspective, texture rendering, shading, colours and shadows in order to advertise the product to
potential users.
The Grade Nine learner must be able to identify and explain a problem, need or opportunity from a given real life context.

10
N.B.: Perspective drawing here is purely artistic and has no link to the method of linking the perspective to the
working drawing, using construction lines.
2.7 Time allocation for Technology
The teaching time for Technology is 2 hours per week. As this subject involves practical work, sixty minutes of the
2 hours should be one continuous period for practical work, e.g. one double period comprising of 2 periods of 30
minutes. Schools using alternative period lengths or a cycle system, must ensure that all subjects get their correct
time allocation.
2.8 Requirements for Technology
1. Each learner must have:
a textbook
a 72 page A4 workbook / exercise book
stationery including basic drawing instruments: pencil, eraser, ruler and set squares.
2. A designated teaching venue with a specialized Technology teacher.
3. Technology rooms must be secure, with doors that lock, and with burglar-proofing if possible. Enough
cupboards should be available to store and lock away all resources.
4. It is the responsibility of the school to provide each learner with the minimum tools and material to meet
the needs of the subject. (See Appendix B for possible tools and resources).

11
SECTION 3
Annual teaching plan GRADE 7 TERM 1
It is compulsory to cover the given topics in the term indicated. The sequence of the topics within the term must be adhered
to.
Skills like investigating, drawing, designing, making and presenting should improve progressively from term to term.
Week Topic Enabling Tasks Content
Enabling Tasks – build the capability to complete the formal assessment tasks later in the term
1
2 hrs
What is
Technology?
The Design
Process
Design
considerations
Definition
Scope: Who does Technology in the „world of work?
Investigate: finding, using and acknowledging information.
Design: design brief, specifications, constraints; initial idea sketches; choosing the best
design; selecting materials.
Make: drawing plans; develop the manufacturing sequence; make the item / model
Evaluate: learners evaluate both their design stages and their final product.
Communicate: learners present their solutions; learners compile all notes and drawings into
a project report in their class-work books.
Fit-for-purpose: Who is it for? What is it for? Will it do the job? Is it cost effective? Is it
safe? Is it easy to use (ergonomics)? Does it look good (aesthetics)? Will it affect
society? Will it affect the environment?
2
2 hrs
Introduction to
graphical
communication
Purpose of graphics: develop ideas and communicate ideas.
Conventions: outlines (thick/dark); construction lines (thin/feint); hidden detail (dashed)
scale; dimensioning.
Sketching: free-hand sketching.
Working Drawings: 2-dimensional drawing of ONE face of an object using conventions
(dark lines; feint lines; dashed lines; dimensions; scale).
3
2 hrs
Graphic
techniques
3-D oblique – front view with depth at 45o (use squared „quadrant‟ paper); oblique
projection used to assist with interpretation, and with drawing single VP perspective.
3-D artistic - single vanishing point perspective with colour, texture and shading.
4
2 hrs
Simple
mechanisms
Lesson: Levers - mechanical advantage - simple qualitative treatment – no calculations.
1st Class levers: characteristics (fulcrum/pivot placed between effort & load).
1st Class levers may give a mechanical advantage or not – depending on pivot position.
Case study: 1st Class levers with mechanical advantage: MA > 1 ; MA = 1 ; MA < 1
5
2 hrs
Simple
mechanisms
(cont.)
Lesson: Levers
2nd Class levers: characteristics (load placed between effort & fulcrum); examples.
Learners demonstrate models of 2nd Class levers which always give a mechanical
advantage.
3rd Class levers: characteristics (placed between effort & fulcrum).
Learners demonstrate models of 3rd Class levers which never give a mechanical advantage.
6
2 hrs
Simple
mechanisms
(cont.)
Investigation: Levers and linkages
Examine linked 1st Class levers (e.g. pair of scissors, pair of pliers; hedge trimming shears).
Examine linked 2nd Class levers (e.g. office punch, bicycle brake calliper, nut crackers).
Examine linked 3rd Class levers (e.g. office stapler, pair of tweezers).
Short practical assessment task: “miniPAT” JAWS-OF-LIFE: Rescue System [70%]

12
7
2 hrs
Simple
mechanisms
(cont.)
Scenario: Impact of technology - emergency workers use “Jaws-of-Life” system to rescue
trapped accident victims.
Lesson: Using pneumatics and hydraulics to enhance human strength.
Investigation: Force transfer between two equal syringes filled with 1) air and 2) water.
Investigation: Force transfer between two unequal syringes filled with 1) air and 2) water.
8
2 hrs
TASK Design & make: Learners work in teams to develop a working model of a hydraulic-syringe
powered, linked-lever rescue device using simple materials.
Design brief, specifications and constraints:
A 3-D drawing of the idea in oblique projection using dark and feint lines
A sketch in single VP perspective enhanced using two of colour, texture or shading.
A working drawing in 2-D showing one view with dimensions to scale.
9 TASK (cont.) Make: The working model. Communicate: Book mark.
10 Summative Assessment Test (Note: the test may be written before the MiniPAT)
30%
Formal Assessment: Term 1: weighting: 10% of promotion markFormative: (0%) miniPAT: [70%]
Summative test: 30% Total: 100%

13
Annual teaching plan GRADE 7 TERM 2
Week Topic Enabling Tasks Content
1
2 hrs
Structures
Definition
Classification
Types
Structures
Definition and purpose of structures to contain, protect, support, span.
Classification of structures: natural and man-made.
Types of structures: shell, frame, solid – learners complete a worksheet.
2
2 hrs
Task:
Introduction - A
cell-phone tower
Investigation: A cell-phone tower – a frame structure
Case study: examine existing towers strengthened by triangulation including pylons,
windmills, mine headgear
Evaluation: worksheet on the advantages & disadvantages of telephone systems;
landline v mobile. Learners complete a table.
3
2 hrs
Building practical
knowledge for the
task
Action research: to strengthen materials
Practical activity 1 – Strengthen a structural material by tubing.
Practical activity 2 – Strengthen a structural material by folding.
Practical activity 3 – Strengthen a structural material by triangulation.
4
2 hrs
Further
investigation –
existing designs
Design issues: impact of technology
Case study: Study photographs of existing cellphone towers noting structural elements,
reinforcing techniques, and design issues like visual pollution.
Class discussion: how designers consider the needs of society in terms of technology while
considering the impact on society and on the environment.
Case study - existing designs 1: Examine the features of a school desk; write the design
brief with specifications for a school desk.
Case study - existing designs 2: Examine an existing product (FM Radio / Cell- phone), list
its features and then write a design brief with specifications for that product.
Short Practical Assessment Task: “miniPAT” The cell-phone tower [70%]

14
5
2 hrs
Design Brief
Initial ideas
Writing the design brief for the task:
Individual learners write the design brief with specifications for a new cell-phone
tower. Sketching initial ideas:
Individual learners use free-hand sketches to draw two different design ideas in 3-D for a
cell-phone tower to be erected near the school.
Draw one idea using oblique and the other using perspective.
At least one of the design ideas must involve disguising the tower so that it blends in
with the surroundings, avoiding visual pollution.
Learners form groups of five to examine and discuss the various design ideas of the
individuals in the group.
They evaluate the sketches of each individual to determine advantages and
disadvantages of each design.
Individual learners now adapt their own design ideas in terms of the group evaluation
making any improvements needed.
6
2 hrs
Make
Planning
Making includes working drawings, choosing materials and tools, and building the model.
Measuring and simple tool skills must be developed.
Simple materials like straws, paper dowels or „elephant grass‟ should be used.
Sufficient strength and rigidity should be achieved by triangulation.
Safe, cooperative working is a key skill and needed in the world of work.
Each learner lists the resources to be used.
Each learner draws a working drawing for the cell-phone tower showing one face in 2-D.
Learners form teams and select the best plan from those drawn by each team member.
7
2 hrs
Build
Evaluate
Building the model:
Learners work in teams to develop the design they chose by consensus from the plans drawn
by each group member.
The team adapts a final plan from these.
Teams build the model using safe working practices.
Learners develop a team rubric to evaluate the models of other teams.
They use their rubric to assess the models of 3 other teams during the team’s
presentation.
8
2 hrs
Communicate
Presentation:
Teams plan a joint strategy to present their model and plans.
Teams present their design sketches, modifications, plans and models to the class.
Each learner explains the role s/he played, sharing the role of spokesperson.
They each enhance their presentation using posters giving an artist‟s impression of their
completed cell-phone tower in position near the school drawn using single VP
perspective.
9-10 Summative assessment: Midyear exams
Formal Assessment: Term 2: Weighting: 10% of promotion mark
MiniPAT: [70%] Summative Exam: 30% Total: 100%

15
Annual teaching plan GRADE 7 TERM 3
In preparation for the school recycling and fund-raising activity in Week 2, learners must begin to collect data on
waste materials generated both at school and at home from the first day of Term 3.
Week Topic Enabling tasks Content
1
2 hrs
Magnetism Investigation: Introductory lesson – what is magnetism?
Action research: Different types of permanent magnets – bar & horseshoe.
Learners find the shapes of magnetic fields using iron filings on paper above magnets.
Experiment: Group work – learners find out which substances stick to a magnet.
They tabulate their test results, trying wood, plastic, iron, paper, copper, old nickel coins,
etc.
They should conclude that some metals do stick to magnets but that non-metals do not.
2
2 hrs
Magnetic metals
Recycling scrap
metals
Experiment: Which metals are attracted by a magnet, and which are not?
Learners test metal samples made of iron, steel (an iron alloy), nickel – which will stick.
Learners test metal samples made of copper, lead, aluminium brass – which will not stick.
Each learner completes a table of the results.
Note: avoid iron coated-with-copper (like some paper clips) which will stick to magnets.
Case study: Recycling scrap metals – impact of and bias in Technology.
Honest gleaners who collect scrap metal and deliver it to scrap metal dealers perform a
valuable service to society. This good work is tainted by the criminal acts of thieves
who steal copper telephone wire and steel man-hole covers.
A recycling scheme for your school:
Learners tabulate a record of the waste produced by the school e.g. empty cans, paper,
plastic etc.
Learners suggest a viable strategy to raise funds by recycling.
3
2 hrs
Introducing
electricity
A simple
electromagnet
1.1. Introductory lesson: Simple electric circuits.
1.1.1. Demonstrate a simple electric circuit with an energy source (cell), switch, conductor and a
light bulb or buzzer.
1.1.2. Sketch the circuit showing how to use component symbols.
Learners work in groups to make a simple circuit as demonstrated.
Each learner draws the circuit using correct symbols for electrical components.
Demonstration: Make a simple electromagnet made by winding insulated copper wire around an
iron nail. When an electric current flows in the wire coil (solenoid) a magnetic field is
created and this is amplified by the iron core. Switching the current off causes the
magnetic field to die away.
4
2 hrs
More Simple
Mechanisms
Introductory lesson: All complex machinery consists of combinations of simple
mechanisms. Machines can be designed to give the user a “mechanical advantage.”
Levers were looked at in Term 1. Introduce learners to cranks and pulleys.
Lesson: The crank – an adaptation of a 2nd class lever.
Lesson: The pulley – a type of wheel & axle.
Revision: a) What is mechanical advantage? b) Strengthening frame structures

16
Short Practical Assessment Task: “miniPAT” Crane with electromagnet [70%]
Background - problem scenario: A scrap-metal dealer sorts magnetic and non-magnetic metals into separate piles for
recycling. The simplest way to do this is to use a crane with a magnet BUT it is difficult to remove the metals that do
stick to permanent magnets. It would be beneficial to have a magnet that can switch on and off.
NOTE 1: The model cranes should be made using simple materials (e.g. paper dowels or „elephant‟ grass, etc).
Sufficient strength and rigidity should be achieved by triangulation. Measuring and simple tool skills must be developed.
Safe, cooperative working is a key skill and needed in the world of work.
NOTE 2: The electromagnet will be strongest if a long insulated wire is used – wire over 100m long is very effective. The wire
should be wound around a “relatively soft” iron core. Avoid using a steel bolt (it is far too hard). A fairly soft core can be made
using a bundle of short lengths of wire. Nails are softer than bolts but are still fairly hard. Increasing the current by using
more cells in a series battery has a small influence in the strength of the electromagnet.

17
5
2 hrs
Design Learners must use their knowledge of structures and the drawing skills developed in earlier
tasks, together with their new knowledge of magnetism, electric circuits and electromagnets
as well as their new knowledge of cranks and pulleys to design and make a crane using an
electromagnet to sort metals in a scrap-yard.
Case study: Examine pictures of cranes in order to get ideas to be used in the learner‟s
own designs.
Write a design brief with specifications & constraints for a crane with electromagnet.
Sketch two possible designs for a suitable crane using single VP perspective.
Draw a circuit diagram for the electromagnet (with a light to show when it is on).
6
2 hrs
Make Revision: Revise the 3-D oblique drawing technique; line types; scale; dimensions.
Drawing: Each learner uses the Oblique technique to draw an idea for the crane chosen
from the two ideas sketched the previous week. The idea should be drawn on squared
paper (quadrant) using pencil and ruler.
Flow chart: Each learner works out a flow chart detailing the sequence of manufacture of
the crane with its electromagnet.
7
2 hrs
Make Electromagnet: Using an electrochemical cell, a switch, a light bulb, a „soft‟ iron core and a
long length of insulated copper wire, the teams of learners make an electromagnet.
Crane: Learners work safely in teams using simple materials to make a model crane with a
crank and pulley system which will carry the electromagnet that will sort the ferrous
metals (iron and steel) from the non-ferrous metals (copper, aluminium, lead, brass,
etc).
8
2 hrs
Evaluate The learner‟s ability to evaluate a product or a process is developed further.
Rubric: Each learner develops a rubric to evaluate the models of other teams.
Assess: Each team uses the rubric to evaluate the models of other teams. Assess each
learner‟s objectivity, fairness and the validity of their comments.
9
2 hrs
Communicate
Planning: Teams plan a joint strategy to present their model and plans to the class. All
team members must explain their ideas and roles they played when they present.
Presentation: Each team presents the design sketches, working drawings and functioning
model to the class. They demonstrate how strong their electromagnet is and show that
it releases the load when switched off. Each learner explains the role s/he played and
shares the role of spokesperson. They explain the principles involved with the
magnetic sorting and how their electromagnet could be made stronger. They comment
on the value of recycling and explain how sorting the metals into types improves their
scrap value. They enhance their presentation using posters giving an artist‟s
impression of their completed crane and electromagnet in use.
Workbook: All notes, design briefs, sketches, flow charts, plans and posters.
Week 10 Summative
assessment
Test (Note: the test may be written before the MiniPAT) [30%]
Formal assessment: Term 3: Weighting: 10% of promotion mark
MiniPAT: [70%] Summative test: 30% Total: 100%

18
Annual teaching plan GRADE 7 TERM 4
Annual teaching plan GRADE 7 Term 4
Week Topic Enabling tasks Content
1
2 hrs
More simple
mechanisms
–
Wedge
Wheel & axle
Gears
counter
rotation
idler
Lesson: More simple mechanisms.
All complex machinery consists of combinations of simple mechanisms.
Well-designed machines give us a “mechanical advantage.”
Revision: Mechanical advantage.
The wedge: e.g. inclined plane or ramp, door wedge, knife blade, etc.
The wheel & axle: e.g. from bicycle to shopping trolley
Gear: (wheel with wedges for teeth)
Show how meshing of two spur gears causes counter-rotation
Show how introducing an idler gear between two spur gears synchronises rotation of the
driver and driven gears.
Note: since a small idler will rotate more times than the larger gears, it should be made of
harder material.
2
2 hrs
More simple
mechanisms –
Gear ratios
Cam
Crank
Lesson: Gear ratios
Show how different sized gears result in a change in the velocity ratio as well as an „opposite‟
change in the force ratio – if force increases, speed decreases, and vice versa.
Lesson: Mechanisms that change the direction of movement.
The Cam: Show how a cam converts rotary motion into reciprocating motion.
Compare an eccentric wheel and a snail cam.
The Crank: An adaptation of a 2nd class lever.
Show how a crank converts rotary motion into reciprocating motion.
Graphic skills: Learners draw an artist‟s impression of one of each of the above mechanisms
in their books using colour, shading and texture.
3
2 hrs
Design & make A short design & make activity intended to put the knowledge of mechanisms recently gained
into practice. Learners must use safe working practices.
Revision: The oblique technique for drawing 3-D with dimensions.
Designing: Use the oblique technique to draw a design for each of the following:
A child‟s toy cardboard horse on wheels that can be pulled using a string.
A child‟s toy cardboard horse on wheels that can be pulled along using a string, but which
moves up and down because the front wheels are cams.
Making: Learners work in pairs to save on materials and tools and to develop collaborative
and organisational skills. Learners do NOT have to get the same mark if their input
differs.
Using cardboard and glue make the cam-wheeled toy horse described above.
4
2 hrs
Processing
specialised
clothing
Investigation: Learners investigate clothing worn by people in specialised occupations like the
emergency services e.g. fire department, NSRI or dangerous professions e.g. racing
drivers. Learners must investigate two of the following:
Find out what textiles are used to make the clothing worn by fire-fighters.
Find out what textiles are used to make the clothing worn by members of the NSRI.
Find out what textiles are used to make the clothing worn by racing drivers.
Short Practical Assessment Task: “miniPAT” Processing [70%]

19
5
2 hrs
Investigating Investigation: Learners investigate materials and building techniques used by indigenous
people for constructing housing in rural South Africa. Materials used in such construction
is typically readily available, appropriate and environmentally friendly.
Investigation: Learners investigate materials and building techniques used by migrant workers
moving to the outskirts of cities in setting up informal settlements. Material used in such
construction is typically difficult to obtain, inappropriate and environmentally unfriendly.
6
2 hrs
Task
Emergency
shelters and the
impact of
technology
Scenario: Tragic shack fires or natural disasters like floods or earthquakes or political strife
may create the need for emergency shelters to be erected for the victims.
Activity: Learners design and make an emergency shelter for disaster victims. The shelter
must be sturdy, waterproof, easy to erect and able to house a family of six for a month.
Investigate: Learners find out what chemicals can waterproof a textile like canvas.
Design brief: Learners write an appropriate design brief with specifications for producing a
textile suitable for use in making an emergency shelter. Design:
Learners sketch design ideas for an emergency shelter which can be transported to and
erected at a site where people have become homeless.
2 hrs
Make
Emergency
food and
the
impact of
technolog
y
Make: Learners work in teams to make a model (made of a water-proofed textile) of an
emergency shelter suitable for housing refugees for period of at least a month. It should
be easy to transport, easy to assemble, and easy to pack away after use.
Processing food:
Investigate the type of food that can be supplied to occupants of a refugee camp.
Design Bbrief: Learners write a design brief giving specifications of the types and quantities of
food needed for a population of 100 refugees.
Design: List the ingredients of a meal that will be nutritious as well as tasty, and which can be
prepared under conditions likely to be found in a refugee camp.
8
2 hrs
Make Make: Write down the sequence of manufacture for the process of preparing one item from the
meal described above.
Make: Learners prepare the item selected above.
Evaluate: Learners evaluate the item in terms of flavour, texture and nutritional value.
Formal Assessment: Term 4: Weighting: 10% of promotion mark
MiniPAT: [70%] Total: 70 x 1,43 = 100%
Week 9 -10 End-of-year examination 60%
YEAR MARK : 100 + 100 + 100 + 100 = 400 ÷ 4 = 100
Promotion mark: year mark (40%) + final exam mark (60%) = 100%
Grade 7,8 and 9 Formal Assessment: 4 mini-PATs + 4 term tests = 40% + year-end exam = 60% TOTAL: 100%
Term 1 Term 2 Term 3 Term 4 Promotion Mark
Formative 0% MiniPAT 70% TEST 30%
Formative 0% MiniPAT 70% TEST 30%
Formative 0% MiniPAT 70% TEST 30%
Formative 0% MiniPAT 70% 70 x 1,43 = 100%
Year Mark: 40% Final Exam: 60%
10 10 10 10 40 + 60 = 100
Total: 100%

20
Annual teaching plan GRADE 8 TERM 1
It is compulsory to cover the given topics in the term indicated. The sequence of the topics within the term must be adhered
to.
Skills like investigating, drawing, designing, making and presenting should improve progressively from term to term.
Week Topic Enabling Tasks Content
1
2 hrs
What is
Technology?
The Design
Process
Design
considerations
Definition of Technology – revision.
Scope: Technology in the man-made world – positive and negative impact on the world.
Investigate: Finding, using and acknowledging information.
Design: Design brief; specifications; constraints; initial idea sketches; selecting materials.
Make: Drawing plans; develop the manufacturing sequence; make the item / model.
Evaluate: Learners evaluate both their design stages and their final product.
Communicate: Learners present their solutions; learners compile all notes and drawings into
a project report in their class-work books.
Fit-for purpose: Who is it for? What is it for? Will it do the job? Does it look good
(aesthetics)? Is it easy to use (ergonomics)? Is it safe? Is it cost effective in terms of
cost of „real‟ materials, cost of labour? What should be the selling price? How will it
impact society? How will it impact the environment?
2
2 hrs
Graphical
communication
Purpose of graphics: develop and communicate ideas.
Conventions: Outlines (thick/dark); construction lines (thin/feint); hidden detail (dashed);
centre lines (chain dash-dot); scaling up & scaling down; dimensioning (in mm).
Working drawing techniques for planning:
Single view flat 2-D drawing with dimensions, line types and scale.
Isometric – using underlying isometric grid (Term 1) and instruments (Term 3).
3
2 hrs
Graphical
communication
(cont)
Artistic: Double vanishing point perspective with colour, texture and shading.
Sketching – using pencil, ruler and blank paper.
Enhancing drawing to promote realism using colour, texture, shading and shadows.
4
2 hrs
Frame structures Lesson: Frame structures - definition of frame structures.
Purpose of structural members (components) in a roof truss.
Learners identify structural members & type of force (shear, torsion, tension, compression)
acting on them in given frame structures.
Case study: Electrical Pylons – use pictures of a range of pylon designs noting:
the variety of designs that solve the same problem effectively
the use of internal cross-bracing and triangulation to provide strength.
Worksheet : Structural members under tension / compression.
5
2 hrs
Structural
members
Lesson: Structures that span over space.
Beams: steel I-beams (girders), concrete lintels; beam & column bridge.
Arches: arches in buildings, bridges, dam walls.
Trusses: wooden roof trusses, steel roof trusses.
Cantilevers: simple cantilever, inverted truss cantilever, cable-stayed cantilever.
6
2 hrs
Mechanisms Revision: levers & linkages Revision: gears giving a mechanical advantage
Lesson: rack & pinion gear system Lesson: worm gears
Worksheet: Evaluating gear systems.
Short Practical Assessment Task: “miniPAT” School sports centre / multipurpose centre or stadium [70%]

21
7
2 hrs
1. TASK 1 Learners work in teams to design & make a structure utilising required structural
components and mechanisms.
Evaluate: learners examine information on several complex structures and list advantages
and disadvantages in the designs.
Design: initial idea sketches.
Design: design brief with specifications and constraints.
8
2 hrs
2. TASK (cont.) Make: a 3-D isometric projection of the idea with dimensions and drawn to scale.
Make: a working drawing in 2-D showing one view with dimensions and line types.
Make: teams build their structure using safe working practices.
9
2 hrs 3. TASK (cont.)
Communicate: Teams present their plans and model.
A sketch in double VP perspective enhanced using two of colour, texture or shading.
Communicate: book mark.
10 4. Summative Assessment Test [30%]
Formal assessment: Term 1: weighting: 10% of promotion mark
Formative: (0%) miniPAT: [70%] Summative Test: [30%] Total: 100%

22
Annual teaching plan GRADE 8 TERM 2
Week Topic Enabling tasks Content
It is compulsory to cover the given topics in the term indicated. The sequence of the topics within the term must be adhered
to.
Skills like investigating, drawing, designing, making and presenting should improve progressively from term to term.
1
2 hrs
Processing
Impact of
technology
Many natural materials have been replaced in modern times by new or improved
materials. Some new materials are environmentally friendly by being bio-
degradable.
Case study 1: Investigate the impact of plastic shopping bags on the environment.
Report: Learners write a report evaluating the effectiveness of using thicker,
biodegradable plastic shopping bags which shoppers must buy.
2
2 hrs
Impact of
technology
Design and
make
Case study 2: Technology with a positive impact on society.
Investigate how waste paper and cardboard are recycled to produce new products for the
packaging industry.
Practical activity: Design packaging for a purpose. A product requires packaging. The
nature of the product determines the design and properties of the packaging material.
3
2 hrs
Design and make
(cont.)
Practical activity (cont.): Making packaging for a purpose. Learners work safely to
make and assemble the packaging product designed in Week 2.
Short Practical Assessment Task: “miniPAT” Impact of technology [70%]
4 Impact of
technology
Investigate
solutions
Case study 3: Some technologies can have a negative impact.
Investigate a technological product that can have a negative impact on society.
Class discussion: Facilitate a class discussion on possible solutions that can counteract or
compensate for the negative impact of the technology identified.
5 Forces (knowledge) Revision: Forces that act on materials – tension; compression; bending; torsion; shear.
Lesson: Adapting materials to withstand forces.
6 Design
Make
Design: Learners adapt a material or design a product that will solve the problem or
reduce the impact or negative effects of the technology identified.
Design: Learners sketch free-hand sketches showing two possible solutions.
Make: Learners draw their chosen solution in 3-D using isometric projection.
Make: Learners make the model / prototype / product they have designed safely.
7 Evaluate Learners evaluate their solution in terms of its effectiveness in solving or reducing the
negative impact of the technology identified. Their evaluation will be assessed in
terms of its objectivity, fairness, accuracy and scope (depth).
8 Communicate Communicate: Teams present their plans, model and evaluation.
9 Mid-year examination
10 Mid-year examination
Formal assessment: Term 2: weighting: 10% of promotion mark
Formative: (0%) miniPAT: [70%] Summative mid-year examination: [30%] Total: 100%

23
Annual teaching plan GRADE 8 TERM 3
It is compulsory to cover the given topics in the term indicated. The sequence of the topics within the term must be adhered
to.
Skills like investigating, drawing, designing, making and presenting should improve progressively from term to term.

24
Week Topic Enabling tasks Content
1
2 hrs
Revision A
[1 hour]
Revision B
[1 hour]
Levers & linkages – single levers and linked levers.
Single 1st Class lever – mechanical advantage depends on the position of the fulcrum.
Linked 1st Class levers - consider various samples like:
paper scissors (equal length blade & handle) – no mechanical advantage
secateurs (long handle & short, strong blades) – mechanical advantage > 1.
Single 2nd Class lever – always gives some mechanical advantage.
Linked 2nd Class levers - consider various samples like:
office punch – mechanical advantage > 1
heavy duty stapler - mechanical advantage > 1.
Single 3rd Class lever – never gives any mechanical advantage.
Linked 3rd Class levers - consider various samples like:
office light-duty stapler - mechanical advantage < 1
pair of tweezers - mechanical advantage < 1
Gear systems – concepts (counter rotation, idler, velocity ratio, force multiplication).
Two spur gears of unequal size - note counter rotation and velocity ratio.
Two spur gears of unequal size - note velocity ratio and force ratio.
Two spur gears connected via an idler – note synchronised rotation.
Suitable materials – the idler needs to be of a harder material than the other gears.
Two bevel gears linked to transfer the axis of rotation through 90o.
2
2 hrs
Graphical
communication
Design
Representing gear systems graphically:
Use circular templates and/or pair of compasses to draw gear systems with:
the driven gear rotating in the opposite direction to the driver (counter rotation).
the driven gear rotating in the same direction to the driver (include an idler gear).
the driven gear rotating faster than the driver (with and without an idler).
the driven gear rotating slower than the driver (with and without an idler).
Design brief: Learners write a design brief with specifications for a device that will use a
combination of gears to achieve:
a mechanical advantage with force multiplication of three times.
an increase in output velocity of four times.
Sketch: Use an isometric projection using instruments to draw sketches showing gear systems
that meet each of the two above specifications.
3
2 hrs
Mechanical
advantage
calculations
Lesson: Calculating Mechanical Advantage (M.A)
Levers: mechanical advantage calculations for levers.
Calculations using LOAD / EFFORT; load ARM / effort ARM; etc.
Gears: mechanical advantage calculations for gears.
Calculations using tooth ratios; gear wheel diameters; velocity ratios.

25
4
2 hrs
Design
Systems
diagrams
Sketches (2-D) showing gear systems that:
provide an output force four times greater than the input force (M.A = 4:1)
provide double the rotation rate on a driven axle at 90o to the driver axle.
Lesson: Bicycle gear system
Analysis of the gears used on modern bicycles – terminology: master/slave or
driver/driven; chain wheel; cogs.
Lesson: Systems diagrams
Analysing a mechanical system by breaking it into input-process-output.
Systems diagram for a gear system with a mechanical advantage of 4:1
Planning a mechanical system to produce a specific output
Systems diagram for a gear train with the driven gear rotating faster than the driver.
5
2 hrs
Impact of
technology
Indigenous
technology
Bias in
technology
Learners working in teams investigate and report on ONE of the following:
(Distribute the investigations so that all are covered and reported in each class)
Investigation: The impact on the environment as a result of mining:
acid mine drainage.
Investigation: The impact on the environment as a result of mining:
dust pollution from mine dumps on residential areas.
Investigation: Iron age technology:
indigenous mining of iron in South Africa before the modern era.
Investigation: Bias in technology:
gender bias in career choice / opportunities related to mining.
Short Practical Assessment Task: “miniPAT” SIMULATION – Tendering for Mine Head-gear [70%]
CAPABILITY TASK: Mechanical Systems & Control
South Africa is a country rich in mineral resources. We have huge reserves of coal, copper and iron ore. We are the main
suppliers of platinum, manganese and chromium in the world. Although it is the source of our nation‟s wealth, mining is
a dangerous, labour intensive activity that has negative impacts on the environment.
The deeper our mines penetrate into the earth‟s crust (over 5 km), the more dangerous mining becomes since tunnelling
through rock under massive pressures leads to “rock bursts” and cave-ins which frequently threaten the lives of miners.
Scenario: A commercially viable ore body containing platinum group metals has been found and measured on land belonging
to a tribe in rural South Africa. Drill samples have proved that the reef lies 500m below the surface and a decision has
been taken to sink a shaft to this depth to conduct bulk sampling on a small scale before deciding on a mining method
best suited for the size and value of the resource.
Your mechanical engineering company decides to submit a tender for the construction of shaft head-gear suitable to transport
miners to and from the work face, and for raising ore and waste in loads not exceeding 10 tons at a time.

26
Week
2 hrs
Topic Content
6
2 hrs
Mine head gear
Design
Investigation: Lifting mechanisms (belt driven mine head-gear) in use at South
African deep-level mines for raising people and ore.
Sketching: Initial idea sketches to meet the requirements given in the scenario.
Design brief with specifications and constraints.
7
2 hrs
Make Simulation: Teams form mechanical engineering companies.
They evaluate the sketches of individuals and select the best idea for the team tender bid.
Drawings for the shaft head-gear: Each learner draws:
a 3-D isometric drawing of the selected design giving dimensions and drawn to scale
a 2-D working drawing showing one or more views with dimensions and lines.
Budget: Teams prepare a realistic budget detailing expected costs of constructing a
real mine shaft head-gear, detailing valid prices of materials and labour costs of the
range of workers who would be involved in designing and building such a device.
8
2 hrs
Make (cont.) Teams build their working scale model using safe working practices.
9
2 hrs
Communicate: Teams present their tender proposal for the mine shaft head-gear (research, plans,
flow chart, model and budget) to the “Tender Board.”
10 Summative assessment Test [30%]
Formal assessment: Term 3: weighting: 10% of promotion mark
Formative: (0%) miniPAT: [70%] Summative Midyear Examination: 30% Total: 100%
27
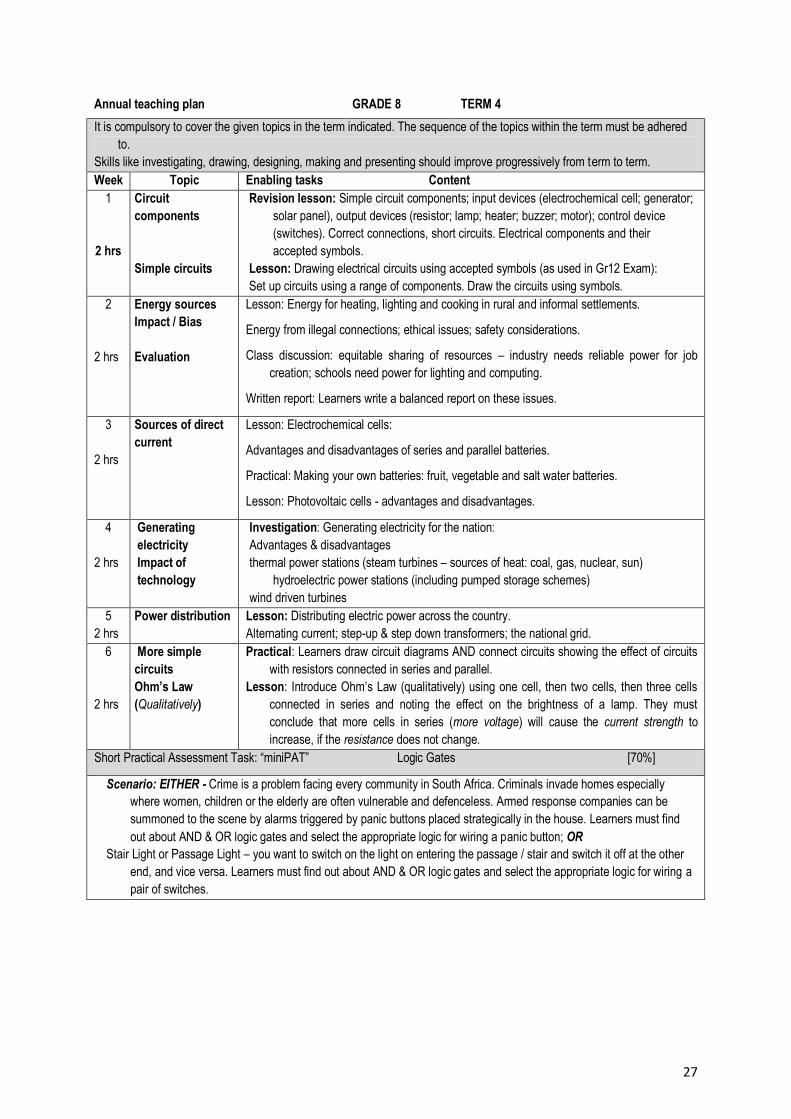
Annual teaching plan GRADE 8 TERM 4
It is compulsory to cover the given topics in the term indicated. The sequence of the topics within the term must be adhered
to.
Skills like investigating, drawing, designing, making and presenting should improve progressively from term to term.
Week Topic Enabling tasks Content
1
2 hrs
Circuit
components
Simple circuits
Revision lesson: Simple circuit components; input devices (electrochemical cell; generator;
solar panel), output devices (resistor; lamp; heater; buzzer; motor); control device
(switches). Correct connections, short circuits. Electrical components and their
accepted symbols.
Lesson: Drawing electrical circuits using accepted symbols (as used in Gr12 Exam):
Set up circuits using a range of components. Draw the circuits using symbols.
2
2 hrs
Energy sources
Impact / Bias
Evaluation
Lesson: Energy for heating, lighting and cooking in rural and informal settlements.
Energy from illegal connections; ethical issues; safety considerations.
Class discussion: equitable sharing of resources – industry needs reliable power for job
creation; schools need power for lighting and computing.
Written report: Learners write a balanced report on these issues.
3
2 hrs
Sources of direct
current
Lesson: Electrochemical cells:
Advantages and disadvantages of series and parallel batteries.
Practical: Making your own batteries: fruit, vegetable and salt water batteries.
Lesson: Photovoltaic cells - advantages and disadvantages.
4
2 hrs
Generating
electricity
Impact of
technology
Investigation: Generating electricity for the nation:
Advantages & disadvantages
thermal power stations (steam turbines – sources of heat: coal, gas, nuclear, sun)
hydroelectric power stations (including pumped storage schemes)
wind driven turbines
5
2 hrs
Power distribution Lesson: Distributing electric power across the country.
Alternating current; step-up & step down transformers; the national grid.
6
2 hrs
More simple
circuits
Ohm’s Law
(Qualitatively)
Practical: Learners draw circuit diagrams AND connect circuits showing the effect of circuits
with resistors connected in series and parallel.
Lesson: Introduce Ohm‟s Law (qualitatively) using one cell, then two cells, then three cells
connected in series and noting the effect on the brightness of a lamp. They must
conclude that more cells in series (more voltage) will cause the current strength to
increase, if the resistance does not change.
Short Practical Assessment Task: “miniPAT” Logic Gates [70%]
Scenario: EITHER - Crime is a problem facing every community in South Africa. Criminals invade homes especially
where women, children or the elderly are often vulnerable and defenceless. Armed response companies can be
summoned to the scene by alarms triggered by panic buttons placed strategically in the house. Learners must find
out about AND & OR logic gates and select the appropriate logic for wiring a panic button; OR
Stair Light or Passage Light – you want to switch on the light on entering the passage / stair and switch it off at the other
end, and vice versa. Learners must find out about AND & OR logic gates and select the appropriate logic for wiring a
pair of switches.

28
7 AND Logic
OR Logic
Truth tables
Investigation: AND logic gate and where it is used.
Investigation: OR logic gate and where it is used.
Lesson: Truth tables for AND & OR logic conditions.
8 Dual switch
system
Design brief: Learners write a design brief giving specifications for a suitable panic
button system or passage light or stair light.
Circuit diagram: Draw the circuit diagram using correct symbol conventions.
Make: Connect the components specified to form the circuit suitable for at least two
panic buttons linked to a home alarm system.
Communicate: Learners draw the truth table for the device.
Communicate: Learners prepare an advertising poster for their device.
9 &10 Year-end examination
Formal assessment: Term 4:
Formative: (0%) miniPAT: [70%] Total: 70 x 1,43 = 100%
YEAR MARK : 100 + 100 + 100 + 100 = 400 ÷ 4 = 100
Promotion mark: year mark (40%) + final exam mark (60%) = 100%
Term 1 + Term 2 + Term 3 + Term 4 = 10 +10 +10 +10 = 40% plus Final Exam 60% = 100%

29
Annual teaching plan GRADE 9 TERM 1: STRUCTURES
It is compulsory to cover the given topics in the term indicated. The sequence of the topics within the term must be adhered
to.
Skills like investigating, drawing, designing, making and presenting should improve progressively from term to term.
Week Topic Enabling tasks Content
1
2 hrs
Working
drawings
1st angle orthographic projection: 3-dimensional objects on flat paper.
Concept of drawing three different views: front, top & side. Simple cubes.
Line types: dark, feint, dashed, wavy, chain. Scale and dimensions.
2
2 hrs
Working
drawings (cont.)
More complex 3-D objects drawn in orthographic projection with instruments.
Design problem: flight of stairs and wheelchair ramp.
Design brief specifying the number of steps, height of stair risers, width & gradient of ramp.
Sketch the stair and ramp in 3-D using isometric projection.
Draw a plan for the stair and ramp using 1st angle orthographic projection to an appropriate
scale, using correct views, line types & dimensions according to convention.
3
2 hrs
Properties of
materials that
affect their
performance in
structures
Revision: Strengthening of structures using tubing, folding and triangular webs.
Lesson: Strength of materials under the action of forces – metal cross-sections:
tension (pulling); compression (pushing); bending of beams (compression & tension)
torsion – using internal cross-bracing to resist twisting.
Lesson: Properties of various construction materials: mass; density; hardness; stiffness;
flexibility, corrosion resistance and prevention of corrosion.
N.B: These skills should be developed progressively with each task. Do not spend more than the time allocated for this
introduction. By the end of the year the learners should have developed the required level of competence. Level
required after Week 2 - learners should be able do the following at an elementary level:
Learners draw a plan for an object of a given size. They use the 1st angle orthographic technique using correct line
types, drawn to scale with dimensions.
Learners design a solution to solve a given problem and draw a suitable plan using 1st angle orthographic. N.B. It is
most important that the plan can work. If the solution will not solve the problem it must be penalised, no matter how
neatly it is drawn.
Short Practical Assessment Task: “miniPAT” The Contractors [70%]
Task1: SIMULATION: Structures (Gr9 learners must be able to identify a problem from a given context)
This task deals with the design of a structure that will solve a problem facing a community living on the far side of a river from
the city. The local authority places an advertisement inviting contractors to submit tenders for a solution.
Learners form teams to act as „Contracting Companies‟ which will compete for the contract to solve the problem.
4
2 hrs
Tenders
Investigation
Lesson: The tender process.
Investigation: Provide the scenario so that learners can investigate the problem situation and
various possible structures which could solve the problem(s) they identify. Analysis of
existing products relevant to the identified problem in terms of fitness-for-purpose
(including suitability of materials), safety for users, costs of materials and costs of
construction. Realistic costs of real materials, labour, etc.
5
2 hrs
Design Sketching initial ideas – each learner generates two possible ideas.
Evaluate and adapt – teams evaluate individual ideas and develop a final idea.
Design brief – learners write a design brief with specifications for the final idea.
Flow chart – teams discuss how to proceed, then each learner draws a flow chart.
6
2 hrs
Make Working drawings: each learner draws the plan (or an aspect of the plan) using 1st
angle orthographic projection with suitable scale, correct line types and dimensions.
Model of a viable solution: built neatly to scale, showing intelligent use of materials.
7
2 hrs
Make
Costing
Model building continued: Learners use safe working practices.

30
Budget: Costing of the “real life” solution, including correct materials and labour costs.
8
2 hrs
Evaluate
Communicate
Evaluation: Teams collaborate to produce an evaluation instrument. Each learner
uses the instrument to evaluate their team‟s solution and that of another team.
Team presentations: Teams present their tender bid to the “Tender Board.”
All team members must be responsible for aspects of the presentation.
Tenders consist of sketches, plans, budget, model and artistic impressions.
9 Communicate Team presentations: continued.
Book Mark.
10 Summative assessment Test [30%]
Formal assessment: Term 1: weighting: 10% of promotion mark
MiniPAT: [70%] Summative Test: [30%] Total: 100%

31
Annual teaching plan GRADE 9 TERM 2: MECHANICAL SYSTEMS & CONTROL
It is compulsory to cover the given topics in the term indicated. The sequence of the topics within the term must be adhered
to. Skills like investigating, drawing, designing, making and presenting should improve progressively from term to term.
Week Topic Enabling tasks Content
1
2 hrs
Using pneumatics
and hydraulics to
increase human
strength
Hydraulic
principles
Revision: Syringe mechanics using two equal sized syringes linked by a tube. Force transfer
between the syringes filled with:
a) Compressed air – pneumatic system; and b) Water – hydraulic system.
Action research: Learners experiment with two different sized syringes linked by a tube and
filled with hydraulic fluid (water). Learners experience force transfer with either force
multiplication or force division (depending on which syringe is the driver / master
Lesson: Gases (like air) are compressible. Liquids (like water, oils) are incompressible.
Action research: Pascal‟s principle – pressure exerted on one part of a hydraulic system will
be transferred equally, without any loss, in all directions to other parts of the system.
Note that equal volumes of liquid are moved through the systems, and this results in
different extensions where syringes (cylinders) are of different sizes, so less
distance/more force (M.A > 1); and more distance/less force (M.A < 1).
2
2 hrs
Hydraulics in use Lesson: The hydraulic press (including simple calculations).
Lesson: The hydraulic jack
Investigation: Design considerations ~ fit-for-purpose: Evaluate the design of the hydraulic
jack in terms of: Who is it for? What is it for? Will it do the job? What should it be
made of? What should it cost? Is it cost-effective? Does it look good (aesthetics)?
Is it safe/easy to use for the end user (ergonomics)? .
Draw a systems diagram which describes the way a hydraulic jack works.
3
2 hrs
Pulley systems
Mechanical
controls
Action research: Practical investigations:
Use a single wheel fixed pulley to change the direction of pull – M.A = 0
Use a single wheel moveable pulley to change the direction of pull – M.A > 0
Use a pulley block system (block & tackle) to determine the relationship between load-
bearing ropes on moveable pulley wheels and M.A (force multiplication).
Investigation: Learners find out about the following mechanical control systems: Ratchet
and pawl
Disc brake
Bicycle brake
Cleat.
4
2 hrs
Gear systems Lesson: Lead learners as they find out about the interactions of the following:
Revise: Spur gears of equal size counter-rotating
Revise: Spur gears of unequal size counter-rotating – note velocity & force relationships
Revise: Spur gears using an idler to synchronise rotation
Bevel gears of equal size – axis of rotation 90o
Bevel gears of unequal size – axis of rotation 90o – note velocity and force relationships
Rack-and-pinion gear system as found on automatic gates and steering racks
Worm gear system for large reduction in speed and increase in force.
5
2 hrs
Evaluating
Designs
Artistic drawing
techniques
Evaluation: Learners examine various items using mechanisms found in the modern kitchen
and/or home, workshop/garage. Items like can openers, egg beaters and ratchet
spanners should be evaluated in terms of: Who is it for? What is it for? Will it do the job?
What material is it made of? Is the material suitable? What should it cost? Does it look
good? Is it safe and easy to use? They report on three items.
Revision lesson: Single vanishing point perspective.
Learners draw a 3-D wooden object using single VP perspective. They enhance the drawing
showing the texture of the wood grain, colour and shadows.
Learners use single VP perspective to draw an inside view of the classroom.
Short Practical Assessment Task: “miniPAT” Problem solving [70%]

32
INTRODUCING THE PRACTICAL TASK: Integrated Systems Duration of this lesson is one 30 minute period.
Systems where mechanical, electrical, hydraulic or pneumatic systems are combined.
Scenario: Describe a scenario where a machine combining at least two of the following sub-systems can be effective in
giving a mechanical advantage to make work easier:
Mechanical, electrical or pneumatic/hydraulic systems.
Note: The mechanical elements may consist of one or more of the following mechanisms: levers, linked levers, wheels,
cams, cranks, pulleys and/or gears.
The machine may include a mechanical or electrical control device like a cleat, ratchet & pawl, or switch.
6
2 hrs
Investigation
Design
Investigate the situation so that an appropriate machine can be designed to solve the
problem, need or want given in the scenario.
Investigate the possible mechanisms and controls to be used together to make the machine.
The design brief: Each learner writes his/her suggestion for the design giving
specifications and constraints.
Sketches:
Each learner produces two sketches of viable possible designs.
Teams meet and examine the individual suggestions and then decide on a final solution.
7
2 hrs
Make
Planning: working drawings
The teams collaborate to produce drawings for their model / prototype using 1st angle
orthographic projection.
Each team member draws a plan of the design OR of an aspect of the design
Make: Prototype / working model
Learners use safe working practices.
Building: The model must showcase a viable solution to the problem. It should be to
scale and neat, and show intelligent use of available materials.
8
2 hrs
Make (cont.)
Communicate
Make (cont)
Team presentations:
Each team is given 5 minutes to present their solution in the form of sketches, artistic
impressions of the solution, working drawings / plans, costing, and their model.
9
2 hrs Revision Revise concepts and skills in preparation for the mid-year examination
10 Summative assessment MID-YEAR EXAM [30%]
Formal assessment: Term 2: weighting: 10% of promotion mark
Formative: (0%)MiniPAT: [70%] Summative mid-year Examination: [30%] Total: 100%

33
Annual teaching plan GRADE 9 TERM 3: ELECTRICAL / ELECTRONIC SYSTEMS
It is compulsory to cover the given topics in the term indicated. The sequence of the topics within the term must be adhered
to.
Skills like investigating, drawing, designing, making and presenting should improve progressively from term to term.
Week Topic Enabling tasks Content
1
2 hrs
Basic circuits
Ohm’s Law
Revision lesson 1
Component symbols:
Cells in series and parallel
Lamps in series and parallel
Switches in series (AND logic) and parallel (OR logic))
Current in the circuit – conventional current flows from positive to negative.
Revision lesson 2
Simple circuits:
1 Cell, switch, 2 lamps in series
2 Cells in series, switch, 2 lamps in series
Ohm‟s Law qualitatively: As voltage increases, current increases if resistance is constant.
Action Research: Testing Ohm‟s Law practically – measure the voltage (potential difference)
and the current strength in each of the following circuits:
One cell connected to the lamp - note the voltmeter and ammeter readings
Two cells connected to the lamp - note the voltmeter and ammeter readings
Three cells connected to the lamp - note the voltmeter and ammeter readings
Plot the readings on a graph and determine the relationship between potential
difference and current strength while keeping the resistance constant.
2
2 hrs
Resistor codes
Ohm’s Law
calculations
Lesson: resistor colour codes
Low value resistors often have their resistance value printed on them in numbers.
Higher value resistors are coded using coloured bands. The first three bands give the value
of the resistor in ohms. The fourth band is an accuracy rating in %.
Calculate values:
........ use to calculate R if V and I are known
........ use to calculate V if I and R are known
........ use to calculate I if V and R are know
Note: R - represents the resistance of a resistor in ohms ... [Ω].
V - represents the potential difference in volts ........ [V].
I - represents the current strength in amperes ........ [A].
3
2 hrs
Control devices Switches:
Manual switches controlled by the user e.g. push, SPST, SPDT, DPDT.
Diodes and LED or Light Emitting Diode:
A diode is a component that allows current to flow in one direction only.
A LED allows current to flow in one direction only and also gives off light and is often used
as an indicator that a circuit is „ON.‟
Transistors: Only npn-type will be used at this level.
A transistor is a device that can act as a switch and it can amplify a small current (e.g. from
a sensor) into a larger current.
Connect a simple transistor circuit.

34
4
2 hrs
Electronic systems
Sensors - important input devices:
LDR: Light Dependent Resistor - a component whose resistance decreases with light.
[dark - high resistance; bright light - low resistance].
Thermistor: A component whose resistance varies with temperature. Two types are made:
+t: resistance increases with increasing temperature.
-t: resistance decreases with increasing temperature.
Touch or Moisture Detector: a component that can be bridged using a „wet‟ finger, thus completing the circuit, indicating the touch.
Capacitors: A component which can store and then release electrical energy.
5
2 hrs
Practical work
Simple Electronic Circuits:
Learners draw, AND work in groups to assemble these simple electronic circuits:
LED, 470Ω resistor, switch, and 4,5V series battery
LDR, buzzer, 3V series battery
NPN transistor, buzzer or bell, thermistors, variable resistor, 1kΩ resistor, 6V series battery (or DC power supply)
6V series battery, LED, 470 Ω resistor, 1000 μF capacitor, switch.
Short Practical Assessment Task: “miniPAT” Innovation [70%]
PRACTICAL TASK: Electronic Systems Setting the scene Duration of this lesson is one 30 minute period. Systems where electrical and electronic systems are combined. This may be integrated with other aspects like structures, etc. Learners will not be expected to design an electronic circuit. They will assemble and connect the components of a given circuit and will design a suitable application for that circuit. The electronic circuit may contain sensor devices and/or use transistor(s). Scenario: Describe a situation where a given electronic circuit can be used to meet a need. Learners are given the task of building a given electronic circuit and finding an appropriate use for this circuit.
6
2 hrs
Investigate
Design
Investigate the situation and the nature of the need so that an appropriate circuit can be chosen to solve the problem, need or want given in the scenario. A given circuit must be incorporated into the design of a device that will use the electronics to address the problem, need or want. The design brief Each learner writes his/her suggestion for the design with specifications & constraints. Sketches Each learner draws the circuit diagram. Each learner produces a sketch in 3D showing the device that will use the electronic circuit. Teams meet and examine the individual suggestions to decide on a final solution.
7
2 hrs
Make
Plans: working drawings The learners produce plans for their device / model / prototype using 1st angle orthographic projection. The plans should include a 3D “assembly” drawing in exploded view showing how the model fits together. Each team member draws a working drawing of the design OR an aspect of the design. Make: device /prototype / working model The model must showcase a viable solution to the problem. It should be to
scale and neat, and show intelligent use of available materials.

35
8
2 hrs
Communicate
Team presentations: Each team is given 5 minutes to present their solution in the form of sketches, artistic impressions of the solution, working drawings / plans, costing, and their model.
9 2 hrs
Each learner compiles a record of his/her own individual contribution to the task. Th is should be reflected in each learner’s class workbook.
10 Summative assessment Test [30%]
Formal Assessment: Term 3: weighting: 10% of promotion mark MiniPAT: [70%] Summative mid-year examination: [30%] Total: 100%
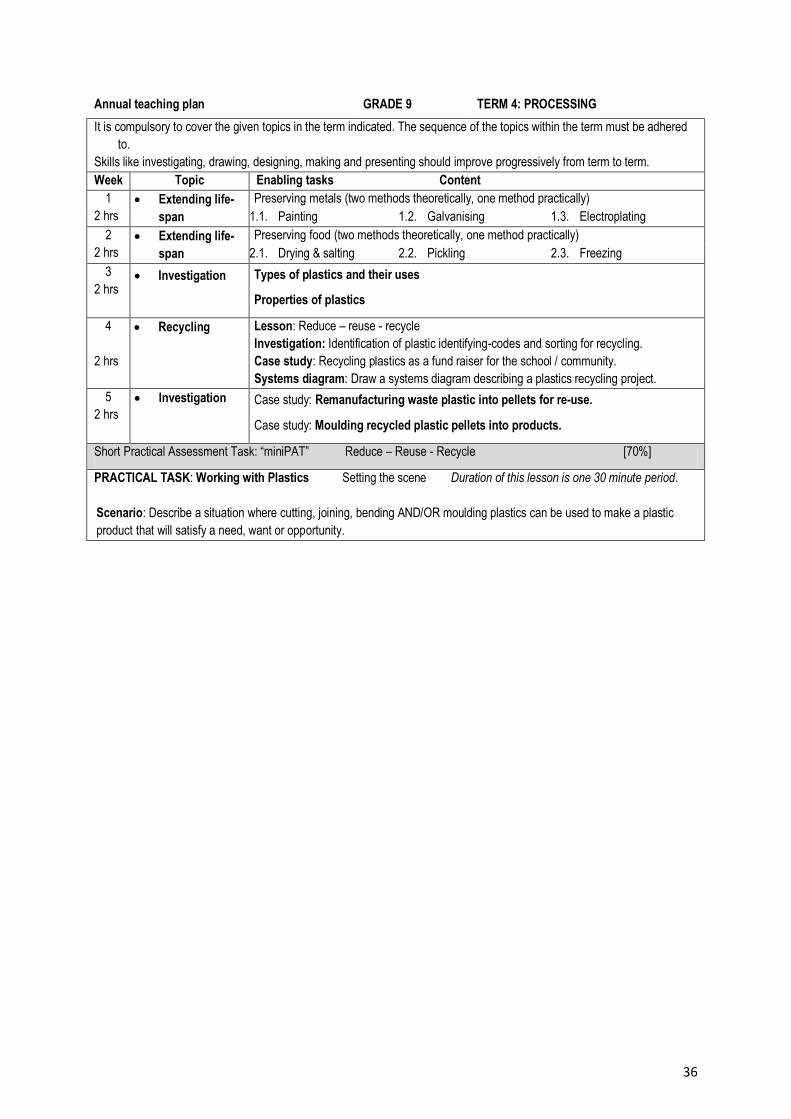
36
Annual teaching plan GRADE 9 TERM 4: PROCESSING
It is compulsory to cover the given topics in the term indicated. The sequence of the topics within the term must be adhered
to.
Skills like investigating, drawing, designing, making and presenting should improve progressively from term to term.
Week Topic Enabling tasks Content
1
2 hrs
Extending life-
span
Preserving metals (two methods theoretically, one method practically)
1.1. Painting 1.2. Galvanising 1.3. Electroplating
2
2 hrs
Extending life-
span
Preserving food (two methods theoretically, one method practically)
2.1. Drying & salting 2.2. Pickling 2.3. Freezing
3
2 hrs Investigation Types of plastics and their uses
Properties of plastics
4
2 hrs
Recycling Lesson: Reduce – reuse - recycle
Investigation: Identification of plastic identifying-codes and sorting for recycling.
Case study: Recycling plastics as a fund raiser for the school / community.
Systems diagram: Draw a systems diagram describing a plastics recycling project.
5
2 hrs
Investigation Case study: Remanufacturing waste plastic into pellets for re-use.
Case study: Moulding recycled plastic pellets into products.
Short Practical Assessment Task: “miniPAT” Reduce – Reuse - Recycle [70%]
PRACTICAL TASK: Working with Plastics Setting the scene Duration of this lesson is one 30 minute period.
Scenario: Describe a situation where cutting, joining, bending AND/OR moulding plastics can be used to make a plastic
product that will satisfy a need, want or opportunity.

37
6
2 hrs
Investigation Case study: Plastics used on modern motor cars.
Case study: Plastics used around the home.
Problem identification: Learners identify a need or want that can be satisfied by the
making of a plastic item of their own design.
7
2 hrs
Design
Make
Sketching: Learners sketch their plastic item using isometric projection on grid paper.
Plan: Learners draw their plastic item using 1st angle orthographic projection.
Skills development: Learners practise the skills needed to manufacture their plastic
item – measure, mark out, cut, bend and join. Moulding is an optional extra.
8
2 hrs
Make
Evaluate
Communicate
Practical sessions: Working safely, learners measure, mark out, cut and bend the materials
for their plastic item, and then assemble the product.
Evaluation: Learners write a critical evaluation of the products produced practically in
Weeks 1 & 2, and of their plastic item.
Class-work book: Each learner compiles a record of his/her term‟s work including
extending the life-span of metals and food, properties and uses of various plastics, the
plastics recycling strategy, the case studies, and the sketches and plans for the plastic
item.
9 Final exam Summative year-end examination covering knowledge, drawing skills, design issues, and
values covered during the Grade 9 year. Questions should be balanced across
Bloom‟s Taxonomy BUT with special emphasis on application of knowledge in a
problem-solving context, as this is the essence of this learning area.
N.B. Recall of knowledge without understanding is of little value in Technology.
10 Final exam
Formal Assessment: Term 4:
MiniPAT: [70%] Total: 70 x 1,43 = 100%
Summative year-end examination: 60% Weighting: 60% of promotion mark
Term 1 + Term 2 + Term 3 + Term 4 = 10 +10 +10 +10 = 40% plus Final Exam 60% = 100%
Grade 7,8 and 9 Formal Assessment: (4 Tasks) Term 1 Term 2 Term 3 Term 4 Promotion Mark
Formative 0%
MiniPAT 70%
TEST 30%
Formative 0%
MiniPAT 70%
TEST 30%
Formative 0%
MiniPAT 70%
TEST 30%
Formative 0%
MiniPAT 70%
70 x 1,43 = 100%
Year Mark: 40%
Fi Final exam: 60%
10 10 10 10 40 + 60 = 100
Total: 100%

38
SECTION 4
ASSESSMENT IN TECHNOLOGY
4. WHAT IS ASSESSMENT ?
Assessment measures individual learners‟ attainment of knowledge and skills in a subject.
The information obtained from this process should:
o inform learners about their strengths, weaknesses and progress,
o assist teachers, parents and other stakeholders in making decisions about the learning process
and the progress of learners.
Assessment should be both informal and formal. In both cases regular feedback should be provided to
learners to enhance the learning experience.
.
4.1 INFORMAL DAILY ASSESSMENT
The informal daily assessment tasks are the planned teaching and learning activities that take place in the
classroom or given as homework tasks. Learner progress should be monitored during learning activities.
This informal daily monitoring of progress can be done through questions and answers, short
activities/written work completed during the lesson, practical investigation activities and homework exercises
such as doing design sketches, practising communication skills, evaluating or comparing products, etc.
Informal daily assessment should not be seen as separate from the learning activities taking place in the
classroom.
Enabling tasks in technology are used to develop skills and knowledge that will be used during Mini-Practical
Assessment Tasks (Mini-PATs) and written test / examination that will be assessed formally.
Learners or teachers can mark the informal assessment activities. Self-assessment and peer assessment
actively involves learners in informal assessment. It gives learners additional exposure to the learning
materials and allows them to learn from and reflect on their own performance.
The results of the informal daily assessment activities are not formally recorded unless the teacher wishes to
do so. In such instances, a simple checklist or rating scale may be used to record this assessment. However,
teachers may use the learners‟ performance in these assessment tasks to provide verbal or written feedback
to learners, the school management team and parents. This is particularly important if barriers to learning or
poor levels of participation are encountered.
The results of the informal daily assessment activities are not taken into account for promotion.
4.2 FORMAL ASSESSMENT
The teacher must plan and submit the annual formal programme of assessment to the school management
team (SMT) before the start of the school year. This will be used to draw up a school assessment plan in
each grade. The school assessment plan should be provided to learners and parents during the first week of
the first term.
Formal assessment provides teachers with a systematic way of evaluating how well learners are progressing
in a grade and in a particular subject.
Formal assessment for Technology will consist of mini-PATs and written tests or examinations.
All formal assessment for Grades 7, 8 and 9 will be school based and set internally.
The end-of-year promotion mark will comprise of 40% CASS and 60% end-of-year examination.

39
4.2.1 Formal Assessment Programme in Technology:
INF
OR
MA
L D
AIL
Y
AS
SE
SS
ME
NT
0%
FORMAL ASSESSMENT: TERM MARKS
Practical tasks & theory test / examination TOTAL
Mini-PATs Term test / examination Term mark
Term 1 70% 30% 100%
Term 2 70% 30% 100%
Term 3 70% 30% 100%
Term 4 70% No test 70 x 1.43 = 100%
Promotion mark
CONTINUOUS ASSESSMENT (CASS) FINAL EXAMINATION Promotion
Term1 + Term 2 + Term 3 + Term 4 Term 4
10 + 10 + 10 + 10 40% 60% 100%
This format means that the practical aspect of the subject forms a significant part of the term mark.
4.2.2 Mini-Practical Assessment Task
As the name suggests, the mini-Practical Assessment Task is designed to give learners the opportunity to
develop and demonstrate their levels of ability (i.e. capability) as they progress through the task‟s activities.
These tasks are structured according to the design process:
Investigate – Design – Make – Evaluate – Communicate. This is not always a LINEAR process.
Formal assessment in a mini-PAT does not need to cover all aspects of the design process each term.
The table below provides a guide for the Mini–PAT per term:
TERM 1 TERM 2 TERM 3 TERM 4
GRADE 7
o Mini-PAT:
Design + Make
o Mini-PAT:
Investigate + Design +
Make
o Mini-PAT
Investigate + Design +
Make + Evaluate +
Communicate
o Mini-PAT:
Design + Make
GRADE 8
o Mini-PAT:
Communicate + Design
+ Make
o Mini-PAT:
Investigate+ Design +
Make
o Mini-PAT
Investigate + Design +
Make + Evaluate +
Communicate
o Mini-PAT:
Design + Make
GRADE 9
o Mini-PAT:
Communicate + Design
+ Make
o Mini-PAT:
Investigate + Design +
Make
o Mini-PAT
Investigate + Design +
Make + Evaluate +
Communicate
o Mini-PAT
Design + Make
A learner must present the full design process once as a mini-PAT in each grade.
The most effective tool used to assess learner performance in a mini–PAT is the analytical rubric. *
Resources for the mini-PATs are the responsibility of the school.
Learners must complete the mini-PATs for formal assessment under teacher supervision.
Teachers will assess the mini-PATs formally.
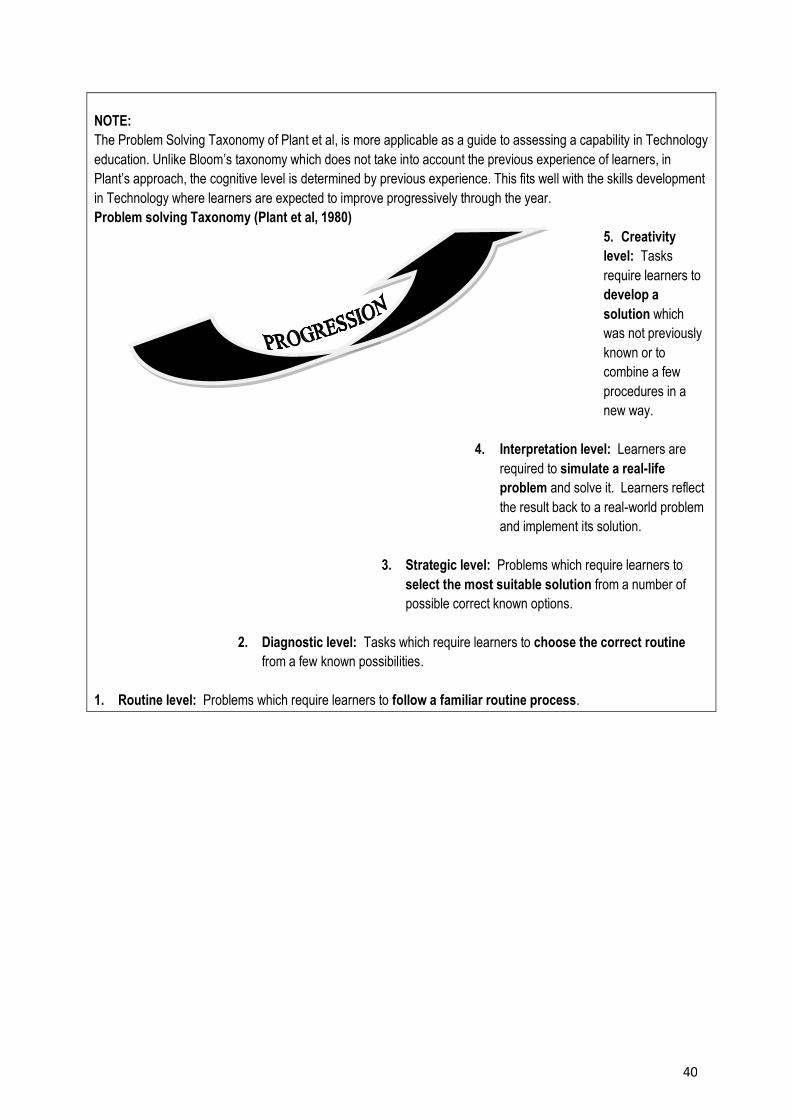
40
NOTE:
The Problem Solving Taxonomy of Plant et al, is more applicable as a guide to assessing a capability in Technology
education. Unlike Bloom‟s taxonomy which does not take into account the previous experience of learners, in
Plant‟s approach, the cognitive level is determined by previous experience. This fits well with the skills development
in Technology where learners are expected to improve progressively through the year.
Problem solving Taxonomy (Plant et al, 1980)
5. Creativity
level: Tasks
require learners to
develop a
solution which
was not previously
known or to
combine a few
procedures in a
new way.
4. Interpretation level: Learners are
required to simulate a real-life
problem and solve it. Learners reflect
the result back to a real-world problem
and implement its solution.
3. Strategic level: Problems which require learners to
select the most suitable solution from a number of
possible correct known options.
2. Diagnostic level: Tasks which require learners to choose the correct routine
from a few known possibilities.
1. Routine level: Problems which require learners to follow a familiar routine process.

41
* AN EXAMPLE OF AN ANALYTICAL RUBRIC TO ASSESS DESIGN CAPABILITY IN A Mini-PAT:
The learner is able to:
LEVELS OF COMPETENCE
EXEMPLARY
COMPETENT
DEVELOPING ,
BUT NOT YET
MASTERING
PROGRESSING
5 4 3 2 1
Generate and
develop design
ideas
Using drawings
reflectively to
generate new
ideas
Progression of
ideas across or
within drawings
Design ideas are
generated but not
developed
Simple sketch
showing object to
be made
Drawing a picture
not designing a
product
Explore the
possibilities of
the problem /
need
Combining novel
solutions to
produce
innovative design
Using drawings to
develop novel
design solution/s
Recording
possible creative
solution/s to the
task
Stereotypical
response,
showing little
creative thought
Design
possibilities are
not addressed in
the drawing
Address the
constraints of
the problem /
need
Task constraints
treated as part of
iterative process
Task constraints
considered as the
design proceeds
Records way to
address task & /or
client needs and
wants
Drawings shows
some
understanding of
task constraints
Minimal
understanding of
task / user needs
Plan the look of
the product
Ideas about
finishing are
developed within
overall designing
Ideas about
finishing are
added to design
whilst drawing
Overall
decoration
scheme
considered
Little
consideration of
final appearance
of product
Appearance of
the product is not
considered
Communicate
design ideas
Clear enough for
somebody else to
make the product
Conveys sense of
the object to be
made e.g.
working diagram
Conveys some
sense of the
object to be
made: e.g.
indicates
materials
Simple unlabelled
sketch (es) ;
relying on shared
meanings
Use of narrative
or other drawing
genre
Plan
construction
Constructional
issues considered
on route to final
design
Drawing
demonstrates
consideration of
construction
Drawing indicates
some
consideration of
construction
Minimal
consideration of
construction
whilst drawing
Not planning to
make the object
drawn
Evaluate whilst
drawing
Changes made a
result of
considering
design drawings
Decisions made
about product
whilst drawing
Considered and
rejected a range
of ideas
Minimal
evaluation at
drawing phase
Yet to define the
design task
Provide a basis
for making
Using drawings
as a resource
during making
Clear
development path
through drawing
into making
Object is one of
the ideas drawn
Product relates to
ideas recorded in
the drawing
Making and object
seen as separate
new activity
Comments to improve the learners performance in design capability:
40

42
4.2.3 Tests
A test for formal assessment should cover a substantial number of skills and content and should be set as
follows:
Grade 7: 45 minutes Grade 8 & 9: 60 minutes
The mark for tests is not prescribed but should be determined by the teacher taking into account the volume
of the content covered and the time available.
Testing in Technology will be limited to ONE test each term. This may take place either just before or just
after the mini-PAT.
Term 1: Term 2: Term 3: Term 4:
30% of term mark 30% of term mark 30% of term mark Final Examination:
60% of final promotion mark
4.2.4 Examinations
All examinations must include questions that integrate knowledge and values with design process skills.
In Technology the final end of year exam comprises 60% of the learners promotion mark and should be set
out as follows:
Grade Time allocation Mark weighting
Grade 7 60 minutes 70 marks
Grade 8 90 minutes 100 marks
Grade 9 120 minutes 100 marks
Cognitive level weighting for end of year examination: Grade 7-9
KNOWLEDGE UNDERSTANDING APPLICATION ANALYSE SYNTHESISE EVALUATE
Low order Middle order High order
30% 40% 30%
Content weighting for end of year examination: Grade 7-9
Design process skills:
(investigate, design, make,
evaluate and
communicate)
Knowledge:
(structures, processing, mechanical and
electrical / electronic systems and
control
Values and attitudes:
(technology, society and the
environment)
50% 30% 20%
4.2.5 Content to be assessed for the end-of-the-year examinations
The content assessed at the end of the year is based on the year‟s work covered for the specific grade.
However, prior knowledge from a previous grade may be necessary to interpret and answer some of the
questions in the higher grade.
4.2.6 Type of questions for written test
The value of memorising by rote learning has little weight in a subject requiring innovation, creativity and
problem solving skills. The ability to think laterally and to develop original and appropriate solutions is a
key element in learning Technology.
Learners should be able to investigate using a variety of sources, to demonstrate their ability to draw in a
specific style, to write a design brief, to give specifications & constraints, to select appropriate materials for a

43
model, to plan the sequence of manufacture of a product, to evaluate a design objectively, to analyse a
system using system diagrams and to communicate their solutions using a range of techniques.
Questions that integrate knowledge, skills and value have more value in Technology than a mere recall of
knowledge or facts.
4.2.7 The use of case studies
Case studies are used to bring reality into the classroom.
The intention should be to show learners that Technology is a subject that is close to the way the world
works.
Case studies can be used both to develop and to assess a technological skill (drawing for example),
knowledge concepts, and values.
4.2.8 Moderation of assessment
All Grade 7-9 tasks for formal assessment are internally set and moderated.
The subject head for Technology or Head of Department at the school will manage this process.
A teacher must keep all formal assessment tasks, assessment instruments and record sheets on file.
4.2.9 Recording
Recording is a process in which the teacher documents the level of a learner‟s performance.
Teachers record the actual raw score marks against the task using a record sheet. **
Records of learner performance should also be used to verify the progress made by teachers and learners in
the teaching and learning process. Records should be used to monitor learning and to plan ahead.
4.2.10 Reporting
Reporting is a process of communicating learner performance to learners, parents, schools, districts and
other stakeholders.
In Grades R – 12, teachers report in percentages against the subject, using the following scale:
Codes and percentages for reporting in Grades R – 12
RATING
CODE DESCRIPTION OF COMPETENCE PERCENTAGE
7 Outstanding achievement 80 – 100
6 Meritorious achievement 70 –79
5 Substantial achievement 60 – 69
4 Adequate achievement 50 – 59
3 Moderate achievement 40 – 49
2 Elementary achievement 30 – 39
1 Not achieved 0 – 29
Schools should provide feedback to parents on the programme of assessment using a formal report card
once a quarter. The schedule and the report card should indicate the overall level of performance of a
learner.
4.2.11 Barriers to learning and assessing
Although there are many barriers to learning, teachers need to identify and build on strengths of learners in
order to affirm their uniqueness. All learners need to experience success.
Alternative strategies must be applied; more time, enlarged text, use of information communication
technology, amanuensis or scribes in cases of learners with special educational needs.

44
The use of alternative assessment relates to the change in the form of assessment used to accommodate all
learners.
Learners personal involvement with tasks often improves their attention span, patience, persistence and
commitment.
Designing and making real products that can be used, will give learners a sense of achievement and improve
their self-esteem.
The following strategies, depending on the physical barriers of the learners, could apply when supporting:
o use the support of others to help pupils take part safely in practical work, for example, the assistance of
adults or other learners to help them to hold or manipulate tools, or to carry out activities according to
instructions is important that the learners should retain control of the making process and be the
decision makers
o learners can describe their design ideas for others to record or to translate into a drawing, whilst
retaining control of the design idea and the modifications
o work on shorter, more focused tasks, rather than longer, open tasks, will provide learners with
incremental elements of success, and regular motivation and reward
o use ICT applications, such as specialist software, to help sequencing and following instructions during
practical work
o use modelling, role play, tape recorders, video and photographs to communicate, develop and record
their ideas
o communicate using a range of methods avoiding over-reliance on the written word
** Sample recording sheet template;

SURNAM
E AND
NAMES
Mini-Practical Assessment Task (Mini- PAT) Term 1, 2, 3 Term TEST
EXAM
TERM
MARK
100%
Formal Assessment
Act
1
Act
2
Act
3
Act
4
Act
5
Act
6
Act
7
Act
8
Act
9
Act
10
B
ook
mar
k
To
tal
70%
Exa
m
30%
Description of Activity
1
2
3
4
5
6
7
8
9
10
11
12
13
14
15
16
17
18
19
20
Teacher: Name: ____________________ Signature: _____________________ Date: ___________________
Academic Head: Name: ______________________ Signature: ______________________ Date: ___________________

SURNAME
AND
NAMES
Mini-Practical Assessment Task (Mini-PAT) Term 4 Year-end EXAM
PROMOTION
MARK
100%
Formal Assessment
Act
1
Act
2
Act
3
Act
4
Act
5
Act
6
Act
7
Act
8
Act
9
Act
10
To
tal
70%
X 1
,43
Ter
m1:
10
Ter
m2:
10
Ter
m 3
: 10
Ter
m 4
: 10
TO
TA
L: 4
0
Exa
m: 6
0
Description of Activity
1
2
3
4
5
6
7
8
9
10
11
12
13
14
15
16
17
18
19
20
Teacher: Name: ____________________ Signature: _____________________ Date: ___________________
Academic Head: Name: _________________________ Signature: ______________________ Date: ___________________

APPENDIX C: TOOLS FOR TECHNOLOGY
Sophisticated high-tech equipment is not needed to reach the aims of the Technology Subject.
Simple tools and cheap materials are all that will be required for this syllabus.
Learners should be encouraged to manage with minimal supply levels as this develops problem solving, lateral
thinking and creativity.
In GET, learners will require mainly scissors, craft knife, rulers, pliers, hammer, hand drill, junior hacksaw, coping
saw, and simple materials like sticky tape, cardboard, foam plastic, and found materials.
Here is an illustrated list of the tools you may want to acquire for your Technology centre over a period of time.
Scissors
Craft Knife Hacksaw
Tenon Saw
Claw Hammer File
Long Nose Pliers
Chisel Tape Measure
Combination Square
G-Clamp Vice
Drawing Aids
Screw Drivers Vice Grip

48
Tin Snips [Metal Shears]
Hand Plane Drill Bits
Adjustable Wrench
Staple Gun Safety Goggles
Coping Saw Electric Glue Gun
Hand Drill
Wire Stripper
Soldering Iron Hand Brace
THE FOLLOWING POWER TOOLS ARE NOT REQUIRED, BUT ARE “NICE-TO-HAVES”
Electric Drill
Electric Jig Saw
Disc / Belt Sander
Electric Systems: Insulated electrical wire, torch cells, torch bulbs, crocodile clips, switches (push, SPST, SPDT,
and DPDT), resistors, rheostat (variable resistors), voltmeter, and ammeter.
Electronic Systems: Diode, LEDs (various colours), light dependent resistor, thermistor, touch or moisture
sensor, npn transistor, capacitor (polarised & unpolarised), buzzer/bell, 470 ohm resistor,
solder, soldering iron, desoldering pump.
Precise descriptions will be given in the textbooks according to the tasks planned by different authors.
The following pages give details of tools and materials that could by found in very well-equipped Technology
centres. Many of them will not be used by untrained teachers and should NOT be bought unless the task
warrants it. Schools are encouraged to develop the subject to levels that have high expectations of their
learners.
However, do not budget for items that cannot be justified by the curriculum.

49
TOOLS FOR DIFFERENT APPLICATIONS IN TECHNOLOGY
Solving problems in real life situations requires using a wide range of materials and many tools to process them. Here follows a list of possible applications and the tools needed to work on them.
ADHESIVES
TYPE PURPOSES PROPERTIES SETTING
TIMES BRAND
NAMES SOLVENTS
Clear cellulose adhesive
Wood, cork, leather, PVC
Waterproof, heat resistant, flammable
10-20 minutes
Bostik, Pattex, etc
Thinners, acetone
Contact Adhesives
Wood, hardboard plastic, metal
Heat resistant and waterproof, flammable
5 minutes Pattex, Alcolin, etc
Thinners
Cyanoacrylic “Superglue”
Plastic, glass, ceramics
Fairly strong but brittle, fails due to vibrations
Instant Bostik, etc Acetone
Epoxy resins Wood, metal, glass, plastic
Very strong, heat resistant, waterproof
20 minutes to 24 hours
Pratley Putty etc
None once set
PVA Wood, paper, card, hardboard
Strong but not heatproof nor waterproof
20 – 60 minutes Alcolin, Pattex, Ponal, etc
Water - before fully dry
Homemade Flour paste
Paper, papier-mâché
Cheap, suitable for purpose
30 - 60 minutes - Water
WORKING WITH PAPER & CARD
Pencils: H and HB grades are the most useful Crayons: Wax and pencil crayons – choose according to need Felt-tipped pens: Felt or nylon tips give clear permanent colours Felt-tipped markers: Large bullet or chisel pointed markers, with a limited colour range Erasers: Medium grade advised Paints: Water based – range from watercolours, poster paints, and acrylics
Enamel – have a varnish base giving hard, glossy finish
Cellulose – aerosol cans are available in most hardware stores
Primers and undercoats – most bare surfaces need priming before applying the top coat
Varnishes – these give a clear protective coating to paintwork
Spirit-based varnishes dry quickly
Polyurethane varnishes give a tougher finishes, but dry slowly
Brushes: Brushes made from man-made fibres are cheaper and adequate for school purposes
Small, pointed brushes are needed for fine detail; broader brushes are used for larger
surfaces
All brushes should be cleaned immediately after use using the same thinning medium as
used for the paint Stencils & transfers: Used for lettering or applying pre-designed patterns
Craft knives: A range of knives is available, from carpet knives to scalpels
For safety, choose a size to suit the level of the learners, and be sure that the blade is
retractable for safety reasons
Safety rulers: These steel rules provide protection for fingers when cutting sheets of paper, cardboard or
carpet using a craft knife Rulers: For measurement only – flat steel rulers and plastic rulers may not be used to guide a craft
knife when cutting Finding angles: Use setsquares or a protractor to mark out angles Drawing circles: Use drawing compasses or use a circular shape as a stencil

50
- -
+ +
M
VVOLTS
Appendix D: Electrical Component Symbols: Grade 7, 8 & 9
Name Picture Symbol Use
Electrochemical cell Input device: source of energy
Series battery Input device: source of more energy
Parallel battery
Input device: source of energy for longer
Push switch Control device: Used to temporarily close a circuit – like ringing a door bell
SPST switch (Single Pole Single Throw)
Control device: opens or closes a circuit
Lamp / light bulb Output device: lights up when current heats it
Resistor Process device that restricts the flow of an electric current
Electrical Component Symbols: Grade 8 & 9
SPDT switch (Single Pole Double Throw)
Control device: diverts current down either one of two possible paths [an OR Logic Gate]
DPDT switch (Double Pole Double Throw)
Control device: diverts current down either one of two possible paths [an OR Logic Gate]
Variable resistor (rheostat)
Stove plate switch: High-Low Light dimmer switch Volume knob on FM Radio Heat setting on a steam iron
Adjustable process device: to restrict the electric current e.g. stove switch
Bell and
buzzer
Output device: vibrates to give off sound when current passes through it – useful as an alarm.
Motor Output device: motor turns converting electric energy into kinetic energy.
Voltmeter (Connect in PARALLEL)
Output device: meter responds to potential difference

51
+ -
emitter
base
collector
BC
108
YE
LL
OW
VIO
LE
T
BR
OW
N
RE
D
4 7 0
470W
2%
i.e.
AAMPS
Ammeter (Connect in SERIES)
Output device: meter responds to current
Electronic Component Symbols: Grade 9
Name Picture Symbol Use
Diode
+ -
Control device: allows current to flow in one direction only
LED Light Emitting Diode
+ -
Control device: allows current to flow in one direction only, and emits light
LDR Light Dependent
Resistor
Sensor: Detects light Resistance decreases in bright light
Thermistor +t OR -t
Sensor: detects heat +t: hotter = more resistance -t: hotter = less resistance
Touch or Moisture detector
Sensor: detects moisture
Transistor npn
b
c
e
Control device: can act as a switch can act as an amplifier
Capacitor Polarised
+ -
Control device: can store and release energy must be connected + to +
Capacitor Unpolarised
Control device: Can store and release energy
RESISTOR COLOUR CODES
The first three bands give the value of the resistor in ohms [ Ω ]. The fourth band is an accuracy rating % Most expensive & most accurate = RED Medium expensive & accurate = GOLD Least expensive & accurate = SILVER RED – the resistor is within 2% of the coded accuracy value GOLD – the resistor is within 5% SILVER – the resistor is within 10%
COLOUR 1 2 ZEROS
BLACK 0 0
BROWN 1 1 0
RED 2 2 0 0
ORANGE 3 3 0 0 0
YELLOW 4 4 0 0 0 0
GREEN 5 5 0 0 0 0 0
BLUE 6 6 0 0 0 0 0 0
VIOLET 7 7 0 0 0 0 0 0 0
GREY 8 8 0 0 0 0 0 0 0 0
WHITE 9 9 0 0 0 0 0 0 0 0 0
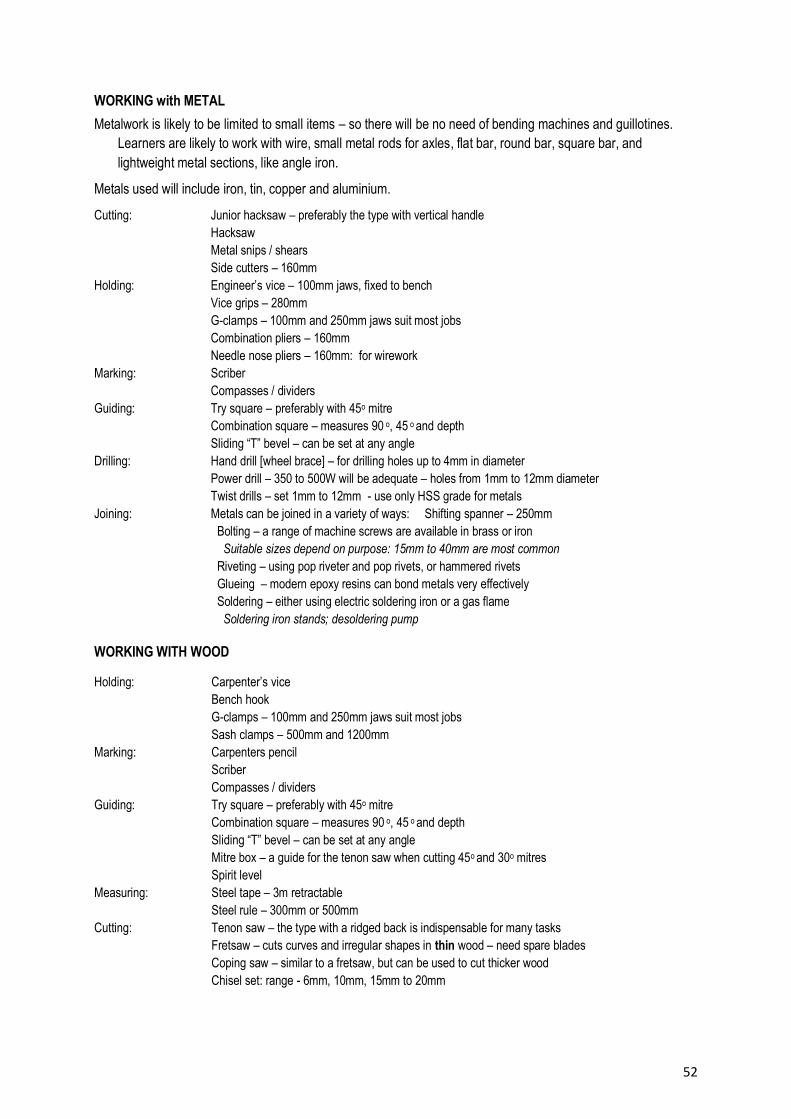
52
WORKING with METAL
Metalwork is likely to be limited to small items – so there will be no need of bending machines and guillotines.
Learners are likely to work with wire, small metal rods for axles, flat bar, round bar, square bar, and
lightweight metal sections, like angle iron.
Metals used will include iron, tin, copper and aluminium.
Cutting: Junior hacksaw – preferably the type with vertical handle
Hacksaw
Metal snips / shears
Side cutters – 160mm
Holding: Engineer‟s vice – 100mm jaws, fixed to bench
Vice grips – 280mm
G-clamps – 100mm and 250mm jaws suit most jobs
Combination pliers – 160mm
Needle nose pliers – 160mm: for wirework
Marking: Scriber
Compasses / dividers
Guiding: Try square – preferably with 45o mitre
Combination square – measures 90 o, 45 o and depth
Sliding “T” bevel – can be set at any angle
Drilling: Hand drill [wheel brace] – for drilling holes up to 4mm in diameter
Power drill – 350 to 500W will be adequate – holes from 1mm to 12mm diameter
Twist drills – set 1mm to 12mm - use only HSS grade for metals
Joining: Metals can be joined in a variety of ways: Shifting spanner – 250mm
Bolting – a range of machine screws are available in brass or iron
Suitable sizes depend on purpose: 15mm to 40mm are most common
Riveting – using pop riveter and pop rivets, or hammered rivets
Glueing – modern epoxy resins can bond metals very effectively
Soldering – either using electric soldering iron or a gas flame
Soldering iron stands; desoldering pump
WORKING WITH WOOD
Holding: Carpenter‟s vice
Bench hook
G-clamps – 100mm and 250mm jaws suit most jobs
Sash clamps – 500mm and 1200mm
Marking: Carpenters pencil
Scriber
Compasses / dividers
Guiding: Try square – preferably with 45o mitre
Combination square – measures 90 o, 45 o and depth
Sliding “T” bevel – can be set at any angle
Mitre box – a guide for the tenon saw when cutting 45o and 30o mitres
Spirit level
Measuring: Steel tape – 3m retractable
Steel rule – 300mm or 500mm
Cutting: Tenon saw – the type with a ridged back is indispensable for many tasks
Fretsaw – cuts curves and irregular shapes in thin wood – need spare blades
Coping saw – similar to a fretsaw, but can be used to cut thicker wood
Chisel set: range - 6mm, 10mm, 15mm to 20mm
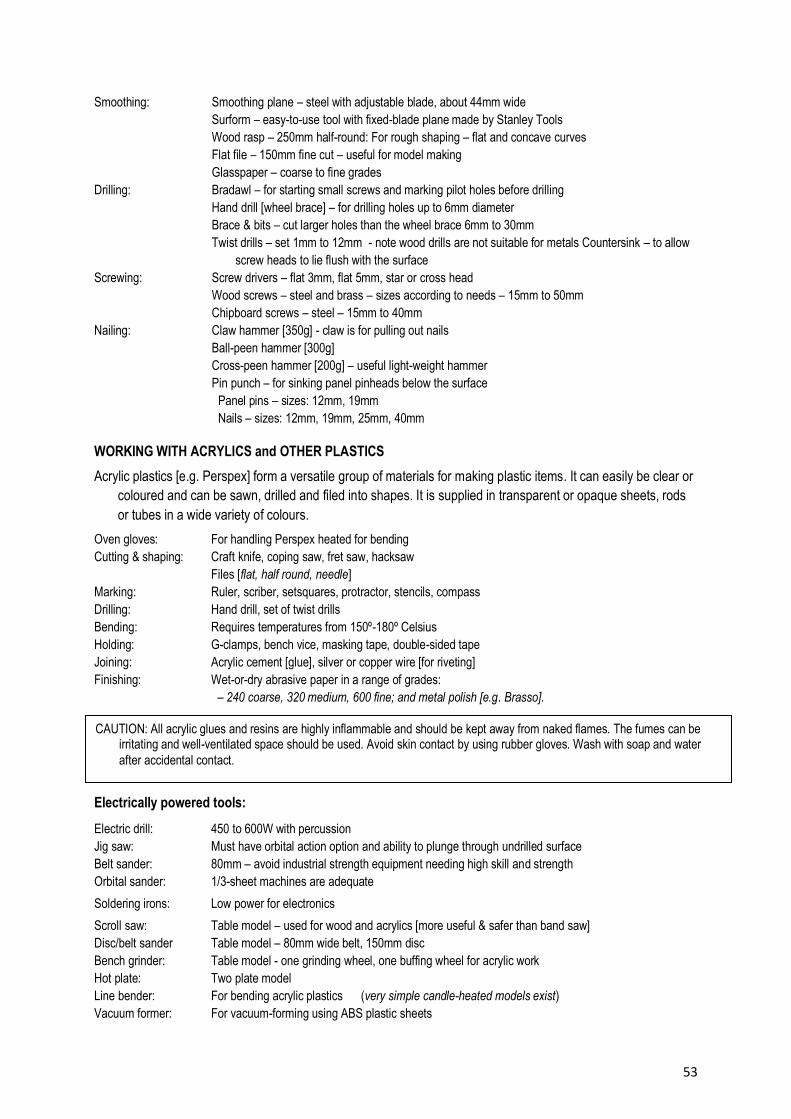
53
Smoothing: Smoothing plane – steel with adjustable blade, about 44mm wide
Surform – easy-to-use tool with fixed-blade plane made by Stanley Tools
Wood rasp – 250mm half-round: For rough shaping – flat and concave curves
Flat file – 150mm fine cut – useful for model making
Glasspaper – coarse to fine grades
Drilling: Bradawl – for starting small screws and marking pilot holes before drilling
Hand drill [wheel brace] – for drilling holes up to 6mm diameter
Brace & bits – cut larger holes than the wheel brace 6mm to 30mm
Twist drills – set 1mm to 12mm - note wood drills are not suitable for metals Countersink – to allow
screw heads to lie flush with the surface
Screwing: Screw drivers – flat 3mm, flat 5mm, star or cross head
Wood screws – steel and brass – sizes according to needs – 15mm to 50mm
Chipboard screws – steel – 15mm to 40mm
Nailing: Claw hammer [350g] - claw is for pulling out nails
Ball-peen hammer [300g]
Cross-peen hammer [200g] – useful light-weight hammer
Pin punch – for sinking panel pinheads below the surface
Panel pins – sizes: 12mm, 19mm
Nails – sizes: 12mm, 19mm, 25mm, 40mm
WORKING WITH ACRYLICS and OTHER PLASTICS
Acrylic plastics [e.g. Perspex] form a versatile group of materials for making plastic items. It can easily be clear or
coloured and can be sawn, drilled and filed into shapes. It is supplied in transparent or opaque sheets, rods
or tubes in a wide variety of colours.
Oven gloves: For handling Perspex heated for bending
Cutting & shaping: Craft knife, coping saw, fret saw, hacksaw
Files [flat, half round, needle]
Marking: Ruler, scriber, setsquares, protractor, stencils, compass
Drilling: Hand drill, set of twist drills
Bending: Requires temperatures from 150º-180º Celsius
Holding: G-clamps, bench vice, masking tape, double-sided tape
Joining: Acrylic cement [glue], silver or copper wire [for riveting]
Finishing: Wet-or-dry abrasive paper in a range of grades:
– 240 coarse, 320 medium, 600 fine; and metal polish [e.g. Brasso].
Electrically powered tools:
Electric drill: 450 to 600W with percussion
Jig saw: Must have orbital action option and ability to plunge through undrilled surface
Belt sander: 80mm – avoid industrial strength equipment needing high skill and strength
Orbital sander: 1/3-sheet machines are adequate
Soldering irons: Low power for electronics
Scroll saw: Table model – used for wood and acrylics [more useful & safer than band saw]
Disc/belt sander Table model – 80mm wide belt, 150mm disc
Bench grinder: Table model - one grinding wheel, one buffing wheel for acrylic work
Hot plate: Two plate model
Line bender: For bending acrylic plastics (very simple candle-heated models exist)
Vacuum former: For vacuum-forming using ABS plastic sheets
CAUTION: All acrylic glues and resins are highly inflammable and should be kept away from naked flames. The fumes can be irritating and well-ventilated space should be used. Avoid skin contact by using rubber gloves. Wash with soap and water
after accidental contact.

54
APPENDIX D: Technology Subject Glossary.
This is an alphabetical list of key terms used in the Technology subject
Aesthetics
Characteristics of a product or system that makes it look beautiful and attractive.
Artefact
A manufactured object.
Anthropometrics
Measurements of people‟s shapes and sizes. Such measurements are usually taken when products are designed
for human use e.g. furniture, eating utensils, hairdryers, sporting equipment cars, clothing, etc
Biases
People‟s preconceived ideas or prejudices about some things or people before they actually meet or deal with
them. These are normally in areas of human rights and inclusitivity such as gender, race, ethics, religion, etc.
For example most cameras are biased towards right handed people, very few women enter the mechanical
engineering industry in South Africa, etc.
Biophysical environment
The land, air, water around us, it is also the space in which we find ourselves.
Compression
A squeezing force.
Constraints
Aspects that limit conditions within which the work or solution must be developed e.g. time, materials, tools,
human resource, cost, etc.
Control
The means by which systems are regulated, i.e. an adjustment of the process, which makes the actual result
conform more closely to the desired result.
Conventions
Ways of showing information on designs or working drawings that are understood and recognized to have
specific meaning.
Criteria
Statements of a particular standard or requirement that a solution must satisfy.
Data
Raw facts and figures (statistics, rainfall figures, temperature readings, etc). Data may be processed into
information.
Design (noun)
The plan, sketch, model, drawing, etc. that outlines or shows the intention of the proposed solution.
Design brief
A short and clear statement that gives the general outline of the problem to be solved as well as the purpose of
the proposed solutions.
Design process
It is a creative and interactive approach used to develop solutions to identified problems or human needs. This is
one of the technological processes. Its associated skills are investigation, design (development of initial
ideas), make, evaluation and communication. The Design Process can be explained as follows:

55
• Investigate
Investigating a situation to gain information is an important starting point for Technology. Research or finding of
information mainly takes place here. Learners gather data and information, grasp concepts and gain insight,
find out about new techniques, etc. Some skills needed for investigating are information accessing and
processing skills, recording, identifying, predicting, comparing, observing, classifying, interpreting, collating, etc.
Design (verb)
Once a problem is fully understood, the design brief needs to be written. Possible solutions should then be
generated. These ideas may be drawn on paper. The first idea may not necessarily be the best; so several
different solutions are desirable. This part of the design process requires awareness and the knowledge and
skills associated with graphics, such as the use of colour, rendering techniques, 2D and 3D drawings, etc.
These in essence include abilities in planning, sketching, drawing, calculating, modelling, and managing
resources. Once possible solutions are available, a decision must be made. The chosen solution will be the one
that best satisfies the specifications. It is expected that learners justify choices made. At this point final
drawings/sketches (working drawings) of the chosen solution should be prepared. They should contain all the
details needed for making the product or system. These include instructions, dimensions, annotated notes, etc.
Testing, simulating or modelling the solutions before final manufacture is done here.
2D – two-dimensional – a flat drawing, in which only two principle dimensions (measurements) are visible (e.g.
length and height,).
3D- three-dimensional – a pictorial drawing. A drawing in which the three principle dimensions are visible, also the
three principle faces are visible in the one drawing.
• Make (verb)
This aspect provides opportunities for learners to use tools, equipment and materials to develop a solution to the
identified problem, need or opportunity. It involves building, testing and modifying the product or system to
satisfy the specifications of the solution (design specification). Learners will cut, join, shape, finish, form,
combine, assemble, measure, mark, separate, mix, etc. should be according to the design although
modifications are also desirable. Making must always be undertaken in a safe and healthy atmosphere and
manner.
• Evaluate
Learners need to evaluate their actions, decisions and results through the technological processes. Learners
need to evaluate the solutions and the process followed to arrive at the solutions. They should be able to
suggest changes or improvements where necessary. Some evaluation should be done against criteria (e.g.
constraints) that may be given or self-generated. This stage requires the use of probing questions, fair test,
analysis, etc.
• Communicate
In this aspect the assessment evidence of the processes follow any given project, i.e. the ability to analyse,
investigate, plan, design, draw, evaluate and communicate. This could be done in various modes like oral,
written, graphic or electronic presentation. A record of the processes from conception to realization of the
solution (i.e. investigating to communicating solutions) should be kept in the form of a project portfolio.
Ergonomics
Features of a product or system that makes it user-friendly.
Findings
Things that have been discovered after a process of investigation or research.
Forming
Changing a material‟s shape without cutting it.
Input
56
The command/information entered into a system.
Information
Data that has been processed (recorded, classified, calculated, stored, etc). Knowledge is gained when different
kinds of information are compared and conclusions are drawn.
Isometric
A 3D drawing where the lines of sight are set at 30 degrees.
Machine
A device made up of a combination of simple mechanisms linked so as to form a system for the purpose of doing
work.
Materials
Physical substances used in technology, e.g. wood, textiles, fabric, plastic, food, etc.
Mechanical advantage
A concept that describes how much easier mechanisms or machines can make a particular task. The amount of
work done is the same, and the amount of energy expended is the same, but the effort used (force) is less
because it is applied over a greater distance.
Mechanism
Parts that can turn one kind of force into another and give mechanical advantage or a distance advantage.
Mechanisms can be combined to form a machine. The basic mechanisms are the lever and the wedge /
inclined plane / screw. Cams/cranks and pulleys/gears are adaptations of the wheel & axle – which is itself a
special case of the first class lever.
Mode
A way or manner in which a thing is done.
Modelling
The testing of a solution, (product or system). This could include using small replicas (scale models), and
intangible representations of the solution (mathematical models, computer models, etc).
Need
A necessity for basic function e.g. food is a need.
Oblique
A 3D drawing where the lines of sight are set at 45 degrees.
Opportunity
The chance to do something about a need or a want.
Orthographic
A type of 2D drawing. It usually shows three separate views of the same object (e.g. front, top and left views).
Output
The actual result obtained from a system.
Perspective
A 3D drawing in which the lines of sight converge on the horizon.
Product
The physical / tangible artefact that results from the process (model, poster, chart, etc).
Portfolio
A systematic and organised collection of a learner‟s work. It includes findings, successful and unsuccessful ideas,
notes on the process that was followed in developing solutions, data, pictures, drawings, etc.
Preserving
A process that prolongs the natural life of a product.
Process
The part of a system that combines resources to produce an output that is in response to input.

57
Problem
Something that leads to a need or want and that can give rise to an opportunity.
Pulley
A wheel with a groove on its circumference. It is used to transmit movement and is used with a belt.
Recycle
To reuse all or part of a substance, including breaking it down to raw material status.
Recyclable
A material that can be recycled.
Safety
The way that a person works with tools, materials and equipment that does not harm themselves or others
physically.
Science
The study and description of natural phenomena.
Shaping
A process used to change the shape or contour of materials – shaping always involves the removal or addition of
material.
Specification
An organized, detailed description of the requirements/criteria that the solution or product must meet, e.g. safety,
size, material, function, human rights, environment, etc.
Structure
Something that has been built, made or been put together in a particular way.
System
Something that is made up of interlinked parts that function together as a whole to accomplish a goal. For
example a mechanical system has a combination of mechanisms that make it function as a whole; an
electrical system has interrelated electrical parts that work together to make the system do what it was
designed to do.
Technological capability
The ability to use a combination of skills, knowledge, resources in a variety of contexts, to solve a technological
problem. Capability leads to technological literacy.
Technological solution
A plan that arises by using a systematic problem solving process (ideas, flowcharts, models, etc).
Technological literacy
The ability to use, understands, manage, and assess technology.
Technological processes –
Creative human activities of developing technological solutions in order to satisfy human needs and wants.
Technological processes include design, manufacturing, repair, restoration, etc.
Tension
A force that stretches an object or material, a pulling force.
Want
Something that people would like but do not actually need (a convenience).

![Advanced Material Technology±MT[0-33-3].pdf · Material Technology Technology. Advanced Material Technology Advanced Material Technology. 3.4-16. Advanced Material Technology. Advanced](https://static.documents.pub/doc/80x56/5ebad08215a94a1265211c82/advanced-material-mt0-33-3pdf-material-technology-technology-advanced-material.jpg)


