100
TELSTRA ELITE® GATEWAY USER GUIDE

TELSTRA EL ITE® GATEWAY USER GUIDE
TELSTRA ELITE™ GATEWAY USER GUIDE
2
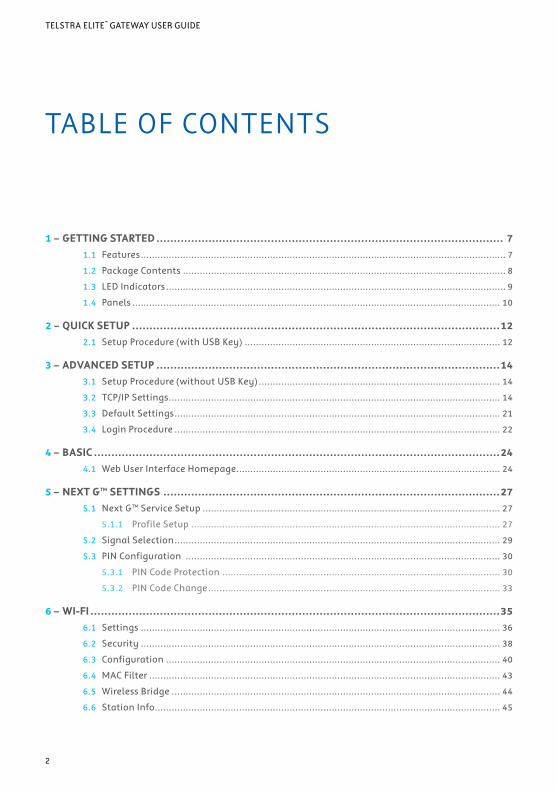
1 – GETTING STARTED ���������������������������������������������������������������������������������������������������� 71.1 Features.................................................................................................................................. 7
1.2 PackageContents................................................................................................................... 8
1.3 LEDIndicators......................................................................................................................... 9
1.4 Panels................................................................................................................................... 10
2 – QUICK SETUP ����������������������������������������������������������������������������������������������������������122.1 SetupProcedure(withUSBKey)........................................................................................... 12
3 – ADVANCED SETUP ���������������������������������������������������������������������������������������������������143.1 SetupProcedure(withoutUSBKey)...................................................................................... 14
3.2 TCP/IPSettings...................................................................................................................... 14
3.3 DefaultSettings.................................................................................................................... 21
3.4 LoginProcedure.................................................................................................................... 22
4 – BASIC ���������������������������������������������������������������������������������������������������������������������244.1 WebUserInterfaceHomepage.............................................................................................. 24
5 – NEXT G™ SETTINGS �������������������������������������������������������������������������������������������������275.1 NextG™ServiceSetup.......................................................................................................... 27
5.1.1 ProfileSetup.............................................................................................................. 27
5.2 SignalSelection.................................................................................................................... 29
5.3 PINConfiguration................................................................................................................ 30
5.3.1 PINCodeProtection................................................................................................... 30
5.3.2 PINCodeChange........................................................................................................ 33
6 – WI-FI ����������������������������������������������������������������������������������������������������������������������356.1 Settings................................................................................................................................ 36
6.2 Security................................................................................................................................ 38
6.3 Configuration....................................................................................................................... 40
6.4 MACFilter............................................................................................................................. 43
6.5 WirelessBridge..................................................................................................................... 44
6.6 StationInfo........................................................................................................................... 45
TABLE OF CONTENTS

TELSTRA ELITE® GATEWAY USER GUIDE
3
7 – MANAGEMENT ��������������������������������������������������������������������������������������������������������477.1 DeviceSettings..................................................................................................................... 47
7.1.1 BackupSettings......................................................................................................... 47
7.1.2 UpdateSettings......................................................................................................... 48
7.1.3 RestoreDefault.......................................................................................................... 48
7.1.4 UpdateFirmware....................................................................................................... 49
7.2 AccessControl....................................................................................................................... 50
7.2.1 Services...................................................................................................................... 50
7.2.2 Passwords.................................................................................................................. 51
7.3 ConfigureSNMPagent......................................................................................................... 52
7.4 SimpleNetworkTimeProtocol(SNTP).................................................................................. 53
7.5 SaveandReboot................................................................................................................... 54
8 – ADVANCED SETTINGS ����������������������������������������������������������������������������������������������568.1 LocalAreaNetwork(LAN)..................................................................................................... 56
8.2 NetworkAddressTranslation(NAT)...................................................................................... 58
8.2.1 PortForwarding......................................................................................................... 58
8.2.2 PortTriggering........................................................................................................... 60
8.2.3 Demilitarized(DMZ)Host........................................................................................... 62
8.3 Security................................................................................................................................ 63
8.3.1 IPFiltering.................................................................................................................. 63
8.3.2 ParentalControl......................................................................................................... 65
8.4 Routing................................................................................................................................. 67
8.4.1 StaticRoute............................................................................................................... 67
8.4.2 DynamicRoute.......................................................................................................... 68
8.5 DomainNameServer(DNS).................................................................................................. 69
8.5.1 DNSServerConfiguration.......................................................................................... 69
8.5.2 DynamicDNS............................................................................................................. 69
8.6 USBPrintServer.................................................................................................................... 71
8.7 USBStorage.......................................................................................................................... 82
9 – DIAGNOSTICS ����������������������������������������������������������������������������������������������������������889.1 Diagnostics........................................................................................................................... 89
9.2 SystemLog........................................................................................................................... 91
9.3 NextGTMNetwork.................................................................................................................. 93
9.4 Statistics............................................................................................................................... 95
9.4.1 LANStatistics............................................................................................................. 95
9.4.2 NextG™Statistics...................................................................................................... 95
9.5 Route................................................................................................................................... 96
9.6 ARP....................................................................................................................................... 97
9.7 DynamicHostConfigurationProtocol(DHCP)...................................................................... 98
9.8 PING...................................................................................................................................... 99

INTRODUCTION
TELSTRA ELITE® GATEWAY USER GUIDE
5
INTRODUCTION
WelcometoTelstraWirelessBroadband–Thanksforchoosingus!
ThisguideisdesignedtohelpyougetthemostoutofyourTelstraWirelessBroadbandexperience.We’resureyou’reitchingtogetstarted,sodon’tfeelthatyouhavetostudytheentireuserguiderightaway.However!It’simportanttoreadthroughtheQuickSetupsectiontoensureyousetupyourTELSTRAELITE®GATEWAYcorrectly.Therestwillbetherewhenyouneedit.
AsaTelstraWirelessBroadbandMember,youcannowenjoyahugerangeofInternetservices,includingstateoftheartsecurityoptions,greataccounttools,flexibleplans,extraemailfeatures,worldsof‘unmetered’content,specialshoppingdealsandlotsmore.
Solet’sgetstarted.

TELSTRA ELITE™ GATEWAY USER GUIDE
6
GETTINGSTARTED

TELSTRA ELITE® GATEWAY USER GUIDE
7
1.1 FEATURES• CombinesNextG™Broadbandservice,Wi-FiandanEthernetgatewayinonedevice
• Dual-bandHSPA+/UMTS(850/2100MHz)
• EmbeddedmultimodeHSUPA/HSDPA/HSPA+/UMTSmodule
• 2xUSB2.0hostports
• WEP/WPA/WPA2and802.1x
• SIMcardPINconfiguration
• MACaddressandIPfiltering
• Staticroutefunctions
• DNSProxy
• Integrated802.11nAP(backwardcompatiblewith802.11b/g)
• CLIcommandinterface
• Web-basedmanagement
• SupportTelstraIPWANservice
• SupportTelstraIPTelephonyonLANport
• SupportsHalf-bridging
• NAT/PAT
• DHCPServer/Relay/Client
• Configurationbackupandrestoration
GETTING STARTED

TELSTRA ELITE™ GATEWAY USER GUIDE
8
1.2 PACKAGECONTENTSYourpackagecontainsthefollowing:
• TELSTRAELITE®GATEWAY
• PrintedQuickStartGuide
• USBkey(ContainingTelstraConnectionManagerandUserGuide)
• EthernetCable
• SecurityCard
• PowerSupply
TELSTRA ELITE® GATEWAY USER GUIDE
9
1.3 LED INDICATORS
The LED indicators are explained in the table below.
LED Icon Color Mode Description
High Blue On High signal strength
Off No activity, gateway powered off or on other signal strength
Med Blue On Medium signal strength
Off No activity, gateway powered off or on other signal strength
Low Blue On Low signal strength
Off No activity, gateway powered off or on other signal strength
3G Blue On Connection established with the 3G network
Off Either there is no activity, the gateway is powered off, or there is no cable or no powered device connected to the associated port
Blinking Connecting with 3G network
2G Blue On Connection established with the 2G network
Off Either there is no activity, the gateway is powered off, or there is no cable or no powered device connected to the associated port
Blinking Connecting with 2G network
LAN 1~4
Blue On Powered device connected to the associated LAN port (includes devices with Wake-on-LAN capability where a slight voltage is supplied to an Ethernet connection)
Off No device connected or connected device is off
Blinking LAN activity present (traffic in either direction)
Internet
Blue On Internet connection established
Off No connection to the Internet or gateway powered off
Blinking Data is currently being transmitted through the Internet connection
Wi-Fi
Blue On Local Wi-Fi access to the gateway is enabled and working
Off Local Wi-Fi access to the gateway is disabled
Blinking Data being transmitted or received over Wi-Fi.
POWER
Blue On Power on
Off Power off

TELSTRA ELITE™ GATEWAY USER GUIDE
10
1.4 PANELSTherearandsidepanelsshownbelowcontaintheportsfordataandpowerconnections.
67
1
2
34
5
(1) USIMcardslot
(2) FourRJ-45EthernetLANports
(3) Resetbutton
(4) PowerjackforDCpowerinput(12VDC/1.5A).
(5) External3GSMAConnector(Optional)Note: The External 3G Connector allows you to plug in an external 3G antenna (not provided) and select it as the main 3G
signal input. By default, the gateway obtains a stable 3G signal from the internal antennas (built-in the gateway). For more details please refer to Chapter 5.2 Signal Selection.
(6) TwoUSBPrinter/HardDriveports
(7) PowerButton

QUICKSETUP

TELSTRA ELITE™ GATEWAY USER GUIDE
12
2.1 SETUPPROCEDURE ( WITHUSBKEY )ThesestepsexplainhowtoquicklysetupyourNextG™Gateway:
1: InsertyourSIMcard(untilyouhearaclick)intotheUSIMslotontherearofthegateway.
2: ConnecttheyellowEthernetcabletooneoftheyellowLANportsfoundonthebackofthegateway.
3: ConnecttheotherendoftheyellownetworkingcabletotheEthernetportonyourcomputer.
4: Connectthepoweradaptertothepowersocketonthebackofthegateway.
5: PlugthepoweradapterintoawallsocketandpressthepowerbuttonintotheONposition.
6: ConfigurethegatewaythroughtheWebUserInterface(WUI).NOTE: Chapters 4 through 8 explain how to set up and use the WUI
7: Savethegatewayconfigurationandreboot(seesection7.5).
QUICK SETUP

ADVANCEDSETUP

TELSTRA ELITE™ GATEWAY USER GUIDE
14
3.1 SETUPPROCEDURE (WITHOUTUSBKEY )ThesestepsexplainhowtoquicklysetupyourNextG™Gateway:
1: InsertyourSIMcard(untilyouhearaclick)intotheUSIMslotontherearofthegateway.
2: ConnecttheyellowEthernetcabletooneoftheyellowLANportsfoundonthebackofthegateway.
3: ConnecttheotherendoftheyellownetworkingcabletotheEthernetportonyourcomputer.
4: Connectthepoweradaptertothepowersocketonthebackofthegateway.
5: PlugthepoweradapterintoawallsocketandpressthepowerbuttonintotheONposition(depressed).
6: ConfigurethegatewaythroughtheWebUserInterface(WUI).NOTE: Chapters 4 through 8 explain how to set up and use the WUI
7: Savethegatewayconfigurationandreboot(seesection7.5).
3 .2 TCP/ IP SETTINGSItislikelythatyourcomputerwillautomaticallyobtainanIPAddressandjointhenetwork.ThisisbecausetheDynamicHostConfigurationProtocol(DHCP)server(onthedevice)willstartautomaticallywhenyourgatewaypowersup.
ThisautomaticassignmentrequiresthatDHCPisconfiguredonyourcomputers.Itislikelythatthisisalreadythecasebutshouldyouberequiredtoconfigurethis,pleaseseetheinstructionsonthefollowingpage.
ADVANCED SETUP

TELSTRA ELITE® GATEWAY USER GUIDE
15
WINDOWSXPToaccessthedialogboxthatallowsyoutoconfigureyournetworkconnection,clickonStart>ControlPanel>NetworkConnections.ThenrightmouseclickontheLocalAreaConnectionandselectProperties.SelectInternetProtocol(TCP/IP)thenselectProperties
D H CP M O D E
YoucansetyourPCtoDHCPmodebyselectingObtainanIPaddressautomaticallyinthedialogboxshownbelow.

TELSTRA ELITE™ GATEWAY USER GUIDE
16
S TATI C I P M O D E
ThefollowingstepsshowhowtoassignaStaticIPaddresstoyourPCusingsubnet10.0.0.x.
1: SettheIPaddressto10.0.0.x.(wherexisanumberbetween1and254)withsubnetmaskof255.255.255.0.
2: SetthedefaultgatewayandDNSservertothegateway’sIPaddress.NOTE: The IP address of the gateway is 10.0.0.138. (Default), so the PC must be set with a different IP. In the case below, the
PC’s IP address is set as 10.0.0.2
3: ClickOKtosubmitthesettings.

TELSTRA ELITE® GATEWAY USER GUIDE
17
MACOSX10.4Toaccessthedialogboxthatallowsyoutoconfigureyournetworkconnection,browsetotheApplemenuandselectSystemPreferences.FromtheSystemPreferencesmenu,clicktheNetworkiconandthenselecttheEthernetconnection.
D H CP M O D E
YoucansetyourMactoDHCPbyselectingDHCPfromtheConfiguredropdownlist.AfterclickingApply,yourMac’sIPAddresswillnowbeautomaticallyassignedfromthegateway.

TELSTRA ELITE™ GATEWAY USER GUIDE
18
S TATI C M O D E
1. FromtheConfiguredropdownlist,youcansetyourcomputertoStaticIPmodebyselectingtheoptionManually.
ThefollowingstepsshowhowtoassignaStaticIPaddresstoyourMac
2. SettheIPaddressto10.0.0.x.(wherexisanumberbetween1and254)withsubnetmaskof255.255.255.0.
3. SetthedefaultgatewayandDNSservertothegateway’sIPaddress.NOTE: The IP address of the gateway is 10.0.0.138. (default), so the computer must be set with a different IP to the gateway. In
the case below, the PC’s IP address is set as 10.0.0.2
4. ClickApplytosubmitthesettings.

TELSTRA ELITE® GATEWAY USER GUIDE
19
WINDOWSVISTAToaccessthedialogboxthatallowsyoutoconfigureyournetworkconnection,clickonStart>ControlPanel>NetworkConnections.ThenrightmouseclickontheLocalAreaConnectionandselectProperties.SelectInternetProtocol(TCP/IP)thenselectProperties
D H CP M O D E
YoucansetyourPCtoDHCPmodebyselectingObtainanIPaddressautomaticallyinthedialogboxshownbelow.

TELSTRA ELITE™ GATEWAY USER GUIDE
20
S TATI C I P M O D E
Toconfigureyourgatewaymanually,yourPCmusthaveastaticIPaddresswithinthegateway’ssubnet.ThefollowingstepsshowhowtoassignaStaticIPaddresstoyourPCusingsubnet10.0.0.x.
1: SettheIPaddressto10.0.0.x.(wherexisanumberbetween1and254)withsubnetmaskof255.255.255.0.
2: SetthedefaultgatewayandDNSservertothegateway’sIPaddress.NOTE: The IP address of the gateway is 10.0.0.138. (default), so the PC must be set with a different Ip. In the case below, the
PC’s IP address is set as 10.0.0.1
3. ClickOKtoapplythesettings.

TELSTRA ELITE® GATEWAY USER GUIDE
21
3.3 DEFAULTSETTINGSThefollowingarethedefaultsettingsforthegateway:
• Local(LAN)access(username:admin,password:admin)
• Remote(WAN)access(username:support,password:support)
• Useraccess(username:user,password:user)
• LANIPaddress:10.0.0.138
• RemoteWANaccess:disabled
• NATandfirewall:enabled
• DynamicHostConfigurationProtocol(DHCP)serveronLANinterface:enabledTechnical Note:
During power on, the device initializes all settings to default values. It will then read the configuration profile from the permanent storage section of flash memory. The default attributes are overwritten when identical attributes with different values are configured. The configuration profile in permanent storage can be created via the web user interface, telnet user interface, or other management protocols. The factory default configuration can be restored either by pushing the reset button for more than five seconds until the power LED blinks or by clicking the Restore Default Configuration option in the Restore Default Settings screen (see section 7.1.3).

TELSTRA ELITE™ GATEWAY USER GUIDE
22
3.4 LOGINPROCEDURETologintothewebinterface,followthestepsbelow:
NOTE: The default settings can be found in 3.3 Default Settings.
1: OpenawebbrowserandenterthedefaultIPaddressforthegatewayintheWebaddressfieldatthetopofthewebbrowserwindow.Inthiscase,theaddressishttp://10.0.0.138
NOTE: For remote access, the WAN IP address assigned to the gateway needs to be a public IP address. It is shown on the WUI Homepage screen. The remote WAN access via HTTP also needs to be enabled,for details please refer to chapter 7.2.
2: Adialogboxwillappearasillustratedbelow.Enterthedefaultusernameandpasswordasdefinedinsection3.3DefaultSettings.
ClickOKtocontinue.
NOTE: The login password can be changed later (see 7.2.2 Passwords)

TELSTRA ELITE® GATEWAY USER GUIDE
23
BASIC

TELSTRA ELITE™ GATEWAY USER GUIDE
24
4.1 WEBUSER INTERFACEHOMEPAGEThewebuserinterface(WUI)isdividedintotwowindowpanels,themainmenu(onthetop)andthedisplayscreen(onthebottom).Themainmenuhasthefollowingoptions:Basic,NextG™Settings,Wireless,Management,AdvancedandStatus.
Selectingoneoftheseoptionswillopenasubmenuwithmoreoptions.Basicisdiscussedbelowwhilesubsequentchaptersintroducetheothermainmenuselections.
NOTE: The menu options available within the web user interface are based upon the device configuration and user privileges
(i.e. local or remote).
BA S I C / H O M E
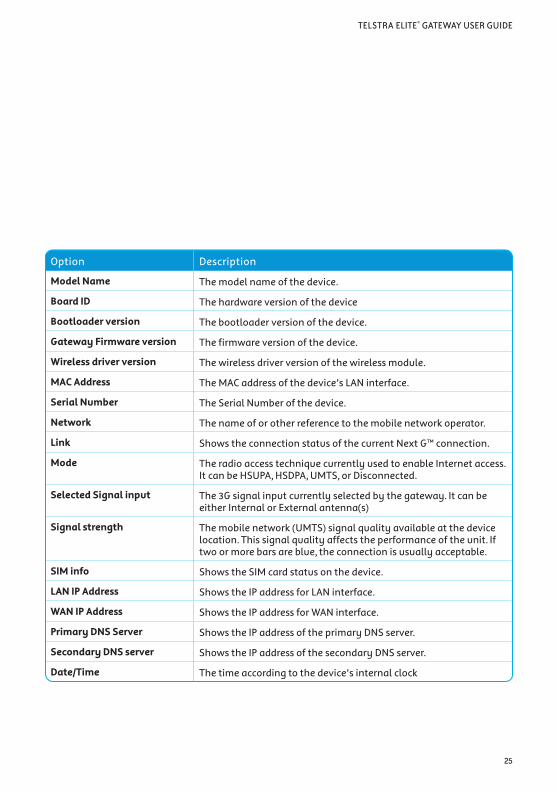
TheBasic/HomescreenistheWUIhomepageandthefirstselectiononthemainmenu.Itprovidesinformationregardingthefirmware,3G,andtheIPconfiguration.
Thefollowingtableprovidesfurtherdetails.
BASIC
TELSTRA ELITE® GATEWAY USER GUIDE
25
Option Description
Model Name Themodelnameofthedevice.
Board ID Thehardwareversionofthedevice
Bootloader version Thebootloaderversionofthedevice.
Gateway Firmware version Thefirmwareversionofthedevice.
Wireless driver version Thewirelessdriverversionofthewirelessmodule.
MAC Address TheMACaddressofthedevice’sLANinterface.
Serial Number TheSerialNumberofthedevice.
Network Thenameoforotherreferencetothemobilenetworkoperator.
Link ShowstheconnectionstatusofthecurrentNextG™connection.
Mode TheradioaccesstechniquecurrentlyusedtoenableInternetaccess.ItcanbeHSUPA,HSDPA,UMTS,orDisconnected.
Selected Signal input The3Gsignalinputcurrentlyselectedbythegateway.ItcanbeeitherInternalorExternalantenna(s)
Signal strength Themobilenetwork(UMTS)signalqualityavailableatthedevicelocation.Thissignalqualityaffectstheperformanceoftheunit.Iftwoormorebarsareblue,theconnectionisusuallyacceptable.
SIM info ShowstheSIMcardstatusonthedevice.
LAN IP Address ShowstheIPaddressforLANinterface.
WAN IP Address ShowstheIPaddressforWANinterface.
Primary DNS Server ShowstheIPaddressoftheprimaryDNSserver.
Secondary DNS server ShowstheIPaddressofthesecondaryDNSserver.
Date/Time Thetimeaccordingtothedevice’sinternalclock

TELSTRA ELITE™ GATEWAY USER GUIDE
26
NEXTG™SETTINGS

TELSTRA ELITE® GATEWAY USER GUIDE
27
NEXT G™ SETTINGS
ThismenuincludesNextG™serviceSetup.
NOTE: Sections 8.3 and 8.4.2 also provide information about the Next G™ service.
5.1 NEXTG™SERVICE SETUPSelectyournextNextG™servicesettingsaccordingtopredefinedorcustomprofiles.Setupinstructionsareprovidedinthefollowingsectionsforyourassistance.
5 .1 .1 P R O FI LE S E T U P
Telstrawillprovidetheinformationrequiredtocompletethefirsttimesetupinstructionsbelow.
Formostusersthisincludesaprofile;forothersthismayalsoincludestheauthenticationmethod,usernameandpassword.Onlycompletethosestepsforwhichyouhaveinformationandskiptheothers.
1. IfyourSIMcardisnotinsertedintothegateway,pleaseturnthegatewayoff,theninserttheSIMandturnthegatewayon.
2. Selectoneofthetwopre-configuredAPNsfromthedrop-downlistortypetheAPNintheAPNfield.Authenticationmethod(visiblewhenCustomAPNisselected)shouldbeprovidedbyTelstra;orjustleaveitAUTOifnotacquiredrequired.Ifyouhavenotreceivedtheusernameandpassword,leavethesefieldsemptyandselectAUTOauthentication.
3. Someusersmayrequiredeletingthetwopre-configuredTelstraAPNsfromthewebinterfaceiftheydonotneedtousethoseservices.Theycandothisbyselectingtheoptionbelow,andthenclicktheSavebutton.
4. ClicktheSavebuttontosavethenewsettings.
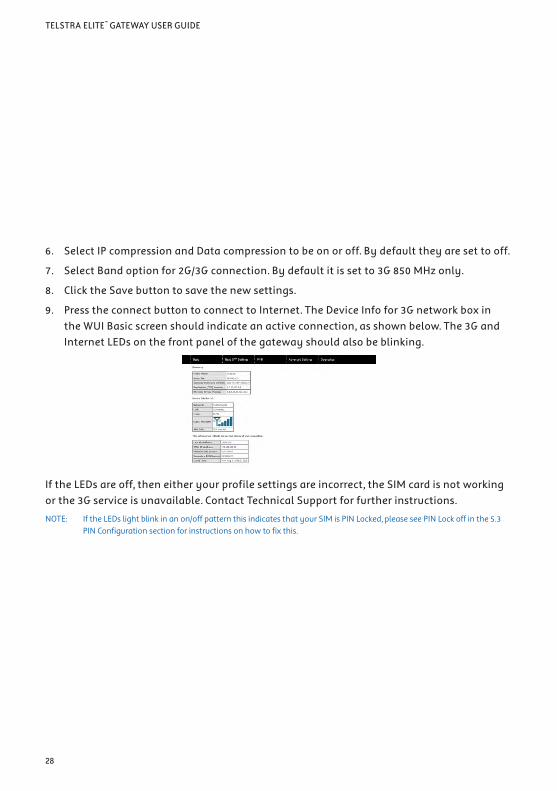
5. PresstheConnectbuttontoconnecttoInternet.TheDeviceInfofor3GnetworkboxintheWUIBasicscreenshouldindicateanactiveconnection,asshownbelow.The3GandInternetLEDsonthefrontpanelofthegatewayshouldalsobeblinking.
Note: You can also delete the pre-configured APNs permanently from the installation Software (the USB key). For PC users, please plug the USB key into your PC and click on DeletePreSetAPN.exe. Click Run to confirm deleting the pre-configured APN permanently. For Mac OS users, please double click into the folder named Mac. Click on DeletePreSetAPN.app and then click Yes to delete the pre-set APN information.
TELSTRA ELITE™ GATEWAY USER GUIDE
28
6. SelectIPcompressionandDatacompressiontobeonoroff.Bydefaulttheyaresettooff.
7. SelectBandoptionfor2G/3Gconnection.Bydefaultitissetto3G850MHzonly.
8. ClicktheSavebuttontosavethenewsettings.
9. PresstheconnectbuttontoconnecttoInternet.TheDeviceInfofor3GnetworkboxintheWUIBasicscreenshouldindicateanactiveconnection,asshownbelow.The3GandInternetLEDsonthefrontpanelofthegatewayshouldalsobeblinking.
IftheLEDsareoff,theneitheryourprofilesettingsareincorrect,theSIMcardisnotworkingorthe3Gserviceisunavailable.ContactTechnicalSupportforfurtherinstructions.
NOTE: If the LEDs light blink in an on/off pattern this indicates that your SIM is PIN Locked, please see PIN Lock off in the 5.3 PIN Configuration section for instructions on how to fix this.

TELSTRA ELITE® GATEWAY USER GUIDE
29
5.2 S IGNALSELECTIONSignalSelectionallowsyoutomanuallyselectthe3Gsignalinputtobeeithertheinternalantennasoranexternalantenna(notincluded).Bydefault,astablesignalisobtainedfromtheantennasbuiltintothegateway.Touseanexternal3Gantenna,pleaseconnectittotheAntennaConnectornexttothePowerInputonthebackofthegateway.
Iftheexternalantennadoesnotsupport850MHzfrequency,pleasegotoNextGSettings>SettingsandselectAllBands/Automaticbeforeselectingsignalinput.
Thegatewaycandetectandautomaticallyselectthehighersignalstrengthbetweeneithertheinternalantennasorfromtheexternalinput.Toinitiatetheautoselectprocess,pleaseselectAutoSelectandclickonSave/Apply.TheAutoSelectprocesstakesabout170seconds.ClosethewebbrowseronyourcomputeranddonotusetheInternetduringthewholeprocess.
Theresultsoftheselectionwillbeshownonscreen.Iftheinternalandexternalsignalsareonthesamelevel,thegatewaywillselecttheInternalAntennasasinput.
Thegatewayisabletorememberthelastselectedsignalinputbeforepower-off.IfthesignalinputischangedtotheExternalAntennaitwillobtainasignalfromtheexternalantennaafterrestart.

TELSTRA ELITE™ GATEWAY USER GUIDE
30
5.3 P INCONFIGURATIONThisscreenallowsforchangestothe3GSIMcardPINcodeprotectionsettings.
NOTE: If you have entered the incorrect PIN 3 times, your SIM card will be locked for your security. Please call Telstra for assistance.
5 . 3 .1 P I N C O D E P R OTE C TI O N
PINcodeprotectionpreventstheuseofaSIMcardbyunauthorizedpersons.Tousethe3GInternetservicewiththisgatewayhowever,thePINcodeprotectionshouldbedisabled.IftheSIMcardinsertedintothegatewayislockedwithaPINcode,thewebuserinterfacewilldisplaythefollowingscreenafterfirstlogin.
PleaseinputthePINcode,selectRememberPINcodeasYesandclickApply.
TELSTRA ELITE® GATEWAY USER GUIDE
31
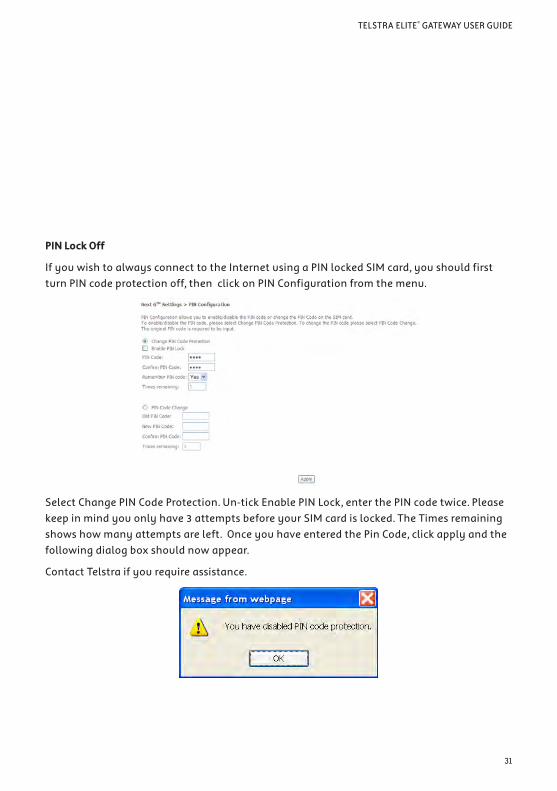
PIN Lock Off
IfyouwishtoalwaysconnecttotheInternetusingaPINlockedSIMcard,youshouldfirstturnPINcodeprotectionoff,thenclickonPINConfigurationfromthemenu.
SelectChangePINCodeProtection.Un-tickEnablePINLock,enterthePINcodetwice.Pleasekeepinmindyouonlyhave3attemptsbeforeyourSIMcardislocked.TheTimesremainingshowshowmanyattemptsareleft.OnceyouhaveenteredthePinCode,clickapplyandthefollowingdialogboxshouldnowappear.
ContactTelstraifyourequireassistance.

TELSTRA ELITE™ GATEWAY USER GUIDE
32
PIN Lock On
AfteryouarefinishedusingyourSIMcardforInternetaccess,youmaywishtolocktheSIMcardagain.InthiscasegotothePINconfigurationscreenasshownbelow.
SelectChangePINCodeProtection.TickEnablePINLockandenterthePINcodetwice.YoucanchangetheRememberPINcodetoyessoyoudon’tneedtoinputthePINcodeeverytimethegatewayturnsonwiththisSIMinserted.ThenclickApply.
Afteryoudoso,thefollowingdialogboxshouldappear.
YoucannowreturnyourSIMcardtoyourcellularphoneorothermobiledevice.

TELSTRA ELITE® GATEWAY USER GUIDE
33
5 . 3 . 2 P I N C O D E CHAN G E
IfyouwishtochangeyourPINcodeforgreatersecurity,gototheprevioussectionandfollowtheprocedurelistedunderPINLockOn.AfterlockingtheSIMcard,selectPINCodeChangeandenteryouroldandnewPINcodesinthefieldsprovided,thenclickapplytoactivatethechange.Keepinmindyouonlyhave3attemptsbeforeyourSIMcardislocked.TheTimesremainingshowshowmanyattemptsleft.ContactTelstraifyourequireanyassistance.
IfyouforgettoturnonPINlockprotectionbeforechangingyourPIN,youwillseethisdialogboxasahelpfulreminder.
IfyourPINcodechangerequestwassuccessfulthefollowingdialogboxwilldisplay.

WI-FI

TELSTRA ELITE® GATEWAY USER GUIDE
35
TheWi-FisubmenuprovidesaccesstoWirelessLocalAreaNetwork(WLAN)configurationsettingsincluding:
• Wirelessnetworkname
• Channelrestrictions(basedoncountry)
• Security
• Accesspointorbridgingbehaviour
• Stationinformation
WI-FI

TELSTRA ELITE™ GATEWAY USER GUIDE
36
6.1 SETTINGSThisscreenallowsyoutoconfigurebasicfeaturesofthewirelessLANinterface.YoucanenableordisablethewirelessLANinterface,hidethenetworkfromactivescans,setthewirelessnetworkname(alsoknownasSSID)andrestrictthechannelsetbasedoncountryrequirements.TheWirelessGuestNetworkfunctionaddsextranetworkingsecuritywhenconnectingtoremotehosts.

TELSTRA ELITE® GATEWAY USER GUIDE
37
Option Description
Enable Wi-Fi
AcheckboxthatenablesordisablesthewirelessLANinterface.WhenselectedtheWebUIdisplaysHideAccesspoint,SSID,andCountysettings.ThedefaultisEnableWi-Fi.
Enable
SSID
Broadcast
DeselectEnableSSIDBroadcasttoprotecttheaccesspointfromdetectionbywirelessactivescans.
TocheckAPstatusinWindowsXP,openNetworkConnectionsfromtheStartMenuandselectViewAvailableNetworkConnections.Iftheaccesspointishidden,itwillnotbelistedthere.Toconnectaclienttoahiddenaccesspoint,thestationmustaddtheaccesspointmanuallytoitswirelessconfiguration.
Clients Isolation
1. PreventsclientPCsfromseeingoneanotherinMyNetworkPlacesorNetworkNeighborhood.
2. Preventsonewirelessclientcommunicatingwithanotherwirelessclient.
SSID Setsthewirelessnetworkname.SSIDstandsforServiceSetIdentifier.AllstationsmustbeconfiguredwiththecorrectSSIDtoaccesstheWLAN.IftheSSIDdoesnotmatch,thatuserwillnotbegrantedaccess.
Thenamingconventionsare:Minimumnumberofcharacters:1,maximumnumberofcharacters:32.
BSSID TheBSSIDisa48bitidentityusedtoidentifyaparticularBSS(BasicServiceSet)withinanarea.InInfrastructureBSSnetworks,theBSSIDistheMAC(MediumAccessControl)addressoftheAP(AccessPoint)andinIndependentBSSoradhocnetworks,theBSSIDisgeneratedrandomly.
Country Adrop-downmenuthatpermitsworldwideandspecificnationalsettings.Eachcountylistedinthemenuenforcesspecificregulationslimitingchannelrange:US=worldwide,Japan=1-14,Jordan=10-13,Israel=1-13
Max Clients Wireless - Guest / Virtual Access Points
Themaximumnumberofclientsthatcanaccesstherouter.
ThisroutersupportsmultipleSSIDscalledGuestSSIDsorVirtualAccessPoints.ToenableoneormoreGuestSSIDsselecttheradiobuttonsundertheEnableheading.TohideaGuestSSID,selectitsradiobuttonundertheHiddenheading.DothesameforIsolateClient.Foradescriptionofthisfunction,seetheentryfor“ClientIsolation”inthistable.Similarly,forMaxClientsandBSSIDheadings,consultthematchingentriesinthistable.
NOTE:RemotewirelesshostsareunabletoscanGuestSSIDs.
TELSTRA ELITE™ GATEWAY USER GUIDE
38
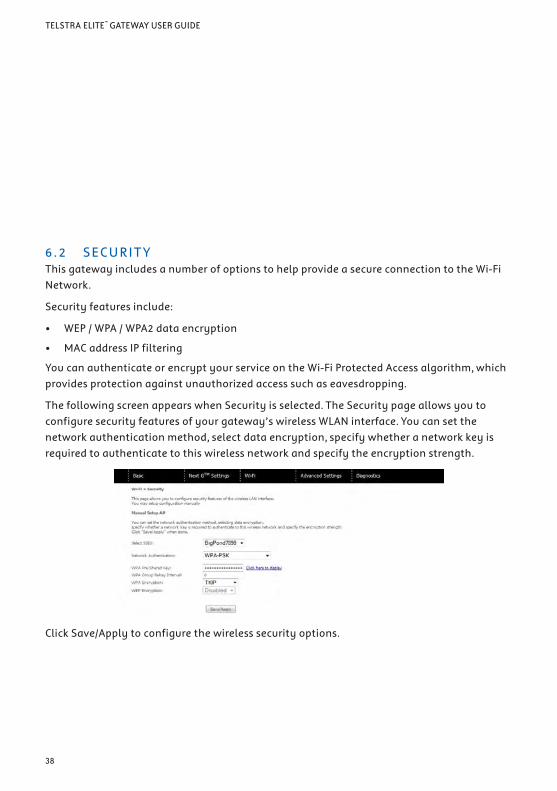
6.2 SECURITYThisgatewayincludesanumberofoptionstohelpprovideasecureconnectiontotheWi-FiNetwork.
Securityfeaturesinclude:
• WEP/WPA/WPA2dataencryption
• MACaddressIPfiltering
YoucanauthenticateorencryptyourserviceontheWi-FiProtectedAccessalgorithm,whichprovidesprotectionagainstunauthorizedaccesssuchaseavesdropping.
ThefollowingscreenappearswhenSecurityisselected.TheSecuritypageallowsyoutoconfiguresecurityfeaturesofyourgateway’swirelessWLANinterface.Youcansetthenetworkauthenticationmethod,selectdataencryption,specifywhetheranetworkkeyisrequiredtoauthenticatetothiswirelessnetworkandspecifytheencryptionstrength.
ClickSave/Applytoconfigurethewirelesssecurityoptions.

TELSTRA ELITE® GATEWAY USER GUIDE
39
Option Description
Select SSID YourServiceSetIdentifier(SSID),setsyourWirelessNetworkName.YoucanconnectmultipledevicesincludingLaptops,DesktopPCsandPDAstoyourWirelessGateway.Toconnectadditionaldevices,scanforanetworkandlocatetheSSIDshownonyourWirelessSecurityCard.IftheSSIDdoesnotmatch,accessisdenied.
Network Authentication Thisoptionisusedforauthenticationtothewirelessnetwork.Eachauthenticationtypehasitsownsettings.Forexample,selecting802.1XauthenticationwillrevealtheRADIUSServerIPaddress,Portandkeyfields.
WEP Encryption Thisoptionindicateswhetherdatasentoverthenetworkisencrypted.Thesamenetworkkeyisusedfordataencryptionandnetworkauthentication.Whilstfournetworkkeyscanbedefined,onlyonecanbeusedatanyonetime.
Encryption Strength Thisdrop-downlistboxwilldisplaywhenWEPEncryptionisenabled.Thekeystrengthisproportionaltothenumberofbinarybitscomprisingthekey.Thismeansthatkeyswithagreaternumberofbitshaveagreaterdegreeofsecurityandareconsiderablymoredifficulttocrack.Encryptionstrengthcanbesettoeither64-bitor128-bit.A64-bitkeyisequivalentto5ASCIIcharactersor10hexadecimalnumbers.A128-bitkeycontains13ASCIIcharactersor26hexadecimalnumbers.

TELSTRA ELITE™ GATEWAY USER GUIDE
40
6.3 CONFIGURATIONThefollowingscreenappearswhenyouselectConfiguration.ThisscreenallowsyoutocontroltheadvancedfeaturesoftheWirelessLocalAreaNetwork(WLAN)interface:
• Selectthechannelwhichyouwishtooperatefrom
• Forcethetransmissionratetoaparticularspeed
• Setthefragmentationthreshold
• SettheRTSthreshold
• Setthewake-upintervalforclientsinpower-savemode
• Setthebeaconintervalfortheaccesspoint
• SetXpressmode
• Programshortorlongpreambles
ClickSave/Applytosettheadvancedwirelessconfiguration.

TELSTRA ELITE® GATEWAY USER GUIDE
41
Option Description
Band ThenewamendmentallowsIEEE802.11gunitstofallbacktospeedsof11Mbps,soIEEE802.11bandIEEE802.11gdevicescancoexistinthesamenetwork.Thetwostandardsapplytothe2.4GHzfrequencyband.IEEE802.11gcreatesdata-rateparityat2.4GHzwiththeIEEE802.11astandard,whichhasa54Mbpsrateat5GHz.(IEEE802.11nhasotherdifferencescomparedtoIEEE802.11borg,suchasofferingmorechannels.)
Channel Drop-downmenuthatallowsselectionofaspecificchannel.
Auto Channel Timer (min)
Autochannelscantimerinminutes(0todisable)
802�11n/EWC Withdrop-downmenu,“Auto”isfor11nand“Disable”isfor11g
Bandwidth Drop-downmenuspecifiesthefollowingbandwidth:20MHzand40MHz.
Control Sideband
Thisisavailablefor40MHz.Drop-downmenuallowsselectinguppersidebandorlowersideband
802�11n Rate Drop-downmenuspecifiesthefollowingfixedrates.Themaximumrateforbandwidth,20MHz,is130MHzandthemaximumbandwidth,40MHz,is270MHz
802�11n Protection
Itissimilaras802.11gprotection.InAutomodetherouterwilluseRTS/CTStoimprove802.11nperformanceinmixed802.11n/802.11g/802.11bnetworks.Turnprotectionofftomaximize802.11nthroughputundermostconditions.
Support 802�11n client only
Drop-downmenuallowsselecting“On/Off”.Choosing“On”allowstheclientwith11nonlytoconnect,notfor11gor11b;choosing“Off”allowstheclientwith11n/11g/11btoconnect
54g Rate Drop-downmenuthatspecifiesthefollowingfixedrates:Auto:Default.Usesthe11Mbpsdataratewhenpossiblebutdropstolowerrateswhennecessary.1Mbps,2Mbps,5.5Mbps,or11Mbpsfixedrates.Theappropriatesettingisdependentonsignalstrength.
Multicast Rate Settingmulticastpackettransmitrate.
Basic Rate Settingbasictransmitrate.
Fragmentation Threshold
Athreshold,specifiedinbytes,thatdetermineswhetherpacketswillbefragmentedandatwhatsize.Onan802.11WLAN,packetsthatexceedthefragmentationthresholdarefragmented,i.e.,splitintosmallerunitssuitableforthecircuitsize.Packetssmallerthanthespecifiedfragmentationthresholdvaluearenotfragmented.Enteravaluebetween256and2346.IfyouexperienceahighpacketerrorratetrytoslightlyincreaseyourFragmentationThreshold.Thevalueshouldremainatitsdefaultsettingof2346.SettingtheFragmentationThresholdtoolowmayresultinpoorperformance.
RTS Threshold RequesttoSend,(whensetinbytes)specifiesthepacketsizebeyondwhichtheWLANCardinvokesitsRTS/CTSmechanism.PacketsthatexceedthespecifiedRTSthresholdtriggertheRTS/CTSmechanism.TheNICtransmitssmallerpacketwithoutusingRTS/CTS.Thedefaultsettingof2347(maximumlength)disablesRTSThreshold.

TELSTRA ELITE™ GATEWAY USER GUIDE
42
Option Description
DTIM Interval DeliveryTrafficIndicationMessage(DTIM),alsoknownasBeaconRate.Theentryrangeisavaluebetween1and65535.ADTIMisacountdowninformingclientsofthenextwindowforlisteningtobroadcastandmulticastmessages.WhentheAPhasbufferedbroadcastormulticastmessagesforassociatedclients,itsendsthenextDTIMwithaDTIMIntervalvalue.
APClientshearthebeaconsandawakentoreceivethebroadcastandmulticastmessages.Thedefaultis1.
Beacon Interval Theamountoftimebetweenbeacontransmissions.Eachbeacontransmissionidentifiesthepresenceofanaccesspoint.Bydefault,radioNICspassivelyscanallRFchannelsandlistenforbeaconscomingfromaccesspointstofindasuitableaccesspoint.
Beforeastationenterspowersavemode,thestationneedsthebeaconintervaltoknowwhentowakeuptoreceivethebeacon(andlearnwhethertherearebufferedframesattheaccesspoint).Theenteredvalueisrepresentedinms.Defaultis100.Acceptableentryrangeis1to0xffff(65535)
Global Max Clients
Thedevicecansupport4SSIDs,andeachSSIDcansetitsownmaxclients,butitcan’tbebiggerthantheGlobalmaxclientssetting.“GlobalMaxClients”limitsthetotalassociatedclientsofthe4SSIDscombined.
XpressTM Technology
XpressTMTechnologyiscompliantwithdraftspecificationsoftwoplannedwirelessindustrystandards.
Transmit Power Therouterwillsetdifferentpoweroutputs(bypercentage)accordingtothisselection.

TELSTRA ELITE® GATEWAY USER GUIDE
43
6.4 MACF ILTERThisscreenappearswhenMediaAccessControl(MAC)Filterisselected.Thisoptionallowsaccesstoberestrictedbasedupontheunique48-bitMACaddressassignedtoanetworkenableddevice.ToaddaMACAddressfilter,clicktheAddbuttonshownbelow.
Todeleteafilter,selectitfromthetablebelowandclicktheRemovebutton.
Option Description
MAC Restrict Mode Disabled–DisablesMACfiltering
Allow–PermitsaccessforthespecifiedMACaddresses.
NOTE: Add a wireless device’s MAC address before clicking the Allow radio button or else you will need to connect to the gateway’s web user interface using the supplied yellow Ethernet cable and add the wireless device’s MAC address.
Deny–RejectsaccessforthespecifiedMACaddresses
MAC Address ListstheMACaddressessubjecttotheMACRestrictMode.TheAddbuttonpromptsanentryfieldthatrequiresyoutypeinaMACaddressinatwo-character,6-byteconvention:xx:xx:xx:xx:xx:xxwherexxarehexadecimalnumbers.Amaximumof60MACaddressescanbeadded.
EntertheMACaddressonthescreenbelowandclickSave/Apply.
TELSTRA ELITE™ GATEWAY USER GUIDE
44
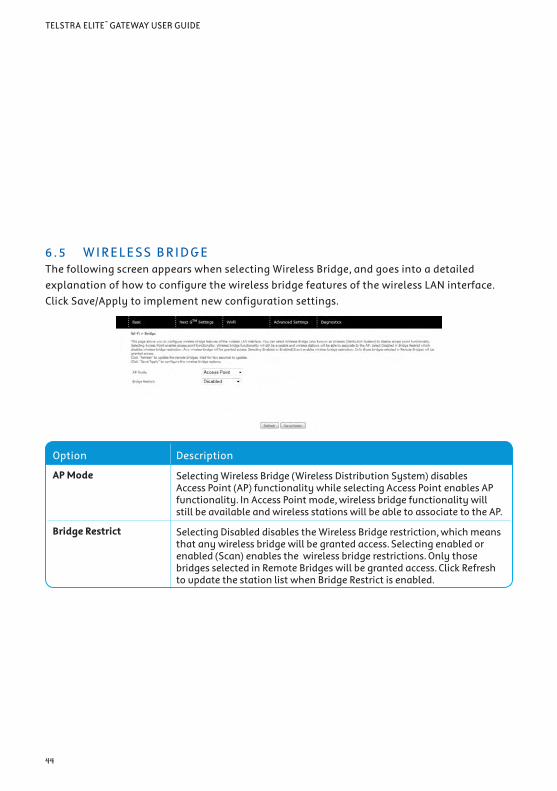
6.5 WIRELESSBRIDGEThefollowingscreenappearswhenselectingWirelessBridge,andgoesintoadetailedexplanationofhowtoconfigurethewirelessbridgefeaturesofthewirelessLANinterface.ClickSave/Applytoimplementnewconfigurationsettings.
Option Description
AP Mode SelectingWirelessBridge(WirelessDistributionSystem)disablesAccessPoint(AP)functionalitywhileselectingAccessPointenablesAPfunctionality.InAccessPointmode,wirelessbridgefunctionalitywillstillbeavailableandwirelessstationswillbeabletoassociatetotheAP.
Bridge Restrict SelectingDisableddisablestheWirelessBridgerestriction,whichmeansthatanywirelessbridgewillbegrantedaccess.Selectingenabledorenabled(Scan)enablesthewirelessbridgerestrictions.OnlythosebridgesselectedinRemoteBridgeswillbegrantedaccess.ClickRefreshtoupdatethestationlistwhenBridgeRestrictisenabled.

TELSTRA ELITE® GATEWAY USER GUIDE
45
6.6 STATION INFOThefollowingscreenappearswhenyouselectStationInfoandshowsauthenticatedwirelessstationsandtheirstatus.ClicktheRefreshbuttontoupdatethelistofstationsintheWLAN
Option Description
MAC TheMAC(MediaAccessControl)addressoftheAP(AccessPoint).
Associated ListsallthestationsthatareassociatedwiththeAccessPoint,alongwiththeamountoftimesincepacketsweretransferredtoandfromeachstation.Ifastationisidlefortoolong,itisremovedfromthislist.
Authorized Liststhosedeviceswithauthorizedaccess.

MANAGEMENT

TELSTRA ELITE® GATEWAY USER GUIDE
47
MANAGEMENT
TheManagementmenuhasthefollowingmaintenancefunctionsandprocesses:
7.1DeviceSettings
7.2 AccessControl
7.3 SimpleNetworkManagementProtocol(SNMP)
7.4 SimpleNetworkTimeProtocol(SNTP)
7.5 SaveandReboot
7 .1 DEVICE SETTINGSTheDeviceSettingsscreensallowyoutobackup,retrieveandrestorethedefaultsettingsofyourgateway.Italsoprovidesafunctionforyoutoupdateyourgateway’ssettings.
7.1 .1 BAC K U P S E T TI N G S
ThefollowingscreenappearswhenBackupisselected.ClicktheBackupSettingsbuttontosavethecurrentconfigurationsettings.
YouwillbepromptedtochoosethelocationtosaveabackupofyoursettingstoonyourPC.

TELSTRA ELITE™ GATEWAY USER GUIDE
48
7.1 . 2 U P DATE S E T TI N G S
ThefollowingscreenappearswhenselectingUpdatefromthesubmenu.ByclickingontheBrowsebutton,youcanlocateapreviouslysavedfilenameastheconfigurationbackupfile.ClickontheUpdatesettingstoloadit.
7.1 . 3 R E S TO R E D E FAU LT
ThefollowingscreenappearswhenselectingRestoreDefault.ByclickingontheRestoreDefaultSettingsbutton,youcanrestoreyourgateway’sdefaultfirmwaresettings.Torestoresystemsettings,rebootyourgateway.
NOTE: The default settings can be found in section 3.3 Default Settings.
OnceyouhaveselectedtheRestoreDefaultSettingsbutton,thefollowingscreenwillappear.Closethewindowandwait2minutesbeforereopeningyourbrowser.Ifrequired,reconfigureyourcomputer’sIPaddresstomatchyournewconfiguration(seesection3.2TCP/IPSettingsfordetails).
NOTE: The Restore Default function has the same effect as the reset button. If the reset button is continuously pushed for more than 5 seconds (and not more than 12 seconds), the boot loader will erase the configuration settings saved on flash memory.

TELSTRA ELITE® GATEWAY USER GUIDE
49
7.1 .4 U P DATE FI R M WAR E
ThefollowingscreenappearswhenselectingUpdateFirmware.Byfollowingthestepsonthisscreen,youcanupdateyourgateway’sfirmware.
1. Obtainanupdatedsoftwareimagefile
2. EnterthepathandfilenameofthefirmwareimagefileintheSoftwareFileNamefieldorclicktheBrowsebuttontolocatetheimagefile.
3. ClicktheUpdateSoftwarebuttononcetouploadandinstallthefile.NOTE: The update process will take about 2 minutes to complete. The gateway will reboot and the browser window will
refresh to the default screen upon successful installation.
ItisrecommendedthatyoucomparetheGatewayFirmwareVersionatthetopoftheBasicscreen(WUIhomepage)withthefirmwareversioninstalled,toconfirmtheinstallationwassuccessful.

TELSTRA ELITE™ GATEWAY USER GUIDE
50
7.2 ACCESSCONTROLTheAccessControloptionfoundintheManagementdropdownmenuconfiguresaccessrelatedparametersinthefollowingtwoareas:
1. Services
2. Passwords
AccessControlisusedtocontrollocalandremotemanagementsettingsforyourGateway.
7. 2 .1 S E RV I C E S
TheServiceControlList(SCL)allowsyoutoenableordisableyourWideAreaNetwork(WAN)servicesbytickingthecheckboxasillustratedbelow.Thefollowingaccessservicesareavailable:FTP,HTTP,ICMP,SSH,TELNET,andTFTP.ClickSave/Applytocontinue.
TELSTRA ELITE® GATEWAY USER GUIDE
51
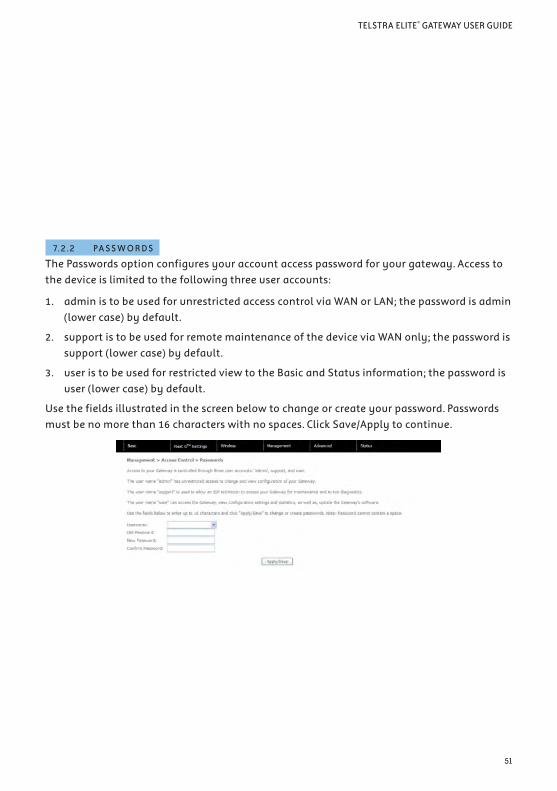
7. 2 . 2 PA S S W O R D S
ThePasswordsoptionconfiguresyouraccountaccesspasswordforyourgateway.Accesstothedeviceislimitedtothefollowingthreeuseraccounts:
1. administobeusedforunrestrictedaccesscontrolviaWANorLAN;thepasswordisadmin(lowercase)bydefault.
2. supportistobeusedforremotemaintenanceofthedeviceviaWANonly;thepasswordissupport(lowercase)bydefault.
3. useristobeusedforrestrictedviewtotheBasicandStatusinformation;thepasswordisuser(lowercase)bydefault.
Usethefieldsillustratedinthescreenbelowtochangeorcreateyourpassword.Passwordsmustbenomorethan16characterswithnospaces.ClickSave/Applytocontinue.

7.3 CONFIGURESNMPAGENTTheSimpleNetworkManagementProtocol(SNMP)allowsanetworkadministratortomonitoranetworkbyretrievingsettingsonremotenetworkdevices.TodothistheadministratortypicallyrunsanSNMPmanagementstationprogramsuchasMIBbrowseronalocalLANhosttoobtaininformationfromtheSNMPagent,inthiscasethe3G21WT(ifSNMPisenabled).AnSNMP‘community’performsthefunctionofauthenticatingSNMPtraffic.A‘communityname’actsasapasswordthatistypicallysharedamongSNMPagentsandmanagers.
Bydefault,SNMPagentisenabledonthegateway.
Setting up SNMP agent
1. GotoManagement>SNMP.EnableSNMPagentandsetupalloptionsaccordingtothescreenshotbelow.
2 ClickSave/Applytoactivatethesesettings.
Option Description
Read Community ReadDeviceSettings
Set Community ReadandchangeDeviceSettings
System Name Setto3G21WTbydefault
System Location User-definedvalue
System Contact User-definedvalue
Trap Manager IP IPaddressofadminmachine

TELSTRA ELITE® GATEWAY USER GUIDE
53
7.4 S IMPLENETWORKTIMEPROTOCOL (SNTP)Thisscreenallowsyoutoconfigurethetimesettingsofyourgateway.ToautomaticallysynchronizewithInternettimeservers,ticktheboxasillustratedbelow.
Thefollowingoptionsareavailableforconfiguration.
First NTP time server: Selecttherequiredserver.
Second NTP time server: Selectsecondtimeserver,ifrequired.
Time zone offset: Selectthelocaltimezone.
ConfiguretheseoptionsandthenclickSave/Applytoactivate.
NOTE: SNTP must be activated to use Parental Control (section 8.3.2).

7.5 SAVEANDREBOOTThisfunctionsavesthecurrentconfigurationsettingsandrebootsyourgateway.
NOTE1: It may be necessary to reconfigure your TCP/IP settings to adjust for the new configuration. For example, if you disable the Dynamic Host Configuration Protocol (DHCP) server you will need to apply Static IP settings.
NOTE2: If you lose all access to your web user interface, simply press the reset button on the rear panel for 6 to 8 seconds to restore default settings.

ADVANCED

TELSTRA ELITE™ GATEWAY USER GUIDE
56
ADVANCED SETTINGS
8.1 LOCAL AREANETWORK (LAN)ThisscreenallowsyoutoconfiguretheLocalAreaNetwork(LAN)interfaceonyourgateway
Seethefielddescriptionsbelowformoredetails.NOTE: If you change the gateway’s address (first option on the chart), you also need to change the gateway ip address on the
usb key so the installation software can communicate with the gateway.
For pc users, please plug the usb key into your pc and click on changegatewayip or changegatewayip.Exe. Type in the new gateway ip address and click run.
For mac os users, please double click into the folder named mac. Click on changegatewayip.App and enter the new gateway ip. Then click on save and close.

TELSTRA ELITE® GATEWAY USER GUIDE
57
Option Description
IP Address EntertheIPaddressfortheLANinterface
Subnet Mask EnterthesubnetmaskfortheLANinterface
Enable Internet Group Management Protocol (IGMP) Snooping
EnablebytickingtheboxStandardMode:Instandardmode,multicasttrafficwillfloodtoallbridgeportswhennoclientsubscribestoamulticastgroup.
BlockingMode:Inblockingmode,themulticastdatatrafficwillbeblocked.Whentherearenoclientsubscriptionstoamulticastgroup,itwillnotfloodtothebridgeports.
Enable NAT Toenable/disableNetworkAddressTranslation(NAT,pleasereferto7.2forNATsetting).BydefaultNATisenabled.
Enable UPnP TicktheboxtoenableUniversalPlugandPlay
Dynamic Host Configuration Protocol (DHCP) Server
SelectenableDHCPserverandenteryourstartingandendingIPaddressesandtheleasetime.ThissettingconfiguresthegatewaytoautomaticallyassignIP,defaultgatewayandDNSserveraddressestoeveryDHCPclientonyourLAN
Static IP Lease List TospecifytheIPaddressassignedthroughDHCPaccordingtotheMACaddressofthehostsconnectedtothegateway.
Enable DHCP Server Relay TorelayDHCPrequestsfromthesubnetwithnoDHCPserveronittoaDHCPserveronothersubnets.DHCPServerRelayisdisabledbydefault.ToaccessenableDHCPrelay,pleaseun-tickNATenablefirst,thatmeanstodisableNATfirst,andthenpresssavebutton.TheenableDHCPserverRelayoptionwillthenshowuponthesamepageasbelow:
ConfigureasecondIPaddressbytickingthecheckboxshownbelowandenterthefollowinginformation:
IP Address: EnterthesecondaryIPaddressfortheLANinterface.
Subnet Mask: EnterthesecondarysubnetmaskfortheLANinterface.
NOTE: The Save button saves new settings to allow continued configuration, while the Save/Reboot button not only saves new settings but also reboots the device to apply the new configuration (i.e. all new settings).
TELSTRA ELITE™ GATEWAY USER GUIDE
58
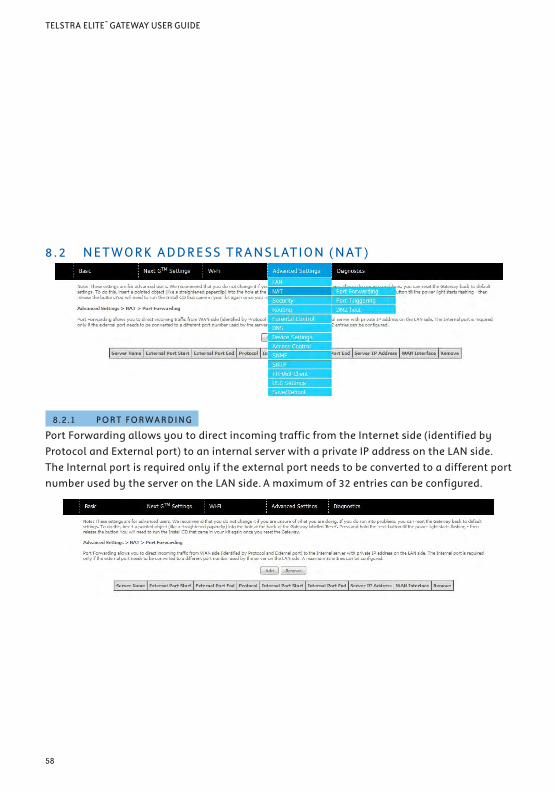
8.2 NETWORKADDRESSTRANSLATION(NAT )
8 . 2 .1 P O RT FO RWAR D I N G
PortForwardingallowsyoutodirectincomingtrafficfromtheInternetside(identifiedbyProtocolandExternalport)toaninternalserverwithaprivateIPaddressontheLANside.TheInternalportisrequiredonlyiftheexternalportneedstobeconvertedtoadifferentportnumberusedbytheserverontheLANside.Amaximumof32entriescanbeconfigured.
TELSTRA ELITE® GATEWAY USER GUIDE
59
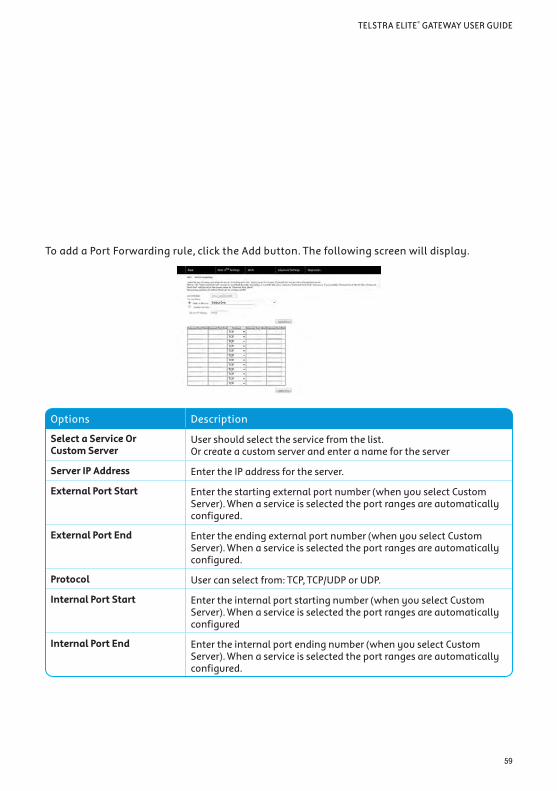
ToaddaPortForwardingrule,clicktheAddbutton.Thefollowingscreenwilldisplay.
Options Description
Select a Service Or Custom Server
Usershouldselecttheservicefromthelist.Orcreateacustomserverandenteranamefortheserver
Server IP Address EntertheIPaddressfortheserver.
External Port Start Enterthestartingexternalportnumber(whenyouselectCustomServer).Whenaserviceisselectedtheportrangesareautomaticallyconfigured.
External Port End Entertheendingexternalportnumber(whenyouselectCustomServer).Whenaserviceisselectedtheportrangesareautomaticallyconfigured.
Protocol Usercanselectfrom:TCP,TCP/UDPorUDP.
Internal Port Start Entertheinternalportstartingnumber(whenyouselectCustomServer).Whenaserviceisselectedtheportrangesareautomaticallyconfigured
Internal Port End Entertheinternalportendingnumber(whenyouselectCustomServer).Whenaserviceisselectedtheportrangesareautomaticallyconfigured.

TELSTRA ELITE™ GATEWAY USER GUIDE
60
8 . 2 . 2 P O RT T R I G G E R I N G
Someapplicationsrequirespecificportsinthegateway’sfirewalltobeopenforaccessbyremoteparties.PortTriggeringopensupthe‘OpenPorts’inthefirewallwhenanapplicationontheLANinitiatesaTCP/UDPconnectiontoaremotepartyusingoneofthe‘TriggeringPorts’.ThegatewayallowstheremotepartyfromtheWANsidetoestablishnewconnectionsbacktotheapplicationontheLANsideusingthe‘OpenPorts’.Amaximum32entriescanbeconfigured
ToaddaTriggerPort,simplyclicktheAddbutton.Thefollowingwillbedisplayed.

TELSTRA ELITE® GATEWAY USER GUIDE
61
Options Description
Select an Application or
Custom ApplicationUsershouldselecttheapplicationfromthelist.orUsercanenterthenameoftheirchoice.
Trigger Port Start Enterthestartingtriggerportnumber(whenyouselectcustomapplication).Whenanapplicationisselected,theportrangesareautomaticallyconfigured.
Trigger Port End Entertheendingtriggerportnumber(whenyouselectcustomapplication).Whenanapplicationisselected,theportrangesareautomaticallyconfigured.
Trigger Protocol TCP,TCP/UDPorUDP.
Open Port Start Enterthestartingopenportnumber(whenyouselectcustomapplication).Whenanapplicationisselected,theportrangesareautomaticallyconfigured.
Open Port End Entertheendingopenportnumber(whenyouselectcustomapplication).Whenanapplicationisselected,theportrangesareautomaticallyconfigured.
Open Protocol TCP,TCP/UDPorUDP.

TELSTRA ELITE™ GATEWAY USER GUIDE
62
8 . 2 . 3 D E M I LITAR I Z E D ( D M Z ) H O S T
YourgatewaywillforwardIPpacketsfromtheWideAreaNetwork(WAN)thatdonotbelongtoanyoftheapplicationsconfiguredintheVirtualServerstabletotheDMZhostcomputer.
Enterthecomputer’sIPaddressandclickApplytoactivatetheDMZhost.
CleartheIPaddressfieldandclickApplytodeactivatetheDMZhost.

TELSTRA ELITE® GATEWAY USER GUIDE
63
8.3 SECURITYYourgatewaycanbesecuredwiththeIPFilteringfunction.
8 . 3 .1 I P FI LTE R I N G
TheIPFilteringscreensetsfilterrulesthatlimitincomingandoutgoingIPtraffic.Multiplefilterrulescanbesetwithatleastonelimitingcondition.AllconditionsmustbefulfilledtoallowindividualIPpacketstopassthroughthefilter.
Outgoing IP Filter
ThedefaultsettingforOutgoingtrafficisACCEPTED.Underthiscondition,alloutgoingIPpacketsthatmatchthefilterruleswillbeBLOCKED.
Toaddafilteringrule,clicktheAddbutton.Thefollowingscreenwilldisplay.

TELSTRA ELITE™ GATEWAY USER GUIDE
64
Options Description
Filter Name Thefilterrulelabel
Protocol TCP,TCP/UDP,UDPorICMP
Source IP address EntersourceIPaddress
Source Subnet Mask Entersourcesubnetmask
Source Port (port or port:port) Entersourceportnumberorportrange
Destination IP address EnterdestinationIPaddress
Destination Subnet Mask Enterdestinationsubnetmask
Destination port (port or port:port) Enterdestinationportnumberorrange
ClickSave/Applytosaveandactivatethefilter.
Incoming IP Filter
ThedefaultsettingforallIncomingtrafficisBLOCKED.UnderthisconditiononlythoseincomingIPpacketsthatmatchthefilterruleswillbeACCEPTED.

TELSTRA ELITE® GATEWAY USER GUIDE
65
Toaddafilteringrule,clicktheAddbutton.Thefollowingscreenwilldisplay.
PleaserefertotheOutgoingIPFiltertableforfielddescriptions.ClickSave/Applytosaveandactivatethefilter.
8 . 3 . 2 PAR E NTAL C O NT R O L
ParentalControlallowsyoutorestrictaccessfromadeviceonyourLocalAreaNetwork(LAN)totheInternetthroughthegatewayonselecteddaysatcertaintimes.MakesuretoactivatetheInternetTimeserversynchronizationasdescribedinsection8.4SNTP,sothatthescheduledtimesmatchyourlocaltime.
ClickAddtodisplaythefollowingscreen.EntertheMACaddressofthedevicethatyouwishtorestrictaccessforandselectdaysoftheweekandtimestoapplytherestriction.

TELSTRA ELITE™ GATEWAY USER GUIDE
66
CompletethefieldslistedbelowandclickSave/Applytoapplythesettings.
Options Description
User Name Auser-definedlabelforthisrestriction
Browser’s MAC Address AllowseasyidentificationofMACaddressofthecomputeryouarecurrentlyusing.
Other MAC Address MACaddressofanotherLANdevice
Days of the Week SelectonemoremoredaysfortherestrictionsfortheenteredMACaddresstoapplyto.
Start Blocking Time EnterthetimeofdayyouwanttherestrictionfortheenteredMACaddresstostart
End Blocking Time EnterthetimeofdayyouwanttherestrictionfortheenteredMACaddresstoend

TELSTRA ELITE® GATEWAY USER GUIDE
67
8.4 ROUTINGStaticRouteandDynamicRoutesettingscanbefoundintheRoutinglinkasillustratedbelow.
8 .4 .1 S TATI C R O U TE
TheStaticRoutescreendisplaystheconfiguredstaticroutes.ClicktheAddorRemovebuttonstochangesettings.
ClicktheAddbuttontodisplaythefollowingscreen.
EnterDestinationNetworkAddress,SubnetMask,gatewayIPAddressand/orWANInterface.ThenclickSave/Applytoaddtheentrytotheroutingtable.

TELSTRA ELITE™ GATEWAY USER GUIDE
68
8 .4 . 2 DY N A M I C R O U TE
Toactivatethisoption,selecttheenabledradiobuttonforGlobalRIPMode.
Toconfigureanindividualinterface,selectthedesiredRIPversionandoperation,followedbyplacingacheckintheenabledcheckboxforthatinterface.ClickSave/Applytosavetheconfigurationandtostartorstopdynamicrouting.

TELSTRA ELITE® GATEWAY USER GUIDE
69
8.5 DOMAINNAMESERVER (DNS)8 . 5 .1 D N S S E RV E R C O N FI G U R ATI O N
IfEnableAutomaticAssignedDNSisselected,thisdevicewillacceptthefirstreceivedDNSassignmentfromtheWideAreaNetwork(WAN)interfaceduringtheconnectionprocess.Otherwise,youcanentertheprimaryandoptionalsecondaryDNSserverIPaddresses.ClickonSavetoapply.
NOTE: Click the Save button to save the new configuration. To make the new configuration effective, reboot your gateway.
8 . 5 . 2 DY N A M I C D N S
TheDynamicDNSserviceallowsadynamicIPaddresstobealiasedtoastatichostnameinanyofaselectionofdomains,allowingthegatewaytobemoreeasilyaccessedfromvariouslocationsontheInternet.
NOTE: The Add/Remove buttons will be displayed only if the gateway has been assigned an IP address from the remote server.

TELSTRA ELITE™ GATEWAY USER GUIDE
70
ToaddadynamicDNSservice,clicktheAddbuttonandthisscreenwilldisplay
Options Description
D-DNS provider SelectadynamicDNSproviderfromthelist.
Hostname EnterthenameforthedynamicDNSserver.
Interface Selecttheinterfacefromthelist.
Username EntertheusernameforthedynamicDNSservice
Password EnterthepasswordforthedynamicDNSservice.

TELSTRA ELITE® GATEWAY USER GUIDE
71
8.6 USBPRINTSERVERThesestepsexplaintheprocedureforenablingthePrintServer.
1. Toenabletheprintserver,selectEnableon-boardprintservercheckboxandenterPrinternameandMakeandmodel
NOTE: The printer name can be any text string up to 40 characters. The Make and model can be any text string up to 128 characters.
F O R W I N D O W S X P :
2: GotothePrintersandFaxesapplicationintheControlPanelandselecttheAddaprinter
function(aslocatedonthesidemenubelow).

TELSTRA ELITE™ GATEWAY USER GUIDE
72
3. ClickNexttocontinue,whenyouseethedialogboxbelow.
4. SelectNetworkPrinterandclickNext.
TELSTRA ELITE® GATEWAY USER GUIDE
73
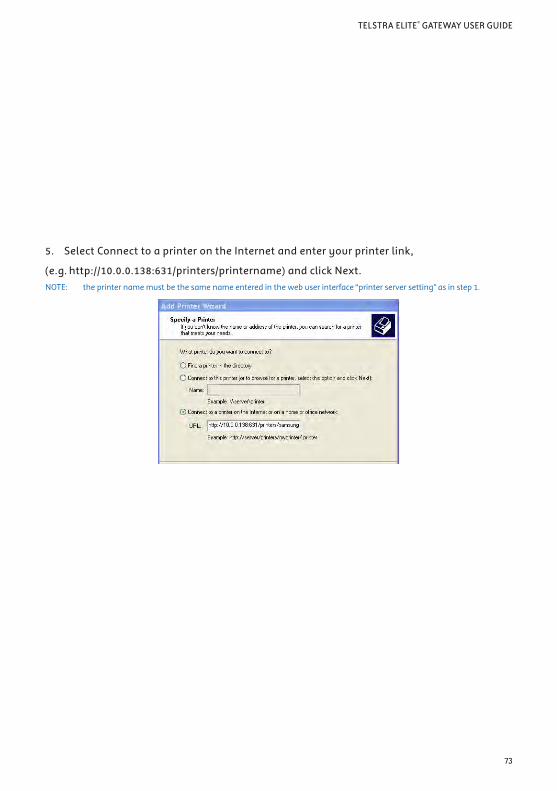
5. SelectConnecttoaprinterontheInternetandenteryourprinterlink,
(e.g.http://10.0.0.138:631/printers/printername)andclickNext.NOTE: the printer name must be the same name entered in the web user interface “printer server setting” as in step 1.

TELSTRA ELITE™ GATEWAY USER GUIDE
74
6. Next,selectthedriverthatcamewithyourprinter.Browsethroughthelisttoselectyourprinterdriver,orclick‘HaveDisk’ifyouhaveyourprinterdriverinstallationmedia.
7. ChooseYesorNofordefaultprintersettingandclickNext.

TELSTRA ELITE® GATEWAY USER GUIDE
75
8.Click“Finish”.
9. CheckthestatusofprinterfromWindowsControlPanel,printerwindow.StatusshouldshowasReady.

TELSTRA ELITE™ GATEWAY USER GUIDE
76
F O R M A C O S X :
2. BrowsetotheApplemenuandselectSystemPreferences.IntheSystemPreferencesmenu
clickonPrint&Fax.
3. WithyourPrinterdriverinstalled,pleaseaddyourprinterfromthePrinter&Faxmenu.
4. Click+toaddyourprinterfromthePrint&Faxmenu.

TELSTRA ELITE® GATEWAY USER GUIDE
77
5. SelectInternetPrintingProtocol–IPPfromtheProtocoldropdownlist.
6. TypeintotheAddressfield“gatewayIPAddress:631”wheregatewayIPAddressistheIPaddressofyourgateway(default:10.0.0.138).Seescreenshotbelowforanexample.AlsoenterintotheQueuefield“/printers/PrinterName”,wherePrinterNameisthenameyougaveyourprinterinstep1
7. SelectyourprinterfromthePrintUsingdropdownlist.

TELSTRA ELITE™ GATEWAY USER GUIDE
78
8. ClickAddandchecktheprinterstatus.
PrintServersetupisnowcomplete.YouwillnowbeabletoprintfromcommonapplicationsbyselectingthisprinterfromthePrintdialoguebox.
FO R W I N D O W S V I S TA
2. Gotothecontrolpanel,andselectPrinters.OnceinthePrinterspage,clicktheAddaprinterbuttonasshownbelow.

TELSTRA ELITE® GATEWAY USER GUIDE
79
3. Selectaddanetwork,wirelessorBluetoothprinter.
4. Clickontheradio-buttonlabeledSelectasharedprinterbyname,andtype“http://10.0.0.138:631/printers/PrinterName”intheboxbelow.ClickNext.
NOTE: The printername must be the same as the printer name entered in the Web User Interface during step 1

TELSTRA ELITE™ GATEWAY USER GUIDE
80
5. Next,selectthedriverthatcamewithyourprinter.Browsethroughthelisttoselectyourprinterdriver,orclick‘HaveDisk’ifyouhaveyourprinterdriverinstallationmedia.
6. Choosewhetheryouwantthisprintertobethedefaultprinter,andthenclickNext.

TELSTRA ELITE® GATEWAY USER GUIDE
81
7. ClickFinish.Yourdeviceisnowconfiguredandreadyforuse.

TELSTRA ELITE™ GATEWAY USER GUIDE
82
8.7 USBSTORAGETheTELSTRAELITETMGATEWAYallowsyoutoconnectaUSBstoragedeviceandshareitwithalloftheusersonthenetwork.
Bydefault,thisfeatureisalreadyenabled,soitissimplyamatterofconnectingyourUSBstoragedeviceandenteringtheappropriatenetworklocation.
Ifyouwishtomodifyanyofthesefeatures,thestepsbelowexplaintheprocedureforenablingtheUSBStorage.
1: EnsurethattheEnableUSBStoragecheckboxischeckedintheWebUserInterface.
Todothis,logontheWUIthenselectAdvanced>USBStoragefromthemenualongthetopofthepage.SelecttheEnableUSBStoragecheckboxandentertheGatewayNameandUSBDriveName
Field Description
Gateway Name Thehostnameofthegatewaydevice.ThisshouldonlybemodifiediftherearemultipleTELSTRAELITETMGATEWAY’sonyournetwork.Thedefaultnameis“Telstra21”.
USB Drive Name ThenameofUSBdrive.ThisshouldonlybemodifiediftherearemultipleUSBdevicesconnectedtoyourTELSTRAELITETMGATEWAY.Thedefaultnameis“USB-Storage”
TELSTRA ELITE® GATEWAY USER GUIDE
83
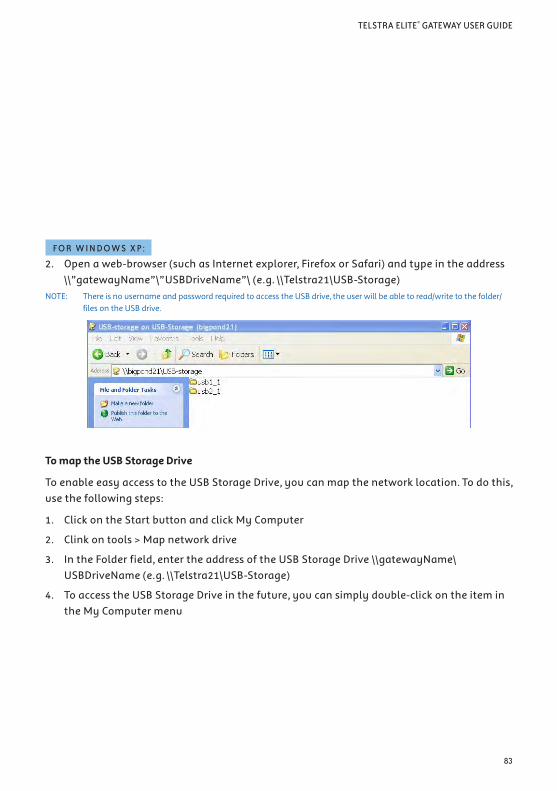
FO R W I N D O W S X P :
2. Openaweb-browser(suchasInternetexplorer,FirefoxorSafari)andtypeintheaddress\\”gatewayName”\”USBDriveName”\(e.g.\\Telstra21\USB-Storage)
NOTE: There is no username and password required to access the USB drive, the user will be able to read/write to the folder/files on the USB drive.
To map the USB Storage Drive
ToenableeasyaccesstotheUSBStorageDrive,youcanmapthenetworklocation.Todothis,usethefollowingsteps:
1. ClickontheStartbuttonandclickMyComputer
2. Clinkontools>Mapnetworkdrive
3. IntheFolderfield,entertheaddressoftheUSBStorageDrive\\gatewayName\USBDriveName(e.g.\\Telstra21\USB-Storage)
4. ToaccesstheUSBStorageDriveinthefuture,youcansimplydouble-clickontheitemintheMyComputermenu

TELSTRA ELITE™ GATEWAY USER GUIDE
84
FO R MAC O S X :
2. FromtheFinder,selecttheGoandthenclickConnecttoServer
3. IntheaddressfieldoftheConnecttoServerdialog,typeintheaddress:
smb://“gatewayName”/“USBDriveName”(e.g.smb://Telstra21/USB-Storage)
4. Clickthe+buttontoaddthisservertothelistofFavouritesandthenclickConnect
TELSTRA ELITE® GATEWAY USER GUIDE
85
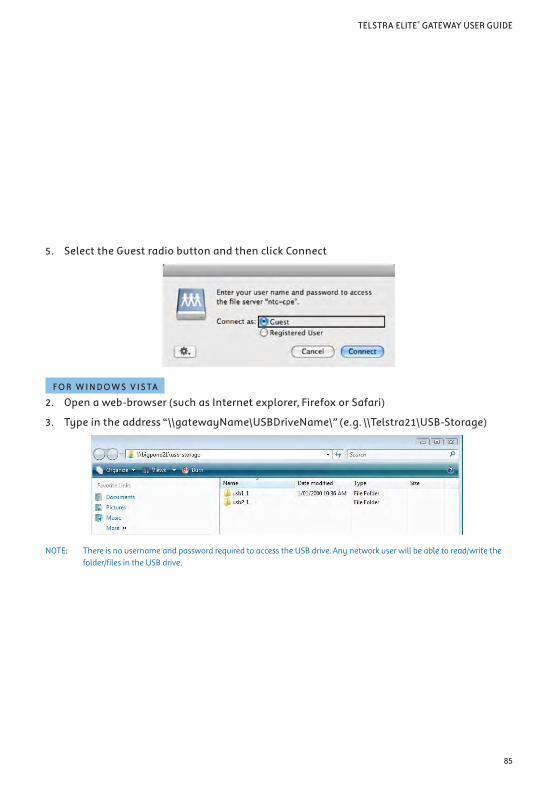
5. SelecttheGuestradiobuttonandthenclickConnect
FO R W I N D O W S V I S TA
2. Openaweb-browser(suchasInternetexplorer,FirefoxorSafari)
3. Typeintheaddress“\\gatewayName\USBDriveName\”(e.g.\\Telstra21\USB-Storage)
NOTE: There is no username and password required to access the USB drive. Any network user will be able to read/write the folder/files in the USB drive.

TELSTRA ELITE™ GATEWAY USER GUIDE
86
TO MAP TH E U S B S TO R AG E D R I V E
ToenableeasyaccesstotheUSBStorageDrive,youcanmapthenetworklocation.Todothis,usethefollowingsteps:
1. ClickontheStartbuttonandclickComputer
2. ClicktheMapnetworkdrivebutton
3. IntheFolderfield,entertheaddressoftheUSBStorageDrive\\gatewayName\USBDriveName(e.g.\\Telstra21\USB-Storage)
4. ToaccesstheUSBStorageDriveinthefuture,youcansimplydouble-clickontheitemintheComputermenu

TELSTRA ELITE® GATEWAY USER GUIDE
87
DIAGNOSTICS

TELSTRA ELITE™ GATEWAY USER GUIDE
88
TheDiagnosticsmenuhasthefollowingsubmenus:
• Diagnostics
• SystemLog
• NextG™Network
• Statistics
• Route
• ARP
• DHCP
• PING
DIAGNOSTICS

TELSTRA ELITE® GATEWAY USER GUIDE
89
9.1 DIAGNOSTICSTheDiagnosticsmenuprovidesfeedbackontheconnectionstatusofthedevice.Theindividualtestsarelistedbelow.IfatestdisplaysafailstatusclickontheHelplinkandfollowthestepsshown:
1. NowclickRe-runDiagnosticTestsatthebottomofthescreentore-testandconfirmtheerror
2. Ifthetestcontinuestofailcontacttechnicalsupportforfurtherassistance

TELSTRA ELITE™ GATEWAY USER GUIDE
90
Field Description
ENET Connection Pass:IndicatesthattheEthernetinterfacefromyourcomputerisconnectedtotheLANportofthisgateway.
Fail:IndicatesthatthegatewaydoesnotdetecttheEthernetinterfaceonyourcomputer.
Wireless connection Pass:IndicatesthatthewirelesscardisON.
Down:IndicatesthatthewirelesscardisOFF.
Ping Default
Gateway
Pass:IndicatesthatthegatewaycancommunicatewiththefirstentrypointtotheWANnetwork.ItisusuallytheIPaddressoftheISP’slocalGateway.
Fail:IndicatesthatthegatewaywasunabletocommunicatewiththefirstentrypointontheWANnetwork.
Ping Primary Domain
Name Server
Pass:IndicatesthatthegatewaycancommunicatewiththeprimaryDomainNameServer(DNS).
Fail:IndicatesthatthegatewaywasunabletocommunicatewiththeprimaryDomainNameServer(DNS).

TELSTRA ELITE® GATEWAY USER GUIDE
91
9.2 SYSTEMLOGThisfunctionallowsyoutoviewsystemeventsandconfigurerelatedoptions.FollowthestepsbelowtoenableandviewtheSystemLog.
1. ClickConfigureSystemLogtocontinue.
2. Selectthesystemlogoptions(seetablebelow)andclickSave/Apply.

TELSTRA ELITE™ GATEWAY USER GUIDE
92
Name Description
Log Indicateswhetherthesystemiscurrentlyrecordingevents.Youcanenableordisableeventlogging.Bydefault,itisdisabled.
Log level Allowsyoutoconfiguretheeventlevelandfilteroutunwantedeventsbelowthislevel.Theeventsrangefromthehighestcriticallevel
“Emergency”downtothisconfiguredlevelwillberecordedtothelogbufferonthegateway’sSDRAM.Whenthelogbufferisfull,thenewesteventwillwrapuptothetopofthelogbufferandoverwritetheoldestevent.Bydefault,theloglevelis“Debugging”,whichisthelowestcriticallevel.Theloglevelsaredefinedasfollows:
Emergencyisthemostseriouseventlevel,whereasDebuggingistheleastimportant.Forinstance,iftheloglevelissettoDebugging,alltheeventsfromthelowestDebuggingleveltothemostcriticallevelemergencylevelwillberecorded.Iftheloglevelissettoerror,onlyerrorandthelevelabovewillbelogged.
Display Level AllowsyoutoselecttheloggedeventsanddisplaysontheViewSystemLogwindowforeventsofthislevelandabovetothehighestemergencylevel.
Mode Allowsyoutospecifywhethereventsshouldbestoredinthelocalmemorybesenttoaremotesyslogserver,ortobothsimultaneously.Ifremotemodeisselected,theviewsystemlogwillnotbeabletodisplayeventssavedintheremotesyslogserver.
WheneitherRemotemodeorBothmodeisconfigured,theWebUIwillprompttheyoutoentertheServerIPaddressandServerUDPportwheresyslogisrunning.
3: ClickViewSystemLog.Theresultsaredisplayedasfollows.

TELSTRA ELITE® GATEWAY USER GUIDE
93
9.3 NEXTGTMNETWORKSelectthisoptionfordetailedstatusinformationonyourgateway’s3Gconnection.
Consultthetableonthenextpagefordetailedfielddescriptions

TELSTRA ELITE™ GATEWAY USER GUIDE
94
Field Description
Manufacturer Themanufactureroftheembedded3Gmodule.
Model Themodelnameoftheembedded3Gmodule.
FW Rev� Thefirmwareversionofthe3Gmodule.
IMEI TheIMEI(InternationalMobileequipmentIdentity)isa15digitnumberthatisusedtoidentifyamobiledeviceonanetwork.
FSN FactorySerialNumberofthe3Gmodule.
IMSI TheIMSI(InternationalMobileSubscriberIdentity)isaunique15-digitnumberusedtoidentifyanindividualuseronaUMTSnetwork.
HW Rev� Thehardwareversionofthe3Gmodule.
Temperature Thetemperatureofthe3GmoduleindegreesCelsius.
System Mode WCDMA/EuropeCMDA2000/America
WCDMA band The3Gradiofrequencybandwhichsupportsdual-bandUTMS/HSDPA/HSUPAfrequencies(850/2100MHz),IMT2000is2100MHz,WCDMA800is850MHz
WCDMA channel The3Gchannel.
MM (CS) state CircuitSwitchingstate
Signal Strength The3GsignalstrengthindBm.
Signal level
in dBm
-109 ~ -103 -101 ~ -93 -91 ~ -87 -85 ~ -79 -77 ~ -52
5 Signal bars
LED Low Medium High
TELSTRA ELITE® GATEWAY USER GUIDE
95
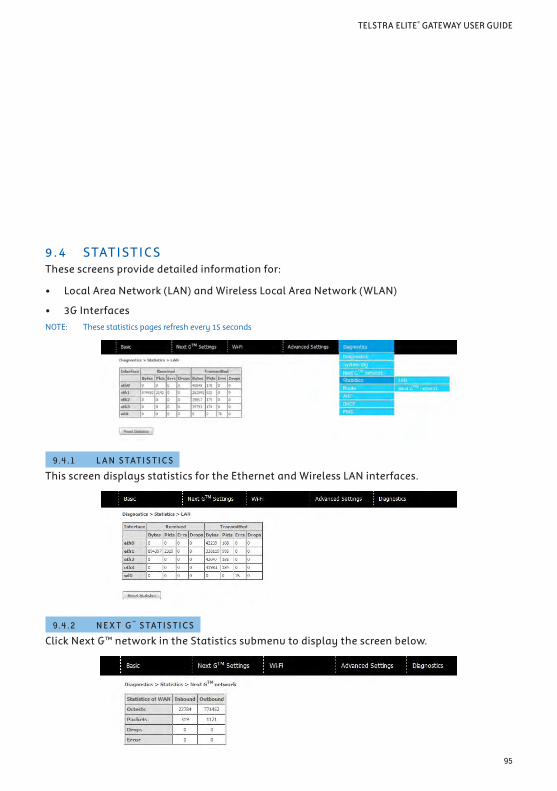
9.4 STATISTICSThesescreensprovidedetailedinformationfor:
• LocalAreaNetwork(LAN)andWirelessLocalAreaNetwork(WLAN)
• 3GInterfacesNOTE: These statistics pages refresh every 15 seconds
9 .4 .1 L AN S TATI S TI C S
ThisscreendisplaysstatisticsfortheEthernetandWirelessLANinterfaces.
9 .4 . 2 N E X T G ™ S TATI S TI C S
ClickNextG™networkintheStatisticssubmenutodisplaythescreenbelow.

TELSTRA ELITE™ GATEWAY USER GUIDE
96
9.5 ROUTESelectRoutetodisplaythepathsthegatewayhasfound.
Field Description
Destination Destinationnetworkordestinationhost
Gateway nexthopIPaddress
Subnet Mask SubnetmaskofDestination
Flag U:routeisup
!:rejectroute
G:usegateway
H:targetisahost
R:reinstateroutefordynamicrouting
D:dynamicallyinstalledbydaemonorredirect
M:modifiedfromroutingdaemonorredirect
Metric The‘distance’tothetarget(usuallycountedinhops).Itisnotusedbyrecentkernels,butmaybeneededbyroutingdaemons.
Service ShowsthenameforWANconnection
Interface Showsconnectioninterfaces

TELSTRA ELITE® GATEWAY USER GUIDE
97
9.6 ARPClickARPtodisplaytheARPinformation.
Field Description
IP address ShowsIPaddressofaconnecteddevice
Flags Complete
Incomplete
Permanent
Publish
HW Address ShowstheMACaddressofaconnecteddevice
Device Showstheconnectioninterface

TELSTRA ELITE™ GATEWAY USER GUIDE
98
9.7 DYNAMICHOSTCONFIGURATIONPROTOCOL (DHCP)ClickDHCPtodisplaytheDHCPinformation.
Field Description
Hostname Showsthedevice/host/PCnetworkname
MACAddress ShowstheEthernetMACaddressofthedevice/host/Pc
IPaddress ShowsIPaddressofdevice/host/PC
ExpiresIn ShowshowmuchtimeisleftforeachofthelistedDHCPLeases

TELSTRA ELITE® GATEWAY USER GUIDE
99
9.8 P INGThePINGmenuprovidesaconnectiontesttoanIPaddressorahostname.
InputanIPaddressorahostname,e.gwww.google.comandpressSubmit.Theconnectiontestresultwillbeshownasbelow.
Theabovescreenshowsasuccessfulpingresult.

100
FORMOREINFORMATIONCALL1300136841
VISITTELSTRA.COM
VISITATELSTRASTORE


