10
AEROCOOL ADVANCED TECHNOLOGIES CORP. ALL RIGHTS RESERVED. aerocool.com.tw Tempered Glass Edition / RGB Mid Tower Chassis User’s Manual

AEROCOOL ADVANCED TECHNOLOGIES CORP. ALL RIGHTS RESERVED.
aerocool.com.tw
Tempered Glass Edition / RGB Mid Tower ChassisUser’s Manual
32
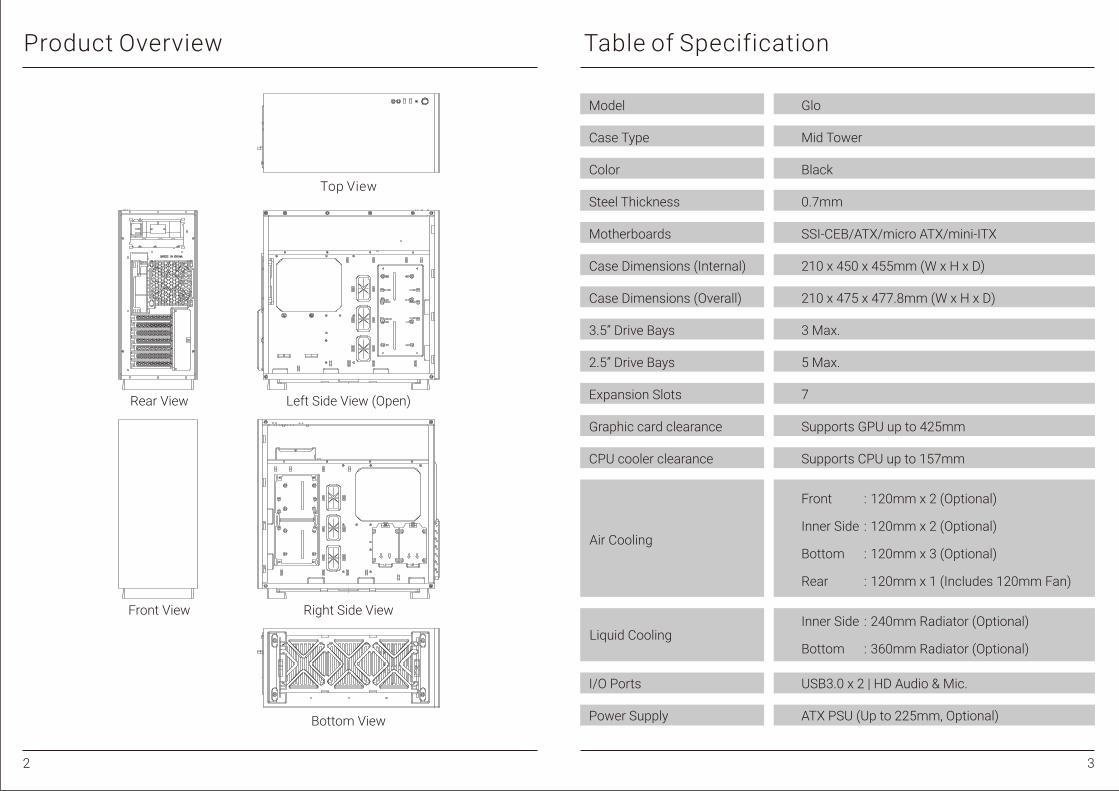
Product Overview Table of Specification
Top View
Left Side View (Open)
Right Side View
Bottom View
Front View
Rear View
Model
Case Type
Color
Steel Thickness
Motherboards
Case Dimensions (Internal)
Case Dimensions (Overall)
3.5” Drive Bays
2.5” Drive Bays
Expansion Slots
Graphic card clearance
CPU cooler clearance
I/O Ports
Power Supply
Glo
Mid Tower
Black
0.7mm
SSI-CEB/ATX/micro ATX/mini-ITX
210 x 450 x 455mm (W x H x D)
210 x 475 x 477.8mm (W x H x D)
3 Max.
5 Max.
7
Supports GPU up to 425mm
Supports CPU up to 157mm
120mm x 2 (Optional)
120mm x 2 (Optional)
120mm x 3 (Optional)
120mm x 1 (Includes 120mm Fan)
Front
Inner Side
Bottom
Rear
:
:
:
:
:
:
Inner Side
Bottom
240mm Radiator (Optional)
360mm Radiator (Optional)
Air Cooling
Liquid Cooling
USB3.0 x 2 | HD Audio & Mic.
ATX PSU (Up to 225mm, Optional)
1
Contents
2
4
5
9
8
6
6
10
12
14
3
5
Product Overview
Table of Specification
Product Diagram
I/O Panel Connector
Accessory Bag Contents
How to Install Guide
Install Power Supply
Install Motherboard
Install Add-on Card Install SSD
Install HDD
Annotation

54
Front Panel Connector
Motherboard
POW
ER S
W+
HD
D L
ED+
HD
D L
ED+
HD
D L
ED-
+
Product Diagram
Accessory Bag Contents
I/O Panel Connector(Please refer to the motherboard’s manual for further instructions).
Motherboard Stand off SSD ScrewMotherboard Screw
Glass Panel
Cooling Fan
Dust FilterFront Panel
HDD Cage
SSD/HDD Cage
SSD Cages
PSU Screw 3.5" HDD Screw
HD AUDIO
5V D G+
76
- Крепления для снятия боковой панели легко отсоединяются- Установите блок питания
Rусский
- Simplesmente solte os parafusos para remover o painel lateral- Instalar a fonte de alimentação
Português
- 螺絲不需全部轉下- 安裝電源供應器
- 螺丝不需全部转下- 安装电源供应器
繁中/简中
- ネジを緩めて、サイドパネルを 取り外します- PSUを取り付けます
日本語
- Бүйірлік панельді шешуге арналған бекіндірмелер жеңіл алынады- Қорек блогын орнатыңыз
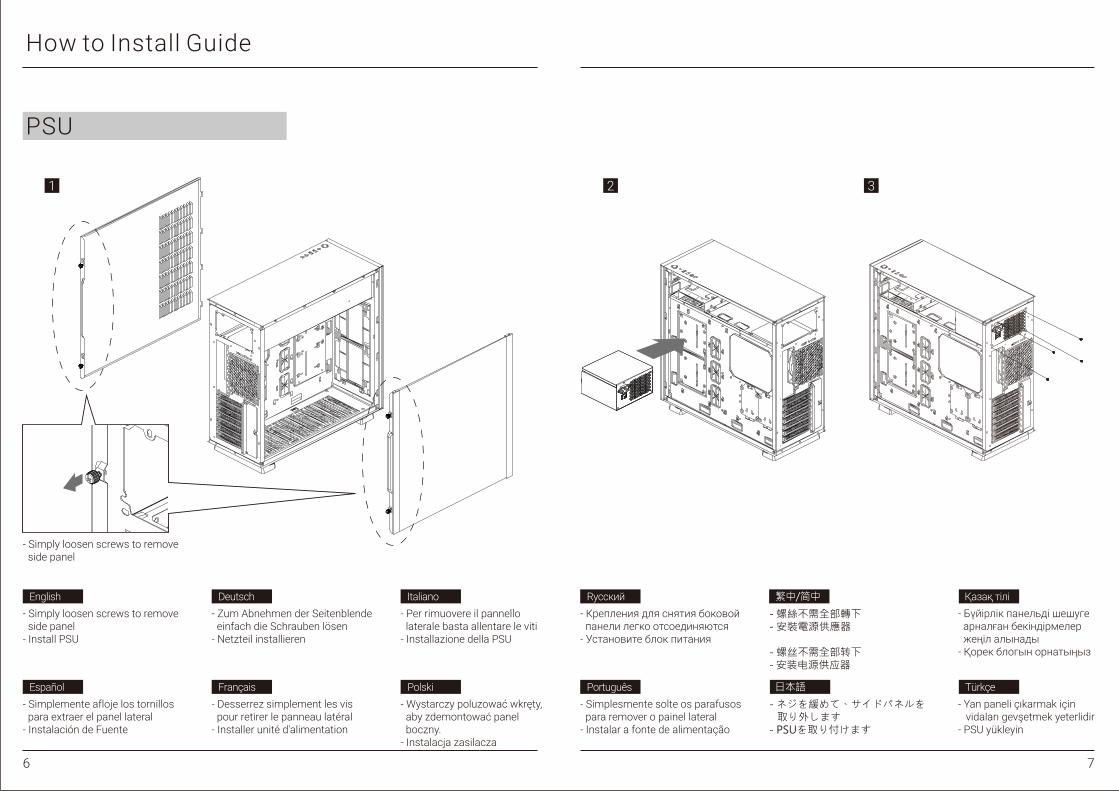
Қазақ тілі- Simply loosen screws to remove side panel - Install PSU
English
- Simplemente afloje los tornillos para extraer el panel lateral- Instalación de Fuente
Español
- Zum Abnehmen der Seitenblende einfach die Schrauben lösen- Netzteil installieren
Deutsch
- Desserrez simplement les vis pour retirer le panneau latéral- Installer unité d'alimentation
Français
- Per rimuovere il pannello laterale basta allentare le viti- Installazione della PSU
Italiano
- Wystarczy poluzować wkręty, aby zdemontować panel boczny.- Instalacja zasilacza
Polski- Yan paneli çıkarmak için vidaları gevşetmek yeterlidir- PSU yükleyin
Türkçe
How to Install Guide
PSU
1 2 3
- Simply loosen screws to remove side panel

98
How to Install Guide
- マザーボードを取り付けます
- Anakart yükleyin
- Установите материнскую плату
- Installer carte mère
- Аналық тақтаны орнатыңыз
- Installazione della scheda madre- Install Motherboard
- Instalar a placa principal
- Instalacja płyty głównej
- Motherboard installieren
- Instalación de Placa madre
Rусский
Português
- 安裝主機板- 安装主机板
繁中/简中
日本語
Қазақ тілі
English
Español
Deutsch
Français
Italiano
Polski
Türkçe
1 2
Motherboard
- ドオンカードを挿入します
- Eklenti Yükleme Kartı
- Установите плату расширения.
- Insérez la carte d'extension
- Кеңейту тақшасын салыңыз
- Inserire la scheda aggiuntiva- Install Add-on Card
- Insira a placa suplementar
- Włóż dodatkową kartę
- Setzen Sie die Erweiterungskarte ei
- Inserte la tarjeta add-on
Rусский
Português
- 安裝擴充卡- 安装扩充卡
繁中/简中
日本語
Қазақ тілі
English
Español
Deutsch
Français
Italiano
Polski
Türkçe
1 2
Add-on Card
1110
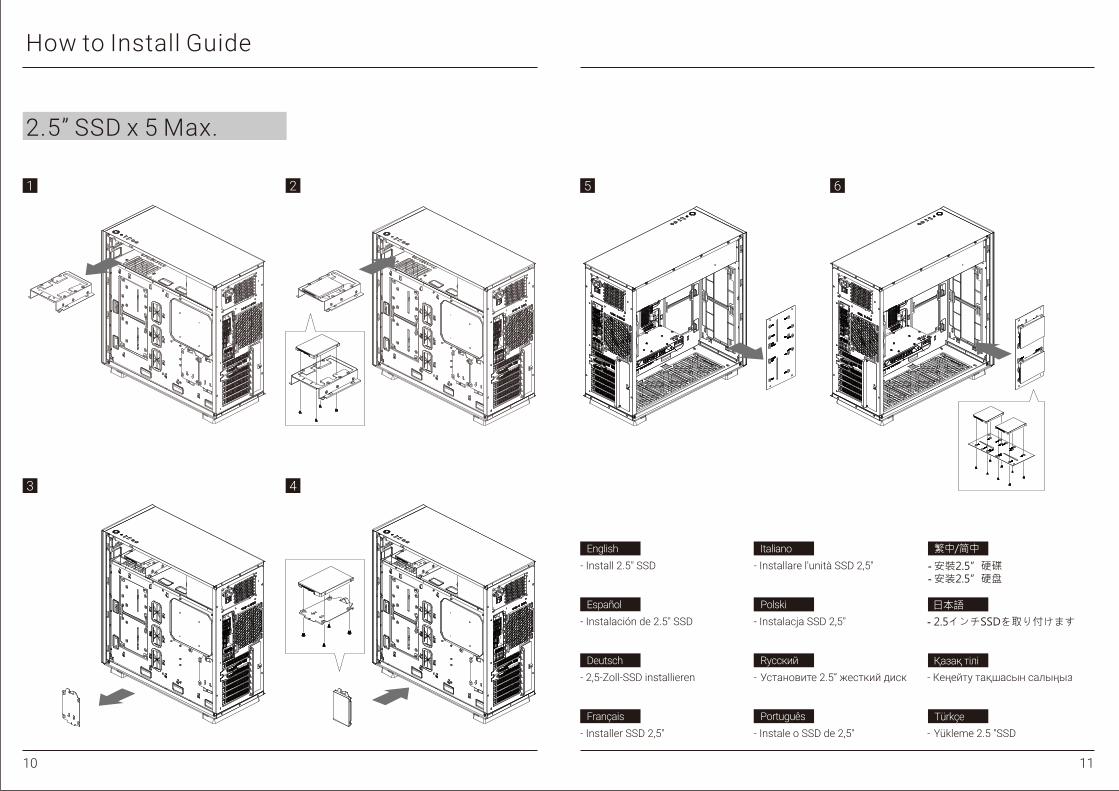
- 2.5インチSSDを取り付けます
- Yükleme 2.5 "SSD
- Установите 2.5” жесткий диск
- Installer SSD 2,5"
- Кеңейту тақшасын салыңыз
- Installare l'unità SSD 2,5"- Install 2.5" SSD
- Instale o SSD de 2,5"
- Instalacja SSD 2,5"
- 2,5-Zoll-SSD installieren
- Instalación de 2.5" SSD
Rусский
Português
- 安裝2.5”硬碟- 安装2.5”硬盘
繁中/简中
日本語
Қазақ тілі
English
Español
Deutsch
Français
Italiano
Polski
Türkçe
How to Install Guide
1 2
3 4
2.5” SSD x 5 Max.
5 6
10

1312
- Установите 3.5” жесткий дискRусский
- Instalar o HDD de 3,5"Português
- 安裝3.5”硬碟- 安装3.5”硬盘
繁中/简中
- Install 3.5" HDDEnglish
- Instalación de 3.5" HDDEspañol
- 3,5-Zoll-Festplatte installierenDeutsch
- Installer disque dur 3,5"Français
- Installare l'unità HDD 3,5"Italiano
- Instalacja HDD 3,5"Polski
- 3.5インチHDDを取り付けます日本語
- 3.5 «қатты дискіні» орнатыңыз
Қазақ тілі
- Yükleme 3.5 "HDD Türkçe
How to Install Guide
1 2
3.5” HDD x 3Max.
3 4
12
1514
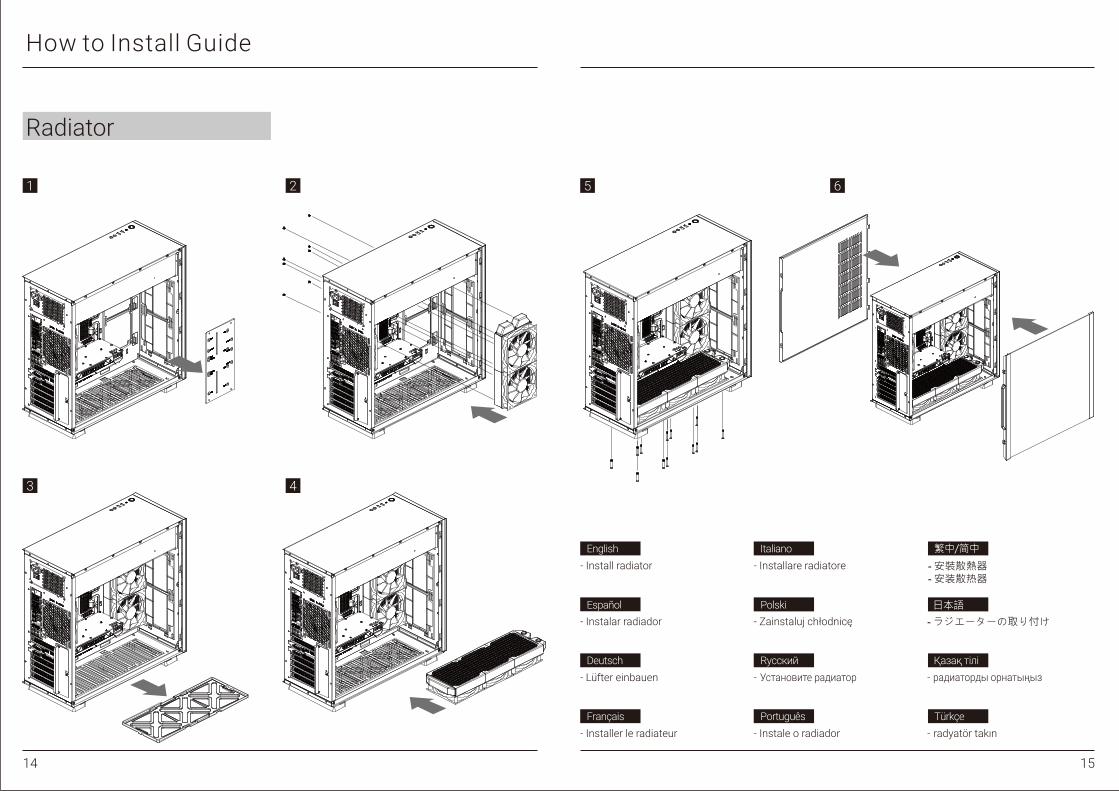
How to Install Guide
Radiator
- ラジエーターの取り付け
- radyatör takın
- Установите радиатор
- Installer le radiateur
- радиаторды орнатыңыз
- Installare radiatore- Install radiator
- Instale o radiador
- Zainstaluj chłodnicę
- Lüfter einbauen
- Instalar radiador
Rусский
Português
- 安裝散熱器- 安装散热器
繁中/简中
日本語
Қазақ тілі
English
Español
Deutsch
Français
Italiano
Polski
Türkçe
1 2
3 4
5 6
14
16
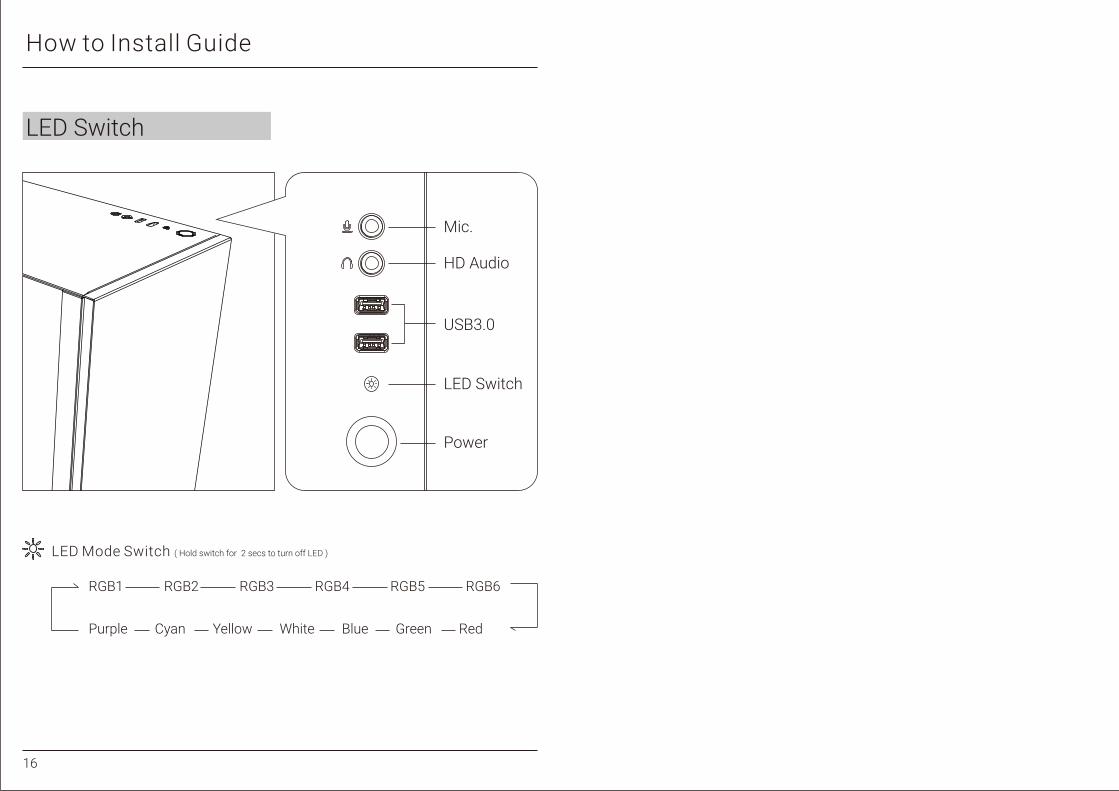
How to Install Guide
LED Switch
Purple Cyan Yellow White Blue Green Red
LED Mode Switch ( Hold switch for 2 secs to turn off LED )
Power
USB3.0
LED Switch
HD Audio
Mic.
RGB1 RGB2 RGB3 RGB4 RGB5 RGB6
16


