75
TEMS ™ Investigation 9.1 Getting Started Manual
| Date post: | 03-Jun-2018 |
| Category: |
Documents |
| Upload: | huuthuan2912 |
| View: | 220 times |
| Download: | 0 times |
8/13/2019 TEMS Investigation 9.1 Getting Started Manual
http://slidepdf.com/reader/full/tems-investigation-91-getting-started-manual 1/74
TEMS™ Investigation 9.1
Getting Started Manual
8/13/2019 TEMS Investigation 9.1 Getting Started Manual
http://slidepdf.com/reader/full/tems-investigation-91-getting-started-manual 2/74
This manual is provided by Ascom Network Testing AB without any kind of
warranty. Improvements and changes in this description due to typographical
errors or inaccuracies in current information, or improvements to programs
and/or equipment may be made by Ascom Network Testing AB at any time
without notice. These changes will, however, be incorporated into new
editions of this manual.
No part of this publication may be reproduced, transmitted, stored in a
retrieval system, nor translated into any human or computer language, in any
form or by any means, electronic, mechanical, magnetic, optical, chemical,
manual or otherwise, without the prior written permission of the copyrighted
owner, Ascom Network Testing AB.
TEMS is a trademark of Ascom.
All other trademarks are the property of their respective holders.
© Ascom 2009. All rights reserved.
Publication number: LZT 108 9852 R2A

8/13/2019 TEMS Investigation 9.1 Getting Started Manual
http://slidepdf.com/reader/full/tems-investigation-91-getting-started-manual 3/74
Contents
LZT 108 9852 R2A i
Contents
1. Introduction 1
1.1. What Is the Getting Started Manual? . . . . . . . . . . . . . . . . . . . . . . . . 1
1.2. What’s in This Manual (and What’s Not) . . . . . . . . . . . . . . . . . . . . . . 1
1.3. Definitions . . . . . . . . . . . . . . . . . . . . . . . . . . . . . . . . . . . . . . . . . . . . . 3
2. Product Packaging 5
2.1. Base Packages . . . . . . . . . . . . . . . . . . . . . . . . . . . . . . . . . . . . . . . . . 5
2.2. Analysis Packages . . . . . . . . . . . . . . . . . . . . . . . . . . . . . . . . . . . . . . 6
2.3. Further Licensing Options . . . . . . . . . . . . . . . . . . . . . . . . . . . . . . . . . 6
2.3.1. Licensing for External Devices. . . . . . . . . . . . . . . . . . . . . . . . 6
2.3.2. Licensing for AQM (PESQ) . . . . . . . . . . . . . . . . . . . . . . . . . . 7
2.3.2.1. Mobile-to-fixed AQM . . . . . . . . . . . . . . . . . . . . . . . . . . 7
2.3.2.2. Mobile-to-mobile AQM. . . . . . . . . . . . . . . . . . . . . . . . . 72.3.3. Network (Floating) Licenses. . . . . . . . . . . . . . . . . . . . . . . . . . 8
2.4. Accessories . . . . . . . . . . . . . . . . . . . . . . . . . . . . . . . . . . . . . . . . . . . . 8
3. Configuring the PC for TEMS Investigation DataCollection 9
3.1. Administrator Rights . . . . . . . . . . . . . . . . . . . . . . . . . . . . . . . . . . . . . 9
3.2. Advanced Power Management (APM) . . . . . . . . . . . . . . . . . . . . . . 10
3.3. Automatic Updating of Software . . . . . . . . . . . . . . . . . . . . . . . . . . . 10
3.4. AutoPlay . . . . . . . . . . . . . . . . . . . . . . . . . . . . . . . . . . . . . . . . . . . . . 10
3.5. Bluetooth . . . . . . . . . . . . . . . . . . . . . . . . . . . . . . . . . . . . . . . . . . . . . 10
3.6. Documents/My Documents Folder . . . . . . . . . . . . . . . . . . . . . . . . . 10
3.7. Intel SpeedStep. . . . . . . . . . . . . . . . . . . . . . . . . . . . . . . . . . . . . . . . 11
3.8. IR Port . . . . . . . . . . . . . . . . . . . . . . . . . . . . . . . . . . . . . . . . . . . . . . . 11
3.9. Port-scanning Software. . . . . . . . . . . . . . . . . . . . . . . . . . . . . . . . . . 11
3.10. RTP (UDP) Ports for Video Streaming . . . . . . . . . . . . . . . . . . . . . 11
3.11. Security Products . . . . . . . . . . . . . . . . . . . . . . . . . . . . . . . . . . . . . 11
8/13/2019 TEMS Investigation 9.1 Getting Started Manual
http://slidepdf.com/reader/full/tems-investigation-91-getting-started-manual 4/74
TEMS Investigation 9.1 Getting Started Manual
ii
3.12. Sleep Mode, Screen Savers, Energy Saving Features. . . . . . . . . 12
3.13. USB Legacy Support . . . . . . . . . . . . . . . . . . . . . . . . . . . . . . . . . . 12
3.14. Windows Firewall . . . . . . . . . . . . . . . . . . . . . . . . . . . . . . . . . . . . . 12
3.15. Windows Media Player . . . . . . . . . . . . . . . . . . . . . . . . . . . . . . . . . 123.16. Windows Power Management . . . . . . . . . . . . . . . . . . . . . . . . . . . 12
3.17. Windows Vista Specific Settings. . . . . . . . . . . . . . . . . . . . . . . . . . 13
3.17.1. Aero Glass . . . . . . . . . . . . . . . . . . . . . . . . . . . . . . . . . . . . . 13
3.17.2. IPv6 . . . . . . . . . . . . . . . . . . . . . . . . . . . . . . . . . . . . . . . . . . 13
3.18. Windows XP Specific Settings . . . . . . . . . . . . . . . . . . . . . . . . . . . 13
3.19. WLAN (IEEE 802.11) . . . . . . . . . . . . . . . . . . . . . . . . . . . . . . . . . . 13
4. External Equipment 14
4.1. Connectable Equipment . . . . . . . . . . . . . . . . . . . . . . . . . . . . . . . . . 14
4.1.1. Phones and Data Cards. . . . . . . . . . . . . . . . . . . . . . . . . . . . 14
4.1.1.1. UMTS . . . . . . . . . . . . . . . . . . . . . . . . . . . . . . . . . . . . 14
4.1.1.2. CDMA . . . . . . . . . . . . . . . . . . . . . . . . . . . . . . . . . . . . 16
4.1.2. Fixed Wireless Terminals. . . . . . . . . . . . . . . . . . . . . . . . . . . 16
4.1.3. AQM Modules . . . . . . . . . . . . . . . . . . . . . . . . . . . . . . . . . . . 16
4.1.4. Scanners . . . . . . . . . . . . . . . . . . . . . . . . . . . . . . . . . . . . . . . 16
4.1.4.1. UMTS . . . . . . . . . . . . . . . . . . . . . . . . . . . . . . . . . . . . 16
4.1.4.2. LTE . . . . . . . . . . . . . . . . . . . . . . . . . . . . . . . . . . . . . . 18
4.1.4.3. CDMA . . . . . . . . . . . . . . . . . . . . . . . . . . . . . . . . . . . . 18
4.1.4.4. WiMAX . . . . . . . . . . . . . . . . . . . . . . . . . . . . . . . . . . . 18
4.1.5. GPS Units . . . . . . . . . . . . . . . . . . . . . . . . . . . . . . . . . . . . . . 18
4.2. Capabilities of Phones and Data Cards Sold with TEMS
Investigation. . . . . . . . . . . . . . . . . . . . . . . . . . . . . . . . . . . . . . . . 20
4.3. Basic Configuration of Phones and Data Cards . . . . . . . . . . . . . . . 22
4.4. Cables to Use with Phones. . . . . . . . . . . . . . . . . . . . . . . . . . . . . . . 22
4.5. Connecting External Antennas to Phones . . . . . . . . . . . . . . . . . . . 22
4.6. Scanners. . . . . . . . . . . . . . . . . . . . . . . . . . . . . . . . . . . . . . . . . . . . . 23
4.6.1. Anritsu . . . . . . . . . . . . . . . . . . . . . . . . . . . . . . . . . . . . . . . . . 23
4.6.2. PCTel: General . . . . . . . . . . . . . . . . . . . . . . . . . . . . . . . . . . 24
4.6.3. PCTel SeeGull LX . . . . . . . . . . . . . . . . . . . . . . . . . . . . . . . . 24
4.6.4. PCTel SeeGull EX . . . . . . . . . . . . . . . . . . . . . . . . . . . . . . . . 24
4.7. GPS Units: Configuration . . . . . . . . . . . . . . . . . . . . . . . . . . . . . . . . 25

8/13/2019 TEMS Investigation 9.1 Getting Started Manual
http://slidepdf.com/reader/full/tems-investigation-91-getting-started-manual 5/74
Contents
LZT 108 9852 R2A iii
5. Installing TEMS Investigation 27
5.1. PC Hardware and Software Requirements . . . . . . . . . . . . . . . . . . . 27
5.1.1. Hardware . . . . . . . . . . . . . . . . . . . . . . . . . . . . . . . . . . . . . . . 275.1.2. Virtual Memory . . . . . . . . . . . . . . . . . . . . . . . . . . . . . . . . . . . 28
5.1.3. Operating System. . . . . . . . . . . . . . . . . . . . . . . . . . . . . . . . . 29
5.1.4. Software . . . . . . . . . . . . . . . . . . . . . . . . . . . . . . . . . . . . . . . . 29
5.2. Other Hardware Requirements . . . . . . . . . . . . . . . . . . . . . . . . . . . . 30
5.3. Installing TEMS Investigation . . . . . . . . . . . . . . . . . . . . . . . . . . . . . 30
5.4. Installing HASP License Software. . . . . . . . . . . . . . . . . . . . . . . . . . 30
5.5. Installation of Device Drivers. . . . . . . . . . . . . . . . . . . . . . . . . . . . . . 31
5.5.1. Installation of USB Driver for Phones. . . . . . . . . . . . . . . . . . 31
5.5.2. Installation of USB Driver for PCTel SeeGull LX MM2
Scanners . . . . . . . . . . . . . . . . . . . . . . . . . . . . . . . . . . . . . 33
5.5.3. Installation of USB Driver for PCTel SeeGull EX Scanners . 33
5.5.4. Installation of USB Driver for Anritsu ML8740/ML8741
Scanners . . . . . . . . . . . . . . . . . . . . . . . . . . . . . . . . . . . . . 33
5.5.5. Installation of USB Driver for GPS Units . . . . . . . . . . . . . . . 33
5.5.6. Installation of Driver for USB-to-RS232 Serial Converter in
Equipment Cases/Backpack . . . . . . . . . . . . . . . . . . . . . . 33
5.5.7. Installation of Drivers for AQM Module. . . . . . . . . . . . . . . . . 34
5.5.8. General Advice on Driver Installation for AQM Equipment
Case/Backpack . . . . . . . . . . . . . . . . . . . . . . . . . . . . . . . . 345.6. Uninstalling TEMS Investigation . . . . . . . . . . . . . . . . . . . . . . . . . . . 35
6. Installing the Call Generator 36
7. Licensing 37
7.1. Licensing Options . . . . . . . . . . . . . . . . . . . . . . . . . . . . . . . . . . . . . . 37
7.2. Route Analysis License Requirements . . . . . . . . . . . . . . . . . . . . . . 37
7.3. Data Collection License Requirements . . . . . . . . . . . . . . . . . . . . . . 38
7.4. Driver for Hardware Key . . . . . . . . . . . . . . . . . . . . . . . . . . . . . . . . . 38
7.5. The HASP HL SRM Key Reader. . . . . . . . . . . . . . . . . . . . . . . . . . . 38
8. Configuring the PC and Phones for DataServices 39
8.1. Introduction . . . . . . . . . . . . . . . . . . . . . . . . . . . . . . . . . . . . . . . . . . . 39

8/13/2019 TEMS Investigation 9.1 Getting Started Manual
http://slidepdf.com/reader/full/tems-investigation-91-getting-started-manual 6/74

8/13/2019 TEMS Investigation 9.1 Getting Started Manual
http://slidepdf.com/reader/full/tems-investigation-91-getting-started-manual 7/74
Contents
LZT 108 9852 R2A v
14. Miscellaneous 55
14.1. Configuring the Motorola E1000 for Inter-frequency Handover
and GSM-to-UTRAN Handover . . . . . . . . . . . . . . . . . . . . . . . . 55
15. Support Contact Information 57
Index 59

8/13/2019 TEMS Investigation 9.1 Getting Started Manual
http://slidepdf.com/reader/full/tems-investigation-91-getting-started-manual 8/74
TEMS Investigation 9.1 Getting Started Manual
vi
8/13/2019 TEMS Investigation 9.1 Getting Started Manual
http://slidepdf.com/reader/full/tems-investigation-91-getting-started-manual 9/74
Chapter 1. Introduction
LZT 108 9852 R2A 1
1. Introduction
Thank you for choosing TEMS Investigation – the industry-leading tool for
troubleshooting, verification, optimization, and maintenance of wireless
networks. Offering data collection, real-time analysis, and post-processing all
in one, TEMS Investigation is a complete solution for all of a network
operator’s daily network optimization tasks. This complete solution eliminates
the need for multiple tools, reducing costs and saving time and effort foroperations staff.
1.1. What Is the Getting Started Manual?
The Getting Started Manual deals with preliminaries that you must work
through before you can start using TEMS Investigation, such as configuring
your computer and phones. The manual also covers the installation of TEMS
Investigation itself.
Most of the procedures described here only have to be performed once, orwhen you are exchanging pieces of hardware.
The other manuals delivered with the product (Data Collection User’s
Manual, Route Analysis User’s Manual, Information Elements and Events)
concentrate on how to operate the TEMS Investigation software once you
have it installed and all your hardware is ready for use. These manuals are
what you will probably be referring to most of the time once you have gotten
started.
1.2. What’s in This Manual (and What’s Not)
Main Topics
• Contents of TEMS Investigation product packages: chapter 2
• Configuring the PC for TEMS Investigation: chapter 3
• Connectable external devices: chapter 4
• PC hardware and software requirements: section 5.1

8/13/2019 TEMS Investigation 9.1 Getting Started Manual
http://slidepdf.com/reader/full/tems-investigation-91-getting-started-manual 10/74
TEMS Investigation 9.1 Getting Started Manual
2
• Installing the TEMS Investigation software: section 5.3
• Installing the Call Generator: chapter 6
• Licensing: chapter 7
• Configuring the PC and phones for data services: chapter 8
• Configuring the PC for use with a DRT scanner: chapter 9
• Configuring the PC for use with an Ericsson Fixed Wireless Terminal:
chapter 10
• Configuring the PC for Python Scripting: chapter 11
Cell Data and Maps
The following tasks may also be regarded as preliminary ones:
• Importing network cell data
• Importing map files
These procedures, however, are not covered here but in the User’s Manuals,
since they are handled from within the TEMS Investigation software
applications. Chapter 12 gives the appropriate references.
Equipment Cases
The TEMS equipment cases, designed to accommodate phones and other
equipment during drive tests, are not covered here but have their own
manuals. These, however, sometimes refer to TEMS Investigation
documentation.
Installation of drivers for TEMS equipment cases is explained in section 5.5.6.
TEMS Pocket
Certain Sony Ericsson phones that are connectable in TEMS Investigation
have TEMS Pocket functionality. For these phones, a separate User’s Manualdeals with the TEMS Pocket functions. However, in the C702, K790a, K790i,
K800i, W760i and Z750i models, the Pocket functions are disabled when the
phone is connected in TEMS Investigation. Nonetheless, it is possible to
purchase such phones with fully enabled TEMS Pocket software; see section
2.4.

8/13/2019 TEMS Investigation 9.1 Getting Started Manual
http://slidepdf.com/reader/full/tems-investigation-91-getting-started-manual 11/74
Chapter 1. Introduction
LZT 108 9852 R2A 3
Readme File, Release Note
Some technical issues not addressed in this manual are dealt with in the file
Readme.rtf in the TEMS Investigation installation folder. The same
information is reproduced in the Release Note issued with the currentrelease.
FAQ
Many questions regarding TEMS Investigation are answered in the FAQ
sections found on the Web at www.tems.com under the link “Tech support”.
Technical Support
If you have a question about TEMS Investigation which is not answered in
any of the manuals nor in any of the other sources mentioned above, please
contact technical support. Contact information is given on the Web at
www.tems.com, under the link “Contact TEMS”.
TEMS On-line Subscription Service
To sign up for the TEMS on-line subscription service, please go to
www.tems.com and click the link “TEMS Subscription Service”. This free
service includes e-mail notification of TEMS product launches, version
upgrades and patches, as well as the on-line newsletter TEMS News.
1.3. Definitions
This section explains a number of central concepts in TEMS Investigation
which are frequently referred to in this manual.
Phone
The term “phone” covers both GSM phones, UMTS (WCDMA/GSM) user
equipments (UEs), and CDMA phones. When a subset is meant, a suitablequalifier is prefixed, and/or a more precise term is used (“GSM phone”, “Sony
Ericsson GSM phone”, “Nokia UE”, “Kyocera CDMA phone”, etc.).
Some user terminals supported by TEMS Investigation are in fact data cards
rather than phones. The word “terminal” is therefore sometimes used instead
of “phone”, without any difference in meaning from the point of view of TEMS
Investigation.
8/13/2019 TEMS Investigation 9.1 Getting Started Manual
http://slidepdf.com/reader/full/tems-investigation-91-getting-started-manual 12/74
TEMS Investigation 9.1 Getting Started Manual
4
Scanner
The term “scanner” denotes a device dedicated to scanning, for example a
PCTel scanner. Phones with scanning capabilities are not referred to as
scanners.
Data Services
This term refers to services requiring a data connection (either circuit-
switched or packet-switched), as opposed to voice calls.
8/13/2019 TEMS Investigation 9.1 Getting Started Manual
http://slidepdf.com/reader/full/tems-investigation-91-getting-started-manual 13/74
8/13/2019 TEMS Investigation 9.1 Getting Started Manual
http://slidepdf.com/reader/full/tems-investigation-91-getting-started-manual 14/74
TEMS Investigation 9.1 Getting Started Manual
6
Collection User’s Manual, section 7.4. No device-specific license options are
ever required for this.
2.2. Analysis Packages
The Analysis Packages differ from the corresponding Base Packages in the
following ways:
• They do not support data collection or realtime presentation.
• They do not support loading of certain logfiles from sources other than
TEMS Investigation; see the Data Collection User’s Manual, section 7.4.
• They do not support presentation of LTE or WiMAX data.
In all other respects they are identical with the corresponding BasePackages.
These contents are included in all Analysis Packages:
• CD with TEMS Investigation PC software and installation application
• USB hardware key (HASP HL SRM) where the TEMS Investigation
license is stored
• TEMS Investigation user documentation
The license delivered with each package permits analyzing of data collectedwith any equipment supported by the product (for the cellular technologies
selected).
2.3. Further Licensing Options
See chapter 7, page 37 about how the licensing applies in practice.
2.3.1. Licensing for External Devices A separate license option is required for connecting each of the following
categories of equipment.
• Sony Ericsson phones (UMTS)
• Motorola phones (UMTS)
• Nokia phones (GSM-only/UMTS) without GAN or HSPA capability
• Nokia phones with GAN capability
• Nokia phones with HSPA capability
8/13/2019 TEMS Investigation 9.1 Getting Started Manual
http://slidepdf.com/reader/full/tems-investigation-91-getting-started-manual 15/74
Chapter 2. Product Packaging
LZT 108 9852 R2A 7
• Devices based on Qualcomm HSDPA-capable chipsets (HSDPA but not
HSUPA)1
• Devices based on Qualcomm HSPA+ and HSPA-capable chipsets (i.e.
supporting at least HSDPA and HSUPA, and possibly HSPA+ as well)1
• Devices based on Qualcomm CDMA-capable chipsets
• Anritsu scanners2
• PCTel scanners
• DRT scanners
For phones and data cards, the set of license options purchased grant
permission to collect data with one device at a time, belonging to one of the
selected equipment categories. A further license option is offered for datacollection with multiple (up to eight) phones concurrently.
No restriction on the number of connectable devices applies to scanners (or
to GPS units, for which no special license is required).
2.3.2. Licensing for AQM (PESQ)
2.3.2.1. Mobile-to-fixed AQM
A separate license option is offered for calculating PESQ and making otheraudio quality measurements using the downlink and uplink AQM modules.
The downlink AQM module is either standalone or installed in a TC-1520B
equipment case; the uplink module is housed in a Call Generator. The license
permits connecting (any number of) downlink AQM modules to the
application. All equipment required for AQM, including a cable kit and other
accessories, is sold separately.
The AQM option is also required for merging AQM uplink data into logfiles
using the Converter tool.
2.3.2.2. Mobile-to-mobile AQM
The same license option also covers mobile-to-mobile AQM.
1. These chipsets are listed in section 4.1.1.1.
2. This license option is not available with TEMS Investigation 9.1 and must
therefore have been purchased with some older version of the product.
8/13/2019 TEMS Investigation 9.1 Getting Started Manual
http://slidepdf.com/reader/full/tems-investigation-91-getting-started-manual 16/74
TEMS Investigation 9.1 Getting Started Manual
8
2.3.3. Network (Floating) Licenses
Instead of fixed single-user licenses, the customer can purchase network
licenses that can be shared among multiple users. See chapter 7 regarding
the practical use and scope of network licenses.
2.4. Accessories
In addition to the standard packages and separately purchased phones and
scanners, the following optional items can be delivered:
• Equipment cases (with or without AQM modules)
• GPS units
• TEMS Pocket-enabled Sony Ericsson and Nokia phones
• Laptops tested with TEMS Investigation 9.1
• Indoor backpack including battery solution
The indoor backpack contains everything (including battery pack and serial
converter) needed to operate a scanner in indoor and pedestrian
environments. It accommodates any of the PCTel models as well as a DRT
scanner and one or two standalone downlink AQM modules.
Please contact Ascom for further information on the available accessories.

8/13/2019 TEMS Investigation 9.1 Getting Started Manual
http://slidepdf.com/reader/full/tems-investigation-91-getting-started-manual 17/74
Chapter 3. Configuring the PC for TEMS Investigation Data Collection
LZT 108 9852 R2A 9
3. Configuring the PC for TEMS
Investigation Data Collection
For TEMS Investigation Data Collection to operate properly, your computer
must be appropriately configured in a variety of respects. This chapter is a
checklist that you need to go through before installing TEMS Investigation
Data Collection.Further PC configuration, required for data service testing, is described in
chapter 8.
General third-party software requirements are listed in section 5.1.4.
If you have not purchased the data collection functionality, you can skip this
chapter.
3.1. Administrator Rights
A number of user actions in TEMS Investigation require that the user have
administrator rights on the PC:• Running multiple concurrent data service sessions. In the course of such
testing, TEMS Investigation must be able to modify Windows routing
tables, which requires admin privileges.
• Use of the IP sniffer. See Data Collection User’s Manual, section 19.7.1
and Information Elements and Events, section 8.3.3.
Note: Please read this chapter carefully, since inappropriate PC
settings may seriously impair the performance of TEMS
Investigation Data Collection, or even render certain functions
unusable.

8/13/2019 TEMS Investigation 9.1 Getting Started Manual
http://slidepdf.com/reader/full/tems-investigation-91-getting-started-manual 18/74
TEMS Investigation 9.1 Getting Started Manual
10
3.2. Advanced Power Management (APM)
Advanced Power Management (APM) should be disabled if possible, since it
may cause external devices to disconnect from TEMS Investigation. The
reason this can happen is that APM sometimes switches off the
communication circuits to save power. This may occur even when a phone is
connected and communicates with the PC on a regular basis. For information
on how to disable APM in BIOS, please consult the user manual for your
computer.
3.3. Automatic Updating of Software
Software that uses an “auto update” function to receive automatic updates
from a web site over a dial-up connection should be disabled.
3.4. AutoPlay
Automatic launching of a PC application following device connect must be
avoided. Therefore, make sure that for all connected devices used with
TEMS Investigation, the AutoPlay option “Take no action” is selected.
In Windows Vista, these settings are found under Control Panel → AutoPlay.
In Windows XP, right-click each device in Explorer and select Properties → AutoPlay tab.
3.5. Bluetooth
If Bluetooth is not needed on the PC, it should be disabled.
If a GPS unit or other equipment (keyboard, mouse, etc.) is connected to the
PC via Bluetooth, you should disable the autodetect function in TEMS
Investigation for all ports that you are not going to use in the application. SeeData Collection User’s Manual, section 6.8.4.
This is to minimize interference from Bluetooth transmissions in the cellular
network air interface.
3.6. Documents/My Documents Folder
TEMS Investigation places certain files under “Documents” (Windows Vista)
or “My Documents” (Windows XP) in a subfolder called “TEMS Product
Files”. If your Documents or My Documents folder is located on a network
8/13/2019 TEMS Investigation 9.1 Getting Started Manual
http://slidepdf.com/reader/full/tems-investigation-91-getting-started-manual 19/74
Chapter 3. Configuring the PC for TEMS Investigation Data Collection
LZT 108 9852 R2A 11
drive, be sure to make the folder available offline before disconnecting from
the network (for example, when going drive testing).
3.7. Intel SpeedStep
If the PC is equipped with Intel’s SpeedStep technology regulating the
processor speed, choose the setting “Maximum Performance” for all types of
operation (“Plugged in”, “Running on batteries”).
3.8. IR Port
The IR port on your PC may need to be disabled, since it may interfere with
the ordinary COM ports. Please consult the user manual for your computerregarding how to disable the IR port.
3.9. Port-scanning Software
You should not have any software installed that periodically scans COM or
USB ports, for instance Microsoft Outlook synchronization software such as
Sony Ericsson PC Suite or Nokia PC Suite. The reason is that such software
may cause difficult connect problems in TEMS Investigation Data Collection.
3.10. RTP (UDP) Ports for Video Streaming
By default TEMS Investigation uses RTP (UDP) ports 5004–5007 for video
streaming. If you intend to accept this default setting, you must make sure
that the ports have not been reserved by some other application. You can
specify a different port usage in the Video Streaming command in a command
sequence; see the Data Collection User’s Manual, section 13.11.2.9.
3.11. Security Products
Please note that hard disk encryption software, firewalls, virus scanners, and
other security products may prevent multiple RAS sessions from being
maintained concurrently, thus interfering with data service testing. Contact
your IS/IT department for assistance in these matters.

8/13/2019 TEMS Investigation 9.1 Getting Started Manual
http://slidepdf.com/reader/full/tems-investigation-91-getting-started-manual 20/74
TEMS Investigation 9.1 Getting Started Manual
12
3.12. Sleep Mode, Screen Savers, Energy SavingFeatures
You should make sure that the computer used for measurement andrecording does not go into any kind of standby mode:
• Never put the PC in Sleep mode.
• Disable the Windows screen saver under Control Panel → Display →
Screen Saver. In the same dialogs, make appropriate settings under
“Energy saving features...” so that these features are never activated
during measurement.
• Disable any other screen savers.
(If the PC does go into standby, it may be necessary to unplug your datacollection devices and plug them in again.)
3.13. USB Legacy Support
USB Legacy Support must be turned off in BIOS. For information on how to
do this, please consult the user manual for your computer.
3.14. Windows FirewallThe built-in software firewall in Windows Vista and Windows XP must be
disabled.
3.15. Windows Media Player
Windows Media Player and other applications that attempt to synchronize to
removable mass storage devices (such as mobile phones) must be disabled.
They may otherwise interfere with data collection.
3.16. Windows Power Management
You must disable all power management routines in Windows. For further
instructions, please consult the documentation for the variety of Windows you
are using.

8/13/2019 TEMS Investigation 9.1 Getting Started Manual
http://slidepdf.com/reader/full/tems-investigation-91-getting-started-manual 21/74
Chapter 3. Configuring the PC for TEMS Investigation Data Collection
LZT 108 9852 R2A 13
3.17. Windows Vista Specific Settings
3.17.1. Aero Glass
For performance reasons, it is strongly recommended to disable the Windows
Aero color scheme (making window frames translucent and producing other
visual effects).
3.17.2. IPv6
It is recommended to disable IPv6 for the modem of each connected device.
If this is not done, the CPU load will rise appreciably, and dial-ups will take
considerably longer to complete.
• Open the Control Panel and select Network and Sharing Center →
Manage network connections.
• Right-click the modem and open its Properties dialog.
• Select the Networking tab.
• Uncheck “Internet Protocol Version 6 ...”.
Alternatively, in the registry, locate the folder
HKEY_LOCAL_MACHINE\SYSTEM\CurrentControlSet\Services\tcpip6\
Parameters\
and in that folder create a new key DisabledComponents and set it to the
value FF (meaning “Disable IPv6 over all interfaces”).
See also section 8.3.1, step 15.
3.18. Windows XP Specific Settings
Visual effects and other “bells and whistles” in the Windows XP user interface
should be disabled.
3.19. WLAN (IEEE 802.11)
If WLAN is not needed on the PC, it should be disabled in order to minimize
interference from WLAN transmissions in the cellular network air interface.

8/13/2019 TEMS Investigation 9.1 Getting Started Manual
http://slidepdf.com/reader/full/tems-investigation-91-getting-started-manual 22/74
TEMS Investigation 9.1 Getting Started Manual
14
4. External Equipment
This chapter gives an overview of the external devices that can interact with
TEMS Investigation Data Collection.
4.1. Connectable Equipment
For a complete and up-to-date list of equipment connectable in this and otherTEMS products, please visit our website www.tems.com and check the Tech
Support section.
4.1.1. Phones and Data Cards
4.1.1.1. UMTS
The following phones and data cards (supporting both GSM and WCDMA
unless otherwise stated) can be delivered with TEMS Investigation 9.1:
• Sony Ericsson C702
• Sony Ericsson K790a (GSM only)
• Sony Ericsson K790i (GSM only)
• Sony Ericsson K800i1
• Sony Ericsson TM506
• Sony Ericsson W760i
• Sony Ericsson Z750i
• Motorola Razr2 V9
• Nokia 6086 (GSM/GAN)
• Nokia 6120
• Nokia N96 EU
1. Embargo countries only.

8/13/2019 TEMS Investigation 9.1 Getting Started Manual
http://slidepdf.com/reader/full/tems-investigation-91-getting-started-manual 23/74
Chapter 4. External Equipment
LZT 108 9852 R2A 15
• Option GlobeTrotter Express HSUPA
Other Connectable UMTS Devices
• Sony Ericsson K600i
• LG CU320
• LG CU500
• LG U960
• Motorola E1000
• Motorola E1070
• Motorola M2501
• Motorola Razr Maxx V6
• Motorola Razr V3x
• Motorola Razr V3xx
• Nokia 6121
• Nokia 6125 (GSM only)
• Nokia 6280
• Nokia 6680
• Nokia 7376
• Nokia N75
• Nokia N80
• Nokia N95
• Certified devices based on Qualcomm HSDPA-capable chipsets
(MSM6275, MSM6280)
• Certified devices based on Qualcomm HSPA-capable chipsets(supporting both HSDPA and HSUPA: MSM7200, MSM7201A,
MDM8200)
Other Connectable GSM Phones
• Sony Ericsson W600i
• Nokia 6230i
8/13/2019 TEMS Investigation 9.1 Getting Started Manual
http://slidepdf.com/reader/full/tems-investigation-91-getting-started-manual 24/74
TEMS Investigation 9.1 Getting Started Manual
16
4.1.1.2. CDMA
• Certified devices based on Qualcomm cdma2000 capable chipsets
• Certified devices based on Qualcomm EV-DO Rev 0 capable chipsets
• Certified devices based on Qualcomm EV-DO Rev A capable chipsets
4.1.2. Fixed Wireless Terminals
The following Ericsson Fixed Wireless Terminals can be connected:
• W21
• W25
4.1.3. AQM Modules
AQM modules (either standalone or mounted in a TC-1520B equipment case)
can be connected.
4.1.4. Scanners
4.1.4.1. UMTSThe following scanners can be delivered with TEMS Investigation 9.1. (Bands
given below are downlink bands; WCDMA 1800 [Band III] is identical to what
is referred to in Japan as WCDMA 1700 [uplink band of Band III].)
• PCTel SeeGull LX GSM 850/1900
• PCTel SeeGull LX GSM 900/1800
• PCTel SeeGull LX WCDMA 850/2100
• PCTel SeeGull LX WCDMA 850 + GSM 900/1800
• PCTel SeeGull EX WCDMA 2100 AWS (Band IV) + GSM 1900
• PCTel SeeGull EX WCDMA 2100 AWS (Band IV) + GSM 850/1900
• PCTel SeeGull EX WCDMA 2100 + GSM 900/1800
• PCTel SeeGull EX WCDMA 850/1900 + GSM 850/1900
• PCTel SeeGull EX WCDMA 900/2100 + GSM 900/1800
• PCTel SeeGull EX Mini WCDMA 2100
• PCTel SeeGull EX Mini WCDMA AWS (Band IV)
8/13/2019 TEMS Investigation 9.1 Getting Started Manual
http://slidepdf.com/reader/full/tems-investigation-91-getting-started-manual 25/74
Chapter 4. External Equipment
LZT 108 9852 R2A 17
• PCTel SeeGull EX Mini WCDMA 900/2100
• PCTel SeeGull EX Mini WCDMA 850/1900
The following UMTS phones are capable of WCDMA scanning:
• Sony Ericsson C702
• Sony Ericsson W760i
• Sony Ericsson Z750i
Regarding GSM scanning capabilities of UMTS phones, see section 4.2.
Other Connectable UMTS Scanners
• Anritsu ML8720 WCDMA 2100
• Anritsu ML8740B Area Scanner (WCDMA 2100)
• Anritsu ML8740B Second RF Option (WCDMA 2100)
• Anritsu ML8741B Area Scanner 2100 (1 Pilot)
• Anritsu ML8741B Area Scanner 2100 (2 Pilots)
• Anritsu ML8741B Area Scanner 1800 (1 Pilot)
• Anritsu ML8741B Area Scanner 1800 (2 Pilots)
• Anritsu ML8741B Area Scanner 1800/2100 (1 + 1 Pilot)
• PCTel SeeGull LX WCDMA 850
• PCTel SeeGull LX WCDMA 900
• PCTel SeeGull LX WCDMA 1800
• PCTel SeeGull LX WCDMA 1900
• PCTel SeeGull LX WCDMA 2100
• PCTel SeeGull LX WCDMA 2100 Band IV
• PCTel SeeGull LX Plus WCDMA 2100
• PCTel SeeGull LX WCDMA 850/1900
• PCTel SeeGull LX WCDMA 1900 + GSM 850/1900
• PCTel SeeGull LX WCDMA 2100 + GSM 900/1800

8/13/2019 TEMS Investigation 9.1 Getting Started Manual
http://slidepdf.com/reader/full/tems-investigation-91-getting-started-manual 26/74
TEMS Investigation 9.1 Getting Started Manual
18
4.1.4.2. LTE
• DRT4301A+ LTE SISO, LTE Bands 12–14 (700 MHz) + Band 5
(850 MHz) + Band 2 (1900 MHz) + Band 4 (2100 MHz)
4.1.4.3. CDMA
The following scanners can be delivered with TEMS Investigation 9.1:
• PCTel SeeGull LX 1x 450
• PCTel SeeGull LX EV-DO 450
• PCTel SeeGull LX 1x 800
• PCTel SeeGull LX 1x 1900
• PCTel SeeGull LX 1x 800/1900
• PCTel SeeGull LX EV-DO 800/1900
• PCTel SeeGull LX 1x 450 + EV-DO 450
• PCTel SeeGull LX 1x 800/1900 + EV-DO 800/1900
4.1.4.4. WiMAX
• DRT4301A WiMAX 2.3/2.5/3.5 GHz
4.1.5. GPS Units
TEMS Investigation supports the NMEA-0183 GPS protocol.
Some other GPS units using a different protocol are also compatible with
TEMS Investigation, including the GPS built into the supported PCTel
scanners.
This is the full list of recommended GPS units:
• Bosch/Blaupunkt TravelPilot
• DeLorme Earthmate LT-40 (NMEA-0183)
• Garmin 10 Mobile Bluetooth (NMEA-0183)
• Garmin 12XL (NMEA-0183)
• Garmin 35 (NMEA-0183)
• GlobalSat BT-338 (NMEA-0183)
• GlobalSat BU-303 (NMEA-0183)

8/13/2019 TEMS Investigation 9.1 Getting Started Manual
http://slidepdf.com/reader/full/tems-investigation-91-getting-started-manual 27/74
Chapter 4. External Equipment
LZT 108 9852 R2A 19
• GlobalSat BU-353 (NMEA-0183)
• Holux GPSlim 236 (NMEA-HS; Bluetooth or USB)
• Magnetti Marelli RoutePlanner NAV200
• Nokia LD-3W Bluetooth (NMEA-0183)
• Sanav GM-44 (NMEA-0183)
• Sanav GM-158 (NMEA-0183)
• Trimble Placer 455/DR (must be initialized using TAIP: see section 4.7)
For poor receiving conditions one of the products Trimble Placer, Magnetti
Marelli RoutePlanner, and Bosch/Blaupunkt TravelPilot can be
recommended, since they have dead reckoning facilities.

8/13/2019 TEMS Investigation 9.1 Getting Started Manual
http://slidepdf.com/reader/full/tems-investigation-91-getting-started-manual 28/74
TEMS Investigation 9.1 Getting Started Manual
20
4.2. Capabilities of Phones and Data Cards Soldwith TEMS Investigation
This section is restricted to devices that can be delivered with TEMSInvestigation 9.1.
General Capabilities
Phone/Feature
Sony Ericsson C702 D
Sony Ericsson K790a
Sony Ericsson K790i
Sony Ericsson TM506a
a. Also supports WCDMA 1700 (Band X).
D
Sony Ericsson W760i D
Sony Ericsson Z750i D
Motorola Razr2 V9 EU D
Motorola Razr2 V9 US D
Nokia 6086
Nokia 6120 D
Nokia N96 EUb
b. Also supports WCDMA 900 (Band VIII).
D
Option GT Expr. HSUPA
H S D P A ,
H S U P A
W C D M A
8 5 0 ( V )
W C D M A
1 9 0 0 ( I I )
W C D M A
2 1 0 0 ( I )
G S M 8 5 0
G S M 9 0 0
G S M 1 8 0
0
G S M 1 9 0
0
E x t e r n a l
A n t e n n a
A Q M
8/13/2019 TEMS Investigation 9.1 Getting Started Manual
http://slidepdf.com/reader/full/tems-investigation-91-getting-started-manual 29/74
Chapter 4. External Equipment
LZT 108 9852 R2A 21
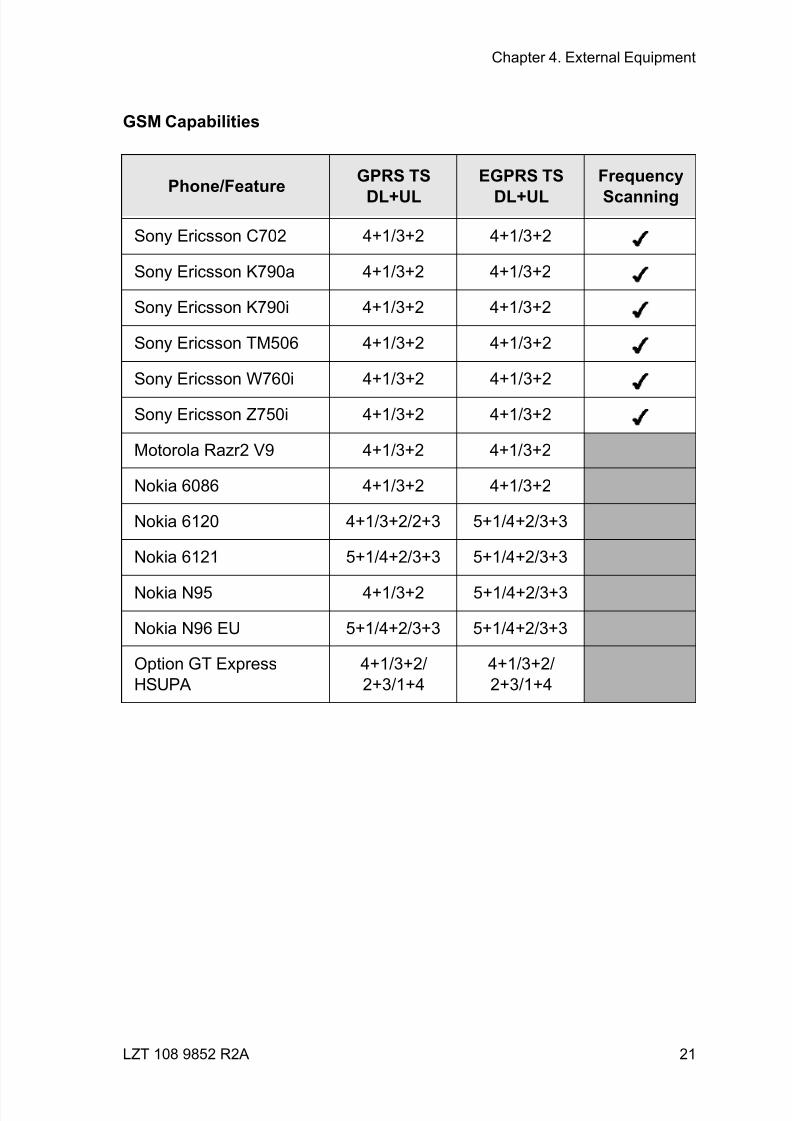
GSM Capabilities
Phone/FeatureGPRS TS
DL+UL
EGPRS TS
DL+UL
Frequency
Scanning
Sony Ericsson C702 4+1/3+2 4+1/3+2
Sony Ericsson K790a 4+1/3+2 4+1/3+2
Sony Ericsson K790i 4+1/3+2 4+1/3+2
Sony Ericsson TM506 4+1/3+2 4+1/3+2
Sony Ericsson W760i 4+1/3+2 4+1/3+2
Sony Ericsson Z750i 4+1/3+2 4+1/3+2
Motorola Razr2 V9 4+1/3+2 4+1/3+2
Nokia 6086 4+1/3+2 4+1/3+2
Nokia 6120 4+1/3+2/2+3 5+1/4+2/3+3
Nokia 6121 5+1/4+2/3+3 5+1/4+2/3+3
Nokia N95 4+1/3+2 5+1/4+2/3+3
Nokia N96 EU 5+1/4+2/3+3 5+1/4+2/3+3
Option GT Express
HSUPA
4+1/3+2/
2+3/1+4
4+1/3+2/
2+3/1+4

8/13/2019 TEMS Investigation 9.1 Getting Started Manual
http://slidepdf.com/reader/full/tems-investigation-91-getting-started-manual 30/74
TEMS Investigation 9.1 Getting Started Manual
22
4.3. Basic Configuration of Phones and DataCards
Motorola E1000
This phone needs to be specially configured for inter-frequency and GSM-to-
UTRAN handover. The configuration is done with a software tool from
Motorola. See section 14.1. (This configuration is not needed for the newer
Motorola phones.)
Nokia Phones
The Net Monitor function in Nokia phones (if present) must be turned off.
Qualcomm Chipset Based Devices
Some commercial Qualcomm chipset derived phones and data cards may
not have diagnostics reporting enabled by default, and Ascom is not at liberty
to distribute information on how to enable this function. Customers desiring to
use such devices with TEMS Investigation therefore need to contact the
relevant supplier or operator in each case.
4.4. Cables to Use with Phones
Sony Ericsson C702, TM506, W760i, Z750i
It is necessary to use the USB cable supplied with the phone (DCU-65, part
number RPM 131 12/1 R1B). Using a USB cable delivered with older phones
such as K800i and K790i/a does not work.
4.5. Connecting External Antennas to Phones
An external monopole antenna is connected to a phone by means of a
coaxial cable (and possibly an adapter) supplied with the phone.
Phone-specific details are as follows:
Sony Ericsson K790i, K790a
One antenna is delivered with the phone. To use this antenna, you must place
the phone in the phone holder (also delivered), which has an integrated
antenna connector. Remove the plastic plug at the back of the phone
8/13/2019 TEMS Investigation 9.1 Getting Started Manual
http://slidepdf.com/reader/full/tems-investigation-91-getting-started-manual 31/74
Chapter 4. External Equipment
LZT 108 9852 R2A 23
covering the outlet above the camera flash. Then install the phone in the
holder and connect the antenna to the antenna connector.
Sony Ericsson Z750iWhen ordering an external antenna with the Sony Ericsson Z750i, the phone
is delivered with the antenna already mounted.
Nokia N96
Screw the antenna adapter into the hole provided for it, then connect the
antenna to the adapter.
4.6. Scanners
4.6.1. Anritsu
An RF antenna as well as all necessary adapters and other accessories are
included in the package.
Anritsu ML8720: Basic Configuration
The serial port baud rate must be set to 115200 in the scanner. Proceed asfollows:
• From the scanner main menu, select System Configuration, then select
Interface and Behavior.
• Set the COM1 protocol to Direct.
• Set the COM1 baud rate to 115200.
• Set COM1 stop bit(s) to 1.
• Set COM1 data length to 8.
• Set COM1 parity to None.
• From the side menu (operated with buttons on the side of the scanner),
select OK.
Anritsu ML8720: Cable
A null modem cable must be used to connect the Anritsu ML8720 to the PC.

8/13/2019 TEMS Investigation 9.1 Getting Started Manual
http://slidepdf.com/reader/full/tems-investigation-91-getting-started-manual 32/74
TEMS Investigation 9.1 Getting Started Manual
24
4.6.2. PCTel: General
Any PCTel scanner can be carried in a TEMS Indoor Backpack (see section
2.4), which includes a battery pack.
A battery pack is also obtainable as a separate add-on.
4.6.3. PCTel SeeGull LX
All PCTel SeeGull LX scanners have an RF antenna included in the package.
WCDMA scanner packages furthermore contain a GPS antenna.
MM2 scanners are equipped with a USB power cable. Dual- and single-band
scanners are powered through a serial cable.
Single-band WCDMA and CDMA scanners and dual-band GSM scanners are
delivered with a mounting kit for installation into a TC-1450 equipment case.
MM2 scanners can be mounted into a TC-1520 or TC-1520B equipment case
(where the mounting kit accompanies the case).
The following functions can be added as options for GSM-capable scanners:
• GSM C/I measurement
• GSM System Information decoding (“GSM BCCH Type 3”)
The following function can be added as an option for CDMA scanners (1xonly, not EV-DO):
• Sync Channel Timing
4.6.4. PCTel SeeGull EX
The PCTel SeeGull EX scanner has two RF antennas included in the
package, as well as a USB cable, a power cable, and a GPS antenna. The
EX Mini has only one RF component and hence only one RF antenna.
The scanner can be mounted into a TC-1520 or TC-1520B equipment case
(where the mounting kit accompanies the case).
The following functions can be added as options:
• GSM C/I measurement (for GSM-capable scanners)
• GSM and WCDMA System Information decoding (“Layer 3 WCDMA/
GSM”).

8/13/2019 TEMS Investigation 9.1 Getting Started Manual
http://slidepdf.com/reader/full/tems-investigation-91-getting-started-manual 33/74
8/13/2019 TEMS Investigation 9.1 Getting Started Manual
http://slidepdf.com/reader/full/tems-investigation-91-getting-started-manual 34/74
TEMS Investigation 9.1 Getting Started Manual
26
• The SRM message tells the GPS to report automatically at the scheduled
intervals. In this case, then, the FPV message will be reported
automatically once a second.
• The SPT message (Set Port Characteristics) causes the port to use theseparameter settings:
– Baud rate = 4800
– Data bits = 8
– Stop bits = 1
– Parity = No
Alternatively, the Trimble Placer can be initialized with Trimble’s GPSSK
software utility, which is downloadable from www.trimble.com. GPSSK, too,uses the TAIP protocol.

8/13/2019 TEMS Investigation 9.1 Getting Started Manual
http://slidepdf.com/reader/full/tems-investigation-91-getting-started-manual 35/74
Chapter 5. Installing TEMS Investigation
LZT 108 9852 R2A 27
5. Installing TEMS Investigation
This chapter covers requirements on the PC, installation of the TEMS
Investigation software, and other installation issues.
Note that before you can run data services, you must also work through
chapters 8 and 13.
5.1. PC Hardware and Software Requirements
5.1.1. Hardware
TEMS Investigation 9.1 is designed to run on a standard PC and interfaces
with the connected devices through USB or serial ports.
If network licenses (see section 7.1) are to be used, the PC hosting the
license server must have at least one free USB port.
Data Collection Requirements
Processor and RAM requirements are strongly dependent on what external
devices are connected and what tasks they perform. The recommended
minimum configuration is: Pentium T7200 or AMD TL-58 class CPU,
preferably with dedicated graphics card from ATI or nVidia; 1 GB RAM.
Other hardware requirements:
• One USB port for each phone1
• One USB port for each standalone AQM module
• USB port for PCTel SeeGull LX MM2 scanner
• USB port for PCTel SeeGull EX scanner
1. Exception: The CDMA phone Samsung SCH A900 uses a serial
connection for TEMS measurements and a USB connection for data
service measurements.
8/13/2019 TEMS Investigation 9.1 Getting Started Manual
http://slidepdf.com/reader/full/tems-investigation-91-getting-started-manual 36/74
TEMS Investigation 9.1 Getting Started Manual
28
• USB port for Anritsu ML8740/ML8741 scanner
• USB port for equipment case
• USB port for HASP HL SRM hardware key
• USB port or serial port for GPS
• Serial port for PCTel SeeGull LX dual-band/single-band scanner
• Serial port for Anritsu ML8720 scanner
• ExpressCard/34 slot or PC Card slot for any data card user terminals
• Sound card and loudspeakers for event audio indications
• Enough disk space to accommodate temporary files created during logfile
recording and replay
Route Analysis Requirements
The Route Analysis application will run smoother the more RAM the PC has.
General Requirements
• Graphics: 1024 × 768 (SVGA) with at least 16 bit colors (High Color)
5.1.2. Virtual Memory
The virtual memory size of the PC must satisfy certain requirements.
In Windows Vista this can be left to automatic management by the OS.
In Windows XP it is necessary to set the virtual memory size manually.
Proceed as follows:
• Open the Control Panel and double-click System.
• Click the Advanced tab, then click Performance Options.
Note: During drive testing, it must be ensured that the PC and all
devices connected to it have adequate power supply for the
duration of the test. This is especially important to bear in mind if
you are using a USB hub that is not self-powered (i.e. has no
external power supply). If there is insufficient power, problems
may arise with device drivers, which in turn may cause
malfunctions in Windows and possibly data loss. Ascom takes no
responsibility for such data loss.

8/13/2019 TEMS Investigation 9.1 Getting Started Manual
http://slidepdf.com/reader/full/tems-investigation-91-getting-started-manual 37/74
Chapter 5. Installing TEMS Investigation
LZT 108 9852 R2A 29
• Under Virtual Memory, click Change.
• In the Virtual Memory dialog, make sure that “Initial size” is larger than
“Recommended” and that “Maximum size” is much larger than “Initial
size”.
5.1.3. Operating System
The following operating systems are supported:
• Windows Vista with Service Pack 1, Ultimate Edition
• Windows XP Professional with Service Pack 2
• Windows XP Tablet PC Edition with Service Pack 2
In addition, all the latest Windows updates should always be installed.
Supported languages are English (U.S.), Chinese (simplified characters), and
Japanese.
5.1.4. Software
Below is a list of other third-party software that is required for various tools
and actions in TEMS Investigation. When installing third-party software,
administrator rights are required, and in Microsoft Vista the installation mustbe run using the “Run as administrator” option.
• The .NET Framework version 3.5 must be installed on the PC. It is
included on the TEMS Investigation installation CD.
• Internet Explorer 6.0 or higher required for Report Generator and online
help
• Python 2.5 interpreter required for script processing of logfiles and for
conversion of CDMA cell files in TEMS Investigation CDMA CSV format
(both managed from the Converter tool). A Python interpreter isdownloadable from www.python.org/download/ . See also chapter 11,
“Configuring the PC for Python Script Processing”.
• Microsoft Core XML Services (MSXML) 6.0 required for support of XML-
format cell files if Windows XP is used. (In Windows Vista, MSXML 6.0 is
included.)
• Microsoft DirectX 9.0c required for video streaming measurements
• For the RAN Tuning tool in Route Analysis, the following is needed:
– Microsoft Office 2007 or Microsoft Office 2003

8/13/2019 TEMS Investigation 9.1 Getting Started Manual
http://slidepdf.com/reader/full/tems-investigation-91-getting-started-manual 38/74
TEMS Investigation 9.1 Getting Started Manual
30
– Microsoft Word, Microsoft Excel, and Microsoft Graph (from Office
tools)
– Microsoft Access or MDAC
5.2. Other Hardware Requirements
• For audio quality measurements a Call Generator is needed. See
chapter 6.
• For video streaming measurements a streaming server is needed: Darwin
Streaming Server (version 5.5.5) or Helix Mobile Server (version 10 or
11).
5.3. Installing TEMS Investigation
You must have administrator rights on the PC to be able to install TEMS
Investigation.
• Insert the installation CD.
– In Windows XP, start the installation when prompted, or open folder
and click the option “Open folder...”, then right-click the file TEMS
Investigation 9.1.exe and select Run.
– In Windows Vista, click the option “Open folder to view files”, then
right-click the file TEMS Investigation 9.1.exe and select “Run as
administrator”.
Route Analysis and Data Collection will now be installed, by default to the
directory C:\Program Files\Ascom\TEMS Products\TEMS Investigation. (Data
Collection is installed even if you have not purchased the data collection
functionality, since certain other functions are available anyway; see section
7.3.)
Once installed, the applications can be run by choosing Start→ Programs → Ascom → TEMS Products.
5.4. Installing HASP License Software
Regarding licensing in general and hardware key use, see chapter 7.
The HASP HL SRM driver is installed automatically on the PC along with the
Route Analysis application. If you are going to use a local license (hardware
key plugged into the PC), you need not do anything further.

8/13/2019 TEMS Investigation 9.1 Getting Started Manual
http://slidepdf.com/reader/full/tems-investigation-91-getting-started-manual 39/74
Chapter 5. Installing TEMS Investigation
LZT 108 9852 R2A 31
If network licenses are to be used (see section 7.1), the HASP HL SRM driver
also needs to be installed on the machine hosting the license server. This
driver is available separately, by default in the directory <TEMS Investigation
install dir>\Drivers\HASP; compare the introductory note in section 5.5.1.
(Installing the HASP HL SRM driver always installs both client and server
software.) Furthermore, depending on the network topology and license
server setup, clients may require special configuration. For both servers and
clients, HASP HL SRM is configured through a web page interface which has
the address
http://localhost:1947/_int_/devices.html
Please refer to the documentation on this web page for details on HASP
installation and configuration.
5.5. Installation of Device Drivers
By default the driver files are extracted to <TEMS Investigation install
dir>\Drivers.
5.5.1. Installation of USB Driver for Phones
USB drivers are provided for all UMTS terminals that can be purchased with
TEMS Investigation. For other UMTS terminals and for all CDMA terminals,
drivers must be obtained from the supplier.The first time you plug in a phone, you will be prompted to locate its driver by
browsing to the correct directory. On your doing so the driver will be installed.
Supplier- and phone-specific details follow below.
If other drivers are already installed on the PC, make sure that the correct
driver becomes associated with the phone modem. Also make sure that you
do not install other (non-TEMS-compatible) drivers from the same supplier
later on.
Note: The drivers are delivered on a separate CD. You must insert this
CD manually after installing TEMS Investigation and run the EXE
file found there in order to copy the drivers to your computer. In
Windows Vista, right-click the EXE file and choose “Run as
administrator” in order to extract the drivers.
8/13/2019 TEMS Investigation 9.1 Getting Started Manual
http://slidepdf.com/reader/full/tems-investigation-91-getting-started-manual 40/74
TEMS Investigation 9.1 Getting Started Manual
32
Sony Ericsson Phones
When prompted, point to ...\Drivers\Sony Ericsson\<model name>.
Motorola Phones
Before plugging in the phone, you must run one of the MSI files found in the
directory ...\Drivers\Motorola. Which file to run depends on the PC hardware
architecture.
This installs the driver files to the directory C:\Program Files\Common
Files\Motorola Shared\MotPCSDrivers. Go to this directory and run the file
Motorola Driver Installer.exe. After the Motorola DriverInstaller has finished,
select “Clean and Reinstall”, then click “Start”.
After plugging in the phone, when the Found New Hardware dialog appears,select the option that allows Windows to automatically detect the drivers.
Nokia Phones
Before plugging in the phone, you must run the MSI file found in the directory
...\Drivers\Nokia. This installs the driver files to the directory C:\Program
Files\Nokia\Connectivity Cable Driver .
After plugging in the phone, point to this directory when prompted. You must
also select “PC Suite” in the menu that appears in the phone display.
Data Cards
This applies to all supported data cards.
Before inserting the data card, use the software application delivered with the
data card to install the requisite driver.
Note: Standard USB drivers from Nokia should never be installed. With
such drivers it is not possible to associate the Nokia GSM phone
with two devices (“MS” and “DC”) in TEMS Investigation. Be
aware that such drivers are installed along with certain other
software products, such as the Nokia PC Suite for synchro-
nization with Microsoft Outlook.
8/13/2019 TEMS Investigation 9.1 Getting Started Manual
http://slidepdf.com/reader/full/tems-investigation-91-getting-started-manual 41/74
Chapter 5. Installing TEMS Investigation
LZT 108 9852 R2A 33
5.5.2. Installation of USB Driver for PCTel SeeGull LX
MM2 Scanners
PCTel SeeGull LX MM2 scanners use an Edgeport USB driver.
The first time you plug in the scanner, you will be prompted to locate its driver.
Point to the directory ...\Drivers\PCTEL\LX\MM2\Edgeport.
5.5.3. Installation of USB Driver for PCTel SeeGull EX
Scanners
PCTel SeeGull EX scanners use a PCTel-specific USB driver, found in the
directory ...\Drivers\PCTEL\EX. For instructions on how to install this driver,
see the readme document which is supplied in the same directory.
5.5.4. Installation of USB Driver for Anritsu ML8740/
ML8741 Scanners
The first time you plug in the scanner, you will be prompted to locate its driver.
Point to the directory ...\Drivers\Anritsu.
5.5.5. Installation of USB Driver for GPS UnitsThis section tells how to install a USB driver for various USB GPS units
delivered with older versions of TEMS Investigation. The first time you plug in
the GPS, you will be prompted to locate its driver.
San Jose Navigation
• When prompted, point to the directory ...\Drivers\SANAV USB GPS.
SiRF Star Chipset Based USB GPS• When prompted, point to the directory ...\Drivers\SiRF Star USB GPS.
5.5.6. Installation of Driver for USB-to-RS232 Serial
Converter in Equipment Cases/Backpack
This section applies equally to the TC-1520 (non-AQM) and TC-1520B
(AQM) equipment cases and to the TEMS Indoor Backpack. It does not apply
to older equipment cases, for which different drivers are used.
8/13/2019 TEMS Investigation 9.1 Getting Started Manual
http://slidepdf.com/reader/full/tems-investigation-91-getting-started-manual 42/74
TEMS Investigation 9.1 Getting Started Manual
34
In order for the PC to detect the COM port of the USB-to-RS-232 serial
converter in the equipment case or backpack, some driver files must be
installed on the PC. These drivers are always delivered along with the case;
they are also found in the directory ...\Drivers\TEMS Case USB to RS232.
The first time you connect the case or backpack to the PC, you will be
prompted to locate the driver directory; on your doing so the driver will be
installed.
5.5.7. Installation of Drivers for AQM Module
The AQM modules, whether standalone or mounted in the TC-1520B
equipment case, need to be initialized by dedicated driver files. The AQM
module does not have any non-volatile memory, so all requisite software andsettings must be downloaded to the AQM module each time it is powered on.
The first time you connect the case or backpack to the PC, you will be
prompted to locate the following drivers:
• When prompted the first time, point to the directory
...\Drivers\AQM\PESQ_CONFIGURATION. This driver configures filter
parameters, signal levels, and other settings for AQM.
• When prompted the second time, point to the directory
...\Drivers\AQM\PESQ_DSP. This driver contains the AQM software.
5.5.8. General Advice on Driver Installation for AQM
Equipment Case/Backpack
When preparing an TC-1520B equipment case for use, we recommend that
you proceed in the steps described below. The same advice applies to a
backpack with AQM modules installed.
• Before plugging the case into the PC, make sure
– that you have installed TEMS Investigation (section 5.3)
– that you have installed all driver files from the separate driver CD
(section 5.5.1)
– that you have rebooted the PC.
• Connect the case to the PC while the case is turned off and does not have
any phones installed.
• Power on the case.
8/13/2019 TEMS Investigation 9.1 Getting Started Manual
http://slidepdf.com/reader/full/tems-investigation-91-getting-started-manual 43/74
Chapter 5. Installing TEMS Investigation
LZT 108 9852 R2A 35
• Locate all of the drivers in sections 5.5.6 and 5.5.7.
• After the drivers for AQM have been activated, install one phone at a time
in the case. For each phone, you will be prompted to locate the phone
driver (see section 5.5.1). Wait each time until the phone driver has beenactivated before you install the next phone.
5.6. Uninstalling TEMS Investigation
To uninstall TEMS Investigation software, follow the steps below.
• Open the Windows Control Panel.
• Double-click the Add/Remove Programs icon.
• Select TEMS Investigation 9.1 in the list. Click Change/Remove andconfirm removal when prompted. The software will now be uninstalled.

8/13/2019 TEMS Investigation 9.1 Getting Started Manual
http://slidepdf.com/reader/full/tems-investigation-91-getting-started-manual 44/74

8/13/2019 TEMS Investigation 9.1 Getting Started Manual
http://slidepdf.com/reader/full/tems-investigation-91-getting-started-manual 45/74
Chapter 7. Licensing
LZT 108 9852 R2A 37
7. Licensing
This chapter describes the fundamentals of the licensing in TEMS
Investigation 9.1.
Regarding the permissions granted by the basic licenses, see sections 2.1
and 2.2. Regarding the range of additional license options, see section 2.3.
The installation of license software is covered in section 5.4.
7.1. Licensing Options
There are two types of license that can be associated with a TEMS
Investigation application:
• a local license, embodied in a hardware key which is inserted into the PC.
A single hardware key controls all aspects of each local license
(accessibility of data collection and realtime presentation functions;
accessibility of technology-specific functions and data; connectability ofexternal devices).
• a network (or floating ) license, obtained by connecting to a license server
where the hardware key is inserted.
7.2. Route Analysis License Requirements
A license is always required to run Route Analysis. Without a license you
cannot launch the application.
Route Analysis can use either a local license or a network license (see
section 7.1).
To analyze data originating from a particular cellular technology, the package
you have purchased must support that technology. For example, a license
covering WCDMA is required for analysis of WCDMA data (including the
WCDMA report in the RAN Tuning tool).
8/13/2019 TEMS Investigation 9.1 Getting Started Manual
http://slidepdf.com/reader/full/tems-investigation-91-getting-started-manual 46/74
TEMS Investigation 9.1 Getting Started Manual
38
7.3. Data Collection License Requirements
The Data Collection application can be started without a license, and the
replay and post-processing functions are then still available. The same range
of functionality is available with an Analysis Package license.
Device Connect and Logfile Recording
For a device to be connectable in Data Collection, it must be covered by your
license options. See section 2.3.1.
Logfile Load
Within the confines of the cellular technologies supported in the package, it is
possible in Data Collection to load and analyze logfiles recorded with devicesfor which you have no license.
Loading of logfiles from sources other than TEMS Investigation, on the other
hand, generally requires a Base Package license; see the Data Collection
User’s Manual, section 7.4.
Local vs. Network License
Data Collection can use a network license for loading of logfiles from TEMS
Investigation-external sources (see the Data Collection User’s Manual,section 7.4).
For all other functions requiring a license, including connect of all external
devices, Data Collection can only use a local license.
7.4. Driver for Hardware Key
The hardware key driver is installed automatically along with TEMS
Investigation.
7.5. The HASP HL SRM Key Reader
You can check what is covered by your (local or network) license by running
the HASP HL SRM Key Reader. This tool is launched by choosing Start→
Programs → Ascom → TEMS Products → Utilities. When the tool has
started up, enter the File menu and choose Read Hasp Keys.
8/13/2019 TEMS Investigation 9.1 Getting Started Manual
http://slidepdf.com/reader/full/tems-investigation-91-getting-started-manual 47/74
Chapter 8. Configuring the PC and Phones for Data Services
LZT 108 9852 R2A 39
8. Configuring the PC and
Phones for Data Services
In this chapter it is assumed that TEMS Investigation has been installed
(section 5.3). Naturally, all that is said here is relevant for TEMS Investigation
Data Collection only.
8.1. Introduction
The present chapter describes how to configure your PC and phones for
running data services.
Most of the configuration is the same for both packet-switched and circuit-
switched data. Where differences exist, they are pointed out on each
occasion.
Please note that this chapter only describes a basic setup. Also note that the
description is incomplete: some settings are operator-dependent (including
all TCP/IP settings such as WINS or DNS entries), and so universally valid
settings cannot be given here. Other operator-specific settings may be
required which override recommendations given in this chapter.
On completing this chapter you will be ready to connect external devices and
establish contact with them in TEMS Investigation. This is covered in
chapter 13.
8.2. USB Drivers for Phones
A USB driver is necessary for using the phone as a modem and hence for
collecting measurements. The USB driver installation was covered in section
5.5.1.

8/13/2019 TEMS Investigation 9.1 Getting Started Manual
http://slidepdf.com/reader/full/tems-investigation-91-getting-started-manual 48/74
TEMS Investigation 9.1 Getting Started Manual
40
8.3. Configuring Dial-up Networking (RAS)
This section describes how to configure Dial-Up Networking (RAS) in
Windows for packet-switched data services.
It is assumed that the phone has been plugged in and recognized by the PC
(section 5.5.1).
8.3.1. Dial-up Networking Configuration in Windows
Vista
1. From the Control Panel, select Network and Internet.
2. Click “Connect to a network”.
3. Click “Set up a connection or network”.
4. Select “Connect to the Internet”. Click Next.
5. If you are already connected to the Internet, you will be notified of this.
Click “Set up a new connection anyway”.
6. Under “How do you want to connect?”, select Dial-up.
7. Under “Which modem do you want to use?”, select the modem of your
device:
Note: The dialogs gone through below may differ in some respects
between different versions of each operating system. However,
the information that needs to be provided is similar in all cases,
so the instructions should still be helpful.
Phone Modem to Select
Sony Ericsson
phones
“Sony Ericsson <model name> Serial Modem” or
“Sony Ericsson [<model name>] USB WMC Data
Modem”
LG phones “LGE <model name> USB WMC Data Modem”
Motorola UEs “Motorola USB Modem”
Nokia GSM
phones
“Nokia <model name> (USB)”

8/13/2019 TEMS Investigation 9.1 Getting Started Manual
http://slidepdf.com/reader/full/tems-investigation-91-getting-started-manual 49/74
Chapter 8. Configuring the PC and Phones for Data Services
LZT 108 9852 R2A 41
8. Under Dial-up phone number, enter the access phone number for thedata service. For UMTS this is usually *99#. If the APN (Access Point
Name: see section 8.4 below) is not at the top of the APN list but at
position n, you must dial *99***n#. For CDMA/EV-DO, enter #777.
9. Fill in your user name and password if required. Leave the boxes Show
characters and Remember this password unchecked. Name your dial-
up connection.
10. Under “Allow other people to use this connection”, make the selection
that is most appropriate in your case.
11. Click Connect. The dial-up connection will now be tested. Click Skip if
you want to skip this test. Later, when you are using the command
sequence for data service testing, you do not dial up in this way but
rather from within TEMS Investigation (see the Data Collection User’s
Manual, chapter 13).
12. Back in Control Panel Home, under Network and Internet, click “View
network status and tasks”.
13. Click “Manage network connections”.
14. Right-click the dial-up connection you just created and select
Properties.
15. Select the Networking tab. Under “This connection uses the following
items:”, make sure that “Internet Protocol Version 4 (TCP/IPv4)” is
checked, and uncheck “Internet Protocol Version 6 (TCP/IPv6)”. See
section 3.17.2. Leave “Client for Microsoft Networks” unchecked.
16. Select “Internet Protocol Version 4 (TCP/IPv4)” and click Properties.
Normally an IP address and DNS server address will be assigned to
you automatically. If that is not the case for you, enter the proper
Nokia UEs Three modems “Nokia <model name> (USB) ...”
are in the list.Which you select here should not matter; however,
tests have shown that the best performance is
achieved by choosing the modem with the middle
port number here.
Qualcomm
chipset based
“Qualcomm Proprietary USB Modem ...”
Phone Modem to Select
8/13/2019 TEMS Investigation 9.1 Getting Started Manual
http://slidepdf.com/reader/full/tems-investigation-91-getting-started-manual 50/74
TEMS Investigation 9.1 Getting Started Manual
42
information and click Advanced. In the dialog that appears, deselect
“Use IP header compression” and make sure that “Use default gateway
on remote network” is checked. Click OK.
17. The dial-up configuration is now complete. Click OK to exit all dialogs.
8.3.2. Dial-up Networking Configuration in Windows XP
1. From the Start menu, choose Connect To → Show All Connections.
The Network Connections dialog appears.
2. Click the underlined link “Create New Connection”. The New
Connection Wizard appears. Click Next.
3. Select “Connect to the Internet”. Click Next.4. Select “Set up my connection manually”. Click Next.
5. Select “Connect using a dial-up modem”. Click Next.
6. Select your modem in the list. For details, see section 8.3.1, step 7.
Then click Next.
7. Name the connection. Click Next.
8. In the Phone number field, enter the access phone number for the data
service. For UMTS this is usually *99#. If the APN (Access Point Name:
see section 8.4 below) is not at the top of the APN list but at position n,
you must dial *99***n#. For CDMA/EV-DO, enter #777.
9. Under “Create this connection for:”, make the selection that is most
appropriate in your case. Click Next.
10. Fill in your user name and password if required. Uncheck all three
checkboxes. Then click Next.
11. Create a shortcut to the desktop if you like, then click Finish.
12. In the Connect... dialog, verify the user name and password. Check thebox “Save this user name and password for the following users”. Then
click Properties.
13. Select the Networking tab. Under “Components checked...”, make sure
that “Internet Protocol (TCP/IP)” is checked and selected, and that
“Client for Microsoft Networks” is not selected.
14. Select “Internet Protocol (TCP/IP)” and click Properties. Normally an IP
address and DNS server address will be assigned to you automatically.
If that is not the case for you, enter the proper information and click
Advanced. In the dialog that appears, deselect “Use IP header

8/13/2019 TEMS Investigation 9.1 Getting Started Manual
http://slidepdf.com/reader/full/tems-investigation-91-getting-started-manual 51/74
Chapter 8. Configuring the PC and Phones for Data Services
LZT 108 9852 R2A 43
compression” and make sure that “Use default gateway on remote
network” is checked. Click OK.
15. Now test the dial-up connection. With the phone plugged in, click Dial in
the Connect... dialog. Verify that the connection is established, thendisconnect. Later, when you are using the command sequence for data
service testing, you do not dial up in this way but rather from within
TEMS Investigation (see the Data Collection User’s Manual, chapter
13).
16. The dial-up configuration is now complete.
8.4. Setting Up the APN for the Phone (UMTS,
RAS)To run packet-switched data services in UMTS, you need to configure the
Access Point Name (APN) in the phone. This can be done:
• directly in the phone user interface
• by sending an AT command to the phone.
8.4.1. Setup in Phone User Interface
Some examples are given below.
Sony Ericsson C702, W760i, Z750i
In the phone’s menu system, navigate to Settings → Connectivity tab →
Internet settings → Connect using.
Nokia N96
In the phone’s menu system, navigate to Tools → Settings → Connection →
Destinations.

8/13/2019 TEMS Investigation 9.1 Getting Started Manual
http://slidepdf.com/reader/full/tems-investigation-91-getting-started-manual 52/74
TEMS Investigation 9.1 Getting Started Manual
44
8.4.2. Setup Using AT Commands
You can send AT commands to the phone from a terminal emulator such as
the Windows HyperTerminal.1 Send the AT commands to the virtual port that
will be used for data service measurements (see section 8.3.2).
For Nokia phones this method does not work, because the APN setting sent
with an AT command is not saved. Do the setup directly in the phone instead,
as exemplified in section 8.4.1.
To check what APNs have already been set up, give this command:
AT+CGDCONT?
To set an APN with CID number 1, the command is:
AT+CGDCONT=1,"IP","<APN>"
where <APN> is the Access Point Name, for example
AT+CGDCONT=1,"IP","umts.my_server.com"
Note that with terminals from certain vendors (including Sierra Wireless), “IP”
must be written in uppercase letters.
You can check that the APN is correct by sending AT+CGDCONT? once
more.
Alternatively, AT commands can be entered in the Windows modem
properties dialog (Control Panel → Phone and Modem Options → Modems
tab → Properties → Advanced). The commands are then sent automatically
to the phone in each dial-up. This method is of course applicable to phones
from any supplier; the disadvantage is that no querying mechanism is
available.
Note: In Windows Vista you must have administrator rights to be able to
send AT commands to devices.
1. AT commands can also be sent from within TEMS Investigation, using
the Command Sequence tool (Data Collection User’s Manual, section
13.9). This, however, naturally requires that the phone has been
connected in TEMS Investigation. See the Data Collection User’s
Manual, chapter 6.

8/13/2019 TEMS Investigation 9.1 Getting Started Manual
http://slidepdf.com/reader/full/tems-investigation-91-getting-started-manual 53/74
Chapter 8. Configuring the PC and Phones for Data Services
LZT 108 9852 R2A 45
8.5. Configuring an NDIS Connection
The following TEMS Investigation connectable devices can be configured to
use an NDIS data connection:
• Sony Ericsson C702
• Sony Ericsson W760i
• Sony Ericsson Z750i
• Option GlobeTrotter HSUPA
• Qualcomm TD8200
• Sierra Wireless AirCard 880/881
The following TEMS Investigation connectable devices always use an NDISdata connection:
• Ericsson Fixed Wireless Terminals (all supported models, see section
4.1.2)
8.5.1. Configuration of Sony Ericsson Phones
The configuration is done directly in the phone.
• In the phone’s menu system, navigate to Settings → Connectivity tab → USB → USB network → USB network type → Phone as modem.
• Press Back, then under USB data accounts, select the data account with
the correct APN.
To terminate the NDIS connection, set USB network type to Off.
8.5.2. Configuration of Data Cards
The configuration is done using a software application delivered with the datacard. For example, for Sierra Wireless data cards, you use an application
called 3G Watcher:
• Assign the correct APN to the device.
• Perform the “connect” operation in order to give the device an IP address.
To terminate the NDIS connection, do a “disconnect” in the third-party
application.
Please consult documentation from the vendor for further details.
8/13/2019 TEMS Investigation 9.1 Getting Started Manual
http://slidepdf.com/reader/full/tems-investigation-91-getting-started-manual 54/74

8/13/2019 TEMS Investigation 9.1 Getting Started Manual
http://slidepdf.com/reader/full/tems-investigation-91-getting-started-manual 55/74
Chapter 9. PC and Device Configuration for DRT Scanner
LZT 108 9852 R2A 47
9. PC and Device Configuration
for DRT Scanner
This chapter applies to all currently supported DRT scanners (models listed in
section 4.1.4).
The DRT scanner can either be connected directly to the PC by means of a
cable, or it can be accessed over a local area network. The instructions thatfollow tell how to configure the PC in each case.
See also the Data Collection User’s Manual, section 6.3.3.
9.1. Direct Connection
The DRT scanner is shipped configured for a direct connection and is
assigned the static IP address 192.168.5.2. The PC’s Ethernet adapter must
likewise have its TCP/IP address configured as static and equal to
192.168.5.1.
Follow these steps:
1. Use Start → Connect To → Show All Connections to access the
network connections.
2. Double-click Local Area Connection and click the Properties button.
3. In the box below “This connection uses the following items:”, scroll
down to see “Internet Protocol (TCP/IP)” and select it, then click the
Properties button. (In Windows Vista, select Internet ProtocolVersion 4.)
4. Select “Use the following IP address”. Under IP address, enter
192.168.5.1. Under Subnet mask, enter 255.255.255.0. Then click OK.
5. Connect the scanner to the PC’s Ethernet port with a crossover
100Base-T cable.
8/13/2019 TEMS Investigation 9.1 Getting Started Manual
http://slidepdf.com/reader/full/tems-investigation-91-getting-started-manual 56/74

8/13/2019 TEMS Investigation 9.1 Getting Started Manual
http://slidepdf.com/reader/full/tems-investigation-91-getting-started-manual 57/74
Chapter 9. PC and Device Configuration for DRT Scanner
LZT 108 9852 R2A 49
3. Ping the unit by typing the command ping DRT4301SNAAAA, where
AAAA is the serial number of the device, and observe if responses are
received.
4. If no response occurs, you may use Wireshark to capture the Ethernettraffic and determine the unit’s current IP address. Enter the filter term
nbns.flags == 0x2910 to isolate the Netbios Naming Service registration
messages sent out by the scanner. The IP address will be included in
the message from the scanner.
9.4. Scanner Antenna Connection
The RF antenna must be connected to the RF IN B port on the DRT scanner.

8/13/2019 TEMS Investigation 9.1 Getting Started Manual
http://slidepdf.com/reader/full/tems-investigation-91-getting-started-manual 58/74
TEMS Investigation 9.1 Getting Started Manual
50
10. PC and Device Configuration
for Ericsson Fixed WirelessTerminal
Ericsson Fixed Wireless Terminals (FWTs) are routers offering wireless
access to broadband Internet and telephony. The FWT constitutes a gateway
to a network.
Regarding FWT operation in general, please consult the documentation
delivered with the product.
10.1. PC Configuration
If an FWT is to be used with TEMS Investigation, the following must be
observed:
• The PC must not be connected to any other network. (The “default
gateway” must be unambiguously defined in the PC OS.)
• The default IP address of the FWT is 192.168.1.1. It is possible to change
this address to any value; however, TEMS Investigation requires that the
IP address fall within the private address space (see IETF RFC 1918).
• If a firewall or other security product is installed, you must make sure that
port 1895 is open, since the TEMS service uses this port.
10.2. FWT Configuration
The FWT itself must be configured as follows:
• Connect the PC and FWT with a LAN cable.
• Configure the network interface on the PC with either a static IP address
in the range 192.168.1.0/241 or DHCP.
• Using Telnet2, log in to the FWT (192.168.1.1)1 as root. The root
password will be different in each custom configuration. Please contact
your supplier or operator for assistance.

8/13/2019 TEMS Investigation 9.1 Getting Started Manual
http://slidepdf.com/reader/full/tems-investigation-91-getting-started-manual 59/74
Chapter 10. PC and Device Configuration for Ericsson Fixed Wireless Terminal
LZT 108 9852 R2A 51
• Run the following commands:
# cf set tems.enabled true
# cf commit
The TEMS service will now always be running on the FWT whenever it is
turned on. There is no need to restart the TEMS service after the FWT
has been rebooted.
To disable the TEMS service, run these commands:
# cf set tems.enabled false
# cf commit
1. This is the default network on the FWT LAN, though it is possible that the
FWT has been configured differently.
2. In Windows Vista, the Telnet client is by default not activated. To activate
it, do as follows: Open the Control Panel and navigate to Programs and
Features. Click “Turn Windows features on or off”. In the feature list that
appears, check Telnet Client.
8/13/2019 TEMS Investigation 9.1 Getting Started Manual
http://slidepdf.com/reader/full/tems-investigation-91-getting-started-manual 60/74
TEMS Investigation 9.1 Getting Started Manual
52
11. Configuring the PC for Python
Script Processing
To be able to run Python scripts from a Windows command prompt, you must
do the following (requires administrator rights on the PC):
• Create a new environment variable PYTHONPATH and set it to
<TEMS Investigation install dir>\Scripts;<TEMS Investigation install
dir>\Application
where by default <TEMS Investigation install dir> = C:\Program
Files\Ascom\TEMS Products\TEMS Investigation.
If you use a different installation directory, or if you put your Python scripts
in a different location, you need to modify the contents of PYTHONPATH
accordingly.
• To the environment variable PATH, add the path to the Python installation,for example C:\Python25.
For details on how to set up environment variables, please consult your
Windows documentation or the following web pages:
• Windows XP: support.microsoft.com/kb/310519
• Windows Vista: The instruction for Windows XP can be followed with
some minor adjustments. In step 2, click Advanced system settings.

8/13/2019 TEMS Investigation 9.1 Getting Started Manual
http://slidepdf.com/reader/full/tems-investigation-91-getting-started-manual 61/74
Chapter 12. Cell Data and Maps
LZT 108 9852 R2A 53
12. Cell Data and Maps
Two aspects of the presentation (in both Data Collection and Route Analysis)
require some preparation:
• Presenting cell data
• Displaying background maps
These things are not addressed here but in the User’s Manuals.
• How to load cell files is described in
– Data Collection User’s Manual, section 5.3
– Route Analysis User’s Manual, section 5.2
• How to load map files is the subject of
– Data Collection User’s Manual, sections 24.3–24.4
– Route Analysis User’s Manual, section 5.1

8/13/2019 TEMS Investigation 9.1 Getting Started Manual
http://slidepdf.com/reader/full/tems-investigation-91-getting-started-manual 62/74
8/13/2019 TEMS Investigation 9.1 Getting Started Manual
http://slidepdf.com/reader/full/tems-investigation-91-getting-started-manual 63/74
Chapter 14. Miscellaneous
LZT 108 9852 R2A 55
14. Miscellaneous
14.1. Configuring the Motorola E1000 for Inter-frequency Handover and GSM-to-UTRANHandover
The Motorola E1000 is by default configured as a commercial E1000
handset. To be able to test and verify inter-frequency handover as well asGSM-to-UTRAN handover, the handset needs to be reconfigured. This is
done by using the Motorola 3G Advanced Features Switcher.
Using this tool to enable Advanced Features should be done with extreme
caution. These features should normally be disabled and are provided in the
Motorola E1000 test mobile for test purposes only, to enable testing of this
functionality ahead of general commercial release. The Advanced Features
have not been certified for general use on all networks, and it is possible that
they will not operate correctly on some networks. Any problems detected
when Advanced Features are enabled fall outside the scope of the normalsupport agreement and may not be possible to correct.
The Advanced Features also require network support, and their use should
not be attempted unless the network is known to support the advanced
functionality.
• To install the software tool, execute the file Motorola_3G_Advanced_
Features_Switcher_setup.exe that is found in the Motorola directory on
the TEMS Investigation installation CD.
• Then connect the Motorola E1000 serial cable to your computer as wellas to the handset. The cable is found in the E1000 delivery box. Note that
the serial cable needs to be used; the Motorola 3G Advanced Features
Switcher cannot be used with the E1000 USB cable.
• Power up the handset and start the tool by choosing “Motorola 3G
Advanced Features Switcher” from the Start menu. The following screen
will show:

8/13/2019 TEMS Investigation 9.1 Getting Started Manual
http://slidepdf.com/reader/full/tems-investigation-91-getting-started-manual 64/74
TEMS Investigation 9.1 Getting Started Manual
56
The operations needed to reconfigure the tool are:
1. Select the serial COM port used in the selector under Setup → Use
COM Port.
2. Read the current settings by selecting the menu item Options → Read
Current Settings.
3. Wait a few seconds for the phone to restart.
4. Choose the wanted settings by selecting the radio button “Advanced
Features Enabled” or “Advanced Features Disabled”.
5. Reconfigure the handset by choosing the menu item Options→ Write
New Settings.
6. Wait a few seconds for the phone to restart.7. Verify the changes by repeating step 2.
If the read operation fails, wait a few seconds, then try again. If a write
operation fails, wait a few seconds, then try again from step 1 or 2.

8/13/2019 TEMS Investigation 9.1 Getting Started Manual
http://slidepdf.com/reader/full/tems-investigation-91-getting-started-manual 65/74
Chapter 15. Support Contact Information
LZT 108 9852 R2A 57
15. Support Contact Information
For support in using TEMS Investigation, please contact Ascom according to
the directions found at
www.tems.com
under the link “Contact TEMS”.To sign up for the TEMS on-line subscription service, please go to the same
web site and click the link “TEMS Subscription Service”. This free service
includes e-mail notification of TEMS product launches, version upgrades and
patches, as well as on-line TEMS News.

8/13/2019 TEMS Investigation 9.1 Getting Started Manual
http://slidepdf.com/reader/full/tems-investigation-91-getting-started-manual 66/74
TEMS Investigation 9.1 Getting Started Manual
58

8/13/2019 TEMS Investigation 9.1 Getting Started Manual
http://slidepdf.com/reader/full/tems-investigation-91-getting-started-manual 67/74
Index
LZT 108 9852 R2A 59
Index
A Access Point Name (APN) 43
accessories 8
administrator rights on PC, actions requiring 9
Aero Glass 13
Anritsu scanners 23basic configuration of ML8720 model 23
cable to use with ML8720 model 23
supported models 17
USB driver for ML8740/8741 models 33
APM (Advanced Power Management) 10
APN (Access Point Name) 43
AQM
licensing for 7
phones supporting 20
AQM modules 16drivers for 34
audio quality measurements (AQM)
phones supporting 20
automatic updating of software 10
AutoPlay 10
Bbackpack (TEMS Indoor Backpack) 33
Bluetooth 10
Ccables to use with phones
Sony Ericsson Z750i 22
Call Generator, installing 36
cell data, importing 53
circuit-switched data services, testing with UEs 46
connectable phones and data cards, list of
CDMA 16
UMTS 14
8/13/2019 TEMS Investigation 9.1 Getting Started Manual
http://slidepdf.com/reader/full/tems-investigation-91-getting-started-manual 68/74
TEMS Investigation 9.1 Getting Started Manual
60
connectable scanners, list of
CDMA 18
UMTS 16
contents of Getting Started Manual 1
Ddata cards
USB drivers for 32
Data Collection User’s Manual 1
data service testing
configuring PC and phones for 39
data services 4
definitions of TEMS Investigation concepts 3
Dial-up Networking, configuring 40
in Windows Vista 40
in Windows XP 42
Documents folder 10
DRT4301A scanner 18
configuring for local area network connection 48
connecting RF antenna to 49
DRT4301A+ scanner 18
Eenergy saving features in Windows 12
equipment cases 2
external antennas
connecting to phones 22
support for in phones 20
external equipment 14
connecting in TEMS Investigation 54
FFAQ (on TEMS website) 3
firewall in Windows 12
GGPS protocols, supported 18
GPS units
configuring 25
list of supported 18
USB driver for 33
Hhardware key, driver for 38
hardware requirements for installing TEMS Investigation 27
8/13/2019 TEMS Investigation 9.1 Getting Started Manual
http://slidepdf.com/reader/full/tems-investigation-91-getting-started-manual 69/74
Index
LZT 108 9852 R2A 61
HASP HL SRM 30
HASP HL SRM Key Reader 38
I
IEEE 802.11 (WLAN) 13indoor backpack 8, 24
Information Elements and Events 1
installing license software 30
installing TEMS Investigation 27, 30
IPv6 13
IR port 11
LLG CU320 15
LG CU500 15LG phones
Dial-up Networking configuration for 40
LG U960 15
licensing in TEMS Investigation 37
floating license 8, 37
for AQM 7
for Data Collection 38
for external devices 6
for Route Analysis 37
local license 37
network license 8, 37
LTE
not supported in Analysis Packages 6
Mmaps, importing 53
Motorola E1000 15
configuring for inter-frequency and GSM-to-UTRAN handover 22, 55
Motorola E1070 15
Motorola M2501 15
Motorola Razr Maxx V6 15
Motorola Razr V3x 15
Motorola Razr V3xx 15
Motorola Razr2 V9 14
general capabilities of 20
GSM capabilities of 21
Motorola UEs
Dial-up Networking configuration for 40
USB driver for 32

8/13/2019 TEMS Investigation 9.1 Getting Started Manual
http://slidepdf.com/reader/full/tems-investigation-91-getting-started-manual 70/74
TEMS Investigation 9.1 Getting Started Manual
62
MSXML 29
My Documents folder 10
N
Nokia 6086 14general capabilities of 20
GSM capabilities of 21
Nokia 6120 14
general capabilities of 20
GSM capabilities of 21
Nokia 6121 15
GSM capabilities of 21
Nokia 6125 15
Nokia 6230i 15
Nokia 6280 15
Nokia 6680 15
Nokia 7376 15
Nokia GSM phones
Dial-up Networking configuration for 40
Net Monitor function 22
USB driver for 32
Nokia N75 15
Nokia N80 15
Nokia N95 15GSM capabilities of 21
Nokia N96 EU 14
general capabilities of 20
GSM capabilities of 21
Nokia PC Suite 11
Nokia UEs
Dial-up Networking configuration for 41
Net Monitor function 22
USB driver for 32
Ooperating system requirements for installing TEMS Investigation 29
Option GlobeTrotter Express HSUPA 15
general capabilities of 20
GSM capabilities of 21
PPC configuration
for Data Collection 9
for DRT scanner 47, 50

8/13/2019 TEMS Investigation 9.1 Getting Started Manual
http://slidepdf.com/reader/full/tems-investigation-91-getting-started-manual 71/74
Index
LZT 108 9852 R2A 63
for Python script processing 52
PCTel SeeGull EX scanners 24
supported models (UMTS) 16
USB driver for 33
PCTel SeeGull LX scanners 24
supported models (CDMA) 18
supported models (UMTS) 16, 17
USB driver for LX MM2 33
phones 3
basic configuration of 22
capabilities of phones sold with TEMS Investigation 20
list of connectable (CDMA) 16
list of connectable (UMTS) 14
port-scanning software 11power management in Windows 12
product packaging 5
Python
configuring PC for 52
required software 29
QQualcomm chipset based devices
Dial-up Networking configuration for 41
enabling diagnostics reporting 22
RReadme file 3
Release Note 3
Route Analysis User’s Manual 1
RTP ports for video streaming 11
Sscanners 4
list of connectable (CDMA) 18
list of connectable (UMTS) 16
screen savers 12
security products 11
software requirements for installing TEMS Investigation 29
Sony Ericsson C702 14, 17
cable to use with 22
general capabilities of 20
GSM capabilities of 21
Sony Ericsson K600i 15
8/13/2019 TEMS Investigation 9.1 Getting Started Manual
http://slidepdf.com/reader/full/tems-investigation-91-getting-started-manual 72/74
TEMS Investigation 9.1 Getting Started Manual
64
Sony Ericsson K790a 14
connecting external antenna to 22
general capabilities of 20
GSM capabilities of 21
Sony Ericsson K790i 14
connecting external antenna to 22
general capabilities of 20
GSM capabilities of 21
Sony Ericsson K800i 14
Sony Ericsson PC Suite 11
Sony Ericsson phones
Dial-up Networking configuration for 40
USB drivers for 32
Sony Ericsson TM506 14cable to use with 22
general capabilities of 20
GSM capabilities of 21
Sony Ericsson W600i 15
Sony Ericsson W760i 14, 17
cable to use with 22
general capabilities of 20
GSM capabilities of 21
Sony Ericsson Z750i 14, 17
cable to use with 22, 23
general capabilities of 20
GSM capabilities of 21
SpeedStep technology 11
support contact information 3, 57
TTC-1450 equipment case 24
TC-1520 equipment case 24, 33
TC-1520B equipment case 24, 33
TEMS Indoor Backpack 33
TEMS on-line subscription service 3
TEMS Pocket 2
terminals 3
Trimble Placer 455/DR, configuration of 25
UUDP ports for video streaming 11
uninstalling TEMS Investigation 35
USB drivers for phones 31

8/13/2019 TEMS Investigation 9.1 Getting Started Manual
http://slidepdf.com/reader/full/tems-investigation-91-getting-started-manual 73/74
Index
LZT 108 9852 R2A 65
USB Legacy Support 12
USB-to-RS232 serial converter in equipment cases and backpack, driver for
33
user terminals 3
Vvideo streaming, RTP (UDP) ports for 11
video telephony
using for circuit-switched data testing 46
virtual memory requirements for installing TEMS Investigation 28
WWiMAX
configuring PC for DRT scanner 47, 50
not supported in Analysis Packages 6Windows firewall 12
Windows Media Player 12
Windows Vista settings 13
Windows XP settings 13
WLAN 13

8/13/2019 TEMS Investigation 9.1 Getting Started Manual
http://slidepdf.com/reader/full/tems-investigation-91-getting-started-manual 74/74
TEMS™ Optimization Solutions – the number one choice for operators
worldwide. For every stage of a wireless network’s life cycle and supporting
all major technologies, the TEMS portfolio helps operators maximize their
Quality of Service and get the most out of their network investment.
The experience and technological leadership of TEMS gives network
operators the strong partnership they need and a commitment to quality,
accuracy, and success.
TEMS Optimization Solutions – Making Wireless Better.


