128
1 of 128 Reference Guide for Travel and Expense Management System (TEMS) April, 2018
| Date post: | 04-Apr-2018 |
| Category: |
Documents |
| Upload: | nguyenthuan |
| View: | 217 times |
| Download: | 2 times |
1 of 128
Reference Guide for Travel and Expense Management System (TEMS)
April, 2018

TEMS Reference Guide
2 of 128
Table of Contents TEMS Vision .................................................................................................................................. 4 New Features over Travel Voucher System (TVS) ........................................................................ 4 Contact information ........................................................................................................................ 4 Technical Requirements .................................................................................................................. 5 Login Procedures ............................................................................................................................ 6 Home Tab........................................................................................................................................ 7 Trips Tab ......................................................................................................................................... 8
Trip List Filter ........................................................................................................................... 8 Sorting ....................................................................................................................................... 9 Creating a New Trip.................................................................................................................. 9 New Trip Screen ..................................................................................................................... 10 General Trip Information: ....................................................................................................... 10 Adding a Destination (New Itinerary Line): ........................................................................... 13 Per Diem ................................................................................................................................. 14
Adding Per Diem (In-state) ........................................................................................... 15 Meals ............................................................................................................................. 16 Lodging ......................................................................................................................... 16
Per Diem Total .......................................................................................................... 18 Memo Field ............................................................................................................... 18
Adding Per Diem (Out-of-State) ................................................................................... 18 Meals ......................................................................................................................... 18 Lodging ..................................................................................................................... 19
Adding Miscellaneous Travel Expenses: ...................................................................... 20 Comments ..................................................................................................................... 21
Edit an Existing Trip ............................................................................................................... 22 Edit General Trip Information: ............................................................................................... 23 Edit an Itinerary Line: ............................................................................................................. 24 Edit Miscellaneous Travel Expenses: ..................................................................................... 27 Edit Existing Comments ......................................................................................................... 28 Delete Existing Comments ..................................................................................................... 29 Inactivating a Trip ................................................................................................................... 30 Activating a Trip ..................................................................................................................... 32 Reimbursements Tab .............................................................................................................. 34 Reimbursement Request List Filter ........................................................................................ 34 Sorting ..................................................................................................................................... 35 Creating a New Reimbursement Request ............................................................................... 36 Adding Trips to a Reimbursement Request ............................................................................ 37 Adding Comments to a Reimbursement Request ................................................................... 40 Edit Existing Comments ......................................................................................................... 42 Delete Existing Comments ..................................................................................................... 42 Removing Trips from a Reimbursement Request ................................................................... 43 Editing Trips from a Reimbursement Request ........................................................................ 43 Flags and Exceptions .............................................................................................................. 45 Reimbursement Request History ............................................................................................ 46 Change Log ............................................................................................................................. 48 Routing .................................................................................................................................... 48 Requestor (To Approver) ........................................................................................................ 48 Inactivating/Activating Reimbursement Requests .................................................................. 50

TEMS Reference Guide
3 of 128
Inactivating a Reimbursement Request .................................................................................. 50 Activating a Reimbursement Request ..................................................................................... 51 Printing a Reimbursement Request ......................................................................................... 51 Check-in/Check-out ................................................................................................................ 52 Preparer (Prepare Only) .......................................................................................................... 53 Preparer (Prepare and Submit) ................................................................................................ 54 Profile Tab .............................................................................................................................. 55 Profile Information .................................................................................................................. 55 Modifying Profile Information ............................................................................................... 57 Review Tab ............................................................................................................................. 58 Reviewing a Reimbursement Request (Approver) ................................................................. 58 Suggested Review Steps: ........................................................................................................ 60 Modifying Trip and Reimbursement Request Data (Approver) ............................................. 62 Adding Comments (Approver) ............................................................................................... 65
Reimbursement Request Comments ......................................................................... 66 Trip Comments ......................................................................................................... 66
Switch Approver ..................................................................................................................... 67 Query....................................................................................................................................... 70 Recommendations for using the above criteria or fields: ....................................................... 71 Viewing Your Query Results: ................................................................................................. 73 Viewing Returned Reimbursement Requests ......................................................................... 74
Fiscal Suite .................................................................................................................................... 76 Review Tab (Fiscal Suite) ....................................................................................................... 77 Reviewing the reimbursement request: ................................................................................... 78 Suggested Review Steps: ........................................................................................................ 79 Input Account Coding ............................................................................................................. 80 Batch Tab ................................................................................................................................ 85 Query Tab ............................................................................................................................... 86 Recommendations for using the above criteria or fields: ....................................................... 87 Viewing Your Query Results: ................................................................................................. 89 Batch Report Tab .................................................................................................................... 90 Returned Tab ........................................................................................................................... 92
Administrator Suite ....................................................................................................................... 93 Routing a Reimbursement Request ......................................................................................... 95 Manage Users .......................................................................................................................... 98 Add New Users ..................................................................................................................... 103 Manage Groups ..................................................................................................................... 106 Add Groups ........................................................................................................................... 111 TVS Historical Report .......................................................................................................... 115
Glossary ...................................................................................................................................... 117 Appendix A ................................................................................................................................. 119
E-mail Notification ............................................................................................................... 119 Appendix B ................................................................................................................................. 122
System Help .......................................................................................................................... 122 Appendix C ................................................................................................................................. 126
TEMS Reports ...................................................................................................................... 126 Appendix D ................................................................................................................................. 127
Abbreviations ........................................................................................................................ 127

TEMS Reference Guide
4 of 128
TEMS Vision The “Travel and Expense Management System” (TEMS) supports and manages requests for reimbursements to state employees and other individuals for personal expenses incurred while conducting state business. TEMS supports the complete business process from preauthorization to reimbursement. Individuals, including those with disabilities, have access to the system; and administrators have the tools to support agency operations. TEMS contains a repository of data on the daily travel and expense activities for each customer, allowing management, activity, and budgetary reporting. TEMS reduces redundancy and errors, streamlines processes, and saves time.
New Features over Travel Voucher System (TVS) o Accessible to those with disabilities o Easier to deploy o Uses the “Trip Concept” o Improved filtering
Contact information For TEMS assistance, please contact WaTech Support Center:
Phone: 360.586.1000 or 855.WaTech1 E-mail: [email protected]

TEMS Reference Guide
5 of 128
Technical Requirements Recommended minimum hardware and software technical requirements for using the TEMS application: IBM-compatible workstation Pentium 4 processor or higher At least 512MB of RAM Microsoft Windows XP SP 1 or 2 or Vista Microsoft Internet Explorer 7.0, 8.0* Microsoft Office 2000, 2003, XP or higher Adobe Acrobat 7.0 or higher TEMS can also be accessed through the internet via a secured “Fortress” server at the Washington Technology Solutions. TEMS will continue support for current products version (i.e., Windows, Internet Explorer, Adobe Acrobat, etc.). Versions that have been declared no longer supported by the vendor will not receive additional support in the TEMS product. This is due in part to our need to have support from the various vendors as we develop and support the applications. It is recommended that agency users stay current with these products through service packs, updates, and upgrades. NOTE:
Compatibility View need to be on if use Internet Explorer version higher than 8.0. TEMS works only with Internet Explorer. The “Firefox”, “Google Chrome” and
“Microsoft Edge” browsers are not compatible with TEMS.

TEMS Reference Guide
6 of 128
Login Procedures The addresses to access the TEMS web sites are: https://tems.ofm.wa.gov (Intranet) https://fortress.wa.gov/ofm/tems (Internet) The TEMS login screen will appear.
The User ID, Agency Number, and Password fields must be completed to access the system.
Click the “Login” button once these fields are completed.

TEMS Reference Guide
7 of 128
Home Tab The Home tab is the default screen for the system and is divided into three sections: System News, Agency News, and Tasks. The System News section is used by the System Administrator(s) at the Office of Financial Management to provide system specific information to users. The Agency News section is used to display agency unique information. The Tasks section contains “quick links” to various frequently performed functions. These functions may also be performed by clicking on the appropriate tab at the top of the screen.
General Navigation Information When navigating the Travel and Expense Management System (TEMS) you will generally be using the Tab key or the mouse to begin the process of entering data into TEMS. NOTE: Do not use the enter key when inputting data as this may open up screens before you are ready for them. The Enter key can be used to select a button when used in conjunction with the Tab key to move from box to box.
TEMS Reference Guide
8 of 128
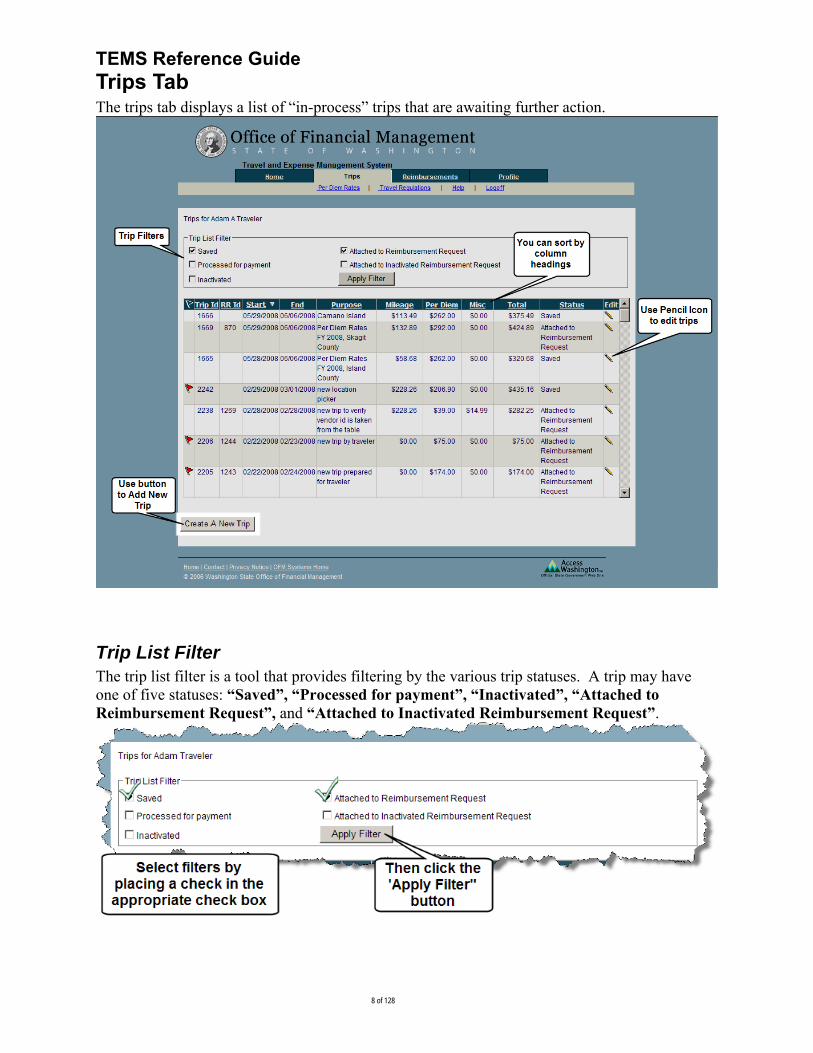
Trips Tab The trips tab displays a list of “in-process” trips that are awaiting further action.
Trip List Filter The trip list filter is a tool that provides filtering by the various trip statuses. A trip may have one of five statuses: “Saved”, “Processed for payment”, “Inactivated”, “Attached to Reimbursement Request”, and “Attached to Inactivated Reimbursement Request”.

TEMS Reference Guide
9 of 128
Filter Options: Saved – A trip that was saved, but was not attached to a reimbursement request.
Processed for Payment – A trip (as part of a reimbursement request) in which payment was received by the Requestor. Inactivated – A trip that was manually inactivated by clicking the Inactivate button. Attached to Reimbursement Request – A “Saved” trip that has been attached to an (active) reimbursement request. Attached to Inactivated Reimbursement Request – A “Saved” trip that is attached to an inactivated reimbursement request. A trip in this status must be accessed through the Reimbursement Tab.
The filter allows the user to choose all or any combination of the five trip statuses. Trips with statuses of “Saved” and “Attached to Reimbursement Request” comprise the default filter option.
To use the filter feature, simply select the desired filter options and click the “Apply Filter” button.
Sorting The trip list can be sorted by any of the column headings except “Edit”. The default sort order is by the “Start” column. To initiate a different sort, click on the desired underscored column heading, i.e. clicking on “Total” will sort the entire trip list by the “Total” column in ascending order. Clicking “Total” again will reverse the sort to descending order.
Creating a New Trip The screen below will appear after clicking the “Create New Trip” button on the trip list screen. The “General Trip Information” section contains required fields that must be completed before the trip can be saved. These fields are preceded by an asterisk (*).
TEMS Reference Guide
10 of 128
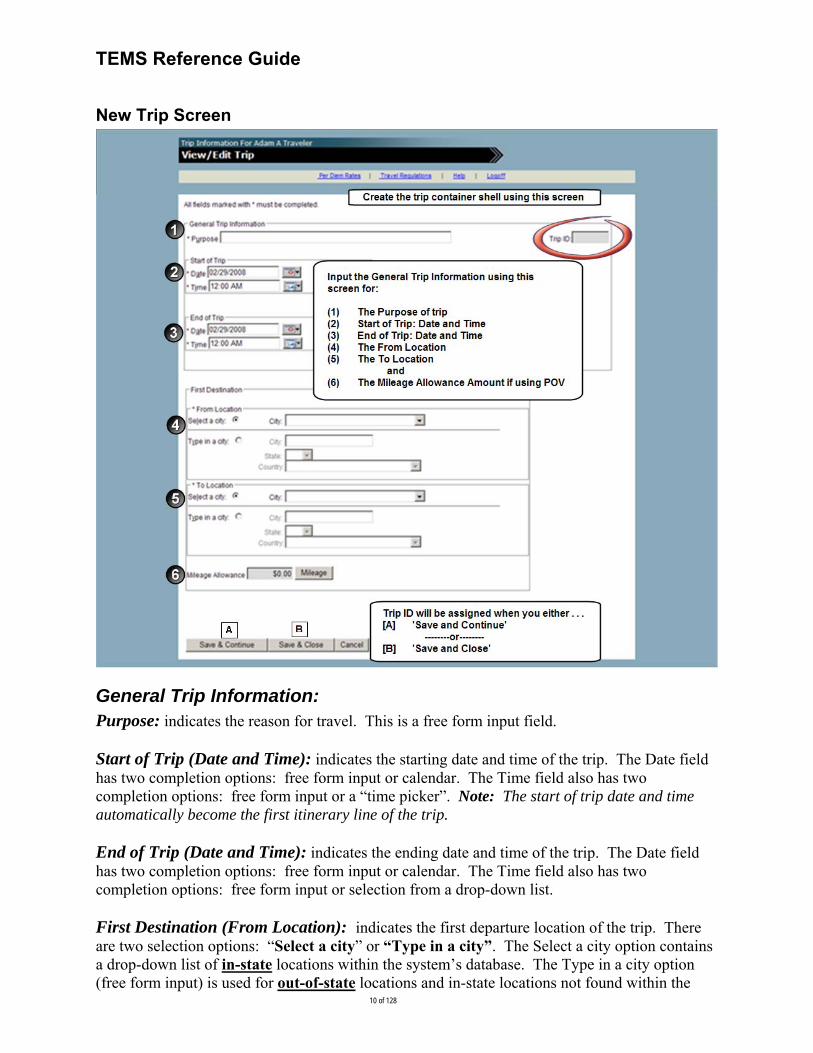
New Trip Screen
General Trip Information: Purpose: indicates the reason for travel. This is a free form input field.
Start of Trip (Date and Time): indicates the starting date and time of the trip. The Date field has two completion options: free form input or calendar. The Time field also has two completion options: free form input or a “time picker”. Note: The start of trip date and time automatically become the first itinerary line of the trip.
End of Trip (Date and Time): indicates the ending date and time of the trip. The Date field has two completion options: free form input or calendar. The Time field also has two completion options: free form input or selection from a drop-down list.
First Destination (From Location): indicates the first departure location of the trip. There are two selection options: “Select a city” or “Type in a city”. The Select a city option contains a drop-down list of in-state locations within the system’s database. The Type in a city option (free form input) is used for out-of-state locations and in-state locations not found within the

TEMS Reference Guide
11 of 128
Select a city option. When the “Type in a city” option is chosen, the “State” and “Country” must be chosen. The State field automatically defaults to “WA” and the country field automatically defaults to “United States”. For out-of-country travel, the State field becomes inactive when a country other than “United States” is selected.
First Destination (To Location): indicates the first destination of the trip. There are two selection options: “Select a city” or “Type in a city”. The Select a city option contains a drop-down list of in-state destinations. The Type in a city option (free form input) is used for out-of-state destinations and in-state destinations not found in the Select a city option. The “State” must also be selected when using the Type in a city option. A “Country” field is available in the Type in a city option for out-of-country travel. When a state is selected the country field automatically defaults to “United States”. The State field becomes inactive when a country other than “United States” is selected. Mileage Calculation: Click the “Mileage” button . . .
. . . if mileage reimbursement is being requested for the initial itinerary line. The mileage calculator as shown below will appear.
Point-to Point Mileage - the system will automatically calculate the one-way point-to-point mileage based on the From and To locations selected for the itinerary line. The system generated point-to point mileage values may be overridden and manually entered into this field. Note: This automatic calculation of mileage only works when the “Select a city” option is used and the locations (From and To) selected are in the system database.

TEMS Reference Guide
12 of 128
Round Trip Indicator - doubles the point-to-point mileage field for single day trips to one location.
Vicinity Mileage - manually enter vicinity mileage claimed.
Default Mileage – displays system default one-way mileage for the itinerary line or “unknown” if one or both locations (From and To) are not in the database or the “Type in a city” destination selection option was used.
Total Mileage - sum of the “Point-to-Point Mileage” and “Vicinity Mileage” fields.
Effective Automobile Reimbursement Rate - the system will retrieve the proper POV reimbursement rate based on the start date of the trip and enters the value in the Reimbursement Rate field.
Reimbursement Rate - defaults to the POV rate in effect on the “Start Date” of the trip.
Mileage Allowance - mileage reimbursement claimed by the traveler. The system determines the sum of this field by multiplying the “Total Mileage” field by the “Reimbursement Rate”.
Memo - this is an optional field that can be used for agency specific needs.
OK - saves the entries and returns the user to the previous screen.
Cancel - does not save the entries and returns the user to the previous screen.
At this point you have created a blank trip container, which you may save or discard. If you save it the system has all the necessary data to a blank trip container.
Three processing options exist: (1) “Save & Continue”, (2) “Save & Close”, and (3) “Cancel”. “Save & Continue” - saves input and opens trip detail input screen for further input options. “Save & Close” – saves input, and then returns to previous screen. “Cancel” – does not save input and then returns to previous screen. Note: The system generates and displays a Trip ID after clicking either “Save and Continue” or “Save & Close”.

TEMS Reference Guide
13 of 128
Clicking “Save and Continue” will produce the trip detail input screen as shown below.
This screen allows the user to input additional destinations, per diem, miscellaneous travel expenses, as well as adding comments.
Adding a Destination (New Itinerary Line): Click the “Add Destination” button on the trip’s detail input screen.

TEMS Reference Guide
14 of 128
The itinerary detail input screen will appear as shown below.
Input new itinerary data in same manner as described in the General Trip Information paragraph for the initial itinerary. After input, two processing options exist from this screen: “Save” and “Cancel”.
Save - saves the entries and returns the user to the previous page.
Cancel - does not save the entries and returns the user to the previous page.
Per Diem Meals and lodging expenses are entered, modified, or deleted through the per diem grid.

TEMS Reference Guide
15 of 128
Adding Per Diem (In-state) The following window will appear after clicking the Per Diem button on the trip summary page. The “Travel Dates” window will be pre-populated with the individual dates of the trip. To claim per diem, the User chooses a date from the drop-down list and clicks the “Claim Per Diem” button. Clicking the “Cancel” button returns the User to the trip summary page.
After choosing a date and clicking the “Claim Per Diem” button, the screen below will appear (if the location is in-state and the location is in the TEMS database).

TEMS Reference Guide
16 of 128
Meals
The User clicks the appropriate box next to the meal period to indicate if a meal is being “Claimed” or is “Provided”. Clicking the “Subject to Tax” box indicates that the chosen meal is taxable. A meal must first be “Claimed” before it can be checked as “Subject to Tax”. Note: Non-overnight travel meals are subject to Payroll Taxes. When a meal is claimed and the per diem location is in the system database, the system will enter the meal value in the “Claimed Amount” column for each meal checked as claimed. The “Claimed Amount” will remain $0 (default) if a meal is checked as being provided. The “Claimed Amount” will also remain $0 (default) if neither the “Claimed” nor “Provided” boxes are checked. Note: When overnight travel is involved, the system will use the per diem rate for the location where the User last stayed overnight for the last day of the trip meal calculations.
Lodging As with meals, the User must check the “Claimed” box if lodging reimbursement is being requested. The lodging amount is then manually entered into amount field. The system provides (in read only and for informational purposes) the standard lodging rate for the per diem location next to the “Claimed” amount field. The system validates the lodging amount entered when the User leaves the “Claimed” amount field. The system accepts the value if the amount entered is the “Standard Rate” amount or below.

TEMS Reference Guide
17 of 128
If the amount entered is above the “Standard Rate”, the system will generate one of two exceptions messages based on the amount entered in the lodging amount field: The first is the 101- 150% exception. The system will not accept the lodging amount entered until the appropriate exception is claimed or an amount equal to or less than the “Standard Rate” is entered.
The second is the Over 150% exception (see below)

TEMS Reference Guide
18 of 128
Any associated lodging tax is manually entered into the “Lodging Tax” field. The system automatically calculates a “Lodging Total” by adding the values in the “Lodging” and “Lodging Tax” fields. The “Lodging Total” is a read only field. Note: When a trip involves overnight travel, the system prevents the User from requesting lodging on the last day of the trip by graying out the lodging “Claimed” checkbox.
Per Diem Total
The system automatically calculates the daily “Per Diem Total” by adding the values in the “Meal Total” and “Lodging Total” fields. The “Per Diem Total” is a read only field.
Memo Field
“Memo” is an optional free-form input field that may be used for agency unique purposes.
The system provides two processing options after the per diem data is entered: “Save” and “Cancel”. The “Save” option saves the data to the database, updates the “Per Diem” grid, and returns the user to the Trip Summary page. The “Cancel” option does not save any data and also returns the User to the Trip Summary page.
Adding Per Diem (Out-of-State) To claim out-of-state per diem you will click on the same ‘Add Per Diem’ button that you did for in-state per diem.
Meals
The following window will appear after clicking the Per Diem button on the trip summary page. The “Travel Dates” widow will be pre-populated with the individual dates of the trip date range. To claim per diem, the User chooses a date from the drop-down list and clicks the “Claim Per Diem” button. Clicking cancel returns to the trip summary page.

TEMS Reference Guide
19 of 128
After choosing a date and clicking the “Claim Per Diem” button, the following screen will appear. This screen appears if the location is either out-of-state or an unknown in-state location.
Select the appropriate meal allowance rate from the drop-down list. Once the meal allowance is selected, a meal is claimed by checking the “Claimed” box of the desired meal period. Based on the meal allowance selected, the system will assign the appropriate value to the meal period when the “Claimed” box is checked. The remaining meal options are the same as those indicated for in-state.
Lodging
As with in-state lodging, the User must check the “Claimed” box if lodging is being claimed. The lodging amount is then manually entered into amount field. Since the location is out-of-state and unknown to the system, the system cannot provide a standard lodging rate as done for (known) in-state locations. Therefore, the automatic comparison of the standard rate to the lodging amount cannot occur. The User must manually select the appropriate lodging exception if necessary. All other remaining out-of-state per diem steps are the same as in-state.
The per diem rate links will allow access to the General Services Administration (GSA) site for rates.

TEMS Reference Guide
20 of 128
Adding Miscellaneous Travel Expenses: Click the “Add Expense” button to add miscellaneous travel expenses.
The View/Edit Miscellaneous Travel Expenses screen will appear.
Date - The date pick list is pre-populated with the date range of the trip. Select a date from the list. Paid To - Enter who the expense was paid to. Paid For - Enter what the expense was paid for. Amount - Enter the amount of the expense. Memo - this is an optional field that can be used for agency specific needs. Save - saves the entries and returns the user to the previous screen. Cancel - does not save the entries and returns the user to the previous screen. Note: The Date, Paid To, Paid For, and Amount Fields are required fields.

TEMS Reference Guide
21 of 128
Comments Comments give the User a mechanism to provide additional information or explanations pertinent to the trip. Users manually key in comments in the free-form input section. The following characters are allowed when using the free-form input section: A-Z a-z 0-9 ! @ # % & ( ) ^ . * $ \ + : ; _ - { } [ ] = / > < | , ? ~. Add New Comments Click on the “Add/Edit Comments” button . . .
. . . from the trip summary screen to add or edit comments. The following” Trip Comments” grid will appear.
Users can add new comments as well as edit or delete existing comments from this screen. Existing comments will appear in the grid above the free-form input section. The grid includes the following data fields:
“Date/Time” - System generated timestamp of when the comment was created. “Comments” - User inputted data. This is a required field. “Comments By” - System generated value displaying the User ID of the individual creating the comment.
TEMS Reference Guide
22 of 128
The User types in the desired comment. After completion, the system provides three processing options:
“Save & Continue” - saves input and maintains comments detail input screen for further input. “Save & Close” – saves input, and then returns to previous screen. “Cancel” – does not save input and then returns to previous screen.
The new comment will appear in the “Trip Comments” grid once it is saved.
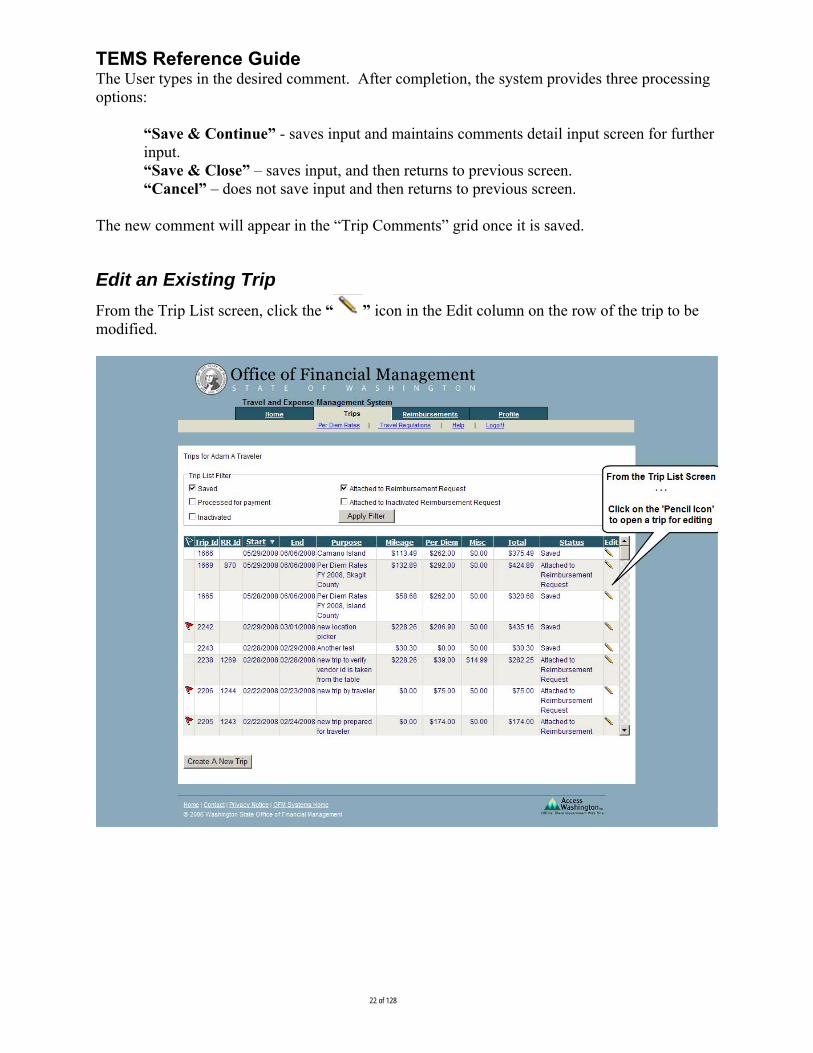
Edit an Existing Trip
From the Trip List screen, click the “ ” icon in the Edit column on the row of the trip to be modified.
TEMS Reference Guide
23 of 128
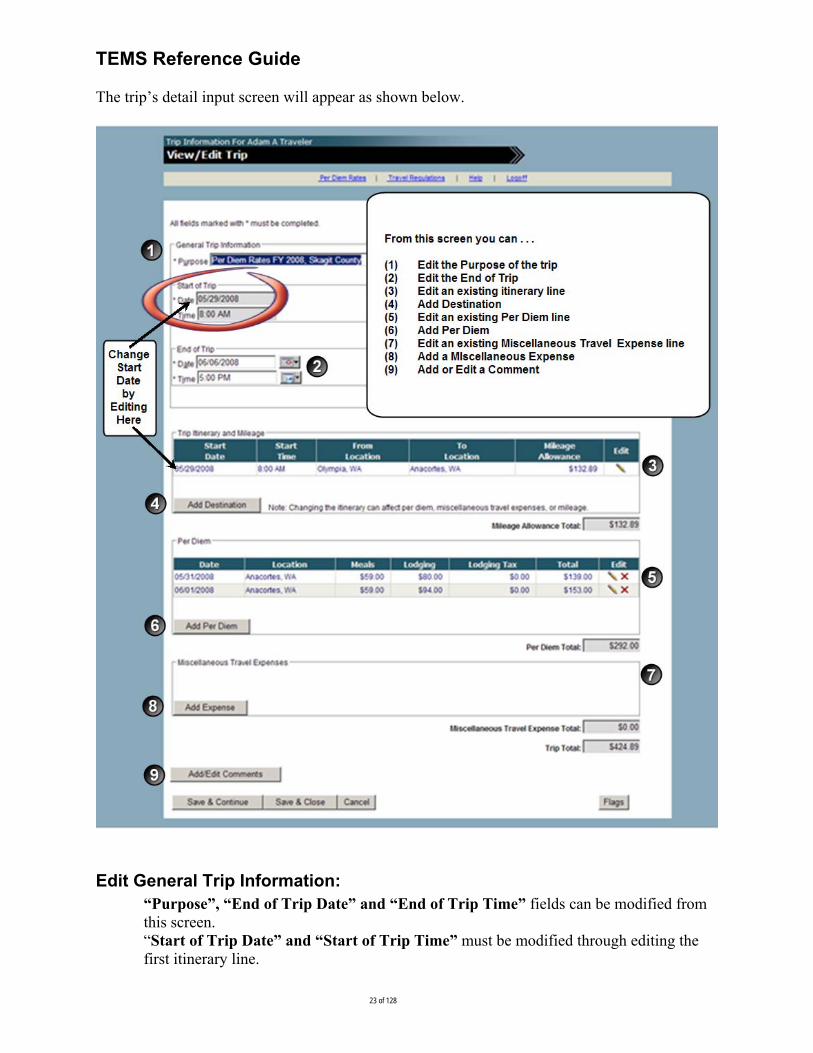
The trip’s detail input screen will appear as shown below.
Edit General Trip Information: “Purpose”, “End of Trip Date” and “End of Trip Time” fields can be modified from this screen. “Start of Trip Date” and “Start of Trip Time” must be modified through editing the first itinerary line.

TEMS Reference Guide
24 of 128
The User has three processing options after entering the edits: “Save & Continue”, “Save & Close”, and “Cancel”. “Save & Continue” - saves input and maintains the current screen.
“Save & Close” – saves input, and then returns to previous screen.
“Cancel” – does not save input and then returns to previous screen.
Edit an Itinerary Line:
Click the “ ” icon in the row of the trip itinerary and mileage grid to be modified.
The “View/Edit Itinerary” detail input screen will appear as shown below.
The “Current Travel Dates” section is informational only and cannot be modified from this screen. This data is obtained from the General Trip Information.

TEMS Reference Guide
25 of 128
Desired modifications to the itinerary line can be made from this screen. If you change the location the following pop-up window will appear.
The mileage calculator will clear when changes are made to either the itinerary’s date or location.
Click on the mileage button to open the mileage pop-up window to recalculate the mileage, if location is unknown to system, or to reset if mileage is known to system. If modifications to the “Mileage Allowance” are necessary, the “Mileage” button must be clicked to open the mileage calculator to enter the new values.
After modifying the itinerary line, the user will have two processing options:

TEMS Reference Guide
26 of 128
“Save” and Cancel”. These options perform the same function as described in earlier paragraphs. Edit Existing Per Diem
Click the “ ” icon on the row of the “Per Diem” grid to be modified.
Upon clicking on the pencil icon the following “View/Edit Per Diem” input screen containing the saved values will appear. Use this screen to modify the per diem values as necessary.
Click “Save” to keep the modifications or “Cancel” to discard them.
TEMS Reference Guide
27 of 128
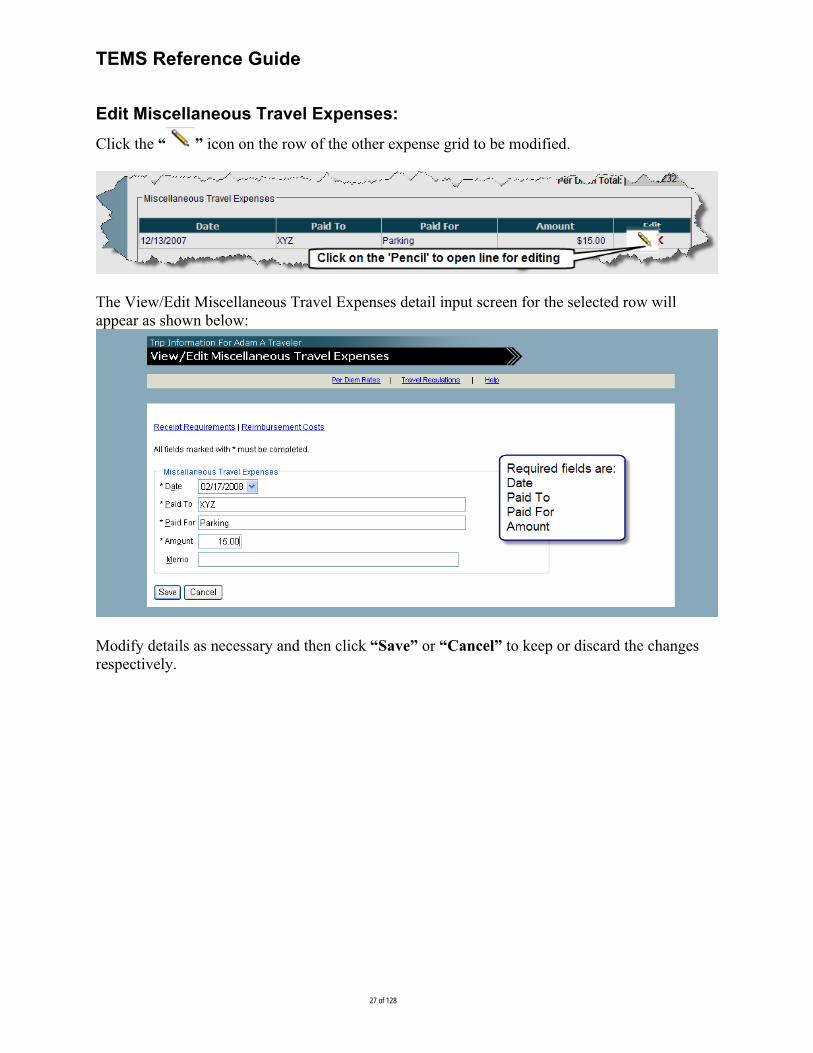
Edit Miscellaneous Travel Expenses:
Click the “ ” icon on the row of the other expense grid to be modified.
The View/Edit Miscellaneous Travel Expenses detail input screen for the selected row will appear as shown below:
Modify details as necessary and then click “Save” or “Cancel” to keep or discard the changes respectively.

TEMS Reference Guide
28 of 128
Edit Existing Comments From the Edit Trip Screen, click on the “Add/Edit Comments” button . . .
. . . to arrive at the View/Edit Trip Comments Screen below.
Click the “ ” icon in the row of the “Trip Comments” grid to be modified.

TEMS Reference Guide
29 of 128
The detail input screen containing the chosen comment will appear as shown below.
The User can modify the comment as necessary. Existing comments cannot be modified once a trip has been routed as part of a reimbursement request The same three processing options as described earlier exist after the desired modifications are made: “Save & Continue”, “Save & Close” or “Cancel”.
Delete Existing Comments
Click the “ ” icon on the row of the “Trip Comments” grid to be deleted. The delete message window will appear as shown below requesting confirmation.
Choose “OK” to continue the deletion or “Cancel” to stop. After the deletion, the comment will no longer appear in the grid. . Existing comments cannot be deleted once a trip has been routed as part of a reimbursement request.

TEMS Reference Guide
30 of 128
Inactivating a Trip Only trips with a “Saved” status can be inactivated. Trip owners (Requestors) can inactivate their own trips. Preparers may also inactivate trips they created for Requestors.

TEMS Reference Guide
31 of 128
The View/Edit Trip screen below will appear.
Click the Inactivate button. The following warning message will appear:
TEMS Reference Guide
32 of 128
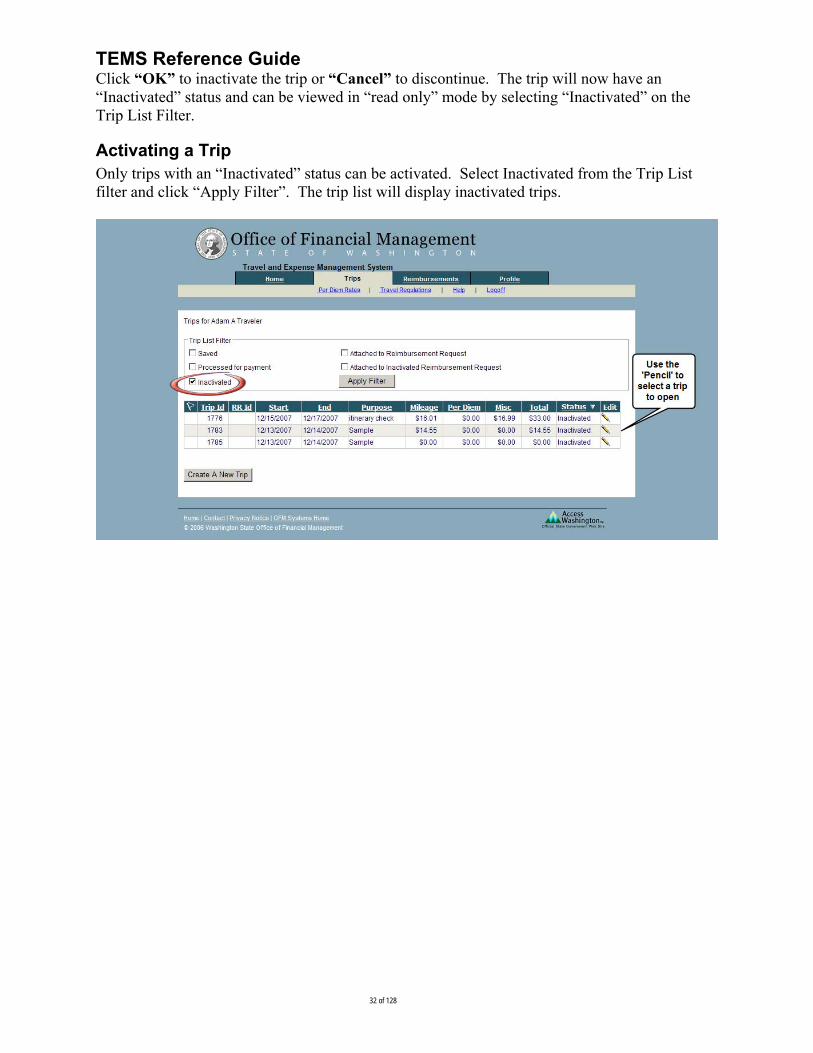
Click “OK” to inactivate the trip or “Cancel” to discontinue. The trip will now have an “Inactivated” status and can be viewed in “read only” mode by selecting “Inactivated” on the Trip List Filter.
Activating a Trip Only trips with an “Inactivated” status can be activated. Select Inactivated from the Trip List filter and click “Apply Filter”. The trip list will display inactivated trips.

TEMS Reference Guide
33 of 128
The View/Edit Trip screen below will appear.
Click the Activate button. The following warning message will appear:
TEMS Reference Guide
34 of 128
Click “OK” to activate the trip or “Cancel” to discontinue. The trip will now have a “Saved” status.
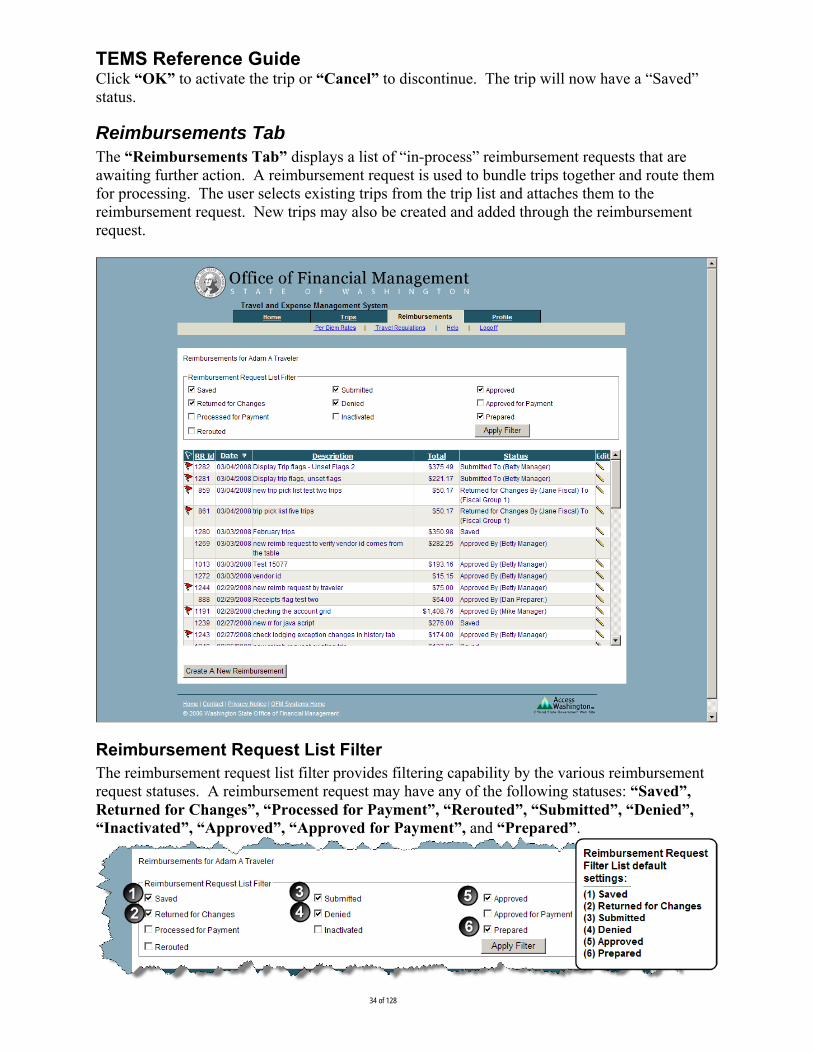
Reimbursements Tab The “Reimbursements Tab” displays a list of “in-process” reimbursement requests that are awaiting further action. A reimbursement request is used to bundle trips together and route them for processing. The user selects existing trips from the trip list and attaches them to the reimbursement request. New trips may also be created and added through the reimbursement request.
Reimbursement Request List Filter The reimbursement request list filter provides filtering capability by the various reimbursement request statuses. A reimbursement request may have any of the following statuses: “Saved”, Returned for Changes”, “Processed for Payment”, “Rerouted”, “Submitted”, “Denied”, “Inactivated”, “Approved”, “Approved for Payment”, and “Prepared”.
TEMS Reference Guide
35 of 128
Filter Options:
Saved – A reimbursement request that was saved, but has not been routed. Returned for Changes – A reimbursement request that has been sent back for modifications. Processed for Payment – A reimbursement request in which payment was received by the Requestor. Rerouted – A reimbursement request that has been redirected by an Agency or System Administrator. Submitted – A reimbursement request that has been initially routed by a Requestor or Preparer. Denied – A reimbursement request that has been declined by an Approver or Fiscal staff. Inactivated – A reimbursement request that was manually inactivated by clicking the Inactivate button. Approved – A reimbursement request that has been approved by an Approver. Approved for Payment – A reimbursement request that has been authorized for payment by the Fiscal staff. Prepared – A reimbursement request that has been created on behalf of someone else.
The filter allows the user to choose all or any combination of the reimbursement request statuses. Reimbursement Requests with statuses of “Saved”, “Returned for Changes”, “Submitted”, “Denied”, “Approved”, and “Prepared” comprise the default filter option. To use the filter feature, simply select the desired filter options and click the “Apply Filter”
button.
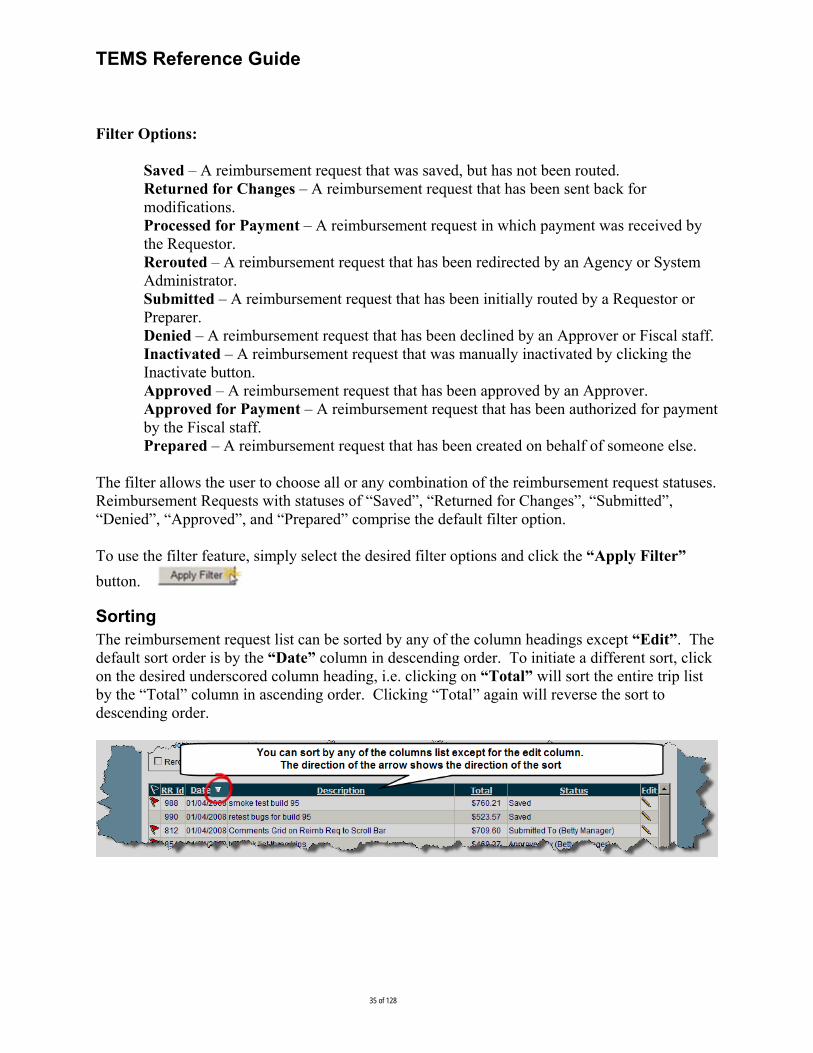
Sorting The reimbursement request list can be sorted by any of the column headings except “Edit”. The default sort order is by the “Date” column in descending order. To initiate a different sort, click on the desired underscored column heading, i.e. clicking on “Total” will sort the entire trip list by the “Total” column in ascending order. Clicking “Total” again will reverse the sort to descending order.

TEMS Reference Guide
36 of 128
Creating a New Reimbursement Request
If you click the “ ” button on the reimbursement request list screen, the following screen will appear.
The new reimbursement request is initially composed of several sections: (1) Description, (2) Profile Information, and (3) Reimbursement Trip List. It also displays the three processing options a user can select after data is entered: (A) “Save & Continue”, (B) “Save & Close”, and (C) “Cancel”. Description: This is a free-form entry field. The user types in the desired description. Profile Information: serves as the header for the reimbursement request. The fields of this section with the exception of Description are pre-populated from the traveler’s profile. The Requestor, Requestor Phone, Approver, Approver Phone, and Routing Status are “Read Only” fields and cannot be changed on the reimbursement request. The Work Schedule, Official Station, Official Residence, and Description are required fields and may be modified on the reimbursement request without impacting data saved on the traveler’s profile. Reimbursement Trip List: lists trips currently attached to the reimbursement request. A new reimbursement request will initially display “No Data Found” for this section until trips are added.
TEMS Reference Guide
37 of 128
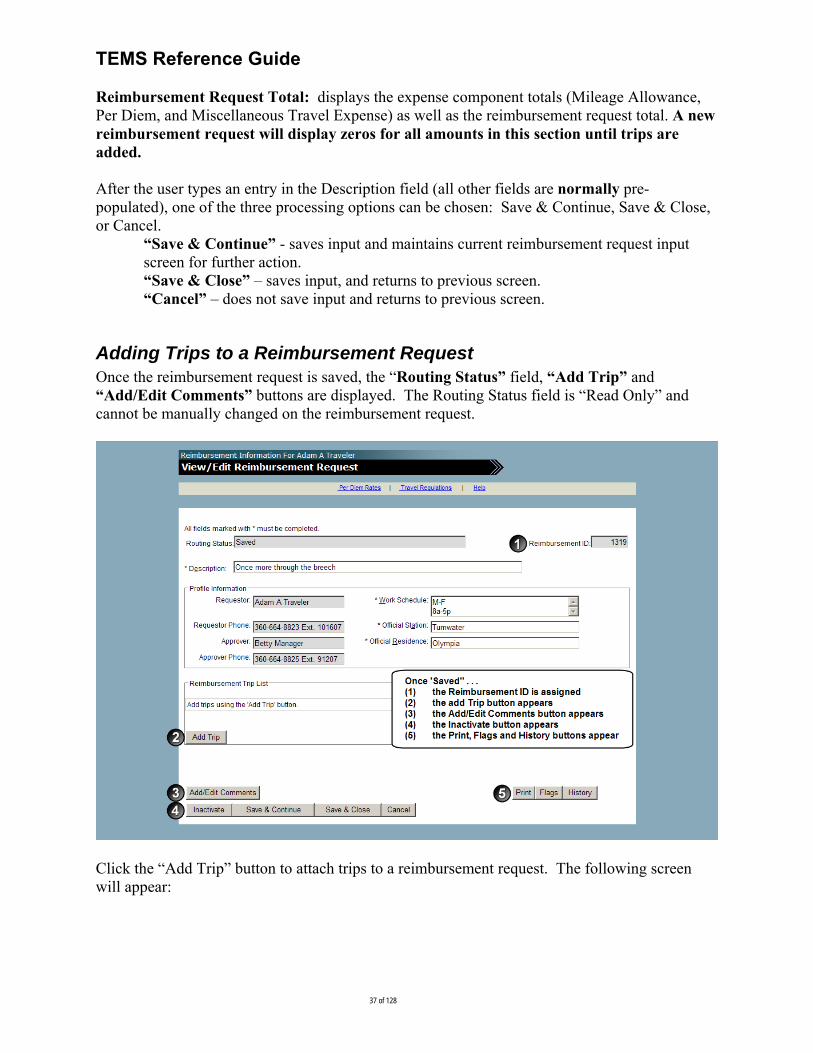
Reimbursement Request Total: displays the expense component totals (Mileage Allowance, Per Diem, and Miscellaneous Travel Expense) as well as the reimbursement request total. A new reimbursement request will display zeros for all amounts in this section until trips are added.
After the user types an entry in the Description field (all other fields are normally pre-populated), one of the three processing options can be chosen: Save & Continue, Save & Close, or Cancel.
“Save & Continue” - saves input and maintains current reimbursement request input screen for further action. “Save & Close” – saves input, and returns to previous screen. “Cancel” – does not save input and returns to previous screen.
Adding Trips to a Reimbursement Request Once the reimbursement request is saved, the “Routing Status” field, “Add Trip” and “Add/Edit Comments” buttons are displayed. The Routing Status field is “Read Only” and cannot be manually changed on the reimbursement request.
Click the “Add Trip” button to attach trips to a reimbursement request. The following screen will appear:
TEMS Reference Guide
38 of 128
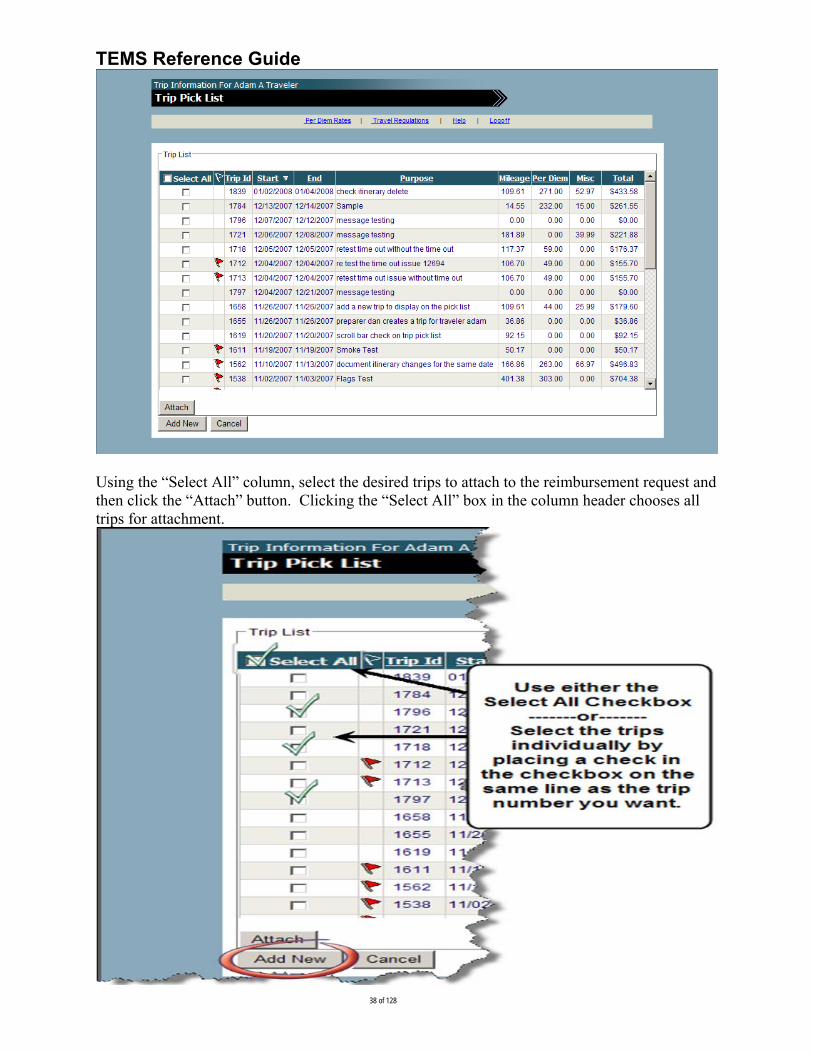
Using the “Select All” column, select the desired trips to attach to the reimbursement request and then click the “Attach” button. Clicking the “Select All” box in the column header chooses all trips for attachment.
TEMS Reference Guide
39 of 128
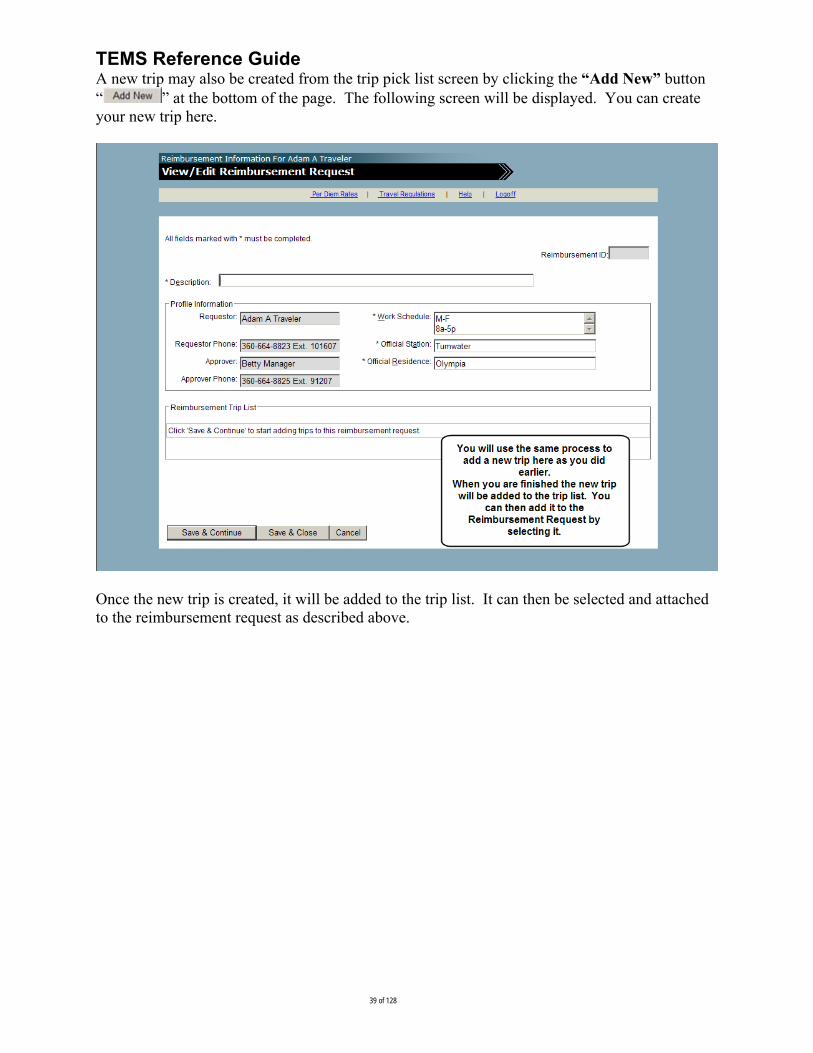
A new trip may also be created from the trip pick list screen by clicking the “Add New” button “ ” at the bottom of the page. The following screen will be displayed. You can create your new trip here.
Once the new trip is created, it will be added to the trip list. It can then be selected and attached to the reimbursement request as described above.

TEMS Reference Guide
40 of 128
Adding Comments to a Reimbursement Request
Clicking the “Add/Edit Comments” button on the reimbursement request will open the View/Edit Reimbursement Comments input screen below.

TEMS Reference Guide
41 of 128
Users can add new comments as well as edit or delete existing comments from this screen. Existing comments will appear in the grid above the free-form input section. The grid includes the following data fields:
“Date/Time” - System generated timestamp of when the comment was created. “Comments” - User inputted data. This is a required field. “Comments By” - System generated value displaying the User ID of the individual creating the comment.
To add a new comment just type your comment in the free form comments field. When you have finished you may either Save & Continue, Save & Close, or Cancel. If you choose one of the save options a new comment line will appear on the screen.

TEMS Reference Guide
42 of 128
“Save & Continue” - saves input and maintains comments detail input screen for further input.
“Save & Close” – saves input, and then returns to previous screen. “Cancel” – does not save input and then returns to previous screen.
The new comment will appear in the “Reimbursement Comments” grid once it is saved.
Edit Existing Comments
Click the “ ” icon on the row of the “Reimbursement Comments” grid to be modified.
The detail input screen containing the chosen comment will appear as shown below.
The User can modify the comment as necessary. Existing comments cannot be modified once a reimbursement request is routed. The same three processing options as described earlier exist after the desired modifications are made: “Save & Continue”, “Save & Close” or “Cancel”.
Delete Existing Comments
Click the “ ” icon on the row of the “Reimbursement Comments” grid to be deleted. The delete message window will appear as shown below requesting confirmation.

TEMS Reference Guide
43 of 128
Choose “OK” to continue the deletion or “Cancel” to stop. After the deletion, the comment will no longer appear in the grid. Existing comments cannot be deleted once a reimbursement request is routed.
Removing Trips from a Reimbursement Request Trips removed from a reimbursement request are placed back into the trip pick list. Trips are
removed from the reimbursement request by clicking the “ ” icon on the row of desired trip in the Reimbursement Trip List section. Trips can only be deleted from a Reimbursement Request before it has been routed.
The system will generate the following warning message asking . . .
Choose “OK” to continue the removal or “Cancel” to stop. If the removal is continued, the system will automatically recalculate the balances in the Reimbursement Request Total section.
Editing Trips from a Reimbursement Request
Trips can be edited by clicking the “ ” on the row of the desired trip in the Reimbursement Trip List section.

TEMS Reference Guide
44 of 128
The system will open the trip for editing.

TEMS Reference Guide
45 of 128
Flags and Exceptions Flags alert users of information entered that might require closer scrutiny. Flags are generated when travel information entered varies from system or business rules; or from both system and business rules. Flags are included on both trip list and reimbursement request list screens.
Click the flag on the row of the desired trip to view details. The following screen will appear displaying the exceptions.

TEMS Reference Guide
46 of 128
Reimbursement Request History TEMS maintains the history of a reimbursement request from it’s creation to the time it’s processed for payment. The history is displayed in chronological order starting with the earliest at the bottom of the screen to the latest at the top. History details may be accessed by clicking the “History” button on reimbursement request.
TEMS Reference Guide
47 of 128
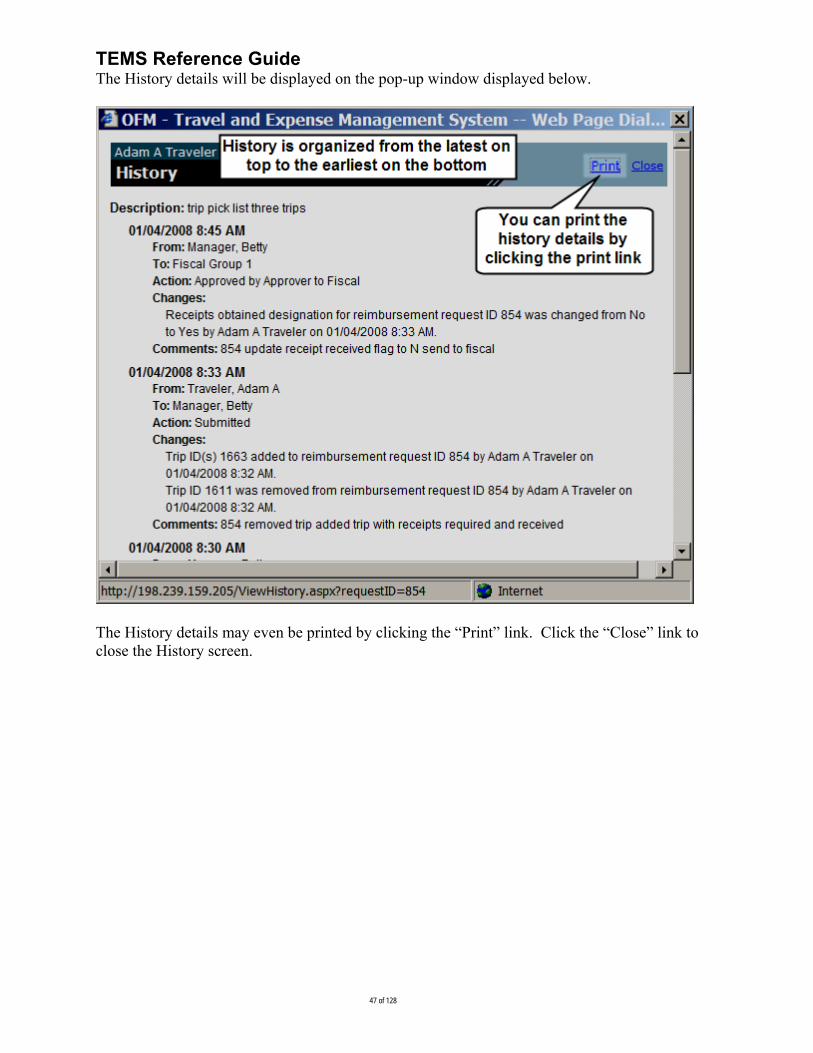
The History details will be displayed on the pop-up window displayed below.
The History details may even be printed by clicking the “Print” link. Click the “Close” link to close the History screen.

TEMS Reference Guide
48 of 128
Change Log When modifications (additions, deletions, or changes) are made to reimbursement requests after their initial submission, the system will auto-generate details of the modifications as entries into History. These system generated entries will display what and when the changes occurred as well as who made the changes.
Routing
Requestor (To Approver) The reimbursement request routing process is initiated by clicking the “Send” button at the bottom of the View/Edit Reimbursement Request. The “Send” button does not appear until at least one trip is added to the reimbursement request. Example of Screen without a trip assigned.

TEMS Reference Guide
49 of 128
Example with at least one trip assigned to reimbursement request.
After clicking the “Send” button, the Process Reimbursement Request screen will display.
The screen is divided into several sections: Action, Routing, Receipts, and Comments.
“Action” defaults to “Send” when the reimbursement request is initially routed. All other actions are grayed-out. “Routing” defaults to the Approver selected in the Requestor’s profile. The Requestor also has the option of choosing another Approver from the drop-down list. “Receipts” if a receipt generating event has occurred, (i.e. lodging); the Requestor must respond whether or not receipts were obtained. A “Yes” or “No” response must be checked in order to proceed from this screen. If a receipt generating event did not occur, the Receipts section will be grayed-out and the system will indicate that receipts are not required.
“Comments” allows the Requestor to type in any desired comments for the reimbursement request.
TEMS Reference Guide
50 of 128
The Requestor responds to the desired sections above and clicks “ ” button to submit the reimbursement request to the chosen Approver. The system will generate an e-mail notification to the Approver that a reimbursement request was received and is waiting to be reviewed. “
” button does not save any changes and returns the Requestor to the reimbursement request.
Inactivating/Activating Reimbursement Requests
Inactivating a Reimbursement Request
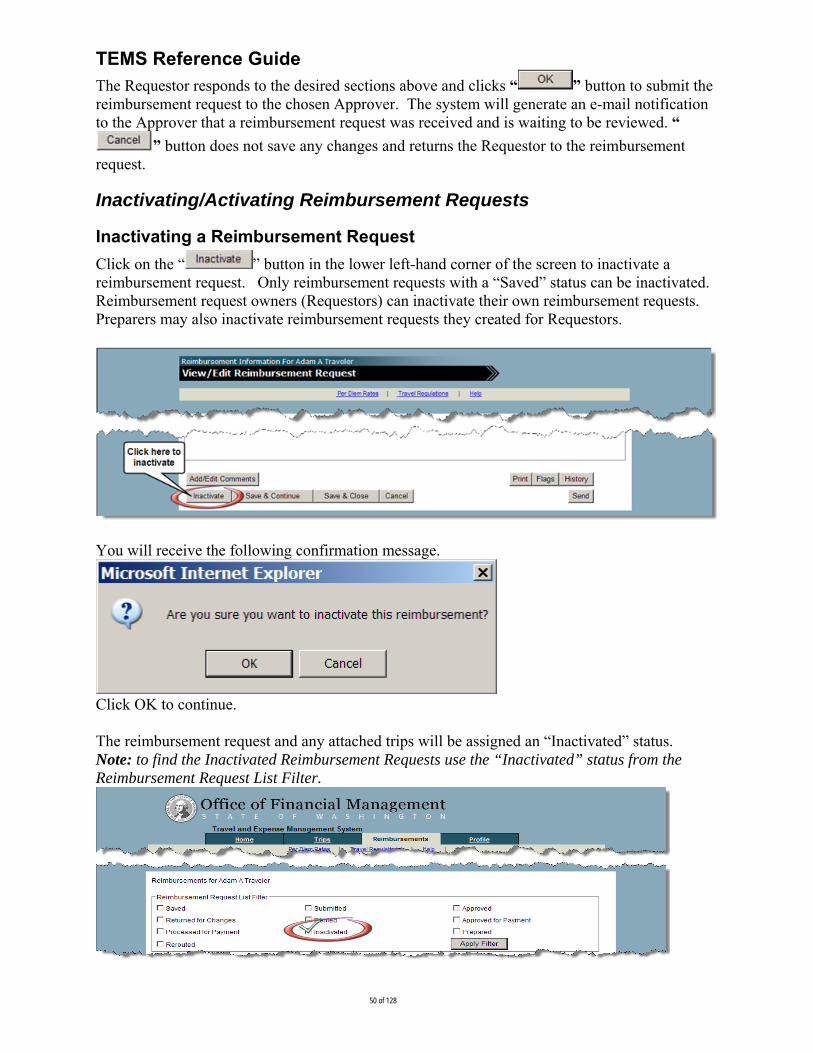
Click on the “ ” button in the lower left-hand corner of the screen to inactivate a reimbursement request. Only reimbursement requests with a “Saved” status can be inactivated. Reimbursement request owners (Requestors) can inactivate their own reimbursement requests. Preparers may also inactivate reimbursement requests they created for Requestors.
You will receive the following confirmation message.
Click OK to continue. The reimbursement request and any attached trips will be assigned an “Inactivated” status. Note: to find the Inactivated Reimbursement Requests use the “Inactivated” status from the Reimbursement Request List Filter.

TEMS Reference Guide
51 of 128
Activating a Reimbursement Request To activate an inactivated reimbursement request, just click on the “Activate” button located in the lower left-hand corner of the View/Edit Reimbursement Request screen.
You will receive the following confirmation message.
Click OK to continue. The reimbursement request will be assigned to a “Saved” status.
Printing a Reimbursement Request When a reimbursement request is initially saved, the “Print” button will display in the lower right corner. Example: Reimbursement request prior to being saved.

TEMS Reference Guide
52 of 128
Example: Saved Reimbursement Request.
From this point, a reimbursement request may be printed regardless of its status.
When the button is clicked, a reimbursement request report will display as shown below.
The reimbursement request report is displayed in an expandable and collapsible format. By clicking on the desired section’s + sign, a user can tailor the report to print only the needed details. Clicking the “Expand All” option in the upper right corner will display all sections of the report. Once the desired sections are displayed, click the “Print” link on the Reimbursement Request Report to print the report. Click the “Close “button to cancel the print option and return to the previous page.
Check-in/Check-out

TEMS Reference Guide
53 of 128
When a reimbursement request is in-use and is opened by someone else, the system will display a warning message at the top of the screen to the later individual.
If the same reimbursement request is opened by two individuals with edit capability then the second individual to open the reimbursement request will receive the following warning message. The message will indicate that the reimbursement request is “read only” and provide the name and phone number of the person who has it open.
Preparer (Prepare Only) A user (Preparer) who has been delegated authority to prepare trips and reimbursement requests for Requestors will have the “Switch Requestor” link available in the “Tasks” section of the Welcome screen.

TEMS Reference Guide
54 of 128
The Preparer clicks the “Switch Traveler” link and screen below will display.
The Preparer chooses a Requestor to prepare for by selecting the desired name from the drop-
down list by highlighting the name and then clicking the “ ” button. The system will display the Home Tab of the chosen Requestor.
The Preparer can now create and/or modify existing trips and reimbursement requests for the Requestor. The Preparer will only be able to send the reimbursement request to the Requestor. Note: Preparer groups are only given prepare only authorization.
Preparer (Prepare and Submit) The procedures for a Preparer with prepare and submit authority is the same as a Preparer with prepare only authority with the exception of having the capability to submit the reimbursement request to the Requestor’s Approver (default routing option).

TEMS Reference Guide
55 of 128
Profile Tab
Profile Information The Profile contains specific information about the requestor that is helpful or required to process the reimbursement request.
Clicking either the “Change Your Profile” link on the Home tab or the “Profile” tab will display the screen below. The resulting screen displays in “read only” mode. The edit button is used to make modifications to the profile.
TEMS Reference Guide
56 of 128
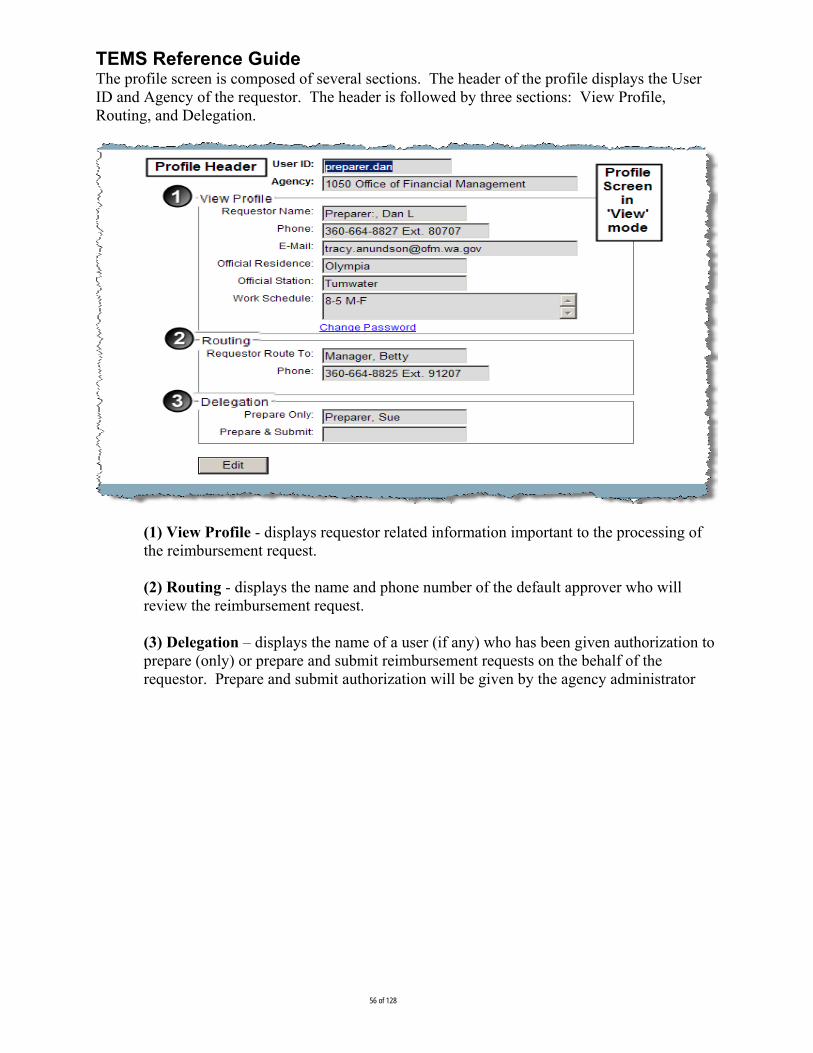
The profile screen is composed of several sections. The header of the profile displays the User ID and Agency of the requestor. The header is followed by three sections: View Profile, Routing, and Delegation.
(1) View Profile - displays requestor related information important to the processing of the reimbursement request. (2) Routing - displays the name and phone number of the default approver who will review the reimbursement request. (3) Delegation – displays the name of a user (if any) who has been given authorization to prepare (only) or prepare and submit reimbursement requests on the behalf of the requestor. Prepare and submit authorization will be given by the agency administrator

TEMS Reference Guide
57 of 128
Modifying Profile Information The screen below will appear after clicking the edit button.
The values in the profile may now be modified. Field names preceded by an asterisk are required entries. To modify an entry, simply tab into or place the cursor into the field to be modified and key in the value. In the “Routing” section, a new default approver may be chosen by clicking the drop-down arrow and selecting the desired name. A new preparer (only) may also be chosen by selecting the name from the drop-down in the “Delegation” section. Click the “Save” button to retain the modifications or “Cancel” to discard them.
Prepare & Submit is activated via the Administrative Suite

TEMS Reference Guide
58 of 128
Review Tab The “Review” Tab is available to users who have the Approver role. It contains reimbursement request submitted to the Approver for review and processing.
Reviewing a Reimbursement Request (Approver) The “For Review” Tab and “Switch Approver” link are available to users who have the approver role. The “For Review” tab contains reimbursement requests submitted to the Approver for processing. The Switch Approver link is used to review reimbursement requests on the behalf of another Approver.
Clicking the “ ” tab will open the following screen.

TEMS Reference Guide
59 of 128
This screen displays reimbursement requests submitted to the approver for review from various requestors (if applicable). This list can be sorted by any of the column headings except “Review”.
The default sort order is by the “Date” column. To initiate a different sort, click on the desired column heading, i.e. clicking on “Total” will sort the entire trip list by the “Total” column in ascending order. Clicking “Total” again will reverse the sort to descending order. Click the “ ” icon (eyeglasses) of the desired reimbursement request to open it from the list. The view/edit reimbursement request will be displayed as shown below.
From this screen, the approver can review reimbursement request related details as well access
trip details. Trips are accessed by clicking the “ ” icon of the desired trip within the “Reimbursement Trip List” section of the View/Edit Reimbursement Request screen.

TEMS Reference Guide
60 of 128
The selected trip will open as shown below. Various components of the trip can be accessed by clicking the desired icon or button.
Suggested Review Steps:
1. Review the Flags to assess situations called to your attention by TEMS.

TEMS Reference Guide
61 of 128
2. Review the dates, destinations and purpose of each trip. Was the Requestor expected to be conducting business at the destinations listed on those days for that purpose?
3. Review the full text of the trip purpose. 4. Review the work schedule against the time of travel to determine whether the Requestor
is entitled to reimbursement of meals. TEMS does not automatically determine eligibility for meals. State travel regulations can be reviewed at the OFM web site.
5. Review the Requestor’s residence and work locations against their destinations to determine whether they are entitled to any lodging reimbursement. State regulations
generally prohibit overnight stays which are less than 50 miles from a residence or work location. TEMS does not automatically determine eligibility for lodging within 50 miles. State travel regulations can be reviewed at the OFM web site.
6. Review the meal and lodging expenses. Consider whether there were any flags listed for this reimbursement request back at the "Review" tab. TEMS will provide standard meal rates for many in-state destinations. Reimbursement requests with unknown destinations and unknown per diem rates will be flagged.
7. Review any IRS taxable amounts. The detail for taxable meals is recorded within the Per Diem box. If you believe the Requestor is incorrect in their identification of taxable meals, you can make the correction and TEMS will document the change within the comments section when sending the reimbursement request. Another alternative is to return the reimbursement request back to the Requestor for changes.
8. Review mileage expenses claimed for use of a privately owned vehicle. Review the mileage claimed for reasonableness. TEMS provides point-to point mileage for many in-state destinations as assistance to the Requestor. The Requestor may claim actual odometer mileage. Regulations exist regarding mileage claimed from a work location or a residence. TEMS does not automatically determine whether to use mileage from a work location or a residence. State travel regulations can be reviewed at the OFM web site. If mileage reimbursement rates are in error, Approvers can make the necessary corrections and forward to fiscal for processing or return the reimbursement request back to the Requestor for correction.
9. Review Miscellaneous Travel Expenses. State regulations regarding allowable miscellaneous travel expenses can be reviewed at the OFM web site.
10. Review the Travel Advance amount. TEMS does not automatically keep track of travel advances and remaining balances. Confirm any travel advance amount according to your office procedures.

TEMS Reference Guide
62 of 128
Modifying Trip and Reimbursement Request Data (Approver) An Approver may modify entries to any of the following fields of a trip:
Mileage Reimbursement Rate
Breakfast Amount Lunch Amount Dinner Amount Taxable Meal Designation Lodging Lodging Tax Lodging Exceptions

TEMS Reference Guide
63 of 128
An Approver may also modify entries to any of the following fields of a reimbursement request:
Travel Advance Reduce Amount Requested
Once the reimbursement request has been reviewed, the Approver may submit it by clicking the “Send” button. This opens the “Process Reimbursement Request” screen.
TEMS Reference Guide
64 of 128
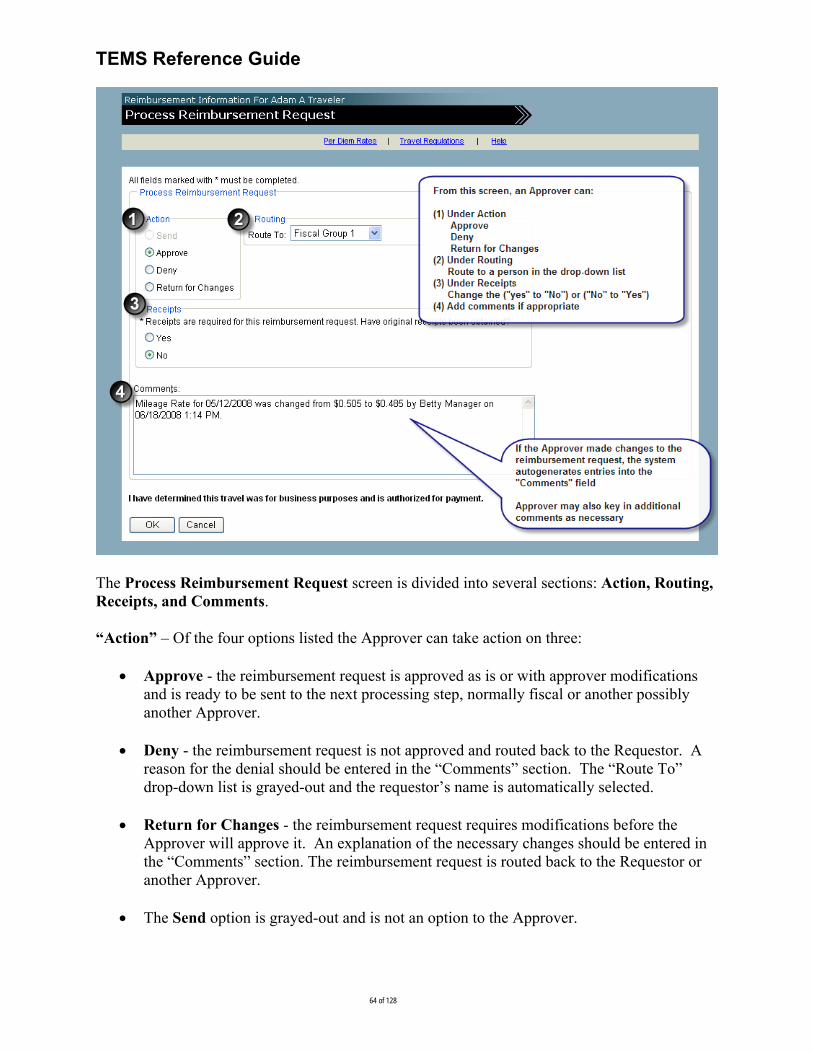
The Process Reimbursement Request screen is divided into several sections: Action, Routing, Receipts, and Comments. “Action” – Of the four options listed the Approver can take action on three:
Approve - the reimbursement request is approved as is or with approver modifications and is ready to be sent to the next processing step, normally fiscal or another possibly another Approver.
Deny - the reimbursement request is not approved and routed back to the Requestor. A
reason for the denial should be entered in the “Comments” section. The “Route To” drop-down list is grayed-out and the requestor’s name is automatically selected.
Return for Changes - the reimbursement request requires modifications before the
Approver will approve it. An explanation of the necessary changes should be entered in the “Comments” section. The reimbursement request is routed back to the Requestor or another Approver.
The Send option is grayed-out and is not an option to the Approver.

TEMS Reference Guide
65 of 128
“Routing” defaults to Fiscal or possibly another Approver based on the selection in the Approver’s profile. The Approver also has the option of choosing another Approver from the drop-down list. The default routing option changes based on the action option chosen.
Action options and their corresponding routing defaults are:
Action
Route To (Default)
Approve Fiscal or Approver (Another Approver can be chosen from the drop-down list)
Deny Requestor
Return for Changes
Requestor (Other options can be chosen from the drop-down list)
“Receipts” defaults to the selection chosen by the requestor. Note: this field is also available for the approver to adjust. “Comments” allows the Approver to type in any desired comments for the reimbursement request. Use of the Comments section is highly recommended when the Deny or Return for Changes action options are selected. If an Approver made any changes to the reimbursement request, the system will display them in the Comments screen. The Approver clicks “OK” to route the reimbursement request to Fiscal, an Approver, or another chosen Approver. The system will generate an e-mail notification based on the action option to the Requestor from the Approver (Refer to Appendix A). The body of the e-mail will display system generated entries resulting from changes made by the Approver as well as comments any made by the Approver. “Cancel” does not save any changes and returns the Requestor to the reimbursement request being reviewed.
Adding Comments (Approver) An Approver may view trip and reimbursement request comments made by others during the review process. An Approver may also add trip and reimbursement request comments.

TEMS Reference Guide
66 of 128
Reimbursement Request Comments
Relate to information displayed or contained in the reimbursement request. This might include comments regarding data within the “Profile Information” or “Reimbursement Request Total” sections, or data displayed on the “Flags” and “History” screens of the reimbursement request, or responses to comments previously made by others. Comments made on the “Process Reimbursement Request” screen are also displayed as reimbursement request comments.
Trip Comments
Relate to specific trips attached to the reimbursement request. The desired trip is opened and the comment is made directly to the trip. Trip comments might contain information regarding: itinerary, mileage, per diem (meals/lodging), miscellaneous travel expenses, etc.

TEMS Reference Guide
67 of 128
Switch Approver The switch approver feature allows a primary Approver to delegate another Approver to review and process reimbursement requests on their behalf. The primary Approver chooses the delegated Approver by using the drop-down list of the “Review & Approve” field of the profile. The drop-down list will be populated with names of individuals assigned the role of Approver for the using agency.

TEMS Reference Guide
68 of 128
Clicking the “ ” button will open the following screen where you can delegate your approving authority.
The “Switch Approver” link will appear in the Tasks section of the Home tab of the delegated approver.
TEMS Reference Guide
69 of 128
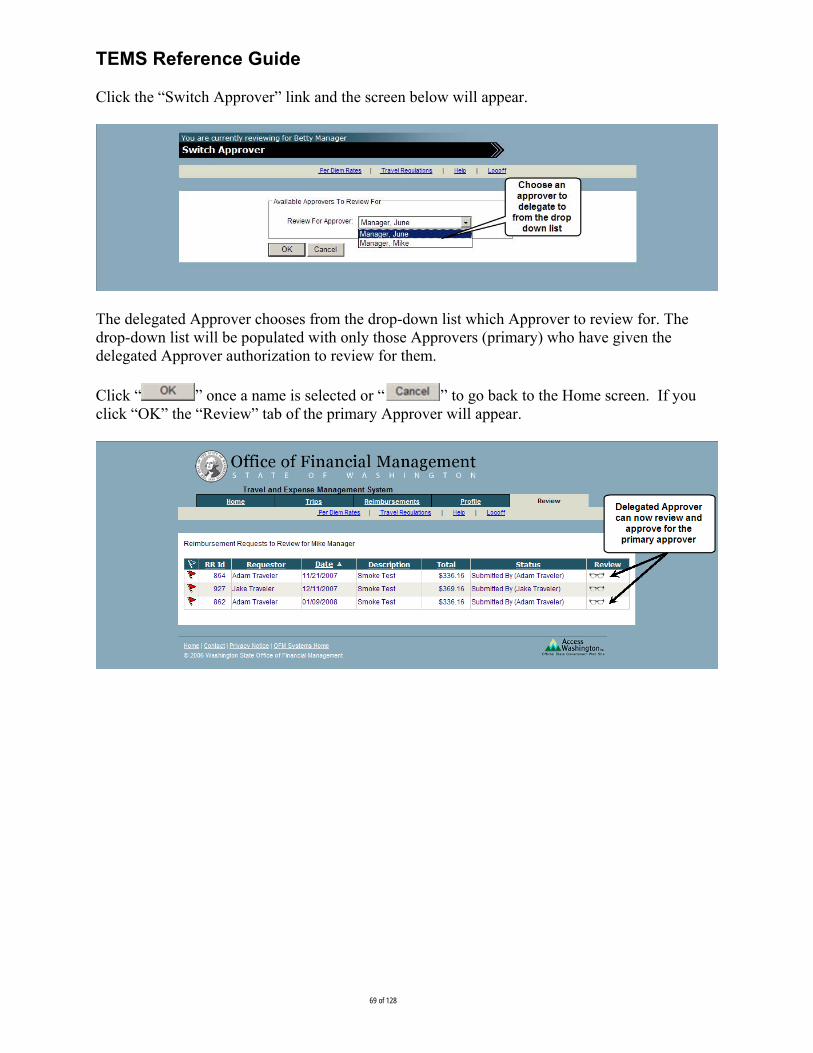
Click the “Switch Approver” link and the screen below will appear.
The delegated Approver chooses from the drop-down list which Approver to review for. The drop-down list will be populated with only those Approvers (primary) who have given the delegated Approver authorization to review for them. Click “ ” once a name is selected or “ ” to go back to the Home screen. If you click “OK” the “Review” tab of the primary Approver will appear.

TEMS Reference Guide
70 of 128
Query The Query feature is used to search and for trips and reimbursement requests that have been approved by Fiscal for payment to the accounting system. Trips and reimbursement requests can be displayed on this screen, but no changes can be made to the data. Approvers can access the query feature through a link located in the Tasks Section of their Home screen.
After clicking on the Query link you will be directed to the following screen.

TEMS Reference Guide
71 of 128
Trips and reimbursement requests can be selected using one or more of the following criteria:
1. RR ID (Reimbursement Request ID) 2. Trip ID 3. Start Date 4. End Date 5. Requestor 6. Official Station 7. Description 8. Taxable Meals 9. Batch Number 10. Batch Type 11. Fiscal Month 12. Biennium 13. Vendor Number/Suffix 14. Document Number/Suffix
Note: Query results can be refined by using more than one selection criteria.
Recommendations for using the above criteria or fields: RR ID TBD Trip ID TBD Start and End Dates
The query allows you to select a range of dates or a single date. Dates must be in the following format: mm/dd/yyyy, where mm=Month, dd=Day, and
yyyy=Year (2008). Delimiters are not necessary (i.e.’/’). Note – Two characters are required for the Month (i.e. 01).
The Start date must be chronologically before the End Date, or an error message will appear. You must enter a valid date. If a date is entered into only one of the date fields (start date or end date), the other date field must also be completed or an error message will appear. Only dates of July 1, 2006 and after can be used.
Requestor TBD Official Station
Type in a portion or all of the location desired. All locations containing the information entered will appear. (Example – typing Oly would result in Olympia appearing).

TEMS Reference Guide
72 of 128
Description
Type in a portion or all of the description desired. All descriptions containing the information entered will appear. (Example – typing Oct would result in October appearing.
Taxable Meals
Check the taxable meals box to display trips and reimbursement requests that contain taxable meals.
Note: Remember to uncheck taxable meals to include all trips and reimbursement requests in the query. Batch Number
The batch number is a 3 digit numeric field. Batch Type
The batch type is a 2 digit alphanumeric field with no special characters allowed. Those characters not allowed are – !@#$%&*.
Fiscal Month
Fiscal month is a 2 digit numeric field. Valid numbers are 01 – 25 or 99. Biennium
The biennium field must be 4 digits and odd numbered years (for example. 2007). Vendor Number/Suffix
The vendor number is a 10 digit alphanumeric field, suffix is two digits. No special characters are allowed.
Document Number/Suffix
The document number is an 8 digit alphanumeric field. Alpha characters will display uppercase. Spaces, dashes, back slashes are allowed. Entry in this field must be identical to the reimbursement request information to achieve successful results.

TEMS Reference Guide
73 of 128
Viewing Your Query Results: Once the criteria have been selected, press the Search button. The results will be displayed on the bottom of the Query Screen.
You will need to use the scroll bar to far right and then click the folder in the Open column of the desired row to view the trip or reimbursement request.
Click the Clear button to clear the current query. You can change the sort order by clicking on any column heading. The default sort order is this screen is by Requestor in descending order. Selective sorting:
Clicking Last Activity as a primary sort will result in a chronological display, to the minute, with the oldest trip or reimbursement request listed first. Secondary sorts are not available.
The system will display a “No Data To Display” message in the Search Results Section if the search doesn’t find a match.

TEMS Reference Guide
74 of 128
Viewing Returned Reimbursement Requests The View Returned Reimbursement Requests link allows Approvers to view reimbursement requests that they “denied” or “returned for changes”.
The “View Returned Reimbursements” screen will appear after clicking the link. This screen will display all active reimbursement requests that the Approver has returned.
C licking the “Folder” icon in the “View” column of the desired reimbursement request will display the Reimbursement Request Report.

TEMS Reference Guide
75 of 128

TEMS Reference Guide
76 of 128
Fiscal Suite The Fiscal Suite is the portion of the application where Fiscal staff review and batch reimbursement requests. This is also the location where the interface with the accounting system occurs. Only users that are assigned a Fiscal role can access the Fiscal Suite. The Task Section of the Home Tab displays the link to the Fiscal Suite. A user simply clicks the link and is directed to the Fiscal Suite.
The initial screen of the Fiscal Suite appears as shown below.
The screen displays five tabs: Review, Batch, Query, Batch Report, and Returned.
o The Review tab is the location where incoming reimbursement requests from Approvers are sent.
o The Batch tab contains the reimbursement requests that have been approved in the Review tab and are now ready to batch. A batch is a group of like reimbursement requests grouped by Batch Type, Biennium, and Fiscal Month.

TEMS Reference Guide
77 of 128
o The Query tab allows you to request, view, print and export information based on fourteen criteria.
o The Batch Report tab allows you to request, view, and print details regarding released batches based on Batch Date, Batch Number and Batch Type.
o The Returned tab allows fiscal to view active reimbursement requests that it returned.
Review Tab (Fiscal Suite) The “Review” tab displays reimbursement requests in grid format.
The grid is composed of nine columns:
1. Flags - displays if the reimbursement request contains trip and/or reimbursement request flags.
2. Priority Reimbursement Requests - displays a triangle indicator if the reimbursement request had been previously submitted to Fiscal.
3. RR Id – System assigned identification number given to the reimbursement request. 4. Requestor - displays the owner of the reimbursement request. 5. Date - displays the routing date the reimbursement request was submitted to the Fiscal
Group. 6. Description - displays the description entered on the reimbursement request. 7. Total - displays the “Requested Reimbursement Total” from the reimbursement request. 8. Status - displays the routing status of the reimbursement request. 9. Review – if you click on the icon when it is “eyeglasses” the reimbursement request will
open in edit mode. If you click on the icon when it is a “checked circle” the reimbursement request will open in read only.
The “ ” button is used is update the Review tab with any new reimbursement requests that may have been submitted during the current session.

TEMS Reference Guide
78 of 128
Reviewing the reimbursement request: From the Review grid, Fiscal users click on the “ ” icon on the row of the reimbursement request to be reviewed. The reimbursement request will open as displayed below.
Reimbursement request and trip details may be accessed from this screen.

TEMS Reference Guide
79 of 128
Fiscal has the capability of modifying the following fields during the trip review process:
o Mileage Reimbursement rate o Breakfast Amount o Lunch Amount o Dinner Amount o Taxable Meal Designation
Fiscal can also modify the following fields of a reimbursement request:
o Travel Advance o Reduce Amount Requested o Reduce Balance to Code o Reduce Amount Requested and Balance to Code
Fiscal may also return the reimbursement request to the Requestor for modification. When modifications (additions, deletions, or changes) are made to reimbursement requests after their initial submission, the system will auto-generate details of the modifications as entries into History. These system generated entries will display what and when the changes occurred as well as who made the changes. This information may be viewed by clicking the History button on the reimbursement request.
Suggested Review Steps:
1. Review the dates, destinations and purpose of each trip. Was the Requestor expected to be conducting business at the destinations listed on those days for that purpose?
2. Review the full text of the trip purpose. 3. Review the work schedule against the time of travel to determine whether the
Requestor is entitled to reimbursement of meals. TEMS does not automatically determine eligibility for meals. State travel regulations can be reviewed at the OFM web site.
4. Review the Requestor’s residence and work locations against their destination to determine whether they are entitled to any lodging reimbursement. State regulations generally prohibit overnight stays which are less than 50 miles from a residence or work location. TEMS does not automatically determine eligibility for lodging within 50 miles.
5. Review the meal and lodging expenses. TEMS will flag the reimbursement request if meal or lodging rates for known destinations exceed the standard. Reimbursement requests without default per diem rates will be flagged.
6. Review any IRS taxable amounts. The detail for taxable meals is recorded within the Per Diem box. If you believe the Requestor is incorrect in their identification of taxable meals, you can make the correction and TEMS will document the change within the comments section when sending the reimbursement request. Another alternative is to return the reimbursement request back to the Requestor for changes.
7. Review mileage expenses claimed for use of a privately owned vehicle. Review the mileage claimed for reasonableness. TEMS provides point-to point mileage for many in-state destinations as assistance to the Requestor. The Requestor may claim actual

TEMS Reference Guide
80 of 128
odometer mileage. Regulations exist regarding mileage claimed from a work location or a residence. TEMS does not automatically determine whether to use mileage from a work location or a residence. If mileage reimbursement rate is in error, Fiscal Users can make the necessary corrections and continue processing or return the reimbursement request back to the Requestor for correction.
8. Review Miscellaneous Travel Expenses. State regulations regarding allowable miscellaneous travel expenses can be reviewed at the OFM web site.
9. Review the Travel Advance amount. TEMS does not automatically keep track of travel advances and remaining balances. Confirm any travel advance amount according to your office procedures.
Input Account Coding
Coded Amount – reflects the total amount entered in the account grid on one or more
rows.
Balance to Code – reflects the remaining amount of the Reimbursement Request Total that has not been coded. Balance to Code serves as reconciliation between the coded amount and the Reimbursement Request Total. The Balance to Code must be zero before the Reimbursement Request can be routed to the Batch Tab.
Reduce Balance to Code – reduces the Balance to Code by the amount entered.
TEMS Reference Guide
81 of 128
Reduce Amount Requested – reduces the Requested Reimbursement Total by the
amount entered. Reduce Amount Requested and Balance to Code – reduces both the Requested
Reimbursement Total and Balance to Code by the amount entered. Document Header and Batch Information – this grid is only available to the Fiscal Group. The grid is configurable by agency. The field options for the Document Header and Batch Information Section are:
Biennium Fiscal Month Batch Type Document Date Current Document Number Current Document Number Suffix Vendor Number Vendor Number Suffix Vendor Message Due Date
Input values directly into the desired fields. The Tab key or the mouse can be used to navigate within the grid. Use the Enter or Tab key (on the last field of the row) to keep finalize all input.
Transaction Detail Information – this grid is available to the Requestor, Preparer, Approver, as well as the Fiscal Group. The Transaction Detail Information Section like the Document Header and Batch Information Section is also configurable by agency. Detailed account code entries to support the reimbursement request are entered here. Input values directly into the desired fields. The Tab key or the mouse can be used to navigate within the grid. Use the Enter or Tab key (on the last field of the row) to input data on the active row. This action will generate a new blank row below for additional entries.
Features of the Transaction Detail Information grid:
Sort – The account grid may be sorted ascending or descending by clicking on the desired column heading. The sort cannot be saved and is only available during the current session. Copy – A single existing row or multiple existing rows can be copied within the grid. To copy a single row, use the row selector to highlight the desired row and click the Copy button. A copy of the desired row will be entered as a new row in the last line of the grid. To copy multiple rows, click on the row selector of the rows to copy and click the Copy button. The keyboard Shift and Ctrl keys may also be used to select a range or specific rows to copy. Delete – A single existing row or multiple existing rows may be deleted within the grid. To delete a single row, use the row selector to highlight the desired row and click the keyboard Delete button. A confirmation message will appear asking for verification of the deletion. “OK” continues the deletion and “Cancel” does not. To delete multiple rows, click on the row selector of the rows to delete and click the keyboard Delete button.

TEMS Reference Guide
82 of 128
The same confirmation as mentioned above will appear. The keyboard Shift and Ctrl keys may also be used to select a range or specific rows to delete.
The Fiscal review will end in one of three ways. The request may be approved in which case it is routed to batches pending; denied in which case it is returned to the requestor/traveler returned for changes. If it is returned for changes then the reviewer may select the
individual to whom it will be returned from the drop down list provided on the “Process Reimbursement Request” screen
The options are displayed at the bottom right-hand corner of the “View/Edit Reimbursement Request” screen:
o Approve - submits to “Batches Pending” o Deny - returns to Requestor o Return for Changes - returns to Requestor (default) or Approver
Once the option has been chosen the Process Reimbursement Request screen appears.
Based on the option chosen, the information will be frozen. Your only choices are “OK” to continue or “Cancel” and return to the prior screen. The system will generate an e-mail notification based on the action option to the Requestor from Fiscal (Refer to Appendix A).

TEMS Reference Guide
83 of 128
The body of the e-mail will display system generated entries resulting from changes made by Fiscal as well as comments any made by Fiscal. NOTE: If a reimbursement request contains a travel advance balance when you click the Approve button, the system will generate the following warning message.
If the balance to code is not zero, the following message will be returned.
The remaining options are Deny or Return for Changes. The following examples show what these options look like.
Based on the Deny option, the screen above is completed and the information is also frozen. Again, you can click “OK” or “Cancel”. But with the Return for Changes option, a drop down list is available for you to select the individual you want to route the reimbursement request to.

TEMS Reference Guide
84 of 128

TEMS Reference Guide
85 of 128
Batch Tab Once approved in the Review tab, reimbursement requests are sent to the grid in the Batch tab.
All or selected reimbursement requests in the Batch tab may be batched. Select the desired reimbursement requests, and then click the Batch button. The application will group like reimbursement requests by “Batch Type”, “Biennium”, and “Fiscal Month”. The following “Batch Release” screen will appear:
A Batch Number must be entered for each batch in order to release the batch. Clicking the “Release” button will submit the batch to the accounting system. Once released, batches cannot be recalled. Note: If a Reimbursement Request within a batch does not “balance to code” at the time of release you will receive the following message “Batch #123: One or more reimbursement requests in the batch has a balance to code.” and the batch with will NOT be sent to the accounting system. Please contact the TEMS Helpline at 360-664-7750 so that they can assist you.

TEMS Reference Guide
86 of 128
Query Tab The Query Tab is used to search for trips and reimbursement requests that have been processed for payment. Trips and reimbursement requests can be displayed on this screen, but no changes can be made to the data. When a Fiscal user clicks on the Query Tab the following screen is displayed to enter the query criteria.
Trips and reimbursement requests can be selected using one or more of the following criteria:
1. RR ID (Reimbursement Request ID) 2. Trip ID 3. Start Date 4. End Date 5. Requestor 6. Official Station 7. Description 8. Taxable Meals 9. Batch Number 10. Batch Type 11. Fiscal Month 12. Biennium 13. Vendor Number/Suffix 14. Document Number/Suffix
Note: Query results can be refined by using more than one selection criteria.

TEMS Reference Guide
87 of 128
Recommendations for using the above criteria or fields: RR ID TBD Trip ID TBD Start and End Dates
The query allows you to select a range of dates or a single date. Dates must be in the following format: mm/dd/yyyy, where mm=Month, dd=Day, and
yyyy=Year (2008). Delimiters are not necessary (that is ’/’). Note – Two characters are required for the Month (that is 01).
The Start date must be chronologically before the End Date, or an error message will appear. You must enter a valid date. If a date is entered into only one of the date fields (start date or end date), the other date field must also be completed or an error message will appear. Only dates of July 1, 2006 and after can be used.
Requestor TBD Official Station
Type in a portion or all of the location desired. All locations containing the information entered will appear. (Example – typing Oly would result in Olympia appearing).
Description
Type in a portion or all of the description desired. All descriptions containing the information entered will appear. (Example – typing Oct would result in October appearing.
Taxable Meals
Check the taxable meals box to display trips and reimbursement requests that contain taxable meals.
Note: Remember to uncheck taxable meals to include all trips and reimbursement requests in the query. Batch Number
The batch number is a 3 digit numeric field.

TEMS Reference Guide
88 of 128
Batch Type
The batch type is a 2 digit alphanumeric field with no special characters allowed (that is !@#$%&*).
Fiscal Month
Fiscal month is a 2 digit numeric field. Valid numbers are 01 – 25 or 99. Biennium
The biennium field must be 4 digits and odd numbered years (for example. 2007). Vendor Number/Suffix
The vendor number is a 10 digit alphanumeric field, suffix is two digits. No special characters are allowed.
Document Number/Suffix
The document number is an 8 digit alphanumeric field. Alpha characters will display uppercase. Spaces, dashes, back slashes are allowed. Entry in this field must be identical to the reimbursement request information to achieve successful results.

TEMS Reference Guide
89 of 128
Viewing Your Query Results: Once the criteria have been selected, press the Search button. The results will be displayed on the bottom of the Query Screen.
You will need to use the scroll bar to far right and then click the folder in the Open column of the desired row to view the trip or reimbursement request.
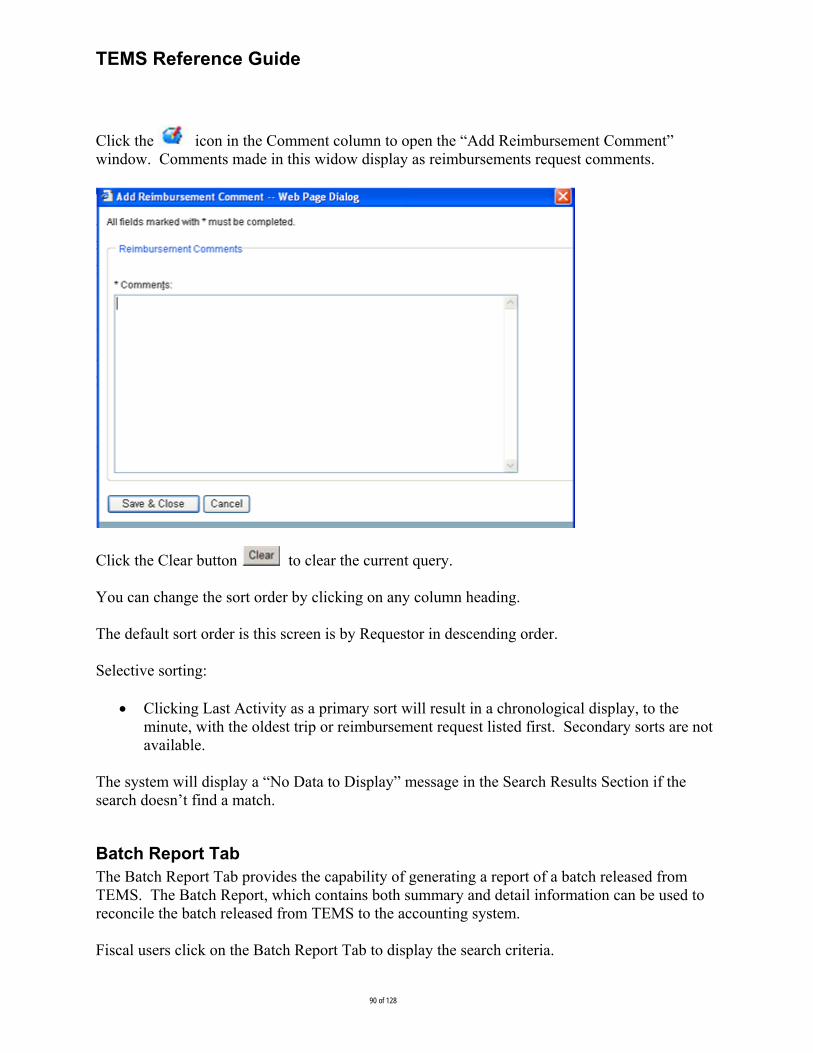
TEMS Reference Guide
90 of 128
Click the icon in the Comment column to open the “Add Reimbursement Comment” window. Comments made in this widow display as reimbursements request comments.
Click the Clear button to clear the current query. You can change the sort order by clicking on any column heading. The default sort order is this screen is by Requestor in descending order. Selective sorting:
Clicking Last Activity as a primary sort will result in a chronological display, to the minute, with the oldest trip or reimbursement request listed first. Secondary sorts are not available.
The system will display a “No Data to Display” message in the Search Results Section if the search doesn’t find a match.
Batch Report Tab The Batch Report Tab provides the capability of generating a report of a batch released from TEMS. The Batch Report, which contains both summary and detail information can be used to reconcile the batch released from TEMS to the accounting system. Fiscal users click on the Batch Report Tab to display the search criteria.

TEMS Reference Guide
91 of 128
You will be directed to the following screen. The desired Batch Date, Batch Number, and Batch Type are entered into the Search Criteria.
Click the Search button to initiate the search. Click the Clear button to clear the current entries. Note: All three fields (Date, Batch Number, and Batch Type) are required fields and must contain valid entries to run the search. The Date field value can be entered via free-form input or a calendar option. The search results, if found will be displayed as a Batch Report shown below.
The message below will display if the system did not find a match to the search criteria.
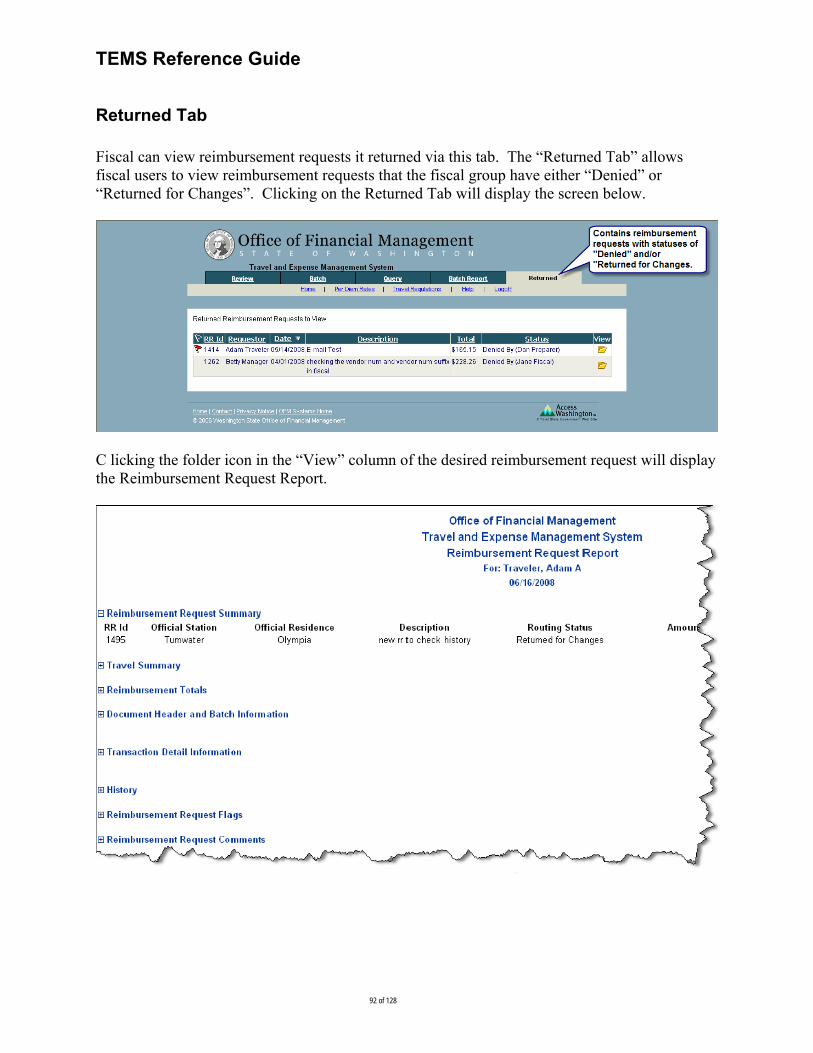
TEMS Reference Guide
92 of 128
Returned Tab Fiscal can view reimbursement requests it returned via this tab. The “Returned Tab” allows fiscal users to view reimbursement requests that the fiscal group have either “Denied” or “Returned for Changes”. Clicking on the Returned Tab will display the screen below.
C licking the folder icon in the “View” column of the desired reimbursement request will display the Reimbursement Request Report.
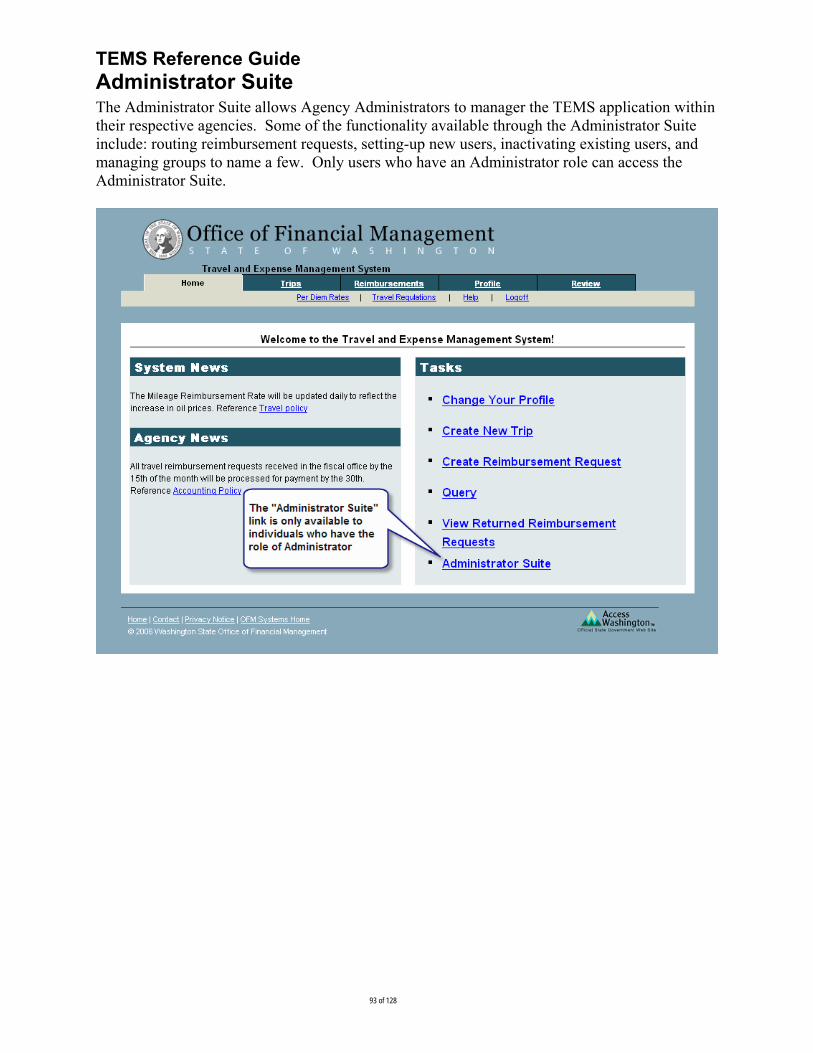
TEMS Reference Guide
93 of 128
Administrator Suite The Administrator Suite allows Agency Administrators to manager the TEMS application within their respective agencies. Some of the functionality available through the Administrator Suite include: routing reimbursement requests, setting-up new users, inactivating existing users, and managing groups to name a few. Only users who have an Administrator role can access the Administrator Suite.
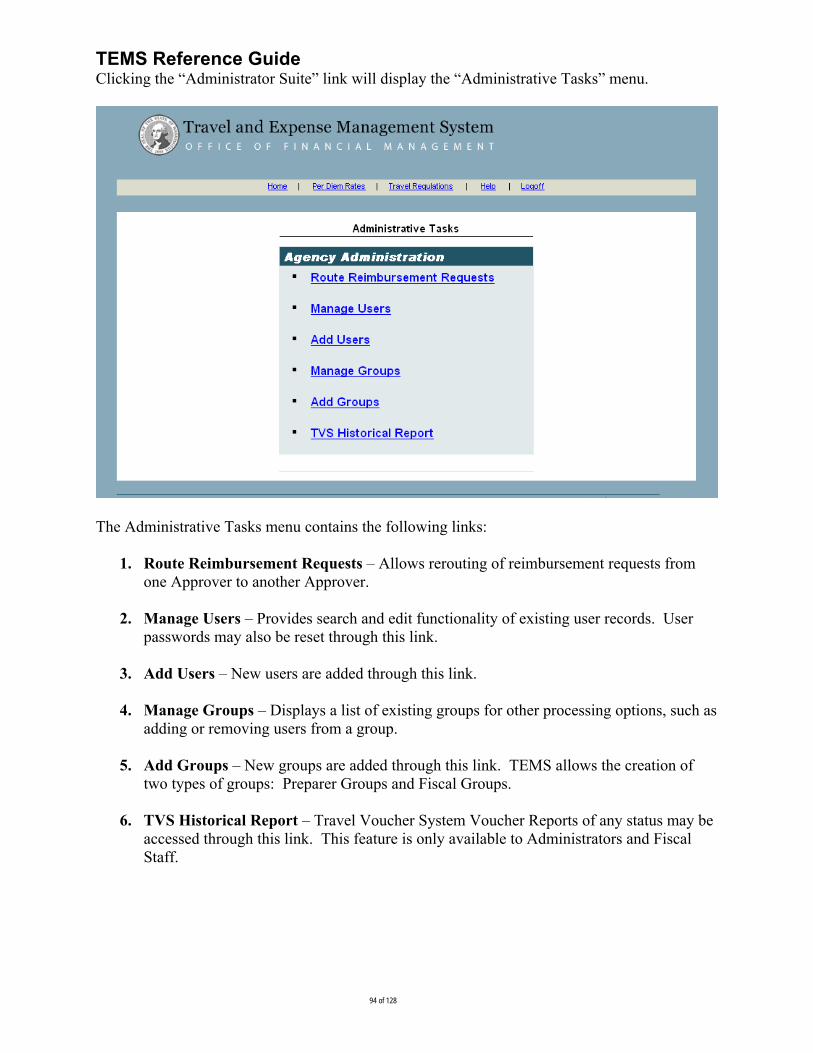
TEMS Reference Guide
94 of 128
Clicking the “Administrator Suite” link will display the “Administrative Tasks” menu.
The Administrative Tasks menu contains the following links:
1. Route Reimbursement Requests – Allows rerouting of reimbursement requests from one Approver to another Approver.
2. Manage Users – Provides search and edit functionality of existing user records. User
passwords may also be reset through this link.
3. Add Users – New users are added through this link.
4. Manage Groups – Displays a list of existing groups for other processing options, such as adding or removing users from a group.
5. Add Groups – New groups are added through this link. TEMS allows the creation of
two types of groups: Preparer Groups and Fiscal Groups. 6. TVS Historical Report – Travel Voucher System Voucher Reports of any status may be
accessed through this link. This feature is only available to Administrators and Fiscal Staff.

TEMS Reference Guide
95 of 128
Routing a Reimbursement Request
There may be situations when an Agency Administrator has to route a reimbursement request from one Approver to another, in which case the route function can be used. From the Administrative Tasks menu, click the “Route Reimbursement Requests” link. The “Reimbursement Request Administrative Routing Process” screen will appear.
To initiate the route, select the owner (Requestor) of the reimbursement request from the “Requestor” drop-down list and click the “Find Requests” button.

TEMS Reference Guide
96 of 128
If the Requestor has any active reimbursement requests available the following screen will appear, then find the specific reimbursement request to route and click the “Route” button on the appropriate row.
If no active reimbursement requests are found, the message below is displayed:

TEMS Reference Guide
97 of 128
If active reimbursement requests are found, the following screen will display after clicking the “Route” button.
Select the approver to route the reimbursement request to using the “Route To” drop-down list. Type in the appropriate comments (comments are required for this process) and click the “Send” button.
The system will update the status of the reimbursement request on the grid.
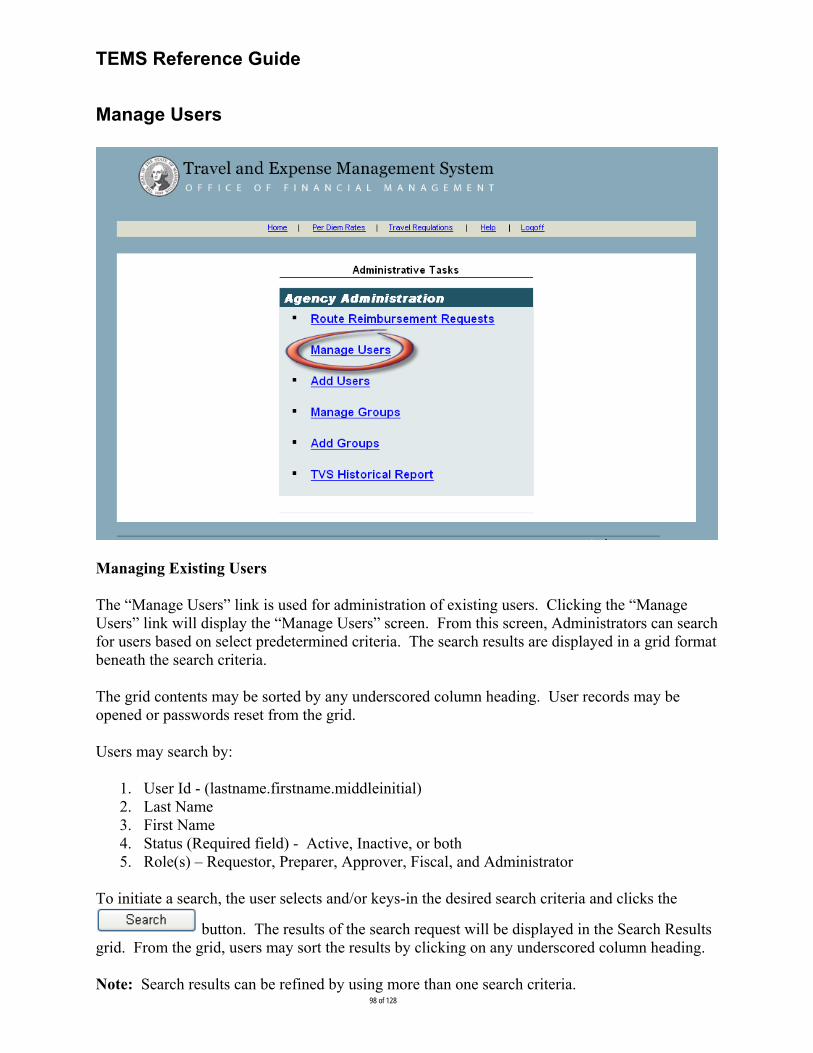
TEMS Reference Guide
98 of 128
Manage Users
Managing Existing Users The “Manage Users” link is used for administration of existing users. Clicking the “Manage Users” link will display the “Manage Users” screen. From this screen, Administrators can search for users based on select predetermined criteria. The search results are displayed in a grid format beneath the search criteria. The grid contents may be sorted by any underscored column heading. User records may be opened or passwords reset from the grid. Users may search by:
1. User Id - (lastname.firstname.middleinitial) 2. Last Name 3. First Name 4. Status (Required field) - Active, Inactive, or both 5. Role(s) – Requestor, Preparer, Approver, Fiscal, and Administrator
To initiate a search, the user selects and/or keys-in the desired search criteria and clicks the
button. The results of the search request will be displayed in the Search Results grid. From the grid, users may sort the results by clicking on any underscored column heading. Note: Search results can be refined by using more than one search criteria.

TEMS Reference Guide
99 of 128
Clicking the button clears the search criteria information.
Clicking the icon will open the existing user record for modification. Clicking the icon allows the Administrator to reset the user’s password directly form the grid (Refer to the “Resetting a Password” on the next page for more details).
Clicking the button opens a blank record to enter a new user. Refer to Add New Users section for more information on this functionality. Resetting a Password A user’s password can be reset two ways:
1. Through the grid as a result of a “Find Users Search”.
2. Through the “Add/Edit User” screen. In either case, the system auto-generates a random temporary password and e-mails it to the user at the address contained in the user’s profile.
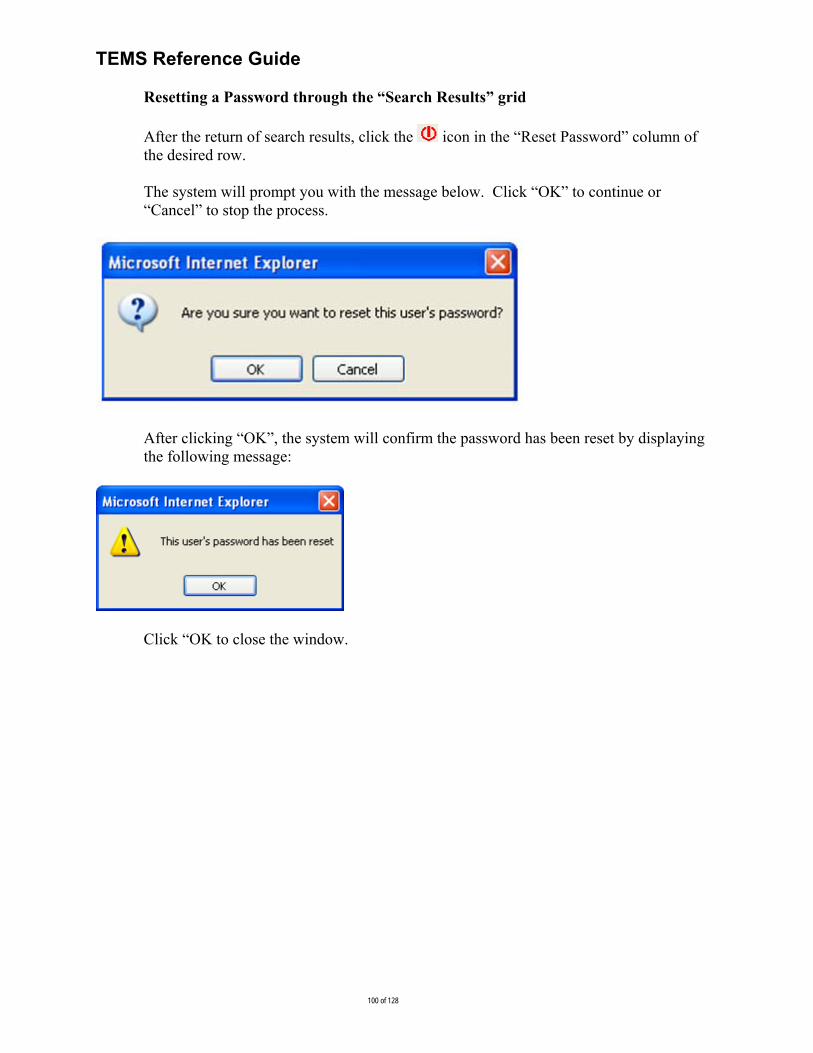
TEMS Reference Guide
100 of 128
Resetting a Password through the “Search Results” grid
After the return of search results, click the icon in the “Reset Password” column of the desired row. The system will prompt you with the message below. Click “OK” to continue or “Cancel” to stop the process.
After clicking “OK”, the system will confirm the password has been reset by displaying the following message:
Click “OK to close the window.

TEMS Reference Guide
101 of 128
Resetting a Password through the User Record A temporary password is emailed to the Requestor upon completing the
checkbox and performing a save action.

TEMS Reference Guide
102 of 128
Click the button to make modifications to the routing and delegation selections.

TEMS Reference Guide
103 of 128
Add New Users

TEMS Reference Guide
104 of 128
Adding New Users The “Add Users” link is used for adding new users to the system. Clicking the “Add Users” link will display the “Add/Edit User” screen.
The Add/Edit User screen is composed of the following sections: Active – Refers to the user’s account status. The options are “Yes” (Active) or “No” (Inactive). “Yes” is default value. Edit Profile – User specific information is entered here. Fields labeled with an asterisk are required fields and must be completed before the record can be saved User ID – The standard configuration is Lastname.Firstname.MI
a) Last name (30 characters & alpha/numeric) b) First name (30 characters & alpha/numeric) c) MI-Middle Initial (1 alpha character)

TEMS Reference Guide
105 of 128
Roles – Selections are made to specify the roles the user will have in the system. All users have a default role of Requestor.
Once the above sections are completed, click to display the Add/Edit User Routing & Delegation screen to complete the add user process. This screen is used to make default routing and delegation selections.
Routing – Default routing destinations for Requestor and Approver (if necessary) roles are selected. Selections made here will carryover to the new user’s profile. Delegation – Selections are made for “Prepare Only”, “Prepare and Submit”, and “Review and Approve”. Prepare Only or Prepare and Submit delegations authorize the new user to prepare trips and reimbursement requests on the behalf of another user. If the new user is also an Approver, “Review and Approve” delegation allows another Approver to review and approve reimbursement requests on the behalf of the primary Approver. Groups – Specifies what group types (if any) the user will belong to. TEMS has two group types: Preparer Groups and Fiscal Groups. Once the desired information is entered/selected, the user has three processing options:
Clicking the button saves the current record and opens a new blank record.
Clicking the button saves the current record and then returns to the previous screen.

TEMS Reference Guide
106 of 128
Clicking the button does not save the current record and then returns to the previous screen.
Manage Groups
Managing Existing Groups “The Manage Groups” link is used for administration of existing groups. Clicking the Manage Groups link will display the screen below. The Manage Groups screen displays a listing of all groups (active and inactive) within an agency. TEMS uses two types of groups: fiscal and preparer groups. Groups listed on the Manage Groups screen may be sorted by clicking on any of the underlined column headings. Once groups are saved they cannot be deleted, however they can be inactivated.

TEMS Reference Guide
107 of 128
Editing a group
Clicking the Edit icon opens the View/Edit Group screen. From this screen, groups may be edited. The following information may be edited within a group:
Active” status “Group Name” “Group Members” (adding or removing users)
Inactivating a group A group may be inactivated by changing the “Yes” (default) to “No” in the Active Section

TEMS Reference Guide
108 of 128
To begin the inactivation process, click “No’ in the Active section, then Save & Continue or Save & Close. The system will display the below warning message.
Click the “OK” button to confirm the group inactivation or “Cancel” to stop. As the warning indicates, inactivating a group will remove its users from the group.
Changing the group name The Group Name is a free form input field. To change the Group Name, simply type in the new information into the field.
Adding users to a group

TEMS Reference Guide
109 of 128
Clicking the “Add Users” button will display the “Add Members to Group” screen which shows a list of potential group members that can be added to the group.
Click the checkbox(es) for the desired users to add, then click the Add Users button.
The selected individual(s) will be added to the group.

TEMS Reference Guide
110 of 128
Removing users from a group
Click the “Remove” icon for the desired person to remove. The system will prompt you with the below warning message. Click “OK” to continue with the deletion or “Cancel” stop the deletion.

TEMS Reference Guide
111 of 128
Once the “OK” button is clicked on the warning message, the system will display an updated view of the View/Edit Group screen with the selected members removed. Group members removed from the group will be returned to the “Potential Group Members” list.
Add Groups

TEMS Reference Guide
112 of 128
Adding New Groups Clicking the “Add Groups” link displays the screen below and is used to add new groups.
The View/Edit Group screen has four sections: Active, General, Group Type, and Group Members.
Active section displays the group status. When setting-up a new group, this section defaults to “Yes”.
General section is comprised of the Agency and Group Name fields.
Agency - defaults to the home agency and cannot be changed. Group Name – free form input field. Type-in desired group name.
Group Type section allows the selection of the desired group type.
Group Members section displays the users who are members of the group. This section is initially blank when setting-up a new group until members are added.
After completing the General and Group Type sections, the system provides three processing options to the user: “Save & Continue”, “Save & Close”, and “Cancel”.

TEMS Reference Guide
113 of 128
Selecting saves the information in the Active, General, and Group Type sections and generates the “Add Users” button.
Clicking the “Add Users” button will generate a list of potential group members that can be selected to add to the group.
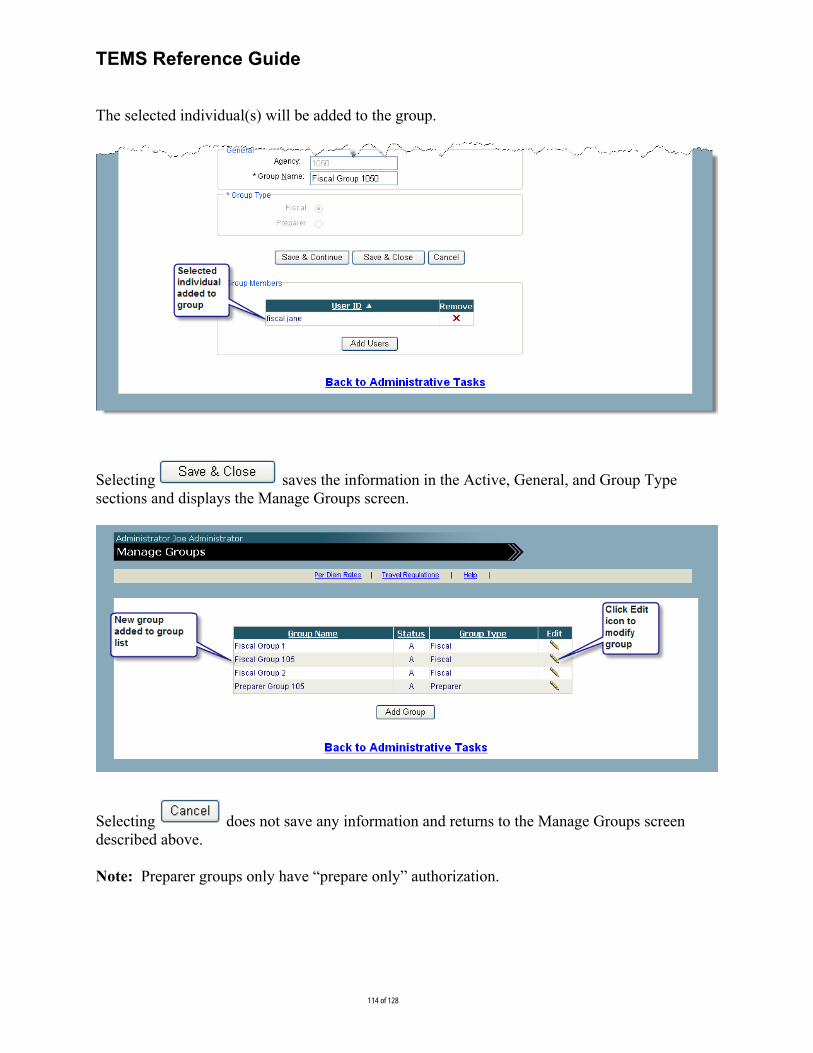
TEMS Reference Guide
114 of 128
The selected individual(s) will be added to the group.
Selecting saves the information in the Active, General, and Group Type sections and displays the Manage Groups screen.
Selecting does not save any information and returns to the Manage Groups screen described above. Note: Preparer groups only have “prepare only” authorization.

TEMS Reference Guide
115 of 128
TVS Historical Report
The TVS Historical Report link is used to access TVS Voucher Reports. This feature is only available to users who have the roles of Administrators or Fiscal. Voucher reports of any status from: “Unsubmitted” to “Processed for Payment” is available. Conducting a Search Clicking the TVS Historical Report link will the display the TVS Query screen below.

TEMS Reference Guide
116 of 128
The use and performance of this feature is still being finalized at this time. Once completed, this section will contain the appropriate details.

TEMS Reference Guide
117 of 128
Glossary 1. Agency Administrator: A user that has been granted administrative permission levels
for the agency.
2. Approver: Someone who is granted authority to approve pre-approval or reimbursement requests for travel and expenses.
3. Batch Report: A report that contains batch summary information and the accounting details of travel vouchers sent to AFRS.
4. Breakfast Rate Amount: The breakfast portion is 25% of the set daily meals entitlement rounded to the nearest dollar.
5. Dinner Rate Amount: The dinner portion is 45% of the set daily meals entitlement rounded to the nearest dollar.
6. Fiscal User: A user authorized to review, approve, code and submit a pre-payment or reimbursement request for final processing.
5. Foreign Travel: Travel in all areas of the world outside of the United States of America and its possessions. (SAAM Glossary)
6. In-State Travel: Travel within the state of Washington. However, with respect to the requirement for prior authorization of out-of-state travel in Subsection 10.10.50, travel to counties and/or cities in the states of Idaho and Oregon that are contiguous to the border between Washington-Idaho or Washington-Oregon shall not be considered out-of-state. (SAAM Glossary)
7. Lodging Rate Amount: Reimbursable lodging expenses include the basic commercial lodging cost and any applicable sales taxes and/or hotel/motel taxes on that amount.
8. Lunch Rate Amount: The lunch portion is 30% of the set daily meals entitlement rounded to the nearest dollar.
9. Miscellaneous Expenses: Miscellaneous travel expenses essential to the transaction of official state business are reimbursable to the traveler. Reimbursable expenses include, but are not limited to:
Taxi, shuttle, or limousine fares (including a customary tip or gratuity), motor vehicle rentals, parking fees, and ferry and bridge tolls.
Registration fees required in connection with attendance at approved conventions, conferences, and official meetings.
Rental of room in a hotel or other place which is used to transact official state business. The room rental is reimbursable as a separate item from lodging when authorized by the agency head or authorized designee.
Charges for necessary facsimile (fax) services.
Charges for necessary stenographic or typing services in connection with the preparation of reports and/or correspondence, when authorized by the agency head or authorized designee.
The actual cost of laundry and/or dry cleaning expenses, as evidenced by a receipt, is authorized for travelers in continuous travel status for five (5) or more days in the continental U.S.A. An allowance is already included in the meals and incidental rates for travel outside CONUS (refer to SAAM, Subsection 10.20.10). Use of a coin-operated Laundromat is allowable.

TEMS Reference Guide
118 of 128
If a receipt for a coin-operated Laundromat is not available, the traveler may claim actual expenses up to $50 on the "Detail of Other Expenses" portion of the Travel Expense Voucher (form A20-A) (refer to SAAM, Subsection 10.80.40).
Mandatory fees charged by lodging facilities for items such as room safes. (SAAM)
10. Official Residence: The city, town, or other location where a state official or employee maintains a residence that is used as their primary domicile. Determinations by the agency head or authorized designee regarding a state official or employee's official residence are to be based on items such as voter registration, ownership, or long-term rental of a personal residence, and the permanent address carried in the state official or employee's personnel or other file. (SAAM Glossary)
11. Official Station: The city, town, or other location where the state official or employee's office is located, or the city, town, or location where the state official or employee's work is performed on a permanent basis. For the purposes of these travel regulations, Olympia, Tumwater and Lacey are considered to be the same official station. A state official or employee's official station is to be designated by the agency. It is to be determined by the needs of the agency and not assigned because it is the home or preferred living area of a state official or employee. (SAAM Glossary)
12. Out-Of-State Travel: Travel anywhere outside the boundaries of the state of Washington is to be coded as out-of-state travel. However, with respect to the requirement for prior authorization of out-of-state travel in Subsection 10.10.50, travel to counties and/or cities in the states of Idaho and Oregon that are contiguous to the border between Washington-Idaho or Washington-Oregon shall not be considered out-of-state. (SAAM Glossary)
13. Per Diem Expenses: Daily travel costs covering both lodging expenses and subsistence expenses while in travel status. (SAAM Glossary)
14. Preparer: A user that requests pre-approval or reimbursement for travel and expenses on behalf of someone else.
15. Reimbursement Request: A request for payment of actual business expenses incurred.
16. Requestor: A user that requests pre-approval or reimbursement for travel and expenses.
17. Privately Owned Vehicle (POV): A vehicle privately owned, leased, or borrowed by a state driver for which the driver receives or is entitled to receive monetary reimbursement or per diem when the vehicle is used to conduct official state business. The state driver is responsible to maintain vehicle insurance on the POV in compliance with Washington mandatory liability insurance requirements as defined in RCW 46.29 and RCW 46.30. Refer to Subsection 12.40.20 (SAAM Glossary)
18. System Administrator: A user that has been granted all system administrative permission levels for TEMS.
19. Travel Status: The official status of a traveler when the traveler is away from both the official residence and the official station, exclusive of commuting between the traveler’s official station and official residence, on state-related business. (SAAM Glossary)
20. Trip: The time from which a person enters travel status to the time the person leaves travel status.

TEMS Reference Guide
119 of 128
Appendix A
E-mail Notification The following e-mail notifications will be sent when a reimbursement request is processed.
Action Receives Direct E-Mail
Receives CC of E-Mail
Preparer with “Prepare Only” authority completes reimbursement request for Requestor and submits to Requestor.
Requestor None
Preparer completes reimbursement request with “Prepare and Submit” authority for Requestor and submits to Approver
Approver Requestor
Requestor completes reimbursement request and submits to Approver
Approver None
Approver (1) approves reimbursement request prepared by Requestor and sends to Fiscal
Requestor
Approver (1) approves reimbursement request prepared by submitter with “Prepare Only” authority and sends to Fiscal
Requestor
Approver (1) approves reimbursement request prepared by submitter with “Prepare and Submit” authority and sends to Fiscal
Preparer Requestor
Approver (1) denies reimbursement request prepared by Requestor
Requestor None
Approver (1) denies reimbursement request prepared by submitter with “Prepare Only” authority
Requestor None
Approver (1) denies reimbursement request prepared by submitter with “Prepare and Submit” authority
Requestor Preparer
Approver (1) returns a reimbursement request for changes prepared by Requestor
Requestor None
Approver (1) returns a reimbursement request for changes prepared by submitter with “Prepare and Submit” authority
Requestor Preparer

TEMS Reference Guide
120 of 128
Approver (2) approves reimbursement request prepared by Requestor and sends to Fiscal
Requestor
Approver (2) approves reimbursement request prepared by submitter with “Prepare Only” authority and sends to Fiscal
Requestor
Approver (2) approves reimbursement request prepared by submitter with “Prepare and Submit” authority and sends to Fiscal
Preparer Requestor
Approver (2) denies reimbursement request prepared by Requestor
Requestor None
Approver (2) denies reimbursement request prepared by submitter with “Prepare Only” authority
Requestor None
Approver (2) denies reimbursement request prepared by submitter with “Prepare and Submit” authority
Requestor Preparer
Approver (2) returns a reimbursement request for changes prepared by Requestor
Requestor None
Approver (2) returns a reimbursement request for changes prepared by submitter with “Prepare Only” authority
Requestor None
Approver (2) returns a reimbursement request for changes prepared by submitter with “Prepare and Submit” authority
Requestor Preparer
Approver (2) returns a reimbursement request for changes to Approver (1)
Approver (1) Requestor
Fiscal approves a reimbursement request prepared by Requestor and received from Approver (1 or 2)
Requestor None
Fiscal approves a reimbursement request prepared by submitter with “Prepare Only” authority and received from Approver (1 or 2)
Requestor None
Fiscal approves a reimbursement request prepared by submitter with “Prepare and Submit” authority and received from Approver (1 or 2)
Requestor Preparer

TEMS Reference Guide
121 of 128
Fiscal denies a reimbursement request prepared by Requestor and received from Approver (1 or 2)
Requestor None
Fiscal denies a reimbursement request prepared by submitter with “Prepare Only” authority and received from Approver (1 or 2)
Requestor None
Fiscal denies a reimbursement request prepared by submitter with “Prepare and Submit” authority and received from Approver (1 or 2)
Requestor Preparer
Fiscal returns a reimbursement request for changes prepared by Requestor and received from Approver (1 or 2)
Requestor None
Fiscal returns a reimbursement request for changes prepared by submitter with “Prepare Only” authorization and received from Approver (1 or 2)
Requestor None
Fiscal returns a reimbursement request for changes prepared by submitter with “Prepare and Submit” authorization and received from Approver (1 or 2)
Requestor Preparer
Fiscal processes reimbursement request for payment that was prepared by Requestor
Requestor None
Fiscal processes reimbursement request for payment that was prepared by submitter with “Prepare Only” authorization
Requestor None
Fiscal processes reimbursement request for payment that was prepared by submitter with “Prepare and Submit” authorization
Requestor Preparer
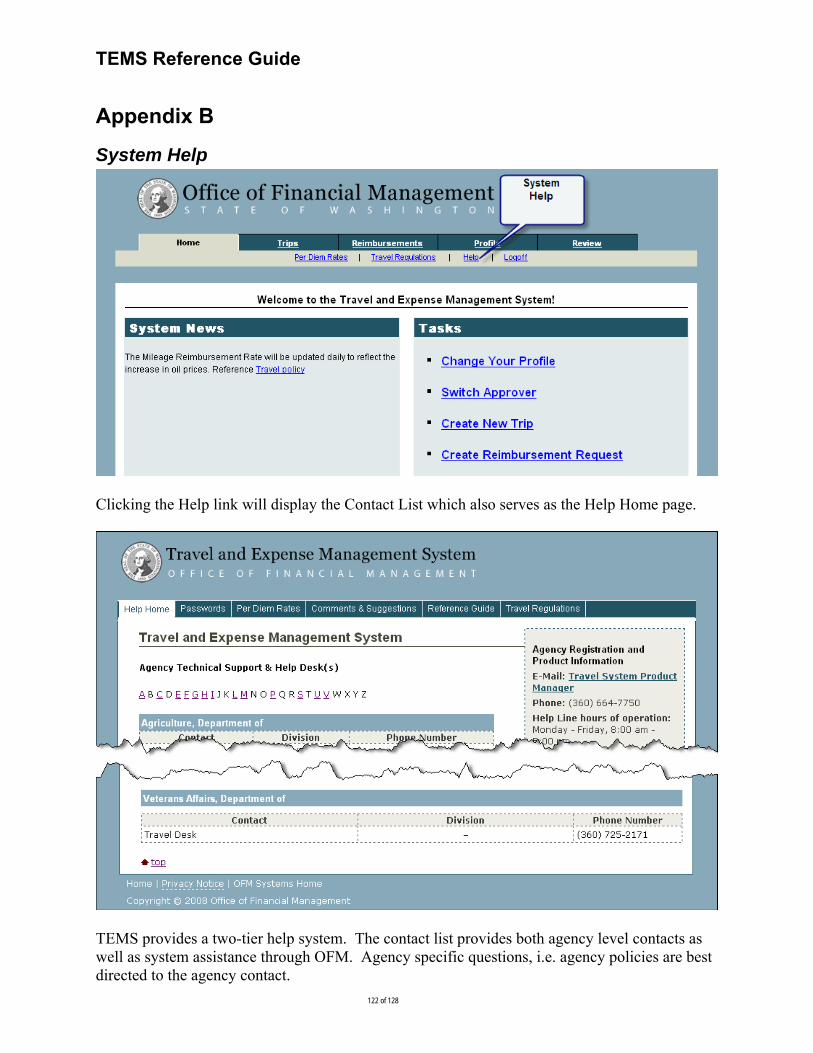
TEMS Reference Guide
122 of 128
Appendix B
System Help
Clicking the Help link will display the Contact List which also serves as the Help Home page.
TEMS provides a two-tier help system. The contact list provides both agency level contacts as well as system assistance through OFM. Agency specific questions, i.e. agency policies are best directed to the agency contact.

TEMS Reference Guide
123 of 128
The Help menu bar is also displays other options. The Passwords Link provides information regarding the process of changing passwords as well as guidelines for password structure.
The Per Diem Rates Link provides access to three sub-links: Washington State Per Diem Map Washington State City / County Locator
OFM Travel Rates - Out-of-state per diem rates may be obtained from this link via the www.gsa.gov website.

TEMS Reference Guide
124 of 128
The Comments & Suggestions Link provides a way for users to submit suggestions and comments concerning the system. These suggestions and comments are submitted directly to the TEMS Product Consultants for review.
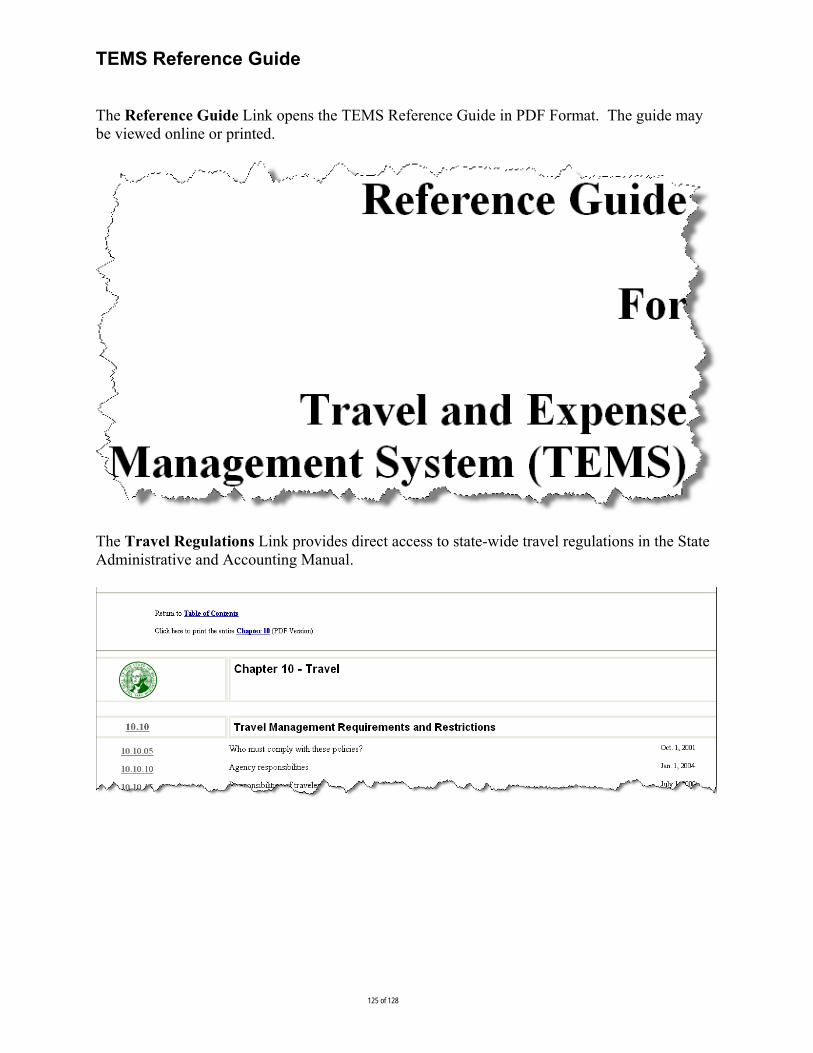
TEMS Reference Guide
125 of 128
The Reference Guide Link opens the TEMS Reference Guide in PDF Format. The guide may be viewed online or printed.
The Travel Regulations Link provides direct access to state-wide travel regulations in the State Administrative and Accounting Manual.
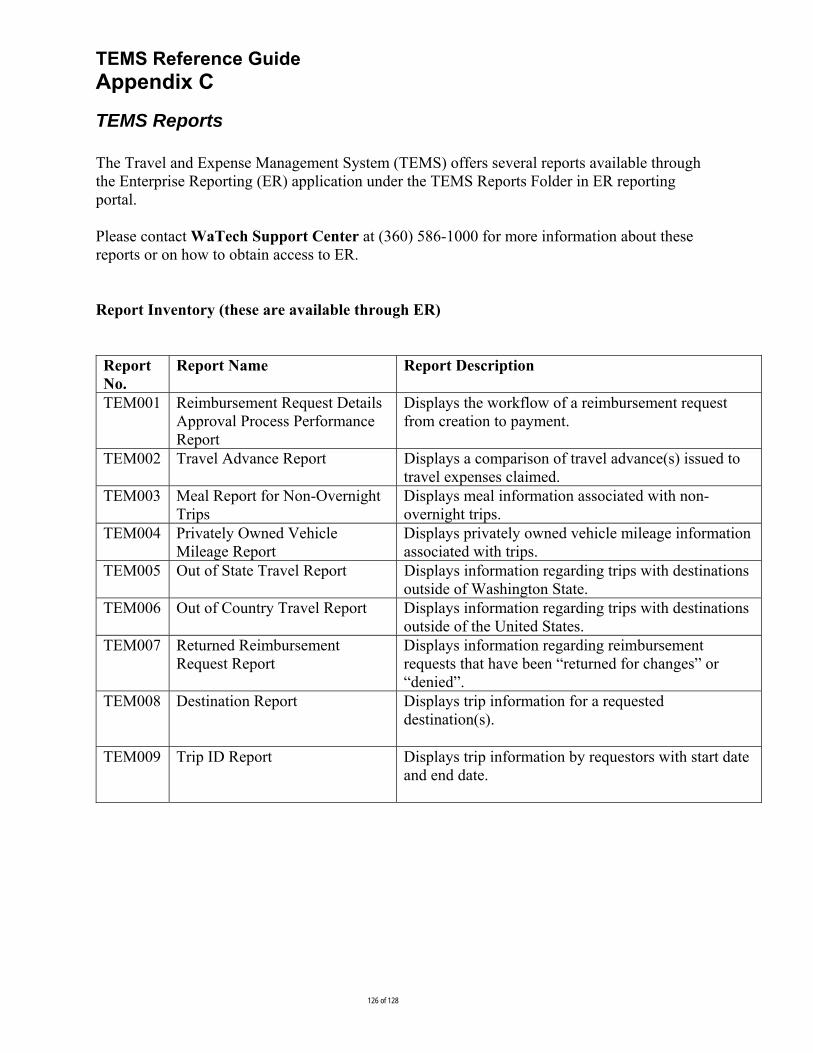
TEMS Reference Guide
126 of 128
Appendix C
TEMS Reports The Travel and Expense Management System (TEMS) offers several reports available through the Enterprise Reporting (ER) application under the TEMS Reports Folder in ER reporting portal. Please contact WaTech Support Center at (360) 586-1000 for more information about these reports or on how to obtain access to ER. Report Inventory (these are available through ER) Report No.
Report Name Report Description
TEM001 Reimbursement Request Details Approval Process Performance Report
Displays the workflow of a reimbursement request from creation to payment.
TEM002 Travel Advance Report Displays a comparison of travel advance(s) issued to travel expenses claimed.
TEM003 Meal Report for Non-Overnight Trips
Displays meal information associated with non-overnight trips.
TEM004 Privately Owned Vehicle Mileage Report
Displays privately owned vehicle mileage information associated with trips.
TEM005 Out of State Travel Report Displays information regarding trips with destinations outside of Washington State.
TEM006 Out of Country Travel Report Displays information regarding trips with destinations outside of the United States.
TEM007 Returned Reimbursement Request Report
Displays information regarding reimbursement requests that have been “returned for changes” or “denied”.
TEM008 Destination Report
Displays trip information for a requested destination(s).
TEM009 Trip ID Report
Displays trip information by requestors with start date and end date.
TEMS Reference Guide
127 of 128
Appendix D
Abbreviations AFRS Agency Financial Reporting System AI Appropriation Index BatTyp Batch Type Bien Biennium Doc Date Document Date ER
Enterprise Reporting FM Fiscal Month HTML Hypertext Markup Language IRS Internal Revenue Service MI Master Index Misc Miscellaneous Travel Expenses OFM Office of Financial Management Org Organization Index PI Program Index Proj Project

TEMS Reference Guide
128 of 128
RR ID Reimbursement Request Identification
SAAM State Administrative & Accounting Manual
Sfx Suffix
SO Subobject SSO Sub-subobject SubPr Sub Project TC Transaction Code TEMS Travel and Expense Management System TVS Travel Voucher System


