CHAPTER 28 Workload Designer Workload Designer e Workload Designer portlet allows you to define, control, balance, and refine rules for managing workloads. Use the following features to manage workloads: • Rulesets which are collections of related filters, throttles, events, states, and workload rules • States which cause actions when a specific combination of planned environment and health condition occur • Sessions limits, including query sessions limits, utility sessions limits, and utility limits • Filters which reject queries • rottles which limit queries • Exceptions which cause actions when one or more specific events occur • Classification criteria which determine which queries use which rules e Workload Designer portlet is a full-width portlet that cannot be minimized. e WORKLOAD DESIGNER view provides controls to select a system and create, edit, view, and perform other actions on rulesets on that system. e Workload Designer Ruleset views provide controls that allow you to refine settings for a system, states, sessions, filters, throttles, workloads, and exceptions. About the Workload Designer View e WORKLOAD DESIGNER view shows summary information about rulesets. Items in the options list depend on whether you are the ruleset owner. If a ruleset is locked by someone else, you have fewer options than if you are the ruleset owner. e Working, Ready, and Active sections contain the following options: Working Names and descriptions of rulesets that are being edited. In Working, you can create and import rulesets. Rulesets in Ready can be copied to Working for editing. Rulesets in Working can also appear in Ready and Active. Ready Rulesets that have been saved to the production system, but are not active. A ruleset must be in Ready before it is copied to Active. e Active ruleset cannot be deleted from Ready. Teradata Viewpoint User Guide, Release 13.11 255
Transcript
CHAPTER 28
Workload Designer
Workload DesignerThe Workload Designer portlet allows you to define, control, balance, and refine rules formanaging workloads. Use the following features to manage workloads:
• Rulesets which are collections of related filters, throttles, events, states, and workload rules• States which cause actions when a specific combination of planned environment and
health condition occur• Sessions limits, including query sessions limits, utility sessions limits, and utility limits• Filters which reject queries• Throttles which limit queries• Exceptions which cause actions when one or more specific events occur• Classification criteria which determine which queries use which rules
The Workload Designer portlet is a full-width portlet that cannot be minimized.
The WORKLOAD DESIGNER view provides controls to select a system and create, edit,view, and perform other actions on rulesets on that system.
The Workload Designer Ruleset views provide controls that allow you to refine settings for asystem, states, sessions, filters, throttles, workloads, and exceptions.
About the Workload Designer View
The WORKLOAD DESIGNER view shows summary information about rulesets. Items inthe options list depend on whether you are the ruleset owner. If a ruleset is locked bysomeone else, you have fewer options than if you are the ruleset owner. The Working,Ready, and Active sections contain the following options:
Working
Names and descriptions of rulesets that are being edited. In Working, you cancreate and import rulesets. Rulesets in Ready can be copied to Working for editing.Rulesets in Working can also appear in Ready and Active.
ReadyRulesets that have been saved to the production system, but are not active. A rulesetmust be in Ready before it is copied to Active. The Active ruleset cannot be deletedfrom Ready.
Teradata Viewpoint User Guide, Release 13.11 255
ActiveActive ruleset on the production system. The only option available in the optionslist, if you have permissions, is to deactivate the ruleset.
Ruleset background color indicates synchronization between the Working and Readysections. Gray in both sections indicates that the same version of the ruleset is in bothsections. Blue indicates that the ruleset has been modified in the Working section since itwas last saved to the Ready section.
TASM ruleset migration is performed automatically during the Teradata Database upgrade.
About Ruleset Options
The WORKLOAD DESIGNER view shows individual rulesets and specific options for eachruleset based on the permissions assigned to your role and the section in which the ruleset islocated.
Working
The Working section contains rulesets that are being edited. Any ruleset listed in Workingcan also be listed in Ready and Active. Available options are:
• Make Ready. Copies the ruleset to the production server and to the Ready section.• Make Active. Makes the ruleset the active ruleset on the production server. Copies the
ruleset to the Ready and Active sections.• View. Opens the ruleset for viewing.• Edit. Opens the ruleset for editing.• Show All. Lists all ruleset attributes on one page.• Lock. Locks the ruleset so only the lock creator can edit the ruleset.• Unlock. Unlocks the ruleset so others can edit the ruleset.• Clone. Creates a copy of the ruleset. This option is useful if you want to use an existing
ruleset as a base or template to create a ruleset.• Export. Exports the ruleset XML file so you can view the file in a browser or save the file
to a location you specify. Use with the Import button to copy a ruleset from one systemto another.
• Delete. Removes the ruleset from the Working section.
Ready
The Ready section lists rulesets saved to the production server. Someone else can create aruleset and add it to the Ready section. Then, from the Ready section, you can select Copy toWorking Rulesets and edit the ruleset. Available options are:
• Activate. Makes the ruleset the active ruleset on the production server.• Copy to Working Rulesets. Copies the ruleset to the Working section.• Delete. Removes the ruleset from the production server.
Active
The Active section contains the active ruleset on the production server. If you havepermission, the only available option is to Deactivate the current ruleset.
Chapter 28 Workload Designer
256 Teradata Viewpoint User Guide, Release 13.11
Creating a Ruleset
A ruleset is a complete collection of related filters, throttles, events, states, and workloadrules. You can create multiple rulesets, but only one ruleset is active on the productionserver at a time. After creating a ruleset, you can specify settings, such as states, sessions, andworkloads, using the toolbar buttons. New rulesets are automatically locked so only theowner can edit the ruleset.
1 From the WORKLOAD DESIGNER view, select a system from the list.
2 Click Create.
3 Enter a ruleset name.
4 [Optional] Enter a description up to 80 characters long.
5 Click Save.
6 [Optional] Specify settings using the tabs in the General view, such as Intervals andBypass.
7 [Optional] Click States and create a state matrix.
8 [Optional] Click Sessions and create any of the following:
10 [Optional] Click Throttles and create a system throttle.
11 [Optional] Click Workloads and create a workload.
12 [Optional] Click Exceptions and create an exception.
Editing a Ruleset
In the WORKLOAD DESIGNER view, you can edit ruleset properties. The TeradataViewpoint Administrator must grant your role permission to edit rulesets so you cancomplete this action. Without permission to edit the ruleset, the menu option is View andthe ruleset view is read-only.
1 From the WORKLOAD DESIGNER view, select a system from the list.
2 In the local Working section, click the ruleset name.
3 Specify settings using the toolbar buttons and tabbed views.
4 Click Save after making changes in each view.
Cloning a Ruleset
Cloning a ruleset makes an exact copy of the ruleset, except for the name and description.
Cloning is a convenient way to create a ruleset using the criteria of an existing ruleset as a base.
1 From the WORKLOAD DESIGNER view, select a system from the list.
Chapter 28 Workload Designer
Teradata Viewpoint User Guide, Release 13.11 257
2 In the local Working section, click the ruleset and click Clone.
An exact copy of the ruleset is made, and the General view appears.
3 Enter a name.
4 [Optional] Enter a description up to 80 characters long.
5 Click Save.
6 Specify additional settings using the toolbar buttons and tabbed views.
7 Click Save.
Deleting a Ruleset
Deleting a ruleset removes the ruleset and all associated information. The TeradataViewpoint Administrator must grant your role permission to edit rulesets so you cancomplete this action.
1 From the WORKLOAD DESIGNER view, select a system from the list.
2 In the local Working section or the system Ready section, click the ruleset , and clickDelete.
3 Click Delete.
The ruleset is deleted from the section.
Importing a Ruleset
The import and export options can be used to copy a ruleset from one system to another. TheTeradata Viewpoint Administrator must grant your role permission to edit rulesets so youcan complete this action. Only rulesets exported from Workload Designer and a TeradataDatabase of the same release can be imported.
1 From the WORKLOAD DESIGNER view, select a system from the list.
2 Click Import.
3 Enter a name for the imported ruleset.
4 Click Browse.
5 Locate and select the saved ruleset file.
Note: Exported ruleset files might be stored in the download area configured for yourbrowser.
6 Click Save.
Exporting a Ruleset
The import and export options can be used to copy a ruleset from one system to another. TheTeradata Viewpoint Administrator must grant your role permission to edit rulesets so youcan complete this action. Only rulesets exported from Workload Designer and a TeradataDatabase of the same release can be imported.
1 From the WORKLOAD DESIGNER view, select a system from the list.
Chapter 28 Workload Designer
258 Teradata Viewpoint User Guide, Release 13.11
2 In the local Working section, click the ruleset , and click Export.
3 Click Save.
The ruleset file is saved to your download area or the location you specify, depending onyour browser settings.
Showing All Criteria in a Ruleset
You can display a read-only summary of all settings and state-specific values for a single ruleset.
1 From the WORKLOAD DESIGNER view, select a system from the list.
2 In the local Working section, click the ruleset , and click Show All.3 [Optional] Do any of the following:
• Click Collapse All to hide all sections of the view.• Click Print to print the full summary.• Click the section name to show or hide individual sections of the view.
Copying a Ruleset to the Production System
When you are finished editing a ruleset in the Working section, copy the ruleset to theReady section on the production system. The Teradata Viewpoint Administrator must grantyour role permission to edit rulesets so you can complete this action. After copying a rulesetto the Ready section, you can make the ruleset the active ruleset on the production system.
1 From the WORKLOAD DESIGNER view, select the production system containing theruleset you want to copy.
2 In the Working section, click the ruleset , and click Make Ready.
Activating a Ruleset
Activating a ruleset copies the ruleset to the active state on the selected system. Only oneruleset is active on the system at a time. A ruleset activated from the local Working sectionis copied to the Ready section before being made active. The Teradata ViewpointAdministrator must grant your role permission to edit rulesets so you can complete this action.
1 From the WORKLOAD DESIGNER view, select a system from the list.
2 From a ruleset in the Working or Ready section, click the ruleset , and click MakeActive.
Deactivating a Ruleset
Deactivating a ruleset removes the ruleset from the active state on the selected system. TheTeradata Viewpoint Administrator must grant your role permission to edit rulesets so youcan complete this action.
1 From the WORKLOAD DESIGNER view, select a system from the list.
2 In the system Active section, click the ruleset , and click Deactivate.
About Ruleset Locks
An exclusive lock can be placed on a ruleset so that the ruleset cannot be edited, deleted, orotherwise modified except by the owner of the lock. A ruleset is automatically locked by the
Chapter 28 Workload Designer
Teradata Viewpoint User Guide, Release 13.11 259
user when it is created and each time changes to the ruleset are saved. Use the WORKLOADDESIGNER view to lock and unlock rulesets. The Teradata Viewpoint Administrator mustgrant your role permission to edit rulesets so you can complete this action.
The WORKLOAD DESIGNER view displays ruleset lock status:
Option Description
Locked.
Unlocked.
The ruleset views display ruleset lock status:
Option Description
Unlocked.
Locked by the current user.
Locked by another user.
Locking or Unlocking a Ruleset
Locking a ruleset prevents others from editing or deleting the ruleset. The TeradataViewpoint Administrator must grant your role permission to edit rulesets so you cancomplete this action.
1 From the WORKLOAD DESIGNER view, select a system from the list.
2 In the local Working section, click the ruleset , and click Lock or Unlock.
About the Ruleset General View
The ruleset General view displays general attributes of a ruleset and appears after you clickthe General button on the ruleset toolbar. The General view appears by default whencreating, editing, cloning, or viewing a ruleset. This view contains the following tabs:
General
Ruleset name and description.
Intervals
Collection and reporting intervals.
Option Description DefaultValue
MinimumValue
MaximumValue
Event Interval How often event thresholdsare checked.
60 seconds 1 second 3600 seconds
DashboardInterval
How often workload statisticsare collected.
60 seconds 1 second 600 seconds
Chapter 28 Workload Designer
260 Teradata Viewpoint User Guide, Release 13.11
Option Description DefaultValue
MinimumValue
MaximumValue
Logging Interval How often workload andexception logs are written.
600 seconds 1 second 3600 seconds
ExceptionInterval
How often exceptionthresholds are checked.
60 seconds 1 second 3600 seconds
Blocker
Settings for responding to throttled blockers. The log is located at DBC.TDWMEventLog.Selecting Log only logs the blocker. If Abort or Release is selected, the action is logged afterthe abort or release occurs.
Option Description DefaultValue
Values
BlockCycles
The number of intervals over whichthe query must be blocked before thespecified Block Action is taken.
Off Off123
BlockAction
The action to perform in response toquery blocking.
Features that are available when the ruleset is activated. Events and States is a required fieldand can be the only field selected.
Bypass
Users, accounts, and profiles whose queries are allowed to bypass system filters and throttles.
Option Description
SourceType
Type of query source (you can select one or more items from each available source type):
Usernames (usernames dbc and tdwm cannot be removed)Account NamesAccount StringsProfiles
Filter Limits your choices in the source list.
Items Lists the names of all available query sources of the selected type.
Bypass Selected sources, listed by source type. Queries from each of the listed query sourceswill bypass system filters and throttles for this ruleset.
Chapter 28 Workload Designer
Teradata Viewpoint User Guide, Release 13.11 261
Defining System-Level Bypass Settings
A system-level bypass is a collection of users, accounts, and profiles that are not filtered orthrottled at the system level. The dbc and tdwm usernames are listed automatically andcannot be changed, renamed, or removed.
1 Edit or create a ruleset.
2 From the ruleset toolbar, click General.3 Click the Bypass tab.
4 Select a Source Type from the list to exclude it from system-level filters and throttles.
5 [Optional] Enter a filter string in the Filter box to limit your choices.
6 Select a source from the list or select multiple sources by using Ctrl or Shift.
7 Click Add Selection to add your selections to the bypass list.
8 [Optional] Repeat steps 4 through 7 to add sources to the bypass list.
9 [Optional] Mouse over a source in the bypass list, and click to include it in system-level filters and throttles.
10 Click Save.
About Ruleset States
A state is the intersection of a health condition and a planned environment. A healthcondition is composed of unplanned events and a planned environment is composed ofplanned events. Creating states provides greater control over how the system allocatesresources. When a health condition and a planned environment intersect, the resulting statetriggers system changes.
Use the state matrix to create and organize states for a ruleset. With the state matrix, createstates so one ruleset can respond to a range of different system conditions. For example, ifyou have many system users on weekdays, but run batch jobs on the weekend, allocatesystem resources differently during the week than you do on weekends by creating twoplanned environments: Weekdays and Weekends.
In the state matrix, create planned events, unplanned events, health conditions, plannedenvironments, and corresponding states specific to your business situation. Update the statematrix at any time to reflect business, system, or priority changes.
The Normal health condition, Always planned environment, and Base state are defaults. Thedefaults apply unless planned or unplanned events occur, triggering other configured states.The defaults cannot be deleted or moved within the state matrix. Like any state, the Basestate can be used in multiple cells of the matrix.
Chapter 28 Workload Designer
262 Teradata Viewpoint User Guide, Release 13.11
Any states you create use the default settings. The default settings can be viewed and editedon the state-specific settings tabs in workloads, filters, throttles, query sessions, and utilitylimits. You can override the default settings by entering new values on the state-specificsettings tabs.
Using only a few states in the state matrix reduces maintenance time. However, consideradding states to the matrix to manage the following situations:
• Consistent, peak workload hours or days where priority management must be strictlyassigned and enforced.
• Load or query times where priority tasks must finish within a specific time frame.• Conditions where resources must be managed in a different way, such as giving higher
priority to critical work when system health is degraded.
Creating a State Matrix
If you have created a ruleset, you can create a state matrix for the ruleset. The state matrixinstructs the system as to which predefined state to use when a specific combination ofplanned environment and health condition exists.
1 Edit or create a ruleset.
2 From the ruleset toolbar, click States.
The state matrix appears. For a new ruleset, the default state matrix consists of one cell.
3 Define at least one health condition.
4 Define at least one unplanned event.Unplanned events are system events, user-defined events, or a combination of these events.
5 Drag the unplanned event to the appropriate health condition so the event triggers thehealth condition.
6 Define at least one planned environment.
7 Define at least one planned event.Planned events are period events, user-defined events, or a combination of these events.
8 Drag the planned event to the appropriate planned environment so the event triggersthe environment.
9 Define at least one state.
10 For each cell in the state matrix, drag and drop a state from the States list into theappropriate cell of the matrix. When the defined combination occurs, the state is triggered.
Chapter 28 Workload Designer
Teradata Viewpoint User Guide, Release 13.11 263
11 Click Save.
Defining Health Conditions
Health conditions define levels of system health and are used to reallocate system resourceswhen an event degrades the system. When at least one unplanned event occurs, a healthcondition can be triggered. The default health condition is Normal, and it is used if no otherhealth conditions are triggered. The Normal health condition always remains at the top. Thelowest severity is listed at the top. The highest priority is at the bottom. If multiple unplannedevents are active at the same time, the health condition with the highest severity is triggered.
1 Edit or create a ruleset.
2 From the ruleset toolbar, click States.
3 Mouse over Health Conditions, and click .
A health condition is added with the default name newCond.
4 Mouse over the health condition, and click .
5 Enter a name for the health condition.
6 Enter a minimum duration, in minutes, for the health condition.The event that triggers the change to the health condition must remain above the triggerthreshold for the minimum duration you enter before the health condition goes intoeffect. Setting minimum duration prevents short incidents of an event from triggering achange in the health condition.
7 Click OK.
8 [Optional] If there are more than two health conditions, click the health condition name,and drag the name to reorder.
9 [Optional] To delete a health condition, mouse over a health condition name, and click.
10 Click Save.
Defining System Events in the State Matrix
System events are unplanned events, such as a down node. Incorporating system events intohealth conditions within the state matrix gives you greater control over what actionsTeradata Database takes when unexpected events occur. To create an event that only sendsout a notification, create the event, but do not assign it to any unplanned environment.When the event occurs, the notification action you specified is triggered.
Note: Some event types give you the option to set qualification time. Qualification time is thelength of time the specified event must last to be recognized as an event. Setting qualificationtime prevents very short incidents of an event from being acknowledged as events.
1 Edit or create a ruleset.
2 From the ruleset toolbar, click States.
3 Mouse over Unplanned Events, and click .
4 Click next to Available Events.
Chapter 28 Workload Designer
264 Teradata Viewpoint User Guide, Release 13.11
5 Select System Event.
6 Enter a name.
7 [Optional] Enter a description up to 80 characters long.
8 Select an Event Type from the list:
• Node Down. Specify the maximum allowed number of nodes down in a clique as apercentage between 0 and 100. The default is 24%.
• AMP Fatal. Specify the maximum number of AMPs reported as fatal at system startup.• Available AWT's. Specify the minimum number of AWTs available on an AMP. Set
a qualification time in minutes and seconds. (Release 13.10 and later.)• AWT Limit. Specify the maximum number of AWTs in use on an AMP. Set the
number of AMPs that must exceed the limit. Set a qualification time in minutes andseconds. (Release 12.0 and Release 13.0.)
• Gateway Fatal. Specify the maximum number of gateways reported as fatal at systemstartup.
• PE Fatal. Specify the maximum number of PEs reported as fatal at system startup.• Flow Control. Specify the maximum allowed number of AMPs in flow control. Set a
qualification time in minutes and seconds.
Maximum and minimum limits must be positive integers.
9 [Optional] Under Notifications, enable any of the following actions for the start or endof the event:
• Send Alert. Select the Teradata Alerts to run.• Run Program. Select the program registered with Teradata Alerts to run.• Post to QTable. Enter a string to post to the QTable at the start or end of the event.
This option is not integrated with Teradata Alerts.
10 Click OK.
11 [Optional] Drag the event under a specific health condition.
12 Click Close.
13 Click Save.
Defining Planned Environments
Planned environments reallocate system resources during scheduled times. Plannedenvironments are triggered when at least one planned event occurs. The default plannedenvironment is Always and it cannot be deleted or moved. The order of precedence is fromlowest to highest, reading from left to right. The planned environment with the highestprecedence is activated if multiple planned events are active at the same time.
1 Edit or create a ruleset.
2 From the ruleset toolbar, click States.
3 Mouse over Planned Environments, and click .
A planned environment is added with the default name newEnv.
Chapter 28 Workload Designer
Teradata Viewpoint User Guide, Release 13.11 265
4 Mouse over the planned environment, and click .
5 Enter a name.
6 Click outside the name.
7 If there are more than two planned environments, click a planned environment name,and drag the name to the left or right in the list to change the order of precedence.
8 [Optional] To delete a planned environment, mouse over the environment name, andclick .You cannot delete the Always environment.
9 Click Save.
Defining Period Events in the State Matrix
Period events are planned events occurring on specific days and times, such as month-endfinancial processing. To create an event that only sends out a notification, create the event,but do not assign it to any planned environment. When the event occurs, the notificationaction you specified is triggered.
1 Edit or create a ruleset.
2 From the ruleset toolbar, click States.
3 Mouse over Planned Events, and click .
4 Click next to Available Events.
5 Select Period Event.
6 Enter a name.
7 [Optional] Enter a description up to 80 characters long.
8 [Optional] Select Create New Corresponding Planned Environment to automaticallycreate a planned environment that this event triggers.
9 Select Day of Week or Day of Month, and click a single day or multiple days.
10 [Optional] Select Month of Year, and click one or more months.
11 [Optional] Select Start Time, and enter a start and end time.
12 [Optional] Select Wrap around midnight to have a time range spanning midnight for aperiod event.
13 [Optional] In Notifications, select any of the following:
• Send Alert. Specify the Teradata Alerts to trigger at the start or end of the event.• Run Program. Specify the Teradata Alerts registered programs to trigger at the start
or end of the event.• Post to QTable. Enter a string to post to the QTable at the start or end of the event.
(This option is not integrated with Teradata Alerts.)
14 Click OK.
15 [Optional] Drag the event under a planned environment.
Chapter 28 Workload Designer
266 Teradata Viewpoint User Guide, Release 13.11
16 Click Close.
17 Click Save.
Wrap Around Midnight Example
When creating period events, use the Wrap around midnight option to have a time rangespanning midnight.
If the From time of a period event is later than the To time, two time segments are available:midnight until the To time and the From time until midnight. When Wrap aroundmidnight is not selected, the period event is in effect for segment 1 and segment 2 on eachspecified day. When Wrap around midnight is selected, the event is in effect for segment 2on each specified day and for segment 1 on each day following the specified day.
For example, specify that a period event occurs on Mondays and Tuesdays with a From timeof 17:00 and a To time of 08:00.
If Wrap around midnight is not selected:
Monday Tuesday Wednesday
midnight—08:00 (time segment 1) Yes Yes No
08:00—17:00 No No No
17:00—23:59 (time segment 2) Yes Yes No
If Wrap around midnight is selected:
Monday Tuesday Wednesday
midnight—08:00 (time segment 1) No Yes Yes
08:00—17:00 No No No
17:00—23:59 (time segment 2) Yes Yes No
Defining User-Defined Events in the State Matrix
User-defined events can be planned or unplanned. To create an event that only sends out anotification, create the event, but do not assign it to any planned or unplannedenvironment. When the event occurs, the notification action you specified is triggered.
1 Edit or create a ruleset.
2 From the ruleset toolbar, click States.
3 Mouse over Unplanned Events or Planned Events, and click .
4 Next to Available Events, click .
5 Select User Defined Event.
6 Enter a name.
7 [Optional] Enter a description up to 80 characters long.
Chapter 28 Workload Designer
Teradata Viewpoint User Guide, Release 13.11 267
8 [Optional] If you are creating the user-defined event as a planned event, you can selectCreate New Corresponding Planned Environment to automatically create a plannedenvironment that this event triggers.
9 Under Activate/Deactivate Event, copy the appropriate SQL request text.
10 Paste the text into an SQL script.
11 [Optional] Under Notifications, do any of the following:
• Send Alert. Specify the Teradata Alerts to trigger at the start or end of the event.• Run Program. Specify the Teradata Alerts registered programs to trigger at the start
or end of the event.• Post to QTable. Enter a string to post to the QTable at the start or end of the event.
(In Release 12.0, you can select the Post to QTable option, but the text box is notavailable.)
12 Click OK.
13 [Optional] Do one of the following:
• For unplanned events, drag the event under a health condition.• For planned events, drag the event under a planned environment.
14 Click Close.
15 Click Save.
Defining Event Combinations in the State Matrix
An event combination is a mix of two or more different events, such as period, system, anduser-defined events. Event combinations can be planned or unplanned. To create an eventthat only sends out a notification, create the event, but do not assign it to any plannedenvironment. When the event occurs, the notification action you specified is triggered.
1 Edit or create a ruleset.
2 From the ruleset toolbar, click States.
3 Mouse over Unplanned Events or Planned Events, and click .
4 Next to Available Events, click .
5 Select Event Combination.
6 Enter a name.
7 [Optional] Enter a description up to 80 characters long.
8 [Optional] If you are creating the combination event as a planned event, you can selectCreate New Corresponding Planned Environment to automatically create a plannedenvironment that this event triggers.
9 Add available events and operators to build the formula representing the combination ofevents that must occur to trigger the event. For example, Node Down OR BatchProcessing, or NOT PEI.When creating event combinations, avoid placing two operators or two events next toeach other. When an event combination is valid, the background of the Event
Chapter 28 Workload Designer
268 Teradata Viewpoint User Guide, Release 13.11
Combination Formula text box is white. If a combination is invalid, the background isorange.
10 [Optional] In Notifications, select any of the following:
• Send Alert. Specify the Teradata Alerts to trigger at the start or end of the event.• Run Program. Specify the Teradata Alerts registered programs to trigger at the start
or end of the event.• Post to QTable. Enter a string to post to the QTable at the start or end of the event.
(This option is not integrated with Teradata Alerts.)
11 Click OK.
12 [Optional] Do one of the following:
• For unplanned events, drag the event under a health condition.• For planned events, drag the event under a planned environment.
13 Click Close.
14 Click Save.
Defining States in the State Matrix
You can create a state to control how resources are allocated in different health conditionand planned environment combinations.
1 Edit or create a ruleset.
2 From the ruleset toolbar, click States.
3 Mouse over States at the top of the states list and click .
A state is added to the list with the default name newState.
4 Mouse over the state name, and click .
5 Enter a name.
6 Click outside the name.
7 [Optional] To edit a state, mouse over the state name, and click .
8 Click Save.
Mapping States in the State Matrix
After creating a state, you can map it in the state matrix to control how resources areallocated when different health condition and planned environment combinations occur. Bydefault, the cell in the upper left corner of the state matrix is assigned the Normal healthcondition, the Always environment, and the Base state. This cell cannot be changed. Allother cells in the matrix must be associated with a single state. Any state, including the Basestate, can be used in multiple cells.
1 Edit or create a ruleset.
2 From the ruleset toolbar, click States.
3 To map a state in the state matrix, drag and drop a state name from the States list to amatrix cell.
Chapter 28 Workload Designer
Teradata Viewpoint User Guide, Release 13.11 269
4 [Optional] To view details about a state, mouse over the state name in the States, list andclick .
5 Click Save.
Mapping Events in the State Matrix
If you have created events in the state matrix, you can combine the events with healthconditions and planned environments for greater control of Teradata Database. Create thehealth conditions and planned environments that you need before mapping events in thestate matrix.1 Edit or create a ruleset.
2 From the ruleset toolbar, click States.
3 Map a planned event:
a Mouse over Planned Events, and click .
b In Available Events, drag and drop an event from the list into one or more of thePlanned Environment columns.
c [Optional] To create a planned event, click next to Available Events.
4 To map an unplanned event:
a Mouse over Unplanned Events, and click .
b In Available Events, drag an event from the list and drop it into one or more of theHealth Condition rows.
c [Optional] To create an unplanned event, click next to Available Events.
5 Click Close.
6 Click Save.
Deleting States from the State List
If a state is not used in the state matrix, you can remove it from the State list.
Chapter 28 Workload Designer
270 Teradata Viewpoint User Guide, Release 13.11
1 Edit or create a ruleset.
2 From the ruleset toolbar, click States.
3 In the State list, mouse over a state name, and click .
4 Click Save.
About Classification Settings
Workload Designer provides a common classification process for workloads, filters,throttles, query sessions, and utility sessions. Classification determines which queries usewhich rules. Teradata Database detects classification criteria before executing queries. Thegoal in creating a useful classification scheme is to meet business goals and fine-tune controlof Teradata Database.
Modifications to the classification settings can be made in response to data monitoring,regular historical analysis, or changes. For example, classification groups may need to becreated, or existing groups modified, if an application is added, two production systems areconsolidated, or service-level goals are missed.
About Classification Criteria
The following classifications are available:
• Request source (Where does the query come from?)• Target (What is the query acting on?)• Query characteristics (What is the query composed of?)• Query band (What metadata is attached to the query?)• Utility (Which utility submitted the query?)
A good approach to using classification is to first use request source to determine where thequery is coming from. Often, the account string is selected, but other options includeusername, account name, or client IP address. If you need a more detailed level ofclassification, establish where the query data is located, such as a database, table, or view. Tonarrow classification further, select query characteristics, query bands, or utilities. Forutilities, use the check boxes to select the specific utilities you want to include.
For example, you could create a filter and add the request source classification to reject allqueries from the Finance department when the Red state is in effect. To further refine thefilter, add the query characteristic classification to filter out all requests from the financedepartment that are estimated to run longer than 10 seconds. (You include classificationitems in a filter to reject those items.) The query characteristic setting is added to the requestsource setting already in place.
All classification settings for a workload, filter, throttle, query session, utility session, orutility limit are listed on the Classification tab.
Chapter 28 Workload Designer
Teradata Viewpoint User Guide, Release 13.11 271
On the Classification tab:
• Request source and target criteria can have a single criteria or several. In Release 13.10, ifa criteria group has more than one criteria, then within the group the criteria are joinedby AND. In Release 12.0 and Release 13.0, the criteria are joined by OR.
• If request source and target groups exist together, they are joined by an AND in Release13.10. In Release 12.0 and Release 13.0, a button can be used to join the groups by ANDor by OR.
• Within a query characteristics criteria group, if the Statement Type parameter is enabled,it is joined to any additional parameters with an AND. In Release 13.10, if there is morethan one parameter, they are joined by an AND. In Release 12.0 and Release 13.0, abutton can be used to join the parameters by AND or by OR.
About Request Source Classification Type
The request source classification type establishes which username, account name, accountstring, profile, application, client IP address, or client ID is making the request.
Consider the following when using request source to classify information:
• A source type can only be used once per rule. After a source type is used, it no longerappears in the menu.
• A match string must be an exact match. A match string can contain ? to match exactlyone character or an * to match zero or more characters. Use the Match String Includeand Exclude buttons to add the match string to a list. You can also select items from thelist and use the Items Include and Exclude buttons to create your classification criteria.
Adding Request Source Classification Type
You can classify filters, throttles, workloads, utility sessions, and query sessions by requestsources such as account name or client IP address.
In Release 12.0 and Release 13.0, when adding the request source classification type to filtersand throttles, an Add button is available instead of the Include and Exclude buttons. InRelease 12.0, when adding the request source classification type to workloads, all specifiedcriteria can be either included or excluded. In Release 12.0, wild cards are not available inMatch String. In Release 12.0 and Release 13.0, the request source types available for filtersand throttles are Username, Profile, Account Name, and Account String.
Chapter 28 Workload Designer
272 Teradata Viewpoint User Guide, Release 13.11
1 Click Filters, Throttles, Workloads or Sessions (Query Sessions or Utility Sessionstab) and select the name of a rule or create a rule.
2 Click the Classification tab.
3 Do one of the following:
• From the Add Classification Criteria list, click Request Source, and click Add.• Click Add Criteria if you are classifying a query session.• Select an existing request source criteria.
4 Select a Source Type from the list.
5 Do at least one of the following:
• In Match String, enter a string. A match string can contain ? to match exactly onecharacter or an * to match zero or more characters. (Wildcards in match strings aresupported in Release 13.0 and later.) Use the Match String Include and Excludebuttons to add the match string to a list.
• Select Items from the list and use the Items Include and Exclude buttons to createyour classification criteria. (In Release 12.0 and Release 13.0, use the Add button.)
6 Click OK.
About Target Classification Type
The target classification type establishes the query data location.
Consider the following when using target to classify information:
• Available target types include database, table, macro, view, or stored procedure. If table,macro, view, or stored procedure is selected, a database selection list appears. A targettype can only be used once per rule. After a target type is used, it no longer appears in themenu.
• Optionally, each selected target item can have subcriteria. For example, if you select adatabase as the target, you could add subcriteria so that it only applies if you areperforming a full table scan. If you select two or more subcriteria, they must all bepresent for the classification setting to be used. The icon appears next to target itemscontaining subcriteria.
• A match string must be an exact match. A match string can contain ? to match exactlyone character or an * to match zero or more characters. Use the Match String Includeand Exclude buttons to add the match string to a list. You can also select items from thelist and use the Items Include and Exclude buttons to create your classification criteria.
Adding Target Classification Type
The target classification type specifies the query data location. You can classify filters,throttles, or workloads by targets such as database, table, or stored procedure. You can addsubcriteria in Release 13.10. If you add multiple subcriteria to a single item, all subcriteriaconditions must be true in order for the query to be classified into the rule. In Release 12.0and Release 13.0, when adding the target classification type to filters and throttles, an Addbutton is available instead of the Include and Exclude buttons. In Release 12.0, when addingthe target classification type to workloads, all specified criteria can be either included orexcluded. In Release 12.0, wild cards are not available in Match String.
Chapter 28 Workload Designer
Teradata Viewpoint User Guide, Release 13.11 273
1 Click Filters, Throttles, or Workloads and select the name of an existing item or createone.
2 Click the Classification tab.
3 Do one of the following:
• From the Add Classification Criteria list, click Target, and click Add.• Select an existing target criteria.
4 Select a Target Type from the list.
5 [Optional] Select a database from the list for Table, View, Macro, or Stored Proceduretarget types.
6 Do at least one of the following:
• Enter a Match String and use the Match String Include and Exclude buttons to addthe match string. A match string can contain ? to match exactly one character or an *to match zero or more characters.
• Select Items from the list and use the Items Include and Exclude buttons to add theitems.
7 [Optional] To add subcriteria, mouse over an item in the Selected list, click , andchoose from the following:
• Full Table Scan. Include or exclude full table (all row) scans.• Join Type. Select a type, such as No Join or Any Join.• Minimum Step Row Count. Set minimum rows at each step.• Maximum Step Row Count. Set maximum rows at each step.• Minimum Step Time. Set minimum time at each step.
8 If you specified subcriteria, click Apply.
The icon appears next to target items containing subcriteria.
9 Click OK.
About Query Characteristic Classification Type
The query characteristic classification type describes a query by answering such questions aswhat does the query do and how long will the query run.
Consider the following when using query characteristics to classify information:
• After a characteristic is selected, its value can be edited.• Many characteristics have minimum and maximum values that can be set independently.
You can set all values above the minimum, below the maximum, or between a minimumand a maximum.
• Query characteristic classification and utility classification are mutually exclusive. If youuse one, the other option is not available.
• You can have one query characteristic classification per rule.• If you select Join Type, you can choose from No Join, Any Join, Product Join, No
Product Join, Unconstrained Product Join, and No Unconstrained Product Join.
Chapter 28 Workload Designer
274 Teradata Viewpoint User Guide, Release 13.11
Adding Query Characteristic Classification Type
You can classify filters, throttles, or workloads by query characteristics.
1 Click Filters, Throttles, or Workloads and select the name of an existing item or createone.
2 Click the Classification tab.
3 Do one of the following:
• From the Add Classification Criteria list, click Query Characteristics, and clickAdd.
• Select an existing query characteristics criteria.
4 Choose from the following query characteristics criteria:
• Statement Type. Click DDL, DML, or SELECT.• AMP Limits. Include or exclude queries that use all AMPs. (Available for filters in
Release 13.10.)• Step Row Count. Set minimum and maximum rows at each step.• Final Row Count. Set minimum and maximum rows in the result set.• Estimated Processing Time. Set minimum and maximum estimated processing
time. (Longer or more complex queries have less accurate estimates.)• Minimum Step Time. Set a minimum time at each step.• Join Type. Use the Include Only list to select one of the following join types: No
Join, Any Join, Product Join, No Product Join, Unconstrained Product Join, or NoUnconstrained Product Join.
• Full Table Scan. Choose to include or exclude full table (all row) scans.
5 Click OK.
About Query Band Classification Type
The query band classification type describes the query band data attached to a query.
Consider the following when using query band to classify information:
• A name must be selected from the Name list or entered into the box.• After picking a name, one or more values must be specified. The value is selected from
the Previously Used Values list or entered into the New Value box. Multiple values canbe selected for the same name.
• After a name and value are specified, the Include and Exclude buttons are available.• Multiple included query band key and value pairs are connected with "AND."• Multiple excluded query band key and value pairs are connected with "OR."
Adding Query Band Classification Type
A query band contains name and value pairs that use predefined names (on TeradataDatabase) or custom names to specify metadata, such as user location or applicationversion. The query band classification type describes the query band data attached to a query.
In Release 12.0 and Release 13.0, when adding the query band classification type to filtersand throttles, an Add button is available instead of the Include and Exclude buttons. In
Chapter 28 Workload Designer
Teradata Viewpoint User Guide, Release 13.11 275
Release 12.0, when adding the query band classification type to workloads, all specifiedcriteria can be either included or excluded.
1 Click Filters, Throttles, or Workloads and select the name of an existing item or createone.
2 Click the Classification tab.
3 Do one of the following:
• From the Add Classification Criteria list, click Query Band, and click Add.• Select an existing query band criterion.
4 Do one of the following:
• Select a predefined query band name from the list.• Enter a name.
5 Select a Previously Used Value or enter a New Value.You must select a name and a value.
6 Use the Include and Exclude buttons to create your classification criteria.
7 Click OK.
About Utility Classification Type
The utility classification type identifies which utility submitted the query.
Consider the following when using utility to classify information:
• Available utility types include FastLoad, FastExport, MultiLoad, and Archive/Restore.Select a top level utility such as FastExport or a specific implementation of a utility suchas JDBC FastExport.
• Utility classification and query characteristic classification are mutually exclusive. If youuse one, the other option is not available.
• You can have one utility classification per rule.
Adding Utility Classification Type
You can classify filters, throttles, workloads, or sessions by utilities such as FastLoad orMultiLoad.
1 From the Filters, Throttles, Workloads, or Sessions (click the Utility Limits or UtilitySessions tab) button, select the name of an item or create one.
2 Click the Classification tab.
3 Do one of the following:
• From the Add Classification Criteria list, click Utility, and click Add.• Select an existing utility criteria.
4 Select any combination of FastLoad, FastExport, MultiLoad, and Archive/Restoreutilities. Select a utility type, such as FastLoad or FastExport, or a specific version, suchas JDBC FastLoad or Stand Alone MultiLoad.
5 Click OK.
Chapter 28 Workload Designer
276 Teradata Viewpoint User Guide, Release 13.11
Deleting a Classification Type
You can delete classification criteria from filters, throttles, workloads, query sessions, utilitysessions, or utility limits at any time.
1 From the ruleset toolbar, click Filters, Throttles, Workloads, or Sessions (click theQuery Sessions, Utility Limits, or Utility Sessions tab).
2 In Name, select existing item.
3 Click the Classification tab.
4 Mouse over an existing classification criteria, and click . If you are deleting a utilitylimit criterion, clear the utilities you want to delete from the classification.
5 Click Save.
About Ruleset Sessions
This topic describes the session limit information you can specify when creating and editingrulesets. In Release 12.0 and Release 13.0, session throttles are configured on the Throttlestab. The Sessions view appears after you click the Sessions button on the ruleset toolbar andhas the following tabs:
Query SessionsLimits on the number of query sessions that can be logged on at one time. You cancreate, enable, clone, and delete query sessions. (Release 13.10 and later)
Query Sessions by StateLimits on the number of query sessions for each state. The default session limit for astate is listed, along with each state you have created and its assigned, state-specificsession limit. (Release 13.10 and later)
Utility LimitsLimits on the number of utilities that can run at the same time. You can create,enable, clone, and delete utility limits.
Utility Limits by StateLimits on the number of utilities for each utility limit rule in each state. The defaultutility limit for a state is listed, along with each state you have created and itsassigned, state-specific utility limit.
Utility SessionsLimits on the number of sessions a specific utility can use. You can create, enable,clone, and delete utility sessions. (Release 13.10 and later)
Utility Sessions Evaluation OrderPrecedence, from highest to lowest, of utility session rules. Evaluation orderdetermines the rule in which the utility job is placed if a utility job matches morethan one utility session rule. (Release 13.10 and later)
Chapter 28 Workload Designer
Teradata Viewpoint User Guide, Release 13.11 277
Creating a Query Session
You can create a query session in Release 13.10 or later. In Release 12.0 and Release 13.0, usea throttle. A query session limits the number of sessions that can be logged on at one time.After the query session is created, additional controls in the Query Sessions tab allow you toclone, delete, and enable or disable the query session. View all created query sessions on theQuery Sessions by State tab.
1 Edit or create a ruleset.
2 From the ruleset toolbar, click Sessions.
3 Click the Query Sessions tab.
4 Click Create Query Session.
5 Enter a name.
6 [Optional] Enter a description up to 80 characters long.
7 Select a Rule Type from the list:
• Select Collective if you want all users that meet the classification criteria treated as agroup, with the group allowed a maximum number of queries.
• Select Individual if you want to apply limits to each user individually.• Select Member if you want accounts or profiles that represent user groups used as the
classification criteria for the rule. Limits are placed on each individual in the group,and no limit is placed on the account or group.
8 Click Save.
9 Click the Classification tab.
10 Add classification criteria.
11 Click the State Specific Settings tab.
12 Set state-specific session limits.
Setting Classification for Query Sessions
Add classification settings to existing query sessions or when creating a query session.Classification options determine which sessions match a rule.
1 Edit or create a ruleset.
2 From the ruleset toolbar, click Sessions.
3 Do one of the following in the Query Sessions tab:
• In Name, select an existing query session.• Click Create Query Session, enter a name and optional description (up to 80
characters long), select a rule type, and click Save.
4 Click the Classification tab.
5 Click Add Criteria.
6 In Source Type, click and select one of the following:
Chapter 28 Workload Designer
278 Teradata Viewpoint User Guide, Release 13.11
• Account Name. The Teradata Database account name.• Account String. The Teradata Database account identification string.• Profile. The Teradata Database profile name.• Application. The application on the network client.• Client IP Address. The IP address of the network client.• Client ID. The logon name on the network client.
7 Do at least one of the following:
• In Match String, enter a string. A match string can contain ? to match exactly onecharacter or an * to match zero or more characters. Use the Match String Includeand Exclude buttons to add the match string to a list.
• Select Items from the list and use the Items Include and Exclude buttons to createyour classification criteria.
8 Click OK.
Setting State Specific Values for Query Sessions
Add state-specific settings to existing query sessions or when creating a query session.
You can override the default by specifying session limits on a per-state basis. For example,you might want to have session limits during high-traffic states and no session limits duringlow-traffic states. View all created query sessions on the Query Sessions By State tab.
1 Edit or create a ruleset.
2 From the ruleset toolbar, click Sessions.
The Query Sessions tab appears, listing all existing query sessions and their attributes.
3 Do one of the following in the Query Sessions tab:
• In Name, select an existing query session.• Select Create Query Session, enter a name and optional description (up to 80
characters long), select a rule type, and click Save.
4 Select State Specific Settings.
5 Click a state in the state matrix to set a query session limit for that state.
6 Select Create State Specific Settings.
7 Select Unlimited, or enter a session limit in the box.
8 Click OK.
Your selection is applied to each cell having that state, and overrides the setting specifiedin Default Settings.
9 [Optional] Change the default setting by selecting Unlimited, or enter a session limitnumber in the box.
10 Click Save.
Chapter 28 Workload Designer
Teradata Viewpoint User Guide, Release 13.11 279
Creating a Utility Limit
A utility limit determines the number and type of utility jobs that can be run at one time.After the utility limit is created, additional controls in the Utility Limits tab allow you toclone, delete, and enable or disable the utility limit.
1 Edit or create a ruleset.
2 From the ruleset toolbar, click Sessions.
3 Click the Utility Limits tab.
4 Click Create Utility Limit.
5 Enter a name.
6 [Optional] Enter a description up to 80 characters long.
7 Select Reject utilities that exceed limit to abort any utilities that exceed the limit. If youdo not select this option, utilities are delayed.(Release 12.0 only.)
8 Click Save.
9 Click the Classification tab.
10 Select the utilities to which the limit should be applied.When a utility limit is created, several utilities are selected by default. The default utilitiescan be cleared.
11 Click Save.
12 Click the State Specific Settings tab.
13 Click Save.
Setting Classification for Utility Limits
Add classification settings to existing utility limits or when creating a utility limit.Classification options determine which sessions match a rule.
1 Edit or create a ruleset.
2 From the ruleset toolbar, click Sessions.
3 Click the Utility Limits tab.
4 Do one of the following:
• In Name, select an existing utility limit.• Click Create Utility Limit, enter a name and optional description (up to 80
characters long), and click Save.
5 Click the Classification tab.
6 Select any combination of FastLoad, FastExport, MultiLoad, and Archive/Restoreutilities. Select a utility type such as FastLoad or FastExport, or a specific version, suchas .NET FastLoad or Stand-Alone MultiLoad. (In Release 12.0 and Release 13.0, specificversions are not available, and only one utility type can be selected.)
Chapter 28 Workload Designer
280 Teradata Viewpoint User Guide, Release 13.11
When a utility limit is created, several utilities are selected by default. The defaultutilities can be cleared.
7 Click Save.
Setting State-Specific Job Limits for Utility Limits
Set state-specific job limits for existing utility limits or when creating a utility limit.
You can override the default by setting job limits on a per-state basis. For example, youmight want to raise the job limit during a low-traffic state, and lower the job limit during ahigh-traffic state.
1 Edit or create a ruleset.
2 From the ruleset toolbar, click Sessions.
3 Select Utility Limits, and do one of the following:
• In Name, select a utility limit.• Select Create Utility Limit, enter a name and optional description (up to 80
characters long), and click Save.
4 Select the State Specific Settings tab.
5 Click a state in the state matrix to select it.
6 Select Create State Specific Settings.
7 Select Job Limit.
8 Enter a number in the box.
9 Select Delay or Reject.(Release 13.0 or later.)
10 Click OK.
Your selection is applied to each cell having that state, and overrides the settingsspecified in Default Values.
11 [Optional] To change the default setting:
a Select Job Limit.
Your selection is applied to each cell having that state, and overrides the settingsspecified in Default Values.
b Enter a number in the box.
c Select Delay or Reject. (Release 13.0 or later.)
12 Click Save.
Creating a Utility Session
You can create a utility session in Release 13.10 or later. A utility session controls thenumber of sessions that are allowed to be logged on to each utility at one time. After theutility session is created, additional controls in the Utility Sessions tab allow you to clone,delete, and enable or disable the utility session.
Chapter 28 Workload Designer
Teradata Viewpoint User Guide, Release 13.11 281
1 Edit or create a ruleset.
2 From the ruleset toolbar, click Sessions.
3 Click the Utility Sessions tab.
4 Click Create Utility Session.
5 Enter a name.
6 [Optional] Enter a description up to 80 characters long.
7 Select the utilities to which this session limit applies.
8 From the list, select the Data Size.
9 In Max Sessions, enter the maximum number of sessions that are allowed to be loggedon to each of the selected utilities at one time.
10 Click Save.
11 Click the Classification tab to add and save classification criteria.
Setting Classification for Utility Sessions
Add classification settings to existing utility sessions or when creating a utility session.Classification options determine which sessions match a rule.1 Edit or create a ruleset.
2 From the ruleset toolbar, click Sessions.
3 Click the Utility Sessions tab.
4 Do one of the following:• In Name, select an existing utility session.• Click Create Utility Session, enter a name, select the utilities to which the session
limit applies, select a Data Size, enter a Max Sessions number, and click Save.
5 Click the Classification tab.
6 In the Add Classification Criteria list, select Request Source or Query Band.
7 Click Add.
8 Specify options based on the classification criteria you selected. If you selected RequestSource, do at least one of the following:• In Match String, enter a string. A match string can contain ? to match exactly one
character or an * to match zero or more characters. Use the Match String Includeand Exclude buttons to add the match string to a list.
• Select Items from the list and use the Items Include and Exclude buttons to createyour classification criteria.
9 Click OK.
Setting Evaluation Order for Utility Sessions
You can create utility sessions and set evaluation order in Release 13.10 or later. If a utilityjob matches more than one utility session rule, evaluation order determines the rule in whichthe utility job is placed. The rule in the highest position on the Utility Sessions Evaluation
Chapter 28 Workload Designer
282 Teradata Viewpoint User Guide, Release 13.11
Order tab is applied. You cannot change the order of the system rules located at the bottomof the list.
1 Edit or create a ruleset.
2 From the ruleset toolbar, click Sessions.
3 Click the Utility Sessions Evaluation Order tab.
4 Drag rules to reorder the list of utility rules.
5 Click Save.
About Ruleset Filters
A filter rejects or limits a query before the query starts running. You can specify filters whencreating or editing a ruleset. Add criteria to each filter that identifies the queries to which thefilter should be applied. When creating or editing a ruleset, filters are specified by clickingFilters in the ruleset toolbar. Any time after creating a filter, you can specify the states towhich you want the filter applied.
Following are examples of using filters:
• Create a filter that prohibits a specific user from running a query with an estimatedprocessing time of longer than 15 minutes.
• Create a filter to limit all members of a specific department that runs large reports fromaccessing the database during peak work hours.
Creating Filters
A filter rejects or limits user queries.
1 Edit or create a ruleset.
2 From the ruleset toolbar, click Filters.
3 Click Create Filter.
4 Enter a name.
5 [Optional] Enter a description (up to 80 characters long).
6 [Optional] Select Global Rule - applies to all requests to apply global filters to allobjects and, as a result, to all logon and query requests that meet the criteria of the rule.If Global Rule - applies to all requests is selected, the request source and targetclassification types are not available. If request source or target classification type is used,the Global Rule - applies to all requests option is not available.(Release 12.0 and Release 13.0 only.)
7 [Optional] Select Warning Only to have a warning message for the filter logged by thedatabase. (Queries still run.)
8 Click Save.
9 Click the Classification tab.
10 Add and save classification criteria.
Chapter 28 Workload Designer
Teradata Viewpoint User Guide, Release 13.11 283
Include classification items in a filter to reject those items. For example, create a filter andadd classification criteria to reject all queries from the finance department.
11 Click the State Specific Settings tab.
12 Enable or disable the filter for specific states.
13 Click OK.
14 Click Save.
Filter Classification Criteria
Some filters for query characteristics classification criteria are only available in Release 13.10.
Filter Options Rel 12.0 Rel 13.0 Rel 13.10
Statement Type available available available
AMP Limits available
Step Row Count available available available
Final Row Count available available available
Estimated ProcessingTime Rel
available available available
Minimum Step Time available
Join Type available available available
Full Table Scan available available available
AND or OR option toestablish how multiplecriteria are joined
available available
Setting Classification for Filters
Filters limit or reject user queries. Add classification settings to existing filters or whencreating a filter. Classification options determine which queries or sessions match a rule.
When using the query characteristics classification criteria with filters, consider the following:
• In Release 13.0 and earlier, select the AND or OR option to establish how multiplecriteria are joined.
• In Release 13.0 and earlier, the Statement Type, AMP Limits, and Estimated ProcessingTime criteria are available.
• In Release 13.10 or later, a Minimum option is available when using Step Row Countcriteria.
1 Edit or create a ruleset.
2 From the ruleset toolbar, click Filters.
3 Do one of the following:
• In Name, select an existing filter.
Chapter 28 Workload Designer
284 Teradata Viewpoint User Guide, Release 13.11
• Click Create Filter, enter a name and optional description (up to 80 characters long),and click Save.
4 Click the Classification tab.
5 In the Add Classification Criteria list select Request Source, Target, QueryCharacteristics, Query Band, or Utility.
6 Click Add.
7 Specify options based on the classification criteria you selected.
8 If you selected Request Source or Target, do at least one of the following:
• In Match String, enter a string. A match string can contain ? to match exactly onecharacter or an * to match zero or more characters. Use the Match String Include orExclude buttons to add the match string to a list.
• Select Items from the list and use the Items Include and Exclude buttons to createyour classification criteria.
9 Click OK.
Setting State-Specific Values for Filters
Add state-specific settings to existing filters or when creating a filter.
You can override the default by enabling or disabling the filter on a per-state basis. Forexample, you may want to leave a filter enabled under all circumstances except when aspecific state occurs.
1 Edit or create a ruleset.
2 From the ruleset toolbar, click Filters.
The Filters tab appears, listing all existing filters and their attributes.
3 Do one of the following in the Filters tab:
• In Name, select an existing filter.• Select Create Filter, enter a name and optional description (up to 80 characters
long), and click Save.
4 Select State Specific Settings.
5 Click a state in the state matrix to enable or disable the filter for that state.
6 Select Create State Specific Setting.
7 Select Filter is Enabled or Filter is Disabled.
8 Click OK.
Your selection is applied to each cell having that state, and overrides the settingsspecified in Default Settings.
9 [Optional] Change the default setting by selecting Filter is Enabled or Filter isDisabled.
10 Click Save.
Chapter 28 Workload Designer
Teradata Viewpoint User Guide, Release 13.11 285
About Ruleset Throttles
A throttle limits the number of user queries that can be active at one time. When creating orediting a ruleset, you can specify throttles. Throttles are different from filters, which rejectqueries. After the throttle limit is reached, the workload adds new queries to the delay queue.
The following are examples of using throttles:
• Create a throttle that limits a specific user to running no more than 10 queries at a time.• Create a throttle that limits a specific department to no more than 4 simultaneous queries.
When creating or editing a ruleset, throttles are specified by clicking Throttles in the rulesettoolbar.
Anytime after creating a ruleset throttle, you can specify the throttle limits for each state.
Creating Throttles
Throttles limit the number of user queries that can be active at one time. This is differentfrom filters, which reject queries and prevent them from running at all.
1 Edit or create a ruleset.
2 From the ruleset toolbar, click Throttles.
3 Click Create Throttle.
4 Enter a name.
5 [Optional] Enter a description up to 80 characters long.
6 Select a Rule Type:
• Select Collective if you want all users that meets the classification criteria treated as agroup, with the group allowed a maximum number of queries.
• Select Individual if you want to apply limits to each user individually.• Select Member if you want accounts or profiles that represent user groups used as the
classification criteria for the rule. Limits are placed on individuals in the group and nolimit is placed on the account or group.
• Select Global if you want all queries placed in a single queue. If Global is selected, therequest source and target classification types are not available. If request source ortarget classification type is used, the Global Rule option is not available.(Release 12.0and Release 13.0.)
7 [Optional] Select Disable Manual Release or Abort to prevent Teradata DatabaseAdministrators from aborting or releasing throttled queries in the queue.
Some throttles for query characteristics classification criteria are only available in Release 13.10.
Filter Options Rel 12.0 Rel 13.0 Rel 13.10
Statement Type available available available
AMP Limits available available available
Any Step Time Exceeds available available
Step Row Count available
Final Row Count available
Estimated ProcessingTime
available
Minimum Step Time available
Join Type available
Full Table Scan available
multiple criteria joinedby AND
available
Setting Classification for Throttles
Throttles limit the number of user queries that can run at the same time. Add classificationsettings to existing throttles or when creating a throttle. Classification options determinewhich queries match a rule.
When using the query characteristics classification criteria with throttles in Release 13.0 orearlier, the Statement Type, AMP Limits, and Any Step Time Exceeds criteria are available.
1 Edit or create a ruleset.
2 From the ruleset toolbar, click Throttles.
3 In the Throttles tab, do one of the following:
• In Name or Workload Name, select a throttle.• Click Create Throttle, enter a name and optional description (up to 80 characters
long), select a rule type, and click Save.
4 Click the Classification tab.
5 In the Add Classification Criteria list, select Request Source, Target, QueryCharacteristics, Query Band, or Utility.
6 Click Add.
7 Specify options based on the classification criteria you selected.
8 If you selected the Request Source or Target criteria, do at least one of the following:
Chapter 28 Workload Designer
Teradata Viewpoint User Guide, Release 13.11 287
• In Match String, enter a string. A match string can contain ? to match exactly onecharacter or an * to match zero or more characters. Use the Match String Includeand Exclude buttons to add the match string to a list.
• Select Items from the list and use the Items Include and Exclude buttons to createyour classification criteria.
9 Click OK.
Setting State-Specific Values for Throttles
Set state-specific query limits for existing system throttles or when creating a throttle.
You can override the default by setting query limits on a per-state basis. For example, youmay want to raise the query limit of a system throttle during a low-traffic state, and lower thequery limit during a high-traffic state.
1 Edit or create a ruleset.
2 From the ruleset toolbar, click Throttles.
The Throttles tab appears, listing all existing throttles and their attributes.
3 Do one of the following:
• Select an existing system throttle from the System Throttles list.• Select Create Throttle, enter a name and optional description (up to 80 characters
long), select a rule type, and click Save.
4 Select State Specific Settings.
5 In When Query Limit Exceeded, select Delay or Reject. (Release 12.0.)
6 Click a state in the state matrix to set the throttle query limit for that state.
7 In Edit [state name] Settings, select Create State Specific Settings.
Note: If you select the Use Default Settings option, the settings at the bottom of theThrottles tab apply to the state.
8 Do one of the following:
• Next to Query Limit, select Unlimited to place no limits on the number of queriesfor this throttle.
• Enter a query limit number in the box, and select either Delay or Reject. (The Delayand Reject options are available in Release 13.0 or later.)
• Next to Session Limit, select Unlimited or enter a session-limit number in the box.(Release 12.0 and Release 13.0.)
9 Click OK.
Your selection is applied to each cell having that state, and overrides the setting specifiedin Default Settings.
10 [Optional] Change the Default Settings by selecting Unlimited, or enter a query limitnumber in the box and select Delay or Reject. (The Delay and Reject options areavailable in Release 13.0 or later.)
Chapter 28 Workload Designer
288 Teradata Viewpoint User Guide, Release 13.11
11 [Optional] Change the Session Limit by selecting Unlimited or entering a session limitnumber in the box. (Release 12.0 and Release 13.0.)
12 Click Save.
About Ruleset Workloads
A ruleset workload is a group of queries that share characteristics so that a set of workloadmanagement controls can be applied to the group. A workload has working values anddefining characteristics that are evaluated during the classification phase of systemmanagement. High-quality workload management can improve response times and ensuremore consistent response times for critical work.
The Workloads tab lists workload names, types, throttle limits, and enabled status. For eachworkload, you can specify one or more of the following:
• Classification criteria which determine if a query is assigned to the workload.• Throttles which limit the number of concurrent active queries that can run.• Service level goals which specify a goal for workload query performance.• Exceptions which monitor queries and take specified actions if a query exceeds exception
criteria while executing.
You can create up to 250 workloads. The following requests are examples of workloads:
• Batch jobs further subdivided by region or organization for reporting.• Weekly or monthly reports that follow the calendar or a regular schedule.• Jobs that are always critical whenever they occur.
Queries not classified into a specific workload are placed into the default workload namedWD-Default. The WD-Default workload cannot be deleted or disabled.
Creating a Workload
You can group queries that share characteristics into a workload so that a set of workloadmanagement controls can be applied to the group.
1 Edit or create a ruleset.
2 From the ruleset toolbar, click Workloads.
3 Click Create Workload.
4 In the General tab, enter a name.
5 [Optional] Enter a description up to 80 characters long.
6 Select an Enforcement Priority (the type of queries you expect to run in this workload):
• Tactical queries are short and high-priority.• Priority queries are longer-running than tactical queries and higher priority.• Normal queries are the customary queries running on the system.• Background queries run when the system is not busy.
7 Click Save.
Chapter 28 Workload Designer
Teradata Viewpoint User Guide, Release 13.11 289
8 [Optional] Click the Classification tab.
9 [Optional] Determine if you want incoming queries classified into this workload. Forexample, select Target to have queries from a specific database sent to this workload.
10 [Optional] Click the Throttles tab.
11 [Optional] Determine if you want to set a throttle just for this workload. Any query thatis classified into this workload is subject to this throttle.
12 [Optional] Click the Service Level Goals tab, and do one of the following:
• Select Response Time Goal, and enter a time in seconds for how quickly you wantthe queries to run. For example, type 4 if you want all queries to finish within 4seconds. You can also set a service percentage. For example, type 90 if you expect 90%of queries to meet the time goal.
• Select Throughput Goal, and type a throughput number per hour. For example, type200 if you expect 200 queries to be processed per hour.
• Select No Goal if you want no service-level goal for this workload.
13 [Optional] Click the Exceptions tab. Determine if you want an exception triggered forthis workload. For example, if a query in this workload is taking too long, create anexception to move the query to a different workload.
14 Click Save.
Setting Classification for Workloads
Classification options determine which queries go into a workload. Add classificationsettings to existing workloads or when creating a workload. Classification options cannot beadded to the default workload, WD-Default.
1 Edit or create a ruleset.
2 From the ruleset toolbar, click Workloads.
3 Do one of the following:
• In Name, select an existing workload.• Click Create Workload, enter a name and optional description (up to 80 characters
long), select an Enforcement Priority, and click Save.
4 Click the Classification tab.
5 Select classification criteria from the list.The classification types are Request Source, Target, Query Characteristics, QueryBand, and Utility.
6 Click Add.
7 Specify options based on the classification criteria you selected.
8 If you selected Request Source or Target, do at least one of the following:
• In Match String, enter a string. A match string can contain ? to match exactly onecharacter or an * to match zero or more characters. Use the Match String Includeand Exclude buttons to add the match string to a list.
Chapter 28 Workload Designer
290 Teradata Viewpoint User Guide, Release 13.11
• Select Items from the list and use the Items Include and Exclude buttons to createyour classification criteria.
9 Click OK.
Setting State-Specific Throttles for Workloads
Set state-specific throttle query limits for existing workloads or when creating a workload. Ifyou select the Use Default Settings option, the settings at the bottom of the Throttles tabapply to the state.
1 Edit or create a ruleset.
2 From the ruleset toolbar, click Workloads.
3 Do one of the following:
• In Name, select an existing workload.• Click Create Workload, enter a name and optional description (up to 80 characters
long), select an Enforcement Priority, and click Save.
4 Click the Throttles tab.
5 Click on a state in the state matrix.
6 In Edit [state name] Settings, select Create State Specific Settings.
7 Do one of the following:
• Select Unlimited to prevent limits on the number of queries for this workload.
Chapter 28 Workload Designer
Teradata Viewpoint User Guide, Release 13.11 291
• Enter a query limit number in the box, and select either Delay or Reject. (The Delayoption is available in Release 13.0 and later.)
8 Click OK.
Your selection is applied to each cell having that state and overrides the setting specifiedin Default Settings.
9 [Optional] Change the default setting by selecting Unlimited or entering a number inthe box so queries over the limit are rejected. (In Release 13.0 and later, Delay and Reject options are available.)
10 Click Save.
Setting Service-Level Goals
Service level goals (SLGs) help determine if workload management is meeting expectations.You can state service-level goals in throughput or response time with a service percentage.
1 Edit or create a ruleset.
2 From the ruleset toolbar, click Workloads.
3 Do one of the following:
• In Name, select an existing workload.• Click Create Workload. Enter a name, optional description (up to 80 characters
long), and enforcement priority. Click Save.
4 Click the Service-Level Goals tab.
5 Do one of the following:
• Select Response Time Goal, enter a time in seconds, and set a service percentage. Forexample, if you want 90% of queries to finish within 4 seconds, set a response time of4 and a service percent of 90. You can have different goals in different plannedenvironments. For example, you can set a response time of 4 seconds for a daytimeenvironment and 12 seconds for a nighttime environment. Metrics graphs showresponse times.
• Select Throughput Goal and enter a throughput number per hour.• Select No Goal if you want no service-level goal. This option may be appropriate, for
example, for very low priority background workloads.
6 Click Save.
Defining a Workload Exception
A workload exception is one or more events that, when all occur at the same time (orcontinuously for a specified period of time) cause a defined action to occur. You can addmultiple criteria to an exception. If you add more than one criteria for an exception, allcriteria must be satisfied for the exception to be triggered.
Note: Some exception criteria give you the option to add qualification time. Qualificationtime is the amount of time the criteria must take place to be recognized. Setting qualificationtime prevents very short incidents of a criteria from being acknowledged.
Chapter 28 Workload Designer
292 Teradata Viewpoint User Guide, Release 13.11
1 Edit or create a ruleset.
2 From the ruleset toolbar, click Workloads.
3 Do one of the following:
• In Name, select an existing workload.• Click Create Workload, enter a name, optional description (up to 80 characters
long), and enforcement priority, and click Save.
4 Click the Exceptions tab.
Note: In Release 12.0 and Release 13.0, local exceptions are displayed separately fromshared exceptions on the Exceptions tab.
5 Click Create Exception.
6 Enter a name.
7 [Optional] Enter a description up to 80 characters long.
8 In Criteria, select an option from the list.
9 Click Add.
10 Specify the additional required information.
11 In Actions, select one of the following actions to be performed when the specifiedcriteria occur:
• Select Notification Only to send notification, and take no other action.• Select Abort to stop the query.• Select Abort Selects Only to stop the query only if it is a SELECT.• Select Change Workload to to change the query workload to the workload you select
from the list.
12 [Optional] In Notifications, select any of the following options:
• Select Alert to specify the Teradata Alerts to trigger at the start of the event. Select analert name from the list.
• Select Run Program to specify the Teradata Alerts registered programs to trigger atthe start of the event. Select a program from the list.
• Select Post to QTable to post the text you specify to the system queue table when theevent starts. (This option is not integrated with Teradata Alerts.)
13 Click OK.
14 If there is more than one local exception assigned to the Change Workload action, usethe Exception Precedence tab to set the priority of the exceptions. (Release 12.0 andRelease 13.0.)
Viewing Workload Service Level Goal Summary
A service level goal for workload query performance is set in either throughput or responsetime with a service percentage. You can view a summary of service level goals that have beenset for individual workloads.
Chapter 28 Workload Designer
Teradata Viewpoint User Guide, Release 13.11 293
1 Edit or create a ruleset.
2 From the ruleset toolbar, click Workloads.
3 Click the SLG Summary tab.Workloads are listed, along with their service level goals for each planned environment.
About Evaluation Order
Evaluation order determines the placement of queries into workloads and utility jobs intorules. Setting evaluation order is useful when you have created several workloads or utilitysessions.
For workloads, if classification criteria can sort the same query into different workloads,evaluation order determines the workload in which the query is placed. For example,account finance users are classified into one workload and users in a specific geographicallocation are classified into a different workload. If an individual is a member of both groups,the workload highest on the evaluation order list is the workload in which the individual issorted.
For utility sessions, if a utility job matches more than one utility session rule, evaluationorder determines the rule in which the utility job is placed.
Setting Evaluation Order for Workloads
If classification criteria can sort the same query into different workloads, evaluation orderdetermines the workload in which the query is placed. The workload in the highest positionon the Evaluation Order tab is applied.
1 Edit or create a ruleset.
2 From the ruleset toolbar, click Workloads.
3 Click the Evaluation Order tab.
4 Select a Planned Environment from the list.
5 In the list of workloads, do one of the following to order the list and place higher priorityworkloads at the top:
Chapter 28 Workload Designer
294 Teradata Viewpoint User Guide, Release 13.11
• Drag workload names to reorder.• Click in a number box, highlight the existing number, and enter a new number.
6 Click Save.
Setting Enforcement Priority for Workloads
Enforcement priority establishes the type of queries you expect to run in a specific workload.
1 Edit or create a ruleset.
2 From the ruleset toolbar, click Workloads.
3 Do one of the following in the Workloads tab:
• In Name, select an existing workload.• Click Create Workload, and enter a name.
4 Select an Enforcement Priority:
• Tactical queries are short and high-priority.• Priority queries are longer-running than tactical queries and high-priority.• Normal queries are the regular queries running on the system.• Background queries run when the system is not busy.
5 Click Save.
Adjusting Priority Distribution for Workloads
On the Priority Distribution tab, each cell in the diagram is an allocation group. The size ofeach cell is proportional to the relative weight. Each column in the diagram is a resourcepartition. The width of each column is proportional to the relative weight of the resourcepartition. Drag cell borders to dynamically change the amount of CPU (as a percentage)allocation groups are given. Drag column borders to change the amount of CPU available toresource partitions.
Note: If you modify the base state on the Priority Distribution tab, the changes are appliedto other states as long as no change has been made to any of the other states. Once any of thestates are changed, the only values that are applied are the changes to system values.
1 Edit or create a ruleset.
2 From the ruleset toolbar, click Workloads.
3 Click the Priority Distribution tab.
Chapter 28 Workload Designer
Teradata Viewpoint User Guide, Release 13.11 295
4 In State, select a state from the list.
5 For resource partitions, do any of the following:
• Mouse over any resource partition name to obtain information about the partition.• Click on a resource partition name, and drag the column resize bar. This resizes the
column and reallocates space between the resource partitions.• Click on a resource partition name, and click . Enter a system percentage allocation
and, optionally, a CPU percentage limit. If you select the Locked option, this columnbecomes fixed in the diagram, and other columns can be dynamically resized aroundthis column.
• Click on a resource partition name and click or to unlock or lock the column.
6 For allocation groups, do any of the following:
• Mouse over any allocation group to obtain information about the group.• Click in a cell, and drag the cell resize bar. This resizes the cell and reallocates space
within a resource partition.• Click in a cell, and click . Enter a system percentage allocation and, optionally, a
CPU percentage limit. If you select the Locked option, this cell becomes fixed in thediagram and other cells can be dynamically resized around this cell.
• Click in a cell and click or to unlock or lock the cell.
7 [Optional] Select System Values, and enter a CPU limit to set the maximum percentageof system CPU that Teradata Database can use.
8 [Optional] Select Reserved AWTs (AMP Worker Task), and enter a number to set themaximum number of AWTs that are reserved for tactical workloads.
Chapter 28 Workload Designer
296 Teradata Viewpoint User Guide, Release 13.11
9 [Optional] Select Max Expedited AWTs, and enter a number to set the maximumnumber of AWTs that are created on each node.
10 Click Save.
Mapping Console Utilities to Workloads
Map console utilities to workloads so utilities can be organized and prioritized.
1 Edit or create a ruleset.
2 From the ruleset toolbar, click Workloads.
3 Click the Console Utilities tab.
4 In Console Utility to Workload Mapping, use the lists to set a workload name for eachconsole utility.The lists contain the predefined workload, WD-Default, and any workloads you havecreated. WD-Default is used when no other workload is specified.
5 Click Save.
About Performance Groups
A performance group is a collection of parameters used to control and prioritize resourceallocation for a particular set of database sessions. Performance groups belong to a resourcepartition, a set of prioritized performance groups related by their users' associations.Resource partitions have an assigned weight that determines the proportion of resourcesavailable to that partition relative to other partitions.
On the Console Utilities tab, the mapping of performance groups to workloads only appliesto console utilities that are not included in the Console Utility to Workload Mapping section.
Creating a Performance Group
Create a performance group to determine which allocation group manages a query.Performance groups belong to a resource partition, a collection of prioritized performancegroups related by their users' associations.
1 Edit or create a ruleset.
2 From the ruleset toolbar, click Workloads.
3 Click the Console Utilities tab.
4 Click Create Performance Group Mapping.
5 Mouse over New Performance Group, and click .
6 Enter a name.
7 Click outside the name.
8 In Workload Name, select a workload from the list for the performance group.
9 Click Save.
10 [Optional] To delete a performance group, mouse over the group name, and click .
Chapter 28 Workload Designer
Teradata Viewpoint User Guide, Release 13.11 297
Mapping Performance Groups to Workloads
Map performance groups to workloads so the groups can be prioritized along with other work.
1 Edit or create a ruleset.
2 From the ruleset toolbar, click Workloads.
3 Click the Console Utilities tab.
4 In Performance Group to Workload Mapping, use the lists to set a Workload Name foreach Performance Group.The lists contain the predefined workload, WD-Default, and any workloads you havecreated. WD-Default is used when no other workload is specified.
5 Click Save.
About Allocation Groups
An allocation group can limit the total amount of CPU used by sessions under its control. Anallocation group has an assigned weight that is compared to other allocation group weights.The four default allocation groups are tactical, priority, normal, and background. The defaultallocation groups and any groups you create are assigned to resource partitions.
Note: The allocation groups named L, M, H, and R stand for Low, Medium, High, and Rush.Do not use or modify the allocation groups named L, M, H, and R. The groups representlevels of priority and are used by the system for console utilities.
By default, individual workloads are associated with a specific allocation group based on theenforcement priority assigned to the workload. You can change the default mapping usingthe diagram on the Workload Mapping tab. The diagram enables you to reassign workloadsto allocation groups and reassign allocation groups to resource partitions. Allocation groupsthat contain workloads cannot be deleted.
Carefully consider the allocation groups you drag in and out of the tactical resource partitionbecause this can have a significant effect on the amount of CPU available to the queriesrunning in the allocation group. The tactical resource partition normally has a much higherweight than other resource partitions. If you move an allocation group containing long,resource-intensive queries into the tactical resource partition, those queries can consume alarge amount of the available CPU, impacting queries running in other resource partitions. Ifyou move a tactical allocation group out of the tactical resource partition, the queriesrunning in the tactical allocation group are assigned a lower priority and may not meet theirresponse-time goals.
Creating an Allocation Group
Create allocation groups using the Workload Mapping tab.
1 Edit or create a ruleset.
2 From the ruleset toolbar, click Workloads.
3 Click the Workload Mapping tab.
4 Mouse over the name of the resource partition, such as Tactical or Standard, to whichyou want to add an allocation group, and click .
Chapter 28 Workload Designer
298 Teradata Viewpoint User Guide, Release 13.11
5 Enter a name.
6 Click outside the name.
7 [Optional] To move the allocation group to a different resource partition, mouse overthe name of the group, and drag the group to a different column.
8 [Optional] To change the name of the allocation group, mouse over the name of thegroup, and click .
9 Click Save.
Mapping Allocation Groups to Workloads
If you have created workloads, you can view the Workload Mapping tab to see how theworkloads map to allocation groups and resource partitions. Allocation groups and resourcepartitions determine how much CPU is available to the queries that are running in the listedworkloads. The allocation groups named L (Low), M (Medium), H (High), R (Rush)represent levels of priority. These groups are used by the system for console utilities andcannot be deleted.
1 Edit or create a ruleset.
2 From the ruleset toolbar, click Workloads.
3 Click the Workload Mapping tab.
4 Do any of the following:
• Create allocation groups by mousing over a resource partition name, such as Tacticalor Standard, and clicking .
• Create a resource partition by mousing over Resource Partitions and clicking .
Chapter 28 Workload Designer
Teradata Viewpoint User Guide, Release 13.11 299
• Drag an allocation group to a different resource partition.• Drag a workload to a different allocation group of same priority in any resource partition.• Rename a resource partition by mousing over a name and clicking .• Delete an empty allocation group by mousing over a name and clicking .• Delete an empty resource partition by mousing over a name and clicking .
5 Click Save.
Deleting An Allocation Group
You cannot delete the L (Low), M (Medium), H (High), R (Rush) allocation groups orallocation groups that contain workloads.
1 Edit or create a ruleset.
2 From the ruleset toolbar, click Workloads.
3 Click the Workload Mapping tab.
4 Mouse over the name of an allocation group, and click .
5 Click Save.
About Ruleset Exceptions
An exception is a collection of one or more events that, when all occur at the same time (orcontinuously for a specified period of time), cause a defined action to occur. When creatingor editing a ruleset, you can specify a set of exception criteria and exception actions to applyto workloads for each planned environment.
The tabs on the ruleset Exceptions view display all exception information for a ruleset fromdifferent perspectives:
By Planned EnvironmentExceptions organized by planned environment. After selecting a plannedenvironment, all exceptions are listed alphabetically by name. All workloads arelisted in workload evaluation order. Select and clear the workload check boxes toenable or disable the use of individual exceptions for individual workloads. If the All-WD check box is selected, all check boxes in the row are selected and cannot beindividually controlled.
By WorkloadExceptions organized by workloads. After selecting a workload, all exceptions arelisted by name. All planned environments are listed by name and by how they arearranged in the state matrix. Select and clear the planned environment check boxesto enable or disable individual exceptions for individual planned environments.Within a workload, if an exception is enabled for All-WD in a specific plannedenvironment, the check box is selected and disabled. (You can change the exceptionsetting on the Planned Environment tab.) In Release 12.0 and Release 13.0 localexceptions are displayed separately from shared exceptions.
Chapter 28 Workload Designer
300 Teradata Viewpoint User Guide, Release 13.11
By ExceptionList of all exceptions created for planned environments and workloads. Afterselecting an exception, all workloads are listed in workload evaluation order. Allplanned environments are listed by name. Select and clear the planned environmentcheck boxes to enable or disable individual workloads for individual plannedenvironments. If the All-WD check box is selected, all check boxes in the column areselected and cannot be individually controlled.
Defining an Exception
An exception is defined by a collection of one or more threshold events that, when all occurat the same time and for a specified period of time, cause a defined action to be taken. If youadd more than one criteria, all criteria must be satisfied in order for the exception to betriggered. Only one qualification time can be specified even if multiple qualified criteria areadded. If qualified criteria are specified, the exception is triggered only if all of the qualifiedcriteria are satisfied for the duration of the qualification time. After an exception is created,additional controls in the tabs of the Exceptions view allow you to manage the exception.
1 Edit or create a ruleset.
2 From the ruleset toolbar, click Exceptions.
3 From any of the tabs in the Exception view, click Create Exception.
4 Enter a name.
5 [Optional] Enter a description up to 80 characters long.
6 Select an option from the Exception Criteria list, and click Add.
7 Enter a value for the criteria.
8 For qualified criteria (marked with *), enter a value in Qualification Time.
9 Select one of the following actions to be performed when the specified criteria are satisfied:
• Notification Only sends a notification only. No other action is performed.• Abort stops the query.• Abort Selects Only stops the query only if it is a SELECT.• Change Workload to changes the workload of the query to the specified workload.
Change Workload to is unavailable if the Blocked Time criterion or Elapsed Timecriterion was selected.
10 [Optional] Select any of the following notifications:
• Alert sends the selected alert.• Run Program starts the selected program.• Post To QTable posts the string entered in the box to the QTable. (In Release 12.0,
you can select the Post to QTable option, but the text box is not available.)
11 Click OK.
12 If there is more than one shared exception assigned the Change Workload to action,use the Exception Precedence tab to set the priority of the exceptions.
Chapter 28 Workload Designer
Teradata Viewpoint User Guide, Release 13.11 301
(Release 12.0 and Release 13.0.)
About Tactical CPU per Node Exceptions
If you select the Tactical CPU per Node exception criteria, the following rules apply:
• The exception can be enabled for workloads that use the tactical enforcement priority.Tactical workloads are in the top row of the Workload Mapping tab.
• The exception must have a Change Workload to action to another workload in the sameresource partition column.
• The exception must have Tactical CPU per Node set to five cpu-seconds or less.• The exception must have CPU Time set to a number greater than Tactical CPU per
Node.• Using Tactical CPU per Node criteria disables the Blocked Time and Elapsed Time
criteria for the exception.
Managing Exceptions
Ruleset exceptions are managed from the ruleset Exceptions view. In Release 12.0 andRelease 13.0, local exceptions are displayed separately from shared exceptions on the byWorkload tab.
1 Edit or create a ruleset.
2 From the ruleset toolbar, click Exceptions.
3 [Optional] Create exceptions by clicking Create Exception from any tab.
4 After exceptions have been created, click the by Planned Environment, by Workload, orby Exception tab to manage exceptions.
5 Depending on the tab, select Workload or Exception from the list.
6 [Optional] Edit an exception from the by Planned Environment or by Workload tab bymousing over the exception and clicking .
7 [Optional] Delete an exception from the by Planned Environment or by Workload tabby mousing over the exception and clicking .
8 In the selected view, select or clear the appropriate check boxes to enable or disable theexceptions for the listed workloads, planned environments, or workload and plannedenvironment combinations.


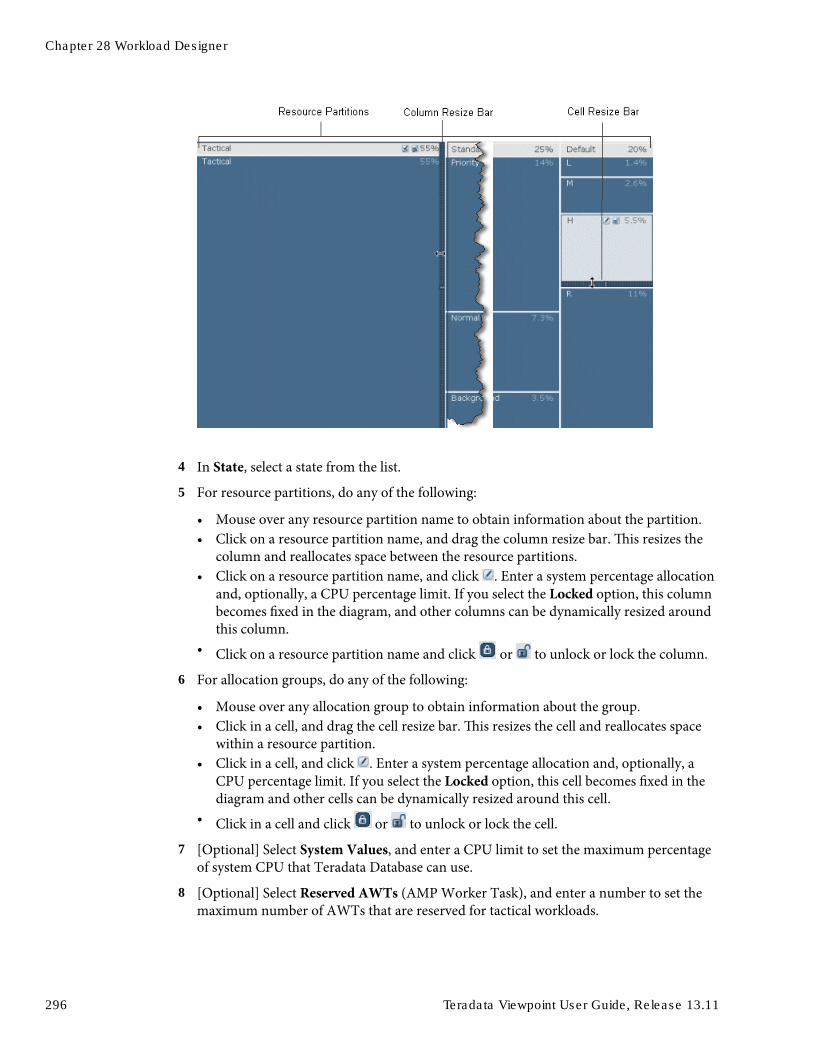


![WELCOME [ ] · PDF filecreating 913 jobs in total. Locally, partners have worked together to ensure Trafford ...](https://static.documents.pub/doc/80x56/5a75e4097f8b9ad22a8cf5ce/welcome-a-creating-913-jobs-in-total-locally-partners-have-worked-together.jpg)


