138
Test Executive Reference Manual LabVIEW Test Executive Reference Manual May 1999 Edition Part Number 320599D-01

Test Executive Reference Manual
LabVIEW Test Executive Reference Manual
May 1999 EditionPart Number 320599D-01
26 00,
0, ,
Worldwide Technical Support and Product Information
www.natinst.com
National Instruments Corporate Headquarters
11500 North Mopac Expressway Austin, Texas 78759-3504 USA Tel: 512 794 0100
Worldwide Offices
Australia 03 9879 5166, Austria 0662 45 79 90 0, Belgium 02 757 00 20, Brazil 011 284 5011, Canada (Ontario) 905 785 0085, Canada (Québec) 514 694 8521, China 0755 3904939, Denmark 45 76Finland 09 725 725 11, France 01 48 14 24 24, Germany 089 741 31 30, Hong Kong 2645 3186, India 91805275406, Israel 03 6120092, Italy 02 413091, Japan 03 5472 2970, Korea 02 596 7456, Mexico (D.F.) 5 280 7625, Mexico (Monterrey) 8 357 7695, Netherlands 0348 433466, Norway 32 27 73 0Singapore 2265886, Spain (Madrid) 91 640 0085, Spain (Barcelona) 93 582 0251, Sweden 08 587 895 00Switzerland 056 200 51 51, Taiwan 02 2377 1200, United Kingdom 01635 523545
For further support information, see the Technical Support Resources appendix. To comment on the documentation, send e-mail to [email protected] .
© Copyright 1993, 1999 National Instruments Corporation. All rights reserved.

Important Information
enced do not riod.
ide costs
y serves The le for
nal rranty
follow s,
nical, hout
.
se in orm
or by rom roducts or ucts
,
WarrantyThe media on which you receive National Instruments software are warranted not to fail to execute programminginstructions, due to defects in materials and workmanship, for a period of 90 days from date of shipment, as evidby receipts or other documentation. National Instruments will, at its option, repair or replace software media that execute programming instructions if National Instruments receives notice of such defects during the warranty peNational Instruments does not warrant that the operation of the software shall be uninterrupted or error free.
A Return Material Authorization (RMA) number must be obtained from the factory and clearly marked on the outsof the package before any equipment will be accepted for warranty work. National Instruments will pay the shippingof returning to the owner parts which are covered by warranty.
National Instruments believes that the information in this document is accurate. The document has been carefullreviewed for technical accuracy. In the event that technical or typographical errors exist, National Instruments rethe right to make changes to subsequent editions of this document without prior notice to holders of this edition. reader should consult National Instruments if errors are suspected. In no event shall National Instruments be liabany damages arising out of or related to this document or the information contained in it.
EXCEPT AS SPECIFIED HEREIN, NATIONAL INSTRUMENTS MAKES NO WARRANTIES, EXPRESS OR IMPLIED, AND SPECIFICALLY DISCLAIMS ANY WARRANTY OF MERCHANTABILITY OR FITNESS FOR A PARTICULAR PURPOSE. CUSTOMER’ S RIGHT TO RECOVER DAMAGES CAUSED BY FAULT OR NEGLIGENCE ON THE PART OF NATIONAL INSTRUMENTS SHALL BE LIMITED TO THE AMOUNT THERETOFORE PAID BY THE CUSTOMER. NATIONAL INSTRUMENTS WILL NOT BE LIABLE FOR DAMAGES RESULTING FROM LOSS OF DATA, PROFITS, USE OF PRODUCTS, OR INCIDENTAL OR CONSEQUENTIAL DAMAGES, EVEN IF ADVISED OF THE POSSIBILITY THEREOF. This limitation of the liability of National Instruments will apply regardless of the form of action, whether in contract or tort, including negligence.Any action against National Instruments must be brought within one year after the cause of action accrues. NatioInstruments shall not be liable for any delay in performance due to causes beyond its reasonable control. The waprovided herein does not cover damages, defects, malfunctions, or service failures caused by owner’s failure to the National Instruments installation, operation, or maintenance instructions; owner’s modification of the product;owner’s abuse, misuse, or negligent acts; and power failure or surges, fire, flood, accident, actions of third partieor other events outside reasonable control.
CopyrightUnder the copyright laws, this publication may not be reproduced or transmitted in any form, electronic or mechaincluding photocopying, recording, storing in an information retrieval system, or translating, in whole or in part, witthe prior written consent of National Instruments Corporation.
TrademarksCVI™, LabVIEW™, natinst.com ™, and National Instruments™ are trademarks of National Instruments Corporation
Product and company names mentioned herein are trademarks or trade names of their respective companies.
WARNING REGARDING MEDICAL AND CLINICAL USE OF NATIONAL INSTRUMENTS PRODUCTSNational Instruments products are not designed with components and testing for a level of reliability suitable for uor in connection with surgical implants or as critical components in any life support systems whose failure to perfcan reasonably be expected to cause significant injury to a human. Applications of National Instruments productsinvolving medical or clinical treatment can create a potential for death or bodily injury caused by product failure, errors on the part of the user or application designer. Because each end-user system is customized and differs fNational Instruments testing platforms and because a user or application designer may use National Instruments pin combination with other products in a manner not evaluated or contemplated by National Instruments, the user application designer is ultimately responsible for verifying and validating the suitability of National Instruments prodwhenever National Instruments products are incorporated in a system or application, including, without limitationthe appropriate design, process and safety level of such system or application.
Contents
iv
-1-22
-23-4-4-7
2-1-1-2
-42-52-9
-1-1-22-2
About This ManualConventions ...................................................................................................................xiiiRelated Documentation..................................................................................................x
Chapter 1Introduction
Overview........................................................................................................................1-1Features............................................................................................................1Available Packages..........................................................................................1
Development System ........................................................................1-Run-Time System .............................................................................1-2
Test Executive Architecture...........................................................................................1System Callback VIs .......................................................................................1-Sequence Callback VIs....................................................................................1
Execution Model............................................................................................................1Operating Levels .............................................................................................1
Chapter 2Getting Started
Running a Test Sequence...............................................................................................Starting the Test Executive..............................................................................2Opening and Running a Test Sequence...........................................................2
Changing to Technician Level ..........................................................2-3Executing Individual Steps and Using Single Pass Mode ................2-3Quitting the Test Executive...............................................................2-4
Examining a Test Program ............................................................................................2Editing a Test Sequence.................................................................................................Example Sequences .......................................................................................................
Chapter 3Operating the Test Executive
Controls..........................................................................................................................3-1Open ................................................................................................................3Close ................................................................................................................3Quit ..................................................................................................................3Login................................................................................................................3-Edit ..................................................................................................................3
© National Instruments Corporation v LabVIEW Test Executive Reference Manual

Contents
-22-233-3-34-4
-4-5
-55-5-56
-7-891010-12-12
-12-133
-134144515
1-22
3
New ................................................................................................................. 3Test UUT......................................................................................................... 3-Single Pass ...................................................................................................... 3Abort ............................................................................................................... 3-Abort Loop...................................................................................................... 3-Run Step(s)...................................................................................................... 3Loop Step(s).................................................................................................... 3Stop On Any Failure ....................................................................................... 3-Sequence Runtime Updates?........................................................................... 3Run Mode........................................................................................................ 3Clear Step Status ............................................................................................. 3Clear Test Display........................................................................................... 3View Test Report ............................................................................................ 3-Sequence Report ............................................................................................. 3Test Runtime Updates? ................................................................................... 3Operator Interface Key Assignments.............................................................. 3-
Indicators ....................................................................................................................... 3-7Sequence Display............................................................................................ 3Test Display .................................................................................................... 3
Result of Each Step........................................................................... 3-Error Messages ................................................................................. 3-The Test Report ................................................................................ 3-
Status............................................................................................................... 3Sequence Name............................................................................................... 3Sequence Information ..................................................................................... 3
Operator Dialog Boxes .................................................................................................. 3Default Login Dialog Box............................................................................... 3-1Default Select Sequence Dialog Box .............................................................. 3Default UUT Information Dialog Box............................................................ 3-1Default Test Failed Dialog Box ...................................................................... 3-Default PASS/FAIL/ABORT Banners ........................................................... 3-1Run-Time Error Warning Dialog Box ............................................................ 3-1Parsing Error Dialog Box................................................................................ 3-
Chapter 4Creating Tests and Test Sequences
Writing LabVIEW Tests................................................................................................ 4-Required Indicators ......................................................................................... 4
Test Data Cluster .............................................................................. 4-Error Cluster ..................................................................................... 4-3
Optional Inputs................................................................................................ 4-Input Buffer ...................................................................................... 4-3Invocation Information ..................................................................... 4-4
LabVIEW Test Executive Reference Manual vi www.natinst.com

Contents
-5-67-74-74-4-8-999
90
0
001
-11111
112
34
5
15
1666-161617777
Writing C Tests (Windows NT/98/95 and UNIX).........................................................4-4Test Data Structure ..........................................................................................4Test Error Structure .........................................................................................4Compiling Test Functions ...............................................................................4-
Creating Pre-Run and Post-Run VIs ..............................................................................4What is a Test Sequence? ..............................................................................................What is a Step? ..............................................................................................................8Creating or Editing a Test Sequence..............................................................................
Step Editing Elements .....................................................................................4Insert..................................................................................................4-New Step ...........................................................................................4-Copy Steps, Cut Steps, Delete Steps, Paste Steps,
and Undo Step Edits.......................................................................4-Using the Editing Elements...............................................................4-1
Adding a New Step.............................................................4-1Modifying a Step ................................................................4-10Copying a Step....................................................................4-1Deleting a Step....................................................................4-1
Mass Editing .....................................................................................4-1Step Editor Controls ........................................................................................4
Type ..................................................................................................4-Name (LabVIEW Test, C Test, Sequence) .......................................4-1Resource (LabVIEW Test, C Test, Sequence)..................................4-Function (C Test) ..............................................................................4-1Limit Specification (LabVIEW Test, C Test) ...................................4-12Load Specification (LabVIEW Test, C Test, Sequence) ..................4-1Run Mode (LabVIEW Test, C Test, Sequence)................................4-1FAIL Action (LabVIEW Test, C Test, Sequence)............................4-14
Max Loop Count.................................................................4-14Input Buffer? (LabVIEW Test, C Test) ............................................4-14Invocation Info? (LabVIEW Test) ....................................................4-15Show Test VI Panel at Runtime? (LabVIEW Test) ..........................4-1Edit Test VI (LabVIEW Test)...........................................................4-15Edit Dependencies.............................................................................4-Edit Step Comment (LabVIEW Test, C Test, GOTO,
Sequence) .......................................................................................4-GOTO Target (GOTO) .....................................................................4-1GOTO Conditions (GOTO) ..............................................................4-1
Sequence Options ............................................................................................4Sequence Load Specification ............................................................4-Sequence Path Specification .............................................................4-Stop on Any Failure ..........................................................................4-1Description ........................................................................................4-1Enable Test Report Logging .............................................................4-1
© National Instruments Corporation vii LabVIEW Test Executive Reference Manual

Contents
81818-182020
-20-22-223
242555
2566
-1-123-3-4
-44
-6
8910-10111
Report File Mode.............................................................................. 4-1Change Report File ........................................................................... 4-Sequence VIs .................................................................................... 4-
Sequence Errors .............................................................................................. 4File Menu ........................................................................................................ 4-Edit Menu........................................................................................................ 4-Sequence Editor Control Key Assignments.................................................... 4Sequence Editor Menu Shortcuts.................................................................... 4Editing Dependencies ..................................................................................... 4
AND and OR Expressions................................................................ 4-2Complex Dependencies .................................................................... 4-Copy, Cut, Delete, Paste, and Undo ................................................. 4-
Dependency Editing Rules ................................................. 4-2OK .................................................................................................... 4-2Cancel ............................................................................................... 4-Dependency Editor Key Assignments .............................................. 4-2Relationship among Dependencies, Run Mode, and Test Flow....... 4-2
Chapter 5Modifying the Test Executive
System Configuration File, testexec.ini......................................................................... 5[Callback Paths] Section ................................................................................. 5
Patching Callback Paths ................................................................... 5-[Operator Interface Path] Section ................................................................... 5-[Preferences] Section ...................................................................................... 5
Operator Interface VI .................................................................................................... 5Modifying the Default VI ............................................................................... 5-4Front Panel ...................................................................................................... 5Block Diagram ................................................................................................ 5-
Command Loop ................................................................................ 5-5Callback VIs .................................................................................................................. 5-6
Test Executive Callback VI Calling Interface ................................................ 5-6System Callbacks ............................................................................................ 5
Login................................................................................................. 5-7Select Sequence ................................................................................ 5-Open Sequence ................................................................................. 5-Close Sequence................................................................................. 5-Save Sequence .................................................................................. 5Sequence Report ............................................................................... 5-Exit.................................................................................................... 5-1
LabVIEW Test Executive Reference Manual viii www.natinst.com

Contents
-124467-17
1920212-2323
45
77829
000-31-31233-334-34344
5
3839
Sequence Callbacks .........................................................................................5Pre-UUT Loop ..................................................................................5-1Pre-UUT............................................................................................5-1Post-UUT ..........................................................................................5-1Post-UUT Loop.................................................................................5-1
Pre-Step and Post-Step Callbacks ...................................................................5Test Report ........................................................................................5-Post Run-Loop Test ..........................................................................5-Test Failure .......................................................................................5-Open Test VI .....................................................................................5-2
Test Executive Typedef Controls ..................................................................................5Typedefs for Callback VIs...............................................................................5-
TYPEDEF - Login Info.ctl................................................................5-23TYPEDEF - Sequence.ctl .................................................................5-2TYPEDEF - Sequence Element.ctl ...................................................5-2TYPEDEF - UUT Results.ctl............................................................5-2TYPEDEF - Sequence Result.ctl ......................................................5-2TYPEDEF - Test Result.ctl...............................................................5-2
Typedefs for LabVIEW Tests .........................................................................5-TYPEDEF - Invocation Info.ctl ........................................................5-30TYPEDEF - Input buffer.ctl..............................................................5-3TYPEDEF - Mode.ctl .......................................................................5-3TYPEDEF - Test Data.ctl .................................................................5-3
Common Modifications .................................................................................................5Changing Passwords........................................................................................5Changing PASS/FAIL/ABORT Banners ........................................................5-3Changing the UUT Serial Number Prompt .....................................................5-Changing the Test Report................................................................................5Using Another Application for Report Generation .........................................5-3
Advanced Modifications................................................................................................5Result Logging Alternatives............................................................................5-
Logging Test Results on a Per-UUT Basis .......................................5-3Per-UUT Logger Callback.vi .............................................5-35Test String Callback.vi .......................................................5-35
Logging Results to a Database Using the LabVIEW SQL Tools (Windows only)..............................................................................5-3
Modifications to the System Configuration File ................5-36The Alternate Callback VIs ................................................5-36
Using LabVIEW Test Shells ...........................................................................5-Example Sequence Using LabVIEW Test Shells............................................5-
© National Instruments Corporation ix LabVIEW Test Executive Reference Manual

Contents
1-1-2
-2-3-4-4
-1-1
122
3-5
6
-11
31
Chapter 6Deploying the Test Executive
LabVIEW Test Executive Run-Time System ............................................................... 6-Building a Run-Time System ........................................................................................ 6Other Required Components for a Complete Run-Time System.................................. 6
Callback and Test VIs ..................................................................................... 6The testexec.ini File ........................................................................................ 6Test Sequences................................................................................................ 6Shared Libraries (C Test Resources) .............................................................. 6
Appendix ACommon Questions
Appendix BSequence Conversion Notes
Version 4.0 and 5.0 Conversion .................................................................................... BStep 1—Use the 5.0 Sequence File Converter ................................................ B
Controls ............................................................................................ B-Indicators .......................................................................................... B-
Step 2—Compile Your Test VIs..................................................................... B-
Appendix CTechnical Support Resources
Glossary
Index
FiguresFigure 1-1. Architecture of the Test Executive ....................................................... 1-Figure 1-2. Test Sequence Callback VIs ................................................................. 1Figure 1-3. Flow of Execution in Test UUT Mode ................................................. 1-6Figure 1-4. Flow of Execution in Single Pass Mode ............................................... 1-
Figure 3-1. Sample Test Report............................................................................... 3
Figure 5-1. Flow of Sequence Callback VIs in a UUT Test Loop .......................... 5-1Figure 5-2. Test VI Shell Configuration and Execution.......................................... 5-4
LabVIEW Test Executive Reference Manual x www.natinst.com

Contents
7
6-7-89-12
-2-3
-12-1414
1920-22
-26-27
TablesTable 1-1. Operating Level Capabilities.................................................................1-
Table 3-1. Default Operator Interface Key Assignments .......................................3-Table 3-2. Run Mode Field Values.........................................................................3Table 3-3. Step Status/Result Field Values ............................................................3Table 3-4. Comparison Values and Relative Limits...............................................3-Table 3-5. Status Indicator Values..........................................................................3
Table 4-1. Test Data Cluster Elements ...................................................................4Table 4-2. Error Cluster Elements ..........................................................................4Table 4-3. tTestData Structure Parameters .........................................................4-5Table 4-4. tTestError Structure Parameters .......................................................4-6Table 4-5. Comparison Type Values ......................................................................4Table 4-6. Run Mode Options ................................................................................4Table 4-7. FAIL Action Options.............................................................................4-Table 4-8. Possible Errors and Corrective Actions in the
Sequence Errors Dialog Box .................................................................4-Table 4-9. Key Assignments for Sequence Editor Controls...................................4-Table 4-10. Sequence Editor Menu Commands .......................................................4Table 4-11. Dependency Editor Key Assignments...................................................4Table 4-12. Run Mode Step Result Values...............................................................4
© National Instruments Corporation xi LabVIEW Test Executive Reference Manual

About This Manual
use
ple,
ions
eturn
ction ord
the ples. ries, ions,
puter ode
This manual describes the LabVIEW Test Executive package. You canthis add-on package for automated sequencing of test programs in LabVIEW 5.1 and later.
ConventionsThe following conventions appear in this manual:
< > Angle brackets enclose the name of a key on the keyboard—for exam<PageDown>.
- A hyphen between two or more key names enclosed in angle bracketsdenotes that you should simultaneously press the named keys—for example, <Control-Alt-Delete>.
» The » symbol leads you through nested menu items and dialog box optto a final action. The sequence File»Page Setup»Options»Substitute Fonts directs you to pull down the File menu, select the Page Setup item, select Options, and finally select the Substitute Fonts option from the last dialog box.
This icon denotes a tip, which alerts you to advisory information.
This icon denotes a note, which alerts you to important information.
bold Bold text denotes a parameter, menu name, palette name, menu item, rvalue, function panel item, or dialog box button or option.
italic Italic text denotes variables, emphasis, a cross reference, or an introduto a key concept. This font also denotes text that is a placeholder for a wor value that you must supply.
monospace Text in this font denotes text or characters that you should enter from keyboard, sections of code, programming examples, and syntax examThis font is also used for the proper names of disk drives, paths, directoprograms, subprograms, subroutines, device names, functions, operatvariables, filenames and extensions, and code excerpts.
monospace bold Bold text in this font denotes the messages and responses that the comautomatically prints to the screen. This font also emphasizes lines of cthat are different from the other examples.
© National Instruments Corporation xiii LabVIEW Test Executive Reference Manual

About This Manual
ul
Related DocumentationThe following documents contain information that you might find helpfas you read this manual:
• G Programming Reference Manual
• LabVIEW Function and VI Reference Manual
• LabVIEW QuickStart Guide
• LabVIEW Technical Resource*
• LabVIEW Test Executive Release and Upgrade Notes
• LabVIEW Tutorial
• LabVIEW User Manual
* To order the LabVIEW Technical Resource Spring 1996 issue, access the LabVIEW Technical Resource web site at www.ltrpub.com , or call 214 706 0587, Fax: 214 706 0506.
LabVIEW Test Executive Reference Manual xiv www.natinst.com

© National Instruments Corporation 1-1 LabVIEW Test Executive
1
test bined ).
h .
ator
e
e
nd
Introduction
This chapter lists the main features of the Test Executive, explains itsexecution model, and describes its three operating levels.
OverviewA Test Executive is an application you can use to develop and executesequences. A test sequence consists of a series of test programs comwith flow control statements that you use to test a unit under test (UUTThe LabVIEW Test Executive can call test programs written using botG and C (Windows NT/98/95 and UNIX only) programming languages
The Test Executive includes a powerful Test Executive engine for performing test sequencing and sequence editing operations, an operinterface virtual instrument (VI), and a set of callback VIs for handling various interface and data-logging tasks. The operator interface and callback VIs are provided with G source code, allowing users to changand/or expand the functionality of the LabVIEW Test Executive.
FeaturesSome of the main features of the Test Executive are as follows:
• Runs hierarchical test sequences
• Calls test programs written in either LabVIEW’s G programming language or in C (Windows NT/98/95 and UNIX only)
• Sequences tests based on PASS/FAIL states and advanced dependencies
• Logs test reports to either an ASCII file or SQL-compliant databas(in conjunction with the LabVIEW SQL Tools, included in the Enterprise Connectivity Toolset).
• Contains run-time interfacing, including the ability to prompt for operator and UUT serial numbers, to display PASS/FAIL banners, ato perform run-time error notification
• Generates ASCII sequence reports to files
• Allows continuous testing in Test UUT mode
Reference Manual

Chapter 1 Introduction
d a nces
t
e em.
set ng, s the r
Available PackagesThe Test Executive is available in two versions.
Development SystemThe LabVIEW Test Executive Development System is designed to rununder the LabVIEW development environment. It consists of the Test Executive engine, an operator interface VI, a library of callback VIs, anlibrary of LabVIEW type definitions for use when developing LabVIEWtests and custom callback VIs. Example test programs and test sequealso are included with the Development System.
Run-Time SystemYou can use the LabVIEW Application Builder to build a LabVIEW TesExecutive Run-Time System. With the Run-Time System, you can distribute the Text Executive to many test stations without incurring thexpense of outfitting each station with the LabVIEW Development Syst
Test Executive ArchitectureThe Test Executive includes an engine, an operator interface VI, and aof callback VIs, which are LabVIEW VIs designed for specific interfaceand data-logging operations. The engine handles tasks such as creatiediting, loading, saving, and executing test sequences. The engine useoperator interface VI and the callback VIs to handle tasks such as uselogin, report generation, and datalogging.
Figure 1-1 shows the relationship between the Test Executive engine,the operator interface VI, and the callback VIs.
LabVIEW Test Executive Reference Manual 1-2 www.natinst.com

Chapter 1 Introduction
he
ich
he r to ce st
Figure 1-1. Architecture of the Test Executive
You can customize the Test Executive by modifying or replacing the operator interface VI or the callback VIs. The operator interface VI is tmain panel of the Test Executive. With the main panel, you can issue commands to the Test Executive engine and see the results of those commands. The Test Executive engine works with 17 callback VIs, whare divided into system and sequence callback VIs. For information about modifying the operator interface VI, the system callback VIs, or the sequence callback VIs, refer to Chapter 5, Modifying the Test Executive.
System Callback VIsThe Test Executive works with the following system callback VIs:
• Close Sequence
• Exit
• Login
• Open Sequence
• Save Sequence
• Select Sequence
• Sequence Report
The Login callback VI identifies the Test Executive operator and sets toperating level. The Select Sequence callback VI prompts the operatochoose a test sequence to open. The Open, Save, and Close Sequencallback VIs are called when the operator opens, saves, or closes a te
Test Executive Engine
The Operator Interface VI
CallbackVI
CallbackVI
CallbackVICallback
VI.....
© National Instruments Corporation 1-3 LabVIEW Test Executive Reference Manual

Chapter 1 Introduction
rt file lled
Pass ful
play.
lay a hat
sequence. The Sequence Report callback VI generates an ASCII repodescribing the currently loaded test sequence. The Exit callback VI is cawhen the user exits the Test Executive.
Sequence Callback VIsThe Test Executive works with the following sequence callback VIs:
• Open Test VI
• Pre-Step
• Pre-UUT
• Pre-UUT Loop
• Post Run-Loop Test
• Post-Step
• Post-UUT
• Post-UUT Loop
• Test Failure
• Test Report
The next section describes how to use the sequence callback VIs.
Execution ModelThe Test Executive can execute a sequence in one of four modes—Test UUT, Single Pass, Run Step(s), or Loop Step(s).
• Test UUT, invoked when the user clicks the Test UUT button, executes a test sequence repetitively. This mode is the productionoperating mode for testing multiple UUTs.
• In Single Pass mode, the test sequence executes only once. Singlemode is primarily for use during development and also can be usefor diagnostic purposes.
• Run Step(s) mode, invoked when the user clicks the Run Step(s) button, executes the steps currently selected in the Sequence Dis
• Loop Step(s) mode, invoked when the user clicks the Loop Step(s) button, executes the step currently selected in the Sequence Dispspecified number of times (or, if only a single step is selected, until tstep fails).
Both Run Step(s) and Loop Step(s) modes are intended primarily for diagnostic purposes.
LabVIEW Test Executive Reference Manual 1-4 www.natinst.com

Chapter 1 Introduction
ertain Test ride es or you iated
ine
ng s the
, T,
ied alls style
Every test sequence has a set of sequence callback VIs that handle crun-time or edit-time events. When you create a new test sequence, theExecutive gives it a default set of sequence callback VIs. You can overthese default callback VIs to change the way the Test Executive executedits a test sequence. The Sequence Editor also calls these VIs whenwant to edit a test VI. Figure 1-2 shows a test sequence and its assoccallback VIs.
Figure 1-2. Test Sequence Callback VIs
For a typical test sequence in Test UUT mode, the Test Executive engcalls the Pre-UUT Loop callback VI before testing the first UUT. The Pre-UUT Loop callback VI performs user-specified setup or data loggioperations. Then, before testing each new UUT, the Test Executive callPre-UUT callback VI, which by default prompts the operator for UUT information.
After testing a UUT, the Test Executive calls the Post-UUT callback VIwhich by default displays a PASS/FAIL banner. After testing the last UUthe Test Executive calls the Post-UUT Loop callback VI for user-specifcleanup or data-logging operations. Then, the Test Executive engine cthe Test Report callback VI, which by default generates a spreadsheet-
Sequence
Test Failure
Post-UUT
Test Report
Pre-UUTLoop
Open Test
Post-UUTLoop
Pre-UUTPost Run-Loop Test
Pre-Step Post-Step
© National Instruments Corporation 1-5 LabVIEW Test Executive Reference Manual

Chapter 1 Introduction
UUT
ke.
gine
alled
Test I I
a
ey ated y
ASCII report detailing the test results for each UUT tested. Figure 1-3 shows the overall flow of execution in Test UUT mode.
Figure 1-3. Flow of Execution in Test UUT Mode
In Single Pass mode, the Test Executive engine does not call the Pre-Loop, Pre-UUT, Post-UUT, or Post-UUT Loop callback VIs. Figure 1-4shows the overall flow of execution in Single Pass mode.
Figure 1-4. Flow of Execution in Single Pass Mode
When a step with a FAIL Action of Callback fails, the Test Executive engine calls the Test Failure callback VI to determine what action to ta
After you click the Run Step(s) or Loop Step(s) button to run or loop the individual steps selected in the Sequence Display, the Test Executive encalls the Post Run-Loop Test callback VI.
In all execution modes, the Pre-Step and Post-Step callback VIs are cbefore and after each test step, respectively.
In contrast to the other sequence callback VIs, which are called by the Executive engine, the Sequence Editor calls the Open Test callback Vwhen you click the Edit Test VI button. The default Open Test callback Vopens the front panel of the current LabVIEW test.
In addition to the sequence callback VIs, each sequence may specify Pre-Run and/or Post-Run VI. These VIs run before and after their associated sequence runs in either Test UUT or Single Pass mode. Thalso run before and after any group of steps you run from their associtest sequence in either Run Step(s) or Loop Step(s) mode. You specifPre-Run and Post-Run VIs in the Sequence Options dialog box of theSequence Editor.
CallPre-UUTCallback
RunTest
Sequence
CallPost-UUTCallback
CallPost-UUT
Loop Callback
CallTest Report
Callback
CallPre-UUT
Loop Callback
Loop UntilOperator Quits
RunTest
Sequence
CallTest Report
Callback
LabVIEW Test Executive Reference Manual 1-6 www.natinst.com

Chapter 1 Introduction
n,
dit
g
test
log o
Operating LevelsThe Test Executive has three operating levels—Developer, Techniciaand Operator. Table 1-1 summarizes the capabilities available in eachoperating level.
At the Developer level, you have access to all capabilities of the Test Executive.
At the Technician level, you can run individual steps, but you cannot esequences. You also can run a sequence in Single Pass mode. The Technician level gives you the flexibility to execute steps for diagnosina UUT.
The Operator level is the most restrictive. At this level, you can executesequences only in Test UUT mode by clicking the Test UUT button.
The Login callback VI determines the initial operating level. When youfirst load the Test Executive, the default Login callback VI displays a diabox that prompts you for a password, which sets the operating level. Tchange the operating level when running the Test Executive, you can re-open the Login dialog box by clicking the Login button on the main panel of the Test Executive.
Table 1-1. Operating Level Capabilities
Level UUT Test
Single PassRun Step(s)Loop Step(s)
Edit Sequences
Developer Yes Yes Yes
Technician Yes Yes No
Operator Yes No No
© National Instruments Corporation 1-7 LabVIEW Test Executive Reference Manual

© National Instruments Corporation 2-1 LabVIEW Test Executive
2
ande
te
h are
stem.
Getting Started
This chapter introduces the basic concepts of Test Executive operationtest sequence development and contains the following examples:
• Running a Test Sequence
• Examining a Test Program
• Editing a Test Sequence
Go through these examples in the order they are presented. The first example, Running a Test Sequence, is relevant to anyone who operates thTest Executive. The second two examples, Examining a Test Program and Editing a Test Sequence, are for users who write test programs and createst sequences.
The Test Executive also comes with four test sequence examples, whicdescribed at the end of this chapter.
Note This chapter assumes that you are running the Test Executive Development SyIf you are executing the Test Executive Run-Time System, you cannot run the Examining a Test Program example.
Running a Test SequenceThis section describes how to run a test sequence.
Starting the Test ExecutivePerform the following steps to start the Test Executive.
1. Launch LabVIEW.
2. Select Project»Test Executive»Launch Test Executive… to run the default operator interface VI.
When the Test Executive begins running, it loads the callback VIs intomemory. After loading the system callback VIs, it calls the Login callback VI, which displays the Login dialog box.
3. Type your name and password into the Login dialog box. Use the <Tab> key to move from the Name to the Password field.
Reference Manual

Chapter 2 Getting Started
e,
any
A
ce
test Test
o
of
,
n.
The default Login callback VI uses the password you enter to set the operating level. It then passes this operating level to the Test Executivwhich configures itself accordingly. In this session, you run the Test Executive at the Operator level. You access the Operator level by typingtext in the Password field.
Note To access the other operating levels, you must type technician for the Technician level and developer for the Developer level.
4. Press <Enter> (<return>, <Return>) or click the OK button to confirm your entries.
On the Test Executive front panel, notice the word STOPPED that appears directly above the Sequence Display. This field is the status indicator. flag of STOPPED indicates that no test sequence is currently running.
Opening and Running a Test SequencePerform the following steps to open and run a test sequence.
1. Click the Open button in the upper left corner of the operator interfapanel.
2. Select the file COMPUTER.SEQ, which is located in the EXAMPLES directory of the Test Executive installation.
A short delay occurs while the Test Executive loads the VIs that the sequence requires into memory. After you load COMPUTER.SEQ, notice that the test sequence appears in the Sequence Display. The name of thesequence and the sequence description also appear at the top of the Executive front panel.
3. Click the Test UUT button located beneath the Sequence Display texecute the test sequence. The Test Executive calls the default Pre-UUT callback VI, which prompts you to enter the serial numberthe UUT.
4. Type any value for the serial number and press <Enter> (<return><Return>) or click the OK button.
As the sequence executes, notice the following activities on your scree
• The Status indicator displays RUNNING.
• As each step runs, the word RUNNING appears next to the name of theactive step in the Sequence Display.
LabVIEW Test Executive Reference Manual 2-2 www.natinst.com

Chapter 2 Getting Started
xt to
VI ou , ort
or.
date sting
an ian
ence p
e isplay.
• After each step runs, the PASS/FAIL status of the step appears nethe name of the step in the Sequence Display, and the step resultappears in the Test Display.
When the sequence execution completes, the Test Executive calls thedefault Post-UUT callback VI, which displays a PASS/FAIL banner.
5. Click the OK button in the PASS/FAIL banner. The Test Executive begins the next test cycle by calling the default Pre-UUT callback again. The Test Executive continues to cycle to the next UUT until yclick the Stop button in the UUT Information dialog box. At that pointthe Test Executive exits the Test UUT loop and calls the Test Repcallback VI to generate the test report.
6. To view the test report after execution completes, click the View Test Report button. The report appears in the Test Display string indicat
The Test Report includes the name and description of the sequence, theand time that testing ended, the name of the user, and the results of tefor each UUT.
Changing to Technician LevelPerform the following steps to change from Operator level to Technicilevel and to see the more flexible execution capabilities at the Techniclevel.
1. Click the Login button on the Test Executive front panel.
2. In the Login dialog box, type the word technician in the Password field and click the OK button. The Single Pass, Run Step(s), and Loop Step(s) buttons appear in the lower left corner of the Test Executive front panel.
3. If you do not see these buttons, click the Login button again and retypethe word technician in the Password field. Remember that the password is case sensitive.
Executing Individual Steps and Using Single Pass ModeTo run an individual step, click the name of the desired step in the SequDisplay and click the Run Step(s) button. Notice that only the selected steruns. You can select multiple steps to run in Run Step(s) mode by <Shift>-clicking them in the Sequence Display. Run Step(s) mode selectively runs individual steps for diagnosis and troubleshooting. Thstatus of each step appears next to the step names in the Sequence DTo execute steps repeatedly, click the Loop Step(s) button.
© National Instruments Corporation 2-3 LabVIEW Test Executive Reference Manual

Chapter 2 Getting Started
t e
. click rt
ull
.
,
st st
The ime
ne of nd
Now, click the Single Pass button. Clicking this button runs the entire tessequence once. When running in Single Pass mode, the Test Executivskips all sequence callback VIs except for the Test Report callback VINotice that the sequence executes one time and then stops. When youthe View Test Report button, the Test Executive displays the Test Repoas it did at the Operator level.
Quitting the Test ExecutiveClick the Quit button to stop execution of the Test Executive. When theTest Executive stops running, LabVIEW automatically quits if you are logged in at the Operator or Technician levels. Launch the LabVIEW fdevelopment system before proceeding to the next examples.
Examining a Test ProgramIn this section, you examine a sample test program written in LabVIEWYou need this information only if you plan to write LabVIEW tests andincorporate them into test sequences. You must be familiar with the LabVIEW full development environment to complete this example.For detailed information about the topics in this section, see Chapter 4Creating Tests and Test Sequences.
Perform the following steps to learn how to build a LabVIEW test.
1. Launch LabVIEW, if you have not already done so.
2. Open random.vi , located in TESTS\TEST_VIS.LLB in the Test Executive installation directory.
random.vi illustrates the basic structure of a LabVIEW test that the TeExecutive runs. The front panel of the VI contains two clusters—the TeData cluster and the error out cluster.
The Test Data cluster transmits information about the result of the test.error out cluster transmits information the Test Executive uses for run-terror handling. In this example, use random.vi as if it were a new test VI to step through the test sequence creation process.
3. Open the block diagram of random.vi by selecting Windows»Show Diagram from the menu on the front panel.
This VI generates two random numbers, Limit and Measurement. The VI compares Limit to Measurement, setting the PASS/FAIL flag in the Test Data cluster to the result of the comparison. This VI also passes othe random numbers and a comment as the Numeric Measurement a
LabVIEW Test Executive Reference Manual 2-4 www.natinst.com

Chapter 2 Getting Started
these
ick
e ty.
of
f nd
t
Comment elements of the Test Data cluster. The Test Executive uses elements when you create a test sequence that calls this VI.
4. Close random.vi . Do not save any changes.
Editing a Test SequenceThis section describes how to set up and edit a test sequence.
1. Start the Test Executive.
a. Launch LabVIEW if you have not already done so.
b. Select Project»Test Executive»Launch Test Executive… to run the default operator interface VI. Type the word developer in the Password field of the Login dialog box and click the OK button. A row of six buttons appears in the upper left corner of the operator interface front panel. If you do not see six buttons, clthe Login button and retype developer as the password. Remember that the password is case sensitive.
2. Edit the Sequence
• Click the Edit button to invoke the Sequence Editor.
The first time you invoke the Sequence Editor, there is a delaywhile the Test Executive loads the editor. This loading delay occurs only the first time you open the Sequence Editor. Noticthat the list box at the top of the Sequence Editor panel is empThis list box, called the sequence list, shows the defined steps forthe current sequence. With the Sequence Editor, you input allthe specifications required to define a test sequence.
3. Create a Step.
Complete the following steps to add random.vi to the sequence.
a. Click the New Step button to add a new, untitled step to the top othe sequence list. Notice that the edit controls are displayed athat the edit control Name is automatically selected. Also notice that the ring control Type is set to LabVIEW Test. Because this example involves only LabVIEW-based test programs, do not change the Type setting.
b. Type the name Random-Boolean into the Name control and press<Enter> (<return>, <Return>). Notice that Random-Boolean now appears in the sequence list.
c. Click the Select Resource... button to choose the VI that you wanto run for this step. For this example, select random.vi . Notice
© National Instruments Corporation 2-5 LabVIEW Test Executive Reference Manual

Chapter 2 Getting Started
h
e a r of nce a ny of
or nter ple,
t
d
e
that the Resource control is automatically filled with the VI patyou selected.
4. Configure the Limit Specification.
To determine if a step passes or fails, the Test Executive must havlimit specification. The Test Executive looks at the Test Data clustethe test VI and applies the limit checking you specify in the SequeEditor to that data. The Test Data cluster contains a Boolean flag,numeric measurement, and a string measurement. You can use athese elements to determine if the VI passes.
a. Click the Set Limit Specification button to view the Set Limit Specification dialog box. Click the Comparison Type ring control to see the available types of checking. If you choose anumeric comparison, you must enter the numeric limits used fthe comparison. If you choose a string comparison, you must ea reference string to be used for the comparison. For this examset Comparison Type to Boolean .
b. Click the OK button to confirm the limit specification. Notice thathe Limit Specification control now contains the text {BOOL} .
5. Add Another Step
Now, perform the following steps to add another step below Random-Boolean and change the limit specification to numeric.
a. Make sure that the Insert control is set to below and click the New Step button. The new step appears below the currently selectestep in the sequence list. Name the new step Random-Numeric .
b. Click the Select Resource... button and again select random.vi . Then, click the Set Limit Specification button and set the Comparison Type to numeric comparison, GELE (>= && <=) , which means the numeric value returned by the test VI must bgreater than or equal to a lower limit and less than or equal to anupper limit. Set the lower limit to 0.00 and the upper limit to 0.50 , as shown in the following illustration.
LabVIEW Test Executive Reference Manual 2-6 www.natinst.com

Chapter 2 Getting Started
l, is
ear e
ce.
cify
With the Format control, you set the numeric limits to fractionascientific, decimal, hexadecimal, octal, or binary notation. For thexample, use fractional notation.
c. Click the OK button to accept the limit specifications. Your completed test sequence appears in the sequence list of the Sequence Editor dialog box.
d. To modify the definition of a step, click the step you want to modify in the sequence list. The specifications of the step appin the edit fields. Make any changes to these edit fields, and thTest Executive automatically applies the changes to the step.
6. Set Dependencies.
Next, set up a dependency between the two steps in your sequen
a. Click the Edit Dependencies button, which opens the Dependency Editor.
b. To set up a dependency between the two steps, you must spethat Random-Boolean must pass for Random-Numeric to execute. If Random-Numeric is not selected in the step list box,select it. Notice that the Dependencies list box is empty, indicating that Random-Numeric has no dependencies.
© National Instruments Corporation 2-7 LabVIEW Test Executive Reference Manual

Chapter 2 Getting Started
s
to
ed
the ve
n
ow and se are e Test ities
c. To add the desired dependency, select Random-Boolean in the New Determinants list box and click the » button. This adds a FAIL dependency on Random-Boolean to the Dependency list for Random-Numeric . (Double-clicking Random-Boolean also allows you to add this FAIL dependency.) Change the FAIL dependency to a PASS dependency by clicking the Change to PASS button. (Double-clicking the FAIL dependency also allowyou to change this dependency from FAIL to PASS.)
d. Click the OK button to keep the new dependencies and returnthe Sequence Editor.
7. Run the Sequence
You are now ready to run your test sequence.
a. Return to the main Test Executive front panel by selecting File»Exit. After you save the new sequence, it appears in the Sequence Display list box.
b. Click the Test UUT button to run the sequence. The Test Executive automatically determines the PASS/FAIL status bason the values placed in the Test Data cluster. Perform the following steps to view your specification.
• After you test several UUTs, click the Stop button in the UUT Information dialog box.
• To see the data generated by random.vi for each test, click the View Test Report button.
8. Quit the Test Executive from the Developer Level
Click the Quit button to quit the Test Executive. The Test Executiveprompts you to confirm or cancel the Quit operation. Proceed with operation, and the Test Executive automatically prompts you to sathe sequence you created.
When you run the Test Executive at the Developer level, the applicatiostays in memory after it finishes executing.
If you followed the examples presented in this chapter, you now know hto operate the Test Executive, develop test programs using LabVIEW, use the Sequence Editor to create sequences that use these VIs. Thethe fundamental steps required to create test sequences that run in thExecutive. The remaining chapters of this manual describe the capabilof the Test Executive in greater detail.
LabVIEW Test Executive Reference Manual 2-8 www.natinst.com

Chapter 2 Getting Started
cated y. ou ces,
t
ted
e
d
e
is
Example SequencesThe Test Executive package includes nine test sequence examples loin the EXAMPLES subdirectory of the Test Executive installation directorIf you quit the Test Executive from the Operator or Technician level, yneed to restart the Test Executive to see these examples. The sequenlisted below, demonstrate different aspects of the Test Executive.
• COMMENT.SEQ executes tests that use the Comment field to log tesresults in a customized format. When you run COMMENT.SEQ, notice that test results in the Test Report contain multiple, custom-formatlines rather than the standard formatted lines.
• COMPUTER.SEQ contains a sequence that includes Pre-run and Post-run VIs (VIs that run before or after a test sequence), multipldependencies, and tests that use a variety of comparison types.
• RTERROR.SEQ contains the same tests as COMPUTER.SEQ but generates a run-time error during the test to illustrate the Run-timeError dialog boxes.
• UNDEFINE.SEQ demonstrates how the Test Executive handles sequence files containing invalid information. This condition is callea parsing error. The Parsing Error dialog box opens when you try to load UNDEFINE.SEQ. UNDEFINE.SEQ is not meant to run. Its purposeis to show how the Test Executive handles a parsing error.
• comp_new.seq contains a sequence that calls subsequences.
• cpu_lv.seq contains a sequence that is called by comp_new.seq .
• cpu_diag.seq contains a sequence that is called by comp_new.seq .
• computer_cvi.seq (Windows NT/98/95 only) contains a sequencthat calls tests developed in LabWindows/CVI.
• cpu_cvi.seq (Windows NT/98/95 only) contains a sequence that called by computer_cvi.seq .
© National Instruments Corporation 2-9 LabVIEW Test Executive Reference Manual

© National Instruments Corporation 3-1 LabVIEW Test Executive
3
ront n. lesree
g
a nce llback
the
from p
Operating the Test Executive
This chapter describes the operation of the main Test Executive front panel—the controls, indicators, and operator dialog boxes. The main fpanel is the user interface for both development and run-time operatioWhen at the Technician and Operator levels, the Test Executive disabsome of the buttons.
ControlsThe controls on the Test Executive front panel access the following thareas of operation:
• Sequence file operations and login
• Execution
• Display
The rest of this section describes the purpose of each control, groupinthem according to their areas of operation.
OpenThe Open button invokes the Select Sequence callback VI for selectingtest sequence to load into memory from a file. Selecting a valid sequefile opens the sequence and loads the step resource and sequence caVIs into memory. A delay occurs proportional to the number and size ofstep resources being loaded. The Open button is visible at all operating levels. The default key assignment for Open is <F2>.
CloseThe Close button closes the current sequence visible in the Sequence Display and unloads the step resources and the sequence callback VIsmemory. A delay occurs proportional to the number and size of the steresources being unloaded. The Close button is visible at all operating levels. The default key assignment for Close is <F3>.
<F2>
<F3>
Reference Manual

Chapter 3 Operating the Test Executive
el
he
t
vel.
t a
e
e
The
QuitThe Quit button causes the Test Executive to stop execution. After youclick the Quit button, the Test Executive prompts you to confirm or cancthe Quit operation. The default key assignment for Quit is <F10>.
Note If the Test Executive is at the Operator or Technician operating level, clicking tQuit button stops the Test Executive and quits LabVIEW.
LoginThe Login button calls the Login callback VI. The default Login callback VI displays a Login dialog box for entering your name and/or password. The Login button is visible at all operating levels. The defaulkey assignment for Login is <F4>.
EditThe Edit button invokes the Sequence Editor. There is a short loadingdelay when you first open the Sequence Editor. The Edit button is visible only when the Test Executive is running at the Developer operating leThe default key assignment for Edit is <F5>.
NewThe New button loads a new Untitled sequence, displaying it in the Sequence Display. You can have only one Untitled sequence loaded atime. The New button is visible only when the Test Executive is at the Developer operating level. The default key assignment for New is <F6>.
Test UUTThe Test UUT button initiates repetitive execution of the currently visibltest sequence for UUT testing. (See the Execution Model section of Chapter 1, Introduction, for information about the Test UUT mode of execution.) The Test UUT button is visible at all operating levels. The default key assignment for Test UUT is <Shift-F1>.
Single PassThe Single Pass button initiates a single execution of the currently visibltest sequence. (See the Execution Model section of Chapter 1, Introduction, for information about the Single Pass mode of execution.) The Single Pass button is visible only at the Developer and Technician operating levels. default key assignment for Single Pass is <Shift-F2>.
<F10>
<F4>
<F5>
<F6>
<Shift-F1>
<Shift-F2>
LabVIEW Test Executive Reference Manual 3-2 www.natinst.com

Chapter 3 Operating the Test Executive
ng next en
d
a t
st
t for
ly
ic ne
in
e
AbortThe Abort button stops sequence execution after the currently executistep completes. If you click the Abort button while in Test UUT mode, theTest Executive stops testing on the current UUT and proceeds to the UUT. The default Post-UUT callback VI displays an ABORT banner whyou abort testing. The Abort button is visible at all operating levels but isactive only when a test is running. The default key assignment for Abort is <Shift-F10>.
Note The Test Executive engine does not log complete result information for abortesequences. Therefore, the test report that the Text Executive generates will contain incomplete result information if you abort the execution of a test sequence.
Abort LoopThe Abort Loop button appears only when the Test Executive loops onfailing step. Clicking the Abort Loop button stops the loop execution. Tessequence execution then continues with the next step. The Abort Loop button appears at all operating levels. The default key assignment for Abort Loop is <Shift-F9>.
Run Step(s)The Run Step(s) button executes the steps currently selected in the Sequence Display. After the step runs, the Test Executive calls the PoRun-Loop Test Callback VI. The Run Step(s) button is visible only at the Developer and Technician operating levels. The default key assignmenRun Step(s) is <Shift-F3>.
Loop Step(s)The Loop Step(s) button initiates repetitive execution of the step currentselected in the Sequence Display. The Loop Step(s) button is visible only at the Developer and Technician operating levels. When you select Loop Step(s), the Loop Parameters dialog box appears.
With the Loop Parameters dialog box, you can either execute a specifnumber of iterations or loop until a step fails (if you have selected only ostep for execution). To specify a number of iterations, make sure the Loop until FAIL checkbox is not selected and enter the number of iterationsthe Loop field. To loop until a step fails, select the Loop until FAIL checkbox. To confirm your inputs, click the OK button. To cancel, click the Cancel button. After the steps finish looping, the Test Executive calls th
<Shift-F10>
<Shift-F9>
<Shift-F3>
<Shift-F4>
© National Instruments Corporation 3-3 LabVIEW Test Executive Reference Manual

Chapter 3 Operating the Test Executive
to run AIL
, it
s s.
ence
or is e the
tes by
ly p for
g this the
Post-Run Loop Test callback VI. The default key assignment for Loop Step(s) is <Shift-F4>.
Note When you run steps using the Run Step(s) or Loop Step(s) button, the Test Executive disregards the Run Mode setting for the selected step and forces the stepnormally. In contrast, if the Run Mode setting of a test is Skip, Force PASS, or Force Fin Test UUT or Single Pass mode, the Test Executive does not run the step. Insteadgenerates a step result of Skip, PASS, or FAIL.
Stop On Any FailureIf you select the Stop On Any Failure checkbox, the Test Executive stopexecuting the current sequence whenever a step in that sequence failWhen you clear this checkbox, the Test Executive runs the current sequence as normal. Changes to this box do not affect the default sequsetting for Stop On Any Failure. You must change this default setting inthe Sequence Editor. The Stop On Any Failure checkbox is visible at all operating levels. The default key assignment for Stop On Any Failure is <Shift-F5>.
Sequence Runtime Updates?When you select the Sequence Runtime Updates? checkbox, the Test Executive updates the Sequence Display whenever a new step startsfinishes running, or another test sequence runs. When you unselect thbox, the Test Executive does not update the Sequence Display. To makTest Executive run as fast as possible, disable Sequence Display updaclearing this checkbox. The Sequence Runtime Updates? checkbox is visible at all operating levels. The default key assignment for Sequence Runtime Updates? is <Shift-F6>.
Run ModeThe Run Mode ring control displays the run mode setting for the currentselected step. You also use this control to change the run mode of a stediagnostic purposes. Changes made to the run mode of any step usincontrol do not affect the default run mode of the step. You must changedefault value in the Sequence Editor. The Run Mode control is visible only at the Developer and Technician operating levels. The default key assignment for Run Mode is <Shift-F7>.
<Shift-F5>
<Shift-F6>
<Shift-F7>
LabVIEW Test Executive Reference Manual 3-4 www.natinst.com

Chapter 3 Operating the Test Executive
h
e y
st
I. I mpts
hen
fast he
Clear Step StatusThe Clear Step Status button clears the Step Status/Result field for eacstep in the Sequence Display. The Clear Step Status button is visible at all operating levels. The default key assignment for Clear Step Status is <Ctrl-F1> (<command-F1>, <meta-F1>, <Alt-F1>).
Clear Test DisplayThe Clear Test Display button clears the contents of the Test Display. ThClear Test Display button is visible at all operating levels. The default keassignment for Clear Test Display is <Ctrl-F2> (<command-F2>, <meta-F2>, <Alt-F2>).
View Test ReportThe View Test Report button displays the current Test Report in the TeDisplay. The View Test Report button is visible at all operating levels. Thedefault key assignment for View Test Report is <Ctrl-F3> (<command-F3>, <meta-F3>, <Alt-F3>).
Sequence ReportThe Sequence Report… button invokes the Sequence Report callback VThe default Sequence Report callback VI generates a formatted ASCIreport for the current sequence and displays a Save dialog box that proyou to save the report. The Sequence Report… button is visible at all operating levels. The default key assignment for Sequence Report… is <Ctrl-F4> (<command-F4>, <meta-F4>, <Alt-F4>).
Test Runtime Updates?When you select the Test Runtime Updates? checkbox, the Test Executive updates the Test Display each time a step finishes running. Wyou clear this checkbox, the Test Executive does not update the Test Display during sequence execution. To make the Test Executive run asas possible, disable Test Display updates by clearing this checkbox. TTest Runtime Updates? checkbox is visible at all operating levels. The default key assignment for Test Runtime Updates? is <Ctrl-F5> (<command-F5>, <meta-F5>, <Alt-F5>).
<Ctrl-F1>
<Ctrl-F2>
<Ctrl-F3>
<Ctrl-F4>
<Ctrl-F5>
© National Instruments Corporation 3-5 LabVIEW Test Executive Reference Manual

Chapter 3 Operating the Test Executive
Operator Interface Key AssignmentsTo summarize, Table 3-1 lists the default key assignments for each operator interface control.
Table 3-1. Default Operator Interface Key Assignments
Control Default Key Assignment
Open <F2>
Close <F3>
Login <F4>
Edit <F5>
New <F6>
Quit <F10>
Test UUT <Shift-F1>
Single Pass <Shift-F2>
Run Step(s) <Shift-F3>
Loop Step(s) <Shift-F4>
Stop On Any Failure <Shift-F5>
Sequence Runtime Updates? <Shift-F6>
Run Mode <Shift-F7>
Abort Loop <Shift-F9>
Abort <Shift-F10>
Clear Step Status <Ctrl-F1> (<command-F1>, <meta-F1>, <Alt-F1>)
Clear Test Display <Ctrl-F2> (<command-F2>, <meta-F2>, <Alt-F2>)
View Test Report <Ctrl-F3> (<command-F3>, <meta-F3>, <Alt-F3>)
LabVIEW Test Executive Reference Manual 3-6 www.natinst.com

Chapter 3 Operating the Test Executive
ve
ring the the in
t to lyph.
hat
IndicatorsThis section describes the displays and indicators on the Test Executifront panel.
Sequence DisplayThe Sequence Display is a control that contains two parts. The first is acontrol that allows the user to select the sequence currently visible in second part, a multiple-selection list box. During sequence execution,ring control also indicates the filename of the current sequence visiblethe list box.
Each line in the list box portion of the display has three fields. From lefright, the fields are Run Mode, Step Name, and Step Status/Result. Inaddition, steps that are sequences are marked with the closed-folder g
Note The fields in the Sequence Display are not labeled, so take special notice of woccurs in each field.
The Run Mode field indicates the setting of the Run Mode parameter for the step. Table 3-2 lists the possible Run Mode field values and their meanings.
Sequence Report <Ctrl-F4> (<command-F4>, <meta-F4>, <Alt-F4>)
Test Runtime Updates? <Ctrl-F5> (<command-F5>, <meta-F5>, <Alt-F5>)
Table 3-2. Run Mode Field Values
Value Meaning
blank (no symbol)
Step runs normally.
S Step is skipped.
P Step is skipped with a forced PASS result.
F Step is skipped with a forced FAIL result.
Table 3-1. Default Operator Interface Key Assignments (Continued)
Control Default Key Assignment
© National Instruments Corporation 3-7 LabVIEW Test Executive Reference Manual

Chapter 3 Operating the Test Executive
lect eld
nk, . n
e
The Step Name field shows the name of the step.
The Step Status/Result field is set to RUNNING during the step execution toindicate the active step. After the step completes, the field is set to refthe result of the step. Table 3-3 lists the possible Step Status/Result fivalues and their meanings.
Notice the difference between NONE and UNKNOWN. If the limit specification for a step is set to Log only , the Test Executive is instructedto log the step data but not make a comparison. The step result is NONE because there is no result. If the limit specification for a step is left blahowever, the Test Executive takes no action other than to run the stepBecause there is no limit specification, the Test Executive has not beeinstructed on what to do with the step data, so the step result is UNKNOWN.
Test DisplayThe Test Display shows three types of information:
• Result of each step, if Test Runtime Updates? is enabled
• Error messages
• Test report
Table 3-3. Step Status/Result Field Values
Value Meaning
SKIP Step did not execute.
PASS Step result satisfied limit specification.
FAIL Step result did not satisfy limit specification.
NONE Step data was logged, but no comparison was madbecause the limit specification was set to Log only .
UNKNOWN No step data was logged, and no comparison was made because the limit specification was left blank.
ERROR Run-time error occurred during step execution.
LabVIEW Test Executive Reference Manual 3-8 www.natinst.com

Chapter 3 Operating the Test Executive
at
me
tep value d to imit ue of ).
Result of Each StepAfter a step executes, the Test Display shows the complete result of thstep. The format of a step result is as follows:
Step name ResultComment (optional, might be multiple lines)
Measurement Comparison Lower LimitUpper Limit orString Limit
Execution Time Time (in ms)
Notice that the number of lines that comprise the step result varies, depending on the type of comparison made and whether a step logs acomment. A step result always contains at least one line listing the naand result of the step. The result is the same value shown in the Step Status/Result field of the Sequence Display.
The format and content of the Comment line(s) is determined by the sthat logged the comment. The Measurement line shows the measured returned by the step. Comparison shows the type of limit checking usedetermine if the step passed. Lower and Upper Limits are the numeric lvalues used for PASS/FAIL determination. String Limit is the string valused for PASS/FAIL determination. Table 3-4 lists the possible values Comparison and their relation to the limits (Condition for Step to Pass
Table 3-4. Comparison Values and Relative Limits
Value Condition for Step to Pass
EQ (==) Numeric Measurement = Lower Limit
NE (!=) Numeric Measurement!= Lower Limit
GT (>) Numeric Measurement > Lower Limit
LT (<) Numeric Measurement < Lower Limit
GE (>=) Numeric Measurement >= Lower Limit
LE (<=) Numeric Measurement <= Lower Limit
GTLT (> && <) Numeric Measurement > Lower Limit and < Upper Limit
GTLE (> && <=) Numeric Measurement > Lower Limit and <= Upper Limit
© National Instruments Corporation 3-9 LabVIEW Test Executive Reference Manual

Chapter 3 Operating the Test Executive
e in
rror
Test r in
hen tes will
a ence.
The Execution Time line shows the execution time of the step resourcmilliseconds, if the step was executed.
Error MessagesError messages also appear in the Test Display. One of two types of emessages can appear. The first is a parsing error. If a test sequence references an undefined resource or contains an invalid limit or dependency, a description of the error appears in the Test Display.
The second type of error message displays run-time errors. When theExecutive detects a run-time error, it displays a description of the errothe Test Display.
Note The Test Executive engine does not log complete result information for steps werrors occur in a sequence. Therefore, the test report that the Test Executive generacontain incomplete result information in the event of an error.
The Test ReportYou also view the Test Report in the Test Display. The Test Report isrecord of the testing results for the most recent execution of a test sequFigure 3-1 shows the format of a Test Report.
GELT (>= && <) Numeric Measurement >= Lower Limit and < Upper Limit
GELE (>= && <=) Numeric Measurement >= Lower Limit and <= Upper Limit
STRCMP String Measurement = String Limit
Table 3-4. Comparison Values and Relative Limits (Continued)
Value Condition for Step to Pass
LabVIEW Test Executive Reference Manual 3-10 www.natinst.com

Chapter 3 Operating the Test Executive
Figure 3-1. Sample Test Report
ReportHeader
Results forFirst UUT
Results forSecond UUT
Result forOne Step
Results for Sequence Step
© National Instruments Corporation 3-11 LabVIEW Test Executive Reference Manual

Chapter 3 Operating the Test Executive
is
ion is
test
nd
ult, ing ys
StatusThe Status indicator appears directly above the Sequence Display. Thindicator shows the current operating status of the Test Executive. Table 3-5 lists the possible values of the Status indicator and their meanings.
Sequence NameThe Sequence Name indicator appears above the Sequence Informatbox. If a new sequence is currently visible in the Sequence Display, thindicator displays Untitled Sequence . When a named sequence is displayed, the Sequence Name indicator displays the filename of the sequence. During sequence execution, the Sequence Name indicatoralways displays the name of the top-level sequence.
Sequence InformationThe Sequence Information indicator appears above the Test Display abelow the Sequence Name. When a sequence is displayed, the Test Executive updates this box to display user-defined information. By defathe Sequence Information box displays the sequence description. Dursequence execution, the Sequence Information indicator always displathe information for the top-level sequence.
Table 3-5. Status Indicator Values
Value Meaning
STOPPED No test sequence currently running.
RUNNING Test sequence is running.
LOOPING [n] Test sequencing is looping on a step and is in the nth iteration.
QUIT Test Executive has stopped executing.
LabVIEW Test Executive Reference Manual 3-12 www.natinst.com

Chapter 3 Operating the Test Executive
hat ction
hen e
and t he
st
e ard
e
g
Operator Dialog BoxesDuring operation of the Test Executive, several dialog boxes appear trequire user action. This section describes these dialog boxes and the athat each dialog box requires.
Default Login Dialog BoxThe default Login dialog box prompts you to enter your name and password.
The password sets the operating level of the Test Executive. The logindialog box appears when the Test Executive first starts running and wyou click the Login button. In the dialog box, use the <Tab> key to movbetween the Name and Password fields. Click the OK button or press <Enter> (<return>, <Return>) to confirm the entries made in the Name Password inputs. Click the Cancel button to remove the dialog box withoumaking any changes to the existing name and password. If you click tCancel button when the Test Executive first starts running, the Test Executive runs at the Operator level.
For information about modifying the Default Login dialog box, refer to Chapter 5, Modifying the Test Executive.
Default Select Sequence Dialog BoxThe default Select Sequence file dialog box prompts you to select a tesequence file to open.
The default Select Sequence file dialog box appears when you click thOpen button on the operator interface panel. This dialog box is the standLabVIEW file dialog box, which is initially configured to show only thosefiles ending with an SEQ extension. If you select a valid test sequence filand click the OK button, the Test Executive opens the selected test sequence. If you click the Cancel button, the Test Executive closes the Select Sequence file dialog box and performs no operation.
For information about modifying the default Select Sequence file dialobox, refer to Chapter 5, Modifying the Test Executive.
© National Instruments Corporation 3-13 LabVIEW Test Executive Reference Manual

Chapter 3 Operating the Test Executive
he lid )
x,
AIL t
er
. The de.
to
Default UUT Information Dialog BoxThe default UUT Information dialog box prompts you to enter a serial number for the device to be tested on the next execution of the test sequence.
The default UUT Information dialog box appears only when you click tTest UUT button. The Test Executive accepts any ASCII string as a vaserial number. Click the OK button or press <Enter> (<return>, <Return>to confirm the serial number. Click the Stop button to stop UUT testing.
For information about modifying the default UUT Information dialog borefer to Chapter 5, Modifying the Test Executive.
Default Test Failed Dialog BoxThe default Test Failed dialog box appears when a step fails and the FAction of the step is set to Callback . The dialog box prompts you to selecan action—Continue, Stop, or Retry.
If you click the Continue button, the Test Executive logs the step failureand continues with the next step in the sequence. If you click Stop, the Test Executive stops testing the UUT. If you click the Retry button, the Test Executive runs the failed step again.
For information about modifying the default Test Failed dialog box, refto Chapter 5, Modifying the Test Executive.
Default PASS/FAIL/ABORT BannersThe default PASS/FAIL/ABORT banners indicate whether the current UUT passed, failed, or was aborted. In Test UUT mode, one of these banners appears at the end of test sequence execution for each UUTdefault PASS/FAIL/ABORT banners do not appear in Single Pass moClick the OK button or press <Enter> (<return>, <Return>) to acknowledge a banner and continue testing.
For information about modifying the PASS/FAIL/ABORT banners, refer Chapter 5, Modifying the Test Executive.
LabVIEW Test Executive Reference Manual 3-14 www.natinst.com

Chapter 3 Operating the Test Executive
ere ng
me ce. n VI.
that
e
Run-Time Error Warning Dialog BoxA Run-Time Error dialog box appears when a step reports an error. Thare two types of Run-Time Error dialog boxes that appear. The followiillustration shows the general Run-Time Error dialog box.
The dialog box shown in the following illustration appears when a run-tierror occurs and you have specified a Post-Run VI for the test sequenWhen this prompt appears, you can choose whether to run the Post-Ru
Parsing Error Dialog BoxThe Parsing Error dialog box appears when the Test Executive detectsa test sequence contains one of the following errors:
• Invalid step resource
• Invalid step name
• Invalid step type
• Invalid limit specification
• Invalid dependency expression
• Invalid GOTO destination
After clicking the OK button in the Parsing Error dialog box, you can usthe Sequence Errors dialog box to find and fix the errors in the test sequence. To show the Sequence Errors dialog box, select Sequence»Sequence Errors... in the Sequence Editor. For more details about the Sequence Errors dialog box, see Chapter 4, Creating Tests and Test Sequences.
© National Instruments Corporation 3-15 LabVIEW Test Executive Reference Manual

© National Instruments Corporation 4-1 LabVIEW Test Executive
4
test n snt izard n
Is. s for e
d
n its nfo
ne mpts
Creating Tests and Test Sequences
This chapter describes the process of creating new test programs andsequences for execution by the Test Executive. The Test Executive cacall two different types of test programs—LabVIEW VIs and C function(Windows NT/98/95 and UNIX).
Writing LabVIEW TestsThe LabVIEW VIs called by the Test Executive must have a specific fropanel and connector pane structure. The Test Executive includes a wto help you create new Test VIs that meet this specification, or you cacreate test VIs manually.
To run the wizard, select Project»Test Executive»Utilities»VI Wizard…. In the wizard, you can open template VIs for the various types of test VThe template VIs contain the correct front panels and connector paneuse with the Test Executive. To use a template VI, add your code to thblock diagram and save the VI.
You also can create test VIs manually. Use the type definitions includewith the Test Executive, which you can access by selecting Controls»User Controls»Test Executive Typedefs.
Every test VI must contain the Test Data cluster and error out cluster ofront panel and connector pane. The input buffer string and invocation icluster are optional.
Note If the Test Executive calls a test VI that does not have the correct connector paconfiguration, it attempts to assign the correct connector pane to the VI and then proyou to save the VI with the new connector pane.
Reference Manual

Chapter 4 Creating Tests and Test Sequences
by
inal
Required Indicators
Test Data ClusterA test VI uses the Test Data cluster for transmitting result data neededthe Test Executive to make a PASS/FAIL determination.
Table 4-1 lists the elements contained in the Test Data cluster.
You must wire the Test Data cluster to the shaded connector pane termon your test VI, shown in the following illustration.
When you create a test VI, use the Test Executive typedef TYPEDEF-Test Data.ctl for result information. For more information about Test Executive typedefs, see Chapter 5, Modifying the Test Executive.
Table 4-1. Test Data Cluster Elements
Name Type Meaning
PASS/FAIL Flag
Set by test VI to indicate whether test passed or failed. This flag is used if the limit specification of the test is Boolean.
Numeric Measurement
Numeric measurement value used by Test Executive for Pass/Fail evaluation.
String Measurement
String value used by Test Executive for Pass/Fail evaluation.
User Output String used to hold test-specific output data. Output data of any type can be flattened to string and passed out in thisbuffer.
Comment Comment from VI that is included in the Test Report.
LabVIEW Test Executive Reference Manual 4-2 www.natinst.com

Chapter 4 Creating Tests and Test Sequences
the
ine if en rror
inal
es ify ing
sing this
Error ClusterA test VI must contain an error out cluster. Table 4-2 lists the elementserror out cluster contains.
The Test Executive uses the contents of the error out cluster to determa run-time error occurs and takes appropriate action, if necessary. Whyou create a test VI, use the standard LabVIEW error out cluster for einformation.
You must wire the error out cluster to the shaded connector pane termon your test VI, shown in the following illustration.
Optional Inputs
Input BufferA test VI optionally may have a string control on its front panel that servas an input buffer. This input buffer allows your test sequence to specinput data for the test VI. The Test Executive does not define the meanor content of the input buffer. It is a general-purpose mechanism for pasany data into a test VI. The test VI defines the meaning and content ofbuffer. To add an Input Buffer control to your test VI, use the Test Executive typedef TYPEDEF-Input Buffer.ctl . For more information about Test Executive typedefs, see Chapter 5, Modifying the Test Executive.
Table 4-2. Error Cluster Elements
Name Type Meaning
Status True if an error occurred, False otherwise
Code 0 if no error, non-0 to indicate specific error
Source Name of the VI that caused the error and text description of the error
© National Instruments Corporation 4-3 LabVIEW Test Executive Reference Manual

Chapter 4 Creating Tests and Test Sequences
on
e rrent est
tor
n a ns g
You must wire the Input Buffer to the shaded connector pane terminalyour test VI, shown in the following illustration.
Invocation Information A test VI may have an Invocation Information cluster on its front panelto receive run-time calling information from the Test Executive. The Invocation Information cluster contains information about the sequencbeing run, the UUT being tested, and the name and loop count of the custep. To add an Invocation Information control to your test VI, use the TExecutive typedef TYPEDEF-Invocation Information.ctl . For more information about Test Executive typedefs, see Chapter 5, Modifying the Test Executive.
You must wire the Invocation Information cluster to the shaded connecpane terminal on your test VI, shown in the following illustration.
Writing C Tests (Windows NT/98/95 and UNIX)C-based tests that can be called by the Test Executive are functions i32-bit DLL (Windows NT/98/95) or shared library (UNIX) with a specificfunctional prototype. These test functions are equivalent to the functiocalled by the LabWindows/CVI Test Executive but can be created usinany compiler capable of creating standard DLLs or shared libraries.
Test functions should have the following prototype:
void SampleTest(tTestData *data, tTestError *error);
LabVIEW Test Executive Reference Manual 4-4 www.natinst.com

Chapter 4 Creating Tests and Test Sequences
t
d
il
Test Data StructureA test function uses the tTestData structure to transmit data results thathe Test Executive uses to determine if a test passed or failed. The tTestData structure is defined in the following way:
typedef struct {
int32 result;
double measurement;
char *inBuffer;
char *outBuffer;
char *modPath;
char *modFile;
void *hook;
int32 hookSize;
void *mallocFuncPtr;
void *freeFuncPtr;
} tTestData;
Table 4-3 lists the tTestData structure parameters.
Table 4-3. tTestData Structure Parameters
Name Type Description
result 32-bit signed integer Set by test function to indicate whether test passe(result=1) or failed (result=0). This flag is observed only if the test has been set to pass or fabased on a Boolean comparison.
measurement 64-bit floating-point number
Measurement value used for Test Executive Pass/Fail evaluation.
inBuffer string pointer String passed in by the Test Executive.
outBuffer string pointer String passed out by the Test Executive.
modPath string pointer Directory path of file containing test function.
modFile string pointer Filename of file containing test function.
hook generic pointer Not used by the LabVIEW Test Executive.
hookSize 32-bit signed integer Not used by the LabVIEW Test Executive.
© National Instruments Corporation 4-5 LabVIEW Test Executive Reference Manual

Chapter 4 Creating Tests and Test Sequences
ified
ts
The Test Executive allocates and frees an input buffer when one is specfor the test. The test function must allocate the outBuffer if needed (using the malloc() function pointed to by mallocFuncPtr), but the Test Executive frees it. If your test function needs access to another file in idirectory (such as a LabWindows/CVI .uir file), you can use the modPath and modFile fields to construct the filename. These fields helpyou avoid problems if you later move the module containing the test.
Test Error StructureA test function reports errors with the tTestError structure. The tTestError structure is defined in the following way:
typedef struct {
int32 errorFlag;
int32 errorLocation;
int32 errorCode;
char *errorMessage;
} tTestError;
Table 4-4 lists the tTestError structure parameters.
mallocFuncPtr generic pointer Function pointer to malloc() function used to allocate outBuffer and errorMessage in Test Error structure.
freeFuncPtr generic pointer Function pointer to free() function pointer to be used in conjunction with the malloc() function pointed to by mallocFuncPtr.
Table 4-4. tTestError Structure Parameters
Name Type Description
errorFlag 32-bit signed integer errorFlag=1 if an error occurred, errorFlag=0 otherwise.
errorLocation 32-bit signed integer Not used by the LabVIEW Test Executive.
errorCode 32-bit signed integer errorCode=0 for no error, non-zero to indicate a specific error.
errorMessage string pointer Text description of error (allocated with mallocFuncPtr ).
Table 4-3. tTestData Structure Parameters (Continued)
Name Type Description
LabVIEW Test Executive Reference Manual 4-6 www.natinst.com

Chapter 4 Creating Tests and Test Sequences
ny or
end ch as d to
e
. rror
rrect
of s:
The Test Executive uses the contents of the tTestError structure to determine if a run-time error occurred and takes appropriate action.
Compiling Test FunctionsTest functions should be compiled using C calling conventions using acompiler that can produce standard 32-bit DLLs (Windows NT/98/95) shared libraries (UNIX).
Creating Pre-Run and Post-Run VIsPre-run and Post-run VIs are special VIs that run at the beginning andof each test sequence. They are used for test system configuration, suturning on a vacuum pump or shutting down power supplies, as opposemaking measurements for a specific test. In general, the Pre-run and Post-run VIs always execute, regardless of the status of any test. If thPre-run or Post-run VI encounters a situation that prevents the test sequence from executing, it indicates the condition as a run-time errorPre-run and Post-run VIs do not log data They simply return run-time einformation.
Like standard LabVIEW tests, Pre-run and Post-run VIs must have theclusters Test Data and error out on their front panels and wired to the coconnector pane terminals.
What is a Test Sequence?A test sequence consists of a collection of data that describes the flowtest execution. The main components of a test sequence are as follow
• List of steps
• Pre-run VI (optional)
• Post-run VI (optional)
• Set of sequence callback VIs (optional)
• Dependencies for flow control based upon PASS/FAIL results
• Global flag for stopping testing on any failure
• Test report file information
• Description of the sequence
• Sequence load specification
• Sequence path specification
© National Instruments Corporation 4-7 LabVIEW Test Executive Reference Manual

Chapter 4 Creating Tests and Test Sequences
ess. r
e
ed
ts
its
or ion
What is a Step?A step consists of a combination of specifications that tell the Test Executive how to perform a single execution element in the testing procSteps can be of four different types—LabVIEW Test, C Test, GOTO, oSequence. For LabVIEW Test, C Test, or Sequence steps, the specifications are as follows:
• Name
• Resource file for LabVIEW VI, DLL/shared library, or Test Executivsequence file
• Function name for C Tests only
• Limit Specification for determining PASS/FAIL status of step for LabVIEW Tests and C Tests only
• Dependency expression
• Load specification indicating whether the step resource is pre-loador loaded dynamically
• Run Mode specifying whether step executes normally
• FAIL Action and maximum loop count if applicable
• Optional input specifiers (Input Buffer for LabVIEW Tests and C Tesonly, Invocation Information for LabVIEW Tests only)
• Panel Display specifier to indicate whether the test VI should showpanel at run time for LabVIEW Tests only
For GOTO, the step specifications are as follows:
• GOTO target
• Dependency expression
Creating or Editing a Test SequenceTo create or edit a test sequence, you must invoke the Sequence Editwhen the Test Executive is at the Developer operating level. This sectdescribes the operation of the Sequence Editor.
LabVIEW Test Executive Reference Manual 4-8 www.natinst.com

Chapter 4 Creating Tests and Test Sequences
e r ne new on.
tly Editor
into e
t
Step Editing Elements
InsertUse the above and below radio buttons to indicate where new steps areinserted or pasted into the sequence list. If you select the above button, new steps are inserted or pasted above the currently selected element in thsequence list. If you select the below button, new elements are inserted opasted below the currently selected element. If you select more than oelement in the sequence list, the Test Executive inserts or pastes the elements either above or below the first or last element in your selecti
New StepWhen you click the New Step button, the Sequence Editor inserts a newstep into the sequence list. Use the above and below radio buttons to determine where the new step is inserted.
Copy Steps, Cut Steps, Delete Steps, Paste Steps, and Undo Step EditsWhen you click the Copy Steps or Cut Steps button or select Edit»Copy Steps or Edit»Cut Steps, the Sequence Editor copies or cuts the currenselected sequence steps, including groups of steps, to the Sequence clipboard.
When you click the Delete Steps button or select Edit»Delete Steps, the Sequence Editor deletes the currently selected steps.
When you click the Paste Steps button or select Edit »Paste Steps, the Sequence Editor inserts the contents of the Sequence Editor clipboardthe sequence list according to the setting of the Insert switch. When thSequence Editor clipboard is empty, the Paste Steps button is disabled, and the Edit»Paste Steps menu item is dimmed.
When you click the Undo Step Edits button or select Edit»Undo Step Edits, the Sequence Editor reverses the last edit action. If you have nomade any changes or have just reversed an action, the Undo Step Edits button is disabled, and the Edit»Undo Step Edits menu item is dimmed.
Note For a list of Element Editing Control key and menu shortcuts, see the Sequence Editor Control Key Assignments and Sequence Editor Menu Shortcuts sections in this chapter.
© National Instruments Corporation 4-9 LabVIEW Test Executive Reference Manual

Chapter 4 Creating Tests and Test Sequences
low to
ition adio el.
, hich
that p.
that p.
he lect
d
Using the Editing Elements Adding a New StepThe Test Executive allows you to insert a new step either above or bean existing step in the sequence list. Perform the following operationsadd a new step to a sequence.
1. Select the existing step in the sequence list and set the insert posto above or below, as desired. The insert position is set using the rbutton control in the upper right corner of the Sequence Editor pan
2. Click the New Step button. Notice that clicking this button adds a newuntitled step to the sequence list and selects the Name control, wallows you to name the new step.
3. Enter or select the desired values in the step editor controls. Noticethe Test Executive automatically applies the new values to the ste
Modifying a StepPerform the following operations to modify a step.
1. Click the step you want to edit in the sequence list. Notice that thesettings for the selected step appear in the step editing area.
2. Enter or select the desired values in the step editor controls. Noticethe Test Executive automatically applies the new values to the ste
Copying a StepTo copy a step, perform the following operations.
1. Click the step you want to copy in the sequence list.
2. Click the Copy Steps button or select Edit»Copy Steps to copy the selected step to the Sequence Editor clipboard.
3. To insert the step above an existing step, select the step and set tinsert position to above. To insert the step below an existing step, sethe step and set the insert position to below.
4. Click the Paste Steps button or select Edit»Paste Steps. The Sequence Editor inserts the contents of the clipboard in the desirelocation in the sequence list.
Deleting a StepTo delete a step, perform the following operations.
1. Click the step you want to delete in the sequence list.
2. Click the Delete Steps button or select Edit»Delete Steps.
LabVIEW Test Executive Reference Manual 4-10 www.natinst.com

Chapter 4 Creating Tests and Test Sequences
This veral .
d or e first
the
these
e. den.
e. The y to
ts,
For et or
Mass EditingThe Sequence Editor allows you to edit more than one step at a time. feature is useful when you need to make the same modifications to sesteps. To mass edit a group of steps, perform the following operations
1. Select the steps you want to edit by <Shift>-clicking them in the sequence list.
Note To add or remove steps from the current selection, <Shift>-click the step. To adremove a group of adjacent steps to the selection, hold down the <Shift> key, click thstep in the group, and drag the mouse pointer to the last step in the group.
2. Enter or select the desired values in the step editor controls. The Sequence Editor automatically applies the changes to every step inselection.
3. To exit mass edit mode, select a single step in the sequence list.
Step Editor ControlsThis section describes the step editor controls and indicators. You use controls, such as Select Resource and the Set Limit Specification, to modify the definition of any step in the sequence.
TypeUse the Type ring control to choose the type of the selected step. Theavailable step types are LabVIEW Test, C Test, GOTO, and SequencDepending on the type selected, other editor controls are shown or hid
Name (LabVIEW Test, C Test, Sequence)Type an ASCII string in the Name control. The name appears in the Sequence Display of the main Test Executive front panel when the sequence is loaded. Each step in a sequence must have a unique namSequence Editor warns you if a step is not properly named when you trquit the editor.
Resource (LabVIEW Test, C Test, Sequence)The Resource indicator contains the path to the resource that the stepexecutes. For LabVIEW tests, the resource is a valid test VI. For C testhe resource is a DLL or shared library containing a valid test function. Sequence steps, the resource is a Test Executive sequence file. To schange the resource, click the Select Resource… button. From the dialog
© National Instruments Corporation 4-11 LabVIEW Test Executive Reference Manual

Chapter 4 Creating Tests and Test Sequences
er he
t
e ectly
ype
box that appears, select a valid resource file from the file system (eithlocal or network). The path to the resource file you select appears in tResource indicator.
Function (C Test)Type the name of the function found with the DLL or shared library specified in the Resource indicator. This function must be a valid C tesfunction.
Limit Specification (LabVIEW Test, C Test)The Limit Specification indicator specifies the type of limit checking thTest Executive uses to determine if a step passes. You cannot type dirinto the Limit Specification indicator. To specify a limit, click the Set Limit Specification… button next to the indicator. Then use the ring control to set the comparison type and the string controls to set the measurement.
The Comparison Type ring control specifies the type of comparison to perform, if any, to determine if a step passed. Select the desired limit tfrom the Comparison Type ring control. Table 4-5 lists the meaning of each value of Comparison Type.
Table 4-5. Comparison Type Values
Type Condition for Test to Pass
EQ (==) Numeric Measurement = Lower Limit
NE (!=) Numeric Measurement != Lower Limit
GT (>) Numeric Measurement > Lower Limit
LT (<) Numeric Measurement < Lower Limit
GE (>=) Numeric Measurement >= Lower Limit
LE (<=) Numeric Measurement <= Lower Limit
GTLT (> && <) Numeric Measurement > Lower Limit and < Upper Limit
GTLE (> && <=) Numeric Measurement > Lower Limit and <= Upper Limit
GELT (>= && <) Numeric Measurement >= Lower Limit and < Upper Limit
GELE (>= && =<) Numeric Measurement >= Lower Limit and <= Upper Limit
Boolean PASS/FAIL Flag = TRUE
LabVIEW Test Executive Reference Manual 4-12 www.natinst.com

Chapter 4 Creating Tests and Test Sequences
it it
ent
ng
the s tive tive
Depending on the setting of Comparison Type, zero, one-limit, or two-limentry controls appear in the Set Limit Specification dialog box. A one-limvalue appears for Comparison Types of EQ (==) , NE (!=) , GT (>) , LT (<) , GE (>=) , or LE (<=) . Two-limit values, a lower and upper limit,appear for Comparison Types of GTLT (> && <) , GELE (>= && <) , GELT (>= && <) , or GTLE (> && <=) .
When the Comparison Type is String , the string limit control appears. The Test Executive compares the string value with the string measuremthat the step calculates. There are no limits for Comparison Types of Boolean , Log only , or None.
For numeric comparisons, use the Format control to view the numericlimits in fractional, scientific, decimal, hexadecimal, octal, or binary format. For string comparisons, use the Display control to view the strilimit in normal, hex, or ‘\’ codes mode.
Load Specification (LabVIEW Test, C Test, Sequence)Load Specification determines whether the step resource loads when sequence loads (pre-load) or loads upon demand when the step execute(dynamic-load). Pre-load steps run much faster because the Test Execudoes not need to load them during the test sequence. The Test Execuloads dynamic-load steps just before running them and unloads them immediately after running them.
String String Measurement = String Limit
Log only No PASS/FAIL determination–measurement is logged
None No PASS/FAIL determination or data logging
Table 4-5. Comparison Type Values (Continued)
Type Condition for Test to Pass
© National Instruments Corporation 4-13 LabVIEW Test Executive Reference Manual

Chapter 4 Creating Tests and Test Sequences
for
he
ns
ass . If ta. If
Run Mode (LabVIEW Test, C Test, Sequence)Run Mode specifies how the step executes. Table 4-6 lists the optionsRun Mode and their meanings.
FAIL Action (LabVIEW Test, C Test, Sequence)FAIL Action specifies an action to take if the step fails. Table 4-7 lists toptions for FAIL Action and their meanings.
Max Loop CountThe Max Loop Count control appears only when FAIL Action is set to Loop . Max Loop Count specifies the maximum number of loop iteratioto perform when the FAIL Action is set to Loop , and the step fails. Settingthe loop count to -1 causes the step to loop until the operator clicks on either the Abort Loop or Abort button, or the step passes.
Input Buffer? (LabVIEW Test, C Test)The Input Buffer? control specifies whether the Test Executive should pa buffer of input data to the test VI or function when it executes the stepyou clear this checkbox, the Test Executive does not pass any input da
Table 4-6. Run Mode Options
Run Mode Meaning
Normal Execute step normally.
Skip Do not execute the step; set result to SKIP.
Force PASS Do not execute the step; set result to PASS.
Force FAIL Do not execute the step; set result to FAIL .
Table 4-7. FAIL Action Options
FAIL Action Meaning
Continue Continue execution with next step.
Stop Stop execution of sequence.
Callback Call the Test Failure sequence callback VI to determine whether to continue, stop, or retry the step.
Loop Repeat execution of the step.
LabVIEW Test Executive Reference Manual 4-14 www.natinst.com

Chapter 4 Creating Tests and Test Sequences
s ust st
ffer?
ses
n.
he
test nel
st not s an
VI
ep.
you check this box, the Input Buffer string control appears, which allowyou to enter the input data. To pass input data to a test VI, the test VI mhave an Input Buffer string control on its front panel. Otherwise, the TeExecutive cannot execute the step. For more details about the Input Bucontrol, see the Test Executive Typedef Controls section in Chapter 5, Modifying the Test Executive. No additional operations are necessary topass input data to a C test function.
Invocation Info? (LabVIEW Test)The Invocation Info? control specifies whether the Test Executive pasrun-time call information to the test VI when it executes the step. If youclear this checkbox, the Test Executive does not pass run-time call information to the test VI. If you check this box, the Invocation Info? control appears, which allows you to enter the run-time call informatioTo pass invocation information to a test VI, the test VI must have an Invocation Information cluster control on its front panel. Otherwise, theTest Executive cannot execute the step. For more information about tInvocation Info? control, see the Test Executive Typedef Controls section in Chapter 5, Modifying the Test Executive.
Show Test VI Panel at Runtime? (LabVIEW Test)The Show Test VI Panel at Runtime? control determines whether the VI shows its panel at run time. If you select this checkbox, the test VI pashows at run time. Otherwise, the test VI panel remains closed.
Edit Test VI (LabVIEW Test)The Edit Test VI button is linked to a callback VI. The default Open TeVI callback opens the test VI panel for the current step. If the test VI is defined or is invalid, the callback VI cannot open the panel and displayerror message. You use the Edit Test VI button to edit test VIs from within the Sequence Editor. Modifying or replacing the Open Test VI callbackmakes the Edit Test VI button perform different functions. For more details, see the Advanced Modifications section in Chapter 5, Modifying the Test Executive.
Edit DependenciesThe Edit Dependencies… button invokes the Dependency Editor, allowing you to examine or modify the dependencies for the current stFor more details, see the Editing Dependencies section of this chapter.
© National Instruments Corporation 4-15 LabVIEW Test Executive Reference Manual

Chapter 4 Creating Tests and Test Sequences
r f you x
tive ithin
TO
ual
ep to ou
f the n to
l step ses
Edit Step Comment (LabVIEW Test, C Test, GOTO, Sequence)With the Edit Step Comment… button, you can edit the comment field fothe step. The Sequence Report callback VI can access this comment. Iclick the Edit Step Comment… button, the Edit Step Comment dialog boappears.
GOTO Target (GOTO)Enter the name of a step in the GOTO Target control. If the Test Execuexecutes this step, sequence execution skips to the GOTO Target. Wthe Test Executive, step names are case-sensitive.
GOTO Conditions (GOTO)The GOTO Conditions… button invokes the Dependency Editor, allowing you to examine or modify the dependencies for the current GOstep. For more information, see the Editing Dependencies section later in this chapter.
Sequence OptionsTo view or set the Sequence Options, select Sequence»Sequence Options….
Sequence Load SpecificationYou use the Sequence Load Specification control to override the individload settings for every step in the sequence. The default setting is Use each step’s load specification , which means that when the Test Executive loads the sequence, it uses the load specification of each stdetermine whether to pre-load or dynamically load step resources. If yset the Sequence Load Specification to Pre-load all steps , the Test Executive pre-loads every step resource in the sequence regardless oload specification of the step. If you set the Sequence Load SpecificatioDynamic-load all steps , the Test Executive dynamically calls each step resource, regardless of the load specification of the step. When alresources are pre-loaded, the Test Executive runs faster, but it also umore memory. When step resources are dynamically loaded, the TestExecutive runs more slowly but uses less memory.
LabVIEW Test Executive Reference Manual 4-16 www.natinst.com

Chapter 4 Creating Tests and Test Sequences
ecify s, and Path
the
est
,
of
the nce
the
Sequence Path SpecificationTo make moving sequence files between computers easier, you can sphow the Test Executive resolves paths to step resources, sequence VIthe test report file specified in a sequence file. Through the SequenceOptions dialog box in the Sequence Editor, you can set the SequenceSpecification to Absolute , Relative to sequence file , or Relative to Test Executive default .
With a Sequence Path Specification of Absolute , the Test Executive expects to find step resources, sequence VIs, and the test report file inexact location where they were when you saved the sequence file.
For a Sequence Path Specification of Relative to sequence file , the Test Executive expects to find test resources, sequence VIs, and the treport file in positions relative to the location of the sequence file.
When the Sequence Path Specification is set to Relative to Test
Executive default , the Test Executive expects to find test resourcessequence VIs, and the step report file in positions relative to the path specified in the DefaultResourceFilePath preference in the testexec.ini file. For additional information about the testexec.ini configuration file, see the System Configuration File, testexec.ini section in Chapter 5, Modifying the Test Executive.
Stop on Any FailureIf set, the Stop on Any Failure checkbox stops sequence execution immediately after any step fails. This setting overrides the FAIL Actionany individual step.
DescriptionThe Description button allows you to edit the description of the test sequence. If you click the Description button, the Edit Description dialog box appears. The description you create in this dialog box appears in Test Report that the Test Executive generates at the end of test sequeexecution.
Enable Test Report LoggingThe Test Executive logs the Test Report to the file specified, if any, in Test Report File indicator.
© National Instruments Corporation 4-17 LabVIEW Test Executive Reference Manual

Chapter 4 Creating Tests and Test Sequences
hen ou
est
st to the
hen, g
ew
nt the
rrors
rrors
Report File ModeThe Report File Mode control specifies the Test Executive response wa file already exists with the name in the Test Report File indicator. If yset Report File Mode to Overwrite , the new report replaces any existingfile contents. If you set Report File Mode to Append , the Test Executive appends the new report to the existing file. If the file does not exist, the TExecutive creates a file, regardless of the mode.
Change Report FileThe Change Report File button specifies the pathname for the ASCII TeReport file generated at the end of test sequence execution. The path file you specify appears in the Test Report File indicator.
Sequence VIsThe term sequence VIs refers to the Pre-Run VI, Post-Run VI, and sequence callback VIs for a particular sequence.
You use the Select VI control to choose any one of the sequence VIs. Tyou change the path for that VI in the VI Path control. Alternately, clickinthe Browse button activates a file dialog box, so you can browse for a nsequence VI. If you select a new sequence VI and click the OK button, the path to that VI is stored in the VI Path control.
To open the front panel of the current sequence VI, click the Open VI button. You can then examine or edit the VI. If the VI Path for the curresequence VI is empty or invalid, the Sequence Editor is not able to openpanel and displays an error message.
To clear the current sequence VI, click the Clear VI button. To save the changes that you make in the Sequence Options dialog box, click the OK button. To discard the changes, click the Cancel button.
Sequence ErrorsWhen you select Sequence»Sequence Errors…, the Sequence Editor checks the test sequence for errors. If the Sequence Editor finds no ein the sequence, it displays the message No Sequence Errors . If it finds errors in the sequence, the Sequence Editor displays the Sequence Edialog box.
The Sequence Errors dialog box lists steps that have errors in the Bad Steps list box. When you select a step from the Bad Steps list box, the errors for the selected step appear in the Step Problems list box. If you select an error
LabVIEW Test Executive Reference Manual 4-18 www.natinst.com

Chapter 4 Creating Tests and Test Sequences
rs
e rs ep. uence ests lists
age
to ges
in the Step Problems list box, an explanation of the selected error appeain the Details list box.
For some errors, the Sequence Errors dialog box displays a CorrectivAction. For example, if a step has an empty name, the Sequence Errodialog box displays a Corrective Action of changing the name of the stHowever, if the error is that the step does not have a resource, the SeqErrors dialog box does not display a Corrective Action. Instead, it suggthat you assign a resource to the step in the Sequence Editor. Table 4-8the errors that the Sequence Editor detects and the corresponding Corrective Actions.
If you enter a Corrective Action, you must click the Apply button to apply the corrective action to the sequence. After you click the Apply button, the Sequence Errors dialog box updates to reflect the application of the Corrective Action. When you fix the last error in the sequence, the messThere are no sequence errors. appears in the Details list box.
Clicking the OK button in the Sequence Errors dialog box returns you the Sequence Editor and updates any changes you make. Clicking theCancel button returns you to the Sequence Editor and discards any chanyou make.
Table 4-8. Possible Errors and Corrective Actions in the Sequence Errors Dialog Box
Error Corrective Action
Step with no name Change selected step name
Step with duplicate name Change selected step name
Step with invalid resource None
Step with invalid limit specification
None
GOTO step with invalid target Change GOTO target in selected GOTO or all GOTOs
Step with error in dependency None
Step dependent on invalid stepChange step name in selected dependency, selected expression, or all expressions
Step with invalid dependency condition
None
© National Instruments Corporation 4-19 LabVIEW Test Executive Reference Manual

Chapter 4 Creating Tests and Test Sequences
not ting nce
ade
aved
st em. x
the
edit s
r
File MenuSelecting File»Save… saves the current sequence. If the sequence hasyet been saved, a dialog box prompts you for a path or filename. SelecSave As… prompts you for a filename and then saves the current sequeunder that name. Selecting Exit returns you to the main Test Executive front panel, prompting you to save if any changes were made. If you mchanges to the sequence or saved it under a different name, the Test Executive unloads the old sequence hierarchy and reloads the new, shierarchy.
When you select Save… or Save As…, the Sequence Editor scans the tesequence for errors. If any errors are found, you are prompted to fix thIf you choose to fix the sequence errors, the Sequence Error dialog boappears. Selecting Save… or Save As… without fixing sequence errors saves a sequence that cannot be executed by the Test Executive untilerrors are fixed.
Edit MenuUse the Cut Steps, Copy Steps, Paste Steps, Delete Steps, and Undo Step Edits menu items to edit steps as described in the Step Editing Elements section earlier in this chapter.
Use the Cut, Copy, Paste, Clear, and Undo menu items to edit data in Sequence Editor controls other than the Steps List. For example, if youthe contents of the Input Buffer string, use the menu items listed in thiparagraph.
Sequence Editor Control Key AssignmentsUse the keyboard shortcuts listed in Table 4-9 for the Sequence Editocontrols.
Table 4-9. Key Assignments for Sequence Editor Controls
Control Key Assignment
Sequence List <F3>
Insert <F4>
New Step <F5>
Copy Steps <F6>
Cut Steps <F7>
LabVIEW Test Executive Reference Manual 4-20 www.natinst.com

Chapter 4 Creating Tests and Test Sequences
Delete Steps <F8>
Paste Steps <F9>
Undo Step Edits <F10>
Type <Shift-F1>
Name <Shift-F2>
Function <Shift-F3>
Set Limit Specification... <Shift-F4>
Select Resource… <Shift-F5>
Edit Dependencies <Shift-F6>
Edit Step Comment <Shift-F7>
Edit Test VI <Shift-F8>
GOTO Target <Shift-F9>
GOTO Condition <Shift-F10>
Load Specification <Ctrl-F1>
Run Mode <Ctrl-F2> (<command-F2>, <meta-F2>, <Alt-F2>)
FAIL Action <Ctrl-F3> (<command-F3>, <meta-F3>, <Alt-F3>)
Max Loop Count <Ctrl-F4> (<command-F4>, <meta-F4>, <Alt-F4>)
Input buffer? <Ctrl-F5>
Invocation Info? <Ctrl-F6>
Show VI Panel at Runtime? <Ctrl-F7>
Input Buffer <Ctrl-F8>
Table 4-9. Key Assignments for Sequence Editor Controls (Continued)
Control Key Assignment
© National Instruments Corporation 4-21 LabVIEW Test Executive Reference Manual

Chapter 4 Creating Tests and Test Sequences
or
led a
ps in
Sequence Editor Menu ShortcutsUse the keyboard shortcuts listed in Table 4-10 for the Sequence Editmenu commands.
Editing DependenciesConditional execution of one step based on the result of another is caldependency. Use the Dependency Editor dialog box to define dependencies for steps.
The Dependency Editor dialog box shows the dependencies for all stethe sequence. The name of each step appears in the Steps list box in the top-left corner of the Dependency Editor dialog box. To see the
Table 4-10. Sequence Editor Menu Commands
Menu Item Key Assignment
File»Save <Ctrl-S> (<command-S>, <meta-S>, <alt-S>)
Undo Step Edits <Ctrl-Shift-Z> (<command-Shift-Z>, <meta-Shift-Z>, <alt-shift-Z>)
Cut Steps <Ctrl-Shift-X> (<command-Shift-X>, <meta-Shift-X>, <alt-shift-X>)
Copy Steps <Ctrl-Shift-C> (<command-Shift-C>, <meta-Shift-C>, <alt-shift-C>)
Paste Steps <Ctrl-Shift-V> (<command-Shift-V>, <meta-Shift-V>, <alt-shift-V>)
Undo <Ctrl-Z> (<command-Z>, <meta-Z>, <alt-Z>)
Cut <Ctrl-X> (<command-X>, <meta-X>, <alt-X>)
Copy <Ctrl-C> (<command-C>, <meta-C>, <alt-C>)
Paste <Ctrl-V> (<command-V>, <meta-V>, <alt-V>)
LabVIEW Test Executive Reference Manual 4-22 www.natinst.com

Chapter 4 Creating Tests and Test Sequences
ep in
e
ome
cy. ly if
en
omes fore . In ALSE.
r
AND Test sion
dependencies for any step in the sequence, select that step in the Steps list box. The Dependency Editor then displays the dependencies for that stthe Dependencies list box. At the same time, the Dependency Editor updates the New Determinants list box to show the list of steps that can badded to the dependencies. If you select a GOTO step in the Steps list box, the New Determinants list includes every step in the sequence. If you select a step, the New Determinants list includes every step in the sequence except for that step. A step cannot be dependent on itself.
Perform the following operations to make a step dependent on the outcof another step.
1. Select the dependent step in the Steps list box.
2. Select the determinant step in the New Determinants list box and click the » button to add it to the Dependencies list box. This adds a FAIL dependency for the determinant step to the Dependencies list box. Double-clicking the determinant step also adds the dependenThe FAIL dependency means that the dependent step executes onthe determinant step fails.
3. To change the dependency to a PASS dependency, click the Change to PASS button to the right of the Dependencies list box. Double-clicking the FAIL dependency also changes it to a PASS dependency.
Notice the Dependency Expression indicator at the bottom of the Dependency Editor dialog box. This indicator displays the same information as the Dependencies list box but in a different notation. The Test Executive uses this notation to store the dependencies for any givstep.
Tip It is possible to make step A dependent on the outcome of step B even if step B cafter step A in the sequence list. Through the use of GOTOS, step B can execute bestep A. If step B does not execute before step A, the result for step B is UNKNOWNsuch a case, any PASS/FAIL dependency that step A has upon step B evaluates to F
AND and OR ExpressionsWhen a step has more than one determinant step, an AND or an OR expression must define the relationship between the determinants. Foexample, suppose Test C is dependent on Tests A and B. If Test C is dependent upon Test A passing and Test B failing, then Test C has an dependency expression on Tests A and B. If Test C is dependent uponA passing or Test B failing, then Test C has an OR dependency expreson Tests A and B.
© National Instruments Corporation 4-23 LabVIEW Test Executive Reference Manual

Chapter 4 Creating Tests and Test Sequences
ion
ction.
ach
eral You TO
OR uld
ns.
ct
ncy.
R
e
Perform the following operations to add an AND dependency expressfor a step.
1. Select the desired dependent step in the Steps list box.
2. Click the Insert AND button to the right of the Dependencies list box to add a new, empty AND expression. Click the BEGIN AND statement and set the Insert switch to below.
3. Add the desired determinant steps as described in the previous se
When the Test Executive evaluates the AND expression, it evaluates eelement between the BEGIN AND and END AND statements. The AND expression only evaluates TRUE if every element inside it is TRUE.
OR expressions are similar to AND expressions in that they contain sevelements within a BEGIN OR and an END OR statement. An OR expression,however, evaluates TRUE if any one of the elements inside it is TRUE. can add a new OR expression to the dependencies for any step or GOstatement by clicking the Insert OR button. You add determinant steps tothe OR expression in the same way that you add them to an AND expression.
You can change any AND expression to an OR expression, or an OR expression to an AND expression, by selecting the BEGIN or END statement of the expression and clicking the Change to PASS button. You can also change an expression by double-clicking its BEGIN or END statement.
Complex DependenciesYou can create complex dependency expressions by nesting AND andexpressions inside each other. For example, suppose that Test D shoexecute only if Test A passes or if Tests B and C fail. To define such adependency in the Dependency Editor, perform the following operatio
1. Select Test D in the Steps list box.
2. Click the Insert OR button. After inserting the OR expression, selethe BEGIN OR statement and set the Insert switch to c.
3. Select Test A in the New Determinants list box and add it to the Dependencies list box. Use the Change to PASS button or double-click the FAIL dependency to change it to a PASS depende
4. Click the Insert AND button to nest an AND expression inside the Oexpression. After inserting the AND expression, click the BEGIN AND statement and set the Insert switch to below.
5. Add FAIL dependencies for Tests B and C by selecting them in thNew Determinants list box and clicking the » button.
LabVIEW Test Executive Reference Manual 4-24 www.natinst.com

Chapter 4 Creating Tests and Test Sequences
nd
sions ns.
rse
erts
ncies
Copy, Cut, Delete, Paste, and UndoThe Dependency Editor dialog box features cut, copy, paste, delete, aundo capabilities. You cut, copy, or delete statements from the dependencies of any step by selecting the statements in the Dependencies list box and clicking the Copy, Cut, or Delete buttons. You paste statements into the dependencies of any other step by clicking the Paste button. When the Dependency Editor clipboard is empty, the Paste button is disabled.
Note You can copy, cut, or delete individual statements or entire AND and OR expresin the Dependency Editor. However, you cannot cut, copy, or delete partial expressioWhen you select a partial expression, the Copy, Cut, and Delete buttons are disabled.
The Dependency Editor dialog box features one level of undo. You reveany edit action by pressing the Undo button. When you have not made changes or have just reversed an action, the Undo button is disabled.
Dependency Editing RulesYou cannot insert or paste elements outside the top-level dependencyexpression in the Dependency Editor. If you attempt to insert or pasteelements outside the top-level expression, the Dependency Editor insthe elements inside the expression.
OKThe OK button saves any changes you make to the sequence dependeand returns you to the Sequence Editor. Clicking the OK button saves only to memory. You must select File» Save or File»Save As… in the Sequence Editor to save changes to disk.
CancelThe Cancel button discards any changes made to the sequence dependencies and returns you to the Sequence Editor.
© National Instruments Corporation 4-25 LabVIEW Test Executive Reference Manual

Chapter 4 Creating Tests and Test Sequences
ing
step e to be
t han
Dependency Editor Key AssignmentsTable 4-11 lists the Dependency Editor controls and their keyboard shortcuts.
Relationship among Dependencies, Run Mode, and Test FlowThe dependencies and run mode for each step determine the flow of execution for a test sequence. The Test Executive performs the followsteps to determine whether to execute a given step.
1. The Test Executive evaluates the dependencies for the step. For ato execute, the dependency expression for that step must evaluatTRUE. If the Test Executive determines that the current step shouldskipped, the step result is set to SKIP.
2. If the dependencies indicate that the step should execute, the TesExecutive evaluates the Run Mode of the step. If the Run Mode isNormal , the step executes. If Run Mode is set to any value other t
Table 4-11. Dependency Editor Key Assignments
Control Key Assignment
Sequence Elements <F2>
New Determinants <F3>
» <F4>
Dependencies <F5>
Insert <F6>
Insert OR <Shift-F1>
Insert AND <Shift-F2>
Copy <Shift-F3>
Cut <Shift-F4>
Delete <Shift-F5>
Paste <Shift-F6>
Undo <Shift-F7>
Change to PASS <Shift-F8>
LabVIEW Test Executive Reference Manual 4-26 www.natinst.com
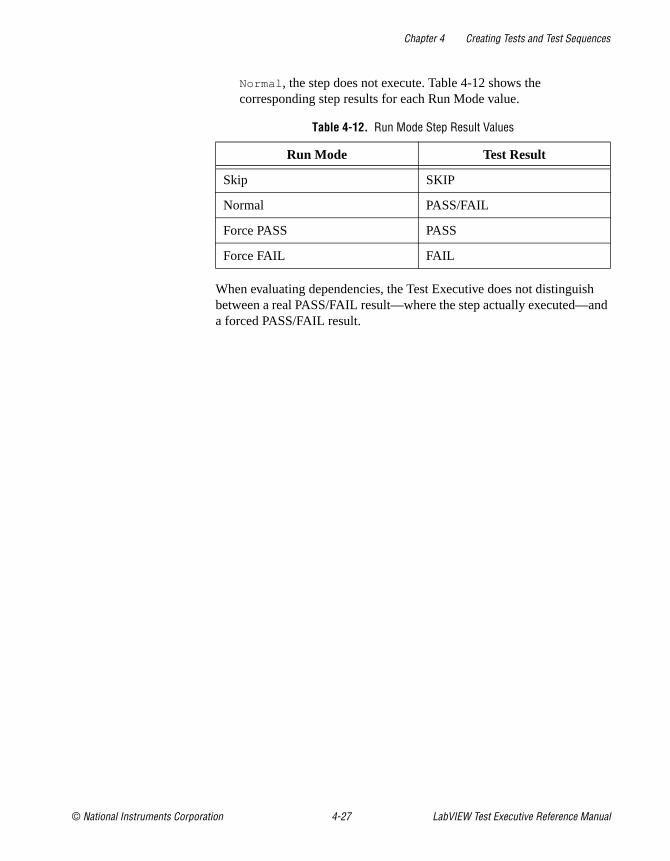
Chapter 4 Creating Tests and Test Sequences
sh and
Normal , the step does not execute. Table 4-12 shows the corresponding step results for each Run Mode value.
When evaluating dependencies, the Test Executive does not distinguibetween a real PASS/FAIL result—where the step actually executed—a forced PASS/FAIL result.
Table 4-12. Run Mode Step Result Values
Run Mode Test Result
Skip SKIP
Normal PASS/FAIL
Force PASS PASS
Force FAIL FAIL
© National Instruments Corporation 4-27 LabVIEW Test Executive Reference Manual

© National Instruments Corporation 5-1 LabVIEW Test Executive
5
lainse VI,
,
on,
ack
Modifying the Test Executive
This chapter describes the architecture of the Test Executive and exphow to make modifications to it. If you do not plan to modify the Test Executive, you can skip this chapter. The chapter covers the followingtopics:
• System configuration file, testexec.ini
• Operator interface VI
• Callback VIs
• Test Executive typedef controls
• Common modifications
• Advanced modifications
System Configuration File, testexec.iniThe system configuration file, testexec.ini , is an ASCII file that defines the names and locations of the Test Executive operator interfaccallback VIs, and preference values. The testexec.ini file is located in the Test Executive installation directory. The Test Executive creates adefault configuration file with paths to the default operator interface VIdefault callback VIs, and initial preference values if one does not existwhen it starts running.
The system configuration file is divided into three sections. The first section, [Callback Paths] , identifies the locations of all default callback VIs. The second section, [Operator Interface Path] , identifies the location of the default operator interface VI. The third secti[Preferences] , lists the preference values that the Test Executive uses.
[Callback Paths] SectionEach time you launch the Test Executive, it loads the appropriate callbVIs by reading the [Callback Paths] section of the testexec.ini file. The entries in this section have the following format:
VI_id=”VI_path”
Reference Manual
Chapter 5 Modifying the Test Executive
tive,
not
VI_id specifies a Test Executive callback VI. The system configuration file must have an entry for each of the following VI_id string values:
• Login
• Select_Sequence
• Open_Sequence
• Save_Sequence
• Close_Sequence
• Exit
• Sequence_Report
• Default_PreUUT_Loop
• Default_PreUUT
• Default_PostUUT_Loop
• Default_PostUUT
• Default_PreStep
• Default_PostStep
• Default_Test_Report
• Default_Post_Run-Loop_Test
• Default_Test_Failure
• Default_Edit_Test_VI
VI_path specifies the absolute file path to the callback VI in a platform independent format. You must enclose VI_path in double quotes and make sure that it contains no extra leading or trailing spaces. The following code shows a sample entry in testexec.ini for the Login callback VI:
Login=”/C/LV51/LVEXEC511/CALLBACK.LLB/Login
Callback.vi”
Patching Callback PathsAs described in the previous section, when you launch the Test Execuit loads the appropriate callback VIs by reading the paths from the testexec.ini file. If the path to a particular callback VI is invalid, the Test Executive prompts you to find the callback VI. This happens, for example, if you deploy the Test Executive to a different machine and doupdate the callback paths in the system configuration file.
After you locate the missing callback VI, the Test Executive patches the invalid callback VI path with the new path. Then, it prompts you to add the
LabVIEW Test Executive Reference Manual 5-2 www.natinst.com

Chapter 5 Modifying the Test Executive
tor
at
s in
t
selected VI library or directory to the search path. If you click the Yes button, the Test Executive automatically searches that VI library or directory to patch the missing paths for any other callback VIs. This searchpath is a temporary path that is deleted after you launch the Test Executive.
Note When the Test Executive patches a callback VI path, it marks the path as modified. If you try to close the Test Executive with patched callback VI paths, the Test Executive prompts you to save changes to testexec.ini . If you click the Yes button, the Test Executive saves the patched callback VI paths to testexec.ini . The next time you launch the Test Executive, it does not need to search for the callback VIs.
[Operator Interface Path] SectionWhen you launch the Test Executive Development System from the LabVIEW Project menu, the Test Executive loads the appropriate operainterface VI by first reading the [Operator Interface Path] section of the testexec.ini file. The entries in this section have the same formas those in the [Callback Paths] section. The system configuration filemust have an entry for the following VI_id string value:
Operator_Interface
[Preferences] SectionThe [Preferences] section of the testexec.ini file holds additional information the Test Executive uses to define certain values. The entriethis section have the following format:
preference_name=value
preference_name specifies the particular preference.
The first preference the default testexec.ini file specifies is TestNameDisplayLength , which is set to a default value of 21. The TestNameDisplayLength preference specifies how long the step namesshown in the Test Executive Sequence Display can be before they are truncated. If you would like to display longer step names, increase the value of this preference in testexec.ini and expand the Sequence Display lisbox to accommodate the longer names.
The second preference the default testexec.ini file specifies is DefaultResourceFilePath , which has a default value of your Test Executive installation directory. When the Sequence Path Specification is set to Relative to Test Executive default , the Test Executive uses the value of this preference as the Test Executive default directory.
© National Instruments Corporation 5-3 LabVIEW Test Executive Reference Manual

Chapter 5 Modifying the Test Executive
m to
ion ser.
ed
py
face
lect
Operator Interface VIThe operator interface VI is the main panel of the Test Executive. It isresponsible for accepting commands from the operator and passing thethe Test Executive engine. It also is responsible for receiving informatfrom the Test Executive engine and displaying that information to the u
The Test Executive package includes a default operator interface VI, callTest Executive. It is installed in the OPERATOR.LLB VI Library in the Test Executive installation directory. The Test Executive also allows you to customize the name, appearance, and/or behavior of the default operator interface VI.
Modifying the Default VIBefore you modify the default operator interface VI, make a backup coof it.
Front PanelYou can open and examine the front panel of the default operator interVI by performing the following steps.
1. Launch LabVIEW.
2. Select File»Open from the menu on the front panel and choose theTest Executive VI in the OPERATOR.LLB VI Library in the Test Executive installation directory. A Login dialog box appears becausethe default operator interface VI is configured to run when opened.
3. Log in as a developer and quit the Test Executive.
In addition to the visible controls and indicators, the front panel also contains some transparent string indicators. Dashed outlines mark thelocations of the transparent string indicators.
You can make cosmetic modifications to the operator interface VI front panel, such as resizing buttons, changing function key assignments, or pasting in a logo or other imported graphics, without editing the block diagram. However, to add new controls to the panel or change the behavior of existing controls, you must edit the block diagram.
Block DiagramTo open and examine the block diagram of the operator interface VI, seWindows»Show Diagram from the menu on the front panel.
LabVIEW Test Executive Reference Manual 5-4 www.natinst.com

Chapter 5 Modifying the Test Executive
and
ck
truct
or se in
nges .
ild
dler
Notice that the operator interface diagram consists of a command loopa clock loop. When you run the operator interface VI, it simultaneouslyruns the command loop and the clock loop until you quit the Test Executive. Notice also that the operator interface VI communicates with the Test Executive engine through subVI calls. The Test Executive allows you to open the front panel of any of these subVIs, but you cannot modify them or look at the block diagrams. The engine subVIs are shipped without blodiagrams.
Command LoopThe command loop of the operator interface VI is a state machine consdescribed in the Spring 1996 issue of the LabVIEW Technical Resource. Refer to the About this Manual chapter, of this manual, for LabVIEW Technical Resource Spring 1996 issue ordering information. It continuously scans all active controls on the operator interface panel fchanges in state. When a control changes state, the corresponding cathe command loop executes.
If you add a new control to the front panel of the operator interface, youmust edit the command loop so that it monitors and handles state chain the new control. Perform the following steps to edit the command loop
1. At the left side of the command loop diagram and in the No Event Case structure, turn the state change of your new control into a Boolean value—TRUE if the state has changed and FALSE if it has not. The default command loop contains examples of Boolean controls and numeric controls.
2. In the No Event Case structure, add an input to the bottom of the BuArray function and wire the state change value into the new input.
3. On the front panel of the operator interface, add an item to the Event List enumerated type representing your new event. Always add new events immediately before the Update Display event. Set the Event List back to No Event after adding the new event.
4. Add a case before the Update Display case in the Command Hancase structure and place the code to handle your new command in the new case.
Note If you create a new subVI and call it from your operator interface block diagram, store the new subVI in OPERATOR.LLB, so the operator interface VI finds the subVI when it is loaded.
© National Instruments Corporation 5-5 LabVIEW Test Executive Reference Manual

Chapter 5 Modifying the Test Executive
t of
e
he
mpts
Callback VIsWhen you install the Test Executive, the installer places a complete sedefault callback VIs in the CALLBACK.LLB VI Library in the Test Executive installation directory. In addition, it installs a set of typedef controls for creating your own callback VIs in the LabVIEW USER.LIB directory.
By creating your own callback VIs, you customize certain operations in the Test Executive, such as user login, prompting for UUT information, displaying PASS/FAIL banners, logging UUT Test results, and generatingTest and Sequence reports. The Test Executive engine then handles theseoperations by calling your callback VIs.
The callback VIs for different operations have different calling interfaces. The calling interface specifies a set of required inputs and outputs for thfront panel of the callback VI. For the Test Executive to successfully call acallback VI, the callback VI must have all required inputs and outputs, and the inputs and outputs must be wired to the correct terminals on tconnector pane of the VI. Refer to the example callback VIs for the required connector pane configuration for each callback VI.
Note If the Test Executive calls a callback VI that does not have the correct connector pane configuration, it attempts to assign the correct connector pane to the VI and proyou to save the VI with the new connector pane.
You use the typedef controls for the correct definitions for some of the required callback inputs and outputs. These controls are available from the Controls palette after you install the Test Executive development system. For a detailed examination of these typedef controls, see the Test Executive Typedef Controls section later in this chapter.
Test Executive Callback VI Calling InterfaceThe Test Executive calling interface includes system callback VIs andsequence callback VIs.
System CallbacksThe Test Executive includes the following system callback VIs:
• Login
• Select Sequence
• Open Sequence
LabVIEW Test Executive Reference Manual 5-6 www.natinst.com

Chapter 5 Modifying the Test Executive
s
ver st
a . If
• Close Sequence
• Save Sequence
• Sequence Report
• Exit
The system callback VIs are not associated with the execution of any particular sequence. Each time you launch the Test Executive, it loads the appropriate system callback VIs by reading the entries in the system configuration file, testexec.ini . If the Test Executive cannot find the system configuration file, it prompts you to find it. When you quit the Test Executive, it unloads the system callback VIs.
The rest of this section contains a detailed description of the calling interface for each system callback VI.
Note In the parameter tables that follow, the type of some inputs and outputs is listed aTYPEDEF- xxx.ctl . This value indicates that the input or output is a Test Executive typedef control. For a detailed examination of these typedef controls, see the Test Executive Typedef Controls section of this chapter.
LoginThe Test Executive calls the Login callback VI upon startup and whenethe user clickes the Login button on the operator interface panel. The TeExecutive installs the default Login Callback .vi in the CALLBACK.LLB VI library in the Test Executive installation directory and uses the following calling interface.
The default Login callback VI performs no action with its inputs. It setswarning in the error out control if the user cancels the Login dialog boxthe login is successful, the default callback VI sets error out to no error and puts the name, password, and privilege level (Developer, Technician, or
Type Name Typedef Description
Input Current Login Info
TYPEDEF-Login Info.ctl Contains login information for the current user.
Output error out Standard LabVIEW error out cluster
Indicates whether an error or warning occurred in the callback VI.
Output New Login Info
TYPEDEF-Login Info.ctl Contains login information for the new user.
© National Instruments Corporation 5-7 LabVIEW Test Executive Reference Manual

Chapter 5 Modifying the Test Executive
ing,
utive
Operator) of the new user into the New Login Info control. If the Login callback VI returns an error or warning, the Test Executive does not change the current login information and displays the error or warning in the Test Display.
You customize the Login callback VI to work with custom login information in the following manner. You first create a custom Login Info typedef to contain the custom login information. Then, when the login callback VI logs in a new user, it fills in the custom Login Info typedef with the custom login information, flattens the contents of the typedef to a strand passes the flattened string out in the User Info output of the New Login Info cluster. If any other callback VI needs to access this custom login information, it uses the Unflatten From String function on the custom Login Info typedef.
Select SequenceThe Test Executive calls the Select Sequence callback VI when the operator clicks the Open button on the main operator interface panel to open a new test sequence. With the Select Sequence callback VI, theoperator chooses the path to the new test sequence file. The Test Execinstalls the default Select Sequence Callback .vi in the CALLBACK.LLB VI library in the Test Executive installation directory anduses the following calling interface.
Type Name Typedef Description
Input Current Sequence Info
TYPEDEF-Sequence.ctl Contains information about the test sequence currently shown in the Sequence Display.
Input Current Login Info
TYPEDEF-Login Info.ctl Contains login information for the current user.
Output Sequence Path
String Contains the path to the selected test sequence file.
Output Cancelled? Boolean This output is TRUE if the operator cancelled the Select Sequence operation, FALSE otherwise.
Output error out Standard LabVIEW error out cluster
Indicates whether an error or warning occurred in the callback VI.
LabVIEW Test Executive Reference Manual 5-8 www.natinst.com

Chapter 5 Modifying the Test Executive
, e
users
s a
r or
box
The default Select Sequence callback VI opens the standard LabVIEWfile dialog box and prompts the operator to choose a sequence file. The default callback VI returns the path to the selected file in the Sequence Path control, returns TRUE in Cancelled? if the operator cancels the dialog boxand always returns no error in the error out control. If the Select Sequenccallback VI returns TRUE in Cancelled?, the Test Executive cancels the operation and keeps the currently loaded sequence. If the callback VIreturns an error in the error out control, the Test Executive cancels the operation and displays the error in the Test Display. To use a custom OpenSequence dialog box or to restrict access to sequences based upon theprivilege level, modify the default Select Sequence callback VI.
Open SequenceThe Test Executive calls the Open Sequence callback VI when it opennew sequence. The Test Executive installs the default Open Sequence Callback .vi in the CALLBACK.LLB VI library in the Test Executive installation directory and uses the following calling interface.
The default Open Sequence callback VI performs no action. If the operation is successful, the default callback VI returns the sequence description in the Sequence Info String control and returns no error in the error out control. If the Open Sequence callback VI returns an errowarning to the Test Executive, the error appears in the Test Display. The string returned in Sequence Info String appears in the Sequence Info
Type Name Typedef Description
Input Sequence Info TYPEDEF-Sequence.ctl Contains information about the test sequence that was opened.
Input Current Login Info
TYPEDEF-Login Info.ctl Contains login information for the current user.
Output Sequence Info String
String Contains a string that appears in the Sequence Info string indicator on the operator interface panel. This string contains a description of the sequence or instructions to the operator.
Output error out Standard LabVIEW error out cluster
Indicates whether an error or warning occurred in the callback VI.
© National Instruments Corporation 5-9 LabVIEW Test Executive Reference Manual

Chapter 5 Modifying the Test Executive
.
e
r
.
.
on the operator interface panel. You can modify this VI to perform initialization functions or to log sequence file usage.
Close SequenceThe Test Executive calls the Close Sequence callback VI immediatelybefore it closes a sequence. The Test Executive installs the default Close Sequence Callback .vi in the CALLBACK.LLB VI library in the Test Executive installation directory and uses the following calling interface
The default Close Sequence callback VI performs no action. If the closoperation is successful, it returns no error in the error out control. If the callback VI returns an error to the Test Executive, the error appears in theTest Display. You modify this callback VI to perform cleanup functions oto log sequence file usage.
Save SequenceThe Test Executive calls the Save Sequence callback VI immediately after it saves a sequence. The Test Executive installs the default Save
Sequence Callback .vi in the CALLBACK.LLB VI library in the Test Executive installation directory and uses the following calling interface
Type Name Typedef Description
Input Sequence Info TYPEDEF-Sequence.ctl Contains information about the test sequence that is being closed
Input Current Login Info
TYPEDEF-Login Info.ctl Contains login information for the current user.
Output error out Standard LabVIEW error out cluster
Indicates whether an error or warning occurred in the callback VI.
Type Name Typedef Description
Input Sequence Info TYPEDEF-Sequence.ctl Contains information about the test sequence that was saved.
Input Current Login Info
TYPEDEF-Login Info.ctl Contains login information for the current user.
Output error out Standard LabVIEW error out cluster
Indicates whether an error or warning occurred in the callback VI.
LabVIEW Test Executive Reference Manual 5-10 www.natinst.com

Chapter 5 Modifying the Test Executive
lick
nce
s it ult
The default Save Sequence callback VI performs no action. If the save operation is successful, it returns no error in the error out control. If the callback VI returns an error to the Test Executive, the error appears in theTest Display. You modify this callback VI to log sequence file modifications.
Sequence ReportThe Test Executive calls the Sequence Report callback VI when you cthe Sequence Report button on the operator interface panel. The Test Executive installs the default Sequence Report Callback .vi in the CALLBACK.LLB VI library in the Test Executive installation directory anduses the following calling interface.
The default Sequence Report callback VI generates an ASCII, spreadsheet-style report of the contents of the currently loaded sequeand prompts you to save the report to disk. You modify this callback VI to customize the contents of the Sequence Report ASCII file to meet your needs.
ExitThe Test Executive calls the Exit callback VI when you quit the Test Executive. If there is an open test sequence, the Test Executive closebefore calling the Exit callback VI. The Test Executive installs the defaExit Callback .vi in the CALLBACK.LLB VI library in the Test Executive installation directory and uses the following calling interface.
You modify the Exit callback VI to work with the Login callback VI to log usage of the Test Executive.
Type Name Typedef Description
Input Sequence Info TYPEDEF-Sequence.ctl Contains information about the test sequence currently shown in the Sequence Display.
Type Name Typedef Description
Input Current Login Info
TYPEDEF-Login Info.ctl Contains login information for the current user.
© National Instruments Corporation 5-11 LabVIEW Test Executive Reference Manual
Chapter 5 Modifying the Test Executive
e
ence.
Sequence CallbacksThe Test Executive includes the following sequence callback VIs:
• Pre-UUT Loop
• Pre-UUT
• Post-UUT
• Post-UUT Loop
• Pre-Step
• Post-Step
• Test Report
• Post Run-Loop Test
• Test Failure
• Open Test VI
Each time you launch the Test Executive, it loads the appropriate sequenccallback VIs by first reading the entries in the system configuration file, testexec .ini . If the Test Executive cannot find the system configuration file, it prompts you to find it. When you quit the Test Executive, it unloads the sequence callback VIs.
Although the Test Executive contains a default set of sequence callback VIs, each sequence has its own custom set of sequence callbackVIs. If a sequence uses a custom callback VI, the Test Executive loads the VI when it opens the sequence and unloads it when it closes the sequWhile the sequence is open, the custom callback VIs override the corresponding default callback VIs. You specify custom callback VIs for asequence by selecting Sequence Options… in the Sequence Editor. For more information, see Chapter 4, Creating Tests and Test Sequences.
When you create custom callback VIs that individual sequences specify, do not use names that are the same as the default callback VIs specified in your testexec.ini file.
The Test Executive calls the first seven sequence callback VIs—Pre-UUTLoop, Pre-UUT, Post-UUT, Post-UUT Loop, Pre-Step, Post-Step, and Test Report—during the execution of a test sequence. Figure5-1 shows how the Test Executive calls these callback VIs during a UUT Test loop.
LabVIEW Test Executive Reference Manual 5-12 www.natinst.com

Chapter 5 Modifying the Test Executive
T
d
l
Figure 5-1. Flow of Sequence Callback VIs in a UUT Test Loop
The sequence callback VIs handle operations such as putting up a UUInformation dialog box at the start of a UUT Test, putting up a PASS/FAIL banner at the end of a UUT Test, and generating an ASCII Test Report at the end of a UUT Test Loop. By modifying these default sequence callback VIs or by specifying custom sequence callback VIs, you createcustomized UUT Information dialog boxes, customized PASS/FAIL banners, or customized Test Reports.
When a step with a FAIL Action of Callback fails, the Test Executive engine calls the Test Failure callback VI to determine what action it shoultake. After the user clicks the Run Step(s) or Loop Step(s) button to run or loop an individual step, the Test Executive engine calls the Post Run-LoopTest callback VI and passes the step results to it.
The Sequence Editor calls the last sequence callback VI, Open Test VI, when you click the Edit Test VI button or double-click a LabVIEW test in the sequence list. The default Open Test VI callback opens the front paneof the selected LabVIEW test, so you can edit it. You replace this default callback VI with one that automatically configures the call to the test VI or performs other LabVIEW test editing operations.
The rest of this section contains a detailed description of the calling interface for each sequence callback VI.
Pre-UUT LoopCallback
Pre-UUTCallback
Post-UUTCallback
Post-UUTLoop Callback
Test ReportCallback
Pre Run S1 S2 Sn*
PostRun...
BEGINif no error
if error
Test Sequence
if continue
if stop or error if stop or error
if continue
END
* Where Sn is
Pre-StepCallback Stepn Post-Step
Callback
© National Instruments Corporation 5-13 LabVIEW Test Executive Reference Manual

Chapter 5 Modifying the Test Executive
s
the
s
e te
g
Note In the parameter tables that follow, the type of some inputs and outputs is listed aTYPEDEF- xxx.ctl . This value indicates that the input or output is a Test Executive typedef control. For a detailed examination of these typedef controls, see the Test Executive Typedef Controls section of this chapter.
Pre-UUT LoopThe Test Executive calls the Pre-UUT Loop callback VI before it tests first UUT in a UUT Test Loop. You initiate a UUT Test Loop by clickingthe Test UUT button. The Test Executive installs the default Pre-UUT Loop Callback .vi in the CALLBACK.LLB VI library in the Test Executive installation directory and uses the following calling interface.
The default Pre-UUT Loop callback VI performs no action and returnsno error in the error out control. If the Pre-UUT Loop callback VI returnan error to the Test Executive, it terminates the UUT Test Loop and displays the error in the Test Display. You modify this callback VI to perform appropriate initialization before a UUT Test Loop begins.
Pre-UUTThe Test Executive calls the Pre-UUT callback VI just before calling thPreRun VI at the beginning of each cycle of a UUT Test Loop. You initiaa UUT Test Loop by clicking the Test UUT button. The Test Executive installs the default Pre-UUT Callback .vi in the CALLBACK.LLB VI library in the Test Executive installation directory and uses the followincalling interface.
Type Name Typedef Description
Input Sequence Info TYPEDEF-Sequence.ctl Contains information about the top-level test sequence in the hierarchy being executed.
Input Current Login Info
TYPEDEF-Login Info.ctl Contains login information for the current user.
Output error out Standard LabVIEW error out cluster
Indicates whether an error or warning occurred in the callback VI.
LabVIEW Test Executive Reference Manual 5-14 www.natinst.com

Chapter 5 Modifying the Test Executive
you I
e
The default Pre-UUT callback VI displays a UUT Info dialog box that prompts you to enter a serial number for the UUT about to be tested. If click the Stop button on the default UUT Info dialog box, the callback Vsets the Continue? Boolean to FALSE and returns no error in the error out control. Otherwise, the callback VI copies the serial number into thUUT Info control, sets Continue? to TRUE, and returns no error in the error out control. The Test Executive ends the UUT Test Loop if the Pre-UUT callback VI returns FALSE in the Continue? control. If the callback VI returns an error to the Test Executive, it terminates the UUT Test Loop and displays the error in the Test Display.
Similar to defining custom login information in the Login callback VI, youalso can define custom UUT information in the Pre-UUT callback VI. For more information, see the Login section earlier in this chapter.
Type Name Typedef Description
Input Sequence Info TYPEDEF-Sequence.ctl Contains information about the top-level sequence in the hierarchy being executed.
Input Previous UUT Info
String Contains the UUT information for the last UUT that was tested. This input is empty for the first UUT in a UUT Test loop.
Input Current Login Info
TYPEDEF-Login Info.ctl Contains login information for the current user.
Input UUT# Numeric (I32) Indicates how many UUTs have been tested in the current UUT Test Loop.
Output Continue? Boolean Indicates whether to continue the UUT Test Loop.
Output UUT Info String Contains user-supplied information about the next UUT to be tested.
Output error out Standard LabVIEW error out cluster
Indicates whether an error or warning occurred in the callback VI.
© National Instruments Corporation 5-15 LabVIEW Test Executive Reference Manual

Chapter 5 Modifying the Test Executive
a
g
a
Post-UUTThe Test Executive calls the Post-UUT callback VI just after calling thePostRun VI at the end of each cycle of a UUT Test Loop. You initiate UUT Test Loop by clicking the Test UUT button. The Test Executive installs the default Post-UUT Callback .vi in the CALLBACK.LLB VI library in the Test Executive installation directory and uses the followincalling interface.
If UUT testing is successful, the default Post-UUT callback VI displaysPASS banner if all the steps in the sequence passed or a FAIL banner if any step in the sequence failed and its Step Fail = Seq. Fail? flag was set to TRUE. If you abort testing for the UUT, the default Post-UUT callback VI displays an ABORT banner. The default Post-UUT callback VI always returns TRUE in the Continue? control. If the Post-UUT callback VI returns FALSE in the Continue? control, the Test Executive ends the UUT Test Loop, just as it does when the Pre-UUT callback VI returns FALSE in Continue? If the Post-UUT callback VI returns an error in theerror out control, the Test Executive terminates the UUT Test Loop and displays the error in the Test Display.
Type Name Typedef Description
Input Sequence Info TYPEDEF-Sequence.ctl Contains information about the top-level sequence in the hierarchy being executed.
Input UUT Results TYPEDEF-UUT Results.ctl Contains user-supplied UUT information and raw UUT test results.
Input Current Login Info
TYPEDEF-Login Info.ctl Contains login information for the current user.
Input UUT# Numeric (I32) Indicates how many UUTs have been tested in the current UUT Test Loop.
Output Continue? Boolean Indicates whether to continue the UUT Test Loop.
Output error out Standard LabVIEW error out cluster
Indicates whether an error or warning occurred in the callback VI.
LabVIEW Test Executive Reference Manual 5-16 www.natinst.com

Chapter 5 Modifying the Test Executive
ch
e
T
d after
You can modify the Post-UUT callback VI to perform custom actions, suas logging result data on a per-UUT basis to a file or a database.
Post-UUT LoopThe Test Executive calls the Post-UUT Loop callback VI when you terminate a UUT Test Loop. You initiate a UUT Test Loop by clicking thTest UUT button. The Test Executive installs the default Post-UUT Loop Callback .vi in the CALLBACK.LLB VI library in the Test Executive installation directory and uses the following calling interface.
The default Post-UUT Loop callback VI performs no action and returns no error in the error out control. If the callback VI returns an error to the Test Executive, it displays the error in the Test Display. You modify the Post-UUT Loop callback VI to perform appropriate cleanup after a UUTest Loop ends.
Pre-Step and Post-Step CallbacksPre-Step and Post-Step are sequence callbacks that execute before aneach test step, respectively. The Test Executive installs the default Pre-Step Callback.vi and Post-Step Callback.vi in the CALLBACK.LLB VI library in the Test Executive installation directory.
The Pre-Step Callback uses the following calling interface.
Type Name Typedef Description
Input Sequence Info TYPEDEF-Sequence.ctl Contains information about the current test sequence.
Input Current Login Info
TYPEDEF-Login Info.ctl Contains login information for the current user.
Output error out Standard LabVIEW error out cluster
Indicates whether an error or warning occurred in the callback VI.
Type Name Typedef Description
Input Execution Mode
TYPEDEF-Execution Mode.ctl Specifies the execution mode under which the callback isbeing run.
Input Current Login Info
TYPEDEF-Login Info.ctl Contains login information for the current user.
© National Instruments Corporation 5-17 LabVIEW Test Executive Reference Manual

Chapter 5 Modifying the Test Executive
The default Pre-Step Callback performs no action and returns no error in the error out control.
The Post-Step Callback uses the following calling interface.
Input Invocation Info
TYPEDEF-Invocation Info.ctl
Contains the invocation information used for the associated test step.
Input Runtime Status In
TYPEDEF-Runtime Status.ctl Contains runtime information like resource path, function name (for C functions), and so on for the associated test step.
Output Runtime Status Out
TYPEDEF-Runtime Status.ctl Contains runtime information like resource path, function name (for C functions), and so on for the associated test step.
Output error out Standard LabVIEW error output cluster
Indicates whether an error or warning occurred in the callback VI.
Type Name Typedef Description
Input Execution Mode
TYPEDEF-Execution Mode.ctl Specifies the execution mode under which the callback is being run.
Input Current Login Info
TYPEDEF-Login Info.ctl Contains login information for the current user.
Input Invocation Info
TYPEDEF-Invocation Info.ctl
Contains the invocation information used for the associated test step
Input Runtime Status In
TYPEDEF-Runtime Status.ctl Contains runtime information like resource path, function name (for C functions), and so on for the associated test step.
Output Test Result TYPEDEF-Test Result.ctl Contains the result information from the associated test step.
Type Name Typedef Description
LabVIEW Test Executive Reference Manual 5-18 www.natinst.com

Chapter 5 Modifying the Test Executive
a by
.
The default Post-Step Callback performs no action and returns no error in the error out control.
Test ReportThe Test Executive calls the Test Report callback VI after calling the Post-UUT Loop callback VI at the end of a UUT Test Loop. You initiateUUT Test Loop by clicking the Test UUT button. The Test Executive alsocalls this callback VI at the end of a Single Pass Test, which you initiateclicking the Single Pass button. The Test Executive installs the default Test Report Callback .vi in the CALLBACK.LLB VI library in the Test Executive installation directory and uses the following calling interface
Output Runtime Status Out
TYPEDEF-Runtime Status.ctl Contains runtime information like resource path, function name (for C functions), and so on for the associated test step.
Output error out Standard LabVIEW error output cluster
Indicates whether an error or warning occurred in the callback VI.
Type Name Typedef Description
Input Sequence Array
Array of TYPEDEF—
Sequence.ctl
Contains information about the currently loaded test sequences.
Input Top-Level Sequence Index
Numeric (I32) Specifies which sequence in the Sequence Array input is the top-level sequence in the hierarchy being executed.
Input Current Login Info
TYPEDEF— Login Info.ctl Contains login information for the current user.
Input Single Pass? Boolean TRUE if called from Single Pass mode, FALSE if called from Test UUT mode.
Type Name Typedef Description
© National Instruments Corporation 5-19 LabVIEW Test Executive Reference Manual

Chapter 5 Modifying the Test Executive
u
The default Test Report callback VI generates a formatted, spreadsheet-style report string and returns it in the Test Report control. If the sequence has a report file, the Test Report callback VI appends or overwrites the report file, depending on the Report File Mode. You view the report string on the operator interface panel by clicking the View Test Report button. You can modify the Test Report callback VI to generate thereport string in a different format or to perform other actions, such as logging result data to a database.
The default Test Report Callback VI uses the following VIs to access the test results from a temporary file, which the Test Executive maintains. These VIs can be found in CALLBACK.LLB in the Test Executive installation directory:
• Open UUT Results File.vi
• Read UUT Results File.vi
• Close UUT Results File.vi
Post Run-Loop TestThe Test Executive calls the Post Run-Loop Test callback VI when yoclick the Run Step(s) or Loop Step(s) button on the main operator interface panel. The Test Executive installs the default Post Run-Loop Test Callback .vi in the CALLBACK.LLB VI Library and uses the following calling interface.
Output Test Report String Contains a report string detailing the test results for each UUT that was tested.
Output error out Standard LabVIEW error out cluster
Indicates whether an error or warning occurred in the callback VI.
Type Name Typedef Description
Input Test # Numeric (I32) Contains the index of the run or looped test in the sequence.
Input Sequence Info TYPEDEF-Sequence.ctl Contains information about the currently loaded test sequence.
Type Name Typedef Description
LabVIEW Test Executive Reference Manual 5-20 www.natinst.com

Chapter 5 Modifying the Test Executive
ts
a
.
u
tion
The default Post Run-Loop Test callback VI does nothing and returns no error in the error out control. You can modify this callback VI to log or process the results of the step that was run or looped. You can use the same VIs used in the default Test Report Callback VI to access the resulfor the testing operation.
Test FailureThe Test Executive calls the Test Failure callback VI when a step withFAIL Action of Callback fails. The Test Failure callback VI allows youto choose the failure action. The Test Executive installs the default Test Failure Callback .vi in the CALLBACK.LLB VI library in the Test Executive installation directory and uses the following calling interface
The default Test Failure callback VI opens a dialog box that prompts yoto choose one of three actions: Continue, Stop, or Retry. When you click a button on this dialog box, the default callback VI returns the selected ac
Input Current Login Info
TYPEDEF-Login Info.ctl Contains login information for the current user.
Output error out Standard LabVIEW error out cluster
Indicates whether an error or warning occurred in the callback VI.
Type Name Typedef Description
Input Failed Test Result
TYPEDEF-Test Result.ctl Contains the test result for the failed test.
Input Test # Numeric (I32) Contains the index of the failed test in the sequence.
Input Sequence Info TYPEDEF-Sequence.ctl Contains information about the currently loaded test sequence.
Input Current Login Info
TYPEDEF-Login Info.ctl Contains login information for the current user.
Output Action Numeric (I32) Indicates a continue, stop, or retry action.
Output error out Standard LabVIEW error out cluster
Indicates whether an error or warning occurred in the callback VI.
Type Name Typedef Description
© National Instruments Corporation 5-21 LabVIEW Test Executive Reference Manual

Chapter 5 Modifying the Test Executive
,
the the
in the Action control. The only values for Action are 0 (Continue), 1 (Stop)and 2 (Retry). When the Test Failure callback VI returns Continue , the Test Executive logs the step failure and continues to run the next test in the sequence. When the callback VI returns Stop , the Test Executive stops testing the current UUT. When the callback returns Retr y, the Test Executive runs the failed step again. If the Test Failure callback returns an error in the error out control, the Test Executive stops running the test sequence and displays the error in the Test Display. The default Test Failure callback VI always returns no error in the error out control.
You can modify the default Test Failure callback VI if you want to use a custom dialog box, to handle the failure automatically, or to handle the failure differently depending on your privilege level.
Open Test VIThe Sequence Editor calls the Open Test VI callback VI when you clickEdit Test VI button in the Sequence Editor. The Test Executive installs default Open Test VI Callback .vi in the CALLBACK.LLB VI library in the Test Executive installation directory and uses the following calling interface.
The default Open Test VI callback opens the front panel of the LabVIEWtest for the test that is being edited. This way, you can edit the LabVIEW
Type Name Typedef Description
Input Sequence Path
File Path Contains the absolute path to the sequence file for the sequence that is being edited. If the sequence has not been saved, this input is empty.
Input Test TYPEDEF-Sequence
Element.ctl
Contains information about the test that is being edited.
Output Test Input String If filled, the Sequence Editor copies the string into the Input Buffer for the test that is being edited. If empty, the Sequence Editor ignores this output.
Output error out Standard LabVIEW error out cluster
Indicates whether an error or warning occurred in the callback VI.
LabVIEW Test Executive Reference Manual 5-22 www.natinst.com

Chapter 5 Modifying the Test Executive
the st
VI rom
at
ith
e are
ight ef
test from within the Sequence Editor. The default Open Test VI callback returns the empty string in the Test Input control and returns no error in the error out control. If the Open Test VI callback returns an error to the Test Executive, it displays the error in a message box.
You can modify the Open Test VI callback if you want to generate input data for the LabVIEW test that is being edited. For a demonstration of this technique, see the Advanced Modifications section of this chapter.
Test Executive Typedef ControlsThe Test Executive install program installs a set of typedef controls inLabVIEW USER.LIB\ directory, allowing you to create callbacks and teVIs more easily. These typedef controls define some of the required callback VI inputs and outputs and all of the required and optional testinputs and outputs. The Test Executive typedef controls are available fthe User Controls subpalette of the Controls palette after you install the Test Executive development version.
When creating or modifying a callback VI or LabVIEW test, remember ththe Test Executive calls these VIs by name. Therefore, every required input or output on the called VI must match in name, type, and data direction wwhat the Test Executive expects. For example, if the Test Executive expects a callback VI to have a Boolean input control named “abc” on its front panel, the call to the VI fails if the name of the control is not “abc”, if thtype is not Boolean, or if it is not a control. Control name comparisons case sensitive, so “ABC” does not match “abc”. Also, make sure that the required control and indicator names do not have any extra spaces.
Typedefs for Callback VIsTo help make sure that your callback VI inputs and outputs have the rname, type, and data direction, use the following Test Executive typedcontrols when you create or modify these VIs.
TYPEDEF - Login Info.ctlTYPEDEF-Login Info.ctl contains user login information. The elements of this cluster are Operating level and User Info.
Operating level is an enum with the three privilege levels of the Test Executive: Developer, Technician, and Operator.
© National Instruments Corporation 5-23 LabVIEW Test Executive Reference Manual

Chapter 5 Modifying the Test Executive
.
e
User Info is a string that contains information about the current Test Executive user. The default Login callback VI stores the name and password of the current operator in the User Info control.
TYPEDEF - Sequence.ctlTYPEDEF-Sequence.ctl contains all the specifications for a sequenceThe elements of this cluster are Elements, Sequence VIs, Stop on anyfailure, Enable Test Report Logging, Test report file, Report file mode,Description, Seq. load specification, and Path.
Elements is an array of TYPEDEF-Sequence Element.ctl typedefs. This array contains the definitions for all the steps in the sequence. For more information, see the TYPEDEF - Sequence Element.ctl section.
Sequence VIs is an array of file paths. This array contains the paths to thfollowing sequence VIs in the following order.
index VI0 PreRun1 PostRun2 Pre-Step Callback VI3 Post-Step Callback VI4 Pre-UUT Loop Callback VI5 Pre-UUT Callback VI6 Post-UUT Loop Callback VI7 Post-UUT Callback VI8 Test Report Callback VI9 Edit Test VI Callback VI10 Post Run-Loop Test Callback VI11 Test Failure Callback VI
Stop on any failure is a Boolean flag. If Stop on any failure is TRUE, the Test Executive stops the sequence execution whenever any test fails.
Enable Test Report Logging is a Boolean flag. If Enable Test Report Logging is TRUE, the default Test Report Callback VI logs the ASCII text report to the file specified in the Test report file.
Test report file is a file path that stores the path to the test report file.
Report file mode is a text ring that indicates how results should be stored tofile, if Enable Test Report Logging is TRUE. You can set Report file mode to append or overwrite .
Description is a string containing a description of the test sequence.
LabVIEW Test Executive Reference Manual 5-24 www.natinst.com

Chapter 5 Modifying the Test Executive
ath, t,
e
ult
Seq. load specification is a text ring that determines how the Test Executive loads the step resources for the sequence. This allows you to set Seq. load specification to Use each step’s load spec ., Pre-load all steps , or Dynamic -load all steps .
Path is a file path that stores the path to the sequence file. If the sequence has not been saved, Path is empty.
TYPEDEF - Sequence Element.ctlTYPEDEF-Sequence Element.ctl contains all the specifications for asingle step. The elements of this cluster are Element type, Name, VI pFunction name, Input buffer, Limit, Run mode, FAIL action, Loop counDependencies, Load specification, Input buffer?, Invocation info?, Show Panel?, Step Fail = Seq. Fail?, and Comment.
Element type is a text ring with four items: LabVIEW Test, C Test, GOTO, and Sequence. The setting of this ring indicates the type of the step.
Name is a string that specifies either the name of a step or the target for a GOTO step. No two steps in a sequence can have the same name. Before executing a sequence, the Test Executive parses the target of each GOTO step. If the Test Executive finds a GOTO target that does not match any step name in the sequence, it stops parsing and displays an error to the usr.
VI path is a file path that specifies the resource for the step.
Function name is the name of the function found in the DLL or sharedlibrary identified in VI path to call for C tests.
Input buffer is a string. If Input buffer? is TRUE, the Test Executive passes the string data in Input buffer to the LabVIEW test or C test at run time.
Limit is a string that specifies a type of comparison. The Test Executive applies this comparison to the measurements returned by the LabVIEW Test or C Test to make a PASS/FAIL determination.
Run mode is a text ring with four items: Normal, Skip, Force PASS, and Force FAIL. If you set the Run mode of a step to Normal , the Test Executive runs the step’s resource and applies the step’s limit comparison to the results. If you set the Run mode of the step to Skip , Force PASS, or Force FAIL , the Test Executive does not run the step, and it sets the resfor the step to SKIPPED, PASS, or FAIL , respectively.
FAIL action is a text ring with four items: Continue, Stop, Loop, and Callback. If you set the FAIL action of a step to Continue , the Test
© National Instruments Corporation 5-25 LabVIEW Test Executive Reference Manual

Chapter 5 Modifying the Test Executive
for
.
t
f
he
e
.
Executive continues to the next step in the sequence when the step fails.Setting the FAIL action to Stop causes the Test Executive to stop testing the current UUT when the step fails. If you set the FAIL action to Loop , the Test Executive enters a failure loop, which means that the Test Executive continues to execute the step until it passes or the maximum loop count the step is reached. If you set the FAIL action to Callback , the Test Executive calls the Test Failure callback VI to determine whether it shouldcontinue to the next step, stop testing the UUT, or run the failed step again
Loop count is an integer that specifies the maximum number of times thathe Test Executive should run the step inside a failure loop.
Dependencies is a string that specifies the dependency expression of a step. Before executing a sequence, the Test Executive parses the dependencies oeach step in the sequence. If the Test Executive finds an invalid step name in any dependency expression, it stops parsing and displays an error to toperator.
Load specification is a text ring with two items: Pre-load and Dynamic-load. When the Test Executive opens a test sequence, it loads thresources for all steps with a Pre-load Load specification. The Test Executive does not load the resources for Dynamic-load steps until they are called during the execution of the test sequence.
Input buffer? is a Boolean flag. If Input buffer? is TRUE, the Test Executive passes the string data in Input buffer to the LabVIEW test or C test at run time. If Input buffer? is FALSE, the Test Executive does not pass Input buffer data to the LabVIEW test or C test.
Invocation info? is a Boolean flag. If Invocation info? is TRUE, the Test Executive passes invocation information to the LabVIEW test at run timeIf I nvocation info? is FALSE, the Test Executive does not pass invocation information to the LabVIEW test.
Show Panel? is a Boolean flag. If Show Panel? is TRUE, the Test Executive shows the panel of the LabVIEW test before running it and closes the panel afterward. If Show Panel? is FALSE, the Test Executive does not show the panel of the LabVIEW test while running it.
Step Fail = Seq. Fail? is a Boolean flag. If Step Fail = Seq. Fail? is TRUE, the sequence fails if the step fails. If Step Fail = Seq. Fail? is FALSE, the result of the step does not affect the result of the sequence.
Comment is a string containing a comment for the step.
LabVIEW Test Executive Reference Manual 5-26 www.natinst.com

Chapter 5 Modifying the Test Executive
e
.
he
un the
e
ath,
TYPEDEF - UUT Results.ctlTYPEDEF-UUT Result.ctl contains all the UUT ID information and sequence result information for a particular UUT. The elements of thiscluster are UUT Info, UUT Abort, UUT Error, UUT Time, and SequencResults.
UUT Info is a string that contains the UUT Information supplied by the user in the Pre-UUT Callback VI.
UUT Abort is a Boolean flag. If UUT Abort is TRUE, the user aborted testing on this UUT. If UUT Abort is FALSE, the user did not abort testing
UUT Error is a Boolean flag. If UUT Error is TRUE, an error occurred during the testing of this UUT that caused the Test Executive to abort the UUT Test Loop. If UUT Error is FALSE, no error occurred during the testing of this UUT.
UUT Time is an integer that gives the total execution time for the UUT Test in milliseconds. The UUT Execution timer starts immediately before thePreRun VI starts and stops immediately after the PostRun VI stops. Ttimer resolution of your computer affects the accuracy of the timing information.
Sequence Results is an array of TYPEDEF-Sequence Result.ctl typedefs. This array contains the results for each sequence that was rduring the testing process. The order of the results is the order in whichsequences were executed. The first element in the array is the result for thtop-level sequence executed. For more information, see the following TYPEDEF - Sequence Result.ctl section.
TYPEDEF - Sequence Result.ctlTYPEDEF-Sequence Result.ctl contains all the step result informationfor a particular sequence. The elements of this cluster are Sequence PPreRun Time, PostRun Time, Test Report Path, and Step Results.
Sequence Path contains the path to the sequence file.
PreRun Time is an integer that gives the execution time of the PreRun VI in milliseconds.
PostRun Time is an integer that gives the execution time for the PostRun VI in milliseconds.
Test Report Path contains the path to the test report file.
© National Instruments Corporation 5-27 LabVIEW Test Executive Reference Manual

Chapter 5 Modifying the Test Executive
sult,
l?.
step
ent
nt,
Step Results is an array of TYPEDEF-Test Result.ctl typedefs. This array contains the results for each step (excluding GOTO steps) that was run during the testing process. For more information, see the following TYPEDEF - Test Result.ctl section.
TYPEDEF - Test Result.ctlTYPEDEF-Test Result.ctl contains all the specifications for a singlestep result. The elements of this cluster are Element Type, Name, ReStep Resource, Comment, User Test Output, Execution Time, String Measurement, Numeric Measurement, radix, Low Limit, High Limit, Comparison, String Limit, Limit Specification, and Step Fail = Seq. Fai
Element Type is a text ring with four items: LabVIEW Test, C Test, GOTO, and Sequence. The setting of this ring indicates the type of the step.
Name is the step name of the step that produced the result.
Result is an enum with five items: PASS, FAIL, None, Skipped, and Unknown. PASS and FAIL mean that the step passed or failed, respectively. None means that the comparison type of the step was Log onl y, and therefore, no PASS/FAIL determination was made for the step. Skipped indicates that the step did not execute, and Unknown indicates that the Test Executive could not determine if the step passed or failed because thehas no limit specification.
Step Resource is a file path that specifies the resource for the step.
Comment is a string containing a comment generated by the LabVIEW test.
User Test Output is a string containing data generated by the LabVIEW test or C test.
Execution Time is an integer that gives the execution time for the step resource in milliseconds.
String Measurement is a string measurement that is transmitted by the LabVIEW test.
Numeric Measurement is a double-precision, floating-point measuremthat is transmitted by the LabVIEW test or C test.
radix is a text ring with six values: fractional, scientific, decimal, hex, octal, and binary. The setting of radix indicates whether Numeric MeasuremeLow Limit, and High Limit should appear in fractional, scientific, decimal, hexadecimal, octal, or binary notation, respectively.
LabVIEW Test Executive Reference Manual 5-28 www.natinst.com

Chapter 5 Modifying the Test Executive
e
Low Limit is a double-precision, floating-point number that the Test Executive compares with Numeric Measurement to make a PASS/FAIL determination for the step.
High Limit is a double-precision, floating-point number that the Test Executive compares with Low Limit and Numeric Measurement to make a PASS/FAIL determination for the step.
Comparison is an enum with 14 items: EQ (==), NE (!=), GT (>), LT (<), GE (>=), LE (<=), GTLT (> && <), GTLE (> && <=) GELT (>= && <), GELE (>= && <=), Boolean, String, Log only, and None. If Comparison is EQ, NE, GT, LT, GE, or LE, the Test Executive applies the indicated comparison to Numeric Measurement and Low Limit and sets Result accordingly. If Comparison is GTLT, GTLE, GELT, or GELE, the Test Executive applies the indicated range comparison to Numeric Measurement, Low Limit, and High Limit and sets Result accordingly. If Comparison is Boolean, the Test Executive sets Result to PASS or FAIL based on the Boolean result transmitted by the LabVIEW test or C test. If Comparison is String, the Test Executive sets Result to PASS if String Measurement equals String Limit and sets Result to FAIL otherwise. This string comparison is case sensitive. If Comparison is Log only, the Test Executive sets Result to None, logs Numeric Measurement and StringMeasurement, and applies no comparison. If Comparison is None, theTest Executive sets Result to None, logs no measurement, and applies no comparison.
String Limit is a string that the Test Executive compares with String Measurement to make a PASS/FAIL determination for the LabVIEW test.
Limit Specification is a string used to store the complete limit specification for the step.
Step Fail = Seq. Fail? is a Boolean flag. If Step Fail = Seq. Fail? is TRUE, the sequence fails if the step fails. If Step Fail = Seq. Fail? is FALSE, the result of the step does not affect the result of the sequence.
Typedefs for LabVIEW TestsTo help make sure that your LabVIEW test inputs and outputs have thright name, type, and data direction, use the following Test Executive typedef controls when you create or modify these VIs.
© National Instruments Corporation 5-29 LabVIEW Test Executive Reference Manual

Chapter 5 Modifying the Test Executive
. In
.
c run
d st the
ter er
TYPEDEF - Invocation Info.ctlTYPEDEF-Invocation Info.ctl contains run-time information that passes from the Test Executive to the LabVIEW test. The elements of this cluster are Test Name, Sequence Path, UUT Info, loop #, and UUT #.
Test Name is the name of the step that is currently running.
Sequence Path contains the absolute file path to the sequence file that is currently executing.
UUT Info is a string that contains the UUT Information supplied by the user in the Pre-UUT callback VI.
loop # is the number of times that this step has run within a failure loopa failure loop, the Test Executive repeatedly executes the step until it passesor the maximum loop count for the step is reached. loop # is 0 for the first run of the step, 1 for the second, and so on.
UUT # is an integer that identifies how many UUTs have been tested in this UUT Test Loop. UUT # is 0 for the first UUT, 1 for the second, and so on
TYPEDEF - Input buffer.ctlTYPEDEF-Input buffer.ctl consists of a string containing test-specifiinput data that passes from the Test Executive to the LabVIEW test attime.
TYPEDEF - Mode.ctlTYPEDEF-Mode.ctl consists of a test ring containing two items, run anconfig, that you use on the front panel of LabVIEW test shells. The TeExecutive identifies the call mode of LabVIEW test shells and passes appropriate input value, run or config, to Mode.ctl . For more information on LabVIEW test shells, see the Advanced Modifications section of this chapter.
TYPEDEF - Test Data.ctlTYPEDEF-Test Data.ctl contains result information that is transmittedfrom the LabVIEW test to the Test Executive. The elements of this clusare PASS/FAIL Flag, Numeric Measurement, String Measurement, UsOutput, and Comment.
LabVIEW Test Executive Reference Manual 5-30 www.natinst.com

Chapter 5 Modifying the Test Executive
n
W .
nt .
y
ating in
PASS/FAIL Flag is set by the LabVIEW test to indicate whether the steppassed or failed. When the limit specification for a step is Boolean, the Test Executive uses this element to make a PASS/FAIL determination.
Numeric Measurement is a double-precision, floating-point number. When the limit specification for a test is EQ (==), NE (!=), GT (>), LT (<), GE (>=), LE (<=), GTLT (> && <), GTLE (> && <=) GELT (>= && <), GELE (>= && <=), the Test Executive uses this element to make a PASS/FAIL determination. The value that the LabVIEW test passes out iNumeric Measurement is stored in the Test Result cluster of the step.
String Measurement is a string. When the limit specification for a step is String, the Test Executive uses this element to make a PASS/FAIL determination. The value that the LabVIEW test passes out in String Measurement is stored in the Test Result cluster of the test.
User Output is a string. The LabVIEW test stores data of any kind in this string by using the Flatten to String function. The data that the LabVIEtest passes out in User Output is stored in the Test Result cluster of the step
Comment is a string. The value that the LabVIEW test passes out in Comment is stored in the Test Result cluster of the step. Use the Commeoption for storing comments that you want to include in the test report
Common ModificationsThe following sections describe common modifications that you may want to make to the Test Executive. You can learn how to make thesemodifications by editing the default callback VIs in the CALLBACK.LLB VI library in the Test Executive installation directory. Before modifying anof the default callback VIs, make a backup copy of CALLBACK.LLB.
This section covers the following areas:
• Passwords
• PASS/FAIL/ABO RT banners
• UUT Serial Number prompt
• Test report
Changing PasswordsYou can change the passwords that determine the Test Executive operlevel (Developer, Technician, or Operator) by modifying the default Logcallback VI. (See the Operating Levels section in Chapter 1, Introduction,
© National Instruments Corporation 5-31 LabVIEW Test Executive Reference Manual

Chapter 5 Modifying the Test Executive
gin
e to
ord
you
his r, IL, r fail
Is.
for a description of the operating modes.) To modify the default Login callback VI, open Login Callback .vi in CALLBACK.LLB in the Test Executive installation directory. Notice that Login Callback .vi has the required Login callback inputs and outputs on its front panel. This VI makes a subVI call to the Login VI. To examine the front panel of the LoVI, show the diagram of Login Callback .vi , pop up on the subVI call to Login, and select Open Front Panel.
To set the password that specifies the Developer level, examine the True case of the larger Case structure. Find the string constant, labeled Developer Level Password , which is wired into the Match Pattern function. Replace the string constant with the password you want to usspecify the Developer level. Subsequently, any password typed in that contains this sequence of characters sets the Test Executive to Developer level.
To set the password that specifies the Technician level, find the string constant labeled Technician Level Password inside the False case of the smaller Case structure. Replace this string constant with the passwyou want to use to specify Technician level. If the password entered at the prompt contains the character sequence in this string constant, the Test Executive sets the level to Technician. If a match is not found for either Developer or Technician passwords, the level defaults to Operator.
Note The password comparison is case sensitive.
Changing PASS/FAIL/ABORT BannersYou can change the PASS, FAIL, and/or ABORT Banner VIs, which display the result of a UUT Test, to show a custom screen. To do so, must modify the default Post-UUT callback VI. To modify this VI, openPost-UUT Callback .vi in CALLBACK.LLB in the Test Executive installation directory. Notice that Post-UUT Callback .vi has the required Post-UUT callback VI inputs and outputs on its front panel. TVI makes subVI calls to PASS Banner, FAIL Banner, or ABORT Bannedepending on the UUT Test Results. On a color monitor, the PASS, FAand ABORT banners have a colored background (green for pass, red foand abort), an OK button, and a free label in a large font containing theword PASS, FAIL, or ABORT.
You change the appearance of these banners by either revising the existing VIs (changing the message, colors, adding graphics, and so forth) or by replacing the PASS, FAIL, and/or ABORT Banner VIs with your own VIs. Notice that the execution palette and menus are hidden in the Banner V
LabVIEW Test Executive Reference Manual 5-32 www.natinst.com

Chapter 5 Modifying the Test Executive
es e
ts
n the
ia an
d its
at.
s to
e tring time
Changing the UUT Serial Number PromptYou customize the prompt that asks for the UUT serial number by modifying the default Pre-UUT callback VI. To modify this VI, open Pre-UUT Callback .vi in CALLBACK.LLB in the Test Executive installation directory. Notice that Pre-UUT Callback .vi has the required Pre-UUT callback VI inputs and outputs on its front panel. This VI maka subVI call to the UUT Information VI. To examine the front panel of thUUT Information VI, show the diagram of Pre-UUT Callback .vi , pop up on the subVI call to UUT Information, and select Open Front Panel. The front panel of this VI consists of a string control, its label (which prompthe user to Enter UUT Serial Number), and two buttons, OK and STOP.
To change the UUT serial number prompt message, retype the label ofront panel using the Labeling tool.
You can make other modifications to the serial number prompt, such as adding a routine that reads the serial number from a bar code reader vRS-232 port, by editing the Pre-UUT callback VI.
Changing the Test ReportThe Test Report is generated by the default Test Report callback VI ansubVIs. You can modify the test format of the Test Report to suit your needs.
To modify the default Test Report callback VI, open Test Report
Callback .vi in CALLBACK.LLB in the Test Executive installation directory. Notice that Test Report Callback .vi has the required Test Report callback inputs and outputs on its front panel. This VI calls twosubVIs, Format Test Report and File Report, and then institutes error checking procedures. The File Report VI sends the completed Test Report to a specified file and does not need to be changed to modify report formMake any modifications in the Format Test Report VI block diagram or its main subVI, Format UUT.vi .
To change the Test Report header information, make the desired changethe large Concatenate Strings function and its inputs in the Format Test Report VI. For example, you might want to include more information in thheader. Stretch the Concatenate Strings function and add the desired sto an input. Another common change might be to add seconds to the display. To do this, change the Boolean constant input to the Get Date/Time String VI from FALSE to TRUE.
© National Instruments Corporation 5-33 LabVIEW Test Executive Reference Manual

Chapter 5 Modifying the Test Executive
ly elimit hen a file
m
n ats
he g
op to
UT titute
The UUT Test results are generated in the For Loop of the Format Test Report VI. This VI converts the data read from a Test Executive temporary file to ASCII strings for inclusion in the Test Report.
Using Another Application for Report GenerationThe format of a standard Test Report allows other applications to easiimport the report. For example, because the Test Report uses tabs to dfields in a test result, each of these fields appears in a separate cell wyou load the Test Report into a spreadsheet. Saving the Test Report toprovides a simple mechanism for transferring the report to another application for further formatting of test results.
You may also want to use an interapplication communication mechanisto have the Test Executive automatically pass the Test Report to another application. You can use the communication VIs in LabVIEW for ActiveX Automation in Microsoft Windows, Apple Events on the Macintosh, or TCP/IP and UDP on all platforms. Using interapplication communicatiorequires that you be familiar with the particular protocols and data formthe recipient application expects.
Advanced ModificationsThis section describes advanced modifications that you can make to tTest Executive. The section covers result logging alternatives and usinLabVIEW test shells.
Result Logging AlternativesBy default, the Test Executive logs the results for an entire UUT Test Loto file. The default Test Report callback VI writes the Test Report stringthe Report File as determined by the Report File Mode. This section discusses two result logging alternatives:
• Logging step results on a per-UUT basis
• Logging step results to a database using the SQL Tools (Windows only)
Logging Test Results on a Per-UUT BasisYou can modify the Test Executive to log UUT step results on a per-Ubasis as soon as a UUT completes testing. To set up this method, subsa VI named Per-UUT Logger Callback .vi for your Post-UUT callback VI and Test String Callback .vi for your Test Report callback VI. Both
LabVIEW Test Executive Reference Manual 5-34 www.natinst.com

Chapter 5 Modifying the Test Executive
tring p,
T port
t uses
y
ce
ou use
of these callback VIs are in the CALLBACK.LLB VI library in the Test Executive installation directory.
Per-UUT Logger Callback.viIn addition to showing the PASS, FAIL, or ABORT banner, Per-UUT
Logger Callback .vi creates a report string for the current UUT. If thecurrent UUT is the first in the UUT Test Loop, Per-UUT Logger
Callback .vi appends a report header to the report string and then, depending on the Report File Mode, either overwrites or appends this sto the report file. If the current UUT is not the first in the UUT Test LooPer-UUT Logger Callback .vi appends the report string to the Report File.
Test String Callback.viTest String Callback .vi creates the Test Report string from the UUTest Loop results, but it does not write this Test Report string to the ReFile.
Using the Edit Sequence Callbacks dialog box in the Sequence Editorallows you to make Per-UUT Logger Callback .vi and Test String Callback .vi the Post-UUT and Test Report callbacks for any sequence. Alternately, you can edit the Test Executive system configuration file, testexec .ini , and make these callback VIs the default Post-UUT andTest Report callbacks for all sequences. When you run a sequence thathese two callback VIs, the Test Executive logs UUT Test results to file on a per-UUT basis.
Logging Results to a Database Using the LabVIEW SQL Tools (Windows only)Using the LabVIEW SQL Tools, included in the Enterprise ConnectivitToolset, you can log your UUT, sequence, and step results to an SQL-compliant database. The DATABASE directory in the Test Executive installation directory contains an alternate testexec.ini file, as well as alternate operator interface and callback VIs that demonstrate the integration of the LabVIEW Test Executive and the SQL Tools. All sourcode is provided for these VIs, so you can modify them to meet your application-specific needs. These VIs were written using SQL Tools. If ywant to use them with a previous version of the SQL Tools, edit them tothe equivalent SQL VIs from the previous version.
© National Instruments Corporation 5-35 LabVIEW Test Executive Reference Manual

Chapter 5 Modifying the Test Executive
nce
n
on
cified to es
Modifications to the System Configuration FileTo use the supplied database examples, you must add several preferevalues to the [Preferences] section of the testexec.ini file. A sample configuration file incorporating these modifications is located ithe DATABASE directory in the Test Executive installation directory. Themodifications are as follows:
• EnableDatabaseSaving=TRUE (or FALSE)
• ConnectionString= a valid data source name for your system
• UUTTableName=name of table in which to store UUT results
• SequenceTableName= name of table in which to store sequence results
• StepTableName= name of table in which to store step results
The Alternate Callback VIsThe Create DB Tables Callback.vi and Per-UUT DB Logger
Callback.vi are alternate callback VIs that enable database logging your Test Executive system. These VIs are found in the DATABASE\CALLBACK.LLB VI library in the Test Executive installation directory.
Create DB Tables Callback.viThe Create DB Tables Callback.vi is a Pre-UUT Loop callback VI. It is responsible for creating three database tables in the database speby the ConnectionString preference. These three tables are referredas the UUT Results Table, the Sequence Results Table, and the StepResults Table. The names of the tables are specified by the preferencUUTTableName, SequenceTableName , and StepTableName , respectively. The EnableDatabaseSaving preference determines whether the tables are actually created.
The three tables contain the following fields:
• UUT Results Table
– Serial Number
– Result
– Date
– Operator
– Top-level Sequence Name
– Test Time
LabVIEW Test Executive Reference Manual 5-36 www.natinst.com

Chapter 5 Modifying the Test Executive
e
• Sequence Results Table
– Serial Number
– Sequence Name
– Result
– Pre-Run Execution Time
– Post-Run Execution Time
• Step Results Table
– Serial Number
– Sequence Name
– Step Name
– Resource
– Result
– Execution Time
– Comment
– User Output
– Comparison Type
If the tables already exist when the Create DB Tables Callback VI runs, the Test Executive uses the existing tables to record results.
Per-UUT DB Logger Callback.viThe Per-UUT DB Logger Callback.vi is a Post-UUT callback VI. In addition to showing the PASS, FAIL, or ABORT banner, the VI logs thresult information to the tables created by the Create DB Tables
Callback.vi . Whether this VI logs the information to the database is determined by the EnableDatabaseSaving preference.
The Per-UUT DB Logger Callback.vi does not necessarily log all measurement information to the Step Results Table. If the step comparisonis numeric, the Per-UUT DB Logger Callback VI logs numeric measurement and radix information. If the comparison is string, the Per-UUT DB Logger Callback VI logs string measurement and limit information. If the comparison is log only, the Per-UUT DB Logger Callback VI logs both the numeric and the string information.
Using the Sequence Options dialog box in the Sequence Editor, you can specify the Create DB Tables Callback VI and the Per-UUT DB Logger Callback VI as the Pre-UUT Loop and Post-UUT Callback VIs, respectively, for any sequence. Alternately, you can edit the Test Executive
© National Instruments Corporation 5-37 LabVIEW Test Executive Reference Manual

Chapter 5 Modifying the Test Executive
s.
e ile. el
to
d
n he
s of
system configuration file, testexec.ini , and make these callback VIs the default Pre-UUT Loop and Post-UUT callback VIs for all sequenceWhen you run a sequence that uses these two callback VIs (or any sequence if you modify the system configuration file), the Test Executive logs UUT Results, Sequence Results, and Step Results to the specified database on a per-UUT basis if EnableDatabaseSaving is TRUE.
Operator Interface VIUse the alternate operator interface VI found in DATABASE
OPERATOR.LLB in the Test Executive installation directory to browse thcontents of the database tables specified in the system configuration fThe alternate operator interface VI has an additional button on its pancalled Database Browser.... Click this button to browse the database contents.
Using LabVIEW Test ShellsThe Test Executive allows your end users to use LabVIEW Test shellsdesign test sequences using instrument drivers without doing any LabVIEW programming. A LabVIEW Test shell consists of a special kinof test VI that runs in two modes, config mode and run mode. A LabVIEW Test shell has the following calling interface.
Each LabVIEW Test shell must have these required inputs and outputs oits front panel and wired to the correct connector pane terminal, with texception of the mode input. Like any other test VI, a LabVIEW Test shell also can contain additional controls and indicators on its front panel, along those controls and indicators are not wired to the connector pane
Type Name Typedef Description
Input mode TYPEDEF-mode.ctl Determines the mode in which the LabVIEW Test shell runs.
Notice that this control is not wired to the connector pane of the VI.
Input Input buffer TYPEDEF-Input buffer.ctl Receives input data.
Output Test Data TYPEDEF-Test Data.ctl Transmits data to its caller.
Output error out Standard LabVIEW error out cluster
Indicates whether an error or warning occurred in the Test VI shell.
LabVIEW Test Executive Reference Manual 5-38 www.natinst.com

Chapter 5 Modifying the Test Executive
lso
nce
ry nce
r the fig s.
on,
the VI. Notice that the two required outputs for a LabVIEW Test shell, Test Data and error, are the same as the two required outputs for a test VI. Anotice that the Input buffer input, which is optional for test VIs, is requiredfor a LabVIEW Test shell.
In run mode, the LabVIEW Test shell executes just like a test VI and transmits result and error information in Test Data and error. In run mode, the shell VI assumes that Input buffer contains a flattened cluster of inputvalues and uses the Unflatten From String function to retrieve the input values.
In config mode, the LabVIEW Test shell acts like a dialog VI and allows the user to set the values of various input controls. In this mode, you clickan OK button after setting the control values. Then, the LabVIEW Test shell bundles the control values into a cluster, flattens the cluster to a string,and returns the string in the User Output element of Test Data.
If you create a LabVIEW Test shell, use the Test Executive typedef controls. For more information on these controls, see the Test Executive Typedef Controls section earlier in this chapter.
Example Sequence Using LabVIEW Test ShellsWhen using LabVIEW Test shells to implement sequences, the sequedeveloper can configure instrument drivers without doing any LabVIEWprogramming. In a no-programming sequence, you must use an auto-configure Open Test VI callback and LabVIEW Test shells for evestep. A sequence developer creates the sequence by using the SequeEditor to add steps to the sequence, selecting LabVIEW Test shells fosteps, and configuring the LabVIEW Test shells by calling them in conmode. As an example of this process, perform the following operation
1. Run the Test Executive and log in as a developer.
2. Click the Edit button to invoke the Sequence Editor.
3. Select Sequence»Sequence Options…to select an auto-configure Open Test VI callback for this sequence. In the Sequence VIs sectiselect the Edit Test VI callback from the callback ring. Click the Browse button and choose the auto-configure callback VI named Configure Test VI Callback.vi in the CALLBACK.LLB VI library in the Test Executive installation directory. Click the OK button to confirm your changes.
4. Back in the Sequence Editor, click the New Step button and enter Fluke 45 Config for the step name. Click the Select Resource button and select the LabVIEW Test shell named Fluke 45 Config Shell
© National Instruments Corporation 5-39 LabVIEW Test Executive Reference Manual

Chapter 5 Modifying the Test Executive
s nce
ed
VI in the TESTS\TEST_VIS .LLB VI library in the Test Executive installation directory.
5. To configure this LabVIEW Test shell, click the Edit Test VI button. This calls the auto-configure callback Configure Test VI
Callback VI, which in turn calls the Test VI shell the Fluke 45 Config Shell VI in config mode. When this happens, the front panel of the Fluke 45 Config Shell VI appears and allows you to set the values of the four input controls on the panel.
6. When you have finished entering values, click the OK button. The Fluke 45 Config Shell VI flattens the values to a string and pasthem back to the auto-configure callback VI. The auto-configurecallback VI passes the same flattened string back to the SequeEditor, which stores the string in the input buffer of the Fluke 45Config step.
7. If you click the Edit Test VI button again, the process repeats, allowing you to examine or modify the input values you have entered.
8. Set the load specification for the step to Dynamic load.
9. Click the OK button on the Sequence Editor panel to confirm the changes you have made and return to the Test Executive.
The LabVIEW Test VI shell Fluke 45 Config Shell makes a subVI call to the test VI Fluke 45 Config in the TESTS\TEST_VIS .LLB VI library in the Test Executive installation directory. This subVI call has been configured to Suspend when called , so you can see the values that are passed to the test VI by the LabVIEW Test shell at run time.
10. Click the Single Pass button to run the test sequence once. The Test Executive executes the Fluke 45 Config Shell VI in run mode, passing it the flattened input string in the Input buffer. The Fluke 45 Config Shell VI unflattens the Input buffer string and passes the input values to the LabVIEW Test VI Fluke 45 Config . The Fluke 45 Config VI suspends when called, showing its front panel so you can examine the input values. Notice that the values are the same as those you enterwhen you configured the test in the Sequence Editor.
11. Click the run button to run the suspended test VI Fluke 45 Config VI. Click the return to caller button to terminate the test VI.
12. Save this example sequence under the name NPROGRAM.SEQ.
If you examine the auto-configure callback VI Configure Test VI
Callback , you see that it calls the LabVIEW Test shell in config mode and passes it the current contents of Input buffer. This way, the shell VI displays the most recent user settings for the input controls. You can use this method
LabVIEW Test Executive Reference Manual 5-40 www.natinst.com

Chapter 5 Modifying the Test Executive
to create no-programming sequences of any length. Figure5-2 shows the configuration and execution mechanisms for LabVIEW Test shells.
Figure 5-2. Test VI Shell Configuration and Execution
Edit Test VICallback
Test VI Shell
Test VIShell
Test VI
Sequence Editor
Sequence Editor
Configuration
Execution
Calls auto-configure callback,passes path to Test VI Shell.
Calls Test VI Shell in run mode,passes flattened input buffer.
Unflattens Input buffer, callstest VI with unflattened inputs.
Returns flattened inputs toSequence Editor in Test Input.
Returns Test Data and errorto Test Executive.
Returns Test Data and errorto Test VI Shell.
Returns flattened inputs toauto-configure callback inTest Data.
Call Test VI Shell in configmode, passes Input buffer.
© National Instruments Corporation 5-41 LabVIEW Test Executive Reference Manual

© National Instruments Corporation 6-1 LabVIEW Test Executive
6
ivee the test ng tive, tem.
ls .
tor
Deploying the Test Executive
This chapter explains how to build and deploy a LabVIEW Test ExecutRun-Time System on a test station computer.
LabVIEW Test Executive Run-Time SystemUsing the LabVIEW Application Builder, you can build a Test ExecutivRun-Time System. This Run-Time System is an executable version ofTest Executive Operator Interface and Engine. You can distribute it to astation computer without an accompanying LabVIEW installation, saviboth money and installation space. When you purchase the Test Execuyou receive a license to create and use one copy of the Run-Time SysPlease contact National Instruments for additional licenses.
Building a Run-Time SystemIncluded with the Test Executive Development System installation is aLabVIEW Application Builder build script file. The setup program instalthis script file in lvexec.bld in the Test Executive installation directoryTo build a Run-Time System executable, load this script file into the LabVIEW Application Builder utility. Building this script produces an executable file named lvtert.exe (lvtert on Macintosh and Unix) in your Test Executive directory. This executable consists of the Text Executive Operator Interface and Engine built into an executable application.
The default build script file builds the Run-Time System using the OperaInterface VI OPERATOR.LLB\Test Executive in the Test Executive installation directory. To build the Run-Time System using a different Operator Interface VI, modify the build script to specify a different top-level VI for the application. Refer to the LabVIEW Application Builder Release Notes for more information about using the Application Builder.
Reference Manual
Chapter 6 Deploying the Test Executive
he
or a ng
h as that test
ave can ing
,
to
I at
Note On Windows NT/98/95, you must install the LabVIEW Run-Time Engine to run tTest Executive Run-Time System and to run executables. Refer to the LabVIEW Application Builder Release Notes for more information on the LabVIEW Run-Time Engine.
Other Required Components for a Complete Run-Time System
The Run-Time System executable is not the only component required fcomplete Test Executive installation. You also must provide the followicustomizable components:
• System Callback VIs
• Default Sequence Callback VIs
• testexec.ini file
Additionally, you also must provide any test sequences, resources suctest VIs and shared libraries, and non-default Sequence Callback VIs you use with the Run-Time System installation. The following sectionsdescribe how to prepare these external components for distribution to astation computer for use with a Run-Time System.
Callback and Test VIsWhen preparing callback and test VIs for distribution to a test station computer for use with the Test Executive Run-Time System, you must sthe VIs and their entire hierarchies to a new location. The new location be either a directory or a VI library. You must then distribute the resultdirectories or VI libraries to the test station computer.
To save a Test Executive VI for distribution with the Run-Time Systemcomplete the following steps:
1. Select Project»Test Executive»Utilities»Save Test Executive VI for Distribution… .
2. Using the first file dialog box, select the Test Executive VI you wantsave for distribution. Click on the OK button. A second dialog box appears.
3. Using the second file dialog box, choose a new location for this Vand its subVIs. You also can create new directories or a VI library this time.
LabVIEW Test Executive Reference Manual 6-2 www.natinst.com

Chapter 6 Deploying the Test Executive
s. iles
) to
.
VI
ied
any
est
back ing for re
y as
aths the
4. Choose whether to save the VIs with or without their block diagramSaving without diagrams is not required, but it makes the resulting fsmaller.
5. LabVIEW then saves your Test Executive VI and all of its subVIs (excluding those VIs already present in the Test Executive enginethe directory or VI library you specified in step 3.
6. Use LabVIEW to mass compile the resulting VI library or directory
You must follow the procedure listed in the previous paragraph for everyrequired to create a complete Test Executive. These VIs include:
• All System Callback VIs and default Sequence Callback VIs specifin your testexec.ini file
• All Sequence Callback VIs and Pre-Run/Post-Run VIs needed by sequence that you will execute with this Test Executive installation
• All test VIs needed by any sequence that you will execute with this TExecutive installation
Tip To streamline the saving process, create a VI that has all of your test VIs or callVIs on its diagram. Then save this VI using the steps listed earlier in this section. Usthis streamlined method, you do not have to follow the steps for saving VIs individuallyevery VI used with the Test Executive. Instead, you only perform the saving proceduonce.
The testexec.ini FileThe testexec.ini file tells the engine where to find all of the externalcomponents of the Test Executive. It must reside in the same directorthe Run-Time System executable file and provides the following information to the Test Executive engine:
• Locations of all system callback VIs
• Locations of all default sequence callback VIs
• Preference values
All path values must be valid for the test station computer and can be pto local files or files on a shared network. For more information about format of the testexec.ini file, refer to the System Configuration File, testexec.ini section of Chapter 5, Modifying the Test Executive.
© National Instruments Corporation 6-3 LabVIEW Test Executive Reference Manual

Chapter 6 Deploying the Test Executive
ch aths
Test SequencesDistribute the sequence files to be used with your Test Executive installation. Depending on the Sequence Path Specification used in easequence file, you might need to update the files to contain the correct pto test resources and non-default callback VIs, including Pre-Run andPost-Run VIs.
Shared Libraries (C Test Resources)For shared library resources, distribute the DLL or shared library alongwith any run-time libraries required by that DLL or shared library.
LabVIEW Test Executive Reference Manual 6-4 www.natinst.com

© National Instruments Corporation A-1 LabVIEW Test Executive
A
Common Questions
This appendix includes a list of common questions you may have when using the Test Executive.
How easy is it to incorporate my existing LabVIEW tests into the Test Executive?
You must to add two clusters to your existing LabVIEW VIs to pass statusinformation to the Test Executive. Additonally, the VI must have the correct connector pane configuration required by the Test Executive. Chapter 4, Creating Tests and Test Sequences, explains in detail how to add a LabVIEW test to the Test Executive.
How can I have individual steps displayed as they are executing?
In the Sequence Editor, select Yes in the Show VI Panel at Run-Time ring control for the step. For more information, refer to Chapter 4, Creating Tests and Test Sequences.
Is it easy to modify the Test Executive to fit my own needs?
The Test Executive uses a modifiable operator interface VI and modifiable callback VIs to implement much of its functionality. To change the behavior of the Test Executive, you can edit or replace any of these VIs. For more information about modifying these VIs, refer to Chapter 5, Modifying the Test Executive.
I have a test sequence that contains several step resources. How can I keep the Test Executive from loading all of the step resources into memory when I open the sequence? Is there a way to load a step resource into memory only when it is needed?
Normally, when the Test Executive opens a test sequence, it loads all thestep resources that the sequence needs into memory. This process is called pre-loading the resources. If you do not want the Test Executive to pre-load a resource, use the Sequence Editor to set the load specification field for that step to dynamic-load . For more information, refer to Chapter 4, Creating Tests and Test Sequences.
Reference Manual

Appendix A Common Questions
a
l
er
to
ay
e
on
How can an operator or technician specify a filename to log test results?
Normally in the Test Executive, only the developer can modify the filename of the test report. This modification is typically made in the Sequence Editor. For the operator or technician to specify a file, you must first place a path control on the Test Executive front panel. Next, modify the block diagram of the operator interface VI to copy the path in this control to global variable. Finally, modify the callback VI that logs test results (Post-UUT, Post-UUT Loop, or Test Report) to use the path in the globavariable instead of the report file path. For more information about modifying the operator interface VI and the callback VIs, refer to Chapter 5, Modifying the Test Executive.
How can I build a filename from the serial number of the UUT?
The default Pre-UUT callback VI prompts the user for the serial numband passes it back to the Test Executive in the UUT Info output. The Test Executive stores this information in the UUT Results and passes it outthe Post-UUT, Post-UUT Loop, and Test Report callback VIs. You can modify any one of these callback VIs to retrieve the serial number, build the file path, and store the result data to file.
Does the Test Executive support the use of localized decimal points?
The Test Executive supports the use of localized decimal points for displpurposes. If you set your LabVIEW Development System (or the run-timeexecutable in the case of the Test Executive Run-Time System) preferenceto Use localized decimal point , the Test Executive displays and reports use your default system decimal point.
Note ASCII sequences files always denote numeric information using a period (“.”) as thdecimal point.
Can I modify the Test Executive to have it open a particular sequence file when launched?
To have the Test Executive open a specific sequence file when launched, specify the path to the sequence file in the Path to Seq. File control on theOperator Interface VI. This control is located beneath the main controlsthe front panel of the VI. After entering the full path to the sequence file, pop up on the control and select Data Operations»Make Current Value Default. Finally, save the changes to the VI.
When you specify a file path in the Path to Seq. File control, the Test Executive opens that sequence file when launched.
LabVIEW Test Executive Reference Manual A-2 www.natinst.com

Appendix A Common Questions
ecify
W
all
Can I call the Test Executive as a subVI?
You can call the Test Executive Operator Interface VI as a subVI. The VIhas the standard error input and output clusters and a path input to spthe initial sequence file to load, if one is desired.
I am running the Test Executive under UNIX, and the text on the user interface panels is too large for the available space. Can I resize the text?
Depending on the configuration of your X server software, the text on the Test Executive user interface panels might be too large for the space allotted. If this is the case, change the default Application Font for LabVIEW (or the run-time executable in the case of the Test Executive Run-Time System) to a smaller size font. You can modify the font size in the LabVIEW Preferences dialog box. For more information about changing default fonts, see Chapter 7, Customizing Your Environment, in the G Programming Reference Manual.
Does the Test Executive reserve any particular error codes?
The Test Executive uses error codes 5000-5003. When creating LabVIETests, C Tests, and callback VIs, do not use any of these error codes.
When National Instruments releases a new version of LabVIEW, will my Test Executive still work?
When you upgrade your LabVIEW installation, you must mass compileof the Test Executive VI libraries and any test and callback VIs that you have created. Additionally, you must rebuild your Run-Time System executable using the new version of the LabVIEW Application Builder.
Can I customize the initial values of properties of new steps in the Sequence Editor?
To customize the initial values of properties of new steps in the SequenceEditor, edit the global variable GLOBAL-New Step Default.vi located in ENGINE.LLB in the Test Executive initialization directory. Modify the step properties in the global variable to the initial values you desire, selectOperate»Make Current Values Default, and save the file. Any new steps you create in the Sequence Editor will then have the new initial property values.
© National Instruments Corporation A-3 LabVIEW Test Executive Reference Manual
© National Instruments Corporation B-1 LabVIEW Test Executive
B
ted ou vert entsor
the
st
e file
box.
Sequence Conversion Notes
This appendix describes the steps for converting a test sequence creawith Version 4.0 or 5.0 of the Test Executive to the current version. If yhave Version 3.0 sequences, convert them to Version 4.0 and then conthose sequences to the latest version. Please contact National Instrumtechnical support for assistance with this conversion.
Version 4.0 and 5.0 ConversionPerform the following steps to convert sequence files from Version 4.05.0 to the latest version.
1. Use the Sequence File Converter to convert your sequence files tonew format.
2. Use LabVIEW to compile all Version 4.0 or 5.0 test VIs with the latetypedef controls.
Step 1—Use the 5.0 Sequence File ConverterThe 5.0 Sequence File Converter is a LabVIEW VI that converts your Version 4.0 sequence files to Version 5.0.
To load the Sequence File Converter, perform the following steps.
1. Launch LabVIEW.
2. Select Project»Test Executive»Utilities»Sequence File Converter….
With the Sequence File Converter, you can open any 4.0 or 5.0 sequencand convert it to the latest version. The following section explains the controls and indicators on the Sequence File Converter panel.
ControlsOpen…The Open… button displays a dialog box that prompts you to select a sequence file. You can select 4.0 or 5.0 sequence files from this dialog
Reference Manual

Appendix B Sequence Conversion Notes
r the ence
ded
ded
for the
ef he e
Convert to 5.0…When you click this button, the Sequence File Converter converts the currently loaded 4.0 or 5.0 sequence file to the latest version. It then displays a dialog box that prompts you to enter a name and location fonew 5.0 sequence file. When no 4.0 sequence file is loaded in the SequFile Converter, this button is disabled.
QuitThe Quit button stops the Sequence File Converter operation.
IndicatorsSequence NameThe Sequence Name indicator displays the filename of the currently loasequence.
Sequence VersionThe Sequence Version indicator displays the version of the currently loasequence.
Sequence File PathThe Sequence File Path indicator shows the complete file path of the currently loaded sequence.
Sequence DescriptionThe Sequence Description indicator displays the sequence descriptionthe currently loaded sequence. If no description has been entered for sequence, this indicator will be empty.
Step 2—Compile Your Test VIsTo make sure that all your test VIs use the latest Test Executive typedcontrols, you must compile those VIs with the LabVIEW after installing tTest Executive. To compile your test VIs, you must complete one of thfollowing steps.
• Open each test VI in LabVIEW and save the changes to it.
• Use LabVIEW’s mass compile operation (File»Mass Compile…) to compile an entire directory or library of VIs.
LabVIEW Test Executive Reference Manual B-2 www.natinst.com

© National Instruments Corporation C-1 LabVIEW Test Executive
C
u in d ve s.ical aily,
rs or ts. nces
line. bed d
st
ges
Technical Support Resources
This appendix describes the comprehensive resources available to yothe Technical Support section of the National Instruments Web site anprovides technical support telephone numbers for you to use if you hatrouble connecting to our Web site or if you do not have internet acces
NI Web SupportTo provide you with immediate answers and solutions 24 hours a day,365 days a year, National Instruments maintains extensive online technsupport resources. They are available to you at no cost, are updated dand can be found in the Technical Support section of our Web site at www.natinst.com/support .
Online Problem-Solving and Diagnostic Resources• KnowledgeBase—A searchable database containing thousands of
frequently asked questions (FAQs) and their corresponding answesolutions, including special sections devoted to our newest producThe database is updated daily in response to new customer experieand feedback.
• Troubleshooting Wizards—Step-by-step guides lead you through common problems and answer questions about our entire product Wizards include screen shots that illustrate the steps being descriand provide detailed information ranging from simple getting starteinstructions to advanced topics.
• Product Manuals—A comprehensive, searchable library of the lateeditions of National Instruments hardware and software product manuals.
• Hardware Reference Database—A searchable database containingbrief hardware descriptions, mechanical drawings, and helpful imaof jumper settings and connector pinouts.
• Application Notes—A library with more than 100 short papers addressing specific topics such as creating and calling DLLs, developing your own instrument driver software, and porting applications between platforms and operating systems.
Reference Manual

Appendix C Technical Support Resources
al nt
nts
n
ch u
al our
0,
,
Software-Related Resources• Instrument Driver Network —A library with hundreds of instrument
drivers for control of standalone instruments via GPIB, VXI, or seriinterfaces. You also can submit a request for a particular instrumedriver if it does not already appear in the library.
• Example Programs Database—A database with numerous, non-shipping example programs for National Instruments programming environments. You can use them to complement theexample programs that are already included with National Instrumeproducts.
• Software Library —A library with updates and patches to applicatiosoftware, links to the latest versions of driver software for NationalInstruments hardware products, and utility routines.
Worldwide SupportNational Instruments has offices located around the globe. Many branoffices maintain a Web site to provide information on local services. Yocan access these Web sites from www.natinst.com/worldwide .
If you have trouble connecting to our Web site, please contact your locNational Instruments office or the source from which you purchased yNational Instruments product(s) to obtain support.
For telephone support in the United States, dial 512 795 8248. For telephone support outside the United States, contact your local branchoffice:
Australia 03 9879 5166, Austria 0662 45 79 90 0, Belgium 02 757 00 2Brazil 011 284 5011, Canada (Ontario) 905 785 0085, Canada (Québec) 514 694 8521, China 0755 3904939, Denmark 45 76 26 00, Finland 09 725 725 11, France 01 48 14 24 24,Germany 089 741 31 30, Hong Kong 2645 3186, India 91805275406, Israel 03 6120092, Italy 02 413091, Japan 03 5472 2970, Korea 02 596 7456, Mexico (D.F.) 5 280 7625, Mexico (Monterrey) 8 357 7695, Netherlands 0348 433466, Norway 32 27 73 00, Singapore 2265886, Spain (Madrid) 91 640 0085Spain (Barcelona) 93 582 0251, Sweden 08 587 895 00, Switzerland 056 200 51 51, Taiwan 02 2377 1200, United Kingdom 01635 523545
LabVIEW Test Executive Reference Manual C-2 www.natinst.com

Glossary
d e for
Test s VIs
y one N,
A
ASCII American Standard Code for Information Interchange.
B
block diagram Pictorial description or representation of a program or algorithm. In LabVIEW, the block diagram, which consists of executable icons callenodes and wires that carry data between the nodes, is the source codthe VI. The block diagram resides in the Diagram window of the VI.
Boolean controls and indicators
Front panel objects used to manipulate and display input and output Boolean (TRUE or FALSE) data. Several styles are available, such asswitches, buttons, and LEDs.
C
callback VIs VIs designed for specific interface and data-logging operations. In the Executive, the system callback VIs handle interface operations, such alogin and sequence opening and closing, while the sequence callbackhandle run-time and edit-time events.
case One subdiagram of a Case structure.
Case structure Conditional branching control structure, which executes one and onlof its subdiagrams based on its input. It is the combination of the IF, THEELSE, and CASE statements in control flow languages.
cluster A set of ordered, unindexed data elements of any data type includingnumeric, Boolean, string, array, or cluster. The elements must be all controls or all indicators.
cluster shell Front panel object that contains the elements of a cluster.
compile Process that converts high-level code to machine-executable code. LabVIEW automatically compiles VIs before they run for the first time after creation or alteration.
© National Instruments Corporation G-1 LabVIEW Test Executive Reference Manual

Glossary
als,
e
a type log ou and
tants a onics
connector Part of the VI or function node that contains its input and output terminthrough which data passes to and from the node.
control Front panel object for entering data to a VI interactively or to a subVI programmatically.
Controls menu Menu of controls and indicators.
current VI VI whose Panel window, Diagram window, or Icon Editor window is thactive window.
D
data logging Generally, to acquire data and simultaneously store it in a disk file. LabVIEW file I/O functions can log data.
datalog file File that stores data as a sequence of records of a single, arbitrary datthat you specify when you create the file. While all the records in a datafile must be of a single type, that type can be complex. For instance, ycan specify that each record is a cluster containing a string, a number,an array.
dependency Conditional execution of one step based on the result of another.
Diagram window VI window that contains the block diagram code.
dialog box An interactive screen with prompts in which you specify additional information needed to complete a command.
E
edit mode The mode in which you create or edit a VI.
enumerations Type controls and constants that are similar to ring controls and consexcept in the way they display data. When an enumeration is wired toCase structure, cases are named according to the enumeration’s mnemrather than traditional numeric values.
LabVIEW Test Executive Reference Manual G-2 www.natinst.com

Glossary
s,
ues d
ront
set l or to
es
F
front panel The interactive user interface of a VI. Modeled from the front panel ofphysical instruments, it is composed of switches, slides, meters, graphcharts, gauges, LEDs, and other controls and indicators.
function Built-in execution element, comparable to an operator, function, or statement in a conventional language.
G
Global variable A built-in LabVIEW object you use to easily access a given set of valthroughout your LabVIEW application. A global variable is a special kinof VI with front panel controls that define the data type of the global variable.
I
indicator Front panel object that displays output.
L
label Text object used to name or describe other objects or regions on the fpanel or block diagram.
Labeling tool Tool used to create labels and enter text into text windows.
LabVIEW Laboratory Virtual Instrument Engineering Workbench.
Local variable A variable assigned to a front panel control or indicator on a VI. Onceup, a local variable always reads from or writes to the front panel controindicator. You can use a local variable to read from an indicator or writea control and in effect create an input-output control that LabVIEW donot normally have.
M
MB Megabytes of memory.
© National Instruments Corporation G-3 LabVIEW Test Executive Reference Manual

Glossary
t
g
ns.
lly
nd
text.
N
numeric controlsand indicators
Front panel objects used to manipulate and display or input and outpunumeric data.
O
object Generic term for any item on the front panel or block diagram, includincontrols, nodes, wires, and imported pictures.
P
palette menu Menu that displays a palette of pictures that represent possible optio
Panel window VI window that contains the front panel, the execution palette and theicon/connector pane.
pop up To call up a special menu by clicking an object with the mouse. (In Windows, click the right mouse button to pop up.)
pull-down menus Menus accessed from a menu bar. Pull-down menu options are usuageneral in nature.
R
ring control Special numeric control that associates 32-bit integers, starting at 0 aincreasing sequentially, with a series of text labels or graphics.
run mode The mode in which you execute a VI.
S
string controls and indicators
Front panel objects used to manipulate and display or input and output
structure Program control element, such as a Sequence, Case, For Loop, or While Loop.
LabVIEW Test Executive Reference Manual G-4 www.natinst.com

Glossary
e.
it as to d of
subdiagram Block diagram within the border of a structure.
subVI VI used in the block diagram of another VI; comparable to a subroutin
T
terminal Object or region on a node through which data passes.
tool Special LabVIEW cursor you can use to perform specific operations.
top-level VI VI at the top of the VI hierarchy. This term distinguishes the VI from itssubVIs.
Type definition(typedef)
A master copy of a control. If you use a custom control, you can save a type definition and use that type definition in all your VIs. If you needchange that control, you can update the single type definition file insteaupdating the control in every VI that uses it. A strict type definition can force everything about the control to be identical everywhere it is used, not just its data type.
U
UUT unit under test
V
VI Virtual instrument.
VI library Special file that contains a collection of related VIs for a specific use.
W
While Loop Post-iterative test loop structure that repeats a section of code until a condition is met. Comparable to a Do loop or a Repeat-Until loop in conventional programming languages.
wire Data path between nodes.
© National Instruments Corporation G-5 LabVIEW Test Executive Reference Manual

Index
AAbort banner. See PASS/FAIL/ABORT banners.Abort button
default key assignment (table), 3-6description, 3-3
Abort Loop buttondefault key assignment (table), 3-6description, 3-3
adding steps, 2-6 to 2-7, 4-10. See also New Step button.
AND expressions, in dependencies, 4-23architecture of Test Executive, 1-2 to 1-4
sequence callback VIs, 1-4system callback VIs, 1-3 to 1-4
BBad Steps list box, 4-18block diagram, operator interface VI, 5-4 to 5-5
CC tests (Windows NT/98/95 and UNIX),
writing, 4-4 to 4-7compiling test functions, 4-7resizing text on user interface panel under
UNIX, A-3test data structure, 4-5 to 4-6test error structure, 4-6 to 4-7
[Callback Paths] section of system configuration file
modifying, 5-1 to 5-3patching, 5-2 to 5-3
callback VIs, 5-6 to 5-23. See also sequence callback VIs; system callback VIs.
modifying, 5-6
Post-Step and Pre-Step callback VIs, 5-17 to 5-19
requirements for Run-Time Systems, 6-2 to 6-3
Test Executive callback VI interface, 5-6typedef controls, 5-23 to 5-29
Change Report File button, 4-18Clear Step Status button
default key assignment (table), 3-6description, 3-5
Clear Test Display buttondefault key assignment (table), 3-6description, 3-5
Clear VI button, 4-18Close button
default key assignment (table), 3-6description, 3-1
Close Sequence callback VI, 5-10command loop, operator interface VI, 5-5comment field, editing, 4-16COMMENT.SEQ example, 2-9common questions about Test Executive,
A-1 to A-3Comparison Type ring control, 2-6comparison type values
Limit Specification indicator (table), 4-12 to 4-13
Test Display (table), 3-9 to 3-10compiling
recompiling Test Executive for new versions of LabVIEW, A-3
test functions, 4-7test VIs, after converting from
Version 4.0, B-2comp_new.seq example, 2-9computer_cvi.seq example, 2-9COMPUTER.SEQ example, 2-9
© National Instruments Corporation I-1 LabVIEW Test Executive Reference Manual

Index
controls. See also indicators.Abort button, 3-3Abort Loop button, 3-3Clear Step Status button, 3-5Clear Test Display button, 3-5Close button, 3-1converting from Version 4.0 to
Version 5.0, B-1 to B-2Edit button, 3-2Function, 4-12Input Buffer?, 4-14 to 4-15Invocation Info?, 4-15key assignments
operator interface (table), 3-6 to 3-7Sequence Editor controls
(table), 4-21Login button, 3-2Loop Step(s) button, 1-6, 2-3, 3-3 to 3-4Max Loop Count, 4-14Name, 4-11New button, 3-2Open button, 3-1, B-1 to B-2Quit button, 2-4, 3-2, B-2Report File Mode, 4-18Run Mode, 3-4Run Step(s) button, 1-6, 2-3, 3-3Select VI control, 4-18Sequence Path Specification, 4-17Sequence Report button, 3-5Sequence Runtime Updates?
checkbox, 3-4Show Test VI Panel at Runtime?, 4-15Single Pass button, 2-4, 3-2Stop On Any Failure checkbox, 3-4Test Runtime Updates? checkbox, 3-5Test UUT button, 1-4, 2-2, 3-2Type ring, 4-11View Test Report button, 2-3, 3-5
conventions used in manual, xiii
converting test sequences, B-1 to B-2compiling test VIs, B-2Version 4.0 and 5.0 conversion,
B-1 to B-2Copy button, Dependency Editor, 4-25Copy Steps button
description, 4-9key assignment (table), 4-20procedure for copying steps, 4-10
cpu_cvi.seq example, 2-9cpu_diag.seq example, 2-9cpu_lv.seq example, 2-9Create DB Tables Callback.vi, 5-36 to 5-37creating test sequences. See test sequences.Cut button, Dependency Editor, 4-25Cut Steps button
description, 4-9key assignment (table), 4-20
Ddecimal points, localized, A-2Delete button, Dependency Editor, 4-23Delete Steps button
description, 4-9key assignment (table), 4-20procedure for deleting steps, 4-10
Dependency Editor dialog box, 4-22 to 4-27Cancel button, 4-25complex dependencies, 4-24copying, cutting, pasting, and
undoing, 4-25Dependency Editor key assignments
(table), 4-26example of setting dependencies,
2-7 to 2-8OK button, 4-25AND and OR expressions, 4-23 to 4-24relationship among dependencies, run
mode, and test flow, 4-26 to 4-27rules for editing, 4-25
LabVIEW Test Executive Reference Manual I-2 www.natinst.com
Index
deploying Test Executive. See Run-Time System for Test Executive.
Description button, 4-17Developer operating level, 1-7Development System for Test Executive, 2-2diagnostic resources, online, C-1documentation
conventions used in manual, xiiirelated documentation, xiv
EEdit button
default key assignment (table), 3-6description, 3-2
Edit Dependencies button. See also Dependency Editor dialog box.
description, 4-15key assignment (table), 4-21setting dependencies, 2-7
Edit menu, Sequence Editor, 4-20Edit Step Comment button
description, 4-16key assignment (table), 4-21
Edit Test VI buttondescription, 4-15key assignment (table), 4-21
editing test sequences. See Sequence Editor; test sequences.
Enable Test Report Logging option, 4-17Error cluster, 4-3error codes reserved by Test Executive, A-3error messages, Test Display, 3-10error structure (test error structure), 4-6 to 4-7examining sample test program, 2-4 to 2-5execution model, 1-4 to 1-7
modes, 1-4use of sequence callback VIs, 1-5 to 1-6
Exit callback VI, 5-11exiting Test Executive. See Quit button.
FFAIL Action
description, 4-14key assignment (table), 4-21
Fail banner. See PASS/FAIL/ABORT banners.
File menu, Sequence Editor, 4-20front panel, operator interface VI, 5-4Function control
description, 4-12key assignment (table), 4-21
GGOTO Conditions button
description, 4-16key assignment (table), 4-21
GOTO Target controldescription, 4-16key assignment (table), 4-21
Iindicators. See also controls.
converting from Version 4.0 to Version 5.0, B-2
Limit Specification, 4-12 to 4-13Load Specification, 4-13required
Error cluster, 4-3Test Data cluster, 4-2
Resource, 4-11 to 4-12Sequence Display, 3-7 to 3-8Sequence Information, 3-12Sequence Name, 3-12Status, 3-12Test Display, 3-8 to 3-11
comparison values and relative limits(table), 3-9 to 3-10
error messages, 3-10
© National Instruments Corporation I-3 LabVIEW Test Executive Reference Manual

Index
results of each step, 3-9 to 3-10Test Report, 3-10 to 3-11
input buffer, for LabVIEW tests, 4-3 to 4-4Input Buffer? control
description, 4-14 to 4-15key assignment (table), 4-21
Insert controlabove and below radio buttons, 4-9adding new step, 2-6key assignment (table), 4-20
Invocation Info? controldescription, 4-15key assignment (table), 4-21
Invocation Information cluster, 4-4
Kkey assignment
Dependency Editor (table), 4-23operator interface (table), 3-6 to 3-7Sequence Editor control keys (table),
4-20 to 4-21Sequence Editor menu shortcuts
(table), 4-22
LLabVIEW SQL Tools for result logging,
5-35 to 5-38alternate callback VIs, 5-36 to 5-38
Create DB Tables Callback.vi, 5-36 to 5-37
Operator Interface VI, 5-38Per-UUT DB Logger Callback.vi,
5-37 to 5-38modifications to system configuration
file, 5-36LabVIEW Test Executive. See Test Executive.LabVIEW Test Executive Run-Time System.
See Run-Time System for Test Executive.
LabVIEW test shells, 5-38 to 5-41calling interface, 5-38config mode, 5-39configuration and execution (figure), 5-41example sequences, 5-39 to 5-41run mode, 5-39
LabVIEW testsincorporating existing tests into Test
Executive, A-1optional inputs, 4-3 to 4-4
input buffer, 4-3 to 4-4Invocation Information cluster, 4-4
required indicators, 4-2 to 4-3Error cluster, 4-3Test Data cluster, 4-2
typedef controls, 5-29 to 5-31writing, 4-1 to 4-4
limit specification, configuring, 2-6. See also Set Limit Specification button.
Limit Specification indicator, 4-12 to 4-13Load Specification indicator
description, 4-13key assignment (table), 4-21
localized decimal points, A-2logging. See result logging alternatives.Login button
default key assignment (table), 3-6description, 3-2
Login callback VIcalling interface, 5-7customizing, 5-7determining operating level, 2-2overview, 1-3 to 1-4
Login dialog boxdefault, 3-13entering password, 2-1 to 2-2
Loop Step(s) button, 2-3default key assignment (table), 3-6description, 3-3 to 3-4typical use, 1-6
Loop Step(s) mode, 1-4
LabVIEW Test Executive Reference Manual I-4 www.natinst.com

Index
n
Mmanual. See documentation.mass editing of steps, 4-11Max Loop Count
description, 4-14key assignment (table), 4-21
modifying Test Executive. See Test Executive.multiple steps, running, 2-3
NName control
description, 4-11key assignment (table), 4-21
National Instruments Web support, C-1 to C-2New button
default key assignment (table), 3-6description, 3-2
New Step buttondescription, 4-9editing test sequence, 2-5, 2-6key assignment (table), 4-20
Oonline problem-solving and diagnostic
resources, C-1Open button
converting from Version 4.0 to Version 5.0, B-1 to B-2
default key assignment (table), 3-6description, 3-1
Open Sequence callback VIcalling interface, 5-9customizing, 5-9 to 5-10
Open Test callback VIcalling interface, 5-22customizing, 5-22 to 5-23typical test sequence, 1-6
Open VI button, 4-18
operating levelschanging to Technician level, 2-3determined by password entered in Logi
dialog box, 2-2Developer, 1-7Operator, 1-7Technician, 1-7
operator dialog boxes, 3-13 to 3-15Login dialog box, 3-13Parsing Error Warning dialog box, 3-15PASS/FAIL/ABORT banners, 3-14Run-Time Error Warning dialog
box, 3-15Select Sequence dialog box, 3-13Test Failed dialog box, 3-14UUT Information dialog box, 3-14
[Operator Interface Path] section, system configuration file, 5-3
operator interface VIblock diagram, 5-4 to 5-5calling as subVI, A-3command loop, 5-5front panel, 5-4logging results with LabVIEW SQL
Tools, 5-38modifying default VI, 5-4 to 5-5
Operator levelcapabilities, 1-7changing to Technician level, 2-3
OR expressions, in dependencies, 4-23
PParsing Error Warning dialog box, default,
3-15PASS/FAIL/ABORT banners
changing, 5-32default, 3-14
passwordschanging, 5-31 to 5-32determining operating level, 2-2
© National Instruments Corporation I-5 LabVIEW Test Executive Reference Manual

Index
4
Paste button, Dependency Editor, 4-23Paste Steps button
description, 4-9key assignment (table), 4-20
Per-UUT DB Logger Callback.vi, 5-37 to 5-38
Per-UUT Logger Callback.vi, 5-34 to 5-35Post-Run-Loop Test callback VI
calling interface, 5-20 to 5-21customizing, 5-20 to 5-21
Post-run VIscreating, 4-7typical test sequence, 1-6
Post-Step callback VIcalling interface, 5-18 to 5-19overview, 5-17
Post-UUT callback VIcalling interface, 5-16customizing, 5-16 to 5-17replacing with Per-UUT Logger
Callback.vi, 5-34 to 5-35typical test sequence, 1-5
Post-UUT Loop callback VIcalling interface, 5-17customizing, 5-17
Pre-run VIscreating, 4-7typical test sequence, 1-6
Pre-Step callback VIcalling interface, 5-17 to 5-18overview, 5-17
Pre-UUT callback VIcalling interface, 5-15customizing, 5-14 to 5-15typical test sequence, 1-5
Pre-UUT Loop callback VIcalling interface, 5-15customizing, 5-14 to 5-15
[Preferences] section, system configuration file, 5-3
problem-solving and diagnostic resources, online, C-1
Qquestions about Test Executive, A-1 to A-3Quit button
converting from Version 4.0 to Version 5.0, B-2
default key assignment (table), 3-6description, 3-2stopping execution of Test Executive, 2-
Rrepeating steps. See Loop Step(s) button.Report File Mode control, 4-18report generation. See Test Report.Resource indicator
description, 4-11 to 4-12key assignment (table), 4-21
result logging alternatives, 5-34 to 5-38LabVIEW SQL Tools for logging to
database, 5-35 to 5-38logging on Per-UUT basis, 5-34 to 5-35specifying filename to log results, A-2
RTERROR.SEQ example, 2-9Run Mode, Sequence Display, 3-7Run Mode, Sequence Editor
key assignment (table), 4-21options (table), 4-14relationship among dependencies, Run
Mode, and test flow, 4-26 to 4-27Run Mode control
default key assignment (table), 3-6description, 3-4
Run Step(s) buttondefault key assignment (table), 3-6description, 3-3executing individual steps, 2-3typical use, 1-6
LabVIEW Test Executive Reference Manual I-6 www.natinst.com

Index
Is
-8
Run Step(s) mode, 1-4Run-Time Error Warning dialog box,
default, 3-15Run-Time System for Test Executive,
6-1 to 6-4building, 6-1 to 6-2overview, 1-2, 6-1required components, 6-2 to 6-4
callback and test VIs, 6-2 to 6-3shared libraries (C test resources),
6-4test sequences, 6-4testexec.ini file, 6-3
running test sequences. See test sequences.
SSave Sequence callback VI
calling interface, 5-10customizing, 5-11
saving Test Executive VIs for distribution, 6-2 to 6-3
Select Resource button, 2-5Select Sequence callback VI
calling interface, 5-8customizing, 5-9
Select Sequence dialog box, default, 3-13Select VI control, 4-18sequence callback VIs
flow of callback VIs in UUT test loop (figure), 5-13
list of VIs, 1-4, 5-12modifying, 5-12 to 5-13Open Test
calling interface, 5-22customizing, 5-22 to 5-23typical test sequence, 1-6
Post-Run-Loop Test, 5-20 to 5-21Post-Step, 5-17 to 5-19
Post-UUTcalling interface, 5-16customizing, 5-16 to 5-17replacing with Per-UUT Logger
Callback.vi, 5-34 to 5-35typical test sequence, 1-5
Post-UUT Loop, 5-17Pre-Step, 5-17 to 5-18Pre-UUT
calling interface, 5-15customizing, 5-14 to 5-15typical test sequence, 1-5
Pre-UUT Loop, 5-14 to 5-15Test Failure, 5-21 to 5-22Test Report
calling interface, 5-19 to 5-20customizing, 5-19 to 5-20typical test sequence, 1-5 to 1-6
test sequence and associated callback V(figure), 1-5
typedefs, 5-23 to 5-29typical use in execution model, 1-5 to 1-7
Sequence Description indicator, converting, B-2
Sequence Display indicator, 3-7 to 3-8Run Mode field values (table), 3-7Step Status/Result field values (table), 3
Sequence Editor. See also test sequences.control key assignments (table),
4-20 to 4-21customizing initial values of properties of
new steps, A-3Edit menu, 4-20editing dependencies, 4-22 to 4-27
Cancel button, 4-25complex dependencies, 4-24copying, cutting, pasting, and
undoing, 4-25Dependency Editor key assignments
(table), 4-26OK button, 4-25
© National Instruments Corporation I-7 LabVIEW Test Executive Reference Manual

Index
2
AND and OR expressions, 4-23 to 4-24
relationship among dependencies, run mode, and test flow, 4-26 to 4-27
rules for editing, 4-25File menu, 4-20invoking, 2-5mass editing, 4-11menu shortcuts (table), 4-22Sequence Errors, 4-18 to 4-20Sequence Options, 4-16 to 4-18
Change Report File button, 4-18Description button, 4-17Enable Test Report Logging, 4-17Report File Mode control, 4-18Sequence Load Specification, 4-16Sequence Path Specification, 4-17Sequence VIs, 4-18Stop on any Failure checkbox, 4-17
step editing elements, 4-9 to 4-11Copy Steps button, 4-9Cut Steps button, 4-9Delete Steps button, 4-9Insert, 4-9New Step button, 4-9Undo Step Edits button, 4-9using editing elements, 4-10
step editor controls, 4-11 to 4-16Edit Dependencies button, 4-15Edit Step Comment button, 4-16Edit Test VI button, 4-15FAIL Action, 4-14Function, 4-11 to 4-12GOTO Conditions button, 4-16GOTO Target control, 4-16Input Buffer? control, 4-14 to 4-15Invocation Info? control, 4-15Limit Specification indicator,
4-12 to 4-13Load Specification indicator, 4-13
Max Loop Count, 4-14Name control, 4-11Resource indicator, 4-11 to 4-12Run Mode, 4-14Show Test VI Panel at Runtime?
control, 4-15Type ring control, 4-11
Sequence Errors dialog box, 4-18 to 4-20sequence file, opening specific file while
launching, A-2Sequence File Path indicator, converting, B-Sequence Information indicator, 3-12Sequence Load Specification control, 4-16Sequence Name indicator
converting from Version 4.0 to Version 5.0, B-2
description, 3-12Sequence Options, 4-16 to 4-18
Change Report File button, 4-18Description button, 4-17Enable Test Report Logging, 4-17Report File Mode control, 4-18Sequence Load Specification, 4-16Sequence Path Specification, 4-17Sequence VIs, 4-18Stop on any Failure checkbox, 4-17
Sequence Path Specification control, 4-17Sequence Report button
default key assignment (table), 3-7description, 3-5
Sequence Report callback VI, 5-11Sequence Runtime Updates? checkbox
default key assignment (table), 3-6description, 3-4
Sequence Version indicator, converting, B-2Sequence VIs option, 4-18sequences. See test sequences.Set Limit Specification button
description, 2-6key assignment (table), 4-21
Set Limit Specification dialog box, 2-6 to 2-7
LabVIEW Test Executive Reference Manual I-8 www.natinst.com

Index
shared libraries, for Run-Time Systems, 6-4Show Test VI Panel at Runtime? control
description, 4-15key assignment (table), 4-21
Single Pass buttondefault key assignment (table), 3-6description, 3-2executing test sequence, 2-4
Single Pass modeexecuting individual steps, 2-3 to 2-4flow of execution (figure), 1-4purpose and use, 1-4typical test sequence, 1-6
software-related resources, C-2SQL Tools. See LabVIEW SQL Tools for
result logging.starting Test Executive, 2-1 to 2-2Status indicator, Test Display (table), 3-12Step Problems list box, 4-19step resources, loading into memory, A-1Step Status/Result field values (table), 3-8steps
definition, 4-8displaying individual steps, A-1executing individual steps, 2-3 to 2-4mass editing, 4-11specifications, 4-8
Stop On Any Failure checkboxdefault key assignment (table), 3-6description, 3-4setting, 4-17
structurestest data structure, 4-5 to 4-6test error structure, 4-6 to 4-7
system callback VIsClose Sequence, 5-10Exit, 5-11Login
calling interface, 5-7customizing, 5-7
determining operating level, 2-2purpose and use, 1-3 to 1-4
Open Sequence, 5-9 to 5-10overview, 1-3 to 1-4, 5-6 to 5-7Save Sequence, 5-10 to 5-11Select Sequence, 5-8 to 5-9Sequence Report, 5-11typedefs, 5-23 to 5-29
system configuration file (testexec.ini), 5-1 to 5-3
[Callback Paths] section, 5-1 to 5-3modifying for result logging, 5-36[Operator Interface Path] section, 5-3[Preferences] section, 5-3requirements for Run-Time Systems, 6-3
Ttechnical support resources, C-1 to C-2Technician operating level
capabilities, 1-7changing to, 2-3
Test Data cluster, 4-2test data structure, 4-5 to 4-6
parameters (table), 4-5 to 4-6structure definition, 4-5
Test Display, 3-8 to 3-11comparison type values (table),
3-9 to 3-10error messages, 3-10result of each test, 3-9 to 3-10Test Report, 3-10 to 3-11
test error structure, 4-6 to 4-7Test Executive. See also Run-Time System for
Test Executive.architecture, 1-2 to 1-4
sequence callback VIs, 1-4system callback VIs, 1-3 to 1-4
calling as subVI, A-3common questions, A-1 to A-3Development System, 1-2
© National Instruments Corporation I-9 LabVIEW Test Executive Reference Manual
Index
execution model, 1-4 to 1-7features, 1-1modifying
callback VIs, 5-6 to 5-23operator interface VI, 5-4 to 5-5PASS/FAIL/ABORT banners, 5-32passwords, 5-31 to 5-32result logging alternatives,
5-34 to 5-38system configuration file
(testexec.ini), 5-1 to 5-3Test Report, 5-33 to 5-34typedef controls, 5-23 to 5-31using another application for report
generation, 5-34using LabVIEW Test shells,
5-38 to 5-41UUT serial number prompt, 5-33
operating levels, 1-7overview, 1-1 to 1-2quitting, 2-4recompiling for new versions of
LabVIEW, A-3Run-Time System, 1-2starting, 2-1 to 2-2versions, 1-2
Test Executive VIs, saving for distribution, 6-2 to 6-3
Test Failed dialog box, default, 3-13Test Failure callback VI
calling interface, 5-21customizing, 5-21 to 5-22
test program, examining, 2-4 to 2-5Test Report
changing, 5-33 to 5-34enabling logging, 4-17example (figure), 3-11generating with other applications, 5-34
Test Report callback VIcalling interface, 5-19 to 5-20customizing, 5-19 to 5-20typical test sequence, 1-5 to 1-6
Test Runtime Updates? checkboxdefault key assignment (table), 3-7description, 3-5
test sequences. See also Sequence Editor.components, 4-7conversion notes, B-1 to B-2
compiling test VIs, B-2Version 4.0 and 5.0 conversion,
B-1 to B-2creating and editing, 2-5 to 2-8,
4-8 to 4-27adding steps, 2-6 to 2-7, 4-10configuring limit specification, 2-6copying steps, 4-10creating steps, 2-5 to 2-6deleting steps, 4-10inserting steps, 4-9mass editing, 4-11modifying steps, 4-10running the sequence, 2-8setting dependencies, 2-7 to 2-8
definition, 4-7examining test program, 2-4 to 2-5example sequences, 2-9opening and running, 2-1 to 2-4
changing to Technician level, 2-3exiting Test Executive, 2-4individual steps, 2-3 to 2-4multiple steps, 2-3Single Pass mode, 2-3 to 2-4starting Test Executive, 2-1 to 2-2steps for running, 2-2 to 2-4
opening specific sequence file while launching, A-2
requirements for Run-Time Systems, 6-4
LabVIEW Test Executive Reference Manual I-10 www.natinst.com

Index
.
test shells. See LabVIEW test shells.Test String Callback.vi, 5-35Test UUT button
default key assignment (table), 3-6description, 3-2executing test sequence, 1-4, 2-2
Test UUT modepurpose and use, 1-4typical test sequence, 1-5 to 1-6
testexec.ini. See system configuration file (testexec.ini).
tests, writingC tests (Windows NT/98/95 and
UNIX), 4-4 to 4-7compiling test functions, 4-7test data structure, 4-5 to 4-6test error structure, 4-6 to 4-7
LabVIEW tests, 4-1 to 4-4optional inputs, 4-3 to 4-4required indicators, 4-2 to 4-3
VI Wizard, 4-1tTestData structure
definition, 4-5parameters (table), 4-5 to 4-6
Type ring controldescription, 4-11key assignment (table), 4-20
typedef controls, 5-23 to 5-31callback VIs, 5-23 to 5-29LabVIEW tests, 5-29 to 5-31overview, 5-23
TYPEDEF-Input buffer.ctl, 5-30TYPEDEF-Invocation Info.ctl, 5-30TYPEDEF-Login Info.ctl., 5-23 to 5-24TYPEDEF-Mode.ctl, 5-30TYPEDEF-Sequence Element.ctl,
5-25 to 5-26TYPEDEF-Sequence Results.ctl, 5-27 to 5-28TYPEDEF-Sequence.ctl, 5-24 to 5-25
TYPEDEF-Test Data.ctl, 5-30 to 5-31TYPEDEF-Test Results.ctl, 5-28 to 5-29TYPEDEF-UUT Results.ctl, 5-27
UUNDEFINE.SEQ example, 2-9Undo button, Dependency Editor, 4-23Undo Step Edits button
description, 4-9key assignment (table), 4-20
UNIX tests. See C tests (Windows NT/98/95 and UNIX).
UUT Information dialog box, default, 3-14UUT serial number
building filename from serial number, A-2
changing prompt, 5-33UUT Test mode. See Test UUT mode.
VVI Wizard, 4-1View Test Report button
default key assignment (table), 3-6description, 3-5
WWeb support from National Instruments,
C-1 to C-2online problem-solving and diagnostic
resources, C-1software-related resources, C-2
Windows NT/98/95 and UNIX tests. See C tests (Windows NT/98/95 and UNIX).
wizard, for writing tests, 4-1Worldwide technical support, C-2writing tests. See test sequences; tests, writing
© National Instruments Corporation I-11 LabVIEW Test Executive Reference Manual


![TIN Reference File [PDF, 2MB]](https://static.documents.pub/doc/80x56/586a2d851a28ab65328be45f/tin-reference-file-pdf-2mb.jpg)


