MICROSCALE GLOBAL WATER KIT INSTRUCTIONS 1 Global Experiment for the International Year of Chemistry pH of the Planet (Testing the pH of Different Water Sources) Overview of the pH Activity The title “pH of the Planet” refers to the testing of the pH of different water samples. Since the activity is part of the Global Experiment, students from all over the World will be submitting their data to the Global database and so the pH of the waters of our Planet will be in the spotlight. In this activity students will collect a water sample from a local natural source. They will measure the pH of the sample using coloured indicator solutions. An average value from the class results will be reported to the Global Experiment Database together with information about the sample and the school. Background to the pH Activity pH measurement is one of the most common tests performed on water. This is because the pH of a body of water is an indication of the quality of that water, both for aquatic systems living in the water as well as for human consumption. All organisms can only tolerate a certain amount of acidity and therefore function within a particular pH range. If the pH changes only slightly, these organisms may die. Similarly, humans can only drink water that is in a specific pH range otherwise we may suffer serious health problems. The pH of water is greatly affected by the addition of certain chemicals to water. For example: the dumping of chemicals into water by individuals, industries and communities can change the pH and other properties of the water. Pollutants such as sulfur dioxide from car and coal power station emissions escape into the atmosphere and produce acid rain that drastically reduces the pH of streams and rivers. When acidic water comes into contact with metals and other chemicals, the water can become even more poisonous. pH is therefore a critical factor of the health of a particular body of water, and as students perform this activity they need to be aware of the impact that human activities can have on water quality. Submitting Results to the Global Database The following information should be submitted to the database. If the details of the school and location have already been submitted in association with one of the other activities, these results should be linked to the previous submission. Date the water was sampled: Name of local water source: (e.g. Limpopo River) pH of local water source: Nature of water: (fresh, salt, sea etc.) Water temperature: (temperature while measuring the pH) Number of students involved School/class Registration number
Transcript
MICROSCALE GLOBAL WATER KIT INSTRUCTIONS
1
Global Experiment for the International Year of Chemistry
pH of the Planet (Testing the pH of Different Water Sources)
Overview of the pH Activity
The title “pH of the Planet” refers to the testing of the pH of different water samples. Since
the activity is part of the Global Experiment, students from all over the World will be
submitting their data to the Global database and so the pH of the waters of our Planet will be
in the spotlight. In this activity students will collect a water sample from a local natural source.
They will measure the pH of the sample using coloured indicator solutions. An average value
from the class results will be reported to the Global Experiment Database together with
information about the sample and the school.
Background to the pH Activity
pH measurement is one of the most common tests performed on water. This is because the pH
of a body of water is an indication of the quality of that water, both for aquatic systems living
in the water as well as for human consumption. All organisms can only tolerate a certain
amount of acidity and therefore function within a particular pH range. If the pH changes only
slightly, these organisms may die. Similarly, humans can only drink water that is in a specific
pH range otherwise we may suffer serious health problems. The pH of water is greatly affected
by the addition of certain chemicals to water. For example: the dumping of chemicals into
water by individuals, industries and communities can change the pH and other properties of
the water. Pollutants such as sulfur dioxide from car and coal power station emissions escape
into the atmosphere and produce acid rain that drastically reduces the pH of streams and
rivers. When acidic water comes into contact with metals and other chemicals, the water can
become even more poisonous. pH is therefore a critical factor of the health of a particular body
of water, and as students perform this activity they need to be aware of the impact that
human activities can have on water quality.
Submitting Results to the Global Database
The following information should be submitted to the database. If the details of the school and
location have already been submitted in association with one of the other activities, these
results should be linked to the previous submission.
Date the water was sampled:
Name of local water source:
(e.g. Limpopo River)
pH of local water source:
Nature of water:
(fresh, salt, sea etc.)
Water temperature:
(temperature while measuring the pH)
Number of students involved
School/class Registration number
MICROSCALE GLOBAL WATER KIT INSTRUCTIONS
2
Table of Contents
Page
Overview of the pH Activity 1
Background to the pH Activity 1
Submitting Results to the Global Database 1
Instructions for the Activity (Teacher)
Experiment Outline 3
Students’ Instructions
Materials needed for the pH Activity 4
Safety Precautions 4
Procedure for the pH Activity
- Testing the pH of your Water Sample with Bromothymol Blue Indicator 4
- Testing the pH of your Water Sample with m-Cresol Purple Indicator (for
samples with pH 7.6) 6
- Analysing and Submitting your pH Results 6
Students’ Observations and Results Sheet for the pH Activity 7
Teacher’s Notes
Using the Activity with your Students 8
Teacher’s Summary of School Results 9
Teacher’s Summary of School Results - Sample 10
Sample of Students’ Observations and Results Sheet for the pH Activity 11
Additional Information about the Activity
- Safety Precautions 12
- Materials and Equipment Listing 12
Student Learning Outcomes
- Science Process Skills 15
- Chemistry background 15
- Learning outcomes for Primary Classes 15
- Learning outcomes for Junior High School 16
- Learning outcomes for Senior High School 16
Extension Activities 16
Background Information on Acidity and pH 16
MICROSCALE GLOBAL WATER KIT INSTRUCTIONS
3
Instructions for the Activity (Teacher)
Experiment Outline
Students should work in small groups (4 – 6 students, or pairs if numbers permit) to measure
the pH of a water sample collected from a local source (fresh, salt, sea, etc.). One Microscale
Global Water Kit should be used per group. The results should be analyzed and reported on the
International Year of Chemistry Global Experiment Database.
Just prior to performing the pH activity, use the thermometer in the School Resource Kit to
measure the temperature of the water sample. Record the value on the Results Sheet.
The pH of the Planet activity involves the following steps:
1. Collection of a natural water sample from an identifiable source.
Thereafter, to find the pH of the sample:
2. Measuring out 2 mℓ volumes of the water sample into the large wells of the comboplate.
3. Adding drops of a coloured indicator to the sample and matching these colours to pH
values using a colour indicator chart specific for each indicator.
Lastly, to complete the activity:
4. Analyzing the data and reporting results to the Global Experiment Database.
MICROSCALE GLOBAL WATER KIT INSTRUCTIONS
4
Students’ Instructions
Materials needed for the pH Activity Collect the following:
1 x sample of water from local source such as fresh (dam, pond or river) or sea water
(100 – 250 mℓ)
Tap water (for rinsing)
Permanent marker or ink pen (used for labelling of propettes)
A piece of white paper
Components from the Microscale Global Water Kit:
1 x comboplate
1 x 2 mℓ plastic syringe
2 x propettes (for indicators)
1 x plastic microspatula per water sample (for stirring)
Components and Chemicals from the School Resource Kit
a thermometer - ASK YOUR TEACHER FOR THE THERMOMETER
bromothymol blue indicator solution – ASK YOUR TEACHER FOR THIS INDICATOR
m-cresol purple indicator solution - ASK YOUR TEACHER FOR THIS INDICATOR
colour charts for the bromothymol blue and m-cresol purple indicators - ASK YOUR
TEACHER FOR THE COLOUR CHARTS
Safety Precautions
Testing the pH of your Water Sample with
Bromothymol Blue Indicator
1. Before you start, make sure that all of your equipment is clean and dry. If there is any
residue in the wells of the comboplate or in the syringe, the water sample may be
contaminated and the pH results may be affected.
2. Using the thermometer from the School Resource Kit, measure and record the
temperature of the water sample.
3. Place the comboplate on the piece of white paper to help you see the indicator colours
better.
The water in this activity is not safe to drink. Direct contact with water
samples and indicator solutions should be avoided. Wash your hands with soap and water after doing the activity.
MICROSCALE GLOBAL WATER KIT INSTRUCTIONS
5
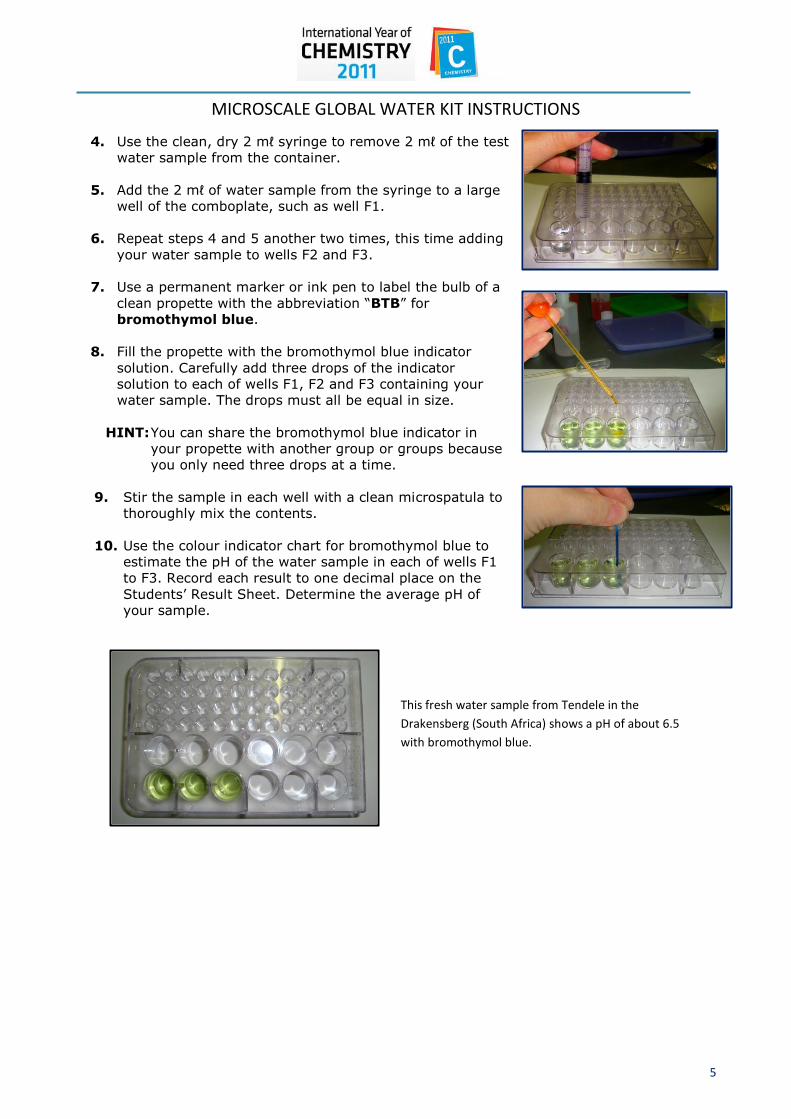
4. Use the clean, dry 2 mℓ syringe to remove 2 mℓ of the test
water sample from the container.
5. Add the 2 mℓ of water sample from the syringe to a large
well of the comboplate, such as well F1.
6. Repeat steps 4 and 5 another two times, this time adding
your water sample to wells F2 and F3.
7. Use a permanent marker or ink pen to label the bulb of a
clean propette with the abbreviation “BTB” for
bromothymol blue.
8. Fill the propette with the bromothymol blue indicator
solution. Carefully add three drops of the indicator
solution to each of wells F1, F2 and F3 containing your
water sample. The drops must all be equal in size.
HINT: You can share the bromothymol blue indicator in
your propette with another group or groups because
you only need three drops at a time.
9. Stir the sample in each well with a clean microspatula to
thoroughly mix the contents.
10. Use the colour indicator chart for bromothymol blue to
estimate the pH of the water sample in each of wells F1
to F3. Record each result to one decimal place on the
Students’ Result Sheet. Determine the average pH of
your sample.
This fresh water sample from Tendele in the
Drakensberg (South Africa) shows a pH of about 6.5
with bromothymol blue.
MICROSCALE GLOBAL WATER KIT INSTRUCTIONS
6
Testing the pH of your Water Sample with m-Cresol
Purple Indicator (only for samples with pH 7.6)
1. If the pH of your sample is 7.6 or greater using bromothymol blue indicator, you must
repeat the procedure again but this time using the m-cresol purple indicator.
2. Use the syringe to add 2 mℓ of the same water sample to wells F4, F5 and F6.
3. Use the marker or ink pen to label another clean propette. This time use the
abbreviation “mCP” for m-cresol purple.
4. Fill the propette with the m-cresol purple indicator solution. Add three equal-sized drops
of the indicator solution to the sample in each well. (Remember to share the indicator
with other groups.)
5. Stir the contents of the wells with a clean microspatula. (Do not use the microspatula
you used before when adding bromothymol blue, unless you have properly cleaned and
dried it.)
6. Use the colour indicator chart for m-cresol purple to estimate the pH of the sample in
each of wells F4 to F6. Record each result on the Students’ Result Sheet as before.
Find the average pH of your sample to one decimal place.
Analysing and Submitting your results
1. Decide which indicator solution gave the best measure of the pH of your sample.
2. Add the average result you have selected to the Class Table of Results.
3. If the entire class has used the same water sample, calculate the class average result
for the local water sample. This is the pH value that will be submitted to the Global
Experiment Database.
4. If different groups have tested other water samples, then the average pH values of the
different water samples can also be submitted to the Global Experiment Database as
long as each sample is appropriately identified.
Rinse and dry all of the equipment you used and place it safely back in the kit.
Wash your hands with soap and water.
This sea water sample from Durban (South Africa)
shows a pH of about 7.8 with bromothymol blue
(three wells on the left). It has been tested further
with m-Cresol purple in the wells on the right, where
it shows a pH value of between 7.8 and 8.0.
MICROSCALE GLOBAL WATER KIT INSTRUCTIONS
7
Students’ Observations and Results Sheet for the
pH Activity
Complete a separate Results Sheet for each water sample tested.
1. Complete the following table:
Date of water sample collection
Date the pH measurement was performed
Temperature of water at time of measuring pH ………………….ºC
Type of water (sea, river, pond, swamp, etc.)
Describe where you found the water
2. Record the pH values of your water sample in the table below.
Well
Number
pH value with
Bromothymol Blue
Indicator
pH value with m-
cresol Purple
Indicator
Average pH value
using best indicator
MICROSCALE GLOBAL WATER KIT INSTRUCTIONS
8
Using the Activity with your Students
This activity has been written so that it can be included as part of an existing water-related
unit of work. However teachers may wish to use it just to give their students an experience of
contributing to an international scientific experiment.
Some elaborations for the activity and ancillary activities are provided so that teachers can
choose options to suit the time their class has available and the depth of understanding about
the topic of pH and acidity appropriate for their class.
Learning outcomes range from using simple equipment and making and recording observations
for younger students, to an introduction to pH and acidity for older students. The activity lends
itself to discussions of the role of nature on the pH of water bodies, as well as the impact of
human activities on the acid concentration - and therefore quality - of water supplies intended
for human consumption.
Teacher’s Notes
MICROSCALE GLOBAL WATER KIT INSTRUCTIONS
9
Teacher’s Summary of School Results
pH of the Planet Observation Table
(summarizing results from a school)
NAME OF SCHOOL: _________________________
_________________________
_________________________
LOCATION OF SCHOOL: _________________________
_________________________
NUMBER OF STUDENTS: _________________________
Type of water Description of
water source
Temperature of
Water at time of
Measuring pH/°C
Average pH value
of Water Sample
1.
2.
3.
4.
5.
6.
7.
8.
9.
10.
MICROSCALE GLOBAL WATER KIT INSTRUCTIONS
10
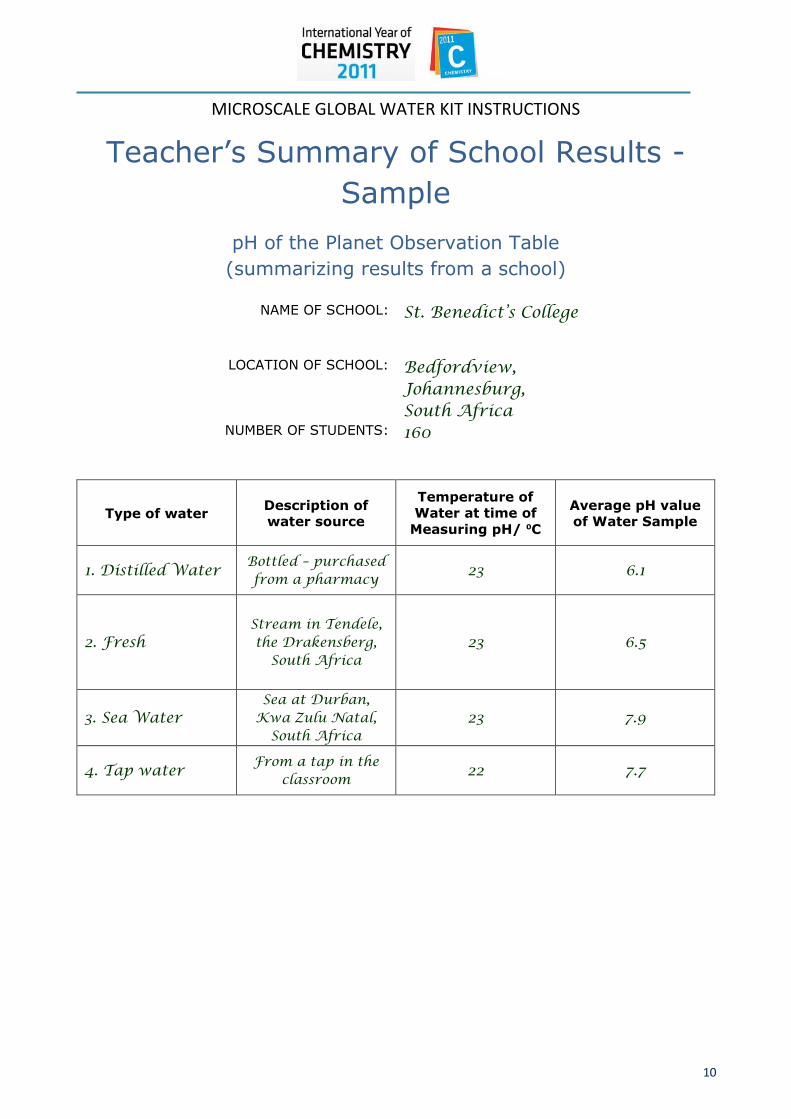
Teacher’s Summary of School Results -
Sample
pH of the Planet Observation Table
(summarizing results from a school)
NAME OF SCHOOL: St. Benedict’s College
LOCATION OF SCHOOL: Bedfordview, Johannesburg, South Africa
NUMBER OF STUDENTS: 160
Type of water Description of
water source
Temperature of
Water at time of
Measuring pH/ ⁰C
Average pH value
of Water Sample
1. Distilled Water Bottled – purchased from a pharmacy
23 6.1
2. Fresh Stream in Tendele, the Drakensberg,
South Africa 23 6.5
3. Sea Water Sea at Durban,
Kwa Zulu Natal, South Africa
23 7.9
4. Tap water From a tap in the
classroom 22 7.7
MICROSCALE GLOBAL WATER KIT INSTRUCTIONS
11
Sample of Students’ Observations and Results
Sheet for the pH Activity
Complete a separate Results Sheet for each water sample tested.
1. Complete the following table:
Date of water sample collection 20 October 2010
Date the pH measurement was performed 27 October 2010
Temperature of water at time of measuring pH 23.ºC
Type of water (sea, river, pond, swamp, etc.) Sea Water
Describe where you found the water Collected from the sea at Durban whilst on holiday
2. Record the pH values of your water sample in the table below.
Well
Number
pH value with
Bromothymol Blue
Indicator
pH value with m-
Cresol Purple
Indicator
Average pH value
using best indicator
F1 7.8
7.9
(since the pH values with each indicator are so close, we have taken the average of 7.8 and 8.0 i.e. 7.9)
F2 7.8
F3 7.8
F4 8.0
F5 8.0
F6 8.0
MICROSCALE GLOBAL WATER KIT INSTRUCTIONS
12
Additional Information about the Activity
Safety Precautions It should be emphasized that the water samples will not be safe to taste or drink. The students
should be made aware of this at the start of the activity.
The materials used in this activity are not hazardous in the form of the dilute solutions
suggested in the procedures, but students should still wash their hands with soap and water
after doing the activity.
Teachers should take care when preparing the indicator solutions, because the solid indicators
may cause irritation particularly if ingested. The indicators have been specially packaged in
bottles so that contact with the solids is kept to a minimum. However, they should still be
handled with care when preparing the indicator solutions and hands should be washed
afterwards.
Materials and Equipment Listing
Materials needed for the pH of the Planet Activity
Collect the following:
1 x sample of water from local source such as fresh (dam, river or pond), or sea water.
(100 – 250 ml)
Tap water (for rinsing)
Permanent marker or ink pen (to label the propettes containing indicator solutions)
A piece of white paper (to place under the comboplate as this helps to observe the
colours better)
Universal indicator solution (optional – only required if the pH of the water sample does
not fall within the range of either the bromothymol blue or m-Cresol purple indicators)
Other water samples (optional – a group can collect and test more than one water
sample if desired)
Components from the Global Water Kit:
1 x comboplate
1 x 2 ml plastic syringe
2 x propettes (you may need a third one if Universal indicator solution is also used)
1 x plastic microspatula per water sample
Components from the School Resource Kit
a thermometer - THE TEACHER MUST SUPPLY THE THERMOMETER
bromothymol blue indicator solution –THE TEACHER MUST SUPPLY THIS INDICATOR
m-Cresol purple indicator solution – THE TEACHER MUST SUPPLY THIS INDICATOR
colour charts for the bromothymol blue and m-Cresol purple indicators - THE TEACHER
MUST SUPPLY THE COLOUR CHARTS
MICROSCALE GLOBAL WATER KIT INSTRUCTIONS
13
Notes on Materials Procurement:
1. The IYC Global Water Kit (GWK) will be made available to selected schools in countries
where resources for carrying out the Global Experiment are lacking. However, any
school can use the kits for the Global Experiment. The apparatus in these learner kits is
small scale and mostly plastic making it robust and safe to use in any environment. A
laboratory is not needed and the kits can be safely taken into the field. Students can
work in groups of 4 to 6. If the school has received a School Pack, it should contain 10
GWKs which will cater for classes of 40 to 60 learners working in groups. For the pH of
the Planet activity, students will need the comboplate, syringe, propettes and
microspatulas found in the GWK. As with any kind of apparatus, students must take
care of the kit components by ensuring that they always clean, rinse and dry the
equipment after each activity. The equipment should always be placed back into the kit
for the next group to use.
2. The School Resource Kit (SRK) has been specially designed as a supporting kit for the
Global Water Kit. It is to be maintained and managed by the teacher, who must
distribute the items as required per activity. For the pH activity, the teacher must make
the thermometer, indicator solutions and indicator colour charts available to learners for
determining the temperature of the water, as well as for measuring the pH of water
samples. The thermometer should be handled with care and put back into the
cardboard tube after use to protect it from breakage. Both the bromothymol blue and
m-Cresol purple indicators are supplied as solids. Teachers are responsible for preparing
the solutions in the bottles prior to the pH activity. The method for solution preparation
is provided below. There is only one colour indicator chart for each indicator per SRK,
which means that teachers need to ensure that the charts are returned to the kit after
the pH activity has been completed.
3. The bromothymol blue indicator can be prepared as follows:
a) Remove the screw cap from the plastic bottle containing the solid bromothymol
blue.
b) Carefully measure and pour 25 ml of ethanol into the bottle. Replace and tighten
the cap and carefully swirl the bottle to dissolve the solid in the ethanol.
c) Once dissolved, remove the cap and add 25 ml of distilled water to the solution
in the bottle. The bottle should now be full to the top.
d) Replace the lid once again and carefully invert the bottle to mix the contents of
the bottle. The solution is now ready to use. Store at room temperature.
If ethanol is not available, surgical spirits or uncoloured methylated spirits can be used
to dissolve the solid bromothymol blue. Distilled water is often available from petrol
stations and pharmacies, but if it cannot be found then cooled, boiled water can be used
as an alternative.
4. The m-Cresol purple indicator can be prepared as follows:
a) Remove the screw cap from the plastic bottle containing the solid m-Cresol
purple.
b) Carefully measure and pour 25 ml of ethanol into the bottle. Replace and tighten
the cap and carefully swirl the bottle to dissolve the solid in the ethanol.
c) Once dissolved, remove the cap and add 25 ml of distilled water to the solution
in the bottle. The bottle should now be full to the top.
d) Replace the lid once again and carefully invert the bottle to mix the contents of
the bottle. The solution is ready for use. Store at room temperature.
MICROSCALE GLOBAL WATER KIT INSTRUCTIONS
14
5. Both the bromothymol blue and m-Cresol purple solutions prepared in this way are
orange in colour. For this reason, students should carefully follow the instruction about
clearly labelling the propettes used for the indicator solutions. The labels can be
removed after the activity once the propettes have been rinsed. Since only 3 drops of
indicator solution are used at a time, the teacher can fill two or three propettes with
each indicator solution before the activity begins i.e. 3 propettes of bromothymol blue
solution and three propettes of m-Cresol purple solution. The teacher must clearly label
the propettes so that students do not mix them up. If this system of propettes is used,
then teachers can keep the bottles of indicator solutions aside as their stock solutions.
Students can collect the propettes as required from a central location. They should then
share the propettes containing each indicator with the other groups in the class,
because each group will only need a few drops per solution. In this way, contamination
of the stock indicator solutions is avoided and wastage of the indicators is also
prevented. If students return the propettes at the end of the activity, the teacher can
use these again with another class.
6. Teachers may already have bromothymol blue indicator solutions in their cupboards
that they use for the teaching of acidity and pH. These solutions can also be used
provided they are very close to 0.05% in concentration. Dilution of more
concentrated solutions will be required to make them compatible for use with this
activity.
7. Universal indicator is only required if a water sample has a pH value that does not fall
within the pH ranges of the bromothymol blue and m-Cresol purple. The same method
of filling the wells with 2 ml of sample should be followed, with addition of three drops
of Universal indicator solution. A Universal indicator chart is also needed from which to
determine the pH value of the sample. (Note that the Universal indicator solution should
have a similar concentration to the other 2 indicators i.e. 0.05% )
8. Water samples: The water samples can be collected in clean, plastic drink bottles
(500 ml will be plenty), or in any other suitable container. It will be more appropriate if
the container is made of a transparent material. If a 2 ml sample cannot be easily
removed from a container (such as a half-filled bottle) using the syringe, then a small
volume of the water sample can be poured into a cup or other container for easier
access.
The local natural water source sample to be reported to the Global Experiment
Database might come from the sea, river, lake, large pond or an estuary. Local tap
water can also be tested. The water source should be a familiar landmark that will be
identifiable by students from other schools for comparative purposes. Collect the water
sample as close to the time the class will be carrying out the activity as possible.
A group of students may test more than one water sample. There are twelve large wells
in the comboplate which means that 4 water samples can be tested (if their pH values
all fall within the range of bromothymol blue indicator) or 2 samples can be tested (if
the pH of each sample needs to be checked with both bromothymol blue and m-Cresol
purple indicators). A separate results sheet should be completed for each water sample.
9. All equipment must be thoroughly rinsed as soon as the pH tests have been completed,
otherwise the indicator solutions may stain the plastic of the comboplate and propettes.
MICROSCALE GLOBAL WATER KIT INSTRUCTIONS
15
Student Learning Outcomes
Science Process Skills
Taking samples that are representative of a system.
Measuring volume using graduated apparatus.
Interpreting data in terms of environment and nature of the water involved.
Recording of the scientific data and observations in an appropriate manner.
Measuring acidity and assessing the quality of the data.
Using the pH scale.
Asking scientific questions about pH and acidity of water samples.
Carrying out scientific investigations by selecting and controlling variables.
Chemistry background
Acids and bases.
Chemical reactions that involve acids and bases. The pH scale and pH as a measure of acidity.
Determining acid (H3O+) concentration from pH and vice versa.
Learning outcomes for Primary Classes
In the primary schools the activity provides an excellent opportunity for students to collect
data using simple equipment and developing a useful skill of colour matching. Students should
have some understanding of decimals and the process of averaging to understand the
analytical part of the activity.
The topic of acidity is one of the important chemical ideas that is firmly embedded in students’
experiences of food and household chemicals. It provides a good example when distinguishing
between physical and chemical processes and is one of the early experiences students have
with chemical reactivity.
The pH scale is best treated as a measure of acidity without reference to its chemical basis.
However, the counter intuitive nature of the scale – lower pH implies more acidic – is
unavoidable.
Emphasis can be usefully placed on exploring the scale, relating the terms neutral to a pH of 7
and acidic to the region of the scale below pH 7 and basic to the region above 7. Students can
usefully learn that substances with pH values well above or below 7 are both dangerous and
the danger increases with the distance from neutrality.
MICROSCALE GLOBAL WATER KIT INSTRUCTIONS
16
Learning outcomes for Junior High School
The explanations include hydrogen ions (H+) or (H3O+) and simple chemical equations
where appropriate. (See background notes at the end of this document)
Learning outcomes for Senior High School
The explanations include strong and weak acids and chemical equilibrium where
appropriate. Alternative methods of measuring pH such as pH meters can be used if
available. (See background notes at the end of this activity)
Extension Activities
The following activities can be carried out to help students gain a deeper understanding of the
concepts of acidity and pH. In some cases, the Global Water Kit can be used but for other
activities additional equipment may be required.
Changing pH – experiments that establish the variable stability of pH in different settings
e.g. blowing into water samples.
pH in everyday life – measuring pH in everyday liquids from around the house and
materials such as soils. Students can be asked to collect things from their homes such as
milk, cool drinks, etc. They can then test these using the small or large wells of the
comboplate. Different indicators can be used according to availability, such as bromothymol
blue, methyl orange, methyl red, phenolphthalein, Universal indicator, etc.
Natural indicators – exploring homemade indicators such as red cabbage juice.
Variation in pH – Measurement of natural variation in pH in water during regular events (24
hours) and after rain etc.
Older students can also explore how the nature of an acid and/or base affects its pH
and conductivity. For example, using the Global Water Kit together with a simple
conductivity meter (or indicator such as an LED), it can be shown that 0.1 M
hydrochloric acid (HCℓ(aq)) has a greater conductivity than 1 M acetic acid
(CH3COOH(aq)). However, if one tests the pH of each acid using Universal Indicator,
the two acids have the same pH values. It can be deduced that the strength of the
acetic acid is much lower than that of the hydrochloric acid.
Background Information on Acidity and pH
The first group of substances that people learn about based on chemical reactivity are often
acids. Many acids are household products such as vinegar, hydrochloric acid or citric acid.
Others, such as sulfuric and phosphoric acid, are used industrially, and millions of tonnes are
manufactured each year.
Acids react with bases, a slightly less well known but equally important group of substances
that includes ammonia, sodium bicarbonate and caustic soda (sodium hydroxide). Thousands
of acids and thousands of bases have been identified, many of them naturally occurring and
important in the processes of life.
Most of the common acid-base reactions occur in water. One of the special but not unique
properties of water is that it can react as both an acid and a base. Because of this property,
and because water is such a common and important substance, it is usually convenient to use
it as the substance that divides acids from bases. Thus water acts as a base with acids and as
MICROSCALE GLOBAL WATER KIT INSTRUCTIONS
17
an acid with bases. Samples of pure water and solutions that have the same acidity as pure
water are said to be neutral. Acid-base reactions are often called neutralisation reactions.