300
TestTrack Pro Client User Guide Version 7.5

TestTrack Pro ClientUser Guide
Version 7.5
Copyright © Copyright Seapine Software, Inc., 1996-2005. All rights reserved. No part of this publication may be reproduced, transmitted, transcribed, stored in a retrieval system, or translated into any language in any form by any means without the written permission of Seapine Software, Inc.
Software LicenseNotice
Your license agreement with Seapine Software, Inc., which is included with the product, specifies the permitted and prohibited uses of the product. Any unauthorized duplication or use of this software, in whole or in part, in print, or in any other storage and retrieval system is forbidden.
Licenses and Trademarks
TestTrack, SoloBug, and SoloSubmit are registered trademarks of Seapine Software, Inc. Seapine, the Seapine logo, Seapine License Server, QA Wizard, and Surround SCM are trademarks of Seapine Software, Inc. Windows is a registered trademark of Microsoft Corporation. Visual Basic, Visual C++, and Visual Studio .NET are registered trademarks of Microsoft Corporation. PVCS is a registered trademark of MERANT, Inc. Perforce is a registered trademark of Perforce Software, Inc. Palm OS is a registered trademark of Palm, Inc. Adobe Acrobat Reader is a registered trademark of Adobe Systems, Incorporated. CS-RCS is a registered trademark of ComponentSoftware, Inc. SourceOffSite Classic is a trademark of SourceGear Corporation. StarTeam is a registered trademark of Fox Data, Inc. ClearCase is a registered trademark of Rational Software Corporation. XML Spy is a registered trademark of Altova. The Sentry Spelling-Checker Engine copyright 1994-2003 Wintertree. Xerces and Xalan are registered trademarks of Apache Software Foundation. All third-party software and/or code is the property of their respective owners. The right to copyright and trademark this software has been granted. See your Seapine license agreement for additional information.
Information in this document is subject to change without notice and does not represent a commitment on the part of Seapine Software, Inc. Unless otherwise noted, all companies, products, street addresses, and persons contained herein are purely fictitious.
Mention of third party companies and products is for informational purposes only and does not constitute an endorsement. Seapine Software, Inc. assumes no responsibility with regard to the selection, performance, or use of these products. All understandings, agreements or warranties, if any, take place directly between the vendor and prospective users.greements or warranties, if any, take place directly between the vendor and prospective users.
Seapine Software, Inc.5412 Courseview Drive, Suite 200Mason, OH [email protected]
0110-7.5
October 2005

iiiContents
Contents
Chapter 1 About TestTrack Pro............................................................................................ 1What’s new.......................................................................................................................................... 2About the guide .................................................................................................................................. 2Documentation conventions............................................................................................................ 2Contacting Seapine support ............................................................................................................. 3
Chapter 2 Getting Started...................................................................................................... 5Starting the TestTrack Pro Server ................................................................................................. 6Starting TestTrack Pro...................................................................................................................... 7Setting up server configurations ..................................................................................................... 9Switching projects ............................................................................................................................ 11Connecting to a different server................................................................................................... 11Logging out......................................................................................................................................... 12
Chapter 3 Personalizing TestTrack Pro.............................................................................. 13Setting local options......................................................................................................................... 14Setting user options ......................................................................................................................... 17Setting spell check options ............................................................................................................. 21Configuring user notification rules ............................................................................................... 22Changing your password ................................................................................................................ 25
Chapter 4 Learning the Basics ............................................................................................. 27TestTrack Pro interface .................................................................................................................. 28Using list windows............................................................................................................................ 29Printing records ................................................................................................................................ 31Using spell check............................................................................................................................... 32Sending mail from TestTrack Pro................................................................................................. 33
Chapter 5 Working with Defects ......................................................................................... 35About defects .................................................................................................................................... 36Adding defects................................................................................................................................... 37Adding additional defect reports .................................................................................................. 40Attaching files .................................................................................................................................... 41Viewing attached files ...................................................................................................................... 42Opening attached files ..................................................................................................................... 43Extracting attached files .................................................................................................................. 43Removing attached files................................................................................................................... 44Finding defects................................................................................................................................... 44Using advanced find.......................................................................................................................... 46Viewing defects ................................................................................................................................. 48Editing defects ................................................................................................................................... 49

iv Contents
Editing additional defect reports................................................................................................... 50Deleting additional defect reports................................................................................................ 50Deleting defects ................................................................................................................................ 51
Chapter 6 Managing Defects ................................................................................................ 53Duplicating defects ........................................................................................................................... 54Merging defects ................................................................................................................................. 54Deferring defect numbering........................................................................................................... 55Assigning defect numbers ............................................................................................................... 55Renumbering defects ....................................................................................................................... 55Configuring link definitions............................................................................................................. 56Linking defects................................................................................................................................... 59Bulk field changes.............................................................................................................................. 66
Chapter 7 Managing the Workflow ..................................................................................... 73About the workflow ........................................................................................................................ 74Understanding defect assignments and events .......................................................................... 74Events toolbar ................................................................................................................................... 75Replying to a defect submitter ...................................................................................................... 76Assigning defects............................................................................................................................... 76Estimating fix time ............................................................................................................................ 77Fixing defects ..................................................................................................................................... 78Verifying a fix ..................................................................................................................................... 79Closing defects .................................................................................................................................. 80Re-opening defects........................................................................................................................... 80Adding release notes ....................................................................................................................... 81Adding comments............................................................................................................................. 82Viewing defect events...................................................................................................................... 82Editing defect events ........................................................................................................................ 83Deleting defect events..................................................................................................................... 84Building release notes...................................................................................................................... 85
Chapter 8 Using Filters ......................................................................................................... 87About filters....................................................................................................................................... 88Creating filters................................................................................................................................... 88Adding restrictions........................................................................................................................... 89Using filters ........................................................................................................................................ 91Viewing filters .................................................................................................................................... 91Viewing restrictions ......................................................................................................................... 91Editing filters ...................................................................................................................................... 92Editing restrictions ........................................................................................................................... 92Inserting restrictions........................................................................................................................ 92Duplicating filters.............................................................................................................................. 93Deleting restrictions ........................................................................................................................ 93Deleting filters ................................................................................................................................... 93

vContents
Chapter 9 Managing Test Configs........................................................................................ 95About test configs ............................................................................................................................ 96Adding test configs ........................................................................................................................... 96Viewing test configs.......................................................................................................................... 97Editing test configs............................................................................................................................ 97Duplicating test configs ................................................................................................................... 97Deleting test configs ........................................................................................................................ 97
Chapter 10 Generating Reports............................................................................................. 99About reports ................................................................................................................................ 100Using stylesheets............................................................................................................................ 100Creating text file report templates ........................................................................................... 102Creating detail reports................................................................................................................. 103Creating distribution reports...................................................................................................... 105Creating list reports...................................................................................................................... 107Creating trend reports................................................................................................................. 110Charting report data..................................................................................................................... 112Viewing report settings ................................................................................................................ 113Editing report settings .................................................................................................................. 114Duplicating reports ....................................................................................................................... 114Previewing reports ........................................................................................................................ 114Printing reports.............................................................................................................................. 114Deleting reports ............................................................................................................................ 115
Chapter 11 Using the Workbook......................................................................................... 117About the workbook.................................................................................................................... 118Adding tasks.................................................................................................................................... 118Viewing tasks .................................................................................................................................. 119Editing tasks .................................................................................................................................... 119Duplicating tasks ............................................................................................................................ 119Deleting tasks ................................................................................................................................. 119
Chapter 12 Integrating with Source Control Tools ........................................................... 121Using source control with TestTrack Pro............................................................................... 122Configuring SCC integration....................................................................................................... 122Setting local SCC options............................................................................................................ 122Setting SCC user options ............................................................................................................ 123Setting SCC project options ....................................................................................................... 124Setting SCC project paths ........................................................................................................... 124Setting SCC check in options ..................................................................................................... 125General source code tab information ...................................................................................... 126Attaching files ................................................................................................................................. 126Getting files ..................................................................................................................................... 128Viewing files .................................................................................................................................... 128Editing files ...................................................................................................................................... 129Checking out files .......................................................................................................................... 129Viewing file history ........................................................................................................................ 130Diffing files....................................................................................................................................... 131
vi Contents
Creating file labels ......................................................................................................................... 133Checking in files ............................................................................................................................. 133Rolling back files............................................................................................................................. 134Undoing check out ........................................................................................................................ 135Detaching files ................................................................................................................................ 135Disabling SCC integration ........................................................................................................... 136SCC application notes .................................................................................................................. 137
Chapter 13 Integrating with Development Tools .............................................................. 141About the Add-In .......................................................................................................................... 142Installing the Add-In ...................................................................................................................... 142Add-In toolbar................................................................................................................................ 142Connecting to a project............................................................................................................... 143Setting options ............................................................................................................................... 144Opening the defects list ............................................................................................................... 147Adding defects................................................................................................................................ 147Opening the workbook list ......................................................................................................... 148Adding tasks.................................................................................................................................... 148Disconnecting ................................................................................................................................. 149
Chapter 14 Configuring Projects ......................................................................................... 151About projects ............................................................................................................................... 152Setting general options................................................................................................................. 152Setting defect options................................................................................................................... 154Setting field options....................................................................................................................... 161Setting report options .................................................................................................................. 162Setting dictionary options............................................................................................................ 163
Chapter 15 Customizing the Workflow .............................................................................. 165About workflows........................................................................................................................... 166Analyzing your workflow............................................................................................................. 166Configuring workflows ................................................................................................................. 167Configuring workflow states....................................................................................................... 168Configuring workflow events...................................................................................................... 170Configuring workflow transitions .............................................................................................. 176Configuring workflow assignment rules ................................................................................... 178Configuring auto-assignment rules ............................................................................................ 180Configuring system notification rules ....................................................................................... 183Diagramming the workflow......................................................................................................... 186Evaluating the workflow............................................................................................................... 187Overriding the workflow............................................................................................................. 188Resetting the workflow................................................................................................................ 188
Chapter 16 Managing Business Processes........................................................................... 189About process management ....................................................................................................... 190About historical defect logging................................................................................................... 191About audit trail logging............................................................................................................... 191

viiContents
Setting project compliance options........................................................................................... 191About audit trail records ............................................................................................................. 194Searching audit trail records ....................................................................................................... 194Viewing audit trail record details ............................................................................................... 196Generating an audit trail detail report...................................................................................... 197Validating audit trail records....................................................................................................... 198Exporting audit trail records....................................................................................................... 198
Chapter 17 Customizing Fields ............................................................................................ 199Configuring list values................................................................................................................... 200Configuring custom fields ............................................................................................................ 202Defining required fields and default values .............................................................................. 204Configuring field relationships .................................................................................................... 206Renaming field labels..................................................................................................................... 208
Chapter 18 Managing Security Groups ............................................................................... 211About security................................................................................................................................ 212About security groups.................................................................................................................. 212Security groups and security....................................................................................................... 213Adding security groups................................................................................................................. 215Viewing security groups ............................................................................................................... 217Editing security groups ................................................................................................................. 217Duplicating security groups......................................................................................................... 218Deleting security groups.............................................................................................................. 218
Chapter 19 Managing Users.................................................................................................. 219About users .................................................................................................................................... 220Adding users ................................................................................................................................... 220Retrieving global users ................................................................................................................. 224Promoting users............................................................................................................................. 224Viewing users.................................................................................................................................. 225Editing users.................................................................................................................................... 225Duplicating users ........................................................................................................................... 225Inactivating users............................................................................................................................ 226Activating users.............................................................................................................................. 226Making a customer a user............................................................................................................ 226Viewing logged in users................................................................................................................ 226Logging out users........................................................................................................................... 227Deleting users................................................................................................................................. 227
Chapter 20 Managing Customers ........................................................................................ 229Adding customers.......................................................................................................................... 230Retrieving global customers........................................................................................................ 234Promoting customers ................................................................................................................... 234Viewing customers ........................................................................................................................ 235Searching for customers .............................................................................................................. 235Editing customers .......................................................................................................................... 236

viii Contents
Duplicating customers.................................................................................................................. 236Making a user a customer............................................................................................................ 236Deleting customers ....................................................................................................................... 237
Chapter 21 Importing and Exporting Files ......................................................................... 239XML import and export............................................................................................................... 240Exporting to XML.......................................................................................................................... 243Importing XML files....................................................................................................................... 244Text file import and export ........................................................................................................ 246Exporting to text files................................................................................................................... 246Creating text file export templates........................................................................................... 247Using text file export templates................................................................................................. 248Importing text files ........................................................................................................................ 248Creating text file import templates........................................................................................... 250Using text file import templates ................................................................................................ 250
Chapter 22 Configuring Email Templates and Hyperlinks................................................ 251Configuring email templates........................................................................................................ 252Adding email notification hyperlinks ......................................................................................... 256Managing email notification hyperlinks ..................................................................................... 257
Chapter 23 Working with SoloBug...................................................................................... 259About SoloBug ............................................................................................................................... 260Distributing SoloBug ..................................................................................................................... 260Customizing SoloBug .................................................................................................................... 261Customizing SoloBug for Palm OS ............................................................................................ 263Automatically importing SoloBug files ...................................................................................... 265Manually importing SoloBug files ............................................................................................... 265
Chapter 24 Reference: Field Codes ..................................................................................... 267Field codes ...................................................................................................................................... 267Label field codes............................................................................................................................. 269Field code notes............................................................................................................................. 270
Chapter 25 Reference: Toolbars .......................................................................................... 271
Chapter 26 Glossary .............................................................................................................. 277
Index ................................................................................................................... 281

1Chapter 1About TestTrack Pro
Chapter 1About TestTrack Pro
Tracking bugs and feature requests is an important part of software development. The earlier and quicker bugs are resolved, the lower your development costs and the higher your quality. TestTrack Pro puts improved quality, communication, and reporting within reach.
What’s new, 2
About the guide, 2
Documentation conventions, 2
Contacting Seapine support, 3

2 Chapter 1About TestTrack Pro
What’s newTestTrack Pro 7.5 includes the following new features:
Unicode support for all fields
A cross-platform GUI client supported on Windows, Mac, Linux, and Solaris
Multiple list windows for comparing information using different filters, columns, and sorting (TestTrack Pro Client)
Image file attachment support including capturing screenshots and pasting images from the clipboard (TestTrack Pro Client)
Toolbars to access commonly used commands and list windows (TestTrack Pro Client)
About the guideThe TestTrack Pro User Guide provides step-by-step instructions for all the tasks you perform when working with TestTrack Pro Client. This guide includes information for users at a variety of levels and is not meant to be read from beginning to end. Chapters 1-13 include information for most TestTrack Pro users such as personalizing TestTrack Pro or adding defects. Chapters 14-23 include information for TestTrack Pro administrators and other high-level users such as customizing the workflow and creating security groups.
Documentation conventionsMost of the examples in this guide are illustrated using TestTrack Pro’s default defect tracking workflow on a Windows computer. The commands and features function in the same way regardless of operating system. When you are instructed to select a menu command, you will find the menu name followed by a greater than sign. For example, to add a defect choose Create > Defect.
Many of the TestTrack Pro commands are available from menus, toolbars, shortcut menus, and shortcut keys. Throughout this guide, most commands are explained using both the menu command and the toolbar button. As you become more familiar with TestTrack Pro, you may find shortcut menus and shortcut keys more efficient to work with.

3Chapter 1About TestTrack Pro
Contacting Seapine supportWe offer telephone and email support along with an online knowledgebase and user forums. Our North American office hours are Monday through Friday from 9 AM to 6 PM EDT.
Telephone: 513-754-1655
Email: [email protected]
Knowledgebase: www.seapine.com/kb/index.php
User forums: www.seapine.com/cgi-bin/dcforum/dcboard.cgi
Note: Software purchased through Seapine’s international partners is supported by those partners. Go to www.seapine.com/contactus.html for contact information.

4 Chapter 1About TestTrack Pro

5Chapter 2Getting Started
Chapter 2Getting Started
In just a few minutes, you’ll learn about starting TestTrack Pro, opening projects, and connecting to the server - everything you need to begin tracking bugs.
Starting the TestTrack Pro Server, 6
Starting TestTrack Pro, 7
Setting up server configurations, 9
Switching projects, 11
Connecting to a different server, 11
Logging out, 12

6 Chapter 2Getting Started
Starting the TestTrack Pro Server
Admin: Make sure the Seapine License Server is started before the TestTrack Pro Server.
The TestTrack Pro Server must be running before users can access TestTrack Pro projects. If there is a problem connecting to the server check the following and try reconnecting:
Make sure the server computer is running
Check the IP address and port number
Make sure you are connected to the network, intranet, or Internet
Windows1 If the server is installed as an application choose Programs > Seapine Software > TestTrack Pro> TestTrack
Pro Server on the Start menu.
2 If the server is installed as a Windows service it should start automatically. You can also double-click the Services icon in the Control Panel or the Services menu under Administrative Tools to start the server.
Unix1 Enter /usr/bin/ttpro start to start the server as a daemon.
2 Enter /usr/bin/ttpro foreground to start the server in the foreground.
Mac1 Start the System Preferences and click TestTrack Pro.
2 Click the lock on the Start/Stop tab to make changes.
Make sure the server is started. Select Start TestTrack Pro Server when this computer starts up to automatically start the server.
3 Click Save.

7Chapter 2Getting Started
Starting TestTrack Pro
Note: If you are already logged in to TestTrack Pro, and the project is not configured to allow multiple logins, you will be prompted to close the existing session.
Windows1 On the Start menu choose Programs > Seapine Software > TestTrack Pro > TestTrack Pro Client.
The Seapine TestTrack Pro Login dialog box opens.
2 Select the Server you want to connect to.
If you need to add a server see Setting up server configurations, page 9 for more information.
3 Select a Project.
Some projects may take longer to load than others. Click Refresh if the project you want to connect to is not listed.
4 Enter your Username and Password.
5 Select Always login to this project using this username and password to automatically log in to the selected project when TestTrack Pro starts.
Tip: To clear this option choose File > Connect to Server. The Login dialog box opens and you can clear the check box.
6 Click Connect.
You are logged in and ready to start using TestTrack Pro.
Unix1 Enter /usr/bin/ttclient.
The Seapine TestTrack Pro Login dialog box opens.

8 Chapter 2Getting Started
2 Select the Server you want to connect to.
If you need to add a server see Setting up server configurations, page 9 for more information.
3 Select a Project.
Some projects may take longer to load than others. Click Refresh if the project you want to connect to is not listed.
4 Enter your Username and Password.
5 Select Always login to this project using this username and password to automatically log in to the selected project when TestTrack Pro starts.
Tip: To clear this option choose File > Connect to Server. The Login dialog box opens and you can clear the check box.
6 Click Connect.
You are logged in and ready to start using TestTrack Pro.
Mac1 Double-click the TestTrack Pro client icon in the Applications/TestTrack Pro folder.
The Seapine TestTrack Pro Login dialog box opens.
2 Select the Server you want to connect to.
If you need to add a server see Setting up server configurations, page 9 for more information.
3 Select a Project.
Some projects may take longer to load than others. Click Refresh if the project you want to connect to is not listed.
4 Enter your Username and Password.
5 Select Always login to this project using this username and password to automatically log in to the selected project when TestTrack Pro starts.
Tip: To clear this option choose File > Connect to Server. The Login dialog box opens and you can clear the check box.
6 Click Connect.
You are logged in and ready to start using TestTrack Pro.

9Chapter 2Getting Started
Setting up server configurationsTestTrack Pro projects are located on servers, which you need to set up access to. A list of all the servers you have added is displayed on the Setup Server Configurations dialog box.
1 Choose File > Connect to Server to open the TestTrack Pro login dialog box.
2 Click Setup.
The Setup Server Configurations dialog box opens.
3 Select a server and click Top, Move Up, Move Down, or Bottom to reorder the list.
When you log in to TestTrack Pro Servers are displayed in the same order. You may want to move the servers you access most frequently to the top of the list.
4 Click Add to create a server connection.
5 Select a server and click Edit to change the server address or port number.
6 Select a server and click Delete to delete the connection.
7 Click Close to close the Setup Server Configurations dialog box.
Adding server connectionsYou need to add server connections to access each server that TestTrack Pro projects are stored on.
Tip: Your TestTrack Pro administrator can provide you with the server address and port number.
1 Choose File > Connect to Server to open the TestTrack Pro login dialog box.
2 Click Setup.
The Setup Server Configurations dialog box opens.

10 Chapter 2Getting Started
3 Click Add.
The Add TestTrack Pro Server dialog box opens.
4 Enter a Server Name and Server Address.
Use a descriptive name to help identify the server.
5 Enter the Port number.
TestTrack Pro clients connect to the server on this port via TCP/IP. Valid values are 1-65535.
6 Click OK.
The server connection is added and you return to the Setup Server Configurations dialog box.
7 To change the order of the servers, select a server and click Move Up or Move Down.
Servers are listed in the specified order in the TestTrack Pro login dialog box.
8 Click Close to close the Setup Server Configurations dialog box.
Editing server connectionsYou can edit a server’s address and port number. You cannot change the server name.
1 Choose File > Connect to Server to open the TestTrack Pro login dialog box.
2 Click Setup.
The Setup Server Configurations dialog box opens.
3 Select the server and click Edit.
4 Make any changes and click OK.
Deleting server connectionsYou may want to delete servers if you are no longer using them.
1 Choose File > Connect to Server to open the TestTrack Pro login dialog box.
2 Click Setup.
The Setup Server Configurations dialog box opens.

11Chapter 2Getting Started
3 Select the server and click Delete.
You are prompted to confirm the deletion.
4 Click Yes.
The server is deleted.
Switching projectsYou can switch to another project on the server you are logged in to without closing TestTrack Pro.
1 Choose File > Switch Project.
The Switch Project dialog box opens.
2 Select a project and click Switch.
The selected project opens.
Note: Click Refresh if the project you want to switch to is not listed. Some projects may take longer to load.
Connecting to a different serverYou can easily connect to a different TestTrack Pro Server to work with projects stored on it.
1 Choose File > Connect to Server.
You are prompted to close the open project.
2 Click Yes.
The Seapine TestTrack Pro Login dialog box opens.
3 Enter the login information and click Connect.
If you need more information about logging in refer to Starting TestTrack Pro, page 7.

12 Chapter 2Getting Started
Logging outLog out of TestTrack Pro when you finish working with a project. This is important if you use a floating license because the license does not become available to other users until you log out.
1 Choose File > Logout and Disconnect.
You are logged out from the project and disconnected from the server.
Tip: Choose File > Exit to close the application.

13Chapter 3Personalizing TestTrack Pro
Chapter 3Personalizing TestTrack Pro
Take the time personalize TestTrack Pro and set your user options.
Setting local options, 14
Setting user options, 17
Configuring user notification rules, 22
Changing your password, 25

14 Chapter 3Personalizing TestTrack Pro
Setting local optionsYou can set local options that apply to all the TestTrack Pro projects you log in to. You can configure the following options:
General
Stylesheet
Help and Browser Settings
View File
Setting general options1 Choose Tools > Local Options then select the General category.
2 Select Always login to this project with this username and password to automatically log in to the selected project TestTrack Pro starts.
3 Select Allow multiple instances of this application to allow more than one instance of TestTrack Pro to run on your computer.
4 Click OK to save the changes.

15Chapter 3Personalizing TestTrack Pro
Setting stylesheet optionsYou can specify the default stylesheet you want to use when printing from list windows.
1 Choose Tools > Local Options then select the Stylesheets cateogry.
2 Select a Report Type.
Each report type corresponds to a list window. For example, the Filter View Detail Report prints a detail report for all filters in the project.
3 Select a Default Stylesheet for the selected report or click Browse to use a customized stylesheet.
4 Click OK to save the changes.
Setting local help and browser paths
Note: This category is not visible if you are using TestTrack Pro on Windows or Mac OS X.
If you are using the TestTrack Pro Client on Linux or Solaris, you must set both the browser and help directory paths.
1 Choose Tools > Local Options then select the Help and Browser Settings cateogry.
2 Set the Browser Path.
You can enter the path or click Browse to select it.

16 Chapter 3Personalizing TestTrack Pro
3 Set the Help Directory.
You can enter the directory path or click Browse to select it.
4 Click OK to save the changes.
Setting view file optionsYou can select the applications you want to use to view files. You can also edit the default view settings or add settings for specific file types.
1 Choose Tools > Local Options then select the View File cateogry.
2 Click Add.
The View File Settings dialog box opens.
3 Enter the File extensions you want to associate with the application.
The extension must start with an asterisk followed by a period (*.). Separate extensions with a semicolon.
4 Select an Open files with option.
Choose Internal viewer to use the internal viewer.
Choose Associated application to launch the application associated with the file. (Windows/Mac only)
Choose Selected application then click Browse to select a specific application.
5 Click OK to save the changes.
Note: To edit or delete view file options, select the file type and click Edit or Delete.

17Chapter 3Personalizing TestTrack Pro
Setting user optionsYou can set user options to customize TestTrack Pro. For example, you can configure TestTrack Pro to play a sound when you are assigned a defect or customize spell check options. You can configure the following options:
General
Display
Notifications
Dictionary
Spell Check
Setting general options1 Choose Tools > User Options then select the General category.
2 Select any Notification options.
TestTrack Pro can play a sound or open a dialog box to notify you of defect assignments.
3 Select a Double-clicking on items... option. This option is applied to list window records.
4 Select an Adding Multiple Defects option.
Select Set all fields to default values to reset the Add Defect dialog box field.
Select Retain pop-up menu values but set other fields to their default values to retain the values you choose for pop-up fields and reset all other fields.
Select Close the Add Defect window to automatically close the Add Defect window.
5 Click OK to save the changes.

18 Chapter 3Personalizing TestTrack Pro
Setting display options1 Choose Tools > User Options then select the Display category.
2 Select a Display names as... option.
Names can be displayed in First/Last or Last/First order.
3 Select a Status option.
You can display the status only or the status and the assignment information.
4 Select any Display option.
Select Grey out closed defects if you want closed defects to appear dimmed on the list window. If you work with a large number of defects this option can help you quickly scan for closed defects.
If the project uses field relationships, select Warn me when values are changed due to field relationship rules to display a warning if you change a value that effects field relationship rules. This option helps enforce field relationship rules.
5 Select a Client Defect Window Layout option.
This option determines how the Found by, Reproduce, Computer Config, and Attachments information is displayed in the TestTrack Pro Client.
Select Vertical tab view to display the information on mini tabs.
Select Single page view to display all of the information on a single page without tabs.
Note: This option does not apply to TestTrack Pro Web.
6 Click OK to save the changes.

19Chapter 3Personalizing TestTrack Pro
Setting notification optionsYou can configure TestTrack Pro to send you an email notification based on specific defect events and actions. For example, you can receive a notification when a bug you reported closes.
1 Choose Tools > User Options then select the Notifications category.
2 A list of your user notifications is displayed.
See Configuring user notification rules, page 22 for more information about notification rules.
3 Click OK to save the changes.

20 Chapter 3Personalizing TestTrack Pro
Setting dictionary optionsTestTrack Pro includes a spelling checker. You can specify which main dictionary you want to use and add custom words to it.
1 Choose Tools > User Options then select the Dictionary category.
2 Select a Main Dictionary.
The spelling checker includes American English, British English, and Canadian English dictionaries. Dictionaries for other languages are also available. Additional dictionaries can be downloaded from Seapine’s Web site at: http://www.seapine.com/ttpresources.php#spellcheck
3 Click OK to save the changes.
Adding dictionary words1 Choose Tools > User Options then select the Dictionary category.
2 Click Add to add a word to the dictionary.
The Add Word dialog box opens.
3 Enter the word and click OK.
The word is added.
Tip: You can also add words to your user dictionary while you are checking spelling. For more information see Using spell check, page 32.
4 Click OK to save the changes.

21Chapter 3Personalizing TestTrack Pro
Editing dictionary words1 Choose Tools > User Options then select the Dictionary category.
2 Select a word and click Edit to change it.
3 Click OK to save the changes.
Deleting dictionary words1 Choose Tools > User Options then select the Dictionary category.
2 Select a word and click Delete.
You are prompted to confirm the deletion.
3 Click Yes.
The word is deleted.
Setting spell check optionsYou can select the options that are used when spell checking.
1 Choose Tools > User Options then select the Spell Check category.
2 Select the options you want the spell check to use.
3 Click OK to save the settings.

22 Chapter 3Personalizing TestTrack Pro
Configuring user notification rulesYou can configure user notification rules to be informed of changes. Do not create notification rules to be informed of every change. You may receive a large number of emails if you create too many rules.
1 Choose Tools > User Options then select the Notifications category.
2 Select a notification and click Configure Rules.
The Configure User Notification Rules dialog box opens.
3 Click Add to create a notification rule.
See Adding notification rules, page 23 for more information.
4 Select a rule and click Edit to change it.
See Editing notification rules, page 24 for more information.
5 Select a rule and click Delete to delete it.
See Deleting notification rules, page 24 for more information.
Tip: You can also inactivate rules that you are not using. See Inactivating notification rules, page 24 for more information.
6 Click OK to save changes.

23Chapter 3Personalizing TestTrack Pro
Adding notification rulesMake sure you do not create too many user notifications. Remember, you may receive a large number of emails if you create too many notifications or you create notifications that are not restrictive enough.
Tip: You may also receive system notifications, which the TestTrack Pro administrator creates.
1 Choose Tools > User Options then select the Notifications category.
2 Select a notification and click Configure Rules.
The Configure User Notification Rules dialog box opens.
3 Click Add to add a rule.
The Add Notification Rule dialog box opens.
4 Enter a Rule Name.
5 Optionally select a Rule Filter.
If a project contains a large number of defects, you may want to filter the defects the rule is applied to.
6 Select an Email Template.
7 Select Don’t send email if I made the change if you do not want to receive an email when you change a defect.
8 Select Only send email if defect is assigned to me to only receive emails when you are the assigned user.
9 Click OK.
The rule is added.
24 Chapter 3Personalizing TestTrack Pro
Editing notification rules1 Choose Tools > User Options then select the Notifications category.
A list of all your user notifications is displayed.
2 Select a notification and click Configure Rules.
3 Select a rule and click Edit.
The Edit Notification Rules dialog box opens.
4 Make any changes and click OK.
The changes are saved.
Inactivating notification rulesIf there is a rule that is no longer in use inactivate it instead of deleting it. You can easily activate the rule if you decide to use it again.
1 Choose Tools > User Options then select the Notifications category.
A list of all your user notifications is displayed.
2 Select a notification and click Configure Rules.
3 Select a rule and click Inactivate.
The rule is inactivated. To activate an inactive rule select the rule and click Activate.
Deleting notification rulesDelete rules if you are sure you will not use the rule again. You can also inactivate a rule to disable it.
Note: Make sure you want to delete the selected rule. You are not prompted to confirm the deletion and this action cannot be undone.
1 Choose Tools > User Options then select the Notifications category.
A list of all your user notifications is displayed.
2 Select a notification and click Configure Rules.
3 Select a rule and click Delete.
The rule is deleted.

25Chapter 3Personalizing TestTrack Pro
Changing your passwordYou can change your password at any time.
1 Choose Tools > Change Password.
The Change Password dialog box opens.
2 Enter a new password and click OK.
You are prompted to verify the new password.
3 Retype the password and click OK.
The new password is saved.

26 Chapter 3Personalizing TestTrack Pro

27Chapter 4Learning the Basics
Chapter 4Learning the Basics
TestTrack Pro is easy to use but it is even easier when you understand the basics and learn a few shortcuts. Take a few minutes to read this overview information.
TestTrack Pro interface, 28
Using list windows, 29
Printing records, 31
Using spell check, 32
Sending mail from TestTrack Pro, 33

28 Chapter 4Learning the Basics
TestTrack Pro interfaceTestTrack Pro provides complex functionality with an easy to use, and learn, interface. The interface includes eight list windows. Features such as the title bar, command buttons, menu bar, toolbar, status bar, and tooltips are common to all list windows.
ToolbarsTestTrack Pro toolbars provides access to commonly used TestTrack Pro commands and list windows. Choose View > Toolbars to display or hide toolbars. If a toolbar button is unavailable, you do not have access to that command or the command is not available for the list window you are on. For more information see Reference: Toolbars, page 271.
Command buttonsThe command buttons are located at the top of each list window. They provide another way to access the View, Add, Edit, and Delete commands.

29Chapter 4Learning the Basics
Using list windowsList windows are used to organize information and display records. TestTrack Pro includes the following list windows:
The Defects list window provides access to defects and defect actions. You can filter data and sort columns. See Chapter 5, “Working with Defects,” page 35 for more information.
The Workbook list window provides access to your personal workbook, your assigned defects, and tasks you add to the Workbook. See Chapter 11, “Using the Workbook,” page 117 for more information.
The Customers list window provides access to customer information and related commands. See Chapter 20, “Managing Customers,” page 229 for more information.
The Users list window provides access to user information and related commands. See Chapter 19, “Managing Users,” page 219 for more information.
The Security Groups list window provides access to security group information and related commands. See Chapter 18, “Managing Security Groups,” page 211 for more information.
The Test Configs list window provides access to test config information and related commands. See Chapter 9, “Managing Test Configs,” page 95 for more information.
The Filters list window provides access to filters and related commands. See Chapter 8, “Using Filters,” page 87 for more information.
The Reports list window provides access to reports and related commands. See Chapter 10, “Generating Reports,” page 99 for more information.
Opening list windowsClick the corresponding TestTrack Pro toolbar button or select the list window from the View menu.
You can also open multiple list windows. For example, you may want to compare defects using two different filters. To open another list window choose View > New List. For example, choose View > New Defect List to open another Defects list window.
Selecting recordsYou need to select the records you want to work with on the list window.
Hold down the Ctrl key while clicking the records to select more than one record.
To select a range of records, click the first record then hold down the Shift key and click the last record.
Choose Edit > Select All or press Ctrl + A to select all records.

30 Chapter 4Learning the Basics
Sorting columnsYou can sort by any column on a list window. You can also perform primary and secondary sorts.
Click a column heading to perform a primary sort. An arrow is added next to the column heading. Click the column heading again to toggle between ascending and descending sort order.
Shift + click a column heading to perform a secondary sort. A double arrow is added next to the column heading. Shift + click the column heading again to toggle between ascending and descending sort order.
Inserting columnsYou can add columns to display the information you need.
1 Right-click the column you want to add a column next to and select Insert Column.
An empty column is inserted.
2 Right-click the new column and select a field from the shortcut menu.
The column is added.
Tip: To change a column width move the cursor to the divide bar between the column headings. Drag the divide bar to change the width of the column to its left
Changing column contents 1 Right-click the column heading you want to change.
The shortcut menu lists all the available fields.
2 Select a field from the menu.
The column heading changes to the field name and the selected field contents are displayed.
Moving columns1 Click the column you want to move and hold down the mouse button.
2 Drag the column to the new location and release the mouse button.
Removing columns1 Right-click the column heading you want to remove.
2 Select Remove Column from the shortcut menu.

31Chapter 4Learning the Basics
Printing recordsYou can print any of the records displayed in a list window.
1 If you do not want to print every record, select the records you want to print on the list window.
2 Choose File > Print or click the Print toolbar button.
The Print Options dialog box opens.
3 Select print options.
Print as list prints all the records in a list format. Select Print gridlines to print lines between each row and column.
Print as detail prints the details for each record. Select Print items on separate pages to print each record on a separate page.
Create report file from template prints a report based on a previously created template. After choosing this option, click Save. The Select Report Template dialog box opens. Select the report template you want to use and click Open. The Save Report As dialog box opens. Select a directory and enter a filename. The report is saved as a text document.
Only print selected items prints the records you selected on the list window.
4 Click Print.
You can also click Preview to open the report in preview mode.

32 Chapter 4Learning the Basics
Using spell checkTestTrack Pro includes a spelling checker that can be used with most text fields. You can also customize spell check options and add custom words to the dictionary. For more information see Setting dictionary options, page 20 or Setting spell check options, page 21.
1 Choose Edit > Spell Check or right-click the text field and select Spell Check.
The Check Spelling dialog box opens.
Tip: The Check Spelling dialog box only opens if there are misspelled words. If all words are spelled correctly, a message opens stating that there are no misspelled words.
2 Click Ignore to ignore a misspelled word or click Ignore All to ignore all instances of the misspelled word.
3 Click Add Problem Word to add the word in the Problem word field to the dictionary.
4 Click Delete Duplicate to delete a duplicate word.
5 To fix a misspelled word, select a word from the Suggestions list.
You can also edit the word in the Change to field.
Note: Click Suggest to more thoroughly search for replacements. If the spelling checker encounters a word it does not recognize it tries to break the word into words that it does recognize. For example, firetruck would be broken into fire and truck.
6 Click Change to use the selected suggestion or the edited word or click Change All to change all instances of the misspelled word at once.
7 The Check Spelling dialog box closes after all misspelled words are checked. Click Cancel to stop the spelling check at any time.

33Chapter 4Learning the Basics
Sending mail from TestTrack ProYou can send email directly from TestTrack Pro. This lets you easily communicate with users and customers without switching to your email program.
1 Choose Email > Send Email.
The Send Mail dialog box opens.
2 Click Add.
The Add Mail Recipients dialog box opens. All available users and customers are listed.
3 Select the users or customers you want to send mail to and click Add.
4 Enter a subject and message.
5 Click Send.
The email is sent.

34 Chapter 4Learning the Basics

35Chapter 5Working with Defects
Chapter 5Working with Defects
Squash the bugs and move on! You’ll be tracking defects in no time at all after learning about adding defects, deleting defects, and everything in between.
About defects, 36
Adding defects, 37
Adding additional defect reports, 40
Attaching files, 41
Viewing attached files, 42
Opening attached files, 43
Extracting attached files, 43
Removing attached files, 44
Finding defects, 44
Using advanced find, 46
Viewing defects, 48
Editing defects, 49
Editing additional defect reports, 50
Deleting additional defect reports, 50
Deleting defects, 51

36 Chapter 5Working with Defects
About defectsA defect is a bug, enhancement, change request, question, or any other product-related issue you need to track and resolve. It can be as simple as a typo in a help file or as complicated as a system crash.
Defect indicatorsDefect indicators are icons on the Defects list window that help you quickly view new, changed, closed, and your assigned defects.
Tip: If the tabs in the Edit Defect and View Defect dialog boxes contain data, a check mark icon is added to the tab. Instead of clicking on each tab, you can quickly scan the tab icons to see if they contain data. In the following screenshot, the Detail and Workflow tabs both contain data. The Found By mini tab also contains data.
Icon Name Indicates
New Defect Defects added since you last logged in
Changed Defect Defects that changed since you last logged in
Closed Defect Closed defects
Assigned Defect Defects assigned to you

37Chapter 5Working with Defects
Adding defects1 Choose Create > Defect or click Add on the Defects list window.
The Add Defect dialog box opens with the Detail tab selected. The Detail tab includes 4 mini tabs: Found By, Reproduce, Computer Config, and Attachments.
Tip: You can configure TestTrack Pro to display all of the defect information in a single page instead of mini tabs. The instructions and examples in this section refer to the mini tab layout. For more information see Setting display options, page 18.
2 Enter the information in the top portion of the Add Defect dialog box.
Tip: TestTrack Pro’s fields and workflow can be customized. The information you enter may be different depending on your company’s use of TestTrack Pro.
Enter a defect summary. You can enter up to 255 characters.
Status displays the defect state and assignment.
Select the defect disposition.
Select the defect type.
Select the defect priority.
Select the product.
A mini tab is a small, horizontally oriented tab.The Detailtab includes4 mini tabs.
These buttons are used to add or delete additional defect reports.

38 Chapter 5Working with Defects
Select the component.
Enter a defect reference number.
Select the defect severity.
Entered by defaults to the current user or you can select another user.
Date Entered defaults to the current date or you can enter another date.
3 Enter the information on the Detail: Found by mini tab.
Found by defaults to the current user or you can select another user. To search for a user or customer, click the Find button located next to the Found by field. Enter the search criteria. If matching users or customers are found, select one to populate the Found by field.
Date defaults to the current date or you can enter another date.
Select the software version.
Enter a detailed defect description.
4 Enter the information on the Detail: Reproduce mini tab.
Select a reproduced level.
Enter the detailed steps to reproduce the defect. This information helps other users fix and test the defect.
Click to search for a user or customer. Select the user or customer to add to the Found by field.

39Chapter 5Working with Defects
5 Enter the information on the Detail: Computer Config mini tab.
Select a computer configuration. The default is the current user’s configuration.
Enter information about other hardware and software that could be affecting the problem.
6 Click the Detail: Attachments mini tab to attach a file to the defect. See Attaching files, page 41 for details.
7 Optionally click the Custom Fields tab.
If a project uses custom fields, they may be displayed in the main area of the Add Defect dialog box or on the Custom Fields tab. Make sure you click this tab to enter or check custom field information.
8 Skip the Workflow tab.
This tab is populated with defect event information and is useful when editing or viewing defects.
9 Click the Workaround tab.
Enter a workaround solution for the bug that can be used until it is fixed or implemented.

40 Chapter 5Working with Defects
10 Skip the Source Code tab.
This tab is used for SCC application functions. Most users do not attach source code files while adding defects. For more information see Chapter 12, “Integrating with Source Control Tools,” page 121.
11 Click the Notify tab to optionally add the users or customers you want to notify when the defect changes.
Click Add. Select the users or customers from the Add Mail Recipients dialog box and click Add.
To remove users, highlight the user or customer and click Remove.
12 Skip the Links tab.
This tab is used to managed linked defects. For more information see Linking defects, page 59.
13 Skip the History tab.
This tab is populated with defect historical information and is useful when editing or viewing defects.
14 Click Add when you finish entering the defect information.
The defect is saved and added to the project.
Adding additional defect reportsUsers, customers, or beta sites often report the same defect. To eliminate duplicates in your project you can add the defect once and add all additional reports to the same defect.
1 Select the defect you want to add an additional report to.
2 Choose Edit > Edit Defect.
The Edit Defect dialog box opens.
3 Choose Activities > New Reported By.
You can also click New on the Detail tab.
4 Enter the additional report information.
5 Click OK when you finish adding the additional report.
Note: The Detail tab includes a counter. When a defect is reported multiple times, the counter increases and shows the number of times the defect is reported.

41Chapter 5Working with Defects
Attaching filesYou can attach files to defects as they are added or you can edit a defect and attach a file to it. This allows you to supply additional information about the defect. For example, if a defect is corrupting a file you can attach the corrupt data file for reference. Or attach a screen shot to point out a cosmetic changes to a dialog box.
1 Select the defect you want to attach a file to.
2 Choose Edit > Edit Defect.
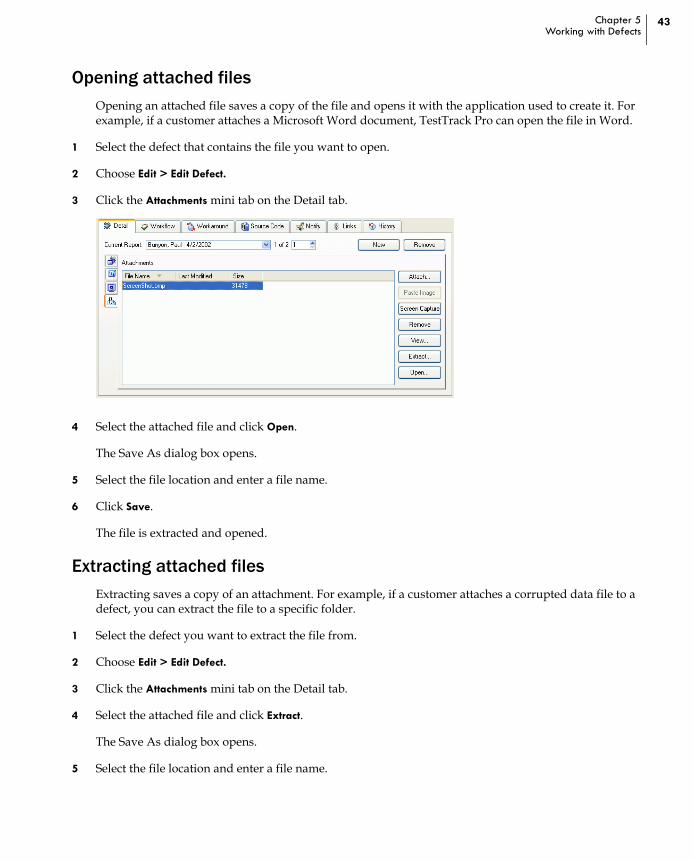
3 Click the Attachments mini tab on the Detail tab.
4 Click Attach.
The Attach File dialog box opens.
5 Browse to the directory containing the file.
6 Select the file and click Open.
The file is attached to the defect.
Tip: You can also drag files to the Attachments tab to add them.
Attaching images from the clipboardYou can paste an image from the clipboard as an attachment.
Note: The TestTrack Pro administrator or another high-level user is generally responsible for setting the image file type. For more information see Setting defect options, page 154.
1 Copy the image to the clipboard.
2 Select the defect you want to attach a file to.
3 Choose Edit > Edit Defect.
4 Click the Attachments mini tab on the Detail tab.
5 Click Paste Image.
The image is attached to the defect.
Tip: Images are attached using default file names. To rename an attachment, right-click the attachment then click Rename.
42 Chapter 5Working with Defects
Capturing and attaching screenshotsYou can capture a screenshot and attach it to a defect all in one action.
Note: The TestTrack Pro administrator or another high-level user is generally responsible for setting the image file type. For more information see Setting defect options, page 154.
1 Select the defect you want to attach a file to.
2 Choose Edit > Edit Defect.
3 Click the Attachments mini tab on the Detail tab.
4 Minimize TestTrack Pro to make sure the screen you want to capture is visible.
The screen capture will include the entire screen that is visible when TestTrack Pro is minimized.
5 Maximize TestTrack Pro.
6 Click Screen Capture.
The screen is captured and attached to the defect.
Tip: Images are attached using default file names. To rename an attachment, right-click the attachment then click Rename.
Viewing attached filesYou can view text and image files without extracting the files.
Note: Depending on project options, you may be able to see thumbnail previews of image file attachments.Select an attachment and click Show Thumbnail to view the attachment.
1 Select the defect with the attached file you want to view.
2 Choose Edit > Edit Defect.
3 Click the Attachments mini tab on the Detail tab.
4 Select the attached file and click View.
The attachment opens.
Tip: You can select the applications to use for viewing files. For more information see Setting view file options, page 16.
43Chapter 5Working with Defects
Opening attached filesOpening an attached file saves a copy of the file and opens it with the application used to create it. For example, if a customer attaches a Microsoft Word document, TestTrack Pro can open the file in Word.
1 Select the defect that contains the file you want to open.
2 Choose Edit > Edit Defect.
3 Click the Attachments mini tab on the Detail tab.
4 Select the attached file and click Open.
The Save As dialog box opens.
5 Select the file location and enter a file name.
6 Click Save.
The file is extracted and opened.
Extracting attached filesExtracting saves a copy of an attachment. For example, if a customer attaches a corrupted data file to a defect, you can extract the file to a specific folder.
1 Select the defect you want to extract the file from.
2 Choose Edit > Edit Defect.
3 Click the Attachments mini tab on the Detail tab.
4 Select the attached file and click Extract.
The Save As dialog box opens.
5 Select the file location and enter a file name.

44 Chapter 5Working with Defects
6 Click Save.
The file is extracted to the folder you selected. You can now open the file.
Removing attached files1 Select the defect with the file you want to remove.
Skip to step 3 if you are on the Edit Defect dialog box.
2 Choose Edit > Edit Defect or click Edit on the Defects list window.
The Edit Defect dialog box opens.
3 Click the Attachments mini tab on the Detail tab.
4 Select the file you want to remove and click Remove.
The attached file is removed.‘
5 Click OK to close the Edit Defect dialog box.
Finding defectsYou can search against the summary field, the description field, or all notes. If you do not have security access to these fields the Find Defects command is disabled.
Tip: If you know the number of a defect you can go directly to that defect. Choose Edit > Go To Defect Number. Enter the defect number and click OK.
1 Choose Edit > Find Defects.
The Find Defects dialog box opens.
2 Select the search field from the Find list.
Fields you have security access to are listed.
3 Enter the text you want to search for in the Contains field.
Select Based on Current Filter if you only want to search the filtered defects.

45Chapter 5Working with Defects
4 Click Find.
If matching defects are found, the search results are displayed on the Defects list window. Notice the Find Results filter is applied.
A warning message opens if matching defects are not found. Click OK. You return to the Defects list window, which is empty. Notice the Find Results filter is applied.
Go to commandIf you know the number of a specific defect you can go directly to it.
1 Choose Edit > Go To Defect Number.
The Go To Defect Number dialog box opens.
2 Enter the defect number and click OK.
The defect opens.

46 Chapter 5Working with Defects
Using advanced findUse advanced find to perform a more powerful search using filters and Boolean logic. You can also search on multiple restrictions. For more information see Chapter 8, “Using Filters,” page 87.
Note: If the defects are filtered, and you choose Advanced Find, the Advanced Find dialog box is populated with the filter restrictions. Click Clear to remove the restrictions.
1 Choose Edit >Advanced Find.
The Advanced Find dialog box opens.
2 Click Add to add a search restriction.
The Restriction dialog box opens.
3 Select the Restrict By field.
The restrictions you can set for the field are displayed.
Use these buttons to add and modify search restrictions.
Click Clear to remove all restrictions and start over.
When you select a Restrict by field...
...the restrictions you can set are displayed here.
47Chapter 5Working with Defects
4 Select the restriction options.
The restriction is added to the search.
5 Click OK.
You return to the Advanced Find dialog box.
6 Optionally, select NOT/AND/OR operators and parentheses to build the boolean logic for the filter. For more information see About Boolean searches, page 88.
7 Click Validate to validate the search criteria.
Click OK if the criteria is valid.
An error message opens if the criteria is not valid. Click OK to return to the Advanced Find dialog box and correct the error.
Click Clear to clear all restrictions and start over.
8 Click Make Filter to save the search criteria as a filter. For more information see Creating filters, page 88.
9 Click Find when you finish adding restrictions and the criteria is validated.
If matching defects are found the search results are displayed on the Defects list window. Notice the Find Results filter is applied.
If matching defects are not found a warning message opens. You return to the Defects list window, which is empty. Notice the Find Results filter is applied.

48 Chapter 5Working with Defects
Viewing defectsYou can view read-only defect information.
1 Select the defect on the Defects list window.
2 Choose Edit > View Defect or click View on the Defect list window.
The View Defect dialog box opens. All fields are read-only.
3 Click the Workflow tab.
This tab provides an overview of where the defect is in the workflow, what defect events were assigned, who the events were assigned to, and any comments or additional information a user entered.
Click to view information about the customer or user who found the defect. The corresponding View dialog box opens.

49Chapter 5Working with Defects
4 Click the History tab.
The History tab includes information about the user who created the defect, when the defect was created, the creation method, who last modified the defect, and the date of the last modification.
5 Click OK to close the View Defect dialog box.
Editing defectsWhen you edit defects
1 Select the defect on the Defects list window.
2 Choose Edit > Edit Defect or click Edit on the Defects list window.
The Edit Defect dialog box opens.
Tip: If another user is editing a defect, a read-only icon is displayed next to the OK button. You can click the icon to see who is editing the record.

50 Chapter 5Working with Defects
3 Make any changes and click OK.
Your changes are saved.
Editing additional defect reports1 Select the defect with the record you want to edit.
If you are on the Edit Defect dialog box, skip to step 3.
2 Choose Edit > Edit Defect or click Edit on the Defects list window.
The Edit Defect dialog box opens.
3 Click the Detail tab and select the report you want to edit.
4 Make any changes and click OK.
Note: If you remove the wrong file, click Cancel on the Edit Defect dialog box. Any changes you make are not saved.
Deleting additional defect reports1 Select the defect with the record you want to delete.
If you are on the Edit Defect dialog box, skip to step 3.
2 Choose Edit > Edit Defect or click Edit on the Defects list window.
The Edit Defect dialog box opens.
3 Choose Activities > Delete Reported By.
You can also click Remove on the Detail tab.
The additional report is deleted.
Select the report you want to edit.
You can also click the arrows to move through the reports.

51Chapter 5Working with Defects
Deleting defects1 Select the defect on the Defects list window.
You can select more than one defect to delete.
2 Choose Edit > Delete Defect or click Delete on the Defects list window.
You are prompted to confirm the deletion.
3 Click Yes.

52 Chapter 5Working with Defects

53Chapter 6Managing Defects
Chapter 6Managing Defects
TestTrack Pro’s advanced defect features help you manage all the defects in a project. While users focus on daily tasks you can duplicate and merge defects, assign defect numbers, or link defects.
Duplicating defects, 54
Merging defects, 54
Deferring defect numbering, 55
Assigning defect numbers, 55
Renumbering defects, 55
Configuring link definitions, 56
Linking defects, 59
Bulk field changes, 66

54 Chapter 6Managing Defects
Duplicating defectsIf you add defects with the same basic information, you can save time by duplicating and editing an existing defect.
1 Select the defect you want to duplicate.
2 Choose Edit > Duplicate Defects.
The defect is duplicated and assigned the next available defect number.
3 Edit the defect and save your changes.
Merging defectsYou can merge defects that report the same issue. When defects are merged, the original defects are deleted from the project. All defect information is retained as multiple defect records. For example, if you merge three defects the Detail tab shows three records. Each record includes the original defect information.
Note: When defects are merged, the original defects are deleted from the project and the resulting defect assumes the lowest number. If you want to maintain unique defects you can link defects instead. For more information see Linking defects, page 59.
1 Select the defects you want to merge.
To select a range of defects, click the first defect in the range then Shift+click the last defect. To select multiple defects not in a range, Ctrl+click each defect.
2 Choose Edit > Merge Defects.
You are prompted to confirm the merge.
3 Click OK.
The defects are merged. The resulting defect assumes the lowest defect number and the type, priority, and severity of that defect.
Duplicated defect

55Chapter 6Managing Defects
Deferring defect numberingDeferred defect numbering allows you to number new defects at a later time. Defects with deferred numbering have a dash instead of a number. You should periodically review deferred defects to assign numbers, merge them with existing defects, or delete them.
1 Choose Tools > Administration > Project Options.
The Project Options dialog box opens.
2 Select the Defects category.
3 Select the deferred numbering options.
4 Click OK to save the options.
Assigning defect numbersAfter you have reviewed deferred defects you can assign defect numbers to them.
1 Select the unnumbered defect.
2 Choose Activities > Assign Defect Numbers.
The defect is assigned the next available defect number.
Renumbering defectsYou can renumber defects at any time. For example, deleting and merging defects may leave gaps in the defect numbers and you may want to renumber the defects.
1 Select the defect you want to renumber.
2 Choose Activities > Renumber Defect.
The Renumber Defects dialog box opens. The starting number is set to the next available defect number.

56 Chapter 6Managing Defects
3 Enter a new defect number and click OK.
The Renumber Defects dialog closes and the defect is renumbered.
If the renumbered defect number is higher than the next available defect number, the next available defect number is set to one higher than the renumbered defect.
If you renumber the entire defect list, the next available defect number must be set to one greater than the highest defect number.
Configuring link definitions
Admin: You may not be able to configure link definitions. Access to link definitions is generally restricted to administrators or other high-level users.
You must define links before users can link defects. The link definition provides a name and description for the link, as well as a set of optional behaviors that restrict the workflow of linked defects.
The sample TestTrack Pro project and each new project you create includes two sample link definitions, Related Defects and Parent/Child. Many companies will only need to use the default link definitions and will not need to create new definitions. The sample link definitions do not affect workflow and can be deleted.
1 Choose Tools > Administration > Link Definitions.
The Configure Link Definitions dialog box opens. Existing link definitions are listed.
2 Click Add to create a new link definition. See Adding link definitions, page 57 for more information.
3 Select a link definition and click Edit to change it. See Editing link definitions, page 58 for more information.
4 Select a link definition and click Inactivate to inactivate it. See Inactivating link definitions, page 58 for more information.
5 Select a link definition and click Delete to delete it. Deleting link definitions, page 59 for more information.
6 Click OK to close the Configure Link Definitions dialog box.

57Chapter 6Managing Defects
Adding link definitions1 Click Add on the Configure Link Definitions dialog box.
The Add Link Definition dialog box opens.
2 Enter a Name and Description.
The definition name must be unique.
3 Select Has Parent to create a parent/child relationship for the link definition.
Parent/child relationship does not restrict workflow is selected by default. This option does not add any additional restrictions to the link definition.
Parent restricts workflow enforces additional restrictions based on the parent defect. Parent cannot be closed if any child is open ensures that child defects are all closed before the parent. Child cannot be re-opened if parent is closed prevents child defects from being re-opened if the parent is closed.
Child restricts workflow enforces additional restrictions based on the child defect. Child cannot be closed if parent is open prevents child defects from being closed if the parent is open. Parent cannot be re-opened if any child is closed prevents the parent from being re-opened if a child defect is closed.
4 Select Children/Peers must be closed in the specified order if you want items to be closed in order.
For example, defects #980, #872, and #922 are linked in a peer relationship in that order. With this option selected, #872 cannot be closed until #980 is closed and #922 cannot be closed until #872 is closed.
5 Select Children/Peers must be re-opened in inverse order to specify that items can only be re-opened in reverse order.
For example, defects #2099, #3147, #2980, and #3122 are linked in a parent/child relationship. Defect #2099 is the parent and #3147, #2980, and #3122 are all children. The parent, #2099, cannot be re-opened if any child is closed. With this option selected, the children must be re-opened in reverse order before the parent can be re-opened. The last child, #3122, must be re-opened first. Next, #2980 can be re-opened then #3147. The parent, #2099, can be re-opened after #3147 is re-opened.

58 Chapter 6Managing Defects
6 Click OK.
The link definition is added and you return to the Configure Link Definitions dialog box.
Note: You may want to reorder definitions so the most-used definitions display at the top of the Add Link and Edit Link dialog boxes. Select a definition and click Top, Move Up, Move Down, or Bottom to move it.
Editing link definitions
Admin: You cannot edit link definitions while other users are logged in.
You can edit a link definition to update the name and description or select additional workflow restrictions. You cannot change any Has Parent options if the link definition is in use.
1 Click Edit on the Configure Link Definitions dialog box.
The Edit Link Definition dialog box opens.
2 Make any changes and click OK.
The changes are saved.
Inactivating link definitions
Admin: You cannot inactivate or activate link definitions while other users are logged in.
If you want to prevent users from using a link definition can you inactivate it. Inactivating a link definition does not affect existing links that use the definition.
1 Select the link definition on the Configure Link Definitions dialog box.
2 Click Inactivate.

59Chapter 6Managing Defects
The link definition is inactivated. Users cannot use the definition to create new links.
Note: To activate a link definition select it and click Activate.
Deleting link definitions
Admin: You cannot delete link definitions if other users are logged in.
You can delete link definitions that are not being used.
1 Select the link definition on the Configure Link Definitions dialog box.
2 Click Delete.
The link definition is deleted.
Linking defectsYou can link defects in the same project together in a parent/child relationship or peer group relationship. You can also set additional parent/child options that restrict the workflow. Your use of defect linking depends on your company’s business processes. For example, some companies do not like to merge defects because they need to maintain the original defect number. In this scenario defect linking can be used. The following examples help you understand the different uses for linking:
QA is testing a new software component and reports five defects. When the team lead reviews the new defects she realizes they are all symptoms of the same coding problem. She links the defects together to make sure the same fix is applied to all defects.
Your company is getting ready to release a major software upgrade. In conjunction with the release the marketing department needs to update the Web site, write a press release, create a direct mail campaign, and create an email marketing blast. The marketing director creates a parent defect named Upcoming Release and creates four separate defects for each task that needs to be accomplished. He then links the defects together in a parent/child relationship.
A problem is found that includes a code change, a documentation change, and an update to an existing knowledgebase article. Instead of creating one defect, you create three different defects, link them together, and specify the order you want the defects to be closed. Requiring the code change defect to be closed first, then the documentation change defect, and finally the knowledgebase defect ensures the documentation and the knowledgebase article both reflect the code changes.
Note: Link definitions must be configured before users can link defects. The TestTrack Pro administrator or another high-level user is generally responsible for creating and maintaining link definitions. For more information see Configuring link definitions, page 56.

60 Chapter 6Managing Defects
Adding links Defect linking is used to group two or more defects together. For example, you may have related defects that all require the same code change. You can link the defects together and enter a comment that explains why they are linked. When you assign the defect, enter a note to let the developer know there are other defects linked to it. The developer can view the link information on the Links tab on the Edit Defect or View Defect dialog box.
1 Select the defects you want to link on the Defect list window.
2 Right-click and select Add Link. You can also click the Links tab on the Edit Defect dialog box and select Add Link.
The Add Link dialog box opens. The selected defects are listed in the Children/Peers area.
3 Select a link Definition.
To view more information about a definition select it and click View Definition. The read-only View Link Definition dialog box opens.
4 Optionally enter any Comments about the link.
The comment is displayed on the defect Links tab and the link diagram.
5 If you are adding a parent/child link select the parent defect and click Make Parent.
6 Click Select Defects to Add to add additional defects to the link.
See Adding defects to links, page 61 for more information.

61Chapter 6Managing Defects
7 Select a defect and click Top, Move Up, Move Down, or Bottom to reorder it.
Reorder defects if the defects must be closed in order or re-opened in inverse order.
8 Select a defect and click Remove to remove it from the link.
To remove a parent defect you must first set another defect as the parent.
9 Click OK to add the link.
Adding defects to links1 Click the Links tab when you are editing or viewing a defect with links.
2 Click Add Link.
The Add Link dialog box opens.
3 Click Select Defects to Add.
The Select Defects to Add dialog box opens.
Select the defects you want to add and click Add.
Tip: This dialog box includes many of the same functions as the Defects list window. For example, you can filter the defects or search for specific defects.

62 Chapter 6Managing Defects
Viewing linksYou can view read-only link information.
Tip: Add a links column to the Defects list window to easily view linked defects. Refer to Inserting columns, page 30 for more information.
1 Click the Links tab when you are editing or viewing a defect with links.
2 Click View Link.
The View Link dialog box opens.
3 Click the Link History tab to view the link history.
For more information see Viewing link history, page 63.
4 Click OK to close the View Link dialog box.

63Chapter 6Managing Defects
Viewing link historyYou can view the history of any changes made to the link. A link history entry is created when a link is created or broken or a defect is added, removed, or merged. Keep in mind that link history is not stored with the defects.
1 Click the Links tab when you are editing or viewing a defect with links.
2 Select a link.
3 Click View Link or Edit Link then click the Link History tab.
4 The Link History tab displays the following information:
Link Broken—Date link was broken, user who removed the parent defect, defect number, and summary information.
Defect Added—Date defect was added, user who added the defect, defect number, and summary information.
Defect Removed—Date defect was removed, user who removed the defect, defect number, and summary information.
Defects Merged—Date defect was merged, user who merged the defects, and the old and new defect numbers.
5 Click OK when you finish viewing the link history.
Editing linksYou can edit a link to add or remove defects to it, reorder defects, or change the comment.
Tip: Add a links column to the Defects list window to easily view linked defects. Refer to Inserting columns, page 30 for more information.
1 Click the Links tab when you are editing or viewing a defect with links.
2 Select a link.

64 Chapter 6Managing Defects
3 Click Edit Link.
The Edit Link dialog box opens.
4 Make any changes and click OK.
Diagramming linksYou can view a link-based or defect-based visual representation of a link. This allows you to quickly view which links a defect is in and its relationship to other defects in each link.
Tip: You can add a links column to the Defects list window to easily view linked defects. For more information see Inserting columns, page 30.
1 Click the Links tab when you are editing or viewing a defect with links.
2 Click Diagram Links.
The Diagram Link Options dialog box opens.
3 Select a Diagram Type.
You can diagram links based on defects or links.

65Chapter 6Managing Defects
4 Click OK.
The diagram opens.
5 Click Save As to save the diagram.
6 Click Page Setup to change the printer options such as paper size.
7 Click Print to print the diagram.
Deleting links1 Click the Links tab when you are editing or viewing a defect with links.
Tip: You can add a links column to the Defects list window to easily view linked defects. Refer to Inserting columns, page 30 for more information.
2 Select a link and click Delete Link.
You are prompted to confirm the deletion.
3 Click Yes.
The link is deleted.

66 Chapter 6Managing Defects
Bulk field changes
Admin: The Edit Defect, Edit Project Options, and Import from XML security options must be enabled to access this command.
You can quickly and easily update multiple records in the TestTrack Pro project. Use this command to replace values for specific fields, search for and replace strings in text fields, or add text. You can replace values for the following field types: General, Reported By, Steps to Reproduce, Computer Config, Events, and Custom Fields.
Replacing general field values1 Select the defects you want to change.
2 Choose Activities > Bulk Field Changes.
The Bulk Field Changes dialog box opens with the General tab selected.
3 Make any changes.
To add text, enter the text in the Summary field and select Prepend or Append.
To replace text, enter the string you want to search for in the Replace field and the string you want to replace it with in the With field.
To change values, select the value from the corresponding menu.
4 Click OK.
You are prompted to confirm the changes.
5 Click Yes.
The records are updated.

67Chapter 6Managing Defects
Replacing reported by field values1 Select the defects you want to change.
2 Choose Activities > Bulk Field Changes.
The Bulk Field Changes dialog box opens.
3 Click the Reported By tab.
4 Make any changes.
Select Apply changes to all Reported by records if defects are reported multiple times and you want to change all reported by records. If you do not select this option only the first reported by record is changed.
To change values, select the value from the corresponding menu.
To add text, enter the text in the Description field and select Prepend or Append.
To replace Description text, enter the string you want to search for in the Replace field and the string you want to replace it with in the With field.
5 Click OK.
You are prompted to confirm the changes.
6 Click Yes.
The records are updated.
Replacing steps to reproduce field values1 Select the defects you want to change.
2 Choose Activities > Bulk Field Changes.
The Bulk Field Changes dialog box opens.

68 Chapter 6Managing Defects
3 Click the Steps to Reproduce tab.
4 Make any changes.
Select Apply changes to all Steps to Reproduce records if defects are reported multiple times and you want to change all reported by records. If you do not select this option only the first steps to reproduce record is changed.
To change values, select the value from the corresponding menu.
To add text, enter the text in the Steps to Reproduce field and select Prepend or Append.
To replace Steps to Reproduce text, enter the string you want to search for in the Replace field and the string you want to replace it with in the With field.
5 Click OK.
You are prompted to confirm the changes.
6 Click Yes.
The records are updated.
Replacing computer config field values1 Select the defects you want to change.
2 Choose Activities > Bulk Field Changes.
The Bulk Field Changes dialog box opens.

69Chapter 6Managing Defects
3 Click the Computer Config tab.
4 Make any changes.
Select Apply changes to all Computer Config records if defects are reported multiple times and you want to change all reported by records. If you do not select this option only the first computer config record is changed.
To change values, select the value from the corresponding menu.
To add text, enter the text in the Other Hardware and Software field and select Prepend or Append.
To replace Other Hardware and Software text, enter the string you want to search for in the Replace field and the string you want to replace it with in the With field.
5 Click OK.
You are prompted to confirm the changes.
6 Click Yes.
The records are updated.
Replacing events field values1 Select the defects you want to change.
2 Choose Activities > Bulk Field Changes.
The Bulk Field Changes dialog box opens.

70 Chapter 6Managing Defects
3 Click the Events tab.
4 Select a Defect Event.
The fields on this tab change based on the defect event you select.
5 Make any changes.
Select Apply to all events to change all corresponding defect events.
To change values, select the value from the corresponding menu.
To add text, enter the text in the Notes field and select Prepend or Append.
To replace Notes text, enter the string you want to search for in the Replace field and the string you want to replace it with in the With field.
6 Click OK.
You are prompted to confirm the changes.
7 Click Yes.
The records are updated.
Replacing custom field values1 Select the defects you want to change.
2 Choose Activities > Bulk Field Changes.
The Bulk Field Changes dialog box opens.

71Chapter 6Managing Defects
3 Click the Custom Fields tab.
4 Select a Custom Field.
The fields on this tab change based on the custom field you select.
5 Make any changes and click OK.
You are prompted to confirm the changes.
6 Click Yes.
The records are updated.

72 Chapter 6Managing Defects
73Chapter 7Managing the Workflow
Chapter 7Managing the Workflow
Jump into the workflow and track your defects. The workflow ensures a defect moves efficiently from start to finish and doesn’t fall through the cracks.
About the workflow, 74
Understanding defect assignments and events, 74
Events toolbar, 75
Replying to a defect submitter, 76
Assigning defects, 76
Estimating fix time, 77
Fixing defects, 78
Verifying a fix, 79
Closing defects, 80
Re-opening defects, 80
Adding release notes, 81
Adding comments, 82
Viewing defect events, 82
Editing defect events, 83
Deleting defect events, 84
Building release notes, 85

74 Chapter 7Managing the Workflow
About the workflowThe TestTrack Pro workflow consists of states, events, and transitions that define the path an issue takes from initial reporting to resolution. To move a defect from state to state, the defect is assigned to users who perform the event assigned to them. TestTrack Pro’s workflow can be used out of the box or customized to support your company’s business processes. For more information about customizing the workflow see Chapter 15, “Customizing the Workflow,” page 165.
The information in this section is specific to the default workflow, which is used to track software bugs, feature requests, and other tasks. The default workflow includes the following events: Assign, Estimate, Fix, Verify, Force Close, Re-open, Release Notes, and Comments. Remember that the steps you follow and the defect events you use may differ depending on your company’s workflow.
Understanding defect assignments and eventsAccountability, such as who is responsible for estimating, fixing, or verifying a fix, is an important component of defect tracking. Defects are assigned to users to ensure someone is accountable and to move the defect through the workflow states.
Each company uses defect assignments and events differently. One company might let all users assign defects. Another company might only want team leads to be responsible for assigning defects while the users are responsible for such things as estimating a fix, fixing a defect, or verifying the fix. Following is an example of how events move a defect through the lifecycle:
The Lead Engineer is notified when a defect is added to the project. After reviewing the defect, the Lead Engineer assigns the defect to Joe Estimator.
The next day, Joe Estimator is notified of the defect assignment in two ways: the Assigned defect indicator appears next to the defect on the Defects list window and he is sent an email notification. Joe Estimator opens the defect and views the Workflow tab. He can view who assigned the defect and what event he needs to perform. He decides what needs to be done to fix the defect and enters the estimate information.
TestTrack Pro’s default workflow

75Chapter 7Managing the Workflow
The Lead Engineer is notified that the defect changed. She reviews Joe Estimator’s work and assigns the fix to Jane User.
When Jane User logs in, she is notified of the defect assignment. Jane User opens the defect and views the Workflow tab. She can view her current defect assignment information and also view Joe Estimator’s notes – this helps her begin working on the fix.
After Jane User fixes the defect and enters the Fix Defect information, the Lead Engineer is notified that the defect changed. The Lead Engineer reviews Jane User’s fix and assigns the next defect event. This process continues until the defect is fixed, tested, verified, and closed.
Events toolbarEach defect event has a corresponding button located in a toolbar. Custom event icons can also be added to the toolbar. For more information see Customizing the events toolbar, page 174.
Icon Name Description
Assign Assign the defect to a user
Estimate Estimate the time needed to fix a defect or implement a new feature
Fix Describe the fix
Verify Verify the defect fix
Force Close Close the defect
Re-open Re-open a closed defect
Release Notes Add release notes to a defect
Comments Add comments to the defect

76 Chapter 7Managing the Workflow
Replying to a defect submitterYou can send an email directly to the defect’s submitter if you need more information or have questions about the defect.
1 Select the defect on the Defects list window.
2 Choose Email > Reply to Submitter.
The Send Mail dialog box opens.
The To field is populated with the name of the user or customer who submitted the defect. You can also click Add to select additional users.
The Subject field contains the defect’s summary text.
The message body contains the defect description.
3 Enter your question or the information you need to clarify.
4 Click Send.
The email is sent.
Assigning defects1 Select the defect and choose Activities > Assign or click the Assign toolbar button.
The Assign dialog box opens.

77Chapter 7Managing the Workflow
2 Select an Assign By user.
This field defaults to the logged in user.
3 Select an Assign To user.
4 The Date defaults to the current date.
You can enter another date.
5 Enter any Notes.
It is helpful to provide additional information about the defect assignment.
6 Click OK.
Note: When a defect is assigned to you, open the defect (Edit/View Defect dialog box) and click the Workflow tab. You can review the assignment notes. The person who assigned the defect to you should let you know what defect event you are responsible for and provide any detailed information. If you need more information about the defect, select Mail > Reply to Submitter to send an email from TestTrack Pro.
Estimating fix time1 Choose Activities > Estimate or click the Estimate toolbar button.
The Estimate dialog box opens.
2 Select an Estimate By user.
This field defaults to the logged in user.
3 The Date defaults to the current date.
You can enter another date.
4 Enter the estimated Effort in hours to complete the fix.

78 Chapter 7Managing the Workflow
5 Enter any Notes.
6 Select a Version number.
You may also be able to enter a version number.
7 Enter an estimated Completion Date.
You can enter another date.
8 Click OK.
Fixing defects1 Choose Activities > Fix or click the Fix toolbar button.
The Fix dialog box opens.
2 Select a Fixed By user.
This field defaults to the logged in user.
3 The Date defaults to the current date.
You can enter another date.
4 Optionally select a Resulting State.
You can only select a state if the workflow allows multiple resulting states.
5 Enter the fix Effort in hours to complete the fix.
6 Enter any Notes about the fix.
7 Select the Affects Documentation check box or the Affects Test Plan check box if either applies.
8 Select a fix Resolution.

79Chapter 7Managing the Workflow
9 Select the Version number.
You may also be able to enter a version number.
10 Click OK.
Verifying a fix
Note: A defect must be fixed before it can be verified.
1 Choose Activities > Verify or click the Verify toolbar button.
The Verify dialog box opens.
2 Select a Verify By user.
This field defaults to the logged in user.
3 The Date defaults to the current date.
You can enter another date.
4 Optionally select a Resulting State.
You can only select a state if the workflow allows multiple resulting states.
5 Enter any Notes.
If a fix fails, describe why the fix failed. It can help with future planning.
6 Select the Version number.
You may also be able to enter a version number.
7 Click OK.

80 Chapter 7Managing the Workflow
Closing defectsThe resolution of some defects does not follow the standard fix/verify model. For example, a defect might not be a bug. In this situation, you can close the defect immediately and bypass the workflow.
1 Choose Activities > Force Close or click the Force Close toolbar button.
The Force Close dialog box opens.
2 Select a Force Close By user.
This field defaults to the logged in user.
3 The Date defaults to the current date.
You can enter another date.
4 Enter any Notes.
It is helpful to provide information about why the defect was closed.
5 Select a Resolution.
6 Click OK.
Re-opening defectsYou can re-open closed defects if they resurface and need to go through your fix process again.
1 Choose Activities > Re-Open or click the Re-Open toolbar button.
The Re-Open dialog box opens.

81Chapter 7Managing the Workflow
2 Select a Re-Open By user.
This field defaults to the logged in user.
3 The Date defaults to the current date.
You can enter another date.
4 Enter any Notes.
It is helpful to include the reason the defect was re-opened.
5 Click OK.
Adding release notes1 Choose Activities > Release Notes or click the Release Notes toolbar button.
The Release Notes dialog box opens.
2 Select a Release Notes By user.
This field defaults to the logged in user.
3 The Date defaults to the current date.
You can enter another date.
4 Enter the Release Version.
5 Enter the release Notes.
The notes are recorded with the defect history.
6 Click OK.
You can add multiple release notes to a defect.
Note: Generating release notes is a two-step process. Before you release your product you need to build the release notes that were added to the defects. You can insert this file into a Read Me file or use it to create a separate Release Notes guide. For more information see Building release notes, page 85.

82 Chapter 7Managing the Workflow
Adding commentsYou can add comments to a defect to clarify an issue or just as a reminder. Other users can view your comments on the Workflow tab.
1 Choose Activities > Comment or click the Comments toolbar button.
The Comments dialog box opens.
2 Select a Comment By user.
This field defaults to the logged in user.
3 The Date defaults to the current date.
You can enter another date.
4 Enter the comments and click OK.
The comments are recorded with the defect history.
Note: To view defect comments, select the defect, click View or Edit, and then click the Workflow tab. All comments are displayed on the Workflow tab.
Viewing defect eventsYou can view the defect event details.
1 Select the defect on the Defects list window.
2 Choose Edit > Defect or click Edit on the Defects list window.
The Edit Defect dialog box opens.
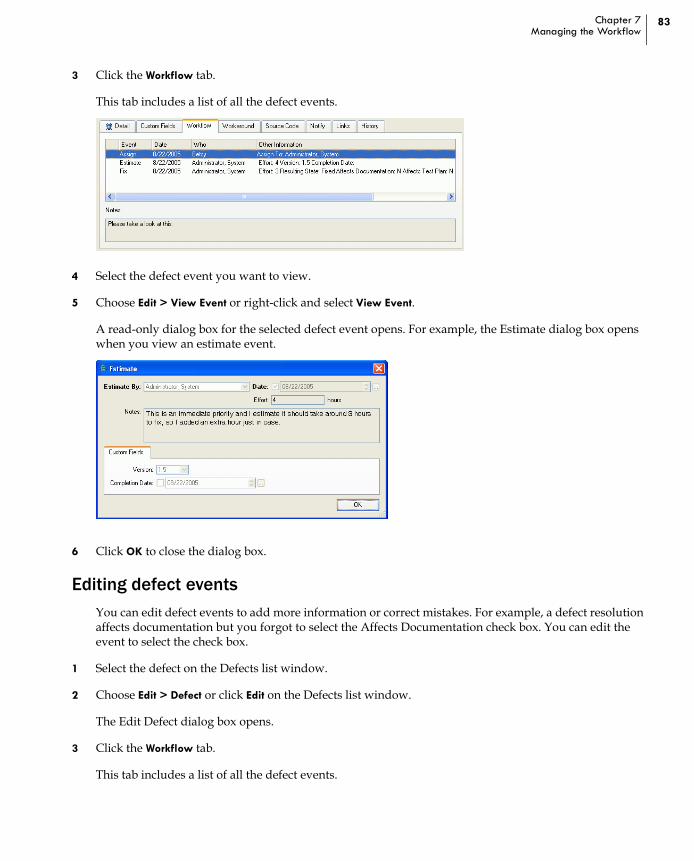
83Chapter 7Managing the Workflow
3 Click the Workflow tab.
This tab includes a list of all the defect events.
4 Select the defect event you want to view.
5 Choose Edit > View Event or right-click and select View Event.
A read-only dialog box for the selected defect event opens. For example, the Estimate dialog box opens when you view an estimate event.
6 Click OK to close the dialog box.
Editing defect eventsYou can edit defect events to add more information or correct mistakes. For example, a defect resolution affects documentation but you forgot to select the Affects Documentation check box. You can edit the event to select the check box.
1 Select the defect on the Defects list window.
2 Choose Edit > Defect or click Edit on the Defects list window.
The Edit Defect dialog box opens.
3 Click the Workflow tab.
This tab includes a list of all the defect events.

84 Chapter 7Managing the Workflow
4 Select the defect event you want to edit.
5 Choose Edit > Edit Event or right-click and select Edit Event.
A dialog box for the selected defect event opens.
6 Make any changes and click OK.
Deleting defect events1 Select the defect on the Defects list window.
2 Choose Edit > Defect or click Edit on the Defects list window.
The Edit Defect dialog box opens.
3 Click the Workflow tab.
This tab includes a list of all the defect events.
4 Select the defect event you want to delete.
5 Choose Edit > Delete Event or right-click and select Delete Event.
You are prompted to confirm the deletion.
6 Click Yes.
The defect event is deleted.

85Chapter 7Managing the Workflow
Building release notes
Note: To generate release notes for just a few defects, select those defects on the Defects list window. If you do not know which defects contain release notes, add a column to the Defects list window to display the Has Release Notes? field.
1 Choose File > Build Release Notes.
The Build Release Notes dialog box opens.
2 Enter the From version and the Through version you want to include in the release notes.
If the release notes are specific to one version, enter the same version number in both fields.
3 Select a filter from the Use Filter menu to generate release notes for defects that meet the filter criteria.
4 Select a product from the Limit to Product menu to generate release notes for a specific product.
5 Select Only include defects selected in the defect list to include only the defects you selected in the Defect list window.
6 Select any Presentation Options.
Select Sort versions from newest to oldest to sort the release notes in order starting with the newest version.
Select Insert a blank line between each release note to add a blank link between each note.
Optionally enter a character in the Begin each release note with field. You can also enter ASCII characters or leave the field empty.
7 Click Preview.
The Release Notes preview dialog box opens. You can edit the release notes in the preview window.

86 Chapter 7Managing the Workflow
8 Click Create and Save to save the release notes.
The Save Release Notes As dialog box opens.
9 Select the directory where you want to save the release notes and enter a file name.
10 Click Save.
TestTrack Pro generates the release notes and saves the text file in the specified directory.

87Chapter 8Using Filters
Chapter 8Using Filters
TestTrack Pro includes extensive filtering capabilities. You can use filters to sort defect records and list only those defects that meet the criteria you select.
About filters, 88
Creating filters, 88
Adding restrictions, 89
Using filters, 91
Viewing filters, 91
Viewing restrictions, 91
Editing filters, 92
Editing restrictions, 92
Inserting restrictions, 92
Duplicating filters, 93
Deleting restrictions, 93
Deleting filters, 93

88 Chapter 8Using Filters
About filtersAs your project grows, it becomes more difficult to easily locate the records you are interested in. Filters allow you to quickly sort project information and view selected records. You can create shared filters that other users you can use, or create private filters that cannot be used by other users. For example, a project team lead may create a private filter that allows her to quickly view a specific team member’s defect list. Or, she may create a shared filter that allows development team members to quickly view the enhancement requests that customers request.
About Boolean searchesYou can use Boolean logic to create complex and highly precise filters. Boolean logic uses three connecting operators (AND, OR, NOT) to narrow or broaden a search or to exclude a term from a search. Boolean operators can also be used with parentheses, which allow you to create even more complex queries.
The boolean operator AND is used to narrow searches. When you use this operator, the filter or search returns records that match all of the criteria you choose.
The boolean operator OR is used to broaden searches. When you use this operator, the filter or search returns records that match any of the criteria you choose.
The boolean operator NOT is used to limit searches by eliminating terms from a search When you use this operator, the filter or search returns records that do not contain any of the criteria you choose.
Creating filtersCreate filters to quickly view specific types of defects. For example, you can create a filter to view bugs by priority or a filter to view opens bugs that need to be fixed by a specific release.
1 Choose Create > Filter or click Add on the Filters list window.
The Add Filter dialog box opens.

89Chapter 8Using Filters
2 Enter a Name and Description.
3 Select a Share option.
Private filters cannot be used by other users.
Filters that are Shared with everyone can be used by all users and customers.
Filters that are Shared with Users can be used by other users.
Filters that are Shared with Customers can be used by customers.
4 Click Add to add a filter restriction.
For more information see Adding restrictions, page 89.
5 Select NOT/AND/OR operators and parentheses to build the Boolean Logic for the filter (optional step).
The Boolean search criteria appear in the Selected Restrictions box at the bottom of the dialog box. For more information see About Boolean searches, page 88.
6 Click Validate.
Click OK if the filter criteria is valid.
An error message opens if the filter criteria is not valid. Click OK to return to the Defect Filter dialog box and correct the error.
Click Clear to clear all restrictions and start over.
7 Click Add.
The filter is added.
Adding restrictions1 Click Add on the Add Defect Filter or Edit Defect Filter dialog box.
The Restriction dialog box opens.
2 Select the field you want to include in the filter from the Restrict by list.
Tip: Most defect actions include Notes fields. You can select the All Action Notes field from the Restrict by menu to search these fields. After selecting All Action Notes, select an option and enter the search text.

90 Chapter 8Using Filters
3 Select the restriction options. The restrictions you can set changed based on the Restrict by field.
<Unknown> represents an empty field. For example, if you select <Unknown> with Restrict by set to Assigned To, it is interpreted as “Show all defects not assigned to anyone.”
If you are adding restrictions with fields that include a text value, you can leave the text value empty. When the filter is applied, TestTrack Pro searches for the Restrict by field with an empty text value. This is useful if you are cleaning up defect records and want to make sure each defect includes a summary. Select Restrict by: Summary and leave the text value empty. When you apply the filter, all defects with an empty Summary field are listed.
4 Click OK to save the restriction.
You return to the Add Defect Filter dialog box.
Note: Repeat steps 1-4 to add additional restrictions to the filter.

91Chapter 8Using Filters
Using filters1 Select the filter from the Filter list on the Defects list window.
2 The filter is applied to the defects.
Defects that meet the filter criteria are listed on the Defects list window.
Select Not Filtered to return to a list of all defects.
Viewing filters1 Select the filter on the Filters list window.
2 Choose Edit > View Filter or click View on the Filters list window.
The View Defect Filter dialog box opens. All fields are read-only.
3 Click OK when you are finished.
Viewing restrictions1 Select the restriction on the Add Defect Filter, Edit Defect Filter, or View Defect Filter dialog.
2 Click View.
The selected restriction opens in the Restriction dialog box. All fields are read-only and cannot be edited.
3 Click OK to close the Restriction dialog box.

92 Chapter 8Using Filters
Editing filters1 Select the filter on the Filters list window.
2 Choose Edit > Edit Filter or click Edit on the Filters list window.
The Edit Defect Filter dialog box opens.
3 Make any changes and click OK.
Your changes are saved and you return to the Filters list window.
Editing restrictions1 Select the restriction on the Add Defect Filter or Edit Defect Filter dialog.
2 Click Edit.
The Restriction dialog box opens.
3 Make any changes and click OK.
The changes are saved and you return to the Advanced Find Defects dialog box.
Inserting restrictionsIf a filter contains a large number of restrictions, you can insert a restriction in a specific position.
1 Select the restriction on the Add Defect Filter or Edit Defect Filter dialog box.
2 Click Insert.
The Restriction dialog box opens. The new restriction is inserted above the selected restriction.
3 Select the field you want to include in the restriction.
4 Select any options and enter the restrictions for the field.
5 Click OK.
The restriction is added.

93Chapter 8Using Filters
Duplicating filtersIf you add filters with the same basic information, you can save time by duplicating and editing an existing filter.
1 Select the filter you want to duplicate.
2 Choose Edit > Duplicate Filter.
The filter is duplicated. A number is added to the end of the filter name. For example, if you duplicate Priority Filter 2 times, the duplicated filters are named Priority Filter 1and Priority Filter 2.
3 Modify the duplicated filter and save your changes.
Deleting restrictionsMake sure you want to delete the restriction. You are not prompted to confirm the deletion and the action cannot be undone.
1 Select the restriction on the Add Defect Filter or Edit Defect Filter dialog.
2 Click Delete.
The restriction is deleted.
Deleting filters1 Select the filter on the Filters list window.
You can select more than one filter to delete.
2 Choose Edit > Delete Filter or click Delete on the Filters list window.
You are prompted to confirm the deletion.
3 Click OK.
The filter is deleted.

94 Chapter 8Using Filters

95Chapter 9Managing Test Configs
Chapter 9Managing Test Configs
Track the nuts and bolts - it is important to pay attention to the computers defects are found on. Is it a hardware problem or a driver bug? Track your test configurations and identify the patterns.
About test configs, 96
Adding test configs, 96
Viewing test configs, 97
Editing test configs, 97
Duplicating test configs, 97
Deleting test configs, 97

96 Chapter 9Managing Test Configs
About test configsA test configuration generally refers to a specific computer used for testing and the hardware and software found on this computer. You should track all your systems to see if bugs are computer-specific. Tracking test configurations helps you identify patterns in defects that may be related to specific hardware or software configurations. You can verify that your application functions the same, or in a similar manner, across all supported platforms or configurations.
Adding test configs1 Choose Create > Test Config or click Add on the Test Configs list window.
The Add Test Config dialog box opens with the CPU tab selected.
2 Enter a Name to uniquely identify the test config.
3 Enter the information on the CPU tab.
Click Capture Config if you are entering a test config for the computer you are currently working with. TestTrack Pro can automatically fill in some of the fields. This option is only available to Windows users.
Enter information in the other CPU fields. This information is optional but you should provide as much detail as possible.
4 Click the Peripherals tab and enter the peripherals information.
These fields are optional but you should enter as much information as possible.
5 Click Add.
The Test Config is added.
Click Capture Config to automatically capture some computer configuration information.

97Chapter 9Managing Test Configs
Viewing test configs1 Select the test config on the Test Configs list window.
2 Choose Edit > View Test Config or click View on the Test Configs list window.
The View Test Config dialog box opens. All fields are read-only.
3 Click OK when you are finished.
You return to the Test Configurations list window.
Editing test configs1 Select the test config on the Test Configs list window.
2 Choose Edit > Edit Test Config or click Edit on the Test Configs list window.
The Edit Test Config dialog box opens.
3 Make any changes and click OK.
Duplicating test configsIf you add test configs with the same basic information, you can save time by duplicating and editing an existing filter.
1 Select the test config on the Test Configs list window.
2 Choose Edit > Duplicate Test Config.
The test configuration is duplicated. A number, incremented by 1, is added to the end of the test config name. For example, if you select and duplicate Eng-cube, the duplicated test config is named Eng-cube1.
3 Modify the duplicated test config and save your changes.
Deleting test configs1 Select the test config on the Test Configs list window.
You can select more than one test config to delete.
2 Choose Edit > Delete Test Config or click Delete on the Test Configs list window.
You are prompted to confirm the deletion.
3 Click Yes.

98 Chapter 9Managing Test Configs

99Chapter 10Generating Reports
Chapter 10Generating Reports
TestTrack Pro makes reporting simple—point, click, print, and read. You can design and preview each report before printing. You can also share your report with other users or keep it private.
About reports, 100
Using stylesheets, 100
Creating text file report templates, 102
Creating detail reports, 103
Creating distribution reports, 105
Creating list reports, 107
Creating trend reports, 110
Charting report data, 112
Viewing report settings, 113
Editing report settings, 114
Duplicating reports, 114
Previewing reports, 114
Printing reports, 114
Deleting reports, 115

100 Chapter 10Generating Reports
About reportsReports are used to analyze the data collected in a TestTrack Pro project. You can use filters to build reports that focus on the data you need. You can also share reports with other users or keep them private. TestTrack Pro includes the following types of reports:
Detail reports include detailed information about defects, customers, users, security groups, or test configurations.
Distribution reports include the distribution of defects. You can choose options such as defects found by user or defect status by component. For example, you can create a distribution report that shows the number of fixed defects for each user.
List reports include summary information about defects, customers, users, security groups, or test configurations. You select the fields to include in the report.
Trend reports include defect events over time. For example, how many defects were fixed this week? Use this report to determine how well you are managing defects.
Using stylesheetsStylesheets are templates you can use to quickly generate formatted reports. Several Extensible Style Language (XSL) stylesheets are installed with TestTrack Pro to help you easily create reports with predefined layout and design options.
Customizing stylesheetsYou can customize an existing XSL stylesheet or create your own and add it to the TestTrack Pro project. Stylesheets are generally located in the Program Files/TestTrack Pro/StyleSheets directory or the Program Files/ Seapine/ TestTrack Pro/ Stylesheets directory. Each report type has a corresponding folder in the Stylesheets directory.
To customize an existing stylesheet open the corresponding report folder, select the stylesheet, and modify it using a third-party tool, such as Altova’s XML Spy.
To add a new stylesheet use a third-party tool to create the stylesheet. Copy the completed stylesheet to the corresponding report folder.
To include an image with a stylesheet copy the image to the Images folder in the TestTrack Pro directory. Add the following script to the stylesheet:
<img><xsl:attribute name=”src”><xsl:value-of select=”external:get-server-image(‘imagename.gif’)” /></xsl:attribute>
</img>

101Chapter 10Generating Reports
Setting default stylesheetsYou can select default stylesheets to use when printing from list windows.
1 Choose Tools > Local Options then select the Stylesheets category.
2 Select a Report Type.
Each report type corresponds to a list window. For example, the Filter View Detail Report prints a detail report for all filters in the project.
3 Select a Default Stylesheet for the selected report or click Browse to select a customized stylesheet.
See Customizing stylesheets, page 100 for information about customizing stylesheets.
4 Click OK.
Refreshing stylesheet menusThe server periodically searches the project for new stylesheets. You can determine the frequency of this update by modifying project options.
1 Choose Tools > Administration > Project Options.
2 Select the Reports category.
3 Select how often the server looks for new stylesheets.
4 Click OK.

102 Chapter 10Generating Reports
Creating text file report templates
Note: We recommend using stylesheets to customize reports. For more information see Using stylesheets, page 100.
You can create custom report templates using a text editor, field codes, and alphanumeric characters. You can even create a tab or comma-delimited document for use with other databases/tools.
1 Create the text document using Notepad or another text editor.
You can use any alphanumeric character and field codes. The report is formatted based on the text code layout. Field codes are replaced with the corresponding text. See Reference: Field Codes page 267 for more information about TestTrack Pro field codes.
2 Save the document.
You can now print a report based on the template you created.
Using text file report templates
Note: If you do not want to print every record, select the records you want to print on the list window. Make sure you select Only print selected items.
1 Choose File > Print.
If you apply a filter only the defects that pass the filter will be used in the report.
2 Select Create report file from template.
3 Click Save.
The Select Report Template dialog box opens.
4 Select the report template you want to use and click Open.
The Save Report As dialog box opens.
5 Select a directory and enter a filename.
6 Click Save.
The report is saved as a text file.

103Chapter 10Generating Reports
Creating detail reportsDetail reports detailed information about defects, customers, users, security groups, or test configurations.
1 Choose Create > Report > Detail.
You can also click Add on the Reports list window and select Detail.
The Add Detail Report dialog box opens with the Report On tab selected.
2 Enter a Name and Title.
The title appears at the top of the report when it is viewed or printed.
3 Select a Share option.
You can create a private report or share it with everyone, all users, or all customers.
4 Select the Report On options.
Select the record type from the Report contains list.
If you select Customers, Users, Security Groups, Customers, or Test Configs you can build a report on all or selected records.

104 Chapter 10Generating Reports
5 Click the Options tab.
Select a Stylesheet or click Browse to select a customized stylesheet. See Customizing stylesheets, page 100 for information about customizing stylesheets.
Select a Filter if you are reporting on defects and only want to include filtered defects.
Select Print items on separate pages to insert page breaks between each item in the report. Internet Explorer is the only browser that supports page breaks.
6 Click the Sorting tab.
Select a Primary or Secondary sort column and set the column sort order.
7 Click Add.
The report is added.
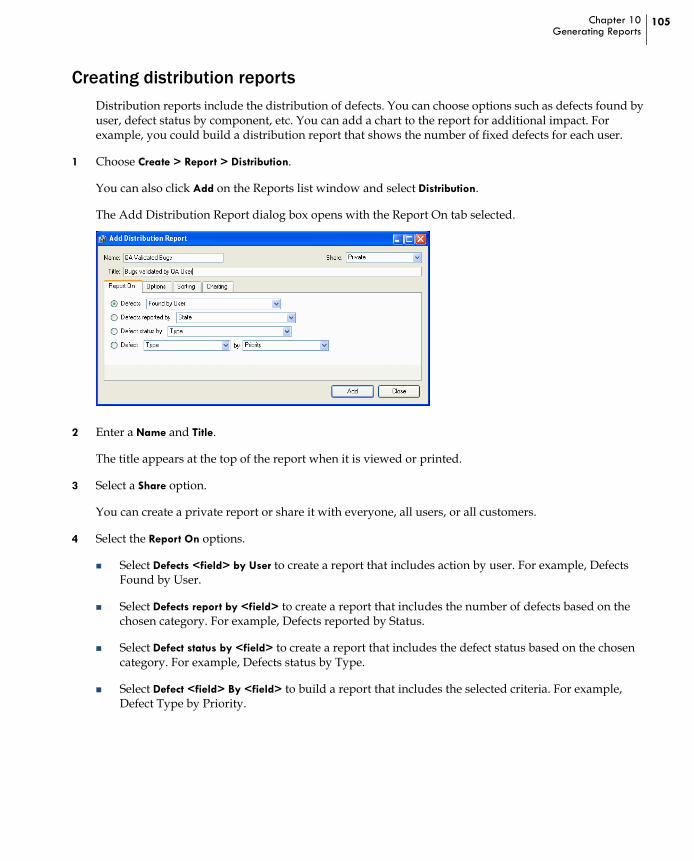
105Chapter 10Generating Reports
Creating distribution reportsDistribution reports include the distribution of defects. You can choose options such as defects found by user, defect status by component, etc. You can add a chart to the report for additional impact. For example, you could build a distribution report that shows the number of fixed defects for each user.
1 Choose Create > Report > Distribution.
You can also click Add on the Reports list window and select Distribution.
The Add Distribution Report dialog box opens with the Report On tab selected.
2 Enter a Name and Title.
The title appears at the top of the report when it is viewed or printed.
3 Select a Share option.
You can create a private report or share it with everyone, all users, or all customers.
4 Select the Report On options.
Select Defects <field> by User to create a report that includes action by user. For example, Defects Found by User.
Select Defects report by <field> to create a report that includes the number of defects based on the chosen category. For example, Defects reported by Status.
Select Defect status by <field> to create a report that includes the defect status based on the chosen category. For example, Defects status by Type.
Select Defect <field> By <field> to build a report that includes the selected criteria. For example, Defect Type by Priority.

106 Chapter 10Generating Reports
5 Click the Options tab.
Select the report date parameters for your report using the Period and through lists.
Select a Stylesheet or click Browse to select a customized stylesheet. See Customizing stylesheets, page 100 for information about customizing stylesheets.
Select a Filter if you are reporting on defects and only want to include filtered defects.
Select Include totals to include totals for the selected report items. To add the totals to a chart, use the Data to Graph list on the Charting tab.
Enter a number in the Records per printed page field to insert page breaks between rows in the report.
6 Click the Sorting tab.
Select a Primary and Secondary sort column and set the column sort order.

107Chapter 10Generating Reports
7 Click the Charting tab.
This tab is used to add a chart to the report. For more information see Charting report data, page 112.
8 Click Add.
The report is added.
Creating list reportsList reports include summary information about defects, customers, users, security groups, or test configurations.
1 Choose Create > Report > List.
You can also click Add on the Reports list window and select List.
The Add List Report dialog box opens with the Report On tab selected.

108 Chapter 10Generating Reports
2 Enter a Name and Title.
The title appears at the top of the report when it is viewed or printed.
3 Select a Share option.
You can create a private report or share it with everyone, all users, or all customers.
4 Select the Report On options.
Select a record type from the Report contains menu.
Select the fields from the Available Fields list and click Add.
Select a field from the Fields in Report list and click Up or Down to change the field order.
5 Click the Options tab.
Select a Stylesheet or click Browse to select a customized stylesheet. See Customizing stylesheets, page 100 for information about customizing stylesheets.
Select a Filter if you are reporting on defects and only want to include filtered defects.
Enter the number of Records per printed page to add page breaks between rows in the report.

109Chapter 10Generating Reports
6 Click the Sorting tab.
Select a Primary and Secondary sort column and set the column sort order.
7 Click the Formatting tab.
Field and table settings are defined by the default stylesheet. This tab lets you override the stylesheet settings. For example, you can change the report header font style, size, color, or alignment.
8 Click Add.
The report is added.

110 Chapter 10Generating Reports
Creating trend reportsTrend reports include defect events over time. Use this report to determine how well you are managing defects.
1 Choose Create > Report > Trend.
You can also click Add on the Reports list window and select Trend.
The Add Trend Report dialog box opens with the Report On tab selected.
2 Enter a Name and Title.
The title appears at the top of the report when it is viewed or printed.
3 Select a Share option.
You can create a private report or share it with everyone, all users, or all customers.
4 Select the Report On options.
Select Defect status in period to report on the number of defects in each state (Open, Fixed, etc.) over the specified reporting period.
Select Defects <field> by <field> to report on the number of defects that are Open, Fixed, Closed, etc. by Type, Priority, or Resolution.
Select Defect open age in period to report on the number of defects open over the specified period.
Select Actual vs. Estimated hours to include the difference between the actual and estimated fix time.
Select Defect status aggregate totals to include the total number of defects in each state in the specified reporting period.
Select Defect Open vs. Closed to include the number of open and closed defects in each period.
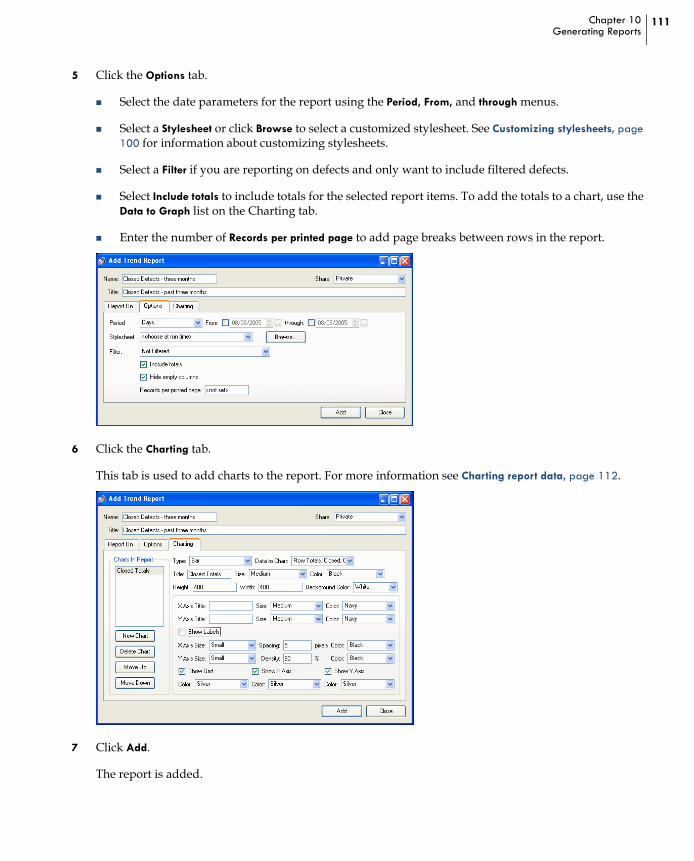
111Chapter 10Generating Reports
5 Click the Options tab.
Select the date parameters for the report using the Period, From, and through menus.
Select a Stylesheet or click Browse to select a customized stylesheet. See Customizing stylesheets, page 100 for information about customizing stylesheets.
Select a Filter if you are reporting on defects and only want to include filtered defects.
Select Include totals to include totals for the selected report items. To add the totals to a chart, use the Data to Graph list on the Charting tab.
Enter the number of Records per printed page to add page breaks between rows in the report.
6 Click the Charting tab.
This tab is used to add charts to the report. For more information see Charting report data, page 112.
7 Click Add.
The report is added.

112 Chapter 10Generating Reports
Charting report dataYou can add charts to distribution and trend reports. The available charts include pie, 3D pie, bar, 3D bar, area, 3D area, line, and 3D line.
Bar, area, and line chartsYou can design a bar, area, or line chart using the available graphing fields.
Graphing field: Use to:
Type Select the type of report
Data to Chart Select report data
Title Enter a chart title
Size Select the chart title size
Color Select the chart title font color
Height Select the chart height
Width Select the chart width
Background Color Select the chart background color
X Axis Title Enter an X axis title
Y Axis Title Enter a Y axis title
Size Select the X and Y axis title size
Color Select the X and Y axis title font colors
Show Labels Show chart component labels
X Axis Size Select the X axis label size
Y Axis Size Select the Y axis label size
Spacing Enter the amount of space (pixels) between labels
Color Select the X and Y axis label color
Density Enter a density percentage. 80% displays all labels, 40% displays half, etc.
Show Grid Select to show the chart grid pattern
Show X Axis Select to show the X axis
Show Y Axis Select to show the Y axis
Color Select the color for the grid lines and the X and Y axis lines

113Chapter 10Generating Reports
Pie chartsUse the graphing fields to add and design pie charts.
Pie charts are scaled based on a number of factors, including image size, label size, and number of labels. You may need to change the image height and width dimensions for the pie chart to display correctly.
Viewing report settings1 Select the report on the Reports list window.
2 Choose Edit > View Report or click View on the Reports list window.
The View Report dialog box opens. All fields are read-only.
3 Click OK when you are finished.
Graphing field: Use to:
Type Select the report type
Data to Chart Select report data
Title Enter a chart title
Size Select the chart title size
Color Select the chart title font color
Height Select the chart height
Width Select the chart width
Background Color Select the chart background color
Show Labels Show chart data labels
Show Percents Show chart data in percents
Label Size Select the chart label size
Color Select the label font colors
Label Position Set the spacing of the chart labels

114 Chapter 10Generating Reports
Editing report settingsYou can edit an existing report’s settings.
1 Select the report on the Reports list window.
2 Choose Edit > Edit Report or click Edit on the Reports list window.
The Edit Report dialog box opens.
3 Make any changes and click OK.
Your changes are saved.
Duplicating reportsIf you add reports with the same basic information, you can save time by duplicating and editing an existing report.
1 Select the report on the Reports list window.
2 Choose Edit > Duplicate Report.
The report is duplicated. A number, incremented by 1, is added to the end of the report name.
3 Edit the duplicated report and save your changes.
Previewing reports1 Select the report on the Reports list window and click Preview.
The report opens in a Web browser.
2 After previewing the report close the browser window or use the browser’s print menu to print it.
Printing reports
Note: This option is only available to Windows users.
1 Select the report on the Reports list window and click Print.
The Print Options dialog box opens.
2 Make your selections and click Print.
The report is printed.

115Chapter 10Generating Reports
Deleting reports1 Select the report on the Reports list window.
You can select more than one report to delete.
2 Choose Edit > Delete Report or click Delete on the Reports list window.
You are prompted to confirm the deletion.
3 Click Yes.
The report is deleted.

116 Chapter 10Generating Reports

117Chapter 11Using the Workbook
Chapter 11Using the Workbook
So much to do, so little time to do it? TestTrack Pro and the workbook can help you stay organized by providing an easy way to track defects and other tasks.
About the workbook, 118
Adding tasks, 118
Viewing tasks, 119
Editing tasks, 119
Duplicating tasks, 119
Deleting tasks, 119

118 Chapter 11Using the Workbook
About the workbookYou can add project-related tasks to the workbook. For example, you can add a task to remind you about project notes that you need to complete for a meeting. Workbook tasks are private and are not shared with other users. The workbook also displays your assigned defects.
Adding tasks1 Choose Create > To Do or click Add on the Workbook list window.
The Add Task dialog box opens.
2 Enter a Task name.
3 Select the task Priority.
4 The Date defaults to the current date.
You can enter another date or click the calendar to select a date.
5 Select a Need by date or Version.
6 Enter a Description.
7 Click Add.
The task is added to TestTrack Pro.
Assigned defect
Workbook task

119Chapter 11Using the Workbook
Viewing tasks1 Select the task on the Workbook list window.
2 Choose Edit > View Task or click View.
The read-only View Task dialog box opens.
3 Click OK when you are finished.
Editing tasks1 Select the task on the workbook list window.
2 Choose Edit > Edit Task or click Edit.
The Edit Task dialog box opens.
3 Make any changes.
Select Done if the task is complete. It will be closed and will no longer appear active in the Workbook list window.
4 Click OK.
Your changes are saved.
Duplicating tasksIf you add tasks with the same basic information, you can save time by duplicating then editing an existing one.
1 Select the task on the Workbook list window.
2 Choose Edit > Duplicate Task.
The task is duplicated. A number incremented by 1 is added to the end of the task name.
3 Modify the duplicated task and save your changes.
Deleting tasks1 Select the task on the Workbook list window.
2 Choose Edit > Delete Task or click Delete.
You are prompted to confirm the deletion.
3 Click Yes.
The task is deleted.

120 Chapter 11Using the Workbook

121Chapter 12Integrating with Source Control Tools
Chapter 12Integrating with Source Control Tools
TestTrack Pro includes two way integration with most source control applications. Instead of switching between programs, integrate TestTrack Pro with your source control application and work in the application of your choice.
Using source control with TestTrack Pro, 122
Configuring SCC integration, 122
General source code tab information, 126
Attaching files, 126
Getting files, 128
Viewing files, 128
Editing files, 129
Checking out files, 129
Viewing file history, 130
Diffing files, 131
Creating file labels, 133
Checking in files, 133
Rolling back files, 134
Undoing check out, 135
Detaching files, 135
Disabling SCC integration, 136
SCC application notes, 137

122 Chapter 12Integrating with Source Control Tools
Using source control with TestTrack ProYou can integrate most popular source code control (SCC) applications with TestTrack Pro, which allows you to work with defects and source code files from within either application. A change made in one application is seamlessly made available to the other application.
TestTrack Pro supports integration with the following SCC applications: CS-RCS, CVS, ClearCase, PVCS, Perforce, SourceOffSite Classic, StarTeam, Surround SCM, and Visual SourceSafe.
Note: Surround SCM is the only supported SCC application on TestTrack Pro Unix.
Configuring SCC integrationThe TestTrack Pro administrator or another high-level user needs to configure the SCC integration before users can start working with source code files. This includes configuring the following: local options, user options, project options, project paths, and check in options. Most users will only have access to the local options and user options categories.
Tip: Most of the examples in this section use Surround SCM. You may follow different steps depending on the SCC application you are using.
Setting local SCC options1 Choose Tools > SCC Integration.
The Configure SCC Integration dialog box opens.
2 Select the Local Options category.
A list of all installed source control applications is displayed on the Local Options tab.
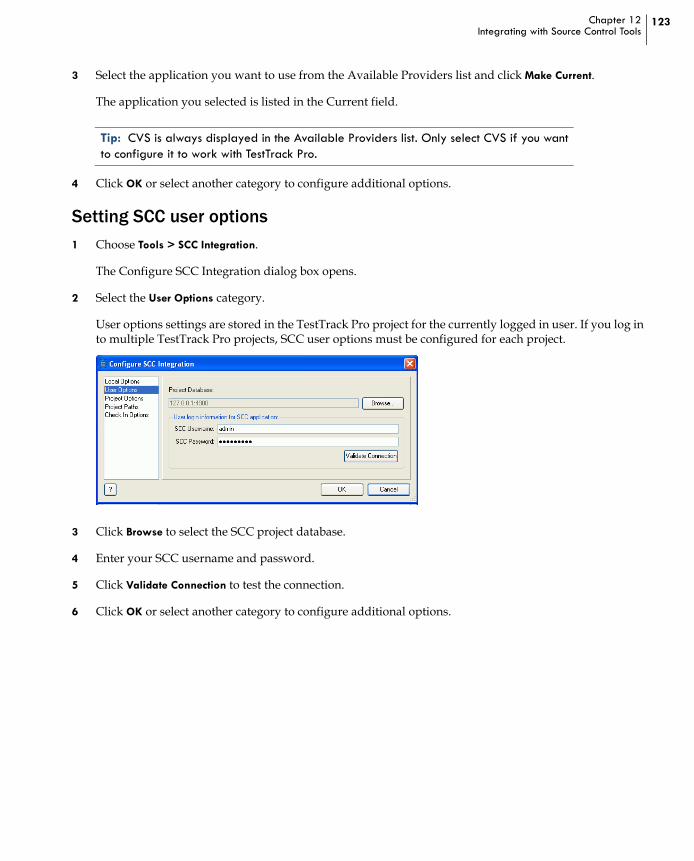
123Chapter 12Integrating with Source Control Tools
3 Select the application you want to use from the Available Providers list and click Make Current.
The application you selected is listed in the Current field.
Tip: CVS is always displayed in the Available Providers list. Only select CVS if you want to configure it to work with TestTrack Pro.
4 Click OK or select another category to configure additional options.
Setting SCC user options1 Choose Tools > SCC Integration.
The Configure SCC Integration dialog box opens.
2 Select the User Options category.
User options settings are stored in the TestTrack Pro project for the currently logged in user. If you log in to multiple TestTrack Pro projects, SCC user options must be configured for each project.
3 Click Browse to select the SCC project database.
4 Enter your SCC username and password.
5 Click Validate Connection to test the connection.
6 Click OK or select another category to configure additional options.

124 Chapter 12Integrating with Source Control Tools
Setting SCC project optionsYou can create a template that automatically populates the comments field when files are checked in. Users can also enter additional text when checking in files.
1 Choose Tools > SCC Integration.
The Configure SCC Integration dialog box opens.
2 Select the Project Options category.
You can use field codes and other alphanumeric characters to create a template for check in comments.
3 Enter text and field codes to create a template.
Note: See Reference: Field Codes, page 267 for more information.
4 Click OK or select another category to configure additional options.
Setting SCC project paths1 Choose Tools > SCC Integration.
The Configure SCC Integration dialog box opens.
2 Select the Project Paths category.
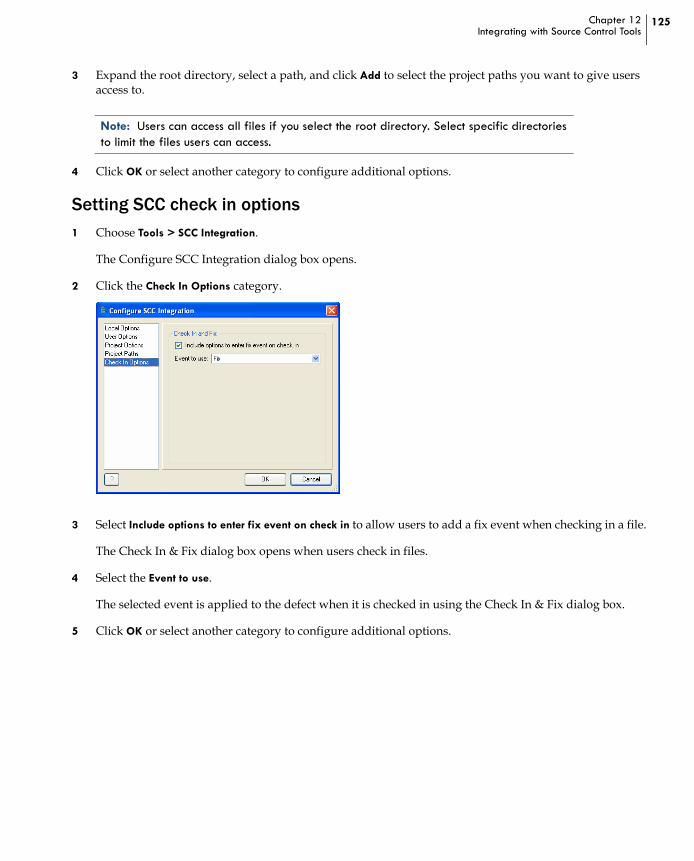
125Chapter 12Integrating with Source Control Tools
3 Expand the root directory, select a path, and click Add to select the project paths you want to give users access to.
Note: Users can access all files if you select the root directory. Select specific directories to limit the files users can access.
4 Click OK or select another category to configure additional options.
Setting SCC check in options1 Choose Tools > SCC Integration.
The Configure SCC Integration dialog box opens.
2 Click the Check In Options category.
3 Select Include options to enter fix event on check in to allow users to add a fix event when checking in a file.
The Check In & Fix dialog box opens when users check in files.
4 Select the Event to use.
The selected event is applied to the defect when it is checked in using the Check In & Fix dialog box.
5 Click OK or select another category to configure additional options.

126 Chapter 12Integrating with Source Control Tools
General source code tab information
Tip: Add a new column to the Defects list window and select Has SCC files? for the contents to quickly view defects that are linked to source files.
The source code tab provides the following information about the source files attached to a defect.
Source Files: All files attached to the defect.
Fixed Revisions: The fixed revision number. Revision numbers are obtained from the SCC application and cannot be updated if the file is not checked in via TestTrack Pro.
Fixed Timestamp: The timestamp of the latest fixed revision found in the Fixed revision column.
Locked By: The username is displayed if it can be determined. If the username cannot be determined, current user or another user is displayed.
Attaching filesYou need to attach source code files to defects to access them from TestTrack Pro.
Tip: You can attach a source code file when adding a defect but most users attach files when editing defects. For example, a team lead may attach a specific source code file to let the developer the bug is assigned to know which file to work with.
1 Select the defect you want to attach a file to on the Defects list window.
2 Choose Edit >Edit Defect.
3 Click the Source Code tab.

127Chapter 12Integrating with Source Control Tools
4 Click Attach File.
The Attach File(s) dialog box opens.
5 Select the project from the SCC Projects list.
A list of available files is displayed in the Files in project list.
Note: If you add files or directories to your SCC project, click Refresh Project Data. The TestTrack Pro client will call the PVCS or Perforce interface to obtain the list of files that are under source code control.
6 Select the files you want to attach from the Files in project list and click the right arrow button.
7 Click OK.
The files are attached to the defect.
Note: If you are using ClearCase, PVCS, or Perforce, make sure you only attach relevant files. Due to the program interfaces, attaching files can cause a small delay in performance depending on the number of files in the project. This delay is based on the number of attached files, not the number of files in ClearCase, PVCS, or Perforce.
The first time you attach SCC files, the Attach File(s) dialog box may take a longer time than expected to open. The TestTrack Pro client must call the program to obtain a list of files that are under source code control.

128 Chapter 12Integrating with Source Control Tools
Getting filesGet files when you want to view a file but do not need to make any changes. A read-only copy of the file is created in the specified directory.
Note: If you are using Perforce the Get command syncs the local file with the depot file. If a file is checked out or locked, the Get command does not work.
1 Select the defect and choose Edit >Edit Defect.
2 Click the Source Code tab.
3 Select the file and click Get.
The Get File(s) dialog box opens.
4 Enter a directory path or click Browse to select a path.
Leave the path field empty to use the default location.
The value of the path field is determined by the SCC user configuration if you are getting one file.
The path field may be empty if you are getting multiple files because each file can have a different default location.
5 Select Make writable to create a writable copy of the file.
6 Click OK.
The file is copied to the directory you specified.
Viewing filesYou can view a source code file. When you view a file the associated viewer or application is launched.
1 Select the defect and choose Edit >Edit Defect.
2 Click the Source Code tab.

129Chapter 12Integrating with Source Control Tools
3 Select the file and click View.
The View File dialog box opens.
4 Select a Viewing option.
5 Click OK.
A copy of the file is opened.
Editing filesWhen you edit a file, Surround SCM checks it out then opens it for editing.
1 Select the defect and choose Edit >Edit Defect.
2 Click the Source Code tab.
3 Select the file and click Edit File.
The file is opened in the corresponding application.
4 Make any changes and save the file.
Tip: Remember to check in the file. When you edit a file it is automatically checked out to the working directory.
Checking out filesCheck out files when you need to make changes.
1 Select the defect and choose Edit >Edit Defect.
2 Click the Source Code tab.

130 Chapter 12Integrating with Source Control Tools
3 Select the file and click Check out.
The Check Out File(s) dialog box opens.
4 Enter a Comment such as the reason for checking out the file.
Perforce does not support the Comment field.
5 Enter a directory path or click Browse to select a path.
Leave the path field empty to use the default location.
The path field value is determined by the SCC user configuration if you are only getting one file.
The path field may be empty if you are getting multiple files because each file can have a different default location.
6 Select a Replace writable option.
This option determines what happens if you try to check out a writable file.
Ask prompts you to confirm that you want to overwrite the file.
Replace automatically overwrites the writable file.
Skip ignores the check out operation for the writable file.
7 Click OK.
The file(s) is checked out. If the SCC application is not configured to allow multiple checkouts, or a user has exclusively locked a file, it cannot be checked out.
Viewing file historyThe history provides a convenient way to view a source file’s history and work with a historic version of the file. You can view file details, get or check out a file, create a label, select two version of a file to see differences, and view or edit the file. You can also filter the history to display specific files.
1 Select the defect and choose Edit >Edit Defect.
2 Click the Source Code tab.

131Chapter 12Integrating with Source Control Tools
3 Select the file and click History.
The History dialog box opens.
4 Optionally select a Filter by user.
5 Optionally select a Filter by action.
6 Select a file and click Details to view the file version details.
The read-only History Details dialog box opens. Click Close to return to the History.
7 Click Get to get the selected version of the file. See Getting files, page 128.
8 Click Check Out to check out the selected version of the file. See Checking out files, page 129.
9 Click Create Label to label the selected version of the file. See Creating file labels, page 133.
10 Click Differences to compare two selected versions of the file. See Diffing files, page 131.
11 Click View File to view the selected version of the file. See Viewing files, page 128.
12 Click Edit File to edit the selected version of the file. See Editing files, page 129.
13 Click Rollback File to revert to a previous version. See Rolling back files, page 134.
14 Click Close to close the file history.
Diffing filesYou can diff files to compare, accept, or reject differences between two files.
1 Select the defect and choose Edit >Edit Defect.
2 Click the Source Code tab.

132 Chapter 12Integrating with Source Control Tools
3 Select the file and click Differences.
The Differences dialog box opens. Read-only information is displayed in the File to Compare area.
4 Select a Second File option.
Copy in working directory compares the server file with the file in your working directory.
Selected file compares the server file with a file you select. Click Browse to choose a file.
5 Click Advanced to select a branched file or historic file version.
The second file area expands with the following options:
Branched file compares the file with a branched version.
Historic version compares the current version with a historic version.
6 Click Differences.
The differences utility launches. For additional information about the utility refer to the utility’s documentation or help file.

133Chapter 12Integrating with Source Control Tools
Creating file labelsLabels provide a way to mark a specific version of a file or repository. When you create a label a new entry is created in the history. The file and the version number do not change.
1 Select the defect and choose Edit >Edit Defect.
2 Click the Source Code tab.
3 Select the file and click History.
4 Click Create Label on the History dialog box.
The Create Label dialog box opens.
5 Enter the Label.
6 Enter optional comments about the reason for creating the label.
7 Select Recursive to apply the label to the selected repository and all child repositories.
8 Select an If label exists option.
Prompt prompts you to replace the label, leave the label, or cancel the command.
Replace deletes the label and replaces it with the new label.
Leave leaves the label as is.
9 Click OK to create the label.
Checking in filesCheck in updates files with changes, removes the lock on the files, makes changes available to other users, and increments the version number by one. If you check in files outside of TestTrack Pro, the fixed revision and fixed timestamp information cannot be updated in the TestTrack Pro project.
Note: If you are using Perforce you can only check in files from the default changelist.
1 Select the defect and choose Edit >Edit Defect.

134 Chapter 12Integrating with Source Control Tools
2 Click the Source Code tab.
3 Select the file and click Check in.
The Check in File(s) dialog box opens.
4 Check the path field.
This field defaults to the directory path you chose when the file was checked out. You can enter a different path or optionally click Browse to select a path.
5 Select Keep checked out to update the master copy of a file while keeping the file checked out.
6 Select Remove local file to remove the copy from your working directory.
7 Enter any comments.
Your project may include a check in comments template that automatically populates the comments field. You can add comments to the field or delete the comments and add your own.
8 Select Apply comments to all files to use the same comment for each source file.
This only applies if you are checking in multiple files at the same time.
9 Click Check in & Fix to check in the selected file and enter the defect fix.
The files are checked in and the Fix Defect dialog box opens.
Note: Check in & Fix is only available if the defect is in the Open state.
10 Click Check in to check in the file without entering the defect fix.
Rolling back filesRollback files to discard changes and revert to a previous file version. The version number increments even though the contents are the same as a previous file version. For example, the current version is 5 and you rollback to version 3. After the rollback, the new tip version is 6. Version 3 and version 6 have the same contents.
1 Select the defect and choose Edit >Edit Defect.

135Chapter 12Integrating with Source Control Tools
2 Click the Source Code tab.
3 Select the file and click Rollback File.
The Rollback File dialog box opens.
4 Enter any comments and click OK.
The file is rolled back to the selected version.
Undoing check outIf you change a checked out file but decide you do not want to save the changes, you can undo the check out. All changes are discarded and the file is checked in. A revision history event is not recorded.
1 On the Source Code tab, select the source file and click Undo Check out.
The Undo Check out dialog box opens.
2 Select a Local file option.
Replace the file in your working directory.
Leave the file in your working directory.
Delete the file from your working directory.
3 Click OK.
Detaching filesWhen you detach files, the link between the TestTrack Pro defect and the source code file is removed.
1 Select the defect and choose Edit >Edit Defect.

136 Chapter 12Integrating with Source Control Tools
2 Click the Source Code tab.
3 Select the source file and click Detach File.
You are prompted to confirm that you want to detach the file.
4 Click Yes.
The file is detached.
Disabling SCC integration1 Choose Tools > SCC Integration.
The Configure SCC Integration dialog box opens.
2 Select the provider you want to disable and click Disable SCC Integration.
You are prompted to confirm that you want to disable the SCC integration.
3 Click Yes to disable the integration.

137Chapter 12Integrating with Source Control Tools
SCC application notesThe following application-specific information is provided to help you easily integrate SCC applications with TestTrack Pro.
CS-RCSIf you configure CS-RCS to work in CVS mode, the Check out, Check in, and Undo Check out buttons are still visible on the SCC tab, which can be confusing to users. The buttons may also be enabled/disabled for certain file depending on the state of the file. These buttons are usually enabled when CS-RCS is running in CVS mode.
CVSValid CVS working directories must be setup before you try to use the integration. The integration cannot be used to get the first copy of a your working files. This includes any local directories, which must exist before you can use the integration. To set up the integration:
1 Enter the local working path in the Project working path field.
The Project Paths settings are based on the information you enter. After you enter a working directory, go to the Project Paths tab and add specific paths to use in the Attach dialog.
2 Enter the connection string in the Repository connection string field.
This string should be what you use for the -d option on the CVS command line
3 If you use a password, enter it in the SCC Password field.
You can also enter the password as part of the connection string. If you enter the password in the connection string, it can be viewed by anyone looking at your computer. If security is an issue, enter it in the password field.
4 If a merge is required when checking in a file, you must manually perform the merge. When you try to check in the file, you will receive a message letting you know a merge is needed. You have to manually perform the merge and then check in the file.

138 Chapter 12Integrating with Source Control Tools
ClearCaseThe Get command is only valid for snapshot views. It is not valid for dynamic views.
Files from different views are displayed on the Source Code tab. If you configure TestTrack Pro to connect to a dynamic view, and you have also attached files that are part of a snapshot view, all files are displayed. In this case, the Get command is invalid for any files that were attached in the dynamic view.
PVCSPVCS uses its own dialogs to handle opening the project and authenticating the user. PVCS prompts you for login data each time you open the project database.
Two different TestTrack Pro users cannot configure PCVS integration, to separate PVCS projects, under one Windows user account.
PerforceThe Browse button is disabled on the User Options tab. The client name is used for the project database. The login for the Perforce depot comes from the Perforce registry keys. The P4USER and P4PASSWD keys must be set correctly before the TestTrack Pro integration will work.
Only the first 31 characters of a file’s check in comments can be displayed when viewing file history (SCC tab, History button).
SourceOffSite ClassicYou must have the SourceOffSite GUI client installed on each computer you are using SourceOffSite integration with in TestTrack Pro. You also need to install the command line version and place it in the same directory as the SourceOffSite client.
You should not run the SourceOffSite client and the TestTrack Pro integration at the same time. This is a SourceGear recommendation.
SourceOffSite does not provide an easy way for TestTrack Pro to get the local path for a VSS file. TestTrack Pro looks at the databasex.sos cache file to get the directory information. If that does not work, the calls rely on the SourceOffSite GUI client to access the cache and provide the information.
The Get, Check out, and Undo check out commands overwrite files without prompting you for permission.
The SourceOffSite command line API has a bug in it and cannot copy files to root drives correctly. If TestTrack Pro does not get the local path information from the cache, the Get and Check out commands will not work with files that use a root drive for the working path. The View command will not work because TestTrack Pro does not know the file location.
A valid cache file must exist for each user’s server/database configuration.

139Chapter 12Integrating with Source Control Tools
Logging into a server with two different names (e.g., 127.0.0.1 and localhost) results in two separate cache files. If you set up the SourceOffSite client to log in to 127.0.0.1 and configure TestTrack Pro to login to localhost, the integration will not work as expected. The localhost cache file will not have any working paths setup. This problem also occurs if you do not set up working paths in your SourceOffSite client. SourceOffSite will put the files in the current directory (e.g., c:\Program) instead of returning an error.
The Login area of the User Options tab includes Server and Port fields that let you enter the server’s connection data. After entering this data, click Browse. A list of available databases available on the server opens.
The SourceOffSite command line application does not create directories when retrieving files. If you attempt to Get or Check out a file to a directory that does not exist, the call fails. You can create the directory path then perform the Get or Check out command.
If the SourceOffSite server or the command line application crash, you need to close the TestTrack Pro client, restart the SourceOffSite server, then restart the TestTrack Pro client. TestTrack Pro is still usable if SourceOffSite crashes. The SourceOffSite integration will not work until you restart TestTrack Pro.
StarTeamMake sure your files are set up before configuring the SCC integration. If files are not set up in the project working path, and you configure the SCC integration, you will receive an error message in the Project Tree.
StarTeam uses its own dialogs to handle opening the project and authenticating the user. StarTeam prompts you for login data each time you open the project database.
Two different TestTrack Pro users cannot configure StarTeam integration, to separate StarTeam projects, under one Windows user account.

140 Chapter 12Integrating with Source Control Tools

141Chapter 13Integrating with Development Tools
Chapter 13Integrating with Development Tools
TestTrack Pro supports integration with popular integrated development environments (IDEs), allowing developers to work with defects from the tool of their choice.
About the Add-In, 142
Installing the Add-In, 142
Add-In toolbar, 142
Connecting to a project, 143
Setting options, 144
Opening the defects list, 147
Adding defects, 147
Opening the workbook list, 148
Adding tasks, 148
Disconnecting, 149

142 Chapter 13Integrating with Development Tools
About the Add-InThe TestTrack Pro Add-In can be used with Visual Basic 6.0, Visual C++ 6.0, and Visual Studio .NET. The Add-In lets you work in your development environment while accessing TestTrack Pro defects and commands. Instead of switching back and forth between defect tracking and developing, you can work in the application of your choice.
The TestTrack Pro Add-In functions the same regardless of your development environment, with the following exceptions:
Visual Basic has no concept of a workspace. If you are working in the Visual Basic development environment, there is no provision for connecting to a project. In addition, you cannot set TestTrack Pro Add-In options in Visual Basic.
Visual C++ refers to workspaces.
Visual Studio .NET refers to solutions.
Installing the Add-InDuring TestTrack Pro Client installation, the Add-In Options dialog box opens if Visual Basic 6.0, Visual C++6.0, or Visual Studio .NET are installed on your computer. The Add-In is automatically installed.
If Visual C++ 6.0 is installed on your computer make sure you read the Note information. It include instructions for enabling the Add-In.
If Visual Basic 6.0 or Visual Studio .NET is installed on your computer, select the corresponding development environment check box. You do not need to manually enable the Add-In.
Add-In toolbarA dockable toolbar is added to the IDE after installation. The toolbar contains buttons that give you access to the available TestTrack Pro functions and list windows.
Button Name Action
Connect Connects you to the TestTrack Pro Server
Disconnect Disconnects you from the TestTrack Pro Server
Defects List Opens the Defects list window
Add Defect Add a defect

143Chapter 13Integrating with Development Tools
Connecting to a project1 Click the Connect toolbar button.
The TestTrack Pro Login dialog box opens.
2 Select the Server you want to connect to.
If you need to add a server see Setting up server configurations, page 9 for more information.
3 Select a Project.
4 Enter your Username and Password.
Select Always login to this project using this username and password to automatically log in.
5 Click Connect.
You are logged in and ready to start using TestTrack Pro.
Note: If there is a problem connecting to the project, make sure the Seapine License Server and the TestTrack Pro Server are both running.
Task List Opens the Workbook list window
Add Task Add a workbook task
Options Opens the Options dialog box (not available with Visual Basic)
About Opens the About dialog box
Button Name Action

144 Chapter 13Integrating with Development Tools
Setting optionsYou can set Open and Login options if you are using Visual C++ or Visual Studio .NET. Each solution can be associated with a single TestTrack Pro project. Multiple workspaces can also be associated with one TestTrack Pro project. The TestTrack Pro project does not have a direct link to a solution.
When a solution is opened and a TestTrack Pro project is associated with it, the TestTrack Pro Add-In receives a message. A connection with the TestTrack Pro Server is established and you are logged in to the project. When a solution is closed, you are logged out of the current project.
Note: Remember, Visual Basic has no concept of a workspace. If you are working in the Visual Basic development environment, there is no provision for connecting to a project. In addition, you cannot set TestTrack Pro Add-In options in Visual Basic.
Setting open options1 Click the Options toolbar button.
The Add-In Options dialog box opens with the Open tab selected.
2 Select a When a solution is opened option.
Select Do nothing (leave the TestTrack connection as is) if you do not want to connect to the TestTrack Pro Server and log in to a TestTrack Pro project.
Select Always login to the default TestTrack Project to automatically log in to your default project. You can specify the default project on the Login tab.
Select Login to the TestTrack Project associated with this workspace to automatically log in to a project. After selecting this option, choose an option from the dropdown list. The dropdown list determines what happens when a TestTrack Pro project is not associated with the solution.
3 Click OK to save the settings.

145Chapter 13Integrating with Development Tools
Setting login optionsYou can configure the Add-In to log in to a specific TestTrack Pro project by default.
1 Click the Options toolbar button.
The Add-In Options dialog box opens.
2 Click the Login tab.
3 Click Edit in the Default TestTrack Login area.
The Associate Solution with TestTrack dialog box opens.
4 Select a Server.
Click Configure to add a server. For more information see Setting up server configurations, page 9.
5 Select a Project.
6 Enter your Username and Password.
7 Click OK.
The Default TestTrack Login area is populated with the information you entered.

146 Chapter 13Integrating with Development Tools
Associating a solution with TestTrack ProYou can associate specific solutions with the TestTrack Pro project.
1 Click the Options toolbar button.
2 Click the Login tab.
3 Click Add in the Associate TestTrack area.
The Associate Solution with TestTrack dialog box opens.
4 Click Use Current or the Browse button to select the solution you want to associate with the project.
Select Save full pathname for the solution to associate each solution with a specific project. For example, if you have two workspace files with the same filename this option lets you associate each workspace with a different TestTrack Pro project.
5 Select a Server.
Click Configure to add a TestTrack Pro Server connection. For more information see Setting up server configurations, page 9.
6 Select a Project.
7 Enter your Username and Password.
8 Click OK.
The Associate TestTrack area is populated with the information you entered.
Note: Select a solution and click Edit to make changes. Select a solution and click Delete to delete it.

147Chapter 13Integrating with Development Tools
Opening the defects list1 Click the Defects List toolbar button.
The Defects list window opens.
Note: The Defects list window can be docked as a modeless window in Visual Studio.
Adding defects
Note: See Chapter 5, “Working with Defects,” page 35 for detailed information about adding defects and working with other defect commands.
1 Click the Add Defect toolbar button or click Add on the Add Defects list window.
The Add Defect dialog box opens.

148 Chapter 13Integrating with Development Tools
2 Enter the defect information.
3 Click Add.
The defect is added.
Note: You can access other commands from the Defects list window. Refer to the TestTrack Pro User Guide for additional information.
Opening the workbook listThe workbook tracks your defects, loose ends, and other tasks. For example, you can add tasks to remind you about meetings or upcoming deadlines. Task indicators are displayed in the type column of the Workbook list window. These indicators point out your assigned defects and tasks you added.
1 Click the Task List toolbar button.
The Workbook list window opens.
Adding tasks
Note: See Chapter 11, “Using the Workbook,” page 117 for more detailed information about adding tasks and working with other workbook commands.
1 Click the Add Task toolbar button or click Add on the Workbook list window.
The Add Task dialog box opens.

149Chapter 13Integrating with Development Tools
2 Enter the task information.
3 Click Add.
The task is added.
DisconnectingMake sure you disconnect from the project and server when you finish working with defects.
1 Click the Disconnect toolbar button.
You are prompted to close the open project and server connection.
2 Click Yes.
The project is closed and you are disconnected from the server.

150 Chapter 13Integrating with Development Tools

151Chapter 14Configuring Projects
Chapter 14Configuring Projects
Projects are one of the most important components of TestTrack Pro - take the time to configure your projects and keep your users productive.
About projects, 152
Setting general options, 152
Setting defect options, 154
Setting field options, 161
Setting report options, 162
Setting dictionary options, 163

152 Chapter 14Configuring Projects
About projectsA TestTrack Pro project contains all the information you track including defects, security groups, users, customers, filters, test configurations, and workbook tasks. Projects are initially created and stored on the computer where the TestTrack Pro Server is installed. Projects can be also be moved to another computer, separate from the computer where the TestTrack Pro Server is installed.
The TestTrack Pro administrator or another user with high level security creates all projects using the TestTrack Pro Server Admin Utility. Refer to the TestTrack Pro Server Admin Utility Guide for more information about creating projects.
Setting general options1 Choose Tools > Administration > Project Options.
The Project Options dialog box opens with the General category selected.
2 Enter a Project Name and Description.
3 Select any Web Client Options.
Select Hide navigation buttons if no security access to hide TestTrack Pro Web navigation buttons for commands users do not have access to. If this option is not selected, buttons are visible but disabled.
153Chapter 14Configuring Projects
Select Replace graphics if field labels are renamed to automatically replace TestTrack Pro Web field label graphics. Do not select this option if you use custom graphics for renamed fields.
Select Disable spell checking to disable spell checking in TestTrack Pro Web.
4 Select the Workflow Options.
Select Show inactive states and events in reports, filters, list windows, etc. to display inactive states and events in the add/edit reports dialog, the filter restrictions dialog, and the defects list window column pop-up menu.
Select Only show enabled events in the activities menu and events toolbar to display active events in the activities menu and defect events toolbar. Select this option if you have a large number of workflow events or simply want to decrease user confusion. Only the events that can be entered for the current defects are displayed. This option also affects the TestTrack Pro Web Workflow link.
5 Select the Multiple Login Options.
These options restrict the number of times floating license users can simultaneously log in to the project. For example, if a user logs into a project three times simultaneously using the TestTrack Pro Client, three floating licenses are used and unavailable to other users.
Select Allow TestTrack Pro Client floating license users to log in multiple times to allow TestTrack Pro Client users to log in to the project multiple times simultaneously. Enter the Maximum logins. The default is 1, which restricts users from logging in multiple times.
Select Allow TestTrack Pro Web floating license users to log in multiple times to allow TestTrack Pro Web users to log in to the project simultaneously. Enter the Maximum logins. The default is 1, which restricts users from logging in multiple times.
Admin: When multiple logins are enabled, users must log out of TestTrack Pro Web before closing the browser. If they do not log out, the session remains active and the floating licenses will not be available until the session times out or you log out users.
6 Select RDBMS File Attachment options.
These options are only available if you are currently logged in to an RDBMS project.
Select Store file attachments as files to store attachments as files on the TestTrack Pro Server instead of blob files in the database
Select Store file attachments in the database when size is < xx mb to specify the maximum file size that can be stored in the database. Any attachment larger than the specified size will be stored as a file on the TestTrack Pro Server. The maximum value is 25 mb.
Select Convert existing file attachments when the server is restarted to change how attachments are stored.
7 Click OK to save the project options.

154 Chapter 14Configuring Projects
Setting defect options1 Choose Tools > Administration > Project Options.
The Project Options dialog box opens.
2 Select the Defects category.
3 Select the Defer numbering defects options.
Select a check box to automatically assign defect numbers for the corresponding option. If you do not automatically assign defect numbers, you can manually assign defect numbers at a later time.
4 Select the Next number options.
Set the Next defect number can be set to any value greater than the largest existing defect number.
Set the Next sequence number to a value greater than the largest sequence number.
5 Select the Version fields options.
These options affect the version found field and any custom field in a defect event (e.g., version fixed, version verified, version released, etc.).
Configure version field menus to accept text entries or restrict version fields to pop-up menus.
Select When sorting on version field, use advanced logic to look for delimiters and sort the alphanumeric characters in that section. If this option is not selected a string comparison is performed when sorting.

155Chapter 14Configuring Projects
6 Select the Image file attachments options.
Select Create thumbnails for image file attachments to generate image file attachment thumbnails in defects. Thumbnails can be created for .gif, .jpg, .bmp, and .png files. This option does not automatically display thumbnails. Users must select an image file attachment and click Show Thumbnail to view the image.
Select Automatically show thumbnails when opening a defect to always display image file thumbnails.
Select a File type for pasted or captured images. In the TestTrack Pro Client, you can save clipboard images and screen captures as defect attachments. This option determines the attachment file type (e.g., .bmp, .gif). For more information see Attaching files, page 41.
7 Click OK to save the project options.
Setting send mail options1 Choose Tools > Administration > Project Options.
The Project Options dialog box opens.
2 Select Send Mail from the Defects category.
3 Select Enable sending of mail for this project to enable email.
If you do not select this option users cannot send mail from TestTrack Pro or receive email notifications.

156 Chapter 14Configuring Projects
4 Select a Return address option.
Always use the notification email account for the return address is the default option.
Only use notification account if no TestTrack Pro user is logged in uses the notification account information. In general, a user is not logged in during email import, automatic SoloBug import, or when SoloSubmit is used. The notification account is used in these scenarios.
Only use notification account if the logged in user’s email address is blank ensures that an email address is available if the logged in user did not provide an email address.
Enter a notification account name. The notification account name defaults to “TestTrack.” You will probably want to customize the account name for your company
Enter an email address. If you do not enter an email address, your email may be rejected because some Internet providers will not accept email without a return address.
5 Select the Closing defects notification options.
These options send notifications when a defect is closed.
Select Send mail to defect’s submitters if defect moves to a “Closed” state to notify the submitters of the change. Select a submitter option from the list. If a defect has multiple found by entries each found by user is sent an email.
Select Don’t send notification if defect is added in a closed state if you do not want to send notifications for defects added in a closed state.
Select the email template you want to use with this notification.
6 Select a Defect notification list template.
This template is used when notifications are sent to users or customers listed on the Notify tab of the Add/Edit Defect dialog box.
7 Select any Email notification hyperlinks options.
You add a hyperlink to email notifications to log a user into TestTrack Pro and display the defect that caused the notification. For more information see Adding email notification hyperlinks, page 256.
Select Enable email notification hyperlinks to enable hyperlinks for this project.
Enter the TestTrack Pro CGI URL. The CGI is required because hyperlinks launch TestTrack Pro Web. Click Test URL to validate the TestTrack Pro connection.
Select Require recipient to login to prompt users to enter their TestTrack Pro username and password. If this option is not selected users are automatically logged in to the TestTrack Pro Server.
Select Provide username at login to automatically enter the username in the TestTrack Pro login dialog box. This option is only enabled if the Require recipient to login option is selected. Users also need to enter their password for authentication.

157Chapter 14Configuring Projects
Select Hyperlink can only be used once to allow users to log in once from the link. If this option is not selected users can use the link to log in multiple times.
Select Disable email hyperlink access after to specify the number of hours, days, weeks, or months the the email notification hyperlink remains active.
8 Click OK to save the project options.
Setting import mail options1 Choose Tools > Administration > Project Options.
The Project Options dialog box opens.
2 Select Import Mail from the Defects category.
3 Select Enable importing defects via email to enable email import.
4 Enter the POP3 Host IP address or domain name.
Do not use the same address as the return email account configured in the Send Mail category. TestTrack Pro can get stuck in a loop if an email account uses an auto-reply and you configure TestTrack Pro to send an acknowledgment after importing mail.
Note: TestTrack Pro cannot determine which project an email should be imported into and cannot differentiate between personal and business emails.
5 Enter the Account Name and Password.
Leave the password field empty if a password is not required.
6 Select a Look for new files time interval.
You can override the selected interval at any time by choosing File > Import > Perform Server Import.

158 Chapter 14Configuring Projects
7 Select Email an acknowledgement to the submitter to automatically send an acknowledgement. Select the email template you want to use.
8 Select Enter next sequence number in defect’s reference field to automatically enter the next defect number.
9 Enter the Time to wait for initial connection response.
This is the time the TestTrack Pro Server waits for an initial response from the email server.
10 Enter the Time to wait for other connection responses.
This is the time the TestTrack Pro Server waits for other connection responses from the email server.
11 Click OK to save the project options.
Setting SoloBug options1 Choose Tools > Administration > Project Options.
The Project Options dialog box opens.
2 Select SoloBug from the Defects category.
3 Select a Look for new files every time interval.
Choose File > Import > Perform Server Import to manually import files.
4 Select an After importing option.
5 Select Email an acknowledgement to the submitter to automatically send an acknowledgement. Select the email template you want to use.
6 Select Enter next sequence number in defect’s reference field to automatically enter the next available number in the reference field.
7 Click OK to save the project options.

159Chapter 14Configuring Projects
Setting SoloSubmit options
Note: The TestTrack Pro SoloSubmit Admin Guide includes detailed information about configuring and customizing SoloSubmit.
1 Choose Tools > Administration > Project Options.
The Project Options dialog box opens.
2 Select the SoloSubmit category.
3 Select Enable entering defects via the SoloSubmit web page to enable SoloSubmit.
This option is project-specific. SoloSubmit must be enabled for each project.
4 The SoloSubmit HTML page field defaults to solosubmit.htm.
If you use a customized SoloSubmit HTML page, enter the file name. Make sure the HTML file is in the correct TestTrack Pro directory on your web server.
5 Select Email an acknowledgement to the submitter to automatically send an acknowledgement. Select the email template you want to use.
6 Select Enter next sequence number in defect’s reference field to automatically enter the next number in the reference field.
7 Select Enforce required field validation to ensure that values are entered for all required fields.
The required field validation is not enforced for the Entered By field because users do not log in to SoloSubmit. If Entered By is a required field, defects entered via SoloSubmit cannot pass the required field validation check.

160 Chapter 14Configuring Projects
8 Select Use default values to initially populate the SoloSubmit Web page with default values.
SoloSubmit cannot determine which time zone to use as default values for date/time custom fields. When a defect is submitted via SoloSubmit there is no associated user in the project. Therefore, there are no user options to check to determine which time zone to use. The current time of the computer the SoloSubmit CGI is running on when the SoloSubmit page is loaded is used as the default value for date/time custom fields. In addition, the date is assumed to be in the server’s time zone.
9 Select fields you do not want JavaScript to handle field relationships for on the SoloSubmit web page.
You would choose not to include the JavaScript for one of the following reasons:
The SoloSubmit web page includes hidden fields. For example, you comment out a field you do not want the customer to see. You can delete the HTML, but the field and its values will still display in the JavaScript if the customer chooses View Source on the SoloSubmit web page. Choosing not to include the JavaScript resolves this issue.
The SoloSubmit web page is customized and you do not want to overwrite the customization. For example, you hard code a list of field values in the HTML. If you include the JavaScript your customization is overwritten. By ignoring JavaScript for the field, the hard coded list values are used.
If neither reason applies and you select a field from the list, it could result in unexpected behavior. For example, you ignore JavaScript for Component, which is a child field of Product. When SoloSubmit is accessed, Product and Component are populated with the initial values. If the user chooses a different Product, the Component values are not changed.
10 Click OK to save the project options.
Note: Remember to provide users and customers with the SoloSubmit URL. To submit bug reports or feature requests, they simply open a browser and enter the SoloSubmit URL (e.g., http://WysiCorp.com/ttweb/loginSoloSubmit.htm).
Setting report field options1 Choose Tools > Administration > Project Options.
The Project Options dialog box opens.
2 Select Reports from the Defects category.

161Chapter 14Configuring Projects
3 Select the time tracking fields to use in reports.
You can select the event time tracking fields to use for actual and estimated hours. TestTrack Pro uses the selected events and determines which defect historical events to use based on the “Sum of hours from all events of this type” or “Hours from last event of this type entered” setting to calculate the value.
4 Click OK to save the project options.
Setting field options1 Choose Tools > Administration > Project Options.
The Project Options dialog box opens.
2 Select the Fields category.
3 Select the Field Relationship Options.
These options force a child field’s value to <not set> if a parent field changes and invalidates the child field. Text entries in version fields decrease the power of field relationships. For example, if Version Found is a child field, and users can add text entries, the value cannot be forced to <not set> because field relationship rules cannot be enforced.
Select Force the child field’s value to <not set> on the Add Item page to enforce the field relationship and prevent data that does not make sense from being added.
Select Force the child field’s value to <not set> on the Edit Item page to enforce the field relationship and prevent data that does not make sense from being added. Do not select this option if historical defect information is important and you want to preserve the original defect information in the child field.

162 Chapter 14Configuring Projects
Select a Default Association option for parent/child fields. When list values are added to a child field, you can associate them with all or none of the parent menu values.
4 Select the Required Fields Identification options.
These options change the appearance of required field labels on the Add Defect and Edit Defect windows.
Select text properties for required TestTrack Pro Client fields. To use a color that is not listed, select <Custom> and enter a hex color code or click the color button to choose a color. Selecting a specific color may make fields difficult to read because of user-defined color schemes.
Select text properties for required TestTrack Pro Web fields.
5 Click OK to save the project options.
Setting report options1 Choose Tools > Administration > Project Options.
The Project Options dialog box opens.
2 Select the Reports category.
3 Select a Look for new server stylesheets time interval.
The server periodically searches the project for new stylesheets and updates the stylesheet menus.
4 Select a time zone option.
Detail reports display the creation and modified time at the bottom of the report. Configure the report to use the server’s time zone or GMT.
5 Select the Diagrams options to change the appearance and output of workflow diagrams.
Select the Diagram Font to use for text in diagrams. Available fonts are installed on the TestTrack Pro server.

163Chapter 14Configuring Projects
Select the diagram Output Type.
6 Select a Chart Font to use for text in report charts.
7 Click OK to save the project options.
Setting dictionary optionsYou can specify the default main dictionary for a project. You can also add custom words to the dictionary. Before you specify the main dictionary, make sure it is available for all TestTrack Pro Client and Web users. It is possible to select a dictionary using the TestTrack Pro Client that is not available in TestTrack Pro Web and vice versa. In this case, users will not be able to spell check.
1 Choose Tools > Administration > Project Options.
The Project Options dialog box opens.
2 Select the Dictionary category.
3 Select a Main Dictionary.
TestTrack Pro includes three dictionaries: American English, British English, and Canadian English. Additional dictionaries can be downloaded from: http://www.seapine.com/ttpresources.php#spellcheck
Note: Users can specify a different dictionary in their user options (Tools > User Options).
4 Click Add to add words to the dictionary.
See Adding dictionary words, page 20 for more information.
5 Select a word and click Edit to change it.
See Editing dictionary words, page 21for more information.
6 Select a word and click Delete to remove it.
See Deleting dictionary words, page 21 for more information.
7 Click OK to save the project options.

164 Chapter 14Configuring Projects

165Chapter 15Customizing the Workflow
Chapter 15Customizing the Workflow
TestTrack Pro’s customizable workflow allows you to define and follow your company’s business processes. Customize the workflow instead of asking users to change how they work.
About workflows, 166
Analyzing your workflow, 166
Configuring workflows, 167
Configuring workflow states, 168
Configuring workflow events, 170
Configuring workflow transitions, 176
Configuring workflow assignment rules, 178
Configuring auto-assignment rules, 180
Configuring system notification rules, 183
Diagramming the workflow, 186
Evaluating the workflow, 187
Overriding the workflow, 188
Resetting the workflow, 188
166 Chapter 15Customizing the Workflow
About workflowsA workflow consists of states, events, and transitions that define the path a defect takes from initial reporting to resolution. The workflow guides users through your tracking process. The complexity of your workflow depends on the process you are following. Simple processes may only require a few steps while more complex processes may include multi-user assignments and stricter requirements.
States indicate a step in the workflow. For example, Open - On Hold or Closed - Verified.
Events specify the action that can be performed at each state or step in the workflow. For example, Assign, Estimate, or Verify. Workflow events are stored with the defect history. Edit or view a defect to access the History tab and view any events.
Transitions specify the initial state when a defect is created and the events that can be added for each state. Transitions move defects from one state to another. For example, Open to Fixed or Fixed to Closed.
Assignment rules specify how assignment events are processed. For example, use state with highest priority.
Analyzing your workflowBefore you customize the workflow, you should take the time to document and understand your company’s business process. Analyzing your workflow helps you easily determine the states that are used, the actions that users perform, and how information moves through the workflow. A clearly defined workflow ensures that issues move from initial reporting to resolution and do not get stranded.
A carefully analyzed and customized workflow can guard against wasted time, redundancy, and disorganization. When analyzing your workflow, you should identify the steps that make up your business process and determine the actions that you want to associate with each step. The workflow should include a state for each step. In addition, consider the business process, the individuals involved in the process, the types of events they perform, the type of data they track, and the types of transitions that are used.
After you analyze the workflow you should be able to list most states, events, and transitions used throughout the process. To begin customization you should first create the workflow states then define the events that can be performed for each state. You can view a graphic representation of the workflow to help understand how the states, events, and transitions work together.
167Chapter 15Customizing the Workflow
Configuring workflows
Note: Workflow examples and sample projects can be downloaded from Seapine’s Web site: http://www.seapine.com/ttpresources.php#database
TestTrack Pro’s workflow can be used out of the box to track defects and other issues such as change requests. However, your company may have other processes you need to track. You can easily customize the workflow to reflect your current process. If you need to track types of processes such as software defects and hardware assets, you can create multiple TestTrack Pro projects and customize the workflow for each project.
For example, you may want to create a TestTrack Pro project and customized workflow for your human resources department’s hiring process. Customize the workflow to provide an easy and convenient way for your human resources staff to track the process from receiving a staffing request from a manger to training a new hire.
Workflow customization generally includes the following steps:
Configuring workflow states, page 168
Configuring workflow events, page 170
Configuring workflow transitions, page 176
Configuring workflow assignment rules, page 178
Configuring auto-assignment rules, page 180
Configuring system notification rules, page 183
It can be difficult to keep track of states, events, and transitions and how they relate to each other. You can evaluate and diagram the workflow to view a graphical representation of the workflow and any potential problems. For more information see Evaluating the workflow, page 187 and Diagramming the workflow, page 186.

168 Chapter 15Customizing the Workflow
Configuring workflow statesA state is a step or decision point in the workflow. While defects are either Open or Closed, you may create different states for the defects. For example, an open defect can be On Hold or Pending Verification. Your company workflow determines the types of open and closed states.
1 Choose Tools > Administration > Workflow.
The Configure Workflow dialog box opens with the States tab selected.
2 Click Add to create a new state. See Adding states, page 169 for more information.
3 Select a state and click Edit to change it. See Editing states, page 169 for more information.
4 Select a state and click Top, Move Up, Move Down, or Bottom to change the display order.
5 Select a state and click Delete to delete it. See Deleting states, page 170 for more information.
Tip: You can also inactivate states that are not being used. See Inactivating states, page 169 for more information.
6 Click OK to save changes.

169Chapter 15Customizing the Workflow
Adding states1 Choose Tools > Administration > Workflow.
The Configure Workflow dialog box opens with the States tab selected.
2 Click Add.
The Add State dialog box opens.
3 Enter a State Name and Description.
4 Select an Attribute.
5 Click OK.
The state is added.
Editing states1 Choose Tools > Administration > Workflow.
The Configure Workflow dialog box opens with the States tab selected.
2 Select a state and click Edit.
The Edit State dialog box opens.
3 Make any changes and click OK.
Your changes are saved.
Inactivating statesTo preserve historical information inactivate a state instead of deleting it. You cannot inactivate a state if a defect is currently in the state.
1 Choose Tools > Administration > Workflow.
The Configure Workflow dialog box with the States tab selected.
2 Select a state and click Inactivate.
You are prompted to confirm the inactivation.
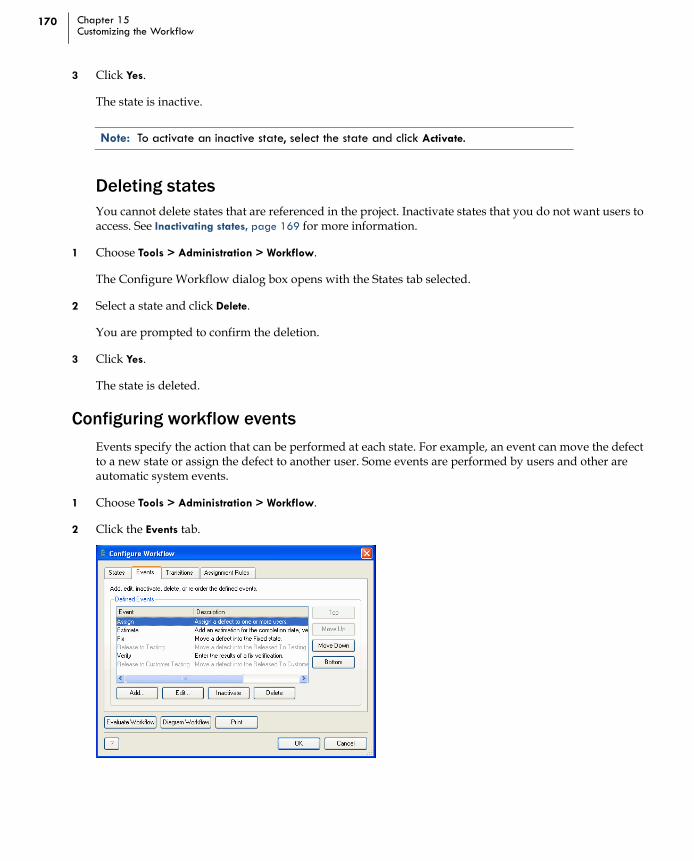
170 Chapter 15Customizing the Workflow
3 Click Yes.
The state is inactive.
Note: To activate an inactive state, select the state and click Activate.
Deleting statesYou cannot delete states that are referenced in the project. Inactivate states that you do not want users to access. See Inactivating states, page 169 for more information.
1 Choose Tools > Administration > Workflow.
The Configure Workflow dialog box opens with the States tab selected.
2 Select a state and click Delete.
You are prompted to confirm the deletion.
3 Click Yes.
The state is deleted.
Configuring workflow eventsEvents specify the action that can be performed at each state. For example, an event can move the defect to a new state or assign the defect to another user. Some events are performed by users and other are automatic system events.
1 Choose Tools > Administration > Workflow.
2 Click the Events tab.

171Chapter 15Customizing the Workflow
3 Click Add to create a new event. See Adding events, page 171 for more information.
4 Select an event and click Edit to change it. See Editing events, page 174 for more information.
5 Select an event and click Top, Move Up, Move Down, or Bottom to change the display order.
6 Select an event and click Delete to delete it. See Deleting events, page 175 for more information.
Tip: You can also inactivate events that are not being used. See Inactivating events, page 175 for more information.
7 Click OK to save changes.
Adding events1 Choose Tools > Administration > Workflow.
The Configure Workflow dialog box opens.
2 Click the Events tab.
3 Click Add.
The Add Event dialog box opens with the Details tab selected.

172 Chapter 15Customizing the Workflow
4 Enter a Name and Description.
5 Select any Details options.
These options specify the event details that determine the resulting state after the event is entered and what optional pre-defined fields are added to the event
Select Informational Event to use the event for information only. Informational events can be added to the defect from any state in the workflow since they do not affect the workflow.
Select a Resulting State. The resulting state specifies which state the defect moves to after the event is entered. You can select multiple states if you want the user to choose a state. For example, you may want users to select a specific state for a fix event so you select Fixed, Closed, or Closed (Fixed) as the resulting states. When users enter fix events they are prompted to select a resulting state.
Select an Assignments option. This option specifies how the event affects the assignment. Select Event results in a new assignment to add an Assign to field to the event. If the event results in a new assignment, select Allow multiple user assignments to allow users to assign the defect to multiple users. Select Event does not affect the current assignment if the event does not change the assignment. Select Event clears the current assignment to remove the current assignment so the defect is not assigned.
Select Display time tracking field using to track event time then select an hours option. An Hours field is added to the event if this option is selected. You can add these fields to a report to view the estimated time and actual time.
Select Files can be attached to this event to allow users to attach files to the event. An attachments section is added to the event if this option is selected.
Select Include event notes with the release notes to add any event notes to the release notes.
Select Electronic signatures are required when adding or editing this event to require users to enter an electronic signature. This option is only available if the Enable detailed audit trail logging option is selected and the Electronic signatures are required when changing defects option is cleared in the Compliance category in the Project Options. You can also set additional electronic signature options. For more information see Setting project compliance options, page 191.
6 Click the Custom tab.
The Custom tab is used to add custom fields and icons to the event.
Click Custom Fields to add a custom field to the event. A custom fields section is added to the event dialog. For more information see Configuring custom fields, page 202.
Select Add a custom icon to the TestTrack Pro Client events toolbar to add a custom event icon to the TestTrack Pro workflow events toolbar. Click Choose Icon to select an icon. The icon must be a 16x16 pixel .bmp file. If you do not add an icon to the event, the event will only be available from the Activities and shortcut menus. For more information see Customizing the events toolbar, page 174.
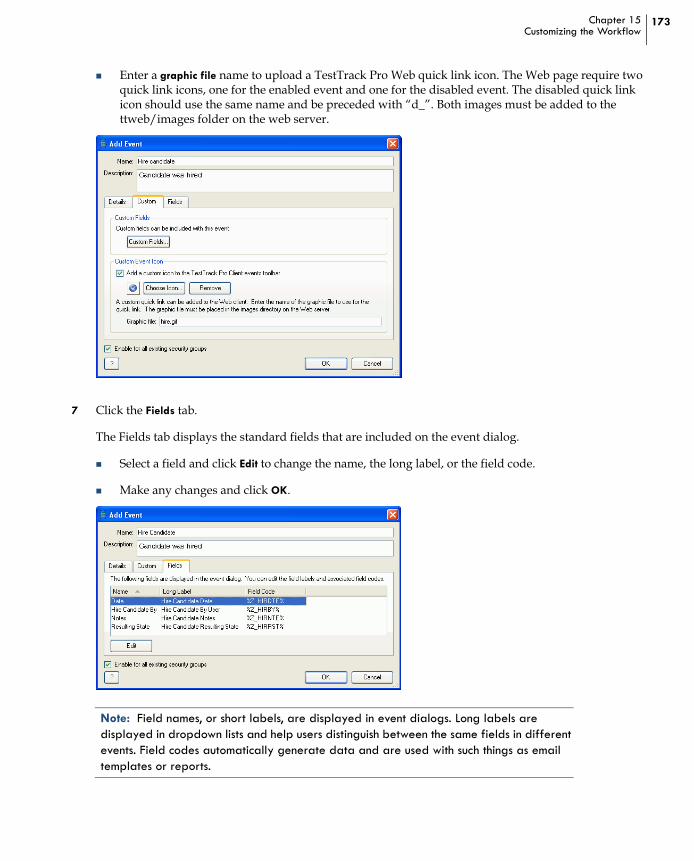
173Chapter 15Customizing the Workflow
Enter a graphic file name to upload a TestTrack Pro Web quick link icon. The Web page require two quick link icons, one for the enabled event and one for the disabled event. The disabled quick link icon should use the same name and be preceded with “d_”. Both images must be added to the ttweb/images folder on the web server.
7 Click the Fields tab.
The Fields tab displays the standard fields that are included on the event dialog.
Select a field and click Edit to change the name, the long label, or the field code.
Make any changes and click OK.
Note: Field names, or short labels, are displayed in event dialogs. Long labels are displayed in dropdown lists and help users distinguish between the same fields in different events. Field codes automatically generate data and are used with such things as email templates or reports.

174 Chapter 15Customizing the Workflow
8 Click OK.
The event is added.
Customizing the events toolbarThe workflow event toolbar icons can be customized. You can use the icons installed in the workflowicons directory in the default TestTrack Pro application directory or create custom icons. Keep the following in mind if you create custom icons:
Icons must be 16x16 pixel .bmp files.
The pixel at 0,0 is used for the transparency color. For example, if you draw a red enclosing box the box will not display because the top left pixel is the same color.
1 Choose Tools > Administration > Workflow.
The Configure Workflow dialog box opens.
2 Click the Events tab.
3 Select the event you want to add the custom icon to and click Edit.
The Edit Event dialog box opens.
4 Click the Custom tab.
5 Select Add a custom icon to the TestTrack Pro Client events toolbar.
6 Click Choose Icon.
The Open dialog box opens.
7 Browse for and select an icon then click Open.
The icon is added to the event.
8 Click OK.
Your changes are saved.
Editing events1 Choose Tools > Administration > Workflow.
The Configure Workflow dialog box opens.
2 Click the Events tab.
3 Select an event and click Edit.
The Edit Event dialog box opens.

175Chapter 15Customizing the Workflow
4 Make any changes and click OK.
Your changes are saved.
Inactivating eventsTo preserve historical information, inactivate an event instead of deleting it.
1 Choose Tools > Administration > Workflow.
The Configure Workflow dialog box opens.
2 Click the Events tab.
3 Select an event and click Inactivate.
You are prompted to confirm the inactivation.
4 Click Yes.
The event is inactive.
Note: To activate an inactive event, select the event and click Activate.
Deleting eventsYou cannot delete events referenced by the Transitions tab or that are part of a defect’s historical events.
1 Choose Tools > Administration > Workflow.
The Configure Workflow dialog box opens.
2 Select an event and click Delete.
You are prompted to confirm the deletion.
3 Click Yes.
The event is deleted.

176 Chapter 15Customizing the Workflow
Configuring workflow transitionsTransitions specify the initial state when a defect is created and the events that can be added for each state. Transitions help enforce the workflow by enabling event menu items and icons based on the current state of the defect.
1 Choose Tools > Administration > Workflow.
The Configure Workflow dialog box opens.
2 Click the Transitions tab.
3 Select a transition and click Edit to change it. See Editing transitions, page 177 for more information.
4 Select a resulting state and click Edit to change it. See Editing event resulting states, page 177 for more information.
5 Click OK to save changes.
Selecting the initial defect state1 Choose Tools > Administration > Workflow.
The Configure Workflow dialog box opens.
2 Click the Transitions tab.
Select the initial state for new defects.

177Chapter 15Customizing the Workflow
3 Select the initial state for a new defect.
All new defects will be added in the selected state.
4 Click OK.
Editing transitions1 Choose Tools > Administration > Workflow.
The Configure Workflow dialog box opens.
2 Click the Transitions tab.
3 Click Edit in the State Transitions area.
The Edit State Transitions dialog box opens.
4 Select the events that can be entered for each state.
5 Click OK.
Your changes are saved and you return to the Configure Workflow dialog box.
Editing event resulting states1 Choose Tools > Administration > Workflow.
The Configure Workflow dialog box opens.
2 Click the Transitions tab.

178 Chapter 15Customizing the Workflow
3 Click Edit in the Event Resulting States area.
The Edit Event Resulting States dialog box opens.
4 Select the states that the defect can move to for each event.
5 Click OK.
Your changes are saved and you return to the Configure Workflow dialog box.
Configuring workflow assignment rulesAssignment rules specify how state assignment events are processed. You can restrict which users can enter an event, specify multi-user assignment options, and change the order rules are processed in.
1 Choose Tools > Administration > Workflow.
The Configure Workflow dialog opens.
2 Click the Assignment Rules tab.
Select a state to view its assignment rules and resulting state priorities.

179Chapter 15Customizing the Workflow
3 Select a state and click Edit to change assignment rules or the resulting states priority.
The Edit Assignment Rules dialog box opens.
4 Select Only allowed assigned users to enter an event when the defect is in the selected state to make sure that only assigned users can enter an event.
5 Select a multi-user assignment rules option to determine the resulting state if a conflict occurs.
Defects can have different resulting states when they are assigned to multiple users. Options also change based on the selected assignment rules. For example, if Use the state entered by the first user to respond is selected the resulting states priority cannot be changed because priority does not affect this option.
Use state entered by first user to respond processes the event entered by the first user and moves the defect to the corresponding state. If the event moves the defect to a new state or affects the current assignment, the remaining assignments are removed. If the event leaves the defect in the current state or does not affect the current assignment, the remaining assignments are not removed and users can still enter events.
Wait for all assigned users to respond then use the state with the highest priority waits until all users respond then uses the event with the highest resulting state to determine the next state. For example, one user enters “Verify Fixed” resulting in a Close state and another user enters “Verify Failed” resulting in an “Open” state. The defect moves to “Open” because it has the highest priority.
Use the state with the highest priority and proceed as soon as an event with the highest priority is entered accept events from users until an event with the highest resulting state priority is entered or until all users have responded. If all users respond, the highest resulting state of the entered events is used. For example, “Open” is the highest resulting state. As soon an event with “Open” as a resulting state is entered, the defect moves to “Open” and the assignment list is cleared. If all users enter events with “Close” as a resulting state, the defect moves to “Close”.
6 Select a state and click Top, Move Up, Move Down, or Bottom to reorder the resulting states priorities.
7 Click OK.
The changes are saved.

180 Chapter 15Customizing the Workflow
Configuring auto-assignment rulesYou can configure auto-assignment rules to automatically move a defect from state to state and assign it to a specified user. These rules only apply if a defect is not assigned to a user when changes are saved. When a defect moves into a state with an auto-assignment rule, TestTrack Pro checks the rules in top-down order. The assignment action is applied if the defect passes a filter. If the defect does not pass the filter the next rule is checked. If the defect does not pass any of the filters the default action is applied.
You can also select a default auto-assignment action to use if you do not want to configure rules or if a defect does not pass the auto-assignment rule filter. For more information see Setting default auto-assignment actions, page 182. For example, your product is in beta testing and you want to make sure defects that failed defects get immediate attention. Two auto-assignment rules are checked when a defect fails verification. If the defect passes the failed fix filter it is automatically assigned to the last fixed by user. This user can review why the defect failed and correct it. If the defect does not pass the failed fix filter, the second rule is checked. The defect passes the on hold filter and is automatically assigned to the project administrator. The administrator can determine if the defect needs to be resolved in beta or at a later time.
Note: Auto-assignment processing is skipped when a defect is created using XML import, text import, or by duplication. For example, if you duplicate an unassigned defect, the new defect is also unassigned.
1 Choose Tools > Administration > Auto-Assignment Rules.
2 Select an item and click Configure Rules.
The Configure Auto-Assignment Rules dialog box opens.

181Chapter 15Customizing the Workflow
3 Click Add to create an auto-assignment rule. See Adding auto-assignment rules, page 181 for more information.
4 Select a rule and click Edit to change it. See Editing auto-assignment rules, page 182 for more information.
5 Select a rule and click Top, Move Up, Move Down, or Bottom to change the display order.
6 Select a rule and click Delete to delete it. See Deleting auto-assignment rules, page 183 for more information.
Tip: You can also inactivate auto-assignment rules that are not being used. See Inactivating auto-assignment rules, page 183 for more information.
7 Click OK to save changes.
Adding auto-assignment rules1 Choose Tools > Administration > Auto-Assignment Rules.
2 Select an item and click Configure Rules.
The Configure Auto-Assignment Rules dialog box opens.
3 Click Add.
The Add Auto-Assignment Rule dialog box opens.
4 Enter a Rule Name.
5 Select a Rule Filter.
6 Select an auto-assign Action.
Make it unassigned does not assign the defect to a user.
Assign to the Entered by user assigns the defect to the user who entered the defect.

182 Chapter 15Customizing the Workflow
Assign to the Found by user assigns the defect to all Found by users, the first Found by user, or the last Found by user.
Assign to the last user to enter... assigns the defect to the user who last entered the selected defect event. The list includes all of the events defined for the workflow. If the last user entered the event in response to a multi-user assignment event, the notification is sent to all users who responded.
Assign to the following users assigns the defect to the users or customers you select.
7 Select an Assign Event.
The rules cannot be saved unless a valid assignment event is selected. Valid events must be active, result in a new assignment, and only allow <No State Change> as the resulting state.
8 Click OK.
The rule is added.
Note: Rules are checked in top-down order. To change the rule order on the Configure Rules dialog box, select a rule and click Top, Move Up, Move Down, or Bottom.
Setting default auto-assignment actionsYou can set a default action for each defect state if you do not want to configure auto-assignment rules.
1 Choose Tools > Administration > Auto-Assignment Rules.
2 Select an item and click Configure Rules.
The Configure Auto-Assignment Rules dialog box opens.
3 Select a Default action and click OK.
Note: You should set a default action for each defect event.
Editing auto-assignment rules1 Choose Tools > Administration > Auto-Assignment Rules.
2 Select an item and click Configure Rules.
The Configure Auto-Assignment Rules dialog box opens.
3 Select a rule and click Edit.
4 Make any changes and click OK.
Your changes are saved.

183Chapter 15Customizing the Workflow
Inactivating auto-assignment rulesYou can inactivate rules that are no longer used. You can easily activate a rule if you need to use it.
1 Choose Tools > Administration > Auto-Assignment Rules.
2 Select an item and click Configure Rules.
The Configure Auto-Assignment Rules dialog box opens.
3 Select a rule and click Inactivate.
The rule is inactivated.
Note: To activate an inactive rule, select the rule and click Activate.
Deleting auto-assignment rulesDelete rules if you are certain you will not use the rule again. You can also inactivate a rule to disable it.
1 Choose Tools > Administration > Auto-Assignment Rules.
2 Select an item and click Configure Rules.
The Configure Auto-Assignment Rules dialog box opens.
3 Select a rule and click Delete.
The rule is deleted.
Configuring system notification rulesConfigure system notification rules to automatically inform users via email about event changes. Notifications only inform users of the event change, they do not assign defects.
1 Choose Tools > Administration > System Notification Rules.
2 Select an item and click Configure Rules.
The Configure System Notification Rules dialog box opens.

184 Chapter 15Customizing the Workflow
3 Click Add to create a system notification rule. See Adding system notification rules, page 184 for more information.
4 Select a rule and click Edit to change it. See Editing system notification rules, page 185 for more information.
5 Select a rule and click Delete to delete it. See Deleting system notification rules, page 186 for more information.
Tip: You can also inactivate system notification rules that are not being used. See Inactivating system notification rules, page 186 for more information.
6 Click OK to save changes.
Adding system notification rules1 Choose Tools > Administration > System Notification Rules.
2 Select an item and click Configure Rules.
The Configure System Notification Rules dialog box opens.
3 Click Add to add a rule.
The Add Notification Rule dialog box opens.
4 Enter a Rule Name.
5 Optionally select a Rule Filter.
If a project contains a large number of defects, you may want to filter the defects the rule is applied to.
6 Select a Recipient.
Send to the Entered by user sends the email notification to the user who entered the defect.

185Chapter 15Customizing the Workflow
Send to assigned users sends the email notification to all assigned users.
Send to the Found by user sends the email notification to all Found by users, the first Found by user, or the last Found by user.
Send to the last user to enter... sends the email notification to the user who last entered the selected event. The list includes all events defined for the workflow. If the last user entered the event in response to a multi-user assignment event, the notification is sent to all users who responded.
Send to the following users sends the email notification to the selected users or customers.
7 Select an Email Template.
Remember users can view all information in the email. Do not select an email template that includes restricted information.
Note: When email templates are created you can set template access options. These options are ignored when system notification rules are created. For example, you add a system notification rule that sends an email when a customer reports a defect. Do not select an email template that includes sensitive information such as the defect state. You may not want customers to have access to this information.
8 Select Don’t send email if current user made the change if you do not want the user who made the change to receive an email notification.
9 Select Only send email if defect is assigned to current user if you only want the assigned user who made the change to receive an email notification.
10 Click OK.
The rule is added.
Editing system notification rules1 Choose Tools > Administration > System Notification Rules.
2 Select an item and click Configure Rules.
The Configure System Notification Rules dialog box opens.
3 Select a rule and click Edit.
4 Make any changes and click OK.
The changes are saved.

186 Chapter 15Customizing the Workflow
Inactivating system notification rulesYou can inactivate a rule if it is not used. You can easily activate the rule if you decide to use it again.
1 Choose Tools > Administration > System Notification Rules.
2 Select an item and click Configure Rules.
The Configure System Notification Rules dialog box opens.
3 Select a rule and click Inactivate.
The rule is inactivated.
Note: To activate an inactive rule, select the rule and click Activate.
Deleting system notification rulesYou can delete a rule if you are sure it will not be used again. You can also inactivate a rule to disable it.
1 Choose Tools > Administration > Auto-Notification Rules.
2 Select an item and click Configure Rules.
The Configure System Notification Rules dialog box opens.
3 Select a rule and click Delete.
The rule is deleted.
Diagramming the workflowYou can diagram the workflow to quickly view configured states, events, and transitions.
1 Choose Tools > Administration > Workflow.
The Configure Workflow dialog opens.
2 Click Diagram Workflow.
The Diagram Workflow dialog box opens.

187Chapter 15Customizing the Workflow
3 Select the states you want to include in the diagram.
If you do not include a state, the states and events leading to it will not be included in the diagram.
4 Click OK.
The workflow diagram opens. States and transitions are represented with the following colors and object types:
Green Double Circle - Indicates the default state
Red Double Circle - Indicates a closed state
Blue Circle - Indicates an open state
Blue Line - Indicates a normal transition
Red Line - Indicates a transition to a closed state
Note: You can also set project options to specify the font and output type of the workflow diagram. For more information see Setting report options, page 162.
Evaluating the workflowYou can evaluate a workflow to view potential issues and correct them. For example, if a state is set to only allow assigned users to enter an event for that state, but the state can be reached through an event other than as assign event, it is reported as a potential workflow issue that should be fixed.
1 Choose Tools > Administration > Workflow.
The Configure Workflow dialog opens.

188 Chapter 15Customizing the Workflow
2 Click Evaluate Workflow.
The Potential Issues dialog opens. All potential issues are listed.
3 Click Save As to save the information as a text file.
Overriding the workflowYou can override the workflow to move a defect to its resulting state. A defect can be delayed if it is assigned to multiple users and events can only be entered by the assigned users. If one of the users is out of the office or busy with other tasks, you may want to override the workflow.
1 Open the defect you want to override the workflow for.
All workflow events are disabled after the defect is open.
2 Choose Activities > Override Workflow.
The valid events for the current state are enabled.
3 Select an event from the Activities list.
The defect moves to the resulting state for the selected event. A workflow override entry is recorded and can be viewed on the defect Workflow tab.
Resetting the workflow
Note: You cannot reset the workflow if the project contains any defects.
When the workflow is reset all states, events, and transitions except for the default state are removed. You should only reset the workflow if you want to start with an empty workflow.
1 Choose Tools > Administration > Workflow.
The Configure Workflow dialog opens.
2 Click Reset. The Reset button is only visible if there are no defects in the project.
3 Click Yes when you are prompted to confirm that you want to reset the workflow.
The workflow is reset.

189Chapter 16Managing Business Processes
Chapter 16Managing Business Processes
Managing regulatory compliance or internal business processes is now simple - let TestTrack Pro do the work for you.
About process management, 190
About historical defect logging, 191
About audit trail logging, 191
Setting project compliance options, 191
About audit trail records, 194
Searching audit trail records, 194
Viewing audit trail record details, 196
Generating an audit trail detail report, 197
Validating audit trail records, 198
Exporting audit trail records, 198

190 Chapter 16Managing Business Processes
About process managementWhen properly implemented and managed, TestTrack Pro can strengthen most best practice and regulatory compliance processes. TestTrack Pro’s compliance features can be used to track both internal business processes and regulatory compliance processes such as Sarbanes-Oxley or 21 CFR Part 11.
Tip: More information about using TestTrack Pro and Surround SCM for process management can be found in the following Seapine white papers, which are available on our Web site: Managing Projects for Regulatory Compliance and Impact of 21 CFR Part 11 on Software Development.
In addition to compliance options, the following options can provide enhanced security and tracking.
Password optionsUsing the Seapine License Server Admin Utility, you can set password options to help enforce your company’s requirements and provide greater security.
Password requirements including minimum length and the minimum number of letter, numeric, and non-alphanumeric characters.
Password restrictions that prevent users from using usernames, first names, or last names in passwords and allow you to set the password to expire in a specified number of days.
Password history options that prevent users from reusing passwords.
Note: You can also require users to change their passwords the next time they log in. This lets you ‘force’ users to change their passwords.
Security optionsAccess to TestTrack Pro functions is controlled by security groups. Users must be assigned to a security group before they can work with TestTrack Pro projects. Security determines what projects users can access, their view and edit rights (on a per-field level), and what commands they can access.
User log optionsUsing the TestTrack Pro Server Admin Utility, you can configure failed login email notifications, providing an easy way to archive events. Failed login attempts are automatically logged in the TestTrack Pro Server log. The log includes the following information:
Date/time of failed login
TestTrack Pro client type and IP address
Failed login reason (invalid username, invalid password, license type not specified)
Login username
Project, if one was specified

191Chapter 16Managing Business Processes
About historical defect loggingHistorical defect logging records the fields that change when a defect is modified. It does not record the values that change. Users can view what changed in a defect record, who made the change, and when the change was made on the History tab. The historical log is stored with the defect record. When a defect is deleted, the historical defect log information is also deleted.
About audit trail loggingAudit trail logging records the information that is modified when a defect is added, edited, or deleted. This information is logged in an audit log change record and cannot be deleted. You can trace back to view a complete trail of when and how the data was modified. This provides a more secure environment with stricter auditing of changes and more accountability. Audit trail records are not affected when defects are deleted because they are maintained separately from the defect history log. The audit trail is project-specific and is only viewable for the project you are currently logged in to. For more information about audit trail records, see About audit trail records, page 194.
Note: Audit trail tables can be archived in TestTrack Pro native projects. When the audit trail log is archived the following tables files are copied and renamed: AUDITLOG.TTT, AUDITLOG.TTI, and AUDITLOG.FPT. The files are stored in a project subdirectory named Archive and are appended with the date and time. For example, AUDITLOG.TTT is saved as AUDITLOG2003120114_56_20.TTT when it is archived. The table files are deleted after they are successfully copied and renamed.
Setting project compliance options1 Choose Tools > Administration > Project Options.
2 Select the Compliance category.

192 Chapter 16Managing Business Processes
3 Select Enable historical defect information logging to log historical information.
Historical defect logging records the changes made to a specific defect but not the changed values. The historical log is stored with the defect record and does not contain detailed information about the changes. For more information see About historical defect logging, page 191.
Note: Disabling this option does not affect any information already logged in the project.
4 Select Enable detailed audit trail logging to log the audit trail information.
Audit trail logging records the information that is modified when a defect is added, edited, or deleted. The audit trail log is stored in its own project table and contains changed values. For more information see About audit trail logging, page 191.
Select the number of audit trail rows before the table is automatically archived. This option applies to TestTrack Pro native projects only.
Select Only log changes to defects to log changed defect fields and values changes.
Select Log all defect record data in the audit trail to log all defect data in the audit trail each time the defect changes.
When audit trail logging is enabled for an existing project, the entire defect is logged the first time it is edited and saved. When this option is enabled, the date and time is stored and logged in the audit trail. TestTrack Pro compares the last modification date to the date and time audit trail logging was enabled. The entire defect is logged if the last modification date is earlier than the date and time that audit trail logging was enabled.
5 Select Electronic signatures are required when changing defects to enable electronic signatures. This option is enabled if you select the audit trail logging option.
Electronic signatures ensure users sign off on each defect change. When a defect is created, modified, or deleted the user is prompted to enter an electronic signature and an optional change reason. When the defect is saved the user’s full name, the defect ID, and the change reason are all stored with the defect.
Select the Signature Component that users are required to enter when changing defects.
Select Signature meaning is required to require users to enter a reason for changing the defect.
Select the Maximum number of attempts before logging user out. If the user exceeds this number of failed attempts the changes are discarded and the user is automatically logged out of TestTrack Pro.
Note: To require electronic signatures only for specific workflow events, Enable detailed audit logging must be selected and Electronic signatures are required when changing defects must be cleared. For more information see Adding events, page 171.
6 Click OK to save the options.

193Chapter 16Managing Business Processes
Deleting historical defect log informationYou can delete log entries if the project becomes too large because of historical defect information. Deleting historical defect log entries does not reduce the amount of used disk space until the project is compressed. Refer to the TestTrack Pro Server Admin Utility Guide for more information.
Note: To delete log entries for specific defects, select the defects on the Defect list window before proceeding.
1 Choose Tools > Administration > Delete Historical Defect Info.
The Delete Historical Defect Info dialog box opens.
2 Select a Log Entry option.
Delete historical information regardless of log date deletes all log entries.
Delete historical information with dates prior to and including this date: deletes log entries prior to and including the date you enter.
3 Select a Defect option button.
You can delete historical defect information for all defects, closed defects, or specific defects.
4 Click Yes when you are prompted to confirm the deletion.
The defect historical log information entries are deleted.
5 Click Close.

194 Chapter 16Managing Business Processes
About audit trail recordsWhen you enable audit trail logging, an audit trail record is created each time a defect is added, edited, or deleted. For more information see About audit trail logging, page 191.
You can search audit trail records and trace back to view a complete trail of when and how data was modified. Audit trail records are not affected when defects are deleted because they are maintained separately from the defect history log.
It is important to understand the difference between data records and audit trail records:
Data records contain the information stored in defects and associated tables as well as cached in memory. Data records can be edited by TestTrack Pro users.
Audit trail records are created within the audit trail and are stored in a separate table. Audit trail records cannot be edited using TestTrack Pro.
Searching audit trail recordsYou can search the audit trail to find change records based on criteria such as date, user, defect number, modification source, and modification type.
Note: Disable the Delete Historical Defect Info command security setting if you do not want a security group to have access to the View Audit Trail menu item.
1 Choose Tools > Administration > View Audit Trail.
The Search Audit Trail dialog box opens.
2 Select the date range of records to view.
The date defaults to today’s date. You can enter another date or use the calendar to select another date.
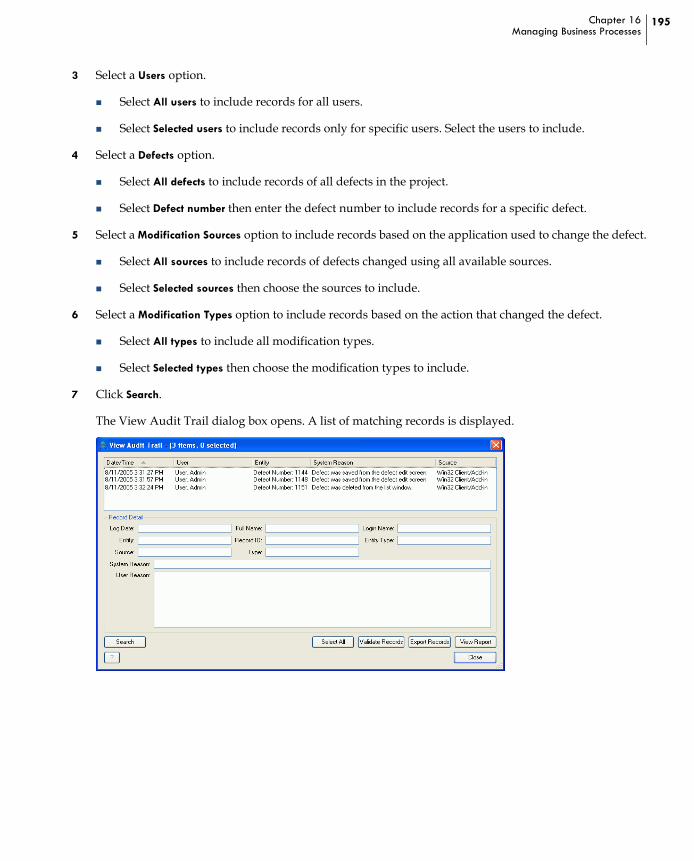
195Chapter 16Managing Business Processes
3 Select a Users option.
Select All users to include records for all users.
Select Selected users to include records only for specific users. Select the users to include.
4 Select a Defects option.
Select All defects to include records of all defects in the project.
Select Defect number then enter the defect number to include records for a specific defect.
5 Select a Modification Sources option to include records based on the application used to change the defect.
Select All sources to include records of defects changed using all available sources.
Select Selected sources then choose the sources to include.
6 Select a Modification Types option to include records based on the action that changed the defect.
Select All types to include all modification types.
Select Selected types then choose the modification types to include.
7 Click Search.
The View Audit Trail dialog box opens. A list of matching records is displayed.

196 Chapter 16Managing Business Processes
Viewing audit trail record details1 Choose Tools > Administration > View Audit Trail.
The Search Audit Trail dialog box opens.
2 Select search criteria and click Search.
The View Audit Trail dialog box opens.
3 Select a record to view the details.
4 Select records and click Validate Records to ensure the records were created using a valid TestTrack Pro source. See Validating audit trail records, page 198 for more information.
5 Select records and click Export Records to export the records to a text or XML file. See Exporting audit trail records, page 198 for more information.
6 Select records and click View Report to generate a report detailing what changed in the defect. See Generating an audit trail detail report, page 197 for more information.
7 Click Search to narrow or broaden the previous search or perform a new search. See Searching audit trail records, page 194 for more information.

197Chapter 16Managing Business Processes
Generating an audit trail detail reportYou can generate a report containing all details in the change record. The report includes defect fields before they changed (From) and after they changed (To).
Note: Audit trail records created prior to TestTrack Pro 7.1 will not include the From data. You can only view the To data.
1 Choose Tools > Administration > View Audit Trail.
The Search Audit Trail dialog box opens.
2 Select search criteria and click Search.
The View Audit Trail dialog box opens.
3 Select the records to include in the report.
To select all records, click Select All. To include more than one record, Ctrl+click each record.
4 Click View Report.
The Audit Trail Detail Report opens.
5 Click Print to print the report or click Save As to save the report as an HTML file.

198 Chapter 16Managing Business Processes
Validating audit trail records
Note: You can only validate audit trail records created in TestTrack Pro 7.1 and higher.
You can validate audit trail records to ensure changes were made using TestTrack Pro, not other means such as editing a record directly in a database table.
1 Choose Tools > Administration > View Audit Trail.
The Search Audit Trail dialog box opens.
2 Select search criteria and click Search.
The View Audit Trail dialog box opens.
3 Search for and select the records to validate.
To select all records, click Select All. To select more than one record, Ctrl+click each record.
4 Click Validate Records.
Click OK if the records are valid.
Records that cannot be validated are displayed in a report for further review.
Exporting audit trail recordsYou can export audit trail records to text or XML files.
Note: Exported audit trail records do not include the related defects or file attachments. To export defects, see Chapter 21, “Importing and Exporting Files,” page 239.
1 Choose Tools > Administration > View Audit Trail.
The Search Audit Trail dialog box opens.
2 Select search criteria and click Search.
The View Audit Trail dialog box opens.
3 Select the records to export.
To select all records, click Select All. To include more than one record, Ctrl+click each record.
4 Click Export Records.
The Export Audit Trail dialog box opens.
5 Select the file location, enter a file name, select the file format, and click Save.
A progress indicator opens to let you know the file is being exported.

199Chapter 17Customizing Fields
Chapter 17Customizing Fields
You can customize TestTrack Pro fields to meet your company’s requirements and make sure users are providing the correct types of information. You can also rename field labels and change existing field data.
Configuring list values, 200
Configuring custom fields, 202
Defining required fields and default values, 204
Configuring field relationships, 206
Renaming field labels, 208

200 Chapter 17Customizing Fields
Configuring list valuesYou can configure list values and customize TestTrack Pro to use your company’s terminology and capture specific information. TestTrack Pro includes the following default list values: type, priority, severity, product, component, disposition, reproduced, and version.
Tip: The examples in this section use priority names. You follow the same general steps for each list value type.
1 Choose Tools > Configure List Values then select the category you want to add the list value to.
The Setup Priority Names dialog box opens. This example uses priority, which is a child field.
Note: The setup dialog box changes based on the field type. For example, if you add a value to a parent field you also need to configure field relationships for the new value.
2 Click Add to create a new list value. See Adding list values, page 201 for more information.
3 Select a list value and click Edit to change it. See Editing list values, page 201 for more information.
4 Select a list value and click Top, Move Up, Move Down, or Bottom to change the display order.
List values are displayed in the corresponding menu in the same order. You may want to move the most frequently used values to the top of the list.
5 Click Sort to sort all values in ascending or descending order.
6 Click OK to save changes.

201Chapter 17Customizing Fields
Adding list values1 Choose Tools > Configure List Values then select the category you want to add the list value to.
2 Click Add.
The Add dialog box opens.
3 Enter a list value name.
4 Click OK.
You return to the Setup Priority Names dialog box.
5 Optionally select the association for the list value.
Remember, priority is a child field in this example. You can associate the new child field with all or none of the parent menu items.
Note: You can also manually configure the parent-child field relationship. For more information see Configuring field relationships, page 206.
6 Click OK to save the changes.
Editing list values1 Choose Tools > Configure List Values then select the category that contains the list value you want to edit.
2 Select the value and click Edit.
The Edit dialog box opens.
3 Make any changes.
4 Click OK.
The list is updated with the new name.

202 Chapter 17Customizing Fields
Deleting list values1 Choose Tools > Configure List Values then select the category that contains the list value you want to delete.
2 Select the value and click Delete.
If the list value is used by a defect you are prompted to reassign it to an existing field. The value cannot be deleted until it is reassigned.
Note: If you delete a list value that is used in a field relationship, an error message opens indicating the action may result in defects that do not follow field relationship rules.
Configuring custom fieldsYou can add up to 100 custom fields to a project. Custom fields can be displayed on the Custom Fields tab or in the main area of the Add Defect, Edit Defect, or View Defect dialog boxes. The Custom Fields tab is only displayed if there are custom fields you do not choose to add to the main area.
Note: You cannot add custom fields if other users are logged in.
1 Choose Tools > Administration > Custom Fields.
The Setup Custom Fields dialog box opens.
2 Click Add to create a new custom field. See Adding custom fields, page 203 for more information.
3 Select a custom field and click Edit to change it. See Editing custom fields, page 204 for more information.
4 Select a custom field and click Top, Move Up, Move Down, or Bottom to change the display order.
5 Click OK to save changes.

203Chapter 17Customizing Fields
Adding custom fields1 Choose Tools > Administration > Custom Fields.
The Setup Custom Fields dialog box opens.
2 Click Add.
The Add Custom Field dialog box opens.
3 Enter a Field Name.
4 Enter the Long Label.
Long labels are displayed in dropdown lists and help users distinguish between the same fields in different events.
5 Enter the Field Code.
The field code automatically generates data and is used with email templates, reports, or SoloSubmit.
6 Select a Location.
Select Main Defect Window to display the field on the Add Defect, Edit Defect, and View Defect dialog boxes.
Select Custom Fields Tab to display the field on the Custom Fields tab.
7 Select a Field Type.
Edit Box lets users enter a value. After choosing this field type, select string, integer, or decimal number as the Field format and enter the Maximum field size.
Date/Time creates a date/time field. Users can change the date and time
Check Box creates a check box field.
Pop-up Menu lets you define the menu values. Click Setup Pop-Up Menu Items to add values to the pop-up menu. Select this field type if you add a field that will be used in a field relationship.
8 Click OK.

204 Chapter 17Customizing Fields
Editing custom fields1 Choose Tools > Administration > Custom Fields.
2 Select the custom field and click Edit.
The Edit Custom Field dialog box opens.
3 Make any changes and click OK.
You cannot change the Location option if other users are logged in to TestTrack Pro.
4 Click OK.
Deleting custom fields1 Choose Tools > Administration > Custom Fields.
2 Select the custom field and click Delete.
You are prompted to confirm the deletion.
3 Click Yes.
The custom field is deleted.
4 Click OK.
Defining required fields and default valuesYou can set any defect or defect action input field, including custom fields, as a required field. When a field is required a user must enter data in the field before TestTrack Pro will add the defect or defect action to the project or save any changes. You can also define default values for most fields included in the Add Defect or Defect Action dialog box. Required fields and default field values are project-specific.
Required fields must be populated for all instances of actions. For example, the Found By field is required and does not have a default value. When multiple detail records are created for a single defect, the Found By field must be populated for all detail records.
Field-level security can be used to restrict access to required fields. For example, the Priority field is required but does not have a default value. A Security Group is created for customers with permissions to add defects. The Priority field is hidden for both Add and Edit privileges and customers cannot add defects. Why? The Priority field is required but the Customer group cannot access the field. An easy workaround is to grant access to the Priority field when customers add defects and hide the Priority field when editing defects.

205Chapter 17Customizing Fields
1 Choose Tools > Administration > Required Fields & Default Values.
The Required Fields & Default Values dialog box opens.
2 Select the field group from the menu.
Field types are grouped together for easy reference.
3 To set a required field, select the corresponding check box.
A field that is set using check boxes and/or radio buttons cannot be set as a required field.
The check box is selected if a field is always required.
The check box is not selected and is inactive if a field cannot be required.
4 To set a default value, select a value from the corresponding menu.
The menu value is labeled <blank> and it is inactive if a default value cannot be set.
5 Repeat steps 2 - 4 to set required fields and default values for other groups.
6 Click OK.
How do default values affect field relationships? A child field’s default value may be invalid, depending on the parent field’s default value. If a default value that does not follow the defined field relationships is selected, the default value can still be used but the child field’s value will not follow field relationship rules.
How do hidden fields affect field relationships? A hidden child field can cause unintended changes. If you change a parent field, you may cause a child field’s value to no longer follow field relationship rules. In addition, changes cannot be saved if the child field is required.
You can clickthese arrows tomove throughthe groups
Select thefield groupfrom the menu

206 Chapter 17Customizing Fields
Editing required fields and default values1 Choose Tools > Administration > Required Fields & Default Values.
The Required Fields & Default Values dialog box opens.
2 Select the field group you want to edit from the menu.
3 Click the corresponding check box to clear a required field.
The field is no longer required.
4 Select a different value from the corresponding menu to change a default value.
5 Click OK to save the changes.
Configuring field relationshipsParent-child field relationships create project dependencies that restrict users to selecting values based on the relationship. When a field is selected from a menu and there is a parent-child relationship, the child field is populated with the values based on the parent’s field value.
Type, product, disposition, priority, component, severity, and custom fields can be set as parent fields. Event fields can be set as parent fields for other event fields in the same event type.
Type, product, disposition, priority, component, severity, version found, reproduced, computer config, and custom fields can be set as child fields. Event fields can be set as child fields to defect fields and other event fields in the same event type.
Entered by, found by, and fixed by cannot be set as parent or child fields.
1 Choose Tools > Administration > Field Relationships.
The Field Relationship Selection dialog box opens.
2 Click Add to create a field relationship. See Adding field relationships, page 207 for more information.
3 Select a field relationship and click Edit to change it. See Editing field relationships, page 208 for more information.
4 Click OK to save changes.

207Chapter 17Customizing Fields
Adding field relationships1 Click Add.
The Setup Parent Child Relationship dialog box opens.
2 Select the parent field from the menu then select the child field and click OK.
The Setup Field Relationships dialog box opens.
3 Enable or disable the child fields for each field in the parent list.
A parent field can have one or more child field relationships. A child field can only have one parent. A child field can also be the parent of another field.
When a field is set as a child field, it is excluded from the child field list.
To prevent circular references, parent or grandparent fields are excluded from the parent list.
4 Click OK when you finish setting up the field relationship.
You return to the Field Relationship Selection dialog box.
5 Click OK to save your changes.
What if a project uses default values? The child field’s default value may be invalid, depending on the parent field’s default value. The default value can still be used.
What if a project uses hidden fields? Hidden fields can cause unintended changes. If a parent field is changed, the child field may be changed to <not set> depending on project options. In addition, changes cannot be saved if the child field is required.

208 Chapter 17Customizing Fields
Editing field relationships1 Choose Tools > Administration > Field Relationships.
The Field Relationship Selection dialog box opens.
2 Select the field relationship and click Edit.
The Setup Field Relationships dialog box opens.
3 Make any changes and click OK.
Deleting field relationships1 Choose Tools > Administration > Field Relationships.
The Field Relationship Selection dialog box opens.
2 Select the field relationship and click Delete.
The field relationship is deleted.
Renaming field labelsYou can rename defect field labels to match your company’s terminology. Keep the following in mind:
Field codes do not change. For example, if you rename Disposition (%DISP) to Substatus, you use %DISP% to include the Substatus data in an email template.
Project columns are not renamed. If you use the ODBC driver the original field name must be used.
Field label changes do not apply to SoloBug. Field names can be changed when you customize the SoloBug executable.
1 Choose Tools > Administration > Rename Field Labels.
The Rename Field Labels dialog box opens.

209Chapter 17Customizing Fields
Note: Fields marked with an asterisk have both short and long field names. The short name is used to allow fields to fit into the user interface without being truncated. Date Found and Version Found, which are both long versions, are used in filters, reports, and columns. Date and Version, which are both short versions, are used in the defect windows (e.g., add defect). Use the same terminology for short and long field names. For example, if you rename Version to Account you should also change Version Found to Account Found.
2 Select the field you want to rename and click Edit.
The Edit Field Label Value dialog box opens.
3 Enter the Field Label.
Field labels cannot be resized in the user interface and should not be longer than 32 characters. Field labels that do not fit in the allotted space are truncated.
4 Click OK.
5 Repeat steps 2 and 3 for each field label you want to rename.
6 When you finish, click OK on the Rename Field Labels dialog box.
Your changes are saved and the project is updated with the new field labels.
Note: Renaming a field does not affect image files. The tabs in TestTrack Pro Web are image files (.gif). To change the tab name in the Web interface you can modify the graphic. Image files are generally stored in: inetpub/wwwroot/ttweb/images. Most graphics include two images, one for a selected tab and one for a non-selected tab.
Restoring original labelsYou can restore the field labels to their original values at any time.
1 Choose Tools > Administration > Rename Field Labels.
The Rename Field Labels dialog box opens.
2 Click Restore to Original Values.
The field labels revert to the original values.
3 Click OK to save the changes.

210 Chapter 17Customizing Fields
211Chapter 18Managing Security Groups
Chapter 18Managing Security Groups
Security groups control security and the TestTrack Pro commands users in the group can access. Protect your data integrity and security by creating groups for all security levels.
About security, 212
About security groups, 212
Security groups and security, 213
Adding security groups, 215
Viewing security groups, 217
Editing security groups, 217
Duplicating security groups, 218
Deleting security groups, 218

212 Chapter 18Managing Security Groups
About securityYou can configure projects to provide as much or as little access as needed. TestTrack Pro includes the following security options:
Passwords limit access to projects.
Command security limits the commands a group of users can perform.
Field security limits who can enter or edit defect field data.
Defect security limits the defects that are visible to each security group.
Advanced defect logging tracks who changed defect fields and states and when changes are made.
Server logging records unusual activity, critical, and non-critical system issues.
About security groupsA security group is a collection of users who share responsibilities and perform similar tasks. Access to TestTrack Pro functions, such as adding a defect or using SCC integration, is controlled by group security. Users must be assigned to a security group before they can work with TestTrack Pro projects.
When you set up a project, create the security groups first. This lets you create a security structure for users. You can create an unlimited number of security groups and levels. Security determines what projects users can access, what their view and edit rights are (on a per-field level), and what they can do at each stage of the workflow.
Before you start creating security groups you may find it helpful to list the types of users you will add to the project and what their needs are. You can add an unlimited number of security groups and make their security levels as general or as command-specific as you need.
Tip: You do not need to create security groups if you want all users to have access to all commands. TestTrack Pro automatically creates an Administration security group when a project is created. This security group has access to every command. Simply add the users to this default security group.
The following example provides security based on group levels:
Group Name Security Level Commands
Level 1 Low View
Level 2 Medium View, Add
Level 3 High View, Add, Edit
Level 4 Highest View, Add, Edit, Delete

213Chapter 18Managing Security Groups
Or, use the same structure to name the security groups according to job description:
Security groups and securityTestTrack Pro security is assigned at the security group level. Each security group can be assigned different levels of security. You can set command, field, and defect security in TestTrack Pro.
Command-level securityCommand security limits the commands users can access. Command security includes the following categories: General, Administration, Defects, Defect Events, Defect Links, Customers, Users, Security Groups, Test Configurations, Filters, Reports, and Workbook.
It is obvious how most of the command-level security options work. For example, the Add Customer command determines if a user can access the Add Customer dialog box. The following command-level security options require additional explanation:
Import From Text File, Export From Text File, Import From XML File, and Export From XML File are administrative commands. Regular, non-admin users should not be given security access to these commands.
Edit Users security lets a user edit user information for every TestTrack Pro user. The Modify Own General User Settings and Edit Own Notifications options let users set their own options only.
Modify Own General User Settings security determines if a user can view the General category on the User Options dialog box. This tab lets the user set their own TestTrack Pro user options.
Edit Own Notifications security determines if a user can view the Email category on the User Options dialog box. This tab lets the user set their own email notification options.
Configure SCC DB Options security determines if a user can view the Project Options and Project Paths categories on the Configure SCC Integration dialog box. Any changes made to the options in these two categories affect all project users.
See SCC Tab security determines if a user can view the Source Code tab on the Add/Edit Defect window. This option only lets the user view the SCC actions that have already been performed; it does not provide security access to perform SCC actions. If a user does not have See SCC Tab security or Configure SCC DB Options security, then the SCC Integration menu option is also disabled because these options do not apply.
Group Name Security Level Commands
Technical Writer Low View
Engineer Medium View, Add
QA Tester High View, Add, Edit
Manager Highest View, Add, Edit, Delete

214 Chapter 18Managing Security Groups
Perform SCC Actions security determines if a user can perform SCC actions such as check in and check out. Because these actions can only be performed from the Source Code tab of the Add/Edit Defect window, the user also needs the See SCC Tab security.
Setup Project Fields security controls many of the configuration options for the specific TestTrack Pro project. This security determines if a user can configure types, priorities, severities, products, components, disposition, and reproduced names. It also controls the ability to configure custom fields. The version field dropdown has its own security option and is not controlled by the Setup Project Fields security.
Add Defects security controls the ability to import SoloBug files.
Defect-level securityDefect security allows you to limit users to work with defects based on a specific filter, only work with the defects they reported, or a combination of both. Defects that do not pass the filter are not displayed in the defects list or included in reports.
Field-level securityField security affects defects and defect events and restricts users’ ability to view, add, and edit field data. Three types of field security can be assigned: Read/Write, Read Only, and Hidden. Users with read/write access to fields can enter and edit information. Users with read only access to fields can only view the information. Users with hidden access to fields will not be able to view the fields or any information.
You can also set field-level security for add and edit scenarios. For example, you can assign a restricted security group read/write Add privileges for the Type field. You can also assign this security group read only Edit privileges for the Type field. When a new defect is added, users can enter information in the Type field but will not be able to make any changes if they edit the defect.
Security can be assigned to the following field categories: General, Found By fields, defect event fields, link fields, and custom fields.
Field security cannot be applied to the following areas: email templates, SoloSubmit, SoloBug, XML import/export, and text file import/export.
System-generated fields cannot be assigned read/write security. This includes the following fields: defect number, defect status, has attachments, has workaround, date created, created by, creation method, date last modified, last modified by, found by group, found by company, how many, and has release notes.
Note: A field can be represented by an edit box, check box, radio button, or a list box. Remember, setting field security affects all field types.
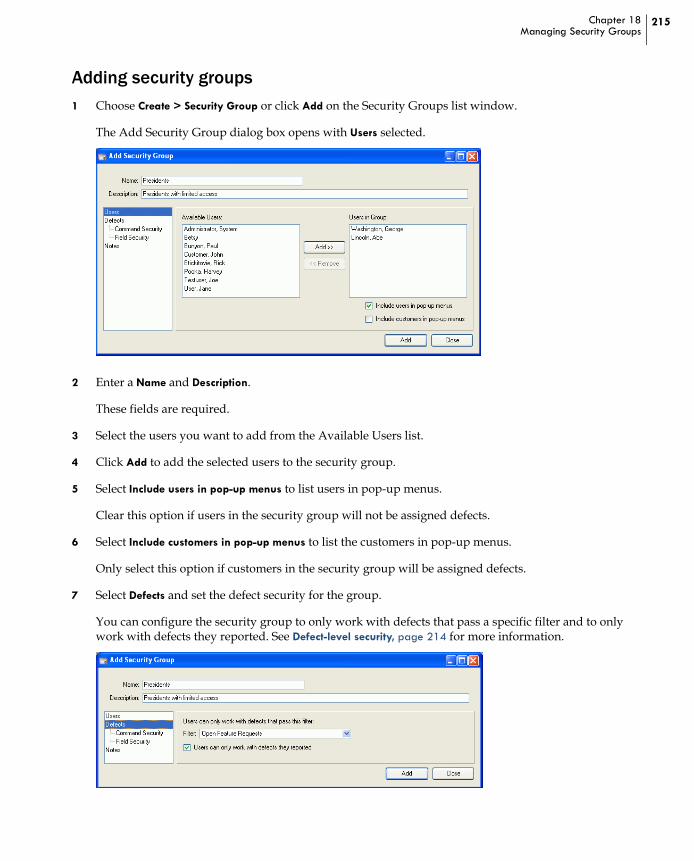
215Chapter 18Managing Security Groups
Adding security groups1 Choose Create > Security Group or click Add on the Security Groups list window.
The Add Security Group dialog box opens with Users selected.
2 Enter a Name and Description.
These fields are required.
3 Select the users you want to add from the Available Users list.
4 Click Add to add the selected users to the security group.
5 Select Include users in pop-up menus to list users in pop-up menus.
Clear this option if users in the security group will not be assigned defects.
6 Select Include customers in pop-up menus to list the customers in pop-up menus.
Only select this option if customers in the security group will be assigned defects.
7 Select Defects and set the defect security for the group.
You can configure the security group to only work with defects that pass a specific filter and to only work with defects they reported. See Defect-level security, page 214 for more information.

216 Chapter 18Managing Security Groups
8 Select Command Security and set the security for each category.
All commands are enabled by default. Disable the commands that you do not want the security group to have access to. Make sure you set security for each category. See Command-level security, page 213 for more information.
9 Select Field Security and set field security for the group.
Field security defaults to full security when a new security group or project is created. Users in this group can view and edit every defect field. Be sure to set Add and Edit privileges for all field groups. See Field-level security, page 214 for more information.

217Chapter 18Managing Security Groups
10 Select Notes and enter any information about the security group.
You may want to enter information about why the group was created or what types of users should be added to it
11 Click Add.
The security group is created.
Viewing security groups1 Select the security group on the Security Groups list window.
2 Choose Edit > View Security Group or click View on the Security Groups list window.
The View Security Group dialog box opens. All fields are read-only and cannot be edited.
3 Click OK when you are finished.
Editing security groups1 Select the security group on the Security Groups list window.
2 Choose Edit > Edit Security Group or click Edit on the Security Groups list window.
The Edit Security Group dialog box opens.
3 Make any changes and click OK.
Your changes are saved.

218 Chapter 18Managing Security Groups
Duplicating security groupsIf you are adding security groups with the same basic information, you can save time by duplicating and editing an existing group.
1 Select the group on the Security Groups list window.
2 Choose Edit > Duplicate Security Group.
The group is duplicated. A number incremented by 1 is added to the group name.
3 Modify the duplicated group and save your changes.
Deleting security groups1 Select the security group on the Security Groups list window.
You can select more than one security group to delete.
2 Choose Edit > Delete Security Group or click Delete on the Security Groups list window.
You are prompted to confirm the deletion.
3 Click Yes.
The security group is deleted.

219Chapter 19Managing Users
Chapter 19Managing Users
Defect, defect, who has the defect? Users, the people who find, fix and verify defects—who found it, who fixed it, who is verifying it.
About users, 220
Adding users, 220
Retrieving global users, 224
Promoting users, 224
Viewing users, 225
Editing users, 225
Duplicating users, 225
Inactivating users, 226
Activating users, 226
Making a customer a user, 226
Viewing logged in users, 226
Logging out users, 227
Deleting users, 227

220 Chapter 19Managing Users
About usersTestTrack Pro includes both global and local users. Global users, which are created in the Seapine License Server or in TestTrack Pro, have usernames and passwords and can log in.
Local users, which are created in TestTrack Pro or when bugs are submitted using SoloSubmit and SoloBug, cannot log in. Local users are generally created for tracking purposes.
Adding users1 Choose Create > User or click Add on the Users list window.
The Add User dialog box opens with the Info tab selected.
2 Select a User Type.
Global users, which are created in the Seapine License Server or in TestTrack Pro, have usernames and passwords and can log in.
Local users, which are created in TestTrack Pro, cannot log in. Local users are generally created for tracking purposes.
Tip: You can add the Type column to the Users list window to quickly view which users are local and which ones are global.
3 Enter the user’s First Name and Last Name.
4 Enter a Username if you are creating a global users.

221Chapter 19Managing Users
5 Enter the information on the Info tab.
Select a Security Group.
Enter the user Phone Numbers.
Select an email type and enter the user Email Address.
Enter and confirm a user Password if you are creating a global user. Users can change their passwords when they log in.
6 Click the Notify tab to select email notification options.
Select a rule and click Configure Rules to configure user notification rules. For more information see Configuring user notification rules, page 22.
Tip: Users can also create their own email notifications.

222 Chapter 19Managing Users
7 Click the License tab and select a license for the global user.
All fields are disabled if you are adding a local user.
8 Click the Address tab and enter the user address.
9 Click the Notes tab and enter any user notes.

223Chapter 19Managing Users
10 Click the CPU tab to enter the user’s CPU information.
This information can help your support department troubleshoot any bugs the user reports.
11 Click the Peripherals tab to enter the user’s peripherals information.
This information can help your support department troubleshoot any bugs the user reports.
12 Click the Display Settings tab to limit the information displayed on the user’s list windows.
Select a list window then add or remove columns. You can also reorder the columns.
Tip: You can select a filter for the Defects list window. When the user opens the Defects list window, it will only include defects that match the filter criteria. This is useful if you want to restrict a user to work with specific defects.
13 Skip the Statistics tab.
This read-only tab contains user statistical information.
14 Click Add.
The user is added.

224 Chapter 19Managing Users
Retrieving global usersGlobal users that are created using the Seapine License Server Admin Utility can be retrieved for use with TestTrack Pro. If the user is assigned a named or floating license, they can also log in and work with TestTrack Pro.
1 Click Retrieve Global on the Users list window.
The Retrieve Global User dialog box opens.
2 Select the user you want to add to the current project.
You can select more than one user.
3 Click Add.
The global user is retrieved.
Promoting usersYou can promote users to the Seapine License Server, which makes them available to all projects. The user’s demographic information is also moved to the Seapine License Server.
1 Select the user on the Users list window.
2 Choose Edit > Promote User or click Promote on the Users list window.
The Promote to Global User dialog box opens.

225Chapter 19Managing Users
3 Enter a Username.
4 Select a Promote As user.
You can create a new global user or you can use an existing Seapine License Server user record. If the local user’s first and last name matches an existing global user, that user is selected as the Promote As user.
Note: For example, a global user named Joseph User is created. A local user named Joe User is also created. These are the same user with a different first name. Joe User can be promoted as Joseph User. The local user information is discarded and replaced with the global user information.
5 Click OK.
The user is promoted.
Viewing users1 Select the user on the Users list window.
2 Choose Edit >View Users or click View on the Users list window.
The read-only View User dialog box opens. Click the tabs to view the user information.
3 Click OK to close the View User dialog box.
Editing users1 Select the user on the Users list window.
2 Choose Edit > Edit Users or click Edit on the Users list window.
The Edit User dialog box opens.
3 Make any changes and click OK.
Your changes are saved.
Duplicating usersIf you are adding users with similar information you can save time by duplicating an existing user.
1 Select the user on the Users list window.
2 Choose Edit > Duplicate User.
A number incremented by one is added to the user’s last name. For example, if you duplicate Jane User, a user named Jane User1 is added.
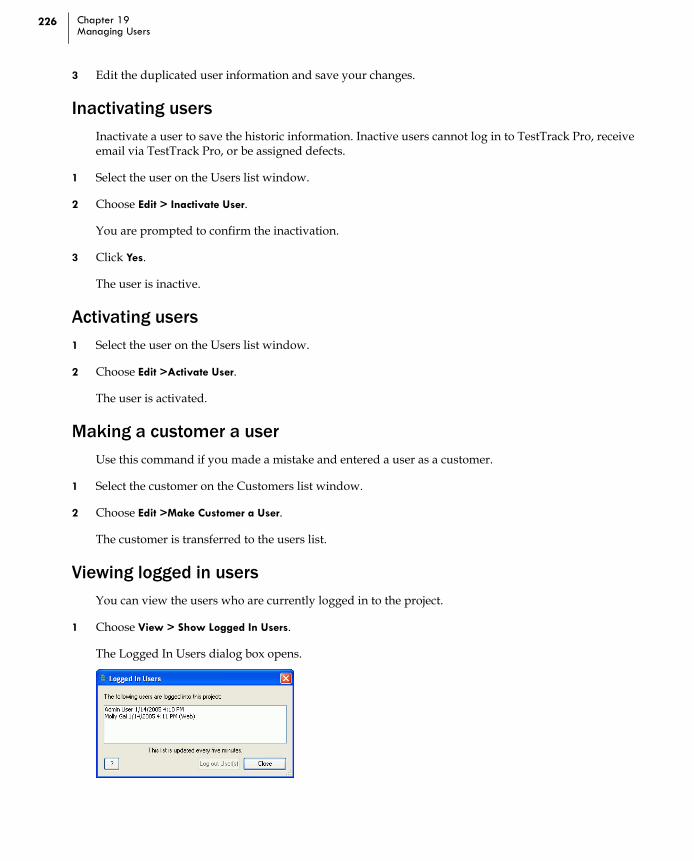
226 Chapter 19Managing Users
3 Edit the duplicated user information and save your changes.
Inactivating usersInactivate a user to save the historic information. Inactive users cannot log in to TestTrack Pro, receive email via TestTrack Pro, or be assigned defects.
1 Select the user on the Users list window.
2 Choose Edit > Inactivate User.
You are prompted to confirm the inactivation.
3 Click Yes.
The user is inactive.
Activating users1 Select the user on the Users list window.
2 Choose Edit >Activate User.
The user is activated.
Making a customer a userUse this command if you made a mistake and entered a user as a customer.
1 Select the customer on the Customers list window.
2 Choose Edit >Make Customer a User.
The customer is transferred to the users list.
Viewing logged in usersYou can view the users who are currently logged in to the project.
1 Choose View > Show Logged In Users.
The Logged In Users dialog box opens.

227Chapter 19Managing Users
2 Click Close to close the dialog box.
Logging out usersUsers require a license to run TestTrack Pro. If a user does not exit TestTrack Pro correctly, the license is not released. When this happens, you can free the license by logging out the user. You can also log out users if you need to perform maintenance or make changes that require all users to be logged out.
1 Choose View > Show Logged In Users.
The Logged In Users dialog box opens.
2 Select the user you want to log out.
To select more than one user, Ctrl+click each user.
3 Click Log out User(s).
The user is logged out and the dialog box closes. When you log out users, they are notified that their session was dropped by an administrator.
Deleting usersYou can delete local TestTrack Pro users. Global users cannot be deleted from TestTrack Pro. Global users can be disassociated from the current project, resulting in lost historic information.
Tip: Historic information is deleted with the user. Inactivate the user if you need to retain historic information.
1 Select the user on the Users list window.
2 Choose Edit >Delete User or click Delete.
You are prompted to confirm the deletion.
3 Click Yes.
The user is deleted.

228 Chapter 19Managing Users

229Chapter 20Managing Customers
Chapter 20Managing Customers
Customers are generally the end-users of your products or services. Unlike users, customers usually do not have access to the project and are created for tracking purposes.
Adding customers, 230
Retrieving global customers, 234
Promoting customers, 234
Viewing customers, 235
Searching for customers, 235
Editing customers, 236
Duplicating customers, 236
Making a user a customer, 236
Deleting customers, 237

230 Chapter 20Managing Customers
Adding customers1 Choose Create > Customer or click Add on the Customers list window.
The Add Customer dialog box opens.
2 Select a User Type.
Global customers, which are created in the Seapine License Server or in TestTrack Pro, have usernames and passwords and can log in.
Local customers, which are created in TestTrack Pro, cannot log in. Local customers are generally created for tracking purposes.
Tip: Add the Type column to the Customers list window to quickly view which users are local and which ones are global.
3 Enter a First Name and Last Name.
4 Enter a Username if you are creating a global customer.
5 Enter the information on the Info tab.
Select a Security Group for the customer.
Enter the user Phone Numbers.
Select an email type and enter the user Email Address.
Enter and confirm a Password if you are creating a global customer. Customers can change their passwords when they log in.

231Chapter 20Managing Customers
6 Click the Notify tab to select email notification options.
Select a rule and click Configure Rules to configure the user notification rules. For more information see Configuring user notification rules, page 22.
7 Click the License tab to select a license for the customer.
All fields are disabled if you are adding a local customer.

232 Chapter 20Managing Customers
8 Click the Address tab and enter the address information.
9 Click the Notes tab and enter any notes about the customer.
10 Click the CPU tab to enter the customer’s CPU information.
This information can help your support department troubleshoot any bugs the customer reports.
11 Click the Peripherals tab to enter the customer’s peripherals information.
This information can help your support department troubleshoot any bugs the customer reports.

233Chapter 20Managing Customers
12 If you are creating a global customer, click the Display Settings tab to limit the information displayed on list windows.
Select a list window then add or remove columns. You can also reorder the columns.
Tip: You can select a filter for the Defects list window. When the customer opens the Defects list window, it will only include defects that match the filter criteria. This is useful if you want to restrict a customer to only view specific defects
13 Skip the Statistics tab.
This read-only tab contains statistical information and is used when viewing customer information.
14 Skip the History Tab.
This read-only tab contains information about defects the customer reported.
15 Click Add.
The customer is added to the project.

234 Chapter 20Managing Customers
Retrieving global customersGlobal customers that are created using the Seapine License Server Admin Utility can be retrieved for use with TestTrack Pro.
1 Choose Edit > Retrieve Global Customer or click Retrieve Global Customer on the Customers list window.
The Retrieve Global Customer dialog box opens.
2 Select the customers you want to retrieve.
3 Click Add.
The customers are added to the current project.
Promoting customersYou can promote local customers to the Seapine License Server, which makes them available to all projects. The customer’s demographic information is also moved to the Seapine License Server. When you promote a customer, you can create a new global customer or use an existing Seapine License Server customer record.
1 Select the customer on the Customers list window.
2 Choose Edit > Promote Customer or click Promote on the Customers list window.
The Promote to Global Customer dialog box opens.
3 Enter a Username.

235Chapter 20Managing Customers
4 Select a Promote As customer.
If the customer’s first and last names match an existing global customer, the matching customer is automatically selected as the Promote As customer. The customer can also be promoted as a new global customer.
For example, a global customer named Anna Customer is created. A local customer named AnnaV Customer is also created. These are the same customer with a different first name. AnnaV Customer can be promoted as Anna Customer. The local customer information is discarded and replaced with the global customer information.
5 Click OK.
The customer is promoted.
Viewing customers1 Select the customer on the Customers list window.
2 Choose Edit >View Customer or click View.
The read-only View Customer dialog box opens.
3 Click the tabs to view the customer information.
4 Click OK to close the View Customer dialog.
Searching for customersSearching provides an easy way to find customers.
1 Click Search on the Customers list window.
The Find Customer dialog box opens.

236 Chapter 20Managing Customers
2 Enter the search criteria.
Enter full or partial first name, last name, and company information.
Leave a field blank if you do not want to include it in the search.
3 Select a Search Option.
Name/Company begins with this text looks for values beginning with the entered text.
Name/Company contains this text looks for values containing the entered text.
4 Click Find.
Customers that meet the search criteria are displayed in alphabetical order.
Editing customers1 Select the customer on the Customers list window.
2 Choose Edit > Edit Customer or click Edit.
The Edit Customer dialog box opens.
3 Make any changes and click OK.
Your changes are saved and you return to the Customers list window.
Duplicating customersIf you are adding customers with similar information you can save time by duplicating existing customers then editing their information.
1 Select the customer on the Customers list window.
2 Choose Edit > Duplicate Customer.
The customer is duplicated and a number incremented by one is added to the customer name.
3 Modify the duplicated customer and save your changes.
Making a user a customerIf you make a mistake and enter a user as a customer, you can easily make the user a customer.
1 Select the user you want to convert to a customer on the Users list window.
You can select more than one user at a time.
2 Choose Edit > Make User a Customer.
The user is transferred to the customers list.

237Chapter 20Managing Customers
Deleting customersDeleting a customer results in the loss of historic information, such as Reported By or Defect Action records. To save historic information, inactive the customer.
1 Select the customer on the Customers list window.
2 Choose Edit >Delete Customer or click Delete on the Customers list window.
You are prompted to confirm the deletion.
3 Click Yes.
The customer is deleted.

238 Chapter 20Managing Customers

239Chapter 21Importing and Exporting Files
Chapter 21Importing and Exporting Files
Save time and easily share data when you import or export XML or text files.
XML import and export, 240
Exporting to XML, 243
Importing XML files, 244
Text file import and export, 246
Exporting to text files, 246
Creating text file export templates, 247
Using text file export templates, 248
Importing text files, 248
Creating text file import templates, 250
Using text file import templates, 250

240 Chapter 21Importing and Exporting Files
XML import and exportXML import and export is the recommended method for importing and exporting files. This method includes the following advantages over importing and exporting text files:
You do not need to match fields.
You can import and export multiple Reported by records.
You can import and export multiples of the same defect actions.
You can import and export more than one record type.
You can import and export file attachments associated with defects.
Admin: Access to XML import/export should be limited to administrative security groups. The misuse of this feature can result in a large number of unwanted records in a project.
The import/export command does not enforce other command-level or field-level security options. For example, if users have export security access they can access security group information even if they do not have access to view security groups. Regular, non-administrative users should not be given security access to the import/export commands.
XML import/export notesIf you manually generate XML files or use a third-party application, you can import these XML files into TestTrack Pro. Refer to the TestTrackData.dtd file for proper formatting of your XML file.
Do not modify the TestTrackData.dtd file. Modifying this file may result in validation errors or errors importing XML data.
Leave <“not set”> elements empty.
Special characters such as &, <, >, “, and ‘ cannot be imported. You must replace these characters with their corresponding entity reference before importing. For example, & must be replaced with &.
Control characters cannot be imported and will be removed when exporting text fields. This includes the following:
Hex Value Explanation
0x01 Start of Heading
0x02 Start of Text
0x03 End of Text
0x04 End of Transmission
0x05 Enquiry

241Chapter 21Importing and Exporting Files
Note: Due to XML specifications, you cannot export an item with a string field containing control characters. There is no way to escape this type of character data.
0x06 Acknowledge
0x07 Bell
0x08 Backspace
0x0B Vertical Tabulation
0x0C Form Feed
0x0E Shift Out
0x0F Shift In
0x10 Data Link Escape
0x11 Device Control One
0x12 Device Control Two
0x13 Device Control Three
0x14 Device Control Four
0x15 Negative Acknowledge
0x16 Synchronous Idle
0x17 End of Transmission Block
0x18 Cancel
0x19 End of Medium
Hex Value Explanation

242 Chapter 21Importing and Exporting Files
XML import/export warnings and errorsA warning means the record can be imported but some of the information could not be imported. Following are some of the warning messages that might be displayed as a result of the file validation:
Could not find match for custom field (applies only to defects).
Could not find match for pop-up menu item value.
Could not generate custom field value.
A default value will be used instead of the specified value.
An error means the record cannot be imported. Following are some of the error messages that might be displayed as a result of the XML file validation:
Defect number already exists (applies only to defects and only if using the import defect number field information option).
Name already exists (applies only to users, customers, or test configs).
Username already exists (applies only to users or customers).
Two defects with same defect number in XML file (applies only to defects and only if using the import defect number field information).
Two entries with same name in XML file (applies only to users, customers, or test configs).
Two entries with same username in XML file (applies only to users or customers).

243Chapter 21Importing and Exporting Files
Exporting to XMLYou can export defects, users, customers, and test configurations to an XML file. Keep the following in mind:
The status and assigned to fields can be exported but not imported. These fields are exported so you can use the data with a third-party application.
The defects found and defects assigned field can also be exported but not imported.
Usernames and passwords are both exported. Usernames are exported in plain text; passwords are always exported as encrypted text.
Note: If you only want to export specific defects, select the defects before continuing.
1 Choose File > Export > XML Export.
The XML Export dialog box opens.
2 Select the type of records you want to export.
To export multiple record types, Ctrl+click each record type.
3 Select the export options if you are exporting defects.
Select Export historical log information with defects to export a historical account of changes made to each exported defect.
Select Export file attachments with defects to include file attachments associated with exported defects. Defects and file attachments are exported to a ZIP file.
4 Click Export.
The Export XML File dialog box opens.
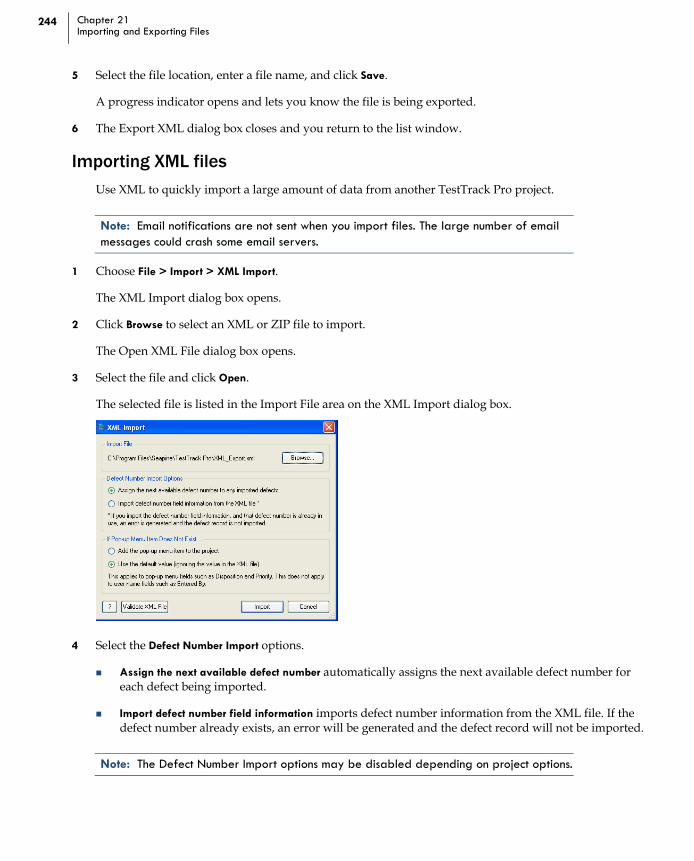
244 Chapter 21Importing and Exporting Files
5 Select the file location, enter a file name, and click Save.
A progress indicator opens and lets you know the file is being exported.
6 The Export XML dialog box closes and you return to the list window.
Importing XML filesUse XML to quickly import a large amount of data from another TestTrack Pro project.
Note: Email notifications are not sent when you import files. The large number of email messages could crash some email servers.
1 Choose File > Import > XML Import.
The XML Import dialog box opens.
2 Click Browse to select an XML or ZIP file to import.
The Open XML File dialog box opens.
3 Select the file and click Open.
The selected file is listed in the Import File area on the XML Import dialog box.
4 Select the Defect Number Import options.
Assign the next available defect number automatically assigns the next available defect number for each defect being imported.
Import defect number field information imports defect number information from the XML file. If the defect number already exists, an error will be generated and the defect record will not be imported.
Note: The Defect Number Import options may be disabled depending on project options.

245Chapter 21Importing and Exporting Files
5 Select the Pop-up Menu Item options.
These options apply to pop-up menu fields, such as Priority, and do not apply to user fields.
Add the pop-up menu item to the project automatically adds the pop-up menu item to the project.
Use the default value uses the default value and ignores any value in the imported XML file.
6 Optionally click Validate XML File to validate the file. Resolving problems before importing is much easier than cleaning up data in the TestTrack Pro project.
If there is a problem with the file format, the XML Import Warning and Errors dialog box opens. The data will not be imported. Click Save As to save the contents of the Warnings and Errors dialog box as a text file.
7 Click Import to import the records.
The records are imported. The XML Import dialog box closes and you return to the Defects list window.
When a user field, such as Fixed By, is imported, TestTrack Pro tries to match the first name and last name with an existing user or customer. If an exact match is not found, the user/customer is created.
A defect’s historical data is not imported. Historical data fields are system-generated. The Created by and Modified by fields are populated with the currently logged in user’s name. The Date created and Date last modified fields are populated with the current date and time. The Creation method field is populated with XML file import.
When imported, the password field can be either encrypted or in plain text. If TestTrack Pro generated the XML file, the password is encrypted. If a third-party XML file is imported, the password is in plain text.

246 Chapter 21Importing and Exporting Files
Text file import and exportYou can import and export records as comma- and tab-delimited text files. You can also import/export files created in other project programs such as FileMaker Pro. The recommended import/export method is XML. For more information see XML import and export, page 240.
Admin: Import/export security access should be limited to administrative security groups. The misuse of this import feature can result in a significant number of unwanted records in your project.
The import/export command does not enforce other command-level or field-level security options. For example, if users have export security access they can access security group information even if they do not have access to view security groups. Regular, non-administrative users should not be given security access to the import/export commands.
Exporting to text filesTo export just a few records, select the records on the list window before continuing.
1 Choose File > Export > Text File Export.
The Export dialog box opens.
2 Select the field type you want to export from the Export fields list.
If you have a Text File Export Template that matches the file format, load it and skip to step 6.

247Chapter 21Importing and Exporting Files
3 Select the fields to export.
Click Check All to export all fields.
Click Check None to deselect all fields.
4 Repeat steps 2 and 3 for all record types.
5 Select the Export options.
Select Export selected records only to only export records selected in the list window.
Select Include column headings to export the column headings.
Select Convert EOLs to spaces to convert carriage returns/line feeds to spaces.
Select Tab or Comma Delimiter to insert the character between fields.
Note: Create a text file export template if you are going to reuse this layout.
6 Click Export.
The Export file dialog box opens.
7 Select the file location and enter a file name.
8 Click Save.
A progress indicator opens and lets you know the file is being exported.
Creating text file export templatesIf you export text files with the same field layout often, save the format as a Text File Export Template.
1 Set up the fields as described in Exporting to text files, page 246.
2 Click the Save button in the Export Templates area on the Export dialog box.
The Save Export Template dialog box opens.
3 Select the file location and enter a file name.
4 Click Save.
You return to the Export dialog box.

248 Chapter 21Importing and Exporting Files
Using text file export templates1 Choose File > Export > Text File Export.
The Export dialog box opens.
2 Click the Load button in the Export Templates area on the Export dialog box.
The Load Export Template dialog box opens.
3 Select the Export Template.
4 Click Open.
The template is loaded and you return to the Export dialog box.
Importing text files
Note: Email notifications are not sent when you import files. The large number of email messages could crash some email servers.
1 Choose File > Import > Text File Import.
The Import dialog box opens.
2 Select the field type you want to import from the Import fields menu. You can import defect, user, and customer information.
3 Click Browse to select a file to import.
The Open dialog box opens.
4 Select the file you want to import.

249Chapter 21Importing and Exporting Files
5 Click Open.
The Import dialog box is populated with the text file information.
6 Select the Import options.
Select Ignore first record to ignore the first record, which often contains field names.
Select Handle quoted text if the program used to export records supports quoting fields. When a file is exported from a project, quotes are often inserted around comma- and tab-delimited records.
Select Map vertical tab to return to restore the formatting of multi-line fields. Some applications map carriage returns in multi-line fields to vertical tab characters.
Select Tab or Comma Delimiter if either character is used to separate fields.
7 Match the TestTrack Pro fields in the right column to the fields in the left column.
The column on the left previews the fields as they appear in the file. Click the Previous and Next arrows to move from record to record
Click and drag the fields in the right column up or down to the proper position. If you cannot find an exact match, use the closest equivalent.
8 Select the fields to import.
To select a field, click in the middle column next to the field. A check mark appears next to selected fields. Click again to deselect the field.
9 Click Import.
The fields are imported.
Note: If you are going to reuse this layout, create a text file import template to save time.
250 Chapter 21Importing and Exporting Files
Creating text file import templatesIf you import text files with the same field layout often, save the format as a Text File Import Template.
1 Map the fields as described in Importing text files, page 248.
2 Click Save in the Import Templates area on the Import dialog box.
The Save Import Template dialog box opens.
3 Select the file location and enter a file name.
4 Click Save.
The Import Template is saved. You return to the Import dialog box.
Using text file import templates1 Choose File > Import > Text File Import.
The Import dialog box opens.
2 Click the Load button in the Import Templates area on the Import dialog box.
The Load Import Template dialog box opens.
3 Select the Import Template and click Open.
The template is loaded. You return to the Import dialog box.

251Chapter 22Configuring Email Templates and
Hyperlinks
Chapter 22
Configuring Email Templates and Hyperlinks
Customized email templates and email notification hyperlinks keep users and customers up-to-date.
Configuring email templates, 252
Adding email notification hyperlinks, 256
Managing email notification hyperlinks, 257

252 Chapter 22Configuring Email Templates and Hyperlinks
Configuring email templatesEmail templates are used when notifications are sent to users and when confirmation messages are sent to users and customers who submit items via email. TestTrack Pro includes standard email templates that can be customized. You can also create new email templates.
1 Choose Tools > Administration > Email Templates.
The Configure Email Templates dialog box opens.
2 Select an email template to view its description.
You can also add a template, view or edit an existing one, or delete a template that you no longer use.
3 Click OK to close the dialog box.

253Chapter 22Configuring Email Templates and Hyperlinks
Adding email templates1 Choose Tools > Administration > Email Templates.
The Configure Email Templates dialog box opens.
2 Click Add.
The Add Email Template dialog box opens with the Format tab selected.
3 Enter a Name and Description.
4 Enter a Subject.
You can enter text and use field codes to customize the subject line.
5 Select Send email in HTML format to send HTML-formatted emails.
Note: If you select this option and want to use email notification hyperlinks, the %NURL% field code must be enclosed in href tags. For more information see Adding email notification hyperlinks, page 256.
6 Select a View option.
This option is only available if you selected to send email in HTML format.
Layout displays the email template in rich text format. Use the available formats to change the appearance of the email.
HTML displays the email template in HTML code.

254 Chapter 22Configuring Email Templates and Hyperlinks
7 Enter the Message body.
To insert a field code in the message body, select a code from the Available field codes list and click Insert. See Reference: Field Codes, page 267 for a list of field codes.
If the email template is in HTML format, you can import a text or HTML file as the message body. The imported file replaces any existing text in the message body field. Click Import, select a file, and click Open. The file contents are added to the message body.
Note: Any field added to an email template can be viewed by all email recipients, regardless of field-level security settings.
8 Select the Options tab.
9 Select a Template Access option.
Select All users can view this template if you do not want to restrict users from viewing the template.
Select Only allow users in the following groups to view this template then choose the security groups that you want to have access to the template. Users that do not belong to the security groups will not be able to view or select the template when they set up notification rules.
Note: Users can still receive email notifications that use a restricted template. If you restrict template access, make sure that users who can access it understand the type of information it contains and what it should be used for. For example, you create a template to notify managers about sensitive information. You also restrict template access to the manager security group to ensure that other employees cannot select it. However, other employees can still receive an email that uses the restricted template.

255Chapter 22Configuring Email Templates and Hyperlinks
10 Select a Recipient list for email notifications option.
Do not select Each email contains multiple recipients (can see who received mail) if you are using email notification hyperlinks with this template. The same email cannot be sent to multiple recipients because each recipient requires a unique cookie.
11 Click OK.
The email template is added.
Viewing email templates1 Choose Tools > Administration > Email Templates.
The Configure Email Templates dialog box opens.
2 Select an email template and click View.
The View Email Template dialog box opens.
3 Click OK when you finish viewing the template.
Editing email templates1 Choose Tools > Administration > Email Templates.
The Configure Email Templates dialog box opens.
2 Select an email template and click Edit.
The Edit Email Template dialog box opens.
3 Make any changes and click OK.
The changes are saved.
Deleting email templates1 Choose Tools > Administration > Email Templates.
The Configure Email Templates dialog box opens.
2 Select an email template and click Delete.
You are prompted to confirm the deletion.
3 Click Yes.
The template is deleted.

256 Chapter 22Configuring Email Templates and Hyperlinks
Adding email notification hyperlinksEmail notification hyperlinks can be added to email templates and user notifications. These clickable links take users directly to the related defect. For example, when users receives a defect assignment message they can click the hyperlink and go directly to the defect assigned to them.
Note: Disable the Allow Access via Email Notification Hyperlink command security setting if you do not want a security group to have access to email notification hyperlinks.
You can also set additional mail options if you are concerned that this feature may increase security risks. For more information see Setting send mail options, page 155.
1 Choose Tools > Administration > Email Templates.
The Configure Email Templates dialog box opens.
2 Select the email template you want to add the hyperlink to and click Edit.
You can also add email notification hyperlinks when you add email templates.
3 Add the %NURL% field code and any text to the body of the message.
When the template is generated the field code is replaced with a hyperlink to the defect.
Note: If the Send email in HTML format is enabled for the email template, you need to use href tags with the field code. If you send a plain text email with a URL link in it, most email clients make the link clickable. If you send an html email with a URL link in it, use href tags to make the link clickable (e.g., <ahref=”%NURL%”> Text <\a>).
4 Click OK.
The changes are saved.
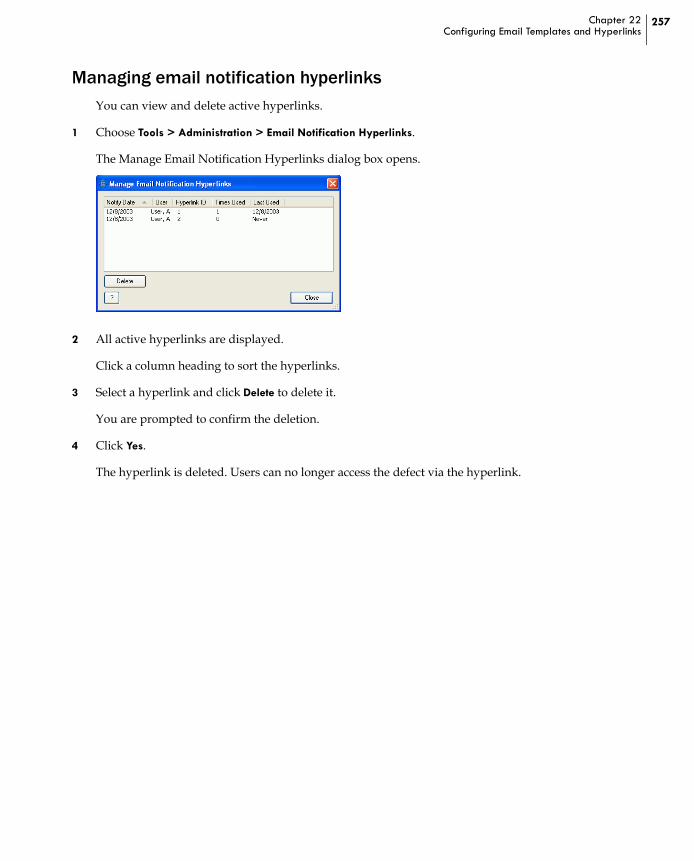
257Chapter 22Configuring Email Templates and Hyperlinks
Managing email notification hyperlinksYou can view and delete active hyperlinks.
1 Choose Tools > Administration > Email Notification Hyperlinks.
The Manage Email Notification Hyperlinks dialog box opens.
2 All active hyperlinks are displayed.
Click a column heading to sort the hyperlinks.
3 Select a hyperlink and click Delete to delete it.
You are prompted to confirm the deletion.
4 Click Yes.
The hyperlink is deleted. Users can no longer access the defect via the hyperlink.

258 Chapter 22Configuring Email Templates and Hyperlinks

259Chapter 23Working with SoloBug
Chapter 23Working with SoloBug
SoloBug is a stand-alone bug reporting application that allows customers and other users to submit defects directly to TestTrack Pro.
About SoloBug, 260
Distributing SoloBug, 260
Customizing SoloBug, 261
Customizing SoloBug for Palm OS, 263
Automatically importing SoloBug files, 265
Manually importing SoloBug files, 265

260 Chapter 23Working with SoloBug
About SoloBugCross-platform SoloBug includes the following benefits:
Eliminates data entry of bug reports and feature requests by automatically importing bug reports into TestTrack Pro.
Restricts customers to your bug reporting terminology, saving data entry time.
Captures customers’ computer information, making it easier to track configuration-specific issues.
Lets your customers and users include file attachments with bug reports and feature requests.
What are SoloBug files?A SoloBug file contains a single bug report, or feature request, created by customers and users. The SoloBug file is emailed to an address you specify. You can import the file into any TestTrack Pro project. A SoloBug file contains:
The customer’s or user’s personal information and computer setup.
A description of the problem or feature request.
Any additional data or files attached to the SoloBug file.
Distributing SoloBugYou can email the SoloBug executable (.exe or .pdb) to your customers, or put it on your Web site and allow customers to download it. When customers find bugs or want to request features, they simply start SoloBug, enter the information, save the file, and then email it to you. A SoloBug file is a single bug report that contains the customer's contact information and computer configuration, a description of the problem or feature request, and optional file attachments.
You can easily import the SoloBug file information into TestTrack Pro. You can use the email import method, configure TestTrack Pro to automatically import SoloBug files, or manually import them. A new defect is created each time a SoloBug file is imported.
SoloBug is installed with a read-only user guide, named SoloBug.pdf, that you can distribute to your users. It is also installed with a customizable user guide, named SoloBug.doc, that you may want to use instead. You can customize this guide with your company’s name, email addresses, and other information.
Note: The customizable user guide is named Solobug.doc. It is installed in the TestTrack Pro application folder. You should make a copy of the document before you customize it.

261Chapter 23Working with SoloBug
Customizing SoloBugBefore distributing SoloBug, customize the executable to make sure customers and users provide all the information you need. You can customize such things as the title, instructions, or field names. You can also rename fields, add field values, and make fields required.
Note: To ensure the correct SoloBug executable is distributed for each project, copy and rename the executable to match the project name.
On Windows, only one executable can be the registered application for a file extension. When you double-click a SoloBug file, the registered SoloBug application opens. To ensure custom information is available, open the file using the project-specific SoloBug application.
1 Start TestTrack Pro and log in to the project you want to customize SoloBug for.
2 Choose Tools > Administration > Customize SoloBug.
The Customize SoloBug dialog box opens.
3 Click Browse to select the SoloBug executable you want to customize.
The Open SoloBug Application dialog box opens.
4 Select a SoloBug executable and click Open.
You return to the Customize SoloBug dialog box with all fields populated.

262 Chapter 23Working with SoloBug
5 Enter the General SoloBug Settings.
Title appears in the title bar of the SoloBug application, preceding the name of the open bug report file.
File Name Prefix is added to the SoloBug file name. The remaining portion of the file name is an automatically generated sequence number. Use this field to help organize SoloBug files. For example, enter each customer’s name in this field.
Instructions provide users with information specific to your use of SoloBug, such as the email address you want the files sent to. Instructions are not displayed if this field is empty.
6 Select a Field to Customize to customize a SoloBug field.
You can customize fields names, add field values, and set user options.
The <Name> field is visible is selected by default. Clear the check box to make the field and its label invisible.
Select User is required to select a value for the field to make the field required. When a field is required, users cannot save a SoloBug file until values are entered for all required fields.
Select User can enter a free form text entry in the field to let users enter a value for this field.
Enter a name in the text box to rename the field. The In SoloBug, the...field is named value is populated from the SoloBug executable and may not match the Field to Customize selection.
Default field values are displayed in the Field Values list. You can add new values or edit or delete existing values. To reorder values, click the arrow next to the field and drag it up or down.
Note: If you want to use the required fields, field names, and field values you set up in the TestTrack Pro project click Use Project Settings. The SoloBug executable will be synchronized with the TestTrack Pro project settings.
7 Click Update SoloBug & Close when you finish configuring SoloBug.
The customized SoloBug executable (.exe. file) is ready for distribution. See Distributing SoloBug, page 260 for more information.

263Chapter 23Working with SoloBug
Customizing SoloBug for Palm OSSoloBug for Palm OS lets your users and customers easily submit bug reports and feature requests. You can customize such things as the title, instructions, and field names. In addition, you can rename fields, add field values, and make fields required. You can also customize SoloBug for each customer.
1 Start TestTrack Pro and log in to the project you want to customize SoloBug for.
2 Choose Tools > Administration > Customize SoloBug for Palm OS.
The Customize SoloBug for Palm dialog box opens.
3 Select a Customization Option.
Select Create new Palm OS configuration project to create a new configuration project. Skip to step 4 to continue customizing the configuration project.
Select Edit existing Palm OS configuration to edit a configuration project. Click Browse to select a Palm configuration project. Select the project you want to edit and click Open. You return to the Customize SoloBug for Palm OS dialog box, with all fields populated.

264 Chapter 23Working with SoloBug
4 Enter the General SoloBug Settings.
Title appears in the title bar of the SoloBug application, preceding the name of the open bug report file.
File Name Prefix is added to the SoloBug file name. The remaining portion of the file name is an automatically generated sequence number. Use this field to help organize SoloBug files. For example, enter each customer’s name in this field.
Instructions provide users with information specific to your use of SoloBug, such as the email address you want the files sent to. Instructions are not displayed if this field is empty.
5 Select a Field to Customize to customize a SoloBug field.
You can customize fields names, add field values, and set user options.
The <Name> field is visible is selected by default. Clear the check box to make the field and its label invisible.
Select User is required to select a value for the field to make the field required. When a field is required, users cannot save a SoloBug file until values are entered for all required fields.
Select User can enter a free form text entry in the field to let users enter a value for this field.
Enter a name in the text box to rename the field. The In SoloBug, the...field is named value is populated from the SoloBug executable and may not match the Field to Customize selection.
Default field values are displayed in the Field Values list. You can add new values or edit or delete existing values. To reorder values, click the arrow next to the field and drag it up or down.
Note: If you want to use the required fields, field names, and field values you set up in the TestTrack Pro project click Use Project Settings. The SoloBug executable will be synchronized with the TestTrack Pro project settings.
6 Click Save when you finish configuring SoloBug.
If you are creating a new project the Save Palm OS SoloBug Configuration Project dialog box opens. Enter a file name and click Save.
If you are editing an existing project your changes are automatically saved.
The customized SoloBug executable (.pdb file) is ready for distribution. See Distributing SoloBug, page 260 for more information.

265Chapter 23Working with SoloBug
Automatically importing SoloBug filesIf you receive a large number of SoloBug files, you can configure TestTrack Pro to automatically import the SoloBug files that customers submit.
1 Choose Tools > Administration > Project Options.
The Project Options dialog box opens.
2 Click the SoloBug tab.
Select a Look for new files option.
Note: You can override this setting by choosing File > Import > Perform Server Import. Any new SoloBug files will be imported regardless of the time interval you set.
3 Click OK to save the settings.
Manually importing SoloBug filesIf you do not receive a large number of SoloBug files, or want to make sure they are imported into the right project, you can manually import the files at any time.
1 Choose File > Import > Load SoloBug Files.
The SoloBug Files to Import dialog box opens.
2 Select the SoloBug file you want to import.
SoloBug files are saved with a .sbg extension.
3 Click Open.
The imported file appears in the Defects list window at the end of the list. Notice the new defect icon appears next to it.
Note: You can also drag the SoloBug file onto the Defects list window.

266 Chapter 23Working with SoloBug
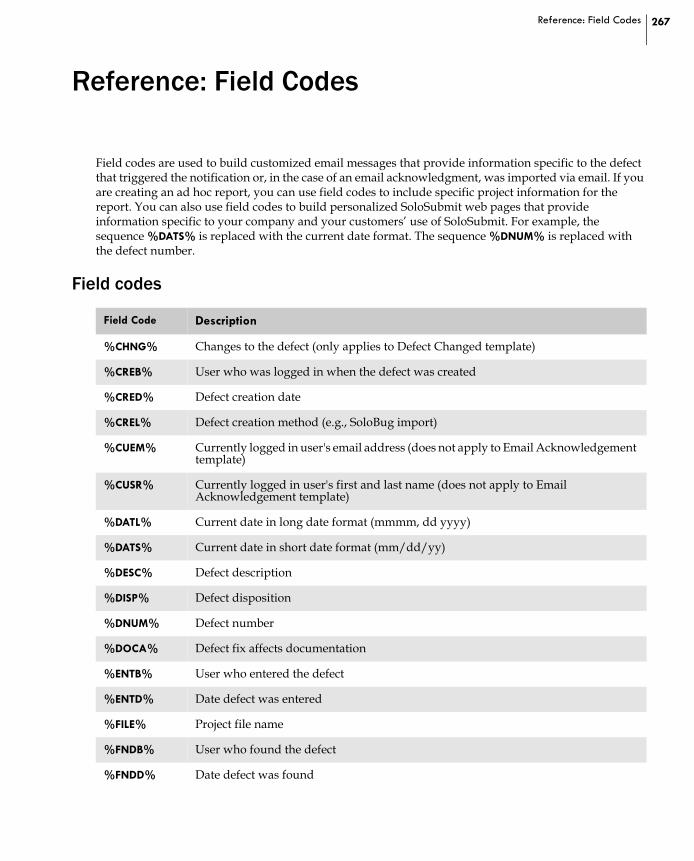
267Reference: Field Codes
Reference: Field Codes
Field codes are used to build customized email messages that provide information specific to the defect that triggered the notification or, in the case of an email acknowledgment, was imported via email. If you are creating an ad hoc report, you can use field codes to include specific project information for the report. You can also use field codes to build personalized SoloSubmit web pages that provide information specific to your company and your customers’ use of SoloSubmit. For example, the sequence %DATS% is replaced with the current date format. The sequence %DNUM% is replaced with the defect number.
Field codes
Field Code Description
%CHNG% Changes to the defect (only applies to Defect Changed template)
%CREB% User who was logged in when the defect was created
%CRED% Defect creation date
%CREL% Defect creation method (e.g., SoloBug import)
%CUEM% Currently logged in user's email address (does not apply to Email Acknowledgement template)
%CUSR% Currently logged in user's first and last name (does not apply to Email Acknowledgement template)
%DATL% Current date in long date format (mmmm, dd yyyy)
%DATS% Current date in short date format (mm/dd/yy)
%DESC% Defect description
%DISP% Defect disposition
%DNUM% Defect number
%DOCA% Defect fix affects documentation
%ENTB% User who entered the defect
%ENTD% Date defect was entered
%FILE% Project file name
%FNDB% User who found the defect
%FNDD% Date defect was found

268 Reference: Field Codes
%FNDV% Version defect was found in
%MODB% User who last modified the defect
%MODD% Date defect was last modified
%NUMR% Number of users and customers reporting the defect
%NURL% Email notification hyperlink
%PRIO% Defect priority
%PRNM% Project Name field in the Project Info dialog.
%PROD% Product that contains the defect.
%REFR% Defect reference field
%REPR% Defect reproducible status
%RESO% Defect fix resolution
%SEQN% Defect sequence number (applies only to Email Acknowledgement template)
%SEVR% Defect severity
%STAT% Defect status
%STEP% Steps to reproduce the defect
%SUMM% Defect summary
%TCFG% Test configuration name
%TPLA% Defect fix affects the test plan
%TYPE% Defect type
%WORK% Defect workaround
%WRKH% Defect has workaround
%Z_...% Custom field codes
Field Code Description

269Reference: Field Codes
Label field codesTestTrack Pro lets you rename defect field labels. The renamed field labels have corresponding field codes. These field codes return the field label, not the field data.
Field Code Field Name
%DFUS_L% Defect - upper case, singular
%DFUP_L% Defects - upper case, plural
%DFUM_L% Defect(s) - upper case, singular/plural
%DFLS_L% defect - lower case, singular
%DFLP_L% defects - lower case, plural
%DFLM_L% defect(s) - lower case, singular/plural
%SUMM_L% Summary Type
%TYPE_L% Type
%DISP_L% Disposition
%PRIO_L% Priority
%PROD_L% Product
%COMP_L% Component
%REFR_L% Reference
%SEVR_L% Severity
%ENTB_L% Entered by
%ENTD_L% Date Entered
%STAT_L% Status
%FNDB_L% Found by
%FNDD_L% Date Found
%DATE_L% Date
%FNDV_L% Version Found
%VERS_L% Version
%DESC_L% Description
%REPR_L% Reproduced

270 Reference: Field Codes
Remember, renamed label field codes only return the label name and not the field data. For example, you rename Reference to Case Number. You customize an email template to notify managers of a problem, including the case number in the subject line. In the subject line of the template, enter %REFR_L%: %REFR%. When a manager is sent an email, the subject line includes: Case Number (label): case number (data).
Field code notesAll dates use system-defined date formats. TestTrack Pro uses the short-date style of the Regional Settings Properties defined in the operating system.
To include a percent sign (%) in the body of a message, include two percent signs in a row (e.g., “%%”).
Email notifications support field codes in the email subject line. You can include personalized subjects such as Re:%SUMM% which expand to include the defect’s summary field in the email’s subject.
%STEP_L% Steps to Reproduce
%TCFG_L% Computer Config
%HWSW_L% Other Hardware and Software
%CFTB_L% Custom Field tab
Field Code Field Name

271Reference: Toolbars
Reference: Toolbars
TestTrack Pro toolbars provide quick access to the most commonly used commands.
File
Edit
Button Action
Switch to another project on the server
Print the selected items
Button Action
Cut the selected items
Copy the selected items to the clipboard
Paste the cut or copied items
Undo the previous action
Check spelling

272 Reference: Toolbars
Find
View
Button Action
Search for defects
Search for defects using advanced find
Go to a specific defect (enter the number)
Button Action
Open the Defects list window
Open the Workbook list window
Open the Users list window
Open the Customers list window
Open the Security Groups list window
Open the Test Configs list window
Open the Filters list window
Open the Reports list window

273Reference: Toolbars
Create
Activities
Button Action
Create a new defect
Create a new Workbook task
Create a new user
Create a new customer
Create a new security group
Create a new test configuration
Create a new filter
Create a new report
Button Action
Add an additional defect report to the selected defect
Assign a defect number the selected unnumbered defects
Change multiple defect field values
Add a link to the selected defects
View a diagram of the selected link

274 Reference: Toolbars
Administration
Button Action
Send an email to a TestTrack Pro user or customer
Send an email to the user or customer who submitted the defect
Button Action
Configure field relationships
Configure custom fields
Configure required fields
Rename field labels
Configure the workflow
Configure auto-assignment rules
Configure system notifications
Configure link definitions
Configure email templates
View the audit trail
Configure project options

275Reference: Toolbars
Options
Workflow EventsEach defect event has a corresponding button on the Workflow Events toolbar. Custom event icons can also be added to the toolbar. Following are the default workflow event buttons.
Button Action
Set local options for all projects
Set user options for all projects
Button Action
Assign the defect to a user
Estimate the time needed to fix the defect or implement a new feature
Describe the defect fix
Verify the defect fix
Close the defect
Re-open the closed defect
Add release notes to the defect
Add comments to the defect

276 Reference: Toolbars

277TestTrack Pro Glossary
Glossary
Assignment rulesConfigurable rules that specify how workflow assignments are processed. Assignment rules restrict which users can enter an event and how multi-user assignments are handled if a conflict occurs.
Audit trailAn archive that records the information that is modified when a defect is added, edited, or deleted. Audit trail records are stored separately from defects and cannot be deleted.
Auto-assignment rulesConfigurable rules that automatically assign defects when defects move to a specific workflow state.
Boolean searchUsing AND, OR, NOT to narrow or broaden the search or to exclude a term from the search.
Bulk field changesUpdating multiple records in a project. You can replace values for specific fields, search for and replace strings in text fields, or add text.
Command-level securitySecurity settings that limit the TestTrack Pro commands users can access.
DatabaseSee Project.
Defect-level securitySecurity settings that limit the defects users can work with based on filters and other criteria.
Detail reportA report that includes detailed information about defects, customers, users, security groups, or test configurations.
Distribution reportA report that includes the distribution of defects in a project such as defects found by specified users or defect status.

278 TestTrack Pro Glossary
Electronic signatureAn audit trail logging option that ensures users sign off on each change. Users may be required to enter a username, password, and reason for the change.
Email notificationsEmail messages that inform users about a defect change.
Email templatesCustomizable email messages used when notifications are sent to users and confirmation messages are sent to users and customers who submit items via email.
EventsActions that users can perform for each state in a workflow such as Assign or Fix.
Field codesCodes used in email templates and reports that provide information specific to the defect that triggered a notification.
Field-level securitySecurity settings that limit the defect fields that users can view, add, and edit.
Field relationshipsA configured dependency that populates a menu with values based on a value selected in another menu.
FilterCriteria you identify and apply to view only the records that meet the criteria.
Global userA user who has a username and password and can log in to TestTrack Pro projects.
LDAPLightweight Directory Access Protocol. Protocols that allow you to define users once and share them across multiple computers and applications.
LinkingGrouping two or more related defects. Linking maintains the original defects without merging them.
List reportA report that includes summary information about defects, customers, users, security groups, or test configurations.

279TestTrack Pro Glossary
List windowA window that displays basic record information. TestTrack Pro includes the following list windows: Defects, Workbook, Customers, Users, Security Groups, Test Configs, Filters, and Reports.
Local userA user who cannot log in to TestTrack Pro or work with projects, generally created for tracking purposes.
MergingCombining two or more defects that report the same issue, resulting in one defect.
ProjectStores all of the information you track including defects, security groups, users, customers, filters, test configurations, and workbook tasks. Called “database” prior to TestTrack Pro 7.0.
Seapine License ServerA client/server application that concurrently manages user, customers, and licenses for TestTrack Pro and Surround SCM.
Security groupUsers who share responsibilities and perform similar tasks. Access to TestTrack Pro functions is controlled by group security.
SoloBugA standalone bug reporting application that allows users and customers to submit defects via email.
SoloSubmitA TestTrack Pro add-on that allows users and customers to submit bug reports and feature requests to a TestTrack Pro project using a Web browser.
Source code control (SCC) integrationAllows you to work with defects and source code files from TestTrack Pro or a supported SCC application.
StatesSteps in a workflow such as Open or Fixed.
StylesheetsExtensible Style Language (XSL) templates that you can apply to generate formatted reports.
280 TestTrack Pro Glossary
Test configsA record of the hardware and software configurations found on a specific computer.
TestTrack Pro SDKA SOAP-based software development kit (SDK) that extends TestTrack Pro's capabilities.
TransitionSpecifies the initial state of a new defect and the events that can be entered for each state. Transitions also move defects from one state to another.
Trend reportA report that includes defect events over a specified time period.
WorkbookHelps you track of your assigned defects and other tasks that you add. Other users cannot view your Workbook.
WorkflowThe path an issue takes from initial reporting to resolution.

281Index
IndexAActivating
link definitions 58users 226
Addingadditional defect reports 40auto-assign rules 181comments 82custom fields 203customers 230defects 37dictionary words 20email notification hyperlinks 256email templates 253events 171field relationships 207filters 88links 60list values 201new stylesheets 100release notes 81restrictions 89security groups 215states 169system notification rules 184test configs 96user notification rules 23users 220users to security group 217workbook tasks 118
Additional defect reportsadding 40deleting 50editing 50
Advanced findadding restrictions 89defects 46deleting restrictions 93editing restrictions 92inserting restrictions 92viewing restrictions 91
Analyzingworkflows 166
Assigningdefect numbers 55defects 76
Assignment optionsselecting for event 172
Asteriskfield labels marked with 209
Attached filesextracting 43opening 43removing 44viewing 42
Attachingclipboard images 41files to defects 41screenshots 42
Audit trail recordsexporting 198report 197searching 194validating 198viewing 196
Auto-assign rulesadding 181configuring 180deleting 183editing 182inactivating 183setting default action 182
BBoolean
operators 88
Buildingrelease notes 85
CCapturing
screenshots 42

282 Index
Changingcolumn contents 30field values 66password 25
Check in optionssetting SCC 125
Clipboardpasting images from 41
Closingdefects 80
Command-level securitysetting 216
Commentsadding 82
Compliance optionssetting 191See also Process Management
Configuringauto-assign rules 180custom fields 202email templates 252events 170field relationships 206link definitions 56list values 200SCC integration 122states 168system notification rules 183transitions 176user notification rules 22workflow assignment rules 178workflows 167
Connectingto a server 11
Creatingdetail reports 103distribution reports 105filters 88list reports 107text file export templates 247text file import templates 250text file report templates 102trend reports 110
Custom fieldsadding 203
check box 203configuring 202date/time 203deleting 204edit box 203editing 204pop-up menu 203types 203
Customersadding 230deleting 237duplicating 236editing 236making user 226promoting 234retrieving global 234searching 235viewing 235
Customizingevents toolbar 174existing stylesheets 100SoloBug 261SoloBug for Palm OS 263stylesheets 100
DDefault values
defining 204editing 206
Default workflowassign 76comment 82estimate 77fix 78force close 80release notes 81re-open 80verify 79
Defect eventsdeleting 84editing 83viewing 82
Defect numberingdeferring 55
Defect numbersassigning 55

283Index
Defect optionssetting 154
Defect-level securitysetting 215
Defectsadding 37advanced find 46assigning 76attaching files to 41closing 80deleting 51duplicating 54editing 49finding 44fixing 78linking 59merging 54renumbering 55re-opening 80viewing 48
Deferringdefect numbering 55
Definingdefault values 204required fields 204
Deletingadditional defect reports 50auto-assign rules 183custom fields 204customers 237defect events 84defects 51detail reports 115dictionary words 21distribution reports 115email templates 255events 175field relationships 208filters 93historical defect log information 193link definitions 59links 65list reports 115list values 202restrictions 93security groups 218server connection 10
states 170system notification rules 186test configs 97trend reports 115user notification rules 24users 227workbook tasks 119
Detail reportscreating 103deleting 115editing 114
Diagramminglinks 64workflows 186
Dictionaryadding words 20deleting words 21editing words 21
Dictionary optionssetting 163
DisablingSCC integration 136
DistributingSoloBug 260
Distribution reportscreating 105deleting 115editing 114
Duplicatingcustomers 236defects 54filters 93reports 114security groups 218test configs 97users 225workbook tasks 119
EEditing
additional defect reports 50auto-assign rules 182custom fields 204customers 236default values 206

284 Index
defect events 83defects 49detail reports 114dictionary words 21distribution reports 114email templates 255events 174field relationships 208filters 92link definitions 58links 63list reports 114list values 201required fields 206restrictions 92resulting states 177security groups 217server connection 10states 169system notification rules 185test configs 97transitions 177trend reports 114user notification rules 24users 225workbook tasks 119
Electronic signaturesrequiring for events 172
Email notification hyperlinksadding 256managing 257
Email templatesadding 253configuring 252deleting 255editing 255viewing 255
Estimatingtime 77
Evaluatingworkflows 187
Eventsadding 171
custom tab 172details tab 171fields tab 173
adding details
allow attachments 172assignments option 172include notes 172informational event 172require signatures 172resulting state 172time tracking option 172
configuring 170deleting 175editing 174inactivating 175
Events toolbarcustomizing 174
Exportingaudit trail records 198to text files 246to XML files 243
Extractingattached files 43
FField codes
general 267label 269notes 270
Field labelsmarked with asterisk 209renaming 208
Field optionssetting 161
Field relationshipsadding 207child fields 206configuring 206deleting 208editing 208parent fields 206parent-child 206
Field valueschanging 66replacing computer config 68replacing custom 70replacing events 69replacing general 66replacing reported by 67

285Index
replacing steps to reproduce 67
Field values. See also Field relationships
Field-levelsecurity
read only 214read/write 214
Field-level securityhidden 214setting 216
Filesattaching to defects 41
Filtersadding 88creating 88deleting 93duplicating 93editing 92using 91viewing 91
Findingcustomers 235defects 44
advanced 46
Fixverifying 79
Fixingdefects 78
GGeneral project options
setting 152
Go todefect number 45
HHistorical defect logging
deleting information 193
Historyviewing link 63
Hyperlinksadding 256managing 257
IIcons
bug 36check mark 36exclamation point 36pencil 36
Imagesattaching from clipboard 41
Import mail optionssetting 157
ImportingSoloBug files automatically 265SoloBug files manually 265text files 248XML files 244
Inactivatingauto-assign rules 183events 175link definitions 58states 169system notification rules 186user notification rules 24users 226
Informational eventadding to event 172
Initial defect stateselecting 176
Insertingcolumns 30restrictions 92
InstallingVisual Studio add-in 142
LLabels
restoring original 209
Link definitionsactivating 58configuring 56deleting 59editing 58inactivating 58

286 Index
Link historyviewing 63
Linkingdefects 59
Linksadding 60deleting 65diagraming 64editing 63viewing 62
List reportscreating 107deleting 115editing 114
List valuesadding 201configuring 200deleting 202editing 201
List windowCustomers 29Defects 29Filters 29Reports 29Security Groups 29Test Configs 29Users 29Workbook 29
List windowschanging column contents 30inserting columns 30Moving columns 30opening 29removing columns 30sorting columns 30
Loadingtext file export templates 248text file import templates 250
Local optionsgeneral settings 14setting 14setting help and browser paths 15setting SCC 122stylesheet settings 15view file settings 16
Logged in usersviewing 226
Logging inTestTrack Pro 7
Logging outfrom TestTrack Pro 12other users 227
MMaking
customers users 226users customers 236
Managingemail notification hyperlinks 257
Mergingdefects 54
Movingcolumns 30
NNotifications
configuring user 22
OOpening
attached files 43list windows 29
Overridingworkflows 188
PParent-child
field relationships 206
Passwordchanging 25
Pastingimages from clipboard 41
Previewingreports 114
Printingrecords 31

287Index
reports 114
Process managementabout 190
Project optionscompliance 191defects 154dictionary 163fields 161general 152import mail 157report fields 160reports 162send mail 155setting SCC 124SoloBug 158SoloSubmit 159
Project pathssetting SCC 124
Projectsswitching 11
Promotingcustomers 234users 224
RRecords
printing 31selecting 29
Refreshingreport stylesheets 101
Release notesadding 81building 85
Removingattached files 44columns 30
Renamingfield labels 208
Renumberingdefects 55
Re-openingdefects 80
Replacingcomputer config field values 68custom field values 70event field values 69general field values 66reported by field values 67steps to reproduce field values 67
Report field optionssetting 160
Report optionssetting 162
Reportscreating audit trail 197creating detail 103creating distribution 105creating list 107creating trend 110deleting 115duplicating 114editing 114previewing 114printing 114viewing 113
Required fieldsdefining 204editing 206
Resettingworkflows 188
Restoringfield labels 209
Restrictionsadding 89deleting 93editing 92inserting 92viewing 91
Resulting stateselecting for event 172
Resulting statesediting 177
Retrievingglobal customers 234global users 224
Rulesadding auto-assign 181

288 Index
adding system notifications 184configuring system 183deleting auto-assignment 183deleting system notifications 186editing auto-assign 182editing system notifications 185inactivating auto-assign 183inactivating system notifications 186setting default auto-assignment 182
SSCC integration
attaching files 126checking in files 133checking out files 129configuring 122creating file labels 133detaching files 135diffing files 131disabling 136editing files 129getting files 128rolling back files 134setting check in options 125setting local options 122setting project options 124setting project paths 124setting user options 123undoing check out 135viewing file history 130viewing files 128
SCC notesClearCase 138CS-RCS 137CVS 137Perforce 138PVCS 138SourceOffSite Classic 138StarTeam 139
Screenshotsattaching 42capturing 42
Searchingaudit trail records 194
Securitycommand-level 213
defect-level 214field-level 214structure 212
Security groupsadding 215adding users to 217deleting 218duplicating 218editing 217viewing 217
Selectinginitial defect state 176
Send mail optionssetting 155
Server connectionadding 9deleting 10editing 10setting up 9
Settingcommand security 216compliance options 191default auto-assignment actions 182default stylesheet 101defect options 154defect security 215dictionary options 163field options 161field security 216general local options 14general project options 152general user options 17import mail options 157local help and browser paths 15local options 14local stylesheet options 15local view file options 16report field options 160report options 162send mail options 155SoloBug options 158SoloSubmit options 159user dictionary options 20user display options 18user notification options 19user options 17user spell check options 21

289Index
Setting upserver connections 9
SoloBugcustomizing 261customizing for Palm OS 263distributing 260importing files automatically 265importing files manually 265setting options 158
SoloSubmitsetting options 159
Sortingcolumns 30
Spell checksetting user options 21using 32
StartingTestTrack Pro 7
Mac 8Unix 7Windows 7
TestTrack Pro server 6Mac 6Unix 6Windows 6
Statesadding 169configuring 168deleting 170editing 169inactivating 169
Stylesheetsadding images to 100adding new 100customizing 100customizing existing 100refreshing 101setting default 101setting local options 15using 100
Switchingprojects 11
System notification rulesadding 184configuring 183
deleting 186editing 185inactivating 186
TTest configs
adding 96deleting 97duplicating 97editing 97viewing 97
TestTrack Prostarting
Mac 8Unix 7Windows 7
starting server 6
TestTrack Pro Add-Inabout integration 142installing 142
TestTrack Pro serverconnecting to 11starting
Mac 6Unix 6Windows 6
Text file import/exportcreating export templates 247creating import templates 250using export templates 248using import templates 250
Text file report templatescreating 102using 102
Text filesexporting to 246importing 248
Timeestimating fix 77
Time trackingselecting for event 172
Transferringcustomers to users list 226users to customers list 236

290 Index
Transitionsconfiguring 176editing 177initial defect state 176
Trend reportscreating 110deleting 115editing 114
UUser notification rules
adding 23configuring 22deleting 24editing 24inactivating 24
User optionsdictionary settings 20display settings 18general settings 17notification settings 19setting SCC 123settings 17spell check settings 21
Usersactivating 226adding 220adding to security group 217deleting 227duplicating 225editing 225inactivating 226logging out 227making customers 236promoting 224retrieving global 224viewing 225
Usingfilters 91spell check 32stylesheets 100text file export templates 248text file import templates 250text file report templates 102
VValidating
audit trail records 198
Verifyingfix 79
View file optionssetting 16
Viewingattached files 42audit trail records 196customers 235defect events 82defects 48email templates 255filters 91link history 63links 62logged in users 226reports 113restrictions 91security groups 217test configs 97users 225workbook tasks 119
Visual Studioabout integration 142add-in toolbar 142adding defects 147adding tasks 148connecting to a database 143installing add-in 142open workspace/solution options 144opening defect list 147opening task list 148setting options 144
WWorkbook tasks
adding 118deleting 119duplicating 119editing 119viewing 119
Workflow assignment rulesconfiguring 178

291Index
Workflow componentsassignment rules 166events 166states 166transitions 166
Workflowsanalyzing 166configuring 167diagramming 186evaluating 187overriding 188
resetting 188
XXML
exporting to 243import/export 240import/export notes 240import/export warnings and errors 242importing files 244

292 Index


![Scripting with Perforce · Scripting with Perforce Using the Perl and Ruby interfaces (c) ... fs = p4.run_fstat( “file.c” ) head = fs[ “headRev” ] (c) 2003 Perforce Software,](https://static.documents.pub/doc/80x56/5b1e82027f8b9af1328b8e54/scripting-with-perforce-scripting-with-perforce-using-the-perl-and-ruby-interfaces.jpg)

