© 2005 Atlas Copco Construction Tools AB | No. 9800 0650 90 | 2005-12-07
P PS PS-US PE PE-USTEX
Safety and Operating instructions
Pneumatic breakers
Consignes de sécurité et d’utilisation
Brise-béton pneumatiques
Sicherheits- und Betriebsvorschriften
Druckluft-Aufbrechhämmer
Instrucciones de seguridad y
funcionamiento
Rompedores neumáticos
Instruções de Segurança e Utilização
Martelos demolidores pneumáticos
Istruzioni per la sicurezza e l’uso
Demolitori pneumatici
Veiligheids- en bedieningsinstructies
Pneumatische sloophamers
Οδηγίε̋ ασφάλεια̋ και λειτουργία̋
Πνευματικέ̋ σφύρε̋
Turvamääräykset ja käyttöohjeet
Paineilmavasarat
Sikkerhedsinstruktioner og
betjeningsvejledning
Tryklufthamre
Sikkerhetsinstrukser og bruksanvisning
Pneumatiske spett
Säkerhets- och driftsanvisningar
Tryckluftsspett
3
TEX P
© 2005 Atlas Copco Construction Tools AB | No. 9800 0650 90 | 2005-12-07
Contents
CONTENTSEnglish. . . . . . . . . . . . . . . . . . . . . . . . . . . . . . . . . . . . . . . . . . . . . . . . . . . . . . . . . . . . . . . . . . . . .4
Français. . . . . . . . . . . . . . . . . . . . . . . . . . . . . . . . . . . . . . . . . . . . . . . . . . . . . . . . . . . . . . . . . . .22
Deutsch . . . . . . . . . . . . . . . . . . . . . . . . . . . . . . . . . . . . . . . . . . . . . . . . . . . . . . . . . . . . . . . . . . .40
Español . . . . . . . . . . . . . . . . . . . . . . . . . . . . . . . . . . . . . . . . . . . . . . . . . . . . . . . . . . . . . . . . . . .58
Português . . . . . . . . . . . . . . . . . . . . . . . . . . . . . . . . . . . . . . . . . . . . . . . . . . . . . . . . . . . . . . . . .76
Italiano . . . . . . . . . . . . . . . . . . . . . . . . . . . . . . . . . . . . . . . . . . . . . . . . . . . . . . . . . . . . . . . . . . . .94
Nederlands . . . . . . . . . . . . . . . . . . . . . . . . . . . . . . . . . . . . . . . . . . . . . . . . . . . . . . . . . . . . . . . 112
Ελληνικά . . . . . . . . . . . . . . . . . . . . . . . . . . . . . . . . . . . . . . . . . . . . . . . . . . . . . . . . . . . . . . . . .130
Suomi. . . . . . . . . . . . . . . . . . . . . . . . . . . . . . . . . . . . . . . . . . . . . . . . . . . . . . . . . . . . . . . . . . . .148
Dansk. . . . . . . . . . . . . . . . . . . . . . . . . . . . . . . . . . . . . . . . . . . . . . . . . . . . . . . . . . . . . . . . . . . .166
Norsk . . . . . . . . . . . . . . . . . . . . . . . . . . . . . . . . . . . . . . . . . . . . . . . . . . . . . . . . . . . . . . . . . . . .184
Svenska . . . . . . . . . . . . . . . . . . . . . . . . . . . . . . . . . . . . . . . . . . . . . . . . . . . . . . . . . . . . . . . . . .202
4
TEX P
© 2005 Atlas Copco Construction Tools AB | No. 9800 0650 90 | 2005-12-07
Contents
Contents
SAFETY INSTRUCTIONS . . . . . . . . . . . . . . . . . . . . . . . . . . . . . . . . . . . . . . . . . . . . . . . . . . . . . . 6
Safety symbols used . . . . . . . . . . . . . . . . . . . . . . . . . . . . . . . . . . . . . . . . . . . . . . . . . . . . . . .6
Machine and tool operating hazards . . . . . . . . . . . . . . . . . . . . . . . . . . . . . . . . . . . . . . . . . .6
Explosion and fire hazard . . . . . . . . . . . . . . . . . . . . . . . . . . . . . . . . . . . . . . . . . . . . . . . . . . .7
Electrical/Concealed object hazards . . . . . . . . . . . . . . . . . . . . . . . . . . . . . . . . . . . . . . . . . .7
Projectile hazard . . . . . . . . . . . . . . . . . . . . . . . . . . . . . . . . . . . . . . . . . . . . . . . . . . . . . . . . . . .7
Noise hazard . . . . . . . . . . . . . . . . . . . . . . . . . . . . . . . . . . . . . . . . . . . . . . . . . . . . . . . . . . . . . .7
Silica/Dust hazard . . . . . . . . . . . . . . . . . . . . . . . . . . . . . . . . . . . . . . . . . . . . . . . . . . . . . . . . .8
Vibration hazard . . . . . . . . . . . . . . . . . . . . . . . . . . . . . . . . . . . . . . . . . . . . . . . . . . . . . . . . . . .8
Machine modification hazard . . . . . . . . . . . . . . . . . . . . . . . . . . . . . . . . . . . . . . . . . . . . . . . .9
Additional safety instructions . . . . . . . . . . . . . . . . . . . . . . . . . . . . . . . . . . . . . . . . . . . . . . . .9
Protective equipment . . . . . . . . . . . . . . . . . . . . . . . . . . . . . . . . . . . . . . . . . . . . . . . . . . . . . . .9
Service and maintenance . . . . . . . . . . . . . . . . . . . . . . . . . . . . . . . . . . . . . . . . . . . . . . . . . . .9
Insertion tools . . . . . . . . . . . . . . . . . . . . . . . . . . . . . . . . . . . . . . . . . . . . . . . . . . . . . . . . . . . .10
OPERATING INSTRUCTIONS . . . . . . . . . . . . . . . . . . . . . . . . . . . . . . . . . . . . . . . . . . . . . . . . . 11
Design and function . . . . . . . . . . . . . . . . . . . . . . . . . . . . . . . . . . . . . . . . . . . . . . . . . . . . . . .11
Main parts . . . . . . . . . . . . . . . . . . . . . . . . . . . . . . . . . . . . . . . . . . . . . . . . . . . . . . . . . . . . . .11
Signs and stickers on the machine . . . . . . . . . . . . . . . . . . . . . . . . . . . . . . . . . . . . . . . . . .12
Noise level . . . . . . . . . . . . . . . . . . . . . . . . . . . . . . . . . . . . . . . . . . . . . . . . . . . . . . . . . . . . 12
Choosing the correct pneumatic breaker for a task . . . . . . . . . . . . . . . . . . . . . . . . . . . . .12
Installation . . . . . . . . . . . . . . . . . . . . . . . . . . . . . . . . . . . . . . . . . . . . . . . . . . . . . . . . . . . . . .12
Connections between the compressed air source and the machine . . . . . . . . . . . . . . . . 12
Connecting a water separator . . . . . . . . . . . . . . . . . . . . . . . . . . . . . . . . . . . . . . . . . . . . . . .13
Fitting and removing the insertion tool . . . . . . . . . . . . . . . . . . . . . . . . . . . . . . . . . . . . . . .13
Actions before starting . . . . . . . . . . . . . . . . . . . . . . . . . . . . . . . . . . . . . . . . . . . . . . . . . . . .13
Prevent freezing . . . . . . . . . . . . . . . . . . . . . . . . . . . . . . . . . . . . . . . . . . . . . . . . . . . . . . . . 13
Lubrication . . . . . . . . . . . . . . . . . . . . . . . . . . . . . . . . . . . . . . . . . . . . . . . . . . . . . . . . . . . . 13
Choosing insertion tool. . . . . . . . . . . . . . . . . . . . . . . . . . . . . . . . . . . . . . . . . . . . . . . . . . . 14
Checking for wear . . . . . . . . . . . . . . . . . . . . . . . . . . . . . . . . . . . . . . . . . . . . . . . . . . . . . . 14
Start and stop . . . . . . . . . . . . . . . . . . . . . . . . . . . . . . . . . . . . . . . . . . . . . . . . . . . . . . . . . . .14
Starting a cut . . . . . . . . . . . . . . . . . . . . . . . . . . . . . . . . . . . . . . . . . . . . . . . . . . . . . . . . . . . .15
Operation . . . . . . . . . . . . . . . . . . . . . . . . . . . . . . . . . . . . . . . . . . . . . . . . . . . . . . . . . . . . . . .15
When taking a break . . . . . . . . . . . . . . . . . . . . . . . . . . . . . . . . . . . . . . . . . . . . . . . . . . . . . .16
Maintenance . . . . . . . . . . . . . . . . . . . . . . . . . . . . . . . . . . . . . . . . . . . . . . . . . . . . . . . . . . . . .16
General. . . . . . . . . . . . . . . . . . . . . . . . . . . . . . . . . . . . . . . . . . . . . . . . . . . . . . . . . . . . . . . 16
Daily maintenance . . . . . . . . . . . . . . . . . . . . . . . . . . . . . . . . . . . . . . . . . . . . . . . . . . . . . . 16
Vibration-absorbing handles main parts. . . . . . . . . . . . . . . . . . . . . . . . . . . . . . . . . . . . . . 16
Periodic maintenance. . . . . . . . . . . . . . . . . . . . . . . . . . . . . . . . . . . . . . . . . . . . . . . . . . . . 16
Tightening torques . . . . . . . . . . . . . . . . . . . . . . . . . . . . . . . . . . . . . . . . . . . . . . . . . . . . . . 17
Actions before transport and storage . . . . . . . . . . . . . . . . . . . . . . . . . . . . . . . . . . . . . . . . 17
Troubleshooting . . . . . . . . . . . . . . . . . . . . . . . . . . . . . . . . . . . . . . . . . . . . . . . . . . . . . . . . . .17
Disposal of used machine . . . . . . . . . . . . . . . . . . . . . . . . . . . . . . . . . . . . . . . . . . . . . . . . . .17
Technical data . . . . . . . . . . . . . . . . . . . . . . . . . . . . . . . . . . . . . . . . . . . . . . . . . . . . . . . . . . . .18
Noise & Vibration Declaration Statement . . . . . . . . . . . . . . . . . . . . . . . . . . . . . . . . . . . . .19
Additional Vibration Information. . . . . . . . . . . . . . . . . . . . . . . . . . . . . . . . . . . . . . . . . . . . .19
Noise and vibration data . . . . . . . . . . . . . . . . . . . . . . . . . . . . . . . . . . . . . . . . . . . . . . . . . . .20
ENGLISH
5
TEX P
© 2005 Atlas Copco Construction Tools AB | No. 9800 0650 90 | 2005-12-07
Safety and Operating instructions
Introduction
Thank you for choosing a product from Atlas Copco. Since 1873, we have been
committed to finding new and better ways of fulfilling our customers' needs.
Through the years, we have developed innovative and ergonomic product designs
that have helped customers improve and rationalize their daily work.
Atlas Copco has a strong global sales and service network, consisting of customer
centers and distributors worldwide. Our experts are highly trained professionals
with extensive product knowledge and application experience.
In all corners of the world, we can offer product support and expertise to ensure
that our customers can work at maximum efficiency at all times.
For more information please visit: www.atlascopco.com
About the Safety and Operating
Instructions
The aim of the instructions is to provide you with knowledge of how to use the
pneumatic breaker in an efficient, safe way. The instructions also give you advice
and tell you how to perform regular maintenance on the pneumatic breaker.
Before using the pneumatic breaker for the first time you must read these
instructions carefully and understand all of them.
6
TEX P
© 2005 Atlas Copco Construction Tools AB | No. 9800 0650 90 | 2005-12-07
Safety and Operating instructions
SAFETY INSTRUCTIONSTo reduce risk of serious injury or death to yourself
or others, read these safety instructions before
operating the machine.
Post these safety instructions at work locations,
provide copies to employees, and make sure that
everyone reads the safety instructions before
operating or servicing the machine.
Comply with all safety regulations.
Safety symbols used
The indications Danger, Warning and Caution
have the following meanings:
Danger Indicates an imminently
hazardous situation which,
if not avoided, will result in
death or serious injury.
Warning Indicates a potentially
hazardous situation which,
if not avoided, could result
in death or serious injury.
Caution Indicates a potentially
hazardous situation which,
if not avoided, may result
in minor or moderate
injury.
Machine and tool operating
hazards
WarningSudden or unexpected movement of the machine
may occur during operating, which may cause
injuries. Furthermore, losing your balance or
slipping may cause injury. To reduce risks:
Make sure that you always keep a stable
position with your feet as far apart as your
shoulder width, and keeping a balanced body
weight.
Stand firmly and always hold on to the machine
with both hands.
Do not start the machine when it is lying on the
ground.
Make sure that the handles are clean and free of
grease and oil.
WarningUnintended start of the machine may cause injury.
Keep your hands away from the start and stop
device until you are about to start work.
►
►
►
►
►
WarningThe insertion tool is exposed to heavy strains
when the machine is used and after a certain
amount of use the tool may break due to fatigue.
If the tool breaks, there may be sudden or strong
movements. Such sudden or strong movements
may cause serious injury.
Make sure that you always keep a stable
position with your feet as far apart as your
shoulder width, and keeping a balanced body
weight.
Keep your feet away from the insertion tool.
Do not ‘ride’ on the machine with one leg over
the handle, since you could be seriously injured
if the tool were to break suddenly.
Check regularly for wear to the insertion tool,
and check whether there are any signs of
damage or visible cracks.
WarningAn incorrect dimension of the insertion tool’s shank
can result in that the insertion tool is lost or is
slipping out during operation. An insertion tool that
is lost or slips out can cause personal injury.
Before inserting the work tool, make sure that
the shank’s dimensions are the ones that should
be used in the machine.
Insertion tools without a collar may not be used.
WarningIf the tool retainer on the machine is not in a locked
position, the tool can be ejected with force, which
can cause personal injury.
Once the insertion tool has been mounted and
locked, the locking function must be checked by
pulling the insertion tool outwards powerfully.
Make sure that the tool is fully inserted and the
tool retainer is in the locked position before the
machine is started.
Never point the insertion tool at yourself or
anyone else.
WarningStarting the machine while changing the insertion
tool may cause personal injury.
Before changing the tool, stop the machine,
switch off the compressed air supply and bleed
the machine by activating the start and stop
device.
►
►
►
►
►
►
►
►
►
►
7
TEX P
© 2005 Atlas Copco Construction Tools AB | No. 9800 0650 90 | 2005-12-07
Safety and Operating instructions
WarningA compressed air hose that comes loose can lash
around and cause personal injury or death. To
reduce risks:
Check that the compressed air hose and the
connections are not damaged.
Check that all compressed air connections are
properly attached.
Never attempt to disconnect a compressed air
hose that is pressurized. First switch off the
compressed air by the compressor and then
bleed the machine by activating the start and
stop device.
WarningIf the oil plug on a pressurized machine comes
loose it can blow out and cause personal injury.
Before loosening the oil plug, the compressed
air must be switched off by the compressor and
the system must be bled.
Before starting the machine, check that the
threads on the oil plug and in the lubricator are
not damaged or worn out.
Check that the O-ring on the oil plug is in place
and that it is not damaged or worn out.
Explosion and fire hazard
WarningBreaking and drilling and working with certain
materials can cause sparks, which may ignite
explosive gases and cause explosions. Explosions
may cause serious injury or death.
To reduce such risk of explosion:
Never operate the machine in any explosive
environment.
Do not use the machine near flammable
materials, fumes or dust.
Make sure that there are no undetected sources
of gas.
►
►
►
►
►
►
►
►
►
Electrical/Concealed object
hazards
WarningThe machine is not electrically insulated. If the
machine comes into contact with electricity, serious
injuries or death may result.
To reduce the risk of such injury or death, never
operate the machine near any electric wire or
other source of electricity.
Make sure that there are no concealed wires or
other sources of electricity.
WarningDuring breaking, concealed wires and pipes
constitute a danger that can result in serious injury.
Before you start breaking, check the
composition of the material you are to work on.
Watch out for concealed cables and pipes e.g.
electricity, telephone, water, gas and sewage
lines etc.
If the tool seems to have hit a concealed object,
switch off the machine immediately.
Make sure that there is no danger before
continuing.
Projectile hazard
WarningDuring breaking, drilling or hammering, splinters
or other particles from the worked material may
become projectiles and cause personal injury by
striking the operator or other persons.
Use approved personal protective equipment,
including impact resistant safety glasses with
side protection, to reduce the risk of being
injured by a projectile.
Noise hazard
WarningHigh sound levels may cause permanent hearing
loss.
Use hearing protection in accordance with
occupational health and safety regulations.
►
►
►
►
►
►
►
►
8
TEX P
© 2005 Atlas Copco Construction Tools AB | No. 9800 0650 90 | 2005-12-07
Safety and Operating instructions
Silica/Dust hazard
WarningExposure to crystalline silica (sometimes called
‘silica dust’) as a result of breaking, drilling,
hammering, or other activities involving rock,
concrete, asphalt or other materials may cause
silicosis (a serious lung disease), silicosis-related
illnesses, cancer, or death. Silica is a major
component of rock, sand and mineral ores.
To reduce silica exposure:
Use proper engineering controls to reduce the
amount of silica in the air and the build-up of
dust on equipment and surfaces. Examples of
such controls include: exhaust ventilation and
dust collection systems, water sprays, and wet
drilling. Make sure that controls are properly
installed and maintained.
Wear, maintain, and correctly use approved
particulate respirators when engineering controls
alone are not adequate to reduce exposure
below permissible levels.
Participate in air monitoring, medical exams,
and training programs offered by your employer
and when required by law.
Wear washable or disposable protective clothes
at the worksite; shower and change into clean
clothes before leaving the worksite to reduce
exposure of silica to yourself, other persons,
cars, homes, and other areas.
Do not eat, drink, or use tobacco products in
areas where there is dust containing crystalline
silica.
Wash your hands and face before eating,
drinking, or using tobacco products outside of
the exposure area.
Work with your employer to reduce silica
exposure at your worksite.
WarningSome dust, fumes or other airborne material
created during use of the machine may contain
chemicals known to the State of California to cause
cancer and birth defects or other reproductive
harm. Some examples of such chemicals are:
Crystalline silica and cement and other masonry
products.
Arsenic and chromium from chemically-treated
rubber.
Lead from lead based paints.
To reduce your exposure to these chemicals,
work in a well ventilated area, and work with
approved safety equipment, such as dust masks
that are specially designed to filter out microscopic
particles.
►
►
►
►
►
►
►
►
►
►
Vibration hazard
WarningNormal and proper use of the machine exposes
the operator to vibration. Regular and frequent
exposure to vibration may cause, contribute to,
or aggravate injury or disorders to the operator’s
fingers, hands, wrists, arms, shoulders and/or
other body parts, including debilitating and/or
permanent injuries or disorders that may develop
gradually over periods of weeks, months, or years.
Such injury or disorder may include damage to the
blood circulatory system, damage to the nervous
system, damage to joints, and possibly damage to
other body structures.
If numbness, tingling, pain, clumsiness, weakened
grip, whitening of the skin, or other symptoms
occur at any time, when operating the machine
or when not operating the machine, do not
resume operating the machine and seek medical
attention. Continued use of the machine after the
occurrence of any such symptom may increase the
risk of symptoms becoming more severe and/or
permanent.
The following may help to reduce exposure to
vibration for the operator:
Let the tool do the job. Use a minimum hand
grip consistent with proper control and safe
operation.
When the percussion mechanism is activated,
the only body contact with the machine you
should have is your hands on the handles. Avoid
any other contact, e.g. supporting any part of the
body against the machine or leaning onto the
machine trying to increase the feed force. It is
also important not to keep the trigger engaged
while extracting the tool from the broken work
surface.
Make sure that the inserted tool is well-
maintained (including sharp, if a cutting tool),
not worn out, and of the proper size. Insertion
tools that are not well-maintained, or that are
worn out, or that are not of the proper size result
in longer time to complete a task (and a longer
period of exposure to vibration) and may result
in or contribute to higher levels of vibration
exposure.
Immediately stop working if the machine
suddenly starts to vibrate strongly. Before
resuming the work, find and remove the cause
of the increased vibrations.
Comply with the recommended air-pressure
when operating the machine. Either higher or
lower air-pressure has the potential of resulting
in higher levels of vibration.
►
►
►
►
►
9
TEX P
© 2005 Atlas Copco Construction Tools AB | No. 9800 0650 90 | 2005-12-07
Safety and Operating instructions
Do not grab, hold or touch the inserted tool
when using the machine.
Participate in health surveillance or monitoring,
medical exams, and training programs offered
by your employer and when required by law.
Note! See the "Noise & Vibration Declaration
Statement" for the machine, including the
declared vibration values and "Additional
vibration information". It is found at the end
of these Safety and Operating instructions.
Machine modification hazard
WarningAny machine modification not approved by Atlas
Copco may result in serious injuries to yourself or
others.
The machine must not be modified without
Atlas Copco's permission.
Use only original parts and accessories
approved by Atlas Copco.
Additional safety instructions
Machines and accessories must only be used
for their intended purpose.
T-handle breakers weighing 15 kg or more may
only be used for vertical breaking.
Only qualified and trained persons may operate
or maintain the machine.
Learn how the machine is switched off in the
event of an emergency.
The maximum permissible air pressure for the
machine must not be exceeded.
Release the start and stop device immediately in
all cases of power supply interruption.
Always inspect the equipment prior to use. Do
not use the equipment if you suspect that it is
damaged.
Always use your common sense and good
judgment.
Pay attention and look at what you are doing.
Do not use the machine when you are tired or
under the influence of drugs, alcohol or anything
else that may affect your vision, reactions or
judgment.
Participate in safety and training courses.
Never strike or abuse any equipment.
►
►
►
►
►
►
►
►
►
►
►
►
►
►
►
►
Keep the machine and tools in a safe place, out
of the reach of children and locked up.
Make sure that all the attached and related
equipment is properly maintained.
Signs and stickers bearing important information
regarding personal safety and care of the
machine are supplied with every machine.
Make sure that the signs are always legible.
New signs and stickers can be ordered from the
spare parts list.
Make sure that no unauthorized personnel
trespass into the working zone.
Keep the workplace clean and free from foreign
objects.
Never point a compressed air hose at yourself or
anyone else. To avoid the risk of getting injured,
never use compressed air to blow e.g. dust, dirt
etc. from your clothes.
Protective equipment
Always use approved protective equipment.
Operators and all other persons in the working
area must wear protective equipment, including at
a minimum:
Protective helmet
Hearing protection
Impact resistant eye protection with side
protection
Respiratory protection when appropriate
Protective gloves
Protective boots
►
►
►
►
►
►
►
►
►
►
►
►
10
TEX P
© 2005 Atlas Copco Construction Tools AB | No. 9800 0650 90 | 2005-12-07
Safety and Operating instructions
Service and maintenance
Regular maintenance is a prerequisite for keeping
the machine safe and effective. Carefully follow the
operating instructions.
Before undertaking any maintenance or changing
the insertion tool on pneumatic machines, always
switch off the air supply and bleed the machine
by depressing the start and stop device Then
disconect the air hose from the machine.
Use only authorized parts. Any damage or
malfunction caused by unauthorized parts will
not be covered by Warranty or Product Liability.
Change damaged parts immediately.
Replace damaged and worn components in
good time.
For major service to the machine, contact your
nearest authorised workshop.
When cleaning mechanical parts with solvent,
make sure to comply with current health and
safety regulations and that there is satisfactory
ventilation.
Insertion tools
Keep the tools clean and in good condition.
Regulary check the insertion tools, make sure
that they are sharp and not worn out.
NOTE! The machine can be destroyed if you use
incorrect insertion tools.
►
►
►
►
►
►
11
TEX P
© 2005 Atlas Copco Construction Tools AB | No. 9800 0650 90 | 2005-12-07
Safety and Operating instructions
OPERATING
INSTRUCTIONSTo reduce the risk of serious injury or death
to yourself or others, before operating the
machine, read the Safety Instructions section
found on the previous pages of this booklet.
Design and function
TEX P is a range of hand-held, pneumatic breakers
designed for medium to heavy demolition of
materials such as concrete, asphalt and brickwork.
The pneumatic breakers are designed for vertical
use. No other use is permitted.
Main parts
Air inlet
Lubricator
Oil plug
Handle
Silencer
Trigger (start/stop device)
Bolt
Tool retainer
Front head
1.
2.
3.
4.
5.
6.
7.
8.
9.
12
TEX P
© 2005 Atlas Copco Construction Tools AB | No. 9800 0650 90 | 2005-12-07
Safety and Operating instructions
Signs and stickers on the
machine
Signs and stickers with important information about
personal safety and machine care are mounted on
the machine. The signs and stickers must always
be legible. New signs and stickers can be ordered
from the spare parts list.
The data plate contains the following
important information:Machine type
Maximum permitted compressed air pressure
Serial number
The warning symbol together with the book
symbol means that the user must read the
safety and operating instructions before the
machine is used for the first time.
The CE symbol means that the machine
is CE-approved. See the CE declaration
which is delivered with the machine for more
information.
NOTE! Certain machines in this range are
not CE-approved!
1.
2.
3.
4.
5.
Noise level
The noise level sign displays the guaranteed noise
level according to EC directive 2000/14/EC.
Choosing the correct
pneumatic breaker for a task
It is important to choose the correct size of
pneumatic breaker for the work to be performed.
A pneumatic breaker that is too small means that
the work will take longer.
A breaker that is too big means that there must be
frequent repositioning, which is unnecessarily tiring
for the operator.
A simple rule for choosing the correct size of
pneumatic breaker is that a normal sized piece
of broken material should be removed from the
workpiece within 10–20 seconds operation.
If it takes less than 10 seconds a smaller
pneumatic breaker should be selected.
If it takes more than 20 seconds a larger
pneumatic breaker should be selected.
Installation
Connections between the compressed air
source and the machine
Compressed air source
Water separator (optional)
Lubricator (optional)
NOTE! Max. 3 meter compressed air hose
between the lubricator and the machine.
Check that you are using the correct
recommended operating pressure, 6 bar (e).
►
►
1.
2.
3.
4.
►
13
TEX P
© 2005 Atlas Copco Construction Tools AB | No. 9800 0650 90 | 2005-12-07
Safety and Operating instructions
Blow any impurities out of the compressed air
hose before connecting it to the machine.
Select the correct dimension and length for the
compressed air hose. For hose lengths up to 30
meters, a hose with a minimum internal diameter
of 19 mm (3/4”) should be used. If the hose
length is between 30 and 100 meters, a hose
with a minimum internal diameter of 25 mm (1”)
should be used.
Connecting a water separator
Use a sufficiently long hose between the
compressor and the water separator to ensure that
the water vapor is cooled and condenses in the
hose before reaching the water separator. If the
ambient temperature is below 0ºC the hose must
not be so long that the water freezes in the hose
before reaching the water separator.
Fitting and removing the
insertion tool
Whenever fitting/removing the insertion tool the
following instructions must be observed:
To prevent an accidental start: switch off the
air supply and disconnect the machine from
the power source. Bleed the machine by
pressing the start/stop device.
Before inserting a tool, lubricate the tool
shank with grease.
Fit/remove the insertion tool.
Close the tool retainer and check the lock
function by tugging the inserted tool sharply
outwards.
Actions before starting
Prevent freezing
Ice formation in the silencer can occur when the
ambient air temperature is 0–10°C and the relative
humidity is high.
The machine is designed to avoid the formation
of ice in the silencer. Despite this, under extreme
conditions ice can form in the silencer.
The following actions can be taken to further
counteract the risk of ice formation:
Use Atlas Copco AIR-OIL as a lubricant. AIR-
OIL counteracts freezing.
Use a water separator.
►
►
1.
2.
3.
4.
1.
2.
Lubrication
The lubricant is important for the machine’s
function and has a great impact on the useful
service life. The pneumatic breaker is usually
fitted with an integrated lubricator. If there is no
integrated lubricator, a separate lubricator should
be connected to the air hose. To guarantee good
lubrication, the length of the air hose between the
separate lubricator and the pneumatic breaker
should not exceed 3 meters.
Use a synthetic lubricant such as Atlas Copco AIR-
OIL or mineral oil with the properties recommended
in the table below.
Lubricant Temperature-
range ºC
Viscosity
AIR-OIL –20 to +50 -
Mineral oil/
Syntetic oil
+15 to +50 ISO VG
46–68
–20 to +15 ISO VG
22–32
Checking the level and filling lubricant:
Oil levels should be checked daily.
The machine should be placed vertically when
checking the level and filling lubricant.
Wipe clean around the oil plug and remove it.
Check that the threads are not damaged or worn
out. Any part with damaged or worn out threads
must be replaced.
Check the O-ring (1). If the O-ring is missing or
damaged it should be replaced immediately.
See table for correct lubricant.
Fill lubricant to the “lowest” thread.
Tighten the plug firmly by hand only and wipe off
any excessive oil.
►
►
►
►
►
►
►
►
14
TEX P
© 2005 Atlas Copco Construction Tools AB | No. 9800 0650 90 | 2005-12-07
Safety and Operating instructions
Choosing insertion tool
A correct insertion tool is a condition for a good
operation. To avoid unnecessary machine
damages, it is important to choose insertion tools
with a high quality.
Recommended insertion tools are listed in the
machine´s spare parts list.
The narrow chisel should be used for demolition and
cutting work in concrete and other types of hard material.
The moil point should only be used for creating holes in
concrete and other types of hard material.
The wide chisel should be used in soft materials e.g.
asphalt and frozen ground.
Always use a sharp tool to be able to work
effectively. A worn out tool causes increased
vibrations and the operation will take longer.
Checking for wear
Using an insertion tool with a worn out shank leads
to increased machine vibrations. To avoid getting
increased vibrations, check the shank for wear
before the insertion tool is fitted in the machine.
Use the gauge that corresponds to the insertion
tool’s shank dimension. If the gauge’s hole (2) can
be pushed down on the insertion tool’s shank, this
means that the shank is worn out and the insertion
tool should be replaced.
Start and stop
Starting position: The start and stop device is in the
upper position. Start the pneumatic breaker by pressing
down the start and stop device.
15
TEX P
© 2005 Atlas Copco Construction Tools AB | No. 9800 0650 90 | 2005-12-07
Safety and Operating instructions
Stop the machine by releasing the start and stop device.
The start and stop device returns automatically to the
stop position.
Starting a cut
Stand steady and make sure that your feet are
at a safe distance from the insertion tool.
Press the machine against the surface of the
workpiece before starting.
Adjust the breaking distance (A) so that the
insertion tool does not get stuck.
Do not try to cut too big a bite.
Trying to loosen an insertion tool that is stuck
will expose the operator to unnecessary
vibrations.
►
►
►
►
►
Operation
Let the machine do the work; do not press too
hard. The vibration-absorbing handle must
absolutely not be pressed all the way down to
the base.
Pneumatic breakers with vibration-absorbing
handles: The feed force should be adapted so
that the handles are pressed down “half way”.
The best vibration damping and breaking effect
is achieved at this position.
Avoid working in extremely hard materials e.g.
granite and reinforcing iron (re bar) which would
cause substantial vibrations.
Any form of idling, operating without insertion
tool or operating with an uplifted machine must
be avoided.
When the machine is lifted, the start and stop
device must not be activated.
Check regularly that the machine is well
lubricated.
►
►
►
►
►
►
16
TEX P
© 2005 Atlas Copco Construction Tools AB | No. 9800 0650 90 | 2005-12-07
Safety and Operating instructions
When taking a break
During all breaks you must put the machine
away in such a way that there is no risk for it to
be unintentionally started.
In event of a longer break or when leaving the
workplace: Switch off the compressed air supply
and then bleed the machine by activating the
start and stop device.
Maintenance
General
Regular maintenance is a fundamental condition
for the machine to continue to be a safe and
efficient tool.
Daily maintenance
Clean and inspect the machine every day.
Check the tool retainer for wear and function.
Conduct a general inspection for leaks and
damage.
Check that the air inlet nipple is tightened and
that the claw coupling is free from damage.
Check regularly that the oil plug is tightened.
Check that the O-ring on the oil plug is
undamaged and that it closes tightly.
Check the threads in the machine lubricator and
on the oil plug. Make sure they are not damaged
or worn out.
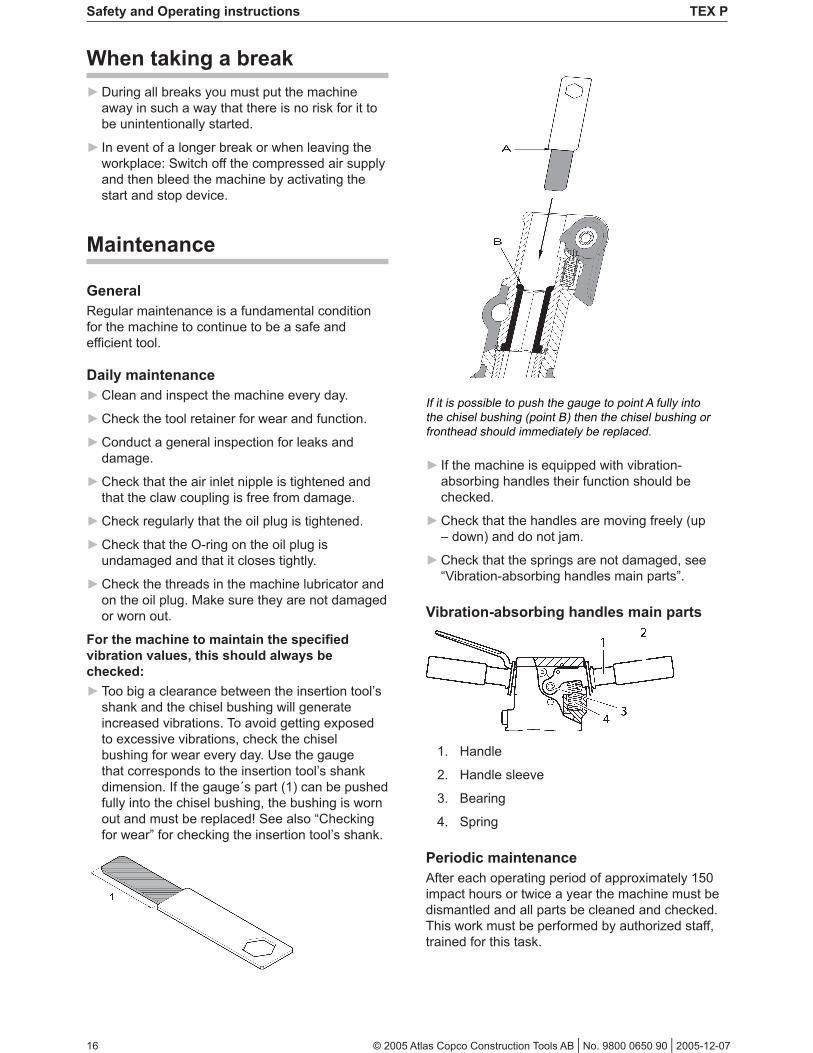
For the machine to maintain the specified
vibration values, this should always be
checked:
Too big a clearance between the insertion tool’s
shank and the chisel bushing will generate
increased vibrations. To avoid getting exposed
to excessive vibrations, check the chisel
bushing for wear every day. Use the gauge
that corresponds to the insertion tool’s shank
dimension. If the gauge´s part (1) can be pushed
fully into the chisel bushing, the bushing is worn
out and must be replaced! See also “Checking
for wear” for checking the insertion tool’s shank.
►
►
►
►
►
►
►
►
►
►
If it is possible to push the gauge to point A fully into
the chisel bushing (point B) then the chisel bushing or
fronthead should immediately be replaced.
If the machine is equipped with vibration-
absorbing handles their function should be
checked.
Check that the handles are moving freely (up
– down) and do not jam.
Check that the springs are not damaged, see
“Vibration-absorbing handles main parts”.
Vibration-absorbing handles main parts
Handle
Handle sleeve
Bearing
Spring
Periodic maintenance
After each operating period of approximately 150
impact hours or twice a year the machine must be
dismantled and all parts be cleaned and checked.
This work must be performed by authorized staff,
trained for this task.
►
►
►
1.
2.
3.
4.
17
TEX P
© 2005 Atlas Copco Construction Tools AB | No. 9800 0650 90 | 2005-12-07
Safety and Operating instructions
Tightening torques
TEX 20-21
Nut, 140 Nm
Nipple, 250 Nm.
(Use Loctite 243)
Nut, 70 Nm
TEX P
Screw plug, 200 Nm
Nut, 350 Nm
Swivel nut
(Use loctite 243)
1.
2.
3.
1.
2.
3.
Actions before transport and storage
Make sure that the machine is properly cleaned
before storage.
Pour approx. 5 cl of oil directly into the air inlet
nipple, connect the machine to the compressed
air supply and start it for a few seconds.
Always store the machine in a dry place.
Troubleshooting
If the pneumatic breaker does not start, has low
power or uneven performance, check the following
points.
Check that the insertion tool being used has the
correct shank dimension.
Check that the pneumatic breaker is getting the
correct amount of lubricant.
NOTE! To much lubrication can cause starting
problems, low power or uneven
performance.
Check that the compressed air system supplies
the machine with sufficient air pressure to get
full power.
Check the dimension and length of the air hose
are according to the recommendations. See
“Installation”.
If there is a risk of freezing, check that the
machine´s exhaust ports are not blocked.
If the machine function is still not satisfactory
after this procedure, contact an authorised
service workshop.
Disposal of used machine
A used machine must be treated and deposed of
in such a way that the greatest possible portion
of the material can be recycled and any negative
influence on the environment is kept as low as
possible.
►
►
►
►
►
►
►
►
►
18
TEX P
© 2005 Atlas Copco Construction Tools AB | No. 9800 0650 90 | 2005-12-07
Safety and Operating instructions
Technical data
TEX Type Weight kg Length mm Impact freq. Hz Air Consumption l/s Shank mm
14PS 14.5 565 25.0 23 22x82.5
25x108
14PS US 14.5 565 25.0 23 25x108
15PE 17.5 565 25.0 23 22x82.5
25x108
15PE US 17.5 565 25.0 23 25x108
18PS 20.0
21.0
615
660
24.5
24.5
25
25
25x108
28x152/28x160
18PS US 20.0
20.0
21.0
615
615
660
24.5
24.5
24.5
25
25
25
25x82.5
25x108
28x152/28x160
19PE, 19PE US 23.0
24.0
615
660
24.5
24.5
25
25
25x108
28x152/28x160
20PS 20.0 635 20.0 23 25x108
20PS-1 20.0 600 20.0 23 R25x75SQ
21PE 21.0 650 20.0 23 25x108
21PE-1 21.0 615 20.0 23 R25x75SQ
22PS 23.5
24.5
24.5
645
690
690
22.0
22.0
22.0
30
30
30
25x108
28x152/28x160
32x152/32x160
22PS US 24.5 690 22.0 30 28x152/28x160
23PE 26.5
27.5
27.5
645
690
690
22.0
22.0
22.0
30
30
30
25x108
28x152/28x160
32x152/32x160
23PE US 27.5 690 22.0 30 28x152/28x160
27PS, 27PS US 28.5
28.5
725
725
20.5
20.5
32
32
28x152/28x160
32x152/32x160
28PE, 28PE US 31.5
31.5
725
725
20.5
20.5
32
32
28x152/28x160
32x152/32x160
32P 32.0
32.0
745
745
20.0
20.0
34
34
28x152/28x160
32x152/32x160
32PS 34.0
34.0
745
745
20.0
20.0
34
34
28x152/28x160
32x152/32x160
33PE, 33PE US 37.0
37.0
745
745
20.0
20.0
34
34
28x152/28x160
32x152/32x160
39P 37.0
37.0
750
750
18.5
18.5
40
40
28x152/28x160
32x152/32x160
39PS 39.0
39.0
750
750
18.5
18.5
40
40
28x152/28x160
32x152/32x160
40PE, 40PE US 42.0
42.0
750
750
18.5
18.5
40
40
28x152/28x160
32x152/32x160
P60 31.0
31.0
690
690
25.0
25.0
36
36
28x152/28x160
32x152/32x160
P60S 33.0
33.0
690
690
25.0
25.0
36
36
28x152/28x160
32x152/32x160
P90 41.0
41.0
710
710
21.0
21.0
40
40
28x152/28x160
32x152/32x160
P90S 43.0
43.0
710
710
21.0
21.0
40
40
28x152/28x160
32x152/32x160
All data at 6 bar (e)
19
TEX P
© 2005 Atlas Copco Construction Tools AB | No. 9800 0650 90 | 2005-12-07
Safety and Operating instructions
Noise & Vibration Declaration
Statement
Guaranteed sound power level Lw according to
EN ISO 3744 in accordance with directive 2000/14/
EC.
Sound pressure level Lp in accordance with EN
ISO 11203
Vibration value A and uncertainty B in accordance
with EN ISO 8662-5. Please see table "Noise and
vibration data" for values A, B, etc.
These declared values were obtained by laboratory
type testing in accordance with the stated directive
or standards and are suitable for comparison
with the declared values of other tools tested in
accordance with the same directive or standards.
These declared values are not adequate for use
in risk assessments and values measured in
individual work places may be higher. The actual
exposure values and risk of harm experienced by
an individual user are unique and depend upon the
way the user works, in what material the breaker is
used, as well as upon the exposure time and the
physical condition of the user, and the condition of
the breaker.
We, Atlas Copco, cannot be held liable for the
consequences of using the declared values,
instead of values reflecting the actual exposure,
in an individual risk assessment in a work place
situation over which we have no control.
Additional Vibration
Information
This tool may cause hand-arm vibration syndrome
if its use is not adequately managed.
This additional vibration information may be
of assistance to employers in meeting their
obligations (for example under EU Directive
2002/44/EC) to assess the risks to their workers
arising from hand arm vibration associated with the
use of this tool.
The vibration emission varies greatly with task and
operator technique. The declared vibration value
relates to a single axis on the non-trigger handle
and much higher vibration levels may occur at
other hand positions or measurement directions.
We believe that normal intended use of the tool will
usually produce three axes vibration emissions in
the range of C m/s2 breaking concrete and in the
range of E m/s2 breaking asphalt (vibration total
values, as defined in ISO 5349-1:2001) depending
on the details of the task, but emissions outside
this range may occur for some applications.
A figure of D m/s2 for concrete and F m/s2 for
asphalt is probably a useful average emission
value when, for example, estimating the likely
average exposures (and hence risk in accordance
with EU Directive 2002/44/EC) of users performing
a wide range of tasks within the intended use of
the tool. We point out that application of the tool
to a sole specialist task may produce a different
average emission and in such cases we strongly
recommend a specific evaluation of the vibration
emission.
We recommend a programme of health
surveillance to detect early symptoms that may
relate to vibration exposure, so that management
procedures can be modified to help prevent
significant disability.
20
TEX P
© 2005 Atlas Copco Construction Tools AB | No. 9800 0650 90 | 2005-12-07
Safety and Operating instructions
Noise and vibration data
Noise Vibration Values
Single axis
values
Three - axes values
Declared values Declared Additional information
ISO 11203 2000/14/EC ISO 8662-5 Concrete Asphalt
TEX Type
Lp
measured
r=1m dB(A)
rel 20µPa
Lw
guaranteed
dB(A) rel
1pW
A
m/s2
value
B
m/s2
spreads
C
m/s2
range
D
m/s2
ave.
E
m/s2
range
F
m/s2
ave.
14PS 93 105 17.4 8.0 - - - -
15PE 93 105 3.4 2.7 7.4–8.1 7.8 4.6–5.3 5.0
18PS 94 106 11.7 5.5 - - - -
19PE 94 106 3.0 2.4 4.9–5.2 5.1 3.2–4.0 3.6
20PS 93 105 16.2 7.5
21PE 93 105 5.0 3.5 7.9–9.0 8.5 6.8–7.1 7.0
22PS 95 107 10.7 5.0
23PE 95 107 2.6 2.2 4.8–5.4 5.1 3.4–4.5 4.0
27PS 94 106 11.3 5.3
28PE 94 106 3.0 2.5 5.2–6.3 5.8 5.7–6.0 5.9
32PS 99 111 11.1 5.0
33PE 99 111 2.7 2.3 4.2–4.8 4.5 4.1–4.4 4.3
39PS 99 111 13.0 6.0
40PE 99 111 3.8 3.0 4.3–4.9 4.6 3.3–3.6 3.5
P60S 97 109 17.4 8.0
P90S 99 111 15.2 7.0
21
TEX P
© 2005 Atlas Copco Construction Tools AB | No. 9800 0650 90 | 2005-12-07
Safety and Operating instructions
www.atlascopco.com
© 2
00
5 A
tlas C
opco C
onstr
uction T
ools
AB
, S
tockholm
, S
wed
en
| No. 980
0 0
650 9
0 |
2005-1
2-0
7
Any unauthorized use or copying of the contents or any part thereof is prohibited.
This applies in particular to trademarks, model denominations, part numbers and
drawings.