THE BARCODE EXPERTS Church Road, Weston on the Green, Oxfordshire, OX25 3QP, UK Tel: +44 (0)1869 351155 | Email: [email protected]Web: www.axicon.com operating manual Axicon Filmbars barcode software package
Transcript
THE BARCODE EXPERTS
Church Road, Weston on the Green, Oxfordshire, OX25 3QP, UKTel: +44 (0)1869 351155 | Email: [email protected]
Web: www.axicon.com
operating manual
Axicon Filmbarsbarcode software package
Contents
www.axicon.comwww.axicon.com
Important Information 4
Installation 5
Getting started 6
Barcode generating options 8
Multiple barcode generation 11
Batch symbols 12
Editing your barcode 13
Quality control marks 14
Saving and exporting 15
Tracking numbers 16
Printing 17
Label formats 18
Preferences 20
Software licence agreement 22
Contact us 24
Page 2 of 24 Page 3 of 24
Axicon Auto ID Limited | Filmbars graphics | Feb 2016Axicon Auto ID Limited | Filmbars graphics| Feb 2016
InstallationImportant informationThe Filmbars Graphics package has been designed to enable the user to originate highly accurate barcode symbols for integration into a desktop processing package.
The package includes a wide range of symbologies together with additional features to help the user design the barcode. This includes a large choice of file extensions to permit compatibility with most artwork programs.
This user guide has been designed to provide the user with information and operational instructions for the FilmBars Graphics software package. It provides instructions on installation and use of the software, and guides the user through the process of generating the required barcodes.
This manual is relevant to all currently supported versions of Windows, and in addition may also work with previous versions of Windows subject to the characteristics of the individual computer set-up.
Filmbars demonstration version is available to download from our website in a 32 bit or 64 bit version. Simply download and run the exe file and follow the on screen instructions.
The demo version will provide access to the entire software for a maximum of five barcodes. Axicon will provide the serial number to activate the software after the five barcodes have been created.
System requirements PC with a currently supported version of Windows operating system with at least 8Mb of ram and 4Mb of free hard disk space.
www.axicon.comwww.axicon.com
Page 4 of 24 Page 5 of 24
Axicon Auto ID Limited | Filmbars graphics | Feb 2016Axicon Auto ID Limited | Filmbars graphics| Feb 2016
Getting startedAcross the top of the Filmbars window there are a variety of menu options to allow you to create and manipulate your barcode symbols. To create your first code you will need to begin by selecting your barcode type.
Barcode types:At the top left hand corner of the software window there is pull down menu displaying the barcode symbologies available to you (only the symbologies that you chose to be included when you purchased the software will be displayed). Select the symbology you would like to use from the menu.
Creating a new code:From the File pull down menu select New. The Symbol Properties window will now appear which allows you to enter your barcode number and to select which options you require. The other options displayed in this window allow you to manipulate the size and structure of your barcode which you can just leave as the default if you do not wish to alter any of these features. For instructions on using these options see 3.0 - In-Depth Features. Pressing the OK button will now create your barcode on screen.
Basic Editing: Bearer bars/frames/corner marks: You can add a variety of lines and marks around your barcode such as bearer bars (used particularly in the ITF and EAN128 (GS1-128) symbologies) and frames or corner marks (which can be used to protect the quiet zones of your code). These choices are found under the Bearer Bars option of the Options menu.
Rotating: You can rotate your barcode 0, 90, 180 or 270 degrees, see the Options menu. Text: You can add a text accompaniment to your barcode using the Text option from the Options menu. There are a total of four text lines available and each can be positioned above or below the barcode and in a variety of justifications. Quality control marks: You can add a variety of quality control marks to your barcode for the purposes of monitoring your print quality.
Saving and ExportingOnce you have created your barcode and performed any necessary editing you are ready to save/export your barcode to a format that you can utilise.
If you would like to retrieve your file for future use then you will need to save it as a FBS (Filmbars Symbol) file. This can be done from the File pull down menu by selecting the Save As option.
Once you have saved your file as a FBS, you can then select the Export option from the pull down menu. From the Export window you can select your saved FBS file and export it to the file type of your choice from the pull down menu on the right hand side. Pressing Export will now export your barcode in the specified format to the directory shown ready for use in your artwork (the default location of this directory can be altered using the Preferences option of the Options menu.
If you do not need to retrieve this file for future use under the Filmbars package, then this process can be simplified – simply select the Save As option from the File pull down menu and instead of saving as a FBS you can choose from the options in the Save As Type box to save directly under your required file type.
Opening an Existing File To open a file that you have already created and saved as a FBS file you need to select the Open command from the File menu. You can then access the properties of this file by selecting the Properties option from the Edit menu, or by double clicking on the image.
www.axicon.comwww.axicon.com
Page 6 of 24 Page 7 of 24
Axicon Auto ID Limited | Filmbars graphics | Feb 2016Axicon Auto ID Limited | Filmbars graphics| Feb 2016
The Symbol Properties window can be displayed one of three ways, either by selecting the File New option, by double clicking on an active barcode or by selecting Properties from the Edit menu.
The options available in the Symbol Properties window are dependent on the symbology in use and will contain a combination of the following:
Code: This mandatory field allows you to enter the characters that you wish to use in your barcode. Certain symbologies are restricted in their structure and length, and non-adherence to the rules of each symbology type will result in the error message Error:Code. Split: The split button will be available for many symbologies and allows you to enter data for a barcode as separate fields to simplify the process of concatenation for some of the more complex symbologies. For example, when generating an ITF-14 barcode you can press the Split button which will bring up the Split window. In this window you then have the opportunity to break down the data entry into the Logistic Variable, EAN-13 and Supplement boxes. Closing the window with the OK button will then automatically calculate the correct format for your ITF-14 code, eliminating the EAN-13 check digit and calculating the new ITF-14 check digit. Grouping: The grouping button allows you to select from the range of options how you would like your human readables displayed underneath your barcode. Analyze: This button is used mainly under the EAN-128 (GS1-128) symbology option to simplify your data entry for different Application Identifiers (AI). Pressing the Optimize button at the base of the Analyze window will concatenate your AI to the most suitable configuration. Ext. Keys: Activating this button will bring up the Extended Keys Table window, from where you can insert one of a range of normally non-keyable characters (such as ASCII 1-31 and Start, Function, Shift etc) by double clicking on the required character. You will automatically exit the Extended Keys Table window upon selection of a character, you can use the Escape key to close the window without selecting a character.
An alternative way to introduce the special symbol characters is to use the following keyboard shortcuts.
Check Char: This tick box refers to the check character (check digit), and gives you the option to add a check digit to some symbologies where a check digit is not mandatory. Ticking this box may then action the display of a further box Show Check Character which provides you with the option of showing the check digit in the human readables.
Show Start/Stop: This tick box gives you the option of showing the start and stop characters in the human readables of relevant symbologies. Short Add Bars: This option allows you to make the bars of an add-on to a barcode shorter or full length, as required.
Spacer: Ticking the spacer box option will add spacers (quiet zones indicators) that will act as a visual aid to help protect the quiet zones of EAN and UPC barcodes. The spacers are displayed as greater than and/or smaller than signs (< >) outside the human readables.
Description: This box can be used to add a description to your barcode for your reference.
M: M stands for magnification factor which is applicable to many barcodes and will it determine the size of your code. 1.00 (100%) is the nominal size of a symbol with variations either side of this to make the barcode smaller or larger. Changes made to M will automatically affect X and Y, however Y (height) can be altered independently of M. If you go outside the bounds of a certain symbology dimensional limits then the error Not valid Magnification will be displayed This can be overridden by de-selecting the Establish Dimensional Limits check box in the Preferences option of the Options menu (this is not recommended unless you have checked with your customer for their approval).
Barcode generation options
www.axicon.comwww.axicon.com
Page 8 of 24 Page 9 of 24
Axicon Auto ID Limited | Filmbars graphics | Feb 2016Axicon Auto ID Limited | Filmbars graphics| Feb 2016
X: X stands for the X-dimension. In linear and stacked symbologies, the X-dimension is the nominal bar size (the width of the narrowest bar) – all other bars and spaces are then calculated based upon a ratio of this size. The X dimension is shown in FilmBars as part of a millimeter e.g. 0.33mm, (this is equivalent to 330 microns) and will vary in range according to the symbology type.
Y: Y stands for Y-dimension and refers to the height of the bars. Y can be altered independently to determine the height of your bars, although if the symbology has a magnification factor then Y will automatically increase or decrease with the magnification. Certain application specifications have restrictions on minimum allowed bar height which should be considered when entering a figure for Y.
I: I stands for the Inter Character Gap, this is the gap in-between the characters that can only be set for certain symbologies such as Code 39 and Codabar. By default this value will be the same as the X-dimension value but it can be altered to provide a wider inter character gap if necessary. For further information see the relevant symbology standard.
N: N stands for the Wide to Narrow bar ratio, which is usually settable between 2:1 and 3:1 with the default set to 2.5:1. Altering the ratio will have a direct impact on the size of the code. Please note that many industry standards will only permit the Wide to Narrow ratio to be in the range of 2.25 to 3.0 so if in doubt please select a higher rather than lower ratio.
BWA: BWA stands for Bar Width Adjustment, and can be used to build in a reduction in bar size to account for any ink-spread that will occur during the print process (print gain). The BWA can have a negative, zero or positive value, but to reduce the bars in order to compensate for print gain (the more normal option) a NEGATIVE value is required (NOTE: for users who are used to dealing with Bar Width Reduction (BWR), BWA acts as an exact opposite). The BWA is shown as 0.xx so if a reduction of the bars of 100 microns is required it would be entered as -0.100.
M.S.A: MSA stands for Module Size Adjustment. This works in the same way as BWA (see above) but is applicable to the 2-D symbologies.
If you wish to generate multiple barcodes at once, this can be done using either an existing database file that you have created or by creating a sequential file using the Data Sequence Generator.
Generating the Data From an Existing File (using FDB files) it is possible to use an existing file of information to generate a batch of barcodes. The file must however conform to a list of properties:
1. It must be a delimited file (the default is a comma, see Preferences to change it). 2. It needs to be structured to contain the following six fields:
Code Number, Description, Text1, Text2, Text3 and Text4 per row.
3. When you save the file you will need to select the file type as a CSV file BUT change the file extension following your file name to FDB. With some common spreadsheet packages you may have to enclose the entire file name and extension in double quote marks in order for it to accept FDB as a valid extension.
Using the FilmBars Editor This text editor can be opened either directly from the FilmBars Directory in the Windows Start Bar or in FilmBar Graphics via the Tools menu. Editor acts as a general purpose text editor and is utilised by the FilmBar Graphics program to edit FDB files.
If you need to produce a batch of sequential barcodes you generate the file containing the information that you will need using the Data Sequence File Generator which can be found under the Tools menu. In the Data Sequence File Generator window you can use the options to input the information you want in your code including the barcode number, how much it should increment by, how many codes you need it to generate and any text and description you wish to add. You can also make individual alterations by using the Edit button. Once you are happy with your data press the Generate button. You will then be asked to save the contents of this file to the file name of your choice.
Axicon Auto ID Limited | Filmbars graphics | Feb 2016Axicon Auto ID Limited | Filmbars graphics| Feb 2016
Now that you have prepared your data you need to use the Save Batch option from the File menu. First you will need to select the file that you have just saved (a FDB file generated using one of the above two methods) in the Database file box (using the Edit button to perform any necessary editing). Then you will need to select a target file.
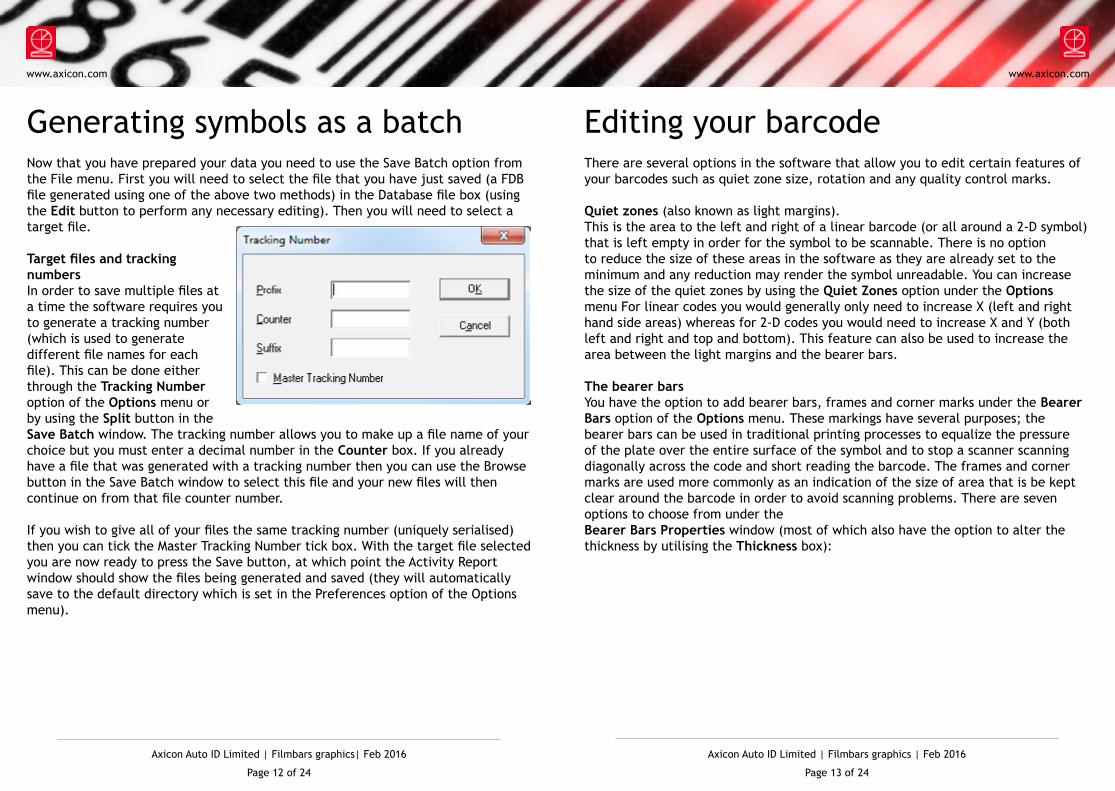
Target files and tracking numbers In order to save multiple files at a time the software requires you to generate a tracking number (which is used to generate different file names for each file). This can be done either through the Tracking Number option of the Options menu or by using the Split button in the Save Batch window. The tracking number allows you to make up a file name of your choice but you must enter a decimal number in the Counter box. If you already have a file that was generated with a tracking number then you can use the Browse button in the Save Batch window to select this file and your new files will then continue on from that file counter number. If you wish to give all of your files the same tracking number (uniquely serialised) then you can tick the Master Tracking Number tick box. With the target file selected you are now ready to press the Save button, at which point the Activity Report window should show the files being generated and saved (they will automatically save to the default directory which is set in the Preferences option of the Options menu).
There are several options in the software that allow you to edit certain features of your barcodes such as quiet zone size, rotation and any quality control marks.
Quiet zones (also known as light margins). This is the area to the left and right of a linear barcode (or all around a 2-D symbol) that is left empty in order for the symbol to be scannable. There is no option to reduce the size of these areas in the software as they are already set to the minimum and any reduction may render the symbol unreadable. You can increase the size of the quiet zones by using the Quiet Zones option under the Options menu For linear codes you would generally only need to increase X (left and right hand side areas) whereas for 2-D codes you would need to increase X and Y (both left and right and top and bottom). This feature can also be used to increase the area between the light margins and the bearer bars.
The bearer bars You have the option to add bearer bars, frames and corner marks under the Bearer Bars option of the Options menu. These markings have several purposes; the bearer bars can be used in traditional printing processes to equalize the pressure of the plate over the entire surface of the symbol and to stop a scanner scanning diagonally across the code and short reading the barcode. The frames and corner marks are used more commonly as an indication of the size of area that is be kept clear around the barcode in order to avoid scanning problems. There are seven options to choose from under the Bearer Bars Properties window (most of which also have the option to alter the thickness by utilising the Thickness box):
Editing your barcodeGenerating symbols as a batch
www.axicon.comwww.axicon.com
Page 12 of 24 Page 13 of 24
Axicon Auto ID Limited | Filmbars graphics | Feb 2016Axicon Auto ID Limited | Filmbars graphics| Feb 2016
Quality control marksThis section deals with the different file formats available in terms of “export/save” options, and also gives a brief explanation of the their uses. It is important to note that when placing your generated file into your required program that no resizing is carried out as this will compromise the accuracy of your barcode symbol If a different size barcode is required then it will need to be remade and re-exported from the Filmbars package.
FBS: Filmbars Symbol is a graphic format created by Symbolnology Labs that has been designed specifically a highly accurate yet economically sized format. If you are intending to reuse your file in the Filmbars software, e.g. as a template for future barcodes or to continue a sequential batch of barcodes, then you must save the file as a FBS file in order for it to be recognised by the software at a later date. Vector Files: Vector files such as EPS and AI files are generally of a very high quality and are the recommended format to use when saving/exporting your barcode. The other vector file offered under the Filmbars program is a Windows Metafile which although still of good quality is only recommended for use when printing labels directly (not for production of images to generate artwork).
Bitmap Files: These options have been included because there are certain applications which only support bitmap images, however it is NOT recommended that this file format is used for production of high quality symbols. Adobe Type 1 Fonts: In the Windows version of Filmbars you are provided with several fonts in Adobe Type 1 format, which are worth installing if you are intending to produce EPS or AI files. You will need to have Adobe Type Manager installed on your PC which you can use to install the fonts using the Filmbars software disk.
Saving and exporting
www.axicon.comwww.axicon.com
There are a range of quality control marks (selected from the Quality Control Marks option of the Options menu) that you can add to your symbols, which can then be used to provide information about the quality of your printing process. The selection is permanent when used with no active document and temporary when used with an active document. The selection of marks is as follows: DIN-Marks: These marks are generally used in conjunction with UPC-A, UPC-E, EAN-13, EAN-8 and UCC/EAN-128 (GS1-128) symbols to assist in evaluating the quality of the printing process.
H-Marks: Also known as H-Gauges, these guides are generally used in conjunction with ITF-14, ITF-6 and UCC/EAN-128 barcode symbols to assist in evaluating the quality of the printing process. GRATING-41 - The GRATING-41 marks provide a quality check for the final image by creating 41 lines of equal width and spacing in 0.002mm (0.0001inches) increments from 0 to 0.080mm (0.0040inches). For further information see the section on Calibrating Your output equipment.
Text: It is possible to add up to four lines of free text around the barcode by choosing the Text option from the Options menu. You can then utilise the Alignment, Position, Gap and Font options to manipulate the location and look of each line.
Page 14 of 24 Page 15 of 24
Axicon Auto ID Limited | Filmbars graphics | Feb 2016Axicon Auto ID Limited | Filmbars graphics| Feb 2016
The Tracking Number dialog box can be accessed using the Tracking Number option of the Options menu. You have the option to add a prefix and suffix around your counter (but the counter must be a decimal number). The total length of the tracking number must not exceed eight characters. The Master Tracking number toggle switch can be used to give all the generated FBS files a uniquely sequential serial number.
Attaching Order Entry Information The Order Entry screen (which can be accessed using the Order Entry option of the Options menu) can be used to add order details to FBS files which can be viewed at a later date if the FBS file is re-opened in the FilmBars package (only for saved FBS files).
It is possible to print directly from the Filmbars package to the printer of your choice, printing directly onto labels. You can utilise the Print Setup option under the File menu to select your chosen Windows printer and an appropriate paper size. Filmbars requires you to have a paper size of equal to or smaller than the printer driver paper size, other wise an error will be returned. To print you need to select the Print option from the File menu.
Printing your current barcode If you have a barcode currently created on the screen then you can select Print and the Print Label dialog box will automatically fill in and disable the file Source boxes at the top of the window leaving you the hoices of label format (see below), label numbers and position of the barcode in the label. The # of Labels option allows you to select how many labels you would like, the # of Times option allows you to select how many times you want to repeat the set of labels and the First Label allows you to choose at which label position you would like to start your first label. The default will be to centre the barcode in the label but this can be altered by toggling off the Centre in Label check box and then entering a valid figure in the Right and Down boxes to place your barcode as required. Filmbars will check that the barcode including light margins will fit inside the label, otherwise an error message will be returned In this case either use a smaller barcode or larger label.
Printing from a database of barcodes If you have created a database of FDB files using the Data Sequence File Generator or by utilising a spreadsheet program then you can print directly from this FDB file (without using the Save Batch facility). This is done by closing any current barcodes you have open, ensuring the barcode symbology that you wish to use is selected then selecting the Print option. This time instead of the upper area of the Print Labels dialog box being disabled it will be enabled, use the Database File section of the form to locate and edit your file as necessary and then proceed as per above Printing your Current Barcode. The number of records (barcodes) in your file will reflect the number of labels that are printed. For example, if you created a serial file of numbers 000 to 200 with the Code 39 symbology selected at print time, then 200 sequential Code 39 barcodes should be printed, but you can choose to print fewer if necessary by altering the number of labels, to 10 for example.
Tracking numbers Printing
www.axicon.comwww.axicon.com
Page 16 of 24 Page 17 of 24
Axicon Auto ID Limited | Filmbars graphics | Feb 2016Axicon Auto ID Limited | Filmbars graphics| Feb 2016
www.axicon.comwww.axicon.com
There are a number of pre-formatted label sizes (saved as SLF files) available for selected media types offering different label sizes and numbers of labels to a page These formats can be edited, or alternatively you can generate your own formats. The Label Formats window can be accessed either directly from the Tools menu or through selecting File Print and then pressing the Select File button in the Print Labels window. In Label Formats you choose the appropriate media manufacturer (Group) and format type (References). Highlighting a Group and pressing the Add button will allow you to add new manufacturers (Groups) to the list. Highlighting a Group and pressing the Edit button will display the properties of that manufacturer (address, telephone etc). Highlighting a file in References and pressing Edit in that section will allow you to edit the layout of that particular label format. You can also use the Add and Remove buttons to create new files for that manufacturer or to delete unnecessary ones. To create your own file select the User Defined group then press Add. The Format Description window should then appear allowing you to set up your own format including choices for page dimensions, label dimensions and page layout.
The Format Description window If you are going to edit an existing format or create a new one then the Format Description window will be shown. This window first shows a box for the Format Name (in which you can enter a relevant name) and an option for units (e.g. millimeters or inches), followed by a range of options as listed below: 1) Page Dimensions - here you can choose the media type i.e. continuous, sheet or fan-fold and the dimensions of the page including margins. This information should reflect the properties of the paper that is in your printer. 2) Label Dimensions - here you enter information about the size of your individual labels on the sheet and select whether they have rounded or squared corners
Label formats3) Page Layout - here you select how the labels are to be laid out on the page.
1. Page Dimensions - here you can choose the media type i.e. continuous, sheet or fan-fold and the dimensions of the page including margins. This information should reflect the properties of the paper that is in your printer.
2. Label Dimensions - here you enter information about the size of your individual labels on the sheet and select whether they have rounded or squared corners
3. Page Layout - here you select how the labels are to be laid out in the page including how many labels there will be across and down the page and any separation that you want to have between them, the Auto Sep button will automatically calculate the horizontal and vertical separation for you.
It is important to consider the combined widths of the label, how many labels across and any margins in the paper to avoid returning an error. The following formulae should be considered to help calculate whether your format will work: Paper Width = Left Margin + (Label Width * Labels Across) + (Horizontal Separation * (Labels Across - 1)) + Right margin Paper Length = Top Margin + (Label Height * Labels Down) + (Vertical Separation * (Labels Down - 1)) + Bottom Margin.
Copying and pasting symbols You can use the clipboard in Filmbars to copy a current barcode and then paste it into another application. This is performed by selecting Copy from the Edit menu, then using the paste facility in your desired program (the format of the pasted symbol will depend on the format required by the program you are pasting to). If you wish to specify the format that you will copy the file as then you can use the Copy As function in the Edit menu. You will then have the choice of Windows Metafile or Windows Bitmap. We recommend you use the Windows Metafile option as it carries a much higher level of accuracy. Please note: The copy/paste method is not recommended for the production of high quality artwork, where the generation and import of an EPS file is far more appropriate.
Page 18 of 24 Page 19 of 24
Axicon Auto ID Limited | Filmbars graphics | Feb 2016Axicon Auto ID Limited | Filmbars graphics| Feb 2016
www.axicon.comwww.axicon.com
Preferences and views of the program You can personalise some aspects of FilmBars to suit your requirements. If you wish to zoom in on an area of the barcode you have created then this can be done using the Zoom option of the View menu, where you are given a range of zoom values to choose from. The View menu also provides you with the option of displaying the Status Bar and Toolbar which can be toggled to show or hide by clicking on the relevant option. To set up your personal preferences you can access the Preferences option of the Options menu. The following options are then shown: Show Welcome Screen check box - toggle this box on or off depending on whether you want the welcome screen to be shown upon program load. Establish Dimensional Limits check box - Filmbars will automatically show an error message on the majority of occasions when you ask the software to alter a symbol in a way that violates that symbology’s specifications. If you would like to override this warning message then you can do this by toggling off the checkbox (the box will automatically toggle back on each time you restart the FilmBars software). Order Entry check box - toggling this tick box on will automatically bring up the Order Entry dialog box each time you make a new barcode or the Save Batch command is executed. Measure Units: Use to select either millimeters or inches. This option is disabled when an active barcode is on the screen. Directories: This is where the default path directories for saving your generated barcodes and label formats are stored. These can be altered if you wish to default to a different directory. Defaults: This section of the form can be used to set various defaults: n will automatically calculate the horizontal and vertical separation for you. Composed Code Separator Character and FDB Separator Character - The delimiter character is entered here for these two options. The default is comma but this can be altered if, for example, your database is tab delimited. B.W.A - If you always use the same value for your Bar Width Adjustment then a default value can be entered here. Image Setter Calibration: You can enter a value here to compensate for any dot gain caused by your image setter. The image setter calibration figure will then be applied when saving or exporting using any EPS or AI format. Save File As Type: If you always save your files as a certain format then you can set the default here.
PreferencesThis chapter provides some basic trouble shooting tips If you do not find your solution here then please contact Axicon using the details provided in the technical support section of this chapter. Symbology required is not listed Although the FilmBars package is capable of producing a wide range of symbologies your package will be limited to the symbologies that you specified when you purchased the software. If you would like to add further symbologies then please contact Axicon for details. Error messages during symbol generation Error messages are generally displayed at the symbol generation stage because one of the data fields contains invalid data. If you presented with an error message, check that your barcode is of the correct character length for that symbology and that the magnification, truncation and BWA are of appropriate measurements. It may be that you are requesting the software to step outside of the symbology’s specification. If this is necessary then toggling off the Establish Dimensional Limits check box in the Preferences option of the Options menu will remove the symbology specification boundaries (this could result in the generation of out of specification barcodes and is not recommended). BWA value required is not listed or is returning an error Common values for BWA are listed in the pull down menu, however you can overtype the value you require into the box Remember if you want to add a reduction of 250 microns then it would be added as - 0.250. If an error is returned then you have probably exceeded the boundaries for that symbology. Filmbars will automatically limit the amount of BWA you can use in relation to the symbology. Restricted/No use of certain features Certain features such as Rotation, Order Entry and saving of certain file types are specific to particular versions of Filmbars. Unable to re-open a previously saved file for editing Filmbars can only re-open files which have been saved using the FBS file format. If you have saved the file as an EPS or AI file then you cannot re-open it using the Filmbars package and will have to regenerate the file.
Page 20 of 24 Page 21 of 24
Axicon Auto ID Limited | Filmbars graphics | Feb 2016Axicon Auto ID Limited | Filmbars graphics| Feb 2016
Software licence agreementFilmbars, Filmbars Graphics and all products made or distributed by Symbolology Labs are registered trademarks of Axicon Auto ID Ltd. All other products or trademarks mentioned are the property of their respective owners.
Axicon Auto ID Ltd has prepared this manual and software to be used by its personnel, licensees and customers. The information contained in them is the property of Axicon Auto ID Ltd and may not be reproduced under any circumstances either in a partial or a complete form without prior written consent.
The information contained in the manual and in the software may not be stored in any other form other than that in which it has been supplied by Axicon Auto ID Ltd, save for the purpose of required computer data backups by its licensees and customers. Expressly, any attempt to disassemble the software is in direct breach of the terms of the licence.
Axicon Auto ID Ltd reserves the right to make any changes deemed necessary in the specifications and/or material without prior notice and takes no responsibility for possible damages, including those which may come as a result of, or be caused by the aforementioned material including, but not limited to, typographical, mathematical or listing errors.
No responsibility will be assumed for infringement of patents, copyrights or any third party rights due to the use they may be given. Axicon Auto ID does not guarantee that the Filmbars Graphics program will run correctly in all hardware and software environments. Axicon Auto ID provides facilities for a “demonstration version” of the software to be available to potential licensees so that a licensee may evaluate the suitability of the product for their purposes prior to purchase. Filmbars Graphics may not work with modified operating systems, with certain software applications residing in memory, or hardware that is not 100% compatible. The Filmbars Graphics licence offered is for the current release of software available at the time the order is received by Axicon Auto ID. Axicon Auto ID does not offer any guarantee that the Filmbars Graphics program will run correctly under any future computer operating system, or hardware, nor does Axicon Auto ID guarantee that it will make a new release of the software available to work under any future computer operating system.
Changes to the computer operating system, the computer hardware or the introduction of other software to the system resulting in incompatibilities are the responsibility of the licensee.
The licence is for personal use ONLY – to generate barcode images for use by the licensee exclusively. Should the licensee wish to generate barcode images for sale to a third-party then it will be necessary for the licensee to purchase a licence for the Filmbars Graphics for Film Masters product.
Although Axicon Auto ID has tested the software supplied, Axicon Auto ID Ltd does not guarantee, either explicitly or implicitly, the quality, application or utilisation of this product and its documentation for a determined purpose. Consequently this product and documentation are licensed as is and it is the licensee who must assume the risk insofar as the quality and application, The licensee, and not Axicon Auto ID Ltd will assume all necessary repair costs. Axicon Auto ID Ltd reserves the right to revise this manual, its accompanying software and documentation making any changes deemed necessary in their content with no obligation to notify any person or organisation about said revision or modification. Under no circumstances will Axicon Auto ID Ltd assume any responsibility for any damage incurred either directly, indirectly, special or consequential as a result of use or the impossibility to make use of this product and/or documentation, even when forewarned about the possibility of causing said damage. Axicon Auto ID does not assume responsibility for any hardware, software or data stored or used with this product, including reparation costs and replacement of hardware, software or data.
www.axicon.comwww.axicon.com
Page 22 of 24 Page 23 of 24
Axicon Auto ID Limited | Filmbars graphics | Feb 2016Axicon Auto ID Limited | Filmbars graphics| Feb 2016
Contact usAxicon Auto ID Ltd Church RoadWeston on the GreenOxfordshire OX25 3QPUK
As Axicon continually improves its products, their specifications and features are subject to change without notice. All trademarks are acknowledged as belonging to their respective companies.