25
GitUp Git2 User Manual dashcamscentral.com.au The Basic Structure

GitUp Git2 User Manual dashcamscentral.com.au
The Basic Structure

GitUp Git2 User Manual dashcamscentral.com.au
Powering Camera On and Off
1. To power on:Press the Power/Mode button for two seconds;
2. To power off:Press and hold the Power/Mode button for four seconds.
Selecting Camera Modes
Press the Power/Mode button repeatedly to cycle through the camera modes,there are four
modes for Git2: Video;Photo;Playback;SetUp
Adjusting Camera Settings
1. Press the Power/Mode button to cycle to your desired mode;
2. Press the Setting/WiFi button to enter the setting menu for that mode;
3. Press the Power/Mode button to cycle through the options;
4. Press the Shutter/Select button to select your desired option;
5. Press the Setting/WiFi button to exit the setting menu
The Icons

GitUp Git2 User Manual dashcamscentral.com.au

GitUp Git2 User Manual dashcamscentral.com.au
Settings Video Mode
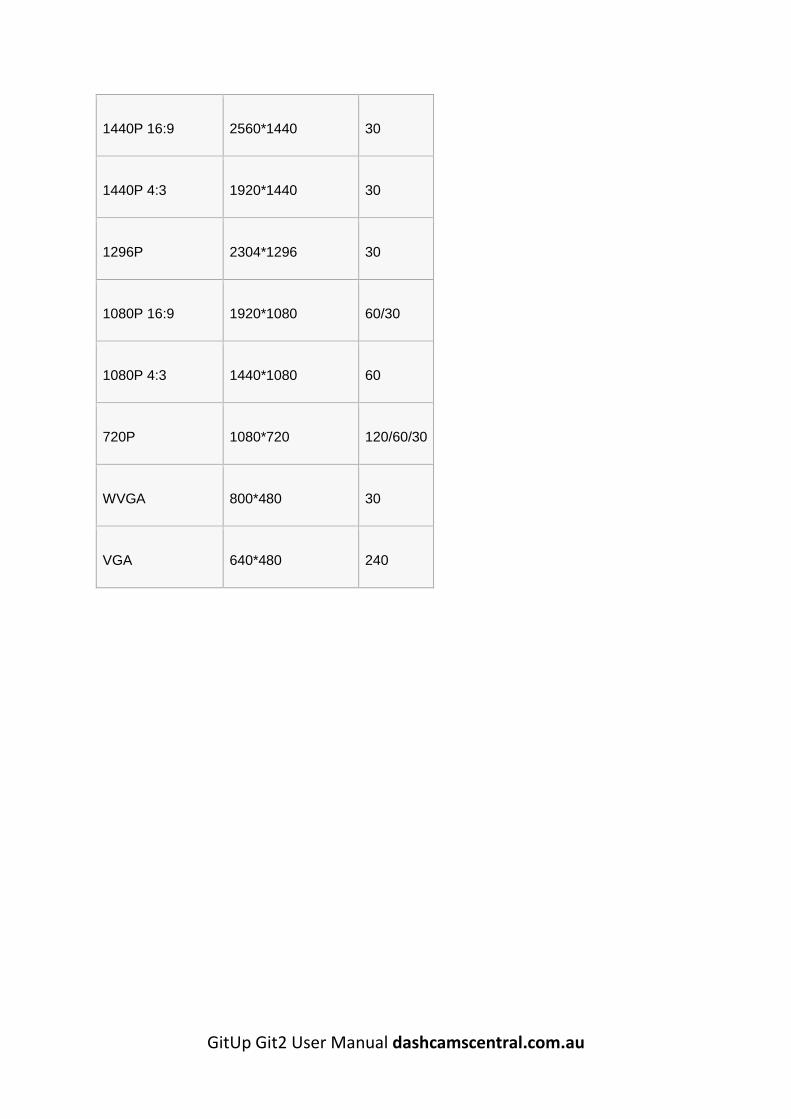
Video Resolution
GitUp Git2 includes the video resolutions listed below.
Video Resolution Screen Resolution FPS
2160P 2880*2160 24
GitUp Git2 User Manual dashcamscentral.com.au
1440P 16:9 2560*1440 30
1440P 4:3 1920*1440 30
1296P 2304*1296 30
1080P 16:9 1920*1080 60/30
1080P 4:3 1440*1080 60
720P 1080*720 120/60/30
WVGA 800*480 30
VGA 640*480 240

GitUp Git2 User Manual dashcamscentral.com.au
Default Setting: 1080P/60fps
Loop Recording
Available Intervals for Loop Recording are 2,3,5,10 minutes. For example, if you set the looping
interval into 2 minutes, when you record 10 minutes video, the video will be saved into 5 files that
each file lasts 2 minutes. What's more, the last file will be covered by the latest file when SD card
will be full.
Default Setting: off
GitUp Git2 User Manual dashcamscentral.com.au
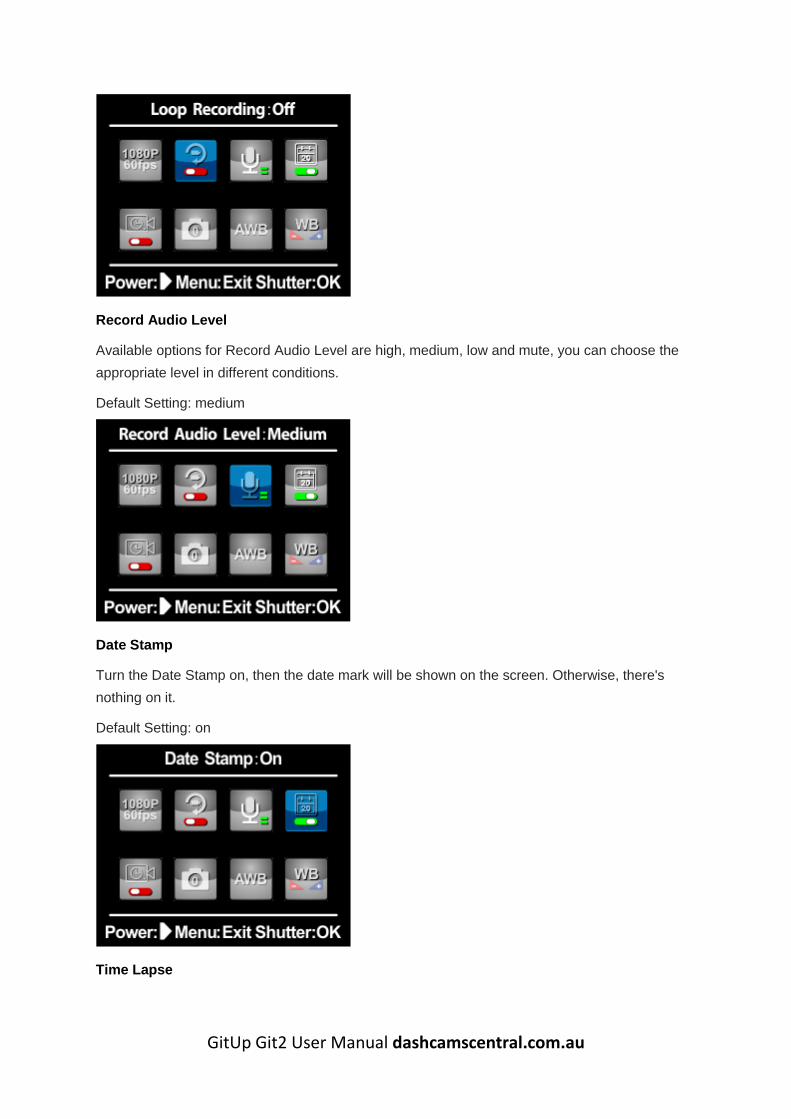
Record Audio Level
Available options for Record Audio Level are high, medium, low and mute, you can choose the
appropriate level in different conditions.
Default Setting: medium
Date Stamp
Turn the Date Stamp on, then the date mark will be shown on the screen. Otherwise, there's
nothing on it.
Default Setting: on
Time Lapse

GitUp Git2 User Manual dashcamscentral.com.au
Available Intervals for Time Lapse Video range from 200 ms to 10 minutes. The details are
below: 1F/200ms; 1F/1Sec; 1F/5Sec; 1F/10Sec; 1F/30Sec; 1F/1Min; 1F/5Min; 1F/10Min
Default Setting: off
Video Snapshot Timer
This function helps your camera snapshot a photo while recording in every interval. Available
Intervals for snapshot are: 5/10/20/30/60 secends.
Default Setting: off
White Balance
This function can help your camera work well in reduction of the color, available options for White
Balance Setting are: Auto/Cloudy/Daylight/Tungsten/Fluorescent/Blue/Light Blue/Red/Light
Red/Custom
Default Setting: auto

GitUp Git2 User Manual dashcamscentral.com.au
Custom White Balance Set
Menu Button Function
Available options for Menu Button Function are: Exposure Lock/White Balance Lock/EV and WB
Lock/Audio Recording/Gyro Stabilization. For example, once you choose the Gyro Stabilization
as the function for menu button, your camera can realize gyro stabilization while recording with
simply pressing the menu button.
Default Setting: off
EV
Exposure Value compensation affects the brightness of your video. Adjusting this setting can
improve video quality when shooting in environments with contrasting lighting conditions. Setting
Options -2.0/-1.5/-1.0/-0.5/+0/+0.5/+1.0/+1.5/+2.0

GitUp Git2 User Manual dashcamscentral.com.au
Default Setting: +0.0
ISO
ISO adjust the camera's sensitivity in low-light environments, and creates a balance between
brightness and resulting image noise. Image noise refers to the degree of graininess in the
image. Setting Options auto/50/100/200/400/800/1600
Default Setting: auto
Color
Color allows you to adjust the color profile of your video footage. Setting Options Normal/Black &
White/Sepia/Vivid
Default Setting: Normal

GitUp Git2 User Manual dashcamscentral.com.au
Gyro Stabilization
With Gyro ON, a stabilization icon will appear on the right-down screen.When the camera is in
the move, the icon is in orange color, otherwise it would be in white color.
Default Setting: Off
WDR
This feature can help your video looks clearly in the contrast between light and dark.
Default Setting: Off
Slow Motion
This feature can make the video slower than the normal. Setting Options Off/-2X/-4X/-8X
Default Setting: Off

GitUp Git2 User Manual dashcamscentral.com.au
Sharpness
Sharpness controls the sharpness of your video footage Setting Options Strong/Normal/Soft
Default Setting: Normal
Metering
Available options for Metering are: Center/Spot/Average
Default Setting: Center
FOV
FOV controls the angle of your video footage Setting Options Wide Angle/Narrow Angle
Default Setting: Wide Angle

GitUp Git2 User Manual dashcamscentral.com.au
Motion Detection
The camera will start to record when it detects motion if you enable the "motion detection"
feature, and it will stop recording after one minute if the camera doesn't detect motion.
Default Setting: Off
G-Sensor
This is a dashcam feature, its main purpose is to lock the current files while recording as soon as
it detects shake. You can set G-sensor sensitivity as from high to low. High means camera will
start recording at slightest shock, low does quite opposite.
Available options for G-Sensor are: Off/Low Sensitivity/Middle Sensitivity/High Sensitivity
Default Setting: Off
Photo Mode
Image Size
GitUp Git2 captures photos at 16MP/12MP/8MP/5MP/3MP
Default Setting:16MP

GitUp Git2 User Manual dashcamscentral.com.au
Shutter Speed
Setting Options Auto;1/30Sec;2 Sec;5 Sec;10 Sec;15 Sec;20 Sec;30 Sec;1 Min
Default Setting: Auto
Date Stamp
Turn on the Date Stamp on, then the date will show on the photo.
Default Setting: On
Time Lapse
Available Intervals for Time Lapse photo range from 200 ms to 10 minutes. The details are
below: 1F/200ms;1F/1Sec;1F/5Sec;1F/10Sec;1F/30Sec;1F/1Min;1F/5Min;1F/10Min
Default Setting: Off

GitUp Git2 User Manual dashcamscentral.com.au
Self-Timer Mode
EV
Exposure Value compensation affects the brightness of your photo. Adjusting this setting can
improve photo quality when shooting in environments with contrasting lighting conditions. Setting
Options -2.0/-1.5/-1.0/-0.5/+0/+0.5/+1.0/+1.5/+2.0
Default Setting: +0.0
ISO
ISO adjust the camera's sensitivity in low-light environments, and creates a balance between
brightness and resulting image noise. Image noise refers to the degree of graininess in the
image. Setting Options auto/50/100/200/400/800/1600
Default Setting: Auto

GitUp Git2 User Manual dashcamscentral.com.au
Color
Color allows you to adjust the color profile of your photo footage. Setting Options Normal/Black &
White/Sepia/Vivid
Default Setting: Normal
White Balance
This function can help your camera work well in reduction of the color, available options for White
Balance Setting are: Auto/Cloudy/Daylight/Tungsten/Fluorescent/Blue/Light Blue/Red/Light
Red/Custom
Default Setting: Auto
Custom White Balance

GitUp Git2 User Manual dashcamscentral.com.au
Capture Mode
Available options for capture mode are: Single/3 Sequence/10 Sequence
Default Setting: Single
Sharpness
Sharpness controls the sharpness of your photo footage Sharpness Setting Strong/Normal/Soft
Default Setting: Normal
Metering
Available options for Metering are: Center/Spot/Average
Default Setting: Center

GitUp Git2 User Manual dashcamscentral.com.au
RAW Photo Mode
GitUp Git2 can provide original photo format.
Default Setting: Off
Playback Mode
When there exists file in the camera, then you can do the operations below:
Play Current File
Delete Current File
Lock/Unlock File

GitUp Git2 User Manual dashcamscentral.com.au
Slideshow
System Setting
Quick Capture
With Quick Capture, you can quickly turn your camera on and begin capturing video or photo.
The options for this setting are on and off(default). A.To capture video with Quick Capture: With
the camera powered off, just press the Shutter/Select button for once. Your camera automatically
powers on and begins capturing video.
B.To capture photo with Quick Capture: With the camera powered off, just press the
Shutter/Select button for several seconds. Your camera automatically powers on and begins
capturing photo.
C.To stop Recording Press the Shutter/Select button again to stop recording and power off
camera.
Default Setting: Off

GitUp Git2 User Manual dashcamscentral.com.au
Beep
You can set the volume for the sound indicators to be on or off.
Default Setting: On
OSD Info
The OSD(on-screen display) setting determines whether the recording icons and file information
on video and on the viewing screen appear during playback. The options for this setting are on
and off.
Default Setting: On
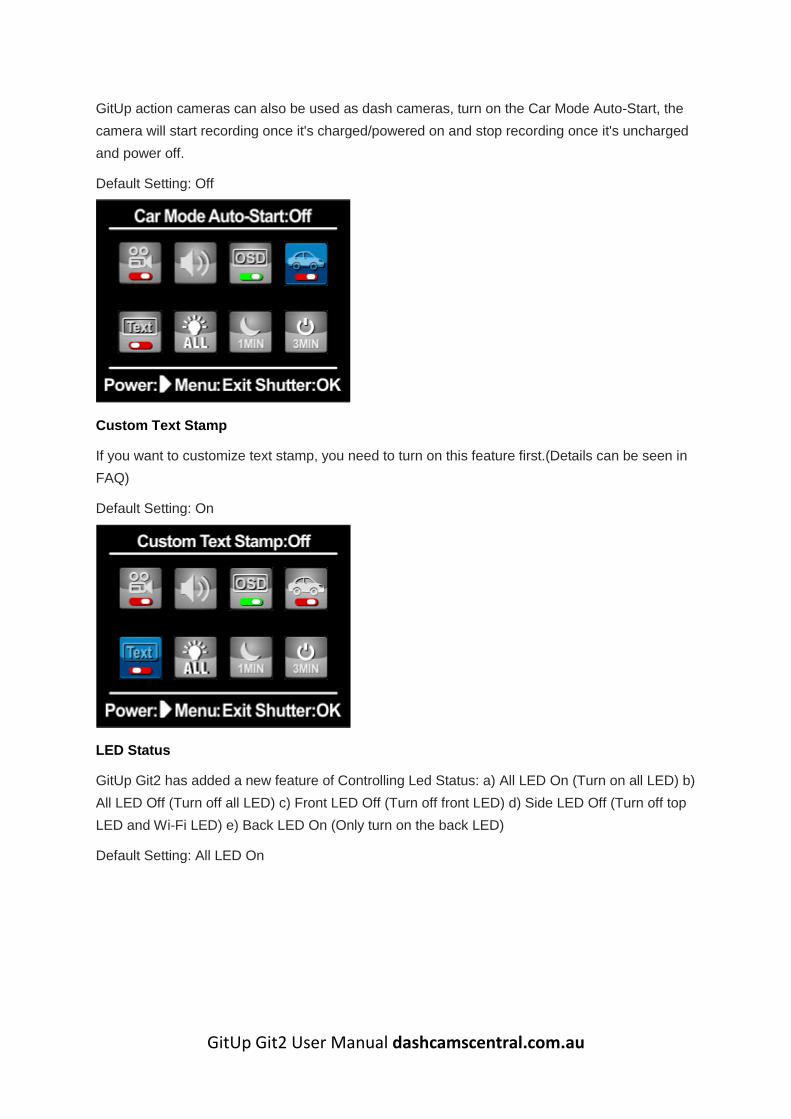
Car Mode Auto-Start
GitUp Git2 User Manual dashcamscentral.com.au
GitUp action cameras can also be used as dash cameras, turn on the Car Mode Auto-Start, the
camera will start recording once it's charged/powered on and stop recording once it's uncharged
and power off.
Default Setting: Off
Custom Text Stamp
If you want to customize text stamp, you need to turn on this feature first.(Details can be seen in
FAQ)
Default Setting: On
LED Status
GitUp Git2 has added a new feature of Controlling Led Status: a) All LED On (Turn on all LED) b)
All LED Off (Turn off all LED) c) Front LED Off (Turn off front LED) d) Side LED Off (Turn off top
LED and Wi-Fi LED) e) Back LED On (Only turn on the back LED)
Default Setting: All LED On

GitUp Git2 User Manual dashcamscentral.com.au
Screen Auto Sleep
To save the battery, the screen of the Git2 can sleep automatically once it is set the Auto Sleep
time. Available settings are: off/1/3/5 minutes
Default Setting: 1 minute
Auto Power Off
When the Git2 is in non-working status , it will power off automatically after the setting time.
Available settings are: off/1/3(default)/5/10/15/30/60 minutes
Default Setting: 3 minutes
Date&Time Setting

GitUp Git2 User Manual dashcamscentral.com.au
The date &time will back to original once the camera is upgraded or defaulted, so this setting can
help your camera back to correct time.
System Language
Available options of system language for Git2 are:
English/France/Spanish/Portuguese/Dutch/Italian/Russian/Japanese/ simplified
Chinese/Traditional Chinese/Czech
Default Setting: English
Frequency
Git2 support two kinds of frequency: 50/60 Hz
Default Setting: 50Hz

GitUp Git2 User Manual dashcamscentral.com.au
TV Mode
Git2 support two kinds of TV mode: PAL/NTSC
Default Setting: PAL
RC Pairing
The interface of matching RC watch with camera, the detail is below the FAQ.
RC Working Mode
USB Mode
Format
You can remove all the files in the SD card through Format, so this feature should be used
carefully.

GitUp Git2 User Manual dashcamscentral.com.au
Default Setting
The camera will back to factory setting through the Default Setting
Version
The place which you can check the version of the firmware, especially after the upgrading to
ensure whether the upgrading is successful.


