24
THE CARRIERE ® MOTION ™ WORKBOOK Turn Class II Into Simple Class I Patients. fast gentle natural

THE CARRIERE® MOTION™ WORKBOOK
Turn Class II Into Simple Class I Patients.fa
stge
ntle
natu
ral

2
A Message from Dr. Carrière
The Carriere Motion Appliance is a biominimalist appliance of unqualified simplicity.
It operates on the premise that achieving a Class I relationship before correcting
individual tooth positions is of strategic importance in simplifying Class II patients
being treated nonextraction. This protocol eliminates competing force vectors
inherent in traditional Class II correction when traction is combined with fixed
appliance treatment.
In developing the Motion Appliance, I was intent on creating a device that mimics the
body’s natural processes using a noninvasive technique to stimulate distalization of
the entire buccal segment as a unit. This biomimetic approach
is the result of research that takes advantage of the most advanced 3D computer technologies. It represents an
evolution of Dr. José Carrière’s protocol, which is based on the principle of dental movement using available space.
It consists of creating space by a distomesial sequence, transverse arch development, or a combination of both,
according to the diagnostic needs prior to movement of the anterior segment in Class II nonextraction patients.
Clinical experience indicates that compared with Class II elastics traction used on fully bonded arch, the Motion
Appliance can resolve the posterior segments of Class II malocclusions in three to five months, reducing the total
treatment time by 35% to 40%. It has also opened new vistas for a more conservative and simplified approach to
Class II patients that would have previously required extractions. My hope is that clinicians around the world will
find it an invaluable adjunct to their clinical armamentarium.
1 Carriere, J.: The Inverse Anchorage Technique in Fixed Orthodontic Treatment, Quintessence Publishing Co., Chicago, 1991.
Luis Carrière, D.D.S., M.D.S., Ph.D.Clinical Orthodontist and ResearcherBarcelona, Spain
3
2 Henry, R.G. Relationship of the Maxillary First Permanent Molar in Normal Occlusion and Malocclusion. Am J Orthod. Dentofacial Orthoped. 1956; 42: 288-306.
3 Stoller, A. E. The Normal Position of the Maxillary First Permanent Molar. Am J Orthod. Dentofacial Orthoped. 1954; 40: 259-271.
Class II Correction to a Class I PlatformThe Motion Appliance: Achieving Class I Prior to Tooth PositioningOne philosophy for simplifying the nonextraction treatment of certain Class II patients is to achieve Class I occlusion in the posterior segment prior to correcting individual tooth positions. This protocol uncomplicates treatment by eliminating the collateral distorting vectors and internal binding forces that traditional corrective methods create when Class II traction is combined with successive wire activations via fixed appliances.
The Carriere philosophy espouses this approach. The Motion Appliance is utilized to correct cases to a Class I Platform during the initial phase of treatment—when patient compliance is at its best—for the macro correction of the occlusion. The clinician can then finish the case with the fixed or aligner appliance system of choice.
While Angle considered the molar relationship the primary reference for defining a Class I occlusion, the Carriere methodology subscribes to a comprehensive definition of Class I referred to as the Class I Platform: perfect buccal segment intercuspation from cuspids to molars in which centric relation coincides with centric occlusion.
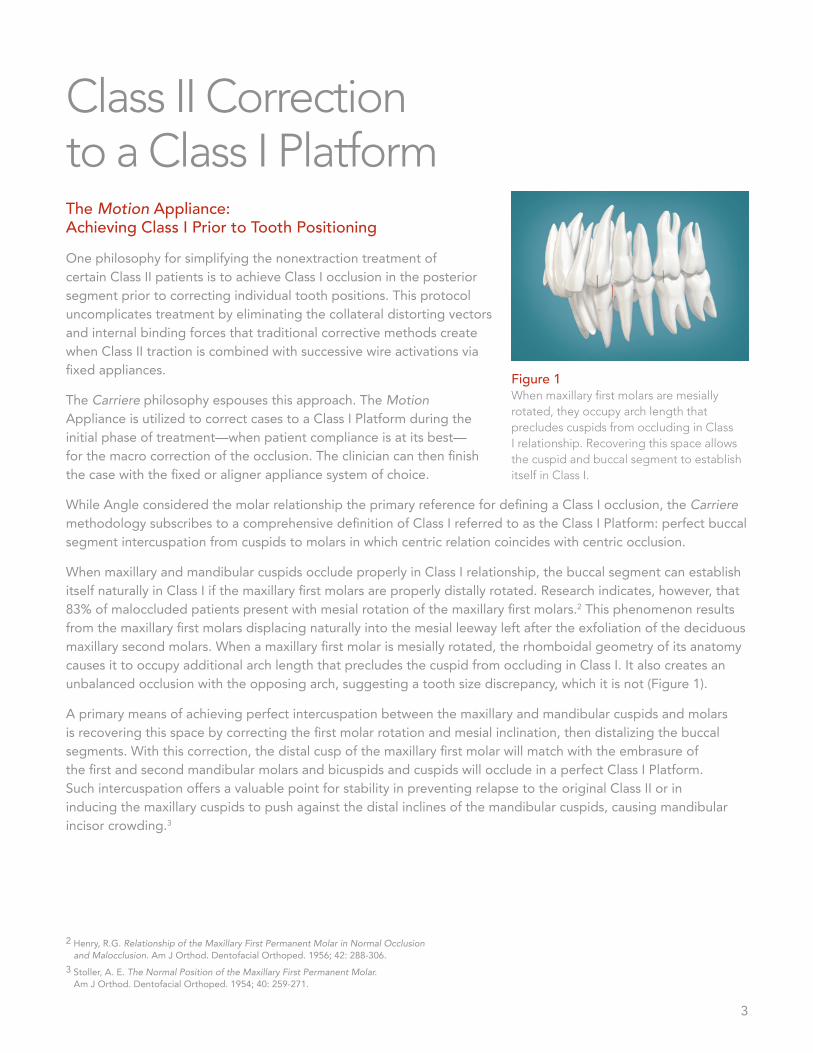
When maxillary and mandibular cuspids occlude properly in Class I relationship, the buccal segment can establish itself naturally in Class I if the maxillary first molars are properly distally rotated. Research indicates, however, that 83% of maloccluded patients present with mesial rotation of the maxillary first molars.2 This phenomenon results from the maxillary first molars displacing naturally into the mesial leeway left after the exfoliation of the deciduous maxillary second molars. When a maxillary first molar is mesially rotated, the rhomboidal geometry of its anatomy causes it to occupy additional arch length that precludes the cuspid from occluding in Class I. It also creates an unbalanced occlusion with the opposing arch, suggesting a tooth size discrepancy, which it is not (Figure 1).
A primary means of achieving perfect intercuspation between the maxillary and mandibular cuspids and molars is recovering this space by correcting the first molar rotation and mesial inclination, then distalizing the buccal segments. With this correction, the distal cusp of the maxillary first molar will match with the embrasure of the first and second mandibular molars and bicuspids and cuspids will occlude in a perfect Class I Platform. Such intercuspation offers a valuable point for stability in preventing relapse to the original Class II or in inducing the maxillary cuspids to push against the distal inclines of the mandibular cuspids, causing mandibular incisor crowding.3
Figure 1 When maxillary first molars are mesially rotated, they occupy arch length that precludes cuspids from occluding in Class I relationship. Recovering this space allows the cuspid and buccal segment to establish itself in Class I.

4
Biomechanics of the ApplianceTooth Movement that the Motion Appliance FostersThe challenge inherent in employing traditional Class II correctors for distalizing the buccal segment is controlling the unwanted effects of reciprocal movement. These challenges include maxillary molar tipping, maxillary bicuspid anchorage loss and mandibular incisor proclination. The Motion Appliance is designed to cultivate cuspid and buccal segment distalization that precludes such undesired side effects (Figure 2a-d) as well as offer technique simplicity and ease of delivery. It is based on the innovative biomechanical concept of “free but controlled” tooth positioning.
The primary biomechanical objectives for the Motion Appliance are to: • Provide controlled rotational movement of the maxillary first molar around its palatal root.• Upright the maxillary first molar.• Create a uniform biomimetic force to obtain univectorial dental displacement. • Distalize the maxillary posterior segment (cuspid to molar) as a unit while controlling for unwanted torquing
and tipping.• Require only a light force to be activated yet be completely passive when traction is not being employed.• Respect periodontal structures. • Establish a Class I Platform from which the clinician can finish the case simply and efficiently using the
finishing appliance of choice.
The cuspid and first molar have different positions in the dental arch and so require an individualized approach to their dental displacement inside the alveolar bone. Because of this situation, the biomechanical design of the Motion Appliance fosters the expression of two completely different types of movement.
Figure 2a-d The Motion translates the maxillary cuspid and buccal segment as a unit after derotating and uprighting the maxillary 1st molar, providing a platform for the cuspid and buccal segment to occlude in Class I Platform.
a b c d

5
Rigid, Half-Round Arm connects the anterior and posterior pads and curves over the two maxillary bicuspids, providing stability to the cuspid while directing movement longitudinally.
Posterior Pad direct bonds to the maxillary 1st molar and houses an articulating ball in a socket to foster free yet controlled movement that allows the molar to travel directly to the desired position after derotating and uprighting it.
Cuspid Movement
The maxillary cuspid requires a bodily movement along the corner of the alveolar ridge with inclination control of its longitudinal axis. The portion of the Motion Appliance attached to it has to be a fixed element that provides stability to the tooth itself while simultaneously directing movement longitudinally and distally. The anterior pad of the Motion Appliance that attaches to the maxillary cuspid (or first bicuspid if the cuspid is inaccessible) is a rigid half-round arm that affords this stability (Figure 3). The arm then curves posteriorally over the bicuspids, ending as an articulation ball within a socket on the posterior pad, which direct-bonds to the maxillary first molar.
Metal Injection Molded (MIM) Stainless steel affords proven strength, performance and patient safety.
Fixed Anterior Pad direct bonds to the maxillary cuspid (or 1st bicuspid), fostering bodily distal movement of the cuspid along the alveolar ridge. Its hook offers an attachment point for Class II traction.
Smooth, Rounded Design and Low Pofile offers maximum patient comfort.
Free Yet Controlled Movement. The ball and socket joint offers maximum freedom of movement that allows molars to travel directly to the desired position. It has built-in stops that prevent unwanted molar overrotation, tipping and torquing.
Figure 3. The Motion Appliance

6
To prevent the tendency for relapse, it is important to surpass the neutroclusion of the cuspids to a Super Class I by continuing the distalization process until the distal incline plane of the maxillary cuspid establishes a contact against the mesial incline plane of the mandibular first bicuspid (Figure 4a). Once accomplished, and the clinician has removed the Motion Appliance and bonded the arches with the fixed appliance of choice to finish treatment, it is necessary to ligate the distalized teeth under the archwire using a .012" stainless steel ligature wire tied in a figure-8 from the maxillary cuspids to the maxillary first molars, maintaining the consolidation throughout the remainder of treatment (Figure 4b). If you are using aligners to finish treatment, you will follow the protocol outlined in Full Aesthetic Treatment on page 17.
Figure 4a-b To prevent relapse, it is important to continue distalization until the cuspids are in Super Class I (a), then, after bonding the case, consolidate the distalized teeth for the remainder of treatment (b).
a b
First Molar Movement
The maxillary first molar requires a triple movement: distal rotation around its palatal root and controlled distal displacement while preventing the distal tipping of its crown and even uprighting if need be. Obviously, the Motion Appliance must first derotate and upright the molar so that the distalizing movement can proceed unfettered. Once the molar uprights, the articulation of the ball within the socket prevents unwanted distal tipping (Figure 2).
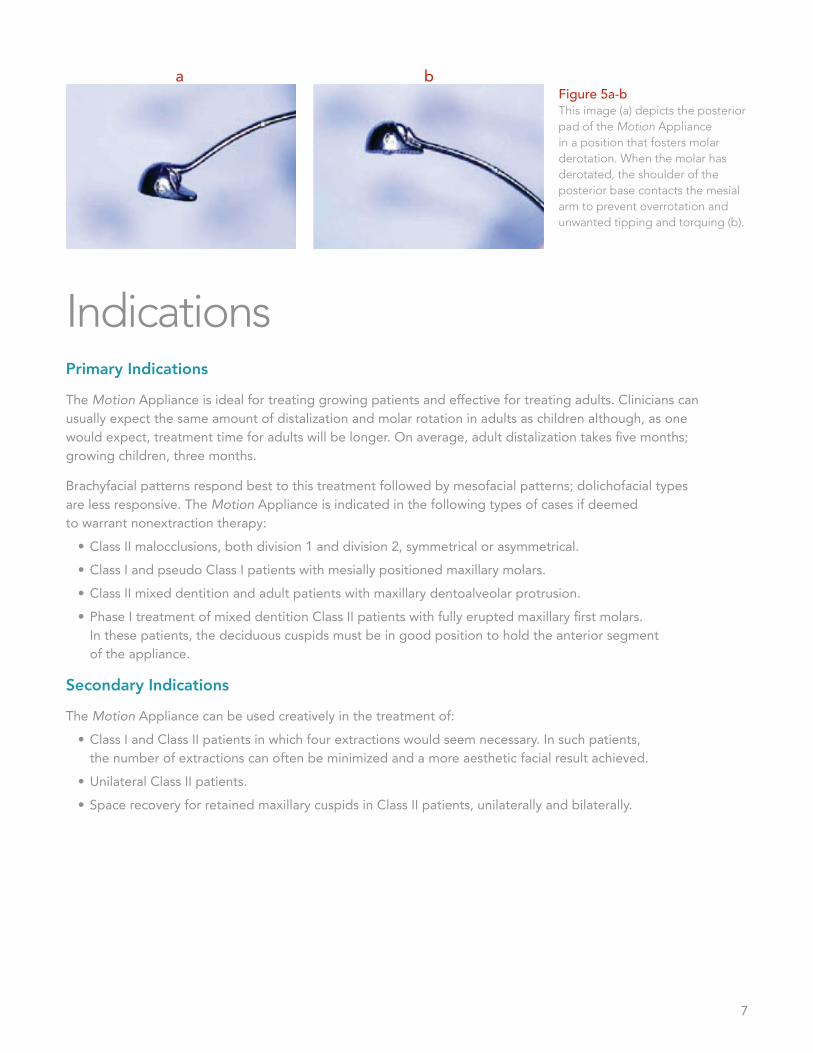
In true biomimetic design, the ball and socket imitates the body’s hip joint. This joint provides maximum freedom of movement with minimal friction while causing the molar to travel directly to the desired position after derotating and uprighting it. There are several predefined points that stop movement for controlling undesired consequences. Polar cuts on the ball articulate with flat surfaces in the socket at a maximum orientation of -15° to the longitudinal axis of the arm, which act as a stop, limiting undesirable movements and providing torque control over the cuspid and molar (Figure 5a-b). When the molar has derotated, the mesial shoulder of the posterior base contacts an eminence in the distal end of the arm that runs between the anterior and posterior pads, preventing overrotation. While the movement of the molar is independent and qualitatively different from the movement of the cuspid, it must also be coordinated with it in order to express a simultaneous response as a unit.
7
a bFigure 5a-b This image (a) depicts the posterior pad of the Motion Appliance in a position that fosters molar derotation. When the molar has derotated, the shoulder of the posterior base contacts the mesial arm to prevent overrotation and unwanted tipping and torquing (b).
IndicationsPrimary Indications
The Motion Appliance is ideal for treating growing patients and effective for treating adults. Clinicians can usually expect the same amount of distalization and molar rotation in adults as children although, as one would expect, treatment time for adults will be longer. On average, adult distalization takes five months; growing children, three months.
Brachyfacial patterns respond best to this treatment followed by mesofacial patterns; dolichofacial types are less responsive. The Motion Appliance is indicated in the following types of cases if deemed to warrant nonextraction therapy:
• Class II malocclusions, both division 1 and division 2, symmetrical or asymmetrical.• Class I and pseudo Class I patients with mesially positioned maxillary molars.• Class II mixed dentition and adult patients with maxillary dentoalveolar protrusion.• Phase I treatment of mixed dentition Class II patients with fully erupted maxillary first molars.
In these patients, the deciduous cuspids must be in good position to hold the anterior segment of the appliance.
Secondary Indications
The Motion Appliance can be used creatively in the treatment of:• Class I and Class II patients in which four extractions would seem necessary. In such patients,
the number of extractions can often be minimized and a more aesthetic facial result achieved. • Unilateral Class II patients.• Space recovery for retained maxillary cuspids in Class II patients, unilaterally and bilaterally.

8
AnchoragePossible Sources of AnchorageTo avoid protrusion of the mandibular incisors during activation of the Motion Appliance, clinicians must determine an adequate source of anchorage based on each patient’s skeletal and neuromuscular pattern (Figure 6). A sound diagnosis for the proper selection of anchorage is a fundamental requirement to prevent anchorage loss. There are four primary sources for establishing anchorage that will each be discussed:
• A mandibular Essix appliance with direct-bonded buccal tubes on the mandibular molars (the preferred method);
• A passive mandibular lingual arch with molar tubes welded buccally and lingually on mandibular molar bands;
• Full mandibular fixed appliances with direct-bonded buccal tubes on the mandibular molars;
• Temporary anchorage devices (TADs).
I. Mandibular Essix Appliance
The Essix appliance (Dentsply Raintree Essix, Sarasota, FL, USA) provides a very good source of anchorage for Class II elastics traction. It unlocks the occlusion, is highly efficient and has become the anchorage method of choice for most clinicians (Figure 16a-b). It must be worn full time except during meals and is particularly applicable to patients with weak musculature. The recommended material is A+ with .040” (1 mm) thickness.
There is an Essix type vacuum in the lower arch from 7 to 7 with direct bonding tubes on the second or first molars, cutting a window in the buccal tube side where the molar tube will be bonded.
Figure 6 Once the motion is bonded, a Class II elastic attaches from the 1st mandibular molar or TAD to the hook of the anterior segment of the appliance bonded to the maxillary cuspid or first bicuspid if the cuspid is inaccessible.
Figure 16a-b The Essix appliance (a-before and b-after distalizing treatment) has become the most popular choice for anchorage with the Motion Appliance.
a b

9
Essix Fabrication
1. Bond buccal tubes with hooks onto the buccal surface of the mandibular first or second molar.2. Cut a window in the thermoformed Essix appliance to allow the buccal tubes to protrude. 3. To provide maximum traction and maintain the appliance in position:
a. Ensure it fits properly to the dental arch, or, b. Fabricate the appliance with small composite wedges bonded to the buccal surfaces
that fit over the mandibular bicuspids.
II. Passive Lingual Arch
A mandibular lingual arch to sustain Class II elastics traction is one means of preparing anchorage for the Motion Appliance and is particularly suited to patients with strong musculature. A .036” lingual arch adapted to the mandibular dental anatomy must run passively from first molar to first molar (second molars if they have erupted.) When second molars are fully erupted, it is advisable to band them (with buccal tubes) in order to obtain the maximum amount of force from elastics and create better anchorage resistance.
The clinician must remain vigilant that the lingual arch does not create protrusion of mandibular anteriors. The archwire must remain completely passive in order to disallow reciprocal movement of the mandibular dentition. It must also fit the length of the arch exactly and be perfectly adapted anatomically; otherwise, spaces will emerge between the mandibular incisors, an indication of anchorage loss. Clinicians must monitor and control against rotations and torque changes in the mandibular molars at every appointment. Patient acceptance of the lingual arch is excellent: it is invisible, comfortable, requires minimal patient care and is hygienic.
Materials to Fabricate (Figure 7)
• .036" lingual archwire• .036" lingual arch pliers • Edgewise pliers• Wax pencil• Patient’s model
Figure 7
10
Procedure to Fabricate
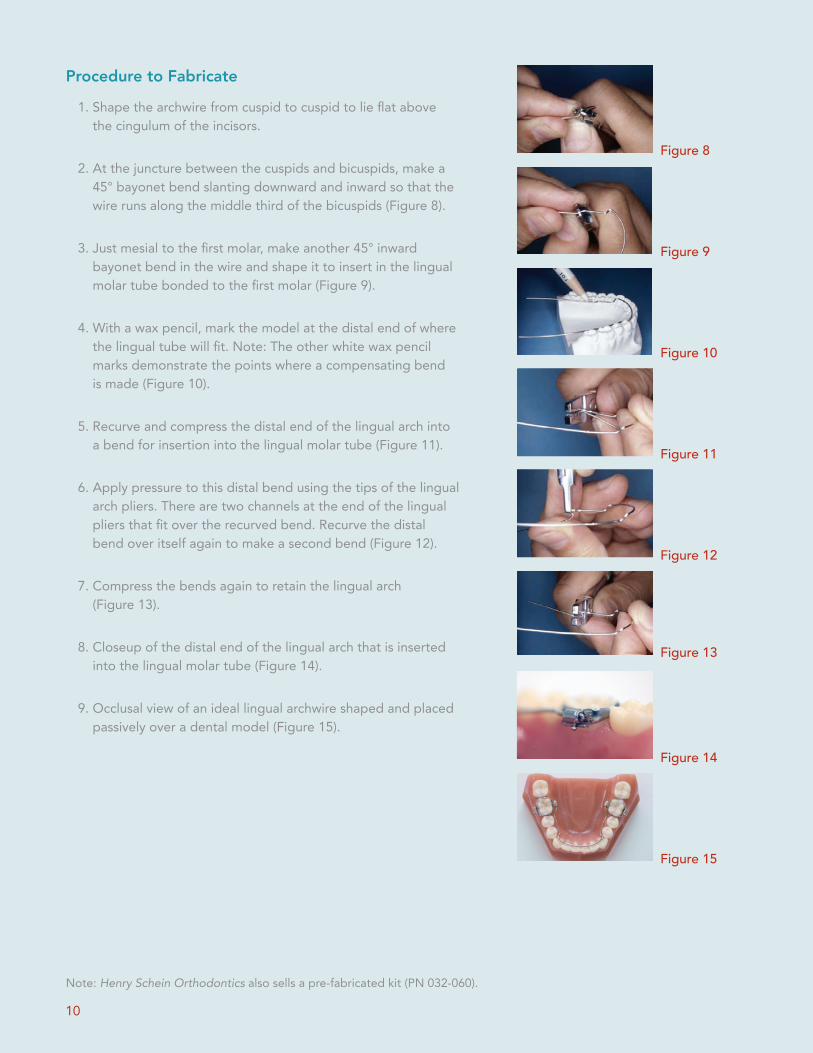
1. Shape the archwire from cuspid to cuspid to lie flat above the cingulum of the incisors.
2. At the juncture between the cuspids and bicuspids, make a 45° bayonet bend slanting downward and inward so that the wire runs along the middle third of the bicuspids (Figure 8).
3. Just mesial to the first molar, make another 45° inward bayonet bend in the wire and shape it to insert in the lingual molar tube bonded to the first molar (Figure 9).
4. With a wax pencil, mark the model at the distal end of where the lingual tube will fit. Note: The other white wax pencil marks demonstrate the points where a compensating bend is made (Figure 10).
5. Recurve and compress the distal end of the lingual arch into a bend for insertion into the lingual molar tube (Figure 11).
6. Apply pressure to this distal bend using the tips of the lingual arch pliers. There are two channels at the end of the lingual pliers that fit over the recurved bend. Recurve the distal bend over itself again to make a second bend (Figure 12).
7. Compress the bends again to retain the lingual arch (Figure 13).
8. Closeup of the distal end of the lingual arch that is inserted into the lingual molar tube (Figure 14).
9. Occlusal view of an ideal lingual archwire shaped and placed passively over a dental model (Figure 15).
Note: Henry Schein Orthodontics also sells a pre-fabricated kit (PN 032-060).
Figure 8
Figure 11
Figure 10
Figure 9
Figure 14
Figure 15
Figure 13
Figure 12

11
Option 1: In the maxilla. For noncompliant patients, the suggested TAD placement is in the maxilla using NiTi coil springs or permanent elastics for traction. It is best positioned between the first and second molar at the mid to apical height of the buccal side of the bone, following the direction of the axis of these teeth. In this position, the TAD is actually placed in the prominent arched border of the zygomatic process in which the cortical bone density is more reliable to hold traction. This placement will prevent the TAD from coming into contact with the molar roots as the teeth distalize. The recommended TAD length for placement in this position is 10 mm to 12 mm.
Option 2: In the mandible. Mini-implant (TAD) in between the lower 6 & 7 or distal to the 7, direct bonded molar tube on the first lower molar in the first case or on the second molar in the second case. Connect the TAD with the direct molar tube and use this molar tube for the elastics. This will give the maximum anchorage of the TAD, and at the same time will prevent the jiggling of a direct traction over the screw.
Figure 17 TADs are designed with heads that offer mechanisms to receive the insertion of elastics for anchorage maintenance. Case image courtesy of Dr. Dave Paquette, Charlotte, North Carolina, USA.
III. Fixed Appliances Bonded on the Mandibular Arch
For patients who present with a severe curve of spee or mild crowding in the mandibular arch, it is advisable to bond brackets to the mandibular dentition to prepare anchorage for supporting Class II traction. After leveling the case with round wires, advance to a .016" x .025" dimension archwire and then to a .019" x .025" Bio-Kinetix™ Archwire before attaching the Class II elastics.
IV. Temporary Skeletal Anchorage (Temporary Anchorage Devices or TADs)
A variety of temporary anchorage devices (TADs), such as miniimplants, miniplates and miniscrews, are designed with heads that offer mechanisms to receive the insertion of elastics for anchorage maintenance (Figure 17). Example includes the Orlus® Mini-Implant System.
12
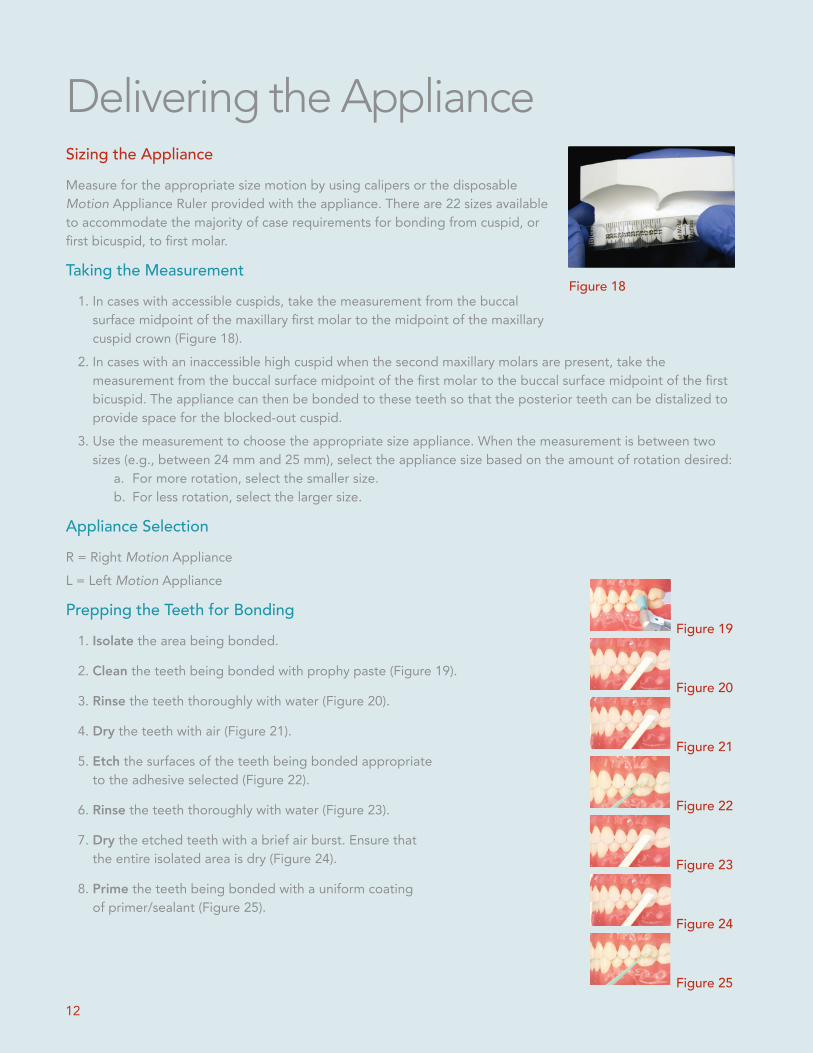
Delivering the ApplianceSizing the ApplianceMeasure for the appropriate size motion by using calipers or the disposable Motion Appliance Ruler provided with the appliance. There are 22 sizes available to accommodate the majority of case requirements for bonding from cuspid, or first bicuspid, to first molar.
Taking the Measurement1. In cases with accessible cuspids, take the measurement from the buccal
surface midpoint of the maxillary first molar to the midpoint of the maxillary cuspid crown (Figure 18).
2. In cases with an inaccessible high cuspid when the second maxillary molars are present, take the measurement from the buccal surface midpoint of the first molar to the buccal surface midpoint of the first bicuspid. The appliance can then be bonded to these teeth so that the posterior teeth can be distalized to provide space for the blocked-out cuspid.
3. Use the measurement to choose the appropriate size appliance. When the measurement is between two sizes (e.g., between 24 mm and 25 mm), select the appliance size based on the amount of rotation desired:
a. For more rotation, select the smaller size. b. For less rotation, select the larger size.
Appliance SelectionR = Right Motion ApplianceL = Left Motion Appliance
Prepping the Teeth for Bonding 1. Isolate the area being bonded.
2. Clean the teeth being bonded with prophy paste (Figure 19).
3. Rinse the teeth thoroughly with water (Figure 20).
4. Dry the teeth with air (Figure 21).
5. Etch the surfaces of the teeth being bonded appropriate to the adhesive selected (Figure 22).
6. Rinse the teeth thoroughly with water (Figure 23).
7. Dry the etched teeth with a brief air burst. Ensure that the entire isolated area is dry (Figure 24).
8. Prime the teeth being bonded with a uniform coating of primer/sealant (Figure 25).
Figure 18
Figure 19
Figure 24
Figure 25
Figure 23
Figure 22
Figure 21
Figure 20

13
Bonding the Appliance1. Adhesive Application
a. Using a locking hemostat, forceps or tweezers, grasp the Motion Appliance by the arm (Figure 26a) and coat both pads of the appliance with a small amount of light-curing adhesive, covering them completely (Figure 26b).
2. Placementa. Use the instrument to position the appliance onto the appropriate
teeth, placing the posterior pad first and then the anterior pad. b. There is a vertical line engraved on the posterior pad to be used as
a reference in aligning the pad coincident with the longitudinal axis of the molar. Position the posterior pad in the center of the buccal surface of the molar. In cases of exaggerated mesial molar rotations, the arm of the Motion Appliance can open laterally up to 45°, easing placement.
c. Position the anterior pad on the mesial third of the vestibular surface of the crown of the cuspid or first bicuspid (not on the midline).
3. Alignmenta. Using the placement instrument, align the pads on the tooth
surfaces (Figure 27).b. Generally, little if any adjustment to the curvature of the appliance
arm is necessary. c. Using the placement instrument, remove excess adhesive from the
tooth surface while maintaining the appliance alignment.
4. Light-Curinga. Fully light-cure the appliance pads, beginning with the molar, then
the cuspid or bicuspid (Figure 28).
CautionDo not use an instrument to adjust the bar or the pad. Avoid making repeated adjustments, bending and straightening the bar. Repeated bending will fatigue the appliance and may cause it to break. Avoid trying the appliance on the patient’s teeth prior to bonding it; this action may contaminate the bonding pads with saliva.
Figure 26b
Figure 27
Figure 28
Figure 26a

14
ActivationAttachment and ActivationAttach the Class II elastic from the selected source of anchorage, then stretch it to the hook provided on the maxillary anterior pad of the appliance. Activation can be initiated immediately after light-curing the appliance in place.
Standard Elastics ProtocolAn elastic will run from upper arch to the lower 7. If the lower 7 is not available, run the elastic from the upper arch to the lower 6.
Standard Protocol• 1st Month: Force 1 elastics (6 oz, 1/4”)• After 1st Month: Force 2 elastics (8 oz, 3/16”) thereafter
Patient Right Patient Left
Motion 3 to 6 with Tube on Lower 6*
Patient Right Patient Left
Motion 3 to 6 with Tube on Lower 7*
*Space should open up distal to the U2’s in the first follow-up appointment
Blocked-Out Canine Standard ProtocolDue to blocked-out, high, or buccally-displaced cuspids.
Motion 4 to 6 with Tube on Lower 6
• 1st Month and thereafter: Force 2 elastics (8 oz, 3/16”)
Patient Right Patient Left
Motion 4 to 6 with Tube on Lower 7
• 1st Month: Force 1 elastics (6 oz, 1/4”)• After 1st Month: Force 2 elastics (8 oz, 3/16”) thereafter
Patient Right Patient Left

15
Scheduling
Appointment checks at 6-week intervals should take only a few minutes. Each is used to observe treatment progress, explain the progress to the patient and praise and/or encourage compliance.
Typical 6-Week Appointment Protocol
1st Visit: Use mirror and floss. Check cooperation and ensure that contacts are open in the maxillary anteriors.
• If using a lingual arch for anchorage, check the mandibular molar positions and monitor and control against unwanted torque changes and anchorage loss at each visit.
• Using an Essix appliance in the mandible or TADs for anchorage usually precludes the control problems that
Mixed Detention Protocol2/3 of deciduous canine’s root must be available.
With Deciduous Canine• 1st and 2nd Months: 2 oz, 1/4”• 3rd and 4th Months: 4 oz, 1/4”• 5th and 6th Months: 4 oz, 1/4” OR 6 oz, 1/4” at doctor’s discretion
Patient Right Patient Left
Motion From Deciduous Canine With Tube on Lower 6
*Elongated use is recommended for orthopedic affect (at doctor’s discretion).
Unique Case ProtocolAdult Patients With High-Bone DensityIf there is no movement after three months following the standard protocol in Class II, Division II, high-bone density patients, boost
the case by doing the following:
Unique Cases: Motion 3 to 6with Tube on Lower 6
• 1st Month: double up Force 2 elastics (8 oz, 3/16”) at night
• 2nd Month and thereafter: revert to single wear of Force
2 elastics (8 oz, 3/16”)
Patient Right Patient LeftTwo Elastics
Unique Cases: Motion 3 to 6with Tube on Lower 7
• 1st Month-Night: double up Force 1 and Force 2 elastics
(6 oz, ¼” & 8 oz, 3/16”)• 1st Month-Day: single wear of Force 2 elastics (8 oz, 3/16”)• 2nd Month and thereafter: revert to single wear of
Force 2 elastics (8 oz, 3/16”) to finish
Patient Right Patient LeftTwo Elastics
Motion From Deciduous Canine With Tube on Lower 7
Patient Right Patient Left

16
can occur with a lingual arch; however, you must still check the condition of these appliances and replace them, if necessary. TADs seldom fail; if they become loose, they can usually be tightened. With good compliance, there are seldom emergencies with an Essix appliance. As mentioned previously, the Essix appliance has become the preferred anchorage holding device for use with the Motion Appliance.
2nd Visit: Check cooperation visually with the mirror and monitor for unexpected side effects.
3rd Visit: Evaluate whether the case has progressed to a Super Class I position and it is time to remove the appliance.
• If so, schedule immediate removal and fixed appliance bonding or aligner fabrication and begin the transitioning steps, which are outlined later.
Delegation and Precluding EmergenciesProtocols associated with the Motion Appliance are highly delegatable depending on your jurisdictional laws, making it a highly efficient Class II corrector in terms of saving valuable doctor time.
There are seldom emergencies associated with the Motion Appliance because if one end of it becomes debonded, the patient will generally play with the appliance until the other end debonds. To preclude debonding, ensure that the appliance goes immediately from its packaging to placement. Do not determine the size of the motion by placing it in the mouth. Doing so contaminates the retention pad and compromises bond strength, which can cause debonding.
Patient Communication and AcceptancePatient AcceptancePatient acceptance of and cooperation with using the Motion Appliance has been exceptional. The maxillary incisors are free of appliances and unless the mandibular arch needs to be bonded for anchorage, the mandible wears only an invisible lingual arch or an Essix appliance, which are easily accommodated. Given its rounded contours, the motion itself is relatively comfortable to wear and is used in the first three to six months of treatment when compliance is best. Having said that, there are still techniques useful for encouraging compliance.
Encouraging Compliance. Each clinician has methods for garnering patient compliance. Here are suggestions that clinicians successful with the Motion Appliance have offered. Asking patients to make the choice between the Motion Appliance and bulky alternative appliances can be an effective means of gaining commitment especially when these appliances are also suggested as the contingency treatment for noncompliance. Moreover, being able to avoid bicuspid extractions and shortening overall treatment time by 35% to 40% are excellent incentives for a few months of elastics wear. Adolescents who are looking forward to wearing their braces can be encouraged to wear elastics for the proper amount of time because such compliance means that they will be wearing their braces sooner.
Patient InstructionsCelebrating Treatment Progress. You will necessarily advise patients to expect interincisal diastemas during this first stage of treatment and it is important to advocate the diastemas as something to celebrate—an important signal that the appliance is working.

17
Complete Aesthetic TreatmentClass II Correction with Clear Aligners is Now SimplifiedThe Motion Appliance is the perfect solution for patients who want clear aligner treatment but display a Class II malocclusion. The small profile of the Motion Appliance will satisfy most patients who are concerned about aesthetics. This allows practitioners to treat more patients requesting clear aligners, such as Invisalign ®*, without limitations. Now complex Class II malocclusion cases can be “jump started” with the Motion Appliance and finished with a clear aligner system.
Transitioning from the Motion Appliance to a Clear Aligner Tray
After removing the Motion Appliance and Class II elastics, transition to an Essix appliance in the maxillary arch to maintain tooth position until the clear aligners arrive. If you used a lingual arch or TADs for anchorage, transition to an Essix appliance for the mandibular arch as well. If you used an Essix appliance for anchorage in the mandibular arch, maintain it until the aligners arrive.
Instructing About Elastic Wear. Because of the vertical force vector that opening the mouth while chewing produces, instruct patients to wear elastics at all times except when eating. A predominantly vertical force vector may result in a mild extrusion of the cuspids. Night-time wear can compensate for this phenomenon because a closed mouth produces a more horizontal vector of traction but this protocol will prolong the distalization period. Patients should change their elastics each time after they eat.
Discouraging Improper Tongue Habits. Instruct patients not to allow their tongue to get under the horizontal arm of the appliance. Doing so could result in lingual inclination of the maxillary bicuspids and vestibulization of the cuspids. Another habit patients must avoid is placing the tip of the tongue in the space that the distalization creates between the maxillary lateral incisors and cuspids. Mild inflammation at the mucogingival border of the maxillary cuspids is an indication of this habit, which may result in a widening of spaces mesial to the cuspids relative to the interincisal diastemas.
Handling Minimal Discomfort. Some patients may experience mild discomfort for the first three to five days after initial elastic activation. Once the initial discomfort subsides, however, it should not return. Recommend that patients chew as much as possible to alleviate soreness in the least amount of time. Some clinicians recommend mild anti-inflammatory medications, but rarely.
Establishing the Goal. Patients respond positively to feeling that they’re in control of their treatment and will appreciate having a visual cue to recognize when they’ve reached their goal. To employ this technique, use a pencil to mark the crown long axis of the maxillary cuspid and the embrasure between the mandibular cuspid and first bicuspid (Figure 29), then inform the patient that they’ll be able to tell that the distalization phase of their treatment is finished when the marks align.
Figure 29 Use a pencil to mark the crown long axis of the maxillary cuspid and the embrasure between the mandibular cuspid and first bicuspid so the patient will know when the distalization phase is complete and will feel more invested in their treatment.

18
Fixed Appliances for Finishing TreatmentTransitioning to Fixed Appliances for Finishing TreatmentWhen transitioning from the Motion Appliance to fixed appliances, it is advisable to have two bonding appointments. Bond only the maxillary arch at the first appointment. Run the round wire first molar to first molar and keep the lingual archwire or Essix appliance in the mandibular arch until the next appointment (for as much as 10 weeks). At the next appointment, you can then remove the lingual arch or Essix appliance and bond the mandibular arch. Of course, if you used fixed appliances for mandibular anchorage, you simply transition to fixed appliances in the maxillary arch. After removing the motion, it is important to ligate the distalized teeth under the archwire using a .012" stainless steel ligature wire tied in a figure 8 from the maxillary cuspids to the maxillary first molars, maintaining the consolidation until the end of treatment. It is necessary to ensure that the ligature wire remains completely passive to prevent the maxillary molars from derotating mesially.
Frequently Asked QuestionsIndicationsIn this section we will present answers to questions in relation to the clinical use of the Motion Appliance. This section provides specifics as to the correct use of the device in order to prevent any issues that might appear if the appliance is not adequately applied.
Question: Are there borderline patients in which you would lean toward using elastics or IPR rather than the Motion Appliance?
Dr. Carrière: Since research indicates that 83% of maloccluded cases present with the maxillary first molar rotated mesially, I would use the Motion Appliance in such patients to create the space that allows the cuspid to occlude in perfect Class I.
Question: How would you address an open bite or a tendency toward open bite?
Dr. Carrière: Open bites are often a result of incorrect swallowing, chewing, speaking and tongue placement at rest. I would first train the patient to function correctly and place the tongue properly, then use the Motion Appliance for initial treatment.
Taking Impressions for a Clear Aligner Tray Finishing Treatment
Clinicians take impressions for a clear aligner tray and the Essix appliances by using PVS material for both or PVS for the aligners and alginate for the Essix appliance. If using PVS material for both (and/or for models), a high-quality product is recommended (e.g., for the heavy body: 3M/Espe Position™ Penta™ Quick impression material (a VPS alginate replacement); for the wash: 3M/Espe Imprint™ Garant™ Quick-Step Impression material). Alternatively, take a digital intraoral scan instead of PVS impression for the aligners.

19
Question: How would you address a skeletal Class II?
Dr. Carrière: If the patient is still growing, the Motion Appliance would be useful for a short period to time—for three months or so to take advantage of the active growth period.
If my diagnosis indicates that orthopedic treatment is advisable, I might attach a Twin Force® Bite Corrector Device to the distal portion of the horizontal arm of a Motion Appliance to take advantage of the Twin Force Bite Corrector’s noncompliant advancement of the mandible. By combining these appliances, two treatment modalities are at work: orthodontic via the Motion Appliance; orthopedic via the Twin Force Appliance. Additionally, the Twin Force Appliance provides the Motion Appliance noncompliant anchorage.
If, however, the Class II is pathological and the patient is not a good grower or has little growth capacity remaining, I would not use the Motion Appliance in its current configuration because my diagnosis would not indicate such a treatment approach.
Question: What is your protocol for using the Motion Appliance for early treatment?
Dr. Carrière: I bond the Motion Appliance to the maxillary first permanent molar and deciduous cuspid and shape a mandibular lingual archwire for anchorage, banding the mandibular first permanent molar (including a buccal tube and hook) for elastics traction. When the case reaches Class I, I remove the Motion Appliance and insert a Hawley plate to retrude the maxillary incisors while keeping the posterior segment in place. I maintain the lingual archwire and bands in the mandibular arch until the permanent teeth erupt to keep the space available so that when the second temporary molars are lost, there will be ample space to accommodate the mandibular bicuspids when they erupt, which fosters better alignment of the mandibular arch.
Question: Is the Motion Appliance an effective option to treat mandibular asymmetry?
Dr. Carrière: If the asymmetry is dentoalveolar, the Motion Appliance is a valuable treatment option. I would bond the Motion Appliance to the mandibular first molar and cuspid and use an Essix for anchorage in the maxilla with buccal tubes on the first or second maxillary molars for Class III elastics traction. Alternatively, I might bond the maxillary arch and use buccal tubes on the first or second molars for Class III elastics traction. After the cuspids come into Class I, I would bond the mandibular arch and center the midline, closing the spaces opened.
Question: Why is it important that the Motion Appliance be used to treat asymmetry cases?
Dr. Carrière: The Motion Appliance works independently in each side of the dental arches and the activation in each side can be selective in terms of amount and time of force application. While asymmetry does not appear in a high percentage of patients who present for treatment, few if any other distalizing appliances can deal effectively with asymmetry.
Loss of Anchorage/Unexpected Side EffectsQuestion: Describe an incidence of incorrect anchorage that could cause anchorage loss.
Dr. Carrière: One such case might include a patient in late mixed dentition whose deciduous molars are already lost but whose mandibular bicuspids are not yet in place to assist with maintaining anchorage when using a lingual arch. In such a case, the mandibular first molars could extrude, causing the archwire to tip lingually and inferiorly surpassing the cingulum, which produces anchorage loss and mandibular incisor protrusion. Sound diagnosis to determine appropriate anchorage selection is of paramount importance for Motion Appliance treatment.

20
Question: If a clinician continues to experience cuspid extrusion, what might be the cause?
Dr. Carrière: If patients continually experience maxillary cuspid extrusion, the culprit is either incorrect placement of the anterior pad of the Motion Appliance or the fact that the patient is maintaining elastic wear while eating, which creates a vertical vector of traction and causes an extrusive force.
Question: Is mild mandibular molar extrusion something that is to be expected?
Dr. Carrière: Mild mandibular molar extrusion, usually less than 1 mm, is to be expected and is easily recovered from normal muscular function and fixed appliances during the finishing treatment phase.
Sources of AnchorageQuestion: Are there additional methods clinicians might use to increase anchorage when using a mandibular lingual archwire?
Dr. Carrière: For greater additional anchorage control, Dr. Clark Colville, Seguin, Texas, finds it valuable to include the second molar in the lingual setup by extending the archwire distally to the second molar, then up along the lingual groove onto the occlusal surface where it is bonded. This protocol not only increases anchorage, but it also disoccludes the posterior teeth to foster better distalization and prevent the first molar from tipping mesially and proclining the lower incisors (Figure 30a-b).
Figure 30a-b For greater anchorage control, it can be useful to extend the lingual archwire to the 2nd molar (or 1st bicuspid), bonding it occlusally. Case photos courtesy of Dr. Clark Colville, Seguin, Texas, USA.
a
b

21
CASE I: Age 15 years. Motion Appliance
Treatment, 10 weeks
.014" Nitanium® NiTi Archwires, 10 weeks
.014" x .025" Nitanium NiTi Archwires, 8 weeks
.017" x .025" Nitanium NiTi Archwires, 8 weeks
.019" x .025" Nitanium NiTi Archwires, 8 weeks
.019" x .025" CNA® Beta Titanium
Archwires, 10 weeks
Total Treatment Time: 12.5 Months
Clinical ApplicationCasesThe cases presented in this workbook were treated with the Motion Appliance until they reached a Class I Platform, then they were finished with the Carriere Self-Ligating Bracket (SLB) fixed appliance system. Clinicians are free to utilize the fixed appliance or aligner system of their choice to complete treatment after using the Motion Appliance.
Pretreatment
Treatment Complete
Pretreatment
Motion Bonded
Class I Achieved In 10 Weeks
Treatment Complete In 12.5 months
Carriere SLB Treatment Progress
22
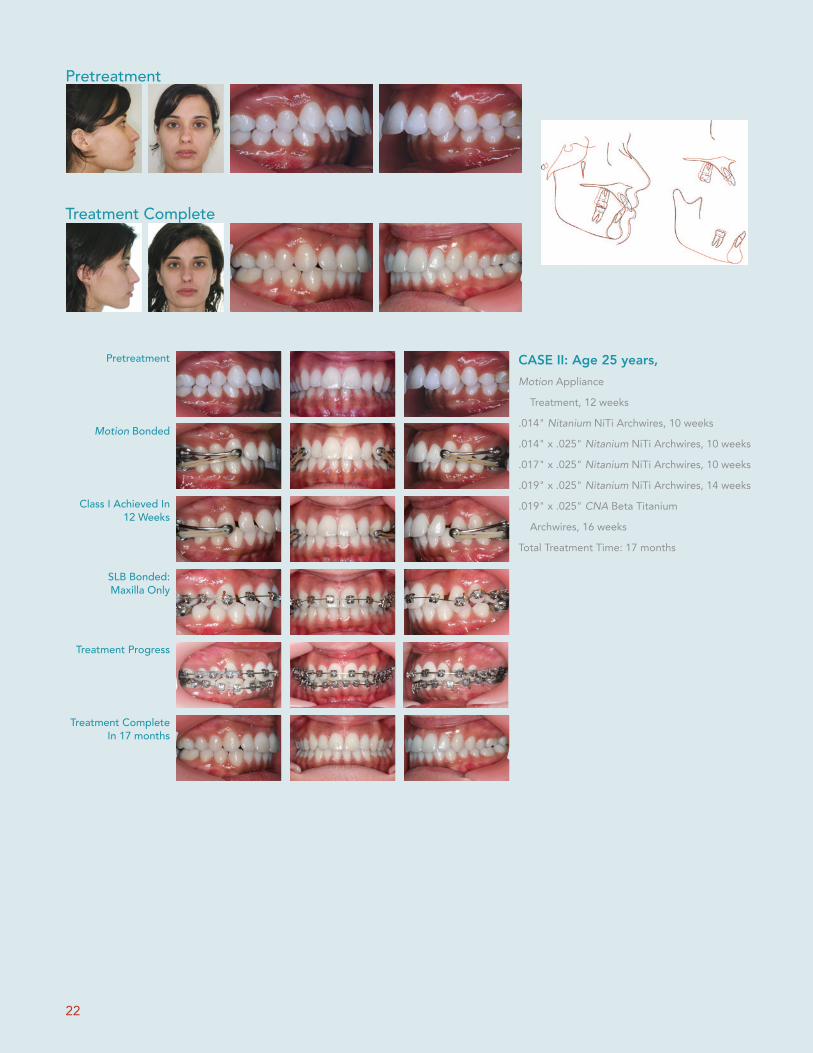
CASE II: Age 25 years, Motion Appliance
Treatment, 12 weeks
.014" Nitanium NiTi Archwires, 10 weeks
.014" x .025" Nitanium NiTi Archwires, 10 weeks
.017" x .025" Nitanium NiTi Archwires, 10 weeks
.019" x .025" Nitanium NiTi Archwires, 14 weeks
.019" x .025" CNA Beta Titanium
Archwires, 16 weeks
Total Treatment Time: 17 months
Pretreatment
Treatment Complete
Pretreatment
Motion Bonded
Class I Achieved In 12 Weeks
Treatment Complete In 17 months
Treatment Progress
SLB Bonded:Maxilla Only

23
Products and Accessories
“The switch from Damon® to Carriere has been a big win in simplicity, cost, chair time, and treatment outcomes.”
John Stieber, DDS, PS
Deep tie-wing undercuts
Fully-integrated hooks
Reduced slot depth
Sure-Lok™ Clip for reliable functionality
Occlusal opening, uppers and lowers
Tooth-specific bracket widths
More vertical and horizontal cues
Smooth, secure, and easy to operate slides
Adhesive Guard Rail™ (AGR) Technology
Lower profile
Carriere Oral ElasticsComplement the Motion Appliance with Carriere Oral Elastics, which were designed specifically to work seamlessly with this appliance and provide optimum results. These elastics are available in two different force levels for both stages of treatment, ensuring a smooth and timely transition to a Class I Platform.
Carriere SLX ™ Self-Ligating Bracket System Our new passive self-ligating system incorporates more than ten clinician inspired enhancements – all designed to enable you to finish treatment more quickly and with the degree of quality that you expect. Try the SLX System today, and see why it’s a game changer for you, your patients, and your practice.
Beats the Market Leader with 10 Essential Enhancements

Dr. Carrière’s philosophy of working in harmony with the body—using precision engineering to achieve treatment-goals has led to a uniquely minimalist protocol for orthodontic correction. Using advanced computer modeling and a scientifically-based, systematic approach to treatment planning, Dr. Carrière has pioneered a treatment path that is conservative, efficient, and optimally effective. He is widely welcomed as a guest professor and lecturer at various orthodontic schools and professional meetings throughout Europe and the USA.
Dr. Luis Carrière’s Philosophy
Carriere Ortho 3D A FREE App. for iPads, iPhones, and Android tablets and phones
Ortho Organizers, Inc.1822 Aston Ave.Carlsbad, CA 92008-7306 USA
For more information on our products and educational offerings, please contact us:HenryScheinOrtho.comCustomer Service: 888.851.0533In the U.S.: 800.547.2000Outside the U.S.: +(1) 760 448 8600Canada: CERUM 800.661.9567
To email an order:[email protected] email an order outside the U.S.:[email protected]
© 2015 Ortho Organizers, Inc. All rights reserved. PN 999-252 1/15. U.S. Patent No. 7,618,257, 6,976,839, and 7,238,022 and foreign patent numbers 2,547,433, 1723927, and 2006202089. *Invisalign is a registered trademark of Align Technology, San Jose, CA. All other trademarks and registered trademarks belong to their respective companies.


