58
THE HOME DEPOT Partner Guardian Training Guide HomeDepotLink & HDConnect Presented by: Merchandising Operations Training & Support

THE HOME DEPOT
Partner Guardian Training Guide HomeDepotLink & HDConnect
Presented by: Merchandising Operations Training & Support

T H E H O M E D E P O T | P A R T N E R G U A R D I A N T R A I N I N G G U I D E 2
Overview
Introduction
This document contains Partner Guardian Training for HomeDepotLink Partner Guardians and
HDConnect Service Provider Guardians.
Click here to access the HomeDepotLink Partner Guardian Training Guide.
Click here to access the HDConnect Service Provider Guardian Training Guide.
T H E H O M E D E P O T | P A R T N E R G U A R D I A N T R A I N I N G G U I D E 3
THE HOME DEPOT
Partner Guardian Training Guide HomeDepotLink
Presented by: Merchandising Operations Training & Support

T H E H O M E D E P O T | P A R T N E R G U A R D I A N T R A I N I N G G U I D E 4
REVISION HISTORY: Partner Guardian Training Guide
Version Changes Modified By
1.0 Document Created Merchandising Operations

T H E H O M E D E P O T | P A R T N E R G U A R D I A N T R A I N I N G G U I D E 5
TABLE OF CONTENTS
Overview ...................................................................................................................................................... 2
Introduction .............................................................................................................................................. 2
OVERVIEW ................................................................................................................................................. 6
Introduction .............................................................................................................................................. 6
Objectives ................................................................................................................................................ 6
First Time Setup ......................................................................................................................................... 7
Setting up Accounts ............................................................................................................................... 7
Maintaining Individual User Accounts ..................................................................................................... 8
Accessing User Information .................................................................................................................. 8
Adding a New User ................................................................................................................................ 9
Managing Requests ............................................................................................................................. 12
Removing/Inactivating a User ............................................................................................................ 15
Editing a User ....................................................................................................................................... 16
Data Management .................................................................................................................................... 19
General, Payment, Shipping Information .......................................................................................... 19
General Tab .......................................................................................................................................... 19
Payment Tab ......................................................................................................................................... 24
Shipping Tab ......................................................................................................................................... 28
Updating Addresses............................................................................................................................. 33
Editing Applications/Reports ............................................................................................................... 36
Maintaining Store Contacts ..................................................................................................................... 39
US Merchandise Supplier Only .......................................................................................................... 39
Adding a Contact .................................................................................................................................. 39
Editing/Deleting a Contact .................................................................................................................. 42
Maintaining Primary Contacts ............................................................................................................ 43

T H E H O M E D E P O T | P A R T N E R G U A R D I A N T R A I N I N G G U I D E 6
OVERVIEW
Introduction
This document is intended for the following: Partner Guardians who will be responsible for managing
user information in HomeDepotLink.
Partner Profile is a new application where we will store Supplier contact information at the store level.
Partner Profile will allow our Partner Guardians to maintain their accounts easily in one area.
Partner Guardian: Partner Guardians will be responsible for creating and maintaining all of the supplier
portal users for their location. Additionally, they will have access to the supplier data/user management
application to manage their data including contacts.
Objectives
The Partner Guardian Course will train participants on the technology and business processes regarding
managing user accounts in HomeDepotLink. This includes the creation and removal of user accounts and
managing their access to content, applications, and reports.

T H E H O M E D E P O T | P A R T N E R G U A R D I A N T R A I N I N G G U I D E 7
First Time Setup
Setting up Accounts
Partner Guardians will receive an email notification once the SBA has been approved stating that they
are the Partner Guardian. They will need to view and confirm or edit some of their information on first
login, setup users and maintain information.
Step 1: Sign into HomeDepotLink: https://homedepotlink.homedepot.com.
Note: The first time you login, you will be asked to read and sign the Terms & Conditions. You
will also be required to update your account information.
Step 2: Once you adhere to the Terms & Conditions, you will be directed to change your password and
update your contact information via My Accounts.
Step 3: Access Partner Guardian to setup all users. Proceed to Maintaining Individual User Accounts for
steps on adding new users.

T H E H O M E D E P O T | P A R T N E R G U A R D I A N T R A I N I N G G U I D E 8
Maintaining Individual User Accounts
Accessing User Information
Partner Guardians are able to maintain individual user accounts.
Step 1: Sign into HomeDepotLink: https://homedepotlink.homedepotl.com.
Step 2: Launch Partner Profile.
Note: Once you sign into Partner Profile, you will automatically come to the Contacts tab and
see a list of all current users.
Step 3: Once you are in the Contacts tab, you will see a list of users for that particular Partner. You will
be able to Add/Edit/Delete any contacts under this screen.

T H E H O M E D E P O T | P A R T N E R G U A R D I A N T R A I N I N G G U I D E 9
Adding a New User
Partner Guardians are able to add new Partner Guardians and general users for their company.
Step 1: In order to Create a new contact, click Add.
Step 2: Under the Profile tab, Partner Guardians will be able to update any field that is not grayed out. If
the User will be a Partner Guardian, select Guardian User. Edit the appropriate fields and click Save.
Note: If the Create User box is not checked, you will only be creating a contact in the system. No
User ID will be created for the contact. In order to assign a 3rd Party access to your account,
check Delegate User.

T H E H O M E D E P O T | P A R T N E R G U A R D I A N T R A I N I N G G U I D E 10
Note: Steps 3 and 4 are for US Merchandise Suppliers only. For non US Merchandise Suppliers
proceed to Step 5. You will not be able to access these screen if you are a Carrier, Canadian
Merchandise Supplier or Non-Merchandise Supplier.
Step 3: Under the M-Vendors tab, add any M-Vendors associated with that user.
Note: Selecting M-Vendors will drive the reporting functionality in HomeDepotLink. Reports can
be maintained at the M-Vendor level, and if they are not selected, users will not have the ability
to access the correct reports.

T H E H O M E D E P O T | P A R T N E R G U A R D I A N T R A I N I N G G U I D E 11
Step 4: Under the Contact Types tab, select the appropriate Contact Type(s) for this user. Contacts may
have more than one Contact Type.
Step 5: Under the Access Rights – HomeDepotLink tab, verify all Applications and Reports the user
should have access to and click Save.
NOTE: You will receive a message stating “User/Contact saved successfully” once you have
completed the process. Click “OK” to continue adding users.
Step 6: Users will receive an email notification with their account information.

T H E H O M E D E P O T | P A R T N E R G U A R D I A N T R A I N I N G G U I D E 12
Managing Requests
Partner Guardians are responsible for managing new user requests to their account.
Step 1: Under the Contacts tab, click on Requests.
Note: The Requests tab will be red if there are requests to be managed.
Step 2: Select the request you want to view and click View Request.

T H E H O M E D E P O T | P A R T N E R G U A R D I A N T R A I N I N G G U I D E 13
Step 3: Review the request and select Approve to grant the user access or Deny to reject the request.

T H E H O M E D E P O T | P A R T N E R G U A R D I A N T R A I N I N G G U I D E 14
Step 4: Update the Profile and Access Rights - HomeDepotLink information for the user and click Finish.
Note: For US Merchandise Suppliers, fill in the M-Vendors and Contact Types tabs.
Step 5: A message will pop up saying User Request Approved successfully and an email notification will
be sent to the user.

T H E H O M E D E P O T | P A R T N E R G U A R D I A N T R A I N I N G G U I D E 15
Removing/Inactivating a User
Partner Guardians have the ability to remove access and inactive users for their company. Inactive users
are still maintained in Partner Profile but deleted users will no longer be accessible through Partner
Profile.
Step 1: In order to remove/inactivate a contact, highlight the appropriate User ID and click Edit.
Step 2: Under the Profile tab, for Status select Inactive and click Save. The user will no longer be able to
access the system but their information will still be maintained in Partner Profile.
Note: Users can be reactivated by changing their Status to Active. If a user is Deleted, then there
will no longer be a record of that user in the system. A notification will be sent to the user.

T H E H O M E D E P O T | P A R T N E R G U A R D I A N T R A I N I N G G U I D E 16
Editing a User
Partner Guardians have the ability to edit user information for all users within their company.
Step 1: In order to edit a contact, highlight the appropriate User ID and click Edit.
Step 2: Under the Profile tab, you will be able to edit any of the fields that are not grayed out.
Note: Under the Edit function of contacts, Partner Guardians will be able to reset Passwords by
clicking on the Reset Password button.

T H E H O M E D E P O T | P A R T N E R G U A R D I A N T R A I N I N G G U I D E 17
Note: Steps 3 and 4 are for US Merchandise Suppliers only. For non US Merchandise Suppliers
proceed to Step 5. You will not be able to access these screens if you are a Carrier, Canadian
Merchandise Supplier or Non-Merchandise Supplier.
Step 3: Under the M-Vendors tab, you can edit any M-Vendors associated with that user.
Step 4: Under the Contact Types tab, you can add or remove Contact Type(s) for this user. Contacts may
have more than one Contact Type.

T H E H O M E D E P O T | P A R T N E R G U A R D I A N T R A I N I N G G U I D E 18
Step 5: Under the Access Rights – HomeDepotLink tab, you can add or remove access for all
Applications and Reports.
Step 6: Once you have updated all user information click Save. You will receive a message stating
“User/Contact saved successfully” once you have completed the process. Click “OK” to continue
working. An email will be sent to the new user with their account information.

T H E H O M E D E P O T | P A R T N E R G U A R D I A N T R A I N I N G G U I D E 19
Data Management
General, Payment, Shipping Information
These tabs are for Merchandising Suppliers only and can be viewed at the MVendor level. This
information was agreed upon during SBA and if there are any discrepancies, it will involve changes to a
contact. You must reach out to your merchant if there are any changes that need to be made.
To start, you must select an M-Vendor number from the dropdown in order to view the following
information:
General Tab
The screen includes a General, and a Market/DC tab, which contain basic pieces of vendor information,
including: financial, shipping and Mkt/DC status information. Most information is maintained through
the SBA process, so most fields will be display-only for users.
General Sub-Tab
Field Level Details:
Vendor Captain BYO (General tab)
Field Description: Displays the Vendor Captain BYO number (non-Import Vendors only)
Required/Optional: Display
Valid Values: Numeric
Default Value: None
Notes: Displayed for import and non-import Vendors (Import = 50; Domestic = 1)
EDI (General tab)
Field Description: Used to display whether or not the vendor has been set up as EDI in the system
Required/Optional: Display/Radio button
Valid Values: Yes/No
Default Value: None
Notes: Displayed for both import and non-import Vendors

T H E H O M E D E P O T | P A R T N E R G U A R D I A N T R A I N I N G G U I D E 20
Certified Receiving Override in Last 12 Months (General tab)
Field Description: Displayed based on derived value of IBM base tables history for the vendor’s certified receiving information
Required/Optional: Display
Valid Values: Yes/No
Default Value: None
Notes: Displayed for non-import vendors only
Certified Receiving (General tab)
Field Description: Indicates if the vendor is/is not set up for certified receiving
Required/Optional: Display/Radio button
Valid Values: Yes/No
Default Value: None
Notes: Displayed for non-import vendors only
DC Inventory Tracking (General tab)
Field Description: Indicates if inventory is/is not controlled by the Supplier at a Distribution Center
Required/Optional: Display/Radio button
Valid Values: Yes/No
Default Value: None
Notes: Displayed for both import and non-import vendors
Cross Border Shipping (General tab)
Field Description: Identifies whether or not a supplier ships across the Mexican or Canadian border
Required/Optional: Display/Radio button
Valid Values: Yes/No
Default Value: None
Notes: Displayed for both import and non-import vendors
Charge Back (General tab)
Field Description: Displays whether or not the supplier is charged back for defective products
Required/Optional: Display/Radio button
Valid Values: Yes/No
Default Value: None
Notes: Displayed for import vendors only
THD Importer of Record (General tab)
Field Description: Indicates if the supplier is/is not the importer of record
Required/Optional: Display/Radio button
Valid Values: Yes/No
Default Value: None
Notes: Displayed for import vendors only
THD Liability Insurance (General tab)

T H E H O M E D E P O T | P A R T N E R G U A R D I A N T R A I N I N G G U I D E 21
Field Description: Indicates if The Home Depot is/is not liable for insurance on products
Required/Optional: Display/Radio button
Valid Values: Yes/No
Default Value: None
Notes: Displayed for import vendors only
THD Pay Wire (General tab)
Field Description: Indicates whether or not the supplier receives wire payments
Required/Optional: Display/Radio button
Valid Values: Yes/No
Default Value: None
Notes: Displayed for import vendors only
Freight Forwarder (General tab)
Field Description: Indicates if the vendor is set up with freight forwarder shipping
Required/Optional: Display/Radio button
Valid Values: Yes/No
Default Value: None
Notes: Displayed for import vendors only
Cost Basis Indicator (General tab)
Field Description: Indicates whether to use the cost in effect at the time the PO is created or the cost in effect at the time of shipment (for a vendor’s purchase order).
Required/Optional: Optional
Valid Values: S- PO costed at the time of shipment O- PO costed when the order is created
Default Value: None
Notes: Displayed for import vendors only
Create Date (General tab)
Field Description: Vendor create date
Required/Optional: Display
Valid Values: N/A
Default Value: None
Notes: Displayed for both import and non-import vendors
By (General tab)
Field Description: Displays the ID of the associate who performed the last update on the vendor record
Required/Optional: Display
Valid Values: N/A
Default Value: None
Notes: Displayed for both import and non-import vendors
Payment Vendor (General tab)
Field Description: Displays the Payment Vendor number for the corresponding Mvendor

T H E H O M E D E P O T | P A R T N E R G U A R D I A N T R A I N I N G G U I D E 22
displayed
Required/Optional: Display
Valid Values: N/A
Default Value: None
Notes: Displayed for both import and non-import vendors
GLN/s (General tab)
Field Description: Displays the GLN(s) attached to the selected MVendor
Required/Optional: Display
Valid Values: N/A
Default Value: None
Notes: Displayed for both Import and non-import vendors
Pallet Charge (General tab)
Field Description: Displays a yes/no value to indicate if there is a pallet charge attached to the vendor
Required/Optional: Display
Valid Values: N/A
Default Value: None
Notes: Displayed for both Import and non-import vendors
Drop Charge (General tab)
Field Description: Displays a yes/no value to indicate if there is a drop charge attached to the vendor
Required/Optional: Display
Valid Values: N/A
Default Value: None
Notes: Displayed for both import and non-import vendors
Direct Delivery to Customer (General tab)
Field Description: Displays a yes or no value to indicate if the vendor is setup for DTC shipping
Required/Optional: Display
Valid Values: N/A
Default Value: None
Notes: Displayed for non-import vendors only
Country of Origin (table- General tab)
Field Description: This table displays the following regarding the country of origin for import vendors: o Primary indicator (Y/N) - indicates if the country shown is the primary country of origin Country Name – name of country of origin
Required/Optional: Display
Valid Values: N/A
Default Value: None
Notes: Displayed for import vendors only

T H E H O M E D E P O T | P A R T N E R G U A R D I A N T R A I N I N G G U I D E 23
Shipping Port (table- General tab)
Field Description: This table displays the following regarding the shipping port for import vendors: o Primary indicator (Y/N) - indicates if the port listed is the primary port o Port name- shipping port name
Required/Optional: Display
Valid Values: N/A
Default Value: None
Notes: Displayed for import vendors only
Edit button (General tab)
Field Description: Selecting “Edit” displays a popup dialog window for maintaining basic information on the general tab. This button is enabled for users who have edit capabilities on the vendor. Fields available for editing vary, depending on the user’s access and vendor category (ex: Import, Domestic)
Required/Optional: Optional
Valid Values: N/A
Default Value: None
Notes: Once desired fields are changed within the Edit window, Users must select “Save” to save their changes. Selecting “Cancel”, or clicking on the “X” in the top-right of the window closes the window without saving changes and returns the user to the general screen.
Market/DC Sub-Tab

T H E H O M E D E P O T | P A R T N E R G U A R D I A N T R A I N I N G G U I D E 24
Field Level Details:
Market/DC tab (org tree & data grid)
Field Description: The Market/DC tab on the General screen consists of an organizational (org) tree and data grid. Organizational tree- displays the market/dc-level statuses for the selected Vendor (obtained from the MVndr_Mkt_DC table). Data can be expanded or collapsed using the arrow buttons, in order to view the desired level of detail. Data grid- displays detailed data for Markets/ DCs selected in the org tree and includes the following: o Market/DC number and name o Status o (Number of) review days o Parts Available (Y/N)
Required/Optional: Required
Valid Values: N/A
Default Value: None
Notes: Users may click on column headings within the data grid to sort data. Clicking a column heading once will sort the rows in ascending order and is indicated by a triangle next to “Type”. Clicking a column heading a second time will sort the rows in descending order and is indicated by an upside down triangle next to the word, “Type”. In addition, the order in which the columns are displayed can be changed by clicking on and dragging the column to the desired location.
Market/DC tab (edit button and corresponding dialog window)
Field Description: The edit button is enabled for users who have edit capabilities on the vendor. When selected, it displays a pop-up dialog window for viewing and maintaining market/DC information on the vendor contained in the Market/DC tab, specifically: review period.
Required/Optional: Required
Valid Values: N/A
Default Value: None
Notes: Edit capabilities are dependent on vendor category (import or non-import) and the user’s access level.
Payment Tab
The Payment screen contains two tabs: the first displays vendor pay terms; the second, vendor discounts. The pay terms tab is divided into three areas:
Organizational tree/selection box (left-hand side)
Filter box (upper right)
Pay terms data grid (lower right) The discounts tab is also divided into three similar areas:

T H E H O M E D E P O T | P A R T N E R G U A R D I A N T R A I N I N G G U I D E 25
Organizational tree/selection are a tree selection box (left-hand side)
Filter box (upper right)
Discounts data grid (lower right)
Pay Terms Sub-Tab
Field Level Details:
Organizational Tree/Selection Area (Pay Terms tab)
Field Description: The pay terms tab displays corporate pay terms only, as these are negotiated at the corporate level. These include the following pay terms, with their corresponding start date: o Regular Pay terms o New Store Pay terms
Required/Optional: Required
Valid Values: N/A
Default Value: None
Notes: Examples:
Regular Pay term example:
1% 60 days; Start Date 05/17/2008
New Store Pay term example:
1% 60 days/Start Date 02/01/2002 Pay terms are maintained using the SBA maintenance process and cannot be maintained using this screen.
Pay Terms Filter Box (Pay Terms tab)
Field Description: The pay terms filter box allows the User to select pay terms within a certain date range. Enter start and end dates in the following format, then select “Load data” to load the data in the pay terms data grid at the bottom of the screen o Start (date)- enter in any date to display only pay terms that started on or after that date; use the format mm/dd/yyyy or click on the calendar icon to search for and enter desired date

T H E H O M E D E P O T | P A R T N E R G U A R D I A N T R A I N I N G G U I D E 26
o End (date) - enter in any date to display only pay terms that ended on or before that date; use mm/dd/yyyy format, or click on the calendar icon to search for and enter desired date
Required/Optional: Optional
Valid Values: mm/dd/yyyy format
Default Value: None
Notes: This same filter box is also available on the Discounts tab and functions in the same manner.
Load Data Button (Pay Terms tab)
Field Description: After entering start and end dates into the pay terms filter box, select, “Load data” to load selected data into the Pay terms data grid at the bottom of the screen.
Required/Optional: Optional
Valid Values: N/A
Default Value: None
Notes: When the “Load data” button is selected, if no data is found for the selected dates, the message, “No records found”, will be displayed. Select “OK” to clear the error and return to the pay terms tab.
DPay Terms Data Grid (Pay Terms tab)
Field Description: The data grid displays any existing regular and new store pay terms, as well as their start dates, for the Vendor selected. If start and end dates were selected in the pay terms filter box, only pay terms valid during those dates will be displayed
Required/Optional: Display only
Valid Values: N/A
Default Value: None
Notes: None
Discounts Sub-Tab
Field Level Details:

T H E H O M E D E P O T | P A R T N E R G U A R D I A N T R A I N I N G G U I D E 27
Organizational Tree/Selection Area (Discounts tab)
Field Description: The discounts organizational tree displays the following: o Corporate-level discounts, including:
Defective allowance
New Store
Trade (Certified, Misc trade, Freight, MET)
o Special terms (discounts at the Market/DC-level1) including:
Market
Misc Trade2
Freight TF
DC
Misc Trade2
Freight Aggregate order Supply Chain Offshore Aggregate order
1BYOs are displayed, in order to provide a grouping of markets for selection purposes only 2The trade-level shows the rolled-up discount and can be expanded to view the specific trade discounts that comprise it
Required/Optional: Required
Valid Values: N/A
Default Value: None
Notes: None
Discount Filter Box (Discounts tab)
Field Description: The Discounts filter box allows the User to select discounts within a certain date range. Enter start and end dates in the following format, then select “Load data” to load the data in the discounts data grid at the bottom of the screen o Start (date)- enter in any date to display only discounts that started on or after that date; or, use the calendar icon to search for and enter the desired date o End (date) - enter in any date to display only discounts that ended on or before that date; or, use the calendar icon to search for and enter the desired date
Required/Optional: Optional
Valid Values: mm/dd/yyyy format
Default Value: None
Notes: When “Load data” is used, if no data is found for selected dates, the message, “No records found” will be displayed. Select “OK” to clear the error and return to the pay terms tab.

T H E H O M E D E P O T | P A R T N E R G U A R D I A N T R A I N I N G G U I D E 28
Load Data Button (Discounts tab)
Field Description: After entering start and end dates into the discounts filter box, select “Load data” to load selected data into the Discounts data grid at the bottom of the screen.
Required/Optional: Optional
Valid Values: N/A
Default Value: None
Notes: When “Load data” is used, if no data is found for selected dates, the message, “No records found” will be displayed. Select “OK” to clear the error and return to the pay terms tab.
Discount Data Grid (Discounts tab)
Field Description: The data grid displays any existing discounts for the location (Mkt/DC) selected, as well as the following: o Type (of discount) o Percent o Start Date o End Date Service (roll up) – shows a summary of discounts that are applied when a Purchase Order is placed for a specific Service Type. This enables the User to understand which discounts have been applied
Required/Optional: Display only
Valid Values: N/A
Default Value: None
Notes: Columns in the grid can be sorted in ascending or descending order by clicking on the column header. Doing so will display an up or down arrow that indicates ascending or descending order Change the order of columns (move columns within the grid) by clicking and dragging on the column header (similar to MS Excel functionality)
Shipping Tab
The shipping screen contains shipping information for the vendor, displayed on three tabs: 1. Terms - displays freight terms for the vendor, at the corporate-level and by service type (ex: DTS,
RDC, TF, etc)
Corporate-level terms apply to all BYO/Mkts unless exceptions exist by service type, or at the market-level
Market-level exceptions can be viewed by clicking on “Service Type”, the corresponding BYO(s)* and then selecting specific markets
2. Minimums - displays the vendor order minimums, at the corporate-level and by service type
Corporate-level terms apply to all BYO/Mkts unless exceptions exist in specific markets
Market-level exceptions can be viewed by clicking on “Service Type”, the corresponding BYO(s)* and selecting specific markets
3. O/D Pairs (Origin/Destination Pairs) - displays supplier shipping origins and the destinations serviced by those shipping locations
T H E H O M E D E P O T | P A R T N E R G U A R D I A N T R A I N I N G G U I D E 29
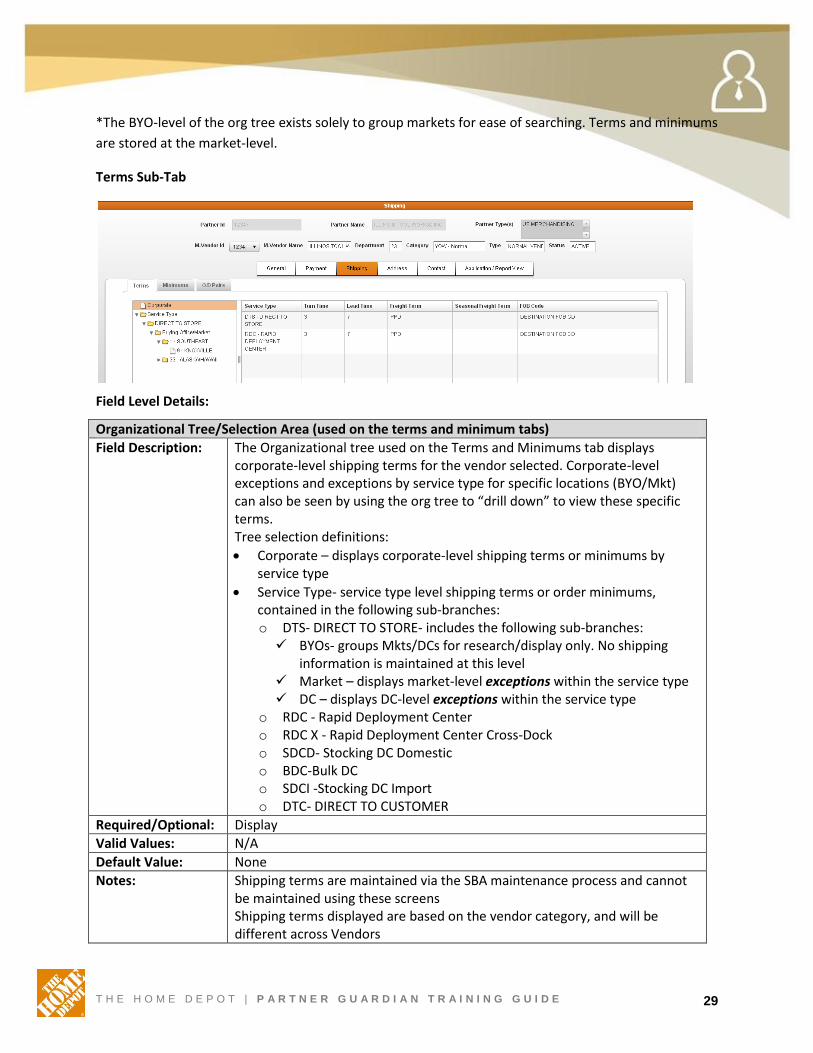
*The BYO-level of the org tree exists solely to group markets for ease of searching. Terms and minimums
are stored at the market-level.
Terms Sub-Tab
Field Level Details:
Organizational Tree/Selection Area (used on the terms and minimum tabs)
Field Description: The Organizational tree used on the Terms and Minimums tab displays corporate-level shipping terms for the vendor selected. Corporate-level exceptions and exceptions by service type for specific locations (BYO/Mkt) can also be seen by using the org tree to “drill down” to view these specific terms. Tree selection definitions:
Corporate – displays corporate-level shipping terms or minimums by service type
Service Type- service type level shipping terms or order minimums, contained in the following sub-branches: o DTS- DIRECT TO STORE- includes the following sub-branches: BYOs- groups Mkts/DCs for research/display only. No shipping
information is maintained at this level Market – displays market-level exceptions within the service type DC – displays DC-level exceptions within the service type
o RDC - Rapid Deployment Center o RDC X - Rapid Deployment Center Cross-Dock o SDCD- Stocking DC Domestic o BDC-Bulk DC o SDCI -Stocking DC Import o DTC- DIRECT TO CUSTOMER
Required/Optional: Display
Valid Values: N/A
Default Value: None
Notes: Shipping terms are maintained via the SBA maintenance process and cannot be maintained using these screens Shipping terms displayed are based on the vendor category, and will be different across Vendors

T H E H O M E D E P O T | P A R T N E R G U A R D I A N T R A I N I N G G U I D E 30
Terms Tab Data Grid
Field Description: The Terms tab data grid displays (current) shipping term details, including corporate level shipping terms, and exceptions by service type and Market/DC. The following columns are included to display shipping term details: o Service Type, Market, DC- this column and corresponding values change, based on the branch selected o Turn time o Lead time o Freight term (displayed for non-Import Vendors only) o Inco term (displayed for Import Vendors only) FOB code
Required/Optional: Display only
Valid Values: N/A
Default Value: None
Notes: None
Minimums Sub-Tab
Field Level Details:
Organizational Tree/Selection Area (used on the terms and minimum tabs)
Field Description: The Organizational tree used on the Terms and Minimums tab displays corporate-level shipping terms for the vendor selected. Corporate-level exceptions and exceptions by service type for specific locations (BYO/Mkt) can also be seen by using the org tree to “drill down” to view these specific terms. Tree selection definitions:
Corporate – displays corporate-level shipping terms or minimums by service type
Service Type- service type level shipping terms or order minimums, contained in the following sub-branches:

T H E H O M E D E P O T | P A R T N E R G U A R D I A N T R A I N I N G G U I D E 31
o DTS- DIRECT TO STORE- includes the following sub-branches: BYOs- groups Mkts/DCs for research/display only. No shipping
information is maintained at this level Market – displays market-level exceptions within the service type DC – displays DC-level exceptions within the service type
o RDC - Rapid Deployment Center o RDC X - Rapid Deployment Center Cross-Dock o SDCD- Stocking DC Domestic o BDC-Bulk DC o SDCI -Stocking DC Import o DTC- DIRECT TO CUSTOMER
Required/Optional: Display
Valid Values: N/A
Default Value: None
Notes: Shipping terms are maintained via the SBA maintenance process and cannot be maintained using these screens Shipping terms displayed are based on the vendor category, and will be different across Vendors
Minimums Tab Data Grid
Field Description: The Minimums tab data grid displays order minimum (min) details, including corporate level order minimums, and corporate-level exceptions, as well as exceptions by service type and Market/DC. The following columns are included for both regular and seasonal minimums: o Service Type, Market, DC- this column and corresponding values change, based on the branch selected o Min type – the method in which product is shipped (cases, pounds, cube, etc) o AB min- the minimum order quantity for an AB type store (based on store sales volume) o CD min – the minimum order quantity for an CD type store (based on store sales volume) o EF min- the minimum order quantity for an EF type store (based on store sales volume) o Eff(ective) Day- the month/day that the order minimum will be effective (through the SBA process)
Required/Optional: Display only
Valid Values: N/A
Default Value: None
Notes: None
O/D Pairs Sub-Tab
Step 1: Select a shipping location(s) from Shipping Location(s).
Note: Shipping location(s) is where shipments ship from and destination location is where they
arrive.

T H E H O M E D E P O T | P A R T N E R G U A R D I A N T R A I N I N G G U I D E 32
Step 2: You can filter by Destination Location Type (DC = Distribution Center, STR = Store) or Location #.
Note: Shipping Address is the address for the specified shipping location and Primary Contact is
the contact for the specified shipping location
Note: This is the only place in Partner Profile where you can log an issue. If there is a problem
with any of the information on this screen, click Submit Issue.
You will be asked to input your First Name, Last Name, Email Address, and the Issue(s) that you
see. Click Submit to submit the issue(s) for review.

T H E H O M E D E P O T | P A R T N E R G U A R D I A N T R A I N I N G G U I D E 33
Updating Addresses
Apart from adding, removing and editing user information, Partner Guardians will be able to update
addresses.
Note: Only US Merchandise Suppliers will be able to edit Addresses. For non US Merchandise
Suppliers proceed to Editing Applications/Reports. You will not be able to access this screen if
you are a Carrier, Canadian Merchandise Supplier or Non-Merchandise Supplier.
Step 1: Once you have logged into the Portal, click on Partner Profile. You will automatically be in the
Contacts tab.
Step 2: Click on the Address tab.

T H E H O M E D E P O T | P A R T N E R G U A R D I A N T R A I N I N G G U I D E 34
Step 3: To Add a new address, click Add.
Step 4: Fill in all fields marked with an * and click Save. You will receive a pop up stating “Address
successfully added”. Click OK.
T H E H O M E D E P O T | P A R T N E R G U A R D I A N T R A I N I N G G U I D E 35
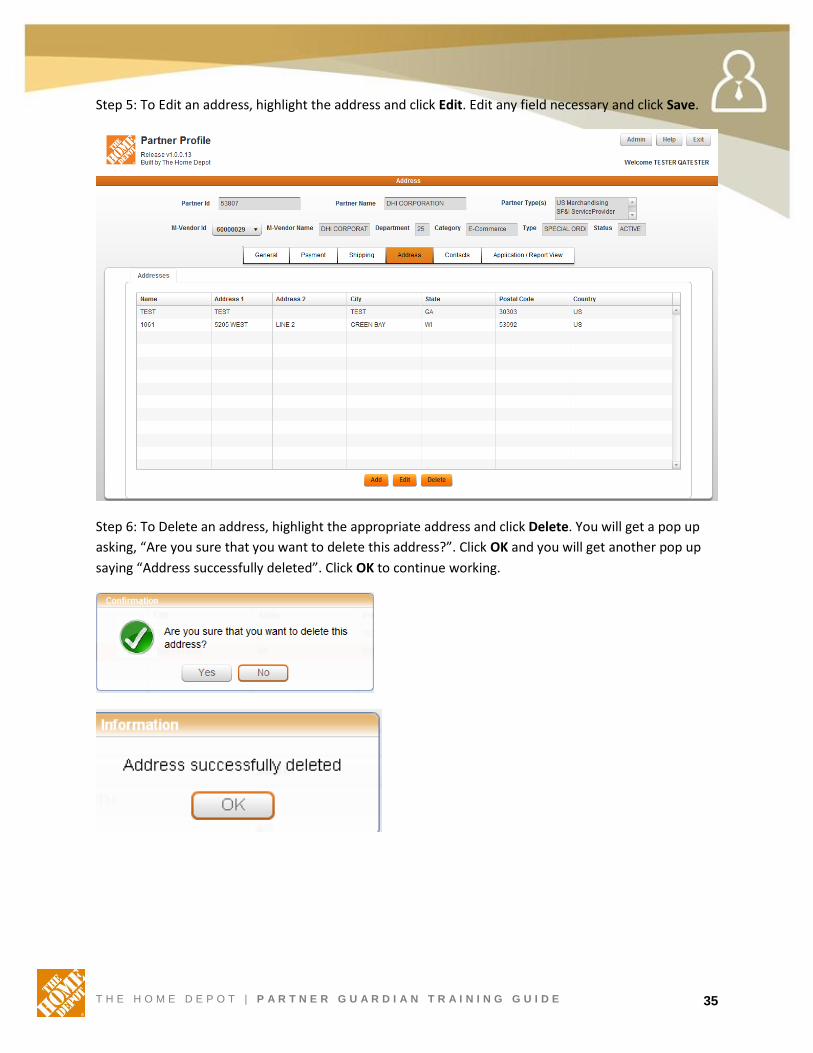
Step 5: To Edit an address, highlight the address and click Edit. Edit any field necessary and click Save.
Step 6: To Delete an address, highlight the appropriate address and click Delete. You will get a pop up
asking, “Are you sure that you want to delete this address?”. Click OK and you will get another pop up
saying “Address successfully deleted”. Click OK to continue working.

T H E H O M E D E P O T | P A R T N E R G U A R D I A N T R A I N I N G G U I D E 36
Editing Applications/Reports
Partner Guardians are able to add and remove access to reports and applications.
Step 1: You will automatically be in the Contacts tab once logging into Partner Profile.
Step 2: Click on the Application/Report View tab.

T H E H O M E D E P O T | P A R T N E R G U A R D I A N T R A I N I N G G U I D E 37
Step 3: Choose the Application or Report you would like to manage. Select Manage Users.
Note: Click on the Reports tab to manage Reports.
Step 4: To Add Access, click on Add User Access.
Note: To Remove access, Select the user you would like to remove access from and click
Remove User Access.

T H E H O M E D E P O T | P A R T N E R G U A R D I A N T R A I N I N G G U I D E 38
Step 5: Search for the user you would like to access by User ID, First Name, Last Name or Email ID. Type
the information in the search field and click Search.
Note: You can put in an “*” to search for ALL users
Step 6: Select the User you would like to add and click Select. You will get a pop up stating, “Do you
want to add portal object access for the following user(s). Click Yes to continue and you will get a pop up
saying, “Application/Report access to users added successfully. Click OK to continue working. Users will
receive an email notification that their account has been updated with the appropriate application or
report.

T H E H O M E D E P O T | P A R T N E R G U A R D I A N T R A I N I N G G U I D E 39
Maintaining Store Contacts
US Merchandise Supplier Only
US Merchandising Suppliers are responsible for maintaining contacts at the store level. During SBA, US
Merchandising Suppliers are asked to update store contacts, but the information needs to be
maintained and verified.
Adding a Contact
Step 1: Once you have signed into Partner Profile, click on the Contacts tab.
Step 2: Click on Store Contacts tab to add a contacts.
Note: An M-Vendor ID must be selected before the Store Contacts tab is available.

T H E H O M E D E P O T | P A R T N E R G U A R D I A N T R A I N I N G G U I D E 40
Step 3: Click Add Contact. A screen will appear where you will input the required information.
Note: All fields marked with an * are required.
Step 4: Input all of the required fields. You can assign a contact by Corporate Office, Buying Office, or
Market/DC. Each contact can have multiple assignments.
Note: If you are adding a contact to a previously assigned location, the system will automatically
delete the previously assigned contact without warning.
Step 5: To add a Market/DC, click on the Market/DC tab.
Step 6: To add a specific store number, click on the appropriate Buying Office/Market. Then click on the
store number(s) that you would like to add and click OK when finished.
Note: To see a more specific list, manually type in the name of BYO, Market, or DC and push List.

T H E H O M E D E P O T | P A R T N E R G U A R D I A N T R A I N I N G G U I D E 41
Step 7: You will see a list of all stores assigned to the contact once you have clicked OK. Click Save to
save the information.

T H E H O M E D E P O T | P A R T N E R G U A R D I A N T R A I N I N G G U I D E 42
Editing/Deleting a Contact Step 1: In order to update contacts, under the Contacts tab, click on the contact you would like to
update.
Step 2: Click on Edit to edit the contact or Delete to delete the contact.
Note: A person can be assigned to more than one location. If you are editing an individual who is
assigned to more than one location, a pop up will appear asking you to Edit One or Edit All.
Choose the appropriate edit function before proceeding.
Step 3: If you are editing the contact, update all fields needing an edit and click Save.
T H E H O M E D E P O T | P A R T N E R G U A R D I A N T R A I N I N G G U I D E 43
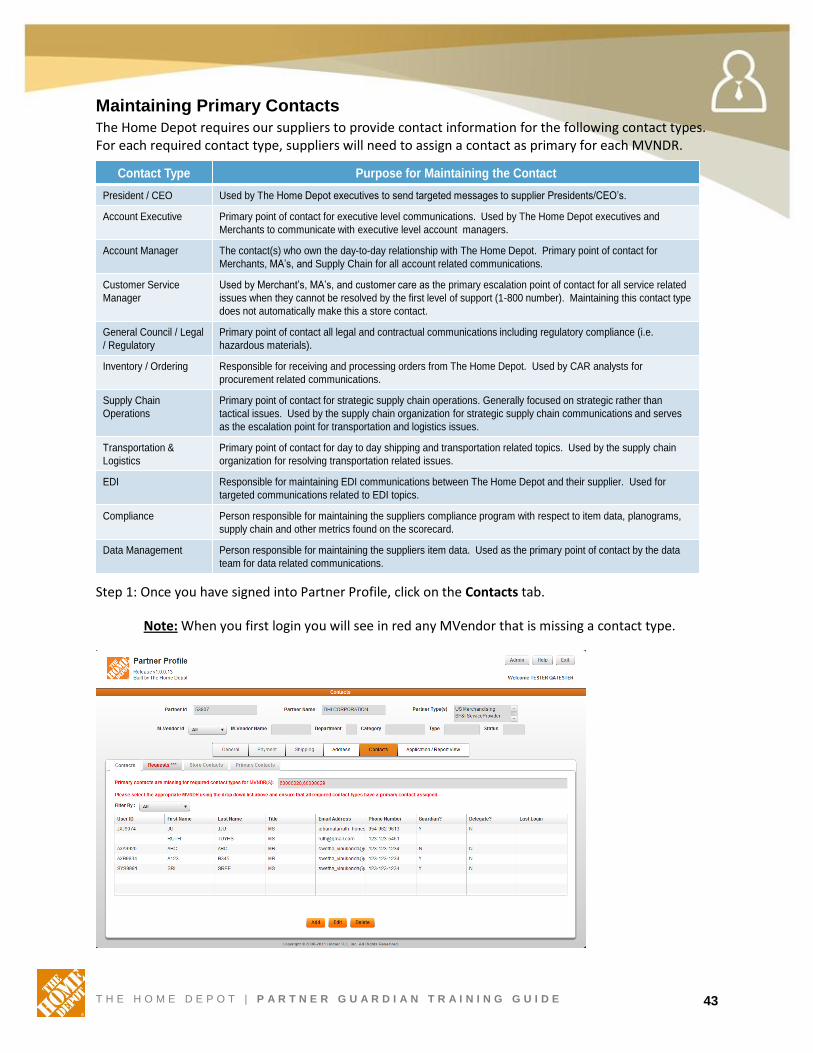
Maintaining Primary Contacts
The Home Depot requires our suppliers to provide contact information for the following contact types. For each required contact type, suppliers will need to assign a contact as primary for each MVNDR.
Step 1: Once you have signed into Partner Profile, click on the Contacts tab.
Note: When you first login you will see in red any MVendor that is missing a contact type.
Contact Type Purpose for Maintaining the Contact
President / CEO Used by The Home Depot executives to send targeted messages to supplier Presidents/CEO’s.
Account Executive Primary point of contact for executive level communications. Used by The Home Depot executives and
Merchants to communicate with executive level account managers.
Account Manager The contact(s) who own the day-to-day relationship with The Home Depot. Primary point of contact for
Merchants, MA’s, and Supply Chain for all account related communications.
Customer Service
Manager
Used by Merchant’s, MA’s, and customer care as the primary escalation point of contact for all service related
issues when they cannot be resolved by the first level of support (1-800 number). Maintaining this contact type
does not automatically make this a store contact.
General Council / Legal
/ Regulatory
Primary point of contact all legal and contractual communications including regulatory compliance (i.e.
hazardous materials).
Inventory / Ordering Responsible for receiving and processing orders from The Home Depot. Used by CAR analysts for
procurement related communications.
Supply Chain
Operations
Primary point of contact for strategic supply chain operations. Generally focused on strategic rather than
tactical issues. Used by the supply chain organization for strategic supply chain communications and serves
as the escalation point for transportation and logistics issues.
Transportation &
Logistics
Primary point of contact for day to day shipping and transportation related topics. Used by the supply chain
organization for resolving transportation related issues.
EDI Responsible for maintaining EDI communications between The Home Depot and their supplier. Used for
targeted communications related to EDI topics.
Compliance Person responsible for maintaining the suppliers compliance program with respect to item data, planograms,
supply chain and other metrics found on the scorecard.
Data Management Person responsible for maintaining the suppliers item data. Used as the primary point of contact by the data
team for data related communications.

T H E H O M E D E P O T | P A R T N E R G U A R D I A N T R A I N I N G G U I D E 44
Step 2: Select an MVNDR number from the drop down list and select the Primary Contacts sub-tab that will appear after an MVNDR is selected.
Note: The Primary Contacts tab will be highlighted in red with asterisks if primary contacts have not been assigned to the required contact types.
Step 3: On the Primary Contacts tab, press the Assign button next to each required contact type that does not have a primary contact assigned.
Step 4: Select the appropriate contact from the list provided to assign as the primary contact and press the OK button.
Note: In order for a contact to be available in this list to select as the primary contact, they must first have that contact type assigned on the Contact record. They must also be associated with the MVNDR that you are assigning primary contacts for.

T H E H O M E D E P O T | P A R T N E R G U A R D I A N T R A I N I N G G U I D E 45
THE HOME DEPOT
Partner Profile Training Guide HDConnect

T H E H O M E D E P O T | P A R T N E R G U A R D I A N T R A I N I N G G U I D E 46
TABLE OF CONTENTS
OVERVIEW ............................................................................................................................................... 47
Introduction ............................................................................................................................................ 47
First Time Logging In ............................................................................................................................... 48
Setting Up New Users ......................................................................................................................... 48
Maintaining Individual User Accounts ................................................................................................... 49
Accessing Partner Profile .................................................................................................................... 49
Adding a New User .............................................................................................................................. 50
Removing/Inactivating a User ............................................................................................................ 53
Editing a User ....................................................................................................................................... 54
Editing Access Rights to Applications/Reports ................................................................................ 55
Password Administration ..................................................................................................................... 57
Appendix A: Access Rights Guide ......................................................................................................... 58

T H E H O M E D E P O T | P A R T N E R G U A R D I A N T R A I N I N G G U I D E 47
OVERVIEW
Introduction
This document is intended for Service Provider Guardians responsible for managing user access to
HDConnect.
Service Provider Guardians will be responsible for creating and maintaining all Service Provider portal
users. Additionally, they will have access to the Service Provider data/user management application to
manage their data including contacts.
New users will be provisioned access to standard HDConnect applications immediately. However, access
to items on the Business Activity Bar including: Compliance, Document Warehouse, SF&I Siebel
application and ProviderNet will be available 1 hour after the user was created.

T H E H O M E D E P O T | P A R T N E R G U A R D I A N T R A I N I N G G U I D E 48
First Time Logging In
Setting Up New Users
Service Provider Guardians will receive an email notification with their HDConnect username and
password prior to your training. During your initial log in to Partner Profile via HDConnect, you will need
to add new users that will be working with The Home Depot systems and applications. As the Service
Provider Guardian, you are responsible for editing and/or deleting users as needed.
To add / update a user during your first log in to HDConnect, follow the steps below. To add / update a
user after your initial log in, simply follow steps 1 & 3 below.
Step 1: Log in to HDConnect by clicking here.
Step 2: Agree to the Terms & Conditions (first log-in only)
Step 3: Access Partner Guardian via the Administration tab to setup users. The next pages will review
how to add and update user accounts.
Step 4: Review User Spreadsheets and Add / Administer Access to Current Users based on User
Spreadsheets
Step 5: SF&I Service Providers only, administer M-Vendor numbers within the SF&I application
T H E H O M E D E P O T | P A R T N E R G U A R D I A N T R A I N I N G G U I D E 49
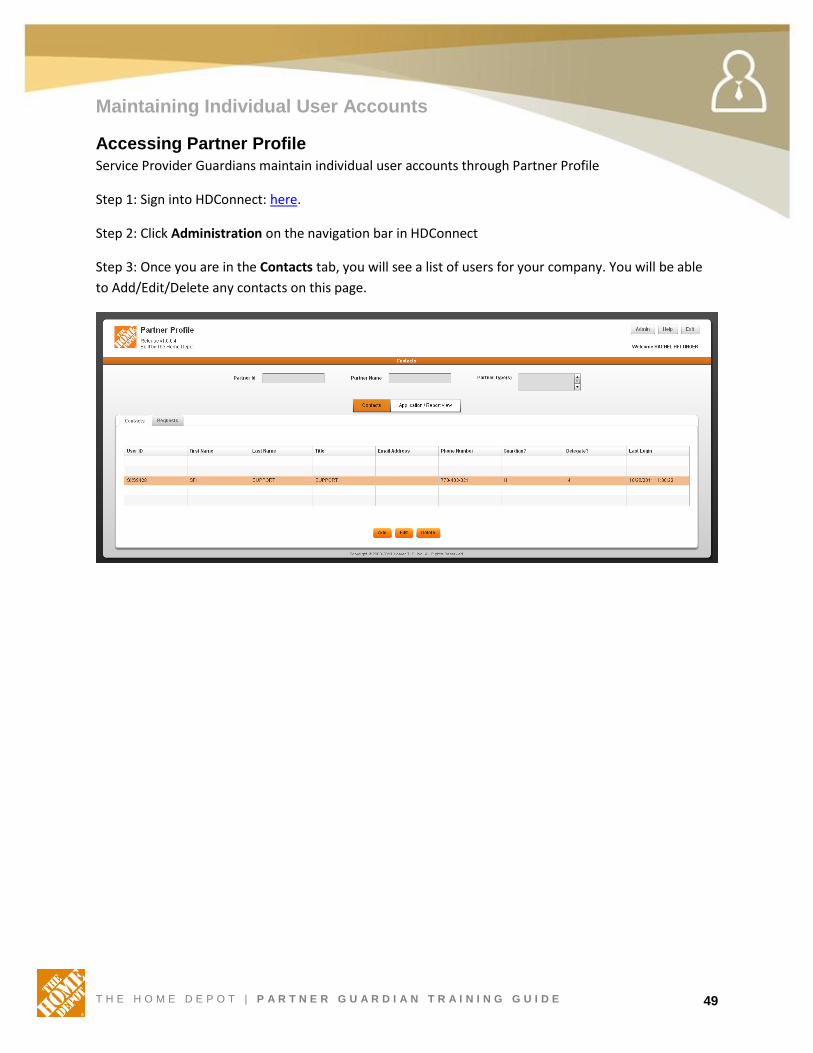
Maintaining Individual User Accounts
Accessing Partner Profile
Service Provider Guardians maintain individual user accounts through Partner Profile
Step 1: Sign into HDConnect: here.
Step 2: Click Administration on the navigation bar in HDConnect
Step 3: Once you are in the Contacts tab, you will see a list of users for your company. You will be able
to Add/Edit/Delete any contacts on this page.

T H E H O M E D E P O T | P A R T N E R G U A R D I A N T R A I N I N G G U I D E 50
Adding a New User
Service Provider Guardians are able to add new Service Provider Guardians and general users for their
company.
Step 1: Click Add.
Step 2: Fill-in the appropriate fields including:
Guardian User - only select this option if the User should be a Service Provider Guardian, select Guardian User
First Name
Last Name
Title
Email Address
Phone Type & Phone Number Please note the following:
If you select Guardian User, the user will have automatic access to Partner Profile – there is no need to click on the Partner Profile check box
Fields that are greyed out cannot be edited
Do not select Delegate User / Delegate Company

T H E H O M E D E P O T | P A R T N E R G U A R D I A N T R A I N I N G G U I D E 51
Step 4: Add M-Vendors
For non-Guardian users, M-Vendors will not automatically be assigned. Use the Assign buttons
as needed to assign M-Vendors to the selected user.
If you selected your user is a Guardian, all M-Vendors will automatically be assigned. If a new
Guardian should only be assigned to certain M-Vendors, use the Assign / Unassign buttons
(highlighted) below as needed.
SF&I Service Providers – you will continue to assign MVendor numbers in the SF&I Siebel
application as you do today
Step 3: Click Save
NOTE: You will receive a message stating “User/Contact saved successfully” once you have
completed the process. Click “OK” to continue adding users.

T H E H O M E D E P O T | P A R T N E R G U A R D I A N T R A I N I N G G U I D E 52
Step 4: After creating the user and assigning M-Vendor numbers, you will be taken back to your User
Administration page. Select the user that you just created in order to assign Access Rights and click Edit.
Step 6: In your user’s profile, select the Access Rights – HomeDepotConnect tab, select all Applications
the user should have access to and click Save. For an in-depth guide on the access levels, see the
Appendix at the end of this training guide.
Step 6: Users will receive an email notifications with their account information including: Username,
Temporary Password, M-Vendor Assignment and Access Rights

T H E H O M E D E P O T | P A R T N E R G U A R D I A N T R A I N I N G G U I D E 53
Removing/Inactivating a User
Service Provider Guardians have the ability to remove access and inactive users for their company.
Inactive users are still maintained in Partner Profile but deleted users will no longer be accessible
through Partner Profile.
Step 1: In order to remove/inactivate a contact, highlight the appropriate User ID and click Edit.
Step 2: Under the Profile tab, for Status select Inactive and click Save. The user will no longer be able to
access the system but their information will still be maintained in Partner Profile.
Note: Users can be reactivated by changing their Status to Active. If a user is Deleted, then there
will no longer be a record of that user in the system. A notification will be sent to the user.

T H E H O M E D E P O T | P A R T N E R G U A R D I A N T R A I N I N G G U I D E 54
Editing a User
Service Provider Guardians have the ability to edit user information for all users within their company.
Step 1: In order to edit a contact, highlight the appropriate User ID and click Edit.
Step 2: Under the Profile, M-Vendor or Access Rights - HomeDepotConnect tab, edit fields as needed.
Step 6: Once you have updated all user information click Save. You will receive a message stating
“User/Contact saved successfully” once you have completed the process. Click “OK” to continue
working. An email will be sent to the new user with their updated account information.

T H E H O M E D E P O T | P A R T N E R G U A R D I A N T R A I N I N G G U I D E 55
Editing Access Rights to Applications/Reports
Service Provider Guardians are able to add and remove access to reports and applications.
Step 1: Once you have logged into the HDConnect, click Administration. Step 2: Click on the Application/Report View tab.
Step 3: Choose the Application or Report you would like to manage. Select Manage Users.
Step 4: To Add Access, click on Add User Access.
Note: To remove access, select the user you would like to remove access from and click Remove
User Access.

T H E H O M E D E P O T | P A R T N E R G U A R D I A N T R A I N I N G G U I D E 56
Step 6: Search for the user you would like to access by User ID, First Name, Last Name or Email ID. Type
the information in the search field and click Search.
Step 7: Select user you want to be added to the application by checking the check box in the Select
column. Click Select.
Step 8: You will get a pop up stating, “Do you want to add portal object access for the following user(s).
Click Yes to continue and you will get a pop up saying, “Application/Report access to users added
successfully. Click OK to continue working. Users will receive an email notification that their account has
been updated with the new application or report.

T H E H O M E D E P O T | P A R T N E R G U A R D I A N T R A I N I N G G U I D E 57
Password Administration
Step 1: To update a user’s password, click on Administration from HDConnect
Step 2: Select User and Click Edit
Step 3: In the Update Contact screen, click on the Reset Password button.
Step 4: You will receive a confirmation pop-up message, click Yes.
Step 5: The user will receive a temporary password to their email address on file (email address on the
Profile page).

T H E H O M E D E P O T | P A R T N E R G U A R D I A N T R A I N I N G G U I D E 58
Appendix A: Access Rights Guide
APPLICATION NAME DESCRIPTION
REPORTS
QUALITY REVIEW Allows user access to Quality Reviews (Recommended Users: Guardian / Principal / Branch Managers)
MASTER PVENDOR & SPECS REPORT Allows user access to Cost Specs, MVendor Data and Active SKU / Store Data (Recommended Users: Guardian / Principal / Branch Managers)
BACK OFFICE - WEBSITES
VOC Access to Voice of the Customer website (MAPS) where SPs can view VOC scores
SERVICE REQUESTS
ADVANCED SERVICE REQUESTS Ability to request sensitive items like address changes (Guardians / Principals)
SERVICE REQUEST CENTER – ACCESS Ability to view the Service Request Center (Coming in December 2011)
COMMUNITY DISCUSSION
SUBMIT POSTS Ability to submit new posts in the Community Discussion
COMPLIANCE
COMPLIANCE - HDCONNECT - ACCESS LICENSE PAGE
Access to License page in Business Activity Bar (Guardian / Principal / Compliance)
COMPLIANCE - HDCONNECT - ACCESS INSURANCE PAGE
Access to Insurance page in Business Activity Bar (Guardian / Principal / Compliance)
COMPLIANCE - HDCONNECT - ACCESS PEOPLE PAGE
Access to People page in Business Activity Bar (Guardian / Principal / Compliance)
COMPLIANCE - LEXISNEXIS WEBSITE - VIEW PEOPLE
Access to LexisNexis website - ability to view people
COMPLIANCE - LEXISNEXIS WEBSITE - UPDATE PEOPLE
Access to LexisNexis website - ability to update people
COMPLIANCE - LEXISNEXIS WEBSITE – ADMINISTRATION
Access to LexisNexis website - ability to change passwords (Principal / Guardian) Note: User must also be given "Compliance - LexisNexis Website - Update People" access
INSTALL (I) and FURNISH & INSTALL (F&I) SERVICE PROVIDERS ONLY
PROVIDERNET Access to ProviderNet application
SELL FURNISH & INSTALL (SF&I) SERVICE PROVIDERS ONLY
SFI SIEBEL Access to SF&I Siebel application Note: this must be checked in addition to one of the 2 user types listed below in order to set-up appropriate access to the SF&I Siebel application
SFI SIEBEL - PAYMENT PROCESSING USER
Access to process payments in the SF&I Siebel application
SFI SIEBEL – NON-PAYMENT PROCESSING USER
Access to SF&I Siebel application (no access to process payments)
PAYPOINT Access to website where SF&I SPs can process customer checks
VIEW DOCUMENTS Access to page within Business Activity Bar where SF&I SPs can view documents posted from the add new documents section
ADD NEW DOCUMENTS Access to page within Business Activity Bar where SF&I SPs can add new documents


