12
1 Mechatronics Integrated Project The HUSH 4.0 Submitted to: Prof. Vikram Kapila By- Zeru Zhang (zz2376), Satish Reddy Bethi (srb629) and Shubham Desai (sbd324)
1
Mechatronics Integrated Project
The HUSH 4.0
Submitted to: Prof. Vikram Kapila
By- Zeru Zhang (zz2376),
Satish Reddy Bethi (srb629) and
Shubham Desai (sbd324)
2
Table of Contents
Sr. no. Title Page no.
1) Abstract 1
2) Overview 1
3) Mathematical Calculations 1
4) Framework of the HTTP Server 3
5) Circuits 4
6) ThingSpeak 4
7) Wi-fi Module ESP8266 4
8) Wi-fi vs Bluetooth 7
9) UI 7
10) Advantages 8
11) Conclusion 8
12) References 8
3
List of Figures
Sr. no. Title Page no.
1) AC Value vs dB(A) 2
2) Framework of HTTP server 3
3) ESP8266 pins 5
4) ESP8266 Data Transfer Circuit 6
5) User interface 7
1
1) Abstract
Everyone expects that studying in the library to be a peaceful experience but continuous
chattering and speaking loudly annoys people who want to concentrate on their studies.
It is also impolite to ask anyone to lower their voice repeatedly. It is also a waste of time
to search for an ideal quite spot in the library. Therefore, we came up with the idea of ‘The
HUSH 4.0’. A smart device made for sound monitoring. It is connected to the internet
which allows students to access the website and find quite tables to study even before
entering the library. Also, it includes a user interface that shows color coded zones based
on sound intensity. The threshold of each device can be remotely controlled from the
library front desk. The occupancy of the library is also available to students on the website.
In this way finding an empty table will be easier.
2) Overview
To create a real-life scenario, we made 2 HUSH devices. We used an Audio amplifier
module which comes with an electret condenser microphone and LM386 (Op-amp) to
amplify signals from a microphone and supply it to the analog port of the Arduino and
Propeller board. The ADC values from the amplifier were converted into dB(A) levels by
using Linear Regression method. The threshold values can be directly sent from a
computer or a mobile phone from the front desk of the library. The microcontroller
compares the constantly measured dB levels with the threshold. These values are
displayed on an LCD screen for the user. If the sound level goes above the threshold, a
red LED blinks indicating that the person sitting around it is being noisy. We have used 2
buttons as password inputs to make the product secure. Also, we used the ultrasonic
sensor to detect occupancy of the tables. And the same data is sent to the internet and
is available to students on through the UI.
3) Mathematical Background [1]
We use the A scale for dB measurement because the A scale is nearest to the sound
heard by human ear. Similarly, the A-weighting curve is widely adopted for environmental
noise measurement. Since Hush is designed only for daily use, we do not need much
2
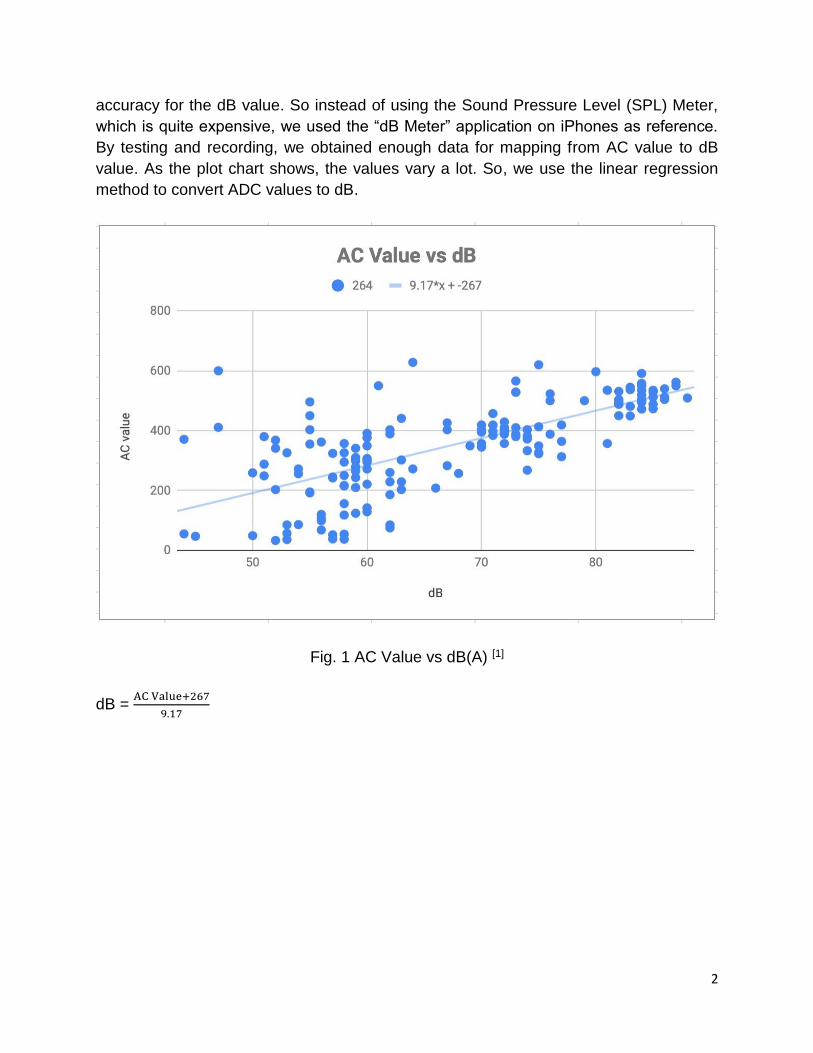
accuracy for the dB value. So instead of using the Sound Pressure Level (SPL) Meter,
which is quite expensive, we used the “dB Meter” application on iPhones as reference.
By testing and recording, we obtained enough data for mapping from AC value to dB
value. As the plot chart shows, the values vary a lot. So, we use the linear regression
method to convert ADC values to dB.
Fig. 1 AC Value vs dB(A) [1]
dB = AC Value+267
9.17
3
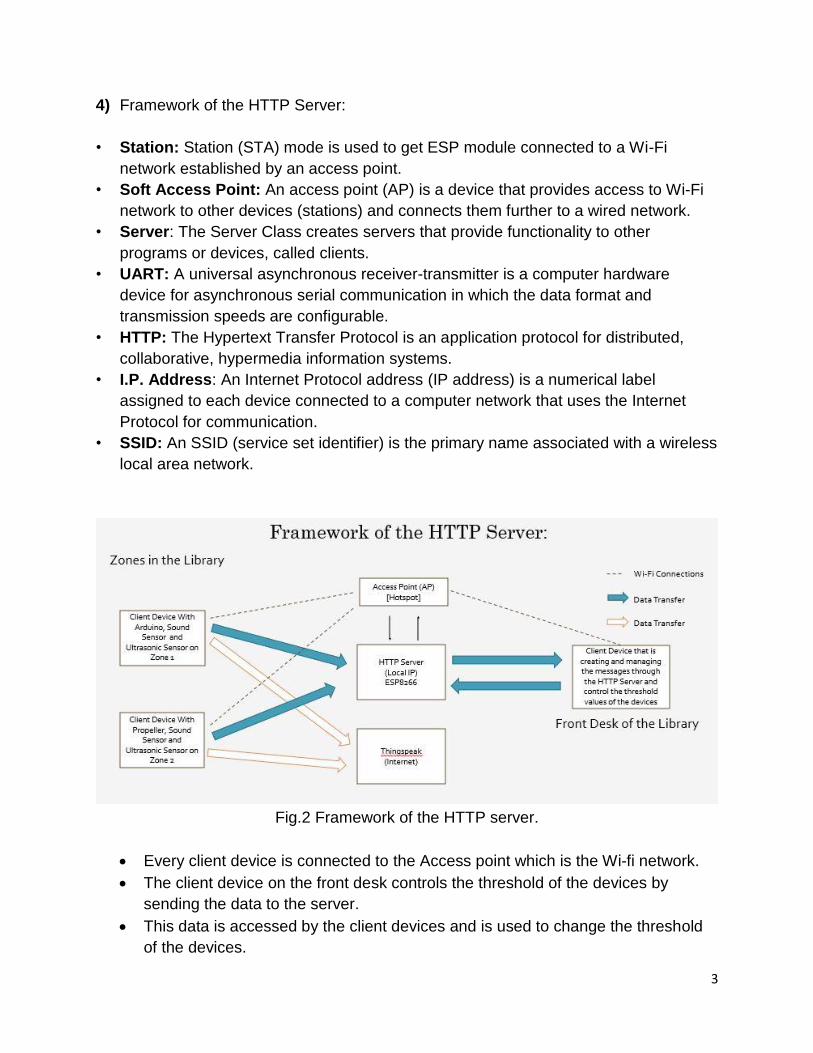
4) Framework of the HTTP Server:
• Station: Station (STA) mode is used to get ESP module connected to a Wi-Fi
network established by an access point.
• Soft Access Point: An access point (AP) is a device that provides access to Wi-Fi
network to other devices (stations) and connects them further to a wired network.
• Server: The Server Class creates servers that provide functionality to other
programs or devices, called clients.
• UART: A universal asynchronous receiver-transmitter is a computer hardware
device for asynchronous serial communication in which the data format and
transmission speeds are configurable.
• HTTP: The Hypertext Transfer Protocol is an application protocol for distributed,
collaborative, hypermedia information systems.
• I.P. Address: An Internet Protocol address (IP address) is a numerical label
assigned to each device connected to a computer network that uses the Internet
Protocol for communication.
• SSID: An SSID (service set identifier) is the primary name associated with a wireless
local area network.
Fig.2 Framework of the HTTP server.
• Every client device is connected to the Access point which is the Wi-fi network.
• The client device on the front desk controls the threshold of the devices by
sending the data to the server.
• This data is accessed by the client devices and is used to change the threshold
of the devices.
4
• This data is then available on the internet which is ThingSpeak to the public for
viewing.
5) Circuits
1) Client device 1: Arduino with ESP8266 as the client device which receives data
from the server, changes the device threshold, checks for occupancy and sends
live data to ThingSpeak.
2) Client and Server device 2: WiFi module on the propeller maintains the local
HTTP server while the propeller checks for occupancy and sends live data to
ThingSpeak.
3) Client Device 3: The computer or any mobile phone will act as the third client
device which can send the threshold values to the server.
6) ThingSpeak
• ThingSpeak is an open-source Internet of Things (IoT) application and API to
store and retrieve data from things using the HTTP protocol over the Internet or
via a Local Area Network.
• ThingSpeak platform service that allows everyone to visualize and analyze live
data streams in the cloud.
• Data can be sent to ThingSpeak from your devices, create instant visualizations
of live data.
• With MATLAB analytics inside ThingSpeak, we can write and execute MATLAB
code to perform preprocessing, visualizations, and analyses.
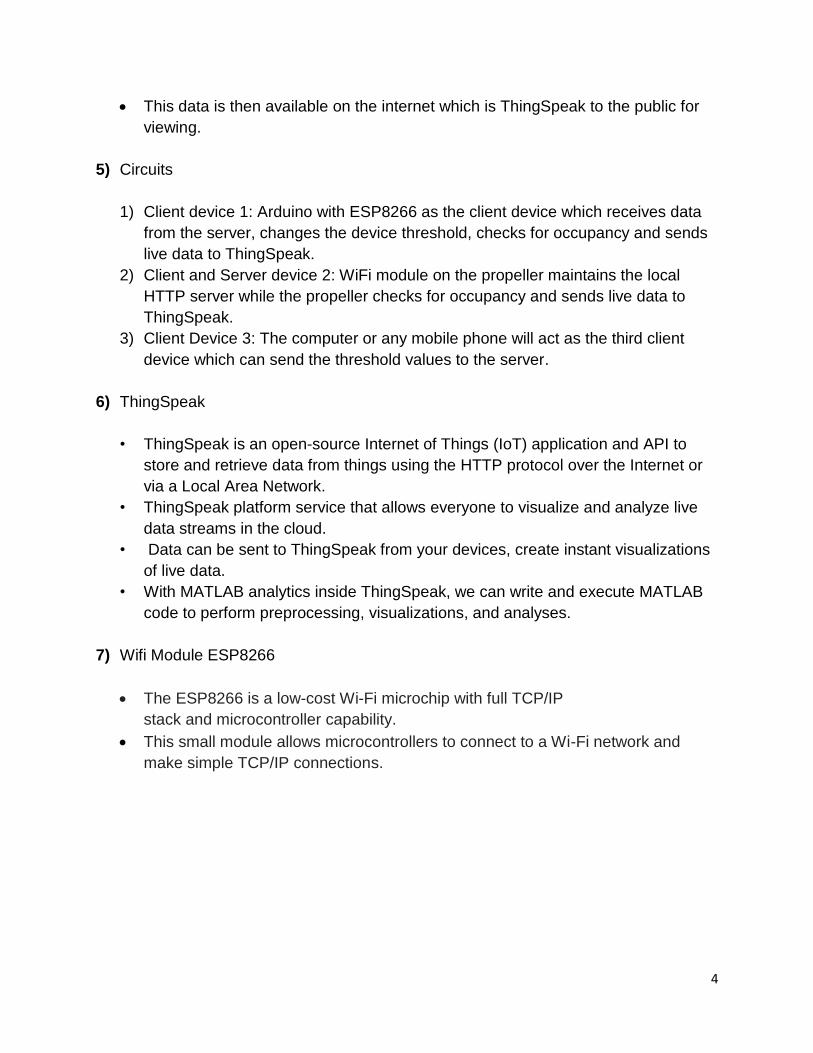
7) Wifi Module ESP8266
• The ESP8266 is a low-cost Wi-Fi microchip with full TCP/IP
stack and microcontroller capability.
• This small module allows microcontrollers to connect to a Wi-Fi network and
make simple TCP/IP connections.
5
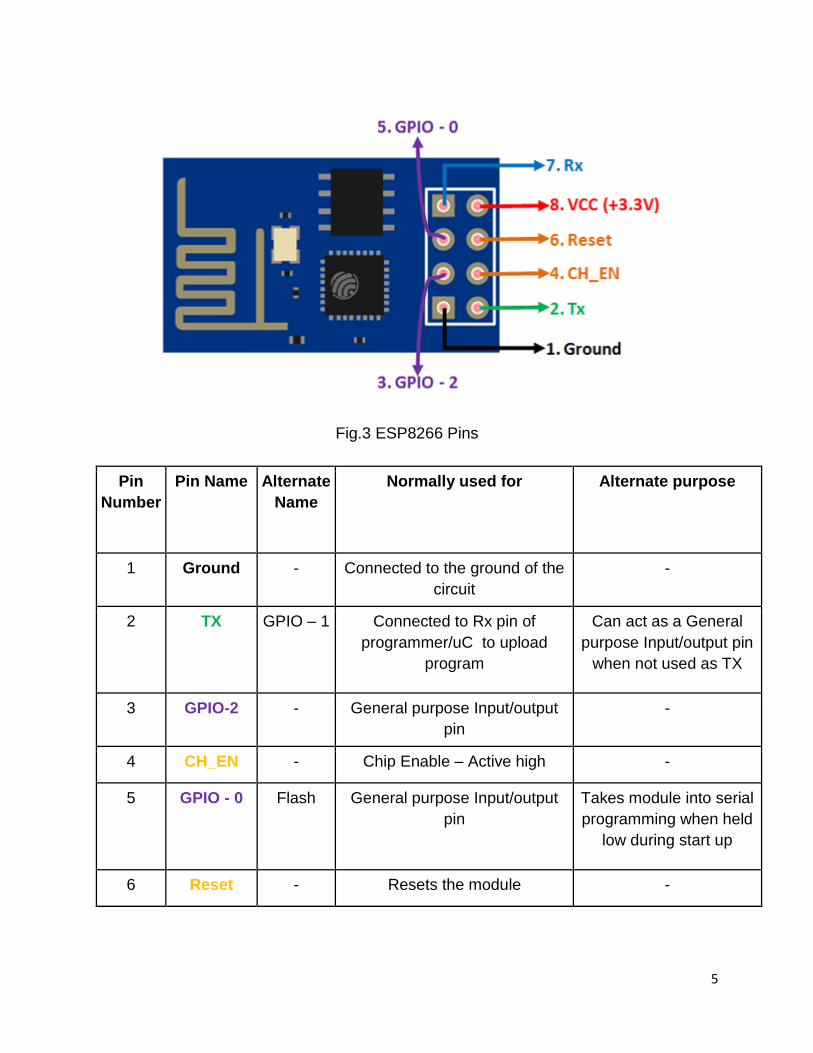
Fig.3 ESP8266 Pins
Pin
Number
Pin Name Alternate
Name
Normally used for Alternate purpose
1 Ground - Connected to the ground of the
circuit
-
2 TX GPIO – 1 Connected to Rx pin of
programmer/uC to upload
program
Can act as a General
purpose Input/output pin
when not used as TX
3 GPIO-2 - General purpose Input/output
pin
-
4 CH_EN - Chip Enable – Active high -
5 GPIO - 0 Flash General purpose Input/output
pin
Takes module into serial
programming when held
low during start up
6 Reset - Resets the module -
6
7 RX GPIO - 3 General purpose Input/output
pin
Can act as a General
purpose Input/output pin
when not used as RX
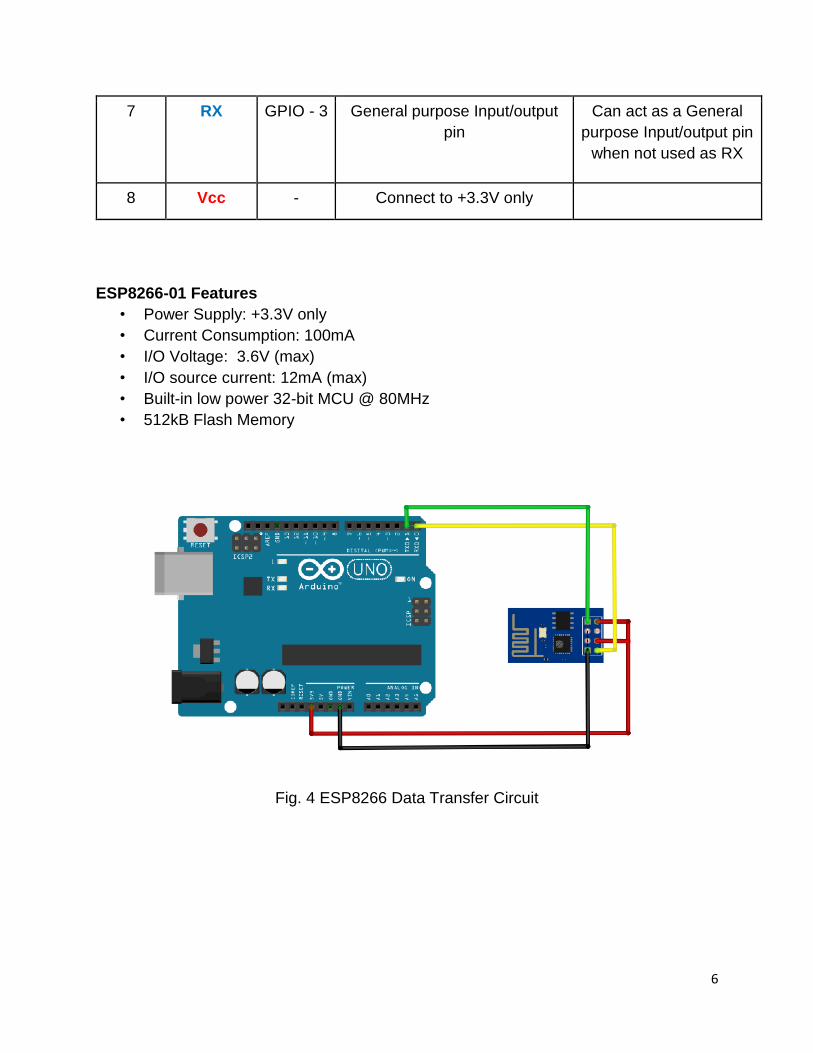
8 Vcc - Connect to +3.3V only
ESP8266-01 Features
• Power Supply: +3.3V only
• Current Consumption: 100mA
• I/O Voltage: 3.6V (max)
• I/O source current: 12mA (max)
• Built-in low power 32-bit MCU @ 80MHz
• 512kB Flash Memory
Fig. 4 ESP8266 Data Transfer Circuit
7
8) Wifi vs Bluetooth
• Range: The range on a Bluetooth network gets cut off at about 30 meters, whereas
the latest versions of WiFi routers can reach out beyond 100 meters.
• Connections: Bluetooth can connect up to 7 devices together in one personal area
network (PAN). WiFi doesn’t have the same limitations.
• Access: If Wi-fi module is connected to internet, it can be accessed from
anywhere. But Bluetooth module has to be in the range to be accessed.
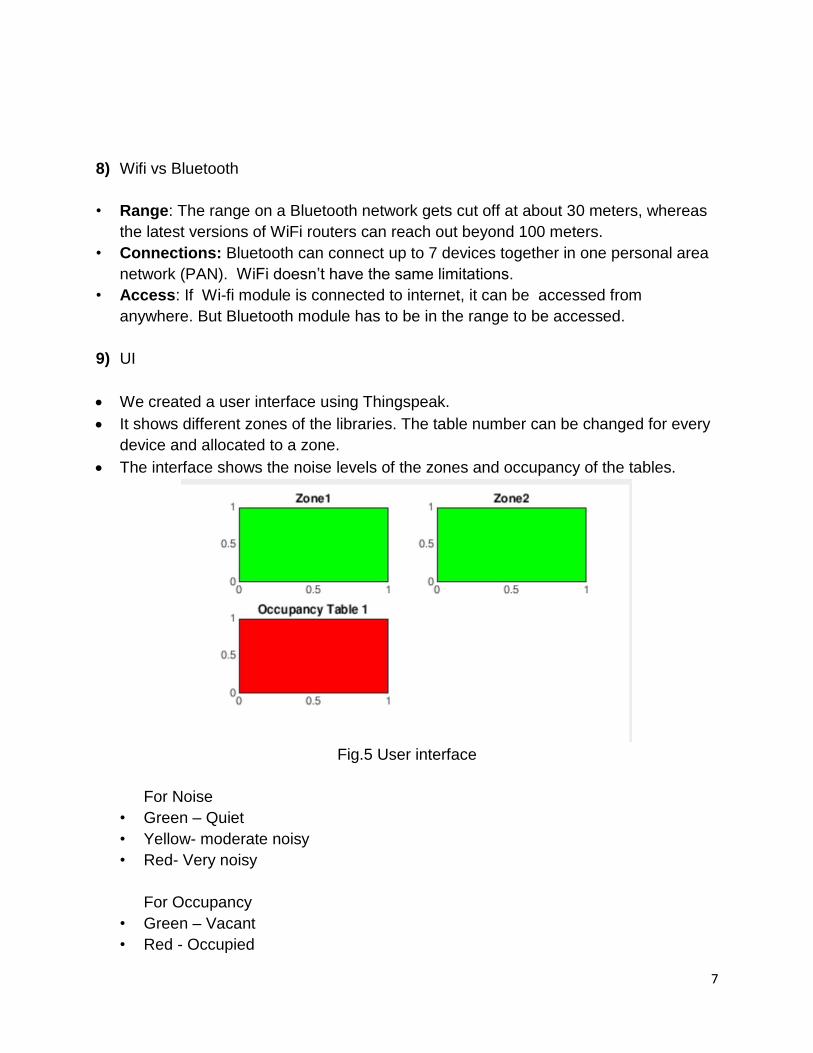
9) UI
• We created a user interface using Thingspeak.
• It shows different zones of the libraries. The table number can be changed for every
device and allocated to a zone.
• The interface shows the noise levels of the zones and occupancy of the tables.
Fig.5 User interface
For Noise
• Green – Quiet
• Yellow- moderate noisy
• Red- Very noisy
For Occupancy
• Green – Vacant
• Red - Occupied
8
10) Advantages
• Improved the existing library occupancy detection system from wired to wireless.
• A perfect multifunction integral kit for each library table.
• No longer required to tune all the devices separately.
• Made it much easier for librarian to manage all the tables.
• More convenient for students to choose the study zone.
11) Conclusion
In this project we have successfully created a system that not only indicated loudness but
also creates a platform for everyone to view the data online. HUSH 4.0 offers a device
that sits on the table and monitors the sound level and occupancy of the table. It also
sends live data to the internet so that it can be accessed by everyone. Students can find
out quiet and empty places to study in the library even before coming to the library. This
will help save a lot of time from the process of finding the ideal study space.
12) References
[1] https://circuitdigest.com/microcontroller-projects/arduino-sound-level-measurement.
[2] https://create.arduino.cc/projecthub/YoussefSabaa/lcd-display-in-real-time-ea0b7b
[3] https://tinkersphere.com/sensors/919-microphone-sound-detector-arduino-
compatible.html

9


