The inFUZE Bundle Contents Introduction 4 Quick Reference 5 Banner 6 Introduction And Usage 6 Code Description 6 Benchmarks 9 Introduction And Usage 9 Code Description 10 Chessica 11 Introduction And Usage 11 Circles 11 Introduction And Usage 11 Lines 12 Introduction And Usage 12 Code Description 12 Luna 14 Introduction And Usage 14 Life 14 Introduction And Usage 14 Beep 15 Introduction And Usage 15 How To Play the Flute 15 How To Play Tunes 15
Transcript
The inFUZE BundleContents
Introduction! 4
Quick Reference ! 5
Banner! 6
Introduction And Usage! 6
Code Description! 6
Benchmarks! 9
Introduction And Usage! 9
Code Description! 10
Chessica ! 11
Introduction And Usage! 11
Circles ! 11
Introduction And Usage! 11
Lines ! 12
Introduction And Usage! 12
Code Description! 12
Luna ! 14
Introduction And Usage! 14
Life! 14
Introduction And Usage! 14
Beep! 15
Introduction And Usage! 15
How To Play the Flute! 15
How To Play Tunes! 15
How Beep Works! 16
How pitch> works.! 17
How the Audio Hardware Works.! 18
Brikky ! 19
Introduction And Usage! 19
TJoy ! 20
Introduction And Usage! 20
Slides! 21
Introduction And Usage! 21
Producing and loading FIGgy Images! 21
How does The SlideShow Work?! 22
MiniRace ! 22
Introduction And Usage! 23
How MiniRace Works! 23
Joggle! 25
Introduction And Usage! 25
How Joggle Works! 25
Mazes! 27
Introduction And Usage! 27
How It Works! 27
Mini Oxo ! 28
Introduction And Usage! 28
Strategy! 28
Full Screen Oxo ! 29
Introduction And Usage! 30
Graphics! 30
Strategy! 31
FigTris! 32
Introduction And Usage! 33
Snake! 34
Introduction And Usage! 34
Locals ! 34
Introduction And Usage! 34
Explanation! 34
Turtles and TurtleCrypt! 37
Introduction And Usage! 38
How To Use The Turtle Graphics! 38
Blitz! 40
Introduction And Usage! 40
Zoo ! 40
Introduction And Usage! 41
Inside The Program! 42
GDem! 46
Introduction And Usage! 46
Inside GDem! 46
Nyan Race ! 48
Introduction And Usage! 48
Primes ! 49
Introduction And Usage! 49
Cal! 50
Introduction And Usage! 50
Technical Details! 51
Multiple Languages! 51
Debugger! 52
Introduction And Usage! 52
EEProm! 54
Introduction And Usage! 54
They are used to provide these operations in block 258:! 54
Technical Details! 55
Image Loader! 55
Introduction And Usage! 55
Using The Autosaver / Autoloader! 56
Logger! 57
Introduction And Usage! 57
Layout! 57
Making a Log! 57
Control Region! 58
Logging Region! 58
Inside Logger! 58
IntroductionFIGnition inFUZE comes with roughly 400Kb of Flash storage and 100Kb of it contains 32 demonstration programs to help you explore the kinds of things FIGnition can do.
You can try out the programs without understanding how to program FIGnition, but as you learn more, they will help you to discover programming techniques. You will need to know how to type on the keypad, this is covered in the build leaflet.
The programs themselves cover simple games: like Brikky, FIGtris and Luna; demonstrate User defined graphics and high resolution graphics; show you how the blitter works; how to generate audio, load data in and out of the Flash chip; sense time; read the keypad; manipulate strings; perform calculations; measure the performance and connect to the outside world.
All the programs make use of the latest features in the firmware.
Quick ReferenceThe table below lists all the available programs, the flash blocks they occupy and which block to load to run each program.
EEProm 257-258 257/258 Image Loader 259, 260, 261 All
Debugger (Auto) 262-266 262 logger 270-290 290
Banner
Introduction And Usagebanner allows you to display enlarged messages, 4x the size of normal messages across the FIGnition screen. You load banner by typing 100 load <exe>. You can use it by typ-ing banner <exe> or by creating messages which you can display enlarged, for exam-ple:
create msg " Hello!" <exe>msg big" <exe>
xp and yp control the current pixel coordinates; where 0 xp ! 0 yp ! is the top, left-hand corner.
chr cBig displays a single character at the current banner coordinates.
Code Description
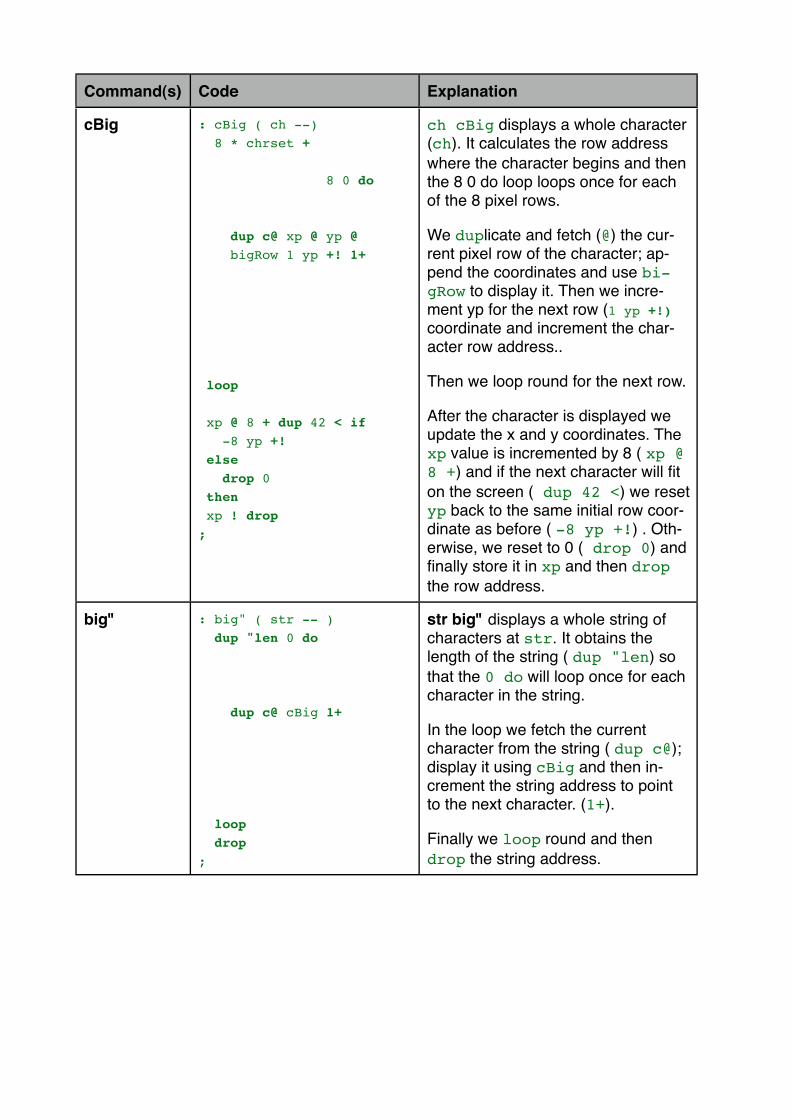
Command(s) Code Explanation
chrset 0 kern const chrset 0 kern returns the memory address of the character set, which we define as the constant chrset.
xp , yp 0 var xp 0 var yp xp and yp are simple variables we use to hold the coordinates for the next banner character on the screen.
Command(s) Code Explanation
bigRow : bigRow ( n x y --) swap 7 + swap
8 0 do
rot dup 1 and 1+ pen
1 >> rot rot 2dup plot
swap 1- swap
loop drop drop drop;
n x y bigRow displays 8 pixels of a row of a character n based on the current coordinates x y . Pixels are displayed right to left, so we first add 7 to the x coordinate. Then the 8 0 do loop loops once for each of the 8 pixels.
We calculate the color of the pixel; we obtain the pixel value (rot), ob-tain the bottom bit (dup 1 and) 0 for white, 1 for black and add 1 (1+) to get the pen mode: 1 for plot, 2 for unplot.
We then shift the pixels down one pixel; obtain the coordinates (rot rot), duplicate them (2dup) and plot the pixel.
We then decrement the x coordinate.
Loop round for another pixel and fi-nally drop the row and coordinates.
Command(s) Code Explanation
cBig : cBig ( ch --) 8 * chrset +
8 0 do
dup c@ xp @ yp @ bigRow 1 yp +! 1+
loop
xp @ 8 + dup 42 < if -8 yp +! else drop 0 then xp ! drop;
ch cBig displays a whole character (ch). It calculates the row address where the character begins and then the 8 0 do loop loops once for each of the 8 pixel rows.
We duplicate and fetch (@) the cur-rent pixel row of the character; ap-pend the coordinates and use bi-gRow to display it. Then we incre-ment yp for the next row (1 yp +!) coordinate and increment the char-acter row address..
Then we loop round for the next row.
After the character is displayed we update the x and y coordinates. The xp value is incremented by 8 ( xp @ 8 +) and if the next character will fit on the screen ( dup 42 <) we reset yp back to the same initial row coor-dinate as before ( -8 yp +!) . Oth-erwise, we reset to 0 ( drop 0) and finally store it in xp and then drop the row address.
big" : big" ( str -- ) dup "len 0 do
dup c@ cBig 1+
loop drop;
str big" displays a whole string of characters at str. It obtains the length of the string ( dup "len) so that the 0 do will loop once for each character in the string.
In the loop we fetch the current character from the string ( dup c@); display it using cBig and then in-crement the string address to point to the next character. (1+).
Finally we loop round and then drop the string address.
Command(s) Code Explanation
banner : banner begin tib @ dup query
cls 0 xp ! 0 yp ! 1+ dup big"
"len 0= until;
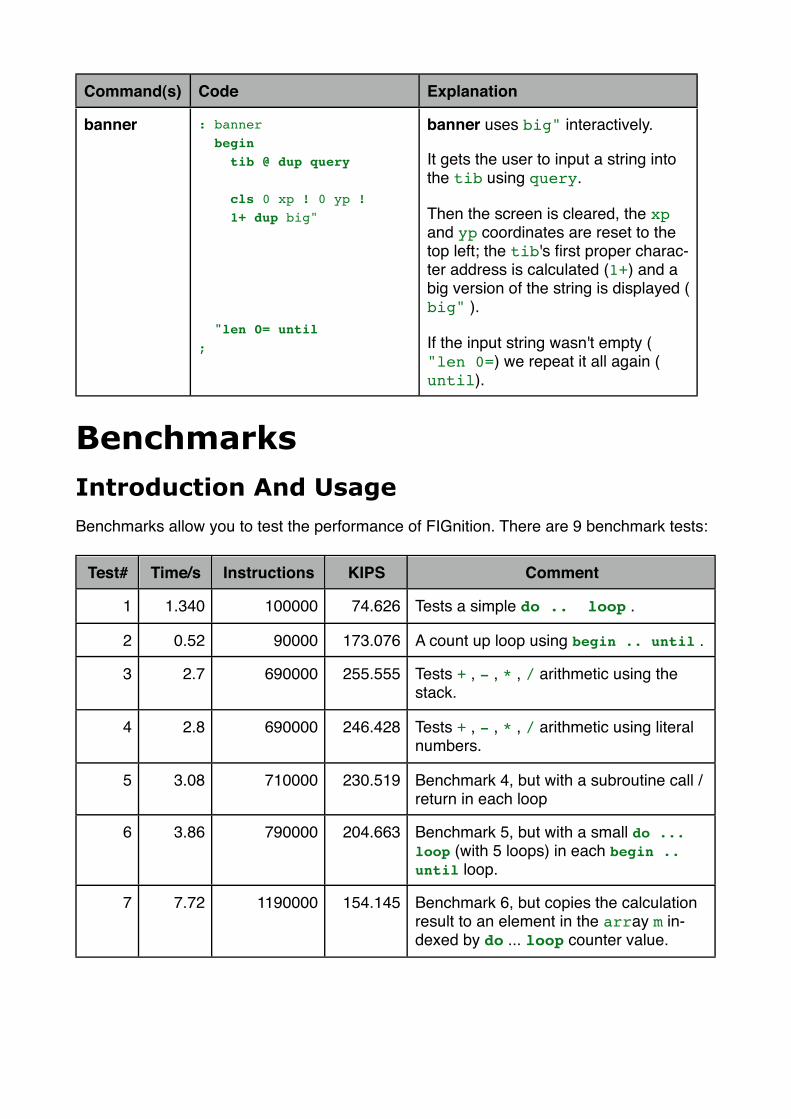
banner uses big" interactively.
It gets the user to input a string into the tib using query.
Then the screen is cleared, the xp and yp coordinates are reset to the top left; the tib's first proper charac-ter address is calculated (1+) and a big version of the string is displayed ( big" ).
If the input string wasn't empty ( "len 0=) we repeat it all again ( until).
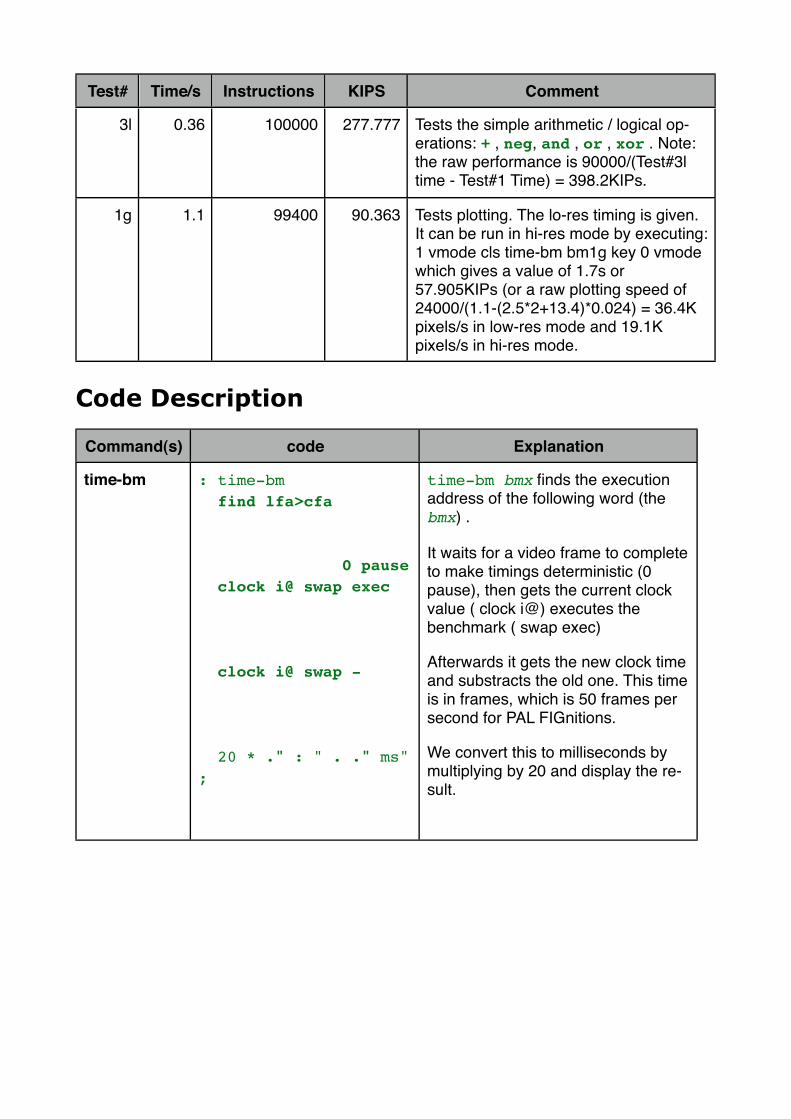
BenchmarksIntroduction And UsageBenchmarks allow you to test the performance of FIGnition. There are 9 benchmark tests:
Test# Time/s Instructions KIPS Comment
1 1.340 100000 74.626 Tests a simple do .. loop .
2 0.52 90000 173.076 A count up loop using begin .. until .
3 2.7 690000 255.555 Tests + , - , * , / arithmetic using the stack.
5 3.08 710000 230.519 Benchmark 4, but with a subroutine call / return in each loop
6 3.86 790000 204.663 Benchmark 5, but with a small do ... loop (with 5 loops) in each begin .. until loop.
7 7.72 1190000 154.145 Benchmark 6, but copies the calculation result to an element in the array m in-dexed by do ... loop counter value.
Test# Time/s Instructions KIPS Comment
3l 0.36 100000 277.777 Tests the simple arithmetic / logical op-erations: + , neg, and , or , xor . Note: the raw performance is 90000/(Test#3l time - Test#1 Time) = 398.2KIPs.
1g 1.1 99400 90.363 Tests plotting. The lo-res timing is given. It can be run in hi-res mode by executing: 1 vmode cls time-bm bm1g key 0 vmode which gives a value of 1.7s or 57.905KIPs (or a raw plotting speed of 24000/(1.1-(2.5*2+13.4)*0.024) = 36.4K pixels/s in low-res mode and 19.1K pixels/s in hi-res mode.
Code Description
Command(s) code Explanation
time-bm : time-bm find lfa>cfa
0 pause clock i@ swap exec
clock i@ swap -
20 * ." : " . ." ms";
time-bm bmx finds the execution address of the following word (the bmx) .
It waits for a video frame to complete to make timings deterministic (0 pause), then gets the current clock value ( clock i@) executes the benchmark ( swap exec)
Afterwards it gets the new clock time and substracts the old one. This time is in frames, which is 50 frames per second for PAL FIGnitions.
We convert this to milliseconds by multiplying by 20 and display the re-sult.
Chessica
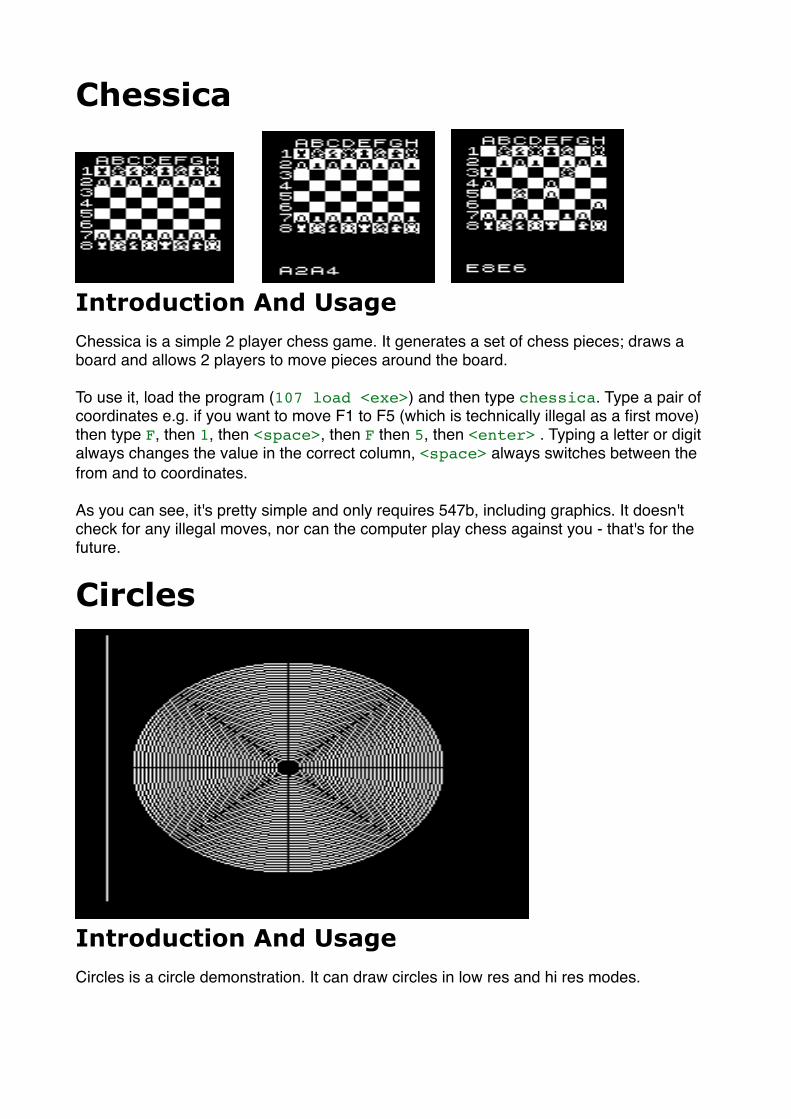
! !Introduction And UsageChessica is a simple 2 player chess game. It generates a set of chess pieces; draws a board and allows 2 players to move pieces around the board.
To use it, load the program (107 load <exe>) and then type chessica. Type a pair of coordinates e.g. if you want to move F1 to F5 (which is technically illegal as a first move) then type F, then 1, then <space>, then F then 5, then <enter> . Typing a letter or digit always changes the value in the correct column, <space> always switches between the from and to coordinates.
As you can see, it's pretty simple and only requires 547b, including graphics. It doesn't check for any illegal moves, nor can the computer play chess against you - that's for the future.
Circles
Introduction And UsageCircles is a circle demonstration. It can draw circles in low res and hi res modes.
To run the demo it, load the program (109 load <exe>) and then type hiCirc. It will display and erase sets of concentric circles until you press <enter> .
circle uses a standard Bresenham circle-drawing algorithm. You can use circle by first set-ting the pen mode (e.g. by typing 1 pen to plot white pixels); then executing e.g. : 24 24 24 circ <exe> . You can experiment with this easily in low res mode by just typing them as commands. In hi-res mode you can't see what you're typing so it's easier to put it all in a command and run it. For example:
: hiTest 1 vmode 40 50 20 circ key drop 0 vmode ;
LinesIntroduction And UsageLine is command for drawing straight lines. It can draw circles in low res and hi res modes. To load the program lines load the first block ( 110 load <exe>). You can then draw lines by setting the pen (e.g. by typing 1 pen to plot white pixels); then executing, for ex-ample:
20 20 17 19 line
This starts a line at 20, 20 then draws a line 17 pixels right and 19 pixels down. To draw lines to specific points you can use lineTo, so:
20 20 49 36 lineTo
Will draw a line from (20,20) to (49,36). line and lineTo work in hiRes mode. As for the circles example, it's much easier to test hires code by putting it in a command, for exam-ple:
: hiLine 1 vmode 5 5 90 120 line key drop 0 vmode ; <exe>
and then you can test it by typing hiLine <exe> .
A line drawing demo program is supplied on blocks 111 and 112. To load the line drawing feature (and the demo) type 112 load <exe> and then type cface <exe> to run it. It shows a minute and second hand and does 50 pause between redrawing each second hand, but you'll find it's a little slow, because the line drawing takes up a bit of time - how do you think you might fix it?
These numbers are sin and cosine values for sin(30º)=0.5, cos(30º)≈0.866 (the angle between each number on a clock face) and sin(6º)≈0.1045, cos(6º)≈0.9945 (the angle moved by the second hand each second). Because FIGnition can only currently work with whole numbers we scale them by 32768.
l* : l* m* 1 << swap 2 u* swap drop +;
l* multiplies these sin and cos 'frac-tions' by a whole number to give a whole number result. We need to do a bit of shifting to correct errors.
rotC : rotC ( x y s c) >r >r ( x y : s c) 2dup r l* swap r> l* r> swap >r swap >r >r r l* swap r> l* r> - swap r> +; ( -- x' y')
You can rotate a coordinate by an angle by performing the following calculation:
new_x = x*sin(angle)-y*cos(angle).
new_y = y*sin(angle)+x*cos(angle).
That's all this code does.
hand : hand xp8xy >r >r 80 80 r> r> line;
hand draws a hand of the clock. It scales down the coordinates by 256 then draws a line given those coor-dinates as a direction starting at 80, 80.
cface : cface 1 vmode cls nums 3 pen 0 -12288 60 0 do hand 0 -16384 60 0 do hand 50 pause hand sin6 cos6 rotC loop drop drop hand sin6 cos6 rotC loop drop drop key drop 0 vmode;
cface draws the animated clock. It goes into hires mode and clears the screen; uses an xor pen. There's an outer loop for minutes: 60 0 do which starts by placing the minute hand at the top ( 0, -12288) and then an in-ner loop for seconds which starts by placing the second at the top (0, -16384). These values are the true coordinates scaled up by 256.
To erase and draw a hand we first draw it, then wait 1s then draw over it. Finally we rotate a hand by 6º.
LunaIntroduction And UsageLuna is a simple interactive version of Lunar Lander. It's a bitmapped version of the game using the blitter for moving sprites. Type 119 load <exe> to load the game. Type luna <exe> to load the game.
"Your Lunar lander is heading for the moon as it drifts along; guide it down gently to the landing pad by pressing (SW7) to provide thrust if necessary. Your Lunar lander will crash if you hit the regolith or hit the landing pad at a velocity over 200! Be careful not to send the craft out of orbit!!!!!!!!!!"
Life
Introduction And Usage'Life' is a simple artificial life simulation. A number of living cells are placed on a grid and ecah cell obeys a few simple rules, yet the result generates complex patterns. On each generation, each grid location is examined along with its neighbours. If less than 2 neigh-bours are alive the current cell is said to die from starvation if it was alive. Or if more than 3 neighbours are alive, the current cell will die from over population. If there are 2 or 3 living neighbours it will survive if it's alive and if there are exactly 3 and the cell is empty, a new cell will be born.
Life was originally written by J H Conway in 1972, but versions exist for pretty much every computer ever designed. Type 130 load <exe> to load the game and (for example)
49152 life <exe>
to start life. A new generation appears roughly every 1.9s and you can quit by pressing <enter>. This version of life is as fast as it is, because the routine to calculate neighbour-ing cells is tailored for different parts of the screen, which makes the program longer. The cells are generated using 16 UDGs. Each UDG is divided into 2x2 grid locations (so there are 4 grid locations in each UDG) and each grid location can be empty or contain a living cell. This means 2x2x2x2 = 16 UDGs are required.
BeepIntroduction And UsageBeep adds some audio commands ( beep and pitch> ); a command for playing simple, tunes ( play) ; an interactive flute and "Happy Birthday" tune demonstration (birth-day). To use audio you need to connect a lead from the audio phono output to the Televi-sion and adjust the volume.
To load the demonstration, type 133 load <exe> . Type: flute <exe> to play the flute.
How To Play the FluteThe flute is pitched so that middle C is on the letter 'a' and that notes go up one semitone per letter as follows:
Every tune is made up from sequence of pairs of bytes, where the first byte in a pair is the pitch in semitones above middle C and the second byte in a pair is the duration of the note in frames. The note 96 is silent (because its pitch is too high to be heard) and the se-quence is terminated by a pitch of 128.
In normal musical notation, each note symbol has a duration half that of the previous note symbol, but you can create durations of 1.5 x as long by adding a dot after the symbol. This means that natural note lengths are multiples of 3*a power of 2. Therefore if we have a tempo of 125 beats per minute, we end up with pauses that can be easily divided into standard note lengths:
breve semi-breve
crotchet quaver semi-quaver
demi-semi-
quaver
duration 96 48 24 12 6 3
dotted du-ration
144 72 36 18 9
For NTSC FIGnitions, the most useful tempo is 112 beats per minute which gives a dura-tion of 32 for a crotchet.
breve semi-breve
crotchet quaver semi-quaver
demi-semi-
quaver
duration 128 64 32 16 8 4
dotted du-ration
192 96 48 24 12 6
Musical notation isn't quite this restrictive, you can add a second dot to produce a note length 1.75 x the original and other note lengths are acheived by tying standard notes to-gether.
You can load beep, pitch> and play without the demonstration block by typing: 131 2 loads <exe> .
How Beep Worksbeep works by making use of a timer circuit inside the FIGnition's processor, the AVR. The timer circuit is fairly simple (at least it is the way beep uses it). There is an internal 8-bit counter, which increments every CPU clock cycle divided by either 1, 8, 64, 256 or 1024 (which is held in a 3-bit internal variable called the prescalar). There's also a match_value which is just another internal 8-bit variable, called an output compare register. Finally, we can configure the timer so that whenever its value reaches the match_value, it will switch the voltage on port D6 (pin 12) from 5v to 0v or back to 5v and reset the timer.
If you put this together it means port D can be made to oscillate at:
200000002*match_value*prescalar
And it turns out we can pick match_values and prescalars which give sensible audio fre-quencies. This is all that beep does; first you provide the prescalar and match_value. beep turns off the timer, then configures the timer as described above, then we set the match_value and prescalar value and setting the prescalar value starts the timer, which generates a note.
To use beep you must first type aud <exe>, to the turn the audio on (it makes port D6 an output). Then to make a beep, you type prescalar freq beep <exe> . However only prescalar values in the range 3 to 5 are useful. For example if you type aud <exe> then:
4 100 beep <exe>
A note (near G on a piano) will start. Type 0 0 beep <exe> to end it.
beep (and pitch>) can be used by themselves, by typing 131 load <exe> .
How pitch> works.To make tuneful music you need a fine control of the pitch. It's possible to set a wide range of pitches using just different match_values, but as the match_values get lower, the jumps in pitch get increasingly large. For example, if the match_value was 2 and you change it to 1, then the pitch will double, a jump of one octave! But if the match_value was 255 and you change it to 254 then the pitch will jump by a small fraction of a semitone.
For tuneful music we therefore need to use large match_values. It turns out we can create a useful range of about 2 octaves from match_values of about 64 to 255, and because the prescalar shifts by 2 octaves at a time, we can obtain a continual musical range of about 8 octaves. The frequency calculations are given in the AVR datasheet as:
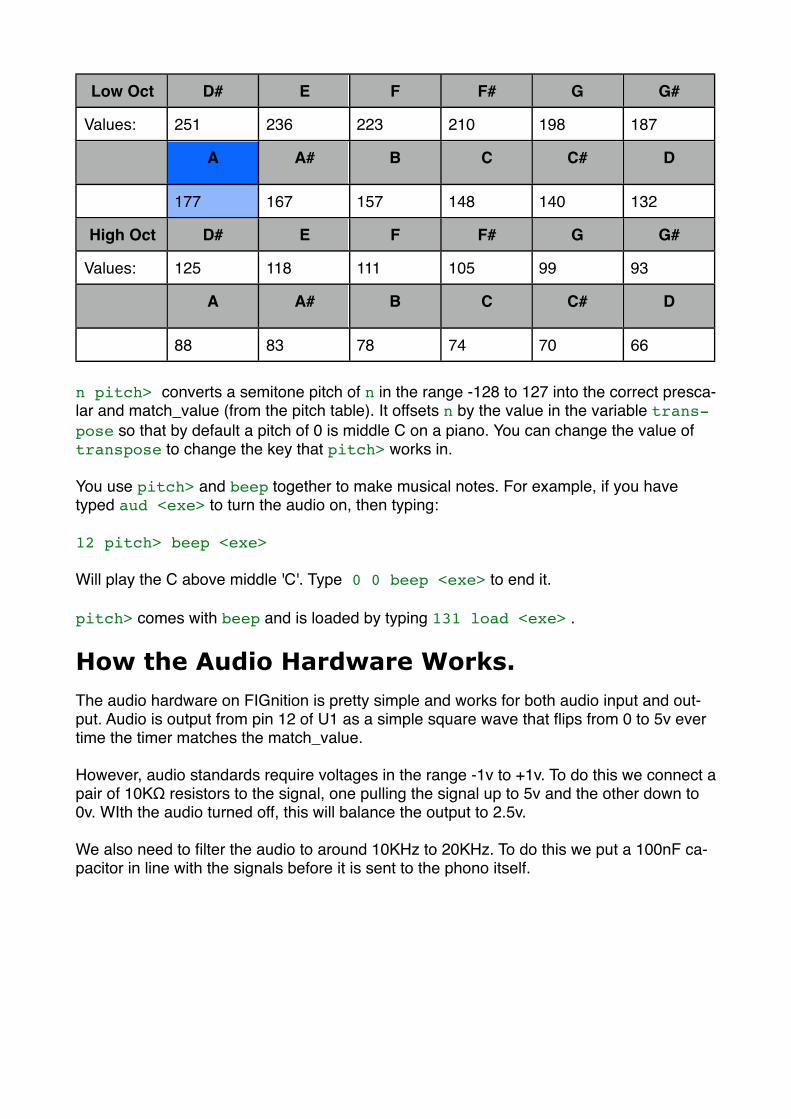
The standard concert pitch is A440, which is at 440Hz, so we need to find N and OCRnx to match that: N.(1+OCR0A) = fclk/fOC0A , which is 20x106/440 = 45,454, which means that N (the prescalar value) must be about 256 so that OCRnx is <256. If N is 256, then OCR0A will be 88. Higher pitches are lower values, by successively dividing by 2(1/12). Similarly, lower pitches are higher values, by successively multiplying by 2(1/12). This gives the following pitch table:
Low Oct D# E F F# G G#
Values: 251 236 223 210 198 187
A A# B C C# D
177 167 157 148 140 132
High Oct D# E F F# G G#
Values: 125 118 111 105 99 93
A A# B C C# D
88 83 78 74 70 66
n pitch> converts a semitone pitch of n in the range -128 to 127 into the correct presca-lar and match_value (from the pitch table). It offsets n by the value in the variable trans-pose so that by default a pitch of 0 is middle C on a piano. You can change the value of transpose to change the key that pitch> works in.
You use pitch> and beep together to make musical notes. For example, if you have typed aud <exe> to turn the audio on, then typing:
12 pitch> beep <exe>
Will play the C above middle 'C'. Type 0 0 beep <exe> to end it.
pitch> comes with beep and is loaded by typing 131 load <exe> .
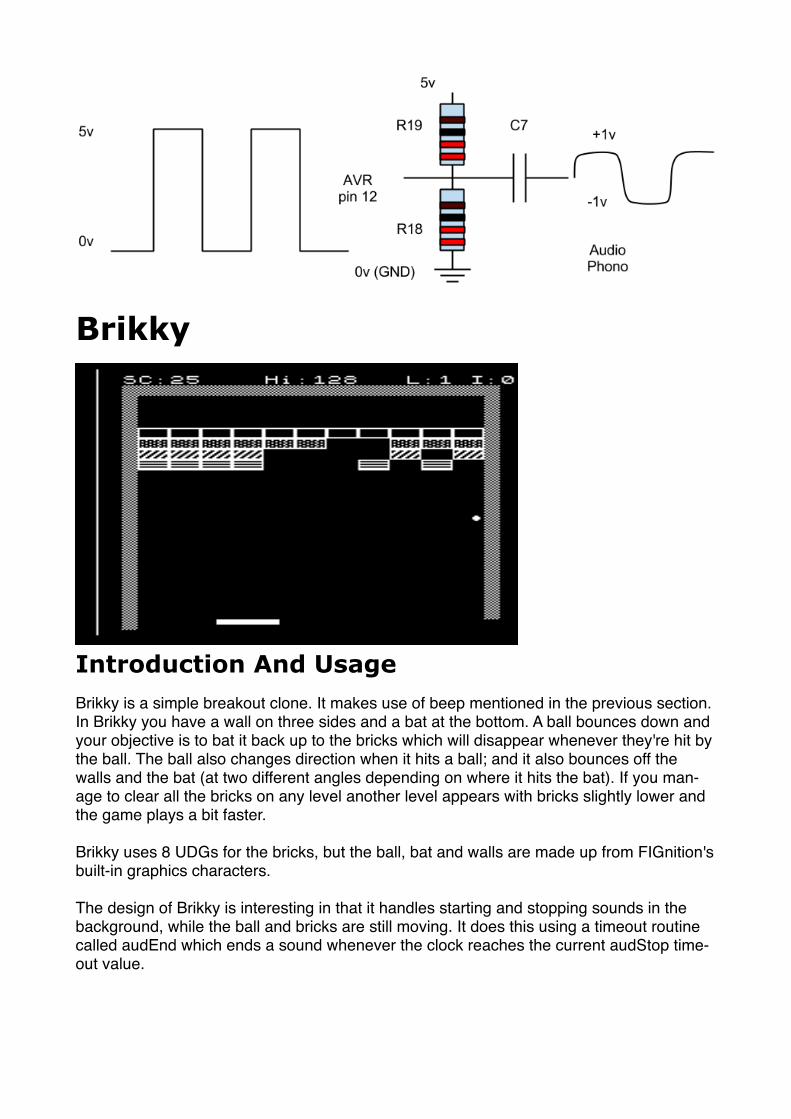
How the Audio Hardware Works.The audio hardware on FIGnition is pretty simple and works for both audio input and out-put. Audio is output from pin 12 of U1 as a simple square wave that flips from 0 to 5v ever time the timer matches the match_value.
However, audio standards require voltages in the range -1v to +1v. To do this we connect a pair of 10KΩ resistors to the signal, one pulling the signal up to 5v and the other down to 0v. WIth the audio turned off, this will balance the output to 2.5v.
We also need to filter the audio to around 10KHz to 20KHz. To do this we put a 100nF ca-pacitor in line with the signals before it is sent to the phono itself.
Brikky
Introduction And UsageBrikky is a simple breakout clone. It makes use of beep mentioned in the previous section. In Brikky you have a wall on three sides and a bat at the bottom. A ball bounces down and your objective is to bat it back up to the bricks which will disappear whenever they're hit by the ball. The ball also changes direction when it hits a ball; and it also bounces off the walls and the bat (at two different angles depending on where it hits the bat). If you man-age to clear all the bricks on any level another level appears with bricks slightly lower and the game plays a bit faster.
Brikky uses 8 UDGs for the bricks, but the ball, bat and walls are made up from FIGnition's built-in graphics characters.
The design of Brikky is interesting in that it handles starting and stopping sounds in the background, while the ball and bricks are still moving. It does this using a timeout routine called audEnd which ends a sound whenever the clock reaches the current audStop time-out value.
Enough of the description, let's play the game. Type 140 load <exe> . The game first loads beep from block 131 and then proceeds to load the game itself. Brikky is just 7 pages of code just 1283b of RAM when loaded, slightly over 1Kb! You'll need to use SW1 (cursor left) to move the bat left and SW3 (cursor right) to move the bat right. To run the game type:
5 brikky <exe>
The 5 represents the speed, lower values are faster. A speed of 2 or less is pretty unplay-able, and a speed of 10 or more is fairly boring!
TJoy
Introduction And UsageTJoy is a joystick demo program. When FIGnition reads keypresses it scans the FIGgypad contacts 100 times per second. You can read the raw contact values by defining this con-stant:
sysvars 11 + const joy <exe>
And then executing joy ic@ . <exe> will display what keys are being pressed. joy is much better for real games, because it keeps reading whatever is pressed as long as you hold it and it can read multiple keys at the same time. Type 141 load <exe> then tJoy <exe> (note the capital 'J').
The current keypresses are shown in the top, left hand corner and the block moves around when you press up, down, left or right - it will even move diagonally if you hold down two keys at the same time! The objective is to move the block over the '+' near the middle of the screen. It's like a tiny version of snake, but with only one meal ;-) Not bad for a 169 byte program though!
tJoy also uses x y at> to obtain the screen address for the given coordinates, it's a handy command for being able to determine what's on the screen at that location.
SlidesIntroduction And UsageSlides is a simple slideshow demo program. It displays a series of slides on the FIGnition screen. The program itself is only 1 block long. You can download it as: 142 load <exe> and start the default slideshow with:
200 143 3 slides
Which shows 3 slides at blocks 143, 150 and 157 for 4 seconds each, which look like this:
A full image takes about 0.5s to load, and as it does, a scrambled text version appears on the screen before the proper bitmapped version appears. Press <enter> to quit.
Producing and loading FIGgy ImagesFIGnition Images can be converted by the little Java utility FIGgyImg on this website. Choose File:Open to open a suitable image (Jpeg or PNG) and then you can convert it to a version suitable for FIGnition. FIGgyImg converts the image into a 1 bit-per-pixel image and grey tones are simulated using a technique called dithering. When it's done that, it stores the image as a set of 7 .hex files. You will need to copy them to the FIGnition.
To do this you'll need avrdude:
1. Set up a command line window on your desktop/laptop computer.2. cd to the directory where your image's .hex files are.3. In the command line window type, but don't press enter yet: avrdude -c usbasp -p
m328p -u -U eeprom:w:YourImageHexFile00.hex .4. On the FIGnition side, unplug the FIGniton's USB power connector.5. Hold down SW1 and plug in the FIGnition's USB power connector, the LED should start
flickering - you will need to keep SW1 held down until after step 6.6. On your main computer, press Enter - avrdude should connect to the FIGnition and the
EEPROM should download. This will take about 2s or so.7. Now you can let go of SW1, FIGnition should reboot.
8. type -1 destinationBlockNumber cp to copy the eeprom to the flash block you want to start storing the image.
9. Repeat steps 4 to 8 for each hex file YourImageHexFile01.hex to YourImageHexFile06.hex and remember to add one to the destinationBlockNum-ber each time.
How does The SlideShow Work?FIGnition's hi-res mode can represent any bitmapped image up to 160x160 pixels, and the bitmapped image is stored at SRAM addresses from -3200 to -1. For example, if you turn on FIGnition and type:
1 vmode cls 85 -1520 c! key drop 0 vmode <exe>
You'll see 4 dots near the middle of the screen - that's because the binary pattern for the number 85 is 01010101 and -1520 is the location half-way down the screen and half-way across.
By copying raw bitmapped data to the screen memory an image will appear. It's possible to copy Flash blocks to SRAM using blockNumber blk> drop so all we need to do is read the blocks in, copying each one to the correct part of screen memory in turn. This is what slide does.
There is one complication though, blk> always copies a block first to internal text mode video memory and then out to the address -512, which is also used for the high-res mode. Therefore slide must copy the last two blocks in a different way to avoid them being overwritten.
blk> and >blk are versatile commands you can use for copying data you've generated to flash and back again. It's also used by the data logging program!
MiniRace
Introduction And UsageMiniRace is a really simple racing game - it illustrates how simple games with UDGs can be written. To load it, type 165 load <exe> . To run it type 5 race <exe> . A road will start appearing from the bottom of the screen and you have to press the left or right keys (SW1 and SW3) to move the car to avoid the sides.
When you typed 5 race <exe>, the '5' was the speed as in the game brikky, lower numbers make the game faster - 0 is completely unplayable!
How MiniRace WorksForth programming is usually done 'bottom-up' which means that we start with the most rudimentary parts of the program and gradually build it up until we can put the whole pro-gram together. Many simple games have the following basic layout:
5 var seed : rnd ( range -- ran-dom ) seed @ 1+ 75 * dup seed ! u* swap drop ;
A simple random number generator with period 32768. seed is incre-mented then multiplied by 75 to pro-duced the next seed value. Repeat-ing this operation has the effect of 'scrambling' the seed from a human view; though in fact it's completely predictable.
udg create udg $BAFE , $BA38 , $28AA , $FE82 ,
These hexadecimal numbers define the bit pattern for the car.
udg vram 608 + 8 cmove This line copies the udg data to UDG 1. So, 1 emit <exe> will display it.
nupath 3 rnd 1- +
0 max 20 min
Creates a random displacement from -1 to 1 adds it to the previous posi-tion of the road and finally keeps it in the range 0 to 20.
Command(s) code Explanation
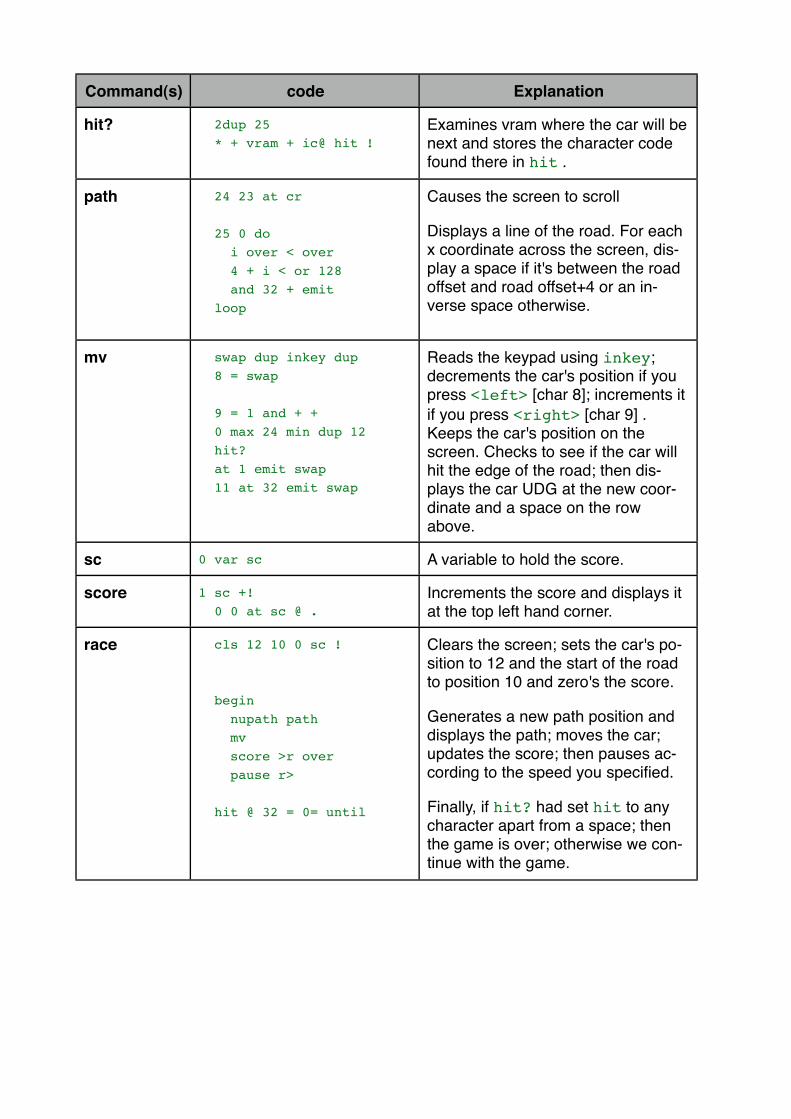
hit? 2dup 25 * + vram + ic@ hit !
Examines vram where the car will be next and stores the character code found there in hit .
path 24 23 at cr
25 0 do i over < over 4 + i < or 128 and 32 + emit loop
Causes the screen to scroll
Displays a line of the road. For each x coordinate across the screen, dis-play a space if it's between the road offset and road offset+4 or an in-verse space otherwise.
mv swap dup inkey dup 8 = swap
9 = 1 and + + 0 max 24 min dup 12 hit? at 1 emit swap 11 at 32 emit swap
Reads the keypad using inkey; decrements the car's position if you press <left> [char 8]; increments it if you press <right> [char 9] . Keeps the car's position on the screen. Checks to see if the car will hit the edge of the road; then dis-plays the car UDG at the new coor-dinate and a space on the row above.
sc 0 var sc A variable to hold the score.
score 1 sc +! 0 0 at sc @ .
Increments the score and displays it at the top left hand corner.
race cls 12 10 0 sc !
begin nupath path mv score >r over pause r>
hit @ 32 = 0= until
Clears the screen; sets the car's po-sition to 12 and the start of the road to position 10 and zero's the score.
Generates a new path position and displays the path; moves the car; updates the score; then pauses ac-cording to the speed you specified.
Finally, if hit? had set hit to any character apart from a space; then the game is over; otherwise we con-tinue with the game.
Joggle
Introduction And UsageJoggle, is a random word game similar to another game you may have heard of!
Load the program by typing 167 load <exe> and type joggle <exe> . A 4x4 grid of letters is shown. You have two minutes to come up with as many words as possible: start at any location and step up/down/left/right or on any diagonal to get to the next letter. You can't go over the same letter twice and only words >= 3 letters count. The person with the most words wins!
I wrote this version because (a) me and my wife have been playing the similar game you may have heard of, but the sand timer's broken :-( . Rather than just fixing it I thought I'd write a computer program. To no avail - she still beats me!!! Now you too can share my misery with your friends :-)
Joggle, the random letter game that requires a millionth of the computing power a face-book version would ;-)
How Joggle Works
Command(s) code Explanation
dice create dice" A B B O J O "...
Creates a set of 16 x 12 character strings; one for each Joggle dice. Joggle uses the built-in command " to enter strings. The start of any string is calculated as: 12 * dice + .
seed & rnd This is described in miniRace.
Command(s) code Explanation
aud 64 191 42 >port> drop Activates the output at port D6, to turn Audio on.
Given an input prescalar and fre-quency, starts a beep.
init cls dice 16 0 do dup 6 rnd 2 * + c@ 0 begin drop 4 rnd 2 * 4 rnd 2 * at> dup ic@ 32 = until ic! 13 + loop drop
Initializes the joggle grid. For each dice, it chooses a random face and then keeps trying different random joggle locations until it finds one that's free, because it's vram location is a space (code 32). Joggle uses the built-in command x y at> which returns the video address for the screen coordinate (x,y).
countdown 0 120 do 0 9 at i 60 /mod . ." :" . 3 spaces 50 pause -1 +loop 4 200 beep 50 pause 0 69 ic!
Starts a 120 to 0 second countdown loop. In each second it displays the time as minute:second and then waits for 1 second.
Finally it beeps at the end for 1s and then stops the beep.
joggle aud begin init countdown key 32 = until
Turns on the audio then enters the game loop. It initializes a joggle grid then performs the countdown. At the end it reads a key and plays another joggle game unless you press <space>.
+1
+2
+3 -2
Mazes
Introduction And UsageMazes is a little program which can quickly generate mazes.
Load the program by typing 170 load <exe> and type mazes <exe> . A new, random maze appears every 10 seconds. However, you can skip to the next maze by pressing <enter>; make it wait on the current maze by holding down a key; or end the maze gen-erator by pressing <space> .
How It WorksMazes is a brute-force random maze generator. There is a maze array which stores 128's in empty locations and any other value represents a filled location in the maze. At each step it just picks a random direction to go in and if it's empty it calculates the new location and stores the direction in the new location in the maze. If it was filled it tries for the next direction in a clockwise sequence and if it gets back to the first direction it backtracks.
Backtracking is pretty simply too: by storing the direction in each new location we visit, it provides backtracking information, so to backtrack we simply retrieve the direction in the current maze location and move in the opposite direction (by subtracting rather than add-ing its displacement). Eventually we'll fill the entire screen with maze walls.
To set it up, we need to make sure the outer edges of the maze are no-go areas, which we do by filling them with 0s (not empty).
The clever part about FIGnition's algorithm is that we don't need special checks for when we backtrack to the start, instead we simply define the direction at our starting position (which is (1,1) ) as 1 (=right) and then set maze[0] to empty. Then when we backtrack from (1,1) we move left to (0,1) and do a search. The algorithm finds that to the right it's filled, as is the bottom, as is the left (which corresponds to the top, right corner of the maze). But then it finds that (0,0) is empty so it moves there and since the terminating
condition happens before the move is displayed, the maze generation stops.
Mini Oxo
# #Introduction And UsageMini Oxo is a minimal version of noughts and crosses (or Tic-tac-toe). The computer al-ways plays first and cannot be beaten (though you can draw).
Load the program by typing 173 load <exe> and type oxo <exe> . A crude oxo grid appears with the centre position already taken by the computer's first move and the other positions marked with digits from 1 to 8.
Pick a digit from 1 to 8 and an O will be placed in the corresponding box. The computer will then make another move and you both keep playing until you either draw, or it wins.
StrategyIn miniOxo, the strategy is controlled through a table of values called compMoves and the command compPlay . Normally we would order an Oxo grid like a phone keypad (left im-age). But here, the grid is ordered clockwise from the top left as on the right:
1 2 3 1 2 3
4 5 6 8 X 4
7 8 9 7 6 5
The computer's strategy is to first play one square on from your first move. This will force you to play opposite the computer to stop it from winning. If you do that and keep blocking it, it then plays two squares on from its last move; then 3 squares on from its third move and 6 squares on (=2 squares back) from its fourth move.
O X 3 O X 3 O X 3 O X O
8 X 4 8 X X O X X O X X
7 6 5 7 O 5 X O 5 X O X
So if you start on a corner and keep blocking the computer; it'll result in a draw. If you fail to block it at any point then the computer plays the opposite side of the grid on its next move and wins. If you play to a side square and then block the computer, it will create two possible winning lines after its third move, and if you block the opposite corner it then plays to one square back from its previous move and wins.
The computer can therefore reduce the complexity of an Oxo game to a table of 8 num-bers and 3 simple rules by going first with an 'X' in the centre.
Full Screen Oxo
Introduction And UsageIt's amazing to see how an Oxo game can be played with such few rules, but playing the game when only the computer can win quickly becomes tiring.
Full Screen Oxo is a more sophisticated version of noughts and crosses (or Tic-tac-toe). In this version, you can choose whether to play first or let the computer play first and the computer can sometimes be beaten. It takes more effort to write a game of Oxo that can be beaten!
Load the program by typing 189 load <exe> and type oxo <exe> . The computer asks for a skill level, a digit 1 to 9 and then 'y' if you want to play first or 'n' if you want the computer to play first.
The flashing block is where you will place your piece. You move it to a free location using the cursor keys and then press <enter> when you want to place your piece. The com-puter then places its piece somewhere else on the board.
In this version it's possible for you to win, draw or lose.
GraphicsFull-screen Oxo needs to fill the screen with its Oxo grid. So, each grid cell is 6x6 charac-ters. This means we'd normally need 2*6*6 = 72 UDGs to represent both an 'O' and an 'X'. However, with a bit of careful thought it's possible to design them in as little as 14 UDGs.
A Large 'X' only requires 2 UDGs that divide the character on each diagonal line. They and their inverse characters can be used to build up the whole of the 'X'.
A Large 'O' requires 12 UDGs. Here, it's done by noticing that if we make the thickness of an 'O' about a character, then the inner edge of the 'O' is approximately like the inverse of the outer edge. Therefore we can define 12 UDGs to represent the inner boundary of the 'O' (three for each quadrant) and re-use their inverses on the outer edge.
The 'O' looks slightly odd because of this, but it's still passable.
StrategyThe first challenge for any Oxo game is to be able to test for winning lines (and potential winning lines) on any edge and corner in any direction. There's quite a lot of combinations there so to reduce them full-screen Oxo, like miniOxo, represents the grid clockwise around the centre with the central square added as the last location. When we do this, we find that there are only two cases we need to look at: an edge case (where squares +0, +1 and +2 are tested) and a centre case (where squares +0, +4 and the centre square are tested).
Like miniOxo, compPlay executes the computer's strategy. It works by testing some 'rules of thumb'1 for playing Oxo: cornerPlay, centrePlay and edgePlay one after another. As soon as one rule succeeds, the computer makes that move and doesn't check any fol-lowing rules. If none of them succeed, the computer plays a random move using rndPlay.
This version of Oxo is designed to lose sometimes; it does this by randomly failing a rule of thumb, causing it to fall through to an inferior rule-of-thumb or even make a random move. The variable skill determines how often full-screen Oxo will randomly fail.
Oxo doesn't require a lot of memory to represent the board. There are only 9 squares and each of them can be empty, or contain 'O' or 'X'. Therefore each cell requires only 2 bits of information; an entire grid consuming only 18 bits. By managing the grid as an 18-bit num-ber, we can easily rotate the grid to test for various cases and test all the required posi-tions on the grid simultaneously.
Full-screen Oxo employs rough heuristics as a strategy, there are many better computer playing techniques starting with the minimax2 algorithm.
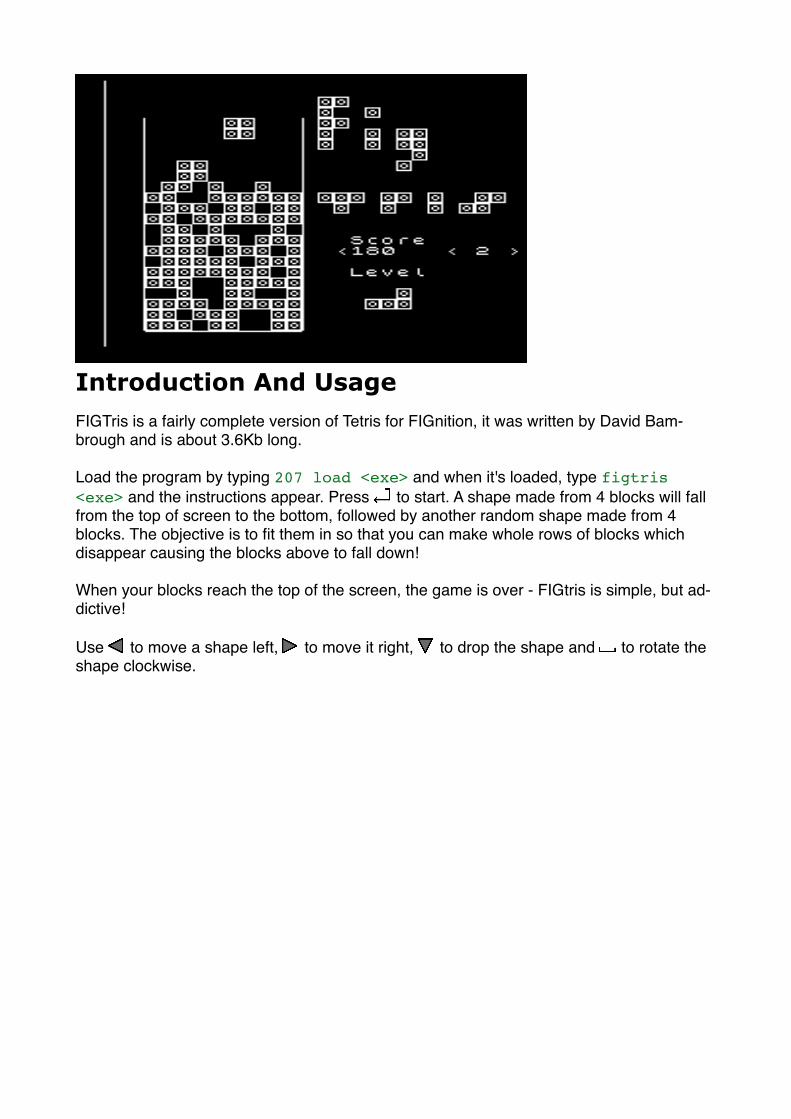
Introduction And UsageFIGTris is a fairly complete version of Tetris for FIGnition, it was written by David Bam-brough and is about 3.6Kb long.
Load the program by typing 207 load <exe> and when it's loaded, type figtris <exe> and the instructions appear. Press to start. A shape made from 4 blocks will fall from the top of screen to the bottom, followed by another random shape made from 4 blocks. The objective is to fit them in so that you can make whole rows of blocks which disappear causing the blocks above to fall down!
When your blocks reach the top of the screen, the game is over - FIGtris is simple, but ad-dictive!
Use to move a shape left, to move it right, to drop the shape and to rotate the shape clockwise.
Snake
Introduction And UsageSnake is a simple version of snake for FIGnition, it was also written by David Bambrough.
Load the program by typing 211 load <exe> and when it's loaded, type snake <exe> . The objective is to guide your snake using the cursor keys: , , or to eat the mushrooms. Each time you eat one, the snake grows longer: be careful not to run into a wall or into yourself!
LocalsIntroduction And UsageLocals is some demonstration code on how to use locals on FIGnition. It's really an ad-vanced topic.
Load the block by typing 212 load <exe> and when it's loaded, type testLocal <exe> . Keep pressing enter and you'll see the numbers: ?? 1234 5678 then 1234 anoth-erNumber and 5678.
ExplanationMost computer languages support locals for passing parameters and maintaining sets of temporary variables. Forth uses a data stack for handling parameters and calculations, but beyond a few items it can get unwieldy. That's a deliberate design choice in FIGnition, to motivate you keep stack operations relatively simple as this should lead to better factorisa-tion ( shorter definitions) and you think more about what your program is really doing.
Sometimes though it really is helpful to handle a set of local variables. For example, the FIGnition ragged line editor uses about 32 bytes of storage, but they're needed only tem-
porarily. Moreover, on a FIGnition, putting them in external RAM means access will be relatively slow. So, the editor uses locals to provide fast access to a set of temporary vari-ables.
FIGnition Forth provides the following commands:
Stack Inputs (: Parameter Stack Inputs)
Command Post-Command inputs
Stack Effect
Action
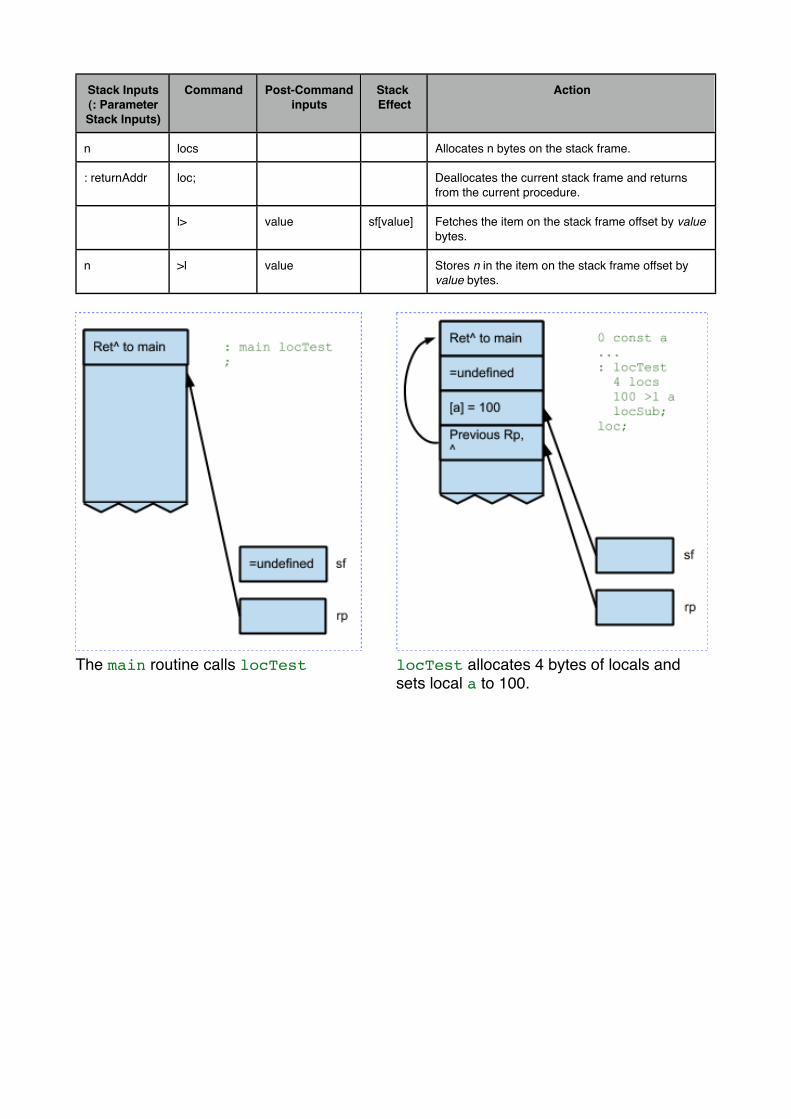
n locs Allocates n bytes on the stack frame.
: returnAddr loc; Deallocates the current stack frame and returns from the current procedure.
l> value sf[value] Fetches the item on the stack frame offset by value bytes.
n >l value Stores n in the item on the stack frame offset by value bytes.
#The main routine calls locTest# locTest allocates 4 bytes of locals and# sets local a to 100.
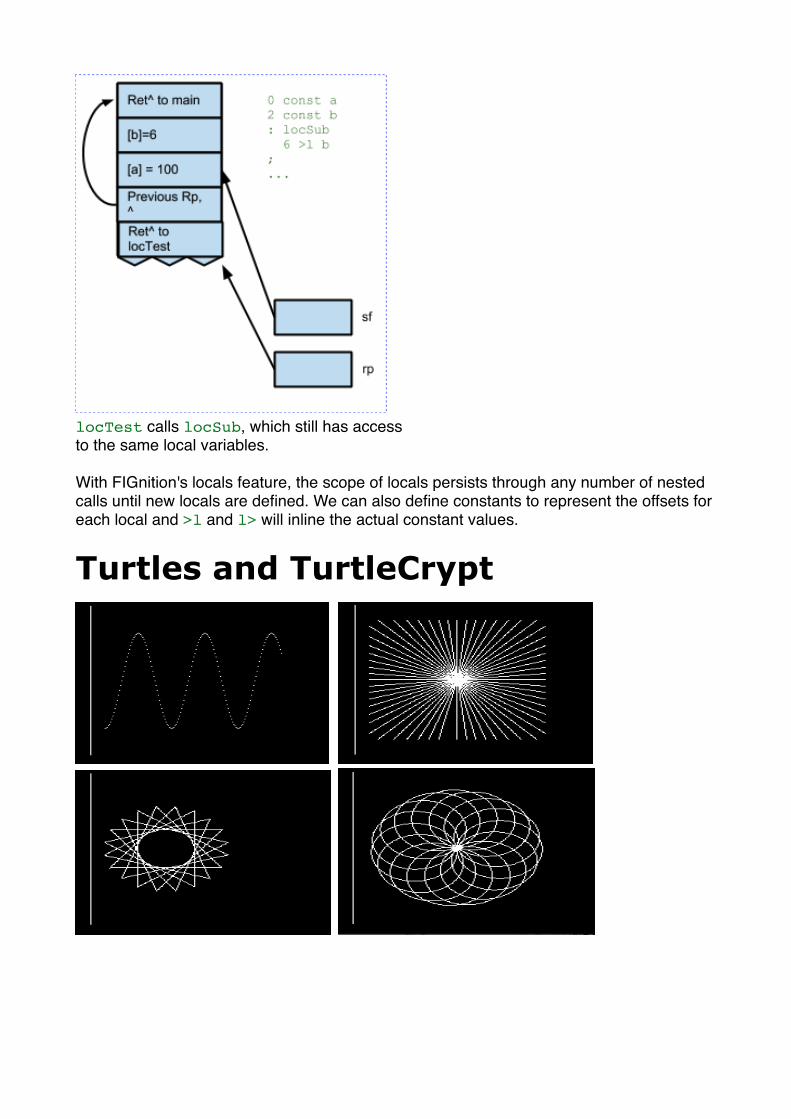
locTest calls locSub, which still has accessto the same local variables.
With FIGnition's locals feature, the scope of locals persists through any number of nested calls until new locals are defined. We can also define constants to represent the offsets for each local and >l and l> will inline the actual constant values.
Turtles and TurtleCrypt
!
!
!
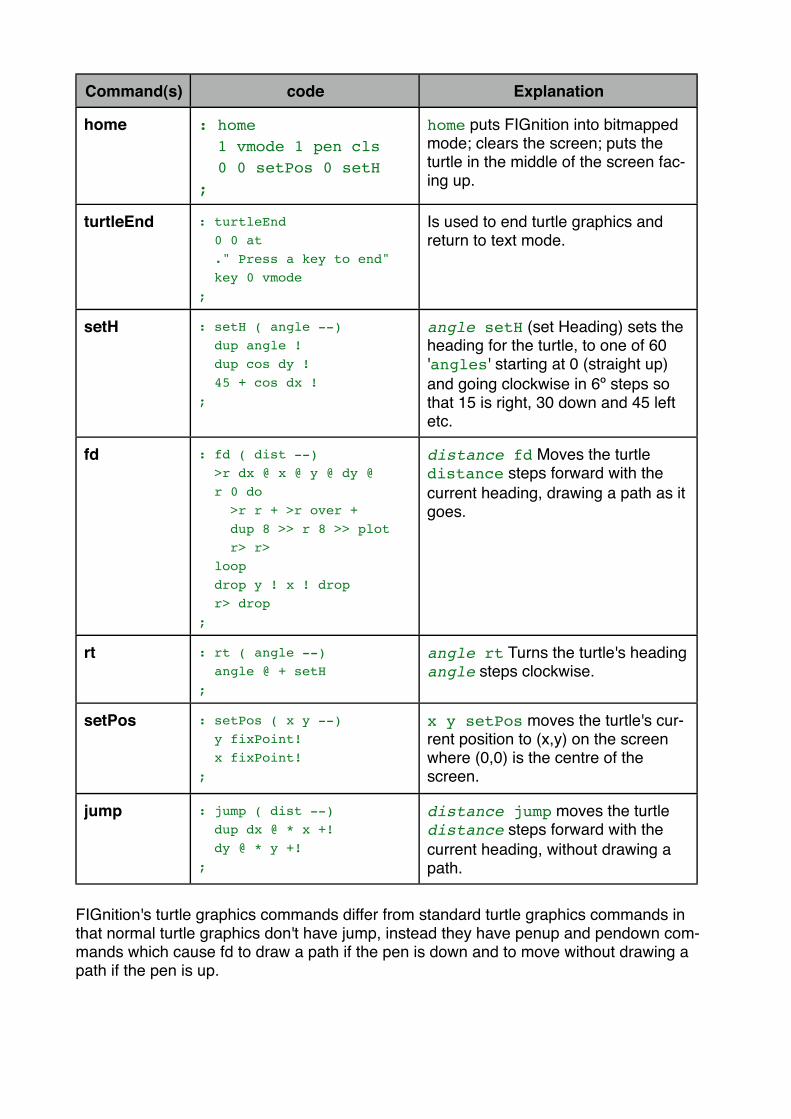
Introduction And UsageTurtles is a two block library which provides some basic turtle graphics commands for hi-res mode as used in the 80s language Logo. It's followed by a turtle graphics demonstra-tion program.
Load the demo by typing 216 load <exe> and when it's loaded, type turtles <exe> . A sequence of graphics demos are displayed with a 10s pause between each one. If you keep pressing <enter> when each image pauses it will eventually take you back to FIGni-tion.
You can load a shorter version of the same demo (without repeats) by typing 218 load <exe> . Then type d <exe>. This is the compact version of the TurtleLib demo originally written by Ashley Fenilo. The only difference with the other one is that there, the turtle commands are made more meaningful
How To Use The Turtle GraphicsTo load Turtle graphics by themselves you would cold start FIGnition and then type 214 load <exe> . Turtle graphics provides a number of simple commands:
home - which puts FIGnition into bitmapped mode; clears the screen; puts the turtle in
Command(s) code Explanation
home : home 1 vmode 1 pen cls 0 0 setPos 0 setH;
home puts FIGnition into bitmapped mode; clears the screen; puts the turtle in the middle of the screen fac-ing up.
turtleEnd : turtleEnd 0 0 at ." Press a key to end" key 0 vmode;
Is used to end turtle graphics and return to text mode.
setH : setH ( angle --) dup angle ! dup cos dy ! 45 + cos dx !;
angle setH (set Heading) sets the heading for the turtle, to one of 60 'angles' starting at 0 (straight up) and going clockwise in 6º steps so that 15 is right, 30 down and 45 left etc.
fd : fd ( dist --) >r dx @ x @ y @ dy @ r 0 do >r r + >r over + dup 8 >> r 8 >> plot r> r> loop drop y ! x ! drop r> drop;
distance fd Moves the turtle distance steps forward with the current heading, drawing a path as it goes.
rt : rt ( angle --) angle @ + setH;
angle rt Turns the turtle's heading angle steps clockwise.
setPos : setPos ( x y --) y fixPoint! x fixPoint!;
x y setPos moves the turtle's cur-rent position to (x,y) on the screen where (0,0) is the centre of the screen.
jump : jump ( dist --) dup dx @ * x +! dy @ * y +!;
distance jump moves the turtle distance steps forward with the current heading, without drawing a path.
FIGnition's turtle graphics commands differ from standard turtle graphics commands in that normal turtle graphics don't have jump, instead they have penup and pendown com-mands which cause fd to draw a path if the pen is down and to move without drawing a path if the pen is up.
Blitz
Introduction And UsageBlitz is a version of the classic VIC-20 game of the same name. It was written (largely) by Carl Attril.
Load the program by typing 224 load <exe> and when it's loaded, type blitz <exe> .
"Your plane is running out of fuel while flying over a derelict city - you must bomb the build-ings using the <space> key before you hit a building - and to avoid runaway explosions, only one bomb can be dropped at a time!"
Zoo
Introduction And UsageZoo is a FIGnition version of the animals program released with the ZX Spectrum on its Horizons tape.
Load the program by typing 228 load <exe> and when it's loaded, type zoo <exe> .
Zoo is really a kind of 20 questions game where the computer builds up a database of animals and then performs a binary search asking questions until it gets to the end of its choices. If it got the animal right, it repeats the game asking for another animal, but if it got it wrong it will ask you for a "question" to distinguish the animal then the name of the ani-mal, after which it adds the question and answer to the database.
Inside The ProgramZoo is an interesting program because it demonstrates how FIGnition can be used to process text and build data structures.
Conceptually, the 20 database is a binary tree containing a series of questions with the names of animals at the leaf nodes:
True responses take the right branch and false responses take the left one, until we arrive at a leaf node.
Building Up A Zoo by Hand
Zoo is designed so that the binary tree can be built up programmatically as well as interac-tively. The initial 'zoo' is built up that way; by starting with an initial animal, then adding questions along with new animals that are distinguished by each new question:
We start the zoo by creating the name of the first animal like this:
create yourAnimal " yourAnimal"
Then we need to create a root node for the zoo, which starts at the current end of the dic-tionary:
here dup animals ! 0 , yourAnimal , 0
Next we need to add a question and a new animal to the zoo; and also decide whether the new animal should be on the false branch (0) or the true branch (1):
0 addZoo eat meat" rabbit"
This adds the question does it... "eat meat"? to the zoo and makes "rabbit" the false answer. Finally we need to decide whether to follow the right branch of the binary tree (rightZoo) or the left branch (leftZoo). Here we choose the right branch:
rightZoo
As we move to a new branch, the computer remembers the list of nodes. So far it has re-membered the root node and the right node from the root node: [rootNode] [CatNode] is remembered (on the data stack as it happens). We can add another node using addZoo. By default it adds does it... "purr"? and puts "dog" on the false branch. However, we could have done:
1 addZoo bark" dog"
Which would have added the question does it... "bark"? and set "dog" to the true branch (putting "cat" on the false branch) for that question.
At this point there's still two nodes on the stack: [rootNode] [CatNode] . We could carry on and add another node, but in the actual program we want to backtrack and then add a left node. So we execute:
drop leftNode
Which drops [CatNode] and then appends a pointer to the [RabbitNode] on the data stack. In this way we can traverse the original tree, adding nodes.
How Does Zoo Represent The Data Structure? (Advanced Topic)
FIGnition doesn't support the kinds of memory allocation features available on modern (or basically any) operating system. This makes it harder to construct dynamic data struc-tures, because all we can easily do is add to the end of the dictionary. The Zoo program can add nodes, but it can't remove them. It's further complicated by the fact we need to store both nodes and strings. The representation of each node is as follows. Initially there's just the "Cat" string and a leaf node:
Each node consists of three pointers. A leaf node begins with '0', is followed by a pointer to the string for that animal and finishes with a dummy '0'. When we add the "eats meat" "rabbit" item we get:
Now we have three nodes: the does it.. "Eat Meat" question node, and two leaf nodes. A question node begins with a pointer to the string for its question and is followed by a pointer to the left node, then a pointer to the right node. Each of these nodes are just leaf nodes. Finally we add the "purr" "dog" item and get this:
This time, the pink node has become the does it... "purr" question node. It begins with a pointer to "purr" is followed by a pointer to the "dog" leaf node and then a pointer to a new "cat" node.
In this way the correct data structure is maintained; without the program having to shift the data around.
Zoo Commands:
Stack Inputs (: Return
Stack Inputs)
Command Post-Command inputs
StackEffect
Action
a b over a b a Duplicates the second item on the stack to the top of the stack.
a drop -- Removes the top item from the stack.
str^ ">here dst ">here allocates space for string str^ and copies it to here, returning the address it was copied to.
animals The root pointer for the zoo.
q'^ a'" f addNode Adds a first leaf node with it's string containing a'"; adds a second leaf node with it's string containing q'^'s string. If f=0, makes q'^s left and right pointers point to the first then second nodes; otherwise, makes them point to the second then first nodes.
yn f Waits for the user to type 'y' or 'n' and returns true if 'y' was pressed.
yesNo f Displays "? (y/n)" and then executes yn.
new" dst Interactively gets a string from the user and allo-cates it to here.
old^ newQ Adds a new Question (in the case where the com-puter didn't get the right animal). Inputs the new name of the animal and the question to distinguish it along with whether the new animal is the true answer. Adds a new item for that animal and ques-tion.
old^ f addZoo Question" Ani-mal"
Programmatically adds a new question. Adds the following (question) string from the command line to here; followed by another (animal) string and finally uses the old^ and f to add a new item.
q^ leftZoo q^ q[2]^ Follows the left branch from the current node.
q^ rightZoo q^ q[4]^ Follows the right branch from the current node.
root guessing Given a root node; traverses the zoo; asking distin-guishing questions and obtaining yes/no responses until a leaf node is found.
zoo Plays zoo. Asks the user to think of an animal; then it tries to guess the animal, displaying "Woohoo I got it right :-) " if it found it or prompting for a new question and animal otherwise.
root tour Displays the graph of questions and animals be-ginning at root.
cat cat" The root animal.
GDem
Introduction And UsageGdemo is a simple UDG demonstration.
Load the program by typing 233 load <exe> and when it's loaded, type 10 gdem <exe> . 10 UDGs appear randomly on the screen; they could be a space invader, a pac-man, a pacman ghost; a pair of musical notes; a rocketship; a mouse cursor; a man or a dog. The UDGs move around randomly, either left, right up or down. At the top of the screen the frames-per-second are shown along with the number of UDGs.
If you press <right> the number of UDGs will increase; and if you press <left> they'll de-crease. As you increase the number of UDGs, the speed of movement will slow down (be-cause it takes longer to move them around); slowing down to about 12 frames per second with about 100 UDGs on the screen.
Inside GDemGDem has the basic framework of a game: some UDGs are defined, the demo is initialized and then it enters a loop where the udgs are moved; the keyboard is read and the status is updated until the demo quits.
GDem is helpful for illustrating how simple UDGs can be moved on the screen. In udgmove The old position of a UDG is read ( i poz @ dup); the new position is calculated; a space is placed over the old position (to erase it) and then the UDG's position is updated with the new location.
Finally GDem shows a number of ways UDGs can be defined. In block 230 the first UDG is defined in binary (the space invader); followed by a UDG in decimal; then one in hex and finally 5 more UDGs are defined as pairs of hex bytes. For beginners, it's easiest to define UDGs in binary, because that way they can be easily visualized, but it's not very efficient, unlike the 5 UDGs defined as pairs of hex bytes.
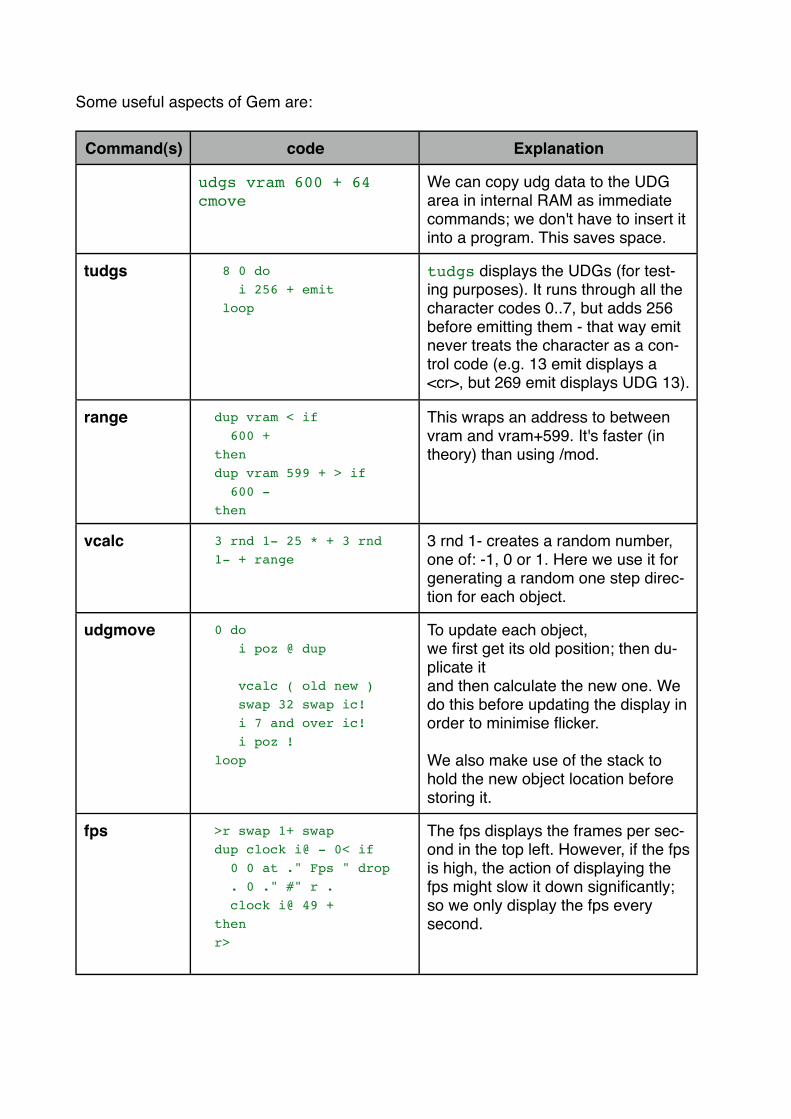
Some useful aspects of Gem are:
Command(s) code Explanation
udgs vram 600 + 64 cmove
We can copy udg data to the UDG area in internal RAM as immediate commands; we don't have to insert it into a program. This saves space.
tudgs 8 0 do i 256 + emit loop
tudgs displays the UDGs (for test-ing purposes). It runs through all the character codes 0..7, but adds 256 before emitting them - that way emit never treats the character as a con-trol code (e.g. 13 emit displays a <cr>, but 269 emit displays UDG 13).
range dup vram < if 600 + then dup vram 599 + > if 600 - then
This wraps an address to between vram and vram+599. It's faster (in theory) than using /mod.
vcalc 3 rnd 1- 25 * + 3 rnd 1- + range
3 rnd 1- creates a random number, one of: -1, 0 or 1. Here we use it for generating a random one step direc-tion for each object.
udgmove 0 do i poz @ dup
vcalc ( old new ) swap 32 swap ic! i 7 and over ic! i poz ! loop
To update each object,we first get its old position; then du-plicate itand then calculate the new one. We do this before updating the display in order to minimise flicker.
We also make use of the stack to hold the new object location before storing it.
fps >r swap 1+ swap dup clock i@ - 0< if 0 0 at ." Fps " drop . 0 ." #" r . clock i@ 49 + then r>
The fps displays the frames per sec-ond in the top left. However, if the fps is high, the action of displaying the fps might slow it down significantly; so we only display the fps every second.
Command(s) code Explanation
doKey >r r 9 = if 1+ maxAnim min then r 8 = if 1- 1 max then r> 32 =
doKey expects a key code on entry. When responding to key codes in a program you often have to test for multiple keys and modify other items on the stack based on whether they match. However, if the key code is the top item on the stack all this time, it gets clumsy. By shifting the key code to the return stack (>r) we can easily keep testing the key code while having easy access to the data on the stack we want to change.
gdem maxAnim initpos 0 clock i@ 49 + rot begin dup udgmove fps inkey doKey until drop drop drop
Puts it all together. It initializes all the positions, then sets the fps timeout to 49 (+1) frames from now and then enters a loop, moving each udg and acting upon any inkey keypress until the user presses <space>. Finally it quits, dropping all the value it's been 'temporarily' using on the stack.
Nyan RaceIntroduction And UsageNyanRace is a simple blitter demonstration.
Load the program by typing 238 load <exe> and when it's loaded, type nyans <exe> . 10 cats appear randomly on the screen and on each frame they move forward by a ran-dom number of pixels eventually getting to the bottom of the screen where they re-appear at the top. At the top of the screen the number of cats are shown along with the frames-per-second are shown.
If you press <right> the number of cats will increase; and if you press <left> they'll de-crease. As you increase the number of cats, the speed of movement will slow down (be-cause it takes longer to move them around); slowing down to about 11 to 12 frames per second with about 50 cats on the screen.
Although the graphics rate appears to be half of that in the GDemo Demonstration, in fact it is about 6x higher because each cat consists of the equivalent of 12 UDGs.
Because Using the Blitter is more complex than most of the other demos; further explana-tion of Nyan race and the blitter can be found in the User guide.
Primes
Introduction And UsagePrimes is a couple of versions of prime number generators - you can use them as a per-formance test or for investigating prime numbers.
Load the 16-bit prime number generator by typing 239 load <exe> and when it's loaded, for example type 1000 primes <exe> , which will display all the primes up to the number given.
Primes is a brute force prime number generator with some optimisations. It can generate primes up to about 32767.
However, with some minor rethinking it's possible to design a 32-bit prime number genera-tor. Type 240 load <exe> and when it's loaded type primed <exe> . You can pause primed at any time by holding down a key and quit by pressing <esc> (shift, <del>). For
example: 133213, 133241 and 133253 were the last 3 primes generated when I held down a key.
The key optimisations are to only test for odd numbers (which doubles the performance) and to only test for prime factors below the square root of the current number. Because there's no square root function (and if we wrote one it'd be slow); we instead square the maximum divisor and test it against the current prime number candidate.
primed is a double-number version of the same thing, except it's able to explore primes all the way up to 2billion. Here we can't use a do loop, because they're only 16-bit loops. So instead we use begin ... until loops. FIGnition's Forth has limited 32-bit number support, but with careful planning we can make efficient use of them to execute the algorithm. Again, we work out limits for testing primes by comparing the square of the current limit with the next number we're testing.
Cal
Introduction And UsageCal is a calendar generator. It was originally written for the Jupiter Ace by Ricardo Lopez and converted to FIGnition by Dave Bambrough.
You load calendar by typing 243 load <exe> and when it's loaded you can generate a calendar month by typing year month <exe> . For example the screenshot at the start was generating by typing:
2013 jun <exe>
And shows the calendar month for July 2013.
Technical DetailsCal works in quite a clever Forthy way, by creating a month defining command called month that does all the work for you. All you have to do then is create a set of months such as:
4 30 month apr6 30 month jun
And month will calculate all the details - you don't even need to include all the months, nor put them in order. Cal correctly calculates leapyears (including whether a century is divis-ble by 4) and then handles the date conversions.
Multiple LanguagesBecause of the way cal works, it's possible for Cal to support multiple languages simulta-neously. In this case, cal in French has been added; try typing:
2012 aout
And you'll be able to see the calendar month for that year (the days are still presented in English though!).
Debugger
!Introduction And UsageDebugger is a debugger for FIGnition Forth, written in Forth itself. It demonstrates the power of Forth and provides a means of stepping through Forth programs in order to de-termine where mistakes have been made.
You load the debugger by typing 253 load <exe> . You then need to load the code you want to debug. Typing in 254 load <exe> will load the example program to debug.
The debugger uses addresses -600 to -1 to store the screen background. If you are using this area of RAM for other purposes, you'll need to move the background screen address. You can do this by typing newSaveArea vback ! <exe> .
To start the debugger type debug memoryArea commandToDebug <exe> . The debug-ger will then start showing the debugging screen which looks like:
IP : The address in the program currently being debugged.CFAs: A Stack of debug addresses with the most current one at the top.Data: The values on the stack.Ret: The return stack.
The debugger has a few useful commands, <left> flips between the running screen and the debugger screen; <right> steps to the next command; <down> steps out of the cur-rent routine being debugged; <up> steps into the current command. 'q' Quits the debug-ger, returning to the command line.
Command(s) code Explanation
traceDepth
traces
traceSp
16 const traceDepthtraceDepth arr traces0 var traceSp
The trace stack manages pending breakpoint instructions. It has a depth of 16, meaning it can debug commands that use other commands for a depth of 16.
condRef is the jump target address.condTrace is the cfa at the jump tar-get address.@condBp should point to condBp, for the jump target address.fallThru is the address for a
bpUI : bpUI ( bp -- bp key ) key dup 8 = if xchVram key drop xchVram then dup 9 = if drop dbOStep 13 then dup 10 = if drop dbIStep 13 then;
User-interface for the debugger. <left> switches the debugger video with the main video. <right> Steps over the next command. <down> Steps into the next com-mand. 'f' Views the next 16 bytes of memory. 'b' Views the previous 16 bytes of memory.
The way the tracestack works is that every time we step over an instruction, the following instruction is patched to point to the breakpoint command. Also, on a jump instruction, the jump target is patched and on breakpoint in instruction we push the target address onto the stack. Then we return from the debugger and continue, which executes the next in-struction and then calls the debugger.
When the debugger is entered (due to hitting a breakpoint); we unpatch the current in-struction (replacing it with the word from the trace stack); and then enter the debugger UI.
Some instructions are handled differently; when the true or false target of a conditional in-struction is breakpointed we need to unpatch both. When a return instruction is encoun-tered we un patch as normal, but stepping over a return instruction doesn't patch the fol-lowing instruction.
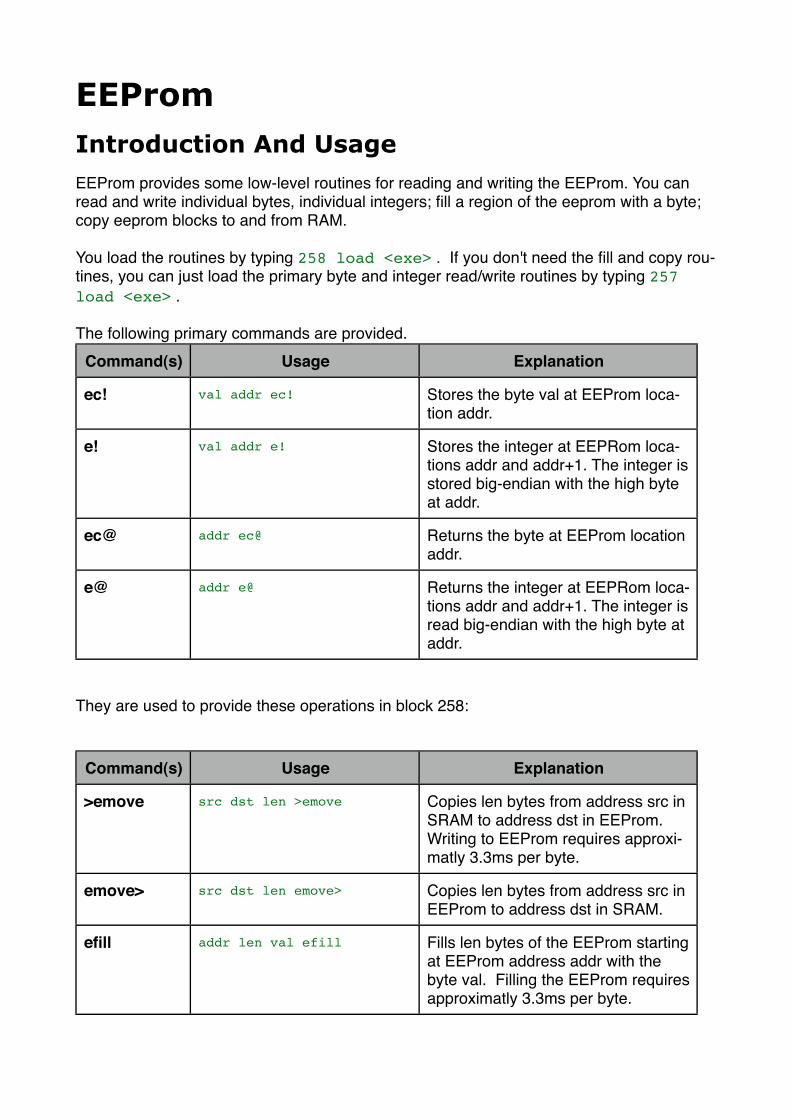
EEPromIntroduction And UsageEEProm provides some low-level routines for reading and writing the EEProm. You can read and write individual bytes, individual integers; fill a region of the eeprom with a byte; copy eeprom blocks to and from RAM.
You load the routines by typing 258 load <exe> . If you don't need the fill and copy rou-tines, you can just load the primary byte and integer read/write routines by typing 257 load <exe> .
The following primary commands are provided.Command(s) Usage Explanation
ec! val addr ec! Stores the byte val at EEProm loca-tion addr.
e! val addr e! Stores the integer at EEPRom loca-tions addr and addr+1. The integer is stored big-endian with the high byte at addr.
ec@ addr ec@ Returns the byte at EEProm location addr.
e@ addr e@ Returns the integer at EEPRom loca-tions addr and addr+1. The integer is read big-endian with the high byte at addr.
They are used to provide these operations in block 258:
Command(s) Usage Explanation
>emove src dst len >emove Copies len bytes from address src in SRAM to address dst in EEProm. Writing to EEProm requires approxi-matly 3.3ms per byte.
emove> src dst len emove> Copies len bytes from address src in EEProm to address dst in SRAM.
efill addr len val efill Fills len bytes of the EEProm starting at EEProm address addr with the byte val. Filling the EEProm requires approximatly 3.3ms per byte.
Technical DetailsThe EEPRom is documented in the AtMega328 user manual and is controlled via 3 regis-ters: the EEProm Address register (eearh and eearl: 2 bytes), the EEProm data register (eedr), and the EEProm Control Register (eecr).
Reading an EEPRom byte is pretty simple: you just write to the EEPRom address register and then set bit 0 of the EEProm Control register (which just means executing 1 -2 eecr >port>).
However, EEProm is one of the few internal AVR peripherals that can't be written to just using Forth, because the write operation requires a sequence that must be executed within 4 AVR clock cycles; namely setting bit 2, then setting bit 1 of eecr. The FIGnition firmware provides that operation via the kernal vector 10 kern ; (which ec! accesses by inserting [ 10 kern , ] into its own code).
Transferring data from FIGnition to a Host Computer.
Using >emove , e! or ec! it's possible to transfer data from FIGnition to a host computer via the EEPROM. For example,
100 blk> drop -512 0 512 >emove
Would copy the banner program to eeprom. Then switching to a host computer (with avr-dude) and typing at a terminal:
1. Unplug the FIGnition.2. Hold down the xxx key and plug in the USB.3. The LED should start flashing as it establishes communication with the host computer.4. While keeping the xxx key held, press Return on the computer.
The whole of the eeprom would then be copied to banner00.hex as a .hex file.
Image LoaderIntroduction And UsageThe Image Loader provides some low-level routines for copying blocks of memory to ex-ternal flash and reading them back. It also supports an autoloader / autosaver so that you can create programs which load quickly.
If you want just the block loading and saving routines, you can load them by typing 261 load <exe> . The following commands are provided:
Command(s) Usage Explanation
bload dst blk len bload Copies len bytes (rounded up to a multiple of 512) from address dst to Flash starting at block blk.
bsave dst blk len bsave Copies len bytes (rounded up to a multiple of 512) from Flash starting at block blk to address dst.
Using The Autosaver / AutoloaderThe autosaver / autoloader allows you to save and load FIGnition programs very quickly as ram images. To use them you must:
1. Make sure the program is saved the normal way on external Flash memory.2. Reset FIGnition.3. Load the autoloader block by typing 259 load <exe> .4. Load the program you want to autosave by typing yourProgBlk load <exe> .5. Load the autosaver block by typing 260 load <exe> .6. Decide where you want to the ram image to be saved, this should be a spare place on
the Flash, and not yourProgBlk. Type autoSaveBlk autoSave firstAutoSaved-Command <exe> and the program image will be autosaved.
To autoload the program, reset the FIGnition and type autoSaveBlk load <exe> : the autoloader will load (taking 1s or so) and then the rest of the program will load very quickly.
Using the autoloader will use about 100b of RAM. The auto saver requires about another 100b of RAM.
You load the routines by typing 259 load <exe> . If you don't need the fill and copy rou-tines, you can just load the primary byte and integer read/write routines by typing 257 load <exe> .
LoggerIntroduction And UsageLogger is a simple interactive analog logging program for FIGnition. It can use ports C4 and C5 for logging (the other ports C pins are used for the keypad). Using C4 will require the FIGnition to be modified with the LED LK1 option. (Development)
You load the logger by typing 290 load <exe> . When the logger has loaded, you can run it by typing: logger <exe> .
LayoutWhen logger runs you'll first see something like:
The screen is divided into a logging region and a control region. The bottom of the screen is the control region and occupies 160x128 pixels (in hi-res mode) or 50x32 pixels (in lo-res mode). At the bottom of the logging region is the sample scale and a 'v' or '^' symbol to let you know which region you're using.
Logger starts off in Monitor mode so that you can see analog readings as they take place, and callibrate them. Ideally you should place a 100nF capacitor between AVCC and ground as well as a 1 to 100KΩ resistor inline with a 14pF capacitor between any channel and Vcc/2. This is covered on sections 24.6.1 and 24.6.2 in the AtMega328 Manual.
Making a LogTo make a log you'd normally take the following steps:
1. Make sure the sensors are wired up correctly, with the correct capacitor between AVCC and the ground and the correct analog connections made.
2. Put the logger into monitor mode so you can see the output (this is the default mode).
3. Set the sampling rate so that you can calibrate the sensor, a sampling rate of 10Hz would be fine for this.
4. Decide how many samples you need to take. If it's only a few hundred then you might want to switch to hi-res mode so that you can see the output in finer detail.
5. Set the zoom so that the full expected range for the sensor is visible.6. Decide whether you need to save the logger output to flash or just keep it in RAM. If
you're using a USB battery pack (e.g. RS part # 775-7508) and you won't need to power off the FIGnition before analysis then RAM will be OK. However, if you save to flash, then you'll be limited to a maximum of 100Hz for sampling and there will be small sampling gaps every 128 samples - every second or so at that rate.
You're finally ready to log your data. Press to start sampling and again when you've finished!
Control RegionAt all times, the current control is highlighted. To change which control you're using, press
or and to change the value of the control, press: or . The controls are as fol-lows:
• Chn: There are 4 channel options: 4 (Ext) , 5 (Ext) , 4+5Ext and 8 (Int). Chan-nel 8 uses an internal adc source and the others use an external adc source.
• Mon: There are 3 logging options: Mon, for realtime calibration and monitoring; Play for playing back recorded logs and Rec for recoding logs.
• Lo: There are two display modes; Lo for low resolution graphics and hi for high resolution graphics. A higher resolution gives you more detail, but limits the amount of logging that can take place as well as the maximum logging frequency. You can't change the display mode if you're recording or playing back a previous log.
• Rate: There are a number of logging rates from 400Hz to 400s; the default is 50Hz. Log-ging rates above 100Hz won't be recorded on time.
• Zoom: This controls the vertical zoom; with a default zoom of 1:32.• Save: This controls whether the logging is saved to Ram or to Flash. Saving to Flash al-
lows up to 64K samples to be saved, but the logging rate consistency may be reduced (because the logger can't log when it's writing a block to Flash).
Logging RegionIf you press then the 'v' turns into '^' and you can pan and zoom around the graph when in play mode. The cursor control keys pan left, right, up and down. Tapping then a cur-sor key zooms the display in ( , ) or out ( , ) along the time axis or in ( , ) or out ( , ) along the y-axis.
Inside Logger
Logger Data Format
Logger data is stored as an array of pairs of 16-bit numbers: an adc value followed by a timestamp in the current timebase for the clock. If you're using Flash to store the data, then the logs are stored from flash blocks 400 to 1399 (up to 256Kb of Flash can be used). You can load in each block using n blk> <exe> and do further analysis on the data without needing logger.Logger data is stored with a timestamp in the current timebase. For sampling rates <=50Hz, the timebase is the 50Hz (or 60Hz) frame counter clock and for sampling rates above 50Hz the timebase is timer-counter 1, which operates at 2.5MHz.


![From: Montie Young [montieyoung@ev1.net] Jonathan G ...Allard, Wayne CO R 224-5941 224-6471 Campbell, Ben Nighthorse CO R 224-5852 228-4609 Dodd, Christopher J. CT D 224-2823 224-1083](https://static.documents.pub/doc/80x56/609bfa156780b67dff5623ee/from-montie-young-montieyoungev1net-jonathan-g-allard-wayne-co-r-224-5941.jpg)