42
The LPI 101 Exam (60 Weights) PART I COPYRIGHTED MATERIAL

The LPI 101 Exam (60 Weights)
Part
I
04836c01.indd 1 1/17/09 2:20:27 PM
COPYRIG
HTED M
ATERIAL

04836c01.indd 2 1/17/09 2:20:27 PM

Chapter
1Exploring Linux Command-Line Tools
ThE foLLoWIng LInux ProfEssIonaL InsTITuTE objECTIvEs arE CovErEd In ThIs ChaPTEr:
1.103.1 Work on the command line (weight: 4)ÛÛ
1.103.2 Process text streams using filters (weight: 3)ÛÛ
1.103.4 Use streams, pipes, and redirects (weight: 4)ÛÛ
1.103.7 Search text files using regular expressions ÛÛ(weight: 2)
04836c01.indd 3 1/17/09 2:20:27 PM

Linux borrows heavily from Unix, and Unix began as a text-based operating system (OS). Unix and Linux retain much of this heritage, which means that to understand how to use and,
especially, administer Linux, you must understand at least the basics of its command-line tools. Thus, this book begins with an introduction to Linux shells (the programs that accept and interpret text-mode commands) and many of the basic commands and procedures you can use from a shell.
This chapter begins with basic shell information, including shell options and procedures for using them. From there, this chapter covers streams, pipes, and redirects, which you can use to shunt input and output between programs or between files and programs. These techniques are frequently combined with text processing using filters—commands you can use to manipulate text without the help of a conventional text editor. Sometimes you must manipulate text in an abstract way, using codes to represent several different types of text. This chapter therefore covers this topic.
Understanding Command-Line BasicsBefore you do anything else with Linux, you should understand how to use a Linux shell. Several shells are available, but most provide similar capabilities. Understanding a few basics will take you a long way in your use of Linux, so I describe some of these techniques and commands. You should also understand shell environment variables, which are place-holders for data that may be useful to many programs. Finally, on the topic of command-line basics, you should know how to get help with commands you’re trying to use.
Exploring Your Linux Shell OptionsAs with many key software components, Linux provides a range of options for shells. A complete list would be quite long, but the more common choices include the following:
bash The GNU Bourne Again Shell (bash) is based on the earlier Bourne shell for Unix but extends it in several ways. In Linux, bash is the most common default shell for user accounts, and it’s the one emphasized in this book and on the Linux Professional Institute (LPI) exam.
bsh The Bourne shell upon which bash is based also goes by the name bsh. It’s not often used in Linux, although the bsh command is usually a symbolic link to bash.
04836c01.indd 4 1/17/09 2:20:28 PM

Understanding Command-Line Basics 5
tcsh This shell is based on the earlier C shell (csh). It’s a fairly popular shell in some circles, but no major Linux distributions make it the default shell. Although it’s similar to bash in many respects, some operational details differ. For instance, you don’t assign environment variables in the same way in tcsh as in bash.
csh The original C shell isn’t much used on Linux, but if a user is familiar with csh, tcsh makes a good substitute.
ksh The Korn shell (ksh) was designed to take the best features of the Bourne shell and the C shell and extend them further. It has a small but dedicated following among Linux users.
zsh The Z shell (zsh) takes shell evolution further than the Korn Shell, incorporating fea-tures from earlier shells and adding still more.
In addition to these shells, dozens more obscure ones are available. In Linux, most users run bash because it’s the default. Some other OSs use csh or tcsh as the default, so if your users have backgrounds on non-Linux Unix-like OSs, they may be more familiar with these other shells. You can change a user’s default shell by editing the account, as described in Chapter 7, “Administering the System.”
The file /bin/sh is a symbolic link to the system’s default shell—normally /bin/bash for Linux. This practice enables you to point to a shell (say, at the start of a simple shell script, as described in Chapter 9, “Writing Scripts, Configuring E-Mail, and Using Databases”) and be assured that a shell will be called, even if the system’s available shells change. This feature is particularly important when developing shell scripts that might be run on other computers, as described in Chapter 9.
Using a ShellLinux shell use is fairly straightforward for anybody who’s used a text-mode OS before: You type a command, possibly including options to it, and the computer executes the com-mand. For the most part, Linux commands are external—that is, they’re separate programs from the shell. A few commands are internal to the shell, though, and knowing the distinc-tion can be important. You should also know some of the tricks that can make using the command shell easier—how to have the computer complete a long command or filename, retrieve a command you’ve recently run, or edit a command you’ve recently used (or haven’t yet fully entered).
One class of commands—those for handling basic file management—is very important but isn’t described here in great detail. For more information on these commands, consult Chapter 4, “Managing Files.”
Starting a ShellIf you log into Linux using a text-mode login screen, chances are you’ll be dropped directly into your default shell—it’s the shell that presents the prompt and accepts subse-quent commands.
04836c01.indd 5 1/17/09 2:20:28 PM
6 Chapter 1 n Exploring Linux Command-Line Tools
If you log into Linux using a graphical user interface (GUI) login screen, though, you’ll have to start a shell manually. Some GUIs provide a menu option to start a program called a terminal, xterm, Konsole, or something similar. These programs enable you to run text-mode programs within Linux, and by default they come up running your shell. If you can’t find such a menu option, look for one that enables you to run an arbitrary command. Select it, and type xterm or konsole as the command name; this will launch an xterm-type pro-gram that will run a shell.
Using Internal and External CommandsInternal commands are, as you might expect, built into the shell. Most shells offer a similar set of internal commands, but shell-to-shell differences do exist; consult your shell’s man page (as described later, in “Getting Help”) for details, particularly if you’re using an exotic shell. Internal commands you’re likely to use enable you to perform some common tasks:
Change the working directory Whenever you’re running a shell, you’re working in a specific directory. When you refer to a file without providing a complete path to the file, the shell works on the file in the current working directory. (Similar rules apply to many programs.) The cd command changes the current working directory. For instance, typing cd /home/sally changes to the /home/sally directory. The tilde (~) character is a use-ful shortcut; it stands for your home directory, so cd ~ will have the same effect as cd /home/sally if your home directory is /home/sally.
Display the working directory The pwd command displays (“prints” to the screen) the current working directory.
Display a line of text The echo command displays the text you enter; for instance, typing echo Hello causes the system to display the string Hello. This may seem pointless, but it’s use-ful in scripts (described in Chapter 9), and it can also be a good way to review the contents of environment variables (described later in this chapter, in “Using Environment Variables”).
Execute a program The exec command runs an external program that you specify, as in exec myprog to run myprog. In most cases, this is better accomplished by typing the name of the program you want to run. The exec command has one special feature, though: Rather than create a new process that runs alongside the shell, the new process replaces the shell. When the new process terminates, it’s as if you terminated the shell.
Time an operation The time command times how long subsequent commands take to execute. For instance, typing time pwd tells you how long the system took to execute the pwd command. The time is displayed after the full command terminates. Three times are displayed: total execution time (a.k.a. real time), user CPU time, and system CPU time. The final two values tell you about CPU time consumed, which is likely to be much less than the total execution time.
Set options In its most basic form, set displays a wide variety of options relating to bash operation. These options are formatted much like environment variables, but they aren’t the same things. You can pass various options to set to have it affect a wide range of shell operations.
04836c01.indd 6 1/17/09 2:20:28 PM
Understanding Command-Line Basics 7
Terminate the shell The exit and logout commands both terminate the shell. The exit command terminates any shell, but the logout command terminates only login shells—that is, those that are launched automatically when you initiate a text-mode login as opposed to those that run in xterm windows or the like.
This list isn’t complete. Later sections of this chapter and later chapters describe some additional internal commands. Consult your shell’s docu-mentation for a complete list of its internal commands.
Some of these internal commands are duplicated by external commands that do the same thing, but these external commands aren’t always installed on all systems. Even when these external commands are installed, the internal command takes precedence unless you provide the complete path to the external command on the command line, as in typing /bin/pwd rather than pwd.
Confusion over Internal and External Commands
When duplicate internal and external commands exist, they sometimes produce subtly different results or accept different options. These differences can occasionally cause problems. For instance, consider the pwd command and symbolic links to directories. (Symbolic links are described in more detail in Chapter 4. For now, know that they’re files that point to other files or directories and for most intents and purposes act just like the files or directories to which they point when they’re accessed.) Suppose you create a sym-bolic link to /bin within your home directory and then cd into that directory. You then want to know where you are. The pwd command that’s internal to bash will produce a different result from the external pwd command:
$ pwd
/home/sally/binlink
$ /bin/pwd
/usr/bin
As you can see, bash’s internal pwd shows the path via the symbolic link, whereas the exter-nal command shows the path to which the link points. Sometimes these differences can cause confusion, such as if you read the man page or other documentation that describes one version but you use the other and a difference is important. You may wonder why the command isn’t operating as you expect. If in doubt, look up the documentation for, and type the complete path to, the external command to be sure you use it.
04836c01.indd 7 1/17/09 2:20:28 PM

8 Chapter 1 n Exploring Linux Command-Line Tools
When you type a command that’s not recognized by the shell as one of its internal com-mands, the shell checks its path to find a program by that name to execute it. The path is a list of directories in which commands can be found. It’s defined by the PATH environment variable, as described shortly in “Using Environment Variables.” A typical user account has about half a dozen or a dozen directories in its path. You can adjust the path by changing the PATH environment variable in a shell configuration file, as described in “Exploring Shell Configuration.”
You can run programs that aren’t on the path by providing a complete path on the com-mand line. For instance, typing ./myprog runs the myprog program in the current directory, and /home/arthur/thisprog runs the thisprog program in the /home/arthur directory.
The root account should normally have a shorter path than ordinary user accounts. Typically, you’ll omit directories that store GUI and other user-oriented programs from root’s path in order to discourage use of the root account for routine operations, thus minimizing the risk of security breaches related to buggy or compromised binaries being run by root. Most important, root’s path should never include the current directory (./). Placing this directory in root’s path makes it possible for a local mis-creant to trick root into running replacements for common programs, such as ls, by having root change into a directory with such a program. Indeed, omitting the current directory from ordinary user paths is also generally a good idea. If this directory must be part of the ordinary user path, it should appear at the end of the path so that the standard programs take prece-dence over any replacement programs in the current directory.
In the case of both programs on the path and those whose complete paths you type as part of the command, the program file must be marked as executable. This is done via the execute bit that’s stored with the file. Standard programs are marked executable when they’re installed, but if you need to adjust a program’s executable status, you can do so with the chmod command, as described in Chapter 4.
Performing Some Shell Command TricksMany users find typing commands to be tedious and error prone. This is particularly true of slow or sloppy typists. For this reason, Linux shells include various tools that can help speed up operations. The first of these is command completion: Type part of a command or (as an option to a command) a filename, and then press the Tab key. The shell tries to fill in the rest of the command or the filename. If just one command or filename matches the characters you’ve typed so far, the shell fills it in and places a space after it. If the characters you’ve typed don’t uniquely identify a command or filename, the shell fills in what it can and then stops. Depending on the shell and its configuration, it may beep. If you press the Tab key again, the system responds by displaying the possible completions. You can then type another character or two and, if you haven’t completed the command or filename, press the Tab key again to have the process repeat.
04836c01.indd 8 1/17/09 2:20:29 PM
Understanding Command-Line Basics 9
The most fundamental Linux commands have fairly short names—mv, ls, set, and so on. Some other commands are much longer, though, such as traceroute or sane-find-scanner. Filenames can also be quite lengthy—up to 255 characters on many filesystems. Thus, com-mand completion can save a lot of time when you’re typing. It can also help you avoid typos.
The most popular Linux shells, including bash and tcsh, support command and filename completion. Some older shells, though, don’t support this helpful feature.
Another helpful shell shortcut is the history. The history keeps a record of every com-mand you type (stored in ~/.bash_history in the case of bash). If you’ve typed a long command recently and want to use it again, or use a minor variant of it, you can pull the command out of the history. The simplest way to do this is to press the Up arrow key on your keyboard; this brings up the previous command. Pressing the Up arrow key repeatedly moves through multiple commands so you can find the one you want. If you overshoot, press the Down arrow key to move down the history. The Ctrl+P and Ctrl+N keystrokes double for the Up and Down arrow keys, respectively.
Another way to use the command history is to search through it. Press Ctrl+R to begin a backward (reverse) search, which is what you probably want, and begin typing characters that should be unique to the command you want to find. The characters you type need not be the ones that begin the command; they can exist anywhere in the command. You can either keep typing until you find the correct command or, after you’ve typed a few characters, press Ctrl+R repeatedly until you find the one you want. The Ctrl+S keystroke works similarly but searches forward in the command history, which might be handy if you’ve used a backward search or the Up arrow key to look back and have overshot. In either event, if you can’t find the command you want or change your mind and want to terminate the search, press Ctrl+G to do so.
Frequently, after finding a command in the history, you want to edit it. The bash shell, like many shells, provides editing features modeled after those of the Emacs editor:
Move within the line Press Ctrl+A or Ctrl+E to move the cursor to the start or end of the line, respectively. The Left and Right arrow keys move within the line a character at a time. Ctrl+B and Ctrl+F do the same, moving backward and forward within a line. Pressing Ctrl plus the Left or Right arrow key moves backward or forward a word at a time, as does pressing Esc and then B or F.
Delete text Pressing Ctrl+D or the Delete key deletes the character under the cursor, whereas pressing the Backspace key deletes the character to the left of the cursor. Pressing Ctrl+K deletes all text from the cursor to the end of the line. Pressing Ctrl+X and then Back-space deletes all the text from the cursor to the beginning of the line.
Transpose text Pressing Ctrl+T transposes the character before the cursor with the charac-ter under the cursor. Pressing Esc and then T transposes the two words immediately before (or under) the cursor.
04836c01.indd 9 1/17/09 2:20:29 PM

10 Chapter 1 n Exploring Linux Command-Line Tools
Change case Pressing Esc and then U converts text from the cursor to the end of the word to uppercase. Pressing Esc and then L converts text from the cursor to the end of the word to lowercase. Pressing Esc and then C converts the letter under the cursor (or the first letter of the next word) to uppercase, leaving the rest of the word unaffected.
Invoke an editor You can launch a full-fledged editor to edit a command by pressing Ctrl+X followed by Ctrl+E. The bash shell attempts to launch the editor defined by the $FCEDIT or $EDITOR environment variable or Emacs as a last resort.
These editing commands are just the most useful ones supported by bash; consult its man page to learn about many more obscure editing features. In practice, you’re likely to make heavy use of command and filename completion, the command history, and perhaps a few editing features.
The history command provides an interface to view and manage the history. Typing history alone displays all the commands in the history (typically the latest 500 com-mands); adding a number causes only that number of the latest commands to appear. Typ-ing history -c clears the history, which can be handy if you’ve recently typed commands you’d rather not have discovered by others (such as commands that include passwords).
In Exercise 1.1, you’ll experiment with your shell’s completion and command-editing tools.
E x E r C I s E 1 .1
Editing Commands
To experiment with your shell’s completion and command-editing tools, follow these steps:
1. Log in as an ordinary user.
2. Create a temporary directory by typing mkdir test. (Directory and file manipulation commands are described in more detail in Chapter 4.)
3. Change into the test directory by typing cd test.
4. Create a few temporary files by typing touch one two three. This command creates three empty files named one, two, and three.
5. Type ls -l t, and without pressing the Enter key, press the Tab key. The system may beep at you or display two three. If it doesn’t display two three, press the Tab key again, and it should do so. This reveals that either two or three is a valid completion to your command, because these are the two files in the test directory whose file-names begin with the letter t.
6. Type h, and again without pressing the Enter key, press the Tab key. The system should complete the command (ls -l three), at which point you can press the Enter key to execute it. (You’ll see information on the file.)
7. Press the Up arrow key. You should see the ls -l three command appear on the command line.
04836c01.indd 10 1/17/09 2:20:29 PM
Understanding Command-Line Basics 11
E x E r C I s E 1 .1 ( c ont inue d )
8. Press Ctrl+A to move the cursor to the beginning of the line.
9. Press the Right arrow key once, and type es (without pressing the Enter key). The command line should now read less -l three.
10. Press the Right arrow key once, and press the Delete key three times. The command should now read less three. Press the Enter key to execute the command. (Note that you can do so even though the cursor isn’t at the end of the line.) This invokes the less pager on the three file. (The less pager is described more fully later, in “Getting Help.”) Because this file is empty, you’ll see a mostly empty screen.
11. Press the Q key to exit from the less pager.
Exploring Shell ConfigurationShells, like many Linux programs, are configured through files that hold configuration options in a plain-text format. The bash configuration files are actually bash shell scripts, which are described more fully in Chapter 9. For now, you should know that the ~/.bashrc and ~/.profile files are the main user configuration files for bash, and /etc/bash.bashrc and /etc/profile are the main global configuration files.
Even without knowing much about shell scripting, you can make simple changes to these files. Edit them in your favorite text editor, and change whatever needs changing. For instance, you can add directories to the $PATH environment variable, which takes a colon-delimited list of directories.
Be careful when changing your bash configuration, and particularly the global bash configuration files. Save a backup of the original file before making changes, and test your changes immediately by logging in using another virtual terminal. If you spot a problem, revert to your saved copy until you can learn the cause and create a working file.
Using Environment VariablesEnvironment variables are like variables in programming languages—they hold data to be referred to by the variable name. Environment variables differ in that they’re part of the environment of a program, and other programs, such as the shell, can modify this environ-ment. Programs can rely on environment variables to set information that can apply to many different programs. For instance, suppose a computer hosts several different Usenet news readers. These programs all need to know what Usenet news server to use; if they all agree to use an environment variable, such as $NNTPSERVER, to hold this information, you can set this
04836c01.indd 11 1/17/09 2:20:29 PM
12 Chapter 1 n Exploring Linux Command-Line Tools
environment variable once as part of your shell startup script and then forget it. You needn’t set this feature individually for all the news readers installed on the system.
Chapter 9 describes environment variables and their manipulation in more detail. For the moment, you should know that you can set them in bash by using an assignment (=) operator followed by the export command:
$ NNTPSERVER=news.abigisp.com
$ export NNTPSERVER
You can combine these two commands into a single form:
$ export NNTPSERVER=news.abigisp.com
Either method sets the $NNTPSERVER environment variable to news.abigisp.com. (When setting an environment variable, you omit the dollar sign, but subsequent references include a dollar sign to identify the environment variable as such.) Thereafter, programs that need this information can refer to the environment variable. In fact, you can do so from the shell yourself, using the echo command:
$ echo $NNTPSERVER
news.abigisp.com
You can also view the entire environment by typing env. The result is likely to be several dozen lines of environment variables and their values. Chapter 9 describes what many of these variables are in more detail.
To delete an environment variable, use the unset command, which takes the name of an environment variable (without the leading $ symbol) as an option. For instance, unset NNTPSERVER removes the $NNTPSERVER environment variable.
Getting HelpLinux provides a text-based help system known as man. This command’s name is short for manual, and its entries (its man pages) provide succinct summaries of what a command, file, or other feature does. For instance, to learn about man itself, you can type man man. The result is a description of the man command.
The man utility uses the less pager to display information. This program displays text a page at a time. Press the spacebar to move forward a page, Esc followed by V to move back a page, the arrow keys to move up or down a line at a time, the slash (/) key to search for text, and so on. (Type man less to learn all the details, or consult the upcoming section “Paging Through Files with less.”) When you’re done, press Q to exit less and the man page it’s displaying.
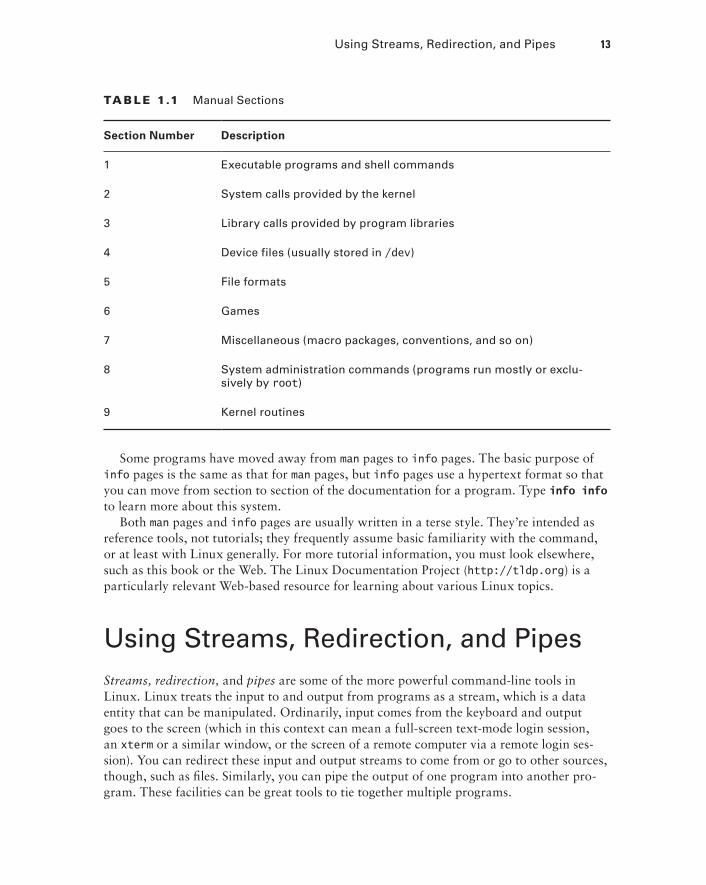
Linux man pages are categorized into several sections, which are summarized in Table 1.1. Sometimes a single keyword has entries in multiple sections; for instance, passwd has entries under both section 1 and section 5. In most cases, man returns the entry in the lowest-num-bered section; but you can force the issue by preceding the keyword by the section number. For instance, typing man 5 passwd returns information on the passwd file format rather than the passwd command.
04836c01.indd 12 1/17/09 2:20:30 PM
Using Streams, Redirection, and Pipes 13
Ta b LE 1.1 Manual Sections
Section Number Description
1 Executable programs and shell commands
2 System calls provided by the kernel
3 Library calls provided by program libraries
4 Device files (usually stored in /dev)
5 File formats
6 Games
7 Miscellaneous (macro packages, conventions, and so on)
8 System administration commands (programs run mostly or exclu-sively by root)
9 Kernel routines
Some programs have moved away from man pages to info pages. The basic purpose of info pages is the same as that for man pages, but info pages use a hypertext format so that you can move from section to section of the documentation for a program. Type info info to learn more about this system.
Both man pages and info pages are usually written in a terse style. They’re intended as reference tools, not tutorials; they frequently assume basic familiarity with the command, or at least with Linux generally. For more tutorial information, you must look elsewhere, such as this book or the Web. The Linux Documentation Project (http://tldp.org) is a particularly relevant Web-based resource for learning about various Linux topics.
Using Streams, Redirection, and PipesStreams, redirection, and pipes are some of the more powerful command-line tools in Linux. Linux treats the input to and output from programs as a stream, which is a data entity that can be manipulated. Ordinarily, input comes from the keyboard and output goes to the screen (which in this context can mean a full-screen text-mode login session, an xterm or a similar window, or the screen of a remote computer via a remote login ses-sion). You can redirect these input and output streams to come from or go to other sources, though, such as files. Similarly, you can pipe the output of one program into another pro-gram. These facilities can be great tools to tie together multiple programs.
04836c01.indd 13 1/17/09 2:20:30 PM
14 Chapter 1 n Exploring Linux Command-Line Tools
Part of the Unix philosophy to which Linux adheres is, whenever possible, to do complex things by combining multiple simple tools. Redirection and pipes help in this task by enabling simple programs to be combined together in chains, each link feeding off the output of the preceding link.
Exploring Types of StreamsTo begin understanding redirection and pipes, you must first understand the different types of input and output streams. Three are most important for this topic:
Standard input Programs accept keyboard input via standard input, or stdin. In most cases, this is the data that comes into the computer from a keyboard.
Standard output Text-mode programs send most data to their users via standard output (a.k.a. stdout), which is normally displayed on the screen, either in a full-screen text-mode session or in a GUI window such as an xterm. (Fully GUI programs such as GUI word pro-cessors don’t use standard output for their regular interactions, although they might use standard output to display messages in the xterm from which they were launched. GUI out-put isn’t handled via an output stream in the sense I’m describing here.)
Standard error Linux provides a second type of output stream, known as standard error, or stderr. This output stream is intended to carry high-priority information such as error messages. Ordinarily, standard error is sent to the same output device as standard output, so you can’t easily tell them apart. You can redirect one independently of the other, though, which can be handy. For instance, you can redirect standard error to a file while leaving standard output going to the screen so that you can interact with the program and then study the error messages later.
Internally, programs treat these streams just like data files—they open them, read from or write to the files, and close them when they’re done. Put another way, ordinary files are streams from a program’s point of view. These streams just happen to be the ones used to interact with users.
Redirecting Input and OutputTo redirect input or output, you use symbols following the command, including any options it takes. For instance, to redirect the output of the echo command, you would type some-thing like this:
$ echo $NNTPSERVER > nntpserver.txt
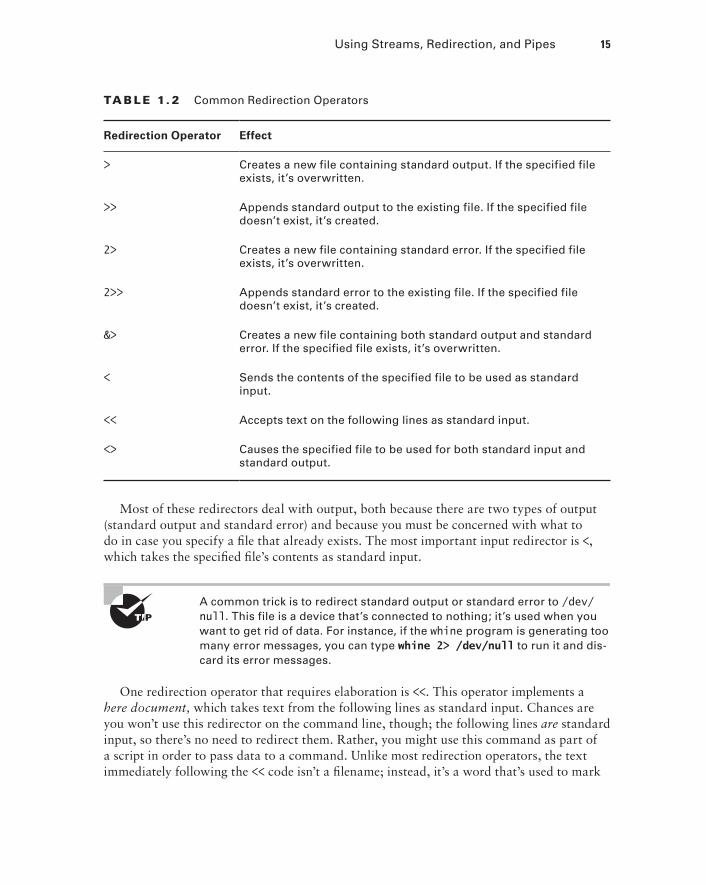
The result is that the file nntpserver.txt contains the output of the command (in this case, the value of the $NNTPSERVER environment variable). Redirection operators exist to achieve several effects, as summarized in Table 1.2.
04836c01.indd 14 1/17/09 2:20:30 PM
Using Streams, Redirection, and Pipes 15
Ta b LE 1. 2 Common Redirection Operators
Redirection Operator Effect
> Creates a new file containing standard output. If the specified file exists, it’s overwritten.
>> Appends standard output to the existing file. If the specified file doesn’t exist, it’s created.
2> Creates a new file containing standard error. If the specified file exists, it’s overwritten.
2>> Appends standard error to the existing file. If the specified file doesn’t exist, it’s created.
&> Creates a new file containing both standard output and standard error. If the specified file exists, it’s overwritten.
< Sends the contents of the specified file to be used as standard input.
<< Accepts text on the following lines as standard input.
<> Causes the specified file to be used for both standard input and standard output.
Most of these redirectors deal with output, both because there are two types of output (standard output and standard error) and because you must be concerned with what to do in case you specify a file that already exists. The most important input redirector is <, which takes the specified file’s contents as standard input.
A common trick is to redirect standard output or standard error to /dev/null. This file is a device that’s connected to nothing; it’s used when you want to get rid of data. For instance, if the whine program is generating too many error messages, you can type whine 2> /dev/null to run it and dis-card its error messages.
One redirection operator that requires elaboration is <<. This operator implements a here document, which takes text from the following lines as standard input. Chances are you won’t use this redirector on the command line, though; the following lines are standard input, so there’s no need to redirect them. Rather, you might use this command as part of a script in order to pass data to a command. Unlike most redirection operators, the text immediately following the << code isn’t a filename; instead, it’s a word that’s used to mark
04836c01.indd 15 1/17/09 2:20:30 PM
16 Chapter 1 n Exploring Linux Command-Line Tools
the end of input. For instance, typing someprog << EOF causes someprog to accept input until it sees a line that contains only the string EOF (without even a space following it).
Some programs that take input from the command line expect you to ter-minate input by pressing Ctrl+D. This keystroke corresponds to an end-of-file marker using the American Standard Code for Information Interchange (ASCII).
A final redirection tool is the tee command. This command splits standard input so that it’s displayed on standard output and on as many files as you specify. Typically, tee is used in conjunction with data pipes so that a program’s output can be both stored and viewed immediately. For instance, to view and store the output of someprog, you might type this:
$ someprog | tee output.txt
The vertical bar (|) is the pipe character. It implements a pipe, as described in the next section.
Ordinarily, tee overwrites any files whose names you specify. If you want to append data to these files, pass the -a option to tee.
Piping Data Between ProgramsPrograms can frequently operate on other programs’ outputs. For instance, you might use a text-filtering command (such as the ones described shortly, in “Processing Text Using Fil-ters”) to manipulate text output by another program. You can do this with the help of redi-rection operators; send the first program’s standard output to a file, and then redirect the second program’s standard input to read from that file. This solution is awkward, though, and it involves the creation of a file that you might easily overlook, leading to unnecessary clutter on your system.
The solution is to use data pipes (a.k.a. pipelines). A pipe redirects the first program’s standard output to the second program’s standard input and is denoted by a vertical bar (|):
$ first | second
For instance, suppose that first generates some system statistics, such as system uptime, CPU use, number of users logged in, and so on. This output might be lengthy, so you want to trim it a bit. You might therefore use second, which could be a script or command that echoes from its standard input only the information in which you’re interested. (The grep command, described in “Using grep,” is often used in this role.)
Pipes can be used in sequences of arbitrary length:
$ first | second | third | fourth | fifth | sixth [...]
04836c01.indd 16 1/17/09 2:20:31 PM

Processing Text Using Filters 17
Generating Command LinesSometimes you’ll find yourself constructing a series of commands that are similar to each other but not similar enough to enable you to use their normal options to substitute a single command. For instance, suppose you want to remove every file in a directory tree with a name that ends in a tilde (~). (This filename convention denotes backup files created by cer-tain text editors.) With a large directory tree, this task can be daunting; the usual file-deletion command (rm, described in more detail in Chapter 4) doesn’t provide an option to search for and delete every file in a directory tree that matches such a specific criterion. One command that can do the search part of the job, though, is find, which is also described in more detail in Chapter 4. This command displays all the files that match criteria you provide. If you could combine the output of find to create a series of command lines using rm, the task would be solved. This is precisely the purpose of the xargs command.
The xargs command builds a command from its standard input. The basic syntax for this command is as follows:
xargs [options] [command [initial-arguments]]
The command is the command you want to execute, and initial-arguments is a list of argu-ments you want to pass to the command. The options are xargs options; they aren’t passed to command. When you run xargs, it runs command once for every word passed to it on standard input, adding that word to the argument list for command. If you want to pass multiple options to the command, you can protect them by enclosing the group in quotation marks.
For instance, consider the task of deleting all those backup files, denoted by tilde characters. You can do this by piping the output of find to xargs, which then calls rm:
$ find ./ -name “*~” | xargs rm
The first part of this command (find ./ -name “*~”) finds all the files in the current directory (./) or its subdirectories with a name that ends in a tilde (*~). This list is then piped to xargs, which adds each one to its own rm command.
A tool that’s similar to xargs in many ways is the backtick (̀ ), which is a character to the left of the 1 key on most keyboards. The backtick is not the same as the single quote character (‘), which is located to the right of the semicolon (;) on most keyboards.
Text within backticks is treated as a separate command whose results are substituted on the command line. For instance, to delete those backup files, you can type the following command:
$ rm `find ./ -name “*~”`
Processing Text Using FiltersIn keeping with Linux’s philosophy of providing small tools that can be tied together via pipes and redirection to accomplish more complex tasks, many simple commands to manipu-late text are available. These commands accomplish tasks of various types, such as combining files, transforming the data in files, formatting text, displaying text, and summarizing data.
04836c01.indd 17 1/17/09 2:20:31 PM
18 Chapter 1 n Exploring Linux Command-Line Tools
Many of the following descriptions include input-file specifications. In most cases, you can omit these input-file specifications, in which case the utility reads from standard input instead.
File-Combining CommandsThe first group of text-filtering commands are those used to combine two or more files into one file. Three important commands in this category are cat, join, and paste, which join files end to end, based on fields in the file, or by merging on a line-by-line basis, respectively.
Combining Files with catThe cat command’s name is short for concatenate, and this tool does just that: It links together an arbitrary number of files end to end and sends the result to standard output. By combining cat with output redirection, you can quickly combine two files into one:
$ cat first.txt second.txt > combined.txt
Although cat is officially a tool for combining files, it’s also commonly used to display the contents of a short file. If you type only one filename as an option, cat displays that file. This is a great way to review short files; but for long files, you’re better off using a full-fledged pager command, such as more or less.
You can add options to have cat perform minor modifications to the files as it com-bines them:
Display line ends If you want to see where lines end, add the -E or --show-ends option. The result is a dollar sign ($) at the end of each line.
Number lines The -n or --number option adds line numbers to the beginning of every line. The -b or --number-nonblank option is similar, but it numbers only lines that contain text.
Minimize blank lines The -s or --squeeze-blank option compresses groups of blank lines down to a single blank line.
Display special characters The -T or --show-tabs option displays tab characters as ^I. The -v or --show-nonprinting option displays most control and other special characters using carat (^) and M- notations.
The tac command is similar to cat, but it reverses the order of lines in the output.
Joining Files by Field with joinThe join command combines two files by matching the contents of specified fields within the files. Fields are typically space-separated entries on a line, although you can specify another character as the field separator with the -t char option, where char is the charac-ter you want to use. You can cause join to ignore case when performing comparisons by using the -i option.
04836c01.indd 18 1/17/09 2:20:31 PM
Processing Text Using Filters 19
The effect of join may best be understood through a demonstration. Consider Listings 1.1 and 1.2, which contain data on telephone numbers—Listing 1.1 shows the names associated with those numbers, and Listing 1.2 shows whether the numbers are listed or unlisted.
Listing 1.1: Demonstration File Containing Telephone Numbers and Names
555-2397 Beckett, Barry
555-5116 Carter, Gertrude
555-7929 Jones, Theresa
555-9871 Orwell, Samuel
Listing 1.2: Demonstration File Containing Telephone Number Listing Status
555-2397 unlisted
555-5116 listed
555-7929 listed
555-9871 unlisted
You can display the contents of both files using join:
$ join listing1.1.txt listing1.2.txt
555-2397 Beckett, Barry unlisted
555-5116 Carter, Gertrude listed
555-7929 Jones, Theresa listed
555-9871 Orwell, Samuel unlisted
By default, join uses the first field as the one to match across files. Because Listings 1.1 and 1.2 both place the phone number in this field, it’s the key field in the output. You can specify another field by using the -1 or -2 option to specify the join field for the first or second file, respectively, as in join -1 3 -2 2 cameras.txt lenses.txt to join using the third field in cameras.txt and the second field in lenses.txt. The -o FORMAT option enables more complex specifications for the output file’s format; consult the man page for join for more details.
The join command can be used at the core of a set of simple customized database-manipulation tools using Linux text-manipulation commands. It’s very limited by itself, though; for instance, it requires its two files to have the same ordering of lines. (You can use the sort command to ensure this is so.)
Merging Lines with pasteThe paste command merges files line by line, separating the lines from each file with tabs, as shown in the following example, using Listings 1.1 and 1.2 again:
$ paste listing1.1.txt listing1.2.txt
555-2397 Beckett, Barry 555-2397 unlisted
555-5116 Carter, Gertrude 555-5116 listed
555-7929 Jones, Theresa 555-7929 listed
555-9871 Orwell, Samuel 555-9871 unlisted
04836c01.indd 19 1/17/09 2:20:31 PM

20 Chapter 1 n Exploring Linux Command-Line Tools
You can use paste to combine data from files that aren’t keyed with fields suitable for use by join. Of course, to be meaningful, the files’ line numbers must be exactly equiva-lent. Alternatively, you can use paste as a quick way to create a two-column output of textual data; however, the alignment of the second column may not be exact if the first column’s line lengths aren’t exactly even, as shown in the preceding example.
File-Transforming CommandsMany of Linux’s text-manipulation commands are aimed at transforming the contents of files. These commands don’t actually change files’ contents, though; rather, they send the changed file to standard output. You can then pipe this output to another command or redirect it into a new file.
An important file-transforming command is sed. This command is very complex and is covered later in this chapter, in “Using sed.”
Converting Tabs to Spaces with expandSometimes text files contain tabs but programs that need to process the files don’t cope well with tabs; or perhaps you want to edit a text file in an editor that uses a different amount of horizontal space for the tab than the editor that created the file. In such cases, you may want to convert tabs to spaces. The expand command does this.
By default, expand assumes a tab stop every eight characters. You can change this spac-ing with the -t num or --tabs=num option, where num is the tab spacing value.
Displaying Files in Octal with odSome files aren’t easily displayed in ASCII; most graphics files, audio files, and so on, use non-ASCII characters that look like gibberish. Worse, these characters can do strange things to your display if you try to view such a file with cat or a similar tool. For instance, your font may change, or your console may begin beeping uncontrollably. Nonetheless, you may some-times want to display such files, particularly if you want to investigate the structure of a data file. You may also want to look at an ASCII file in a way that eliminates certain ambiguities, such as whether a gap between words is a tab or several spaces. In such cases, od (whose name stands for octal dump) can help. It displays a file in an unambiguous format—octal (base 8) numbers by default. For instance, consider Listing 1.2 as parsed by od:
$ od listing1.2.txt
0000000 032465 026465 031462 033471 072440 066156 071551 062564
0000020 005144 032465 026465 030465 033061 066040 071551 062564
0000040 005144 032465 026465 034467 034462 066040 071551 062564
0000060 005144 032465 026465 034071 030467 072440 066156 071551
0000100 062564 005144
0000104
04836c01.indd 20 1/17/09 2:20:32 PM
Processing Text Using Filters 21
The first field on each line is an index into the file in octal. For instance, the second line begins at octal 20 (16 in base 10) bytes into the file. The remaining numbers on each line represent the bytes in the file. This type of output can be difficult to interpret unless you’re well versed in octal notation and perhaps in the ASCII code.
Although od is nominally a tool for generating octal output, it can generate many other out-put formats, such as hexadecimal (base 16), decimal (base 10), and even ASCII with escaped control characters. Consult the man page for od for details on creating these variants.
Sorting Files with sortSometimes you’ll create an output file that you want sorted. To do so, you can use a com-mand that’s called, appropriately enough, sort. This command can sort in several ways, including the following:
Ignore case Ordinarily, sort sorts by ASCII value, which differentiates between upper-case and lowercase letters. The -f or --ignore-case option causes sort to ignore case.
Month sort The -M or --month-sort option causes the program to sort by three-letter month abbreviation (JAN through DEC).
Numeric sort You can sort by number by using the -n or --numeric-sort option.
Reverse sort order The -r or --reverse option sorts in reverse order.
Sort field By default, sort uses the first field as its sort field. You can specify another field with the -k field or --key=field option. (The field can be two numbered fields separated by commas, to sort on multiple fields.)
As an example, suppose you wanted to sort Listing 1.1 by first name. You could do so like this:
$ sort -k 3 listing1.1.txt
555-2397 Beckett, Barry
555-5116 Carter, Gertrude
555-9871 Orwell, Samuel
555-7929 Jones, Theresa
The sort command supports a large number of additional options, many of them quite exotic. Consult sort’s man page for details.
Breaking a File into Pieces with splitThe split command can split a file into two or more files. Unlike most of the text-manip-ulation commands described in this chapter, this command requires you to enter an output filename—or more precisely, an output filename prefix, to which is added an alphabetic code. You must also normally specify how large you want the individual files to be:
Split by bytes The -b size or --bytes=size option breaks the input file into pieces of size bytes. This option can have the usually undesirable consequence of splitting the file mid-line.
04836c01.indd 21 1/17/09 2:20:32 PM

22 Chapter 1 n Exploring Linux Command-Line Tools
Split by bytes in line-sized chunks You can break a file into files of no more than a speci-fied size without breaking lines across files by using the -C=size or --line-bytes=size option. (Lines will still be broken across files if the line length is greater than size.)
Split by number of lines The -l lines or --lines=lines option splits the file into chunks with no more than the specified number of lines.
As an example, consider breaking Listing 1.1 into two parts by number of lines:
$ split -l 2 listing1.1.txt numbers
The result is two files, numbersaa and numbersab, that together hold the original con-tents of listing1.1.txt.
Translating Characters with trThe tr command changes individual characters from standard input. Its syntax is as follows:
tr [options] SET1 [SET2]
You specify the characters you want replaced in a group (SET1) and the characters with which you want them to be replaced as a second group (SET2). Each character in SET1 is replaced with the one at the equivalent position in SET2. Here’s an example using Listing 1.1:
$ tr BCJ bc < listing1.1.txt
555-2397 beckett, barry
555-5116 carter, Gertrude
555-7929 cones, Theresa
555-9871 Orwell, Samuel
This example translates some, but not all, of the uppercase characters to lowercase. Note that SET2 in this example was shorter than SET1. The result is that tr substitutes the last available letter from SET2 for the missing letters. In this example, the J in Jones became a c. The -t or --truncate-set1 option causes tr to truncate SET1 to the size of SET2 instead.
Another tr option is -d, which causes the program to delete the characters from SET1. When using -d, you can omit SET2 entirely.
The tr command also accepts a number of shortcuts, such as [:alnum:] (all numbers and letters), [:upper:] (all uppercase letters), [:lower:] (all lowercase letters), and [:digit:] (all digits). You can specify a range of characters by separating them with dashes (-), as in A-M for characters between A and M, inclusive. Consult tr’s man page for a complete list of these shortcuts.
Converting Spaces to Tabs with unexpandThe unexpand command is the logical opposite of expand; it converts multiple spaces to tabs. This can help compress the size of files that contain many spaces and can be helpful if a file is to be processed by a utility that expects tabs in certain locations.
04836c01.indd 22 1/17/09 2:20:32 PM

Processing Text Using Filters 23
Like expand, unexpand accepts the -t num or --tabs=num option, which sets the tab spacing to once every num characters. If you omit this option, unexpand assumes a tab stop every eight characters.
Deleting Duplicate Lines with uniqThe uniq command removes duplicate lines. It’s most likely to be useful if you’ve sorted a file and don’t want duplicate items. For instance, suppose you want to summarize Shake-speare’s vocabulary. You might create a file with all of the Bard’s works, one word per line. You can then sort this file using sort and pass it through uniq. Using a shorter example file containing the text to be or not to be, that is the question (one word per line), the result looks like this:
$ sort shakespeare.txt | uniq
be
is
not
or
question
that
the
to
Note that the words to and be, which appeared in the original file twice, appear only once in the uniq-processed version.
File-Formatting CommandsThe next three commands—fmt, nl, and pr—reformat the text in a file. The first of these is designed to reformat text files, such as if a program’s README documentation file uses lines that are too long for your display. The nl command numbers the lines of a file, which can be helpful in referring to lines in documentation or correspondence. Finally, pr is a print-processing tool; it formats a document in pages suitable for printing.
Reformatting Paragraphs with fmtSometimes text files arrive with outrageously long line lengths, irregular line lengths, or other problems. Depending on the problem, you may be able to cope simply by using an appropri-ate text editor or viewer to read the file. If you want to clean up the file a bit, though, you can do so with fmt. If called with no options (other than the input filename, if you’re not having it work on standard input), the program attempts to clean up paragraphs, which it assumes are delimited by two or more blank lines or by changes in indentation. The new paragraph for-matting defaults to no more than 75 characters wide. You can change this with the -width, -w width, or --width=width options, which set the line length to width characters.
04836c01.indd 23 1/17/09 2:20:33 PM

24 Chapter 1 n Exploring Linux Command-Line Tools
Numbering Lines with nlAs described earlier, in “Combining Files with cat,” you can number the lines of a file with that command. The cat line-numbering options are limited, though, so if you need to do complex line numbering, nl is the tool to use. In its simplest case, you can use nl alone to accomplish much the same goal as cat -b achieves: numbering all the non-blank lines in a file. You can add many options to nl to achieve various special effects:
Body numbering style You can set the numbering style for the bulk of the lines with the -b style or --body-numbering=style option, where style is a style format code, described shortly.
Header and footer numbering style If the text is formatted for printing and has headers or footers, you can set the style for these elements with the -h style or --header-numbering=style option for the header and -f style or --footer-numbering=style option for the footer.
Page separator Some numbering schemes reset the line numbers for each page. You can tell nl how to identify a new page with the -d=code or --section-delimiter=code option, where code is a code for the character that identifies the new page.
Line-number options for new pages Ordinarily, nl begins numbering each new page with line 1. If you pass the -p or --no-renumber option, though, it doesn’t reset the line number with a new page.
Number format You can specify the numbering format with the -n format or --number-format=format option, where format is ln (left justified, no leading zeros), rn (right justi-fied, no leading zeros), or rz (right justified with leading zeros).
The body, header, and footer options enable you to specify a numbering style for each of these page elements:
Number only non-blank lines The default behavior is to number lines that aren’t empty. This corresponds to a style of t.
Number all lines If you want empty lines to be numbered, specify a style of a.
Number no lines To omit line numbers (say, for headers or footers), specify a style of n.
Number lines matching a regular expression A style of pREGEXP numbers only those lines that match the regular expression REGEXP. (Regular expressions are described later, in “Using Regular Expressions.”)
As an example, suppose you’ve created a script, buggy, but you find that it’s not working as you expect. When you run it, you get error messages that refer to line numbers, so you want to create a version of the script with lines that are numbered for easy reference. You can do so by calling nl with the option to number blank lines (-b a):
$ nl -b a buggy > numbered-buggy.txt
Because the input file doesn’t have any explicit page delimiters, the output will be numbered in a single sequence; nl doesn’t try to impose its own page-length limits.
04836c01.indd 24 1/17/09 2:20:33 PM
Processing Text Using Filters 25
The numbered-buggy.txt file created by this command isn’t useful as a script because of the line numbers that begin each line. You can, however, load it into a text editor or display it with a pager such as less to view the text and see the line numbers along with the com-mands they contain.
Preparing a File for Printing with prIf you want to print a plain-text file, you may want to prepare it with headers, footers, page breaks, and so on. The pr command was designed to do this. In its most basic form, you pass the command a file:
$ pr myfile.txt
The result is text formatted for printing on a line printer—that is, pr assumes an 80-character line length in a monospaced font. Of course, you can also use pr in a pipe, either to accept input piped from another program or to pipe its output to another program. (The recipient program might be lpr, which is used to print files, as described in Chapter 6, “Configuring the X Window System, Localization, and Printing.”)
By default, pr creates output that includes the original text with headers that include the current date and time, the original filename, and the page number. You can tweak the out-put format in a variety of ways, including the following:
Generate multi-column output Passing the -numcols or --columns=numcols option cre-ates output with numcols columns. Note that pr doesn’t reformat text; if lines are too long, they’re truncated or run over onto multiple columns.
Generate double-spaced output The -d or --double-space option causes double-spaced output from a single-spaced file.
Use form feeds Ordinarily, pr separates pages by using a fixed number of blank lines. This works fine if your printer uses the same number of lines that pr expects. If you have problems with this issue, you can pass the -F, -f, or --form-feed option, which causes pr to output a form-feed character between pages. This works better with some printers.
Set page length The -l lines or --length=lines option sets the length of the page in lines.
Set the header text The -h text or --header=text option sets the text to be displayed in the header, replacing the filename. To specify a multi-word string, enclose it in quotes, as in --header=”My File”. The -t or --omit-header option omits the header entirely.
Set left margin and page width The -o chars or --indent=chars option sets the left margin to chars characters. This margin size is added to the page width, which defaults to 72 charac-ters and can be explicitly set with the -w chars or --width chars option.
These options are just the beginning; pr supports many more, which are described in its man page. As an example of pr in action, consider printing a double-spaced and numbered ver-sion of a configuration file (say, /etc/profile) for your reference. You can do this by piping together cat and its -n option to generate a numbered output, pr and its -d option to double-space the result, and lpr to print the file:
$ cat -n /etc/profile | pr -d | lpr
04836c01.indd 25 1/17/09 2:20:33 PM
26 Chapter 1 n Exploring Linux Command-Line Tools
The result should be a printout that might be handy for taking notes on the configura-tion file. One caveat, though: If the file contains lines that approach or exceed 80 characters in length, the result can be single lines that spill across two lines. The result will be dis-rupted page boundaries. As a workaround, you can set a somewhat short page length with -l and use -f to ensure that the printer receives form feeds after each page:
$ cat -n /etc/profile | pr -dfl 50 | lpr
The pr command is built around assumptions about printer capabilities that were reasonable in the early 1980s. It’s still useful today, but you might prefer to look into GNU Enscript (http://www.codento.com/people/mtr/genscript/). This program has many of the same features as pr, but it generates PostScript output that can take better advantage of modern printer features.
File-Viewing CommandsSometimes you just want to view a file or part of a file. A few commands can help you accomplish this goal without loading the file into a full-fledged editor.
As described earlier, the cat command is also handy for viewing short files.
Viewing the Starts of Files with headSometimes all you need to do is see the first few lines of a file. This may be enough to iden-tify what a mystery file is, for instance; or you may want to see the first few entries of a log file to determine when that file was started. You can accomplish this goal with the head command, which echoes the first 10 lines of one or more files to standard output. (If you specify multiple filenames, each one’s output is preceded by a header to identify it.) You can modify the amount of information displayed by head in two ways:
Specify the number of bytes The -c num or --bytes=num option tells head to display num bytes from the file rather than the default 10 lines.
Specify the number of lines You can change the number of lines displayed with the -n num or --lines=num option.
Viewing the Ends of Files with tailThe tail command works just like head, except that tail displays the last 10 lines of a file. (You can use the -c/--bytes and -n/--lines options to change the amount of data dis-played, just as with head.) This command is useful for examining recent activity in log files or other files to which data may be appended.
04836c01.indd 26 1/17/09 2:20:34 PM
Processing Text Using Filters 27
The tail command supports several options that aren’t present in head and that enable the program to handle additional duties, including the following:
Track a file The -f or --follow option tells tail to keep the file open and to display new lines as they’re added. This feature is helpful for tracking log files because it enables you to see changes as they’re added to the file.
Stop tracking on program termination The --pid=pid option tells tail to terminate tracking (as initiated by -f or --follow) once the process with a process ID (PID) of pid terminates. (PIDs are described in more detail in Chapter 2, “Managing Software.”)
Some additional options provide more obscure capabilities. Consult tail’s man page for details.
Paging Through Files with lessThe less command’s name is a joke; it’s a reference to the more command, which was an early file pager. The idea was to create a better version of more, so the developers called it less.
The idea behind less (and more, for that matter) is to enable you to read a file a screen at a time. When you type less filename, the program displays the first few lines of filename. You can then page back and forth through the file:
Pressing the spacebar moves forward through the file a screen at a time.Ûn
Pressing Esc followed by V moves backward through the file a screen at a time.Ûn
The Up and Down arrow keys move up or down through the file a line at a time.Ûn
You can search the file’s contents by pressing the slash (/) key followed by the search Ûn
term. For instance, typing /portable finds the first occurrence of the string portable after the current position. Typing a slash followed by the Enter key moves to the next occurrence of the search term. Typing n alone repeats the search forward, while typing N alone repeats the search backward.
You can search backward in the file by using the question mark (?) key rather than the Ûn
slash key.
You can move to a specific line by typing Ûn g followed by the line number, as in g50 to go to line 50.
When you’re done, type Ûn q to exit from the program.
Unlike most of the programs described here, less can’t be readily used in a pipe, except as the final command in the pipe. In that role, though, less is very useful because it enables you to readily examine lengthy output.
Although less is quite common on Linux systems and is typically con-figured as the default text pager, some Unix-like systems use more in this role. Many of less’s features, such as the ability to page backward in a file, don’t work in more.
04836c01.indd 27 1/17/09 2:20:34 PM
28 Chapter 1 n Exploring Linux Command-Line Tools
One additional less feature can be handy: Typing h displays less’s internal help system. This display summarizes the commands you may use, but it’s long enough that you must use the usual less paging features to view it all! When you’re done with the help screens, type q, just as if you were exiting from viewing a help document with less. This action will return you to your original document.
File-Summarizing CommandsThe final text-filtering commands I describe are used to summarize text in one way or another. The cut command takes segments of an input file and sends them to standard out-put, while the wc command displays some basic statistics on the file.
Extracting Text with cutThe cut command extracts portions of input lines and displays them on standard output. You can specify what to cut from input lines in several ways:
By byte The -b list or --bytes=list option cuts the specified list of bytes from the input file. (The format of a list is described shortly.)
By character The -c list or --characters=list option cuts the specified list of charac-ters from the input file. In practice, this method and the by-byte method usually produce identical results. (If the input file uses a multi-byte encoding system, though, the results won’t be identical.)
By field The -f list or --fields=list option cuts the specified list of fields from the input file. By default, a field is a tab-delimited section of a line, but you can change the delimiting character with the -d char, --delim=char, or --delimiter=char option option, where char is the character you want to use to delimit fields. Ordinarily, cut echoes lines that don’t con-tain delimiters. Including the -s or --only-delimited option changes this behavior so that the program doesn’t echo lines that don’t contain the delimiter character.
Many of these options take a list, which is a way to specify multiple bytes, characters, or fields. You make this specification by number; it can be a single number (such as 4), a closed range of numbers (such as 2-4), or an open range of numbers (such as -4 or 4-). In this final case, all bytes, characters, or fields from the beginning of the line to the specified number or from the specified number to the end of the line are included in the list.
The cut command is frequently used in scripts to extract data from some other command’s output. For instance, suppose you’re writing a script and the script needs to know the hard-ware address of your Ethernet adapter. This information can be obtained from the ifconfig command (described in more detail in Chapter 8, “Configuring Basic Networking”):
$ ifconfig eth0
eth0 Link encap:Ethernet HWaddr 00:0C:76:96:A3:73
inet addr:192.168.1.3 Bcast:192.168.1.255 Mask:255.255.255.0
inet6 addr: fe80::20c:76ff:fe96:a373/64 Scope:Link
UP BROADCAST NOTRAILERS RUNNING MULTICAST MTU:1500 Metric:1
04836c01.indd 28 1/17/09 2:20:34 PM

Using Regular Expressions 29
RX packets:7127424 errors:0 dropped:0 overruns:0 frame:0
TX packets:5273519 errors:0 dropped:0 overruns:0 carrier:0
collisions:0 txqueuelen:1000
RX bytes:6272843708 (5982.2 Mb) TX bytes:1082453585 (1032.3 Mb)
Interrupt:10 Base address:0xde00
Unfortunately, most of this information is extraneous for the desired purpose. The hard-ware address is the 6-byte hexadecimal number following HWaddr. To extract that data, you can combine grep (described shortly, in “Using grep”) with cut in a pipe:
$ ifconfig eth0 | grep HWaddr | cut -d “ “ -f 11
00:0C:76:96:A3:73
Of course, in a script you would probably assign this value to a variable or otherwise process it through additional pipes. Chapter 9 describes scripts in more detail.
Obtaining a Word Count with wcThe wc command produces a word count (that’s where it gets its name), as well as line and byte counts, for a file:
$ wc file.txt
308 2343 15534 file.txt
This file contains 308 lines (or, more precisely, 308 newline characters); 2,343 words; and 15,534 bytes. You can limit the output to the newline count, the word count, the byte count, or a character count with the --lines (-l), --words (-w), --bytes (-c), or --chars (-m) option, respectively. You can also learn the maximum line length with the --max-line-length (-L) option.
For an ordinary ASCII file, the character and byte counts will be identical. These values may diverge for files that use multi-byte character encodings.
Using Regular ExpressionsMany Linux programs employ regular expressions, which are tools for expressing patterns in text. Regular expressions are similar in principle to the wildcards that can be used to specify multiple filenames. At their simplest, regular expressions can be plain text without adornment. Certain characters are used to denote patterns, though. Because of their impor-tance, I describe regular expressions here. I also cover two programs that make heavy use of regular expressions: grep and sed. These programs search for text within files and per-mit editing of files from the command line, respectively.
04836c01.indd 29 1/17/09 2:20:34 PM

30 Chapter 1 n Exploring Linux Command-Line Tools
Understanding Regular ExpressionsTwo forms of regular expression are common: basic and extended. Which form you must use depends on the program; some accept one form or the other, but others can use either type, depending on the options passed to the program. (Some programs use their own minor or major variants on either of these classes of regular expression.) The differences between basic and extended regular expressions are complex and subtle, but the fundamen-tal principles of both are similar.
The simplest type of regular expression is an alphabetic string, such as Linux or HWaddr. These regular expressions match any string of the same size or longer that contains the reg-ular expression. For instance, the HWaddr regular expression matches HWaddr, This is the HWaddr, and The HWaddr is unknown. The real strength of regular expressions comes in the use of non-alphabetic characters, which activate advanced matching rules:
Bracket expressions Characters enclosed in square brackets ([]) constitute bracket expres-sions, which match any one character within the brackets. For instance, the regular expres-sion b[aeiou]g matches the words bag, beg, big, bog, and bug.
Range expressions A range expression is a variant on a bracket expression. Instead of list-ing every character that matches, range expressions list the start and end points separated by a dash (-), as in a[2-4]z. This regular expression matches a2z, a3z, and a4z.
Any single character The dot (.) represents any single character except a newline. For instance, a.z matches a2z, abz, aQz, or any other three-character string that begins with a and ends with z.
Start and end of line The carat (^) represents the start of a line, and the dollar sign ($) denotes the end of a line.
Repetition operators A full or partial regular expression may be followed by a special symbol to denote how many times a matching item must exist. Specifically, an asterisk (*) denotes zero or more occurrences, a plus sign (+) matches one or more occurrences, and a question mark (?) specifies zero or one match. The asterisk is often combined with the dot (as in .*) to specify a match with any substring. For instance, A.*Lincoln matches any string that contains A and Lincoln, in that order—Abe Lincoln and Abraham Lincoln are just two possible matches.
Multiple possible strings The vertical bar (|) separates two possible matches; for instance, car|truck matches either car or truck.
Parentheses Ordinary parentheses (()) surround subexpressions. Parentheses are often used to specify how operators are to be applied; for example, you can put parentheses around a group of words that are concatenated with the vertical bar, to ensure that the words are treated as a group, any one of which may match, without involving surrounding parts of the regular expression.
Escaping If you want to match one of the special characters, such as a dot, you must escape it—that is, precede it with a backslash (\). For instance, to match a computer host-name (say, twain.example.com), you must escape the dots, as in twain\.example\.com.
04836c01.indd 30 1/17/09 2:20:35 PM

Using Regular Expressions 31
The preceding descriptions apply to extended regular expressions. Some details are dif-ferent for basic regular expressions. In particular, the ?, +, |, (, and ) symbols lose their special meanings. To perform the tasks handled by these characters, some programs, such as grep, enable you to recover the functions of these characters by escaping them (say, using \| instead of |). Whether you use basic or extended regular expressions depends on which form the program supports. For programs, such as grep, that support both, you can use either; which you choose is mostly a matter of personal preference.
Regular expression rules can be confusing, particularly when you’re first introduced to them. Some examples of their use, in the context of the programs that use them, will help. The next couple of sections provide such examples.
Using grepThe grep command is extremely useful. It searches for files that contain a specified string and returns the name of the file and (if it’s a text file) a line of context for that string. The basic grep syntax is as follows:
grep [options] regexp [files]
The regexp is a regular expression, as just described. The grep command supports a large number of options. Some of the more common options enable you to modify the way the program searches files:
Count matching lines Instead of displaying context lines, grep displays the number of lines that match the specified pattern if you use the -c or --count option.
Specify a pattern input file The -f file or --file=file option takes pattern input from the specified file rather than from the command line.
Ignore case You can perform a case-insensitive search, rather than the default case-sensi-tive search, by using the -i or --ignore-case option.
Search recursively The -r or --recursive option searches in the specified directory and all subdirectories rather than simply the specified directory. You can use rgrep rather than specify this option.
Use an extended regular expression The grep command interprets regexp as a basic regu-lar expression by default. To use an extended regular expression, you can pass the -E or --extended-regexp option. Alternatively, you can call egrep rather than grep; this variant command uses extended regular expressions by default.
A simple example of grep uses a regular expression with no special components:
$ grep -r eth0 /etc/*
This example finds all the files in /etc that contain the string eth0 (the identifier for the first Ethernet device). Because the example includes the -r option, it searches recursively, so files in subdirectories of /etc are examined as well as those in /etc itself. For each match-ing text file, the line that contains the string is printed.
04836c01.indd 31 1/17/09 2:20:35 PM
32 Chapter 1 n Exploring Linux Command-Line Tools
Some files in /etc can’t be read by ordinary users. Thus, if you type this command as a non-root user, you’ll see some error messages relating to grep’s inability to open files.
Ramping up a bit, suppose you want to locate all the files in /etc that contain the string eth0 or eth1. You can enter the following command, which uses a bracket expression to specify both variant devices:
$ grep eth[01] /etc/*
A still more complex example searches all files in /etc that contain the hostname twain.example.com or bronto.pangaea.edu and, later on the same line, the number 127. This task requires using several of the regular expression features. Expressed using extended regular expression notation, the command looks like this:
$ grep -E “(twain\.example\.com|bronto\.pangaea\.edu).*127” /etc/*
This command illustrates another feature you may need to use: shell quoting. Because the shell uses certain characters, such as the vertical bar and the asterisk, for its own pur-poses, you must enclose certain regular expressions in quotes lest the shell attempt to parse the regular expression as shell commands.
You can use grep in conjunction with commands that produce a lot of output in order to sift through that output for the material that’s important to you. (Several examples throughout this book use this technique.) For example, suppose you want to find the pro-cess ID (PID) of a running xterm. You can use a pipe to send the result of a ps command (described in Chapter 2) through grep:
# ps ax | grep xterm
The result is a list of all running processes called xterm, along with their PIDs. You can even do this in series, using grep to further restrict the output on some other criterion, which can be useful if the initial pass still produces too much output.
Using sedThe sed command directly modifies the contents of files, sending the changed file to stan-dard output. Its syntax can take one of two forms:
sed [options] -f script-file [input-file]
sed [options] script-text [input-file]
In either case, input-file is the name of the file you want to modify. (Modifications are temporary unless you save them in some way, as illustrated shortly.) The script (script-text or the contents of script-file) is the set of commands you want sed to per-form. When you pass a script directly on the command line, the script-text is typically enclosed in single quote marks. Table 1.3 summarizes a few sed commands that you can use in its scripts.
04836c01.indd 32 1/17/09 2:20:35 PM

Using Regular Expressions 33
Ta b LE 1. 3 Common sed Commands
Command Addresses Meaning
= 0 or 1 Display the current line number.
a\text 0 or 1 Append text to the file.
i\text 0 or 1 Insert text into the file.
r filename 0 or 1 Append text from filename into the file.
c\text Range Replace the selected range of lines with the provided text.
s/regexp/replacement Range Replace text that matches the regular expres-sion (regexp) with replacement.
w filename Range Write the current pattern space to the specified file.
q 0 or 1 Immediately quit the script, but print the current pattern space.
Q 0 or 1 Immediately quit the script.
Table 1.3 is incomplete; sed is quite complex, and this section merely intro-duces this tool.
The Addresses column of Table 1.3 requires elaboration: sed commands operate on addresses, which are line numbers. Commands may take no addresses, in which case they operate on the entire file; one address, in which case they operate on the specified line; or two addresses (a range), in which case they operate on that range of lines, inclusive.
In operation, sed looks something like this:
$ sed ‘s/2008/2009/‘ cal-2008.txt > cal-2009.txt
This command processes the input file, cal-2008.txt, using sed’s s command to replace the first occurrence of 2008 on each line with 2009. (If a single line may have more than one instance of the search string, you must perform a global search by appending g to the com-mand string, as in s/2008/2009/g.) By default, sed sends the modified file to standard out-put, so this example uses redirection to send the output to cal-2009.txt. The idea in this example is to quickly convert a file created for the year 2008 so that it can be used in 2009. If you don’t specify an input filename, sed works from standard input, so it can accept the output of another command as its input.
04836c01.indd 33 1/17/09 2:20:35 PM
34 Chapter 1 n Exploring Linux Command-Line Tools
Although it’s conceptually simple, sed is a very complex tool; even a modest summary of its capabilities would fill a chapter. You can consult its man page for basic information; but to fully understand sed, you may want to consult a book on the subject, such as Dale Dougherty and Arnold Robbins’s sed & awk, 2nd Edition (O’Reilly, 1997).
Certain sed commands, including the substitution command, are also used in Vi, which is described more fully in Chapter 5, “Booting Linux and Edit-ing Files.”
SummaryThe command line is the key to Linux. Even if you prefer GUI tools to text-mode tools, understanding text-mode commands is necessary to fully manage Linux. This task begins with the shell, which accepts commands you type and displays the results of those com-mands. In addition, shells support linking programs together via pipes and redirecting pro-grams’ input and output. These features enable you to perform complex tasks using simple tools by having each program perform its own small part of the task. This technique is fre-quently used with Linux text filters, which manipulate text files in various ways—sorting text by fields, merging multiple files, and so on.
Exam Essentials
Summarize features that Linux shells offer to speed up command entry. The command history often enables you to retrieve an earlier command that’s similar or identical to the one you want to enter. Tab completion reduces typing effort by letting the shell finish long command names or filenames. Command-line editing lets you edit a retrieved command or change a typo before committing the command.
Describe the purpose of the man command. The man command displays the manual page for the keyword (command, filename, system call, or other feature) that you type. This documentation provides succinct summary information that’s useful as a reference to learn about exact command options or features.
Explain the purpose of environment variables. Environment variables store small pieces of data—program options, information about the computer, and so on. This information can be read by programs and used to modify program behavior in a way that’s appropriate for the current environment.
Describe the difference between standard output and standard error. Standard output carries normal program output, whereas standard error carries high-priority output, such as error messages. The two can be redirected independently of one another.
04836c01.indd 34 1/17/09 2:20:36 PM

Exam Essentials 35
Explain the purpose of pipes. Pipes tie programs together by feeding the standard output from the first program into the second program’s standard input. They can be used to link together a series of simple programs to perform more complex tasks than any one of the programs could manage.
Summarize the structure of regular expressions. Regular expressions are strings that describe other strings. They can contain normal alphanumeric characters, which match the exact same characters, as well as several special symbols and symbol sets that match multiple different characters. The combination is a powerful pattern-matching tool used by many Linux programs.
04836c01.indd 35 1/17/09 2:20:36 PM

36 Chapter 1 n Exploring Linux Command-Line Tools
Review Questions
1. You type a command into bash and pass a long filename to it, but after you enter the com-mand, you receive a File not found error message because of a typo in the filename. How might you proceed?
A. Retype the command, and be sure you type the filename correctly, letter by letter.
B. Retype the command, but press the Tab key after typing a few letters of the long file-name to ensure that the filename is entered correctly.
C. Press the Up arrow key, and use bash’s editing features to correct the typo.
D. Any of the above.
2. Which of the following commands is implemented as an internal command in bash?
A. cat
B. echo
C. tee
D. sed
3. You type echo $PROC, and the computer replies Go away. What does this mean?
A. No currently running processes are associated with your shell, so you may log out without terminating them.
B. The remote computer PROC isn’t accepting connections; you should contact its adminis-trator to correct the problem.
C. Your computer is handling too many processes; you must kill some of them to regain control of the computer.
D. You, one of your configuration files, or a program you’ve run has set the $PROC envi-ronment variable to Go away.
4. What does the pwd command accomplish?
A. It prints the name of the working directory.
B. It changes the current working directory.
C. It prints wide displays on narrow paper.
D. It parses Web page URLs for display.
5. In an xterm window launched from your window manager, you type exec gedit. What will happen when you exit from the gedit program?
A. Your shell will be a root shell.
B. The gedit program will terminate, but nothing else unusual will happen.
C. Your X session will terminate.
D. The xterm window will close.
04836c01.indd 36 1/17/09 2:20:36 PM

Review Questions 37
6. What is the surest way to run a program (say, myprog) that’s located in the current working directory?
A. Type ./ followed by the program name: ./myprog.
B. Type the program name alone: myprog.
C. Type run followed by the program name: run myprog.
D. Type /. followed by the program name: /.myprog.
7. How does man display information by default on most Linux systems?
A. Using a custom X-based application
B. Using the Firefox Web browser
C. Using the less pager
D. Using the Vi editor
8. You want to store the standard output of the ifconfig command in a text file (file.txt) for future reference, and you want to wipe out any existing data in the file. How can you do so?
A. ifconfig < file.txt
B. ifconfig >> file.txt
C. ifconfig > file.txt
D. ifconfig | file.txt
9. What is the effect of the following command?$ myprog &> input.txt
A. Standard error to myprog is taken from input.txt.
B. Standard input to myprog is taken from input.txt.
C. Standard output and standard error from myprog are written to input.txt.
D. All of the above.
10. How many commands can you pipe together at once?
A. 2
B. 3
C. 4
D. An arbitrary number
11. You want to run an interactive script, gabby, which produces a lot of output in response to the user’s inputs. To facilitate future study of this script, you want to copy its output to a file. How might you do this?
A. gabby > gabby-out.txt
B. gabby | tee gabby-out.txt
C. gabby < gabby-out.txt
D. gabby &> gabby-out.txt
04836c01.indd 37 1/17/09 2:20:36 PM

38 Chapter 1 n Exploring Linux Command-Line Tools
12. A text-mode program, verbose, prints a lot of spurious “error” messages to standard error. How might you get rid of those messages while still interacting with the program?
A. verbose | quiet
B. verbose &> /dev/null
C. verbose 2> /dev/null
D. verbose > junk.txt
13. How do the > and >> redirection operators differ?
A. The > operator creates a new file or overwrites an existing one; the >> operator creates a new file or appends to an existing one.
B. The > operator creates a new file or overwrites an existing one; the >> operator appends to an existing file or issues an error message if the specified file doesn’t exist.
C. The > operator redirects standard output; the >> operator redirects standard error.
D. The > operator redirects standard output; the >> operator redirects standard input.
14. What program would you use to display the end of a configuration file?
A. uniq
B. cut
C. tail
D. wc
15. What is the effect of the following command?$ pr report.txt | lpr
A. The file report.txt is formatted for printing and sent to the lpr program.
B. The files report.txt and lpr are combined together into one file and sent to standard output.
C. Tabs are converted to spaces in report.txt, and the result is saved in lpr.
D. None of the above.
16. Which of the following commands will number the lines in aleph.txt? (Select all that apply.)
A. fmt aleph.txt
B. nl aleph.txt
C. cat -b aleph.txt
D. cat -n aleph.txt
17. Which of the following commands will change all occurrences of dog in the file animals.txt to mutt in the screen display?
A. sed –s “dog” “mutt” animals.txt
B. grep –s “dog||mutt” animals.txt
C. sed ‘s/dog/mutt/g’ animals.txt
D. cat animals.txt | grep –c “dog” “mutt”
04836c01.indd 38 1/17/09 2:20:36 PM
Review Questions 39
18. You’ve received an ASCII text file (longlines.txt) that uses no carriage returns within paragraphs but two carriage returns between paragraphs. The result is that your preferred text editor displays each paragraph as a very long line. How can you reformat this file so that you can more easily edit it (or a copy)?
A. sed ‘s/Ctrl-M/NL/‘ longlines.txt
B. fmt longlines.txt > longlines2.txt
C. cat longlines.txt > longlines2.txt
D. pr longlines.txt > longlines2.txt
19. Which of the following commands will print lines from the file world.txt that contain matches to changes and changed?
A. grep change[ds] world.txt
B. sed change[d-s] world.txt
C. od “change’d|s’“ world.txt
D. cat world.txt changes changed
20. Which of the following regular expressions will match the strings dig and dug but not dog?
A. d.g
B. d[iu]g
C. d[i-u]g
D. di*g
04836c01.indd 39 1/17/09 2:20:37 PM

40 Chapter 1 n Exploring Linux Command-Line Tools
Answers to Review Questions
1. D. Any of these approaches will work, or at least might work. (You might err when per-forming any of them.) Option B or C is likely to be the most efficient approach; with a long filename to type, option A is likely to be tedious.
2. B. The echo command is implemented internally to bash, although an external version is also available on most systems. The cat, tee, and sed commands are not implemented internally to bash, although they can be called from bash as external commands.
3. D. The echo command echoes what follows to standard output, and $PROC is an environment variable. Thus, echo $PROC displays the value of the $PROC environment variable, meaning that it must have been set to the specified value by you, one of your configuration files, or a program you’ve run. Although many environment variables are set to particular values to con-vey information, $PROC isn’t a standard environment variable that might be associated with information described in options A, B, or C.
4. A. The pwd command prints (to standard output) the name of the current working directory. The remaining options are simply incorrect, although option B describes the cd command and various tools can be used to reformat wide text for display or printing in fewer columns, as in option C.
5. D. The exec command causes the rest of the command to replace the current shell. Thus, when you exit from gedit in this scenario, the result will be the same as if you’d terminated the shell, namely, the xterm window will close. The exec command doesn’t raise the execu-tion privilege, so option A is incorrect. (The su and sudo commands can raise execution privilege, though.) Because the xterm window closes, option B is incorrect. X won’t ordi-narily terminate when a single xterm does, and definitely not if that xterm was launched from a window manager, so option C is incorrect.
6. A. The dot (.) character refers to the current working directory, and the slash (/) is a directory separator. Thus, preceding a program name by ./ unambiguously identifies the intention to run the program that’s stored in the current directory. Option B will run the first instance of the program that’s found on the current path. Because paths often omit the current directory for security reasons, this option is likely to fail. The run command isn’t a standard Linux com-mand, so option C is unlikely to do anything, much less what the question specifies. Option D would be correct except that it reverses the order of the two characters. The effect is to attempt to run the .myprog file in the root (/) directory. This file probably doesn’t exist, and even if it did, it’s not the file the question specifies should be run.
7. C. By default, man uses the less pager to display information on most Linux systems. Although an X-based version of man does exist (xman), the basic man doesn’t use a custom X-based application, nor does it use Firefox or the Vi editor.
04836c01.indd 40 1/17/09 2:20:37 PM
Answers to Review Questions 41
8. C. The > redirection operator stores a command’s standard output in a file, overwriting the contents of any existing file by the specified name. Option A specifies the standard input redirection so that ifconfig will take the contents of file.txt as input. Option B is almost correct; the >> redirection operator redirects standard output, as requested, but it appends data to the specified file rather than overwriting it. Option D specifies a pipe; the output of ifconfig is sent through the file.txt program, if it exists. (Chances are it doesn’t, so you’d get a command not found error message.)
9. C. The &> redirection operator sends both standard output and standard error to the speci-fied file, as option C states. (The name of the file, input.txt, is intentionally deceptive, but the usage is still valid.) Option A mentions standard error but describes it as if it were an input stream, which it’s not; it’s an output stream. Option B mentions standard input, but the &> operator doesn’t affect standard input.
10. D. In principle, you can pipe together as many commands as you like. (In practice, of course, there will be limits based on input buffer size, memory, and so on, but these limits are far higher than the 2, 3, or 4 commands specified in options A, B, and C.)
11. B. The tee command sends its output both to standard output and to a named file. Thus, placing the tee command (with an output filename) after another command and a pipe will achieve the desired effect. Options A and D redirect gabby’s output to a file, which means you won’t be able to see the output and interact with it. Option C sends the contents of gabby-out.txt to gabby as input, which isn’t what’s desired, either.
12. C. The 2> redirection operator redirects standard error only, leaving standard output unaf-fected. Sending standard error to /dev/null gets rid of it. Option A pipes the standard output of verbose through the quiet program, which isn’t a standard Linux program. Option B sends both standard output and standard error to /dev/null, so you won’t be able to interact with the program, as the question specifies you must be able to do. Option D redirects standard output only to the junk.txt file, so once again, interaction will be impossible—and you’ll see the unwanted error messages on the screen.
13. A. Option A correctly describes the difference between these two redirection operators. Option B is almost correct, but the >> operator will create a new file if one doesn’t already exist. The >> operator does not redirect standard error (as stated in option C) or standard input (as stated in option D).
14. C. The tail command displays the final 10 lines of a file. (You can change the number of lines displayed with the -n option.) The uniq command removes duplicate lines from a list. The cut command echoes the specified characters or fields from an input text file. The wc command displays counts of the number of characters, words, and lines in a file.
15. A. The pr program takes a text file as input and adds formatting features intended for printing, such as a header and blank lines to separate pages. The command also pipes the output through lpr (which is a Linux printing command).
04836c01.indd 41 1/17/09 2:20:37 PM
42 Chapter 1 n Exploring Linux Command-Line Tools
16. B, C, D. The nl command numbers lines, so it does this task without any special options. (Its options can fine-tune the way it numbers lines, though.) The cat command can also number lines via its -b and -n options; -b numbers non-blank lines, whereas -n numbers all lines (including blank lines). The fmt command is the only one described here that will not number the lines of the input file.
17. C. The sed utility can be used to “stream” text and change one value to another. In this case, the s option is used to replace dog with mutt. The syntax in option A is incorrect, and choices B and D are incorrect because grep doesn’t include the functionality needed to make the changes.
18. B. The fmt command performs the desired task of shortening long lines by inserting car-riage returns. It sends its results to standard output, so option B uses output redirection to save the results in a new file. The sed command of option A won’t accomplish anything useful; it only replaces the string Ctrl-M with the string NL. Although these strings are both sometimes used as abbreviations for carriage returns or new lines, the replacement of these literal strings isn’t what’s required. Option C creates an exact copy of the original file, with the long single-line paragraphs intact. Although option D’s pr command is a formatting tool, it won’t reformat individual paragraphs. It will also add headers that you probably don’t want.
19. A. The grep utility is used to find matching text within a file and print those lines. It accepts regular expressions, which means you can place in brackets the two characters that differ in the words for which you’re looking. The syntax for sed, od, and cat wouldn’t per-form the specified task.
20. B. The bracket expression within the d[iu]g regular expression means that either i or u may be the middle character; hence, this regular expression matches both dig and dug but not dog. Option A’s dot matches any single character, so d.g matches all three words. The range expression [i-u] matches any single character between i and u, inclusive. Because o falls between these two letters, option C matches all three words. Finally, di*g matches dig, diig, diiig, or any other word that begins with d, ends with g, and contains any number of i letters in-between. Thus, option D matches dig but not dug as required.
04836c01.indd 42 1/17/09 2:20:37 PM


![CompTIA Linux+ [Powered by LPI] Exam 1: LX0-101 … Linux+ [Powered by LPI] Exam 1: LX0-101 Exam Number : LX0-101 Passing Score : 800 Time Limit : 120 min File Version : 1.0](https://static.documents.pub/doc/80x56/5b49c17f7f8b9a5c278b9fd3/comptia-linux-powered-by-lpi-exam-1-lx0-101-linux-powered-by-lpi-exam-1.jpg)


