61
1 SUPPLEMENT EPIC THE MOSSINIAN CAMPAIGN

1
SUPPLEMENT
EPIC
THE MOSSINIAN CAMPAIGN


2
“We shall fall upon them as an endless wave; they shall drown beneath our dead” - Major General Jeridan, 5879th Death Korps Regiment
Contents . . . . . . . . . . . . . . . . . . . . . . . . . . . . . . . . . . . . . . . . . . . . . .Contents . . . . . . . . . . . . . . . . . . . . . . . . . . . . . . . . . . . . . . . . . . . . . .Contents . . . . . . . . . . . . . . . . . . . . . . . . . . . . . . . . . . . . . . . . . . . . . .Contents . . . . . . . . . . . . . . . . . . . . . . . . . . . . . . . . . . . . . . . . . . . . . . Introduction. . . . . . . . . . . . . . . . . . . . . . . . . . . . . . . . . . . . . . . . . . . .Introduction. . . . . . . . . . . . . . . . . . . . . . . . . . . . . . . . . . . . . . . . . . . .Introduction. . . . . . . . . . . . . . . . . . . . . . . . . . . . . . . . . . . . . . . . . . . .Introduction. . . . . . . . . . . . . . . . . . . . . . . . . . . . . . . . . . . . . . . . . . . . SECTION 1 SECTION 1 SECTION 1 SECTION 1 ———— BACKGROUNDBACKGROUNDBACKGROUNDBACKGROUND The Mossinian Campaign . . . . . . . . . . . . . . . . . . . . . . . . . . . . . . . . . .The Mossinian Campaign . . . . . . . . . . . . . . . . . . . . . . . . . . . . . . . . . .The Mossinian Campaign . . . . . . . . . . . . . . . . . . . . . . . . . . . . . . . . . .The Mossinian Campaign . . . . . . . . . . . . . . . . . . . . . . . . . . . . . . . . . . SECTION 2 SECTION 2 SECTION 2 SECTION 2 ———— COLLECTING & PAINTINGCOLLECTING & PAINTINGCOLLECTING & PAINTINGCOLLECTING & PAINTING Gallery . . . . . . . . . . . . . . . . . . . . . . . . . . . . . . . . . . . . . . . . . . . . . . . Gallery . . . . . . . . . . . . . . . . . . . . . . . . . . . . . . . . . . . . . . . . . . . . . . . Gallery . . . . . . . . . . . . . . . . . . . . . . . . . . . . . . . . . . . . . . . . . . . . . . . Gallery . . . . . . . . . . . . . . . . . . . . . . . . . . . . . . . . . . . . . . . . . . . . . . . Hobby Guides . . . . . . . . . . . . . . . . . . . . . . . . . . . . . . . . . . . . . . . . . . Hobby Guides . . . . . . . . . . . . . . . . . . . . . . . . . . . . . . . . . . . . . . . . . . Hobby Guides . . . . . . . . . . . . . . . . . . . . . . . . . . . . . . . . . . . . . . . . . . Hobby Guides . . . . . . . . . . . . . . . . . . . . . . . . . . . . . . . . . . . . . . . . . . SECTION 3 SECTION 3 SECTION 3 SECTION 3 ———— FORCESFORCESFORCESFORCES Death Korps of Krieg Forces . . . . . . . . . . . . . . . . . . . . . . . . . . . . . . . Death Korps of Krieg Forces . . . . . . . . . . . . . . . . . . . . . . . . . . . . . . . Death Korps of Krieg Forces . . . . . . . . . . . . . . . . . . . . . . . . . . . . . . . Death Korps of Krieg Forces . . . . . . . . . . . . . . . . . . . . . . . . . . . . . . . The Mossinian Forces . . . . . . . . . . . . . . . . . . . . . . . . . . . . . . . . . . . . The Mossinian Forces . . . . . . . . . . . . . . . . . . . . . . . . . . . . . . . . . . . . The Mossinian Forces . . . . . . . . . . . . . . . . . . . . . . . . . . . . . . . . . . . . The Mossinian Forces . . . . . . . . . . . . . . . . . . . . . . . . . . . . . . . . . . . . SECTION 4 SECTION 4 SECTION 4 SECTION 4 ———— GAMINGGAMINGGAMINGGAMING Gaming With The Death Korps Of Krieg . . . . . . . . . . . . . . . . . . . . . . . Gaming With The Death Korps Of Krieg . . . . . . . . . . . . . . . . . . . . . . . Gaming With The Death Korps Of Krieg . . . . . . . . . . . . . . . . . . . . . . . Gaming With The Death Korps Of Krieg . . . . . . . . . . . . . . . . . . . . . . . Death Korps Of Krieg Army List . . . . . . . . . . . . . . . . . . . . . . . . . . . . .Death Korps Of Krieg Army List . . . . . . . . . . . . . . . . . . . . . . . . . . . . .Death Korps Of Krieg Army List . . . . . . . . . . . . . . . . . . . . . . . . . . . . .Death Korps Of Krieg Army List . . . . . . . . . . . . . . . . . . . . . . . . . . . . . Gaming With The Mossinian Rebels. . . . . . . . . . . . . . . . . . . . . . . . . . .Gaming With The Mossinian Rebels. . . . . . . . . . . . . . . . . . . . . . . . . . .Gaming With The Mossinian Rebels. . . . . . . . . . . . . . . . . . . . . . . . . . .Gaming With The Mossinian Rebels. . . . . . . . . . . . . . . . . . . . . . . . . . . Mossinian Rebels Army List . . . . . . . . . . . . . . . . . . . . . . . . . . . . . . . .Mossinian Rebels Army List . . . . . . . . . . . . . . . . . . . . . . . . . . . . . . . .Mossinian Rebels Army List . . . . . . . . . . . . . . . . . . . . . . . . . . . . . . . .Mossinian Rebels Army List . . . . . . . . . . . . . . . . . . . . . . . . . . . . . . . . White Scars History . . . . . . . . . . . . . . . . . . . . . . . . . . . . . . . . . . . . . .White Scars History . . . . . . . . . . . . . . . . . . . . . . . . . . . . . . . . . . . . . .White Scars History . . . . . . . . . . . . . . . . . . . . . . . . . . . . . . . . . . . . . .White Scars History . . . . . . . . . . . . . . . . . . . . . . . . . . . . . . . . . . . . . . White Scars Army List. . . . . . . . . . . . . . . . . . . . . . . . . . . . . . . . . . . . . White Scars Army List. . . . . . . . . . . . . . . . . . . . . . . . . . . . . . . . . . . . . White Scars Army List. . . . . . . . . . . . . . . . . . . . . . . . . . . . . . . . . . . . . White Scars Army List. . . . . . . . . . . . . . . . . . . . . . . . . . . . . . . . . . . . . Scenarios. . . . . . . . . . . . . . . . . . . . . . . . . . . . . . . . . . . . . . . . . . . . . . Scenarios. . . . . . . . . . . . . . . . . . . . . . . . . . . . . . . . . . . . . . . . . . . . . . Scenarios. . . . . . . . . . . . . . . . . . . . . . . . . . . . . . . . . . . . . . . . . . . . . . Scenarios. . . . . . . . . . . . . . . . . . . . . . . . . . . . . . . . . . . . . . . . . . . . . . Development History . . . . . . . . . . . . . . . . . . . . . . . . . . . . . . . . . . . . . Development History . . . . . . . . . . . . . . . . . . . . . . . . . . . . . . . . . . . . . Development History . . . . . . . . . . . . . . . . . . . . . . . . . . . . . . . . . . . . . Development History . . . . . . . . . . . . . . . . . . . . . . . . . . . . . . . . . . . . . Death Korps Reference Sheet . . . . . . . . . . . . . . . . . . . . . . . . . . . . . . . Death Korps Reference Sheet . . . . . . . . . . . . . . . . . . . . . . . . . . . . . . . Death Korps Reference Sheet . . . . . . . . . . . . . . . . . . . . . . . . . . . . . . . Death Korps Reference Sheet . . . . . . . . . . . . . . . . . . . . . . . . . . . . . . . Mossinian Rebels Reference Sheet. . . . . . . . . . . . . . . . . . . . . . . . . . . .Mossinian Rebels Reference Sheet. . . . . . . . . . . . . . . . . . . . . . . . . . . .Mossinian Rebels Reference Sheet. . . . . . . . . . . . . . . . . . . . . . . . . . . .Mossinian Rebels Reference Sheet. . . . . . . . . . . . . . . . . . . . . . . . . . . . White Scars Reference Sheet. . . . . . . . . . . . . . . . . . . . . . . . . . . . . . . . White Scars Reference Sheet. . . . . . . . . . . . . . . . . . . . . . . . . . . . . . . . White Scars Reference Sheet. . . . . . . . . . . . . . . . . . . . . . . . . . . . . . . . White Scars Reference Sheet. . . . . . . . . . . . . . . . . . . . . . . . . . . . . . . .
Written by:Written by:Written by:Written by:
Benjamin Martyn SkinnerBenjamin Martyn SkinnerBenjamin Martyn SkinnerBenjamin Martyn Skinner
Army Lists by:Army Lists by:Army Lists by:Army Lists by:
Everything in this document is copyright of its original creators. notably those names, definitions, logos and visual media Everything in this document is copyright of its original creators. notably those names, definitions, logos and visual media Everything in this document is copyright of its original creators. notably those names, definitions, logos and visual media Everything in this document is copyright of its original creators. notably those names, definitions, logos and visual media items which are and will remain the intellectual property, trademarks and copyrights of Games Workshop Ltd.items which are and will remain the intellectual property, trademarks and copyrights of Games Workshop Ltd.items which are and will remain the intellectual property, trademarks and copyrights of Games Workshop Ltd.items which are and will remain the intellectual property, trademarks and copyrights of Games Workshop Ltd.
Sale of this document is expressly forbidden.Sale of this document is expressly forbidden.Sale of this document is expressly forbidden.Sale of this document is expressly forbidden.
THE MOSSINIAN CAMPAIGN
2222 3333 5555 13131313 15151515 21212121 37373737 47474747 48484848 49494949 50505050 51515151 52525252 53535353 56565656 57575757 58585858 59595959
David Susco David Susco David Susco David Susco ---- Proof Reading. Paul Wake Paul Wake Paul Wake Paul Wake - Proof Reading. Barnaby Skinner Barnaby Skinner Barnaby Skinner Barnaby Skinner - Proof Reading. ‘Commissar Kinyaf’ ‘Commissar Kinyaf’ ‘Commissar Kinyaf’ ‘Commissar Kinyaf’ ---- Artwork on page 21. Peter LaycockPeter LaycockPeter LaycockPeter Laycock - Artworks on pages 28, 36, 37-38, 49, 50 and the front & back cover artworks. Bombard photograph on page 45. Jack Williams Jack Williams Jack Williams Jack Williams ---- Artwork on page 4. ‘Howard‘Howard‘Howard‘Howard----33’ 33’ 33’ 33’ ---- CGI Render on page 47. Ryan Downes Ryan Downes Ryan Downes Ryan Downes ---- Aircraft photographs on page 46. Justin Knight Justin Knight Justin Knight Justin Knight ---- Howitzer & AA Gun photographs on page 43. Steve Marr Steve Marr Steve Marr Steve Marr ---- Firestrike launcher photograph on page 42. Glyn Green Glyn Green Glyn Green Glyn Green ---- Hellhound photograph on page 44 & Heavy Mortar photograph on page 42. Christian Salling Christian Salling Christian Salling Christian Salling ---- Photographs on pages 15 & 18. Patrick Weaver Patrick Weaver Patrick Weaver Patrick Weaver ---- Deathstrike silo on page 27, Quartermaster unit on page 13. Paul Townsend Paul Townsend Paul Townsend Paul Townsend ---- Gorgon Painting Guide.
Games Workshop Games Workshop Games Workshop Games Workshop ---- For creating such a compelling setting and game system and for encouraging us to pl ay in it. Tacti cal Command F orum Members Tacti cal Command F orum Members Tacti cal Command F orum Members Tacti cal Command F orum Members ---- For all the theoryhammering and playtesting. W.L. Sturtevant W.L. Sturtevant W.L. Sturtevant W.L. Sturtevant ---- For arranging the print run for Epi c: Siege.
Death Korps of Krieg Death Korps of Krieg Death Korps of Krieg Death Korps of Krieg ---- Benjamin Martyn Skinner Mossinian Rebels Mossinian Rebels Mossinian Rebels Mossinian Rebels ---- Chris Hayes, Matthew Arnold & Benjamin Martyn Skinner White Scars Marines White Scars Marines White Scars Marines White Scars Marines ---- O ri gi nal arm y li st by M a tt K e e f e, a d just m e nt s by H e nri kk i A l m usa f o r t h e Ne tE A P ro je ct
Contributors:Contributors:Contributors:Contributors:
Special thanks to:Special thanks to:Special thanks to:Special thanks to:

3
Welcome to EPIC: SIEGE, an unofficialunofficialunofficialunofficial supplement for Epic. Contained in the following pages you will find the history of the war known as the ‘Mossinian Campaign’, as well as the background and rules for the armies that were involved in the war. The major players in the war for the continent of Mossino are the rebellious citizens of the area and the famous Imperial Guard Regiment sent to pacify them, the Death Korps of Krieg. Also included is an army list for a Space Marine Chapter that was tangentially involved in the conflict, the White Scars. As well as army lists, you will also find scenarios that recreate some of the major battles and events of the siege. These scenarios are not designed as balanced match-ups between two equal forces, but as recreations of the events found in the tale of the war for Mossino. The objective for the players is not always to ‘win’ in the manner normally associated with tabletop wargaming, but to participate in the war yourself, to tell the story of the Mossino Campaign as a visceral experience right before your eyes (oh all right, sometimes it can be cool to pull off a victory against the intention of the designer and your opponent combined… that’s one of the reasons why re-creating famous historical battles is such a popular pastime for many wargamers!). To go into greater detail:
• The Mossinian RebelsThe Mossinian RebelsThe Mossinian RebelsThe Mossinian Rebels army list is essentially a defensive-biased Siege army list, which makes use of several Out Of Production models from previous versions of Epic in order to ‘de-tech’ it.
• The White ScarsThe White ScarsThe White ScarsThe White Scars army list has been slightly modified from its originally published form.
• The Death Korps of KriegThe Death Korps of KriegThe Death Korps of KriegThe Death Korps of Krieg army list has been designed as a higher-tech siege list, more focused towards offensive warfare than the Mossinian Rebels.
If you know your history (and if not, then go educate yourself and come back later!), then if the Siege of Mossino is World War One, then the Mossinian Rebels are the Germans with their superior defensive positions, while the Death Korps of Krieg are the siegebreaking British, with a more offensive ethos. The fact that these army lists are not official doesn’t automatically mean that they’re unbalanced or simply overpowered, in fact we think they’re quite well balanced! If you do have comments to make about the power of the army lists contained here, please drop by Tactical Command (http://www.tacticalwargames.net/forums/index.cgi) or the Epic sub-forum on Warseer Warseer Warseer Warseer and leave your thoughts. Note that the Death Korps Gorgon, Centaur & Macharius models featured in this supplement are scratch builds, whilst most other featured model can be bought from: http://www.forgeworld.co.ukhttp://www.forgeworld.co.ukhttp://www.forgeworld.co.ukhttp://www.forgeworld.co.uk or http://gameshttp://gameshttp://gameshttp://games----workshop.comworkshop.comworkshop.comworkshop.com Many models in the Mossinian Rebels army list are Out Of Production, and can only be obtained from second-hand trading. So for now, I’d just like to say welcome to the Mossinian Campaign, I hope you enjoy using this supplement as much as we’ve enjoyed creating it. - Ben Martyn S.
INTRODUCTION

4
Death Korps infantry of the 977th Regiment during the third assault on the Barum Line, on the 90th day of the war.

5
Treachery On Casinum VTreachery On Casinum VTreachery On Casinum VTreachery On Casinum V The Imperial planet Casinum V was a sparsely populated agri-world of little renown, nestled in the western reaches of Ultima Segmentum. Settled in early M34 in order to exploit its mild climate, Casinum V was tithed regularly for nearly seven millennia for foodstuffs. The planet’s main import during this period was Oil, which was used in the light munitions factories that were constructed in M38. Each decade also saw the raising of a small number of Guard Regiments for service off-world. In 924.3.M41, a group of apparently elected representatives began issuing demands on behalf of the planet’s third-largest continent, Mossino. As if taking part in elections were not heresy enough, the representatives’ agenda called for full self-governance for Mossino, free trade terms and an ecclesiastical blessing! In response, Governor Jerni, the planetary ruler, dispatched a force composed of PDF troops to retake control of the continent. The intervention was stymied when, upon arrival on Mossino, the majority of the intervention force refused to take action against the rebels and had seemingly deserted to join the ranks of the opposition. Massively diminished without fighting a single battle, the Governor’s army withdrew from the continent after only a few minor skirmishes. 925.M41 saw further escalation of the conflict in the skies if not on the ground, as the planetary governor refused to yield and the rebels consolidated their hold over Mossino. Having failed for two years to quell the rebellion, in 926.6.M41, a distress signal was issued by Governor Jerni informing the Departmento Munitorum that the world’s third continent was in open and unceasing rebellion against rightful Imperial Law. Upon receipt, the distress message was passed up the hierarchy of the Departmento Munitorum until it reached Area-Adept Anata Borr, who was authorised to make requests for military support on behalf of Casinum V. A missive was duly dispatched to a nearby Adeptus Astartes Chapter, the White Scars, which did not reply. Therefore, Borr set about marshalling an army of lesser men. A scan of the Munitorum database found several infantry regiments from Krieg available. The regiments had just finished an extended campaign against a Hrud infestation of a nearby planet and were undergoing a post-campaign rationalisation from fifteen Regiments into seven due to campaign losses. The seven newly amalgamated regiments, along with their logistical train and supporting Imperial Navy atmospheric fighters and bombers, were immediately ordered to relocate to the Casinum system.
By 927.3.M41, all elements of the task force had arrived in-system and had made contact with Governor Jerni. Within a week, the Death Korps ranking officer, General Whelan, had formed a council of war. The council’s first action was to subsume the two available PDF Regiments into General Whelan’s command. Planning was then begun to determine the best way in which Mossino could be brought back under Imperial Law. The PlanThe PlanThe PlanThe Plan Mossino was a semi-industrial continent, ringed with mountains, making any potential movement across the landmass a challenging prospect. Although there were several large roadways and maglev tracks leading to the coast, orbital surveil lance indicated newly-construc ted fortifications which appeared strong enough to hold against an attacking army.
Planet: Casinum V. Length of Day: 26 Hours. Continents: (Population) - Altego (4 Million) - Cantageo (1 Million) - Mossino (1.6 Million) Main exports: Agri-Products, Light Munitions. Main imports: Oil.
Krieg Regiments:Krieg Regiments:Krieg Regiments:Krieg Regiments: 973rd Death Korps Regiment—12,000 Infantry 974th Death Korps Regiment—12,000 Infantry 975th Death Korps Regiment—12,000 Infantry 976th Death Korps Regiment—12,000 Infantry 977th Death Korps Regiment—12,000 Infantry 978th Death Korps Regiment—12,000 Infantry 979th Death Korps Regiment—7,000 Infantry Casinum Regiments:Casinum Regiments:Casinum Regiments:Casinum Regiments: 1st Casinum Irregulars—30,000 Infantry 2nd Casinum Irregulars—30,000 Infantry Imperial Navy Squadrons:Imperial Navy Squadrons:Imperial Navy Squadrons:Imperial Navy Squadrons: 1st Fighter Squadron—20 Thunderbolts 2nd Fighter Squadron—20 Thunderbolts 3rd Fighter Squadron—18 Thunderbolts 1st Bomber Squadron—23 Marauders Total Imperial Forces—127,000 Infantry Total Rebel Forces (Estimated) - 60,000 Infantry
SECTION 1—THE MOSSINO CAMPAIGN

6
In addition, the centre of the continent was protected by several massive anti-aircraft batteries, effectively denying a direct attack.. As an alternative to a frontal assault, General Whelan proposed a landing on an area of the continent known as the Rooleg peninsula, which offered a somewhat short, albeit difficult approach to Mossino’s capital city; Forty hours after the decision was made, the first landings began.
Day 1 Day 1 Day 1 Day 1 ---- PlanetfallPlanetfallPlanetfallPlanetfall Five Colossus drop ships containing the lighter elements of the 979th Death Korps Regiment were the first Imperial craft to make planetfall. They touched down on the Southern tip of the peninsula just before the cold dawn. Within two hours, 3000 Kriegsmen had taken up positions across the width of the peninsula’s tip and had begun to dig in, awaiting the second landing scheduled for mid-morning. Behind the shallow defensive line, Enginseers supervised the deployment of artillery and anti-aircraft gun platforms under the direction of General Whelan, who had chosen to lead the first landing personally; Before the second landing arrived, the Mossinian rebels launched their attack. It began with an artillery barrage from behind the mountains to the north, against which the Death Korps’ own artillery could only reply with ineffective counter-battery fire. The rebel artillery was heavy and accurate, inflicting scores of casualties. However, with loyalist reinforcements an inevitable eventuality, the rebels were forced to move quickly and strike at the landing site in an effort to expel the Death Korps from the continent before they could secure a beachhead.
As artillery continued to shell the Death Korps formations, more than 5000 rebels crossed the mountain ridge above the drop site and began moving between covered positions towards the ad-hoc Death Korps line. Given targets they could see, the Death Korps artillery platforms switched from counter-battery fire to suppressive duties against the encroaching rebels. Heavy mortars and Quad Launchers joined the defence as explosions tore the mountainside apart, hammering remorselessly into the lines of rebel infantry. Several rebel formations routed in the face of the concentrated firepower, fleeing back the way they had come before they even reached the Imperial line. The majority came on recklessly however, abandoning all pretence of seeking cover as they charged the thin Krieg lines. Soon, firefights began in earnest as the rebels came into small arms range. The fighting was intense, with both sides knowing that they were fighting a crucial battle. If the rebels failed then the loyalists would secure a foothold on the continent, while if the Death Korps broke there was nowhere to flee that would not result in death. After fifteen minutes of infantry clashes, the weight of the attackers’ numbers began to tell, slowly buckling the centre of the Imperial line as squads were forced to fall back or be overwhelmed. Seeing that his centre was close to breaking, General Whelan committed his only reserves, three platoons of Grenadiers that had been held behind the Death Korps line. With salvos of hotshot lasgun fire and devastatingly effective Heavy Flamer teams, the Grenadiers entered the battle, pinning the centre of the Death Korps line back into place, at least temporarily. However, other sections of the Imperial line soon began to fall back under the unrelenting pressure of the Mossinian rebels. Foot by foot and death by death, the Death Korps were forced backwards towards the coast. With a heavy drone, a pair of rebel bombers appeared from the northwest, angling towards the Imperial line. A crescendo of flak enveloped them, causing one to explode into a meteor of flame that clipped a wing from the second, sending it spinning down into the mountains overlooking the battle zone. Cheers erupted from the faltering Death Korps line, before being stilled, as the droning sound of more approaching aircraft could be heard above the din of battle. The rebels pressed closer, believing that the rest of their air force was coming to deliver the final blow to the faltering Death Korps army, but the aircraft that soon appeared were not the medium-sized bombers of Mossino’s airforce; Ponderous and looming, five Colossus landing craft of the loyalist fleet broke through the cloud layer and made landfall behind the Death Korps lines.
The Rooleg peninsula is a land formation that juts some 60 miles from the main body of the Continent of Mossino.

7
Thousands of reinforcements poured out from the Landing Craft, amongst them were heavy vehicles such as Leman Russ Demolishers and Hellhounds, which collectively slammed into the rebel lines; The Mossinian rebels broke and ran for the mountain ridge, with the second wave of Death Korps troops close behind. Soon, the Krieg reinforcements had captured the low mountains overlooking the landing zone and began calling down artillery strikes against the rebel artillery positions that could now finally be seen in the low-lands to the north. Within an hour all rebel forces had pulled back and the landing zone was secured.
Day 15 Day 15 Day 15 Day 15 ---- The AdvanceThe AdvanceThe AdvanceThe Advance In accordance with the standard doctrine on Krieg, the Imperial Lines did not encroach further north until all of the Death Korps forces had made planetfall; After fourteen days the Death Korps troops were ready to advance. Portions of the 2nd Cassinum Irregulars were left to garrison the mountain line above the landing zone, which was now constantly busy with the work of unloading logistical supplies from transport craft for the campaign ahead. Beside the landing zone, servitors toiled unceasingly to hammer a flat area of ground into a compacted runway for the operation of the various atmospheric fighters and bombers that had accompanied the Imperial army to Mossino.
The advance finally began on day fifteen, as the Imperial forces pushed into the fifty miles of lowland countryside that led up towards the Barum Mesa, which was the only natural obstacle that now stood between the loyalist army and the rebellious capital city. The Death Korps advanced northwards steadily on a wide front, making five miles per day before halting to dig temporary entrenchments as dusk fell. In this cautious manner, the first twenty miles were covered without incident. On the fifth day of the advance, small skirmishes began to flare up across the line of advance as the rebel forces sought to harry the Imperial approach to Mossina City. As expected, the majority of the rebels had been deployed to defend the main roadways and maglev tracks that led from the periphery of Mossino to the interior and it was taking time to for the rebels to re-deploy their forces to resist the unexpected enemy in the south. As they lacked the numbers to face the Imperial forces in open battle the rebels scattered mines and tank traps as well as prepared ambushes in the path of the Imperial advance. These delaying tactics did not work well against the Death Korps’ methodical en-masse advance however, as any ambushing forces tended to be outnumbered and overwhelmed before they had the opportunity to escape. Those rebel formations that did affect an initial withdrawal were normally hunted down by the scouting Death Rider platoons that ranged ahead of the Imperial advance. After a week of delaying skirmishes, the rebels withdrew their remaining forces from the lowlands and retreated to a pre-prepared defence line upon the Barum Mesa. As soon as they reached this defensive line, the Death Korps attacked.
Day 29 Day 29 Day 29 Day 29 ---- The First Assault On The Barum LineThe First Assault On The Barum LineThe First Assault On The Barum LineThe First Assault On The Barum Line The Barum Line was mostly constructed
on top of a steep mesa, impassable to vehicles, so any assaults against the rebels could not make use of armoured support; Only infantry could hope to crack the Barum Line.
The Advance was to las t only 12 days, during which the loyalist regiments covered fifty miles, largely unopposed.
The first assault was attempted merely as a probing attack, to gauge the enemy’s strength and determination.
The Landing.The Landing.The Landing.The Landing. Losses:Losses:Losses:Losses: 979th Death Korps Regiment—2,000 Infantry Rebel Forces (Estimated) - 3,000 Infantry Imperial Forces Remaining - ~125,000 Infantry Rebel Forces Remaining - ~57,000 Infantry

8
At dawn on the twelfth day of the advance, the Death Korps guns opened fire on the western extents of the Barum Line. For two days the artillery pounded the rebel defences on the heights, after which General Whelan signalled the attack personally by blowing the first signal whistle. As one, the twelve thousand men of the 973rd Death Korps Regiment left their trenches and advanced on foot towards the dark silhouette of the Barum mesa above them. Thousands of heavy stubbers on both sides opened fire, Quad Launchers pounded in staccato rhythm and flame weapons roared. The clouds above the battlefield were lit up a baleful red as they brooded over the immense battlefield; beneath the glowering sky, tens of thousands of men came to close quarters and tried to kill each other. The battle raged for seven hours in a series of short-ranged firefights that surged against the Barum line time and time again, until finally the signal to pull back was issued. Of the twelve-thousand Kriegsmen who had assaulted the enemy fortifications, less than half had come back down in a fit state to recover and fight again, while the rebellious defence lines had held firm. The attack had failed.
Day 32 Day 32 Day 32 Day 32 ---- The Bombing Of Saint The Bombing Of Saint The Bombing Of Saint The Bombing Of Saint Barnab’s Commune.Barnab’s Commune.Barnab’s Commune.Barnab’s Commune. The post-battle analyses of the first assault all pointed towards one fact, the hostile artillery strikes had been far too accurate; The rebels must have had a sheltered position which overlooked the main battle line in order to coordinate their artillery. However, there was only one possible vantage point that the rebels could have used to look down
on the Death Korps’ advance during the first attack, an ancient ecclesiastical commune which nestled high on southern face on the western edge of the Barum Mesa. Many on Casinum regarded the commune as a place of holy pilgrimage, as legends spoke that Saint Barnab the Beholder of Terra had founded the commune himself during a post-heretical crusade. The idea that the loyal Ecclesiastical custodians of such a revered site could have allowed heretics to use their shrine as a place to direct artillery strikes against the forces of the Imperium was unthinkable. The monks were obviously either turned traitor or dead, but neither eventually mattered as much as one fact; the shrine had been defiled and it was the loyalists’ duty to cleanse it. The thirty-second day after the landing was unremarkable, with only minor skirmishes occurring across the now settling trench lines that stretched for nearly forty miles eastwards from the coast. However, the night brought the rumble of heavy engines and the thunder of explosions. Tracer fire cut at the sky for hours as unseen aircraft passed overhead. Morning showed what the night had wrought. Where once had stood a grand edifice of spiritual expression, now only rubble covered the summit of Barnab’s Peak. The ancient ecclesiastical com-mune had been destroyed. Days 60Days 60Days 60Days 60----totototo----90 90 90 90 ---- The Second And Third Assaults The Second And Third Assaults The Second And Third Assaults The Second And Third Assaults On The Barum LineOn The Barum LineOn The Barum LineOn The Barum Line The time following the destruction of Saint Barnab’s Commune brought little in the way of progress for the Imperial forces. Each day was spent in low-intensity warfare, with minor skirmishers between infiltrating scouting forces being the largest events of note along the thirty-mile battlefront. Slowly, the Imperial forces entrenched more of their heavy guns behind their lines, while on the mountains behind the wrecked commune the rebels were beginning to receive reinforcements. Both armies spent their days sheltering in trenches from the constant artillery and their nights repairing the damage. The rebel guns proved to be more accurate due to their commanding position above the lowlands, while the Death Korps guns were considerably more numerous. Twice more the Death Korps assaulted the Mesa, on the sixtieth and the ninetieth days of the intervention. Twice more they were repelled with heavy losses, while the rebels suffered only moderate losses. However, attrition was starting to adversely affect the Mossinian rebels. Before the start of the campaign the rebels had been able to call on a total of more than sixty-thousand men under arms, but after three months they had already they had lost nearly third of their numbers. The Imperium had lost thousands more than the rebels, but they had begun with twice the number
The First AssaultThe First AssaultThe First AssaultThe First Assault Action Losses:Action Losses:Action Losses:Action Losses: 973rd Death Korps Regiment—7,000 Infantry Rebel Forces - 4,000 Infantry Imperial Forces Remaining - ~117,000 Infantry Rebel Forces Remaining - ~50,000 Infantry
Saint Barnab’s Commune had stood untouched for over nine thousand years, until the De ath Korps were forced to destroy it.
9
of infantry; All the rebels could hope for was to kill enough of the enemy during their attacks that they lost heart and withdrew, just as Governor Jerni’s PDF army had fled three years previously.
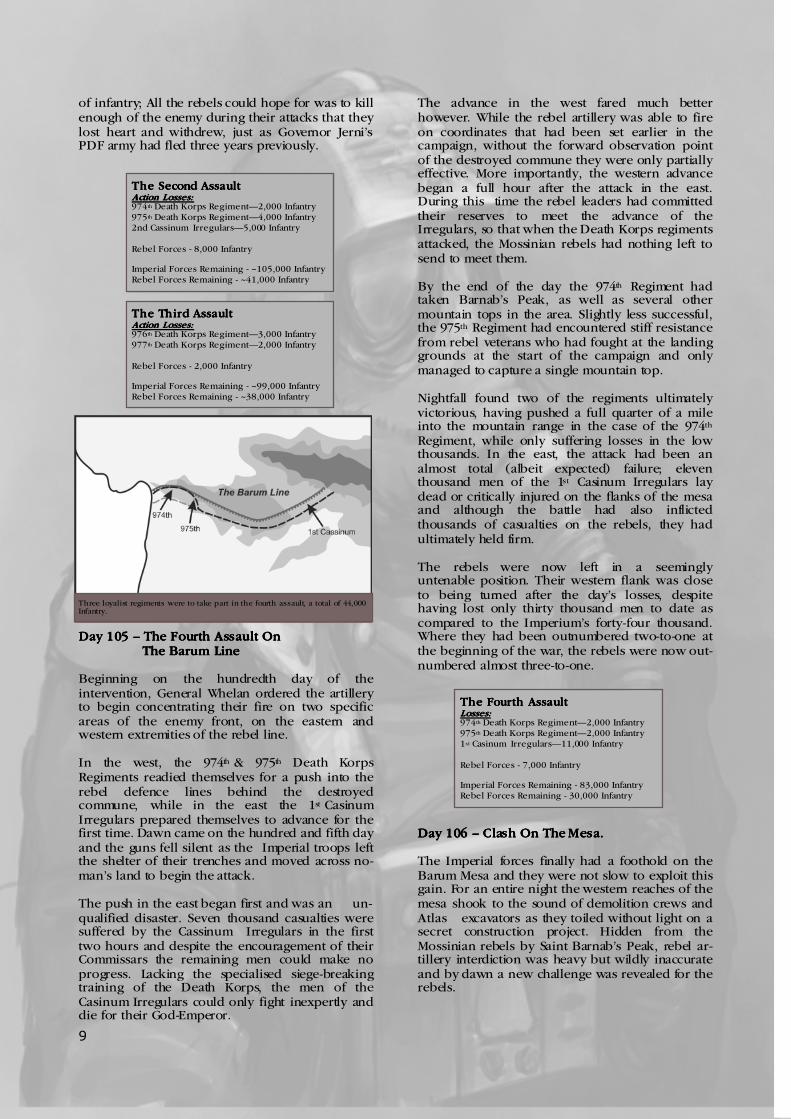
Day 105 Day 105 Day 105 Day 105 –––– The Fourth Assault On The Fourth Assault On The Fourth Assault On The Fourth Assault On The Barum LineThe Barum LineThe Barum LineThe Barum Line
Beginning on the hundredth day of the intervention, General Whelan ordered the artillery to begin concentrating their fire on two specific areas of the enemy front, on the eastern and western extremities of the rebel line. In the west, the 974th & 975th Death Korps Regiments readied themselves for a push into the rebel defence lines behind the destroyed commune, while in the east the 1st Casinum Irregulars prepared themselves to advance for the first time. Dawn came on the hundred and fifth day and the guns fell silent as the Imperial troops left the shelter of their trenches and moved across no-man’s land to begin the attack. The push in the east began first and was an un-qualified disaster. Seven thousand casualties were suffered by the Cassinum Irregulars in the first two hours and despite the encouragement of their Commissars the remaining men could make no progress. Lacking the specialised siege-breaking training of the Death Korps, the men of the Casinum Irregulars could only fight inexpertly and die for their God-Emperor.
The advance in the west fared much better however. While the rebel artillery was able to fire on coordinates that had been set earlier in the campaign, without the forward observation point of the destroyed commune they were only partially effective. More importantly, the western advance began a full hour after the attack in the east. During this time the rebel leaders had committed their reserves to meet the advance of the Irregulars, so that when the Death Korps regiments attacked, the Mossinian rebels had nothing left to send to meet them. By the end of the day the 974th Regiment had taken Barnab’s Peak, as well as several other mountain tops in the area. Slightly less successful, the 975th Regiment had encountered stiff resistance from rebel veterans who had fought at the landing grounds at the start of the campaign and only managed to capture a single mountain top. Nightfall found two of the regiments ultimately victorious, having pushed a full quarter of a mile into the mountain range in the case of the 974th Regiment, while only suffering losses in the low thousands. In the east, the attack had been an almost total (albeit expected) failure; eleven thousand men of the 1st Casinum Irregulars lay dead or critically injured on the flanks of the mesa and although the battle had also inflicted thousands of casualties on the rebels, they had ultimately held firm. The rebels were now left in a seemingly untenable position. Their western flank was close to being turned after the day’s losses, despite having lost only thirty thousand men to date as compared to the Imperium’s forty-four thousand. Where they had been outnumbered two-to-one at the beginning of the war, the rebels were now out-numbered almost three-to-one. Day 106 Day 106 Day 106 Day 106 –––– Clash On The Mesa.Clash On The Mesa.Clash On The Mesa.Clash On The Mesa.
The Imperial forces finally had a foothold on the Barum Mesa and they were not slow to exploit this gain. For an entire night the western reaches of the mesa shook to the sound of demolition crews and Atlas excavators as they toiled without light on a secret construction project. Hidden from the Mossinian rebels by Saint Barnab’s Peak, rebel ar-tillery interdiction was heavy but wildly inaccurate and by dawn a new challenge was revealed for the rebels.
The Second AssaultThe Second AssaultThe Second AssaultThe Second Assault Action Losses:Action Losses:Action Losses:Action Losses: 974th Death Korps Regiment—2,000 Infantry 975th Death Korps Regiment—4,000 Infantry 2nd Cassinum Irregulars—5,000 Infantry Rebel Forces - 8,000 Infantry Imperial Forces Remaining - ~105,000 Infantry Rebel Forces Remaining - ~41,000 Infantry
The Third AssaultThe Third AssaultThe Third AssaultThe Third Assault Action Losses:Action Losses:Action Losses:Action Losses: 976th Death Korps Regiment—3,000 Infantry 977th Death Korps Regiment—2,000 Infantry Rebel Forces - 2,000 Infantry Imperial Forces Remaining - ~99,000 Infantry Rebel Forces Remaining - ~38,000 Infantry
Three loyalist regiments were to take part in the fourth assault, a total of 44,000 Infantry.
The Fourth AssaultThe Fourth AssaultThe Fourth AssaultThe Fourth Assault Losses:Losses:Losses:Losses: 974th Death Korps Regiment—2,000 Infantry 975th Death Korps Regiment—2,000 Infantry 1st Casinum Irregulars—11,000 Infantry Rebel Forces - 7,000 Infantry Imperial Forces Remaining - 83,000 Infantry Rebel Forces Remaining - 30,000 Infantry

10
During the night, a rough passage had been carved directly into the face of the Barum Mesa which was wide enough for a single large vehicle to pass through. Stretched out in a terrifying line beneath the mesa that disappeared into the morning mists, sixty Gorgon assault transports waited for the attack order. Two dozen Macharius heavy tanks stood at the head of the column, while platoons of Leman Russ tanks were grouped on the flanks of the transport convoy. Finally, the very tip of the column was led by a Baneblade and two Stormsword super-heavy tanks in a wedge formation. Packed into the Gorgons, three thousand Kriegsmen of the 979th Death Korps Regiment prepared to ride into battle. All told, this would be the single largest armoured assault of the entire conflict. As one, hundreds of tanks began to rumble forwards.
The Imperial attack was impressive, but the Mossinian rebels had re-assigned their own reserve and had committed all of their mobile forces to counter the Imperial attempt to break out beyond the Mesa. The Imperial Baneblade leading the attack was met at the lip of the mesa by the main strength of the Rebels’ armoured response, scores of Ragnarok tanks were drawn up in a wide line, prepared to face the Death Korps armour in open battle. As soon as the first super-heavy tank crested the rise the Mossinian tanks fired as one, inflicting at least a dozen direct hits that slammed into the Baneblade’s armoured form. Tracks links were blown free, sparks flew and several fires flashed angrily atop the monstrous vehicle as it ground to a halt. Despite the damage, the Baneblade had not yet met its end and a single deliberately placed shot from its main cannon destroyed one of the rebel tanks in a ball of smoke and fire that soon stretched a hundred feet into the air. Seconds later, the rebels had other targets to focus on, as the two Stormsword tanks dragged their way onto the flat-topped mesa, soon followed by a
precession of Macharius heavy tanks that fired shell after shell towards the rebel armour. Within ten minutes of the attack signal, the main strength of the Imperial heavy tanks had reached the plateau and while many had suffered damage or had been wrecked, the rebel Ragnarok tanks were forced to pull back, shadowed by faster Leman Russ tanks. With the rebel tank formations in full retreat to the east, General Whelan signalled the Gorgon squadrons to advance. Atop the Barum Mesa, the lines of fire were clear and the pounding noise of the heavy guns seemed to blend into each other, until all that could be heard was one never-ending thundering roar. Two Macharius tanks exploded in quick succession, amongst the scores of Leman Russ and Ragnarok hulks that already littered the battlefield, as the armoured forces duelled. With their main armoured force already engaged, the Mossinian rebels had no reserves remaining to stop the Gorgons in their advance. For each transport that was destroyed by those few guns which the Mossinians could bring to bear, five others would pass the burning wreck, and all the while the rebels’ ability to strike at the Imperials was being degraded, as the rebel anti-tank guns and remaining armoured vehicles were systematically targeted and neutralised by the methodical and disciplined Death Korps attack. The line of Gorgons had crossed half the distance between the hastily carved passage and the rebel lines when a new, deeper note was added to the cacophony of the battle. Diving through the morning sky like vengeful harpies, twenty Imperial Marauder bombers fell towards the rebel line. Delivering dozens of indiscriminate bombs, the aircraft turned the already damaged defences into a maelstrom of fire and destruction. As the aircraft hit home, the Gorgons added their mortars to the bombardment, saturating the enemy position with fragmentation rounds, before closing for the final assault. Fifteen minutes after the first Death Korps tank had begun the attack, the Gorgon transports began to reach the rebel trenches. As each hulking transport vehicle reached the rebel trench lines, the forward ramp would crash open and the fifty men onboard would charge directly into close combat. Unused to close-quarters fighting the Mossinian infantry typically held for bare seconds against the ferocious Death Korps troops, whose superior hand-to-hand combat training quickly silenced any pockets of resistance. Within twenty-five minutes of the initial attack signal, the remaining defenders had been routed or killed and the western flank of the Barum Line had finally been captured.
Elements of the 979th Death Korps Regiment during the advance onto the Barum Mesa.

11
The last days of the of the war; Death Korps artillery pounds the outskirts of Mossina City.
Within hours, reports began to filter in to the Imperial Command from the entire length of the Imperial siege works. The rebels had begun pulling back from their positions on the Barum Line towards the capital city of Mossino; Faced with a choice between retreat or a series of battles with a turned flank, the rebels had fled towards their final stronghold of Mossina City. Along the entire length of the siege line, the loyalists left their trenches and moved northwards in pursuit of the rebels.
Days 107Days 107Days 107Days 107----totototo----120 120 120 120 –––– The SecondThe SecondThe SecondThe Second Advance.Advance.Advance.Advance. With the Barum Line abandoned, mobility had been restored to the war. Each day the rebels fell back to the north towards Mossina City, with the Death Korps and the Casinum Irregulars in steady pursuit. Occasional skirmishes occurred, but for the most part the will of the Mossinian rebels to resist had been broken; it wasn’t until they reached the outskirts of their capital city that the rebels began to hold their ground. Although heavily outnumbered the rebels once again had the advan-tage of a pre-prepared defensive position. General Whelan refused the offer of a frontal as-sault, as the majority of the rebel artillery had been either left behind on the Barum Line, or abandoned during the retreat to Mossina City. Instead of ordering an immediate attack, General Whelan ordered the city’s defences to be shelled.
Day 130 Day 130 Day 130 Day 130 –––– The End Of The War.The End Of The War.The End Of The War.The End Of The War. For ten days the outskirts of Mossina City trembled under the impact of high explosives, as the Death Korps heavy guns pounded the city’s defences. At dawn on the hundred and thirtieth day of the intervention, a white banner of parlay was raised on the edge of the city. Cautiously, a single platoon of Death Korps Grenadiers, with General Whelan at their head advanced to meet the delegation from Mossina City. Imperial records indicate that the two groups met in the ruins of a small hamlet outside of the city and that a surrender was negotiated. The rebels talked of misapprehensions and mistakes as they pled their ultimate loyalty to the Emperor. It was not until one of the lesser delegates stepped forwards and raised his hands in heretical supplication that the dark truth was revealed. Calling upon the name of the Chaotic deity Tzeentch, the man writhed as his soul was snatched away, to be replaced by something less able to conceal its presence and work its subtle machinations on those around it, but of far greater danger to those who now beheld it. Daemonically possessed, the man slew several of the delegation standing at his side before throwing himself at General Whelan. The General anticipated the wild attack, however, and with a single stroke of his power sword cleft the heretic’s head from his torso. It had taken the intervention force more than four months to advance the eighty miles from the tip of the Rooleg peninsula to the outskirts of Mossina City, with most of the fighting occurring during the seventy-seven day Siege on the Barum Line. Around fourty-six thousand casualties were suffered by the loyalist forces, thirty-four thousand by the Mossinian rebels. Ultimately every Imperial death during the siege of Mossino was suffered in order to discover and kill a single Tzeentchian cultist who had managed to so pervert the perceptions of an entire continent that they had become blind to their own heresy.
Day 106Day 106Day 106Day 106 Losses:Losses:Losses:Losses: 979th Death Korps Regiment—~2,000 Infa ntry Rebel Forces - ~3,000 Infa ntry Imperial Forces Remaining - ~80,000 I nfantry Rebel Forces Remaining - ~26,000 Infant ry
The breakout towards Mossina City was rapid and the loyalist armies were able to take new positions largely without resistance.

12
We have undertaken a rationalisation following our losses during the Mossino campaign; The 979th and the 973rd have been disbanded, the survivors have been folded into the four remaining regiments under my command. The 974th through to the 978th are now ready for their next deployment. Of the Chaos influence on Mossino, little more can be gleaned. The ringleaders protested their integrity of purpose to the end, whilst random psychic checks and interrogations amongst the larger population have raised no leads. Still, as a precaution I would recommend a program of mass conscription for the Adeptus Munitorum for off-world crusades, or transfer to the Servitorai facilities of the proximate Forgeworld of Ixiat, so that within a few short generations the entire population of Mossino will be of fresh stock and any residual taint will be gone. As to the matter of Governor Jerni’s official protest over the usage of the 1st Cassinum Irregulars in a moderately costly diversionary attack (Which ultimately afforded us the opportunity to crack the Barum Line), I can only say that this man allowed the continent of Mossino to disrupt Casinum’s tithes to the Imperium for more than two years and I cannot imagine how many lives that dip in production has cost in other fields of battle. In my opinion, Governor Jerni has failed in his God-given task and should join the people of Mossino in their fate… ...Spend all their lives soon, lest their thoughts turn sour again.
Thought for the day: We are but dust, His Will be Done.
Excerpts from the post-campaign summary of General Aldar Whelan.

13
SECTION 2—COLLECTING AND PAINTING
A Mechanised Death Korps army of 3000 points. Every formation has a transport (even if that
Death Korps commander units, made by combining the Siege Infantry models with the Imperial Guard Characters set.
A Death Korps Quartermaster and his grim retinue scour the battlefield to find dying Krieg soldiers in order to salvage their valuable equipment. A conversion like this can be used in games to represent the Commissar upgrade.

14
“transport” is just a horse!) , or is itself a vehicle capable of moving under its own power.
Ten bases of Death Korps Infantry. (Note how the swamp area is modelled across multiple bases)
A scratch-built Macharius Heavy Tank. It has been painted in a manner that suggests a wet, muddy battlefield.
A Death Korps Heavy Mortar.

15
Above:Above:Above:Above: The Death Korps defend a fixed position against a huge armoured assault by rebellious forces.
Below:Below:Below:Below: Death Korps defence works will normally consist of many layers, starting with lines of infantry, followed by stronger bunkers, then finally with entrenched artillery at the rear. This strategy of ‘defence in depth’ has been used by the armies of Krieg ever since the centuries-long civil war that almost destroyed their home planet.
Above:Above:Above:Above: Outnumbered and heavily outgunned, the Death Korps troops refuse to yield without a fight.

16
Above:Above:Above:Above: Entrenched Death Korps troops are attacked by a Dark Eldar raiding force.
Below: Below: Below: Below: The Death Korps assault a rebel defence line during the Mossinian Campaign.

17
Above:Above:Above:Above: The Death Korps defend against an assault by Red Corsairs Chaos Space Marines
Below: Below: Below: Below: A small Tyranid swarm attacks a Death Korps position.

18
Above:Above:Above:Above: A Death Korps Stormsword forges its way through a ruined city.
Above:Above:Above:Above: A Death Korps force assaults an Ork-held factory during the third war for Armageddon. Below: Below: Below: Below: A column of Stormsword Super-Heavy tanks advance to the front.

19
Step 1Step 1Step 1Step 1: Glue the models into place.
Step 2Step 2Step 2Step 2: Apply very fine sand, using white glue to keep it in place.
Step 3Step 3Step 3Step 3: Apply an undercoat of Chaos Black spray paint.
Step 4Step 4Step 4Step 4: Apply Adeptus Battlegrey to the coats and Boltgun Metal to the Lasguns.
Step 5Step 5Step 5Step 5: Apply Scorched Brown to the Gasmasks, the Backpacks and the Base. Highlight the coats with Codex Grey.
Step 6Step 6Step 6Step 6: Apply Bleached Bone to the Gasmask tips. Highlight the Backpacks with Snakebite Leather.
Step 7Step 7Step 7Step 7: Drybrush Bleached Bone mixed with Desert Yellow onto the base.
Step 8Step 8Step 8Step 8: Apply Static Grass
Step 9Step 9Step 9Step 9: Mix Scorched Brown with a small amount of Chaos Black, water it down (5 parts water to 1 part paint), then use this mix to tease the grass into clumps, which are then left to dry.
Step 10Step 10Step 10Step 10: Highlight the grass clumps with Desert Yellow, then apply a Desert Yellow drybrush to the base.
HOW TO: HOW TO: HOW TO: HOW TO: DEATH KORPS INFANTRYDEATH KORPS INFANTRYDEATH KORPS INFANTRYDEATH KORPS INFANTRY
Step 1: Take a piece of plasticard and cut it into a 10cm length.
Step 2: Cut lengths of textured plasticard to serve as the uprights and glue them into place.
Step 3: Smear plaster of paris unevenly to form the edge of the trench…. ...Now paint it!
HOW TO: HOW TO: HOW TO: HOW TO: DEATH KORPS TRENCHWORKSDEATH KORPS TRENCHWORKSDEATH KORPS TRENCHWORKSDEATH KORPS TRENCHWORKS

20
Step 1Step 1Step 1Step 1: Prep & clean your model as usual. Mould lines should be removed, as well as any excess casting material. Assemble as best fit for painting. Remember: leaving some sections off may make painting easier - as shown here with the top of the Gorgon. Prime with Citadel Chaos Black spray. Once the primer is dry, coat the entire model in Scorched Brown.
Steps 2&3: Steps 2&3: Steps 2&3: Steps 2&3: The next stage is to coat all the armour in Graveyard Earth. Thin your paint to make sure you don’t obscure any detail, although you may require a couple of coats as you need good coverage at this stage. Then its time to start adding the ‘camo’ effect. Do this by stippling on lines of Scorched Brown as required. To “Stipple”, remove most of the paint from the brush as you would for dry brushing , but “dot” the brush onto the model rather than the sweeping strokes used for dry brushing.
Step 4: Step 4: Step 4: Step 4: Next, a thinned brown wash is applied to help tie the colours together and also bring out some of the details on the model. When thinning washes, it often helps to add a small drop of washing up liquid, which will break the surface tension of the paint & help it flow into the details without pooling.
Step 5: Step 5: Step 5: Step 5: The camo stripes were highlighted by adding Elf Flesh to Scorched Brown and stippled in place leaving a thin dark line visible around the edges of the stripes & in the shadows. The main areas of armour were highlighted with a 50/50 mix of Graveyard Earth and Desert Yellow.
Step 6: Step 6: Step 6: Step 6: Pure desert yellow was then applied to the main armoured areas, again leaving areas of shadow & transition around the stripes. The camouflage stripes themselves were highlighted with more Elf Flesh being added to the Scorched Brown .
Step 7: Step 7: Step 7: Step 7: Adding a little Skull White to each of the current highlights, the leading edges of all the armoured areas were picked out with a very thin line highlight using a fine detail brush. This adds the final definition to each of the areas and makes the model detail itself stand out after being broken up by the camouflage paint scheme.
Step 8: Step 8: Step 8: Step 8: Now that the main scheme is painted, the metallic areas are picked out in boltgun metal and given a thin black wash. The Aquilla symbol was picked out in Shining Gold.
HOW TO: HOW TO: HOW TO: HOW TO: GORGON SIEGE TRANSPORTGORGON SIEGE TRANSPORTGORGON SIEGE TRANSPORTGORGON SIEGE TRANSPORT By Paul “TuffSkull” T.By Paul “TuffSkull” T.By Paul “TuffSkull” T.By Paul “TuffSkull” T.
Credited Epic Rulebook Painter & Winner of the ‘best Specialist Games entry’ award at Golden Daemon 2004.Credited Epic Rulebook Painter & Winner of the ‘best Specialist Games entry’ award at Golden Daemon 2004.Credited Epic Rulebook Painter & Winner of the ‘best Specialist Games entry’ award at Golden Daemon 2004.Credited Epic Rulebook Painter & Winner of the ‘best Specialist Games entry’ award at Golden Daemon 2004.
Step 9: Step 9: Step 9: Step 9: At this stage you may rather stick with a nice clean “factory finish” paint scheme. Myself, I prefer a more used look & went ahead with some weathering, using Dark Flesh, Vermin Brown and more Boltgun Metal to add realism.

21
THE DEATH KORPS’ MOSSINIAN THE DEATH KORPS’ MOSSINIAN THE DEATH KORPS’ MOSSINIAN THE DEATH KORPS’ MOSSINIAN INTERVENTION FORCE.INTERVENTION FORCE.INTERVENTION FORCE.INTERVENTION FORCE. Since having suffered an extended civil war lasting five hundred years, the world known as Krieg has devoted all of its resources to creating Imperial Guard regiments. In never-ending penance for their civil war, Krieg raises new armies at a higher rate than almost any other planet in the Imperium. The seven regiments of Death Korps infantry that were involved in the Mossinian Campaign had originally been part of the 9th crusading army group, allocated to an anti-Xenos crusade through the fifth Ultiman Anterior star cluster. During the crusade, sections of the 9th army had been split off into smaller sub-crusades, each tasked with conquering a single planet or continent. In the case of the Mossininan task force, fifteen regiments had originally been given the mission of pacifying a Hrud-infested Hive World known as Nalad. Once the campaign was successfully completed and the Xenos presence restored to more manageable levels (the full cleansing of a Hrud infestation is remarkably rare, as they are an exceptionally hardy and cunning race), the surviving Death Korps troops were folded into
seven smaller regiments, before transmitting their readiness for further operations to the Adeptus Munitorum. During the time it had taken to pacify Nalad, the 9th crusading army group had been withdrawn to meet the advance of a Tyranid Hive Fleet and it was now impractical for the Death Korps task force to reunite with the distant army. The seven regiments were instead made available to the wider Munitorum as a reaction force and were instructed to remain in place and await new or-ders. The sombre Kriegsmen did not have long to wait. In 926.7.M41, an Area Adept identified as Anata Borr made contact with General Whelan, inform-ing him of his new mission: the pacification of the rebellious continent of Mossino. It seemed as though the Imperium had selected the perfect tool to cut out the canker in the heart of Mossino, for no regiment would be more dedicated to the cause of the Emperor in a civil war intervention than the Death Korps of Krieg. Within hours, the Kriegsmen were marching onto Imperial Navy transport craft in drab grey lines that stretched for miles. The Death Korps was marching to war.
SECTION 3—FORCES

22
DEATH KORPS DEATH KORPS DEATH KORPS DEATH KORPS SUPREME COMMANDERSUPREME COMMANDERSUPREME COMMANDERSUPREME COMMANDER The Supreme Commander of a Death Korps army is a great man amongst an army of lesser heroes, the trusted
father figure placed at the head of the army by the Will of the Emperor and the blessing of the High Lords of Terra. It is not his personal combat prowess that sets him
apart, but the decisions he must bear upon his own conscience, as ultimately it is his choice how and where the Kriegsmen under his command will seek their repentance. Such a burden cannot be borne by most, the magnitude of the task would break any unworthy man. Thus it is that any Death Korps Supreme Commander is likely the survivor and victor of many engagements and can justifiably expect to fight many more.
DEATH KORPS COMMANDER
Notes: Commander.
Type Speed Armour Close Combat Firefight
Infantry 15cm 6+ 4+ 5+
DEATH KORPS COMMANDERDEATH KORPS COMMANDERDEATH KORPS COMMANDERDEATH KORPS COMMANDER Normally raised from the lesser ranks due to an exemplary service record, the officers of the Death Korps are amongst the finest in the Imperium and they are
generally popular with their men as a consequence. Of course, only a popular and trusted Commander could even begin to consider mounting the attritional attacks
that the Death Korps is famed for without fearing mutiny. Leading bravely from the front lines, Officers of Command rank suffer the highest attrition figures of any branch of the Death Korps military; it is a testament to their commitment to the cause that there is never a shortage of capable Junior Officers ready to step into the breach.
DEATH KORPS SUPREME COMMANDER
Notes: Supreme Commander.
Type Speed Armour Close Combat Firefight
Infantry 15cm 5+ 4+ 5+
Weapon Range Firepower Notes
Power Weapon (Base Contact) Assault Weapons Macro-Weapon, Extra Attack (+1)
Lasguns (15cm) Small Arms
Twin Heavy Stubber 30cm AP5+
Weapon Range Firepower Notes
Lasguns (15cm) Small Arms
Twin Heavy Stubber 30cm AP5+
DEATH KORPS COMMISSAR
Notes: Inspiring, Fearless, Leader, Character.
Type Speed Armour Close Combat Firefight
n/a n/a n/a n/a n/a
Weapon Range Firepower Notes
Power Weapon (Base Contact) Assault Weapons Macro-Weapon, Extra Attack (+1)
DEATH KORPS COMMISSARDEATH KORPS COMMISSARDEATH KORPS COMMISSARDEATH KORPS COMMISSAR Drawn f rom off-world so as to have no sentimental compunction against the prose cuti on of thei r duties , the Commissars of the Death Korps are used
in a different role for the armies of Krieg than in more typical Imperial Guard armies.
So pure of purpose are the soldiers of the Death Korps that instead of acting as cold-hearted executioners who instill courage in their men through the use of their strict battlefield justice, Death Korps Commissars find them-selves used in a more advisory role in matters of battlefield tactics, for it is a truly rare occasion that sees Kriegsmen break and run when faced with their duty.

23
DEATH KORPS INFANTRY
Type Speed Armour Close Combat Firefight
Infantry 15cm none 5+ 5+
Weapon Range Firepower Notes
Lasguns (15cm) Small Arms
DEATH KORPS INFANTRYDEATH KORPS INFANTRYDEATH KORPS INFANTRYDEATH KORPS INFANTRY Every Death Korps regiment finds the heart of its strength in the resilient natives of the planet Krieg.
Hardened to their fate from birth, these soldiers specialize in close-quarters combat and their equipment reflects this; Most Krieg infantry companies employ Gorgon Siege Transporters to deliver them directly into the heart of the enemy army.
Almost uniquely amongst notable Imperial Guard regiements, the Death Korps does not issue its basic line infantry squads with heavy weapons like Missile Launchers or Autocannons. However, Death Korps infantry doctrine emphasizes short range firefights and even close combats over ranged combat, so this lack of capability is rarely missed by commanders, and when it is required dedicated heavy weapons squads can be allocated to support infantry formations.
DEATH KORPS GRENADIERS
Notes: Scouts.
Type Speed Armour Close Combat Firefight
Infantry 15cm 5+ 5+ 4+
Weapon Range Firepower Notes
Heavy Flamer 15cm AP4+ Ignores cover
DEATH KORPS GRENADIERSDEATH KORPS GRENADIERSDEATH KORPS GRENADIERSDEATH KORPS GRENADIERS Sometimes a target will be too tough a nut to crack for the ordinary masses of Kriegsmen and it is at this point that a Death Korps commander will call for his
Grenadiers. These elite soldiers of Krieg are specially trained and equipped with superior weaponry and body armour than most Death Korps infantry.
Most Grenadier formations will operate ahead of the main attack line, taking import ant objectives in highly mobile Centaur formations, seizing valuable objectives and engaging enemies which few other Kriegsmen could stand against. It has also been known for Grenadiers to reinforce the main battle lines too, usually commandeering Gorgons for this purpose.
DEATH KORPS FIRE SUPPORT
Type Speed Armour Close Combat Firefight
Infantry 15cm None 5+ 4+
Weapon Range Firepower Notes
Twin Heavy Stubber
Autocannon
30cm
45cm
AP5+
AP5+ / AT6+
—
—
DEATH KORPS FIRE SUPPORTDEATH KORPS FIRE SUPPORTDEATH KORPS FIRE SUPPORTDEATH KORPS FIRE SUPPORT The Death Korps combat doct rine normally calls for heavy weapons to be collected together into dedicated fire support detachments, rather than allocated
to line infantry squads. This separation sits well with the Death Korps style of warfare, as it allows typical infantry detachments to concentrate on their primary role, that of attacking the
enemy at close range until they are defeated through weight in numbers. When a Krieg force is called upon to defend a position, it will normally be assigned a support detachment of heavy weapons squads. These heavier weapons allow the now static Kriegsmen to attack approaching enemies with considerable firepower, whittling down the attackers as their come closer. Eventually however, standard Krieg training will take over, and as one the Krieg line infantry will rise to meet the enemy attack head on.

24
DEATH KORPS ROUGH RIDERS
Notes: Mounted, Infiltrators.
Type Speed Armour Close Combat Firefight
Infantry 20cm 5+ 4+ 6+
Weapon Range Firepower Notes
Laspistols (15cm) Small Arms
Power Lances (Base contact) Assault Weapon First Strike
DEATH KORPS ROUGH RIDERSDEATH KORPS ROUGH RIDERSDEATH KORPS ROUGH RIDERSDEATH KORPS ROUGH RIDERS Few sights are so awe-inspiring as a massed cavalry charge; the thunder of hooves, the cry of the horses and the screams of the riders all combine to create
a visceral reaction in any nearby observers. During the Death Korps’ intervention in 3rd War for Armageddon, the largest cavalry charge in recent history was undertaken, as fifteen thousand Death Riders
crashed into the Feral Ork lines which had been laying siege to Gondlor Hive. Despite suffering huge losses from rampaging Feral Ork Squiggoths, more than an hour later huge formations of cavalry were still engaging the Greenskins. Amidst the mass carnage, three Death Riders charged and killed the Feral Ork grand Warboss Little Snagga, breaking the spirit of the Ork army and ultimately saving the Hive.
DEATH KORPS HELLHOUND
Type Speed Armour Close Combat Firefight
Armoured Vehicle 30cm 4+ 6+ 3+
Weapon Range Firepower Notes
Inferno Cannon 30cm AP3+ Ignore Cover
Heavy Bolter 30cm AP5+
DEATH KORPS HELLHOUNDDEATH KORPS HELLHOUNDDEATH KORPS HELLHOUNDDEATH KORPS HELLHOUND Hellhounds are a popular vehicle with Death Korps infantry, as its heavy armour and devastating short-range firepower can help in breaking through strong points in
enemy lines.
Few opponents will stand their ground in the face of a jet of flaming promethium and those that do soon tend to regret it! Casualty figures for Hellhound crews tell their own tale however, due to the volatile nature of the Inferno Cannon’s fuel tanks, a destroyed Hellhound normally means the death of a Hellhound crew as well.
DEATH KORPS LEMAN RUSS (MARS PATTERN)
Notes: Reinforced Armour.
Type Speed Armour Close Combat Firefight
Armoured Vehicle 20cm 4+ 6+ 4+
Weapon Range Firepower Notes
Battle Cannon 75cm AP4+ / AT4+
Lascannon 45cm AT5+
2x Heavy Bolter 30cm AP5+
DEATH KORPS LEMAN RUSSDEATH KORPS LEMAN RUSSDEATH KORPS LEMAN RUSSDEATH KORPS LEMAN RUSS Far from being a sophisticated vehicle, the Leman Russ was designed and built with reliability and versatility in mind. It can survive almost any punishment the Xenos
can throw at it and can run on any combustible fuel. Though not a fast vehicle, its frontal armour is normally
strong enough to withstand attacks long enough to bring its weapon systems to bear. However, the Leman Russ is vulnerable to close assaults and a wise commander will use these tanks in conjunction with screening infantry formations or else risk losing his precious Armour to enemy counter-attacks.

25
DEATH KORPS LEMAN RUSS DEMOLISHER (RYZA PATTERN)
Type Speed Armour Close Combat Firefight
Armoured Vehicle 20cm 4+ 6+ 3+
Weapon Range Firepower Notes
Demolisher 30cm AP3+ / AT4+ Ignores Cover
Lascannon 45cm AT5+
2x P lasma Cannon 30cm AP4+ / AT4+ Slow Firing
DEATH KORPS LEMAN RUSS THUNDERER SIEGE TANK
(STYGIES VIII PATTERN)
Notes:Reinforced Armour, Thick Rear Armour.
Type Speed Armour Close Combat Firefight
Armoured Vehicle 20cm 4+ 6+ 5+
Weapon Range Firepower Notes
Demolisher 30cm AP3+ / AT4+ Ignores Cover
DEATH KORPS LEMAN RUSS DEATH KORPS LEMAN RUSS DEATH KORPS LEMAN RUSS DEATH KORPS LEMAN RUSS THUNDERER SIEGE TANKTHUNDERER SIEGE TANKTHUNDERER SIEGE TANKTHUNDERER SIEGE TANK It is unknown what dire emergency prompted the construction of the first Thunderer siege tank. Certainly it must
have been a situation so severe as to convince Adeptus Mechanicus Tech-Adepts to blaspheme against their deity by defiling the revered STC constructs of the Destroyer tank-hunter. The retrofitting of damaged Destroyers into Thunderers,
abandoning the damaged Laser Destroyer weapon and replacing it with a humble Demolisher cannon is still regarded by many Tech-Adepts as an unacceptable sacrifice. No matter how many Guardsmen’s lives are saved, a significant portion of the machine-cult will always regard it as a terrible affront to their deity which is beyond forgiveness. Fortunately for the Death Korps, the Forgeworld of Stygies VIII is more flexible in ethos and is willing to provide the Death Korps with this humble yet useful tank.
DEATH KORPS LEMAN RUSS VANQUISHER (GRYPHONNE IV PATTERN)
Weapon Range Firepower Notes
Vanquisher 75cm AP4+ / AT2+
Lascannon 45cm AT5+
2x Heavy Bolter 30cm AP5+
DEATH KORPS DEATH KORPS DEATH KORPS DEATH KORPS LEMAN RUSS VANQUISHERLEMAN RUSS VANQUISHERLEMAN RUSS VANQUISHERLEMAN RUSS VANQUISHER The Vanquisher variant of the Leman Russ has become a rare sight on the battlefield in recent times, in part due
to the loss of the Forgeworld of Gryphonne IV to the Tyranid Hive Fleet codenamed Leviathan.
This once-mighty Forgeworld, now a barren shell, had been one of only a handful of Adeptus Mechanicus factory-planets which specialised in the production of Vanquishers. As such, Vanquisher production in the Imperium has dipped by at least 4%, and until Vanquisher Cannon templates are disseminated by Mars to other Forgeworlds, campaign losses are unlikely to see replacement as all new-build units are now being assigned exclusively to fresh regiments.
Notes: Reinforced Armour.
Notes: Reinforced Armour.
DEATH KORPS DEATH KORPS DEATH KORPS DEATH KORPS LEMAN RUSS DEMOLISHERLEMAN RUSS DEMOLISHERLEMAN RUSS DEMOLISHERLEMAN RUSS DEMOLISHER Imperial artificers have created or discov-ered many different Leman Russ variants over the millennia and the single most
common variant of the basic Leman Russ main battle tank is the Demolisher.
The Demolisher’s one flaw lies with its Plasma Cannons. These arcane weapons are unreliable in the best of circumstances, and when subjected to the constant stresses inherent in being clamped to the side of a vibrating, unstable tank, they can become prone to malfunction. Thus , tank crews tend to use these weapons sparingly, for fear of the delicate plasma coils overloading with fatal consequences.
Type Speed Armour Close Combat Firefight
Armoured Vehicle 20cm 4+ 6+ 4+

26
DEATH KORPS HEAVY MORTARS
Type Speed Armour Close Combat Firefight
Infantry 5cm none 6+ 6+
Weapon Range Firepower Notes
Heavy Mortar 30cm 1BP Indirect Fire
DEATH KORPS HEAVY MORTARSDEATH KORPS HEAVY MORTARSDEATH KORPS HEAVY MORTARSDEATH KORPS HEAVY MORTARS The Death Korps Heavy Mortar is of the same STC-pattern as the Griffon Mortar Carrier’s main weapon.
The Heavy Mortar is a reliable workhorse, easy to deploy and rugged enough to withstand the normal stresses of active duty with a combat unit. Although it is the same weapon as is carried by the
unpopular Griffon vehicle, Heavy Mortars enjoy a considerably higher reputation even though they lack the armoured protection of a Chimera hull. This is likely due to the simple fact that Griffons take longer to produce and are thus less omni-present, with the resultant effect being that barrages unleashed by typical-sized Griffon formations are simply less destructive than the firepower of a Heavy Mortar fire platoon.
DEATH KORPS CENTAUR
Notes: Transport (May carry one Heavy Mortar or one Quad Launcher or one Grenadier unit)
Centaurs transporting Heavy Mortars or Quad Launchers reduce their speed to 20cm (Shown in brackets)
Type Speed Armour Close Combat Firefight
Light Vehicle 35cm or (20cm) 6+ 6+ 6+
Weapon Range Firepower Notes
Heavy Stubber 30cm AP6+
DEATH KORPS CENTAURDEATH KORPS CENTAURDEATH KORPS CENTAURDEATH KORPS CENTAUR While some siege regiments have to make do with ad-hoc tractors for their support weapons, the Death Korps is fortunate enough to have a range of specialised
transports for their weapons, the two most common being the Chimera-based Trojan and the Centaur light utility vehicle.
The Centaur is a small but versatile vehicle, used to move guns, ammunition and men about the battlefield. It is not generally used as a frontline combat vehicle although it does have limited armour protection. The Centaur is most commonly used as a gun tow, but Grenadiers have been known to use this vehicle too, as its exceptional speed means that lightning raids can be carried out across no-man’s land.
DEATH KORPS QUAD LAUNCHER
Type Speed Armour Close Combat Firefight
Infantry 5cm none 6+ 5+
Weapon Range Firepower Notes
Quad Launcher 45cm 2x AP4+ Indirect Fire
DEATH KORPS QUAD LAUNCHERDEATH KORPS QUAD LAUNCHERDEATH KORPS QUAD LAUNCHERDEATH KORPS QUAD LAUNCHER The Quad Launcher is a light artillery piece which fires high-explosive shells. Used by Siege regiments to provide close supporting fire during attacks, the Quad
Launcher shoots rapidly, its four barrels pumping in and out as each shell fires in succession. The Quad Launcher is usually mounted on a small wheeled chassis that is light enough in its construction
for its crew to manhandle the light artillery piece over short distances. Most siege infantry regiments include many batteries of Quad Launchers, which are split up into fire teams and allocated to the support of particular companies. They are used to lay down a curtain of high explosive fire that is especially effective against enemy infantry.

27
DEATH KORPS ENGINEERS
Type Speed Armour Close Combat Firefight
Infantry 15cm 5+ 4+ 5+
Weapon Range Firepower Notes
Gas Grenades (Base Contact) Assault Weapon
Mole Launcher 30cm AP5+ Ignores Cover
DEATH KORPS ENGINEERSDEATH KORPS ENGINEERSDEATH KORPS ENGINEERSDEATH KORPS ENGINEERS The armies of Krieg often make use of battlefield Engineer formations, in order to undermine enemy defence works.
Due to the methodical, pre-planned nature of Death Korps attacks, siege Engineers are able to spend weeks tunneling under the enemy positions, awaiting the time to emerge and spread havoc behind enemy lines.
Unfortunately for the loyalist forces, the earth in Mossino was unsuitable for extensive excavation works and thus engineer formations were not employed in digging tun-nels, but in more mundane works above ground, digging trenchworks and participating in overland attacks. Those few Engineer units that were deployed to Mossino suffered amongst the highest casualties of the Death Korps army, due to their training leading them to close with the enemy, heedless of the risk inherent in unsupported charges.
DEATH KORPS HADES BREACHING DRILL (Phaeton Pattern)
Notes: Tunneler, Transport (May transport 8 Engineers)
Note that the Hades Breaching Drill is not a unit and so may not be shot at nor have hits applied to it. It is in all respects simply a marker, to be used in a similar manner to Space Marine Drop Pods. No Blast Marker is
generated for its parent formation leaving the Hades Breach Drill behind during the game.
Type Speed Armour Close Combat Firefight
- Immobile - - -
DEATH KORPS DEATH KORPS DEATH KORPS DEATH KORPS HADES BREACHING DRILLHADES BREACHING DRILLHADES BREACHING DRILLHADES BREACHING DRILL The Hades Breaching Drill is a small tracked utility vehicle, used for excavation works by the forces of Krieg.
Although the Death Korps forces deployed to Mossino did possess some Hades Drills, none were used during the fighting for their intended purpose.
Typically Hades Drills are used by battlefield Engineer formations, to slowly dig under the enemy’s defence lines, building a secret tunnel without being detected. Once the enemy’s lines have been reached, the engineers will either plant large amounts of explosives before retreating and detonating their subterranean mines, or use the Hades Drills to open a passage to the surface, allowing hundreds of concealed engineers to lead an attack right into the heart of the enemy.
DEATH KORPS DEATHSTRIKE SILO
Notes: Reinforced Armour. Damage Capacity 3. Critical Hit Effect: The bunker is destroyed in an awesome detonation. All units within 5cm take a MW4+ hit.
Type Speed Armour Close Combat Firefight
War Engine Immobile 4+ 6+ 4+
Weapon Range Firepower Notes
Deathstrike missile Unlimited MW2+ Titan killer (D6), Indirect Fire, Slow Firing
DEATH KORPS DEATH KORPS DEATH KORPS DEATH KORPS DEATHSTRIKE SILODEATHSTRIKE SILODEATHSTRIKE SILODEATHSTRIKE SILO Many, perhaps the majority of Imperial Guard Regiments make use of a variety of highly destructive bombardment missiles
which are known collectively as ‘Deathstrikes’. Most regiments that make use of these potent weapons place them on mobile launch platforms, so as to hide the Deathstrikes amongst the confusion of a maneuvering army. The Death Korps method of warfare is more static though, so they choose to protect their stock of
Deathstrike Missiles in heavily armoured bunkers. There may also be a second, more subtle reason that the Death Korps habitually build Deathstrike silos rather than utilising mobile launchers. During long campaigns the lower levels of each silo is slowly converted into a shrine to the Emperor, in praise and remembrance of the self-inflicted Atomic Purging that saved their planet. These shrines then become places of solitude where Death Korps troops can come to meditate upon their fate in the hours before a battle.

28
Above: Above: Above: Above: Death Korps infantry trooper 566437-13375456-Xinder, of the 973rd Death Korps Regiment.
DEATH KORPS TRENCHWORKS
Notes: Trenches may hold one Infantry Unit per 4cm of length, Gun Emplacements may hold one Unit and Bunkers may hold three Units. Bunkers are Fortifications (See 1.8.4). Trenchworks and their bunkers must
maintain normal coherency when they are placed on the table, just like a formation of Units.
Terrain Infantry Vehicle War Engine
Trenches 4+ Cover Save Dangerous No Effect
Bunker 3+ Cover Save Dangerous Impassable
Gun Emplacement 4+ Cover Save 5+ Cover Save No Effect
DEATH KORPS TRENCHWORKSDEATH KORPS TRENCHWORKSDEATH KORPS TRENCHWORKSDEATH KORPS TRENCHWORKS Life in the Death Korps can take a Kriegsman to many worlds and leave him to fight against enemies that vary from the mundane to the bizarre and terrifying, but
there is one unifying constant to every Death Korps campaign however and that is Trenchworks.
Wherever a Death Korps army finds itself, its first task will always be the same, to dig foxholes, trenches and dugouts. Alongside the Kriegsmen will toil servitors, ceaselessly constructing sheltered bunkers and strong points in the lines. In time these trench lines will stretch into a vast overlapping defence network, behind which the Death Korps wait in their thousands for the attack signal.

29
DEATH KORPS EARTHSHAKER PLATFORM (PHAETON PATTERN)
Type Speed Armour Close Combat Firefight
Light Vehicle 0cm 6+ 6+ 6+
Weapon Range Firepower Notes
Earthshaker 120cm AP4+ / AT4+ or 1BP Indirect Fire (BP mode only)
DEATH KORPS DEATH KORPS DEATH KORPS DEATH KORPS EARTHSHAKER PLATFORMEARTHSHAKER PLATFORMEARTHSHAKER PLATFORMEARTHSHAKER PLATFORM As the Death Korps’ method of war is more ponderous than most Imperial ar-mies, they have little need for self-
propelled artillery, as the battlefront moves forwards only slowly, if at all. This makes stationary weapons platforms well suited to the Death Korps, as their use releases resources which can then be spent elsewhere.
During the final days of the siege of the traitorous Hive Mantioch on Axelon, it was said that Death Korps Earthshaker platforms, lined up side-by-side for six full miles, fired more than eight million shells in a constant barrage of one sector of the Hive walls that lasted for thirty days and nights. When the whistles were blown and the Infantry charged, what little resistance remained was swiftly pushed aside and the eight month campaign to enter the Hive was won.
DEATH KORPS TROJAN SUPPORT VEHICLE (GRAIA PATTERN)
Notes: Transport (One Weapon Platform).
Type Speed Armour Close Combat Firefight
Armoured Vehicle 20cm 6+ 6+ 6+
Weapon Range Firepower Notes
Heavy Bolter 30cm AP5+
DEATH KORPS DEATH KORPS DEATH KORPS DEATH KORPS TROJAN SUPPORT VEHICLETROJAN SUPPORT VEHICLETROJAN SUPPORT VEHICLETROJAN SUPPORT VEHICLE A popular modification of the seemingly endlessly mutable Chimera chassis, the Trojan Support Vehicle is the logistical
backbone of any Death Korps operation. Trojans are rarely seen on the battlefield itself, as they lack direct battlefield utility, but behind the front lines they scuttle in convoys that can stretch many miles, moving ammunition and troops up to the front.
It has been said by many Imperial Analyticae that it was only due to a lack of Trojan Support Vehicles that the planet Taros was lost to the Tau. Although the Imperial forces outnumbered the Xenos several times, the Tau’s campaign concentrated on covert strikes and aerial attacks against Trojan columns. As the numbers of Trojans in active service decreased, the war faltered. Krieg armies tend to protect their supply lines by entrenching every mile from the depot to the front and since the trench lines will often lie static for months the Trojans normally remain safe.
DEATH KORPS MEDUSA PLATFORM (PHAETON PATTERN)
Type Speed Armour Close Combat Firefight
Light Vehicle 0cm 6+ 6+ 6+
Weapon Range Firepower Notes
Medusa Siege Gun 60cm or
30cm
1BP
MW4+
Ignores Cover, Disrupt, Indirect Fire
Ignores Cover
DEATH KORPS MEDUSA PLATFORMDEATH KORPS MEDUSA PLATFORMDEATH KORPS MEDUSA PLATFORMDEATH KORPS MEDUSA PLATFORM What the Medusa lacks in range, it more than makes up for in sheer firepower. The main strength of Medusas is not in acting as deployed artillery during a sustained
engagement as even with modifications to the cannon they lack the range of dedicated artillery pieces and are consequently quite vulnerable to counter-battery fire. Instead the Medusa’s niche is in being deployed comparatively closely to the enemy, utterly shattering their defences and providing supporting fire to infantry
forces as they capture the targeted area. Medusas are not only of use during offensive actions however; during the siege of Firnos, eight unsupported Medusa platforms (along with their Trojan transport vehicles) held off a mob of over two thousand Chaos cultists for more than four hours by using prepared corridors of fire and previously chosen fallback positions, until they were finally overrun. Their valiant stand allowed the safe evacuation of several Hive quadrants, saving tens of thousands of civilian lives.

30
DEATH KORPS HYDRA PLATFORM (PHAETON PATTERN)
Type Speed Armour Close Combat Firefight
Light Vehicle 0cm 6+ 6+ 6+
Weapon Range Firepower Notes
2x Hydra Autocannon 45cm AP4+ / AT5+ / AA5+
DEATH KORPS DEATH KORPS DEATH KORPS DEATH KORPS HYDRA PLATFORMHYDRA PLATFORMHYDRA PLATFORMHYDRA PLATFORM The main anti-aircraft STC design currently in production in the Imperium is the Hydra long-barreled Autocannon system.
Whilst more advanced missile-based anti-aircraft weapon systems do exist (most notably the Sky Eagle missile system sometimes utilized by Manticore launchers), the STC templates for them are mostly confined mostly to a few smaller Forge Worlds which specialise in archaic construction techniques not best suited for mass-production and only a few well-equipped Skittarii Regiments have been known to make genuinely wide-spread use of them. Thus, until more efficient production methods are re-discovered for these weapons, the less arcane Hydra will have to suffice as the backbone of Imperial anti-aircraft defences. Luckily for the Impirium’s forces, this should not prove to
be a problem, as the Hydra is easy to produce, easy to maintain, and efficient at destroying enemy aircraft, or at the least deterring them from entering its umbrella of protection. A Hydra gunner’s war is a monotonous one, especially if the Hydra system is attached to a static platform as is standard procedure for the armies of Krieg. The crew will likely be called into action on few occasions and will then measure engagements with the enemy in terms of seconds. Despite days or weeks passing between engage-ments with the enemy, Hydra crwes are expected to maintain constant vigilance, and train ceaselessly so that they may react fast enough when they are given their short chance to destroy their enemy. The Mossinian Conflict saw more than a hundred Hydra platforms deployed to support the war effort, and collectively they claimed, or were instrumental in the destruction of, twenty rebel bombers and around fifteen rebel fighter craft, a notably high rate of kills considering the limited size of the conflict.
DEATH KORPS HEAVY ANTI-AIRCRAFT PLATFORM (PHAETON PATTERN)
Type Speed Armour Close Combat Firefight
Light Vehicle 0cm 6+ 6+ 6+
Weapon Range Firepower Notes
Heavy AA gun 60cm AP5+ / AT5+ / AA5+
DEATH KORPS HEAVYDEATH KORPS HEAVYDEATH KORPS HEAVYDEATH KORPS HEAVY ANTIANTIANTIANTI----AIRCRAFT PLATFORM.AIRCRAFT PLATFORM.AIRCRAFT PLATFORM.AIRCRAFT PLATFORM. The Heavy Anti-Aircraft Platform, as it is officially known, is a relatively new STC discovery, having been recovered from the
data-banks of the ancient and derelict Mechanicus vessel, Divinatus Sanctifico, lost in Warp turbulence for millennia but rediscovered at some point between 747.M.41 and 752.M.41. Warp disturbances around the sector make a precise timing of the discovery impossible and since the expedition was lost to a man before the conclusion of its research further information is unlikely to be forthcoming. Several data-packets transmitted by the Explorator Fleet were received and properly analysed, however, amongst which were records of Earthshakers fitted for use as anti-aircraft guns . Such a usage had long been postulated as practical and easy to produce by Mechanicus Adeptus, but without the proper blessing of an approved STC record such a usage was strictly banned. Data bursts found within the Divinatus Sanctifico indicated that
modified Earthshaker cannons had been produced in large numbers for anti-aircraft duties by Mechanicus Forges during the early years of the Imperium, but a cross-check of site records indicated that all production lines had been destroyed during the civil conflicts of the Heresy. Although only a tertiary-rated source, after deep cogitation a Tech Lord conclave decided that the information held aboard the Divinatus Sanctifico was genuine, and that their Mechanicus ancestors doubtless would not have adapted Earthshakers for other uses without a trusted STC, and so production was sanctioned on a small number of Mechanicus Forgeworlds. The Heavy Anti-Aircraft Platform (or ‘Skyshaker’ , as its crews have begun to call it) has quickly become a reliable and popular weapon in the Imperial arsenal. Of the Divinatus Sanctifico nothing more is known; both it and the entirety of Explorator fleet Phaeton-CXXII fell into a Warp storm before the completion of their mission and the Mechanicus ships have not been heard from in more than two hundred years.

31
DEATH KORPS GORGON SIEGE TRANSPORTER (Lucius Pattern)
Notes: Reinforced Armour, Walker, Transport (10 Infantry Units). Damage Capacity 3.
The Gorgon may either have ‘Gorgon Mortars’ or ‘2x Twin Heavy Bolters’, not both. Critical hit effect= The Gorgon is immobilized. A Further Critical Hit will destroy the Gorgon outright.
Type Speed Armour Close Combat Firefight
War Engine 20cm 4+ 6+ 6+ (5+)
Weapon Range Firepower Notes
2x Twin Heavy Stubbers 30cm AP5+
Gorgon Mortars or 30cm 2BP One-Shot, Indirect Fire, Fixed Forward Arc.
2x Twin Heavy Bolters 30cm AP4+ If chosen, upgrade Firefight stat to 5+.
DEATH KORPS GORGON DEATH KORPS GORGON DEATH KORPS GORGON DEATH KORPS GORGON SIEGE TRANSPORTERSIEGE TRANSPORTERSIEGE TRANSPORTERSIEGE TRANSPORTER No armoured vehicle is more iconic to the Death Korps method of war than the Gorgon Siege Transporter.
These massive armoured vehicles rumble across no-man’s land en masse, easily crossing wide trenches and crushing obstacles with their frontal shield/ram. Fifty infantry can fit inside each Gorgon, packed into the simple central hold in anticipation of the moment that the Gorgons crash home into the enemy positions and the men within make their desperate, unstoppable charge. Once the Infantry have disembarked, there are two schools of thought on how the Gorgon should next be used.
The first (and minority) opinion is that once it has released its cargo, the Gorgon should retreat to friendly positions in order to load up on fresh troops and then return to the enemy lines with reinforcements. The majority opinion, however, is that this tactic is en-tirely too slow, even for the methodical Death Korps. During the vital first minutes of an attack it is not helpful to morale for the men to see their vast transports retreating back towards safety, and so conventional Death Korps doctrine states that the Gorgons should re-main with their formations, using their armoured bulk as a shield to protect the vulnerable Infantry as they push as far as they can into the enemy lines before they are destroyed. Inevitably, Gorgons rarely return intact from their missions, but to the attrition-minded Death Korps this is of very little concern. All that matters is that once unleashed, the Gorgons spread fear and death amongst the enemy.
DEATH KORPS BOMBARD (COLOSSUS PATTERN)
Type Speed Armour Close Combat Firefight
Armoured Vehicle 20cm 6+ 6+ 5+
Weapon Range Firepower Notes
Heavy Bolter 30cm AP5+
Siege Mortar 45cm 2BP Ignores Cover, Slow Firing, Indirect
DEATH KORPS BOMBARDDEATH KORPS BOMBARDDEATH KORPS BOMBARDDEATH KORPS BOMBARD The Bombard siege mortar is the only self-propelled artillery piece in regular service with the armies of Krieg. Additionally it fires the heaviest warhead payload of any
artillery piece in the Krieg arsenal, a shell which is easily capable of smashing through reinforced walls and fortified roofs. Based on the adaptable Chimera chassis, the Colossus pattern Bombard is able to re-deploy in a comparably short time around the battlefield in order to react to hostile movements or to bring its huge mort ar into range of an enemy strongpoint. This mobility is a highly prized asset to the normally static Death Korps armies, as most of their artillery pieces cannot react to movement orders with the same kind of flexibility. During the third war for Armageddon, the Death Korps regiments deployed to protect Hive Volcanus were
blessed with the possession of forty-two Bombard siege mortars. Ork warbands attacked the Hive repeatedly for months on end, with the Death Korps st anding resolutely against them each day. During every Ork attack the Death Korps Bombards shelled the rampaging mobs relentlessly, smashing apart thousands of light vehicles, hundreds of heavy vehicles, and killing tens of thousands of Ork boyz. After the relief of the beleaguered Imperial defenders, the nineteen surviving Bombard crews were all awarded commendations for valour by the Imperial Guard high command, on the recommendation of the artillery company’s attached political officer, Commissar Tronsk. In his recommendation Tronsk stated ‘Never in my career have I seen men work and maintain their guns for days on end not only without rest, but without once contemplating rest… ...No artillery crews on Armageddon this season can have been so relentlessly efficient”.

32
MACHARIUS HEAVY TANK (LUCIUS PATTERN)
Notes: Reinforced Armour, Damage Capacity 2.Critical Hit Effect = The Macharius is destroyed instantly.
Type Speed Armour Close Combat Firefight
War Engine 15cm 4+ 6+ 4+
Weapon Range Firepower Notes
2x Battlecannons 75cm AT4+ / AP4+
2x Heavy Bolters 30cm AP5+
Twin Heavy Stubber 30cm AP5+
MACHARIUS HEAVY TANKMACHARIUS HEAVY TANKMACHARIUS HEAVY TANKMACHARIUS HEAVY TANK Sometimes known as second-generation Banebades, Macharius Heavy Tanks are a popular vehicle with the Death Korps. It is comparatively faster to produce than many
of the Imperium’s other large tank designs and, therefore, more numerous than some of the more famous super-heavy tank variants. The reduction in armour (and, consequentially battlefield longevity) associated with the smaller Macharius hull as compared to the Baneblade is of only minor concern to the Death Korps, as their method of warfare is more concerned with quantity than quality. The Death Korps battlefield ethos is always rooted in attritional behavior, no matter how valuable the asset being employed. The Macharius is at its most effective when it has closed to medium range and can open fire with a fusillade of anti-personnel fire from its heavy bolters and heavy stubbers. Whilst it is still a potent tank at longer ranges, its lack of speed hinders its effectiveness in situations that require rapid mobility.
Twenty-two Macharius heavy tanks were deployed during the siege of Mossino, of which eleven were ultimately destroyed outright. Only three Macharius tanks survived the campaign without requiring extensive repairs of one sort or another. In return for their battlefield losses, scores of Ragnarok tanks were destroyed by the highly trained Macharius crews during the climactic battle for the Mesa on day 106 of the conflict. Although the double battlecannon armament is the most common, other turret variants of the Macharius heavy tank chassis also exist, including Hydra-equipped anti-aircraft platforms. While there are also some more extensive modifications of the Macharius hull including a multiple mortar launcher configuration, these variants are rarely deployed by the Death Korps due to their more specialist nature; for example, what need does the Death Korps have of a mobile Hydra-armed Macharius, when in most fields of battle all of the Death Korps assets in the area will already be excellently protected by static anti-aircraft platforms?
MACHARIUS COMMAND TANK (LUCIUS PATTERN)
Notes: Reinforced Armour, Damage Capacity 2.Critical Hit Effect = The Macharius is destroyed instantly.
The Macharius Command Tank may have either 2x Vanquisher cannons or a Vulcan Megabolter, not both.
Type Speed Armour Close Combat Firefight
War Engine 15cm 4+ 6+ 4+
Weapon Range Firepower Notes
2x Vanquisher cannons or 75cm AP4+ / AT2+
2x Heavy Bolters 30cm AP5+
Twin Heavy Stubber 30cm AP5+
Vulcan Megabolter 45cm 4x AP3+ / AT5+
MACHARIUS COMMAND TANKMACHARIUS COMMAND TANKMACHARIUS COMMAND TANKMACHARIUS COMMAND TANK Compared to some of the truly ancient designs of tanks utilized by the Imperium such as the Baneblade or Shadowsword, the Macharius tank is a relatively recent
addition to the battlefields of the 41st millennium. Mostly built on the Forgeworld of Lucius, extensive resources have been allocated to its production. Due to the less complicated construction methods used in its creation (As compared to more well known super-heavy tanks like the Baneblade), within a few years of the
production lines opening enough heavy tanks were being constructed that there was a significant surplus of unrequisitioned Macharius hulls. Rather than mothball them for a future surge in demand, the Tech-Lords of Lucius decreed that any surplus Macharius hulls be reconfigured with other STC-approved weaponry, in order that the Departmento Munitorum would find these extra hulls worthy of tithing. The two most common of these upgraded Macharius variants mount either a Vulcan Megabolter or a pair of Vanquisher cannons, though other designs are also produced in limited numbers.

33
SHADOWSWORD (LUCIUS PATTERN)
Notes: Reinforced Armour. Damage Capacity 3. Critical Hit Effect = The Shadowsword’s magazine detonates, the Shadowsword is destroyed and units within 5cm take a hit on a 6+.
Type Speed Armour Close Combat Firefight
War Engine 15cm 4+ 6+ 5+
Weapon Range Firepower Notes
Volcano Cannon 90cm MW2+ Titan Killer (D3), Fixed Forward
2x Twin Heavy Bolter 30cm AP4+
DEATH KORPS SHADOWSWORDDEATH KORPS SHADOWSWORDDEATH KORPS SHADOWSWORDDEATH KORPS SHADOWSWORD Amongst the ranks of the Imperium’s super-heavy vehicles, there is no tank that has been more designed towards a single battlefield role than the Shadowsword.
Utilising the same Volcano Cannon technology as is used by the battle class Titans of the Adeptus Mechanicus, Shadowswords lack the many of the adv antages which the massive Titans enjoy, but they have found their own niche when deployed in a defensive role, where they become excellent ambush predators. Only two Shadowswords were deployed to Casinum V during the Mossinian Campaign and neither saw active combat operations until the final days of the war.
For the most of the conflict they were held in reserve ten miles behind the front line, patiently awaiting a threatened enemy breakout that never materialised. During the armoured clash on day 106 of the campaign, the Shadowsword pair were moved up to just one mile behind the front in order to support the attack, but the Mossinian rebels withdrew from the Barum Line before the two tanks arrived in the main line of battle. Both Shadowswords participated in the shelling of Mossina City in the last week of the conflict, destroying dozens of enemy pillboxes and bunkers with ease from a great enough distance that no return fire was possible.
BANEBLADE (LUCIUS PATTERN)
Notes: Reinforced Armour. Damage Capacity 3. Critical Hit Effect = The Baneblade’s magazine detonates,
the Baneblade is destroyed and units within 5cm take a hit on a 6+.
Type Speed Armour Close Combat Firefight
Armoured Vehicle 15cm 4+ 6+ 4+
Weapon Range Firepower Notes
Baneblade Cannon 75cm AP3+ / AT3+
Autocannon 45cm AP5+ / AT6+
Demolisher Cannon 30cm AP3+ / AT4+ Fixed Forward, Ignores Cover
3x Twin Heavy Bolter 30cm AP4+
2x Lascannon 45cm AT5+
DEATH KORPS BANEBLADEDEATH KORPS BANEBLADEDEATH KORPS BANEBLADEDEATH KORPS BANEBLADE While there are many designs of Imperial super-heavy tanks, the Baneblade is undoubtedly both the most common and the most well-known.
Its armaments are varied and numerous, ensuring that the Baneblade will be able to attack any type of enemy, either through targeted strikes at range, or by moving in closer and unleashing a torrent of firepower from all of its many weapons systems. Only one Baneblade was deployed during the Mossinian Campaign, a venerable machine from the Forgeworld of Lucius known as the Caveat Puritor, which had been in constant service with Death Korps armies for a hundred
and fifty years. Having suffered extensive damage during the final attack on the Barum Line, the vehicle’s battered armoured frame was carefully recovered after the battle by anxious tech-adepts, who diligently oversaw the damaged giant’s retrieval from the corpse-filled battlefield with the loving care of a concerned parent tending over their hurt offspring. By the end of the war, repairs had already begun on the Caveat Puritor as the devout Tech-Priests worked unceasingly to restore their wounded child-God to its former power and glory.

34
DEATH KORPS STORMBLADE (LUCIUS PATTERN)
Notes: Reinforced Armour. Damage Capacity 3. Critical Hit Effect= The Plasma generator detonates, the
Stormblade is destroyed, units within 5cm take a hit on a 6+.
Type Speed Armour Close Combat Firefight
War Engine 15cm 4+ 6+ 5+
Weapon Range Firepower Notes
Plasma Blastgun 45cm 2x MW2+ Slow Firing, Fixed Forward Arc
Heavy Bolter 30cm AP5+
2x Twin Heavy Bolter 30cm AP4+
2x Lascannon 45cm AT5+
DEATH KORPS STORMBLADEDEATH KORPS STORMBLADEDEATH KORPS STORMBLADEDEATH KORPS STORMBLADE Originally inte nded as a low-cost substitute for the Shadowsword, the shorter-ranged Stormblade has found a home amongst the Death Korps, its draw-
backs of little concern to a force that tends to engage the enemy at extremely close range. With the Plasma Blastgun providing fire support to Krieg formations, the Stormblade is a unit of which an enemy commander would be prudent to be wary. The strengths of the Stormblade in city fighting were well demonstrated during the 3rd battle for Hesperus Hive during the Taratus war.
Vastly outnumbered and close to being overwhelmed, a detachment of Death Korps armoured vehicles led by Major Stern Nakal’s three Stormblades counter-attacked against the near victorious traitor forces. During the ensuing battle Nakal’s Super-Heavy tanks beat off two traitorous armoured companies, outflanked the more numerous heretics and ultimately turned the tide of battle in favour of the loyal Kriegsmen after catching the traitor armoured companies in a hellish crossfire. Although Nakal himself was subsequently killed during another tank battle later on during the same campaign, he will forever be remembered as a paragon of the Death Korps’ 7164th Regiment.
DEATH KORPS STORMSWORD (LUCIUS PATTERN)
Notes: Reinforced Armour. Damage Capacity 3. Critical Hit Effect= The cannon’s magazine detonates, the Stormsword is destroyed, units within 5cm take a hit on a 6+.
Type Speed Armour Close Combat Firefight
War Engine 15cm 4+ 6+ 4+
Weapon Range Firepower Notes
Siege Cannon 45cm BP3 Disrupt, Ignores Cover
Fixed Forward Arc
Heavy Bolter 30cm AP5+
2x Twin Heavy Bolter 30cm AP4+
2x Heavy Flamer 15cm AP4+ Ignores Cover
DEATH KORPS STORMSWORDDEATH KORPS STORMSWORDDEATH KORPS STORMSWORDDEATH KORPS STORMSWORD A specialised city fighting super-heavy tank, the Stormsword is often used by the Death Korps as the spearhead of siege assaults.
Conventional tactics for the use of the Stormsword involve advancing at maximum speed directly into the heart of enemy formations, unleashing Heavy Bolter shells, gouts of flame and carefully placed shots from the devastating Siege Cannon. As soon as the onslaught begins to fade or enemy resistance begins to thicken, supporting Gorgons will disgorge their troops and infantry will quickly occupy the
area, setting up a firebase for a new advance. Although scorned as an inferior super-heavy tank by many who are unaware of its full abilities, the Death Korps have adopted the Stormsword as a weapon superbly appropriate to their usual methods of anti-infantry warfare. The Death Korps is often more liable to fight battles at ranges of tens of metres rather than tens of miles and at such distances the incredible range and accuracy of the more discriminate super-heavy tanks like the Shadowsword becomes a liability.

35
THUNDERBOLT FIGHTER (Phaeton Pattern)
Type Speed Armour Close Combat Firefight
Aircraft Fighter-Bomber 6+ - -
Weapon Range Firepower Notes
Stormbolters 15cm AP4+/AA5+ Fixed Forward
Multilaser 30cm AP5+/AT6+/AA5+ Fixed Forward
Underwing Rockets 30cm AT4+ Fixed Forward
IMPERIAL NAVY THUNDERBOLTIMPERIAL NAVY THUNDERBOLTIMPERIAL NAVY THUNDERBOLTIMPERIAL NAVY THUNDERBOLT The Thunderbolt Fighter is the solid workhorse of the Impe rial Navy’s atmospheric aircraft forces, indeed it is likely that the Thunderbolt fighter (across
its many different patterns) is the single most common aircraft in Imperial service. Thunderbolt fighters normally operate in pairs and are furthermore usually grouped into squadrons of twenty aircraft , each squadron being led by a squadron commander. During the war for Alletang, more than sixteen-thousand Thunderbolt fighters were deployed over the course of the three year conflict for the skies of the contested planet.
For years at a time the Imperial squadrons dueled with Ork air groups in the spore-choked clouds of Alletang. During high points in the fighting, dogfights involving hundreds of aircraft would occur on a weekly basis, where individual Aces made names for themselves synonymous with skill and bravery. For the Imperial Guard troops fighting the ground war far beneath, the grappling opponents in the sky were looked upon with trepidation, for the sheer numbers of aircraft deployed by each side made it obvious that the eventual winner in the sky would soon determine which side won the land war. This belief turned out to be correct, for after three years of fighting, the Ork Fighta-Bombers finally gained the upper hand and had soon assisted in scouring all remaining Guardsmen from the sands of Alletang.
MARAUDER BOMBER (Phaeton Pattern)
Notes: Damage Capacity 2.
Critical Hit Effect = The bomber is struck in a critical location and the aircraft is destroyed.
Type Speed Armour Close Combat Firefight
War Engine Bomber 5+ - -
Weapon Range Firepower Notes
Bomb Racks 15cm 3BP Fixed Forward
Twin Lascannon 45cm AT4+ Fixed Forward
2x Twin Heavy Bolter 15cm AA5+
IMPERIAL NAVY MARAUDER BOMBERMPERIAL NAVY MARAUDER BOMBERMPERIAL NAVY MARAUDER BOMBERMPERIAL NAVY MARAUDER BOMBER The most common variant of the Marauder bomber is a large, moderately armoured aircraft with a set of turret-mounted anti-aircraft guns, capable of traveling at a
great altitude and carrying a variety of payloads. The typical armament carried by Marauder bombers is a set of multiple high explosive bombs, which can be indiscriminately dropped over a target area from high altitude when used in a strategic role, or peppered over a discrete area from low altitude when used in a tactical role over a single battlefield. The war for Mossino only saw twenty-three Marauder bombers deployed and this small force was carefully husbanded by General Whelan.
Only on two occasions were Marauder bombers used in anything approaching their total squadron strength in direct attacks on the contested battlefields, in the bombing of Saint Barnab’s Commune and in the critical battle on day 106 of the campaign; at all other times the Marauders were used as strategic bombers. Flying in pairs, escorted by a flight of Thunderbolt fighters, the Marauders would only briefly stray into Mossinian airspace, dropping their bombs over supply dumps and logistics hubs before quickly returning to the loyalist side of the lines. In most cases, these small raids went uncontested, as the poorly prepared Mossinian PDF fighters failed to react in time to intercept the raiders. On those occasions where interception did occur, the Marauder’s potent point defences were normally strong enough to see off the rebel antagonists.

36
Above: Death Korps troops enter a Gorgon Transport vehicle in preparation for an attack across no-man’s land.
Below: Death Korps troops scout a captured trench where a disabled Ragnarok tank has come to rest.

37
The Democratic Rebellion of Mossino.The Democratic Rebellion of Mossino.The Democratic Rebellion of Mossino.The Democratic Rebellion of Mossino. For seven millennia the continent of Mossino grew foodstuffs for the Imperium. For three millennia, light munitions were manufactured on Mossino and exported to the stars. Every year passed was beneficial to the cause of mankind. For some, serving the Imperium quietly wasn’t enough and Mossino sent its young sons to fight in the name of the Emperor. Over the course of Mossino’s time in the Imperium, tens of millions of Mossinians were sent to fight beyond the world of their birth. And yet, for some, this honour was still not enough. Quietly, in the bars and halls of Mossino, some began to whisper that perhaps there was more that the continent could give to the Imperium, if only their leaders would see how the little continent was being under exploited. None could say from where the idea first sprang, but for years people would gather in quiet
places and wonder: ‘How can we change things? How can Mossino give more?’ Slowly, groups began to form. Factory workers came together and chose leaders, and the delegates would gather in turn to choose their own representatives. Structures of power began to form, as the pro-action groups began to speak more openly about their desires. Where once only mad preachers had stood on the streets and espoused their faith, now the roadsides teemed with the young, proclaiming ‘We must do more! We must work harder in the name of the Emperor!’ People would stop and listen for a few moments before moving on, the seed of radicalism planted in their head. Then came the announcement that Mossino’s Guardsman levy for the decade was to be waived as the population had not grown at a fast enough rate to justify sending the Planetary Defence Forces off-world. Regiments that had been scheduled for transfer to the Departmento Munitorum were instead disbanded.

38
Discontent spread, as it became obvious that for ten years no Mossinian would get the opportunity to kill the enemies of the Emperor. The Workers’ Councils united, came into the open, began demanding the right to decide the fate of Mossino for themselves; if Governor Jerni wasn’t prepared to send the men of Mossino to fight for the Emperor, then the Delegates of Mossino certainly were. Elections were held to confirm that the population was behind the Delegates, after which a statement was issued; until Governor Jerni granted Mossino the right to decide its own tithing levels, as well as other connected issues of self-determination, then Mossino would cease exporting foodstuffs and munitions. The Governor’s terse response was to demand that the ringleaders of the Mossinian rebellion surrender to his rightful authority, or face military action. The Delegates discussed the Governor’s ultimatum hotly for several days before issuing their formal reply. The delegates stated that either Mossino be
given the boon of a higher level of tithing, including the immediate raising of regiments for offworld service, or Mossino would not cooperate with the Governor’s demands; the Delegates were prepared to surrender, but only if Mossino’s sons were to be tithed. Knowing that compromise always constitutes failure, Governor Jerni dispatched PDF forces to retake control over wayward Mossino. However, the PDF forces either refused to attack the mobs of pious workers, or in many cases even deserted to join their ranks. Those forces that remained loyal were forced to retreat. The situation continued for a further two years, as Mossino reformed its disbanded PDF regiments in anticipation of a holy crusade. Proselytizers filled the streets proclaiming the correct course of their actions and the munitions factories worked night and day to stockpile arms for the war ahead; The Delegates all agreed that whatever forces Governor Jerni sent against them, Mossino would resist until Mossino’s children were permitted to crusade across the Heavens in the name of the Emperor.

39
MOSSINIAN COMMANDER
Notes: Commander
Type Speed Armour Close Combat Firefight
Infantry 15cm 6+ 5+ 5+
Weapon Range Firepower Notes
Heavy Stubber 30cm AP6+ -
MOSSINIAN COMMANDERMOSSINIAN COMMANDERMOSSINIAN COMMANDERMOSSINIAN COMMANDER Most of the Commanders who fought at the head of the Mossinian rebel army had previously served in the Mossinian Planetary Defence Forces,
before their pre-war disbandment. As Mossino gradually moved from disgruntled region to outright rebellion, the former PDF Commanders that came under the sway of the rebellious mood naturally fell back into place as military leaders in the
reformed Mossinian crusade regiments. As the war progressed, most of the Commanders fought a disciplined campaign in accordance with General Kholin’s dictates; The Mossinian troops were asked to hold the line at all costs, to hold back the Imperium long enough to exhaust their army and force a diplomatic resolution to the crisis. Against a less pragmatically grim army than the Death Korps, this tactic may even have worked.
MOSSINIAN MOSSINIAN MOSSINIAN MOSSINIAN SUPREME COMMANDERSUPREME COMMANDERSUPREME COMMANDERSUPREME COMMANDER Prior to the war, the commanding officer of the Mossinian Regiments was a brave and well-respected man known
to Imperial records as General Kholin. As the most skilled of his generation, Kholin had risen through the ranks and had looked forward to being drafted off-world with his army and as such he had been one of the first to fall under the influence of the Democratic movement.
During the war General Kholin followed a variety of tactics that stalled the Imperial advance for much longer than loyalist analyticae had initially expected, through the careful use of strategic reserve forces. On the last day of the war for Mossino, General Kholin finally came face-to-face with his opposite number, General Whelan of the Death Korps; after the end of the war, with the taint of Chaos revealed to him, the skilled and capable General Kholin offered up his life to Whelan’s Commissar escort who solemnly did his duty and fired the last gunshot of the war.
MOSSINIAN SUPREME COMMANDER
Notes: Supreme Commander
Type Speed Armour Close Combat Firefight
Infantry 15cm 5+ 4+ 5+
Weapon Range Firepower Notes
Heavy Stubber 30cm AP6+ -
Power Weapons (Base contact) Assault Weapons Macro Weapon, Extra Attacks (+1)
MOSSINIAN ITERATOR
Notes: Leader, Inspiring, Character.
Type Speed Armour Close Combat Firefight
Character - - - -
Weapon Range Firepower Notes
Eviscerator (Base Contact) Assault Weapon Macro-Weapon, Extra Attacks (+1)
MOSSINIAN ITERATORMOSSINIAN ITERATORMOSSINIAN ITERATORMOSSINIAN ITERATOR As the rightful government of Mossino was being subverted, preachers and radicals began to fill the streets, proclaiming the imminent destiny of
Mossino was to lead a crusade across the Heavens in the name of the Emperor. The local Adeptus Arbites were powerless to prevent the uprising of so much of the population at one time, and so these radical orators came to find themselves with thousands of
willing followers, eager to do their bidding in the war ahead. When war came to Mossino, the iterators (As they became known) held lectures to the infantry on the correctness of their actions, pointing out how their act of defiance against the law was necessary before they could be permitted to begin their holy crusade. During the loyalist attacks, the Iterators inspired their followers by seeking out the very thickest of the fighting to stand side-by-side with their followers.

40
MOSSINIAN SNIPERS
Notes: Scouts
Type Speed Armour Close Combat Firefight
Infantry 15cm - 6+ 5+
Weapon Range Firepower Notes
Sniper Rifles 30cm AP5+ Sniper
MOSSINIAN SNIPERSMOSSINIAN SNIPERSMOSSINIAN SNIPERSMOSSINIAN SNIPERS Mossino’s preparation for the war to decide the fate of their continent involved planning and training for a war of defence.
Aside from the main features of a defensive war, such as trench lines and an emphasis on artillery support, Mossino, an emphasis on ambush tactics and prepared defences led to the founding of three Sniper schools.
For a full year prior to the war for Mossino, the hundreds of snipers trained hard, firing almost twenty thousand carefully placed practice rounds each, at both static and mobile drone targets. By the time the war for Mossino began, the Sniper Corps was amongst the most highly trained of the rebel forces, each man more than equal to the very best of marksmen amongst the Imperial forces sent to pacify them.
MOSSINIAN INFANTRY MOSSINIAN INFANTRY MOSSINIAN INFANTRY MOSSINIAN INFANTRY Prior to the Mossinian rebellion, the basic line infantry of the Mossino Planetary Defence Force regiments had
been a conscription-raised force, like most armies across the wide Imperium. In the days following Mossino’s declaration of non-compliance with Imperial law, the regiments of the wayward continent were swelled considerably with volunteers.
Most of the volunteers were former members of the Planetary Defence Force, who had been disappointed not to be called offworld for service as a crusading army for the Imperium, but some new recruits were simply idealistic civilians who had been swayed by the impassioned speeches of the Democratic Delegates and Preachers. When the battle to decide the fate of Mossino finally began, the rebel infantry fought with the righteous zeal of men utterly convinced that their chosen path was blessed by the immortal Emperor of Man.
MOSSINIAN INFANTRY
Notes: Only one unit in every two (Rounding up) has a Heavy Stubber.
Type Speed Armour Close Combat Firefight
Infantry 15cm - 6+ 5+
Weapon Range Firepower Notes
Heavy Stubber 30cm AP6+ -
MOSSINIAN OGRYNS
Type Speed Armour Close Combat Firefight
Infantry 15cm 3+ 4+ 5+
Weapon Range Firepower Notes
Industrial Drills
Ripper Guns
(Base contact)
(15 cm)
Assault Weapons
Small Arms
Macro-Weapons, Extra Attack (+1)
-
MOSSINIAN OGRYNSMOSSINIAN OGRYNSMOSSINIAN OGRYNSMOSSINIAN OGRYNS The Orgyns of Mossino were not indigenous to the planet, having been imported for industrial usage by the Adeptus Administratum. Mostly, they
were put to work in the munitions factories in Mossino. Ogryns are generally amenable in nature and
respectful of authority and for this reason did not take part in the democratic elections, or partake in the civil unrest which led up to Mossino splitting away from the rightful Imperial authorities. Once power had transferred to the Delegates, the Ogryns naturally regarded the new rulers of Mossino as their masters and happily followed new orders that asked them to put down their tools and pick up Ripper Guns.

41
MOSSINIAN ROUGH RIDERS
Notes: Mounted, Infiltrators, Scouts
Type Speed Armour Close Combat Firefight
Infantry 20cm 5+ 4+ 6+
Weapon Range Firepower Notes
Power Rams (Base contact) Assault Weapons First Strike
MOSSINIAN ROUGH RIDERSMOSSINIAN ROUGH RIDERSMOSSINIAN ROUGH RIDERSMOSSINIAN ROUGH RIDERS Although present in the armies of Mossino, Rough Riders were deployed sparingly by the rebellious forces during the siege.
Rough Riders are more typically used in an offensive role, in breaking through enemy lines or harassing supply conveyers. However, the Mossinian strategy was one of defence
and delay, in the hope of holding off the attacking Imperial armies for long enough to break their will. The ultimate aim of the Mossinian rebellion was not to hurt the Imperium, but to make the planetary governor see that Mossino must be tithed more actively for off-world service. Needless bloodshed was therefore to be avoided if possible and so the Rough Riders were held in reserve until the very last days of the war.
MOSSINIAN MOSSINIAN MOSSINIAN MOSSINIAN COMBAT ENGINEERSCOMBAT ENGINEERSCOMBAT ENGINEERSCOMBAT ENGINEERS Prior to the intervention of the Krieg forces, the Mossinian forces had been able to take the time to prepare
defensive positions. Thousands of troops had been drafted into working on the defence lines and when the war finally began they retained much of their skills and equipment.
Those troops drafted into the pre-war Engineering detachments were often kept with their formations once the war had begun and some of the hardest fighting of the conflict was placed upon their shoul-ders. In every situation where the Imperials threatened to break through the Mossinian defences upon the Barum line, Combat Engineer formations were drafted into the fight, expected to repair damaged defences and repel the loyalist attackers at the same time.
MOSSINIAN COMBAT ENGINEERS
Type Speed Armour Close Combat Firefight
Infantry 15cm 6+ 5+ 5+
Weapon Range Firepower Notes
Heavy Flamer 15cm AP4+ Ignores Cover
Melta Bombs (Base contact) Assault Weapons Macro-Weapons, Extra Attacks (+1)
MOSSINIAN THUDD GUN
Type Speed Armour Close Combat Firefight
Infantry 10cm - - 5+
Weapon Range Firepower Notes
Thudd Gun 45cm AP4+/AT6+ Indirect Fire
MOSSINIAN THUDD GUNMOSSINIAN THUDD GUNMOSSINIAN THUDD GUNMOSSINIAN THUDD GUN These humble weapons are similar in construction to the Quad Launchers used by the Death Korps of Krieg, and were put to heavy service during the
siege of the Barum line, mostly seeing action during the enemy’s attacks across no-man’s land. Any infantry caught outside of their protective Gorgon transporters during their attacks were invariably exposed to heavy fire from the accurate and relentless
rebel Thudd Gun weapon teams, a few well-placed barrages from a Thudd Gun section was often enough to force an unprotected infantry formation into a re-treat. From the first day of the conflict to the last, Mossinian Thudd Gun crews worked tirelessly to expel the invading Imperial armies from their home land, often fighting small artillery duels with their opposite numbers crewing Krieg Quad Launchers, but more usually in relentlessly shelling the slowly encroaching loyalist trenchworks.

42
MOSSINIAN HEAVY MORTAR
Type Speed Armour Close Combat Firefight
Infantry 10cm - - 6+
Weapon Range Firepower Notes
Heavy Mortar 30cm 1BP Indirect Fire
MOSSINIAN HEAVY MORTARMOSSINIAN HEAVY MORTARMOSSINIAN HEAVY MORTARMOSSINIAN HEAVY MORTAR The Heavy Mortar was extensively employed by both loyalist forces from Krieg and rebellious Mossinians during the siege on the Barum line.
Although the Heavy Mortar lacks the long range of a true artillery piece, the sheer numbers of Heavy Mortars available during the war for Mossino were a great threat to both sides. These humble mortars provided useful fire support
during infantry attacks, as they were able to react more quickly and accurately to close support requests than the heavy artillery, which was often upwards of a mile behind the front line. Due to their commonality of usage, many of the Heavy Mortars captured by the successful Death Korps offensive on day 106 of the Mossinian intervention were subsequently repaired and then later used against their erstwhile owners during the shelling of Mossina city in the final days of the war.
MOSSINIAN RAPIER MOSSINIAN RAPIER MOSSINIAN RAPIER MOSSINIAN RAPIER LASER DESTROYERLASER DESTROYERLASER DESTROYERLASER DESTROYER The Rapier Laser Destroyer is a potent defensive weapon, which is more often
seen amongst the Skitarii armies of the Adeptus Mechanicus . Mossino was fortunate in that several of its light munitions factories possessed the design patterns for the Rapier. Prior to the war’s commencement, hundreds of these potent weapons were produced and stockpiled, at first in anticipation of serving with an off-world crusade, then later with the intention of repelling the
Imperial intervention force’s tanks and armoured vehicles, in order to help assert Mossino’s earnest desire to help the Imperium. Standard tactics with the Rapier Laser Destroyer involve concealed ambush positions, as the Rapier team is kept waiting for an enemy attack. It’s bulky nature and lack of armour make it an inferior weapon when used in an aggressive role. During the conflict, more than one hundred loyalist Leman Russ crews reported damage to (or the destruction of) their vehicle due to action from enemy Rapier Laser Destroyer fire.
MOSSINIAN RAPIER LASER DESTROYER
Type Speed Armour Close Combat Firefight
Infantry 10cm - - 5+
Weapon Range Firepower Notes
Rapier Laser Destroyer 45cm AP6+/AT4+ -
MOSSINIAN FIRESTRIKE MISSILE LAUNCHER
Type Speed Armour Close Combat Firefight
Light Vehicle 10cm - - 6+
Weapon Range Firepower Notes
Firestrike Missile Unlimited MW2+ One-Shot, Indi rect Fi re, Ti tan Ki ll er (D3 )
Heavy Stubber 30cm AP6+ -
MOSSINIAN FIRESTRIKE MOSSINIAN FIRESTRIKE MOSSINIAN FIRESTRIKE MOSSINIAN FIRESTRIKE MISSILE LAUNCHERMISSILE LAUNCHERMISSILE LAUNCHERMISSILE LAUNCHER The Firestrike launcher is an ancient design, rarely used by the Imperium’s frontline forces.
However, a PDF regiment such as the Mossininan forces can rarely call upon more powerful weapons like the Deathstrike missile and must make do with
what their more meagre production facilities can fabricate. Although they are less powerful than their larger equivalents, Firestrike missiles are still a respectably destructive weapon, able to penetrate Titan-class armour and cause considerable damage to the most protected of targets.

43
MOSSINIAN AA GUN (Nikea Pattern)
Type Speed Armour Close Combat Firefight
Light Vehicle 0cm - - 6+
Weapon Range Firepower Notes
AA Cannon 60cm AP5+/AT5+/AA5+ -
MOSSINIAN AA GUNMOSSINIAN AA GUNMOSSINIAN AA GUNMOSSINIAN AA GUN The Nikea Pattern Anti-Aircraft Gun, like much of the Mossinian equipment, is a reliable workhorse designed to be easily produced by the relatively
primitive construction facilities available on an average backwater planet. The Mossinian Anti-Aircraft guns were rarely called upon to fire during the conflict, as the Death Korps ethos of battle calls for constant artillery bombardments and infantry charges, not aircraft
raids. Only on two major occasions were the loyalist bomb-ers employed en masse (firstly for the bombing of St. Barnab’s commune and secondly on day 106 of the conflict in order to support the armoured push onto the Mesa) and on both occasions the out of practice Mossinian Anti-Aircraft crews’ fire was light and generally ineffective. As a consequence of their light usage, not one loyalist aircraft was lost to enemy ground fire during the war.
MOSSINIAN HOWITZERMOSSINIAN HOWITZERMOSSINIAN HOWITZERMOSSINIAN HOWITZER The Nikea pattern standard Howitzer is a basic and reliable artillery piece which has often seen service with armies unable to build or maintain the
more sophisticated Earthshaker cannons used by the Basilisk artillery platform. Although it does not quite match the Earthshaker’s exceptional range, the Nikea Pattern Howitzer still possesses a respectable reach and can loft a similar-sized artillery shell with reasonable accuracy. During the Mossinian campaign, rebel Howitzers
duelled daily with the Krieg forces’ array of artillery platforms, each attempting to suppress the other in a constant long-range battle. When the Mossinian rebels abandoned their defences upon the Barum Line they did not have enough time to retrieve most of their heavy guns and thus they were forced to spike most of their Howitzers. During the shelling of Mossina city itself that followed a few days later, the Mossinian reply was weak and ineffective, as all their best artillery had been left upon the Barum Line. Without their artillery the spirit of the Mossinian rebellion was finally broken, and the flag of parlay was soon raised.
MOSSINIAN HOWITZER (Nikea Pattern)
Type Speed Armour Close Combat Firefight
Light Vehicle 0cm - - 6+
Weapon Range Firepower Notes
Howitzer 90cm 1BP Indirect Fire
MOSSINIAN LAND CRAWLER (Nikea Pattern)
Notes: Transport (May carry one of the following: AA Gun, Howitzer, Thudd Gun, Rapier)
Type Speed Armour Close Combat Firefight
Light Vehicle 15cm 6+ - 6+
Weapon Range Firepower Notes
Heavy Stubber 30cm AP6+
MOSSINIAN LAND CRAWLERMOSSINIAN LAND CRAWLERMOSSINIAN LAND CRAWLERMOSSINIAN LAND CRAWLER The Nikea Pattern Land Crawler is not a purpose-built war machine, but a humble farm tractor pressed into military service.
For PDF regiments that lack dedicated gun tows such as the Centaur, the Land C rawler forms an adequate if not stellar replacement. The Land Crawler’s hardy engine and sturdy construction allowed the guns of
Mossino to be redeployed during the siege on the Barum Line, so as to meet expected loyalist attacks, or deal with enemy artillery fire. During the abandonment of the Barum Line after day 106 of the conflict, those Land Crawlers present were found to be too slow to keep up with the general retreat and they (along with the artillery pieces they were towing) were mostly abandoned, left to be captured by the advancing Imperial forces.

44
MOSSINIAN HELLHOUND (Nikea Pattern)
Type Speed Armour Close Combat Firefight
Armoured Vehicle 15cm 3+ 6+ 3+
Weapon Range Firepower Notes
Inferno Cannon 30cm AP3+ Ignores Cover
MOSSINIAN HELLHOUNDMOSSINIAN HELLHOUNDMOSSINIAN HELLHOUNDMOSSINIAN HELLHOUND The Nikea pattern Hellhound tank is a slower, more heavily armoured combat vehicle than its more common Chimera-based cousins.
As with most Nikea pattern designs, it is simple, rugged and reliable, able to be produced by the simplest of construction facilities. During the Mossinian Campaign, rebel Hellhounds were commonly deployed in garrisons amongst the frontline troops, awaiting patiently the enemy attacks.
Each time the loyalist forces charged the Hellhounds would roar to life, pouring flaming promethium over the landscape. Caught between the necessity of capturing the enemy trenches and the hellstorm of stubber rounds, lasgun bolts and hellhound blasts, thousands of loyalist soldiers died trying to breach the solid rebel defences. The main weakness of the Nikea pattern Hellhound is its lack of speed, which was underlined during the rout from the Barum Line, as most of the Hellhounds were abandoned rather than face the slow retreat under fire.
MOSSINIAN SIEGFRIED MOSSINIAN SIEGFRIED MOSSINIAN SIEGFRIED MOSSINIAN SIEGFRIED LIGHT TANKLIGHT TANKLIGHT TANKLIGHT TANK The Siegfried light tank is a common militarised variant of the Land Crawler
that is used by PDF regiments throughout the Imperium. Fitted with a short-burn engine, the Siegfried is unreliable but fast, able to wait behind the lines before surging forwards either to exploit holes in the enemy lines or plug gaps in their own defences. The conflict for Mossino mostly saw the rebels’
Siegfried tanks used in the counter-attack role (as the overall battle plan did not call for offensive attacks so as to avoid unnecessary loss of life; the Mossinian rebellion was a war for the right to self-determination, not a full-blown revolt against the Imperium) so they were invariably employed in reinforcing the Mossinian lines at their weak points whenever they threatened to break. It is likely that if it were not for the valiant efforts of the Siegfried formations in defending breaks in the Barum Line during the early loyalist attacks, the war for Mossino would have been concluded far sooner.
MOSSINIAN SIEGFRIED LIGHT TANK (Nikea Pattern)
Type Speed Armour Close Combat Firefight
Armoured Vehicle 30cm 5+ 6+ 5+
Weapon Range Firepower Notes
Autocannon 45cm AP5+/AT6+ -
MOSSINIAN RAGNAROK TANK (Nikea Pattern)
Notes: Reinforced Armour, Walker
Type Speed Armour Close Combat Firefight
Armoured Vehicle 15cm 4+ 6+ 4+
Weapon Range Firepower Notes
Ragnarok Battlecannon 60cm AP4+/AT4+ -
2x Heavy Stubbers 30cm AP6+ -
MOSSINIAN RAGNAROK TANKMOSSINIAN RAGNAROK TANKMOSSINIAN RAGNAROK TANKMOSSINIAN RAGNAROK TANK As with several of the Mossinian front-line war machines, the Ragnarok tank was originally developed on the home planet of their besiegers. The Ragnarok
had provided sterling service during the Krieg civil war and its design had propagated to many other
worlds for use by Planetary Defence Forces in need of an easily-constructed main battle tank. In Mossinian service, the Ragnarok provided a solid armoured defence force, which although outmatched by the faster, longer-ranged Leman Russ, never faltered in putting up a strong fight against the be-sieging army.
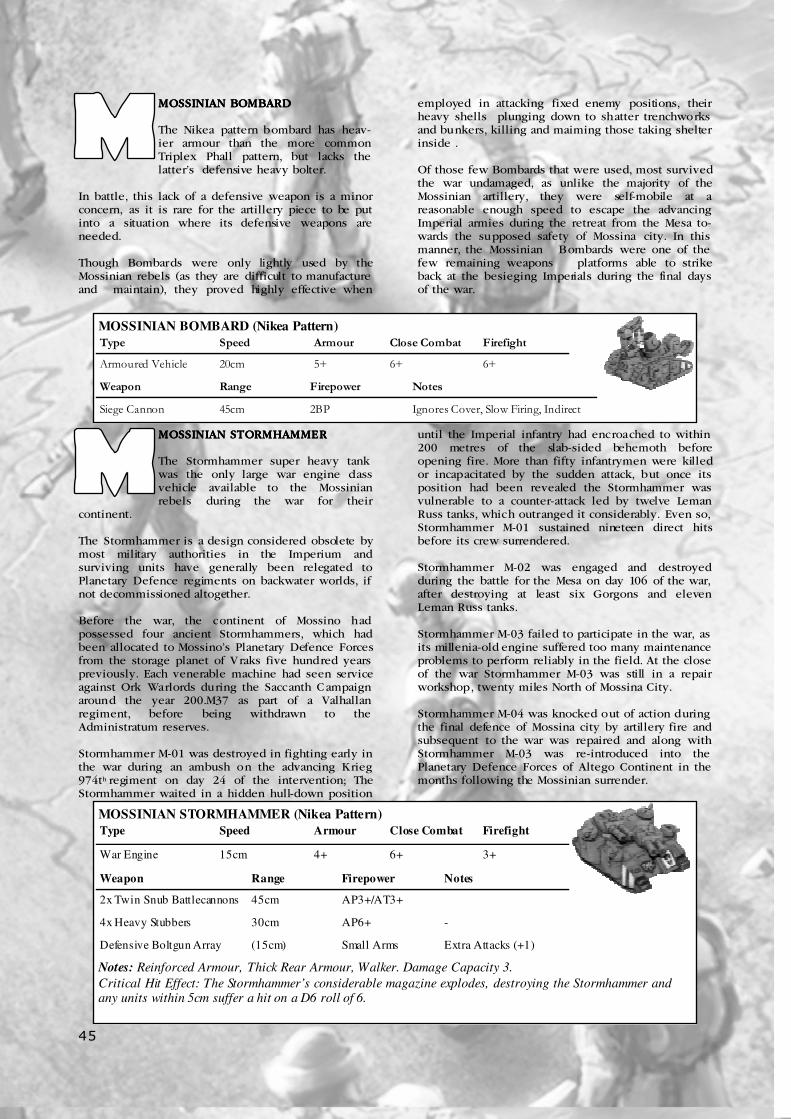
45
MOSSINIAN STORMHAMMER (Nikea Pattern)
Notes: Reinforced Armour, Thick Rear Armour, Walker. Damage Capacity 3.
Critical Hit Effect: The Stormhammer’s considerable magazine explodes, destroying the Stormhammer and any units within 5cm suffer a hit on a D6 roll of 6.
Type Speed Armour Close Combat Firefight
War Engine 15cm 4+ 6+ 3+
Weapon Range Firepower Notes
2x Twin Snub Battlecannons 45cm AP3+/AT3+
4x Heavy Stubbers 30cm AP6+ -
Defensive Boltgun Array (15cm) Small Arms Extra Attacks (+1)
MOSSINIAN STORMHAMMERMOSSINIAN STORMHAMMERMOSSINIAN STORMHAMMERMOSSINIAN STORMHAMMER The Stormhammer super heavy tank was the only large war engine class vehicle available to the Mossinian rebels during the war for their
continent. The Stormhammer is a design considered obsolete by most military authorities in the Imperium and surviving units have generally been relegated to Planetary Defence regiments on backwater worlds, if not decommissioned altogether. Before the war, the continent of Mossino had possessed four ancient Stormhammers, which had been allocated to Mossino’s Planetary Defence Forces from the storage planet of Vraks five hundred years previously. Each venerable machine had seen service against Ork Warlords during the Saccanth Campaign around the year 200.M37 as part of a Valhallan regiment, before being withdrawn to the Administratum reserves. Stormhammer M-01 was destroyed in fighting early in the war during an ambush on the advancing Krieg 974th regiment on day 24 of the intervention; The Stormhammer waited in a hidden hull-down position
until the Imperial infantry had encroached to within 200 metres of the slab-sided behemoth before opening fire. More than fifty infantrymen were killed or incapacitated by the sudden attack, but once its position had been revealed the Stormhammer was vulnerable to a counter-attack led by twelve Leman Russ tanks, which outranged it considerably. Even so, Stormhammer M-01 sustained nineteen direct hits before its crew surrendered. Stormhammer M-02 was engaged and destroyed during the battle for the Mesa on day 106 of the war, after destroying at least six Gorgons and eleven Leman Russ tanks. Stormhammer M-03 failed to participate in the war, as its millenia-old engine suffered too many maintenance problems to perform reliably in the field. At the close of the war Stormhammer M-03 was still in a repair workshop, twenty miles North of Mossina City. Stormhammer M-04 was knocked out of action during the final defence of Mossina city by artillery fire and subsequent to the war was repaired and along with Stormhammer M-03 was re-introduced into the Planetary Defence Forces of Altego Continent in the months following the Mossinian surrender.
MOSSINIAN BOMBARDMOSSINIAN BOMBARDMOSSINIAN BOMBARDMOSSINIAN BOMBARD The Nikea pattern bombard has heav-ier armour than the more common Triplex Phall pattern, but lacks the latter’s defensive heavy bolter.
In battle, this lack of a defensive weapon is a minor concern, as it is rare for the artillery piece to be put into a situation where its defensive weapons are needed. Though Bombards were only lightly used by the Mossinian rebels (as they are difficult to manufacture and maintain), they proved highly effective when
employed in attacking fixed enemy positions, their heavy shells plunging down to shatter trenchworks and bunkers, killing and maiming those taking shelter inside . Of those few Bombards that were used, most survived the war undamaged, as unlike the majority of the Mossinian artillery, they were self-mobile at a reasonable enough speed to escape the advancing Imperial armies during the retreat from the Mesa to-wards the supposed safety of Mossina city. In this manner, the Mossinian Bombards were one of the few remaining weapons platforms able to strike back at the besieging Imperials during the final days of the war.
MOSSINIAN BOMBARD (Nikea Pattern)
Type Speed Armour Close Combat Firefight
Armoured Vehicle 20cm 5+ 6+ 6+
Weapon Range Firepower Notes
Siege Cannon 45cm 2BP Ignores Cover, Slow Firing, Indirect

46
MOSSINIAN PLANETARY DEFENCE FORCE BOMBER (Nikea Pattern)
Type Speed Armour Close Combat Firefight
Aircraft Bomber 5+ - -
Weapon Range Firepower Notes
Bombs 15cm 2BP Fixed Forwards
2xT win Heavy Stubb ers 15cm AA6+ -
MOSSINIAN PLANETARY MOSSINIAN PLANETARY MOSSINIAN PLANETARY MOSSINIAN PLANETARY DEFENCE FORCE BOMBERDEFENCE FORCE BOMBERDEFENCE FORCE BOMBERDEFENCE FORCE BOMBER Nikea Pattern bombers are lightweight craft, more manoeuvrable than their squat appearance may at first imply
and are capable of bearing a considerable weight in high explosive bombs to a target. During the war for Mossino, the rebellious forces employed Nikea Pattern bombers const antly throughout the war, in attempting to stymie loyalist
advances, or disrupt entrenching crews as they undertook their slow and dangerous work. As the most aggressive and active arm of the Mossinian armed forces, the PDF bombers had suffered as much as ninety percent casualties by the end of the war and although their efforts had slowed the besieging forces in their advance, they alone could not hold back the irresistible might of the Imperium.
MOSSINIAN PLANETARY MOSSINIAN PLANETARY MOSSINIAN PLANETARY MOSSINIAN PLANETARY DEFENCE FORCE FIGHTERDEFENCE FORCE FIGHTERDEFENCE FORCE FIGHTERDEFENCE FORCE FIGHTER The Nikea Pattern PDF Fighter craft is a slow and poorly-manoeuvrable craft, when compared to frontline aircraft
such as the Thunderbolt or Lightning. During the Siege of Mossino, the loyalist aircraft rarely operated en mass in hostile airspace. Only when called upon to target specific objectives as part of a larger attack did the loyalist bombers (and their escort fighters) attack the Mossinian defence lines directly.
During these occasions, Mossinian PDF Fighters rose to meet the challenge and several dogfights occurred. Invariably, the outmatched Mossinian aircraft came out of these confrontations badly, with a high proportion of their numbers being shot down in their first engagement. By the end of the war, most of the Mossinian PDF squadrons had been disbanded due to lack of service-able aircraft, whilst the loyalist air crews were free to rule the skies almost unopposed.
MOSSINIAN PLANETARY DEFENCE FORCE FIGHTER (Nikea Pattern)
Type Speed Armour Close Combat Firefight
Aircraft Fighter-Bomber - - -
Weapon Range Firepower Notes
Cannon 15cm AT6+/AA6+ Fixed Forwards
Heavy Stubber 15cm AP6+/AA6+ Fixed Forwards
MOSSINIAN FORTIFIED POSITIONS
Notes: Bunkers are Fortifications (See 1.8.4). Gun Emplacements provide vehicles with a Cover Save that works in the same manner as an infantry Cover Save (See 1.8.3). Each gun emplacement can hold one unit and
each bunker can hold three units. Trenches can hold one infantry unit per 4cm of length.
MOSSINIAN MOSSINIAN MOSSINIAN MOSSINIAN FORTIFIED POSITIONSFORTIFIED POSITIONSFORTIFIED POSITIONSFORTIFIED POSITIONS During the period of hostilities leading up to the eventual siege, the leaders of the Mossinian rebellion had expended
a considerable effort in fortifying the main
approaches to Mossina City. The defences of the Barum line were stronger and more well-built than the Death Korps’ own t rench-works, but ultimately, superior numbers came to triumph over the rebels, despite their defence lines.
Terrain Infantry Vehicle War Engine
Trench 4+ Cover Save Dangerous No Effect
Gun Emplacement 4+ Cover Save 5+ Cover Save No Effect
Bunker 3+ Cover Save Dangerous Impassable
Razor Wire Dangerous No Effect No Effect

47
SECTION 4—GAMING
SPECIAL RULESPECIAL RULESPECIAL RULESPECIAL RULE COMMISSARSCOMMISSARSCOMMISSARSCOMMISSARS
Death Korps of Krieg armies include one Commissar for every 500 points, thus if two players agree to play a game of 3000 points each, the Death Korps army will have 6 Commissars available. Commissars are allocated to formations as Characters before the start of the game. If there is a Supreme Commander present, then the first Commissar must join the Supreme Commander’s formation. Subsequent Commissars can be allocated to any unit in any order, though no formation may have more than one Commissar. Titans and aircraft may not carry Commissars.
Gaming With The Death Korps Of KriegGaming With The Death Korps Of KriegGaming With The Death Korps Of KriegGaming With The Death Korps Of Krieg The following army list allows you to field a Siege regiment of the type raised on the planet Krieg. Death Korps armies are selected from two main types of formations, Companies and Support Formations. Each Company you include in an army allows you to include two Support Formations. Note that Companies and any Support Formations you may select operate independently from each other on the battlefield as autonomous groups. In addition, each Company may be Upgraded with up to three selections from the Upgrades list. Each Company may only take a specific upgrade once (For example, a Death Rider Company may take a Hellhound Squadron as an Upgrade, but not two Hellhound Squadrons). Treat Gorgons as normal transports, rather than using the War Engine Transport special rule. As well as Death Korps formations, Imperial Navy aircraft and Titan Legion allies are also available for selection. A maximum of one third of the points available to the army may be spent on Imperial Navy or Titan Legion allies.
SPECIAL RULESPECIAL RULESPECIAL RULESPECIAL RULE TRENCHWORKSTRENCHWORKSTRENCHWORKSTRENCHWORKS
Death Korps of Krieg armies are allowed to purchase one set of Trenchworks for its use for each Regimental HQ Company or Infantry Company included in the army. Trenchworks must be set up after Objectives, but before Spacecraft and Garrisons are plotted and deployed. They may be set up anywhere in the Death Korps deployment zone, or alternatively they may ‘garrison’ as if they were a formation of units according to the rules found on page 125 of the main rulebook. Note that each set of Trenchworks must maintain coherency with itself when it is placed on the table. Trenchworks may be used by any eligible unit, not just the units that purchased them, even enemy units may make use of your Trenchworks if they manage to capture them during the game!
OPTIONAL RULESOPTIONAL RULESOPTIONAL RULESOPTIONAL RULES
Tournament style games must necessarily attempt to accommodate the widest possible variety of players, which in a practical sense means that the game rules must conform to the standard models available from Games Workshop, and to the expectations of the opposing players. However, it’s fun to include some optional rules for use in scenarios and non-tournament games, feel free to use the following rules in your games. Note that you may not use these optional rules in Tour-Note that you may not use these optional rules in Tour-Note that you may not use these optional rules in Tour-Note that you may not use these optional rules in Tour-naments.naments.naments.naments.
• Any Leman Russ Tank variant may remove its sponson weapons (dropping its Firefight stat to 5+, or 4+ for Leman Russ Demolishers) for a points discount of -10 points per tank.
• Any Leman Russ Tank variant may add a “pintle mounted Heavy Stubber” for +2 points per tank. This weapon has the same profile as a standard Heavy Stubber.
• Any Leman Russ Tank vari ant may add “Trench Rails” for +3 points per tank. Trench Rails grant the tank the walker Special Ability when crossing trenches or similar rough terrain.
• This supplement shows the forces of Krieg on the attack; to represent Death Korps forces on the defensive, a Krieg player may purchase 80cm of razorwire for 50 points (0-1 per set of Trenchworks).

48
FORMATION UNITS COST
Grenadiers Platoon Eight Death Korps Grenadier units
(May add eight Centaurs) or (May add one Gorgon)
225 Points
(+75 Points)
Engineers Platoon Eight Death Korps Engineer units and a Hades Breaching Drill 300 Points
Tank Platoon Six Leman Russ variants (0-1 of which may be a Leman Russ Vanquisher) 280 Points
Heavy Tank Platoon Two Macharius tanks and one Macharius command tank. 350 Points
Light Support Battery Four Quad Launchers or Four Heavy Mortars
(Light Support Batteries may have four Centaurs or 20cm of Trenches)
200 Points
(Free)
Heavy Support Battery Three Hydra platforms or Three Heavy Anti-Aircraft platforms, or a mix of the two.
Three Earthshaker platforms
Three Medusa platforms
(Heavy Support Batteries may have three Trojans or three Gun Emplacements)
125 Points
200 Points
275 Points
(Free)
Self-Propelled Heavy Support Three Bombards 250 Points
Super-Heavy Tank Platoon One Stormblade, Stormsword, Baneblade, or Shadowsword. 200 Points
Death Rider Scout Platoon Six Death Korps Rough Rider units (All units in this Formation gain the Scouts ability) 150 Points
0-1: Deathstrike Silo One Death Korps Deathstrike Missile Silo 250 points
Artillery Support Company Nine Earthshaker platforms
(Artillery Support Companies may have nine Trojans or nine Gun Emplacements)
600 Points
(Free)
Super-Heavy Tank Support Company A formation of three Stormblades, Stormswords, Baneblades, Shadowswords,
or any mix of the four types
500 Points
DEATH KORPS OF KRIEG S IEGE REGIMENT
ARMY LIST Death Korps armies have a strategy rating of 2.
All formations have an initiative rating of 2+, except Titans which have an initiative rating of 1+.
FORMATION UNITS COST
0-1: Regimental HQ Company Nineteen Death Korps Infantry units plus Death Korps Supreme Commander 400 Points
Infantry Company Nineteen Death Korps Infantry units plus Death Korps Commander unit 300 Points
0-1 Per 1500pts: Death Rider Company Twelve Death Korps Rough Rider units 250 Points
DEATH KORPS CORE COMPANIES
IMPERIAL NAVY AIRCRAFT TITAN LEGION BATTLEGROUPS
DEATH KORPS COMPANY UPGRADES (Three may be taken per Death Korps Core Company)
UPGRADE UNITS COST
Tank Squadron Three Leman Russ variants (May not include Leman Russ Vanquishers) 140 Points
Hellhound Squadron Three Hellhounds 125 Points
Gorgon Siege Transporters Two Gorgons (May not be added to Death Rider Companies) 125 Points
Infantry Platoon Ten Death Korps Infantry Units
(May have a Gorgon)
175 Points
(+50 Points)
Heavy Tank One Macharius tank 125 Points
Fire Support Battery Four Fire Support units 75 Points
FORMATION COST
One Warhound Titan 275 Points
Two Warhound Titans 500 Points
LEMAN RUSS VARIANTS (When selecting Leman Russ tanks, apply these modifiers to the basic cost of the formation for each tank you select)
Thunderer Leman Russ Demolisher Vanquisher
0 Points +20 Points +20 Points +50 Points
FORMATION COST
Two Thunderbolt Fighters 150 Points
One Marauder Bomber 150 Points
DEATH KORPS TRENCHWORKS (One may be taken per Infantry Company or Regimental HQ Company)
Trenchworks 80cm of Trenches, plus 4 bunkers. 100 Points
One Reaver Titan 650 Points
One Warlord Titan 850 Points
FORMATION COST
DEATH KORPS SUPPORT FORMATIONS (Two may be taken per Death Korps Core Company)

49
Gaming With The Mossinian RebelsGaming With The Mossinian RebelsGaming With The Mossinian RebelsGaming With The Mossinian Rebels The following army list allows you to field a Mossinian Rebels army. Mossinian armies are selected from two main types of formations, Companies and Support Formations. Each Company you include in an army allows you to include two Support Formations. Note that Companies and any Support Formations you may select operate independently from each other on the battlefield as autonomous groups. In addition, each Company may be upgraded with up to three selections from the Upgrades list. Each Company may only take a specific upgrade once. For example, an Infantry Company may take a Hellhound Squadron as an upgrade, but not two Hellhound Squadrons.
MOSSINIAN REBELS SPECIAL RULESMOSSINIAN REBELS SPECIAL RULESMOSSINIAN REBELS SPECIAL RULESMOSSINIAN REBELS SPECIAL RULES
The following Special Rules apply to Mossinian armies:
• IteratorsIteratorsIteratorsIterators—With the rise of the Mossinian rebellion, ringleaders emerged amongst the troops who inspired their followers. Iterators do not cost any points, Mossinian rebel armies receive one Iterator upgrade for every 300 points available to the army. Iterators may be allocated to any formation and the first Iterator in the army must be allocated to the Supreme Commander’s formation (If there is one present). Iterators must be allocated to Infantry Companies before they may be added to Support Formations.
• Fortified PositionsFortified PositionsFortified PositionsFortified Positions—The Mossinian rebels make up for their shortcomings in training and equipment by making use of defensive positions. A Mossinian army is allowed to purchase one set of fortified positions for its troops to occupy for each Regimental HQ or Infantry company included in the army.
Fortified positions are set up after Objectives, but
before Spacecraft and Garrisons are deployed. They may be set up anywhere a vehicle may deploy in the Mossinian half of the table.
Fortified positions count as having a move of
zero and may therefore ‘garrison’. Once set up fortified positions may be used by any unit, not just the units they were purchased for. They may even be captured and used by the enemy.
• Regimental HQsRegimental HQsRegimental HQsRegimental HQs—The Regimental HQ is staffed by some of the most important ringleaders of the Mossinian Democratic rebellion. Understandably, it is a grave loss to the army if their ideological leaders are killed in battle.
When playing Grand Tournament-style games, a
Mossinian army must include a Regimental HQ. The enemy count as having achieved the ‘Break their Sprit’ victory condition by destroying this formation instead of by destroying the most expensive formation in the army.

50
MOSSINIAN REBELS PDF REGIMENT
ARMY LIST Mossinian Rebel armies have a strategy rating of 1. All Mossinian formations have an initiative rating of 2+.
MOSSINIAN REBELS COMPANIES
FORMATION UNITS COST
0-1 Mossinian Regimental HQ Company O n e Mo ss in i an Supr em e Co mm an d er un it p lus ni ne Mo ss in i an I nf antr y p lu s t hr e e Mo s si ni an R a pi er s. 325 Points
Mossinian Infantry Company One Mossinian Commander unit plus nine Mossinian Infantry units. 200 Points
MOSSINIAN REBELS SUPPORT FORMATIONS (Three may be taken per Mossino Infantry Company or Regimental HQ)
FORMATION UNITS COST
0-1 Mossinian Engineering Platoon
Eight Mossinian Combat Engineer units. The units may be split up and added to one or more Companies in the army, or fielded as a single formation in their own right.
250 points
Mossinian Sniper Platoon Six Mossinian Sniper units 150 points
Mossinian Artillery Company Nine Mossinian Howitzers, plus nine gun emplacements. 425 points
Mossinian Bombard Battery Three Mossinian Bombards 250 points
Mossinian Light Tank Platoon Six Mossinian Siegfried light tanks 150 points
Mossinian Heavy Tank Platoon Six Mossinian Ragnarok heavy tanks 300 points
Mossinian Artillery Battery Three Mossinian Howitzers, plus three Land Crawl ers. 150 points
Mossinian AA Battery Three Mossinian AA guns, plus three Land Crawlers or three gun emplacements. 125 points
Mossinian Super Heavy Tank One Stormhammer 200 points
0-1 Tactical Missile Battery Three Firestrike Missile Launchers plus three gun emplacements 225 points
Mossinian Fighter Support Four Planetary Defence Force Fighters 200 Points
Mossinian Bomber Support Two Planetary Defence Force Bombers 200 Points
MOSSINIAN REBELS COMPANY UPGRADES (Three may be taken per Mossinian Infantry Company or Regimental HQ)
UPGRADE UNITS COST
Mossinian Infantry Platoon Six Mossinian Infantry units 75 points
Mossinian Rapier Section One Mossinian Rapier 25 points
Mossinian Thudd gun platoon Three Mossinian Thudd guns 75 points
Mossinian Flame Tank Squadron Three Mossinian Hellhound Tanks 125 points
Mossinian Ogryns Four Mossinian Ogryn units 100 points
Mossinian Rough Rider Platoon Six Mossinian Rough Rider units 125 points
Mossinian Mortar Platoon Three Mossinian Heavy Mortars 75 Points
MOSSINIAN REBELS FORTIFIED POSITIONS (One may be taken per Mossinian Infantry Company or Regimental HQ)
Mossinian Fortified Positions 50cm of Trenches and 50cm of razor wire, plus 6 gun emplacements or bunkers. 100 Points

51
Special Rule Special Rule Special Rule Special Rule ---- 5.1.1 5.1.1 5.1.1 5.1.1 “And They Shall Know No Fear”“And They Shall Know No Fear”“And They Shall Know No Fear”“And They Shall Know No Fear” Space Marines are renowned for their tenacity and bravery. This is represented by the following rules: • It takes two Blast markers to suppress a Space
Marine unit, or to kill a unit in a broken formation (ignore any left over Blast markers).
• Space Marine formations are only broken if they
have two Blast markers per unit in the formation. • Space Marine formations halve their number of
Blast markers to a minimum of one when calculating Assault Modifiers.
• Halve the number of extra hits suffered by a Space
Marine formation that loses an assault, rounding down in favour of the Space Marines.
• When a broken Space Marine formation rallies
then it receives a number of Blast markers equal to the number of units, rather than half this number.
• A Space Marine formation that includes any lead-
ers may remove two (not one) extra Blast markers for each leader whenever it regroups or successfully rallies.
The White ScarsThe White ScarsThe White ScarsThe White Scars Few Space Marine Chapters in the Imperium can lay claim to a history as long and remarkable as the White Scars. For ten thousand years the Chapter has fought Xenos and Heretics alike in the name of the Emperor. As one of the Legions of the first founding and one of only three Legions to be present at the defence of the Emperor’s palace during the Siege of Terra, the White Scars are justifiably famous for the role they played in disrupting Horus’ forces as they moved to attack the Palace and most especially for their capture of the Lion’s Gate Spaceport. Arguably, this military action ultimately saved the Emperor’s palace from being overrun and changed the fate of the galaxy; Instead of the Emperor being killed and Horus being installed as lord of all Mankind, Horus was vanquished and the Emperor was able to remain in his rightful place as the master of the Imperium. Secretly, it is a matter of deep burning regret within the Chapter that their antecedents failed to take the Eternity Wall Spaceport as well, for had they done so it is likely that the Emperor’s personal duel with Horus would have been rendered unnecessary and the Emperor might very well not have received the mortal wounds that led to his enshrinement upon the Golden Throne. Such is the legacy that has shaped the mentality of the sons of the Khan. The White Scars and MossinoThe White Scars and MossinoThe White Scars and MossinoThe White Scars and Mossino In 926.7.M41, the White Scars Chapter received a missive from Area-Adept Anata Borr on behalf of the planet Casinum V, stating that the continent of Mossino was in open rebellion and that the quickest and least-costly way to end the uprising would be an Astartes intervention. Two Strike Cruisers were immediately dispatched towards Casinum, with the 3rd and the 8th companies embarked. On the Chapter’s home planet Chogoris, Serf-Astrophaths attempted to acknowledge Adept Borr’s request, but mild warp storms prevented the Astropaths f rom confirming that the message had been received. Aboard the Strike Cruiser Accretion, the Chief Astropath soon reported to Third Khagan Ontak that the Warp jump would be completed in record time. Without hesitation, Khagan Ontak ordered his Marines to prepare for an immediate planetary assault. As soon as the Accretion and its sister ship translated out of Warp Space above Casinum V, drop pods began to fill the skies over Mossino. Within minutes, the massive anti-aircraft batteries that guarded the skies of Mossino had been destroyed by Strike Cruiser bombardments and the drop pods were able to land strategically at pre-programmed positions throughout Mossina City. Seconds after landing, the White Scars were moving towards their objectives; The main delegates’ chamber was stormed and the leadership of Mossino was
removed in a single clean stroke. It was not until they had analysed the planetary Chrono-broadcast that the Marines found that it had been eleven months since their departure from Chogoris, even though subjectively they had only experienced a few days. Such Warp currents are rare, though not so unusual that Khagan Ontak could now fail to recognise what had transpired. No enemy forces were moving to respond to the White Scars’ attack and the implication was stark; during their time-dilated Warp jump the war for Mossino had been fought and won and Mossina City had subsequently been demilitarised. Thirty minutes after the initial landings, a mixed flight of Thunderhawk Transporters and Stormhawk Landing Craft touched down on Mossino and re-mained only as long as was necessary to recover every Drop Pod and Astartes on the planet. Fourty-five minutes after the initial landings, the White Scars broke orbit and disappeared back into the aetherical mists of the Warp. The new proxy-ruler of Casinum, Imperial Governor Ablut, soon reported the attack to the Adeptus Munitorum, blaming a Chaos Space Marine raiding party as being the most likely culprits, probably as a petulant retaliation for the failure of their plans to subvert the continent. By the time the report reached the attention of Area-Adept Anata Borr, Khagan Ontak, along with his 3rd company, were only just setting out on the first mission of what was to become a penitent crusade lasting fifty-eight months, one month for each loyal Mossinian they had taken from the Emperor.

52
Titan Legion Battlegroups Imperial Navy Aircraf t
Upgrade Units Points Cost
Attack Bike Replace any number of Bike units with one Attack Bike each Free
Battle Barge Replace the Strike Cruiser with a Battle Barge 150 points
Commander Add one Space Marine Commander character to a unit in the formation. The Commander may be a Captain, Librarian or Chaplain. One Space Marine Commander in the army may be a Supreme Commander
50 points (+50 points if Supreme Commander)
Hunter Add one Hunter 75 points
Razorbacks Add any number of Razorbacks, up to the number required to transport the formation 25 points each
Sniper One Scout unit may be given the Sniper ability 25 points
Tornado Replace any number of Land Speeders with one Land Speeder Tornado each Free
Typhoon Replace any number of Land Speeders with one Land Speeder Typhoon each 25 points
Vindicator Add one or two Vindicators 50 points each
(Each allowed upgrade may be taken once by each detachment)
WHITE SCARS MOSSINAN INTERVENTION FORCE ARMY LIST White Scars armies have a strategy rating of 5. All formations have an initiative rating of 1+, except for Imperial Navy formations, which have an initiative rating of 2+.
The ‘They shall know no fear’ rule applies to all White Scars detachments (See 5.1.1).
Specia l Rule Specia l Rule Specia l Rule Specia l Rule –––– White Sca rs TransportWhite Sca rs TransportWhite Sca rs TransportWhite Sca rs Transport
The White Scars are a highly mobile army. Because of this the points cost of a detachment usually includes enough transport vehicles to transport it and any upgrades that have been ta ken. The number of vehicles will always be the minimum needed to carry the formation; you can’t take extras along to cover any losses! The transport vehicles will be Land Raiders if the detachment is Terminators, Rhinos for any other form of detachment. Note that many formations don’t receive transports, usually because they can’t fit into them. Detachments that come with vehicles will be note d as having “plus transport” in the Units section of the detachment list below. White Scars detachments must take the transport vehicles for a detachment – you cannot leave them behind in order t o use the unit as a garrison. You can only choose t o ignore this if the detachment is instead to be deployed by air transport (Thunderhawk or Landing Craft). Alternately, you may choose to deploy the White Scars force with drop pods. If you choose to do this, all detachments in the army which are eligible to be deployed from drop pods must do so. If you do choose to use drop pods, then the affected detachments will enter play in drop pods using the rules for Planetfall (see section 4.4). Note that you will require at least one Space Marine strike cruiser or battle barge to deploy the drop pods from. Formations which are not eligible to be deployed from drop pods must adhere to the transportation requirements above
White Scars Detachments
Detachment Units Upgrades Allowed
Tactical Six Tactical units plus transport Commander, Razorback
Assault Four Assault units Commander
Terminator Four Terminator units plus transport Commander
Scout Four Scout units plus transport Commander, Razorback, Sniper
White Scars Bikes Eight Bike units Commander, Attack Bike
Land Speeder Five Land Speeders Commander, Tornado/Typhoon
Predator Four Predators (Annihilator, Destructor, or any combination of the two)
Commander, Vindicator, Hunter
Whirlwind Four Whirlwinds Commander, Hunter, Vindicator
Thunderhawk One Thunderhawk n/a
Points Cost
300 Points
175 Points
675 Points
150 Points
375 Points
200 Points
275 Points
300 Points
200 Points
Landing Craft One Landing Craft n/a 350 Points
Strike Cruiser One Strike Cruiser Battle Barge 200 Points
White Scars Upgrades
Note: No more than 1/3 of
the army’s available points
may be spent on Imperial
Navy Aircraft and Titan
Legion formations.
Formation Points Cost
Two Thunderbolt Fighters 150 points
Two Marauder Bombers 250 points
Formation Points Cost
One Warhound Titan 275 points
Two Warhound Titans 500 points
Specia l Rule Specia l Rule Specia l Rule Specia l Rule –––– Born In The SaddleBorn In The SaddleBorn In The SaddleBorn In The Saddle
The White Scars hail from the world of Chogoris (know n locally as Mundus Planus), where much of the population lives a nomadic, horseback existence on the great barren steppes which cover much of the planet. In his youth, the White Scars' Primarch, Jaghatai Khan lived amongst these horsemen and soon became greatest amongst them. The first recruits to the White Scars were drawn from Khan's own adopted tribe,and the White Scars continue to draw new members from amongst the horsemen of Chogoris. Once recruited, the White Scars retain many of their horseriding traditions, and the mounted style of warfare is greatly favoured by the Chapter, leading to a surfeit of bike mounted troops. The tribesmen of Mundus Planus are virtually born in the saddle, able to ride before they can walk, and these skills make White Scars the most able bikers in the Imperium. Years of combat fought from horseback allow the White Scars to maintain control of their bikes with their unparalleled sense of balance and riding skills. All White Scars Bike and Attack Bike units gain the walker special ability to represent this control.

53
Scenario 1Scenario 1Scenario 1Scenario 1————Planetfall (Epic)Planetfall (Epic)Planetfall (Epic)Planetfall (Epic) This scenario recreates the battle for the landing ground on Day 1 of the war for Mossino and is fought between the Death Korps of Krieg and the Mossinian rebels on a 4x4 table. DEATH KORPS FORCESDEATH KORPS FORCESDEATH KORPS FORCESDEATH KORPS FORCES - Death Korps Infantry Company. - Death Korps Regimental HQ. - Light Support Battery. - 4x Quad Launchers - Heavy Support Battery. - 3x Earthshaker Platforms. - Heavy Support Battery. - 3x Heavy AA guns. - Grenadiers Platoon. Arriving from reserves on turn 4:Arriving from reserves on turn 4:Arriving from reserves on turn 4:Arriving from reserves on turn 4: - Death Korps Infantry Company - 3x Hellhounds - 2x Demolishers & 1x Thunderer - 1x Macharius Heavy Tank - Death Riders Scout Platoon - Heavy Support Battery. - 3x Earthshaker Platforms with 3x Trojans. - Heavy Support Battery. - 3x Heavy AA guns with 3x Trojans.
MOSSINIAN REBELS FORCESMOSSINIAN REBELS FORCESMOSSINIAN REBELS FORCESMOSSINIAN REBELS FORCES - Mossinian Infantry Company - Mossinian Infantry Company - Mossinian Infantry Company - Mossinian Infantry Company - Mossinian Infantry Company - 2x Ogryn units - Mossinian Infantry Company - 2x Sniper units - Mossinian Artillery Ba ttery - 3x Howitzers in gun emplacements. - Mossinian Artillery Ba ttery - 3x Howitzers in gun emplacements. - Mossinian Artillery Ba ttery - 3x Howitzers in gun emplacements. Arriving from reserves on turn 2:
• Two PDF Bombers Objective: The game is played according to the ‘Grand Tournament Scenario’ although victory conditions may not be checked until the end of turn five. The rebels may choose to auto-matically win the roll to see which army activates first.
Scenario 2Scenario 2Scenario 2Scenario 2————Ambush on the Advance (40k)Ambush on the Advance (40k)Ambush on the Advance (40k)Ambush on the Advance (40k)
This scenario recreates one of the many ambushes that occurred as the Death Korps advanced towards the Barum Line and is fought between the Death Korps (Using Imperial Armour V) and the Mossinian rebels (Using Codex: Imperial Guard) on a 4x4 table. DEATH KORPS FORCESDEATH KORPS FORCESDEATH KORPS FORCESDEATH KORPS FORCES ---- Platoon Command Squad - Junior Officer with CCW & Plasma Pistol - 1x Guardsman with Plasmagun - 1x Guardsman with Vox Caster - 2x Guardsmen with lasguns - 2x Infantry Squads - Watchmaster - 1x Guardsman with Vox Caster - 1x Guardsman with Grenade Launcher - 7x Guardsmen with lasguns - Death Rider Squadron (All have hunting lances) - Veteran Ridemaster - 4x Rough Riders Arriving from reserves on turn 4:Arriving from reserves on turn 4:Arriving from reserves on turn 4:Arriving from reserves on turn 4: - Hellhound Tank - Thunderer Siege Tank - Death Rider Squadron (All have hunting lances) - Veteran Ridemaster - 4x Rough Riders
MOSSINIAN REBELS FORCESMOSSINIAN REBELS FORCESMOSSINIAN REBELS FORCESMOSSINIAN REBELS FORCES - Command Squad - Junior Officer - 2x Guardsmen (Missile Launcher Team) - 2x Guardsmen with lasguns - Fire Support Squad - 3x Heavy Bolter Teams - 1x Infantry Squad - 1x Veteran Sergeant with Storm Bolter - 2x Guardsmen (Mortar Team) - 1x Guardsman with Meltagun - 6x Guardsmen - 3x Snipers - 3x Ogryns Victory Conditions: The Mossinian rebels must kill as many of the enemy as possible and then move off their own board edge on the last turn of the game. The game lasts 7 turns and the Mossinian rebels automatically win the roll for the first turn. If the Mossinian player escapes the board with at least eight models and has killed at least fifteen Death Korps troops, then he wins. Any other result is a Death Korps win.
Mountain / Hill Terrain Areas
Mossinian Table Edge
Forest
Forest
Ocean (Impassable Terrain)
Death Korps Table Edge
Road
Forest
Building
Building Building
Death Korps Deployment Zone
Mossinian Deployment Zone

54
Scenario 3Scenario 3Scenario 3Scenario 3————The First Assault (Epic)The First Assault (Epic)The First Assault (Epic)The First Assault (Epic) This scenario recreates the first attack on the Barum Line by the Death Korps, though it could just as easily represent the second and third assaults too. The game is played between the Death Korps and the Mossinian rebels on a 6x4 table. DEATH KORPS FORCESDEATH KORPS FORCESDEATH KORPS FORCESDEATH KORPS FORCES - Death Korps Infantry Company. - Death Korps Regimental HQ. - Grenediers Platoon - Grenediers Platoon - Heavy Support Battery. - 3x Earthshaker Platforms - Light Support Battery - 4x Quad Launchers - Two Thunderbolt Fighters - 3x sets of Death Korps Trenchworks.
MOSSINIAN REBEL FORCESMOSSINIAN REBEL FORCESMOSSINIAN REBEL FORCESMOSSINIAN REBEL FORCES - Mossinian Infantry Company - 2x Sniper units - 3x Hellhounds - Mossinian Infantry Company - 2x Sniper units - 3x Thudd guns - Mossinian Infantry Company - Mossinian Infantry Company - Siege Infantry Platoon - 2x Ogryn units - Mossinian AA Battery - 3x AA guns in gun emplacements. - Mossino Artillery Battery - 3x Howitzers in gun emplacements. - 3x Sets of Siege Regiment Fortified Positions. Objective: Historically , the Death Korps lost this a ssault, objectively speaking. However, this is not tactical, but attr itional warfare; As each infantry base is removed from play, place it aside. At the end of the game, if the Death Korps have killed at least one enemy infantry unit for every three infantry units they have lost, then the Death Korps have won! If the Mossinian rebels ensure that the Death Korps Kill/Death ratio is higher than 1:3, then they win instead. The game is played for four turns. Note: With minor modifications (Fewer Mossinian rebels) this scenario can also be used to represent the Fourth Assault. Special Rules: The cliff counts as dangerous terrain for infantry.
Scenario 4Scenario 4Scenario 4Scenario 4————The Diversion (Epic)The Diversion (Epic)The Diversion (Epic)The Diversion (Epic) This scenario recreates the disastrous attack on the Barum Line by the 1st Mossinian Irregulars. The game is played between the Cassinum Irregulars (Using the Steel Legion army list) and the Mossinian rebels on a 6x4 table. CASSINUM IRREGULARS FORCESCASSINUM IRREGULARS FORCESCASSINUM IRREGULARS FORCESCASSINUM IRREGULARS FORCES - Steel Legion Infantry Company - 2x Sniper units - Steel Legion Infantry Company - 2x Ogryn units - Steel Legion Infantry Company - Fire Support Platoon upgrade - Infantry Platoon upgrade - Steel Legion Infantry Company - 1x Hydra - Four Sentinels - Steel Legion Artil lery Battery - 3x Basil isks - Steel Legion Artil lery Battery - 3x Bombards
MOSSINIAN REBELS FORCESMOSSINIAN REBELS FORCESMOSSINIAN REBELS FORCESMOSSINIAN REBELS FORCES The Mossinian Rebels have the same forces as they had in scenario 3. In addition they also have: - 2x PDF Bombers - 2x PDF Bombers Mossinian Artillery Ba ttery - 3x Howitzers in gun emplacements. Arriving from reserves on turn 3: - 6x Ragnarok Heavy Tanks - 6x Siegfried Light Tanks - 6x Siegfried Light Tanks Objective: The game is played according to the ‘Grand Tournament Scenario’ victory conditions and lasts four turns. Special Rules: The cliff counts as dangerous terrain for infantry.
Death Korps Trenches (Formations may garrison here)
Mossinian Trenches (Formations may garrison here)
Forest
Forest
Cassinum Irregulars table edge
Mossinian Trenches (Formations may garrison here)
Cliff (The North side is higher) Cliff (The North side is higher) St. Barnab’s Commune (Intact)
Ru ined bu ildin g s.

55
Scenario 5Scenario 5Scenario 5Scenario 5————The Assault On The Mesa (Epic)The Assault On The Mesa (Epic)The Assault On The Mesa (Epic)The Assault On The Mesa (Epic) DEATH KORPS FORCESDEATH KORPS FORCESDEATH KORPS FORCESDEATH KORPS FORCES - Death Korps Regimental HQ. - Extra Infantry. - 3x Gorgons - Death Korps Infantry Company. - 2x Gorgons - 3x Hellhounds - Death Korps Infantry Company. - 2x Gorgons - 2x Thunderer Siege Tanks, 1x Leman Russ. - Grenadiers Platoon. - 1x Gorgon. - Super-Heavy Support Company. - 1x Baneblade. - 2x Stormswords. - Heavy Tank Platoon - 2x Macharius Heavy Tanks - 1x Macharius Command Heavy Tank - Heavy Tank Platoon - 2x Macharius Heavy Tanks - 1x Macharius Command Heavy Tank - Tank Platoon. - 3x Leman Russ. - 2x Thunderer Siege Tanks. - 1x Leman Russ Vanquisher. - Tank Platoon. - 2x Thunderer Siege Tanks. - 2x Leman Russ. - 1x Leman Russ Demolisher. - 1x Leman Russ Vanquisher. - Heavy Support Battery. - 3x Earthshaker Platforms - Heavy Support Battery. - 3x Earthshaker Platforms. - One Marauder Bomber. - One Marauder Bomber. - 4x sets of Death Korps Trenchworks. Special Rules: The cliff counts as dangerous terrain for infantry.
MOSSINIAN REBELS FORCESMOSSINIAN REBELS FORCESMOSSINIAN REBELS FORCESMOSSINIAN REBELS FORCES - Mossinian Regimental HQ -3x Rapiers - Mossinian Infantry Company - Mossinian Infantry Company - Mossinian Infantry Platoon - Mossinian Infantry Company - Mossinian Infantry Company - Mossinian Infantry Company - Mossinian Infantry Company - Mossinian Infantry Company - Mossinian Artillery Company - 9x Howitzers in gun emplacements. - 6x Ragnarok Heavy Tanks - 6x Ragnarok Heavy Tanks - 6x Ragnarok Heavy Tanks - 6x Ragnarok Heavy Tanks - 6x Siegfried Light Tanks - 1x Stormhammer - Bombard Battery -3x Bombards 4x sets of Siege Regiment Fortified Positions. Objective: The game is played according to the ‘Grand Tournament Scenario’ . Special Rules: The cliff is impassable to vehicles, except ‘The passage onto the mesa’, which counts as dangerous terrain for vehicles. Remember that vehicles traveling 5cm or less per move may re-roll dangerous terrain tests.
This scenario represents the critical battle in which the Death Korps finally turned the flank of the Mossinian army and ultimately broke the stalemate on the Barum Line.
OTHER SCENARIOS:OTHER SCENARIOS:OTHER SCENARIOS:OTHER SCENARIOS: The Siege of Mossino was a large campaign, so presented here are a few more ideas for games you can play in this setting. The Bombing of St. Barnab’s Commune.The Bombing of St. Barnab’s Commune.The Bombing of St. Barnab’s Commune.The Bombing of St. Barnab’s Commune. Game System: Game System: Game System: Game System: Aeronautica Imperialis. The Imperial forces have six Marauder bombers and two Thunderbolts and must destroy the commune building (Which has 20 damage points). The rebels meanwhile, have four flak guns and four Thunderbolts (As a proxy for the PDF fighters of Mossino). The End of the War.The End of the War.The End of the War.The End of the War. Game System: Game System: Game System: Game System: Inquisitor. General Whelan and his staff of scribes and diplomatii meet with representatives of the Mossinian rebels to discuss surrender terms, so the start of the game will be filled with a lot of Sagacity and Leadership tests!
However, one of the representatives (Don’t tell the Death Korps player who!) is secretly a Tzeenchian cultist and will become possessed by a Daemon at an opportune moment as decided by the Games Master. White Scars Attack!White Scars Attack!White Scars Attack!White Scars Attack! Game System: Game System: Game System: Game System: Epic. Six months after the end of the war, a task force of White Scars arrive in the system, having been delayed by a Warp Storm. In the typical manner of their Chapter, the White Scars moved to attack as soon as they translated from Warp Space. Acting on information that they believed was only days old, the White Scars drop-podded onto Mossina City and neutralised all local resistance in less than thirty minutes, before realising their mistake and withdrawing. Casinum V reported the event to the wider Imperium as a Chaos Space Marine raid, possibly linked to the events of the Mossinian rebellion.
Death Korps Trenches (Formations may garrison here)
Mossinian Trenches (Formations may garrison here)
Dead Forest
St. Barnab’s Commune (Destroyed)
Dead Forest
Cliff (The North side is higher)
The pa ssage on to th e mesa .

56
DEVELOPMENT HISTORY. For curiosity’s sake, we’ve included a log of the changes this book has undergone during its development. Version 1.4—
• Changed Rough Rider company from 250 to 300 points.
• Changed Towed Artillery from 100 to 175 points.
• Changed Stormsword main gun from 45 to 3 0cm.
• Medusa given no minimum range for its indirect fire. Version 1.41-
• Leman Russ Destroyer FF corrected to 6+
• Leman Russ Conquerer, Exec utioner & Thunderer FF changed to 5+
• Leman Russ Demolisher typo corrected (Added 2x to plasma cannon entry)
• Medusa stats rewri tten to mesh wi th the background.
• Hydra typo corrected (Now 2x shots)
• Gorgon ‘gains’ Weak Rear Armour special rule.
Version 1.42-
• Adopted the aircraft rules from the Elysian Drop Troops army
list.
• Added a few more unit descriptions. Version 1.5-
• Added the Heavy Mortar & Centaur units.
• Moved Thudd Guns to Support Formation status. Version 1.6-
• Added the Centaur Grenadier-carrier variant.
• Added the Rapier Laser Destroyer.
• Moved Thudd & Heavy Mortars back to Company Upgrade status, but implemented a 0-1 restriction per Company to stop cheap & resilient Upgrade spamming.
• Attached Heavy Support Platforms also given the same restriction.
• Increased the Centaur’s speed to 35cm
• Command Salamanders limited to 0-1 per Company.
• A whole bunch more unit descriptions added. Version 1.7
• The Great Cull; Number of model types in the list reduced by about a third in an effort to make the l ist more Infantry-centric.
Version 1.71
• Lance special rule removed
• Leman Russ Destroyer given AT3+ (Sniper) shot instead as a consequence.
• Trojan FF down to 6+
• Death Riders moved back to Company status. Version 1.8
• Heavy Support Battery points costs nudged (175/75 to 2 00/50 ).
• Light Support Battery points costs nudged (7 5/75 to 100/50 )
• Gorgons changed from 200 to 100 points.
• Sentinels removed from the list (Currently we’ve no proof that
the Death Korps use them). Version 1.81
• Death Riders lose scout, but drop by 50 points to 250.
• Gorgons increase to 150 points. Version 1.82
• Gorgons lose the special save rules.
• Medusas given Heavy Bol ters.
• Rough Rider Scout support formation added.
Version 1.83
• Leman Russ Destroyer goes from 80 to 100 points.
• Leman Russ Destroyer goes from AT3+ to AT4+
• Fatalisti c Special Rule removed.
• Added the Extra Infantry choice at 175 Points. Version 1.84
• Attached Medusa upgrade dropped from 100 to 7 5 points.
• Storm Troopers Heavy Flamers given (firefight) Ignor e Cover .
• Points costs given independently for the three heavy platforms.
• Heavy AA platform (New FW model) added.
• Super-Heavy Tanks now allowed as detachments of 1-3 tanks.
• ‘May not fire when moved’ note removed from all platforms except the AA g uns.
Version 1.85
• Changed Leman Russ Destroyer to AT4+ TK1
• Started the unit pictures revamp.
Version 1.9
• Vanquisher sta ts changed to ma tch the standard IG Vanquisher
with sponson weapons.
• Gorgon firefight changed from 4+ to 5+.
• Changed the Commissars rule to ‘1 commissar per 500pts’
• Gorgon critical-hit table modified to become harsher.
• Added more flavour text and unit pic tures.
Version 1.91
• Provisional Baneblade stats adopted.
• Hydra battery goes from 150 to 100pts.
• Heavy AA gun goes from 200 to 150pts.
• Extra Infantry given the option to take a Gorgon.
• Centaur upgrade for Light Support Batteries goes from 50 to 25pts.
• Gorgon changed from 75 to 50pts.
• Gorgon changed from 15cm move to 20cm move.
• Gorgon critical hit table made less-harsh.
• Changed Medusa main gun to be closer to the background (More useful in a bunker-busting role than as a bombardment gun).
• Removed the Leman Russ Destroyer (As much as it may seem appropriate, the Death Korps specifically don’t have access to them in 40k ).
• Placed stricter restrictions on access to the Vanquisher .
• Trenchworks added.
• Stormsword main gun loses MW status, bu t gains Disrupt.
• Mossino Campaign pages added to main document.
• May not fir e when moved removed from AA guns.
• Added Reference Sheet
• Centaur changed to LV status.
• Proposed Marauder Bomber stats adopted (In reference sheet, not yet in main document).
Version 1.92
• Trenchworks cost raised from 50pts to 100pts.
• Number of bunkers allowed with a set of Trenchworks raised
from 3 to 4.
• Deathstrike Silos added.
• Mossino rebels armylist and background added.
• Scenarios added.
• White Scars armylist & background added.
• Modeling DK trenches tutorial added.
• Gallery page added.
• Painting DK infantry tutorial added.
• Added a few sketches & CGI pieces.
FINAL VERSIONS (at this point Epic: Siege was published as part of the ‘Firebase’ F anzine. Versions after this date are referred to as ‘f inal’
versions). Version 1.01 Final
• Demolisher changed to FF4+
Version 1.02 Final
• Demolisher reverts to FF3+
• All Demolisher Cannons revert to original (ap3+ / at4+) stat.
• Medusa platforms increase from 200 to 225pts.
• Points costs for Leman Russ taken from the Minervan tank legion army list.
Version 1.03 Final
• Fire arcs stripped for SHT minor weapons.
• Trojan reduced from 30cm to 20cm speed.
• Rough Riders lose their extra att ack.
• One Warhound for 275pts, two for 500pts. Version 1.04 Final
• Deathstrike Silo up to 250pts
• Centaurs for Grenadiers up to 100pts
• Grenadiers up to 225pts
• Gorgon critical simplified .
• Stormsword main gun range upped from 30cm to 45cm.
• Added VMB Macharius variant.
Version 1.05 Final
• Added Krieg Engineers & Hades Breaching Drill.
Version 1.06 Final
• Changed Marauder Bomber to War Engine stats (Phaeton
Pattern bomber). Made them 1 for 150 points.
• Increased the cost of a Gorgon for Storm Troopers by 25 points (It’s bet ter for them as they have an armour save they can use it more).
• Almost all DK unit pictures replaced.
• All Mossinian unit te xt entries finished. Version 1.07 Final
• Mostly Cosmetic changes & Additions. Version 1.08 Final
• Mostly Cosmetic changes & Additions.
• Added a Mossinian Reference Sheet Version 1.09 Final
• Death Riders go to Armour 5+
• White Scars Reference Sheet added.
• Some modifications to the Whi te Scars army l ist occurred so as
to synch up with the Epic.Uk l ist version. Version 1.10 Final
• Added Front Cover Art.
• Fixed some typos. Version 1.11 Final
• Reduced DK supreme commander CC stat from 3+ to 4+
• Re-worked the Mossinian army list. Version 1.12 Final
• Fixed some typos.
• Updated Front Cover. Version 1.13 Final
• Mossinian Siegfrieds lose Scout, and replace Multi-Laser wi th Autocannon.
• Made Mossinian Rapiers compulsory for the Reg HQ, upped
points cost.
• Made Rapier upgrade smaller to reflect its comparative rarity.
• Firestrikes from 200 to 225 points.
• Bombers go from 6+ to 5+ armour.
• Fixed forwards arc on fighter weapons added (Typo fix)
• Fighters go up to 200pts per squadron. Version 1.14 Final
• Death Korps Manticore Platform deleted .
• Death Korps infantry lose their ranged attack (Dropped cost for both infantry companies by 50pts).
• Death Korps Fire Support unit added.
• Made ‘Mortar’ configuration Gorgon FF6+
Version 1.15 Final
• DK Thudd Gun renamed Quad Launcher, given AP-only stats.
• Thudd Guns and Quad Launchers return to being Support Formations (as they were in V1.5 ).
• Increased Gorgon Upgrade for Companies by 25pts.
• Introduced Artillery Company. Version 1.16 Final
• DK Thudd Guns go up to 200pts per formation.
• Artillery Company made a support formation
• Entrenchments made compulsory for all artillery formations.

57
NAME TYPE SPEED ARMOUR CC FF WEAPONS RANGE FIREPOWER NOTES
Death Korps Supreme Commander Inf 15cm 5+ 4+ 5+ Twin Heavy Stubber Power Weapon
30cm (Base Contact)
AP5+ Assault Wpn, MW, +1A
Supreme Commander
Death Korps Commander Inf 15cm 6+ 4+ 5+ Twin Heavy Stubber 30cm AP5+ Commander
Death Korps Commissar —— —— —— —— —— Power Weapon (Base Contact) Assault Wpn, MW, +1A Inspiring, Fearless, Leader, Character
Death Korps Infantry Inf 15cm none 5+ 5+ Lasguns (15cm) Small Arms
Death Korps F ire Support Squad Inf 15cm none 5+ 4+ Twin Heavy Stubber Autocannon
30cm 45cm
AP5+ AP5+ / AT6+
Death Korps Grenadiers Inf 15cm 5+ 5+ 4+ Heavy F lamers 15cm AP4+ Ignores Cover
Death Korps Engineers Inf 15cm 5+ 4+ 5+ Mole Launchers 30cm AP5+, Ignores Cover
Death Korps Rough Riders Inf 20cm 5+ 4+ 6+ Power Lances (Base Contact) Assault Wpn, First Strike. Mounted, Infiltrators. (May have Scout)
Death Korps Hellhound AV 30cm 4+ 6+ 3+ Inferno Cannon Heavy Bolter
30cm 30cm
AP3+, Ignores Cover AP5+
Death Korps Leman Russ AV 20cm 4+ 6+ 4+ Battle Cannon Lascannon
2x Heavy Bolter
75cm 45cm
30cm
AP4+ / AT4+ AT5+
AP5+
Reinforced Armour
Death Korps Leman Russ Demolisher AV 20cm 4+ 6+ 3+ Demolisher Lascannon
2x Plasma Cannon
30cm 45cm
30cm
AP3+ / AT4+, Ignores Cover AT5+
AP4+ / AT4+, Slow F iring
Reinforced Armour
Death Korps Leman Russ Vanquisher AV 20cm 4+ 6+ 5+ Vanquisher Lascannon
2x Heavy Bolter Autocannon
75cm 45cm
30cm 45cm
AP4+ / AT2+ AT5+
AP5+ AP5+ / AT6+
Reinforced Armour
Death Korps Leman Russ Thunderer AV 20cm 4+ 6+ 5+ Demolisher 30cm AP3+ / AT4+, Ignores Cover Reinforced Armour
Death Korps Centaur LV 35cm 6+ 6+ 6+ Heavy Stubber 30cm AP6+ Transport (1)Morta r, Quad Gun, Gr enadier
Death Korps Heavy Mortar Inf 5cm none 6+ 6+ Heavy Mortar 30cm 1BP, Indirect F ire
Death Korps Quad Launcher Inf 5cm none 6+ 6+ Quad Launcher 45cm 2x AP4+, Indirect F ire May fire non-bp weapon indirect.
Death Korps Tro jan AV 20cm 6+ 6+ 6+ Heavy Bolter 30cm AP5+ Transport (1 Weapon Platform)
Death Korps Earthshaker Platform LV 0cm 6+ 6+ 6+ Earthshaker 120cm AP4+ / AT4+ OR 1BP Indirect F ire
Death Korps Hydra Platform LV 0cm 6+ 6+ 6+ 2x Hydra Autocannon 45cm AP4+ / AT5+ / AA5+
Death Korps Heavy AA Platform LV 0cm 6+ 6+ 6+ Heavy AA gun 60cm AP5+ / AT5+ / AA5+
Death Korps Medusa Platform LV 0cm 6+ 6+ 6+ Medusa Siege Gun 60cm 1BP Ignore Cover, Disrupt Indirect
Death Korps Bombard AV 20cm 6+ 6+ 5+ Heavy Bolter Siege Mortar
30cm 45cm
2BP, Ignores Cover, Slow Firing, Indirect
Death Korps Gorgon Siege Transporter WE 20cm 4+ 6+ 6+ (5+) 2x Twin Heavy Stubbers Gorgon Morta rs OR
2x Twin Heavy Bolters
30cm 30cm
30cm
AP5+ 2BP, One-Shot, Indirect, Fward Arc
AP4+
Reinforced Armour, Walker, T ransport (10 Inf ) DC3. Critical = See datasheet.
Heavy Bolters upgrade F irefight stat to 5+
Death Korps Stormblade WE 15cm 4+ 6+ 5+ Plasma Blastgun Heavy Bolter
2x Twin Heavy Bolter 2x Lascannon
45cm 30cm
30cm 30cm
2x MW2+, Slow firing, fixed forward AP5+
AP4+ AT5+
Reinforced Armour, DC3. Critical = Destroyed. Units within 5cm take a MW hit
on a 6+
Death Korps Stormsword WE 15cm 4+ 6+ 4+ Siege Cannon Heavy Bolter
2x Twin Heavy Bolter 2x Heavy F lamer
45cm 30cm
30cm 15cm
BP3, ignores cover, disrupt, fixed fwd AP5+
AP4+ AP4+, Ignores Cover
Reinforced Armour. DC3. Critical: Destroyed. Units within 5cm take a hit on a
6+
Death Korps Shadowsword WE 15cm 4+ 6+ 5+ Volcano Cannon 2x Twin Heavy Bolter
90cm 30cm
MW2+, Titan killer (d3) Fixed forward AP4+
Reinforced Armour. DC3. Critical: Destroyed. Units within 5cm take a hit on a 6+.
Death Korps Baneblade WE 15cm 4+ 6+ 4+ Baneblade Cannon Autocannon
Demolisher Cannon 3x Twin Heavy Bolter 2x Lascannon
75cm 45cm
30cm 30cm 45cm
AP3+ / AT3+ AP5+ / AT6+
AP3+ / AT4+, fixed fwd, Ignores cover AP4+ AT5+
Reinforced Armour. DC3. Critical: Destroyed. Units within 5cm take a hit on a
6+.
Death Korps Macharius Heavy Tank WE 15cm 4+ 6+ 4+ 2x Battlecannons 2x Heavy Bolters
Twin Heavy Stubber
75cm 30cm
30cm
AP4+ / AT4+ AP5+
AP5+
Reinforced Armour. DC2. Critical: Destroyed.
Death Korps Macharius Heavy Tank (Command variant)
WE 15cm 4+ 6+ 4+ 2x Vanquishers Vulcan Megaboler
2x Heavy Bolters Twin Heavy Stubber
75cm 45cm
30cm 30cm
AP4+ / AT2+ 4x AP3+ / AT5+
AP5+ AP5+
Reinforced Armour. DC2. Critical: Destroyed.
May have 2x Vanquishers or a Vulcan Megabolte r, not both.
Death Korps Deathstrike Silo WE Immobile 4+ 6+ 4+ Deathstrike Missile Unlimited MW2+, TK(D6), Slow F ire, Indirect Reinforced Armour. DC3. Critical:See datasheet
Warhound T itan WE 30cm 5+ 4+ 4+ Vulcan Me gabol ter Plasma Blastgu n
45cm 45cm
4x AP3+ / AT5+, Forw ard A rc 2x MW2+ , Slow F iring, Forw ard A rc
Reinforc ed Armour , Fearless , Walker , DC3. Critical: See datas heet
Reaver T itan WE 20cm 4+ 3+ 3+ 2x Turbo Lase r Rocket La unch er
60cm 60cm
4x AP5+ / AT3+, Forw ard A rc BP3, F ixed Forward Ar c
Reinforc ed Armour , Fearless , Walker , DC6. Critical: See datas heet
Warlord T itan WE 15cm 4+ 2+ 3+ 2x Turbo Lase r Gatling Blast er
Volcano Can non
60cm 60cm
90cm
4x AP5+ / AT4+, F ixed Fo rward Arc 4x AP4+ / AT4+, Forw ard A rc
MW2+, TK(D3) , Forwar d Arc
Reinforc ed Armour , Fearless , Walker , DC8, Thick Rear Armour .
Critical: See datas heet.
NAME TYPE SPEED ARMOUR CC FF WEAPONS RANGE FIREPOWER NOTES
Thunderbolt F ighter Aircraft F i ghter-bomber
6+ N/A N/A Stormbol ters Multilase r
Underwin g Rocket s
15cm 30cm
30cm
AP4+/AA5+, F ixed Forwa rd AP5+/AT6+/AA5+, F ixed Forwa rd
AT4+, F ixed Forward
Marauder Bomber (Phaeton Patt ern ) WE Bomber 5+ N/A N/A Bomb Racks Twin Lascann on
2x Twin Heavy Bolte r
15cm 45cm
15cm
3BP, F ixed Forward AT4+, F ixed Forward
AA5+
DC2 Critical: Dest royed
NAME TYPE SPEED ARMOUR CC FF WEAPONS RANGE FIREPOWER NOTES
DEATH KORPS OF KRIEG REFERENCE SHEET

58
NAME TYPE SPEED ARMOUR CC FF WEAPONS RANGE FIREPOWER NOTES
Mossin ian Supreme Commander Infant ry 15cm 5+ 4+ 5+ Heavy Stubb er Power Weap ons
30cm (Base Con tact)
AP6+ Assault Weap on
Suprem e Com man der
Mossin ian Commander Infant ry 15cm 6+ 5+ 5+ Heavy Stubb er 30cm AP6+ Comma nde r
Mossin ian Iterator Charact er - - - - Power Weap on (Base Con tact) Assault Weap on Leade r, Ch aract er, I nspiri ng
Mossin ian Infantry Infant ry 15cm - 6+ 5+ Heavy Stubb er 30cm AP6+ Only one unit in eve ry two has a H eavy Stu bbe r
Mossin ian Snipers Infant ry 15cm - 6+ 5+ Sniper Rifles 30cm AP5+, Sniper Scouts
Mossin ian Ogryns Infant ry 15cm 3+ 4+ 5+ Ripper G uns (Base Con tact) Assault Weap ons, MW, EA (+1 )
Mossin ian Combat Engineers Infant ry 15cm 6+ 5+ 5+ Heavy F lame r Melta Bombs
AP4+ Assault Weap ons
Ignor es Cove r Assault Weap ons, MW, EA (+1 )
Mossin ian Rough Riders Infant ry 20cm 5+ 4+ 6+ Power La nces (Base Con tact) Assault Weap ons, First St rike Mount ed, I nfiltra tors, Scouts
Mossin ian Thudd Gun Infant ry 10cm - - 5+ Quad L aunc her 45cm AP4+/AT6+, Indir ect F ire
Mossin ian Rapier Laser Destroyer Infant ry 10cm - - 5+ Rapier L aser Destr oyer 45cm AP6+/AT4+
Mossin ian Heavy Mortar Infant ry 10cm - - 6+ Heavy Mo rta r 30cm 1BP, Indirect F ire
Mossin ian F irestrike Launcher LV 10cm - - 6+ F irestrike Missil e Heavy Stubb er
Unlimited 30cm
MW2+, O ne-Sh ot, In direc t, TK (D3) AP6+
Mossin ian Howitzer LV Immobile - - 6+ Howitzer 90cm 1BP, Indirect F ire
Mossin ian AA Gun LV Immobile - - 6+ AA Cannon 60cm AP5+/AT5+/AA5+
Mossin ian Land Crawler :LV 15cm 6+ - 6+ Heavy Stubb er 30cm AP6+ Transpor t (O ne: AA Gun , Howitze r, Thud d Gun or Rapier L aser Destr oyer )
Mossin ian Siegfried L ight Tank AV 30cm 5+ 6+ 5+ Autocann on 45cm AP5+/AT6+
Mossin ian Hellhound AV 15cm 3+ 6+ 3+ Infern o Can non 30cm AP3+, Igno res Co ver
Mossin ian Ragnarok Tank AV 15cm 4+ 6+ 4+ Ragnar ok Batlec anno n 2x Heavy Stu bbe rs
60cm 30cm
AP4+/AT4+ AP6+
Reinforc ed Arm our , Walker
Mossin ian Bombard AV 20cm 5+ 6+ 6+ Siege Cann on 45cm 2BP, Ignor es Cove r, Slow F iring, Indirect F ire
Mossin ian Stormhammer WE 15cm 4+ 6+ 3+ 2x Twin Snub Ca nnons 4x Heavy Stu bbe rs
Boltgun Ar ray
45cm 30cm
(15cm)
AP3+/AT3+ AP6+
Small Arms, Ext ra Attacks (+ 1)
Reinforc ed Arm our , Thick Rea r Armo ur, W alker. Critical Hit Effect: Stor mham me r dest roye d, u nits
within 5cm suffe r a hit on a D6 roll of 6.
TERRAIN INFANTRY VEHICLE WAR ENGINE
Trenches 4+ Cover Save Dangerous No Effect
Bunker 3+ Cover Save Dangerous Impassable
Gun Emplacement 4+ Cover Save 5+ Cover Save No Effect
Razor Wire Dangerous No Effect No Effect
Mossin ian Planetary Def ence Force F ighter Aircraft F ighter-Bomber - - - Cannon Heavy Stubb er
15cm 15cm
AT6+/AA6+, F ixed Forwar ds AP6+/AA6+, F ixed Forwa rds
Mossin ian Planetary Def ence Force Bomber Aircraft Bomber 5+ - - Bombs 2x Twin Heavy Stub bers
15cm 15cm
2BP, F ixed Forwards AA6+
NAME TYPE SPEED ARMOUR CC FF WEAPONS RANGE FIREPOWER NOTES
MOSSINIAN REBELS REFERENCE SHEET
Trenches may hold one Infantry Unit per 4cm of length, Gun Emplacements may hold one Unit and Bunkers may hold three Units.
Bunkers are Fortifications (See 1.8.4).

59
Adeptus Astartes, Battlefleet Gothic, Black Flame, Black Library, the Black Library logo, BL Publishing, Blood Angels, Bloodquest, Blood Bowl, the Blood Bowl logo, The Blood Bowl Spike Device, Cadian, Catachan, the Chaos device, Cityfight, the Chaos logo, Citadel, Citadel Device, City of the Damned, Codex, Daemonhunters, Dark Angels, Dark Eldar, Dark Future, the Double-Headed/Imperial Eagle device, 'Eavy Metal, Eldar, Eldar symbol devices, Epic, Eye of Terror, Fanatic, the Fanatic logo, the Fanatic II logo, Fire Warrior, Forge Worl d, Games Workshop, Games Workshop logo, Genestealer, Golden Demon, Gorkamorka, Great Unclean One, the Hammer of Sigmar logo, Horned Rat logo, Inferno, Inquisitor, the Inquisitor logo, the Inquisitor device, Inquisitor:Conspiracies, Keeper of Secrets, Khemri, Khorne, Kroot, Lord of Change, Maraude r, Mordheim, the
Mordheim logo, Necromunda, Necromunda stencil logo, Necromunda Plate logo, Necron, Nurgle, Ork, Ork skull devices, Sisters of Battle, Skaven, the Skaven symbol devices, Slaanesh, Space Hulk, Space Marine, Space Marine chapters, Space Marine chapter logos, Talisman, Tau, the Tau caste designations, Tomb Kings, Trio of Warriors, Twin Tailed Comet Logo, Tyranid, Tyra nnid, Tzeentch, Ultramarines, Warhammer, Warhammer Historical, Warhammer Online, Warhammer 40k Device, Warhammer World logo, Warmas-ter, White Dwarf, the White Dwarf logo and all associated marks, names, races, race insignia, characters, vehicles, locations illustrations and images from the Blood Bowl game, the Warhammer world, the Talisaman world and the Warhammer 40,000 universe are either ®, TM and/or © Copyright Games Workshop Ltd 2000-2008, variably registered in
the UK and other countries around the world. All Rights Reserved. Used without permission. No challenge to their status intended. All Rights Reserved to their respective owners. Used without permission. No challenge to their status intended. All Rights Reserved to their respective owners. Used without permission. No challenge to their status intended. All Rights Reserved to their respective owners. Used without permission. No challenge to their status intended. All Rights Reserved to their respective owners.
Not for sale.
NAME TYPE SPEED ARMOUR CC FF WEAPONS RANGE FIREPOWER NOTES
Commander Charact er - - - - Power Weap on Smite
(Base Con tact) (15cm)
Assault Weap on, MW, EA (+1 ) Small Arms. MW, EA (+1 )
Invulne rable Sa ve, L ead er. Captain = Com man der
Librari an= S mite, Ch aplain =Ins piring
Suprem e Com man der =Supr eme Com mand er
Terminators Infant ry 15cm 4+ 3+ 3+ 2x Assault Ca nnons Power Weap ons
30cm (Base Con tact)
AP5+ / AT5+ Assault Weap on, MW, EA (+1 )
Reinforc ed Arm our , Thick Rea r Armo ur
Tactical Infant ry 15cm 4+ 4+ 4+ Missile La unche r 45cm AP5+ / AT6+
Assault Infant ry 30cm 4+ 3+ 5+ Chainswor ds (Base Con tact) Assault Weap on Jump Packs
Scouts Infant ry 15cm 5+ 4+ 5+ Heavy Bolter 30cm AP5+ Scouts, Infilt rato rs
White Scars Bike Infant ry 35cm 4+ 3+ 4+ Chainswor ds (Base Con tact) Assault Weap on Mount ed, Walk er
White Scars Att ack Bi ke LV 35cm 4+ 5+ 4+ Heavy Bolter 30cm AP5+ Walker
Land Speeder LV 35cm 4+ 6+ 5+ Multi-Melta 15cm (15cm)
MW5+ a nd Small Arms, Macr o-Wea pon
Skimmer, Sc out
Land Speeder Tornado LV 35cm 4+ 6+ 5+ Assault Cann on Heavy Bolter
30cm 30cm
AP5+ / AT5+ AP5+
Skimmer, Sc out
Land Speeder Typhoon LV 35cm 4+ 6+ 5+ Heavy Bolter Twin Typhoon Missile
30cm 45cm
AP5+ AP3+ / AT5+
Skimmer, Sc out
Vindicator AV 25cm 4+ 6+ 4+ Demolishe r 30cm AP3+ / AT4+, Ign ores Cove r Walker
Whirlwind AV 30cm 5+ 6+ 5+ Whirlwind 45cm 1BP, Indirect F ire
Hunter AV 30cm 5+ 6+ 6+ Hunter -Killer 60cm AT4+ / AA4+
Land Raider AV 25cm 4+ 6+ 4+ 2x Twin Lascan non Heavy Bolter
45cm 30cm
AT4+ AP4+
Reinforc ed Arm our , Thick Rea r Armo ur, T ranspor t (1 Te rmin ator unit)
Rhino AV 30cm 5+ 6+ 6+ Storm Bolte r (15cm) Small Arms Transpor t (2 Tactic al or Scout u nits)
Razorback AV 30cm 5+ 6+ 5+ Twin Heavy Bolter OR Twin Lascan non
30cm 45cm
AP4+ AT4+
Transpor t (1 Tactic al or Scout u nit)
Predator Annih ilator AV 30cm 4+ 6+ 5+ Twin Lascann on 2x Lasca nno n
45cm 45cm
AT4+ AT5+
Predator Destructor AV 30cm 4+ 6+ 4+ Autocann on 2x Heavy Bolt er
45cm 30cm
AP5+ / AT6+ AP5+
Strike Cruiser SC n/a n/a n/a n/a Orbital Bomba rdment n/a 5BP Transpor t (2 0 Tactical u nits)
Battle Barge SC n/a n/a n/a n/a Orbital Bomba rdment n/a 14BP Transpor t (6 0 Tactical u nits)
Landing Craft WE Bomber 4+ 5+ 3+ 2x Twin Lascan non 3+ Heavy Bolter
45cm 15cm
AT4+ AP4+ / AA5+
Planetfall, Rei nforc ed Ar mou r, Fearle ss, T ranspor t (1 2 infa ntry units & 6 R hinos -hull
vehicles o r 4 L and R aider s. Termi nato rs tak e up
two slots). DC4. Critic al = D estroy ed
Thunderhawk Gunship WE Bomber 4+ 6+ 4+ Battlecann on 2x Twin Heavy Bolte r
Heavy Bolter
Heavy Bolter
75cm 30cm
15cm
15cm
AP4+ / AT4+, F ixed Forwa rd Arc AP4+ / AA5+, F ixed Forw ard Arc
AP4+ / AA5+, Righ t Arc
AP4+ / AA5+, L eft Arc
Planetfall, Rei nforc ed Ar mou r, T rans port (8 Infant ry units , Termi nato rs tak e up two slots ),
DC2, Critical = Destr oyed
Drop Pod Marke r Immobile n/a n/a n/a Deathwind 15cm AP5+ / AT5+, On e Shot See below f or f ull rules .
WHITE SCARS REFERENCE SHEET
White Scars Drop Pod Rules: Planetfall, Transport (May carry one formation that includes only Tactical Marine units). Af ter the Drop Pod lands, its deathwind attacks all enemy units within 15cm. Each enemy formation attacked receives a Blast Marker for coming under fire as normal and an extra Blast Marker for each casualty, again as normal for a formation that su stains lo sses. A fter the Deathwind attack has been resolved, any troops carried in the Drop Pod must disembark within 5cm of another unit from the same formation that has already landed, so long as all unit s are placed within 15cm of the Drop Pod. Drop Pods may not be used to claim crossfire. Note that after they have di sembarked their troops Drop Pods cease to be used in the game as a unit; They may not be shot at, they do not remain part of their parent formation and no Blast Marker is incurred on the parent formation for the loss of the Drop Pod.
Thunderbolt F ighter Aircraft F i ghter-bomber
6+ N/A N/A Stormbol ters Multilase r
Underwin g Rocket s
15cm 30cm
30cm
AP4+/AA5+, F ixed Forwa rd AP5+/AT6+/AA5+, F ixed Forwa rd
AT4+, F ixed Forward
Marauder Bomber Aircraft Bomber 4+ N/A N/A Bomb Racks Twin Lascann on
2x Twin Heavy Bolte r
15cm 45cm
15cm
3BP, F ixed Forward AT4+, AA5+, F ixed Forwa rd
AA5+
NAME TYPE SPEED ARMOUR CC FF WEAPONS RANGE FIREPOWER NOTES
Warhound T itan WE 30cm 5+ 4+ 4+ Vulcan Me gabol ter Plasma Blastgu n
45cm 45cm
4x AP3+ / AT5+, Forw ard A rc 2x MW2+ , Slow F iring, Forw ard A rc
Reinforc ed Armour , Fearless , Walker , DC3. Critical: See datas heet
NAME TYPE SPEED ARMOUR CC FF WEAPONS RANGE FIREPOWER NOTES

60
EPIC: SIEGE The Mossinian Campaign
On the lonely planet Casinum V, the troublesome continent of Mossino has progressed from political intransigence to outright rebellion. Unable to quash the traitors with local forces, the planetary Governor has called for reinforcements, and so siege warfare will come to Mossino, as the Imperial authorities attempt to restore control over the wayward continent. Epic : Siege is a fan-made Epic supp lement featur ing histor ica l background, scenarios, galleries and painting guides. In addition it contains three army lists (The Death Korps of Krieg, the Mossinian Rebels, and the White Scars Space Marines) which allow players to build and game with the forces involved in the Mossinian Campaign.
Raiders & Crusaders


![Leçons d'informatique - perso.eleves.ens-rennes.frperso.eleves.ens-rennes.fr/~mruffini/Files/Other/ruffini_plans... · Listes chainées [FG] p 70 Listes doublement chainées ...](https://static.documents.pub/doc/80x56/5b9d3d9909d3f253238bbe8d/lecons-dinformatique-perso-mruffinifilesotherruffiniplans-listes.jpg)


