16


The QuickStudy Guide for
Zoho CRM
Susan Clark
Cornerstone Solutions Inc. Houston

The QuickStudy Guide for Zoho CRM
Using Zoho Everyday How Did “Quick” Get Included in the Book Name? Using This QuickStudy Guide… Hey, Don’t Skip This What’s Zoho?
Which CRM Edition Do You Need? What is the Purpose of Each Module?
Modules Found in All Versions (including Free) Additional Modules Included in Standard Edition and Above Additional Modules Included in Professional Edition and Above Modules Found in Enterprise Only
Getting Started with Zoho CRM Logging In
Zoho Screen Elements Menu
Getting Started Leads
Leads List View Left Panel Leads Detail View Editing Records
Lead Detail Layout Moving Around Notes Other Related Items
Interacting with the Lead Emailing Understanding Activities Task Event Call History Moving Between List View and Detail View
Viewing Activities Activities List View Calendar View
Working with Activities Working with Activities in Detail View Completing Activities in List View
Checking the Social Stream Converting Leads to Contacts Contacts
Duplicating Contacts Creating New Contact Records
Accounts Account Fields Recent View Deleting Records
Potentials Updating your Potential
Searching Your Database Search by Alphabet

List Views Working with the List View
Selecting Single Records Modifying List Views
Filtering Records Using the Smart Filters Creating New List Views
Last Activity Time Search Criteria Operators
Advanced View Criteria Scenarios Have too many view names?
Import Data To Import a Spreadsheet File
Preparing the Excel File Assigning Record Ownership Formatting Date Fields Preparing Number or Currency Fields Preparing Check Mark Fields Final Clean Up Recommendations Before Importing Converting the Excel File to .CSV file
Time to Import the Prepared File What else can you do with List Views? Tools
Mass Transfer Mass Delete Mass Update Mass Convert (Leads Module Only) Assignment Rules Mass Email Schedule Mass Email Autoresponders Approve Leads (or Contacts) Deduplicate Leads (or Contacts or Accounts) Zoho Sheet View – aka Export Print View
Using Tools on Selected Records Using Tools on the Current Record
Clone Delete Print Preview Find & Merge Duplicates Mail Merge Share Meet Now! Run Macro Customize Business Card, Organize [module] Details, Add Related List
Home View Customizing Your Home View
Reviewing Other Modules Activities Module
Events Completing Events Tasks Completing Tasks Calls

Completing Calls Feeds
Left Filter Panel Options for Feeds Reports Creating Reports
Adding a Chart Creating Report Folders Scheduling Reports
Dashboards Campaigns
Campaigns Scenario Zoho Campaigns App Scenario
Documents Folders Managing File Revisions
Emails Emails on the Lead or Contact Record Mail Magnet Email Module
Cases Activities Timeline
Solutions Inventory Management Products
Associating Products Importing New and/or Updating Existing Products
Price Books Vendors
Quotes Quote Header/Footer Info Product Details More Actions, Print Preview More Actions, Export to PDF More Actions, Send Mail Convert to Sales Order or Invoice Sales Orders Purchase Orders Invoices
Forecasting Social
Basics Review Conversion Flow
Working with the Activities Module Tips and Tricks
Setup-General Setup Getting Set Up
Personal Settings Company Details
Fiscal Year Business Hours Currencies
Email Settings
BCC Dropbox Gamification
Setup-Users and Control Users Security Control
Profiles Roles Data Sharing Settings Fields & Link Permissions Zoho Mail Add-on Users
Territory Management Territories Territory Rules Assign Territories
Setup-Customization Module Basics
A Word of Caution Definitions
The Layout Designer Arranging Your Layouts Sections
Custom Fields Field Types
Single Line Multi Line Email Phone Pick List Multi Select Date Date Time Number Auto Number Currency Decimal Percent Long Integer Check Box URL Formula Lookup
Working with Lookup Fields Managing Related Lists
Working with Formula Fields Formula Calculation
Working with Existing Fields The Field List Editing Fields Removing Fields from the Layout
Creating Custom Modules Templates
Email Templates Create Email Templates

Setup-Automation Automation: Making Your Team More Productive Workflow Automation
Workflow Creating a Workflow
Macros Assignment Rules Case Escalation Rules Approval Processes
Setup-API, Apps & Integration Web forms Social Integration Google Apps Zoho Apps Setting up Zoho Campaigns
Setting up Zoho Campaigns Other Apps Developer Space
Setup-Data Administration Import/Migrate
Import History Export
Export Data Data Backup
Storage Usage Recycle Bin Audit Log
Appendix My Today Activities View Preparing Excel Files
Proper () Function Text to Column Concatenate Formatting the ZIP code field Removing Non-printing Characters

Automation One of the great features of modern CRMs is the ability to automate many activities and processes to help you save time and effort. Zoho offers several options for automation:
Workflow Automation Macros Assignment Rules Case Escalation Rules Approval Processes
Workflow Automation Workflows help you automate tasks and activities in your CRM. They are designed to reduce the time it takes to do something manually, as well as reduce potential data entry errors. The idea is to use workflows to help you and your team to be more efficient.
Workflows are launched when certain conditions are met in the database.
When a record is created and/or edited, and/or When specific field conditions are met.
Once triggered a workflow can:
Send Mail (perhaps an automatic reply or a planned follow up email or notifications to internal users)
Update a field (change Contact Status from Prospect to Customer when a Potential Stage is Closed Won)
Add a Task (schedule single or multiple follow-up tasks) Use Webhook (to connect with a 3rd party app) Launch a Custom Function (custom programming that expands the options of things that a
workflow can accomplish)
Keep in mind that Zoho Workflows are not built like decision trees; they are linear.
Decision tree style workflows perform one action if the condition is true and another if the condition is false. In Zoho, you would just create two workflows: one for each condition.

Workflow You can create simple Workflows even in the Free CRM edition. The number of Workflows you can create for each module is limited by the Edition of Zoho CRM you are using.
Free: 1 Workflow/module Standard: 3 Workflows/module Professional: 10 Workflows/module Enterprise: 30 Workflows/module
Only Administrators or users with a role that can “Manage Workflows” can create Workflows for the organization.
To understand Workflows better, let’s start by looking at the one that is installed with all Zoho databases: Big Deal Rule
Procedure: To edit an existing Workflow Rule 1. Click Tools icon, select Setup. 2. Under Automation, click Workflow Automation. 3. Click the Edit (pencil) icon to the left of the Rule Name. 4. Make changes as necessary. 5. Click the Save button to secure your changes.
Practice: Quick review of the Big Data Rule 1. Use the previous procedure to put the Big Data Rule in edit mode. 2. What module is the Workflow designed for? 3. Notice whether the rule is Active or Inactive. 4. Notice that it is executed whenever a Potential record is created or edited.
AND 5. The Amount is greater than $1000 and the Probability (%) is 100 (aka Closed Won). 6. When those conditions are met, an email Alert is sent letting the team know about the Big Deal. 7. Click Cancel to exit without saving any changes.
Creating a Workflow To design a workflow you should think first about what process you want to put in place. For example, you may want to implement a workflow that automatically creates some follow up tasks with new Leads.
Should it be implemented for all Leads or only specific ones? When should the follow up take place? Should it be an email or a task? Should more than one action be implemented?
Procedure: To create a simple Workflow based on a text or number field 1. Click Tools icon, select Setup. 2. Under Automation, click Workflow Automation. 3. Click the Create Rule button at the right.

4. Module: All workflows start by selecting the desired Module from the drop-down.
5. Rule Name: The full Rule Name may not display in the Rules list view, so keep it short so that it
is easy to identify later. 6. Status: At some point you may want to deactivate a Workflow because it is not relevant anymore.
Or you can also make it inactive now while you are designing. 7. Description: Document the criteria required to execute the workflow and what happens. It is
really easy to bypass this step, but is important later on to help you identify which Workflow you want to work with or to remember what the criteria is. Sometimes I enter this after I have created the Workflow so I can be sure to get the correct criteria.
8. Click Next.
9. Rule Trigger (Enterprise Edition Only) - Execute based on:
a. A Date field value: Select one of the defined Date or Date/Time fields from the drop-
down. Then select an execution time. For the Execution cycle, Every Year would be good for Birthday or Contract reminders.
b. A Record action: This is the default option in Free, Standard, and Professional Editions and allows you to define triggers based on text or number fields.
c. Click Next. 10. Rule Trigger (Free, Standard and Professional Editions)
a. Create: Workflow is triggered whenever a new record is created.
b. Edit: Workflow is triggered only when a record is edited. Even if it meets the criteria when it is being saved for the first time, it won’t launch until the record is edited and saved. Create or Edit may be a better option unless you have a specific reason to select this trigger.
c. Create or Edit: Workflow is triggered whenever any record is created or edited. This is probably the best option unless you only want to trigger on Create.
d. Delete (Professional and Enterprise only): Workflow is triggered when a record from the selected Module (step 4) is deleted. For example, you might create a Workflow for Potentials that sends an email Alert to the Sales Manager whenever a Potential is deleted. You could restrict the ability to delete records, but maybe you just want to know

when it happens.
e. Field Update (Enterprise only): Executes the specific Workflow when one or more of three defined fields are updated. You might use this option if you have defined quite a few fields and you want to limit how often workflows are triggered.
Zoho allows you to trigger up to 300 workflows/hr. If your organization exceeds that amount, then the excess will be launched in the following hour.
11. Click Next.
12. Rule Criteria-How Often? a. Execute workflow only when the criteria is met for the first time: If you change a
field back and forth between values, you might consider this option so that it doesn’t launch the workflow multiple times.
b. Execute workflow whenever the criteria is met: Be very careful in choosing this option. If you selected to launch the workflow when an edit is made then selecting this option could send out a duplicate email or create another task each time the record is edited.
13. Rule Criteria-Fields: Limits which records are selected for launching the workflow. Unless you
want this workflow to launch whenever a record is created or edited, you may want to enter some selection criteria based on one or more selected field values.
a. Select a field. b. Select a criteria (like “is” or “contains” or “is not empty”) c. Choose or enter some options. If the field you selected in a. is a picklist field, then you
can select one or more options. If it is a text field, you can manually enter the restricting criteria.
d. Click the + at the end of the line to enter additional criteria. For example, you might be developing a Potentials Workflow where the Stage isn’t Closed and the Closing Date is still in the future.

If you are unsure about how to create the correct criteria, create a view first in the module to be sure that the correct records are filtered. Once you have the correct criteria defined, you can return to the Workflow to add it there.
e. Edit and update the Criteria Pattern as needed. This is one of those things that you probably learned about in high school: math order of operations, We will have more elaborate examples later to see how this works.
14. Instant Actions: Once the Workflow meets the conditions you have outlined above, the Instant Action will be triggered.
a. Send Alerts – Alerts are email messages using a template that you have created. The email can be sent to the defined internal user or group of users. Only in the Enterprise Edition can you send an email to the Contact or Lead record. Example in the Free, Standard, and Professional Editions you can send a Birthday Email to yourself or the record owner reminding you to call the Contact and wish them a happy birthday. Only in the Enterprise Edition can the email go straight to the Contact. Click the + to create an Alert or the folder to use a previously defined Alert.
b. Assign Tasks – The Workflow can create a task when the criteria has been met.
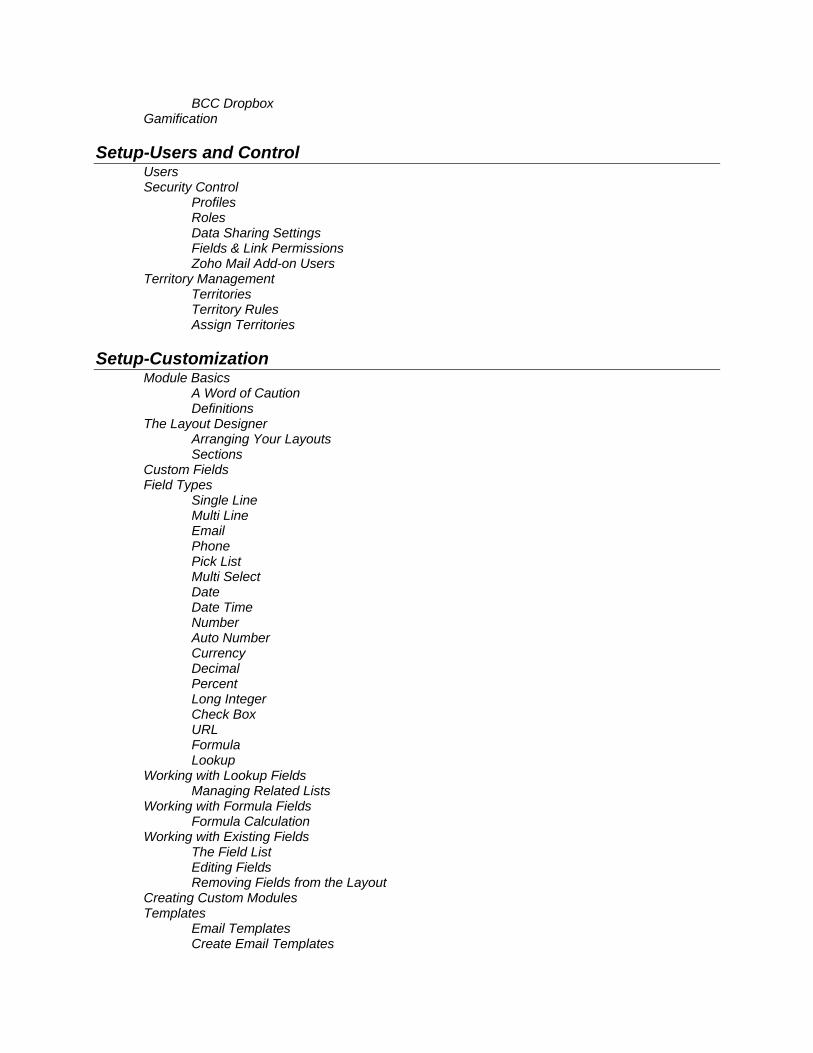
Click the + icon to create a Task. Enter a Subject that is descriptive…not just “follow-up”. Select a Due Date from the drop-down. The WFRule Trigger Date is the default and will work for most of your tasks. It will base the new task on the date and time that your record first met the criteria. Then you could add or subtract a specific number of days for defining the Due Date. However, if you have created other Date or Date/Time fields in this module, they will also display in the drop-down. So the Workflow might create a task with a Due Date based on the Contract Renewal Date with a Subject of “Call 30 days before the Renewal Date”. You can also add Merge Fields into the Subject by clicking the Show Merge Fields link.
Select the fields from the drop-downs and click the Insert Field icon to add them to the Subject line. In the case of the previous example you might create a Subject of: “Call ${Contacts.First Name} to discuss contract expiring ${Accounts.Contract Renewal Date}”. Note that you can also merge fields from related modules. Notify Assignee (not available in Free Edition) will send an email to the defined user letting them know that a task was created for them by the Workflow. Usually this is checked when the task is assigned to someone other than the current user. If you check this option, then the assigned User would get an email with a link to the Activity. See the email example here:
Remind Assignee (not available in Free Edition) If you check this option, select a time from the drop-downs for the reminder.
Then let Zoho know if you want the Task reminder via Email or Pop-up.

At the specified time, an alert will Pop-up on the screen (or email sent).
c. Update Fields (Professional and Enterprise) – This is a great function that can help to keep your database up to date. It is so easy for your users to forget to update fields based on certain conditions. For example, when a Potential is Closed Won, you could use this trigger to update both the Account and the Contact Type fields to Client. You can have up to 3 Update field actions per action.
Click the + icon to create an Update Field action. Give the action a Name. Select the Module that has the field you wish to update. From the Update option, select a field from the drop-down (Multi-select picklists and Text Area fields cannot be updated). Enter the desired value.
d. Call Webhooks (Professional and Enterprise) - Webhooks enable communication with third-party applications and are best left to programmers to create. The specifics will not be covered by this guide. However you should know that you could use Webhooks to send SMS messages to your field service reps, or push customer information to an outside accounting solution, or add subscribers to your email marketing software.
e. Call Custom Functions (Enterprise Only) – Custom Functions allow a programmer to write custom code using a programming language called Deluge to perform specific functions. Zoho provides a small gallery of code options for you to get started if you want to try your hand at programming. For example, you could create a Custom Function that reads the Zip Code that is entered and automatically update the associated City, State, County and Time Zone. You could use a Custom Function so that when specific field values (Support Contract Expiration) are changed on the Account record that those values are updated on all related Contact records. Custom Functions could also be designed to generate Lead scoring based on specific conditions. The end-user may not see the results of a Custom Function until the

record is refreshed (press F5 or click the Refresh circling arrow on the address bar).
15. Time Based Actions (Enterprise Only): In addition to the Instant Actions that we have just created, the Enterprise Edition allows you to have up to 5 additional Time Based Actions defined. These actions will be launched at the defined time period after the workflow is triggered, as long as the record still meet the defined conditions. There are a few things that make Time Based Actions different from adding 5 Instant Actions. Instant Actions do not allow you to add delayed timing for Email Alerts: You can only add timing to Tasks. In addition, all defined Instant Actions are added “instantly” when the record meets the Workflow criteria. In Time Based Actions, if the criteria changes before you make it through all of your defined future actions, then the remaining actions will be cancelled. To add a Time Based Action, click the button.
Assign a Name to the action. Then define the number of Day(s) after the rule is triggered that you want to launch this action.
Note that one of the options is Hour(s) instead of Day(s). This is a great feature for testing your Workflows. Select the Hour(s) option when testing and if the actions are successfully launched, and then you can edit the Workflow to change the execution time from Hour(s) back to Day(s). Click Save so that you can create the actions that will be triggered the specified time period after the Instant Action is triggered.
Continue to create new Time Based Actions as desired (you can add up to 5 Time Based Actions in addition to the Instant Action.
For each action, you can associate a maximum of 5 alerts, 5 tasks, and 3 field updates. You can associate up to 6 (1 Instant Action and 5 Time-Based Actions) custom functions per workflow rule. Similarly, you can associate up to 6 (1 Instant Action and 5 Time-Based Actions) webhooks per workflow rule.
16. Click the Save button to secure your changes.

When creating Workflow rules, you might consider creating a criteria where Last Name or Subject is “Testing”. That way you can play with and test a Workflow before implementing for the organization. When you are ready, you can remove that single criteria.
Let’s create a basic workflow in your Edition of Zoho
Practice: Creating a simple Workflow for Lead Follow Up 1. Create a workflow where every time you Create or Edit a Lead record, where the Lead Status is
Contacted, create two Instant Actions. 2. The first Instant Action is a Task that is triggered 7 Days after the workflow trigger with a Subject
of “1 Week Lead Follow Up with ..” (use the Mail Merge option to add the Lead First Name and Last Name.)
3. Add a second Instant Action of a Task that is 2 weeks after the workflow is triggered.


![Biology Quickstudy Reference Guide [4 pages] (2003) WW](https://static.documents.pub/doc/80x56/613cacc5a3339922f86ec56d/biology-quickstudy-reference-guide-4-pages-2003-ww.jpg)


