+ All Categories
Home > Documents > The stencil kit includes Acrylic paint · PDF fileStencils Included & Color Guide Dark...

The stencil kit includes Acrylic paint · PDF fileStencils Included & Color Guide Dark...

Date post: 17-Mar-2018
Category:
Upload: nguyennhan
View: 214 times
Download: 1 times
Share this document with a friend
2
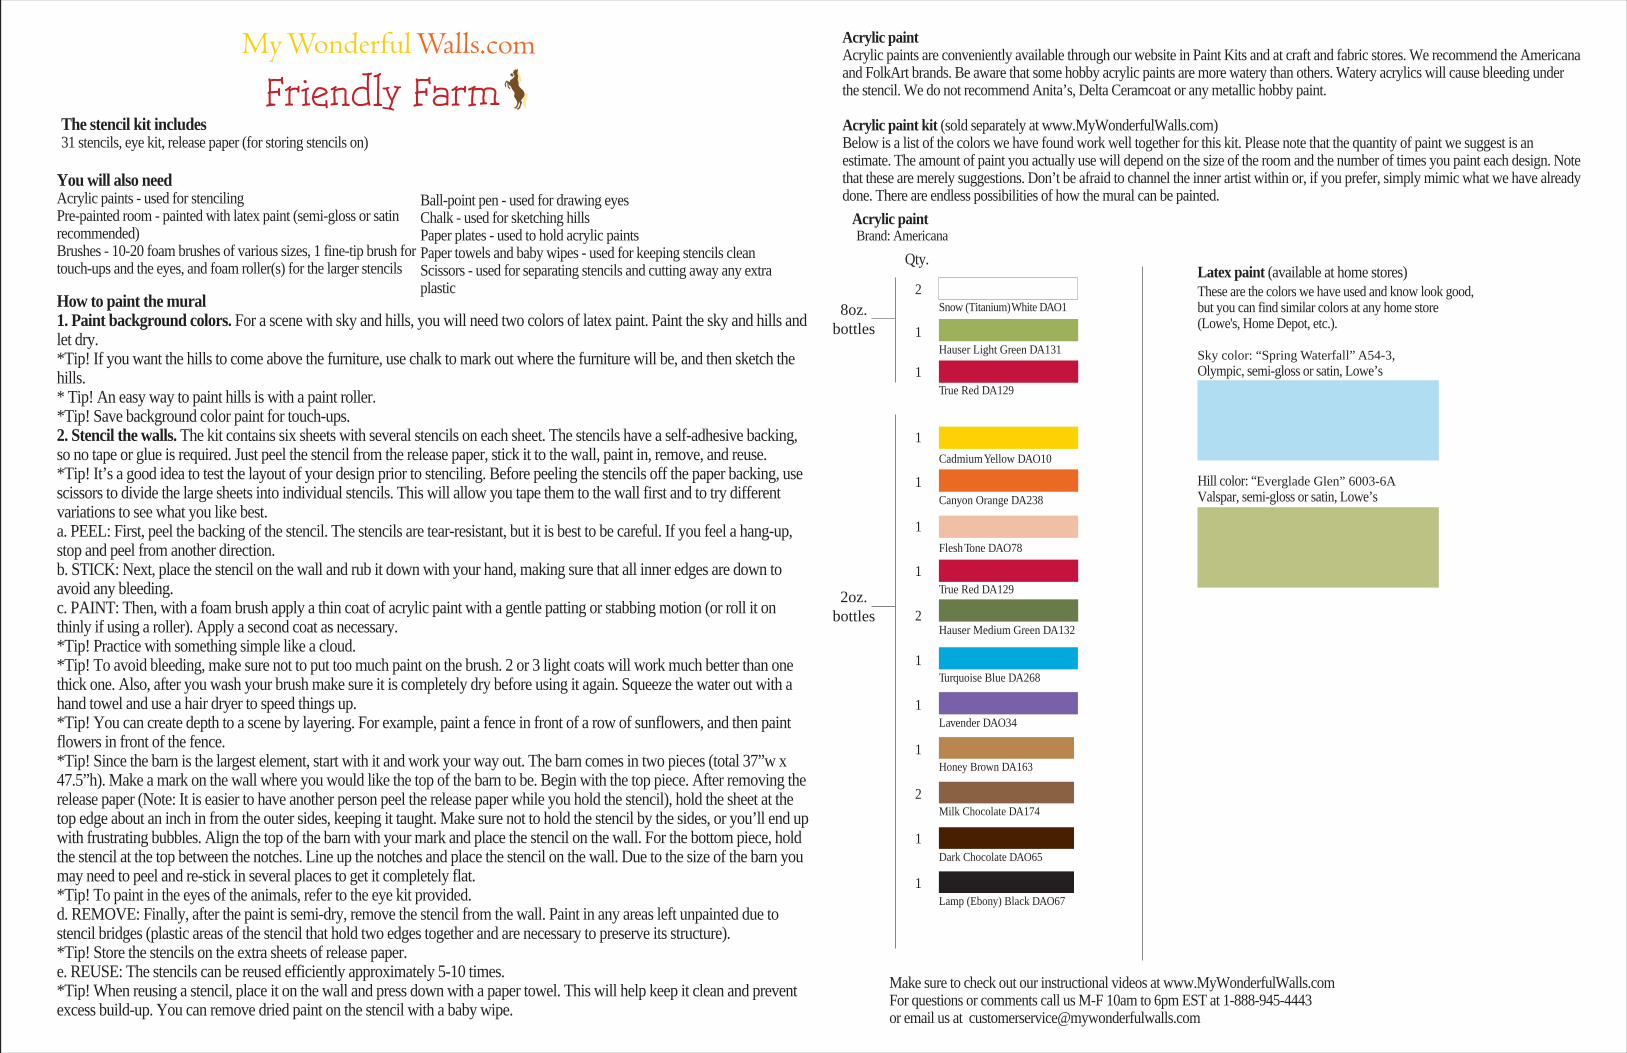
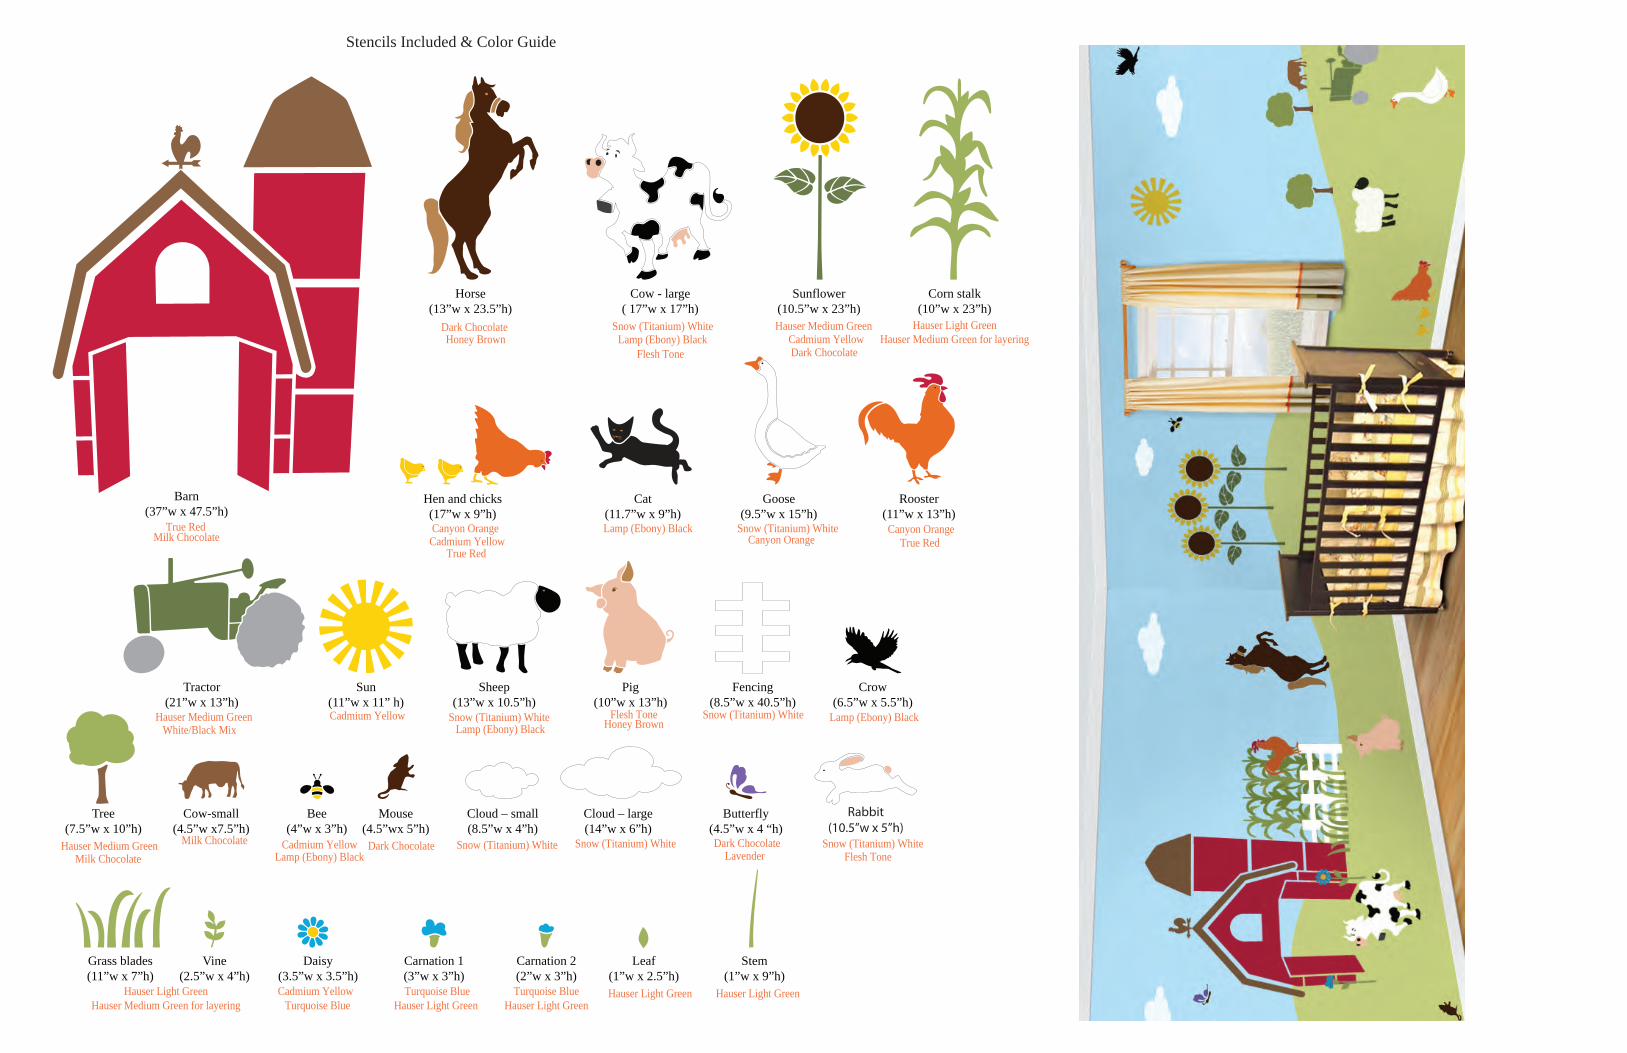
Brand: Americana Acrylic paint Latex paint (available at home stores) How to paint the mural 1. Paint background colors. For a scene with sky and hills, you will need two colors of latex paint. Paint the sky and hills and let dry. *Tip! If you want the hills to come above the furniture, use chalk to mark out where the furniture will be, and then sketch the hills. * Tip! An easy way to paint hills is with a paint roller. *Tip! Save background color paint for touch-ups. 2. Stencil the walls. The kit contains six sheets with several stencils on each sheet. The stencils have a self-adhesive backing, so no tape or glue is required. Just peel the stencil from the release paper, stick it to the wall, paint in, remove, and reuse. *Tip! It’s a good idea to test the layout of your design prior to stenciling. Before peeling the stencils off the paper backing, use scissors to divide the large sheets into individual stencils. This will allow you tape them to the wall first and to try different variations to see what you like best. a. PEEL: First, peel the backing of the stencil. The stencils are tear-resistant, but it is best to be careful. If you feel a hang-up, stop and peel from another direction. b. STICK: Next, place the stencil on the wall and rub it down with your hand, making sure that all inner edges are down to avoid any bleeding. c. PAINT: Then, with a foam brush apply a thin coat of acrylic paint with a gentle patting or stabbing motion (or roll it on thinly if using a roller). Apply a second coat as necessary. *Tip! Practice with something simple like a cloud. *Tip! To avoid bleeding, make sure not to put too much paint on the brush. 2 or 3 light coats will work much better than one thick one. Also, after you wash your brush make sure it is completely dry before using it again. Squeeze the water out with a hand towel and use a hair dryer to speed things up. *Tip! You can create depth to a scene by layering. For example, paint a fence in front of a row of sunflowers, and then paint flowers in front of the fence. *Tip! Since the barn is the largest element, start with it and work your way out. The barn comes in two pieces (total 37”w x 47.5”h). Make a mark on the wall where you would like the top of the barn to be. Begin with the top piece. After removing the release paper (Note: It is easier to have another person peel the release paper while you hold the stencil), hold the sheet at the top edge about an inch in from the outer sides, keeping it taught. Make sure not to hold the stencil by the sides, or you’ll end up with frustrating bubbles. Align the top of the barn with your mark and place the stencil on the wall. For the bottom piece, hold the stencil at the top between the notches. Line up the notches and place the stencil on the wall. Due to the size of the barn you may need to peel and re-stick in several places to get it completely flat. *Tip! To paint in the eyes of the animals, refer to the eye kit provided. d. REMOVE: Finally, after the paint is semi-dry, remove the stencil from the wall. Paint in any areas left unpainted due to stencil bridges (plastic areas of the stencil that hold two edges together and are necessary to preserve its structure). *Tip! Store the stencils on the extra sheets of release paper. e. REUSE: The stencils can be reused efficiently approximately 5-10 times. *Tip! When reusing a stencil, place it on the wall and press down with a paper towel. This will help keep it clean and prevent excess build-up. You can remove dried paint on the stencil with a baby wipe. Acrylic paint Acrylic paints are conveniently available through our website in Paint Kits and at craft and fabric stores. We recommend the Americana and FolkArt brands. Be aware that some hobby acrylic paints are more watery than others. Watery acrylics will cause bleeding under the stencil. We do not recommend Anita’s, Delta Ceramcoat or any metallic hobby paint. Acrylic paint kit (sold separately at www.MyWonderfulWalls.com) Below is a list of the colors we have found work well together for this kit. Please note that the quantity of paint we suggest is an estimate. The amount of paint you actually use will depend on the size of the room and the number of times you paint each design. Note that these are merely suggestions. Don’t be afraid to channel the inner artist within or, if you prefer, simply mimic what we have already done. There are endless possibilities of how the mural can be painted. These are the colors we have used and know look good, but you can find similar colors at any home store (Lowe's, Home Depot, etc.). Sky color: “Spring Waterfall” A54-3, Olympic, semi-gloss or satin, Lowe’s Hill color: “Everglade Glen” 6003-6A Valspar, semi-gloss or satin, Lowe’s The stencil kit includes 31 stencils, eye kit, release paper (for storing stencils on) You will also need Acrylic paints - used for stenciling Pre-painted room - painted with latex paint (semi-gloss or satin recommended) Brushes - 10-20 foam brushes of various sizes, 1 fine-tip brush for touch-ups and the eyes, and foam roller(s) for the larger stencils Ball-point pen - used for drawing eyes Chalk - used for sketching hills Paper plates - used to hold acrylic paints Paper towels and baby wipes - used for keeping stencils clean Scissors - used for separating stencils and cutting away any extra plastic Make sure to check out our instructional videos at www.MyWonderfulWalls.com For questions or comments call us M-F 10am to 6pm EST at 1-888-945-4443 or email us at [email protected] Qty. 8oz. bottles 2oz. bottles 2 1 1 1 1 1 1 1 2 1 1 1 2 Honey Brown DA163 Milk Chocolate DA174 Lavender DAO34 Turquoise Blue DA268 Flesh Tone DAO78 Canyon Orange DA238 Cadmium Yellow DAO10 Hauser Light Green DA131 Hauser Medium Green DA132 True Red DA129 1 True Red DA129 Dark Chocolate DAO65 Lamp (Ebony) Black DAO67 Snow (Titanium) White DAO1
Transcript

Brand: AmericanaAcrylic paint

Latex paint (available at home stores)

How to paint the mural 1. Paint background colors. For a scene with sky and hills, you will need two colors of latex paint. Paint the sky and hills and let dry. *Tip! If you want the hills to come above the furniture, use chalk to mark out where the furniture will be, and then sketch the hills. * Tip! An easy way to paint hills is with a paint roller. *Tip! Save background color paint for touch-ups.2. Stencil the walls. The kit contains six sheets with several stencils on each sheet. The stencils have a self-adhesive backing, so no tape or glue is required. Just peel the stencil from the release paper, stick it to the wall, paint in, remove, and reuse.*Tip! It’s a good idea to test the layout of your design prior to stenciling. Before peeling the stencils off the paper backing, use scissors to divide the large sheets into individual stencils. This will allow you tape them to the wall first and to try different variations to see what you like best.a. PEEL: First, peel the backing of the stencil. The stencils are tear-resistant, but it is best to be careful. If you feel a hang-up, stop and peel from another direction.b. STICK: Next, place the stencil on the wall and rub it down with your hand, making sure that all inner edges are down to avoid any bleeding.c. PAINT: Then, with a foam brush apply a thin coat of acrylic paint with a gentle patting or stabbing motion (or roll it on thinly if using a roller). Apply a second coat as necessary.*Tip! Practice with something simple like a cloud.*Tip! To avoid bleeding, make sure not to put too much paint on the brush. 2 or 3 light coats will work much better than one thick one. Also, after you wash your brush make sure it is completely dry before using it again. Squeeze the water out with a hand towel and use a hair dryer to speed things up.*Tip! You can create depth to a scene by layering. For example, paint a fence in front of a row of sunflowers, and then paint flowers in front of the fence.*Tip! Since the barn is the largest element, start with it and work your way out. The barn comes in two pieces (total 37”w x 47.5”h). Make a mark on the wall where you would like the top of the barn to be. Begin with the top piece. After removing the release paper (Note: It is easier to have another person peel the release paper while you hold the stencil), hold the sheet at the top edge about an inch in from the outer sides, keeping it taught. Make sure not to hold the stencil by the sides, or you’ll end up with frustrating bubbles. Align the top of the barn with your mark and place the stencil on the wall. For the bottom piece, hold the stencil at the top between the notches. Line up the notches and place the stencil on the wall. Due to the size of the barn you may need to peel and re-stick in several places to get it completely flat. *Tip! To paint in the eyes of the animals, refer to the eye kit provided.d. REMOVE: Finally, after the paint is semi-dry, remove the stencil from the wall. Paint in any areas left unpainted due to stencil bridges (plastic areas of the stencil that hold two edges together and are necessary to preserve its structure).*Tip! Store the stencils on the extra sheets of release paper.e. REUSE: The stencils can be reused efficiently approximately 5-10 times.*Tip! When reusing a stencil, place it on the wall and press down with a paper towel. This will help keep it clean and prevent excess build-up. You can remove dried paint on the stencil with a baby wipe.

Acrylic paintAcrylic paints are conveniently available through our website in Paint Kits and at craft and fabric stores. We recommend the Americana and FolkArt brands. Be aware that some hobby acrylic paints are more watery than others. Watery acrylics will cause bleeding under the stencil. We do not recommend Anita’s, Delta Ceramcoat or any metallic hobby paint.

Acrylic paint kit (sold separately at www.MyWonderfulWalls.com)Below is a list of the colors we have found work well together for this kit. Please note that the quantity of paint we suggest is an estimate. The amount of paint you actually use will depend on the size of the room and the number of times you paint each design. Note that these are merely suggestions. Don’t be afraid to channel the inner artist within or, if you prefer, simply mimic what we have already done. There are endless possibilities of how the mural can be painted.

These are the colors we have used and know look good, but you can find similar colors at any home store (Lowe's, Home Depot, etc.).

Sky color: “Spring Waterfall” A54-3,Olympic, semi-gloss or satin, Lowe’s

Hill color: “Everglade Glen” 6003-6AValspar, semi-gloss or satin, Lowe’s

The stencil kit includes31 stencils, eye kit, release paper (for storing stencils on)

You will also needAcrylic paints - used for stencilingPre-painted room - painted with latex paint (semi-gloss or satin recommended)Brushes - 10-20 foam brushes of various sizes, 1 fine-tip brush for touch-ups and the eyes, and foam roller(s) for the larger stencils

Ball-point pen - used for drawing eyesChalk - used for sketching hillsPaper plates - used to hold acrylic paintsPaper towels and baby wipes - used for keeping stencils cleanScissors - used for separating stencils and cutting away any extra plastic

Make sure to check out our instructional videos at www.MyWonderfulWalls.comFor questions or comments call us M-F 10am to 6pm EST at 1-888-945-4443or email us at [email protected]

Qty.

8oz.bottles

2oz.bottles

2

1

1

1

1

1

1

1

2

1

1

1

2

Honey Brown DA163

Milk Chocolate DA174

Lavender DAO34

Turquoise Blue DA268

Flesh Tone DAO78

Canyon Orange DA238

Cadmium Yellow DAO10

Hauser Light Green DA131

Hauser Medium Green DA132

True Red DA129

1True Red DA129

Dark Chocolate DAO65

Lamp (Ebony) Black DAO67

Snow (Titanium) White DAO1

Stencils Included & Color Guide

Dark Chocolate

True Red

Honey Brown Lamp (Ebony) BlackHauser Light GreenHauser Medium GreenSnow (Titanium) White

Barn(37”w x 47.5”h)

Tractor(21”w x 13”h)

Fencing(8.5”w x 40.5”h)

Hen and chicks(17”w x 9”h)

Cow - large( 17”w x 17”h)

Cow-small(4.5”w x7.5”h)

Pig(10”w x 13”h)

Bee(4”w x 3”h)

Horse(13”w x 23.5”h)

Cat(11.7”w x 9”h)

Goose(9.5”w x 15”h)

Mouse(4.5”wx 5”h)

Sheep(13”w x 10.5”h)

Crow(6.5”w x 5.5”h)

Rooster(11”w x 13”h)

Butterfly(4.5”w x 4 “h)

Sun(11”w x 11” h)

Cloud – large(14”w x 6”h)

Cloud – small(8.5”w x 4”h)

Grass blades(11”w x 7”h)

Vine(2.5”w x 4”h)

Leaf(1”w x 2.5”h)

Daisy(3.5”w x 3.5”h)

Carnation 1(3”w x 3”h)

Carnation 2(2”w x 3”h)

Stem(1”w x 9”h)

Corn stalk(10”w x 23”h)

Tree(7.5”w x 10”h)

Sunflower(10.5”w x 23”h)

Flesh Tone

Canyon Orange

Cadmium YellowDark Chocolate

Hauser Medium Green for layering

Cadmium YellowTrue Red

True RedCanyon OrangeSnow (Titanium) White

Canyon OrangeLamp (Ebony) Black

Lamp (Ebony) BlackSnow (Titanium) WhiteSnow (Titanium) WhiteLamp (Ebony) Black

Flesh ToneHoney Brown

Cadmium Yellow

Hauser Medium GreenMilk Chocolate

Milk Chocolate

Milk Chocolate Dark ChocolateCadmium YellowLamp (Ebony) Black

Snow (Titanium) White Snow (Titanium) White Snow (Titanium) WhiteDark ChocolateFlesh Tone

Hauser Light GreenHauser Medium Green for layering

Cadmium YellowTurquoise Blue

Turquoise BlueHauser Light Green

Turquoise BlueHauser Light Green

Hauser Light Green Hauser Light Green

Hauser Medium GreenWhite/Black Mix

Lavender


Recommended