1 THE SUNSHINE COAST BEEKEEPERS GROUP An introduction to backyard beekeeping. Prepared by O.G.G. Dent 29.9.2001 PREAMBLE: The preparations prior to purchases, equipment assembly, hive handling, legal requirements, estimated preliminary costing to be followed by an inspection of my set up for general comment. AMATEUR BEEKEEPING: Keeping two or three hives in the backyard as a hobby can be an interesting and rewarding experience. Care must be taken to select your site free from interfering with neighbours whose children may get stung. Most people have an inbuilt fear of bees and only by understanding the workings of a beehive can one enhance the enjoyment of keeping bees. By producing honey one can placate neighbours by giving a jar or two at suitable times. This will lead to questions concerning the functioning of the hive and give opportunity to demonstrate the workings of a hive, ensuring you have a hive dominated with quiet bees. PRIOR PREPARATION: • The Site: Select a warm sunny well drained spot facing the north to east direction if possible put the hives in a spot where a hedge or fence can cause the bees to fly high above head height. Remember that in Queensland the threat of cane toads requires hives to be set up with the entrances about 50cm above ground level, on concrete blocks preferably, or on a stand (See Page 5) • Purchase of equipment: New or second-hand - here the advice of experienced beekeepers in the Group can help. Remember that new boxes and frames ensure disease free hives. • Hive Equipment: Decide on what size of material you wish to use ( 8 or 10 frame) For the hobbyist who may be elderly the 8 frame is most suitable. Full depth brood boxes and half depth supers are best together with the bases, lids and frames. All of which can be purchased factory made from a reputable supplier and assembled by the hobbyist. (See details and assembly instructions attached) It is noted that a good handyman can make his own lids and bottom boards but boxes should be expertly made from precise measurements. HIVE ASSEMBLY: • Preservation and painting- Immersion or painting with 3% or 5% copper napthanate is advised for all boxes but frames are not given any preparatory treatment. After treatment allow to stand for several days before painting (See page 7) • Detail of the 8 frame bee hive ( See attached) It should be noted that the holding power of a nail lies in its length NOT its diameter. The longer the nail the better it will hold, so use nails as long as the equipment will take. • General assembly Suggestions (See pages 7-10) • Fitting foundation wax (See page 11) HIVE HANDLING: • personal equipment - protective clothing, preferably white or khaki coloured with a good hat and bee veil. Eg. boiler suit and boots. Optional equipment consists of gloves (gauntlet type) and gaiters • Spare parts - have one complete set of boxes and frames on hand even if only one hive is registered, say about 6 months after starting with bees. • The smoker A size 3 inch for up to 1 hours use is needed. Second hand smokers are the best option. Pine needles make the best fuel.
Transcript
1
THE SUNSHINE COAST BEEKEEPERS GROUP An introduction to backyard beekeeping. Prepared by O.G.G. Dent 29.9.2001 PREAMBLE: The preparations prior to purchases, equipment assembly, hive handling, legal requirements, estimated preliminary costing to be followed by an inspection of my set up for general comment. AMATEUR BEEKEEPING: Keeping two or three hives in the backyard as a hobby can be an interesting and rewarding experience. Care must be taken to select your site free from interfering with neighbours whose children may get stung. Most people have an inbuilt fear of bees and only by understanding the workings of a beehive can one enhance the enjoyment of keeping bees. By producing honey one can placate neighbours by giving a jar or two at suitable times. This will lead to questions concerning the functioning of the hive and give opportunity to demonstrate the workings of a hive, ensuring you have a hive dominated with quiet bees. PRIOR PREPARATION:
• The Site: Select a warm sunny well drained spot facing the north to east direction if possible put the hives in a spot where a hedge or fence can cause the bees to fly high above head height. Remember that in Queensland the threat of cane toads requires hives to be set up with the entrances about 50cm above ground level, on concrete blocks preferably, or on a stand (See Page 5)
• Purchase of equipment: New or second-hand - here the advice of experienced beekeepers in the Group can help. Remember that new boxes and frames ensure disease free hives.
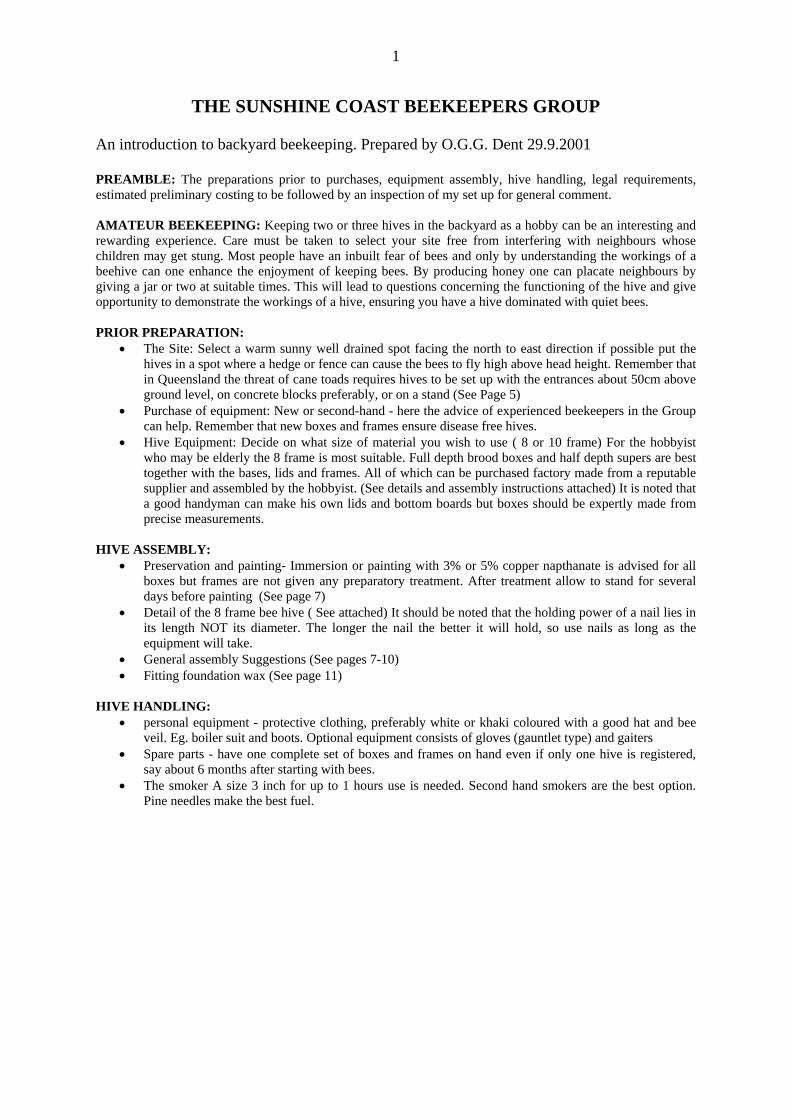
• Hive Equipment: Decide on what size of material you wish to use ( 8 or 10 frame) For the hobbyist who may be elderly the 8 frame is most suitable. Full depth brood boxes and half depth supers are best together with the bases, lids and frames. All of which can be purchased factory made from a reputable supplier and assembled by the hobbyist. (See details and assembly instructions attached) It is noted that a good handyman can make his own lids and bottom boards but boxes should be expertly made from precise measurements.
HIVE ASSEMBLY:
• Preservation and painting- Immersion or painting with 3% or 5% copper napthanate is advised for all boxes but frames are not given any preparatory treatment. After treatment allow to stand for several days before painting (See page 7)
• Detail of the 8 frame bee hive ( See attached) It should be noted that the holding power of a nail lies in its length NOT its diameter. The longer the nail the better it will hold, so use nails as long as the equipment will take.
• General assembly Suggestions (See pages 7-10) • Fitting foundation wax (See page 11)
HIVE HANDLING: • personal equipment - protective clothing, preferably white or khaki coloured with a good hat and bee
veil. Eg. boiler suit and boots. Optional equipment consists of gloves (gauntlet type) and gaiters • Spare parts - have one complete set of boxes and frames on hand even if only one hive is registered,
say about 6 months after starting with bees. • The smoker A size 3 inch for up to 1 hours use is needed. Second hand smokers are the best option.
Pine needles make the best fuel.
2
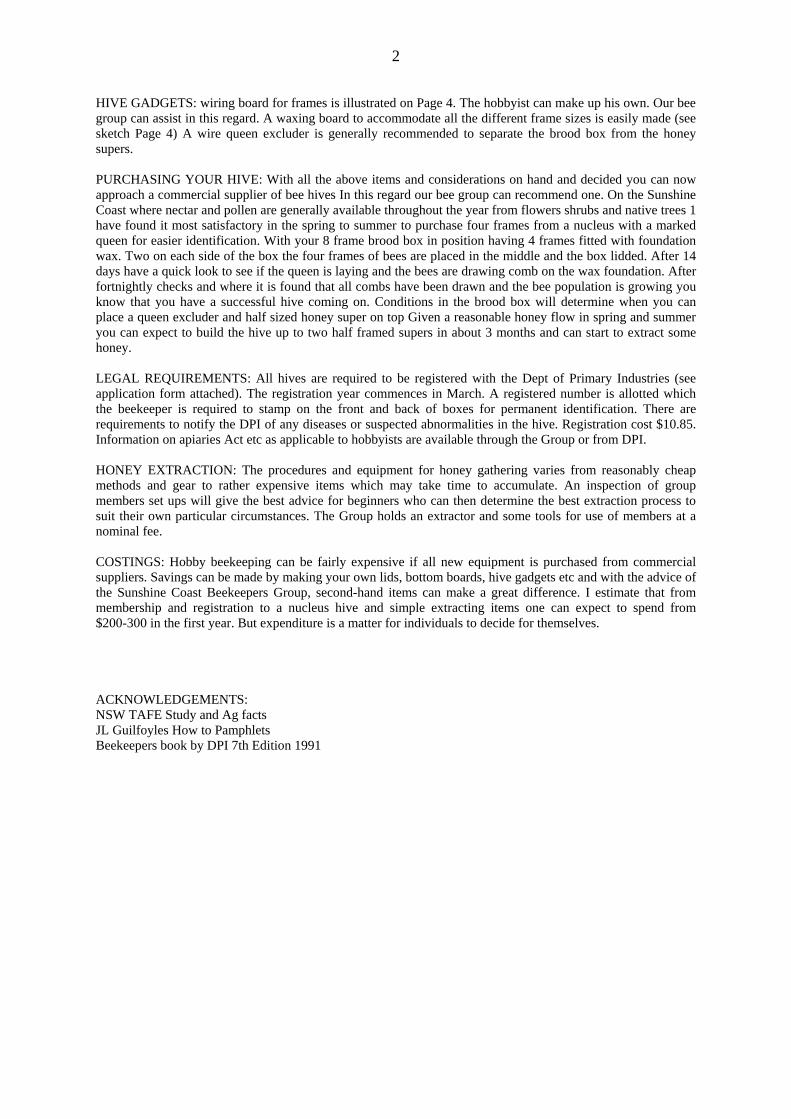
HIVE GADGETS: wiring board for frames is illustrated on Page 4. The hobbyist can make up his own. Our bee group can assist in this regard. A waxing board to accommodate all the different frame sizes is easily made (see sketch Page 4) A wire queen excluder is generally recommended to separate the brood box from the honey supers. PURCHASING YOUR HIVE: With all the above items and considerations on hand and decided you can now approach a commercial supplier of bee hives In this regard our bee group can recommend one. On the Sunshine Coast where nectar and pollen are generally available throughout the year from flowers shrubs and native trees 1 have found it most satisfactory in the spring to summer to purchase four frames from a nucleus with a marked queen for easier identification. With your 8 frame brood box in position having 4 frames fitted with foundation wax. Two on each side of the box the four frames of bees are placed in the middle and the box lidded. After 14 days have a quick look to see if the queen is laying and the bees are drawing comb on the wax foundation. After fortnightly checks and where it is found that all combs have been drawn and the bee population is growing you know that you have a successful hive coming on. Conditions in the brood box will determine when you can place a queen excluder and half sized honey super on top Given a reasonable honey flow in spring and summer you can expect to build the hive up to two half framed supers in about 3 months and can start to extract some honey. LEGAL REQUIREMENTS: All hives are required to be registered with the Dept of Primary Industries (see application form attached). The registration year commences in March. A registered number is allotted which the beekeeper is required to stamp on the front and back of boxes for permanent identification. There are requirements to notify the DPI of any diseases or suspected abnormalities in the hive. Registration cost $10.85. Information on apiaries Act etc as applicable to hobbyists are available through the Group or from DPI. HONEY EXTRACTION: The procedures and equipment for honey gathering varies from reasonably cheap methods and gear to rather expensive items which may take time to accumulate. An inspection of group members set ups will give the best advice for beginners who can then determine the best extraction process to suit their own particular circumstances. The Group holds an extractor and some tools for use of members at a nominal fee. COSTINGS: Hobby beekeeping can be fairly expensive if all new equipment is purchased from commercial suppliers. Savings can be made by making your own lids, bottom boards, hive gadgets etc and with the advice of the Sunshine Coast Beekeepers Group, second-hand items can make a great difference. I estimate that from membership and registration to a nucleus hive and simple extracting items one can expect to spend from $200-300 in the first year. But expenditure is a matter for individuals to decide for themselves. ACKNOWLEDGEMENTS: NSW TAFE Study and Ag facts JL Guilfoyles How to Pamphlets Beekeepers book by DPI 7th Edition 1991
3
The bee hive
4
APIARY GADGETS
WIRING BOARD FOR FRAMES
WAXING BOARD
5
QUEENSLAND HIVE STAND
The introduced giant toad (Bufo marinus L.) is now recognized by beekeepers as a persistent and voracious feeder on workers, queens and drones. It is a native of tropical America extending from Mexico to Argentina. From French Guiana it was introduced into Barbados about 1850, to assist in the control of rodents attacking sugar cane. From there they were introduced to most West Indian Islands including Puerto Rico in 1920. Later they were taken to Honolulu where they increased rapidly and have since been established in the Philippine Islands. In Puerto Rico where they were introduced, it was observed that they were eating successfully large numbers of cane beetles in their newly added country and of course the value of such an important predator attracted the attention of sugar cane technologists from Queensland Following this they were introduced into Gordonvale, Queensland, from Honolulu on 22nd June 1935. The animal is now widespread in many localities in coastal Queensland including the lower foothills of some coastal ranges. Honeybee colonies are weakened when these pests congregate near apiaries snapping up the honey bees at the entrance to hives. Most of the feeding is at night and during the day they are found hiding in small holes and under logs. They grow very rapidly and consume different kinds of insects and there is evidence to show that they regularly visit the same spot where they have been in the habit of making easy kills of large numbers of insects. This is noticeable by the way they congregate near street lights at night. They were primarily imported for the purpose of attacking the greyback cane beetle, a major pest of sugar cane in Queensland. The toad's diet, however, has proved to be varied and extensive, and it has an enormous capacity for food. Examination of toads showed that 51% of their food contained species of insects harmful to sugar cane. Since their introduction stomach contents have been found to contain ants, leafhoppers, grasshoppers, mole-crickets, a range of beetles, including the greyback beetle, cynid bugs, dipterous bugs, white grubs, flying ants, termites, moths and of course honey bees. In the honey producing industry control measures are an added cost in materials and labour, Placing the hives on stands about 609 mm. high considerably reduces losses. Migratory beekeepers have found the collapsible hive stand illustrated most suitable for the purpose It can be easily assembled and dismantled in the field, and the components can be packed readily for transport. A complete stand to carry two hives is constructed of grey ironbark timber. The five parts of each support are nailed together with 60 mm x 2.8 galvanised flat-headed nails through drilled holes with the nail ends clinched. (See the diagram next page.)
6
The timber required is as follows:---- RUNNERS: 2 pieces each 1525 mm x 50 mm x 38 mm (60 in x 2 in x 1.5 in). SUPPORTS: 4 pieces- each 635 mm x 50 mm x 25 mm (25 in x 2 in x 1 in) 6 pieces each 533 mm x 50 mm x 25 mm (21 in x 2 in x 1 in).
Each support is made up of five wooden parts assembled as shown in this plan.
The two supports and two runners of the collapsible hive stand assembled
As the supports are slanted outwards, stability of the stand is assured by the weight of the hives locking the runners in the opening formed by the top crosspieces. The bottom crosspieces help to prevent the stand from sinking into the ground.
7
General Hive Assembly suggestions Careful and Correct Assembly of Material Doubles Both Its Life and Its Value. Paint - Hoop pine is not really an outside timber but we cannot use hard wood as it would be far too heavy -Therefore it has to be kept well painted to give you maximum service. We recommend 3 coats for the inside of the box and 4 coats for the outside. Choose a light colour as this reflects the heat. Any paint, which is suitable for humans, is suitable for bees. Treat with Copper Napthenate before painting. We recommend that where possible you undercoat the joins and nail them together while the undercoat is still wet. Good quality undercoat dries into an effective glue and this helps to keep moisture out of the joins.
How to Assemble Supers 1. Drill a 2mm hole in the top of the super ends, that is, in the thin part that has been rebated for the frames to sit on. (Some people drill all the holes before nailing.) 2. Using undercoat, paint the end grain areas and allow to dry. 3. Warning - ensure that the four handgrips are on the outside and facing up the right way up (although you really are not a beekeeper until you have put at least one box together with the hand grips wrong). 4. Using undercoat paint these same places a second time. While this undercoat is still wet, nail together using 65 x 2.8 nails or 60 x 2.3 nails. It is essential that you use galvanised flat-headed nails. For rabbeted supers we recommend nails for each comer joint, and for dovetailed supers one nail in each lug, giving a total of 11 nails per corner joint. This is a messy job, but by doing it while the undercoat is wet, it helps to form the perfect weatherproof seal. 5. Paint box inside and outside with undercoat. 6. Give the inside one coat of topcoat and the outside two coats.
8
How to Assemble Bottom Boards
Masonite Bottom Board 1. We suggest that you give everything a coat of undercoat. 2. Paint again any surfaces where two parts touch. Assemble while the undercoat is wet to help waterproof the joins. For fixing the Masonite to the cleats use 25 x 1.3 nails. For nailing on the risers use 40 x 1.3 nails, 3. It is a good idea to give the entire bottom board a coat of undercoat and 2 coats of topcoat. The assembly of a metal bottom board is the same as a Masonite bottom board, just substitute the Masonite for a sheet of galvanised iron.
Two Piece Solid Pine Bottom Board 1. We suggest that you give everything a coat of undercoat 2. Paint again any surfaces where two parts touch. An adequate amount of wet undercoat along the z-line join will act as a very effective glue - assemble while the undercoat is wet. Nail one piece of the pine using 40 x 1.8 nails onto both cleats. Then push the other piece into the z -line join and nail into place. For nailing on the risers use 40 x 1.3 nails. 3. It is a good idea to give the bottom board a coat of undercoat and 2 coats of topcoat.
9
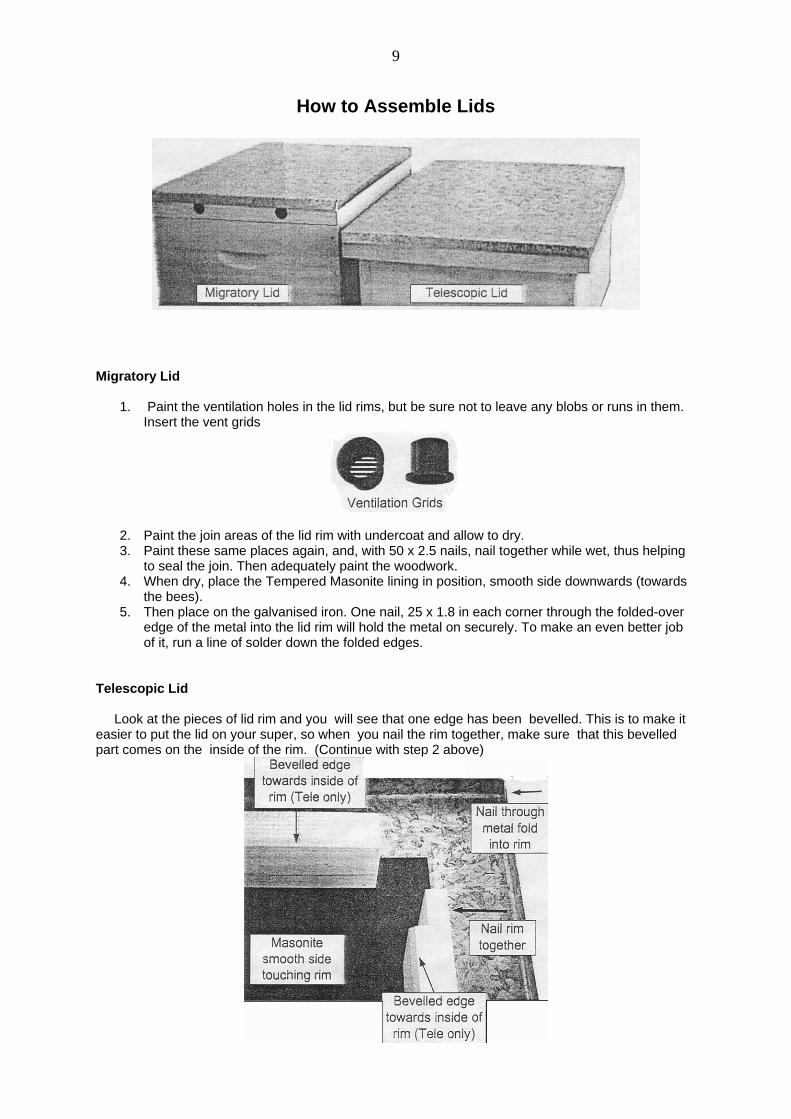
How to Assemble Lids
Migratory Lid
1. Paint the ventilation holes in the lid rims, but be sure not to leave any blobs or runs in them. Insert the vent grids
2. Paint the join areas of the lid rim with undercoat and allow to dry. 3. Paint these same places again, and, with 50 x 2.5 nails, nail together while wet, thus helping
to seal the join. Then adequately paint the woodwork. 4. When dry, place the Tempered Masonite lining in position, smooth side downwards (towards
the bees). 5. Then place on the galvanised iron. One nail, 25 x 1.8 in each corner through the folded-over
edge of the metal into the lid rim will hold the metal on securely. To make an even better job of it, run a line of solder down the folded edges.
Telescopic Lid Look at the pieces of lid rim and you will see that one edge has been bevelled. This is to make it easier to put the lid on your super, so when you nail the rim together, make sure that this bevelled part comes on the inside of the rim. (Continue with step 2 above)
10
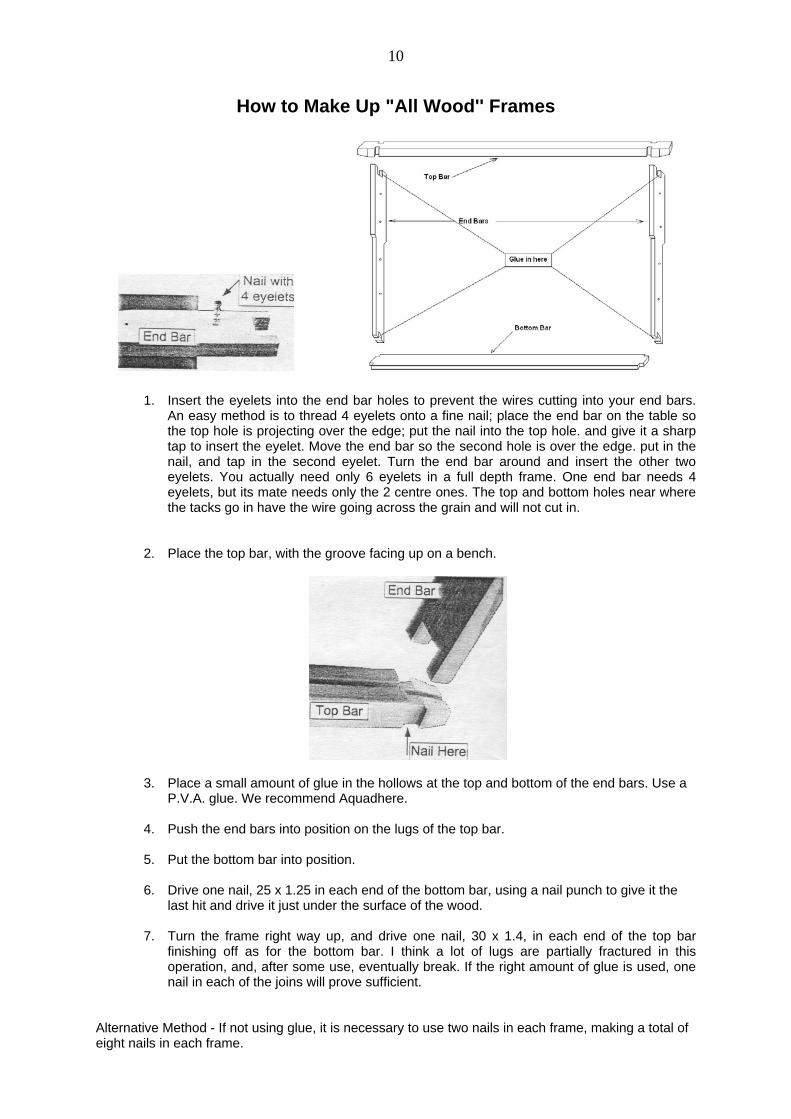
How to Make Up "All Wood'' Frames
1. Insert the eyelets into the end bar holes to prevent the wires cutting into your end bars. An easy method is to thread 4 eyelets onto a fine nail; place the end bar on the table so the top hole is projecting over the edge; put the nail into the top hole. and give it a sharp tap to insert the eyelet. Move the end bar so the second hole is over the edge. put in the nail, and tap in the second eyelet. Turn the end bar around and insert the other two eyelets. You actually need only 6 eyelets in a full depth frame. One end bar needs 4 eyelets, but its mate needs only the 2 centre ones. The top and bottom holes near where the tacks go in have the wire going across the grain and will not cut in.
2. Place the top bar, with the groove facing up on a bench.
3. Place a small amount of glue in the hollows at the top and bottom of the end bars. Use a P.V.A. glue. We recommend Aquadhere.
4. Push the end bars into position on the lugs of the top bar.
5. Put the bottom bar into position.
6. Drive one nail, 25 x 1.25 in each end of the bottom bar, using a nail punch to give it the
last hit and drive it just under the surface of the wood.
7. Turn the frame right way up, and drive one nail, 30 x 1.4, in each end of the top bar finishing off as for the bottom bar. I think a lot of lugs are partially fractured in this operation, and, after some use, eventually break. If the right amount of glue is used, one nail in each of the joins will prove sufficient.
Alternative Method - If not using glue, it is necessary to use two nails in each frame, making a total of eight nails in each frame.
11
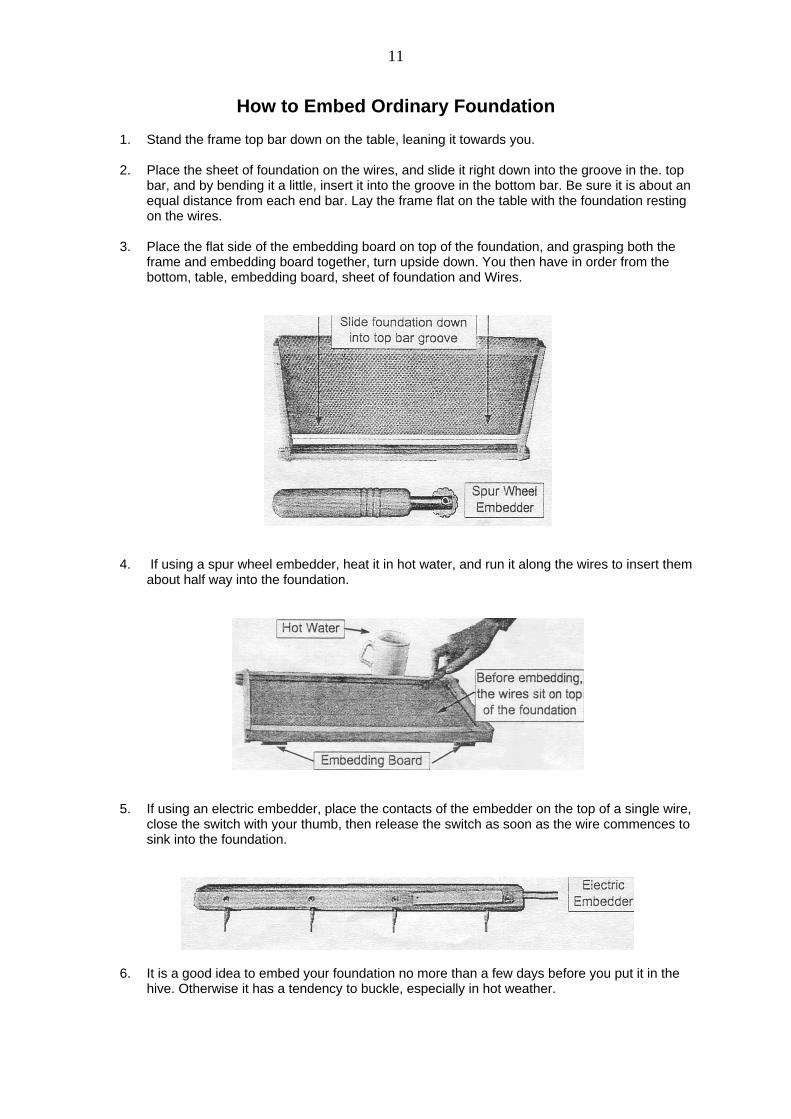
How to Embed Ordinary Foundation
1. Stand the frame top bar down on the table, leaning it towards you. 2. Place the sheet of foundation on the wires, and slide it right down into the groove in the. top
bar, and by bending it a little, insert it into the groove in the bottom bar. Be sure it is about an equal distance from each end bar. Lay the frame flat on the table with the foundation resting on the wires.
3. Place the flat side of the embedding board on top of the foundation, and grasping both the
frame and embedding board together, turn upside down. You then have in order from the bottom, table, embedding board, sheet of foundation and Wires.
4. If using a spur wheel embedder, heat it in hot water, and run it along the wires to insert them about half way into the foundation.
5. If using an electric embedder, place the contacts of the embedder on the top of a single wire, close the switch with your thumb, then release the switch as soon as the wire commences to sink into the foundation.
6. It is a good idea to embed your foundation no more than a few days before you put it in the hive. Otherwise it has a tendency to buckle, especially in hot weather.
12
How to Light and Use a Smoker
How to Light a Smoker
1. The best - fuels are dried pine needles. dried tea tree bark, wood shavings (about half pine and half hard wood), or dried grass. Some beekeepers use old hessian bags, but although they will stay alight and burn for a long time, they often give out a strong smell which the bees dislike.
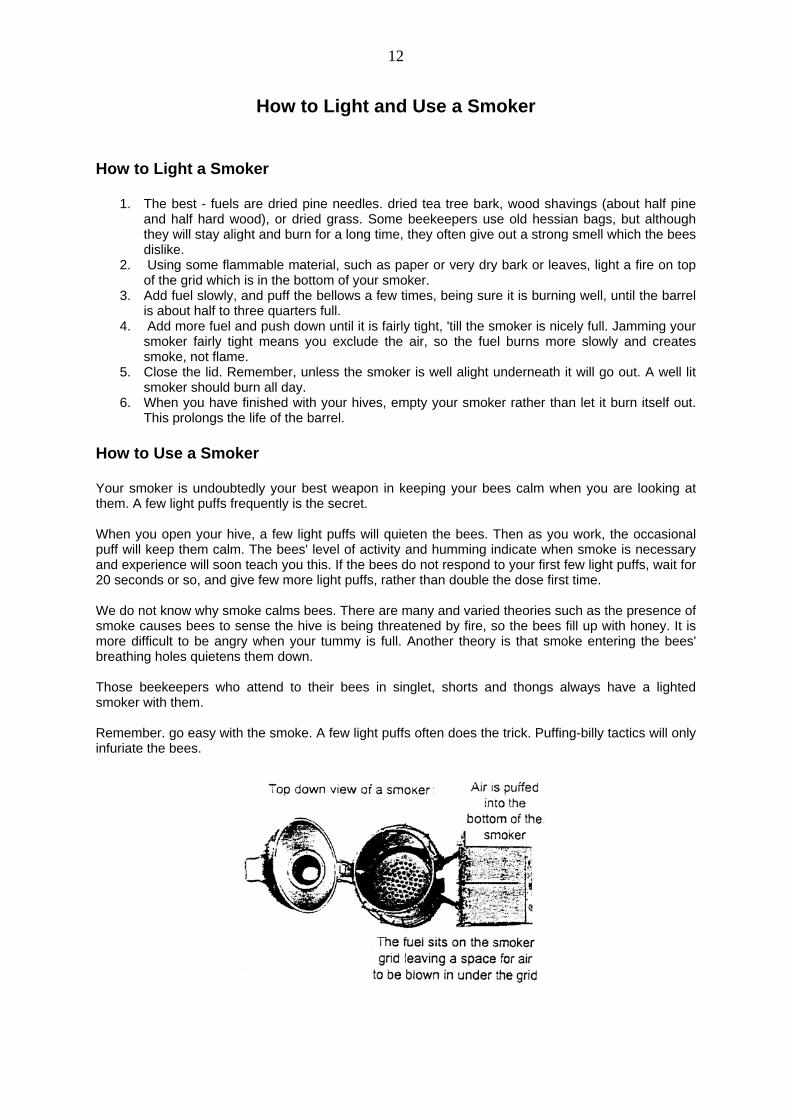
2. Using some flammable material, such as paper or very dry bark or leaves, light a fire on top of the grid which is in the bottom of your smoker.
3. Add fuel slowly, and puff the bellows a few times, being sure it is burning well, until the barrel is about half to three quarters full.
4. Add more fuel and push down until it is fairly tight, 'till the smoker is nicely full. Jamming your smoker fairly tight means you exclude the air, so the fuel burns more slowly and creates smoke, not flame.
5. Close the lid. Remember, unless the smoker is well alight underneath it will go out. A well lit smoker should burn all day.
6. When you have finished with your hives, empty your smoker rather than let it burn itself out. This prolongs the life of the barrel.
How to Use a Smoker Your smoker is undoubtedly your best weapon in keeping your bees calm when you are looking at them. A few light puffs frequently is the secret. When you open your hive, a few light puffs will quieten the bees. Then as you work, the occasional puff will keep them calm. The bees' level of activity and humming indicate when smoke is necessary and experience will soon teach you this. If the bees do not respond to your first few light puffs, wait for 20 seconds or so, and give few more light puffs, rather than double the dose first time. We do not know why smoke calms bees. There are many and varied theories such as the presence of smoke causes bees to sense the hive is being threatened by fire, so the bees fill up with honey. It is more difficult to be angry when your tummy is full. Another theory is that smoke entering the bees' breathing holes quietens them down. Those beekeepers who attend to their bees in singlet, shorts and thongs always have a lighted smoker with them. Remember. go easy with the smoke. A few light puffs often does the trick. Puffing-billy tactics will only infuriate the bees.