Page 1
*** MAIN MANUAL ***
The Underground AR-9 PCC (Pistol Caliber Carbine) System!
The Step-By-Step Guide For
True Patriots Showing How To Get A 100% Private AR-9 That’s
Completely “Off The Books”!
Page 2
The Underground AR-9 System By Caleb Lee
©2021 and Beyond
ALL RIGHTS RESERVED. No part of this report may be reproduced or transmitted in any form whatsoever, electronic, or mechanical, including photocopying,
recording, or by any informational storage or retrieval system without express written, dated and signed permission from the author.
DISCLAIMER AND/OR LEGAL NOTICES:
The information presented herein represents the view of the author as of the date of publication. Because of the rate with which conditions change, the author
reserves the right to alter and update his opinion based on the new conditions. The report is for informational purposes only. While every attempt has been made to verify the information provided in this report, neither the author nor his
affiliates/partners assume any responsibility for errors, inaccuracies or omissions. Any slights of people or organizations are unintentional. If advice concerning legal
or related matters is needed, the services of a fully qualified professional should be sought. This report is not intended for use as a source of legal advice. You should be aware of any laws which govern the topics discussed herein in your city, country
and state. Any reference to any person or business whether living or dead is purely coincidental.
Page 3
The Underground AR-9 Manual
© 2021 and beyond Page 3
INTRO
Welcome fellow Patriot!
I’m extremely excited to introduce you to an exciting new opportunity to exercise your
God given rights of self-defense … and … your Second Amendment rights by showing
you how to build what I call “The Underground AR-9”!
This powerful guide will show you how to get this AR-9 PCC style firearm completely
“off the books” so that Big Brother keeps its eyes off your business!
Important Note About Laws:
This guide is for purely informational purposes only. I am not responsible for anything
you do with this information. It is provided “as is”. By reading this guide you agree to
these terms.
Additionally, I am NOT a lawyer and in no way am I qualified to tell you what is legal
Federally or on a state level as it pertains to you.
I am simply telling you “what I have heard” about the legality of all things I write about
in this book and I’m exercising my First Amendment rights.
You are fully responsible to know the laws Federally and Locally as they pertain to you.
This is extremely important, because in recent years, states such as New Jersey and
California have either passed or attempted to pass laws to outlaw 3D gun printing and
building your own guns. Do your research!
Here are some links about building your own gun pertaining to federal laws. If you are
unsure about anything, I encourage you to do your own research before attempting
anything in this guide.
http://www.atf.gov/firearms/faq/general.html#gca-manufacturing
http://www.atf.gov/files/publications/download/p/atf-p-5300-4.pdf
http://www.atf.gov/firearms/faq/firearms-technology.html#commercial-parts-assembly
Now that the Lawyers are satisfied, let’s get into it!
Page 4
The Underground AR-9 Manual
© 2021 and beyond Page 4
WHAT IS AN AR-9?
In the simplest of terms, the firearm you’re going to see how to build is an AR-9.
In case you’re not already immediately familiar with the AR-9, then let’s talk about what
it actually is…
I’m assuming you are familiar with the most popular rifle designed in America, the AR-
15. The AR-15 is the most popular semi-automatic firearm in the hands of civilians in
America and the AR-9 is a variation on that design.
In short, the AR-9 is an AR-15 style rifle that has been designed to fire 9mm (and some
styles can fire .40 cal or other pistol ammo but that’s beyond the scope of this build
manual).
So, what is different on an AR-9 versus the AR-15 you know and love?
The Major Differences Between the AR-15 and the AR-9:
Let’s break this down into lower receiver and upper receiver, because in large part, this
guide and the video showing you how to build your own AR-9 off the books is really just
about the lower receiver…
LOWER RECEIVER:
Page 5
The Underground AR-9 Manual
© 2021 and beyond Page 5
1. The magazine well – because you’ll be using pistol magazines, the magazine well is a
different design.
2. The Ejector – which is sticking out of the magazine well is different.
3. The magazine release button – because the magazines are different.
4. The bolt catch opposite the magazine release button
5. The FCG (Fire Control Group) trigger, hammer, etc MAY need to be different, but
in some cases, it will use a standard AR-15 FCG (the build I show you here uses a
standard trigger)
6. The buffer spring and buffer (pictured on next page with the Upper Receiver parts) –
need to be a different weight than normal AR-15
UPPER RECEIVER:
Page 6
The Underground AR-9 Manual
© 2021 and beyond Page 6
1. The barrel – needs to be 9mm of course
2. The Bolt Carrier Group (BCG)
In short, you might mistake an AR-9 for an AR-15 when you first look at it until you see
the weird pistol magazine (like this picture of a Wilson Combat AR-9 below) because
they’re so similar:
That’s another thing that makes the AR-9 a unique platform for us as AR-15 enthusiasts –
many of your same AR-15 accessories – grips, stocks/braces, handguards, lights, optics,
and more – can be used on your AR-9 build because of the parts interchangeability.
Why Would You Want An AR-9?
1. Size – AR-9’s are generally smaller than AR-15’s and commonly have shorter barrels
if a pistol variant (with pistol brace).
2. Weight – Shorter barrel, lighter lower receiver, and lighter ammunition make AR-9’s
significantly lighter and easier to use than AR-15
3. Cheaper Ammo – Shooting 9mm ammo is practically the cheapest centerfire ammo
you can get.
Page 7
The Underground AR-9 Manual
© 2021 and beyond Page 7
4. Share Ammo and Magazines With Your Handgun – Because your AR-9 will use
Glock magazines, if you carry a glock, then you can share magazines with your handgun
including the 15, 17, 21, and the 33rd magazines work great.
5. Almost ZERO Recoil – a standard AR-15 doesn’t have much recoil, but it’s still a
rifle caliber giving almost 4lbs of push to the shooter’s shoulder – the AR-9 cuts the
already diminutive recoil of an AR-15 in half!
6. Better & Quieter With A Silencer – 9mm is silenced much better than .223 rifle
caliber ammo. Plus, you can get subsonic ammunition for it more easily
7. Better Than a Handgun For Home Defense – Many people use a handgun for home
defense. If you switch to an AR-9, then you not only get 200 or more FPS velocity from
the same 9mm ammo—but it’s a fact that everyone is faster and more accurate with a
carbine than a rifle because rifles are much easier to shoot effectively than pistols.
8. Extra Velocity for Self-Defense (compared to handgun) – again the longer barrels
of a carbine instead of a handgun barrel adds extra velocity making 9mm ammo more
lethal.
9. Easier To Make Hits and Shoot Accurately – Because it’s a carbine – it’s easier to
shoot than a handgun
10. Can Use All Your AR-15 Accessories (Optics, Lights, Etc) – you can put the same
scopes, red dots, silencers, flashlights, lasers, stocks, hand grips, etc on your AR-9 that
you use with your AR-15
11. Can shoot indoors or at ranges that don’t allow rifle calibers to be shot. This way
you can practice your AR-15 rifle handling skills with a 9mm that is similar to your “go
to war” rifle – on ranges where they are ok with you shooting their backstops with pistol
calibers but not rifle calibers.
12. Shooting Sports – PCC’s are one of the hottest sellers in firearms because they were
included into USPSA and Steel Challenge competition in 2016 and in 2018 IDPA formed
a PCC division too. 3-Gun is also having them in matches now.
https://www.targetbarn.com/broad-side/pistol-caliber-carbines/
https://www.ssusa.org/articles/2019/3/6/top-uspsa-pcc-guns-in-2018/
13. You want a PDW/SMG style weapon – Submachine guns (SMG’s) like the classic
MP5 used to all be pistol caliber guns, and there has been a resurgence of their popularity
Page 8
The Underground AR-9 Manual
© 2021 and beyond Page 8
with the PCC movement for pistol caliber platforms as PDW’s (Personal Defense
Weapons).
And the biggest reason for me…
You can build your own AR-9 completely “off the books”.
That means no serial number, no registration, and no way to trace it to your name. I’ve
built a number of these “ghost guns” and this is my preferred method to acquire guns I
want to depend on for survival.
Why would you want to get an AR-9 that can’t be traced to you?
Simply because the future doesn’t look good for us gun lovers—or really any American
that believes in the 2nd Amendment and the right to bear arms. At every turn, and at every
opportunity – the gun grabbers in politics seek to use every power they have to pass laws
to get these guns outlawed.
They succeeded with the first Assault Weapon Ban (AWB). From Wikipedia:
“There are no federal restrictions on the ownership
of AR-15 rifles in the United States. During the
period 1994–2004 variants with certain features
such as collapsible stocks, flash suppressors, and
bayonet lugs were prohibited for sales to civilians
by the Violent Crime Control and Law Enforcement
Act of 1994, with the included Assault Weapons Ban.
Included in this was a restriction on the pistol
grip that protrudes beneath the stock, which was
considered an accessory feature under the ban and
was subject to restrictions. Some rifles were
manufactured with a grip not described under the
Ban installed in its place. Those AR-15s that were
manufactured with those features, as well as the
accompanying full capacity magazines, were stamped
"Restricted Military/Government/Law
Enforcement/Export Only". The restrictions only
applied to guns manufactured after the ban took
Page 9
The Underground AR-9 Manual
© 2021 and beyond Page 9
effect. It was legal to own, sell, or buy any gun
built before 1994. Hundreds of thousands of pre-ban
ARs were sold during the ban as well as new guns
redesigned to be legal.
Since the expiration of the Federal AWB in
September 2004,[22] these features became legal in
most states.[23] Since the expiration of the ban the
manufacture and sale of then-restricted rifles has
resumed completely.
At least two states regulate possession of AR-15
rifles either by the restriction of certain
features or outright bans of certain manufacturers'
models.”
In some super left states – they’ve already banned them AGAIN! Look no further than
California or New York to see some of the most draconian gun laws in existence …
… The same gun laws that put innocent, law abiding civilians in danger because they
ensure that the only people with these so called “assault weapons” are the criminals!
The current administration wants to pass another Assault Weapon Ban and tyrants in
government will ALWAYS try to take guns out of the hands of citizens.
With all this in mind, to protect yourself and prepare for a survival situation privately,
you might want to build your AR-9 with no way to trace it back to you.
That’s what this short – yet extremely powerful guide will teach you!
Page 10
The Underground AR-9 Manual
© 2021 and beyond Page 10
HOW DO YOU BUILD YOUR AR-9 WITH NO WAY TO TRACE IT TO YOU?
The fact is, as far as Federal laws are concerned, if you build your own firearm, then you
can do it without having to fill out any paperwork, without needing a serial number,
without anybody knowing about it at all… because you built it yourself.
And, as far as the feds are concerned, you don’t need any special license or permission
either…
In fact, here’s an actual screenshot from the ATF’s own website answering this very
question:
The print may be small, so here’s the question:
“Does an individual need a license to make a firearm
for personal use?”
And the ATF’s answer:
“No, a license is not required to make a firearm solely
for personal use. However, a license is required to
manufacture firearms for sale or distribution. The law
Page 11
The Underground AR-9 Manual
© 2021 and beyond Page 11
prohibits a person from assembling a non–sporting
semiautomatic rifle or shotgun from 10 or more imported
parts, as well as firearms that cannot be detected by
metal detectors or x–ray machines. In addition, the
making of an NFA firearm requires a tax payment and
advance approval by ATF. [18 U.S.C. 922(o), (p) and
(r); 26 U.S.C. 5822; 27 CFR 478.39, 479.62 and 479.105]
Last Reviewed November 6, 2017”
So, there you go!
Now, remember, you need to check your local (city, county, etc) and state laws because
ever since I started building my own guns this way back in 2013, there have been
numerous changes in local cities and states by anti-gun politicians who have tried to take
away this freedom.
All that said, I think that building your own gun is something every Patriotic, DIY, red-
blooded Americans would love!
Page 12
The Underground AR-9 Manual
© 2021 and beyond Page 12
WHY IT’S NOT THAT COMPLICATED TO BUILD AN AR-9
Luckily for us DIY people, who want nothing more than complete and total privacy and
the satisfaction that our gun will be “off the books” forever – building your own AR-9
from scratch is not as hard as it sounds!
The AR-9 is becoming so popular so there is PLENTY of information out there on how
to complete your firearm, make changes to it, and do basic repairs and customizations.
And here’s the key thing to remember: the lower receiver is the important part. You only
need to find a way to get this one single part without any paperwork because it’s the
actual “firearm”—the rest of the gun is just “parts”.
For example: If you were to buy the completed receiver from a source online—it would
be considered a firearm and it would have to be delivered to your local FFL (Federal
Firearms Licensed dealer, aka, your gun shop) and you’d have to go there to pick it up
after filling out the necessary paperwork and background checks (and paying for the
privilege).
On the other hand, the rest of the rifle—triggers, barrels, stocks, etc—you can already
buy and build from parts that are completely legal to own “off the books” and without
background checks and there are no serial numbers on any other parts. And you could
order those online and they would ship directly to your house in the privacy of your mail.
COMPLETE LOWER RECEIVER: For example, here is a completed AR-9 lower
receiver with everything ready to go – you just need an upper receiver to slap on here and
you start shooting. THIS completed lower would require a transfer through an FFL (gun
shop):
Page 13
The Underground AR-9 Manual
© 2021 and beyond Page 13
STRIPPED RECEIVER: Now, here is a “stripped” but 100% completed lower AR-9
receiver. As you can see the ejector is already installed, etc – the magazine well is
finished and the FCG area is obviously milled and ready for parts installation. This also
requires an FFL transfer:
… As defined by the BATF, because many weapons these days have modular barrels and
other parts, the part or assembly that accepts the trigger is the registerable part, or
basically the firearm itself.
On an AR-9 – this is the lower receiver.
Page 14
The Underground AR-9 Manual
© 2021 and beyond Page 14
Furthermore, according to the BATF, if the firearm (the lower receiver) is at least 20%
incomplete, and the trigger cannot be installed, it is not, by definition, a firearm—it is a
hunk of metal.
Basically, an individual could legally whittle a firearm out of a block of metal and
produce a legal firearm assuming it doesn't violate any other BATF specs such as rate of
fire, etc.
The only condition is that this home-built weapon is not to be manufactured to be sold
(otherwise you would then be considered a firearm maker and you would be in for a TON
of red tape and licensing and other considerations because you’re now a company like
“Colt” who is a “firearm manufacturer”!)
Now, some people HAVE done this!
If you are a CNC machinist – and you have access to the HUGE machines that are super
expensive – and plenty of blocks of aircraft grade aluminum -- then more power to ya!
Simply go grab yourself a chunk of aluminum, download some CAD drawings and get to
work! You will have a simple time making your own stripped receiver ☺
For the rest of us though, without machining knowledge or the access or money to make
our own from these machines …
What’s The Solution For The DIY Patriot?
Enter the 80% lower ☺
Page 15
The Underground AR-9 Manual
© 2021 and beyond Page 15
WHAT IS AN 80% LOWER & WHERE CAN YOU GET IT?
With this ruling by the ATF in mind, several manufacturers sell AR-15 and AR-9 style
lower receivers that are called 80% because they meet the “incomplete” rule, and the
ATF actually evaluates their respective designs, granting them the ability to legally sell
these incomplete parts.
Just like the name sounds, they are about “80% complete” on the way to becoming a
firearm (or “true” stripped receiver).
That means you have to finish the “Final 20%” to make them into a stripped receiver –
which is capable of having the lower parts kit installed in it (the trigger, etc that makes it
function!)
Here is a picture of an 80% AR-15 lower:
As you can see, the magazine well has been milled out already – but the holes for the
trigger and firing components, and other important holes have not been drilled out – those
are the final 20% of tooling you will have to complete before it is ready to use!
From the top view of an 80% receiver on the left– you can see that next to the magazine
well is milled out and completed.
But the fire control “pocket” where the “lower parts kit” goes (in simple terms: “all the
stuff like the trigger and hammer that make the gun work”) needs to be milled out. And
also the hole for the trigger needs to be drilled out too.
For the AR-9, you basically have the exact same idea of an 80% receiver:
Page 16
The Underground AR-9 Manual
© 2021 and beyond Page 16
In the state of the picture above, this receiver is considered the same as a hunk of
aluminum as far as the firearm laws are concerned. However, just like the AR-15 80%
receiver what you have to do is mill out the fire control pocket and drill holes and the
receiver will be complete and ready for assembly—what we call a “stripped receiver”:
The machining process involves:
• Drilling the hammer pin hole
• Drilling a trigger pin hole
• Making a safety selector lever hole
• Milling out the fire control group cavity
Here is a machinist drawing of the work that needs to be completed:
NOTE: you can buy lowers in a state that is before 80% -- such as 0% (block of
aluminum), but the simplest and most cost-effective way for the DIY Patriot is the 80%
lower in my opinion, so that’s what this guide focuses on.
Where to get an 80% Lower
You can simply Google “80% AR-9 for sale” but there are some sites that have always
been recommended by gun builders online.
For the purposes of this manual, for building an AR-9, I highly recommend
https://www.80percentarms.com/ because that’s where I bought the 80% lower that I
used and also the specialized tools to complete the lower.
If at the time you read this – due to new pending regulations or panic buying or for
whatever reason, the websites above are back-ordered you can always look for local
sellers in your area OR visit the internet on sites like gunbroker.com.
Page 17
The Underground AR-9 Manual
© 2021 and beyond Page 17
For example, here is a search for 80% lowers on gunbroker.com:
Most likely, you will be able to find a private seller there who you can buy them if the
above sites are back-ordered or out of stock.
Now you could use trial and error and download blueprints from the internet and use that
method to figure out how to drill your lower to complete it … but … it’s much easier to
use a JIG.
Where to Get A “Jig” to complete Your Lower
To complete an 80% lower receiver assembly so that you can use it to make a ready-to-
build firearm by definition, you will need a router jig kit and power tools such as a
quality drill and drill bits (included in the kit) to cut through the excess material from the
receiver blank to cut it into a functional stripped receiver or frame.
The jig is made from steel, aluminum, or polymer, and by using a drill, it will guide you
along every fabrication step.
Page 18
The Underground AR-9 Manual
© 2021 and beyond Page 18
In the accompanying video and throughout this guide, you will see me use the
EXCELLENT Gen 2 jig from 80PercentArms.com. I highly recommend their jigs for this
build.
At the time of publication, you can find an updated version of their jig, now in version
3.0 at this link: https://www.80percentarms.com/products/easy-jig-gen-3-multi-platform-
ar-15-ar-9-and-308-80-lower-jig/
NOTE: If you’re buying everything for the first time, then you probably want to buy one
of their complete “Starter Kits” because it comes with everything you need, like this one:
https://www.80percentarms.com/products/easy-jig-gen-3-starter-kit-ar15/
A starter kit like this ensures you have the tool kit you need as well. Then you’ll also
need a common hand drill and a handheld router to finish the project. I used a basic
Ryobi hand drill like the one pictured and a Makita RT0701C router:
Page 19
The Underground AR-9 Manual
© 2021 and beyond Page 19
NOTE: the 80PercentArms page has a list of routers that they have tested that work
perfect with their jig, it is worth it to check that list before you buy one, if you need to
buy one.
The Parts You Will Need To Finish Your AR-9 Receiver And Build Your
Firearm
Now, you know you will be finishing your receiver and turning it into a functional
stripped lower receiver, so what else do you need to build your AR-9? Let me show you
the easiest thing and what I did…
I bought this kit from Aim Surplus: https://aimsurplus.com/foxtrot-mike-products-9mm-
ar-pistol-builder-kit/
The Foxtrot Mike Products 9mm
AR Pistol Builder Kit because it has
basically everything you need. In
fact, here’s the description from
their page:
Want to build a 9mm AR
but do not know where to
start? Here is the best
solution! Complete
Foxtrot Mike Upper
featuring a 7" barrel
with thread protector,
5.5" M-Lok Handguard,
slick side upper. Plus
most of the parts you
need to finish your
firearm including: A2
Pistol Grip, 6.5 Ounce
9mm Heavy buffer, Buffer Spring, carbine Buffer tube
(not pictured), AimSurplus Ambi Safety, castle nut, end
plate and builder style LPK. Add a trigger and your
Foxtrot Mike lower and your ready to rock!
Page 20
The Underground AR-9 Manual
© 2021 and beyond Page 20
So, like the description says, you just need
an extra LPK or AR-15 trigger to complete
your AR-9 lower receiver and have a
functional firearm. Because they are
relatively cheap, it’s worth it to just buy a
complete LPK (lower parts kit) for the
AR-15 so you have some spare parts for
your build in my opinion, like the one
pictured here.
So basically, you’ll complete your 80%
lower receiver with the milling and
drilling… install the lower parts kit and
other parts into it… then put the upper
receiver which is already complete onto it
and you’re ready to go!
Now, once you have all those parts, what do you do?
Page 21
The Underground AR-9 Manual
© 2021 and beyond Page 21
HOW TO FINISH YOUR 80% LOWER AND BUILD YOUR GUN
Now, there are a lot of ways to finish your lower. If you have access to CNC machines
and you have experience there then that might be a way to go.
But for the DIY patriot like us – we can complete this rifle in our garage with little more
than a drill, a router, some other simple tools, and some good old red-blooded American
Elbow Grease!
What’s more: because you can buy a jig to help you out – you don’t have to be a whiz
with measuring for where to drill. It’s mostly done for you and pretty easy to use.
If you’re into measuring/blueprints and the like – then feel free to search online for some
blueprints and measurements and if you trust your skills enough you could make this
work without a jig. For most of us though—I say use the jig!
In fact, depending on where you buy your Jig – it will probably come with an instruction
guide and show you how to use it.
In the meantime, I will show you the basic process for finishing your 80% lower and
making it into the base of your new AR-9!
Page 22
The Underground AR-9 Manual
© 2021 and beyond Page 22
*** The Written Instructions Below Are Only Meant to Give a BRIEF Outline Of The Entire Process of
Completing Your Lower -- PLEASE Watch The Videos Included With This Course for STEP-BY-STEP, More Detailed Instructions! ***
Page 23
The Underground AR-9 Manual
© 2021 and beyond Page 23
Step 1: Mount Jig on Receiver
First, you of course need your AR-9 80% lower:
This guide uses the 80% Arms Easy-Jig Gen 2. This jig can help you finish an AR-15,
AR-308 and also the AR-9. The important thing for our purposes is that the AR-9 is
finished by using the AR-15 features of the jig. This means you want “AR-15 LEFT” on
the left side facing out, and “AR-15 RIGHT” on the right side facing out when you
assemble the jig onto the lower.
Page 24
The Underground AR-9 Manual
© 2021 and beyond Page 24
You also want the red buffer tube screw support – with the arrows and the red part that
sticks out and screws into the lower – facing towards the lower receiver and the front of
the jig. You’ll want to wait until you insert the long, threaded bolt through the side plates
before tightening the sides of the jig fully. This is apparently to account for the tolerances
in different lower manufacturers. Quick-release cotter pins go in the front and rear
takedown pin holes of the lower and the threaded bolt goes up top:
Page 25
The Underground AR-9 Manual
© 2021 and beyond Page 25
Step 1A: General Hints, Tips And Tricks For Drilling/Milling 80%
Receivers.
I’ve completed multiple “Ghost guns” by milling and drilling 80% receivers and these are
some of my best tips that will help you going forward…
1. Let the drill bit “center” itself. Even when using the jig with something like a drill
press, you want to lower the drill bit to the receiver inside the jig hole and let the bit
“center” itself, before you make your final tightness adjustments to your clamps and grip
the jig. This will help make sure there’s no sideways pressure on the drill bit or you’re
less likely to cut into the walls of your jig.
2. Always “peck drill” the holes. This means you drill downward a bit until it starts
cutting the aluminum, then raise the bit back out a little bit so that the aluminum shavings
can be pulled out of the hole. It takes more time, but if you don’t do this, you’re just
redrilling the shavings, dulling your bit, and making it more likely you’ll disturb the
alignment of your drilling.
3. Lubrication is your friend! Don’t be afraid to use a lot of oil while drilling, this will
keep the drill bit cool and overall help things out. Spray WD-40 is the easiest and what I
used here. Yes, it will make a mess but it’s worth it.
4. Take your time! Every mistake I’ve ever made building my own guns is when I was
“rushing” or in a hurry to get a hole drilled or whatever. If you are impatient like me, take
your time, and take breaks so you can focus.
5. Drill one side at a time. Whenever you have to drill holes on both sides of a receiver,
never try to drill all the way through both sides. Drill one side, then flip and drill the other
side.
6. Take breaks to clean – I’m trying to get better at this because I’m a ready aim fire
type of person – but taking breaks to vacuum up the shavings as you drill and mill is a
good way to keep you focused on not making mistakes and keeps the work area less
messy and makes the process easier for milling for example.
OK, those are some good tips, now let’s continue.
Page 26
The Underground AR-9 Manual
© 2021 and beyond Page 26
Step 2: Drill Pilot Hole For Milling
You’ll now insert the Drill Block jig piece into the main part of the jig with the small
round pilot hole facing the buffer extension and the oval trigger slot facing the front of
the jig. They also include a bubble level to make sure your jig is level before you start
drilling.
NOTE: If you are using a lower receiver with a pre-installed trigger guard – like I am
using – then you have to be extra careful NOT to drill all the way through the lower
receiver AND the trigger guard. Make sure you stop often to check when you drill
through the lower receiver so you don’t go too far.
Page 27
The Underground AR-9 Manual
© 2021 and beyond Page 27
Once the Drill Block is installed, then go ahead and drill through the lower receiver:
Page 28
The Underground AR-9 Manual
© 2021 and beyond Page 28
Page 29
The Underground AR-9 Manual
© 2021 and beyond Page 29
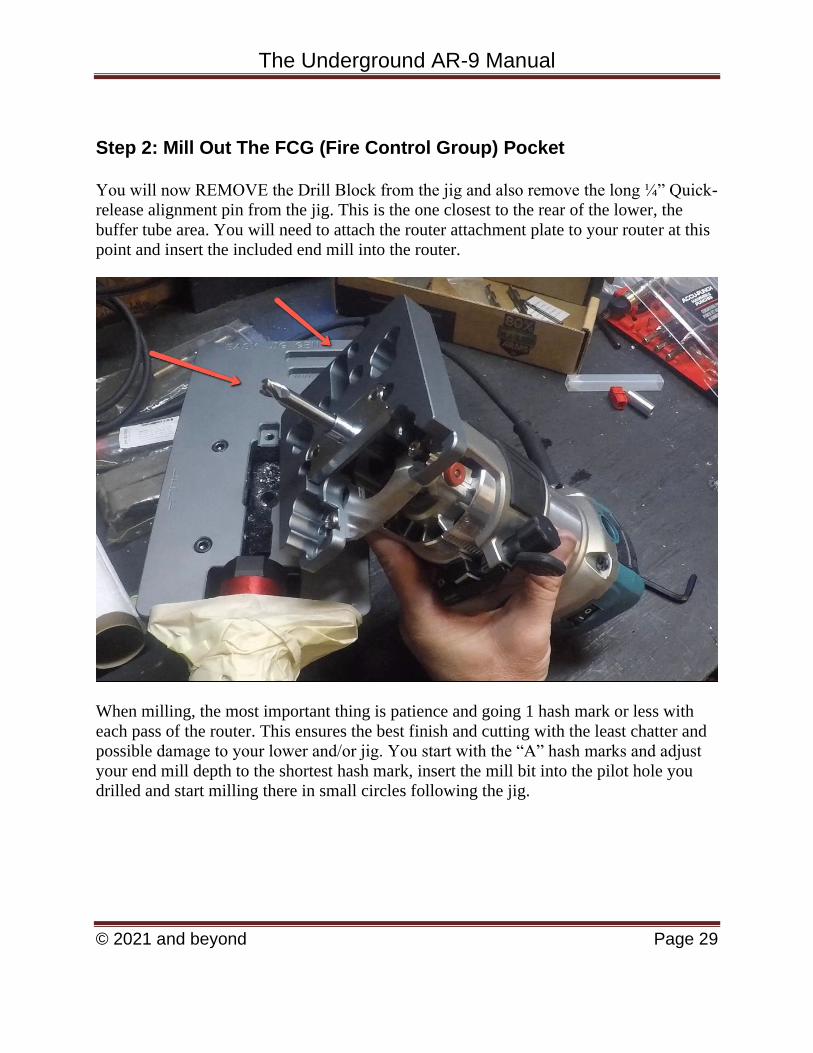
Step 2: Mill Out The FCG (Fire Control Group) Pocket
You will now REMOVE the Drill Block from the jig and also remove the long ¼” Quick-
release alignment pin from the jig. This is the one closest to the rear of the lower, the
buffer tube area. You will need to attach the router attachment plate to your router at this
point and insert the included end mill into the router.
When milling, the most important thing is patience and going 1 hash mark or less with
each pass of the router. This ensures the best finish and cutting with the least chatter and
possible damage to your lower and/or jig. You start with the “A” hash marks and adjust
your end mill depth to the shortest hash mark, insert the mill bit into the pilot hole you
drilled and start milling there in small circles following the jig.
Page 30
The Underground AR-9 Manual
© 2021 and beyond Page 30
Again, take your time, if you meet resistance don’t push through it or try and force the
router to mill faster than it wants to cut – you don’t want to break your mill bit. Mill in a
CLOCKWISE SMALL CIRCLE direction (do not do counter-clockwise circles).
Page 31
The Underground AR-9 Manual
© 2021 and beyond Page 31
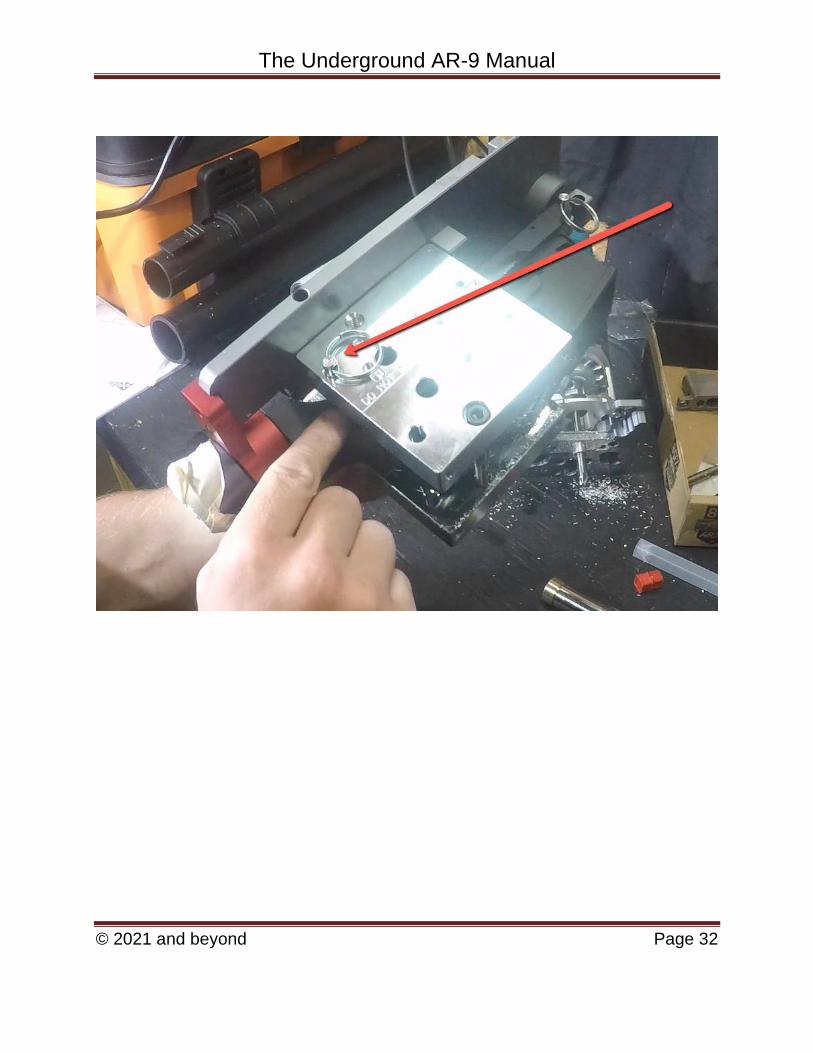
After you finish milling the “A” depth – before you move to “B” depth, you will want to
re-insert the long ¼” Quick-release pin into the back of the lower that will “guard” the
rear shelf area.
Page 32
The Underground AR-9 Manual
© 2021 and beyond Page 32
Page 33
The Underground AR-9 Manual
© 2021 and beyond Page 33
Now, you will move onto milling the “B” depths – again starting with the first hashmark
and working your way down further into the jig with each pass:
Page 34
The Underground AR-9 Manual
© 2021 and beyond Page 34
When you have finished all of the “B” depth milling – then you need
to STOP and not mill any further until you install the Trigger Slot
template into the jig! I made this mistake by moving onto the “C depth” before
installing the template. Do not mill the “C depth” until you install the trigger template!
This is the same template you inserted earlier to drill your pilot hole, but now we’ll use it
to mill the trigger.
Page 35
The Underground AR-9 Manual
© 2021 and beyond Page 35
When installed correctly, the Trigger Template will be flush to the top of the jig and the
oval shape will be facing the rear of the lower closest to the buffer tube. Using the Jig,
adjust the end mill to the first hashmark of “C depth”:
Page 36
The Underground AR-9 Manual
© 2021 and beyond Page 36
Use lube in the hole and put the router flush down against the trigger template, rock the
routers side to side to make sure the end mill is actually down in the pilot hole correctly
(it should not actually rock side to side). Press down firmly and mill the trigger slot
slowly. Mill in a small circular clockwise motion. When you have finished milling the
trigger slot with the C Depth then you are done with the milling! Take out the trigger
template for the next step of drilling.
Page 37
The Underground AR-9 Manual
© 2021 and beyond Page 37
Page 38
The Underground AR-9 Manual
© 2021 and beyond Page 38
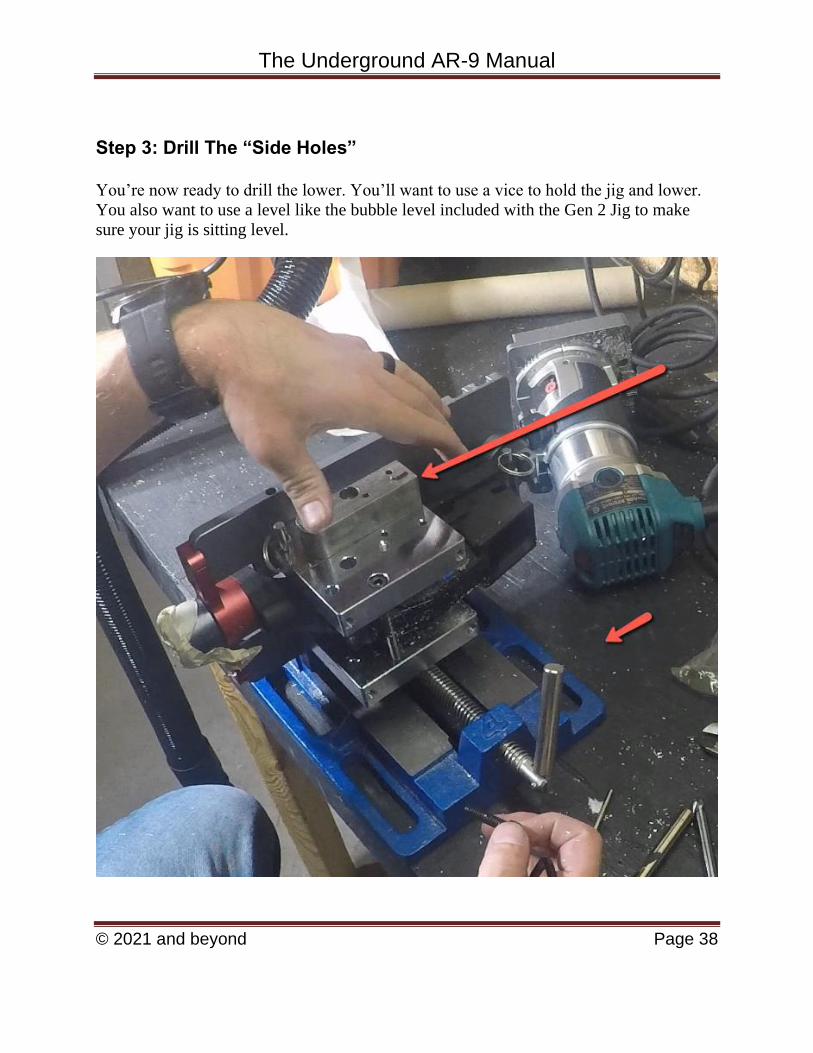
Step 3: Drill The “Side Holes”
You’re now ready to drill the lower. You’ll want to use a vice to hold the jig and lower.
You also want to use a level like the bubble level included with the Gen 2 Jig to make
sure your jig is sitting level.
Page 39
The Underground AR-9 Manual
© 2021 and beyond Page 39
You can use a drill press or the Gen 2 Jig comes with “hand drill stabilizers” that are
really neat so you can use a hand drill like I did here. If using the optional hand drill
stabilizer, place the stabilizer onto the side plate with the two alignment tabs inserted into
the corresponding slots on the side plate. Insert the 3/8” drill bit into the stabilizer’s 3/8”
hole and push it all the way through so the drill bit is through the stabilizer’s and the side
plate’s 3/8” holes. Do the same with the 5/32” bit using the 5/32” hole furthest away from
the 3/8” hole. With the bits through the stabilizer and side plate holes, insert the
stabilizer’s 1” bolt through the stabilizer and tighten the bolt. Remove the bits. This
process ensures that the stabilizer’s guide holes are optimally aligned with the side plate
holes.
Page 40
The Underground AR-9 Manual
© 2021 and beyond Page 40
You then can start drilling. Whenever you drill, make sure you insert the drill bit all the
way through the jig until it touches the surface of the lower before you turn the drill on.
You drill the two 5/32” holes, then drill the bigger 3/8” hole. Make sure you drill ONLY
one side of the lower at a time – you should be able to “Feel” when you punch through
the lower. Stop and check often to make sure.
Page 41
The Underground AR-9 Manual
© 2021 and beyond Page 41
After you have drilled all the holes on both sides of the lower, congratulations!
Page 42
The Underground AR-9 Manual
© 2021 and beyond Page 42
You’ve now created a real “firearm” according to the Feds. You have a stripped receiver
at this point.
Now, it’s time to assemble it…
Page 43
The Underground AR-9 Manual
© 2021 and beyond Page 43
Step 4: Assemble The Lower Receiver
Now, we will assemble the AR-9 lower with the included AR-9 specific lower parts and a
standard AR-15 Lower Parts Kit. The AR-9 lower receiver from 80% Arms came with
these specific parts – which are mainly the ejector and parts for the magazine release
area.
First install the ejector that looks like a shark fin as shown in the picture…
Page 44
The Underground AR-9 Manual
© 2021 and beyond Page 44
Using the two small set screws to secure the ejector:
The spring goes in the magazine release hole on the right side of the lower, and the
magazine release button goes over it:
Page 45
The Underground AR-9 Manual
© 2021 and beyond Page 45
The top of the magazine release button has a hole in it, that the long screw pin is going to
go into to secure the magazine release button to the lower through the top of the lower
hole:
Page 46
The Underground AR-9 Manual
© 2021 and beyond Page 46
Insert it and tighten with hex key.
Page 47
The Underground AR-9 Manual
© 2021 and beyond Page 47
Next, install the bolt hold open piece with the included threaded screw.
Page 48
The Underground AR-9 Manual
© 2021 and beyond Page 48
Use the hex key to screw it in
Page 49
The Underground AR-9 Manual
© 2021 and beyond Page 49
Install the front takedown pin as you would a normal AR-15 receiver – I used a Real
Avid AR-15 fixture here to help, or you can do like I normally do and send springs and
detents flying 20x until you get it installed:
Page 50
The Underground AR-9 Manual
© 2021 and beyond Page 50
Before installing the trigger. Check all your holes that you drilled to make sure you’re
your trigger pins fit easily, use a file or reamer to clean up or widen the holes as needed.
Install the trigger next:
Page 51
The Underground AR-9 Manual
© 2021 and beyond Page 51
Then install the hammer next…
Page 52
The Underground AR-9 Manual
© 2021 and beyond Page 52
Install the safety and you can check to make sure that it works, making sure not to let the
hammer drop on the lower, use your finger in the way to protect the lower, but function
check the safety works to stop the hammer when on safe and drops the hammer when on
fire:
Page 53
The Underground AR-9 Manual
© 2021 and beyond Page 53
Now you can install the safety detent, safety spring and grip all together:
Page 54
The Underground AR-9 Manual
© 2021 and beyond Page 54
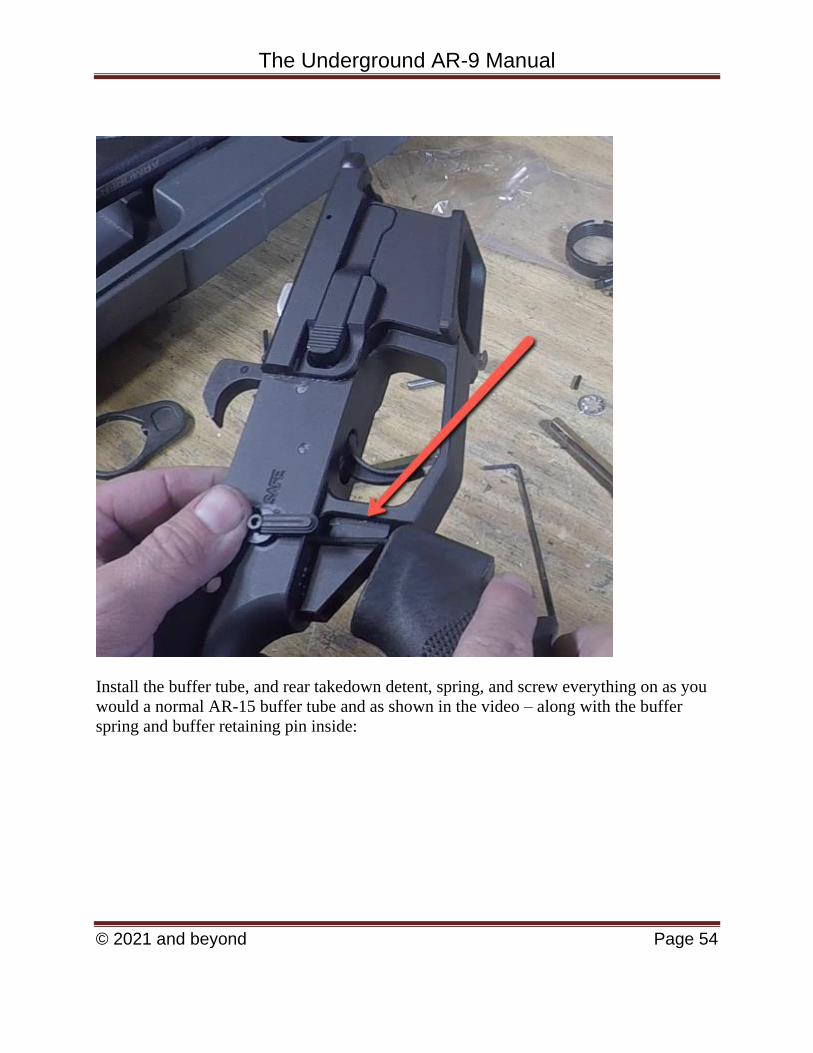
Install the buffer tube, and rear takedown detent, spring, and screw everything on as you
would a normal AR-15 buffer tube and as shown in the video – along with the buffer
spring and buffer retaining pin inside:
Page 55
The Underground AR-9 Manual
© 2021 and beyond Page 55
Then install your buffer and spring inside the buffer tube:
Page 56
The Underground AR-9 Manual
© 2021 and beyond Page 56
The lower receiver is now finished.
Page 57
The Underground AR-9 Manual
© 2021 and beyond Page 57
Step 5: Attach The Upper Receiver
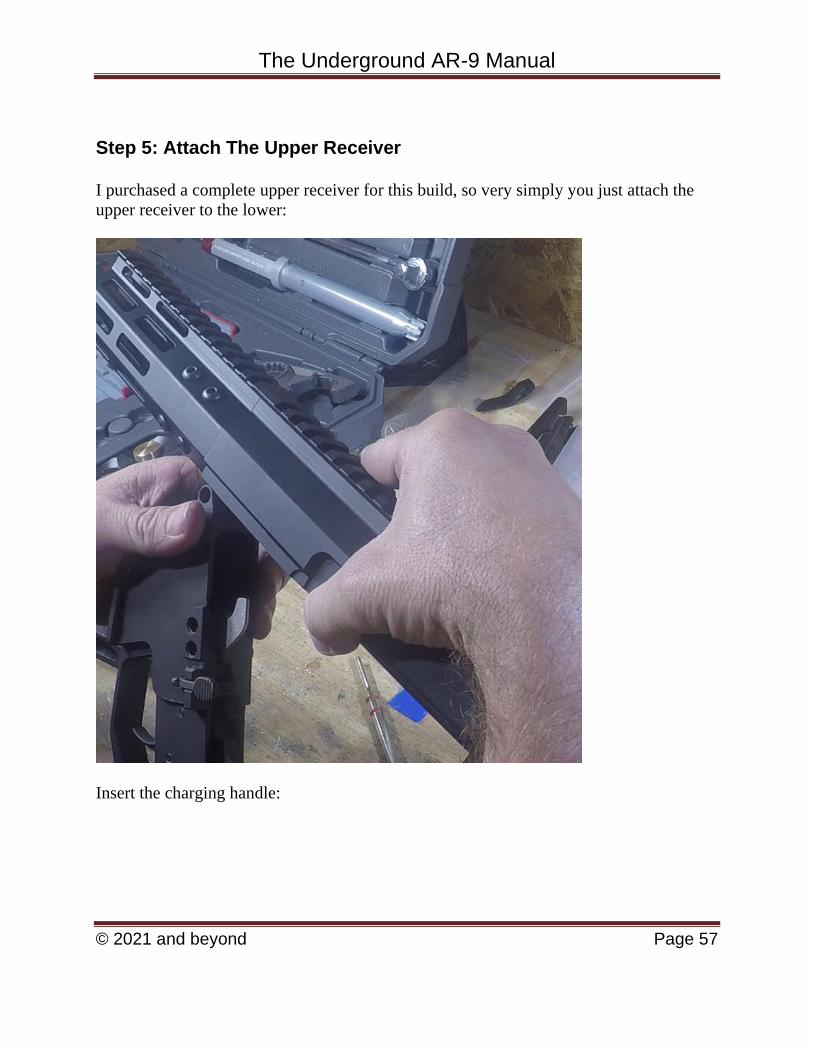
I purchased a complete upper receiver for this build, so very simply you just attach the
upper receiver to the lower:
Insert the charging handle:
Page 58
The Underground AR-9 Manual
© 2021 and beyond Page 58
And insert the bolt, then close the upper to the lower and you’re done!
Congrats! Your AR-9 is complete!
Page 59
The Underground AR-9 Manual
© 2021 and beyond Page 59
Page 60
The Underground AR-9 Manual
© 2021 and beyond Page 60
SHOULD YOU SERIALIZE YOUR LOWER?
Now, the main benefit to building your own gun from scratch is that there is no serial
number… there is no record of it “on the books” … and nobody but you will know that
you have it.
The fact that there are no markings or serial numbers on your weapon could also be a
drawback as well …
Consider these two possible reasons why you might want to serialize your lower:
1. You are using your firearm at the range, or hunting with it and you encounter law
enforcement. They become suspicious that you have no serial numbers on your
weapon and they assume that you filed off the serial numbers like a criminal
would to make your weapon untraceable!
This is a serious offense and you could get in a lot of trouble. Many people would
rather serialize their weapons themselves to avoid such a
conversation/explanation.
2. Your firearm is stolen, and you want to report it to the police – you will want to
report the serial numbers, make and “manufacturer” along with any other
distinguishing marks so they know it is yours – that you reported stolen – if it ends
up somewhere it’s not supposed to be.
3. In the last few years, some states, such as California, have been trying to pass laws
requiring that any homemade guns have a serial number created. Check your local
laws, this may apply to you.
For these reasons (and probably some more that you could think of) it might be a good
idea to mark your lower receiver.
This can also be a great way to add your own unique and personal artistic “touch” to the
rifle. Some builders on the internet have taken to making beautiful custom designs on
their rifles – which you can do as well.
This could be especially cool if you intend to make the rifle that you built from scratch a
family heirloom to pass onto your children—what a story that would be for them!
Page 61
The Underground AR-9 Manual
© 2021 and beyond Page 61
What Should You Engrave On Your Lower?
It is up to you, but here seem to be some popular choices:
Manufacture (this could be your name)
City State (if you feel like it)
Model (AR-9 or whatever you wanna call your gun)
Caliber (9mm or “multi”)
Serial # (most people online recommend something like your initials and a
number—example: CL—0001.)
NOTE: most sources suggest a max of 10-12 letters/numbers per line.
Another cool idea I saw, was a guy put a quote from the second amendment on his
lower—very patriotic!
How Can You Do It?
First, there are some people that you can send your 80% lower to and have them do it for
you for a small fee. For example, 80 Percent Arms apparently offers this service
https://www.80percentarms.com/80-lower-engraving/
Alternatively, if you know anyone in the laser etching industry—they might be able to
help you out too.
Then of course, there is the DIY method we all love ☺
Your own serial numbers can be made with a sharp etching tool such as small chisels and
other methods. Depending on your skill level, you can do it this way.
The other method is to etch your markings using electrical etching. This is a method that
a lot of DIY knife makers like to rely on (as well as DIY 80% gun builders) to add
designs and etching to their weapons and you can do it that way too.
What Should You Coat Your Lower With?
The last step, after you’ve made any markings on your lower that you want is to coat it to
protect it from the elements and to make it look better.
Page 62
The Underground AR-9 Manual
© 2021 and beyond Page 62
A common option is to anodize your lower with home anodizing kits. You can choose a
variety of colors for this and because this is how most commercial lowers are finished—it
will work great.
Another cheap and easy option is to just spray paint the dang thing!
Any good tough coating/paint that will bond to aluminum would work in this case. Some
“purists” might cringe at the suggestion, but there are many people that finish their rifles
after building them with a “camouflage” colored paints – so it IS an option.
At this point it is up to you whether you want to serialize your receiver and how you want
to coat it.
Page 63
The Underground AR-9 Manual
© 2021 and beyond Page 63
ENJOY YOUR NEW GUN!
Congratulations Patriot!
You now have your own AR-9 that is completely “off the books” and just the way it
should be – PRIVATE ☺
I hope you enjoyed this guide and I sincerely pray that it helps you reclaim your privacy,
safeguard your freedom, and empowers your Second Amendment Rights!
Speaking of the Second Amendment …
A Suggestion …
You may not think it, but your voice counts!
If you care at all about your rights, your freedoms, and fighting the anti-gun criminals in
Washington – then you need to step up and join the fight …
I would encourage you to join the NRA – the National Rifle Association if you haven’t
already. They’re not perfect but they’re one of the biggest pro-gun lobbyists in
Washington. More information can be found at: home.nra.org/.
In recent years though, the NRA has been less than ideal – they basically sold us out by
supporting a Bump Stock ban with Trump and I don’t think you can really trust them
anymore…
That’s why I would also HIGHLY encourage you to join the Gun Owners of America
(GOA) at gunowners.org/. They are an excellent organization. The highest praise I can
give them is from a Patriot I truly respect: “The only no-compromise gun lobby in
Washington” – Ron Paul.
I also recommend Firearms Policy Coalition – FPC found at FirearmsPolicy.org and
The Second Amendment Foundation (SAF) found at SAF.org. Both these
organizations are VERY active in suing and taking to court various local, state and
Federal governments over their violations of our second amendment rights.
Page 64
The Underground AR-9 Manual
© 2021 and beyond Page 64
In addition, I encourage you to join whatever LOCAL groups there may be available to
you – to get involved at the LOCAL level – as much headway can be made here for gun
rights and your voice is sure to be heard.
Myself, I’m a member of the Virginia Citizens Defense League (VCDL) at VCDL.org.
They are a grassroots organization. I believe this same organization model is in many
other states and I would encourage you to find the one nearest you and to join it (just
Google “INSERT YOUR STATE + citizens defense league”).
Once you join these organizations – make sure you use your best email – and then they
will alert you when there is anti-gun legislation coming up for votes at the local or federal
level and you can respond with other Second Amendment supporters to encourage your
representatives to fight these freedom robbing laws!
It truly is up to us!
At no time in history (primarily because of the wonder of the internet!) has it been easier
to get information on what the Government is doing behind closed doors … to be notified
almost immediately when freedom-stealing legislation is going to pass … and … to fight
back so that the PEOPLE have a say in Washington!
If we all give up or think our voices won’t matter – then it is a self-fulfilling prophecy
and nothing will change.
But if we all let our voices be heard—then we can at best change the direction of the
Nation for our future, our children’s future and future generations …
… And at worst – we can delay the power-hungry politicians from taking away our
freedoms one small bite at a time.
If you consider yourself a Patriot, I encourage you to fight for the former!
All my best,
Caleb