18
CMS Made Simple The User’s Guide to Kirstyn Costa
CMS Made SimpleThe User’s Guide to
Kirstyn Costa

The User’s Guide toCMS Made Simple
Kirstyn Costa

ii
CMS Made Simple is a great tool. You can update your site’s content quickly and efficiently without having to wade through or understand all of that code and without all of the hassle of sending it off to your developer and waiting for her to upload it for you. And yet, for something with “simple” in its name, it can be a little less than simple at times.
We know you’re busy running a business - most of the time your website is probably the last thing on your mind. When it finally comes time to make an update to your site, don’t get stuck trying to remember how to use your CMS on your own - that’s what manuals are for. The User’s Guide to CMS Made Simple makes using your content management system easier than ever. Whether you need to add a new page, news article, or photo gallery, this guide walks you through the steps so you can get your site updated and get back to work.
Introduction

iii
Table of Contents
Chapter OneLearning the Basics 1
Chapter TwoManaging Your Content 7
Appendix 19
1 - Page View Quick Reference 22 - WYSIWYG Quick Reference 43 - Applying Styles 54 - Inserting a Link 6
1 - Adding a New Page 82 - Editing an Existing Page 93 - Uploading Images 104 - Uploading Documents 115 - Adding a News Article 126 - Adding a Calendar Event 137 - Creating an Image Gallery 148 - Creating a Poll 169 - Creating a Showtime Slideshow 18
Image Gallery Templates 20

iv

Chapter Two - Managing Content
7
Chapter TwoManaging Content
Adding a New Page
Editing an Existing Page
Uploading Images
Uploading Documents
Adding a News Article
Adding a Calendar Event
Creating an Image Gallery
Creating Poll
Creating a Showtime Slideshow
Content Management is the “CM” of “CMS.” And if it’s right in the name, then you know it’s important. This chapter will help you manage your content. From adding new pages, news articles, and calendar events, to uploading images and documents, this chapter is all about helping you manage your content.
1
2
3
4
5
6
7
8
9

8
The User’s Guide to CMS Made Simple
Adding a New Page
1. From the Content drop down menu, click Pages.
2. Click Add New Content.
3. In the Title field, type a title for the new page.
4. In the Menu Text field, type the menu text.
5. From the Parent drop down, choose a parent page to link to. Leave as None if it is a top level page.
6. Enter your content and format using the WYSIWYG editor.
7. In the Page Description field, type a description for the page.
8. Click the Preview tab to preview the new page, if desired.
9. Click Submit when finished editing the new page.
NOTE: The Menu Text is the text that appears in the navigation of your website. The Title is the text that appears at the top of the browser window.
Your website should grow as your business or following grows. Sometimes, you need to add new pages to keep up with it all. Luckily, with your Content Management System, adding a new page is a breeze. Follow these instructions and you’ll have your new page up and running in no time.
NOTE: The Page Description is for search engine optimization. The text entered in this field appears under the page title when it shows up as a result in a search engine. Your page description should be descriptive and full of key words that accurately describe what your page is presenting.
1

Chapter Two - Managing Content
9
Editing an Existing Page
1. From the Content drop down menu, click Pages.
2. Click the name of the page to be edited.
3. Edit the content using the WYSIWYG editor.
4. Click the Preview tab to preview the changes, if desired.
5. Click Submit when finished editing the page.
You can do your best to make sure your pages are perfect when you upload them the first time, but sometimes they need to be edited. Whether you notice a typo, have some outdated information to update, or just get tired of looking at the same content, knowing how to edit a page is essential, but simple. These steps show you how to edit your pages to make sure they’re as perfect as they can be.
2

10
The User’s Guide to CMS Made Simple
Uploading Images
1. From the Content drop down menu, click Image Manager.
2. Choose a folder to upload the image to by clicking on the name of the folder or the folder’s thumbnail.
3. Once within the desired folder, click Choose File to browse your hard drive for an image.
4. Select the desired image. Click Open. The file name appears next to the Choose File button.
5. Click Send to upload the image. A thumbnail of the image appears in the image manager.
NOTE: To create a new folder, type the name of the new folder in the Create New Folder text field and click Create.
Many of the images around your site have already been uploaded for you, but if you have some new pictures to include in your content, uploading them is simple and easy.
NOTE: The Gallery folder is reserved for use in creating image galleries in the Gallery module. Read more on this in section 8 of this chapter.
3

Chapter Two - Managing Content
11
Uploading DocumentsUploading documents, like a PDF of a menu or contract, or even images, is simple and easy using the File Manager. Follow these steps to upload any documents you want to put on your site.
1. From the Content drop down menu, click File Manager.
2. Choose a folder to upload the document to by clicking on the name of the folder.
3. Once within the desired folder, click the Upload files tab.
4. Click Choose File to browse your hard drive for a document.
5. Select the desired file. Click Choose. The file name appears next to the Choose File button.
6. Repeat steps 4-5 if you have multiple documents to upload.
7. Click OK to upload the file(s).
NOTE: To create a new folder, type the name of the new folder in the Create new directory text field and click OK.
4
12
The User’s Guide to CMS Made Simple
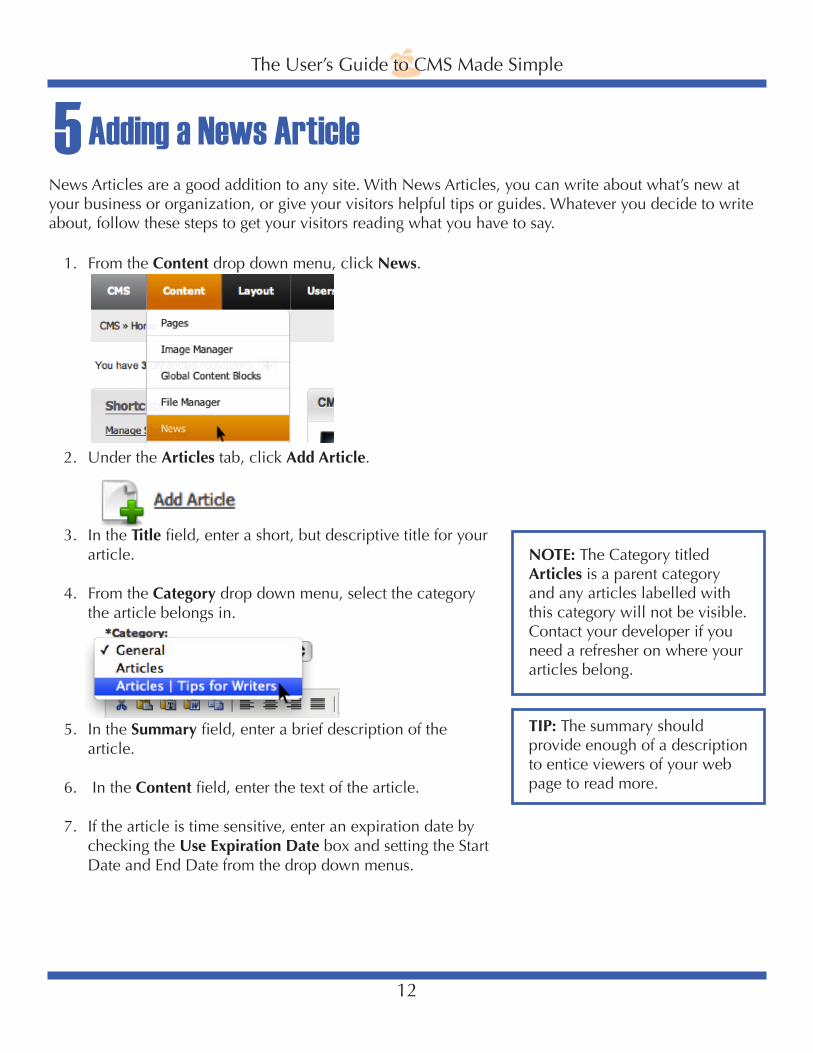
Adding a News Article
1. From the Content drop down menu, click News.
2. Under the Articles tab, click Add Article.
3. In the Title field, enter a short, but descriptive title for your article.
4. From the Category drop down menu, select the category the article belongs in.
5. In the Summary field, enter a brief description of the article.
6. In the Content field, enter the text of the article.
7. If the article is time sensitive, enter an expiration date by checking the Use Expiration Date box and setting the Start Date and End Date from the drop down menus.
NOTE: The Category titled Articles is a parent category and any articles labelled with this category will not be visible. Contact your developer if you need a refresher on where your articles belong.
TIP: The summary should provide enough of a description to entice viewers of your web page to read more.
News Articles are a good addition to any site. With News Articles, you can write about what’s new at your business or organization, or give your visitors helpful tips or guides. Whatever you decide to write about, follow these steps to get your visitors reading what you have to say.
5

Chapter Two - Managing Content
13
Adding a Calendar Event
1. From the Content drop down menu, click Calguys Calendar.
2. Under the Events tab, click Add Event.
3. Use the drop down menus to choose a start and end date.
4. If the event is not recurring, select No from the Recurs drop down menu. If the event does recur, choose from the options in the drop down menu and update the Recurring Event Details.
5. In the Title field, enter a descriptive title for the event.
6. In the Summary field, enter a brief summary of the event, if desired. Feel free to leave this blank.
7. In the Details field, enter the details of the event. These may include specifics about the event, such as location. Format using the WYSIWYG editor, if desired.
8. Select a category by clicking its corresponding check box, if desired.
9. Click Add.
Calendar events can be used for anything from organizing meetings to informing customers of a sale. If you don’t have a calendar, but think your site would improve if you did, contact your developer to have one set up. If you already have a calendar on your site, follow these simple steps to add a new event.
Check this box if the event takes place all day, or if you don’t wish to specify a time.
Check this box if the event lasts multiple days. The end date
information is hidden if the box remains
unchecked.
6

14
The User’s Guide to CMS Made Simple
Creating an Image GalleryWhether you’re showcasing items for your online store or presenting images of pleased customers, an image gallery can really help people understand what you do. But first, you have to make sure you know how to use one. Follow these steps to add an image gallery (or two) to your page.
1. Upload any images to be used to the Gallery folder using the image manager (see section 2 - Uploading Images).
2. From the Content drop down menu, click Gallery.
3. In the Galleries tab, click Gallery/. 4. In the Gallery Title field, enter a title for the gallery. 5. In the Comment field, type a brief description or introduction. 6. Use the Template drop down menu to choose a template for
displaying the gallery. 7. Enter names and comments for each image, if desired. 8. Go to the Edit Content view of the page where the gallery is to be
included (see section 2 of this chapter for more on editing pages). 9. In the WYSIWYG editor, include this text: {Gallery}
10. Click Submit.
7
Note: There are a number of pre-made templates to choose from - which template you use is a matter of preference and what looks best on your site. See the Appendix for gallery template examples.

Chapter Two - Managing Content
15
Note: You can also copy and paste the text from under the Tag to display this subgallery column in the Gallery module main page.
To include multiple galleries on your site, follow these steps:
1. In the Gallery module main page, click Add Subgallery. 2. In the New directory name field, type a directory name. 3. Follow previous steps 4-6. 4. Click the Hide link to parent gallery check-box if the gallery
should remain separate from the main gallery. 5. Click Save. 6. Click the check mark next to the new gallery’s name under active
if the gallery should remain separate from the main gallery. 7. Click the gallery’s directory name then click Add images to upload
images to the new gallery. Click Save when finished. 8. Go to the Edit Content view of the page where the gallery is to be
included. 9. In the WYSIWYG editor, include this text: {Gallery
dir=’DirectoryName’}. Be sure to replace “Directory Name” with the directory name of the new gallery.
10. Click Submit.

16
The User’s Guide to CMS Made Simple
Creating a PollPolls are great for asking for your visitors’ opinions when normally you wouldn’t be able to. You can make a poll asking when you should hold an event, which new item should be added to a menu, or whether they like a new article you’ve posted. Polls Made Simple is a module that has to be added by your developer, and not all sites have it. If you think your site could benefit from polls, ask your developer to add them for you.
1. From the Extensions drop down menu, choose Polls Made Simple.
2. Click Add Poll.
3. In the Poll name field, type the question to be asked. In the Poll ID field, type a brief identifier, like “poll1”.
4. Click Add poll and options. 5. Click Add option. 6. In the Option name field, type an answer to the question.
Click Add. Repeat for all answers. 7. In the Edit Poll view, click the pencil and paper graphic
to edit an option; click the trash can graphic to delete an option.
NOTE: The labels for editing and deleting options are reversed. The graphics are correct; rely on those to edit or delete options.
8

Chapter Two - Managing Content
17
To add the poll to an existing page:
1. Go to the Edit Content view of the page where the poll is to be included (see section 2 of this chapter for more on editing pages).
2. In the WYSIWYG editor, include this text: {Polls poll_
id=”PollID”}. Be sure to replace PollID with the Poll ID previously entered.
3. From the Options tab, in the Page Specific Metadata field,
enter this text: {AjaxMadeSimple}. Do not change anything else on this page.
4. Click Submit.
Managing your Poll:
After your poll as been up for some time, return to the Polls Made Simple module and click the name of your poll to see your response data. The number of votes and a corresponding percentage are given for each option.
Erase your votes by clicking Reset Poll. Click OK when prompted.

18
The User’s Guide to CMS Made Simple
Creating a Showtime SlideshowShowtime Slideshow gives you an easy-to-customize alternative to a simple image gallery. You can add images and text to create a visually appealing way to show off your photos, products, or anything you want.
1. From the Content drop down menu, choose Showtime Slideshow.
2. Click Add show.
3. In the Name field, type a name for the show. Click Save.
4. Click Add pictures.
5. Click Upload Images to upload images from your hard drive, or choose from images already uploaded to your server. Click Save.
6. Enter a name and comment for each image. Click Save.
7. Click Edit Show Settings.
8. Under Animation Type, click the radio button next to jQuery.
9. Change any other settings to suit your preferences. Click Apply to view the changes before saving, if desired. Click Save.
10. Copy the text under Tag to display this Show.
11. Go to the Edit Content view of the page where the show is to be included (see section 2 of this chapter for more on editing pages).
12. Paste the text into the WYSIWYG editor. Click Save.
NOTE: The jQuery animation type is much more user friendly. You may still choose to use the swfobject (Flash) animation type, but it is not recommended - users on such devices as iPads or iPhones will not be able to view your slideshow.
9


![WELCOME [] › cms › lib › WA01919490...WELCOME! Welcome, Wildcats! Just like any new tool, your school comes with a user’s guide. This guide provides information on the design](https://static.documents.pub/doc/80x56/5f10caca7e708231d44ad6a1/welcome-a-cms-a-lib-a-wa01919490-welcome-welcome-wildcats-just-like.jpg)


