OurStory: Life on the Water The Water Nearby Read the Directions sheets for step-by-step instructions. SUMMARY In this activity, you and your child will use Google Maps to first find your school, and then find and learn about the closest body of water to your school. WHY Working with maps helps children to build visual literacy and begin to develop awareness of geography. By finding a local body of water, children can begin applying their knowledge of maritime history to their own lives. TIME ■ 20–30 minutes RECOMMENDED AGE GROUP This activity will work best for children in kindergarten through 4th grade. CHALLENGE WORDS ■ canal: a human-made waterway dug across land ■ chart: an outline map that shows geographic information, like water depth, and is especially useful to seafarers ■ lighthouse: a structure, often a tower on land or in the water, with a powerful light that gives a signal to guide seafarers ■ map: a representation of an area, usually drawn or printed on a flat surface ■ maritime: of, relating to, or bordering a body of water ■ seafarer: a person who operates or assists in operating a ship GET READY Read Keep the Lights Burning, Abbie together. Keep the Lights Burning, Abbie is a work of historical fiction about a teenager who saves the day by running her father’s lighthouse during a storm. For tips on reading this book together, check out the Guided Reading Activity (http://americanhistory.si.edu/ourstory/pdf/water/w ater_reading.pdf). YOU NEED ■ Directions sheets (attached) ■ Background sheet (attached) ■ One computer or more with Internet More information at http://americanhistory.si.edu/ourstory/activities/water/ Parent Guide
Transcript
OurStory: Life on the Water
The Water Nearby
Read the Directions sheets for step-by-step instructions.SUMMARY In this activity, you and your child will use Google Maps to first find your school, and then find and learn about the closest body of water to your school.
WHY
Working with maps helps children to build visual literacy and begin to develop awareness of geography. By finding a local body of water, children can begin applying their knowledge of maritime history to their own lives.
TIME ■ 20–30 minutes
RECOMMENDED AGE GROUP This activity will work best for children in kindergarten through 4th grade.
CHALLENGE WORDS■ canal: a human-made waterway dug across land■ chart: an outline map that shows geographic information, like water depth, and is
especially useful to seafarers■ lighthouse: a structure, often a tower on land or in the water, with a powerful light
that gives a signal to guide seafarers■ map: a representation of an area, usually drawn or printed on a flat surface■ maritime: of, relating to, or bordering a body of water■ seafarer: a person who operates or assists in operating a ship
GET READY
Read Keep the Lights Burning, Abbie together. Keep the Lights Burning, Abbie is a work of historical fiction about a teenager who saves the day by running her father’s lighthouse during a storm. For tips on reading this book together, check out the Guided Reading Activity (http://americanhistory.si.edu/ourstory/pdf/water/water_reading.pdf).
YOU NEED ■ Directions sheets (attached) ■ Background sheet (attached)■ One computer or more with Internet
More information at http://americanhistory.si.edu/ourstory/activities/water/
Parent Guide
OurStory: Life on the Water
The Water Nearby
or hundreds of years, seacoasts, rivers, lakes, and canals have had a big impact on the ways America
has changed as a country. Even Americans who have never seen an ocean are still very connected to water. Eating fish for dinner, playing at the beach, ordering goods made overseas, and other maritime activities continue to play an important role in our lives.
Life and work on the water—for seafarers, fishers, passengers, and many others—have included many big challenges and successes, and even some disasters. On shore, many other jobs are connected to maritime activities, like moving cargo carried by boats, making fishing nets, and running lighthouses.
In fog or deep night, a lighthouse’s beam warns ships away from dangers such as shorelines, shallow waters, and underwater rocks. Because the exact locations of lighthouses are marked
on charts, the lights help seafarers figure out where they are. In the past, lighthouse keepers lived in lighthouses to make sure the lights were shining every night. Today, many lighthouses are run by computers.
For more information, visit the On the Water online exhibition at http://americanhistory.si.edu/onthewater.
What body of water is closest to you?
Use Google Earth and Google Maps to get a birds-eye view and find out!
FFor more information, visit the National Museum of American History Web site http://americanhistory.si.edu/ourstory/activities/water/.
Background Information
Image of Bolivar Point Lighthouse in Texas.
Unknown date
Image of Matinicus Rock Lighthouse in Maine.
Unknown date
OurStory: Life on the Water
The Water Nearby
For adults and kids to follow together.
1. Download Google Earth from http://earth.google.com/download-earth.html.
Be sure to remember where you saved the application!
For technical help with Google Earth, visit (http://earth.google.com/support/).
2. From the saved location on your computer, open Google Earth.
3. Type your school’s address into the “Fly To” bar on the right-hand side of your Google Earth screen.
If you don’t know the address of your school, look it up online. Enter the name of your school, the name of your town, and the state into a Google search.
Directions, page 1 of 4
Tip
Tip
Tip
Using “Fly To” in Google Earth
OurStory: Life on the Water
The Water Nearby
4. How can you tell the water from the land? Using the zoom slider on the left-hand side of your Google Earth screen (with a plus on top and a minus on the bottom), zoom out until you see a dark blue or black area indicating water.
Especially with younger children, you may want to switch to the Google Maps view, which has display options that make land and water more easily distinguishable. To do this, go to the File menu and select View in Google Maps. Within Google Maps, switch between the “Map,” “Satellite,” and “Terrain” options to see which one is most helpful.
On many maps, blue is used to show the location of water and green is used to show the location of land.
5. (optional) Print or send an image of what you found in Google Earth. If you print out the map, color the water blue and the land green. Are there any other things you want to mark on your map?
The print and e-mail functions are under the File menu.
Directions, page 2 of 4
Tip
Tip
Using the Map, Satellite, and Terrain options in Google Maps
Tip
OurStory: Life on the Water
The Water Nearby
6. In Google Earth, measure from your school to the water. First , go to the Tools menu and select Ruler. A small window, labeled “Ruler,” should appear. Using your cursor, click on your school, which should make a small dot appear on your school’s location. Finally, click on the closest body of water. In the small grey “ruler” window, the “length” tells you how far away the water is from your school.
7. In Google Earth or Google Maps, use the map to see if the water is connected to any other body of water. Where does it start or end?
In either Google Earth or Google Maps, simply click on the map and drag your mouse to change the view.
If you wanted to take a trip on the water by boat or ship, you would need to look up the chart for that body of water. Charts are maps that include information about water depth. Charts help seafarers find safe routes and avoid shallow water. The government’s charts are online at http://www.nauticalcharts.noaa.gov/mcd/OnLineViewer.html.
8. Switch to Google Maps to see the name of the body of water. Within Google Maps, switch between the “Map,” “Satellite,” and “Terrain” options to see which one is most helpful.
Directions, page 3 of 4
Tip
Tip
Using the Ruler Tool in Google Earth
OurStory: Life on the Water
The Water Nearby
9. In another Internet browser window, search for information about the body of water you have found. Can you learn more about its history?
■ If it’s a large body of water, are there any businesses that rely on that water for success? How do the businesses di�er in their use of the water? Does the body of water have any bridges or docks?
■ If it’s a small body of water, take a look in the satellite view in Google Earth. Are there any structures at all near the water? Why would people choose to live or build something near the water? How might those people use the water?
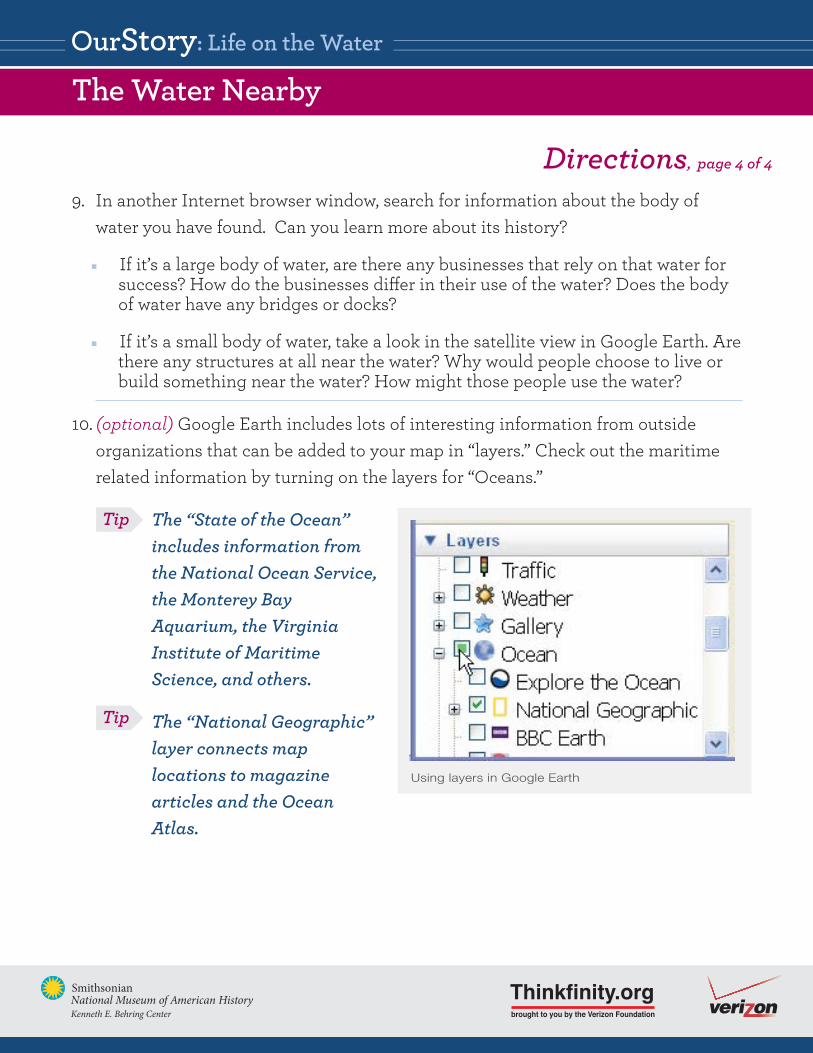
10. (optional) Google Earth includes lots of interesting information from outside organizations that can be added to your map in “layers.” Check out the maritime related information by turning on the layers for “Oceans.”
The “State of the Ocean” includes information from the National Ocean Service, the Monterey Bay Aquarium, the Virginia Institute of Maritime Science, and others.
The “National Geographic” layer connects map locations to magazine articles and the Ocean Atlas.
Directions, page 4 of 4
Tip
Using layers in Google Earth
Tip
OurStory: Life on the Water
The Water Nearby
Read the Directions sheets for step-by-step instructions.
SUMMARY Students will use Google Earth and Google Maps to find their schools. They will then find and learn about the closest body of water to the school.
RATIONALE
In this activity, students will use multiple maps to explore answers to several di�erent questions. Working with maps helps students to build visual literacy, begin to develop awareness of geography, and support the use of logical and spatial intelligences.
By finding a local body of water, students begin applying their knowledge of maritime history to their own lives. By applying knowledge, the information acquisition process becomes deeper, more meaningful, and, according to some educational theorists, longer-lasting.
OBJECTIVES
The students will be better able to: ■ Use maps.■ Identify and/or describe a nearby body of water.
TIME ■ 20–30 minutes
AGE GROUP: K–4
TARGET VOCABULARY:
■ canal: a human-made waterway dug across land■ chart: an outline map that shows geographic information, like water depth, and is
especially useful to seafarers■ lighthouse: a structure, often a tower on land or in the water, with a powerful light
that gives a signal to guide seafarers■ map: a representation of an area, usually drawn or printed on a flat surface■ maritime: of, relating to, or bordering a body of water■ seafarer: a person who operates or assists in operating a ship
Teacher Guide, page 1 of 3
More information at http://americanhistory.si.edu/ourstory/activities/water/
OurStory: Life on the Water
The Water Nearby
MATERIALS
■ Directions sheets (attached) ■ Background sheet (attached)■ One or more computer with Internet
PREPARATION
Read Keep the Lights Burning, Abbie together. Keep the Lights Burning, Abbie is a work of historical fiction about a teenager who saves the day by running her father’s lighthouse during a storm. For tips on reading this book together, check out the Guided Reading Activity (http://americanhistory.si.edu/ourstory/pdf/water/water_reading.pdf).
STUDENT PERFORMANCE CRITERIA ■ Use maps to . . . ■ Name a nearby body of water. ■ Identify buildings and other structures. ■ Identify geographic features.
STANDARDS
NCHS History StandardsK-4 Historical Thinking Standards
2H: Draw upon data in historical maps.
K-4 Historical Content Standards2A. The student understands the history of his or her local community.
8B. The student understands changes in transportation and their e�ects.
IRA/NCTE Language Arts Standards8. Students use a variety of technological and information resources (e.g., libraries,
databases, computer networks, video) to gather and synthesize information and to create and communicate knowledge.
Teacher Guide, page 2 of 3
OurStory: Life on the Water
The Water Nearby
21st-Century SkillsLearning and Innovation Skills
■ Critical Thinking and Problem Solving
Information, Media, and Technology Skills■ Media Literacy
■ ICT (Information, Communications, and Technology) Literacy
ISTE Education Technology Standards for Students (NETS.S)Research and Information Fluency
C. Evaluate and select information sources and digital tools based on the appropriateness to a specific task.
Technology Operations and ConceptsA. Understand and use technology systems.
B. Select and use applications e�ectively and productively.