56
A series of hands-on labs for the Internet of Things ThingLabs IoT Workshop @ThingLabsIO facebook.com/ThingLabsIO
| Date post: | 24-Jan-2017 |
| Category: |
Technology |
| Upload: | doug-seven |
| View: | 844 times |
| Download: | 0 times |

A series of hands-on labs for the Internet of Things
ThingLabs IoT Workshop
@ThingLabsIOfacebook.com/ThingLabsIO

OverviewPreparing your dev environmentMaker 101
Writing Digital OutputReading Analog InputInput Controls Output
Connected Things 101Sending Telemetry to the CloudHot Path Processing IoT DataVisualizing IoT Data
Agenda

Overview

Field
Gat
eway
s
Prot
ocol
Adap
ters
OSS
Proje
ct
Clou
d Ga
tewa
yEv
ent H
ub ->
IoT
Hub
Hot Path AnalyticsAzure Stream Analytics, Azure Storm
Cold / Batch Analytics & Visualizations
Azure HDInsight, AzureML, Power BI, Azure Data Factory
Hot Path Business LogicPaaS V2 & Actor Framework En
terp
rise
Proc
ess C
onne
ction
sBi
zTalk
Ser
vices
, Not
ifica
tion
Hubs
Devic
esLin
ux, A
ndro
id, i
OS, R
TOS,
Win
dows
Device Connectivity
Analytics & Operationalized Insights
BusinessConnectivity
IoT Device <-> Cloud Patterns

Field
Gat
eway
s
Prot
ocol
Adap
ters
OSS
Proje
ct
Clou
d Ga
tewa
yIo
T Hu
b
Hot Path AnalyticsAzure Stream Analytics, Azure Storm
Cold / Batch Analytics & Visualizations
Azure HDInsight, AzureML, Power BI, Azure Data Factory
Hot Path Business LogicPaaS V2 & Actor Framework En
terp
rise
Proc
ess C
onne
ction
sBi
zTalk
Ser
vices
, Not
ifica
tion
Hubs
Devic
esLin
ux, A
ndro
id, i
OS, R
TOS,
Win
dows
Device Connectivity
Analytics & Operationalized Insights
BusinessConnectivity
IoT Device <-> Cloud Patterns
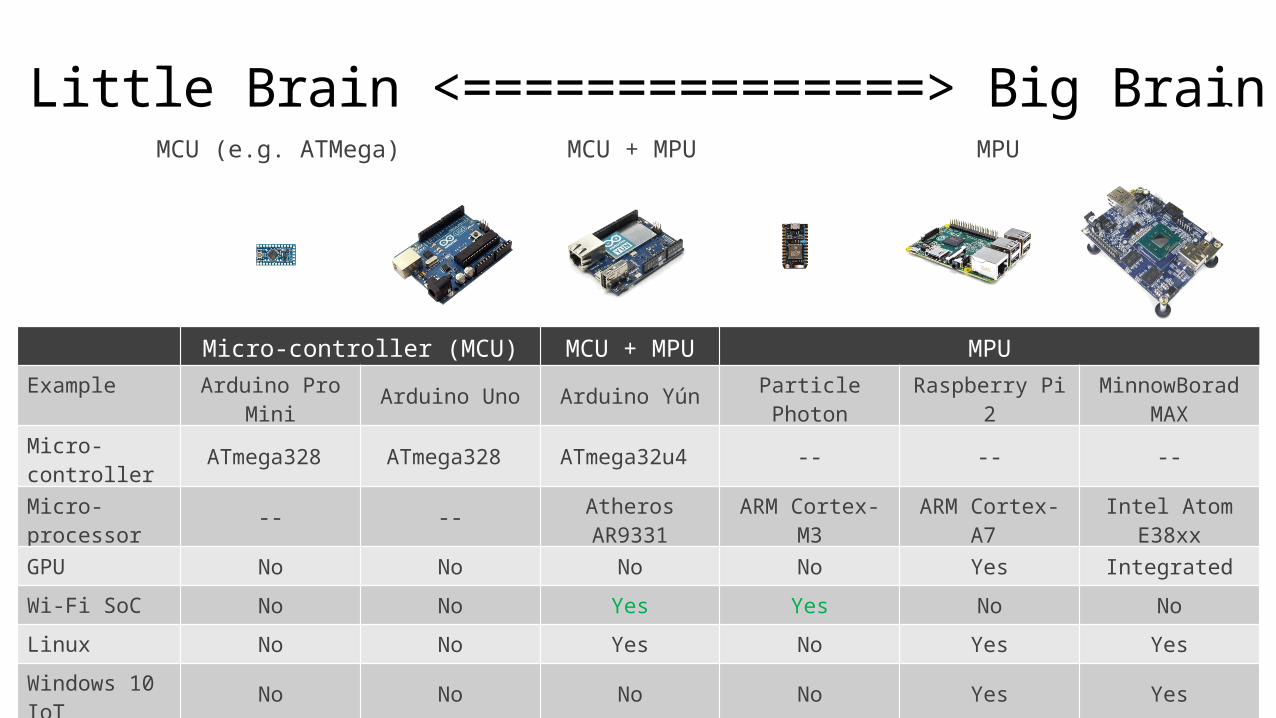
Little Brain <===============> Big BrainMCU + MPUMCU (e.g. ATMega) MPU
Micro-controller (MCU) MCU + MPU MPUExample Arduino Pro
Mini Arduino Uno Arduino Yún Particle Photon Raspberry Pi 2 MinnowBorad MAX
Micro-controller ATmega328 ATmega328 ATmega32u4 -- -- --
Micro-processor -- -- Atheros
AR9331ARM Cortex-
M3 ARM Cortex-A7 Intel Atom E38xx
GPU No No No No Yes IntegratedWi-Fi SoC No No Yes Yes No NoLinux No No Yes No Yes YesWindows 10 IoT No No No No Yes Yes
Cost $10 $30 $80 $19 $35++ $100 (1GB) -$140 (2GB)
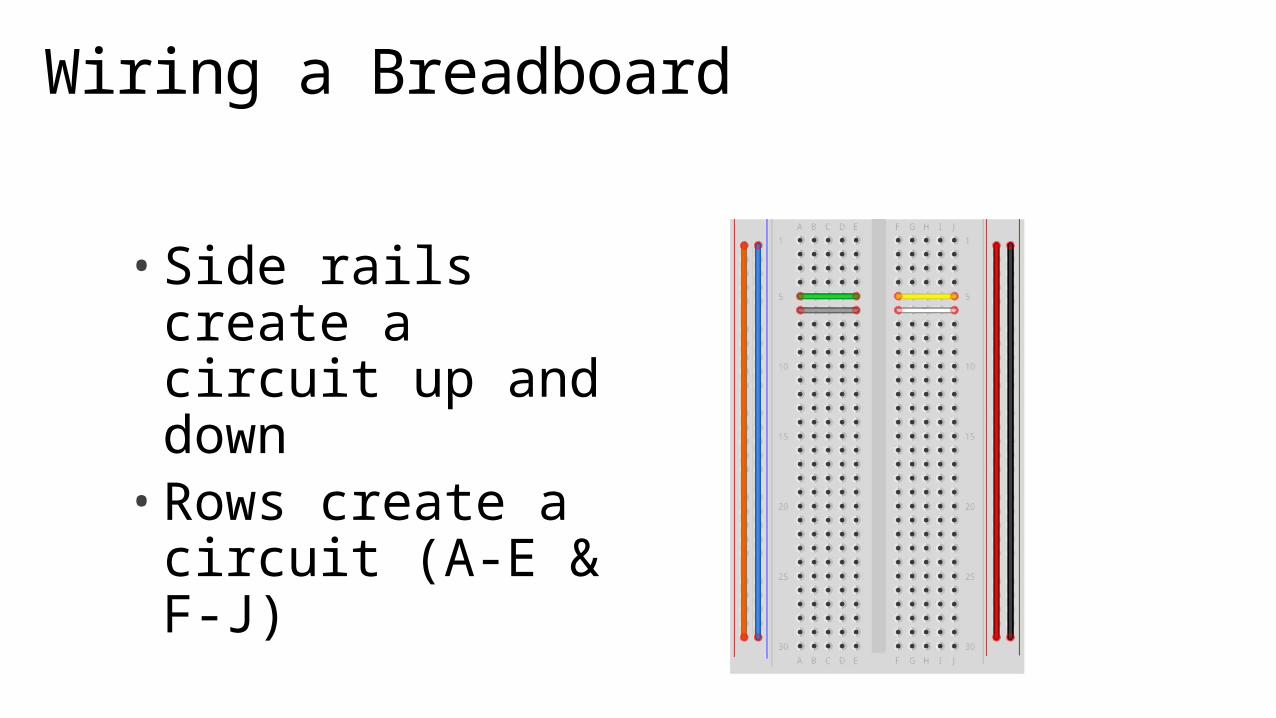
Wiring a Breadboard
• Side rails create a circuit up and down• Rows create a
circuit (A-E & F-J)
Getting StartedPreparing your development environment
Photon.ThingLabs.io/00/
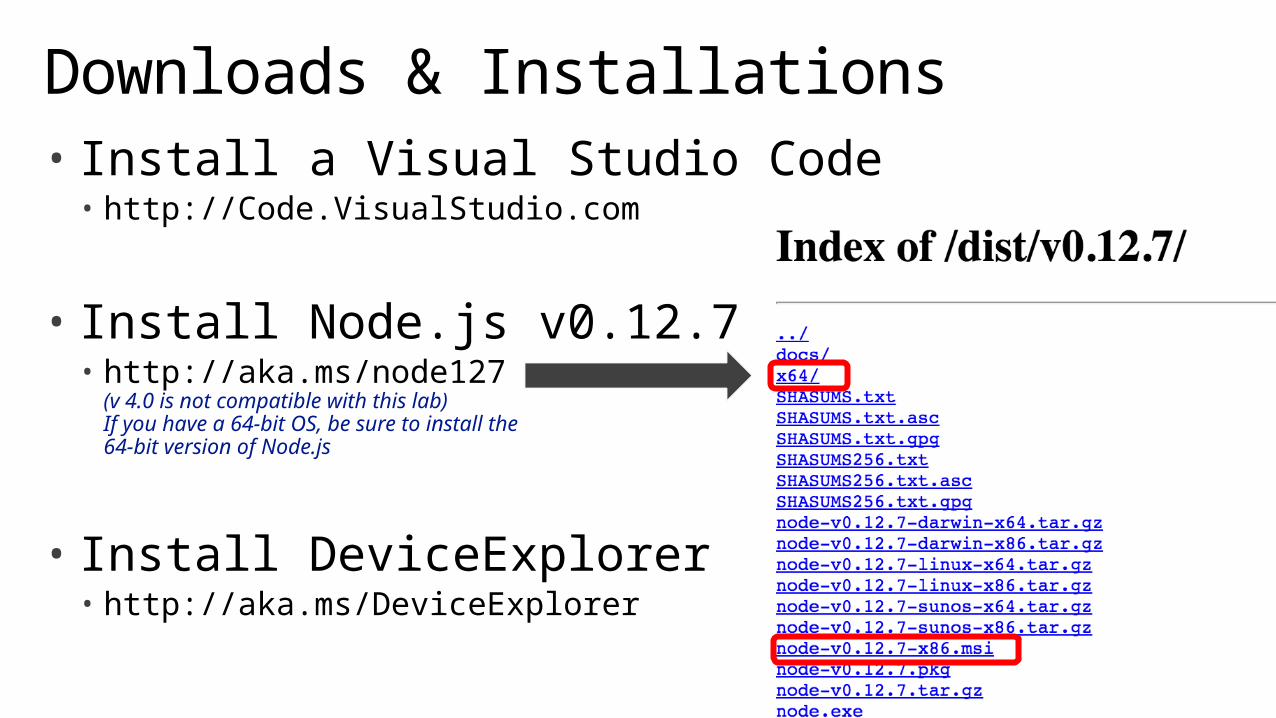
• Install a Visual Studio Code• http://Code.VisualStudio.com
• Install Node.js v0.12.7• http://aka.ms/node127
(v 4.0 is not compatible with this lab)If you have a 64-bit OS, be sure to install the64-bit version of Node.js
• Install DeviceExplorer• http://aka.ms/DeviceExplorer
Downloads & Installations

• From Node.js Command Prompt• Install Johnny-Five
npm install -g johnny-five
• Install Particle-CLInpm install -g particle-cli
• Install IoT Hub Explorer CLInpm install -g iothub-explorernpm update -g iothub-explorer
NPM Installations

• Set Up a Development DirectoryC:\Development\IoTLabs
• Create a Free Particle Cloud Accounthttps://build.particle.io/signup
• Create a Microsoft Azure Accounthttp://www.MicrosoftAzurePass.com/
Other Preparation
Maker 101The fundamentals of maker development kits

Gateway Pattern
HVAC SecuritySmart scale
Refrigerator
Coffee maker
Alarm clock
HOME
Azure IoT
Gateway
{ aggregate message }

Lab Focus: Particle Photon & Weather Shield
Gateway
HVAC SecuritySmart scale
Refrigerator
Coffee maker
Alarm clock
Azure IoT
Standard Firmware
Node.js

• Particle Photon• USB to micro-USB cable (there is
one included in the Photon Development Kit)
• LED (there is one included in the Photon Development Kit)
• 220-Ohm 1/4 Watt resistor (there are two included in the Photon Development Kit)
Bill of Materials
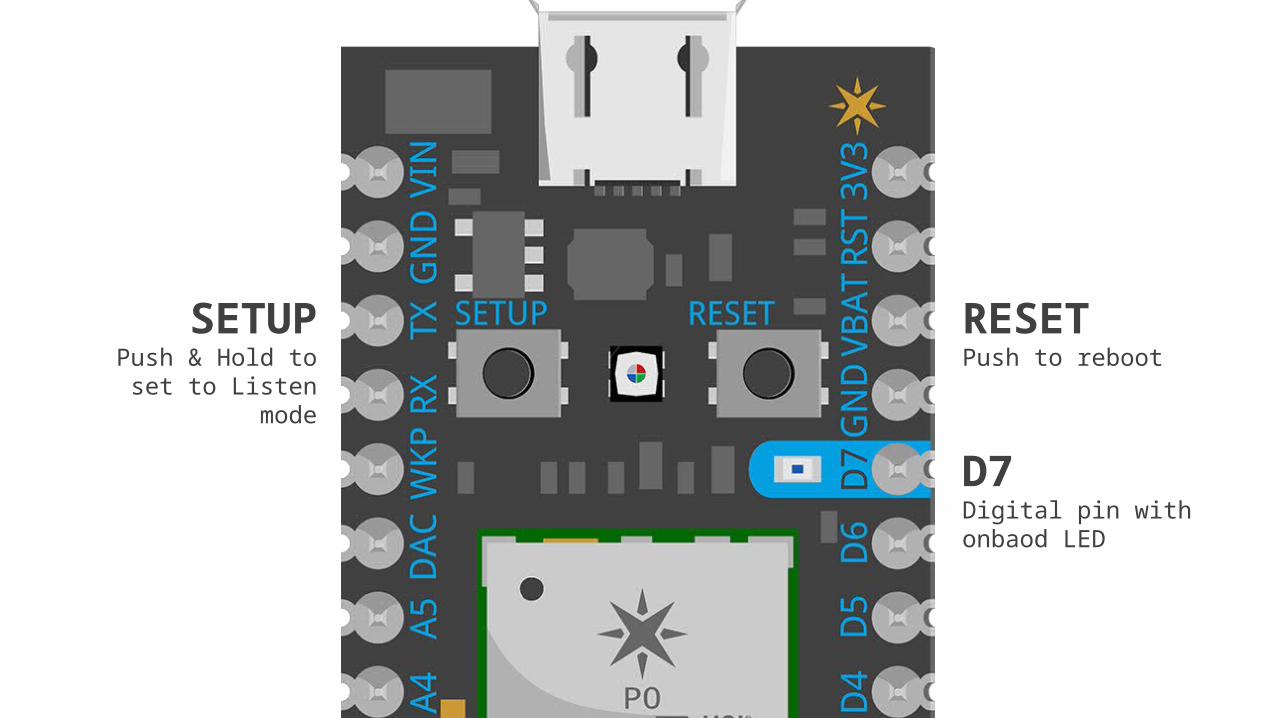
SETUPPush & Hold to set
to Listen mode
D7Digital pin with onbaod LED
RESETPush to reboot

Particle Photon, Johnny Five and Node.js
Gateway
Particle Photon w/ Weather
Shield
Azure IoT
VoodooSpark Firmware
Node.js, Johnny Five
Particle Cloud
1 Photon ‘phones home’ andregisters local IP addresswith Particle Cloud service.
2 Gateway app requests Photon IP address fromParticle Cloud.
3Gateway app communicateswith Photon over local TCP.
4Gateway app sends datato Azure over HTTP.
1
42
3

• Windows Only - Download and install Photon drivers:
http://aka.ms/PhotonDriver
• From Node.js Command Prompt:particle identify (copy the device ID)particle serial wifi (scan and select the Wi-Fi network)(Wait for Photon to restart)particle device add YOUR_DEVICE_ID_HERE
Claim Your Photon
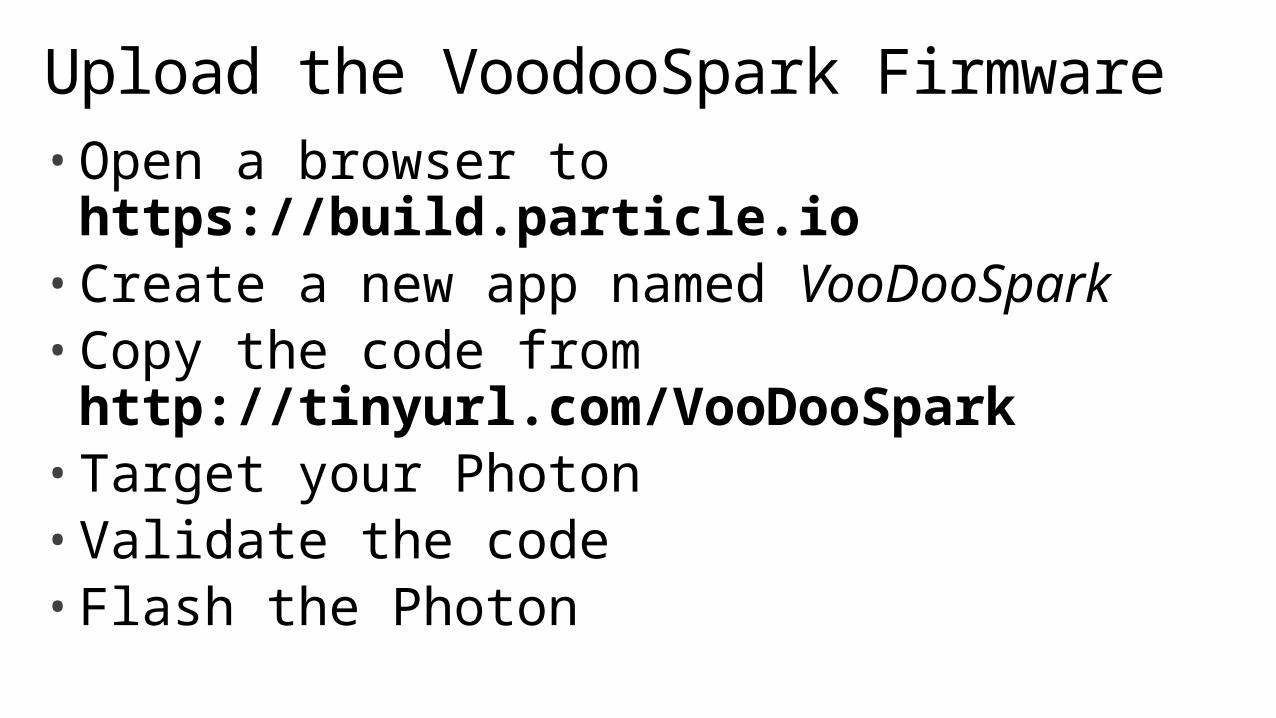
• Open a browser to https://build.particle.io
• Create a new app named VooDooSpark• Copy the code from http://tinyurl.com/VooDooSpark
• Target your Photon• Validate the code• Flash the Photon
Upload the VoodooSpark Firmware
Lab 01: Writing Digital OutputThe ‘Hello, World!’ of devices
Photon.ThingLabs.io/01/
Tweet with @ThingLabsIO and #HelloIoT
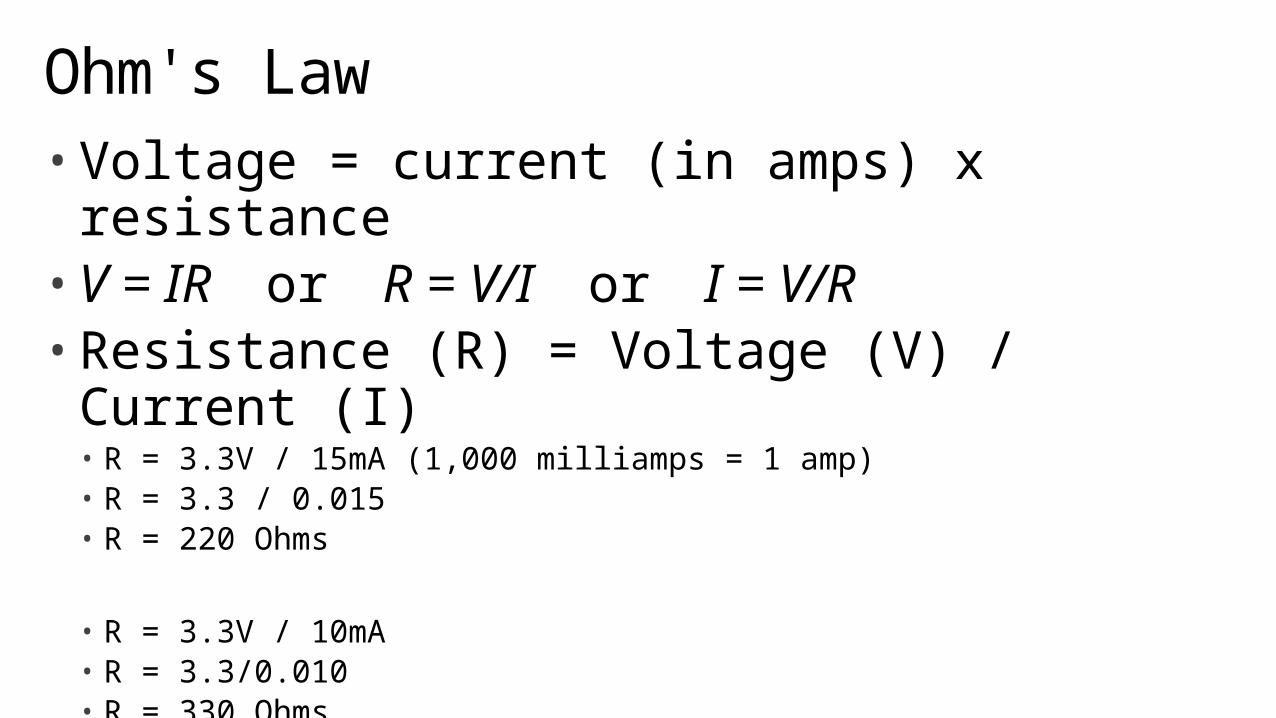
• Voltage = current (in amps) x resistance• V = IR or R = V/I or I = V/R• Resistance (R) = Voltage (V) / Current (I) • R = 3.3V / 15mA (1,000 milliamps = 1 amp)• R = 3.3 / 0.015• R = 220 Ohms
• R = 3.3V / 10mA• R = 3.3/0.010• R = 330 Ohms
Ohm's Law
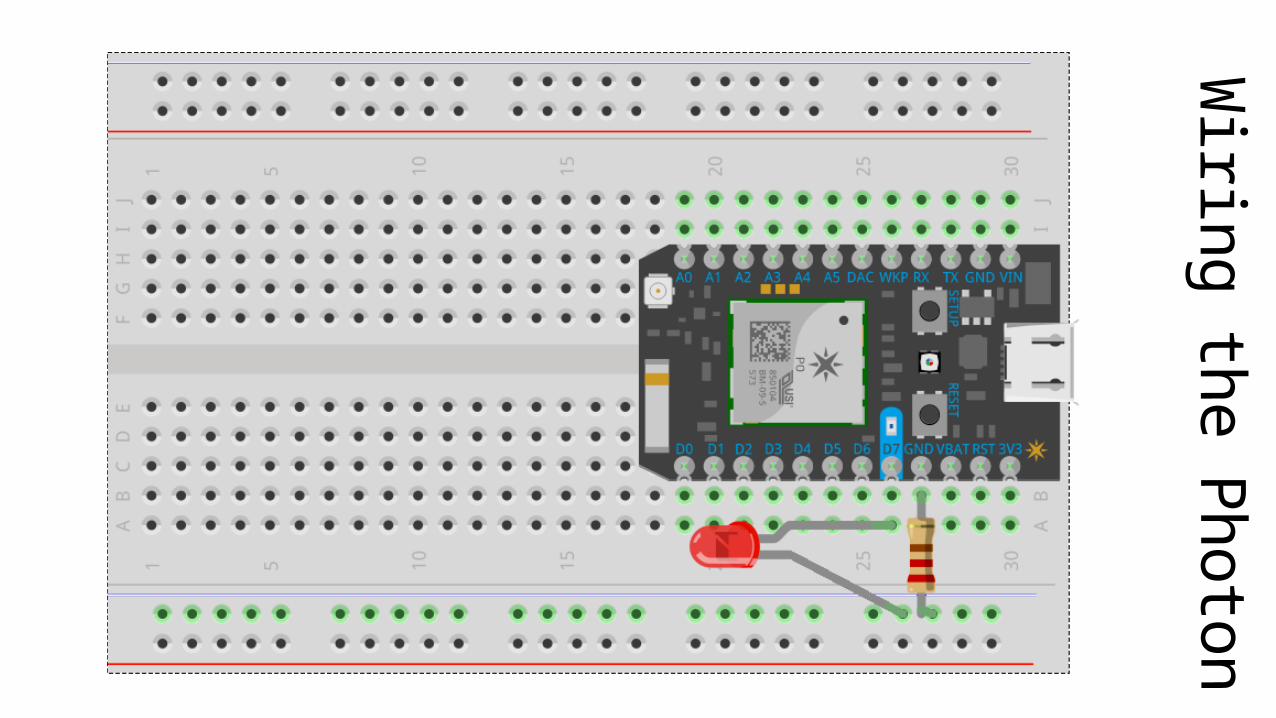
Wiring the Photon
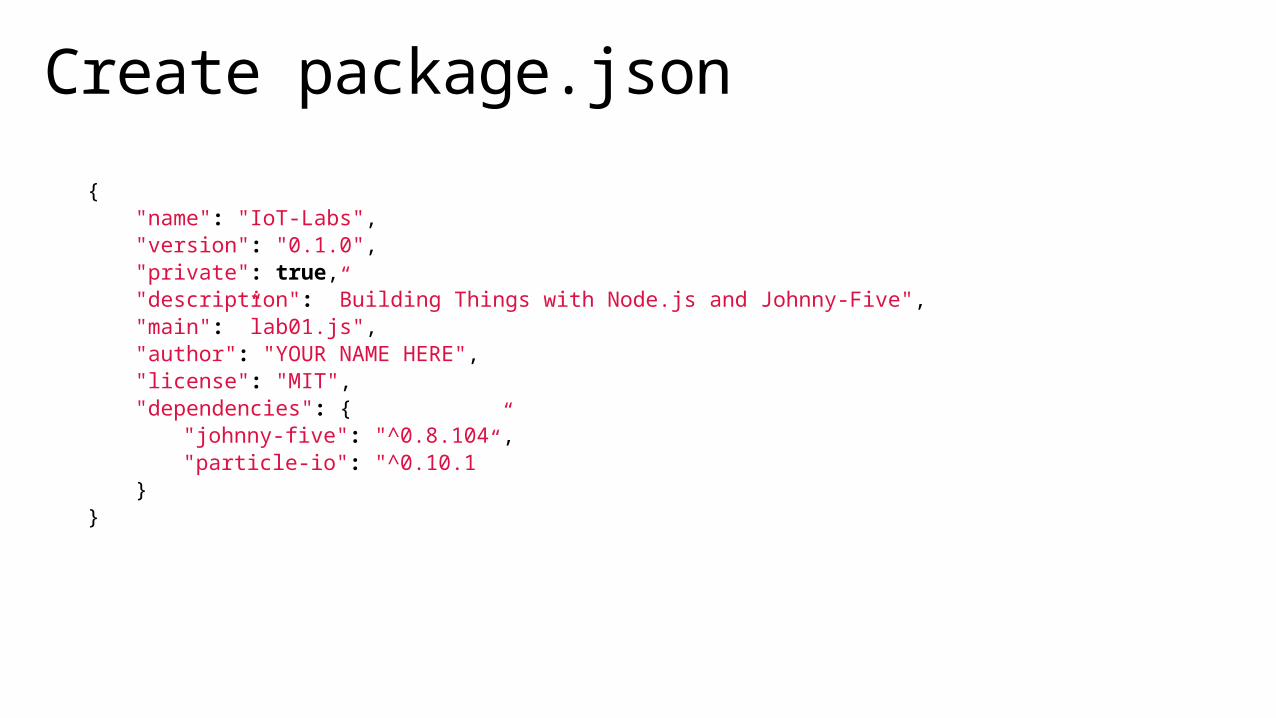
{"name": "IoT-Labs","version": "0.1.0","private": true,"description": ”Building Things with Node.js and Johnny-Five", "main": ”lab01.js", "author": "YOUR NAME HERE", "license": "MIT", "dependencies": {
"johnny-five": "^0.8.104”, "particle-io": "^0.10.1”
}}
Create package.json

Install Dependencies• From Node.js Command Prompt
cd C:\Development\IoTLabs npm install

• From a Node.js Command Prompt:particle token list (copy the user token)
• Or in build.particle.io• Click on Settings
• Copy the Access Token
Get Your Photon Token
1
1
2
2

// lab01.jsvar five = require ("johnny-five"); var Particle = require("particle-io");// Set up the access credentials for Particle and Azure var token = 'YOUR PARTICLE ACCESS TOKEN HERE'; var deviceId = 'YOUR PARTICLE PHOTON DEVICE ID/ALIAS HERE'; // Define the pin that is connected to the LED var LEDPIN = ‘D7’;// Create a Johnny Five board instance to represent your Particle Photon.// ‘Board ‘is simply an abstraction of the physical hardware, // whether it is a Photon, Arduino, Raspberry Pi or other boards. var board = new five.Board({
io: new Particle({ token: token, deviceId: deviceId
}) });
Lab01.js

// The board.on() executes the anonymous function when the // board reports back that it is initialized and ready. board.on("ready", function() {
console.log("Board connected..."); // Set the pin you connected to the LED to OUTPUT mode this.pinMode(LEDPIN, five.Pin.OUTPUT);
// Create a loop to "flash/blink/strobe" the LED once per secondvar val = 0; this.loop( 1000, function() {
this.digitalWrite(LEDPIN, (val = val ? 0 : 1));});
});
Lab01.js (cont’d)

Lab 02: Reading Analog InputIn this lab you will read input from an analog sensor using a voltage
divider.Photon.ThingLabs.io/02/
Tweet with @ThingLabsIO and #ilikedark

Voltage DividerA voltage divider splits input voltage input amongst two or more components.
The resisted voltage indicates the value.
Brighter light == Less resistance;

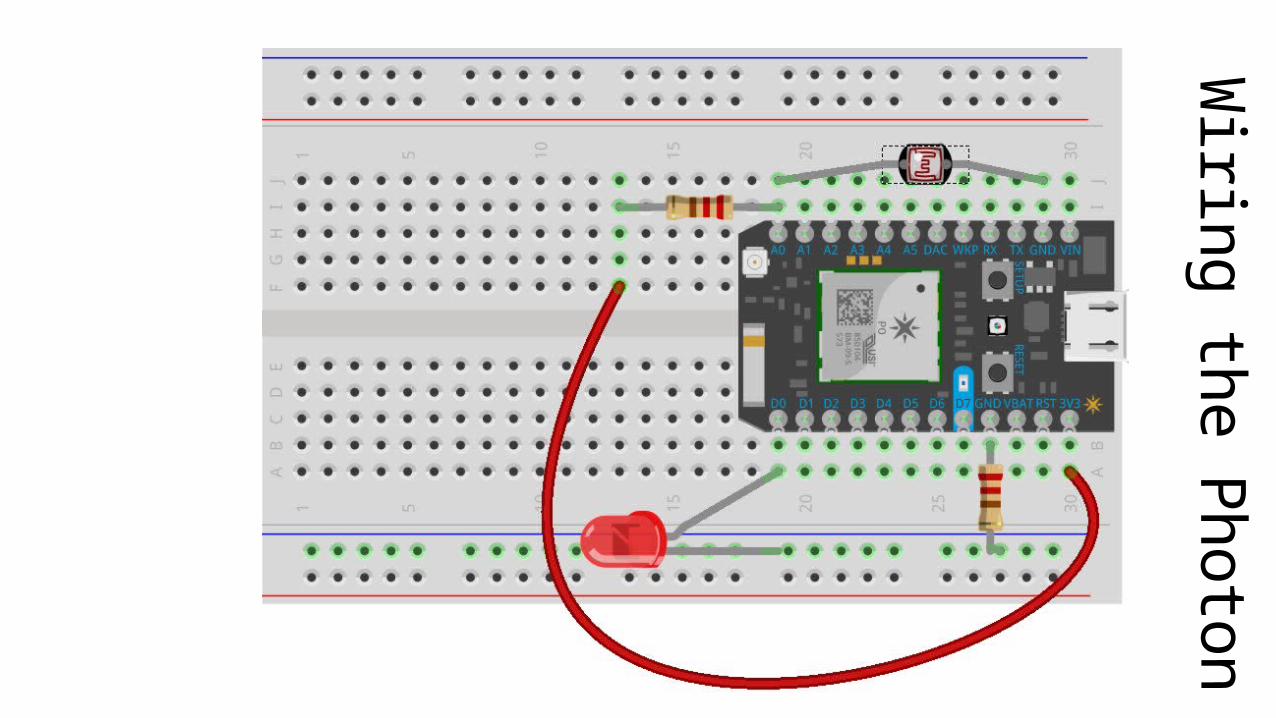
Wiring the Photon

// lab02.jsvar five = require ("johnny-five"); var Particle = require("particle-io");// Set up the access credentials for Particle and Azure var token = 'YOUR PARTICLE ACCESS TOKEN HERE'; var deviceId = 'YOUR PARTICLE PHOTON DEVICE ID/ALIAS HERE'; // Define the pin you will use to read the residual voltage // coming from the photoresistorvar ANALOGPIN = "A0"; // Create a Johnny Five board instance to represent your Particle Photon.// ‘Board ‘is simply an abstraction of the physical hardware, whether// it is a Photon, Arduino, Raspberry Pi or other boards. var board = new five.Board({
io: new Particle({ token: token, deviceId: deviceId
}) });
Lab02.js

// The board.on() executes the anonymous function when the // board reports back that it is initialized and ready.board.on("ready", function() {
console.log("Board connected..."); // Read the residual voltage coming from the photoresistor this.analogRead(ANALOGPIN, function(val) {
// Multiple the value by 3.3V / 1024, which the the // value range of the photoresistor console.log(val * (3.3 / 1024.0));
});});
Lab02.js (cont’d)

Lab 03: Input Controls OutputIn this lab you will use analog input to control digital output.
Photon.ThingLabs.io/03/
Tweet with @ThingLabsIO and #NightLight

Pulse Width Modulation (PWM)
Wiring the Photon

// lab03.jsvar five = require ("johnny-five"), photoresistor; var Particle = require("particle-io");// Set up the access credentials for Particle and Azure var token = 'YOUR PARTICLE ACCESS TOKEN HERE'; var deviceId = 'YOUR PARTICLE PHOTON DEVICE ID/ALIAS HERE'; // Define the pin that is connected to the LEDvar LEDPIN = “D0"; // Define the pin you will use to read the residual voltage // coming from the photoresistorvar ANALOGPIN = "A0"; // Create a Johnny Five board instance to represent your Particle Photon. ‘Board ‘is simply an abstraction of // the physical hardware, whether it is a Photon, Arduino, Raspberry Pi or other boards. var board = new five.Board({
io: new Particle({ token: token, deviceId: deviceId
}) });
Lab03.js

// The board.on() executes the anonymous function when the // board reports back that it is initialized and ready.board.on("ready", function() {
console.log("Board connected..."); // Set the pin you connected to the LED to OUTPUT mode this.pinMode(LEDPIN, five.Pin.PWM);// Create a new 'photoresistor' hardware instance.photoresistor = new five.Sensor({
pin: ANALOGPIN // Analog pin 0});
// TODO: Handle the photoresistor data events});
Lab03.js (cont’d)

// Replace ‘TODO: Handle the photoresistor data events’ with the following:
// Define the callback function for the photoresistor reading.// The freq value used when the photoresistor was defined // determines how often this is invoked.// Scale the sensor's data from 0-1023 to 0-255.photoresistor.scale(0, 255).on("data", function() {
// Multiple the value by 3.3V / 1024, which the the// value range of the photoresistorconsole.log(this.value);// Set the brigthness of the LEDboard.analogWrite(LEDPIN, this.value);
});
Lab03.js (cont’d)
Connected Things 101The fundamentals of connecting Things to the Cloud
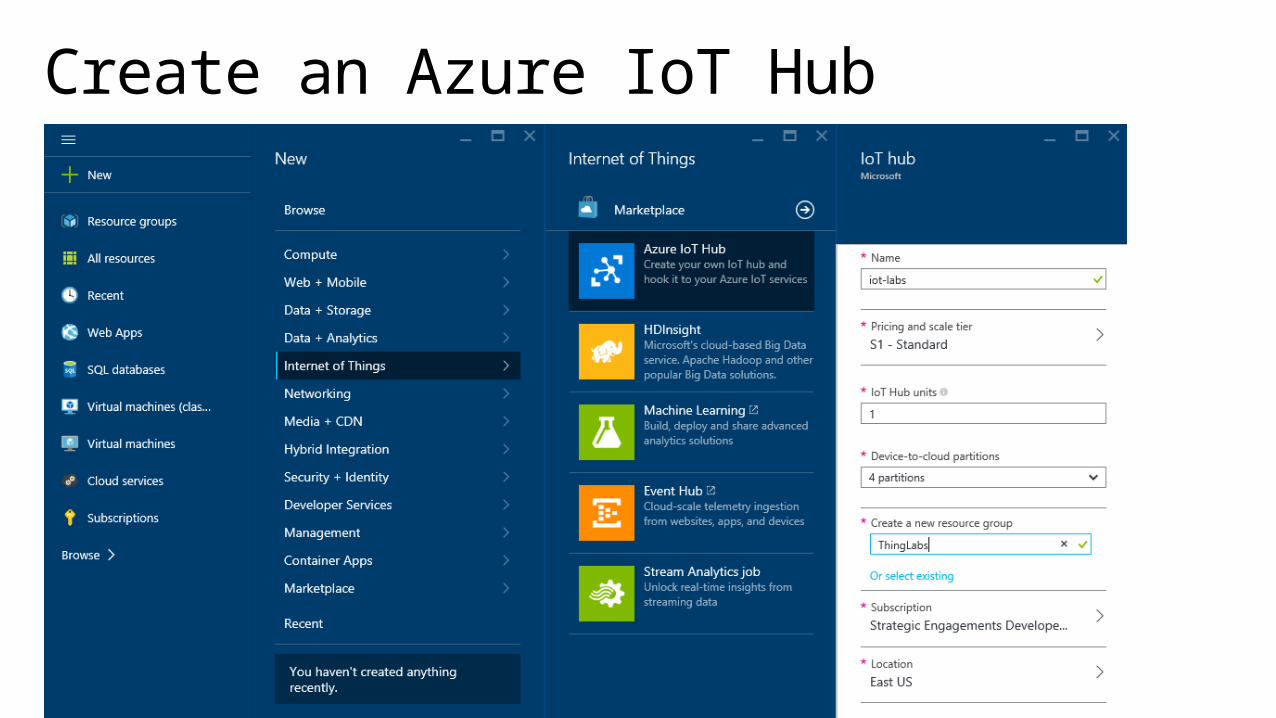
Create an Azure IoT Hub
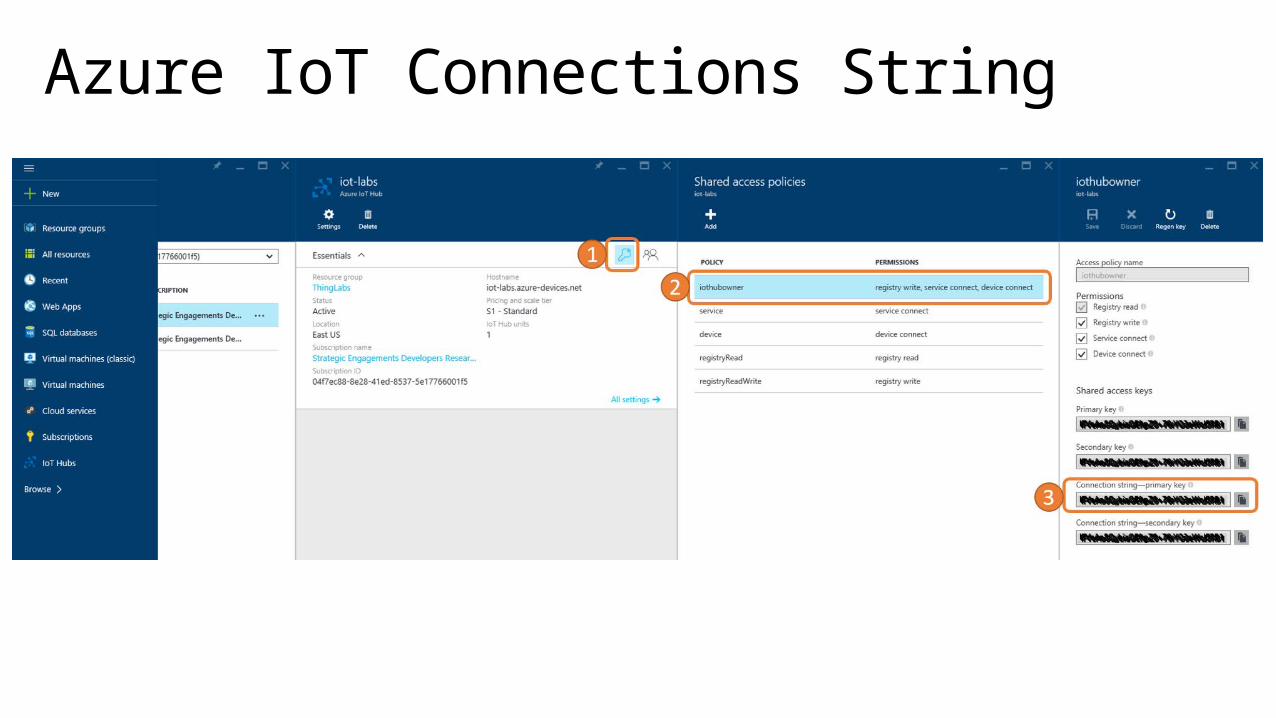
Azure IoT Connections String
Lab 04: Sending Telemetry to the CloudIn this lab you will gather telemetry and send it to the cloud.
Azure.ThingLabs.io/02/
Tweet with @ThingLabsIO and #Telemetry

Define Node.js Dependencies in package.json{
"name": "IoT-Labs","version": "0.1.0","private": true,"description": "Sample app that connects a device to Azure using Node.js", "main": "weather.js", "author": "YOUR NAME HERE", "license": "MIT", "dependencies": {
"johnny-five": "^0.8.104","particle-io": "^0.10.1” ,"j5-sparkfun-weather-shield": "^0.2.0","azure-iot-device": "^1.0.0-preview.3”
}}
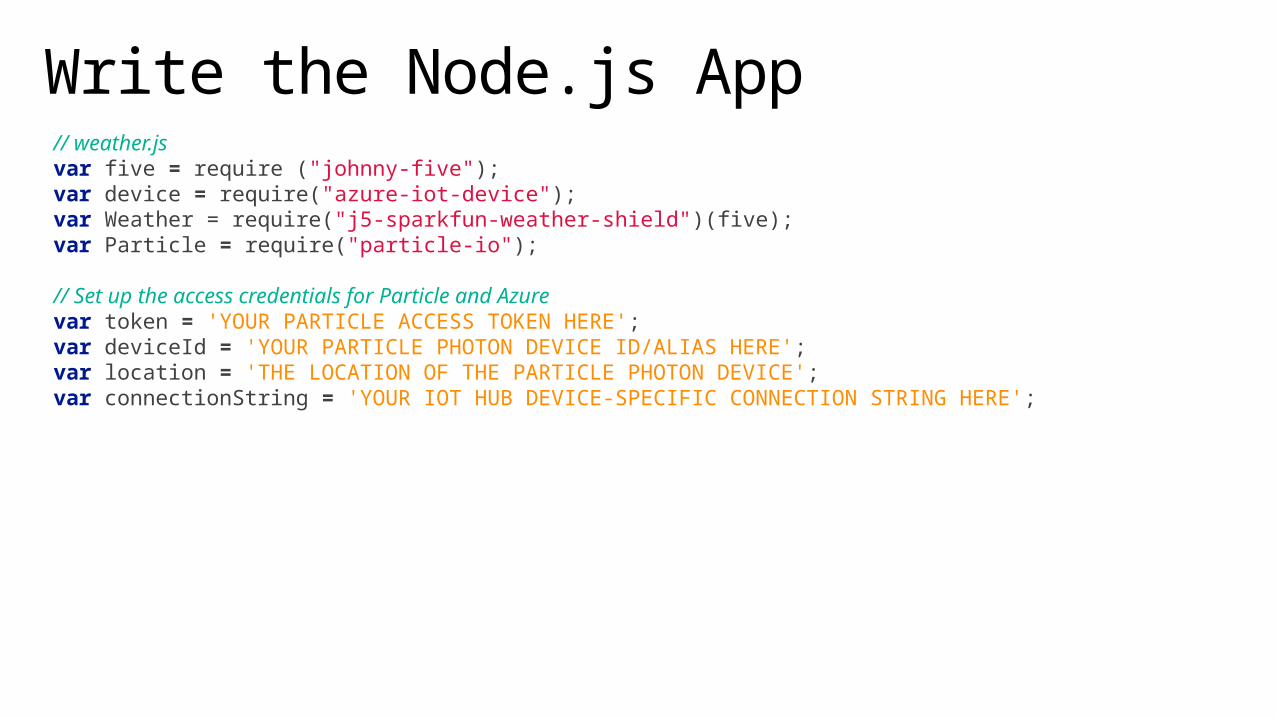
Write the Node.js App// weather.jsvar five = require ("johnny-five"); var device = require("azure-iot-device"); var Weather = require("j5-sparkfun-weather-shield")(five);var Particle = require("particle-io");
// Set up the access credentials for Particle and Azure var token = 'YOUR PARTICLE ACCESS TOKEN HERE'; var deviceId = 'YOUR PARTICLE PHOTON DEVICE ID/ALIAS HERE'; var location = 'THE LOCATION OF THE PARTICLE PHOTON DEVICE'; var connectionString = 'YOUR IOT HUB DEVICE-SPECIFIC CONNECTION STRING HERE';

Node.js App (contd)// Create a Johnny Five board instance to represent your Particle Photon.// Board is simply an abstraction of the physical hardware, whether it is // a Photon, Arduino, Raspberry Pi or other boards. var board = new five.Board({
io: new Particle({ token: token, deviceId: deviceId
}) });
// Create an Azure IoT client that will manage the connection to your IoT Hub// The client is created in the context of an Azure IoT device, which is why// you use a device-specific connection string.var client = new device.Client(connectionString, new device.Https());
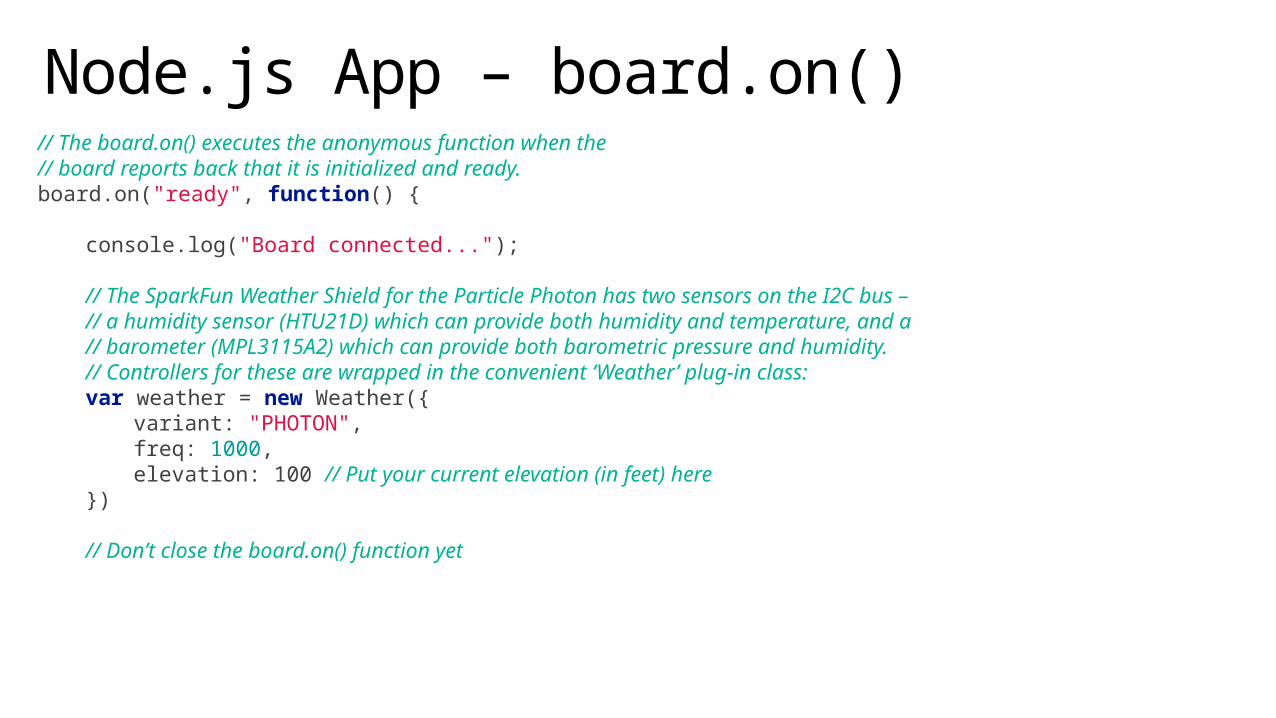
Node.js App – board.on()// The board.on() executes the anonymous function when the // board reports back that it is initialized and ready. board.on("ready", function() {
console.log("Board connected...");
// The SparkFun Weather Shield for the Particle Photon has two sensors on the I2C bus – // a humidity sensor (HTU21D) which can provide both humidity and temperature, and a // barometer (MPL3115A2) which can provide both barometric pressure and humidity.// Controllers for these are wrapped in the convenient ‘Weather’ plug-in class:var weather = new Weather({variant: "PHOTON",
freq: 1000,elevation: 100 // Put your current elevation (in feet) here
})
// Don’t close the board.on() function yet
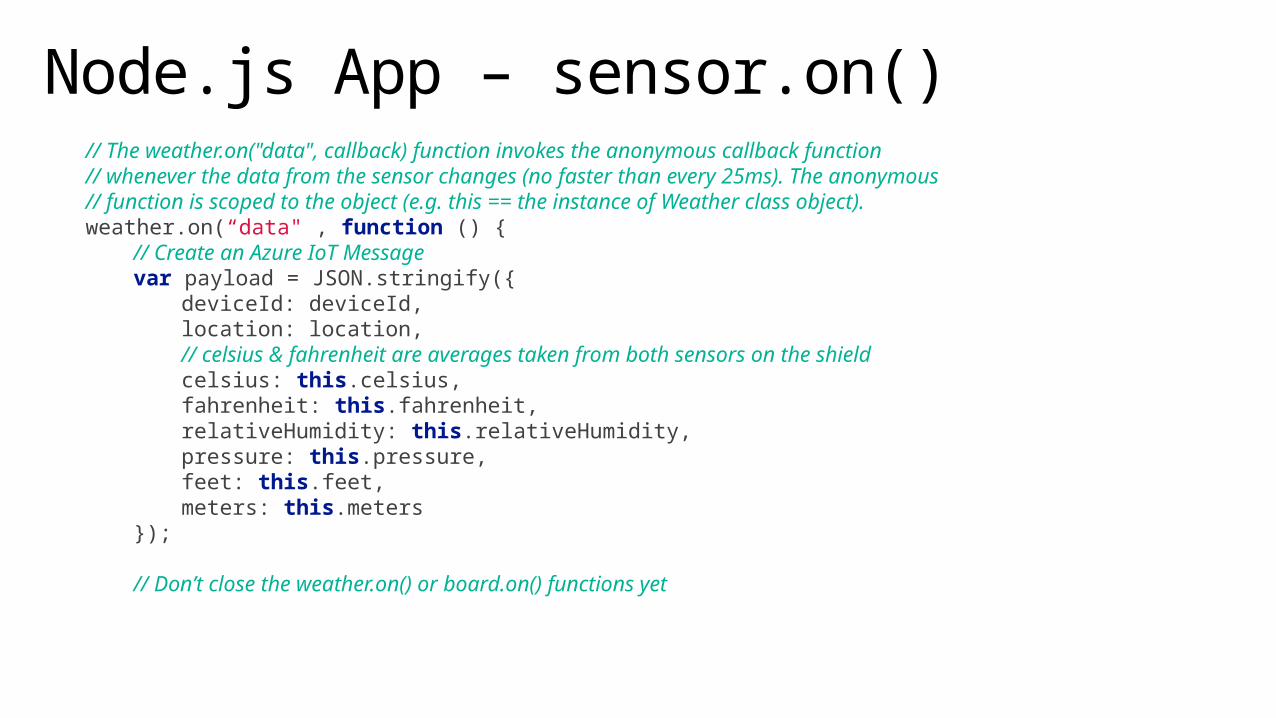
Node.js App – sensor.on()// The weather.on("data", callback) function invokes the anonymous callback function// whenever the data from the sensor changes (no faster than every 25ms). The anonymous// function is scoped to the object (e.g. this == the instance of Weather class object). weather.on(“data" , function () {
// Create an Azure IoT Messagevar payload = JSON.stringify({
deviceId: deviceId,location: location,// celsius & fahrenheit are averages taken from both sensors on the shieldcelsius: this.celsius,
fahrenheit: this.fahrenheit,relativeHumidity: this.relativeHumidity,pressure: this.pressure,feet: this.feet,meters: this.meters
});
// Don’t close the weather.on() or board.on() functions yet

Node.js App – Send an Azure IoT Message// Create the message based on the payload JSON
var message = new device.Message(payload);
// For debugging purposes, write out the message payload to the console console.log("Sending message: " + message.getData());
// Send the message to Azure IoT Hub // printResultsFor() is a function you will write nextclient.sendEvent(message, printResultFor('send'));
}); // Close the weather.on() function
}); // Close the board.on() function

Lab 05: Visualizing IoT DataIn this lab you will create visualizations of IoT data.
Azure.ThingLabs.io/03/
Tweet with @ThingLabsIO and #IoTBI

Create a Stream Analytics Job

Define the Input Data Stream
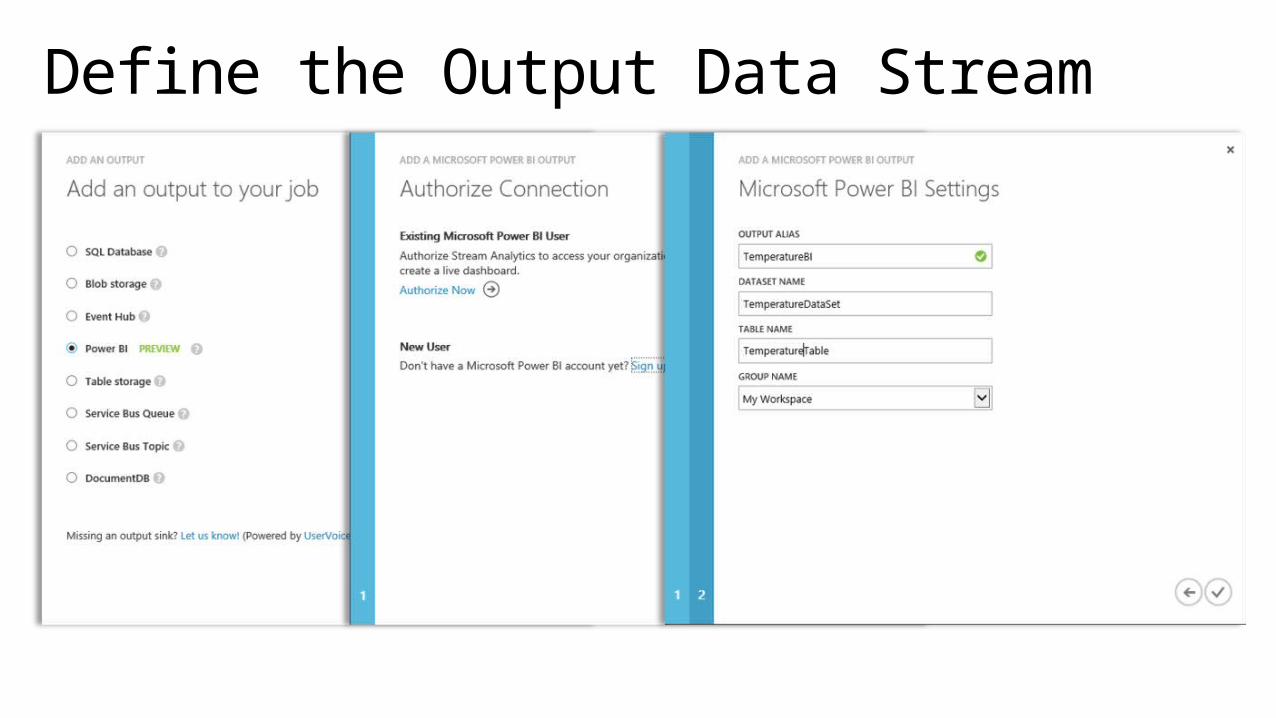
Define the Output Data Stream

Define the Query from Input to OutputSELECT
MAX(fahrenheit) MaxTempF, MIN(fahrenheit) MinTempF, AVG(fahrenheit) AvgTempF, MAX(celsius) MaxTempC, MIN(celsius) MinTempC, AVG(celsius) AvgTempC, MAX(relativeHumidity) MaxHumidity, MIN(relativeHumidity) MinHumidity, AVG(relativeHumidity) AvgHumidity, location,deviceId, System.Timestamp AS Timestamp
INTO [TemperatureBI]
FROM [DeviceInputStream]
GROUP BY TumblingWindow (second, 1), deviceId, location

Create a PowerBI Report
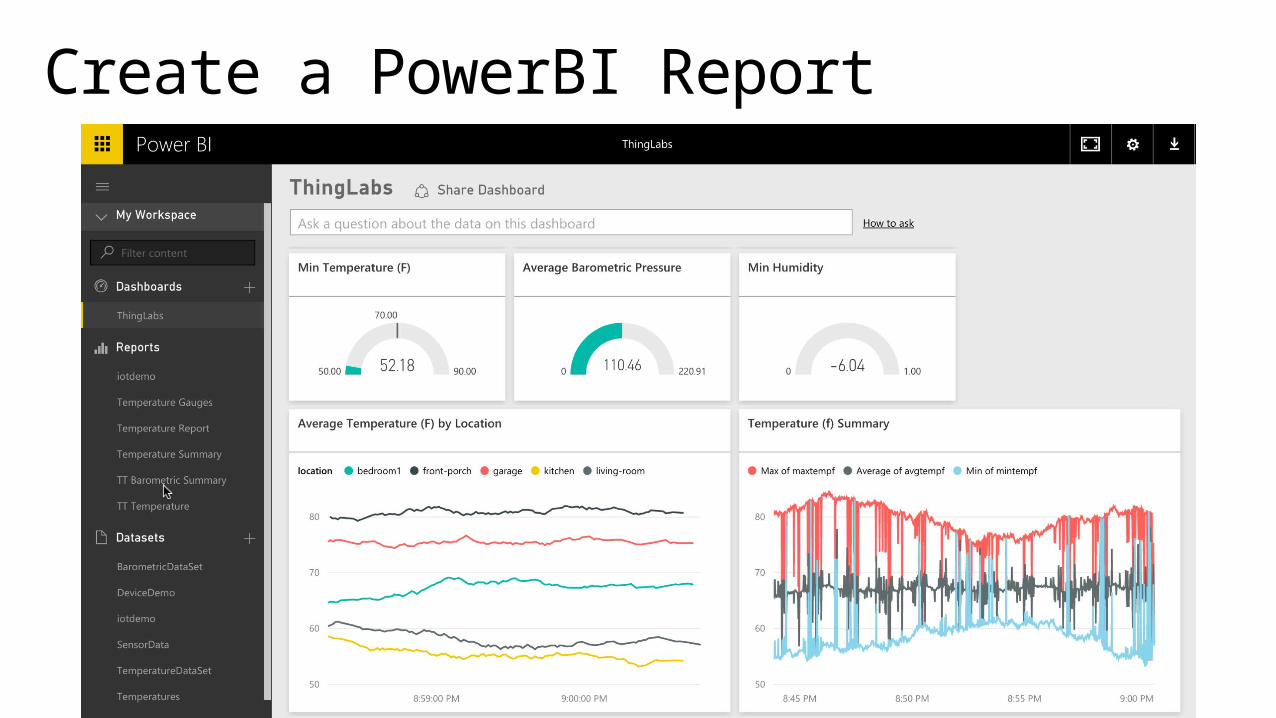
Create a PowerBI Report

ThingLabs.io
@ThingLabsIOfacebook.com/ThingLabsIO
Tweet with @ThingLabsIO and #ThatWasAwesome


