Introduction Although CasaTunes has developed several 2-‐way drivers for many popular tuners and 3rd party AV controllers, there continues to be a large number of devices that installers and homeowners would like to use with CasaTunes that are not currently supported. To provide a more comprehensive solution to this problem, the company has partnered with Bitwise Controls. The combined solution offers seamless integration of third party music equipment, and integration of stand alone home theaters and receivers in to a unique whole house music experience. By partnering with Bitwise Controls we offer customers the best multi-‐room audio and the best 3rd party device control and automation solution on the market, at a fraction of the price of similar competitive solutions built on AMX and/or Crestron. The main goals of this partnership are to address real installer pain points. For example, installers often ask us:
1. How can I provide support for [fill in the blank] device and provide customers an easy to use interface that works with our existing control points and integrates with our Graphical User Interfaces (GUI), providing a comprehensive, yet seamless solution? Often these devices include satellite receivers, cable set top boxes, tuners, network players, CD or DVD players, jukeboxes, etc. The solution must be future proof and supported on popular smart phone and tablet devices including the ever increasingly popular iOS (Apple) and Android platforms, and the latest browser technologies.
2. How can I seamlessly integrate multiple Home Theater setups in the home, for example in the Living Room, Family Room and Master Bedroom, so that they are all seamless integrated with your whole house music solution, for a true whole house music experience?
3. How can I easily customize the graphical User Interface to meet the automation needs and simplify control for my customers?
In this step-‐by-‐step tutorial we will walk the installer through an example installation and show how you can use CasaTunes and Bitwise Controls to address these pain points.
Advanced CasaTunes Device and Automation Control using Bitwise Controls
Tutorial 1 – Controlling a cable box via CasaTunes In the first part of this step-‐by-‐step tutorial we are going integrate a cable box from Scientific Atlanta with the CasaTunes XLi music server, so customers can select their favorite music channels or TV programming using the CasaTunes GUI .
Steps: 1. Install the latest 2.8 (or later) version of CasaTunes software on your
CasaTunes XLi music server. The latest version can be downloaded from the CasaTunes web site at http://www.casatunes.com/downloads
2. Install the latest version of the Bitwise Controls Project Editor onto your CasaTunes XLi music server.
3. (Optionally) Install the GUI templates
4. Connect the stereo audio output of your cable box and feed it into the L1 IN source on your CasaTunes XLi music server
5. Connect your BC4 device to the network and devices to be controlled a. In this example, locate your BC4 with your cable set top box, and
connect an IR emitter from your IR1 port on the BC4X1 device to your cable set top box IR window. Connect your network cable and power to the BC4X1 device.
6. Add support for your cable set top box.
a. You can skip this step if you are familiar with BC4 setup, or if you want more information on this step, check out the videos on the Bitwise Controls web site.
b. Start Project Editor
c. Expand the Project tree and right click on the item BC4s, select Add BC4 from Network. Click on Discover and make sure all your BC4 devices on the network are discovered.
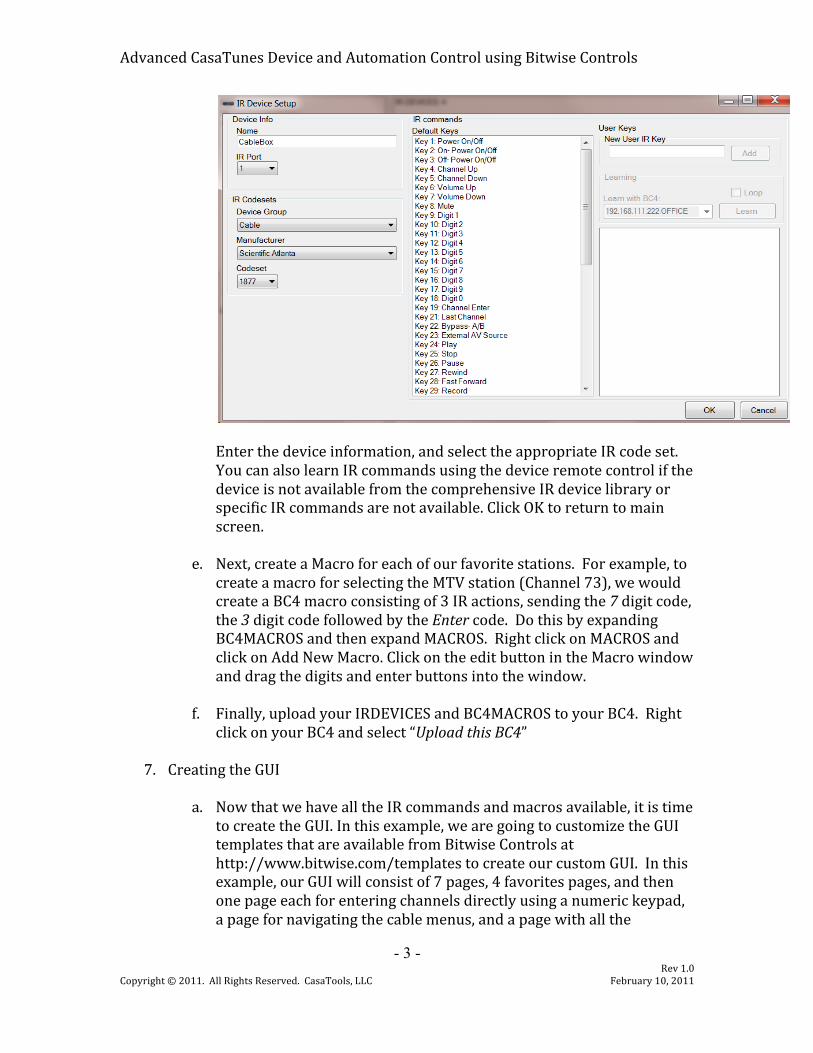
d. Expand the BC4 connected to the cable set top box, expand Module:BCX1, right click on IRDevices, and select Add New IR Device.
Advanced CasaTunes Device and Automation Control using Bitwise Controls
Enter the device information, and select the appropriate IR code set. You can also learn IR commands using the device remote control if the device is not available from the comprehensive IR device library or specific IR commands are not available. Click OK to return to main screen.
e. Next, create a Macro for each of our favorite stations. For example, to create a macro for selecting the MTV station (Channel 73), we would create a BC4 macro consisting of 3 IR actions, sending the 7 digit code, the 3 digit code followed by the Enter code. Do this by expanding BC4MACROS and then expand MACROS. Right click on MACROS and click on Add New Macro. Click on the edit button in the Macro window and drag the digits and enter buttons into the window.
f. Finally, upload your IRDEVICES and BC4MACROS to your BC4. Right click on your BC4 and select “Upload this BC4”
7. Creating the GUI
a. Now that we have all the IR commands and macros available, it is time to create the GUI. In this example, we are going to customize the GUI templates that are available from Bitwise Controls at http://www.bitwise.com/templates to create our custom GUI. In this example, our GUI will consist of 7 pages, 4 favorites pages, and then one page each for entering channels directly using a numeric keypad, a page for navigating the cable menus, and a page with all the
Advanced CasaTunes Device and Automation Control using Bitwise Controls
transport controls. When the customer selects the cable box source, CasaTunes will default to the 1st Favorites page.
b. We can use the templates available from Bitwise Controls to provide not only professional looking pages, but also to significantly reduce the time to create your own pages.
c. In this example we are going to design our pages so the same pages can be used for both the iPhone and the browser. Depending on your control points you can create more or less GUIs.
Follow this same procedure for Android devices. Differences will be noted when appropriate.
d. In order to optimize our design for CasaTunes for an iPhone or iPod touch device, we are going to use the available portrait templates for a cable box device. In addition, we are going to adjust the size of the GUI templates to fit the space available in the CasaTunes iPhone UI, which is 320W x 372H. This will allow CasaTunes to display the room power and volume controls in the remaining available space.
For Android devices, you can start off with the same templates. Adjust the size of the template as follows: 320W x 358H for small devices, such as the HTC Hero; 480W x 612H for larger devices, such as the Galaxy S phones; and 480W x 678H for Android Tablets.
e. Here is what the final pages will look like on the iPhone when we are all finished. As we can see, the solution offers a tremendous amount of functionality, is visually appealing, and seamlessly integrates with the CasaTunes whole house music control devices.
Advanced CasaTunes Device and Automation Control using Bitwise Controls
The integrated solution shows the room that is being controlled (Office), as well as the source that is being used (Cable). You can control the power and volume in the room, just as if it were any other CasaTunes source, and you can change sources and rooms, by touching the “Select Music” and “Rooms” buttons, respectively.
f. So, lets create our pages for the Cable set top box device: i. Right click on the GUIs item and select Add GUI Group. Name the Group Cable Box.
ii. Now copy each of the portrait template pages we want to use and paste them in to the new Cable Box GUI Group. For our example, we are using the following template pages:
iii. Double-‐click on each template and adjust the GUI Target Screen Resolution to 320x372. In this example, we removed the last line of the templates since CasaTunes will implement the Power and Volume Controls. Then we reduced the size of the images in the first row, and moved the rest of the items in the grid up.
iv. Next, we will remove the background image for each page, since this background image was not designed to work with our smaller page layout. To remove the background, right click on the background image for each page, and select “Remove background image”.
Advanced CasaTunes Device and Automation Control using Bitwise Controls
v. If you are creating a GUI for an Android or iPhone device, click on GUI | Render Style and change to “mobile Safari” for each of your new GUIs.
g. Next, lets add our TV Channel images for each of our favorite stations. The GUI templates come with a large selection of TV Channel images. Simply locate these images using File Explorer (if you installed the GUI templates, the images are located in “C:\Program Files\BitWise - BC4 Template Package\BC4 iPhone Template\Channel Icons\78 x 55” folder by default, find the image you want and drag and drop the logo on to the favorites slot you want to use. Drag and drop the logo twice on each slot, once for the image to use in the normal state, and the second time to set the image for the pressed state. To set the image for the pressed state, hold the Shift Key down while dropping the logo on to the slot. Repeat for all 4 favorites pages.
h. Now, lets program our buttons to send IR commands or execute macros. Make sure that you have created a macro for each of your favorite stations. To associate an IR command with a button, simply locate the IR Command from the list of IR KEYS for your IR device in the IRDEVICES section and drag it onto the image of the button associated with the IR Command. This programs the GUI to issue this IR command when the button is pressed. Similarly, you can drag a macro onto a button image, and the macro will be executed when the button is pressed.
i. The final step in designing the GUI is to create the links between pages that allow you to navigate between your pages. Since we are using the templates, the templates have predefined these links for us, so this step in our example, is not necessary.
8. Generating the HTML
a. Now that we have created our GUI and associated links, commands and macros with each of the buttons in the GUI, it is time to check out our hard work!
b. In the GUIs portion of Project Edit, locate and right click on the Cable Box group item, select “Generate Group as HTML” and specify a location where you want the generated HTML to be saved.
c. When prompted whether you want to view the files, say yes.
Advanced CasaTunes Device and Automation Control using Bitwise Controls
d. Double-‐click on any of the HTML pages and you will now be able to control your Cable box and navigate your pages.
e. Great job! But we are not quite finished. We now need to add it to CasaTunes.
9. Integrating the generated HTML into the CasaTunes Web Server
a. Locate the folder where Bitwise Controls generated the HTML code
b. Now, in a separate File Explorer window, locate the folder C:\inetpub\wwwroot\CasaTunes. This is where the CasaTunes Web Server application is installed. Now create a folder called “WebSources”, then create a folder called “Cable Box” in the WebSources folder, and another folder called “320x372” in the “Cable Box” folder. You should now have created the folder path “C:\inetpub\wwwroot\CasaTunes\WebSources\Cable Box\320x372”
For GUIs that you create for an Android or iPhone device, add an “M” to the end of the folder name, for example: “480x612M”
c. Copy the generated HTML files and folders into the newly create folder, “C:\inetpub\wwwroot\CasaTunes\WebSources\Cable Box\320x372”
10. Configuring CasaTunes to use the newly created web source
a. Start CasaTunes Setup. If the CasaTunes service is stopped, then start it.
b. Select the Sources tab
c. You can also configure the gain for the source, to maintain a consitent volume level when switching between sources
d. Select Source 5, External Source 1 and enter a name for the source, for example, Cable.
e. Select “Browser Controlled Device” from the select source type drop down
f. You should now see an option to select a Device. Since you have only created a single web source device, Cable Box, this should be the only item listed.
Advanced CasaTunes Device and Automation Control using Bitwise Controls
g. The next option allows you to specify the Start Page when this device is selected. In our case we are going to want to select the Favorites page the customer is most likely to want. This will allow the customer, for example, to quickly select a Music Choice channel.
h. Now click on the Summary tab, and click Finish
i. The first time you setup for BitWise, you will have to restart the CasaTunes service. Go to the CasaTunes Startup folder and run Diagnostics. Click on Restart Service in the Summary folder.
11. Testing your work
a. Start your browser and enter the URL, http://localhost/casatunes, change to the “Cable” source and voila, you should see your GUI rendered within the CasaTunes UI. Now check it out on your iPhone and Android devices.
Tutorial 2 – Integrating Home Theater/Surround Sound setups with CasaTunes In this tutorial we will walk you through step-‐by-‐step to show you how to integrate a Denon AV Receiver that is setup in the Living Room so that is can participate in the whole music experience, and be seamlessly controlled within CasaTunes.
Steps 1. In this example, we will assume the Living Room is to be connected as Zone
1.
2. Connect the pre-‐amp output on the CasaTunes XLi music server (Z1) to the CD Input on the Denon A/V Receiver.
3. Connect your BC4 device to the network and to the devices to be controlled a. In this example, locate your BC4 next to your Denon receiver, and
connect an IR emitter from your IR2 port on the BC4X1 device to your Denon Receiver IR window. Connect your network cable and power to the BC4X1 device.
4. Add your Denon Receiver as an IR Device via Project Editor (see Step 6 in the previous tutorial for more details)
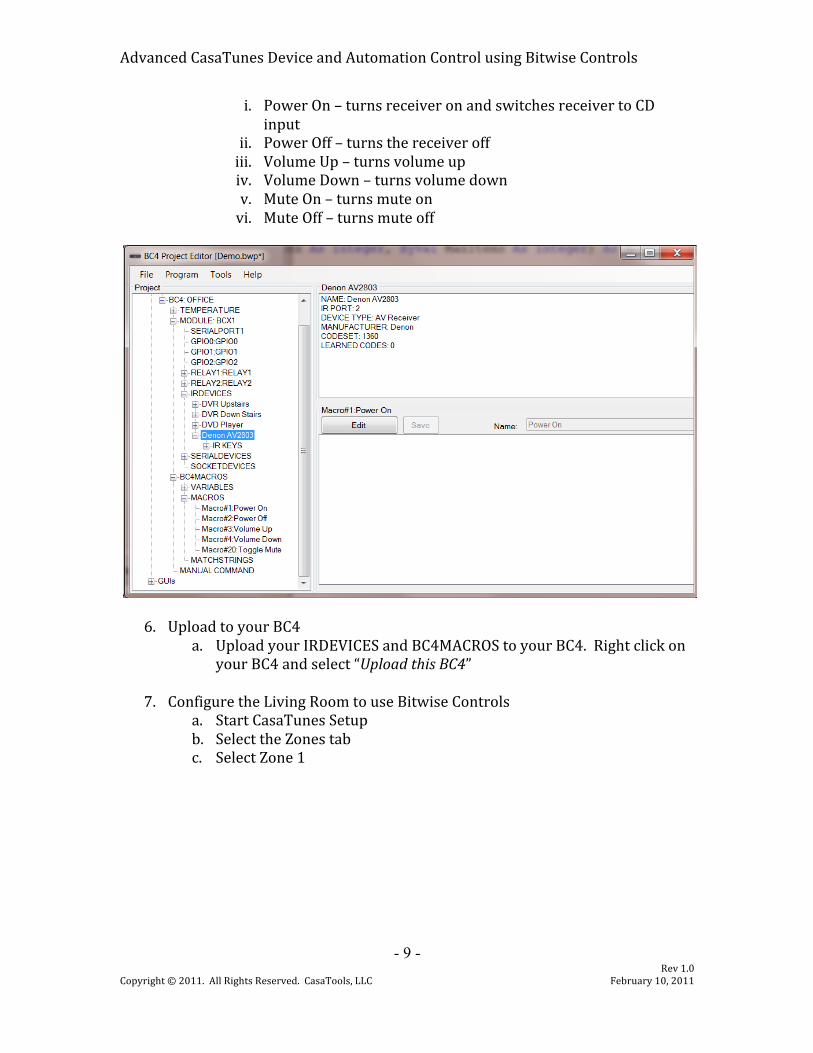
5. Create macros.
a. These macros will be invoked by CasaTunes when the power is turned on for the Living Room, power is turned off, etc.
b. Create the following macros with the following actions for your Denon Receiver:
Advanced CasaTunes Device and Automation Control using Bitwise Controls
i. Power On – turns receiver on and switches receiver to CD input
ii. Power Off – turns the receiver off iii. Volume Up – turns volume up iv. Volume Down – turns volume down v. Mute On – turns mute on vi. Mute Off – turns mute off
6. Upload to your BC4 a. Upload your IRDEVICES and BC4MACROS to your BC4. Right click on
your BC4 and select “Upload this BC4”
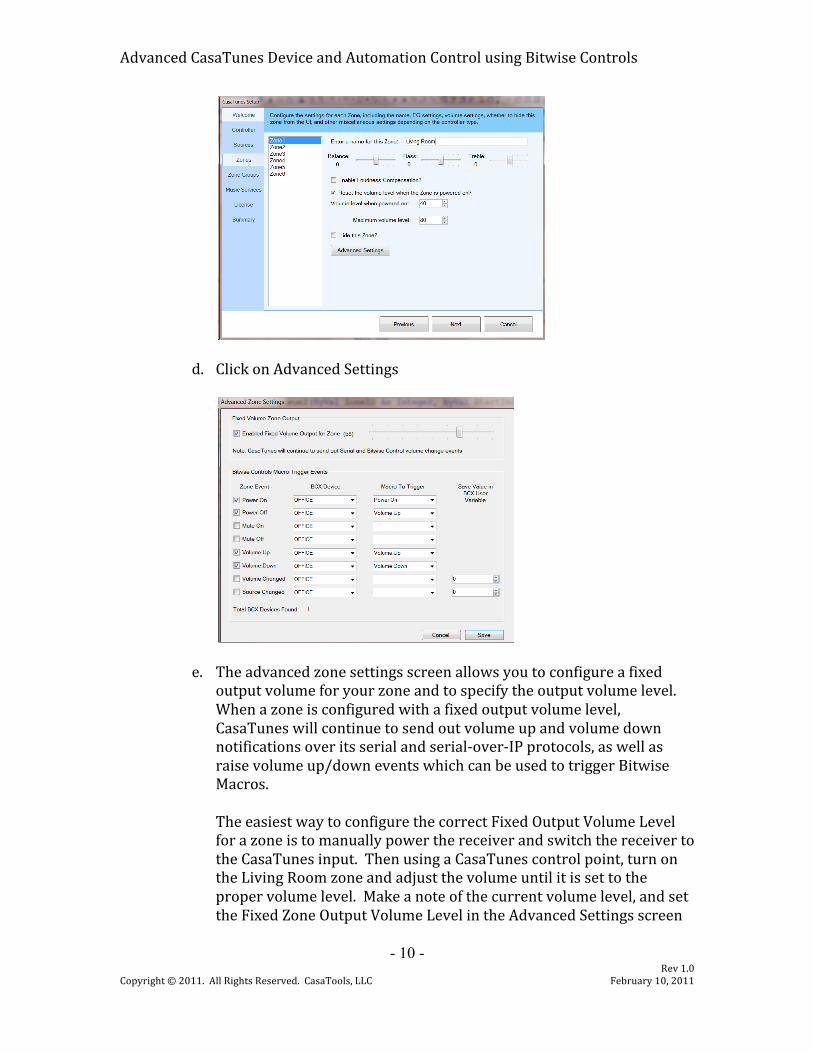
7. Configure the Living Room to use Bitwise Controls a. Start CasaTunes Setup b. Select the Zones tab c. Select Zone 1
Advanced CasaTunes Device and Automation Control using Bitwise Controls
e. The advanced zone settings screen allows you to configure a fixed output volume for your zone and to specify the output volume level. When a zone is configured with a fixed output volume level, CasaTunes will continue to send out volume up and volume down notifications over its serial and serial-‐over-‐IP protocols, as well as raise volume up/down events which can be used to trigger Bitwise Macros. The easiest way to configure the correct Fixed Output Volume Level for a zone is to manually power the receiver and switch the receiver to the CasaTunes input. Then using a CasaTunes control point, turn on the Living Room zone and adjust the volume until it is set to the proper volume level. Make a note of the current volume level, and set the Fixed Zone Output Volume Level in the Advanced Settings screen
Advanced CasaTunes Device and Automation Control using Bitwise Controls
f. Configure the Bitwise Macros to be triggered for each CasaTunes event. You can trigger a different Bitwise Control macro for each CasaTunes event, including:
1. Power On 2. Power Off 3. Mute On 4. Mute Off 5. Volume Up 6. Volume Down 7. Volume Changed 8. Source Changed
To configure a macro to be triggered for a CasaTunes event, first check the zone event you want, select the BC4X1 device that contains the macro to run, then select the macro from the list of available BC4X1 macros. For example, in the Advanced Settings screen above, the zone has been configured to trigger or run the Power On macro on the Office BCX Device when the Zone Event Power On occurs.
g. Test your setup i. Click OK to save the Advanced Settings screen ii. Click the summary tab and click Finish iii. Now change to the Living Room and turn on the zone. The
Denon AV Receiver will turn on, and will switch its input to the CD source, where CasaTunes is setup
iv. Now select volume up and down and the volume on the receiver should change
Final Thoughts Hopefully this tutorial has provided you with enough information to get you started. More information is available on the Bitwise Controls site, as well as the CasaTunes site and forum. Although this tutorial covered two common scenarios, there are many other examples where these two products can be combined to provide a rich and seamless experience for your customers. Please share your experience with us.