• What is a tracheostomy or ‘trach’?• Why do I need a tracheostomy?• How will I care for my tracheostomy when I go home?• When should I get medical help for my tracheostomy?
Information for patients preparing for a tracheostomy at Toronto General Hospital
Author: Cathy Bergman, R.N. Head and Neck Surgery, University Health Network/GeneralDivision (Revised by: Cathy Bergman RN, Julia Bruce RN, Gina Bryden RN, Romeo Cruz RN, Natalia Evitch RN, Jennifer Deering RN)Reviewed: 03/2017Form: D-5013
2
About tracheostomies
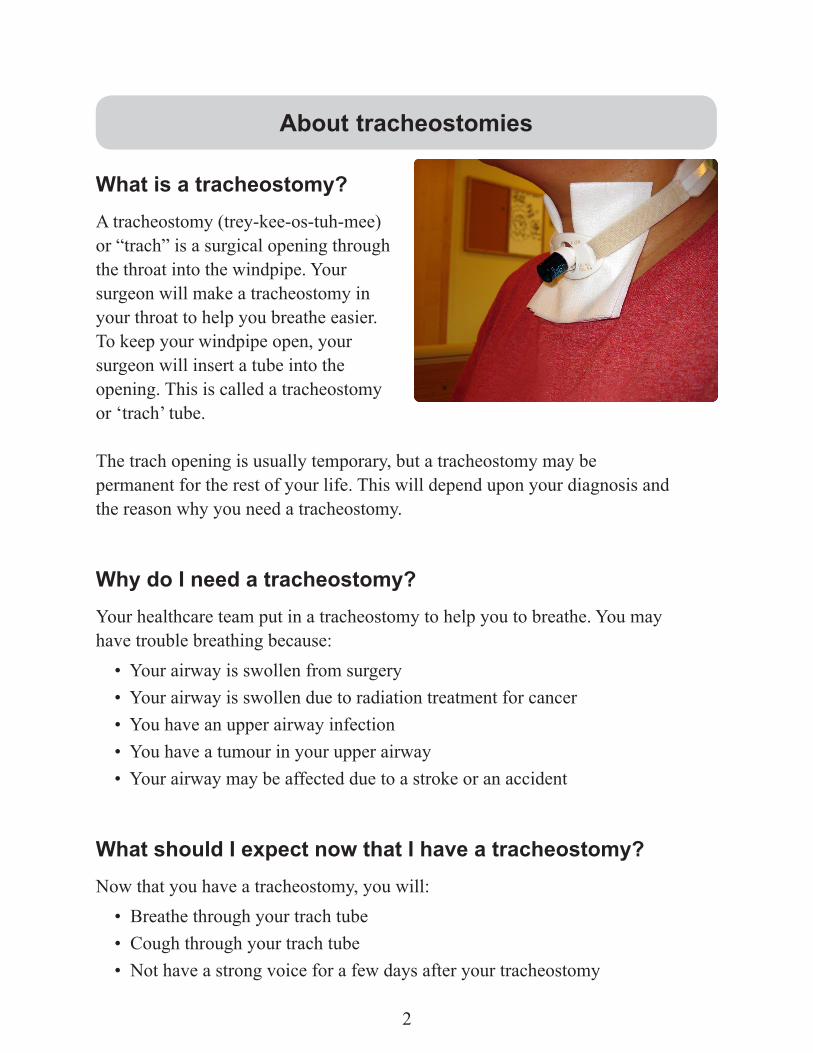
What is a tracheostomy? A tracheostomy (trey-kee-os-tuh-mee) or “trach” is a surgical opening through the throat into the windpipe. Your surgeon will make a tracheostomy in your throat to help you breathe easier. To keep your windpipe open, your surgeon will insert a tube into the opening. This is called a tracheostomy or ‘trach’ tube.
The trach opening is usually temporary, but a tracheostomy may be permanent for the rest of your life. This will depend upon your diagnosis and the reason why you need a tracheostomy.
Why do I need a tracheostomy?Your healthcare team put in a tracheostomy to help you to breathe. You may have trouble breathing because: • Your airway is swollen from surgery • Your airway is swollen due to radiation treatment for cancer • You have an upper airway infection • You have a tumour in your upper airway • Your airway may be affected due to a stroke or an accident
What should I expect now that I have a tracheostomy?Now that you have a tracheostomy, you will: • Breathe through your trach tube • Cough through your trach tube • Not have a strong voice for a few days after your tracheostomy
3
Some patients may need to go home with a trach tube. If this is the case for you, a nurse will help you learn how to take care of your trach at home. Your teaching will begin after your surgery.
When can I eat and drink?
If you have just had a tracheostomy inserted, you may start clear fluids such as apple juice, water, ginger ale and clear tea within a few hours.
You may gradually start eating your usual food.
When can I talk?
You will be able to talk once your doctor decides with you when to change your trach tube to a different type of tube called a ‘fenestrated’ trach tube. This will be done at your bedside and will help you to have a stronger voice.
What should I know before I go home with my trach?Before you go home:
You, your family member or both must learn how to take care of your trach. This will be covered on page 6 of this booklet.
The Community Care Access Centre (CCAC) coordinator will visit you in the hospital. He or she will arrange for a home care nurse to see you at homeThe home care nurse will visit you at home once or twice per day.
Your CCAC nurse will give you supplies for trach care before you go home.You can check the list of supplies at the back of this booklet and use it when you need to get more.
4
Parts of a trach tube
Outer cannula (‘kan-yuh-luh’) This is the outer part of the tube. It sits in your windpipe and keeps your airway open. You should never remove the outer cannula from your windpipe.
Tracheostomy tube
5
Inner cannula
This is the inner part of the trach tube. It fits inside the outer cannula. The inner cannula is taken out for cleaning and then put back in. This inner cannula should never be thrown out. It belongs to your trach set.
Obturator
This is also called the ‘introducer.’ The obturator has a smooth end. It is used by your healthcare team to put your trach back into your throat if it comes out accidentally. This obturator should never be thrown out. It belongs to your trach set.
Cork
This is a plastic cap that fits over the end of your inner cannula. Your trach will be corked when your doctor thinks you are ready to try breathing through your nose and mouth. Your nurse will show you how to remove the cork from your trach if you feel short of breath. See more on page 13 about corking.
Trach plateThis is the flat part (flange) of the trach tube around its opening. The plate sits on your neck and holds your trach tube in place.
6
Velcro® trach tiesThe Velcro trach tie holds your trach tube in place. Your trach ties can be washed and used over and over. You should have someone to help you change your Velcro trach ties for the first few times. Please see page 11 for information on how to change your ties.
Taking care of your trach at home
To take care of your trach at home, you will need to:
• Clean your trach tube
In the beginning, clean your trach tube 3 to 4 times a day. You can clean it more often if you need to. Later on, you will not have to clean the tube as often. See page 7 for more information on how to clean it.
• Keep your skin around the trach plate clean and dry.
• Your skin can get red and sore if you do not take care of it. Put Vaseline® on the skin around your trach tube using a Q-tip®. See page 11 for more information
• Put trach gauze under your trach plate. This will keep your skin dry. Change the gauze often to protect your skin.
• If the redness or soreness does not go away, call your doctor.
• Keep your airways moist.
• If you notice some blood when you cough out your secretions, this could mean you need more moisture when you breathe. Your airway may be dry. Keep a cool mist vaporizer in your home and drink plenty of fluids. Use saline squirts to keep your secretions moist. We will teach you how to use saline squirts in this booklet.
7
Cleaning your trach
Before cleaning your trach1. Collect your supplies
Your nurse will show you how to care for your trach tube. You will be givena few supplies to start by the Home Care nurse before you go home. When they run out, you can buy more from a drug store or a medical/surgical supply store.
To clean your trach tube, you will need: • 3% Hydrogen peroxide • Normal saline (salt water) • Trach brush • Q tips or cotton tipped swabs • Vaseline or petroleum jelly • Trach gauze • Clean, Velcro ties • 4 small, clean disposable cups or
any four clean cups • Suction catheters • 3cc syringe • Small, free standing mirror
2. Wash your hands.
3. Put the cleaning items on a clean, flat surface. A table or counter top will work.
4. Pour your cleaning solutions into four small cups: 3% hydrogen peroxide into one small cup and normal saline into the other three cups.
8
Cleaning your trachThere are 4 steps to cleaning your trach:
1. Squirting normal saline2. Suctioning3. Cleaning your inner cannula4. Cleaning your skin around your trach
Step 1: Squirting saline
1. Sit in front of a free standing mirror.
2. Fill a 3 cc syringe with normal saline from one of the cups.
3. Squirt the normal saline into your trach tube. This will help loosen your secretions. It will make you cough.
Step 2: Suctioning
A suction machine will be delivered to your home by CCAC before you leave the hospital.
• Suction your trach when you wake up in the morning and before you go to bed.
• You will also need to suction your trach when you cannot easily cough up your secretions.
• You will need to suction your trach if you are not able to clear the mucous in your lungs (your secretions) by coughing. You may hear a gurgling or rattling of secretions in your throat.
9
How to suction your trach
1. Rinse the suction catheter before use by suctioning normal saline from the small cup.
2. Put the suction catheter about 10 - 12 cm (3 - 4 inches) into your trach.
Do not apply suction when putting the suction catheter into your trach.
3. Put your thumb on the opening of the suction catheter. This provides suction.
4. Slowly remove the suction catheter from your trach by twisting it side to side with your fingers while applying suction (covering the hole with your thumb).
Suctioning tips
• Do not leave the suction catheter in your trach longer than 10 seconds as it may cause you to become short of breath.
• One catheter can be used to suction your secretions several times. Rinse the suction catheter in normal saline if needed. When finished, throw away this cup of normal saline.
10
• Throw away the suction catheter when you are finished. You must use a new catheter and a new cup of normal saline with each suctioning session.
Step 3: Cleaning your inner cannula
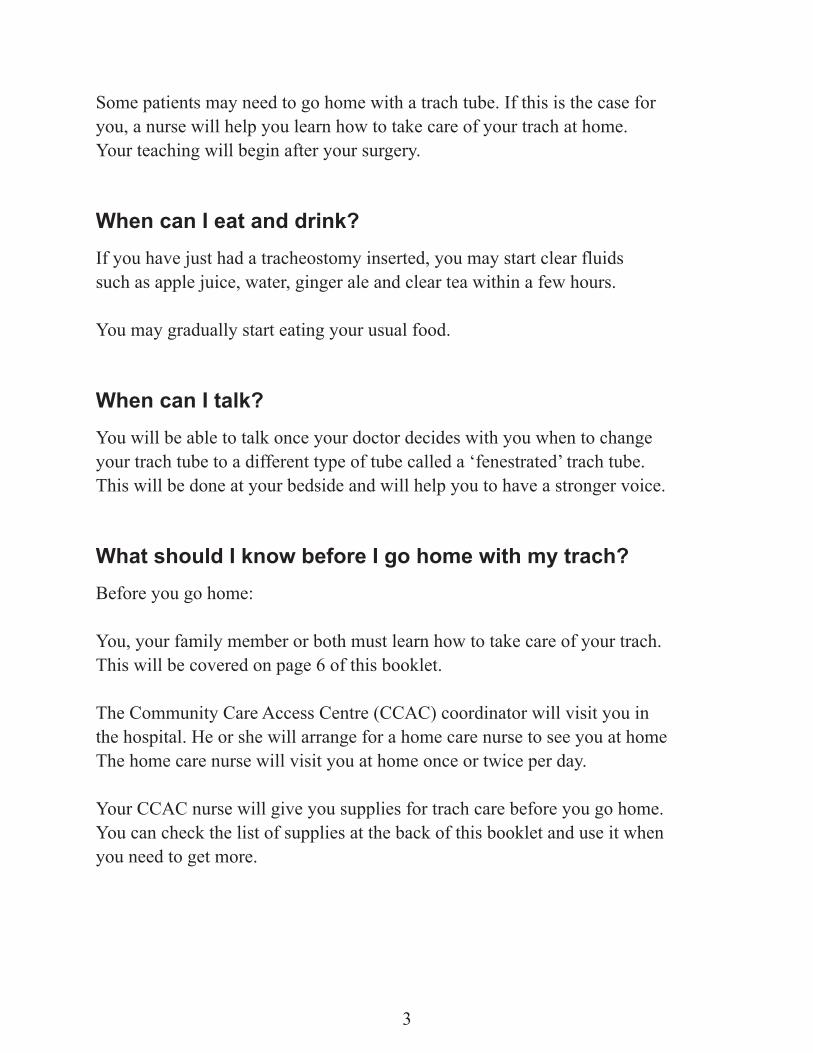
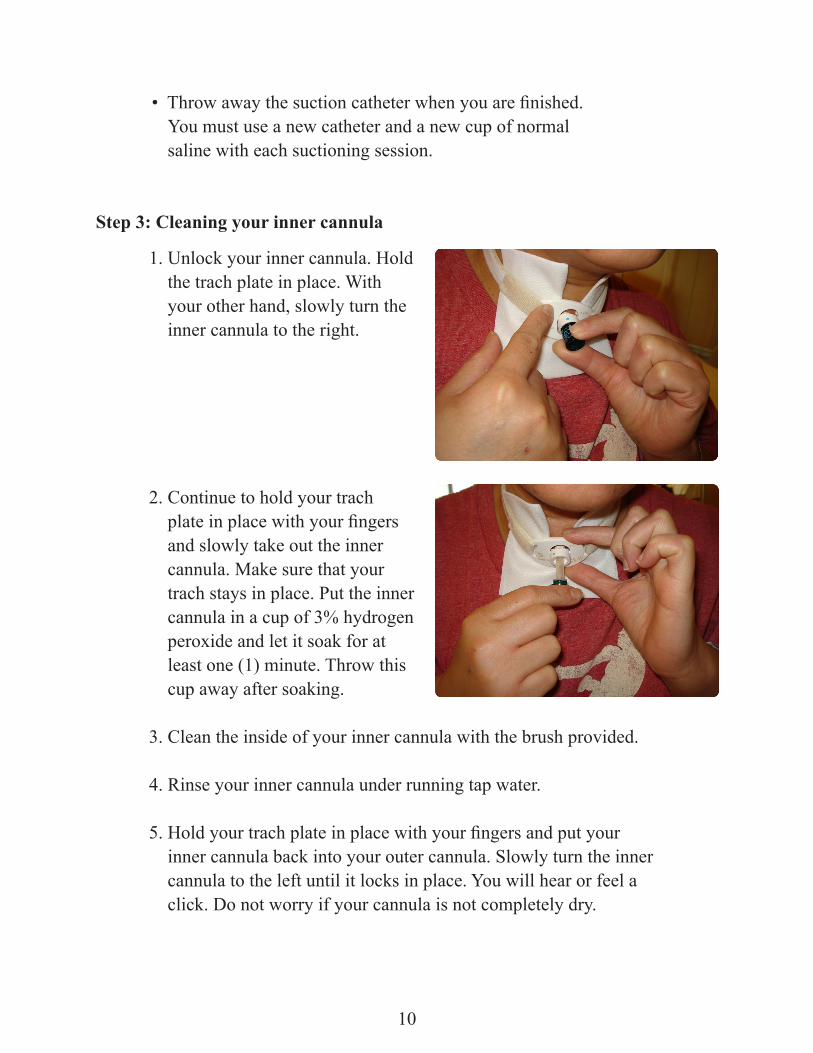
1. Unlock your inner cannula. Hold the trach plate in place. With your other hand, slowly turn the inner cannula to the right.
2. Continue to hold your trach plate in place with your fingers and slowly take out the inner cannula. Make sure that your trach stays in place. Put the inner cannula in a cup of 3% hydrogen peroxide and let it soak for at least one (1) minute. Throw this cup away after soaking.
3. Clean the inside of your inner cannula with the brush provided.
4. Rinse your inner cannula under running tap water.
5. Hold your trach plate in place with your fingers and put your inner cannula back into your outer cannula. Slowly turn the inner cannula to the left until it locks in place. You will hear or feel a click. Do not worry if your cannula is not completely dry.
11
Step 4: Cleaning the skin around your trach plate
1. Dip a Q-tip in a cup of normal saline.
If the skin around your trach plate has a lot of crusting, you will need to clean the skin around your trach with 3% hydrogen peroxide. You will need to pour a new cup of peroxide for this.
2. Gently clean the skin around your trach plate. Try not to move your trach tube. Repeat this cleaning using Q-tips soaked in normal saline.
3. Use a Q-tip to apply a thin layer of Vaseline or petroleum jelly to the skin around your trach.
4. Put trach gauze under your trach plate. This will prevent skin irritation.
You need to clean around your trach site at least two (2) times per day (when you wake up and before you go to bed).
Changing your trach ties
You will need help changing your trach Velcro ties for the first few times.
Do not remove your old Velcro trach ties until you have replaced them with new trach ties.
You may change your Velcro trach ties once they have become soiled. Wash the ties with a mild soap, hand dry and reuse them again.
12
1. Put the new Velcro tie (rough ends facing out) around your neck. Take one of the ends and put it through one of the openings in your trach flange (flat part of the trach plate).
2. Fold back the end of the Velcro tie until it sticks to the side of the trach tie.
3. Follow the same steps with the other end of the Velcro tie.
4. Make sure the new tie on your neck is well secured.
5. Remove the old trach tie.
New tie
New tie
New
tie
New tie
Old tie
Old tie
Old tie
13
Things to think about when at home
About corking your trach tube
When you are ready to try breathing through your nose and mouth, your trach will be ‘corked.’ Corking is when a plastic cap is placed over the end of your inner cannula. Your doctor will decide with you when you are ready for your trach to be corked. When your trach is corked:
• You will breathe through your nose and mouth. • Your voice will become stronger. • If you cough, your secretions will come out of your mouth instead of
your trach.
If you feel short of breath when the cork is on your trach, remove the cork right away.
The cork is easy to remove. To do this, hold your trach plate with your one hand. Gently twist the cork until it comes out.
I am coughing up blood. Is that normal?It is normal to cough up some blood for a few days after your trach surgery. If the bleeding becomes heavy, bright red and for a long period, go to your nearest Emergency Room.
Can I shower with a trach tube?Yes, you may shower, but do not get water in your trach tube.A hand-held showerhead works best for controlling where the spray goes.
14
When to get medical help
I feel short of breath, congested or both. What should I do?• Stay calm. You may have a mucous plug or your inner cannula may
be blocked.• Squirt saline using a 3 cc syringe into your trach tube.• Cough out your secretions.• Take out your inner cannula and clean it.• Suction yourself as needed.
If you are still short of breath, congested or cannot breathe, call 911 or have someone call for you.
My trach tube fell out. What should I do?If your trach falls out:
• Stay calm.• Lift your head up. This will keep your trach hole open.• Call 911 or have someone call for you.• Put your trach tube back in if you are able to. You should still go to your
nearest Emergency Room to make sure your trach is in the right place.
What should I do if I my secretions change in colour, odour or in amount?If your secretions change in any way, make an appointment with your family doctor.
15
Who do I talk to if I have questions or concerns about my tracheostomy?For question or concerns about the care of your trach, contact:
Clinical Nurse Coordinator, Head and Neck Program, Toronto General Hospital Phone: 416 340 4665
Patient Care Coordinator, Head and Neck Program, Toronto General Hospital Phone: 416 340 4800 ext. 6683
For any other questions, please call your surgeon’s office.
Trach care supply check list□ 3% Hydrogen peroxide□ Normal saline□ Trach brush□ Q tips□ Vaseline or petroleum jelly□ Trach gauze□ Clean, Velcro ties□ Small cups□ Suction catheters□ Small, free standing mirror□ 3cc syringe
Suggestions where you can buy trach care suppliesCall your local CCACShopper’s Home Health Care
Disclaimer: Any vendor or retail outlet in this booklet is not an endorsement by UHN of any particular goods or services. UHN cannot be responsible for the goods or services which may be available from those vendors or retailers.