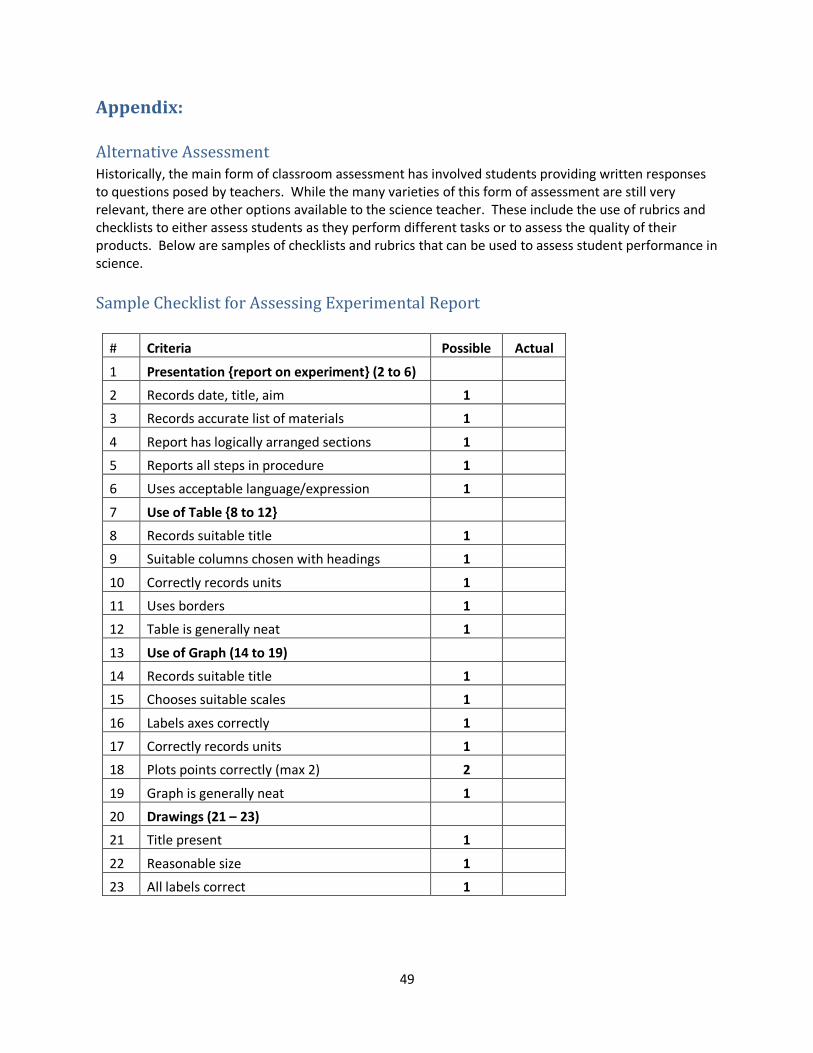
53
This version of the primary science curriculum was last revised in September 2019
This version of the primary science curriculum was last revised in September 2019
2
Contents Foreword: ............................................................................................................................................... 3
Acknowledgements: ................................................................................................................................ 3
Organization of the curriculum: ............................................................................................................... 4
Knowledge: ......................................................................................................................................... 4
Process Skills: ...................................................................................................................................... 4
Attitudes and Values:........................................................................................................................... 4
Technology: ......................................................................................................................................... 4
Structure of the Units: ......................................................................................................................... 4
Key Attitudes and Skills: Definitions ......................................................................................................... 6
Grade III: Term 1 ..................................................................................................................................... 9
Unit 1: Plants ................................................................................................................................... 9
Unit 2: Seeds and Germination ....................................................................................................... 13
Unit 3: Classifying Vertebrates ....................................................................................................... 16
Unit 4: Food Chains and Webs........................................................................................................ 19
Unit 5: Conservation of the Environment ....................................................................................... 22
Grade III: Term 2 ................................................................................................................................... 25
Unit 6: Effect of Forces ................................................................................................................... 25
Unit 7: Magnets ............................................................................................................................. 28
Unit 8: Structures in the Environment ............................................................................................ 31
Unit 9: Heat and Light .................................................................................................................... 34
Grade III: Term 3 ................................................................................................................................... 38
Unit 10: Water Cycle ........................................................................................................................ 38
Unit 11: Properties of Air ................................................................................................................. 42
Unit 12: Our Solar system ................................................................................................................ 46
Appendix: .............................................................................................................................................. 49
Alternative Assessment ..................................................................................................................... 49
Sample Checklist for Assessing Experimental Report .......................................................................... 49
Sample Checklist for Assessing Practical Skills .................................................................................... 50
Sample Rubric for Assessing Student Collaboration............................................................................ 51
Sample Rubric for Creation of a Model .............................................................................................. 51
Sample Rubric for Holistic Assessment of a Task ................................................................................ 51
Recommended Resources for Primary Science Teachers .................................................................... 52
3
Foreword: Science education should prepare students to become socially well-adjusted citizens capable of utilizing the knowledge, attitudes and skills gained from the program into their daily lives. It should open up a variety of career pathways for students while simultaneously providing them with a foundation for further academic studies. The national primary science curriculum is designed to facilitate the realization of these goals. Among the philosophical pillars supporting this design, is the core belief that the science program should be both fun and relevant. Thus, students should enjoy doing science. The subject matter with which they interact should stimulate and maintain their interest. This in turn is likely to foster a desire for further experiences within the field – and many opportunities abound to deepen ones experiences. In partial recognition of this, the curriculum design deliberately encourages teachers to liberally incorporate materials, resources and processes within the students’ experiences into science lessons. This should help students to realize that the application of scientific knowledge, skills and attitudes can – and often do – lead to significant benefits for society and for individuals. Modern society relies on many technological advances that resulted from the work of scientists. Today, science, technology and society keep influencing each other and this interdependency should be leveraged to highlight the relevance of studying science. Also, while students will go on to choose diverse career paths in life, the habits of mind developed from studying science will find application and functionality in almost every facet of life.
Acknowledgements: Revision of the curriculum required several years and input from many different individuals. Some of the key persons assisting with this revision are, Ms. Kendra Thomas, Ms. Joycelyn James, Ms. Allison Ledeatte, Ms. Soynie Lewis, Mrs. Leonora Roberts-Thomas and Mrs. Michiyo Robinson. On behalf of the Ministry of Education, I wish to offer thanks to these dedicated teachers – and the many others who contributed to the revision process. In particular, I wish to offer personal gratitude to Ms. Kendra Thomas and Ms. Joycelyn James, who worked in every phase of the project and who were pivotal in compiling and reviewing every unit at every grade level.
Anthony Spencer .
W Anthony Spencer Education Officer – Natural Sciences
4
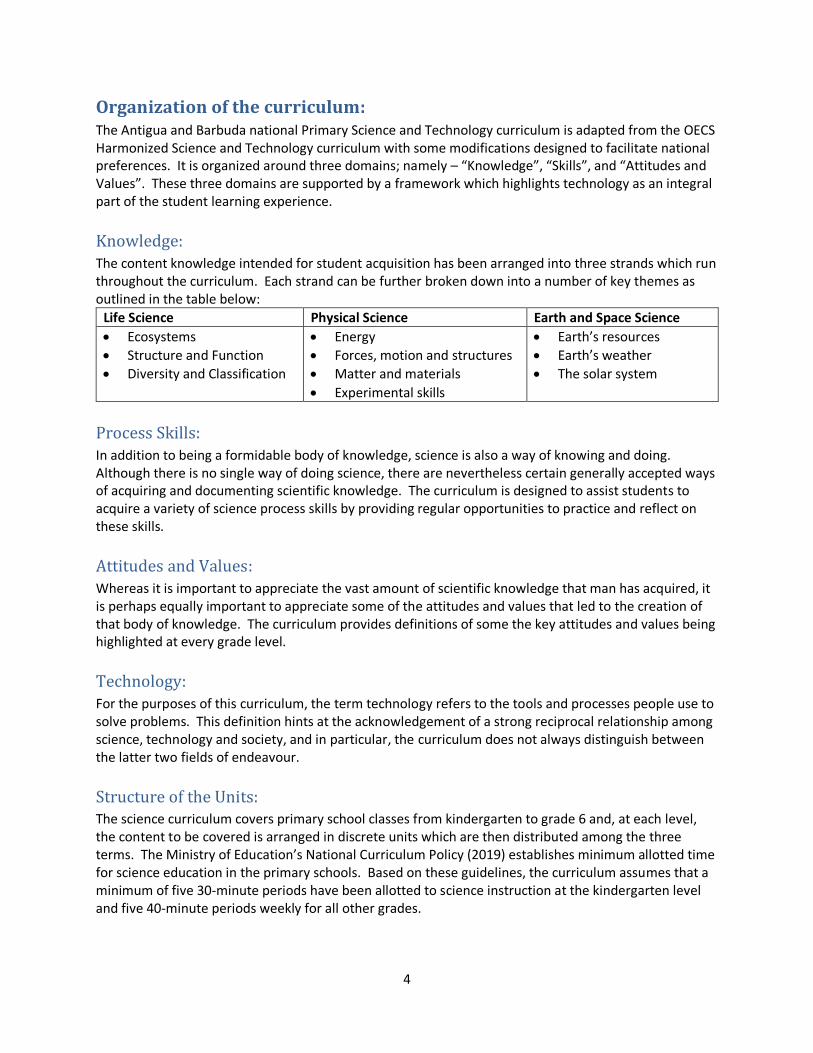
Organization of the curriculum: The Antigua and Barbuda national Primary Science and Technology curriculum is adapted from the OECS Harmonized Science and Technology curriculum with some modifications designed to facilitate national preferences. It is organized around three domains; namely – “Knowledge”, “Skills”, and “Attitudes and Values”. These three domains are supported by a framework which highlights technology as an integral part of the student learning experience.
Knowledge: The content knowledge intended for student acquisition has been arranged into three strands which run throughout the curriculum. Each strand can be further broken down into a number of key themes as outlined in the table below:
Life Science Physical Science Earth and Space Science
Ecosystems
Structure and Function
Diversity and Classification
Energy
Forces, motion and structures
Matter and materials
Experimental skills
Earth’s resources
Earth’s weather
The solar system
Process Skills: In addition to being a formidable body of knowledge, science is also a way of knowing and doing. Although there is no single way of doing science, there are nevertheless certain generally accepted ways of acquiring and documenting scientific knowledge. The curriculum is designed to assist students to acquire a variety of science process skills by providing regular opportunities to practice and reflect on these skills.
Attitudes and Values: Whereas it is important to appreciate the vast amount of scientific knowledge that man has acquired, it is perhaps equally important to appreciate some of the attitudes and values that led to the creation of that body of knowledge. The curriculum provides definitions of some the key attitudes and values being highlighted at every grade level.
Technology: For the purposes of this curriculum, the term technology refers to the tools and processes people use to solve problems. This definition hints at the acknowledgement of a strong reciprocal relationship among science, technology and society, and in particular, the curriculum does not always distinguish between the latter two fields of endeavour.
Structure of the Units: The science curriculum covers primary school classes from kindergarten to grade 6 and, at each level, the content to be covered is arranged in discrete units which are then distributed among the three terms. The Ministry of Education’s National Curriculum Policy (2019) establishes minimum allotted time for science education in the primary schools. Based on these guidelines, the curriculum assumes that a minimum of five 30-minute periods have been allotted to science instruction at the kindergarten level and five 40-minute periods weekly for all other grades.
5
Since the curriculum is a spiral curriculum, there are recurring topics at various grade levels. However, at each level, the consistent and organized manner in which the units are presented should provide clarity about the depth and breadth of coverage required. Each unit in the curriculum begins by identifying the strand, the theme, the topic and an estimate of the time that should be allocated to covering unit. Focus questions are presented at this point and these should further help to highlight the key emphases for the unit. The next section of the unit contains two components, namely, learning outcomes and specific objectives. The learning outcomes (including those specifically related to technology) can be considered as the broad goals which the unit covers while the specific objectives present a more precise statement of the required content. To further clarify the expected depth of coverage, the next section includes a list of the “key concepts” encountered in the unit as well as a summary of the required content. It also offers a list the skills, attitudes and values that are particularly relevant in the unit. Next is a section that contains suggested teaching activities. These activities generally end with a suggestion for a project that students can undertake. Additionally, the section also includes suggestions for integrating science with other curriculum areas and a variety of assessment ideas. The suggestions for assessment include both traditional pen and paper tests but there is also a deliberate emphasis on alternative forms of assessment. Towards the end of the unit, there is a list of materials that might be required to perform the activities identified in the unit. There are also references to textbooks and Internet sites that might prove helpful in the delivery of the curriculum. Each unit then ends with visual aids that relate to some of the content within the unit. Finally, at each level, some attempt has been made to arrange the units in such a way that teachers can progress sequentially through the content. However, rather than slavishly following the suggested activities and sequence of content in the curriculum, teachers are encouraged to be creative in covering the content that has been mapped out for each specific grade.
6
Key Attitudes and Skills: Definitions APPROPRIATE EXPECTATIONS AT THE DIFFERENT GRADE LEVELS FOR THE ATTITUDES, SKILLS AND
TECHNOLOGY OUTCOMES ARE AS FOLLOWS:
SKILLS: In developing their skills of inquiry, problem solving and design, the students are expected to:
Observing Use as many senses as are appropriate and safe to gather information. Identify differences and similarities between objects and events. Identify sequence in events.
Measuring Use simple measuring instruments or model of measuring instruments. Manipulating Set up simple experiments to compare results.
Manipulate simple equipment. Recording Use pictures and charts to report results.
Fill out simple tables to report results. Classifying Group objects according to several criteria. Communicating Talk freely about their activities and the ideas they have, with or without
making a written record. Use appropriate vocabulary to describe their observations. Listen to others’ ideas and look at their results. Report events by using demonstrations, role-play, simple drawings,
paintings and paragraphs. Inferring Notice patterns in simple measurements and events. Interpreting data Discuss what they find out in response to questions.
Compare their findings with their predictions. Notice changes when one variable is changed.
Experimenting Freely ask a variety of questions and suggest how they might be answered. Suggest how they could investigate to find out answers to questions. Identify the manipulated and responding variables in simple experiments. Suggest equipment materials and procedure for conducting investigations.
Predicting Use evidence to make predictions. Suggest how something may have happened.
Problem solving Suggest solutions to simple problems. Designing Construct models either by following instructions or by using their own
designs. Select appropriate material to make models and gadgets.
7
ATTITUDES: Students should be encouraged to:
Curiosity Ask questions about objects and events. Find out more about events and objects on their own.
Inventiveness Suggest new ways of doing things. Use equipment in novel ways
Respect for evidence
Provide explanations for their conclusions. Listen to other children’s results and explanations. Recognize when conclusions do not fit the evidence
Persistence Complete activities. Persist at tasks.
Respect for living things
Show sensitivity to living things.
Cooperation Share with others. Work together with others. Accept responsibilities.
Concern for safety Observe safety instructions.
Concern for the environment
Suggest ways to care for the environment. Commit to protect the environment.
Technology In developing their ability to interact appropriately with technology, students should:
Technological methods be able to discuss and make gadgets to solve problems. be able to construct models
Nature of Technology realize that people make some things for their use. understand that products are replicable. realize that people can make unique things. understand that others may be working on the same idea.
Use of Technology appreciate the use of devices, tools and structures made by humans in the home and community.
realize that human-made things can pollute the environment. realize that people may abuse and misuse technology.
9
Grade III: Term 1 Strand: Life Science (Diversity and Classification)
Unit 1: Plants Duration: 15 periods Focus Questions: (1) How are plants classified?
Learning Outcome Specific Objectives
At the end of this unit students should 1. understand that plants can be
grouped according to their similarities.
Technology:
Construct models.
1. At the end of this unit students should be able to 1.1. name the main parts of a plant. 1.2. relate the features of the external structures of
plants to their functions. 1.3. classify plants as flowering or non-flowering. 1.4. classify plants as monocotyledons or
dicotyledons. 1.5. describe the differences between
monocotyledons and dicotyledons.
Key Concepts CONTENT Skills, Attitudes and Values
di-cotyledon
fibrous root system
flowering
flowers
fruits
jointed stem
leaves
mono-cotyledons
net-veined leaves
non-flowering
one seed leaf
parallel-veined leaves
roots
seeds
spore
stem
tap root system
Content Principle:
Plants can be classified into different groups based on their characteristics.
Required Content:
The main parts of a plant are the leaves, stem root, flower and fruit.
The root anchors the plant in the soil and absorbs nutrients.
The leaves make food for the plants.
The stem holds the leaves, flowers and fruits.
The flower contains the reproductive parts of the plant.
Fruits contain seeds that grow into new plants.
Flowering plants are plants that produce flowers which make seeds that help the plants to reproduce. Examples include mango, beans, corn, grass, pumpkin and paw-paw.
Non-flowering plants do not bear flowers. They usually reproduce from spores. Examples include ferns, conifers and moss.
Flowering plants can be classified as monocotyledons and dicotyledons.
Skills
Classifying
Communicating
Manipulating
Measuring
Observing
Predicting
Recording
Reporting Attitudes and Values
Cooperation
Curiosity
Respect for living things
10
two seed leaves
un-jointed stem
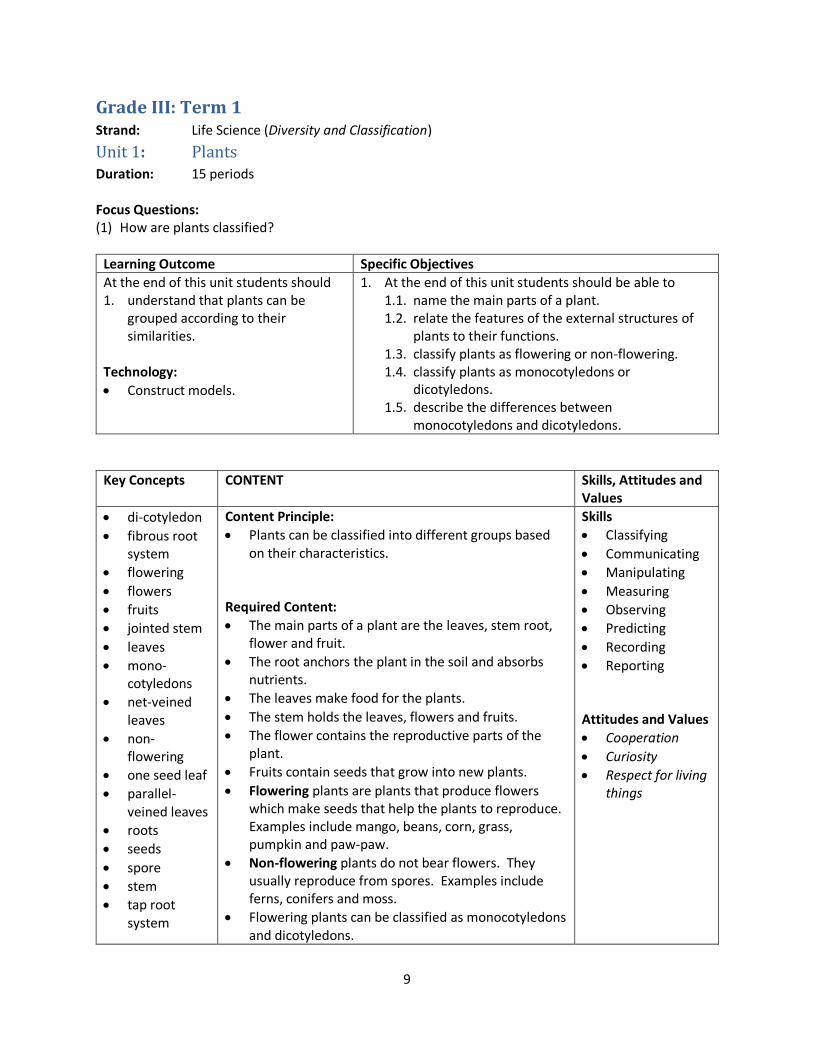
Monocotyledons have one cotyledon in the seed o They have parallel-veined leaves, fibrous roots,
jointed stems and the petals are in three or multiples of three.
o Examples include garlic, onion, corn, banana, sugar cane, rice, grass, ginger and coconut.
Dicotyledons have two cotyledons in the seed.: o They have net veined leaves, tap roots, unjointed
stems and the petals are in fours or fives or multiples of four or five.
o Examples include mango, peas, beans, peanut, avocado, sunflower, apple, lettuce, citrus fruits, tomatoes and cashew.
Suggested Activities Assessment Cross Curricular Links
Show pupils pictures of various types of plants.
Have them compare the plants and discuss the similarities. Alternatively a set of plants (mainly weeds and grasses) may be provided for pupils. Hold a discussion about plants.
Have pupils complete a plants are, can, have chart e.g. o https://www.teacherspayteachers.com/Pr
oduct/Freebie-Plant-Unit-Needs-Can-Have-Are-Chart-1848709
Note that not all plants have flowers and fruits.
Identify and the parts of a plants using the pictures or specimens.
Relate the features of the parts of a plant to their functions.
Have pupils sketch and label diagrams of a plant in their notebooks.
Make a parts of a plant mini book. Collect and paste examples of each plant part on the appropriate pages; o https://worksheetplace.com/mf_pdf/Parts
-of-a-Plant.pdf
Students work in groups to look at pictures of plants or go outdoors to observe plants and classify them as flowering or non-flowering, giving examples in each group.
Students work in groups to examine seed samples, by peeling away their seed coat, to observe the number of seed leaves present in
Assess students’ sketches and models
Use a rubric to assess students’ collaboration. Criteria can include respect, participation, team work, etc.
Assess Venn diagrams
Language Arts: Use of descriptive language
Mathematics: use of tables, graphing skills
Visual Arts: Leaf rubbings, making models, making sketches.
11
each. Make sketches and record any other observations.
After discussions about monocotyledons and dicotyledons students classify their seeds.
Students work in groups to investigate up-rooted plant samples such as corn and mango (seedlings) or other monocotyledons and dicotyledons. After describing the leaves, roots and stems in each case, they link their findings to the number of seed leaves present in each type of plant and draw conclusions about the features of monocots and dicots.
Complete a Venn diagram comparison of monocotyledons and dicotyledons.
Students construct a key for the identification of flowering, non flowering, monocotyledons and dicotyledonous plants.
Sort leaves (or pictures of leaves) as monocotyledons and dicotyledons.
Do leaf rubbings of monocotyledonous leaves and dicotyledonous leaves to observe the venation.
Go outside and count the number of different species of monocots and dicots in a given area. Present the information in tables and pictographs.
Project: o Make models of leaves, stems, flowers
and seeds of monocot and dicots using a variety of materials.
Materials:
Pictures of flowering and nonflowering plants, specimens of flowering and non flowering plants, hand lens, various leaves, variety of seeds, variety of materials.
Books:
Modern Science and Technology for the Caribbean: Book 2 Bright Ideas Book 3
URLs: http://www.kean.edu/~fosborne/resources/ex6d.htm http://theseedsite.co.uk/monocots2.html
12
Diagrams:
13
Grade III: Term 1 Strand: Life science (Structure and Function)
Unit 2: Seeds and Germination Duration: 10 periods Focus Questions: (1) What are the parts of a plant? (2) How are plants propagated?
Learning Outcome Specific Objectives
At the end of this unit students should 1. appreciate that the seed is a useful
method for propagating plants. Technology:
Appreciate the use of devices made by humans.
2. At the end of this unit students should be able to 2.1. define seed. 2.2. draw and label the parts of seeds. 2.3. state the functions of the various parts of a seed. 2.4. define germination. 2.5. describe the process of germination in plants. 2.6. state the conditions necessary for germination.
Key Concepts CONTENT Skills, Attitudes and Values
Germinate
Hilum
Micropyle
Moisture
Plantlets
Plumule
Propagate
Radicle
Seeds
Content Principle:
Flowering plants can be propagated by seeds. Required Content:
Fruits contain seeds that grow into new plants.
Many plants grow from seeds. The seed is the part of a plant which contains an embryo of a new plant.
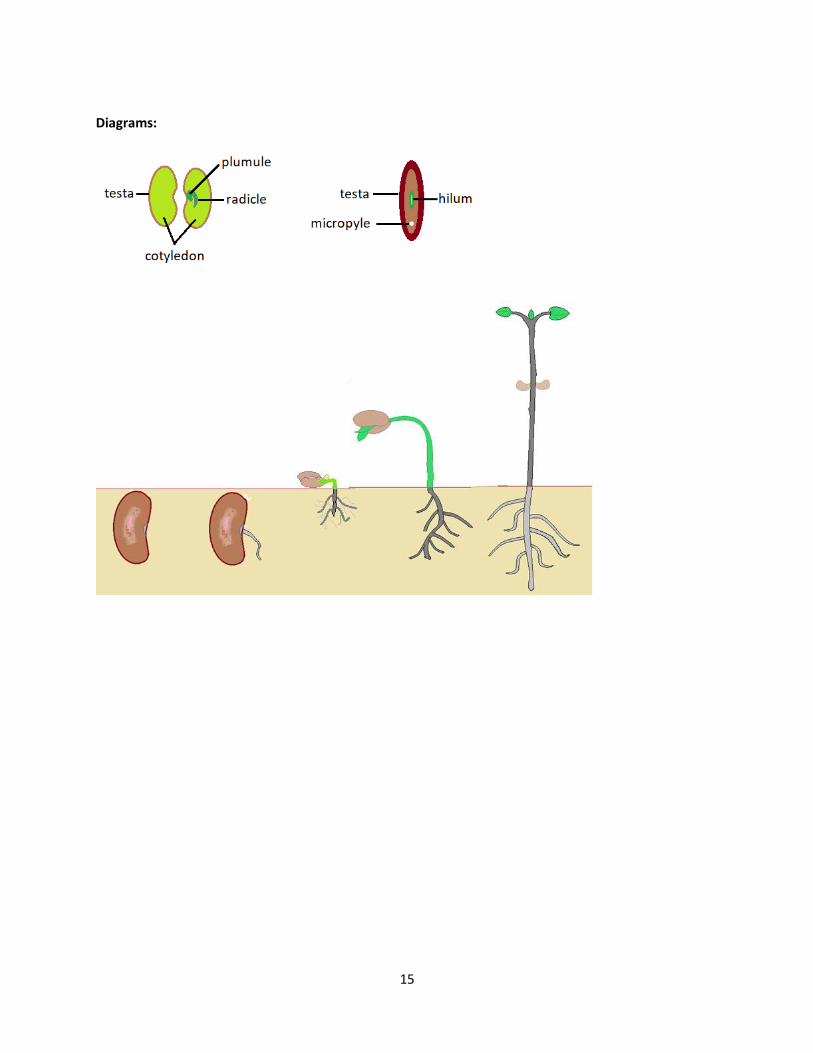
The main parts of a seed are the seed coat (testa), cotyledons, plumule, radicle, hilum and micropyle. o The seed coat protects the seed. o The cotyledon provides food for the germinating
seed. o The plumule develops into the shoot and the
radicle develops into the root. o The micropyle is a tiny hole in the seed that
allows water to enter the seed. o The hilum is the scar from which the seed was
attached to the pod.
During germination, the seed first takes in water and swells up. The testa then splits and the radicle emerges and grows downwards. The plumule then emerges and grows upwards. The cotyledons decrease in size as the food is used up and eventually fall off as the seedling becomes established.
Skills
Classifying
Communicating
Experimenting
Interpreting data
Manipulating
Measuring
Observing
Recording Attitudes and Values
Cooperation
Persistence
Respect for living things
14
Suggested Activities Assessment Cross Curricular Links
Provide students with seeds that have been soaked overnight.
Open some of the seeds and observe using a hand lens.
Draw and label the parts of a seed.
Discuss the concept of propagation.
Set up seeds to germinate and record the process over several days.
Set up similar seeds to germinate under various conditions e.g. with moisture, without moisture, in warm conditions in cool conditions, in soil, without soil.
Discuss the conditions necessary for germination to take place.
Read and respond to comprehension passages about plant life cycles e.g. https://www.k12reader.com/worksheet/plant-life-cycles/view/
Project: o Create a “flowering plants” garden by
setting up seeds to germinate in clear containers (use both monocots and dicots). Observe and record their germination and growth in the science experiment book. Construct a bar graph to show the height of one of the seedlings on selected days.
Use a rubric to assess students’ teamwork and commitment as they develop the garden.
Language Arts: Creative writing,
Mathematics: using numbers, use of tables, graphing skills
Visual Arts: Making models, posters
Materials:
Water, a variety of seeds, hand lens, clear containers, paper towel, soil. Books:
Modern Science and Technology for the Caribbean: Book 2 Bright Ideas Book 3
URLs: https://www.pinterest.com/pin/231583605813237074/ https://k8schoollessons.com/germination/ https://theeducatorsspinonit.com/germination-science-experiment/ https://www.teachingchannel.org/videos/planning-claims-evidence-reasoning https://www.teachingchannel.org/videos/lesson-claims-evidence-reasoning
15
Diagrams:
16
Grade III: Term 1 Strand: Life Sciences (Diversity and Classification)
Unit 3: Classifying Vertebrates Duration: 15 periods Focus Questions: (1) How are vertebrates classified?
Learning Outcome Specific Objectives
At the end of this unit students should 1. be aware that animals can be
grouped according to characteristics Technology:
Make simple gadgets.
3. At the end of this unit students should be able to 3.1. Name the two main groups of animals. 3.2. Define the term vertebrate. 3.3. List the five classes of vertebrates. 3.4. Describe the main features of each class of
vertebrates. 3.5. Classify animals as vertebrates. 3.6. Classify vertebrates into one of the five classes.
Key Concepts CONTENT Skills, Attitudes and Values
amphibians
backbones
birds
characteristic
classify
features
fish
mammals
reptiles
skeleton
spine
vertebrates
Content Principle:
There are five classes of vertebrates. Required Content:
A vertebrate is an animal that has a backbone and an internal skeleton.
There are five classes of vertebrates; mammals, birds, fish, reptiles and amphibians.
Mammals are warm-blooded, covered with hair/fur, give birth to their young which they breastfeed with milk.
Reptiles have dry, scaly skins, are cold-blooded, breathe through lungs and lay eggs.
Birds are covered with feathers, have wings, are warm-blooded and lay eggs.
Amphibians have smooth, moist skin, are cold-blooded, lay eggs, the young live in water and breathe through gills, the adults live on land and breathe through lungs.
Fish are covered with moist scales, live in water, breathe through gills and lay eggs.
Skills
Classifying
Communicating
Designing
Inferring
Observing
Reporting Attitudes and Values
Curiosity
Respect for living things
17
Suggested Activities Assessment Cross Curricular Links
View pictures / photos; observe vertebrates in their homes, or community. Discuss any differences and similarities.
View x-ray images of animals showing their skeletal structures.
Use cut pieces of straws and pipe cleaners to make a model of a backbone. Manipulate the model to demonstrate how the backbone allows for movement.
Make and play the vertebrate domino Game: https://drive.google.com/file/d/0BwivNcO0Yu1RN3JWdnl2aEJHem8/edit
Teacher asks students to draw their concept of a bird, fish, etc. then display and compare the drawings to generate a list of what makes a bird a bird, or a fish a fish, etc.
Research information on the following areas about vertebrates: o external body o habitat o breathing organ o warm blooded / cold blooded o method of reproduction
Students design posters or booklets showing different classes of vertebrates.
Use matchsticks, toothpicks, skewers etc. to make a skeletal representation of any vertebrate.
Compare and contrast the characteristics of the various classes of vertebrates.
Students draw an outline of one of their hands and turn each finger into a drawing of an animal in each class of vertebrates.
Go outside and record the names and numbers of the different types of vertebrates observed. Display the information in tables and pictographs.
Make a model of any vertebrate using reusable materials.
Project: o Select five different vertebrates and make
a simple identification chart (e.g. dichotomous key) to identify each animal. Include pictures or drawings of the animals.
Use rubrics to assess students’ models, posters and drawings
Give a quiz
Mathematics: use of tables, graphing skills
Visual Arts: Making models and posters, drawing
18
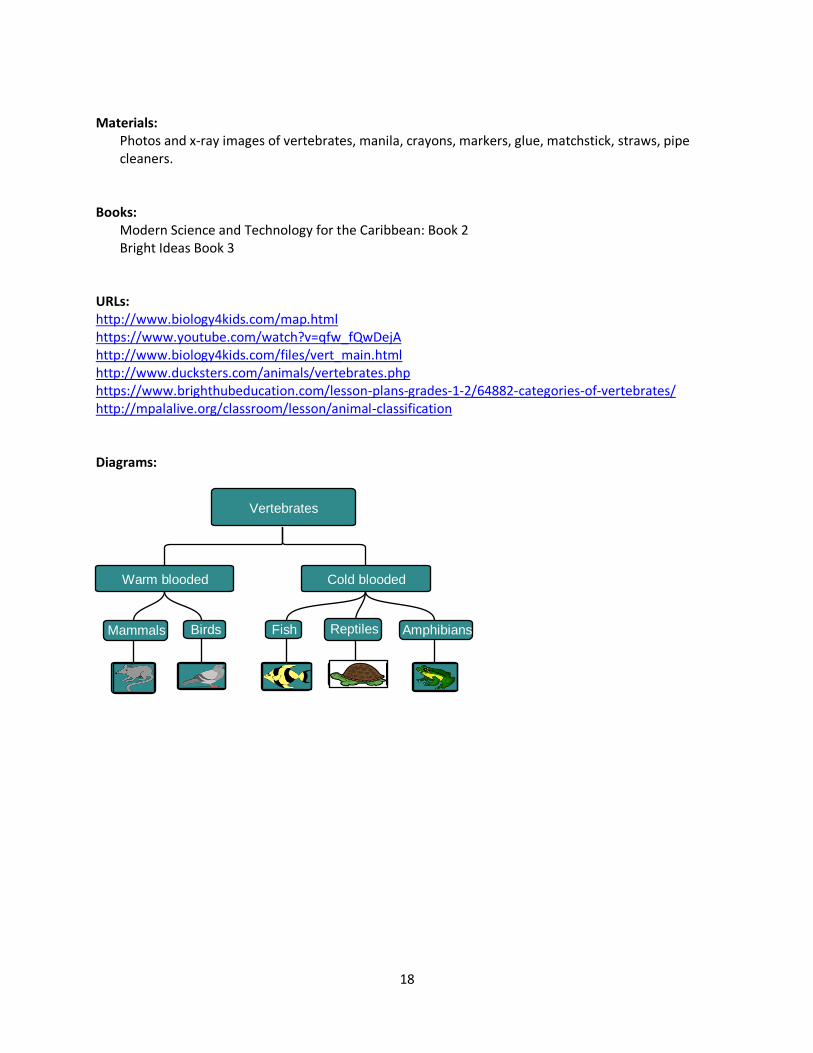
Materials:
Photos and x-ray images of vertebrates, manila, crayons, markers, glue, matchstick, straws, pipe cleaners.
Books:
Modern Science and Technology for the Caribbean: Book 2 Bright Ideas Book 3
URLs: http://www.biology4kids.com/map.html https://www.youtube.com/watch?v=qfw_fQwDejA http://www.biology4kids.com/files/vert_main.html http://www.ducksters.com/animals/vertebrates.php https://www.brighthubeducation.com/lesson-plans-grades-1-2/64882-categories-of-vertebrates/ http://mpalalive.org/classroom/lesson/animal-classification Diagrams:
Vertebrates
Warm blooded Cold blooded
Mammals Birds Fish Reptiles Amphibians
19
Grade III: Term 1 Strand: Life Science (Ecosystems)
Unit 4: Food Chains and Webs Duration: 10 periods Focus Questions: (1) In what ways are organisms dependent on each other?
Learning Outcome Specific Objectives
At the end of this unit students should 1. understand that organisms in an
environment depend on each other for survival.
2. appreciate that there are things in nature that cause imbalance in the way organisms function.
Technology:
Construct models.
4. At the end of this unit students should be able to 4.1. construct simple food chains to show feeding
relationships amongst animals and plants in a given area.
4.2. identify different types of organisms in simple food chains or food webs.
4.3. construct food webs. 4.4. interpret simple food webs. 4.5. identify factors that may disrupt nature’s balance. 4.6. discuss the consequences of disrupting nature’s
balance.
Key Concepts CONTENT Skills, Attitudes and Values
Balance of nature
Carnivores
Competition
Consumers
Decomposers
Food chain
Food web
Herbivores
Omnivores
Predator
Prey
Primary consumer
Producers
Secondary consumer
Tertiary consumer
Content Principle:
Living things depend on each other for survival. Required Content:
A food chain is a simple diagram that shows the feeding relationship between plants and animals.
All food chains begin with a green plant (producer).
Herbivores are animals that eat plants only.
Carnivores are animals that eat meat only.
Omnivores are animals that eat both plants and meat.
Decomposers are organisms that feed on dead or decaying plants and animals.
The primary consumer eats the producer.
The secondary consumer eats the primary consumer.
The tertiary consumer eats the secondary consumer.
A predator is one that hunts and eats another animal.
A prey is an animal that is hunted and eaten by another animal.
Organisms in a food chain depend on each other for survival.
Skills
Classifying
Communicating
Designing
Inferring
Observing
Predicting
Recording Attitudes and Values
Respect for living things
20
Suggested Activities Assessment Cross Curricular Links
Students study diagrams of simple food chains and identify relationships of animals.
Go outside or visit a local area and record the names of organisms found there. Go back to the classroom and work in groups to construct food chains for the area.
Discuss the diets of various consumers and classify them according to what they eat.
Identify predators and preys in the food chains
Make booklets showing pictures of different types of consumers. Describe the diet of each animal.
Discuss the importance of decomposers in an ecosystem.
Link the previously constructed food chains to form food webs.
Identify organisms in various habitats and construct food webs for the various habitats.
Demonstrate how all parts of a food web are dependent on each other by making a pyramid using paper cups. Illustrate and decorate the cups. Place four cups at the base to represent the sun, next three cups to represent the producers, then two cups to represent herbivores and finally one cup to represent carnivores. Remove any one cup and observe and discuss what happens.
Make a 3D food web food pyramid o https://www.education.com/worksheet/a
rticle/trophic-level-pyramid/
Create a food web using students as organisms. Teacher reads aloud various scenarios and the affected organisms react accordingly, e.g. Due to polluted waters many of the fish died. NB. More than one student should be used to represent each organism.
Discuss what may happen when the balance of nature is disrupted and what we can do to ensure we conserve the environment – keep the balance of nature.
Project: o Make a food web booklet showing food
webs from a variety of habitats. o Create a food chain diorama or triorama
to illustrate a food web from a specified habitat.
Assess construction of food chains/ food webs. Criteria may include correct sequence, arrows pointing in the correct direction, at least four organisms in each food chain.
Visual Arts: Making models, booklets
21
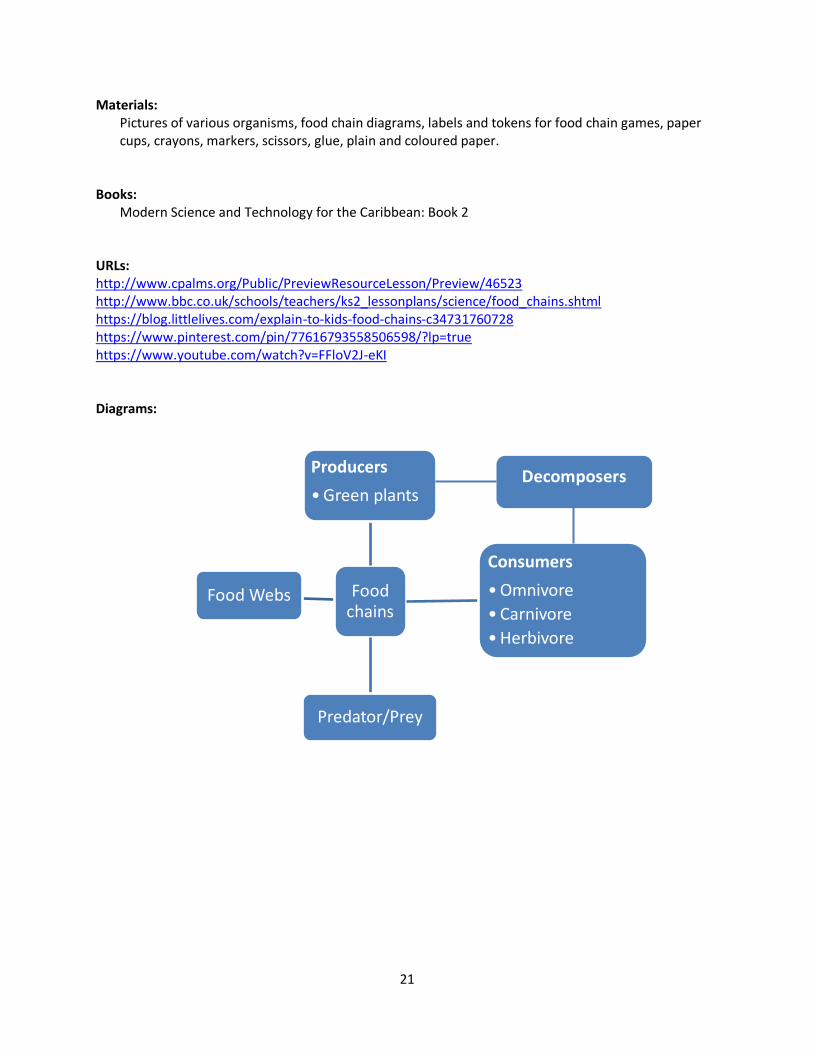
Materials: Pictures of various organisms, food chain diagrams, labels and tokens for food chain games, paper cups, crayons, markers, scissors, glue, plain and coloured paper.
Books:
Modern Science and Technology for the Caribbean: Book 2 URLs: http://www.cpalms.org/Public/PreviewResourceLesson/Preview/46523 http://www.bbc.co.uk/schools/teachers/ks2_lessonplans/science/food_chains.shtml https://blog.littlelives.com/explain-to-kids-food-chains-c34731760728 https://www.pinterest.com/pin/77616793558506598/?lp=true https://www.youtube.com/watch?v=FFloV2J-eKI Diagrams:
Food Webs Food chains
Producers
• Green plants
Consumers
• Omnivore
• Carnivore
• Herbivore
Predator/Prey
Decomposers
22
Grade III: Term 1 Strand: Life Science (Ecosystems)
Unit 5: Conservation of the Environment Duration: 10 periods Focus Questions: 1. How can the environment be protected?
Learning Outcome Specific Objectives
At the end of this unit students should 2. appreciate the importance of
conservation in maintaining balance in the environment.
3. be aware of actions/methods that help to conserve the environment and resources in the environment.
Technology:
Realize that human-made things can pollute the environment.
Realize that people may abuse and misuse technology.
5. At the end of this unit students should be able to 5.1. define the term ‘conservation’. 5.2. describe the role of the three r’s and
conservation in maintaining balance in the environment.
5.3. identify local ecosystems in need of conservation. 5.4. explain the importance of conserving our
resources. 5.5. discuss environmental conservation actions that
can be taken in everyday life.
Key Concepts CONTENT Skills, Attitudes and Values
Balance of nature
Conservation
Recycling
Reusing
Reducing
Resources
Content Principle:
There are many reasons to conserve the environment.
Required Content:
Conservation is the careful use and management of our natural resources such as land, water and plants.
The 3 R’s of protecting and conserving our environment is an easy and effective way to protect the environment: o Reduce: decrease waste by not creating it in the
first place. o Reuse: use materials for another purpose before
throwing out. o Recycle: transform materials into other usable
products.
Skills
Manipulating
Observing
Problem solving Attitudes and Values
Cooperation
Concern for the environment
Respect for living things
23
Suggested Activities Assessment Cross Curricular Links
Students each have a drink of water/juice from a central jug or each take a marble from a bag. Observe what happens if this action is not balanced by replenishing the water and marbles. They will predict what will happen in other scenarios in environment if resources are overused.
Discuss the meaning of conservation and the three R’s and their role in maintaining balance in the environment.
Go on a field trip to visit an ecosystem that is in need of conservation. Make a plan to assist in conserving the ecosystem. Implement the conservation plan. Document the activity using journals, pictures and videos.
Discuss the ways in which we can help to conserve or harm the environment.
Talk about how the national Styrofoam and plastic bag bans will help the environment.
Collect garbage from classroom. Sort the garbage into items that may be reused and those that may be recycled. Suggest how the items may be reused. Suggest ways of reducing the amount of garbage generated.
Discuss the importance of conserving natural resources such as water, air and soil.
Make useful items from reusable materials, e.g. pencil holders from paper and craft sticks. Hold an exhibition of the items produced.
Hold a “Conservation Tea Party”- Set up pairs of tables around the room. Give each student an information card about conservation. Pairs of students take turns moving from table to table sharing and discussing their cards while sipping tea/iced tea. Students are allotted one minute before moving to another table: o https://docs.google.com/file/d/0B_Xl6AW
_iMadSlpzVVp6TWJ3TDA/edit
Project: o Make a “Helping Hand” class poster by
having students trace and cut out their handprints. Students should write what they can do to help to conserve the environment on their handprint.
Us a rubric to assess items made from reusable materials. Criteria may include creativity, use of materials, functionality, durability.
Assess students’ participation in Conservation Tea Party activity. Criteria may include willingness to participate, accuracy of answers, ability to listen, adherence to rules, etc.
Visual Arts: Making various artefacts

24
Assemble the handprints onto a poster and display in class.
o Make a pillow or floor mat from old clothes.
Materials:
Jug, water/juice, cups, marbles, bag, manila, glue, scissors, crayons, markers, gloves, old clothes, burlap bag.
Books:
Modern Science and Technology for the Caribbean: Book 2 Bright Ideas Book 3
URLs: http://www.wwf.org.au/get-involved/change-the-way-you-live/reduce-reuse-recycle#gs.esT0MGo https://www.youtube.com/watch?v=OasbYWF4_S8 https://www.youtube.com/watch?v=FjT8GG0ETQg Diagrams:

25
Grade III: Term 2 Strand: Physical Science (Forces, Motion and Structures)
Unit 6: Effect of Forces Duration: 10 periods Focus Questions: (1) What can forces do?
Learning Outcome Specific Objectives
At the end of this unit students should 1. understand that objects can exert
forces 2. realize that forces affect structures Technology:
Appreciate the use of devices, made by humans.
Make simple gadgets.
Realize that people can make unique things.
6. At the end of this unit students should be able to 6.1. identify forces as push or pull by one body on
another. 6.2. discuss the effects of forces on objects. 6.3. discuss the effect of gravity on objects.
Key Concepts CONTENT Skills, Attitudes and Values
Bend
Force
Gravity
Motion
Pull
Push
Twist
Content Principle:
Forces have many effects. Required Content:
A force is a push, pull or twist.
Forces are measured in Newtons (N)
A force can change the size and shape of an object.
A force can cause an object that is not moving to move or cause an object that is moving to stop moving.
A force can cause an object to speed up, slow down, or change direction.
Gravity is the force that pulls all objects down to the surface of the earth.
Skills
Inferring
Manipulating
Observing
Problem solving Attitudes and Values
Cooperation
Curiosity
Inventiveness
26
Suggested Activities Assessment Cross Curricular Links
Attach string to a small car and ask students what can be done in order to move the car. Demonstrate students’ suggestions.
Stand next to a door and ask students what must be done to open and close the door.
Discuss the concept of a force and ask students to define force based on the two activities.
Have students demonstrate that they can set the car in motion and stop it.
Have students roll balls and use a force to slow down the motion and speed up the motion.
Give students playdough and let them demonstrate how they can change its shape and size.
Engage students in a football match. Afterwards discuss all of the forces that were exerted during the match and their effects.
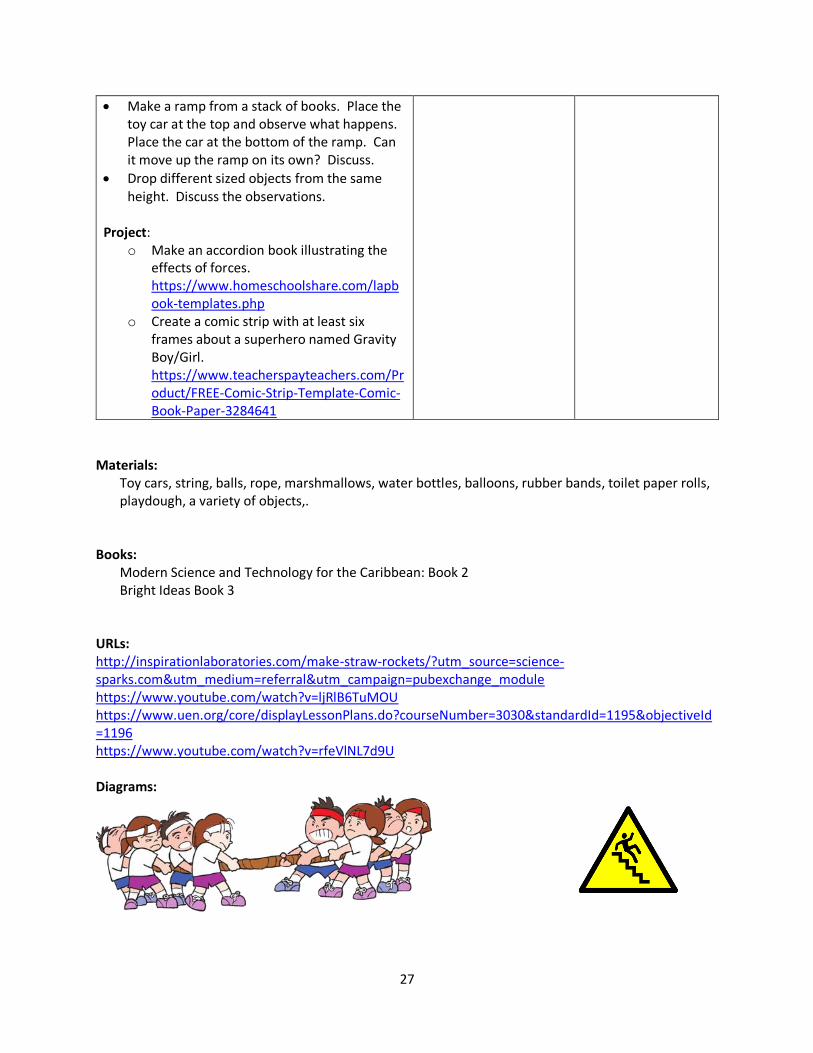
Go outside and form students into two teams for a tug-o-war activity. Demonstrate what happens when forces are equal and unequal.
Discuss how forces are used in daily life.
Review the effects of the force of air.
Make marshmallow shooters by cutting the bottom and top sections off of a small plastic water bottle. Tie the mouth of a large balloon and cut the bottom end off. Place the cut end of the balloon over one end of the bottle, secure the balloon with a rubber band if necessary. Place marshmallows in the shooter and pull then release the tied end of the balloon to launch the marshmallows. Experiment to determine how changing the force used changes the outcome. NB. a toilet paper roll may be used instead of a plastic bottle.
Ask students to jump. Discuss with students whether they exerted a force to get their bodies to jump. Why did they fall back to the ground? Did they exert a force to get their bodies to fall back to the ground? Where did the force come from?
Throw various objects into the air and observe what happens.
Discuss the concept of gravity.
Use a rubric to assess students’ participation in class activities. Criteria can include frequency of participation, focus, quality of contributions, etc.
Assess accordion book. Criteria may include neatness, creativity, correct information, appropriate illustrations etc.
Physical Education: football, tug-o-war
Visual Arts: working with playdough, drawing.
27
Make a ramp from a stack of books. Place the toy car at the top and observe what happens. Place the car at the bottom of the ramp. Can it move up the ramp on its own? Discuss.
Drop different sized objects from the same height. Discuss the observations.
Project:
o Make an accordion book illustrating the effects of forces. https://www.homeschoolshare.com/lapbook-templates.php
o Create a comic strip with at least six frames about a superhero named Gravity Boy/Girl. https://www.teacherspayteachers.com/Product/FREE-Comic-Strip-Template-Comic-Book-Paper-3284641
Materials:
Toy cars, string, balls, rope, marshmallows, water bottles, balloons, rubber bands, toilet paper rolls, playdough, a variety of objects,.
Books:
Modern Science and Technology for the Caribbean: Book 2 Bright Ideas Book 3
URLs: http://inspirationlaboratories.com/make-straw-rockets/?utm_source=science-sparks.com&utm_medium=referral&utm_campaign=pubexchange_module https://www.youtube.com/watch?v=ljRlB6TuMOU https://www.uen.org/core/displayLessonPlans.do?courseNumber=3030&standardId=1195&objectiveId=1196 https://www.youtube.com/watch?v=rfeVlNL7d9U Diagrams:

28
Grade III: Term 2 Strand: Physical Science (Forces Motion and Structures)
Unit 7: Magnets Duration: 15 periods Focus Questions: (1) What materials/objects are attracted to magnets? (2) What happens when a magnet attracts a material?
Learning Outcome Specific Objectives
At the end of this unit students should 1. magnets exert forces on certain
materials. Technology:
Appreciate the use of devices, made by humans.
Make simple gadgets.
Realize that people may abuse and misuse technology.
7. At the end of this unit students should be able to 7.1. demonstrate how a magnet works. 7.2. describe the effects of magnets on different
materials. 7.3. describe the use of magnets in the home and
community. 7.4. suggest novel ways of using magnets in the home
or school.
Key Concepts CONTENT Skills, Attitudes and Values
Attract
Force
Iron
Magnet
Magnetic
Nonmagnetic
Pole
Repel
Steel
Content Principle:
Magnets can exert forces
Not all materials are magnetic Required Content:
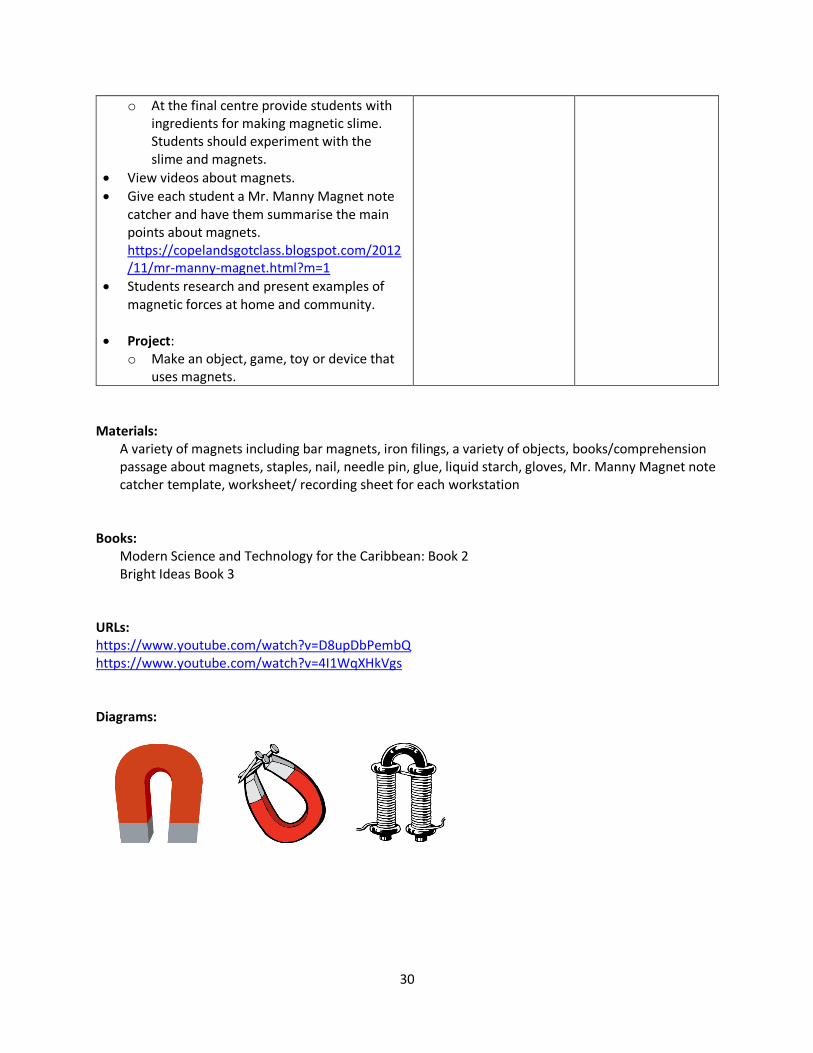
A magnet is a metal that attracts iron and steel.
Magnets also attract cobalt and nickel.
Materials that are attracted to a magnet are called magnetic materials.
Materials that are not attracted to a magnet are called nonmagnetic materials.
The strongest parts of a magnet are the poles.
Each magnet has a North and a South pole.
Like poles of a magnet repel each other.
Unlike poles of a magnet attract each other.
Magnets are used in devices such as cranes, electric bells and speakers. They are also used to separate things, to form a tight seal on doors, to store information on computers and in MRI machines to look inside our bodies.
Skills
Classifying
Communicating
Designing
Experimenting
Interpreting data
Manipulating
Observing
Predicting Attitudes and Values
Cooperation
Curiosity
Inventiveness
29
Suggested Activities Assessment Cross Curricular Links
Conceal a small magnet in the palm of your hand and quickly pass your hand over a few small paper clips.
Ask students to explain what happened to the paper clips.
Reveal the magnet and ask students to say what they know about magnets.
Set up five magnet exploration centres in the classroom. Place students into five groups and assign each group to a station until all of the groups have completed all of the activities. NB This will take several periods to complete. At the end of the rotations, hold a discussion with students to elicit from them what they have learnt. o At one centre provide a variety of
materials and have students predict then test them to determine which are attracted and which are not. Students should record their results in their notebooks.
o At another centre provide students with various appropriate books, handouts, information cards etc. about magnets and have them read to find information about magnets which will be used to complete a worksheet provided. Alternatively a comprehension passage could be provided.
o At a third centre provide students with bar magnets and have them experiment to determine how the poles of a magnet react to each other. Students should also experiment to determine whether one pole of a magnet is stronger than the other.
o At a fourth centre provide students with bar magnets and pins, needles, nails, metal paper clips. Provide instructions for magnetising an object. Have students magnetise each object and test the strength by observing how many staples each object attracts. Students should record the experiment in their books using an appropriate format.
Assess students’ responses to the centre activities.
Use a rubric to assess students’ toy or game. Criteria may include creativity, functionality, durability, etc.
Assess note catcher. Criteria may include correct information, level of understanding displayed, neatness, etc.
Visual Arts: Drawing/ sculpting
30
o At the final centre provide students with ingredients for making magnetic slime. Students should experiment with the slime and magnets.
View videos about magnets.
Give each student a Mr. Manny Magnet note catcher and have them summarise the main points about magnets. https://copelandsgotclass.blogspot.com/2012/11/mr-manny-magnet.html?m=1
Students research and present examples of magnetic forces at home and community.
Project: o Make an object, game, toy or device that
uses magnets.
Materials:
A variety of magnets including bar magnets, iron filings, a variety of objects, books/comprehension passage about magnets, staples, nail, needle pin, glue, liquid starch, gloves, Mr. Manny Magnet note catcher template, worksheet/ recording sheet for each workstation
Books:
Modern Science and Technology for the Caribbean: Book 2 Bright Ideas Book 3
URLs: https://www.youtube.com/watch?v=D8upDbPembQ https://www.youtube.com/watch?v=4I1WqXHkVgs Diagrams:
31
Grade III: Term 2 Strand: Physical Sciences (Forces, Motion and Structures)
Unit 8: Structures in the Environment Duration: 10 periods Focus Questions: (1) What are some structures in the environment? (2) Are the natural or manmade?
Learning Outcome Specific Objectives
At the end of this unit students should 1. be aware of common structures and
their uses. 2. be familiar with simple mechanical
devices and their uses in erecting and maintaining structures.
Technology:
Construct models.
Realize that people can make unique things.
Realize that people make some things for their use.
8. At the end of this unit students should be able to 8.1. identify structures in everyday life and state their
functions. 8.2. classify structures as shell, frame or solid. 8.3. design and build simple structures using other
materials such as cardboard, glue, tape, etc. 8.4. design and build a simple structure using simple
mechanical devices such as nails, screws and hinges.
Key Concepts CONTENT Skills, Attitudes and Values
Bridge
Building
Frame
Manmade
Mass
Natural
Shell
Solid
Strength
Structures
Tower
Content Principle:
The environment contains both natural and manmade.
Required Content:
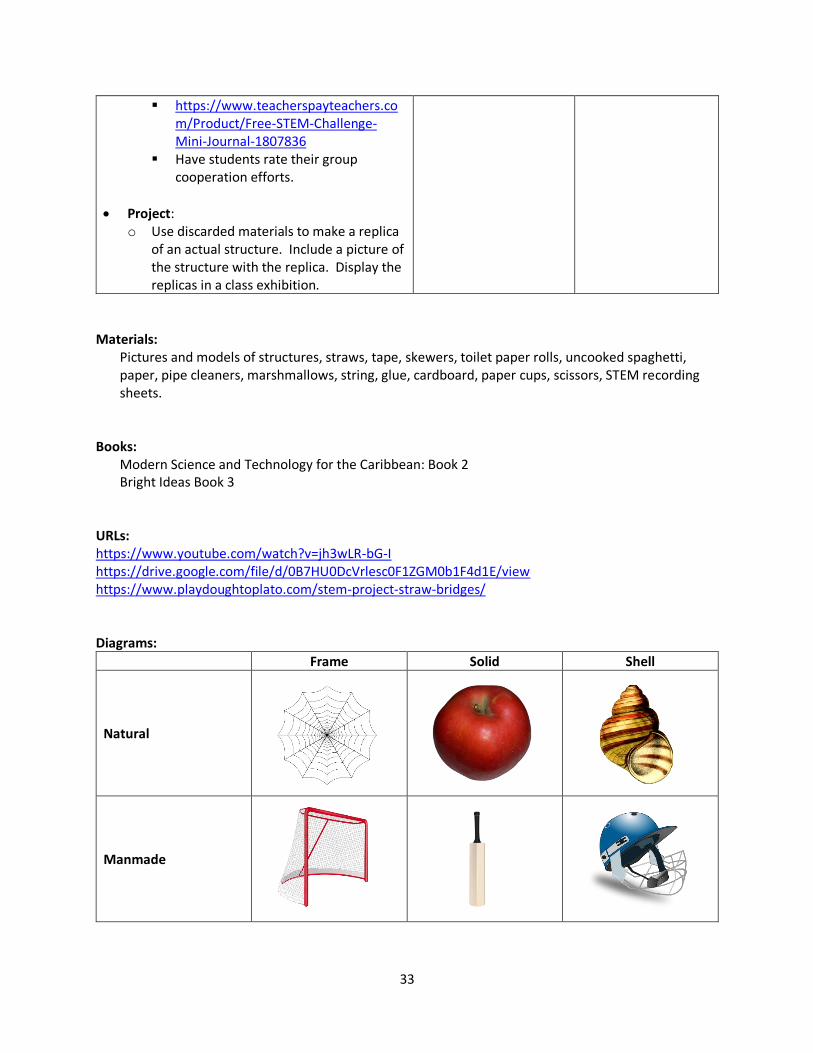
Structures may be frame, shell or solid (mass).
There are many natural and man-made structures.
Manmade structures are structures made by humans. They include bridges, buildings, vehicles, building blocks, towers, etc.
Natural structures are structures not made by humans. They include leaves, our skeletons, spider webs, coral reefs and honey combs, etc.
Structures may be strengthened by increasing the thickness of the materials, adding beams and columns and adding strong shapes like the triangle.
Skills
Communicating
Designing
Experimenting
Manipulating
Measuring
Observing
Problem solving
Reporting Attitudes and Values
Concern for safety
Cooperation
Curiosity
Inventiveness
Persistence
32
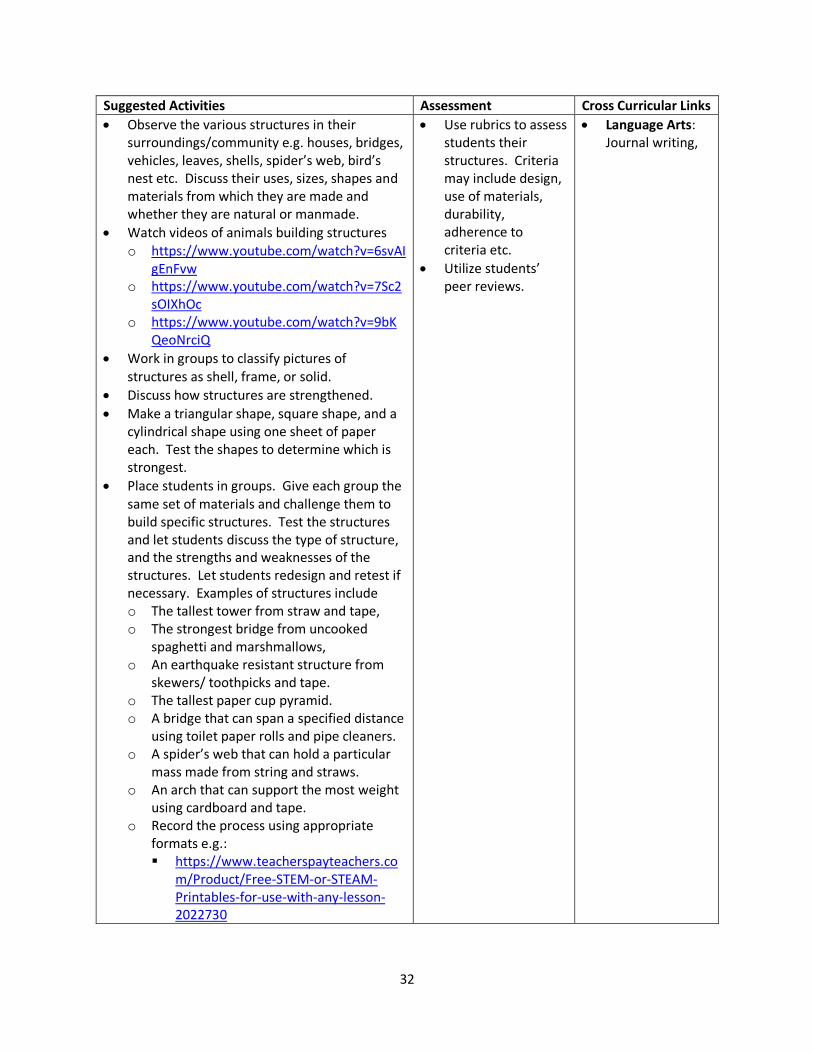
Suggested Activities Assessment Cross Curricular Links
Observe the various structures in their surroundings/community e.g. houses, bridges, vehicles, leaves, shells, spider’s web, bird’s nest etc. Discuss their uses, sizes, shapes and materials from which they are made and whether they are natural or manmade.
Watch videos of animals building structures o https://www.youtube.com/watch?v=6svAI
gEnFvw o https://www.youtube.com/watch?v=7Sc2
sOIXhOc o https://www.youtube.com/watch?v=9bK
QeoNrciQ
Work in groups to classify pictures of structures as shell, frame, or solid.
Discuss how structures are strengthened.
Make a triangular shape, square shape, and a cylindrical shape using one sheet of paper each. Test the shapes to determine which is strongest.
Place students in groups. Give each group the same set of materials and challenge them to build specific structures. Test the structures and let students discuss the type of structure, and the strengths and weaknesses of the structures. Let students redesign and retest if necessary. Examples of structures include o The tallest tower from straw and tape, o The strongest bridge from uncooked
spaghetti and marshmallows, o An earthquake resistant structure from
skewers/ toothpicks and tape. o The tallest paper cup pyramid. o A bridge that can span a specified distance
using toilet paper rolls and pipe cleaners. o A spider’s web that can hold a particular
mass made from string and straws. o An arch that can support the most weight
using cardboard and tape. o Record the process using appropriate
formats e.g.: https://www.teacherspayteachers.co
m/Product/Free-STEM-or-STEAM-Printables-for-use-with-any-lesson-2022730
Use rubrics to assess students their structures. Criteria may include design, use of materials, durability, adherence to criteria etc.
Utilize students’ peer reviews.
Language Arts: Journal writing,
33
https://www.teacherspayteachers.com/Product/Free-STEM-Challenge-Mini-Journal-1807836
Have students rate their group cooperation efforts.
Project: o Use discarded materials to make a replica
of an actual structure. Include a picture of the structure with the replica. Display the replicas in a class exhibition.
Materials:
Pictures and models of structures, straws, tape, skewers, toilet paper rolls, uncooked spaghetti, paper, pipe cleaners, marshmallows, string, glue, cardboard, paper cups, scissors, STEM recording sheets.
Books:
Modern Science and Technology for the Caribbean: Book 2 Bright Ideas Book 3
URLs: https://www.youtube.com/watch?v=jh3wLR-bG-I https://drive.google.com/file/d/0B7HU0DcVrlesc0F1ZGM0b1F4d1E/view https://www.playdoughtoplato.com/stem-project-straw-bridges/ Diagrams:
Frame Solid Shell
Natural
Manmade
34
Grade III: Term 2 Strand: Physical Science (Energy)
Unit 9: Heat and Light Duration: 10 periods Focus Questions: (1) What provides us with heat and light? (2) What fire safety measures are necessary?
Learning Outcome Specific Objectives
At the end of this unit students should 1. appreciate the importance of heat
and light in everyday life. 2. be aware of and practice safety
measures against exposure to excess heat/light.
Technology:
Appreciate the use of devices made by humans.
9. At the end of this unit students should be able to 9.1. identify natural and manmade sources of heat
and light. 9.2. state ways in which heat and light are used in
everyday activities. 9.3. evaluate the role of the sun and manmade
devices that make heat or light. 9.4. list examples of fuels used to generate heat or
light in the home. 9.5. state some fire safety measures. 9.6. discuss the dangers of excessive heat and light.
Key Concepts CONTENT Skills, Attitudes and Values
Candle
Fire
Fire-drill
Fuel
Heat
Lamp
Light
Man-made
Natural
Source
Sun
Content Principle:
Heat and light are both forms of energy. Required Content:
Heat and light are both forms of energy.
Natural sources of light include the sun, stars, fireflies, glow worms, some jellyfish, lightning and fires.
Natural sources of heat are the sun, our bodies, volcanoes, hot springs, fossil fuels, and lightning.
Manmade sources of light are flashlights, lamps, candles, matches, bulbs.
Manmade sources of heat are stoves, heaters, toasters, irons and microwaves.
We use light to see things, to make signs and signals. Plants use light to make their food.
Heat is used for cooking, drying, keeping us warm, preserving food, treating aches and pains.
Fuels such as wood, coal, propane, kerosene are used to produce heat in the home.
Skills
Communicating
Designing
Experimenting
Observing
Problem solving Attitudes and Values
Concern for safety
Cooperation
Curiosity
Persistence
35
Suggested Activities Assessment Cross Curricular Links
Light a candle and have students make observations about what is happening as the candle burns. o Focus students’ attention to the fact that
the candle produces both light and heat. o Hold a discussion with students about
where heat and light come from.
Have students list things that produce light and/or heat. Classify them as natural or artificial sources.
Show students an object and have them describe the object. Make a tube from a piece of construction paper and have students place the rube over the object on the desk. Instruct students to look through the tube at the objet a d describe their observations. Discuss the importance of light to sight.
Let students view pictures of activities involving light, then state how light is being used in each picture.
Observe the effect of light on photosensitive glasses.
Observe what happens when a solar powered calculator is placed in the dark and then in light.
Place similar pieces of coloured butcher or construction paper in the dark and direct sunlight. Observe the changes over a period of time.
Get two similar potted plants. Place a paper bag over one plant and leave the other in direct sunlight. Observe what happens over a period of time.
Let students view pictures of activities involving heat, then state how heat is being used in each picture.
Use a heat source to melt ice, chocolate, candle wax, etc.
Discuss the importance of light and heat.
Have students imagine and state what they think life would be like without the sun and other sources of light and heat.
Students read a comprehension passage about light and heat energy and answer questions: http://www.accuteach.com/files/2nd/science/Energy-Reading-Comprehension.pdf?
Give a quiz
Use a rubric to assess students’ posters. Criteria may include visual impact, neatness, organisation, correct information, etc.
Language Arts: Comprehension
Visual Arts: Making posters
36
Make a class solar dehydrator and use it to dry tomatoes, etc.: o https://www.youtube.com/watch?v=DhG
7mGIc6qg. Plastic wrap may be used instead of glass and a piece black plastic garbage bag may be used to line the box.
Make a solar cooker using a “Pringles” can or shoe box. Use the solar cookers to cook sausages, eggs, etc. Record the temperature of the foods before and after cooking. o http://www.ehow.com/how_5240773_ma
ke-shoebox-solar-oven.html o http://www.instructables.com/id/Hot-
Dog-Cooker-Solar-Oven/
Identify fuels that are used in the home.
Draw a timeline to show how technology for heating or lighting has changed over a period of time.
Compare and contrast two different sources or devices that produce light or heat.
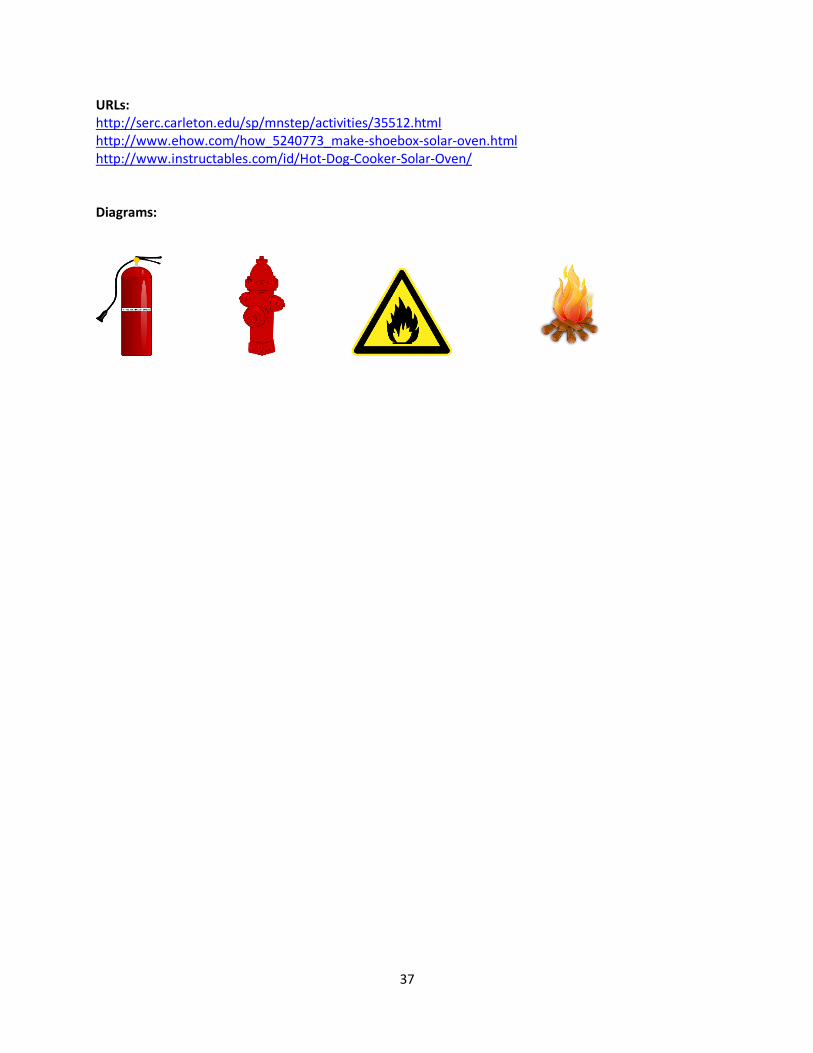
View video on fire safety or invite a firefighter to talk to students about fire safety.
Students make a fire safety manual and share with the school.
Engage in a fire safety drill.
Discuss the dangers of excessive heat and light.
Project: o Design and produce posters to illustrate
the role of the sun and/or manmade devices as providers of heat and light in their lives.
Materials:
Candle, matches, pictures of activities involving light and heat, potted plants, paper bag, worksheet, pizza box, black construction paper, cling wrap, wire mesh, pieces of wood, Pringles can, shoe box, wooden skewers, foil paper, black plastic bags, cling wrap, sausages, eggs, photosensitive glasses, solar powered calculators.
Books:
Modern Science and Technology for the Caribbean: Book 2
37
URLs: http://serc.carleton.edu/sp/mnstep/activities/35512.html http://www.ehow.com/how_5240773_make-shoebox-solar-oven.html http://www.instructables.com/id/Hot-Dog-Cooker-Solar-Oven/ Diagrams:
38
Grade III: Term 3 Strand: Earth and Space Science (Earth’s Resources)
Unit 10: Water Cycle Duration: 10 periods Focus Questions: (1) What are the main sources of water? (2) Why is the water cycle important?
Learning Outcome Specific Objectives
At the end of this unit students should 1. understand the water cycle and its
effects. Technology:
Realize that people can make unique things.
10. At the end of this unit students should be able to 10.1. state the importance of water to humans. 10.2. list the two main sources of water in nature’s
water cycle (groundwater and surface water). 10.3. identify the heat source that powers nature’s
water cycle. 10.4. describe the water cycle. 10.5. identify and observe the evaporation and
condensation of water. 10.6. state factors that affect the rate of evaporation. 10.7. design and construct a model to represent the
water cycle.
Key Concepts CONTENT Skills, Attitudes and Values
Condensation
Evaporation
Ground water
Precipitation
Sun
Surface water
Water cycle
Content Principle:
Water is continually being recycled in nature. Required Content:
The two main sources of water on the earth are surface water and groundwater.
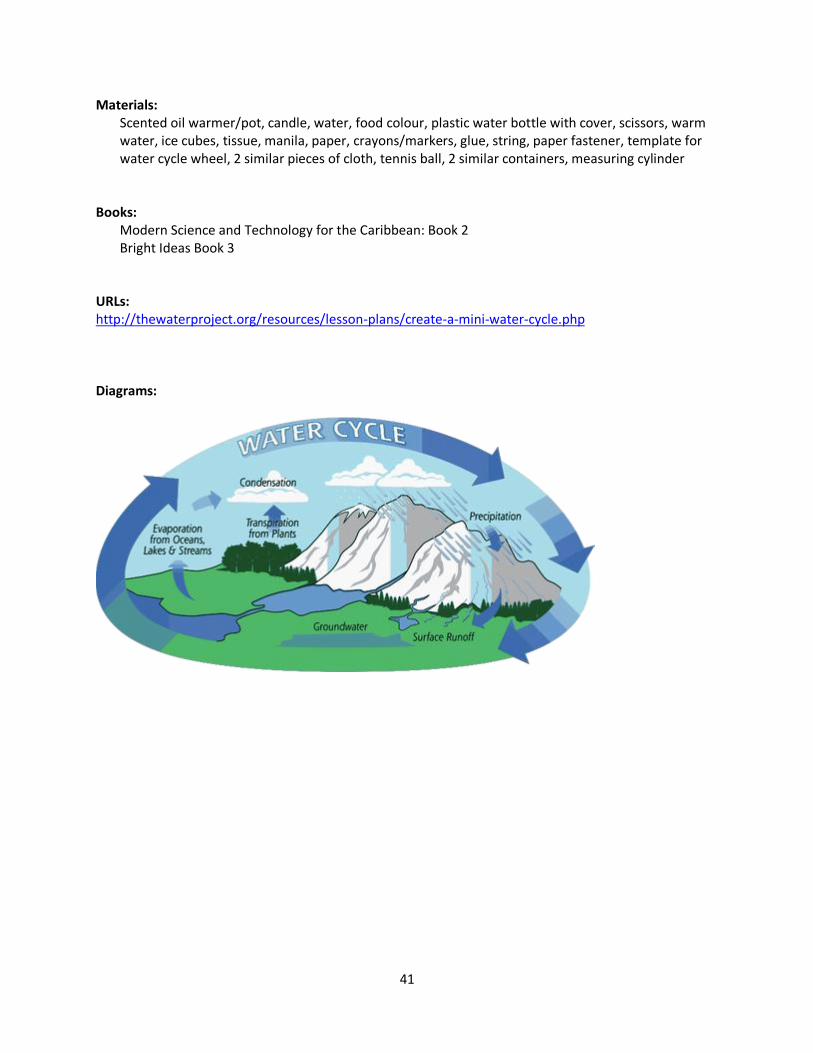
The water cycle provides a continuous fresh supply of water on the earth’s surface.
In the water cycle, water is continuously cycled from liquid to gas to liquid again. These changes are brought about by temperature changes in the atmosphere.
Evaporation is the change from a liquid to a gas.
Factors that affect the rate of evaporation include, temperature, wind and surface area.
Condensation is the change from a gas to a liquid.
In the water cycle the sun’s heat evaporates water and changes it to a gas (water vapour). The water vapour travels up into the atmosphere where it cools
Skills
Communicating
Designing
Experimenting
Inferring
Interpreting data
Manipulating
Measuring
Observing
Recording Attitudes and Values
Cooperation
Curiosity
Respect for evidence
39
down and condenses forming tiny drops of water. These tiny drops of water merge to form clouds. When the clouds become too heavy they burst and water falls from them as rain, snow or hail. This is called precipitation.
Suggested Activities Assessment Cross Curricular Links
Discuss with students where water can be found on the earth.
Talk about the uses of water in everyday life.
Make charts showing the use of water in everyday life.
Place some water in the well of a scented oil warmer/pot. Light a candle and place it in the arch of the warmer. Let students observe what happens as the water is heated. Discuss with students what happens to the water and where the water went. Encourage students to use terms such as “change of state”.
Discuss with students concept that matter cannot be created nor destroyed but changes from one state to another. Introduce the term evaporation. Ask students to state examples of evaporation in everyday life.
Let students do the following in groups: o Fill a cup with cold water and ice cubes. o Add two drops of food colouring to the
water and ice cubes. [Each group may use a food colour of their choice]
o Let the cup sit undisturbed for 5 minutes or until there are drops of water on the outside of the cup.
o Wipe the outside of the cup with the white napkin. Record what happens.
Use questions to guide a class discussion. o Where did the water on the outside of the
cup come from? o How do you know? o What caused the water drops on the
outside of the glass?
Discuss the concept of condensation and let students give everyday examples.
Cut the top off of a plastic water bottle. Pour some warm water into the bottom half of the bottle. Ensure that the cover is on the top half of the bottle then invert the top half of the
Assess students’ observation records from experiments.
Use rubrics to assess students’ artefacts.
Language Art: Writing a comic strip.
Performing Arts: Acting.
Visual Arts: Making models and bracelets, drawing.
40
bottle into the bottom half. Place a small bag of ice cubes in the top half of the bottle. Allow students to observe what happens and discuss the observations. Link the demonstration to nature’s water cycle.
Identify the processes in nature's water cycle along with the heat source.
Discuss the importance of the water cycle.
Make water cycle bracelets using beads of different colours to represent each stage of the water cycle.
Create a water cycle domino game using water cycle concepts and their meanings.
Draw diagrams of the water cycle.
Make water cycle mobiles and wheels: o https://www.teacherspayteachers.com/Fr
eeDownload/Water-Cycle-Craft-2795677 o https://www.flickr.com/photos/rnsaffold/
3989288530/in/photostream/
Place two similar pieces of cloth in the same volume of water. Wring both pieces of cloth together. Fold one of the cloths two or three times. Hang both pieces to dry in the same location for a specific time period. Observe both pieces and discuss how surface area affects the rate of evaporation.
Place the same volume of water in similar containers place one outside in a sunny place and the other in a cool place. Measure the volume of water remaining in each container. Discuss how temperature affects the rate of evaporation.
Place two similar sized wet spots on the chalkboard. Fan one spot and observe which dries faster. Discuss the effect of wind on the rate of evaporation.
Discuss ways in which we use water.
Act out what happens during the water cycle.
Create a comic strip of at least five frames illustrating the changes that Drippy the water drop goes through as he/she cycles through the water cycle.
Project: o Make a 3D triorama or diorama model of
the water cycle.
41
Materials: Scented oil warmer/pot, candle, water, food colour, plastic water bottle with cover, scissors, warm water, ice cubes, tissue, manila, paper, crayons/markers, glue, string, paper fastener, template for water cycle wheel, 2 similar pieces of cloth, tennis ball, 2 similar containers, measuring cylinder
Books:
Modern Science and Technology for the Caribbean: Book 2 Bright Ideas Book 3
URLs: http://thewaterproject.org/resources/lesson-plans/create-a-mini-water-cycle.php Diagrams:
42
Grade III: Term 3 Strand: Earth and Space Science (Earth’s Resources)
Unit 11: Properties of Air Duration: 10 periods Focus Questions: (1) What are the properties of the air? (2) How can we measure the properties of air? (3) What are the effects of the wind?
Learning Outcome Specific Objectives
At the end of this unit students should 1. understand that air has measurable
properties and effects. Technology:
Appreciate the use of devices, made by humans.
Make simple gadgets.
Realize that people can make unique things.
Realize that people make some things for their use.
11. At the end of this unit students should be able to 11.1. List the properties of air. 11.2. List and discuss ways in which air is important to
people. 11.3. Infer the presence of air by the resistance it
offers. 11.4. Infer that air exerts a force which can bring
about movement of objects. 11.5. Discuss the useful and harmful effect of wind.
Key Concepts CONTENT Skills, Attitudes and Values
Air
Breathe
Flight
Force
Gas
Mass
Motion
Volume
Wind
Content Principle:
Air is made up of matter
Air can be helpful or harmful Required Content:
Air is a mixture of gases that surrounds the earth. It is usually colourless, odourless and tasteless.
Air has mass and volume.
Although we normally cannot see air we can hear, see and feel its effects.
Wind is moving air.
Air can exert a force which causes objects to move.
We use air for breathing, drying, burning, talking, singing and transportation.
Skills
Communicating
Designing
Experimenting
Inferring
Interpreting data
Manipulating
Measuring
Observing
Predicting Attitudes and Values
Cooperation
Curiosity
Respect for evidence
43
Suggested Activities Assessment Cross Curricular Links
Elicit from students, their ideas about air by asking: How do you know air is around? What can you do to show air has volume (takes up space)?
Inflate a balloon. Why does it become bigger? Does this show that air occupies space?
Release the inflated balloon. Why does it fly about?
Submerge an empty glass upside down completely into a bucket of water. o Observe what happens. Why does the
water not go all the way up into the empty glass?
o Pass a straw under the glass until it is just above the level of the water in the glass. Then take a pull at the straw and observe what happens. Describe what happens. Why do you think water goes into the glass now?
o Place a funnel into the mouth of an empty bottle. Ensure that the funnel fits tightly. Pour some water into the funnel and observe what happens. Lift the funnel slightly from the mouth of the bottle and observe what happens. Discuss the observations
Balance a uniform stick (or metre rule) at its centre. Inflate two balloons to different sizes and hang them equal distances on opposite sides of the stick. How does it slant? Why?
Weigh a bicycle tube, balloon and/or a ball when deflated and inflated. In each, case which has the greater mass. Why?
Discuss the effects (positive and negative) of wind.
Use a wet tennis ball to make two equal sized wet spots on the chalkboard. Fan one of the spots and observe which spot dries faster. Discuss. o Make straw rockets: o http://inspirationlaboratories.com/make-
straw-rockets/?utm_source=science-sparks.com&utm_medium=referral&utm_campaign=pubexchange_module
Informally asses students’ responses to questions.
Use rubrics to assess students artefacts.
Visual Arts: Making a lapbook
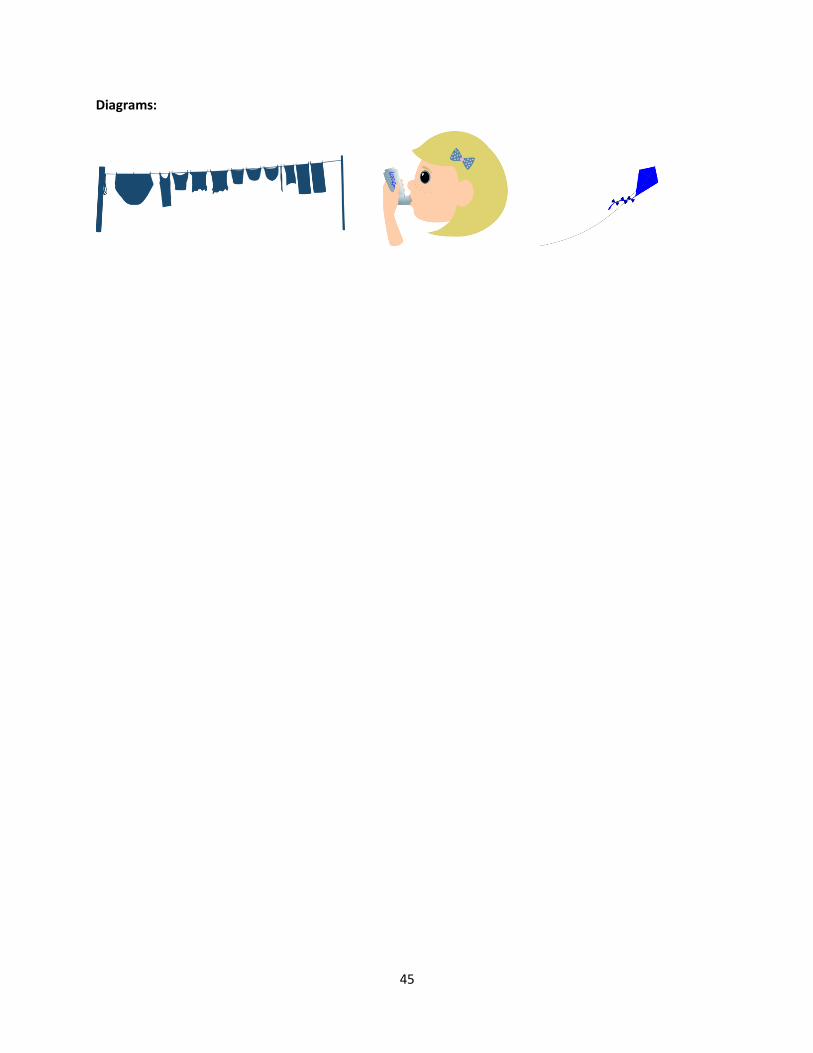
44
Make a balloon and CD hovercraft o https://www.kidspot.com.au/things-to-
do/activity-articles/how-to-make-a-cd-balloon-hovercraft/news-story/70557e45df51763da2d9076548db749d
Make balloon powered cars and test them.
Make paper aeroplanes, helicopters etc., and test their flight patterns.
Go outside and observe birds and insects in flight.
Have children talk about what happens on windy days, then have them draw and colour pictures to illustrate their ideas.
Students can make structures from matchboxes, etc. and use a fan at different speeds to simulate hurricanes. Discuss the observations.
Project: o Make a lapbook about the properties and
effects of air. o In groups, design and build a kite. Test the
kites to determine which flies best
Materials:
Balloons, glass, bottle, funnel, water, bowl, straws, beach ball, tennis ball, old cds, glue gun, glue sticks, bottle covers, cardboard, skewers, tape, plastic water bottles, manila, newspaper, paper, scissors, crayons, markers, matchboxes, fan.
Books:
Modern Science and Technology for the Caribbean: Book 2 URLs: https://sciencebob.com/make-a-balloon-rocket/ https://sciencebob.com/the-incredible-hoop-glider https://www.youtube.com/watch?v=qZNqdA7uid4 https://www.youtube.com/watch?v=QzY9RH_JnL0 https://www.printablepaper.net/click2.php https://www.redtedart.com/paper-helicopter-diy-stem-kids/
45
Diagrams:

46
Grade III: Term 3 Strand: The Solar System (The Solar System)
Unit 12: Our Solar system Duration: 10 periods Focus Questions: (1) What bodies make up the solar system? (2) What is the relative position of each planet to the sun?
Learning Outcome Specific Objectives
At the end of this unit students should 1. understand that earth is a part of
the solar system which consists of the sun, planets and their satellites.
Technology:
Realize that people can make unique things.
Understand that technology is novel and creative.
12. At the end of this unit students should be able to 12.1. name the eight main planets in the solar system
and place them in their relative position on a diagram.
12.2. identify the earth as a planet in space. 12.3. define the terms rotate and revolve. 12.4. infer that the sun is the main source of light in
the solar system. 12.5. define the terms planet, star and satellite. 12.6. construct a model of the solar system.
Key Concepts CONTENT Skills, Attitudes and Values
Asteroids
Earth
Jupiter
Mars
Mercury
Neptune
Orbit
Planets
Revolve
Rotation
Satellites
Saturn
Solar system
Space
Star
Uranus
Venus
Content Principle:
The solar system is part of the universe. Required Content:
The solar system consists of the sun and the eight planets that revolve around it.
A star is a large hot ball of gas in space that makes its own heat and light.
The sun is a large hot ball of gas in space that provides heat and light to the earth. The sun is the nearest star to the earth
A planet is a large object that orbits the sun. It does not make its own light. The planets move around the sun along different orbits.
The usual order of the planets is, Mercury, Venus, Earth, Mars, Jupiter, Saturn, Uranus and Neptune.
Venus is the second planet from the sun. It is the brightest planet in the sky.
The earth is the third planet from the sun. It is covered by water and land. Earth is the only planet known to support life.
Skills
Classifying
Communicating
Designing
Manipulating
Observing Attitudes and Values
Cooperation
Inventiveness
47
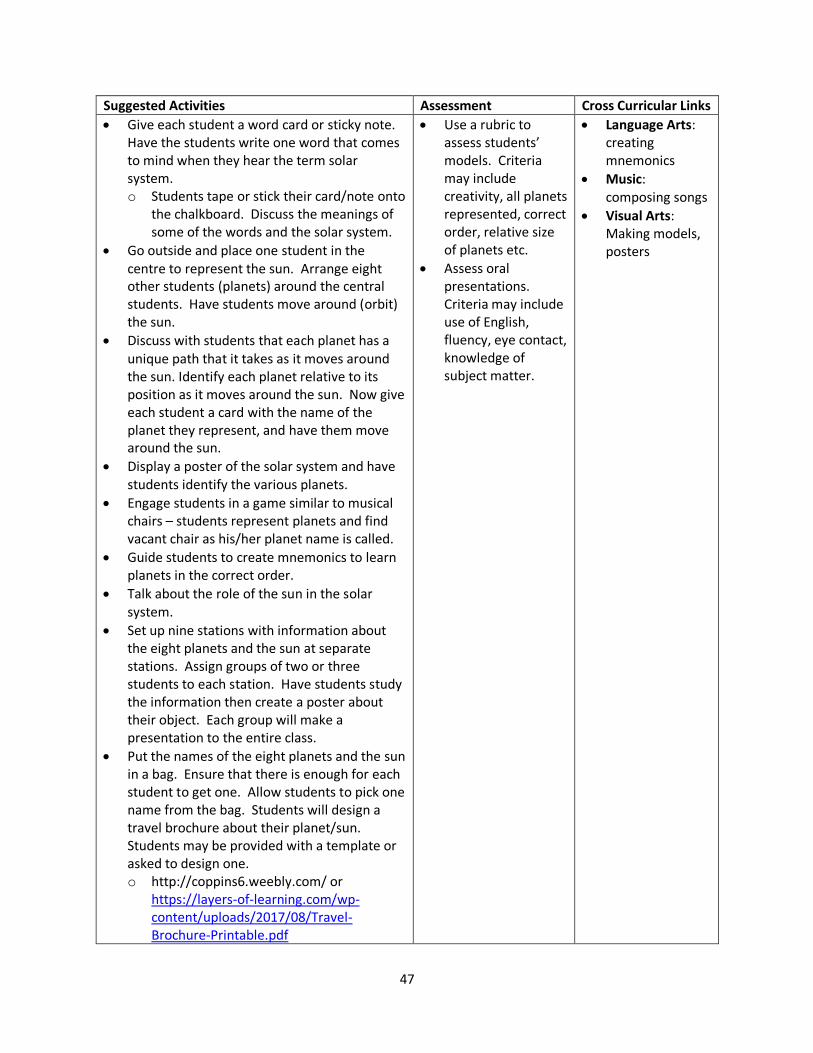
Suggested Activities Assessment Cross Curricular Links
Give each student a word card or sticky note. Have the students write one word that comes to mind when they hear the term solar system. o Students tape or stick their card/note onto
the chalkboard. Discuss the meanings of some of the words and the solar system.
Go outside and place one student in the centre to represent the sun. Arrange eight other students (planets) around the central students. Have students move around (orbit) the sun.
Discuss with students that each planet has a unique path that it takes as it moves around the sun. Identify each planet relative to its position as it moves around the sun. Now give each student a card with the name of the planet they represent, and have them move around the sun.
Display a poster of the solar system and have students identify the various planets.
Engage students in a game similar to musical chairs – students represent planets and find vacant chair as his/her planet name is called.
Guide students to create mnemonics to learn planets in the correct order.
Talk about the role of the sun in the solar system.
Set up nine stations with information about the eight planets and the sun at separate stations. Assign groups of two or three students to each station. Have students study the information then create a poster about their object. Each group will make a presentation to the entire class.
Put the names of the eight planets and the sun in a bag. Ensure that there is enough for each student to get one. Allow students to pick one name from the bag. Students will design a travel brochure about their planet/sun. Students may be provided with a template or asked to design one. o http://coppins6.weebly.com/ or
https://layers-of-learning.com/wp-content/uploads/2017/08/Travel-Brochure-Printable.pdf
Use a rubric to assess students’ models. Criteria may include creativity, all planets represented, correct order, relative size of planets etc.
Assess oral presentations. Criteria may include use of English, fluency, eye contact, knowledge of subject matter.
Language Arts: creating mnemonics
Music: composing songs
Visual Arts: Making models, posters

48
Present the solar system riddles to students and have them guess which planet each riddle is about. Riddles may be found here: o https://www.superteacherworksheets.co
m/space/planet-riddles_WMTZD.pdf?up=1520249756. After students have solved the riddles have them learn them by putting a tune to them e.g. rap.
Let students make a cipher wheel and use it to crack the secret code and learn facts about the solar system : o https://www.superteacherworksheets.co
m/space/cipher-wheel-solar-system_HOKIE.pdf?up=1493721021
Project: o Make a model of the solar system.
Materials:
Word cards/ sticky notes, poster of the Solar System, information sheets about the parts of the solar system, tape, manila, markers, crayons, brochure templates(optional), copy of riddles,
Books:
Modern Science and Technology for the Caribbean: Book 2 URLs: http://www.kidsastronomy.com/solar_system.htm https://www.youtube.com/watch?v=w36yxLgwUOc Diagrams:
moon
Sun
Mer
cury
Ven
us
Eart
h
Mar
s
Jup
iter
Satu
rn
Ura
nu
s
Nep
tun
e
49
Appendix:
Alternative Assessment Historically, the main form of classroom assessment has involved students providing written responses to questions posed by teachers. While the many varieties of this form of assessment are still very relevant, there are other options available to the science teacher. These include the use of rubrics and checklists to either assess students as they perform different tasks or to assess the quality of their products. Below are samples of checklists and rubrics that can be used to assess student performance in science.
Sample Checklist for Assessing Experimental Report
# Criteria Possible Actual
1 Presentation {report on experiment} (2 to 6)
2 Records date, title, aim 1
3 Records accurate list of materials 1
4 Report has logically arranged sections 1
5 Reports all steps in procedure 1
6 Uses acceptable language/expression 1
7 Use of Table {8 to 12}
8 Records suitable title 1
9 Suitable columns chosen with headings 1
10 Correctly records units 1
11 Uses borders 1
12 Table is generally neat 1
13 Use of Graph (14 to 19)
14 Records suitable title 1
15 Chooses suitable scales 1
16 Labels axes correctly 1
17 Correctly records units 1
18 Plots points correctly (max 2) 2
19 Graph is generally neat 1
20 Drawings (21 – 23)
21 Title present 1
22 Reasonable size 1
23 All labels correct 1
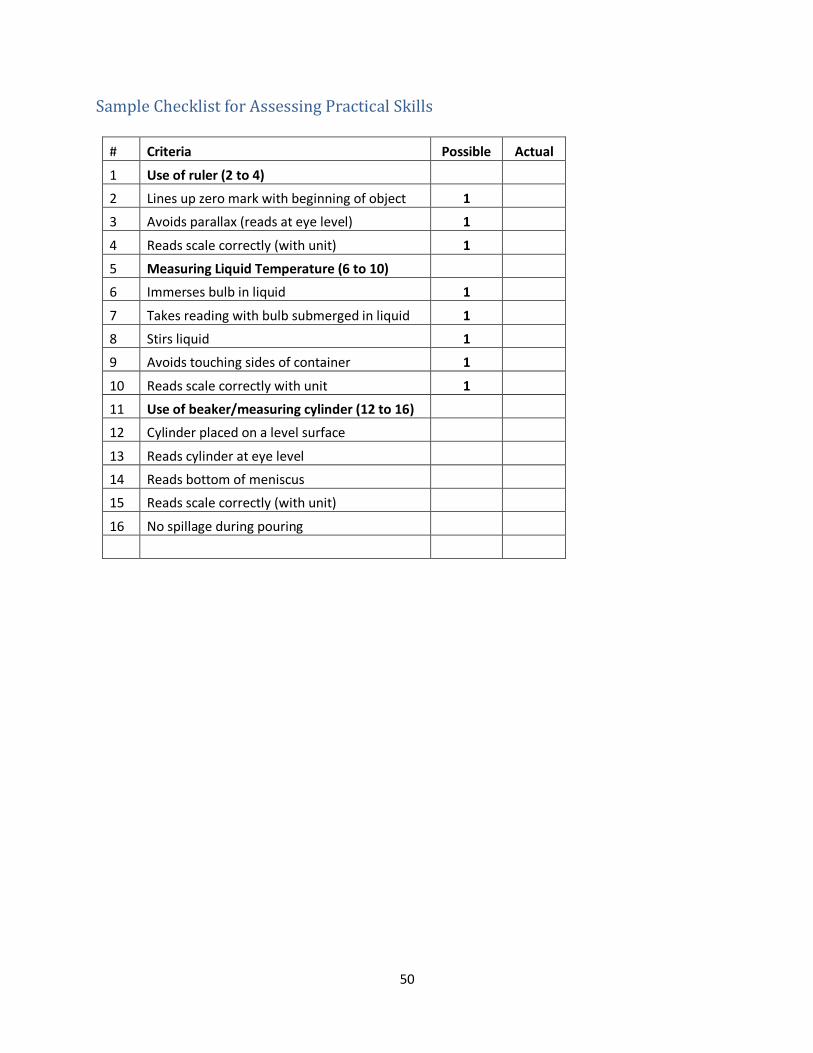
50
Sample Checklist for Assessing Practical Skills
# Criteria Possible Actual
1 Use of ruler (2 to 4)
2 Lines up zero mark with beginning of object 1
3 Avoids parallax (reads at eye level) 1
4 Reads scale correctly (with unit) 1
5 Measuring Liquid Temperature (6 to 10)
6 Immerses bulb in liquid 1
7 Takes reading with bulb submerged in liquid 1
8 Stirs liquid 1
9 Avoids touching sides of container 1
10 Reads scale correctly with unit 1
11 Use of beaker/measuring cylinder (12 to 16)
12 Cylinder placed on a level surface
13 Reads cylinder at eye level
14 Reads bottom of meniscus
15 Reads scale correctly (with unit)
16 No spillage during pouring
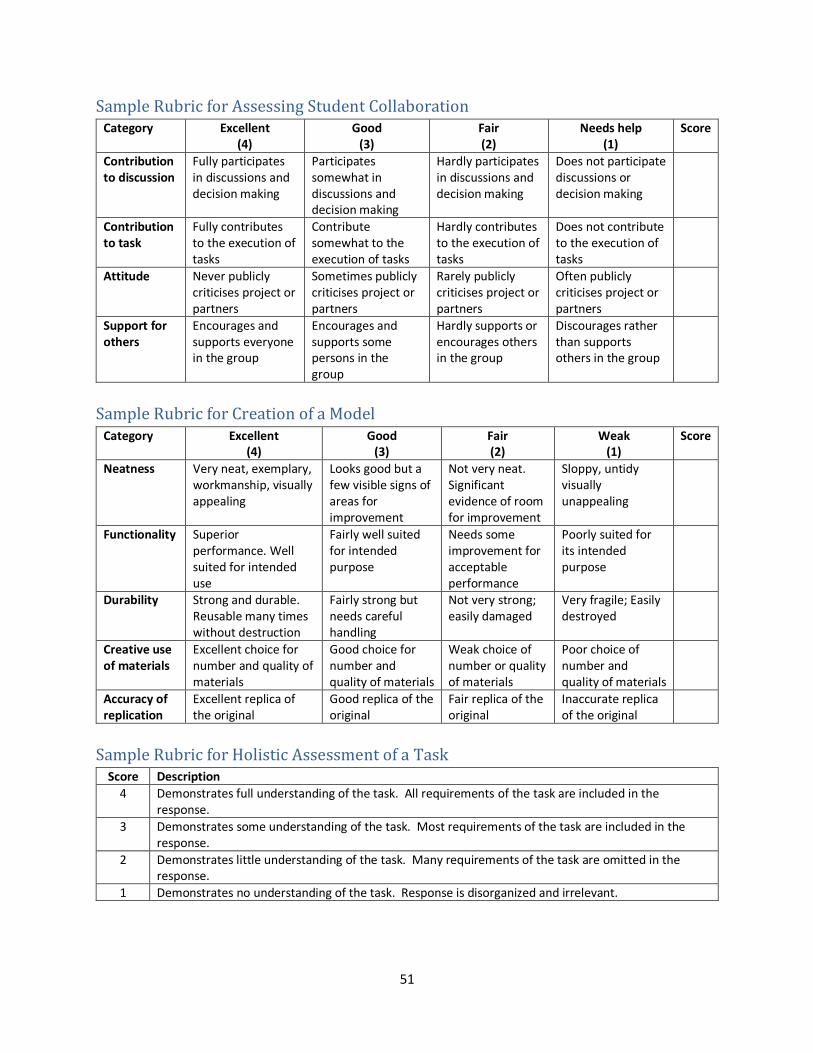
51
Sample Rubric for Assessing Student Collaboration Category Excellent
(4) Good
(3) Fair (2)
Needs help (1)
Score
Contribution to discussion
Fully participates in discussions and decision making
Participates somewhat in discussions and decision making
Hardly participates in discussions and decision making
Does not participate discussions or decision making
Contribution to task
Fully contributes to the execution of tasks
Contribute somewhat to the execution of tasks
Hardly contributes to the execution of tasks
Does not contribute to the execution of tasks
Attitude Never publicly criticises project or partners
Sometimes publicly criticises project or partners
Rarely publicly criticises project or partners
Often publicly criticises project or partners
Support for others
Encourages and supports everyone in the group
Encourages and supports some persons in the group
Hardly supports or encourages others in the group
Discourages rather than supports others in the group
Sample Rubric for Creation of a Model Category Excellent
(4) Good
(3) Fair (2)
Weak (1)
Score
Neatness Very neat, exemplary, workmanship, visually appealing
Looks good but a few visible signs of areas for improvement
Not very neat. Significant evidence of room for improvement
Sloppy, untidy visually unappealing
Functionality Superior performance. Well suited for intended use
Fairly well suited for intended purpose
Needs some improvement for acceptable performance
Poorly suited for its intended purpose
Durability Strong and durable. Reusable many times without destruction
Fairly strong but needs careful handling
Not very strong; easily damaged
Very fragile; Easily destroyed
Creative use of materials
Excellent choice for number and quality of materials
Good choice for number and quality of materials
Weak choice of number or quality of materials
Poor choice of number and quality of materials
Accuracy of replication
Excellent replica of the original
Good replica of the original
Fair replica of the original
Inaccurate replica of the original
Sample Rubric for Holistic Assessment of a Task Score Description
4 Demonstrates full understanding of the task. All requirements of the task are included in the response.
3 Demonstrates some understanding of the task. Most requirements of the task are included in the response.
2 Demonstrates little understanding of the task. Many requirements of the task are omitted in the response.
1 Demonstrates no understanding of the task. Response is disorganized and irrelevant.

52
Recommended Resources for Primary Science Teachers
Online Resources Notes
Teachers Pay Teachers https://www.teacherspayteachers.com/ Offers both free and paid-for resources. Registration required for full access
YouTube https://www.youtube.com/ A video sharing website with a large repository of educational videos. No sign up, registration or subscription required.
TeacherTube https://www.teachertube.com/ Self described as “A free community for sharing instructional videos and content for teachers and students … an education focused, safe venue for teachers, schools, …” Subscription required for full access.
Teaching Channel https://www.teachingchannel.org/ Self described as “online community where teachers can watch, share, and learn diverse techniques to help every student grow”. Subscription required for full access.
Pinterest https://www.pinterest.com/ Host a wide variety of online resources. Subscription required for full access.
Science Sparks https://www.science-sparks.com/ Provides ideas for science activities and lessons Subscription required for full access.
Mystery Science https://mysteryscience.com/ Provides ideas for science activities and lessons Paid subscription required for full access
National Geographic Kids
https://kids.nationalgeographic.com/ Provides a variety of educational videos and texts. Free content is available.
HomeSchoolShare https://www.homeschoolshare.com/ Self described as an “on-line cooperative effort of several homeschooling moms to provide free but quality literature-based unit studies and resources” No subscription required
53
Local Resources Notes
Antigua and Barbuda Fisheries Division
Manages and regulates the national fisheries and marine resources. Point Wharf, Lower North Street Saint John’s, Antigua And Barbuda Tel: 1 (268) 462-6106 Email: [email protected] Web: https://www.facebook.com/268fisheries/,
Antigua and Barbuda Humane Society
An animal welfare organization. Bethesda Village, St. Pauls, Antigua Tel: 1 (284) 461-4957 Email: [email protected] Web: https://www.antiguaanimals.com/
Department of Environment
Mandated to maintain an up-to-date national environmental policy. Department of Environment #1 Victoria Park Botanical Gardens Factory Road St. John’s, Antigua Tel: 1 (268) 462-4625 Email: [email protected], [email protected] Web: https://www.environment.gov.ag/en/
Environmental Awareness Group (EAG)
A not-for-profit organization interested in care for the environment. Cnr Market and Church St St. John’s, Antigua Tel: 1 (268) 462-6236 Email: [email protected] Web: https://www.eagantigua.org/
Wadali Animal Nature Park
Guided tours exhibiting flora and fauna. Tel: 1 (268) 732-2895 Email: [email protected] Web: https://www.facebook.com/The-Wadadli-Animal-Nature-Park-
451816011541661/


