54
TIBCO ActiveMatrix BusinessWorks ™ Service Engine Plug-in for Oracle E-Business Suite User’s Guide Software Release 1.1 September 2011

TIBCO ActiveMatrix BusinessWorks™ Service Engine Plug-in for Oracle E-Business Suite
User’s GuideSoftware Release 1.1September 2011

Important Information
SOME TIBCO SOFTWARE EMBEDS OR BUNDLES OTHER TIBCO SOFTWARE. USE OF SUCH EMBEDDED OR BUNDLED TIBCO SOFTWARE IS SOLELY TO ENABLE THE FUNCTIONALITY (OR PROVIDE LIMITED ADD-ON FUNCTIONALITY) OF THE LICENSED TIBCO SOFTWARE. THE EMBEDDED OR BUNDLED SOFTWARE IS NOT LICENSED TO BE USED OR ACCESSED BY ANY OTHER TIBCO SOFTWARE OR FOR ANY OTHER PURPOSE.
USE OF TIBCO SOFTWARE AND THIS DOCUMENT IS SUBJECT TO THE TERMS AND CONDITIONS OF A LICENSE AGREEMENT FOUND IN EITHER A SEPARATELY EXECUTED SOFTWARE LICENSE AGREEMENT, OR, IF THERE IS NO SUCH SEPARATE AGREEMENT, THE CLICKWRAP END USER LICENSE AGREEMENT WHICH IS DISPLAYED DURING DOWNLOAD OR INSTALLATION OF THE SOFTWARE (AND WHICH IS DUPLICATED IN THE LICENSE FILE) OR IF THERE IS NO SUCH SOFTWARE LICENSE AGREEMENT OR CLICKWRAP END USER LICENSE AGREEMENT, THE LICENSE(S) LOCATED IN THE “LICENSE” FILE(S) OF THE SOFTWARE. USE OF THIS DOCUMENT IS SUBJECT TO THOSE TERMS AND CONDITIONS, AND YOUR USE HEREOF SHALL CONSTITUTE ACCEPTANCE OF AND AN AGREEMENT TO BE BOUND BY THE SAME.This document contains confidential information that is subject to U.S. and international copyright laws and treaties. No part of this document may be reproduced in any form without the written authorization of TIBCO Software Inc.TIBCO, The Power of Now, TIBCO Adapter, TIBCO ActiveMatrix BusinessWorks, TIBCO Designer, TIBCO Administrator, TIBCO Rendezvous, TIBCO Runtime Agent, TIBCO Hawk, TIBCO Enterprise Message Service, TIBCO ActiveMatrix BusinessWorks Service Engine, and TIBCO Business Studio are either registered trademarks or trademarks of TIBCO Software Inc. in the United States and/or other countries.EJB, Java EE, J2EE, and all Java-based trademarks and logos are trademarks or registered trademarks of Sun Microsystems, Inc. in the U.S. and other countries.All other product and company names and marks mentioned in this document are the property of their respective owners and are mentioned for identification purposes only.THIS SOFTWARE MAY BE AVAILABLE ON MULTIPLE OPERATING SYSTEMS. HOWEVER, NOT ALL OPERATING SYSTEM PLATFORMS FOR A SPECIFIC SOFTWARE VERSION ARE RELEASED AT THE SAME TIME. SEE THE README FILE FOR THE AVAILABILITY OF THIS SOFTWARE VERSION ON A SPECIFIC OPERATING SYSTEM PLATFORM.THIS DOCUMENT IS PROVIDED “AS IS” WITHOUT WARRANTY OF ANY KIND, EITHER EXPRESS OR IMPLIED, INCLUDING, BUT NOT LIMITED TO, THE IMPLIED WARRANTIES OF MERCHANTABILITY, FITNESS FOR A PARTICULAR PURPOSE, OR NON-INFRINGEMENT.THIS DOCUMENT COULD INCLUDE TECHNICAL INACCURACIES OR TYPOGRAPHICAL ERRORS. CHANGES ARE PERIODICALLY ADDED TO THE INFORMATION HEREIN; THESE CHANGES WILL BE INCORPORATED IN NEW EDITIONS OF THIS DOCUMENT. TIBCO SOFTWARE INC. MAY MAKE IMPROVEMENTS AND/OR CHANGES IN THE PRODUCT(S) AND/OR THE PROGRAM(S) DESCRIBED IN THIS DOCUMENT AT ANY TIME.THE CONTENTS OF THIS DOCUMENT MAY BE MODIFIED AND/OR QUALIFIED, DIRECTLY OR INDIRECTLY, BY OTHER DOCUMENTATION WHICH ACCOMPANIES THIS SOFTWARE, INCLUDING BUT NOT LIMITED TO ANY RELEASE NOTES AND "READ ME" FILES.Copyright © 2011 TIBCO Software Inc. ALL RIGHTS RESERVED.TIBCO Software Inc. Confidential Information

| iii
Contents
Figures . . . . . . . . . . . . . . . . . . . . . . . . . . . . . . . . . . . . . . . . . . . . . . . . . . . . . . . . . . . . . . . . . . . . . . . . .v
Tables . . . . . . . . . . . . . . . . . . . . . . . . . . . . . . . . . . . . . . . . . . . . . . . . . . . . . . . . . . . . . . . . . . . . . . . . .vii
Preface . . . . . . . . . . . . . . . . . . . . . . . . . . . . . . . . . . . . . . . . . . . . . . . . . . . . . . . . . . . . . . . . . . . . . . . . ix
Related Documentation . . . . . . . . . . . . . . . . . . . . . . . . . . . . . . . . . . . . . . . . . . . . . . . . . . . . . . . . . . . . . . . . . . . . . . xTIBCO ActiveMatrix BusinessWorks Service Engine Plug-in for Oracle E-Business Suite Documentation. . . xOther TIBCO Product Documentation . . . . . . . . . . . . . . . . . . . . . . . . . . . . . . . . . . . . . . . . . . . . . . . . . . . . . . . x
Typographical Conventions . . . . . . . . . . . . . . . . . . . . . . . . . . . . . . . . . . . . . . . . . . . . . . . . . . . . . . . . . . . . . . . . . . xi
Connecting with TIBCO Resources . . . . . . . . . . . . . . . . . . . . . . . . . . . . . . . . . . . . . . . . . . . . . . . . . . . . . . . . . . . .xiiiHow to Join TIBCOmmunity . . . . . . . . . . . . . . . . . . . . . . . . . . . . . . . . . . . . . . . . . . . . . . . . . . . . . . . . . . . . . .xiiiHow to Access All TIBCO Documentation . . . . . . . . . . . . . . . . . . . . . . . . . . . . . . . . . . . . . . . . . . . . . . . . . . .xiiiHow to Contact TIBCO Support . . . . . . . . . . . . . . . . . . . . . . . . . . . . . . . . . . . . . . . . . . . . . . . . . . . . . . . . . . .xiii
Chapter 1 Introduction. . . . . . . . . . . . . . . . . . . . . . . . . . . . . . . . . . . . . . . . . . . . . . . . . . . . . . . . . . . .1
Overview . . . . . . . . . . . . . . . . . . . . . . . . . . . . . . . . . . . . . . . . . . . . . . . . . . . . . . . . . . . . . . . . . . . . . . . . . . . . . . . . . 2
Chapter 2 Working with TIBCO Business Studio . . . . . . . . . . . . . . . . . . . . . . . . . . . . . . . . . . . . . .3
Starting TIBCO Business Studio . . . . . . . . . . . . . . . . . . . . . . . . . . . . . . . . . . . . . . . . . . . . . . . . . . . . . . . . . . . . . . . 4
Creating a TIBCO BusinessWorks Designer Project . . . . . . . . . . . . . . . . . . . . . . . . . . . . . . . . . . . . . . . . . . . . . . . . 6
Creating a TIBCO SOA Project . . . . . . . . . . . . . . . . . . . . . . . . . . . . . . . . . . . . . . . . . . . . . . . . . . . . . . . . . . . . . . . . 7
Enabling BusinessWorks Service Resources for ActiveMatrix . . . . . . . . . . . . . . . . . . . . . . . . . . . . . . . . . . . . . . . . 8
Associating a BWSE Component with a Service Resource . . . . . . . . . . . . . . . . . . . . . . . . . . . . . . . . . . . . . . . . . 10
Chapter 3 Working with TIBCO ActiveMatrix Administrator . . . . . . . . . . . . . . . . . . . . . . . . . . . .13
Adding a New Node to the Development Environment . . . . . . . . . . . . . . . . . . . . . . . . . . . . . . . . . . . . . . . . . . . . . 14
Setting Up a New Node . . . . . . . . . . . . . . . . . . . . . . . . . . . . . . . . . . . . . . . . . . . . . . . . . . . . . . . . . . . . . . . . . . . . . 15
Chapter 4 Creating a Distributed Application Archive . . . . . . . . . . . . . . . . . . . . . . . . . . . . . . . . .17
Overview . . . . . . . . . . . . . . . . . . . . . . . . . . . . . . . . . . . . . . . . . . . . . . . . . . . . . . . . . . . . . . . . . . . . . . . . . . . . . . . . 18
Using Business Studio to Create a DAA . . . . . . . . . . . . . . . . . . . . . . . . . . . . . . . . . . . . . . . . . . . . . . . . . . . . . . . . 19
Using the EAR2DAA Utility to Convert an EAR File to a DAA File . . . . . . . . . . . . . . . . . . . . . . . . . . . . . . . . . . . . 20
TIBCO ActiveMatrix BusinessWorks Service Engine Plug-in for Oracle E-Business Suite User’s Guide

iv | Contents
Chapter 5 Tutorial . . . . . . . . . . . . . . . . . . . . . . . . . . . . . . . . . . . . . . . . . . . . . . . . . . . . . . . . . . . . . . 21
Overview . . . . . . . . . . . . . . . . . . . . . . . . . . . . . . . . . . . . . . . . . . . . . . . . . . . . . . . . . . . . . . . . . . . . . . . . . . . . . . . . 22
Procedure . . . . . . . . . . . . . . . . . . . . . . . . . . . . . . . . . . . . . . . . . . . . . . . . . . . . . . . . . . . . . . . . . . . . . . . . . . . . . . . 24Importing the Classic OEBSBWSE TIBCO BusinessWorks Project . . . . . . . . . . . . . . . . . . . . . . . . . . . . . . . 24Configuring the Classic OEBSBWSE TIBCO BusinessWorks Project . . . . . . . . . . . . . . . . . . . . . . . . . . . . . 25Importing the OEBSReference SOA Project . . . . . . . . . . . . . . . . . . . . . . . . . . . . . . . . . . . . . . . . . . . . . . . . . 27Reviewing the Composite Configuration of the OEBSReference SOA Project . . . . . . . . . . . . . . . . . . . . . . . 27Creating a Distributed Application Archive (DAA) . . . . . . . . . . . . . . . . . . . . . . . . . . . . . . . . . . . . . . . . . . . . . 29Setting Up the TIBCO ActiveMatrix Environment . . . . . . . . . . . . . . . . . . . . . . . . . . . . . . . . . . . . . . . . . . . . . 29Adding an HTTP Connector Resource Instance . . . . . . . . . . . . . . . . . . . . . . . . . . . . . . . . . . . . . . . . . . . . . . 30Deploying the DAA. . . . . . . . . . . . . . . . . . . . . . . . . . . . . . . . . . . . . . . . . . . . . . . . . . . . . . . . . . . . . . . . . . . . . 32
Running the Example . . . . . . . . . . . . . . . . . . . . . . . . . . . . . . . . . . . . . . . . . . . . . . . . . . . . . . . . . . . . . . . . . . . . . . 33
Viewing the Result in Oracle E-Business Suite. . . . . . . . . . . . . . . . . . . . . . . . . . . . . . . . . . . . . . . . . . . . . . . . . . . 36
Index . . . . . . . . . . . . . . . . . . . . . . . . . . . . . . . . . . . . . . . . . . . . . . . . . . . . . . . . . . . . . . . . . . . . . . . . . 39
TIBCO ActiveMatrix BusinessWorks Service Engine Plug-in for Oracle E-Business Suite User’s Guide

Figures | v
Figures
Figure 1 The Workbench Window . . . . . . . . . . . . . . . . . . . . . . . . . . . . . . . . . . . . . . . . . . . . . . . . . . . . . . . . . . 4
Figure 2 Composite Sample Screen . . . . . . . . . . . . . . . . . . . . . . . . . . . . . . . . . . . . . . . . . . . . . . . . . . . . . . . 11
Figure 3 New Application Installation . . . . . . . . . . . . . . . . . . . . . . . . . . . . . . . . . . . . . . . . . . . . . . . . . . . . . . . 16
Figure 4 Two Methods of Creating a DAA . . . . . . . . . . . . . . . . . . . . . . . . . . . . . . . . . . . . . . . . . . . . . . . . . . . 18
Figure 5 Project Implementation . . . . . . . . . . . . . . . . . . . . . . . . . . . . . . . . . . . . . . . . . . . . . . . . . . . . . . . . . . 23
Figure 6 OracleEBSConnection Settings . . . . . . . . . . . . . . . . . . . . . . . . . . . . . . . . . . . . . . . . . . . . . . . . . . . . 25
Figure 7 OEBSReference Composite . . . . . . . . . . . . . . . . . . . . . . . . . . . . . . . . . . . . . . . . . . . . . . . . . . . . . . 28
Figure 8 Promoted Service Binding . . . . . . . . . . . . . . . . . . . . . . . . . . . . . . . . . . . . . . . . . . . . . . . . . . . . . . . . 28
Figure 9 Composite Property . . . . . . . . . . . . . . . . . . . . . . . . . . . . . . . . . . . . . . . . . . . . . . . . . . . . . . . . . . . . . 29
Figure 10 New Resource Instances . . . . . . . . . . . . . . . . . . . . . . . . . . . . . . . . . . . . . . . . . . . . . . . . . . . . . . . . . 31
Figure 11 Deploy and Run the Service . . . . . . . . . . . . . . . . . . . . . . . . . . . . . . . . . . . . . . . . . . . . . . . . . . . . . . 32
Figure 12 WSDL Generation . . . . . . . . . . . . . . . . . . . . . . . . . . . . . . . . . . . . . . . . . . . . . . . . . . . . . . . . . . . . . . 33
Figure 13 Web Service Navigator . . . . . . . . . . . . . . . . . . . . . . . . . . . . . . . . . . . . . . . . . . . . . . . . . . . . . . . . . . 34
Figure 14 Input of the Example . . . . . . . . . . . . . . . . . . . . . . . . . . . . . . . . . . . . . . . . . . . . . . . . . . . . . . . . . . . . 34
Figure 15 Output of the Example . . . . . . . . . . . . . . . . . . . . . . . . . . . . . . . . . . . . . . . . . . . . . . . . . . . . . . . . . . . 35
Figure 16 Select V1 Organization . . . . . . . . . . . . . . . . . . . . . . . . . . . . . . . . . . . . . . . . . . . . . . . . . . . . . . . . . . 36
Figure 17 Search the Result. . . . . . . . . . . . . . . . . . . . . . . . . . . . . . . . . . . . . . . . . . . . . . . . . . . . . . . . . . . . . . . 37
Figure 18 Created BOM Bill in OEBS. . . . . . . . . . . . . . . . . . . . . . . . . . . . . . . . . . . . . . . . . . . . . . . . . . . . . . . . 37
Figure 19 Substitute Components . . . . . . . . . . . . . . . . . . . . . . . . . . . . . . . . . . . . . . . . . . . . . . . . . . . . . . . . . . 38
TIBCO ActiveMatrix BusinessWorks Service Engine Plug-in for Oracle E-Business Suite User’s Guide

vi | Figures
TIBCO ActiveMatrix BusinessWorks Service Engine Plug-in for Oracle E-Business Suite User’s Guide
Tables | vii
Tables
Table 1 General Typographical Conventions . . . . . . . . . . . . . . . . . . . . . . . . . . . . . . . . . . . . . . . . . . . . . . . . xi
Table 2 EAR2DAA Optional Arguments . . . . . . . . . . . . . . . . . . . . . . . . . . . . . . . . . . . . . . . . . . . . . . . . . . . 20
TIBCO ActiveMatrix BusinessWorks Service Engine Plug-in for Oracle E-Business Suite User’s Guide

viii | Tables
TIBCO ActiveMatrix BusinessWorks Service Engine Plug-in for Oracle E-Business Suite User’s Guide

| ix
Preface
This user’s guide explains how to use TIBCO ActiveMatrix BusinessWorks Service Engine Plug-in for Oracle E-Business Suite in the TIBCO ActiveMatrix environment.
Topics
• Related Documentation, page x
• Typographical Conventions, page xi
• Connecting with TIBCO Resources, page xiii
TIBCO ActiveMatrix BusinessWorks Service Engine Plug-in for Oracle E-Business Suite User’s Guide

x | Related Documentation
Related Documentation
This section lists documentation resources you may find useful.
TIBCO ActiveMatrix BusinessWorks Service Engine Plug-in for Oracle E-Business Suite Documentation
The following documents form the TIBCO ActiveMatrix BusinessWorks Service Engine Plug-in for Oracle E-Business Suite documentation set:
• TIBCO ActiveMatrix BusinessWorks Service Engine Plug-in for Oracle E-Business Suite Installation Read this manual for instructions on site preparation and installation.
• TIBCO ActiveMatrix BusinessWorks Service Engine Plug-in for Oracle E-Business Suite User’s Guide Read this manual for instruction on using the product.
• TIBCO ActiveMatrix BusinessWorks Service Engine Plug-in for Oracle E-Business Suite Release Notes Read the release notes for a list of new and changed features. This document also contains lists of known issues and closed issues for this release.
Other TIBCO Product DocumentationYou may find it useful to read the documentation for the following TIBCO products:
• TIBCO Designer™
• TIBCO ActiveMatrix BusinessWorks™
• TIBCO ActiveMatrix BusinessWorks™ Service Engine
• TIBCO Rendezvous®
• TIBCO Enterprise Message Service™
• TIBCO Hawk®
• TIBCO Runtime Agent™
• TIBCO Business Studio™
• TIBCO ActiveMatrix BusinessWorks™ Plug-in for Oracle E-Business Suite
TIBCO ActiveMatrix BusinessWorks Service Engine Plug-in for Oracle E-Business Suite User’s Guide
Preface | xi
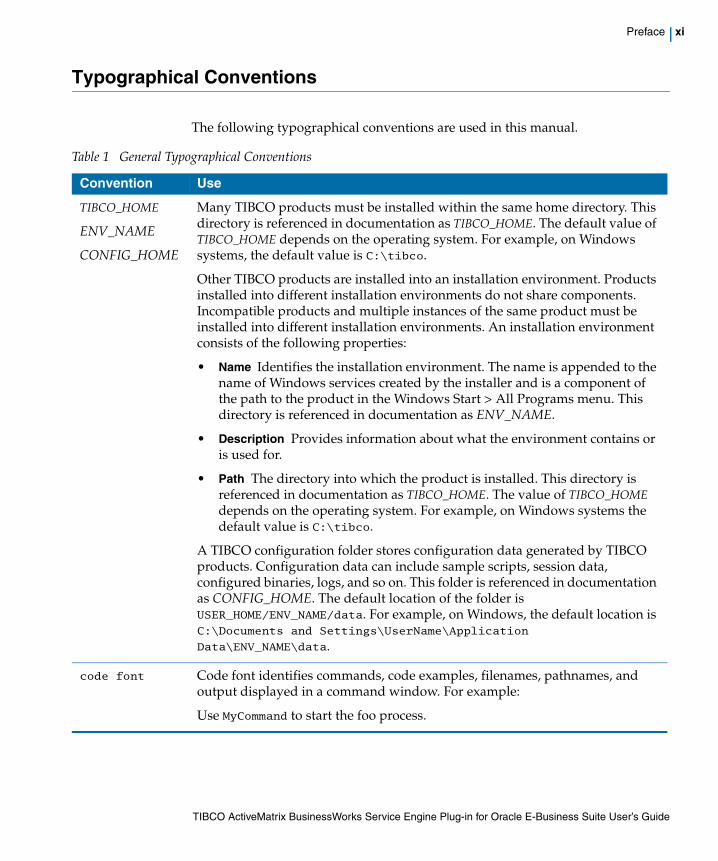
Typographical Conventions
The following typographical conventions are used in this manual.
Table 1 General Typographical Conventions
Convention Use
TIBCO_HOME
ENV_NAME
CONFIG_HOME
Many TIBCO products must be installed within the same home directory. This directory is referenced in documentation as TIBCO_HOME. The default value of TIBCO_HOME depends on the operating system. For example, on Windows systems, the default value is C:\tibco.
Other TIBCO products are installed into an installation environment. Products installed into different installation environments do not share components. Incompatible products and multiple instances of the same product must be installed into different installation environments. An installation environment consists of the following properties:
• Name Identifies the installation environment. The name is appended to the name of Windows services created by the installer and is a component of the path to the product in the Windows Start > All Programs menu. This directory is referenced in documentation as ENV_NAME.
• Description Provides information about what the environment contains or is used for.
• Path The directory into which the product is installed. This directory is referenced in documentation as TIBCO_HOME. The value of TIBCO_HOME depends on the operating system. For example, on Windows systems the default value is C:\tibco.
A TIBCO configuration folder stores configuration data generated by TIBCO products. Configuration data can include sample scripts, session data, configured binaries, logs, and so on. This folder is referenced in documentation as CONFIG_HOME. The default location of the folder is USER_HOME/ENV_NAME/data. For example, on Windows, the default location is C:\Documents and Settings\UserName\Application
Data\ENV_NAME\data.
code font Code font identifies commands, code examples, filenames, pathnames, and output displayed in a command window. For example:
Use MyCommand to start the foo process.
TIBCO ActiveMatrix BusinessWorks Service Engine Plug-in for Oracle E-Business Suite User’s Guide

xii | Typographical Conventions
bold code font Bold code font is used in the following ways:
• In procedures, to indicate what a user types. For example: Type the username admin.
• In large code samples, to indicate the parts of the sample that are of particular interest.
• In command syntax, to indicate the default parameter for a command. For example, if no parameter is specified, MyCommand is enabled: MyCommand [enable | disable]
italic font Italic font is used in the following ways:
• To indicate a document title. For example: See TIBCO BusinessWorks Concepts.
• To introduce new terms. For example: A portal page may contain several portlets. Portlets are mini-applications that run in a portal.
• To indicate a variable in a command or code syntax that you must replace. For example: MyCommand pathname
Key combinations
Key names separated by a plus sign indicate keys pressed simultaneously. For example: Ctrl+C.
Key names separated by a comma and space indicate keys pressed one after the other. For example: Esc, Ctrl+Q.
The note icon indicates information that is of special interest or importance, for example, an additional action required only in certain circumstances.
The tip icon indicates an idea that could be useful, for example, a way to apply the information provided in the current section to achieve a specific result.
The warning icon indicates the potential for a damaging situation, for example, data loss or corruption if certain steps are taken or not taken.
Table 1 General Typographical Conventions
Convention Use
TIBCO ActiveMatrix BusinessWorks Service Engine Plug-in for Oracle E-Business Suite User’s Guide

Preface | xiii
Connecting with TIBCO Resources
How to Join TIBCOmmunityTIBCOmmunity is an online destination for TIBCO customers, partners, and resident experts, a place to share and access the collective experience of the TIBCO community. TIBCOmmunity offers forums, blogs, and access to a variety of resources. To register, go to http://www.tibcommunity.com.
How to Access All TIBCO DocumentationAfter you join TIBCOmmunity, you can access the documentation for all supported product versions here:
http://docs.tibco.com/TibcoDoc
How to Contact TIBCO SupportFor comments or problems with this manual or the software it addresses, please contact TIBCO Support as follows:
• For an overview of TIBCO Support, and information about getting started with TIBCO Support, visit this site:
http://www.tibco.com/services/support
• If you already have a valid maintenance or support contract, visit this site:
https://support.tibco.com
Entry to this site requires a username and password. If you do not have a username, you can request one.
TIBCO ActiveMatrix BusinessWorks Service Engine Plug-in for Oracle E-Business Suite User’s Guide

xiv | Connecting with TIBCO Resources
TIBCO ActiveMatrix BusinessWorks Service Engine Plug-in for Oracle E-Business Suite User’s Guide

| 1
Chapter 1 Introduction
This chapter gives an overview of TIBCO ActiveMatrix BusinessWorks Service Engine Plug-in for Oracle E-Business Suite.
Topics
• Overview, page 2
TIBCO ActiveMatrix BusinessWorks Service Engine Plug-in for Oracle E-Business Suite User’s Guide

2 | Chapter 1 Introduction
Overview
TIBCO ActiveMatrix BusinessWorks Service Engine (BWSE) is a gateway for TIBCO BusinessWorks to the Service Oriented Architecture (SOA) world. It implements all of the functionality of the BusinessWorks Engine, and it allows you to deploy those components into the TIBCO ActiveMatrix environment via the TIBCO ActiveMatrix Administrator.
TIBCO ActiveMatrix BusinessWorks Service Engine provides a BWSE component that can be associated with a BusinessWorks project to expose BusinessWorks services in the TIBCO ActiveMatrix environment. It also lets TIBCO ActiveMatrix BusinessWorks projects consume services provided by other components in the TIBCO ActiveMatrix environment.
Before starting this menu, it is recommended that you become familiar with:
• TIBCO ActiveMatrix platform terminology and concepts.
Refer to TIBCO ActiveMatrix BusinessWorks Service Engine User’s Guide for detailed information.
• TIBCO ActiveMatrix BusinessWorks Plug-in for Oracle E-Business Suite functions and features.
Refer to TIBCO ActiveMatrix BusinessWorks Plug-in for Oracle E-Business Suite User’s Guide for detailed information.
TIBCO ActiveMatrix Development Tools
The TIBCO ActiveMatrix development tools consist of TIBCO Business Studio Workbench and a set of TIBCO ActiveMatrix plug-ins.
TIBCO Business Studio allows you to create and configure composites, services, references, shared resources, and substitution variables in the Composite Editor. In TIBCO Business Studio, you can associate a BusinessWorks Designer project with a BWSE component in an ActiveMatrix SOA Project. For information on TIBCO Business Studio, refer to Workbench User Guide in the Workbench online help. To view the online help, select Help > Help Contents.
TIBCO Designer Add-in for TIBCO Business Studio allows you to create classic TIBCO BusinessWorks projects in TIBCO Business Studio.
TIBCO ActiveMatrix Deployment Tool
TIBCO ActiveMatrix Administrator is the utility used to create, configure, monitor, and manage objects in the TIBCO ActiveMatrix runtime.
TIBCO ActiveMatrix BusinessWorks Service Engine Plug-in for Oracle E-Business Suite User’s Guide
| 3
Chapter 2 Working with TIBCO Business Studio
This chapter describes how to create a classic TIBCO BusinessWorks project, create a TIBCO SOA project, enable BusinessWorks service resources for TIBCO ActiveMatrix, and associate a BWSE component with a service resource using TIBCO Business Studio.
Topics
• Starting TIBCO Business Studio, page 4
• Creating a TIBCO BusinessWorks Designer Project, page 6
• Enabling BusinessWorks Service Resources for ActiveMatrix, page 8
• Creating a TIBCO SOA Project, page 7
• Associating a BWSE Component with a Service Resource, page 10
TIBCO ActiveMatrix BusinessWorks Service Engine Plug-in for Oracle E-Business Suite User’s Guide

4 | Chapter 2 Working with TIBCO Business Studio
Starting TIBCO Business Studio
To start TIBCO Business Stutio, complete the following steps:
1. From the Start menu, select All Programs > TIBCO > TIBCO Business Studio version_number ActiveMatrix SOA Edition > Studio for Designers.
or
From the command line, run TIBCO_HOME\studio\version_number\eclipse\TIBCOBusinessStudio.exe.
2. The Workspace Launcher dialog appears. Accept the default workspace or to create a new workspace, and click the OK button.
The Workbench window appears. The first time a new workspace is selected, a Welcome screen is displayed in the window.
The Layout of the Workbench Window
The Workbench window contains the following: Menu, Toolbar, Project Explorer Panel, Outline Panel, Editor Panel, and Views Panel. For detailed information, select Help > Help Content.
Figure 1 The Workbench Window
TIBCO ActiveMatrix BusinessWorks Service Engine Plug-in for Oracle E-Business Suite User’s Guide

Starting TIBCO Business Studio | 5
• Menu
Contains menu items such as File, Edit, Navigate, Search, Project, Run, Window, and Help.
• Toolbar
Contains buttons for the most frequently used commands.
• Project Explorer Panel
Displays a tree containing all the project resources, such as project folders, shared resource definition files, WSDL files, composite files, service assembly files, and so on.
• Editor Panel
Displays editors for the objects currently being edited. You can switch between editors by clicking the tabs at the top of the Editor area. The Composite Editor contains a canvas on which you can drop elements and a palette that organizes the elements that you have added to the composite. Other editors allow you to configure shared resources and service assemblies.
• Outline Panel
Provides an overview of the Composite Editor canvas. You can easily navigate from one part of a composite to another.
The Outline view also displays a content tree structure that contains the composite elements inside the composite. In this view you can delete the contents of the composite. When you select a composite element in the Outline tree, the corresponding artifact in the composite is selected.
• Views Panel
Displayed under the Editor area and contains the following views by default:
— Properties
Displays property sheets for editing composites and composite elements. When you select a composite or composite element in the Composite Editor canvas, this view shows the properties of the selected object in a vertical tabbed notebook.
— Problems
Displays validation and other errors.
— Registries
Lists UDDI registries and the WSDL files returned from searching a registry.
To open a view, select Window > Show View.
TIBCO ActiveMatrix BusinessWorks Service Engine Plug-in for Oracle E-Business Suite User’s Guide
6 | Chapter 2 Working with TIBCO Business Studio
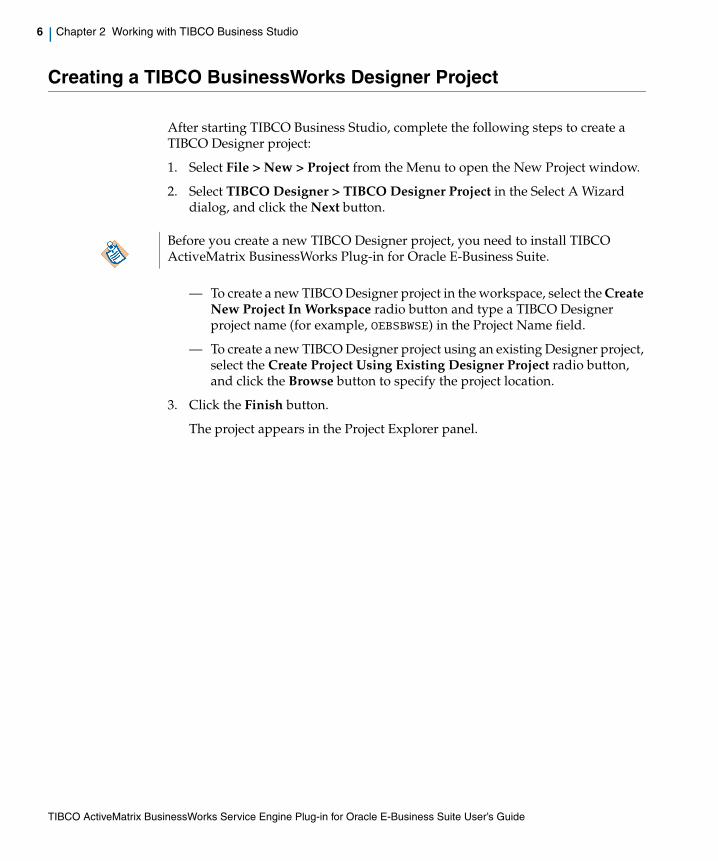
Creating a TIBCO BusinessWorks Designer Project
After starting TIBCO Business Studio, complete the following steps to create a TIBCO Designer project:
1. Select File > New > Project from the Menu to open the New Project window.
2. Select TIBCO Designer > TIBCO Designer Project in the Select A Wizard dialog, and click the Next button.
— To create a new TIBCO Designer project in the workspace, select the Create New Project In Workspace radio button and type a TIBCO Designer project name (for example, OEBSBWSE) in the Project Name field.
— To create a new TIBCO Designer project using an existing Designer project, select the Create Project Using Existing Designer Project radio button, and click the Browse button to specify the project location.
3. Click the Finish button.
The project appears in the Project Explorer panel.
Before you create a new TIBCO Designer project, you need to install TIBCO ActiveMatrix BusinessWorks Plug-in for Oracle E-Business Suite.
TIBCO ActiveMatrix BusinessWorks Service Engine Plug-in for Oracle E-Business Suite User’s Guide

Creating a TIBCO SOA Project | 7
Creating a TIBCO SOA Project
TIBCO SOA projects are Implementation Types for the ActiveMatrix resources that you can develop with TIBCO Business Studio.
After starting TIBCO Business Studio, complete the following steps to create a TIBCO SOA project:
1. Select File > New > Project from the Menu to open the New Project dialog.
2. Expand the TIBCO SOA Platform folder, select TIBCO SOA Project in the Select A Wizard page, and click the Next button.
3. Enter an SOA project name in the Project Name field, for example, OEBSReference.
Check the Use Default Location checkbox if you want to save the SOA project to your default workspace, and click the Next button.
4. In the Asset Type Selection screen, keep the default selection and click the Next button.
5. Select the Empty SOA Project item from the Project Types column, then click the Next button.
6. Click the Next button in the Composite File Name page.
7. Click the Finish button in the Set Special Folders page.
The new SOA project appears in the Project Explorer panel and displays OEBSReference.composite in the Design panel by default.
By selecting the Empty SOA Project type, an SOA project with an empty composite is created.
TIBCO ActiveMatrix BusinessWorks Service Engine Plug-in for Oracle E-Business Suite User’s Guide

8 | Chapter 2 Working with TIBCO Business Studio
Enabling BusinessWorks Service Resources for ActiveMatrix
In order to provide services to other ActiveMatrix components, ensure that the TIBCO ActiveMatrix BusinessWorks project with Service resources is available.
Complete the following steps to check if the Service resource is available:
1. Start TIBCO Business Studio.
2. Expand the project in Project Explorer.
3. Search for a BusinessWorks Service resource, for example, bomService.serviceagent.
If the project does not contain a Service resource, complete the following steps to enable a BusinessWorks Service resource:
1. Right-click in the design panel and select Add Resource > Service > Service.
2. In the Service tab,
a. Check the Enable For AMX checkbox.
b. Click the button (the Add A New Interface button) to select a resource.
c. Select a WSDL resource file, for example, bomWSDL.wsdl, and click the OK button in the Select A Resource dialog.
d. Double-click the Operation Implementation field and use the Browse button to locate the resource that implements each operation.
Process definitions that implement an operation must have an input, output, and error schemas that match the input, output, and fault messages of the operation.
e. Select the Endpoint Bindings tab, then click the button (the Add New Endpoint button) to add the binding point automatically.
f. In the Endpoint Bindings tab, specify a name for the endpoint in the Endpoint Name field. And specify the endpoint type by double-clicking
Before creating a Service resource, you will need to create a WSDL file that contains abstract interface descriptions. The interface can include one or more operations. Refer to TIBCO ActiveMatrix BusinessWorks Palette Reference for details about how to create a WSDL file.
TIBCO ActiveMatrix BusinessWorks Service Engine Plug-in for Oracle E-Business Suite User’s Guide
Enabling BusinessWorks Service Resources for ActiveMatrix | 9
the Endpoint Type field, then select one of the following options: AMX, SOAP, or Local.
g. Check the Expose ceckbox in the Properties tab to expose the global variables used by resources in a TIBCO BusinessWorks project.
h. Click the Apply button to save the configuration.
TIBCO ActiveMatrix BusinessWorks Service Engine Plug-in for Oracle E-Business Suite User’s Guide

10 | Chapter 2 Working with TIBCO Business Studio
Associating a BWSE Component with a Service Resource
Associate a BWSE Component with a BusinessWorks Service resource by completing the following steps:
1. Start TIBCO Business Studio.
2. Click an SOA project in the Project Explorer Panel, for example, OEBSReference. Then double-click the composite file under the Composites folder, for example, OEBSReference.composite, to launch the Composite Editor on the right.
3. From the Project Explorer panel, select a TIBCO BusinessWorks project, for example, OEBSBWSE, and locate Service resource, for example, bomService.serviceagent.
4. Drag a service agent, for example, bomService.serviceagent, into the Composite Editor in the Editor panel.
5. Select the BWSE component, right-click it, and then select Promote All from the popup menu.
6. Click the composite service, for example, the bomPortType composite service in the composite editor.
7. Click the Bindings tab on the left side of the Promoted Service panel, then click the button to add a binding.
8. Save the project.
Bindings enable communication between TIBCO ActiveMatrix and its environment. Service bindings enable consumers outside the TIBCO ActiveMatrix environment to consume services provided by TIBCO ActiveMatrix.
In the composite sample screen shown in Figure 2, a SOAP binding type has been selected. Refer to TIBCO ActiveMatrix BusinessWorks Service Engine User’s Guide for details.
TIBCO ActiveMatrix BusinessWorks Service Engine Plug-in for Oracle E-Business Suite User’s Guide

Associating a BWSE Component with a Service Resource | 11
Figure 2 Composite Sample Screen
TIBCO ActiveMatrix BusinessWorks Service Engine Plug-in for Oracle E-Business Suite User’s Guide

12 | Chapter 2 Working with TIBCO Business Studio
TIBCO ActiveMatrix BusinessWorks Service Engine Plug-in for Oracle E-Business Suite User’s Guide

| 13
Chapter 3 Working with TIBCO ActiveMatrix Administrator
This chapter describes how to add a new node to the development environment, and how to set up the TIBCO ActiveMatrix BusinessWorks Service Engine Plug-in for Oracle E-Business Suite application on the newly created node using TIBCO ActiveMatrix Administrator.
Topics
• Adding a New Node to the Development Environment, page 14
• Setting Up a New Node, page 15
TIBCO ActiveMatrix BusinessWorks Service Engine Plug-in for Oracle E-Business Suite User’s Guide
14 | Chapter 3 Working with TIBCO ActiveMatrix Administrator
Adding a New Node to the Development Environment
When you create TIBCO ActiveMatrix Administrator, a node named DevNode is created by default. If you want to add a new node, complete the following steps:
1. Open TIBCO ActiveMatrix Administrator.
2. Select Infrastucture > Nodes.
3. Click the New button to add a node.
4. Enter a node name in the New Node dialog, for example, testNode, then click the Save button.
5. Select the newly created node.
6. Click the Install button to install the node into the environment.
7. After the node has been installed, click the Start button to run the node.
TIBCO ActiveMatrix BusinessWorks Service Engine Plug-in for Oracle E-Business Suite User’s Guide

Setting Up a New Node | 15
Setting Up a New Node
If you launch TIBCO Configuration Tool after you install the ActiveMatrix platform and TIBCO ActiveMatrix BusinessWorks Service Engine Plug-in for Oracle E-Business Suite, by default, the TIBCO ActiveMatrix BusinessWorks Service Engine Plug-in for Oracle E-Business Suite application is automatically installed on the DevNode.
However, if you use the newly created node, before deploying the TIBCO ActiveMatrix BusinessWorks Service Engine Plug-in for Oracle E-Business Suite applications on this node, you must complete the following steps to configure the new node:
1. Select the new node you created.
2. Click the Configuration tab under the selected node.
3. Click the Add button, then select the TIBCO ActiveMatrix BusinessWorks Service Engine item.
4. Click the Add button, then select the TIBCO ActiveMatrix BusinessWorks Service Engine Plug-in for Oracle E-Business Suite item.
5. Click the Save button to save the configuration.
6. Click the Apply button to install the new applications to the node.
The new applications are installed successfully, as shown in Figure 3.
You should also add third-party drivers, for example, TIBCO Enabled JDBC Driver For Oracle, on this new node. Refer to the Post Installation chapter in TIBCO ActiveMatrix BusinessWorks Service Engine Plug-in for Oracle E-Business Suite Installation for details.
TIBCO ActiveMatrix BusinessWorks Service Engine Plug-in for Oracle E-Business Suite User’s Guide

16 | Chapter 3 Working with TIBCO ActiveMatrix Administrator
Figure 3 New Application Installation
7. Click the Applications tab, then select the TIBCO ActiveMatrix BusinessWorks Service Engine application.
8. Click the Distribution tab, move the testNode item from the Available Nodes list to the Selected Nodes list, then click the Save button.
9. Repeat step 7 and step 8 to distribute the TIBCO ActiveMatrix BusinessWorks Service Engine Plug-in for Oracle E-Business Suite application to the testNode.
After completing the above steps, the Runtime State and Synchronization columns for each of the allication should be Running and In Sync respectively, if not, you need to undeploy, then deploy and start the application.
TIBCO ActiveMatrix BusinessWorks Service Engine Plug-in for Oracle E-Business Suite User’s Guide

| 17
Chapter 4 Creating a Distributed Application Archive
This chapter describes how to create a Distributed Application Archive (DAA).
Topics
• Overview, page 18
• Using Business Studio to Create a DAA, page 19
• Using the EAR2DAA Utility to Convert an EAR File to a DAA File, page 20
TIBCO ActiveMatrix BusinessWorks Service Engine Plug-in for Oracle E-Business Suite User’s Guide

18 | Chapter 4 Creating a Distributed Application Archive
Overview
A Distributed Application Archive (DAA) is a deployable archive of the composite. It is a file imported into TIBCO ActiveMatrix Administrator to deploy a project to a running node.
Once a component is configured, you can create a DAA for deployment. The DAA file gathers all the information required by the component at runtime.
TIBCO ActiveMatrix BusinessWorks Service Engine provides two ways of creating a DAA:
• Using Business Studio to Create a DAA, page 19
• Using the EAR2DAA Utility to Convert an EAR File to a DAA File, page 20
Figure 4 Two Methods of Creating a DAA
Enterprise Archive (.ear) EAR 2DAA .exe
DAA
BusinessW orks Project
T IBC O Business S tudio
T IBCO ActiveM atrix Adm inistrator
TIBCO ActiveMatrix BusinessWorks Service Engine Plug-in for Oracle E-Business Suite User’s Guide
Using Business Studio to Create a DAA | 19
Using Business Studio to Create a DAA
To create a DAA using Business Studio, complete the following steps:
1. Expand the Composite folder in the Project Explorer panel. Then select a composite, right-click it, and select Create DAA from the popup menu.
Or
Right-click the composite in the Editor panel, and select Create DAA from the popup menu.
2. Select the Deployment Artifacts folder under a SOA project in the Select Archive Location page.
3. Enter a new filename or accept the default name.
4. Click the Next button.
5. Select the Do Not Use A Distribution File radio button in the Select Distribution page, then click the Next button.
6. Check the Save DAA Spec checkbox in the DAA Specification page, then click the Finish button.
Before creating a DAA, it is good practice to validate the project using the button (the Designer Validate Project for Development button) in Designer - TIBCO Perspective.
TIBCO ActiveMatrix BusinessWorks Service Engine Plug-in for Oracle E-Business Suite User’s Guide

20 | Chapter 4 Creating a Distributed Application Archive
Using the EAR2DAA Utility to Convert an EAR File to a DAA File
This section shows how to use the EAR2DAA utility to convert an EAR file to a DAA file.
The EAR2DAA utility allows you to create a DAA archive without creating an ActiveMatrix SOA project. The utility is available at the following location only if the product UI features are installed on the machine: TIBCO_HOME\bwse\version\bin
Run the utility on the command line with the following syntax:EAR2DAA.exe -earPath EarPath [ -daaLocation DAALocation -componentName ComponentName -componentVersion ComponentVersion -compositeName CompositeName -compositeVersion CompositeVersion -verbose true]
where EarPath is the absolute path of the EAR file.
The EAR2DAA utility accepts the optional arguments specified in the following table.
Table 2 EAR2DAA Optional Arguments
Argument Default Value
daaLocation TIBCO_HOME/bwse/version/bin
componentName EarName
componentVersion 1.0.0
compositeName EarName_Composite
compositeVersion 1.0.0
verbose false
TIBCO ActiveMatrix BusinessWorks Service Engine Plug-in for Oracle E-Business Suite User’s Guide

| 21
Chapter 5 Tutorial
This chapter demonstrates how to configure, deploy, and run a classic TIBCO BusinessWorks project in the TIBCO ActiveMatrix environment.
Topics
• Overview, page 22
• Procedure, page 24
• Running the Example, page 33
• Viewing the Result in Oracle E-Business Suite, page 36
TIBCO ActiveMatrix BusinessWorks Service Engine Plug-in for Oracle E-Business Suite User’s Guide

22 | Chapter 5 Tutorial
Overview
The example associated with TIBCO ActiveMatrix BusinessWorks Service Engine Plug-in for Oracle E-Business Suite is in the TIBCO_HOME\bwse\plugins\oebs\samples directory.
The example has two projects:
• OEBSBWSE is a classic TIBCO BusinessWorks project with two processes:
— inventoryProcess Five Inventory items are created, namely, TIBCO_CPU, TIBCO_HD, TIBCO_RAM, TIBCO_SUB_RAM, and TIBCO_MAINBOARD.
— bomProcess The TIBCO_MainMachine BOM bill, which includes the five Inventory items, is created.
• OEBSReference In this SOA project, an OEBSReference composite has been created, which includes two components: BOM_SER_BWSE, and INV_SER_BWSE.
Input
The input of this example are the following strings:
• Inventory items TIBCO_CPU, TIBCO_HD, TIBCO_RAM, TIBCO_SUB_RAM, TIBCO_MAINBOARD
• BOM bill TIBCO_MAINMACHINE
Output
After deploying the example project successfully, you can use SOAP client, such as, SOAPUI, for testing and running the example. You can also use TIBCO Business Studio to check the output.
Refer to Running the Example on page 33 for more information.
Procedure
A detailed procedure about how to deploy the example project is specified in Procedure on page 24.
TIBCO ActiveMatrix BusinessWorks Service Engine Plug-in for Oracle E-Business Suite User’s Guide

Overview | 23
Figure 5 shows the general implementation process.
Figure 5 Project Implementation
Design
Service Agent Resource
Deploy
Create BW SE Com ponent
Im port Existing BW
Project
Create DAA
SO A Project
EAR2DAA Utility
Deploy DAA
Set Up AM X Environm ent
TIBCO BusinessW orks BW
TIBCO BusinessW orksService Engine
Legend
TIBCO ActiveM atrixAM XBW SE
Distributed Application Archive
DAA
TIBCO ActiveMatrix BusinessWorks Service Engine Plug-in for Oracle E-Business Suite User’s Guide
24 | Chapter 5 Tutorial
Procedure
The following sections provide details about how to develop, deploy, and run the example:
1. Importing the Classic OEBSBWSE TIBCO BusinessWorks Project
2. Configuring the Classic OEBSBWSE TIBCO BusinessWorks Project
3. Importing the OEBSReference SOA Project
4. Reviewing the Composite Configuration of the OEBSReference SOA Project
5. Creating a Distributed Application Archive (DAA)
6. Setting Up the TIBCO ActiveMatrix Environment
7. Adding an HTTP Connector Resource Instance
8. Deploying the DAA
Importing the Classic OEBSBWSE TIBCO BusinessWorks ProjectThis section shows how to import the predefined OEBSBWSE TIBCO BusinessWorks project to TIBCO Business Studio.
Complete the following steps to import an existing TIBCO BusinessWorks project:
1. Start TIBCO Business Studio.
2. Select File > New > Project from the Menu to open the New Project dialog.
3. Select TIBCO Designer > TIBCO Designer Project in the Select A Wizard page, and then click the Next button.
4. Select the Create Project Using Existing Designer Project radio button, then click the Browse button to specify the project location.
The directory for the OEBSBWSE TIBCO Designer project is TIBCO_HOME\bwse\plugins\oebs\samples.
5. Check the Copy Project Into Workspace checkbox, then click the Finish button.
The classic OEBSBWSE TIBCO BusinessWorks project appears in the Project Explorer panel.
Before creating or importing a TIBCO ActiveMatrix BusinessWorks Service Engine Plug-in for Oracle E-Business Suite Designer project, you need to install TIBCO ActiveMatrix BusinessWorks Plug-in for Oracle E-Business Suite.
TIBCO ActiveMatrix BusinessWorks Service Engine Plug-in for Oracle E-Business Suite User’s Guide

Procedure | 25
Configuring the Classic OEBSBWSE TIBCO BusinessWorks ProjectAfter importing the classic OEBSBWSE TIBCO BusinessWorks project, configure it by completing the following tasks:
Task A Connect to Oracle Database Server
A connection to the Oracle database server is required by the plug-in for the configuration of the basic settings. Refer to Chapter 2 of TIBCO ActiveMatrix BusinessWorks Plug-in for Oracle E-Business Suite User’s Guide for details about how to connect to the Oracle database server.
Task B Configure the Oracle E-Business Suite Connection
Before running or deploying the project, you need to configure the Oracle E-Business Suite connection, then test to see f the connection is successfull.
Figure 6 shows a sample screen of the Oracle E-Business Suite Connection panel.
Figure 6 OracleEBSConnection Settings
The following steps shows how to configure and test the Oracle E-Business Suite Connection share resource:
1. Expand the OEBSBWSE folder in the Project Explore panel.
TIBCO ActiveMatrix BusinessWorks Service Engine Plug-in for Oracle E-Business Suite User’s Guide

26 | Chapter 5 Tutorial
2. Click the OracleEBSConnection shared resource in the DABS Main View panel.
3. Review and configure the information in the Configuration tab, such as, Database URL, APPS User Name, APPS User Password, and so on.
Refer to TIBCO ActiveMatrix BusinessWorks Plug-in for Oracle E-Business Suite User’s Guide for details about Oracle E-Business Suite Connection resource.
4. Click the Test Connection button to test the connection.
5. Click the Apply button to save the configuration.
Task C Run the BOM_BO_PUB SQL Script Using the Oracle Application Administrator Account
BOM_BO_PUB package contains PL/SQL data types that are not accessible outside the package. Therefore, you need to use Oracle JPublisher to generate PL/SQL scripts. After running the generated PL/SQL scripts, the wrappers are created. You are then able to invoke the procedures contained inside the Oracle E-Business Suite APIs packages.
In this example, the generated SQL scripts are associated in the TIBCO_HOME\bwse\plugins\oebs\samples\jpub directory:
• BOM_BO_PUB SQL script
• BOM_BO_PUB_drop SQL script
Refer to Apendix D in TIBCO ActiveMatrix BusinessWorks Plug-in for Oracle E-Business Suite User’s Guide for details about how to use Oracle JPublisher to create the wrappers.
Task D Generate and Run SQL Scripts
After reviewing and configuring each activity in the two processes, you need to generate the SQL scripts for the involved PL/SQL APIs, for example, BOM_BO_PUB and EGO_ITEM_PUB:
1. Expand the OEBSBWSE > Processes folder in the Project Explore panel.
2. Select an activity in the process, for example, the CreateInventoryItem1 activity in inventoryProcess.
3. Click the Generate SQL Script button to generate two SQL scripts.
The two SQL scripts ProcessName_ActivityName_APIPackageAndName.APIProcedureName.sql and ProcessName_ActivityName_APIPackageName.APIProcedureName_undo.sql are created in the TIBCO_HOME\bw\plugins\oracleebs\sql directory.
TIBCO ActiveMatrix BusinessWorks Service Engine Plug-in for Oracle E-Business Suite User’s Guide

Procedure | 27
4. Select and run the appropriate SQL script from the two generated in step 3.
Repeat the above steps to run the SQL script for the other activities. Refer to Chapter 5 of TIBCO ActiveMatrix BusinessWorks Plug-in for Oracle E-Business Suite User’s Guide for details.
Importing the OEBSReference SOA ProjectComplete the following steps to import the existing OEBSReference SOA project:
1. Select File > Import from the Menu in TIBCO Business Studio.
2. Select General > Existing Projects Into Workspace, then click the Next button in the Import dialog.
3. Click the Browse button to select the root directory of the SOA project.
The directory for the OEBSReference SOA project is TIBCO_HOME\bwse\plugins\oebs\samples.
4. Check the Copy Projects Into Workspace checkbox, then click the Finish button.
The OEBSReference SOA project appears in the Project Explorer panel.
Reviewing the Composite Configuration of the OEBSReference SOA ProjectComplete the following steps to review the composite configuration:
1. Expand the Composites folder of the OEBSReference project in the Project Explorer panel.
2. Double-click the predefined OEBSReference.composite composite to launch the Composite Editor, as shown in Figure 7.
To create a new TIBCO SOA project, refer to Creating a TIBCO SOA Project on page 7 for details.
TIBCO ActiveMatrix BusinessWorks Service Engine Plug-in for Oracle E-Business Suite User’s Guide
28 | Chapter 5 Tutorial
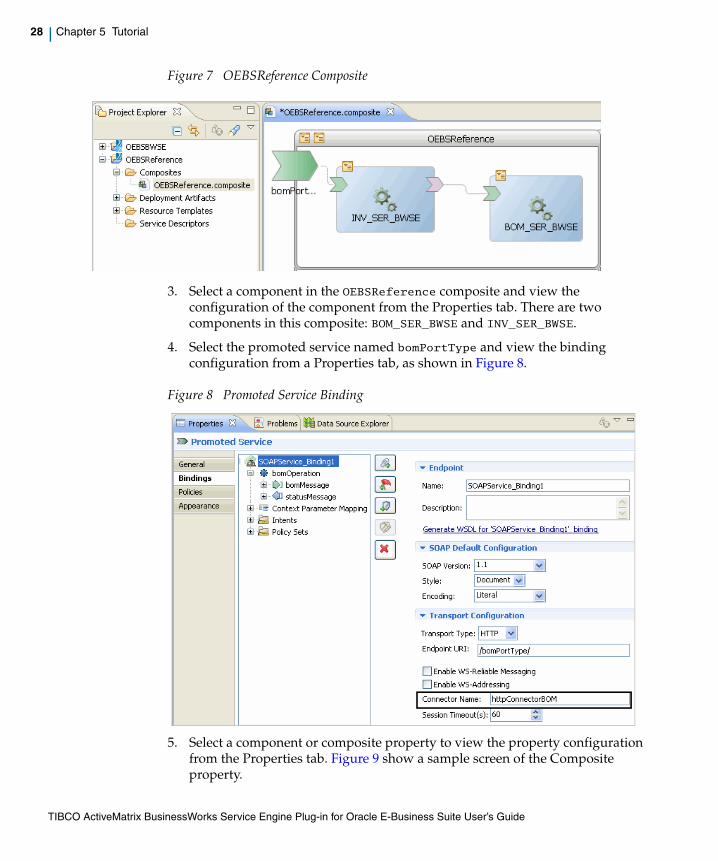
Figure 7 OEBSReference Composite
3. Select a component in the OEBSReference composite and view the configuration of the component from the Properties tab. There are two components in this composite: BOM_SER_BWSE and INV_SER_BWSE.
4. Select the promoted service named bomPortType and view the binding configuration from a Properties tab, as shown in Figure 8.
Figure 8 Promoted Service Binding
5. Select a component or composite property to view the property configuration from the Properties tab. Figure 9 show a sample screen of the Composite property.
TIBCO ActiveMatrix BusinessWorks Service Engine Plug-in for Oracle E-Business Suite User’s Guide

Procedure | 29
Figure 9 Composite Property
6. Save the configuration if any changes have been made.
Creating a Distributed Application Archive (DAA)Projects developed during design time need to be packaged into a DAA file before you can deploy them in the TIBCO ActiveMatrix environment.
To create a DAA using Business Studio, complete the following steps:
1. Expand the Composite folder in the Project Explorer panel, right-click OEBSReference.composite, and select Create DAA from the popup menu.
2. Select the Deployment Artifacts folder in the Select Archive Location page.
Enter a new filename or accept the default name in the File Name field. Then click the Next button.
3. Select the Do Not Use A Distribution File radio button in the Select Distribution page, then click the Next button.
4. Check the Save DAA Spec checkbox in the DAA Specification page, then click the Finish button.
The OEBSReference DAA file is created successfully and stored in the OEBSReference\Deployment Artifacts folder in your workspace.
Setting Up the TIBCO ActiveMatrix EnvironmentComplete the following steps to set up the TIBCO ActiveMatrix environment:
To check the location of the DAA file, you can expand the OEBSReference > Deployment Artifacts folder in the Project Explorer panel, right-click OEBSReference.daa, then select Properties from the popup menu.
TIBCO ActiveMatrix BusinessWorks Service Engine Plug-in for Oracle E-Business Suite User’s Guide

30 | Chapter 5 Tutorial
1. Start TIBCO Enterprise Message Service (EMS) Server.
— Right-click the My Computer icon on your desktop, select Manage from the pop-up menu.
— Expand the Services and Applications > Services folder in the Computer Management window. Select and then start the TIBCO EMS Server service.
2. Start the predefined TIBCO host.
Run the executable named tibcohost.exe located in the TIBCO ActiveMatrix configuration directory: TIBCO_Configuration_Folder\tibcohost\TibcohostInstance_name\host\bin.
3. Start TIBCO ActiveMatrix Administrator.
If TIBCO ActiveMatrix Administrator has been created:
a. Launch a web browser and enter the Administrator URL, http://host_name:port_number/amxadministrator/loginForm.jsp, in the address bar to start the TIBCO ActiveMatrix Administrator Server.
b. Enter the username and password to log in. The default username is root, and the password is t.
If TIBCO ActiveMatrix Administrator has not been created, see TIBCO ActiveMatrix BusinessWorks Service Engine Plug-in for Oracle E-Business Suite Installation for instructions about how to create it.
4. Add the TIBCO Enabled JDBC Driver For Oracle driver on the node where the application will be deployed, for example, DevNode. Refer to Chapter 3 of TIBCO ActiveMatrix BusinessWorks Service Engine Plug-in for Oracle E-Business Suite Installation for details.
Adding an HTTP Connector Resource InstanceAn HTTP connector describes an incoming HTTP connection. The following steps describe how to add an HTTP Connector resource instance using TIBCO ActiveMatrix Administrator:
1. Open TIBCO ActiveMatrix Administrator.
2. Select Shared Objects > Resource Templates.
3. Click the New button in the Resource Templates page. The Add Resource Template dialog appears.
TIBCO ActiveMatrix BusinessWorks Service Engine Plug-in for Oracle E-Business Suite User’s Guide

Procedure | 31
4. In the Add Resource Template dialog:
— Enter httpConnectorBOM in the Name field.
— Select HTTP Connector from the Type drop-down list.
— Click the Save button.
5. Select the newly created HTTP Connector resource, then click the New Resource Instances button in the Resource Templates page.
The New Resource Instances dialog appears.
6. In the New Resource Instances dialog, as shown in Figure 10:
— Select the SystemHost item (the default host) in the Host column.
— Select a node on which the application will be deployed, for example, DevNode, in the Available Nodes list, then click the button to move the DevNode item to the Selected Nodes list.
— Click the Save And Install button.
Figure 10 New Resource Instances
The HTTP Connector resource instance is created successfully.
The name of the HTTP Connector resource must be the same as the binding connector name of the bomPortType promoted service, for example, httpConnectorBOM, as shown in Figure 8.
Also, make sure that the values in the Machine Name and Port fields are consistent with the Host and Port fields when creating the concrete WSDL to run the example project. See Running the Example on page 33 for details.
TIBCO ActiveMatrix BusinessWorks Service Engine Plug-in for Oracle E-Business Suite User’s Guide

32 | Chapter 5 Tutorial
Deploying the DAAThe following steps describe how to deploy the DAA using TIBCO ActiveMatrix Administrator:
1. Open TIBCO ActiveMatrix Administrator.
2. Select the Applications tab and click the New button.
3. Configure the application in the New Application dialog.
a. Enter a name in the Application Name field, for example, OEBSReference.
b. Select the Upload A DAA File radio button.
c. Click the Next button.
4. Click the Browse button and select the DAA file created previously in Creating a Distributed Application Archive (DAA) on page 29.
5. Click the Next button.
6. Review the setup information of the newly created application. Click the Save And Exit button.
7. Select the newly created OEBSReference item from the Applications list. Click the Distribution tab of the selected application.
8. Select the application in the left-hand panel, then select the node on which you want to distribute it. For example, select the DevNode item in the Available Nodes column, then move it to the Selected Nodes column.
9. Click the Save button.
10. Click the Deploy button, then select Deploy With Start from the pop-up menu to deploy and start the application.
The OEBSReference application status in the Runtime State column appears as Running, as shown in Figure 11.
Figure 11 Deploy and Run the Service
TIBCO ActiveMatrix BusinessWorks Service Engine Plug-in for Oracle E-Business Suite User’s Guide
Running the Example | 33
Running the Example
The following steps show how to run the example using TIBCO Business Studio after the example is deployed successfully:
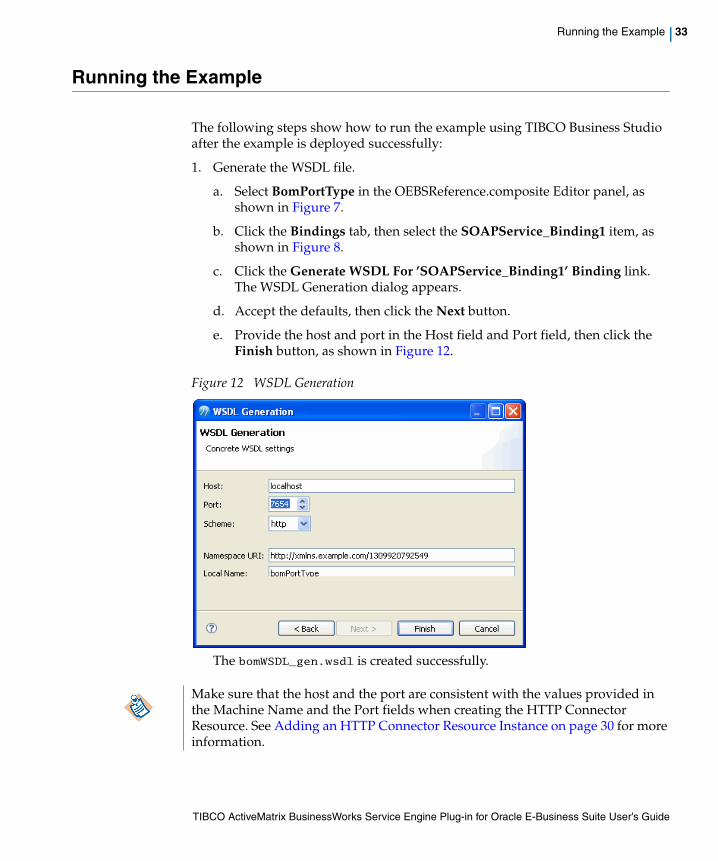
1. Generate the WSDL file.
a. Select BomPortType in the OEBSReference.composite Editor panel, as shown in Figure 7.
b. Click the Bindings tab, then select the SOAPService_Binding1 item, as shown in Figure 8.
c. Click the Generate WSDL For ’SOAPService_Binding1’ Binding link. The WSDL Generation dialog appears.
d. Accept the defaults, then click the Next button.
e. Provide the host and port in the Host field and Port field, then click the Finish button, as shown in Figure 12.
Figure 12 WSDL Generation
The bomWSDL_gen.wsdl is created successfully.
Make sure that the host and the port are consistent with the values provided in the Machine Name and the Port fields when creating the HTTP Connector Resource. See Adding an HTTP Connector Resource Instance on page 30 for more information.
TIBCO ActiveMatrix BusinessWorks Service Engine Plug-in for Oracle E-Business Suite User’s Guide

34 | Chapter 5 Tutorial
2. Right-click the BomWSDL_gen.wsdl file in the Service Descriptors folder under the OEBSReference project, then select Web Services > Test With Web Services Explorer. The Web Services Explorer appears in the Editor Panel.
3. Select BomOperation in the Navigator panel, as shown in Figure 13.
Figure 13 Web Service Navigator
4. Enter the input data for the items, as shown in Figure 14.
Figure 14 Input of the Example
5. Click the Go button to run the example.
TIBCO ActiveMatrix BusinessWorks Service Engine Plug-in for Oracle E-Business Suite User’s Guide

Running the Example | 35
After running the example successfully, the status S indicates that the example ran successfully, as shown in Figure 15. On the other hand, the status E indicates an error occurred when running the example.
Figure 15 Output of the Example
TIBCO ActiveMatrix BusinessWorks Service Engine Plug-in for Oracle E-Business Suite User’s Guide
36 | Chapter 5 Tutorial
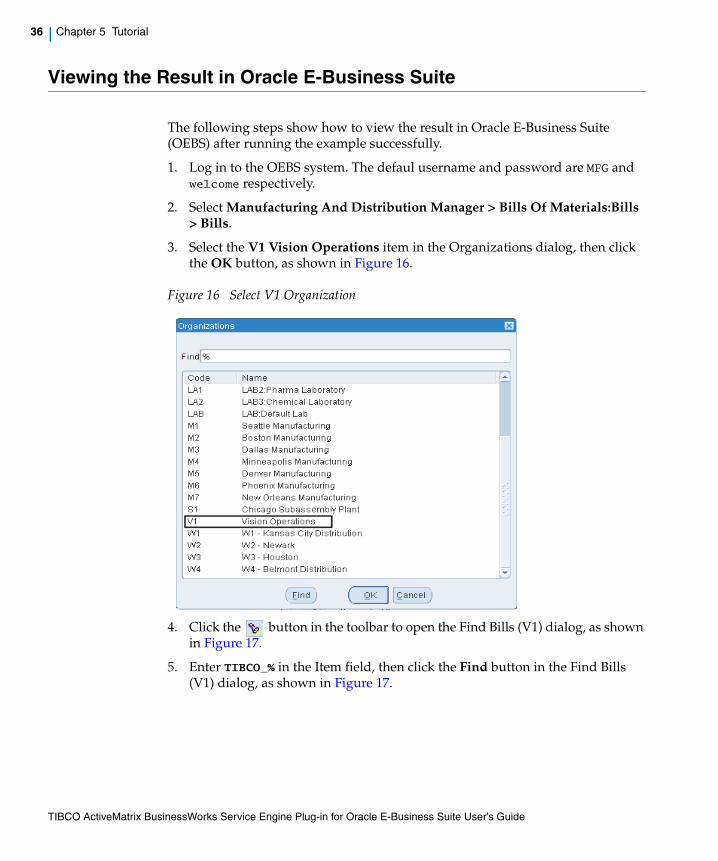
Viewing the Result in Oracle E-Business Suite
The following steps show how to view the result in Oracle E-Business Suite (OEBS) after running the example successfully.
1. Log in to the OEBS system. The defaul username and password are MFG and welcome respectively.
2. Select Manufacturing And Distribution Manager > Bills Of Materials:Bills > Bills.
3. Select the V1 Vision Operations item in the Organizations dialog, then click the OK button, as shown in Figure 16.
Figure 16 Select V1 Organization
4. Click the button in the toolbar to open the Find Bills (V1) dialog, as shown in Figure 17.
5. Enter TIBCO_% in the Item field, then click the Find button in the Find Bills (V1) dialog, as shown in Figure 17.
TIBCO ActiveMatrix BusinessWorks Service Engine Plug-in for Oracle E-Business Suite User’s Guide

Viewing the Result in Oracle E-Business Suite | 37
Figure 17 Search the Result
The search result appears, as shown in Figure 18.
Figure 18 Created BOM Bill in OEBS
TIBCO ActiveMatrix BusinessWorks Service Engine Plug-in for Oracle E-Business Suite User’s Guide

38 | Chapter 5 Tutorial
6. Click the Substitutes button to view the substitute component of the TIBCO_RAM item, as shown in Figure 19.
Figure 19 Substitute Components
TIBCO ActiveMatrix BusinessWorks Service Engine Plug-in for Oracle E-Business Suite User’s Guide
| 39
Index
A
ActiveMatrix Administrator 2, 30add a new node 14Associating the BWSE Component with Service
Resource 10
B
Business Studio 2BusinessWorks Service Engine 2
C
composite configuration 27CONFIG_HOME xiCreating a Distributed Application Archive 18Creating a TIBCO Designer Project 6Creating a TIBCO SOA Project 7customer support xiii, xiii
D
DAA 18deploy a DAA 32Distributed Application Archive 18
E
EAR file 20EAR2DAA 20
Enabling BusinessWorks Service Resource 8ENV_NAME xiEnvironment for TIBCO ActiveMatrix 29
H
HTTP Connector resource instance 30
I
implementation process 23
O
Oracle E-Business Suite connection 25
R
run the example 33
S
Service Resource 8set up the new node 15SOA project 7Starting TIBCO Business Studio 4, 4support, contacting xiii, xiii
TIBCO ActiveMatrix BusinessWorks Service Engine Plug-in for Oracle E-Business Suite User’s Guide

40 | Index
T
technical support xiii, xiiiTIBCO Designer project 6TIBCO host 30TIBCO_HOME xi
TIBCO ActiveMatrix BusinessWorks Service Engine Plug-in for Oracle E-Business Suite User’s Guide


