108
TIBCO BusinessEvents ® Getting Started Software Release 5.0 April 2011 The Power to Predict ®
TIBCO BusinessEvents®
Getting StartedSoftware Release 5.0April 2011
The Power to Predict®

Important Information
SOME TIBCO SOFTWARE EMBEDS OR BUNDLES OTHER TIBCO SOFTWARE. USE OF SUCH EMBEDDED OR BUNDLED TIBCO SOFTWARE IS SOLELY TO ENABLE THE FUNCTIONALITY (OR PROVIDE LIMITED ADD-ON FUNCTIONALITY) OF THE LICENSED TIBCO SOFTWARE. THE EMBEDDED OR BUNDLED SOFTWARE IS NOT LICENSED TO BE USED OR ACCESSED BY ANY OTHER TIBCO SOFTWARE OR FOR ANY OTHER PURPOSE.USE OF TIBCO SOFTWARE AND THIS DOCUMENT IS SUBJECT TO THE TERMS AND CONDITIONS OF A LICENSE AGREEMENT FOUND IN EITHER A SEPARATELY EXECUTED SOFTWARE LICENSE AGREEMENT, OR, IF THERE IS NO SUCH SEPARATE AGREEMENT, THE CLICKWRAP END USER LICENSE AGREEMENT WHICH IS DISPLAYED DURING DOWNLOAD OR INSTALLATION OF THE SOFTWARE (AND WHICH IS DUPLICATED IN THE LICENSE FILE) OR IF THERE IS NO SUCH SOFTWARE LICENSE AGREEMENT OR CLICKWRAP END USER LICENSE AGREEMENT, THE LICENSE(S) LOCATED IN THE “LICENSE” FILE(S) OF THE SOFTWARE. USE OF THIS DOCUMENT IS SUBJECT TO THOSE TERMS AND CONDITIONS, AND YOUR USE HEREOF SHALL CONSTITUTE ACCEPTANCE OF AND AN AGREEMENT TO BE BOUND BY THE SAME.This document contains confidential information that is subject to U.S. and international copyright laws and treaties. No part of this document may be reproduced in any form without the written authorization of TIBCO Software Inc.TIBCO, The Power of Now, TIBCO ActiveMatrix, TIBCO ActiveMatrix BusinessWorks, TIBCO Administrator, TIBCO ActiveSpaces, TIBCO Designer, TIBCO Enterprise Message Service, TIBCO Hawk, TIBCO Runtime Agent, TIBCO Rendezvous, are either registered trademarks or trademarks of TIBCO Software Inc. in the United States and/or other countries.EJB, Java EE, J2EE, and all Java-based trademarks and logos are trademarks or registered trademarks of Sun Microsystems, Inc. in the U.S. and other countries.All other product and company names and marks mentioned in this document are the property of their respective owners and are mentioned for identification purposes only.THIS SOFTWARE MAY BE AVAILABLE ON MULTIPLE OPERATING SYSTEMS. HOWEVER, NOT ALL OPERATING SYSTEM PLATFORMS FOR A SPECIFIC SOFTWARE VERSION ARE RELEASED AT THE SAME TIME. SEE THE README.TXT FILE FOR THE AVAILABILITY OF THIS SOFTWARE VERSION ON A SPECIFIC OPERATING SYSTEM PLATFORM.THIS DOCUMENT IS PROVIDED “AS IS” WITHOUT WARRANTY OF ANY KIND, EITHER EXPRESS OR IMPLIED, INCLUDING, BUT NOT LIMITED TO, THE IMPLIED WARRANTIES OF MERCHANTABILITY, FITNESS FOR A PARTICULAR PURPOSE, OR NON-INFRINGEMENT.THIS DOCUMENT COULD INCLUDE TECHNICAL INACCURACIES OR TYPOGRAPHICAL ERRORS. CHANGES ARE PERIODICALLY ADDED TO THE INFORMATION HEREIN; THESE CHANGES WILL BE INCORPORATED IN NEW EDITIONS OF THIS DOCUMENT. TIBCO SOFTWARE INC. MAY MAKE IMPROVEMENTS AND/OR CHANGES IN THE PRODUCT(S) AND/OR THE PROGRAM(S) DESCRIBED IN THIS DOCUMENT AT ANY TIME.THE CONTENTS OF THIS DOCUMENT MAY BE MODIFIED AND/OR QUALIFIED, DIRECTLY OR INDIRECTLY, BY OTHER DOCUMENTATION WHICH ACCOMPANIES THIS SOFTWARE, INCLUDING BUT NOT LIMITED TO ANY RELEASE NOTES AND "READ ME" FILES.Copyright © 2004-2011 TIBCO Software Inc. ALL RIGHTS RESERVED.TIBCO Software Inc. Confidential Information
| iii
Contents
Preface . . . . . . . . . . . . . . . . . . . . . . . . . . . . . . . . . . . . . . . . . . . . . . . . . . . . . . . . . . . . . . . . . . . . . . . . .v
Changes from the Previous Release of this Guide . . . . . . . . . . . . . . . . . . . . . . . . . . . . . . . . . . . . . . . . . . . . . . . . vi
TIBCO BusinessEvents Express . . . . . . . . . . . . . . . . . . . . . . . . . . . . . . . . . . . . . . . . . . . . . . . . . . . . . . . . . . . . . . vii
Related Documentation . . . . . . . . . . . . . . . . . . . . . . . . . . . . . . . . . . . . . . . . . . . . . . . . . . . . . . . . . . . . . . . . . . . . .viiiTIBCO BusinessEvents and Add-On Product Documentation . . . . . . . . . . . . . . . . . . . . . . . . . . . . . . . . . . . .viiiAccessing TIBCO BusinessEvents Functions Reference Documentation . . . . . . . . . . . . . . . . . . . . . . . . . . . xiOther TIBCO Product Documentation . . . . . . . . . . . . . . . . . . . . . . . . . . . . . . . . . . . . . . . . . . . . . . . . . . . . . . xi
Typographical Conventions . . . . . . . . . . . . . . . . . . . . . . . . . . . . . . . . . . . . . . . . . . . . . . . . . . . . . . . . . . . . . . . . . . xii
Connecting with TIBCO Resources . . . . . . . . . . . . . . . . . . . . . . . . . . . . . . . . . . . . . . . . . . . . . . . . . . . . . . . . . . . . xvHow to Join TIBCOmmunity . . . . . . . . . . . . . . . . . . . . . . . . . . . . . . . . . . . . . . . . . . . . . . . . . . . . . . . . . . . . . . xvHow to Access All TIBCO Documentation . . . . . . . . . . . . . . . . . . . . . . . . . . . . . . . . . . . . . . . . . . . . . . . . . . . xvHow to Contact TIBCO Support . . . . . . . . . . . . . . . . . . . . . . . . . . . . . . . . . . . . . . . . . . . . . . . . . . . . . . . . . . . xv
Chapter 1 Introduction. . . . . . . . . . . . . . . . . . . . . . . . . . . . . . . . . . . . . . . . . . . . . . . . . . . . . . . . . . . .1
Overview . . . . . . . . . . . . . . . . . . . . . . . . . . . . . . . . . . . . . . . . . . . . . . . . . . . . . . . . . . . . . . . . . . . . . . . . . . . . . . . . . 2Configured Tutorial Projects are Provided . . . . . . . . . . . . . . . . . . . . . . . . . . . . . . . . . . . . . . . . . . . . . . . . . . . . 2Additional Example Projects Provide More Learning . . . . . . . . . . . . . . . . . . . . . . . . . . . . . . . . . . . . . . . . . . . . 2Skills Required . . . . . . . . . . . . . . . . . . . . . . . . . . . . . . . . . . . . . . . . . . . . . . . . . . . . . . . . . . . . . . . . . . . . . . . . . 3
The Fraud Detection Scenario . . . . . . . . . . . . . . . . . . . . . . . . . . . . . . . . . . . . . . . . . . . . . . . . . . . . . . . . . . . . . . . . . 4
Chapter 2 Project Design Tutorial . . . . . . . . . . . . . . . . . . . . . . . . . . . . . . . . . . . . . . . . . . . . . . . . . .5
General Runtime Flow . . . . . . . . . . . . . . . . . . . . . . . . . . . . . . . . . . . . . . . . . . . . . . . . . . . . . . . . . . . . . . . . . . . . . . . 6
Importing Existing Projects into Your Workspace . . . . . . . . . . . . . . . . . . . . . . . . . . . . . . . . . . . . . . . . . . . . . . . . . . 7
Create the FraudDetection Project. . . . . . . . . . . . . . . . . . . . . . . . . . . . . . . . . . . . . . . . . . . . . . . . . . . . . . . . . . . . . . 9
Create an HTTP Channel and Destination . . . . . . . . . . . . . . . . . . . . . . . . . . . . . . . . . . . . . . . . . . . . . . . . . . . . . . 12
Define the AccountOperation, CreateAccount, Debit, and Reply Events . . . . . . . . . . . . . . . . . . . . . . . . . . . . . . . 16
Define the Account Concept . . . . . . . . . . . . . . . . . . . . . . . . . . . . . . . . . . . . . . . . . . . . . . . . . . . . . . . . . . . . . . . . . 20
Add the FraudCriteria Scorecard . . . . . . . . . . . . . . . . . . . . . . . . . . . . . . . . . . . . . . . . . . . . . . . . . . . . . . . . . . . . . . 23
Add the InitializeScorecard Rule Function . . . . . . . . . . . . . . . . . . . . . . . . . . . . . . . . . . . . . . . . . . . . . . . . . . . . . . . 25
Add the PreProcessor Rule Function. . . . . . . . . . . . . . . . . . . . . . . . . . . . . . . . . . . . . . . . . . . . . . . . . . . . . . . . . . . 28
Add BadCreateAccount and CreateAccount Rules . . . . . . . . . . . . . . . . . . . . . . . . . . . . . . . . . . . . . . . . . . . . . . . . 30
Add ApplyDebit, BadApplyDebit, and CheckNegativeBalance Rules . . . . . . . . . . . . . . . . . . . . . . . . . . . . . . . . . . 34
Add the FraudDetection Rule and Unsuspend Account Rule . . . . . . . . . . . . . . . . . . . . . . . . . . . . . . . . . . . . . . . . 38
TIBCO BusinessEvents Getting Started

iv | Contents
Analyze and Validate the Project . . . . . . . . . . . . . . . . . . . . . . . . . . . . . . . . . . . . . . . . . . . . . . . . . . . . . . . . . . . . . 41
Add a Cluster Deployment Descriptor and Build the EAR File . . . . . . . . . . . . . . . . . . . . . . . . . . . . . . . . . . . . . . . 44
Start the Engine and Send Events . . . . . . . . . . . . . . . . . . . . . . . . . . . . . . . . . . . . . . . . . . . . . . . . . . . . . . . . . . . . 48
Chapter 3 Cache OM Tutorial. . . . . . . . . . . . . . . . . . . . . . . . . . . . . . . . . . . . . . . . . . . . . . . . . . . . . 49
Cache OM Tutorial Overview . . . . . . . . . . . . . . . . . . . . . . . . . . . . . . . . . . . . . . . . . . . . . . . . . . . . . . . . . . . . . . . . 50
TIBCO BusinessEvents Cache Fundamentals . . . . . . . . . . . . . . . . . . . . . . . . . . . . . . . . . . . . . . . . . . . . . . . . . . . 51
Rename or Copy the FraudDetection Example (And Change Port) . . . . . . . . . . . . . . . . . . . . . . . . . . . . . . . . . . . 54
Update the Event Preprocessor to Load the Rete Network . . . . . . . . . . . . . . . . . . . . . . . . . . . . . . . . . . . . . . . . . 55
Add a CDD File for Cache Object Management and Build the EAR. . . . . . . . . . . . . . . . . . . . . . . . . . . . . . . . . . . 57
Deploy the Inference and Cache Agents and Send Events . . . . . . . . . . . . . . . . . . . . . . . . . . . . . . . . . . . . . . . . . 60
Chapter 4 Backing Store Tutorial . . . . . . . . . . . . . . . . . . . . . . . . . . . . . . . . . . . . . . . . . . . . . . . . . 63
Backing Store Setup — Overview. . . . . . . . . . . . . . . . . . . . . . . . . . . . . . . . . . . . . . . . . . . . . . . . . . . . . . . . . . . . . 64
Ensure DBMS Software and Driver are in Place and Edit the TRA . . . . . . . . . . . . . . . . . . . . . . . . . . . . . . . . . . . 65
Configure the TIBCO BusinessEvents Studio Project. . . . . . . . . . . . . . . . . . . . . . . . . . . . . . . . . . . . . . . . . . . . . . 67
Prepare the Database Schema. . . . . . . . . . . . . . . . . . . . . . . . . . . . . . . . . . . . . . . . . . . . . . . . . . . . . . . . . . . . . . . 72
Deploy and Test the Application . . . . . . . . . . . . . . . . . . . . . . . . . . . . . . . . . . . . . . . . . . . . . . . . . . . . . . . . . . . . . . 75
Reset the Backing Store Tutorial. . . . . . . . . . . . . . . . . . . . . . . . . . . . . . . . . . . . . . . . . . . . . . . . . . . . . . . . . . . . . . 77
Chapter 5 TIBCO BusinessEvents Monitoring and Management Tutorial . . . . . . . . . . . . . . . . 79
Configure Copssh, TIBCO Hawk, and TRA File . . . . . . . . . . . . . . . . . . . . . . . . . . . . . . . . . . . . . . . . . . . . . . . . . . 80
Configure the Site Topology File . . . . . . . . . . . . . . . . . . . . . . . . . . . . . . . . . . . . . . . . . . . . . . . . . . . . . . . . . . . . . . 82
Specify the Site Topology File Location in the MM CDD File . . . . . . . . . . . . . . . . . . . . . . . . . . . . . . . . . . . . . . . . 87
Start MM Server and Log on to the MM Console . . . . . . . . . . . . . . . . . . . . . . . . . . . . . . . . . . . . . . . . . . . . . . . . . 88
Index . . . . . . . . . . . . . . . . . . . . . . . . . . . . . . . . . . . . . . . . . . . . . . . . . . . . . . . . . . . . . . . . . . . . . . . . . 91
TIBCO BusinessEvents Getting Started
| v
Preface
TIBCO BusinessEvents® allows you to abstract and correlate meaningful business information from the events and data flowing through your information systems, and take appropriate actions using business rules. By detecting patterns within the real-time flow of events, TIBCO BusinessEvents can help you to detect and understand unusual activities as well as recognize trends, problems, and opportunities. TIBCO BusinessEvents publishes this business-critical information in real time to your critical enterprise systems or dashboards. With TIBCO BusinessEvents you can predict the needs of your customers, make faster decisions, and take faster action.
TIBCO BusinessEventsThe Power to Predict®
Topics
• Changes from the Previous Release of this Guide, page vi
• TIBCO BusinessEvents Express, page vii
• Related Documentation, page viii
• Typographical Conventions, page xii
• Connecting with TIBCO Resources, page xv
TIBCO BusinessEvents Getting Started
vi | Changes from the Previous Release of this Guide
Changes from the Previous Release of this Guide
This section itemizes the major changes from the previous release of this guide.
• One new tutorial is added in this release: Chapter 4, Backing Store Tutorial, on page 63
• Each example project HTTP channel now uses a different port so that multiple examples can be used without issues. A new section explains this, and also explains how to update the port specified in the readme.html file, if you change the port in an example project. See Dependency Between Readme File and Project — Port Number on page 7.
TIBCO BusinessEvents Getting Started
Preface | vii
TIBCO BusinessEvents Express
The TIBCO BusinessEvents Express edition provides more limited functionality than the TIBCO BusinessEvents standard edition. Some content in this documentation is not relevant to users of TIBCO BusinessEvents Express. Such content includes but is not limited to any chapters and major sections that contain a note indicating that the content does not apply to TIBCO BusinessEvents Express.
Minor references to unsupported features may not be called out in the text. Use the following general guidelines to understand what is and is not supported in these cases:
• Only In Memory object management (OM) is supported. Therefore all functionality that requires Cache OM, such as use of a backing store, is not available. Berkeley DB OM is also not supported with the TIBCO BusinessEvents Express edition.
• The Monitoring and Management component and the related Site Topology editor are not supported with the TIBCO BusinessEvents Express edition. Instead you can use TIBCO Administrator and JMX for deployment, monitoring, and management.
• Only the TIBCO BusinessEvents Decision Manager add-on is supported with the TIBCO BusinessEvents Express edition in this release. Other add-on products are not supported.
TIBCO BusinessEvents Getting Started
viii | Related Documentation
Related Documentation
This section lists documentation resources you may find useful.
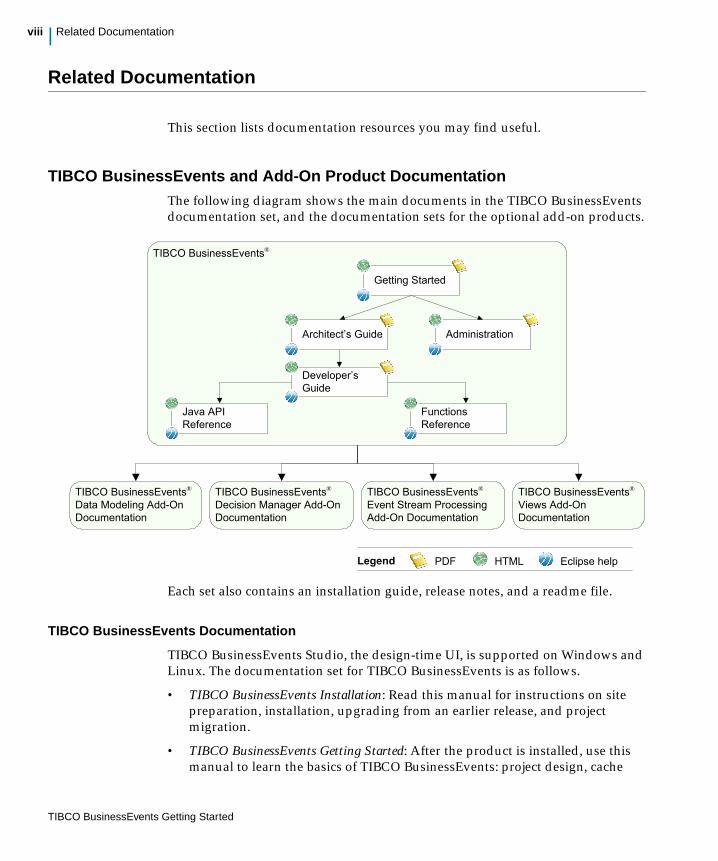
TIBCO BusinessEvents and Add-On Product DocumentationThe following diagram shows the main documents in the TIBCO BusinessEvents documentation set, and the documentation sets for the optional add-on products.
Each set also contains an installation guide, release notes, and a readme file.
TIBCO BusinessEvents Documentation
TIBCO BusinessEvents Studio, the design-time UI, is supported on Windows and Linux. The documentation set for TIBCO BusinessEvents is as follows.
• TIBCO BusinessEvents Installation: Read this manual for instructions on site preparation, installation, upgrading from an earlier release, and project migration.
• TIBCO BusinessEvents Getting Started: After the product is installed, use this manual to learn the basics of TIBCO BusinessEvents: project design, cache
TIBCO BusinessEvents®
Getting Started
AdministrationArchitect’s Guide
Developer’s Guide
Java API Reference
Functions Reference
Legend PDF HTML Eclipse help
TIBCO BusinessEvents® Data Modeling Add-On Documentation
TIBCO BusinessEvents® Event Stream Processing Add-On Documentation
TIBCO BusinessEvents® Decision Manager Add-On Documentation
TIBCO BusinessEvents® Views Add-On Documentation
TIBCO BusinessEvents Getting Started
Preface | ix
OM, and backing store. This guide explains the main ideas so you gain understanding as well as practical knowledge.
• TIBCO BusinessEvents Architect’s Guide: If you are architecting an application using TIBCO BusinessEvents, read this guide for overview and detailed technical information to guide your work.
• TIBCO BusinessEvents Developer’s Guide: Use this guide when you implement a project design in TIBCO BusinessEvents Studio. It covers topics such as project-level tasks, resource-level tasks, debugging, and integration with TIBCO ActiveMatrix BusinessWorks.
• TIBCO BusinessEvents Administration: This book explains how to configure, deploy, monitor, and manage a TIBCO BusinessEvents application and the data it generates. It explains how to configure the CDD file for different object management options, set up a backing store, and how to work with TIBCO BusinessEvents Monitoring and Management component, and with TIBCO Administrator.
• Online References:
— TIBCO BusinessEvents Java API Reference: This online reference is available from the HTML documentation interface. It provides the Javadoc-based documentation for the TIBCO BusinessEvents API.
— TIBCO BusinessEvents Functions Reference: This reference is available from the HTML documentation interface. It provides a listing of all functions provided with TIBCO BusinessEvents, showing the same details as the tooltips available in TIBCO BusinessEvents Studio.
• TIBCO BusinessEvents Release Notes: Read the release notes for a list of new and changed features. This document also contains lists of known issues and closed issues for this release.
TIBCO BusinessEvents Event Stream Processing
This TIBCO BusinessEvents add-on is available separately, and includes the TIBCO BusinessEvents Query Language features and the Pattern Matcher Service.
• TIBCO BusinessEvents Event Stream Processing Installation: Read this brief manual for installation instructions. A compatible version of TIBCO BusinessEvents must be installed before you install any add-on.
• TIBCO BusinessEvents Query Developer’s Guide: This manual explains how to use the object query language to query various aspects of the running system For details on configuring and deploying query agents, see TIBCO BusinessEvents Administration.
TIBCO BusinessEvents Getting Started
x | Related Documentation
• TIBCO BusinessEvents Event Stream Processing Pattern Matcher Developer’s Guide: This manual explains how to use the pattern matcher language and engine to correlate event patterns in a running system.
• TIBCO BusinessEvents Event Stream Processing Release Notes: Read the release notes for a list of new and changed features. This document also contains lists of known issues and closed issues for this release.
TIBCO BusinessEvents Decision Manager
This TIBCO BusinessEvents add-on is available separately. It incorporates the Decision Manager decision modeling business user interface (supported on Windows and Linux), and the Rules Management Server (supported on all platforms supported by TIBCO BusinessEvents).
• TIBCO BusinessEvents Decision Manager Installation: Read this brief manual for installation instructions. A compatible version of TIBCO BusinessEvents must be installed before you install any add-on.
• TIBCO BusinessEvents Decision Manager User’s Guide: This manual explains how business users can use decision tables and other decision artifacts to create business rules. It also covers configuration and administration of Rules Management Server, which is used for authentication, authorization, and approval processes.
• TIBCO BusinessEvents Decision Manager Release Notes: Read the release notes for a list of new and changed features. This document also contains lists of known issues and closed issues for this release.
TIBCO BusinessEvents Data Modeling
This TIBCO BusinessEvents add-on is available separately. It contains state models and database concept features.
• TIBCO BusinessEvents Data Modeling Installation: Read this brief manual for installation instructions. A compatible version of TIBCO BusinessEvents must be installed before you install any add-on.
• TIBCO BusinessEvents Data Modeling Developer’s Guide: This manual explains data modeling add-on features for TIBCO BusinessEvents. The database concepts feature enables you to model TIBCO BusinessEvents concepts on Database tables. The state modeler feature enables you to create state machines.
• TIBCO BusinessEvents Data Modeling Release Notes: Read the release notes for a list of new and changed features. This document also contains lists of known issues and closed issues for this release.
TIBCO BusinessEvents Getting Started
Preface | xi
TIBCO BusinessEvents Views
This TIBCO BusinessEvents add-on is available separately. It includes graphical dashboard components for run-time event monitoring.
• TIBCO BusinessEvents Views Installation: Read this manual for instructions on site preparation and installation. A compatible version of TIBCO BusinessEvents must be installed before you install any add-on.
• TIBCO BusinessEvents Views Developer’s Guide: This guide explains how to use TIBCO BusinessEvents Views to create meaningful metrics that are presented to business users in real-time for proactive decision making.
• TIBCO BusinessEvents Views User’s Guide: This book explains how to monitor metrics in TIBCO BusinessEvents TIBCO BusinessEvents Views and how to represent the business processes graphically.
• TIBCO BusinessEvents Views Release Notes: Read the release notes for a list of new and changed features. This document also contains lists of known issues and closed issues for this release.
Accessing TIBCO BusinessEvents Functions Reference DocumentationReference documentation for functions, including those used in add-ons, is available in the HTML documentation interface for the TIBCO BusinessEvents documentation set, and as tooltips in TIBCO BusinessEvents Studio. To use the HTML-based functions reference from the file system do the following:
1. Browse to BE_HOME/doc/standard/html and click index.htm . The HTML documentation interface appears.
2. In the left panel, browse to Online References and in the right panel choose TIBCO BusinessEvents Functions Reference. The reference opens in a new tab.
3. Click the navigation links to browse to the functions as desired.
Other TIBCO Product DocumentationYou may find it useful to refer to the documentation for the following TIBCO products:
• TIBCO ActiveSpaces®
• TIBCO Hawk®
• TIBCO Rendezvous®
• TIBCO Enterprise Message Service™
• TIBCO ActiveMatrix BusinessWorks™
TIBCO BusinessEvents Getting Started
xii | Typographical Conventions
Typographical Conventions
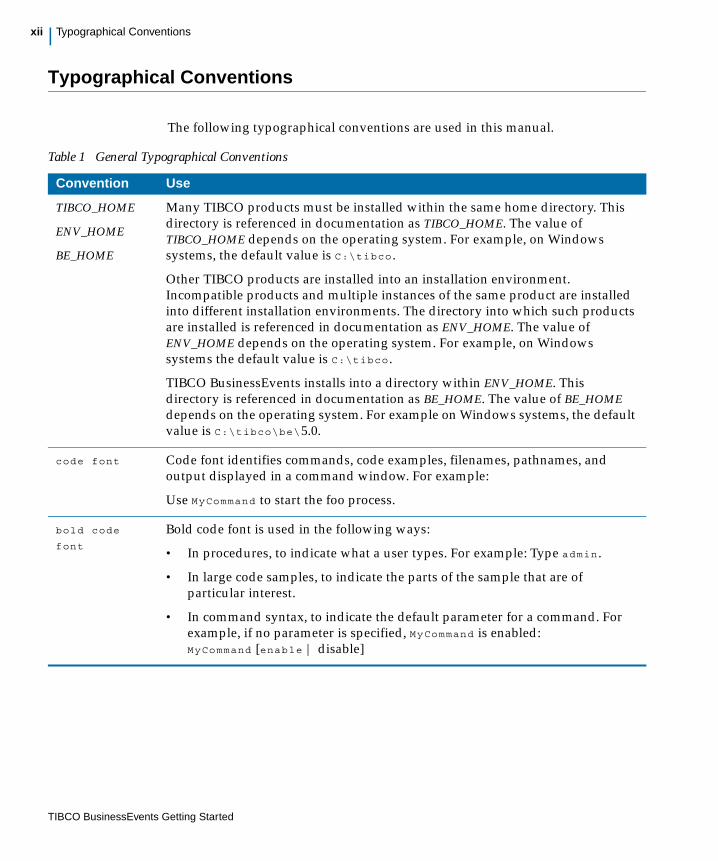
The following typographical conventions are used in this manual.
Table 1 General Typographical Conventions
Convention Use
TIBCO_HOME
ENV_HOME
BE_HOME
Many TIBCO products must be installed within the same home directory. This directory is referenced in documentation as TIBCO_HOME. The value of TIBCO_HOME depends on the operating system. For example, on Windows systems, the default value is C:\tibco .
Other TIBCO products are installed into an installation environment. Incompatible products and multiple instances of the same product are installed into different installation environments. The directory into which such products are installed is referenced in documentation as ENV_HOME. The value of ENV_HOME depends on the operating system. For example, on Windows systems the default value is C:\tibco .
TIBCO BusinessEvents installs into a directory within ENV_HOME. This directory is referenced in documentation as BE_HOME. The value of BE_HOME depends on the operating system. For example on Windows systems, the default value is C:\tibco\be\5.0.
code font Code font identifies commands, code examples, filenames, pathnames, and output displayed in a command window. For example:
Use MyCommand to start the foo process.
bold code
font Bold code font is used in the following ways:
• In procedures, to indicate what a user types. For example: Type admin .
• In large code samples, to indicate the parts of the sample that are of particular interest.
• In command syntax, to indicate the default parameter for a command. For example, if no parameter is specified, MyCommand is enabled: MyCommand [enable | disable]
TIBCO BusinessEvents Getting Started
Preface | xiii
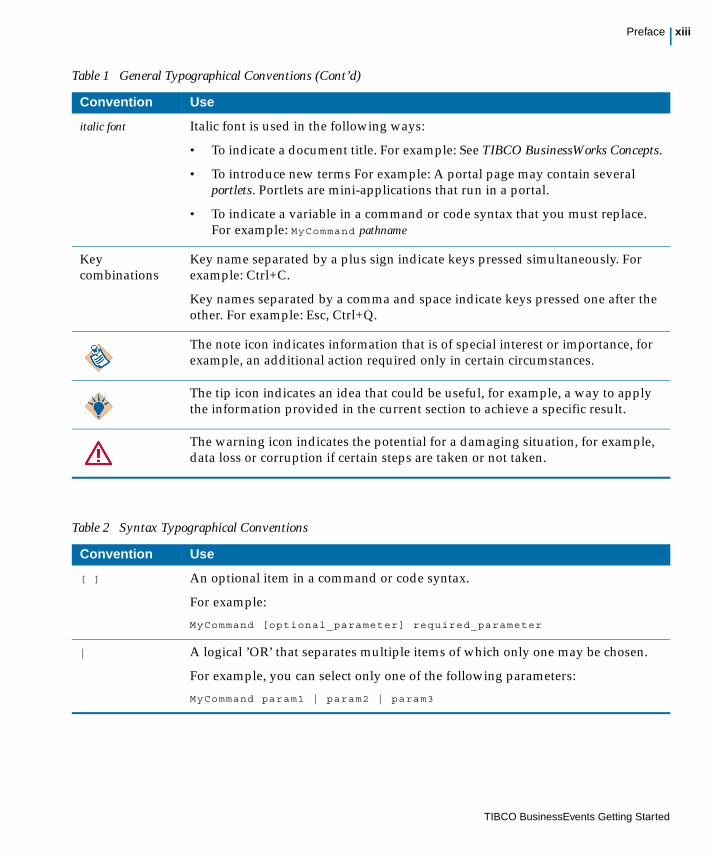
italic font Italic font is used in the following ways:
• To indicate a document title. For example: See TIBCO BusinessWorks Concepts.
• To introduce new terms For example: A portal page may contain several portlets. Portlets are mini-applications that run in a portal.
• To indicate a variable in a command or code syntax that you must replace. For example: MyCommand pathname
Key combinations
Key name separated by a plus sign indicate keys pressed simultaneously. For example: Ctrl+C.
Key names separated by a comma and space indicate keys pressed one after the other. For example: Esc, Ctrl+Q.
The note icon indicates information that is of special interest or importance, for example, an additional action required only in certain circumstances.
The tip icon indicates an idea that could be useful, for example, a way to apply the information provided in the current section to achieve a specific result.
The warning icon indicates the potential for a damaging situation, for example, data loss or corruption if certain steps are taken or not taken.
Table 1 General Typographical Conventions (Cont’d)
Convention Use
Table 2 Syntax Typographical Conventions
Convention Use
[ ] An optional item in a command or code syntax.
For example:
MyCommand [optional_parameter] required_parameter
| A logical ’OR’ that separates multiple items of which only one may be chosen.
For example, you can select only one of the following parameters:
MyCommand param1 | param2 | param3
TIBCO BusinessEvents Getting Started
xiv | Typographical Conventions
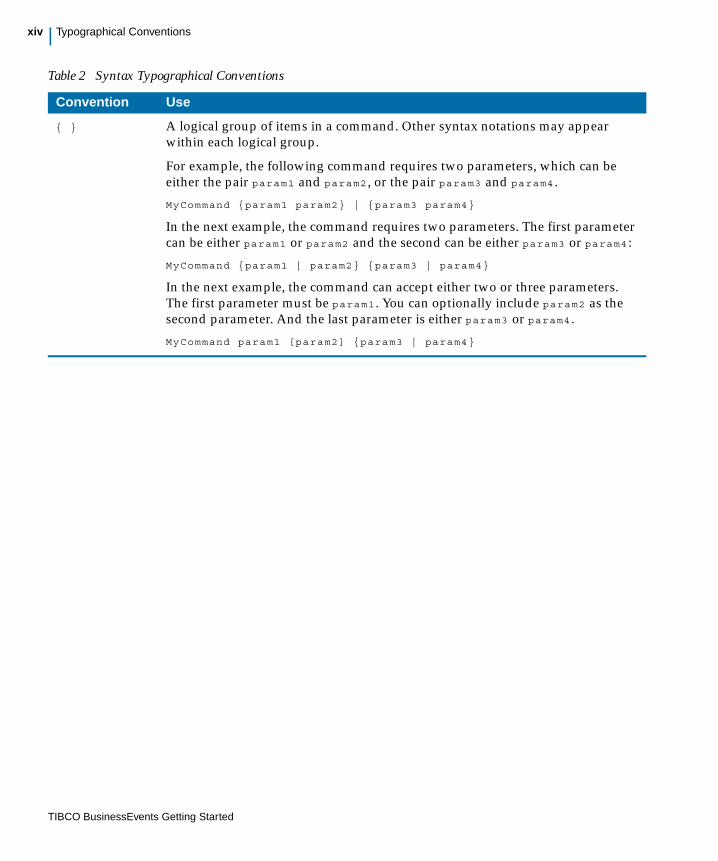
{ } A logical group of items in a command. Other syntax notations may appear within each logical group.
For example, the following command requires two parameters, which can be either the pair param1 and param2 , or the pair param3 and param4 .
MyCommand {param1 param2} | {param3 param4}
In the next example, the command requires two parameters. The first parameter can be either param1 or param2 and the second can be either param3 or param4 :
MyCommand {param1 | param2} {param3 | param4}
In the next example, the command can accept either two or three parameters. The first parameter must be param1 . You can optionally include param2 as the second parameter. And the last parameter is either param3 or param4 .
MyCommand param1 [param2] {param3 | param4}
Table 2 Syntax Typographical Conventions
Convention Use
TIBCO BusinessEvents Getting Started
Preface | xv
Connecting with TIBCO Resources
This section provides links to helpful TIBCO resources.
How to Join TIBCOmmunityTIBCOmmunity is an online destination for TIBCO customers, partners, and resident experts, a place to share and access the collective experience of the TIBCO community. TIBCOmmunity offers forums, blogs, and access to a variety of resources. To register, go to http://www.tibcommunity.com.
How to Access All TIBCO DocumentationAfter you join TIBCOmmunity, you can access the documentation for all supported product versions here:
http://docs.tibco.com/TibcoDoc
How to Contact TIBCO SupportFor comments or problems with this manual or the software it addresses, please contact TIBCO Support as follows.
• For an overview of TIBCO Support, and information about getting started with TIBCO Support, visit this site:
http://www.tibco.com/services/support
• If you already have a valid maintenance or support contract, visit this site:
https://support.tibco.com
Entry to this site requires a user name and password. If you do not have a user name, you can request one.
TIBCO BusinessEvents Getting Started

xvi | Connecting with TIBCO Resources
TIBCO BusinessEvents Getting Started
| 1
Chapter 1 Introduction
This brief chapter provides an overview of the tutorials and the tutorial scenario used in this guide.
Topics
• Overview, page 2
• The Fraud Detection Scenario, page 4
TIBCO BusinessEvents Getting Started
2 | Chapter 1 Introduction
Overview
This guide contains tutorials based on one simplified business scenario. The tasks in the tutorials provide step-by-step instructions and also explain the main ideas so you gain understanding as well as practical knowledge. References to related information are provided so you can jump to the main documentation on any topic to learn more.
The Project Design Tutorial shows you how to configure a TIBCO BusinessEvents project, run it at the command line, and test its behavior. This tutorial focuses on ontology and inferencing features.
The Cache OM Tutorial shows you how to add caching functionality to the project.
The Backing Store Tutorial shows you how to add a backing store, which allows the object data generated in the inference engine to be persisted on disk, and reused as needed.
The TIBCO BusinessEvents Monitoring and Management Tutorial explains how to configure the MM component and use it to deploy, monitor, and manage a cache-based project. This tutorial requires use of a cache based project, but it does not require use of a backing store.
You can do the Backing Store tutorial and the Monitoring and Management tutorial in any order. Both require a cache.
Configured Tutorial Projects are ProvidedThe tutorial projects, all based on the basic FraudDetection example, are located in the BE_HOME/examples/standard directory.
Additional Example Projects Provide More LearningAfter you have completed the tutorials, you can explore the examples in the BE_HOME/Examples directory. These examples demonstrate specific techniques that you can apply in your work.
TIBCO BusinessEvents Express Content relating to Cache OM and backing store is not relevant to TIBCO BusinessEvents Express edition.
TIBCO BusinessEvents Getting Started
Overview | 3
Skills RequiredThis guide is written for users with little or no familiarity with TIBCO products. Readers should have some familiarity with Java programming and the Eclipse platform.
Eclipse Platform
If you are not familiar with Eclipse platform, it is recommended that you first read the topics available from the Overview link on the Welcome page, especially Workbench basics, which explains concepts such as perspectives and views. Then complete the "Create a Hello World Application" available from the Tutorials link on the Welcome page, and any other tutorials of interest.
TIBCO BusinessEvents Getting Started
4 | Chapter 1 Introduction
The Fraud Detection Scenario
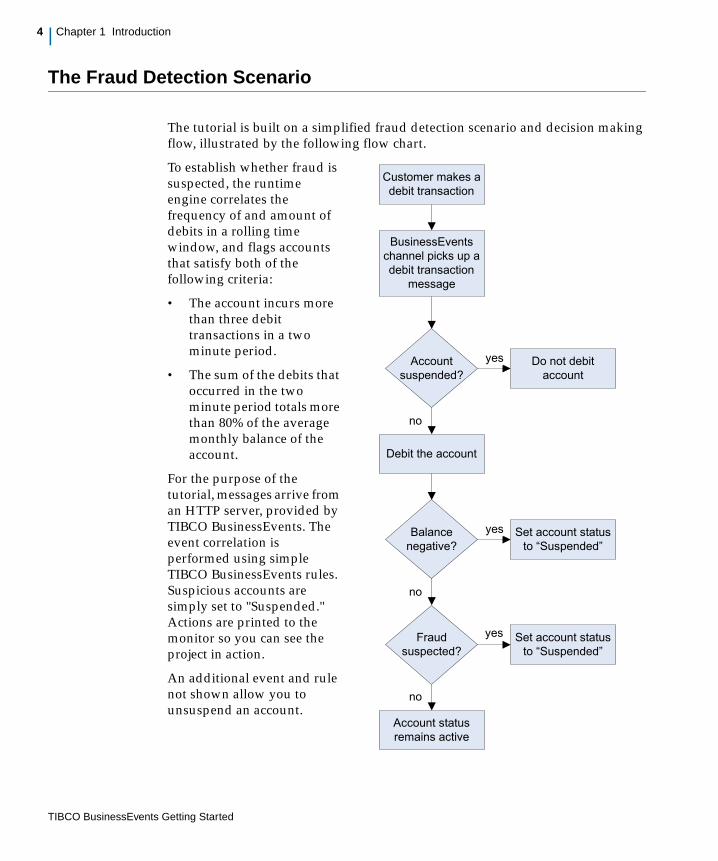
The tutorial is built on a simplified fraud detection scenario and decision making flow, illustrated by the following flow chart.
To establish whether fraud is suspected, the runtime engine correlates the frequency of and amount of debits in a rolling time window, and flags accounts that satisfy both of the following criteria:
• The account incurs more than three debit transactions in a two minute period.
• The sum of the debits that occurred in the two minute period totals more than 80% of the average monthly balance of the account.
For the purpose of the tutorial, messages arrive from an HTTP server, provided by TIBCO BusinessEvents. The event correlation is performed using simple TIBCO BusinessEvents rules. Suspicious accounts are simply set to "Suspended." Actions are printed to the monitor so you can see the project in action.
An additional event and rule not shown allow you to unsuspend an account.
Customer makes a debit transaction
BusinessEvents channel picks up a debit transaction
message
Debit the account
Set account status to “Suspended”
Account status remains active
no
yes
Account suspended?
Do not debit account
yes
no
Fraud suspected?
Balance negative?
yes
no
Set account status to “Suspended”
TIBCO BusinessEvents Getting Started
| 5
Chapter 2 Project Design Tutorial
This tutorial takes you through all the steps of configuring, building, deploying, and testing a TIBCO BusinessEvents project. The emphasis is on basic project design, with deploytime activities limited to the basic actions required to test a design.
Topics
• General Runtime Flow, page 6
• Importing Existing Projects into Your Workspace, page 7
• Create the FraudDetection Project, page 9
• Create an HTTP Channel and Destination, page 12
• Define the AccountOperation, CreateAccount, Debit, and Reply Events, page 16
• Define the Account Concept, page 20
• Add the FraudCriteria Scorecard, page 23
• Add the InitializeScorecard Rule Function, page 25
• Add the PreProcessor Rule Function, page 28
• Add BadCreateAccount and CreateAccount Rules, page 30
• Add ApplyDebit, BadApplyDebit, and CheckNegativeBalance Rules, page 34
• Add the FraudDetection Rule and Unsuspend Account Rule, page 38
• Analyze and Validate the Project, page 41
• Add a Cluster Deployment Descriptor and Build the EAR File, page 44
• Start the Engine and Send Events, page 48
TIBCO BusinessEvents Getting Started

6 | Chapter 2 Project Design Tutorial
General Runtime Flow
The section The Fraud Detection Scenario on page 4 explains the general tutorial scenario, the fraud detection criteria, and how a customer account can become Suspended. This section explains in more technical terms what happens at runtime given an example debit that triggers the fraud detection rules. (You will learn more details about the terms shown in italics below, as you complete the tutorial steps):
1. A message arriving through a TIBCO BusinessEvents channel is transformed into an event. (At design time you create an event type for this purpose, with the appropriate properties.) The event instance is then asserted into the Rete network, an in-memory network of objects based on the Rete algorithm which enables fast matching of facts with rule dependencies.
2. The presence of this new event in the Rete network causes the inference engine to check for rules that are designed to be triggered when this event is asserted.
3. A rule that is triggered by this event executes. It may make changes to concept instances, create an event and send it to a channel (and out of the TIBCO BusinessEvents application to some destination), and so on. The rule then consumes the event unless there is a reason not to do so.
Event lifespan It is important to consume events when they are no longer needed so that they don’t trigger rules to fire erroneously. On the other hand, it is also important to use a long enough time-to-live (TTL) setting for an event, so that it exists long enough to perform all work needed, for example, to trigger rules that correlate multiple events and take appropriate actions.
TIBCO BusinessEvents Getting Started
Importing Existing Projects into Your Workspace | 7
Importing Existing Projects into Your Workspace
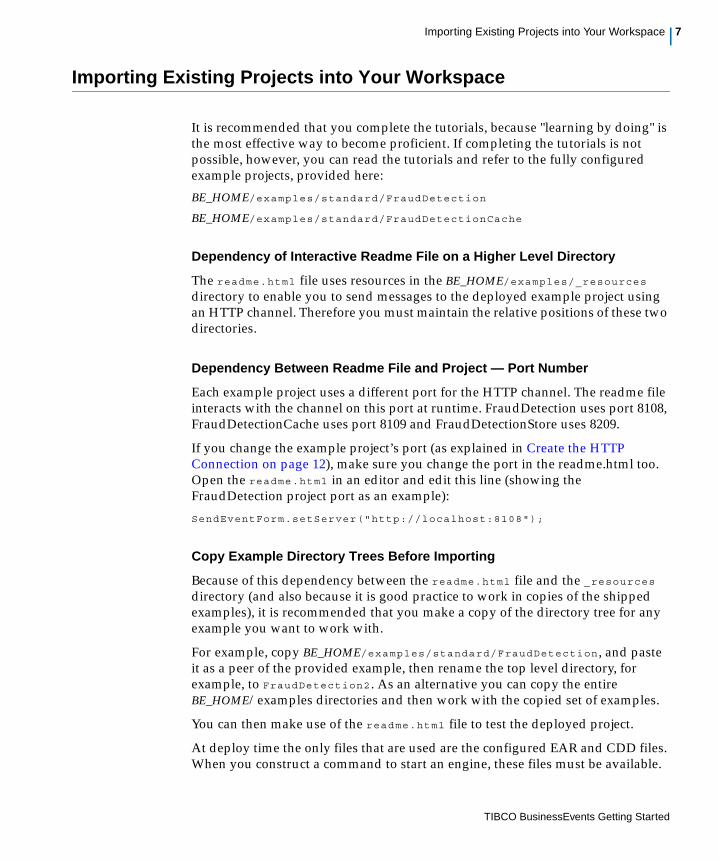
It is recommended that you complete the tutorials, because "learning by doing" is the most effective way to become proficient. If completing the tutorials is not possible, however, you can read the tutorials and refer to the fully configured example projects, provided here:
BE_HOME/examples/standard/FraudDetection
BE_HOME/examples/standard/FraudDetectionCache
Dependency of Interactive Readme File on a Higher Level Directory
The readme.html file uses resources in the BE_HOME/examples/_resources directory to enable you to send messages to the deployed example project using an HTTP channel. Therefore you must maintain the relative positions of these two directories.
Dependency Between Readme File and Project — Port Number
Each example project uses a different port for the HTTP channel. The readme file interacts with the channel on this port at runtime. FraudDetection uses port 8108, FraudDetectionCache uses port 8109 and FraudDetectionStore uses 8209.
If you change the example project’s port (as explained in Create the HTTP Connection on page 12), make sure you change the port in the readme.html too. Open the readme.html in an editor and edit this line (showing the FraudDetection project port as an example):
SendEventForm.setServer("http://localhost:8108");
Copy Example Directory Trees Before Importing
Because of this dependency between the readme.html file and the _resources directory (and also because it is good practice to work in copies of the shipped examples), it is recommended that you make a copy of the directory tree for any example you want to work with.
For example, copy BE_HOME/examples/standard/FraudDetection , and paste it as a peer of the provided example, then rename the top level directory, for example, to FraudDetection2 . As an alternative you can copy the entire BE_HOME/examples directories and then work with the copied set of examples.
You can then make use of the readme.html file to test the deployed project.
At deploy time the only files that are used are the configured EAR and CDD files. When you construct a command to start an engine, these files must be available.
TIBCO BusinessEvents Getting Started

8 | Chapter 2 Project Design Tutorial
To Import an Example Project into Your Workspace
1. Start TIBCO BusinessEvents Studio. In Windows, click Start > All Programs > TIBCO > YourEnvironment > TIBCO BusinessEvents 5.0 > TIBCO BusinessEvents Studio.
2. As needed, create a workspace for your tutorial projects. Select File > Switch Workspace > Other and select the directory you want to use or create a new directory.
3. Select File > Import > Existing Projects Into Workspace, then click Next.
4. In the Select Root Directory, browse to a directory above the desired project directory and click OK.
All TIBCO BusinessEvents Studio projects within the selected directory are listed.
5. Select the projects you want to import.
6. Check or uncheck the Copy projects to workspace checkbox to suit your needs. If you are working from a copy of the example project, as recommended, you do not have to copy projects to your workspace. It’s up to you how you manage your files.
7. Click Finish. The selected projects appear in Studio Explorer.
TIBCO BusinessEvents Getting Started
Create the FraudDetection Project | 9
Create the FraudDetection Project
In this task, you start TIBCO BusinessEvents Studio and create an empty project.
Learning Points What is TIBCO BusinessEvents Studio? TIBCO BusinessEvents Studio is the Eclipse-based user interface for TIBCO BusinessEvents. It enables you to build, test, and debug projects. Use of this industry-standard development framework shortens your learning curve and enables you to take advantage of common tools and facilities.
What are the TIBCO BusinessEvents Perspectives? TIBCO BusinessEvents has these Eclipse perspectives:
• TIBCO BusinessEvents Studio Debug
• TIBCO BusinessEvents Studio Development
• TIBCO BusinessEvents Studio Diagram
TIBCO BusinessEvents switches perspectives transparently depending on the editor you are working with.
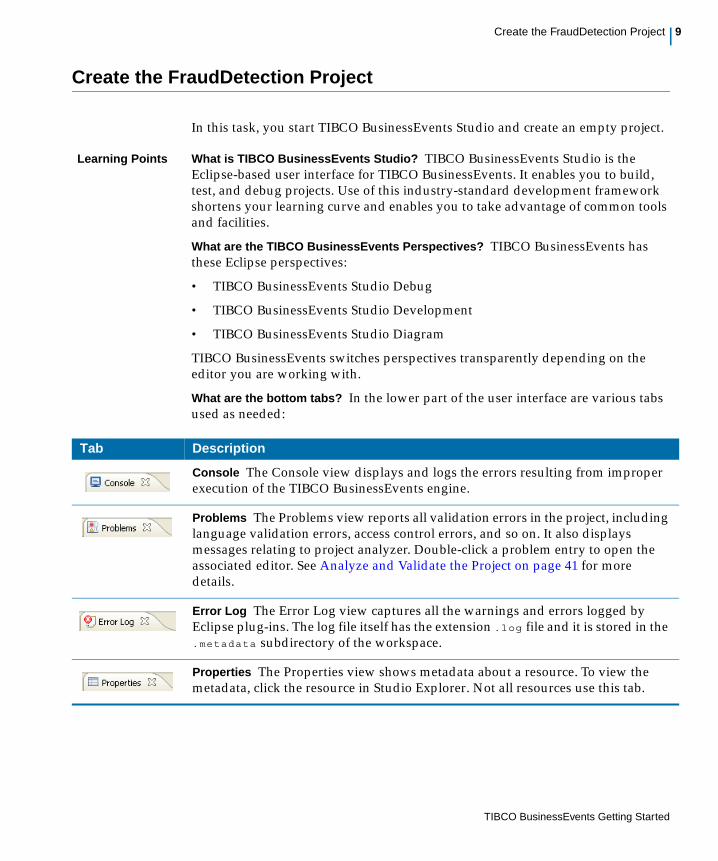
What are the bottom tabs? In the lower part of the user interface are various tabs used as needed:
Tab Description
Console The Console view displays and logs the errors resulting from improper execution of the TIBCO BusinessEvents engine.
Problems The Problems view reports all validation errors in the project, including language validation errors, access control errors, and so on. It also displays messages relating to project analyzer. Double-click a problem entry to open the associated editor. See Analyze and Validate the Project on page 41 for more details.
Error Log The Error Log view captures all the warnings and errors logged by Eclipse plug-ins. The log file itself has the extension .log file and it is stored in the .metadata subdirectory of the workspace.
Properties The Properties view shows metadata about a resource. To view the metadata, click the resource in Studio Explorer. Not all resources use this tab.
TIBCO BusinessEvents Getting Started
10 | Chapter 2 Project Design Tutorial
How should I organize project folders? When you create a new project a set of folders is created. You can use a different folder structure to organize your project components in any way you like. Example projects are kept simple and use provided folder names such as Concepts, Events, Rules. More complex projects might use a different folder hierarchy with names that relate to the purpose or contents of the folders.
More Information Chapter 2, Project Tasks in TIBCO BusinessEvents Developer’s Guide discusses actions you can take at the project level such as importing projects, validating projects, using project libraries, and so on.
Task A Create the Fraud Detection Project
1. Start TIBCO BusinessEvents Studio. In Windows, click Start > All Programs > TIBCO > YourEnvironment > TIBCO BusinessEvents 5.0 > TIBCO BusinessEvents Studio.
2. The first time you run TIBCO BusinessEvents Studio, a Welcome screen displays. You can access this guide from the Welcome page. Click the X next to Welcome to dismiss the screen.
3. As needed, create a workspace for your tutorial projects. Select File > Switch Workspace > Other and select the directory you want to use. You can create a new directory.
4. Right click in the TIBCO BusinessEvents Studio Explorer view (the panel on the left, where the project folders will display), and select New > Project. You see the New Project wizard.
5. From the list, select TIBCO BusinessEvents > Studio Project.
Then click Next.
6. In the New Studio Project dialog, enter the project name FraudDetection , and click Finish. (If you want to use a non-default location, uncheck the Use default location checkbox and select the location.)
In the Studio Explorer viewer, the root folder of the project is called FraudDetection. It has a set of project subfolders.
In addition you may see links for various diagrams: FraudDetection.conceptview, FraudDetection.eventview and
Incorrect display? If the Eclipse user interface is not rendering correctly, try adjusting your computer display options. For example, on Windows XP, the following option causes rendering problems: Control Panel > System Properties > Advanced > Performance Options > Visual Effects > Adjust for best performance. In this example, choosing the Adjust for best performance option results in correct rendering.
TIBCO BusinessEvents Getting Started
Create the FraudDetection Project | 11
FraudDetection.projectview. These are respectively concept model, event model, and project (or element) diagrams. Diagrams are created dynamically and are not saved. More diagrams are available for other purposes. They are UML compliant, with some exceptions. Some diagrams are created only when generated.
7. Save the project.
— To save all changes to all resources in a project (since last save), click File > Save All or click Ctrl+Shift+S.
— To save changes in just the currently viewed resource, click File > Save or click Ctrl+S, or click the Save button.
Summary andNext Steps
You have created a new empty project in the TIBCO BusinessEvents Studio Development perspective.
Next you will begin to define your TIBCO BusinessEvents project by building a channel for information to enter the deployed application, and a destination for the application to listen to.
The order in which you build up the project is not fixed. For example, instead you might define the project ontology first.
TIBCO BusinessEvents Getting Started
12 | Chapter 2 Project Design Tutorial
Create an HTTP Channel and Destination
In this task you configure an HTML channel with one destination. The AllOps destination listens for messages that come from HTTP forms embedded in the project’s readme.html file.
Example projects use the HTTP channel because it does not require use of any external software. If you have TIBCO ActiveMatrix BusinessWorks, TIBCO Enterprise Message Service, TIBCO Rendezvous, or other source for messages you can experiment with adding different types of channels.
Learning Points What are channels and destinations? Messages enter and leave the system through channels. You create destinations within a channel to define the message sources and sinks. Typically, events are created using data in incoming messages; outgoing messages are created using data from events. Later in the tutorial, you will set up the relationship between these destinations and the event types that they listen to by default.
Note that in this tutorial outbound messages are simply sent to the console, so there are no outbound destinations.
How are channels and destinations created? You create channels and destinations at design-time, as explained below. When you are planning TIBCO BusinessEvents projects, you would consider the incoming and outgoing messages for your project, and then define the channels, destinations, and the corresponding event types — outbound events are transformed into appropriate messages, and inbound messages are transformed into events of a specified type.
Why Use Shared Resources? Shared resources are generally used in channels to configure communication with some external system such as a database server or JMS server. You can configure the connection once and use it in multiple places. If some configuration has to be changed, you just have to change it in one place.
More Information Chapter 5, Channels and Destinations, and Chapter 6, JMS Channels in TIBCO BusinessEvents Developer’s Guide.
Task B Create the HTTP Connection
1. Select the SharedResources folder and press Ctrl+N. You see the Select a Wizard dialog. (You could also get here using File > New > Other.)
2. Select TIBCO Shared Resources > HTTP Connection and click Next.
TIBCO BusinessEvents Getting Started
Create an HTTP Channel and Destination | 13
3. In the New HTTP Connection Wizard, name the connection HTTPConnection and click Finish. (In a real world situation you would probably give the connection a more meaningful name.) You see the HTTP Connection dialog.
4. In the Host field, enter localhost .
5. In the Port field, enter 8108 . This is the port used in the readme.html for this example.
6. Save the resource (click the save button in the toolbar) and close it.
Resource names and directory names in the path to a resource can’t be any of the keywords or other words listed in Chapter 17, Rule Language Grammar in TIBCO BusinessEvents Developer’s Guide, and they can’t use spaces.
If you change the port here, change the readme port too If port 8108 is not free, use an available port in the 8000 range. You must also edit the readme.html that goes with the project. Each example uses a different port, so that you can use multiple examples without issues. The FraudDetectionCache readme uses port 8109.
To change the port, open the readme.html in an editor and edit this line:
SendEventForm.setServer("http://localhost:8108");
TIBCO BusinessEvents Getting Started
14 | Chapter 2 Project Design Tutorial
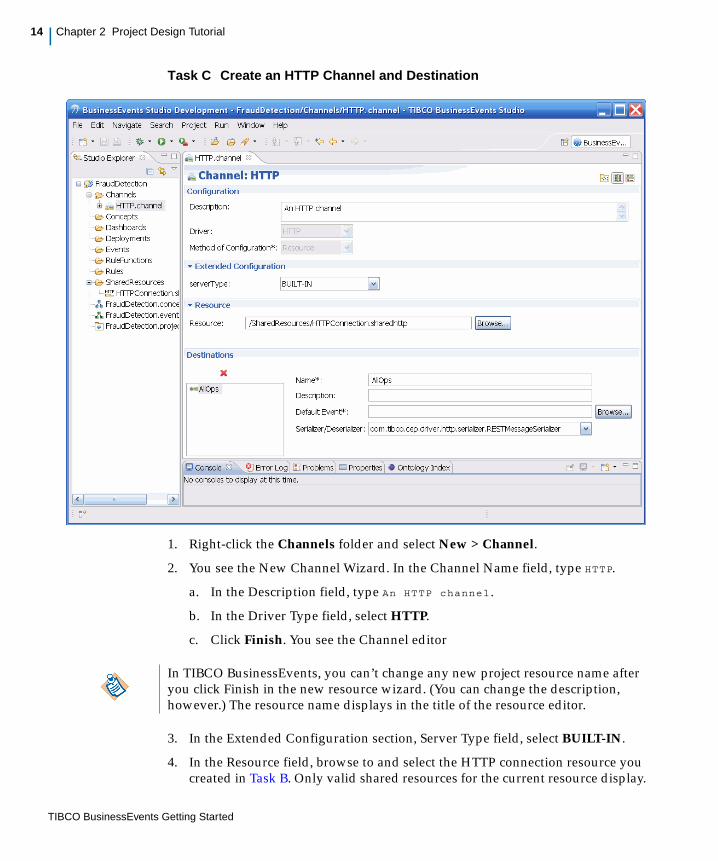
Task C Create an HTTP Channel and Destination
1. Right-click the Channels folder and select New > Channel.
2. You see the New Channel Wizard. In the Channel Name field, type HTTP.
a. In the Description field, type An HTTP channel .
b. In the Driver Type field, select HTTP.
c. Click Finish. You see the Channel editor
3. In the Extended Configuration section, Server Type field, select BUILT-IN.
4. In the Resource field, browse to and select the HTTP connection resource you created in Task B. Only valid shared resources for the current resource display.
In TIBCO BusinessEvents, you can’t change any new project resource name after you click Finish in the new resource wizard. (You can change the description, however.) The resource name displays in the title of the resource editor.
TIBCO BusinessEvents Getting Started

Create an HTTP Channel and Destination | 15
5. In the Destinations section, click Add and name the destination AllOps . Leave all other fields set to their default values.
6. Save and close the resource.
Summary andNext Steps
Now you have built a channel and a destination within that channel to listen for messages. The next step is to create some events.
Provided Examples Requirements
• HTTP and AllOps are required names for examples. The readme.html uses the AllOps destination in its embedded forms.
• The HTTP connection port must match the readme port (as explained in Task B).
• Adding a default event is not necessary for the provided examples because the readme.html , which starts an HTTP channel, specifies the event. However for other use cases, default events are convenient: all messages arriving at a destination are transformed to the destination’s default event, unless the message specifies a different event. The default event in this channel is not required, but it does stop the warning sign from appearing! — the warning sign just lets you know when a destination does not have a default event.
TIBCO BusinessEvents Getting Started

16 | Chapter 2 Project Design Tutorial
Define the AccountOperation, CreateAccount, Debit, and Reply
Events
In this task, you begin to build the project ontology by defining some events — or strictly speaking, event types. Before you define event types in a real-world project, you first examine the incoming and outgoing messages, as well as messages that you want to occur within the application, and configure each event type’s characteristics accordingly. You can use inheritance (as demonstrated here) to simplify configuration.
TIBCO BusinessEvents provides various kinds of events. Simple events are used in this tutorial to bring messages into the application. In addition you can use SOAP events, time events and advisory events, which you can learn about in the product documentation.
Learning Points What is an event? The term event is overloaded: it means an activity that happens, and the definition of an object that represents the activity in TIBCO BusinessEvents (an event type), and an instance of that event type definition.
How are events (event instances) created? Simple event types are created at design time. Event instances are generally created using data in incoming messages. When a destination receives a message, it creates an event to hold the information from the message. Events from channels are automatically asserted into the Rete network, where their presence generally triggers rules (if all rule conditions are met).
Simple events can also be created by rules and rule functions. Events created this way are not asserted automatically because they could be intended for use as outbound events, to be sent to a destination. You must explicitly assert such internally created events as needed.
What is an event payload? Just as messages have properties and a message body, events can have properties and payloads. The payload is optional. It is used to hold more complex data, for example, SOAP messages. (The events in this example do not use a payload.)
What is a default destination? Outbound events of the same event type are often sent to the same destination. To simplify the process of sending those events, you can specify a default destination in the event type.
Why do the events have this warning sign? The yellow triangle with exclamation point means something may not be right. A red triangle means there is an error. The yellow triangle is shown for events with no default destination. In this case, however, no events are sent out through channels so no default is required.
TIBCO BusinessEvents Getting Started
Define the AccountOperation, CreateAccount, Debit, and Reply Events | 17
What is a default event? The default event configured for a destination is used to hold information transferred from an incoming message, when no event type is specified in the message.
See Default Destinations and Default Events in TIBCO BusinessEvents Architect’s Guide for more details.
Rules that apply to a parent type also apply to its child types Concept and event types use inheritance in a similar way to Java classes. Because rules that apply to a parent type also apply to its child types, it is generally not advisable to create many levels of inheritance. However it can be a useful technique. In this tutorial the AccountOperations event is the parent of both the CreateAccount and Debit events. You’ll see why in a later section.
More Information • Chapter 2, Channels and Events in TIBCO BusinessEvents Architect’s Guide for overview and conceptual information.
• Chapter 8, Simple Events, Chapter 9, Time Events and Scheduler Functions, and Chapter 10, Advisory Events in TIBCO BusinessEvents Developer’s Guide for implementation details.
Task D Define the AccountOperations Event
This event is a parent to events that are used in the project. It has one property: AccountId . All its child events inherit this property, and extend the parent by adding more.
1. Right click the Events folder, and select New > Simple Event.
2. You see the New Simple Event Wizard. In the Simple Event Name field, type AccountOperations . In the Description field, type Parent event for all account-related events . Click Finish.
3. You see the Simple Event Editor. In the Properties section, click the Add button. Click in the cell under Name and type the name AccountId . It’s a String property, and String is the default type.
4. Save and close the resource.
TIBCO BusinessEvents Getting Started
18 | Chapter 2 Project Design Tutorial
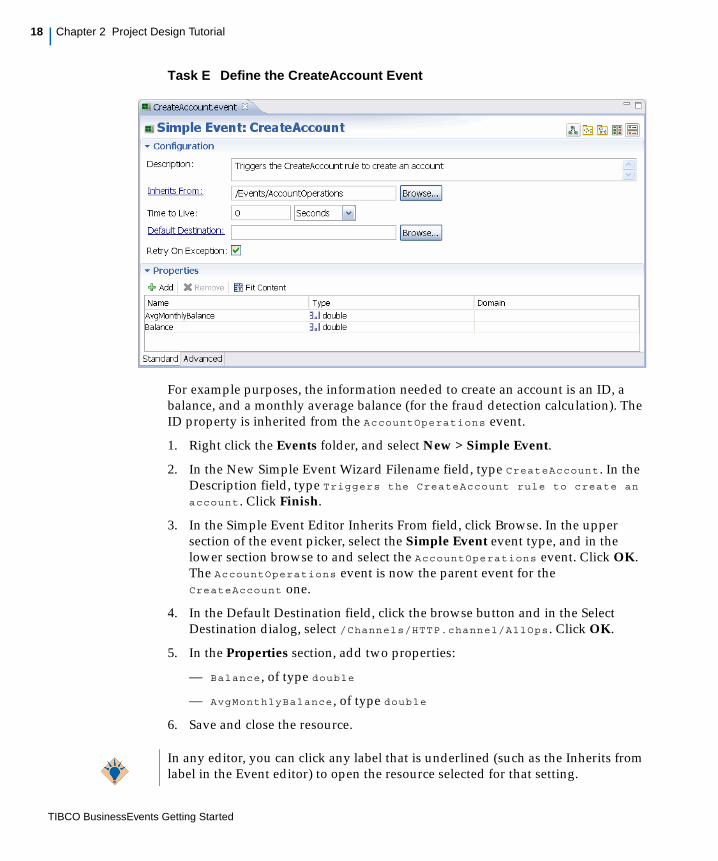
Task E Define the CreateAccount Event
For example purposes, the information needed to create an account is an ID, a balance, and a monthly average balance (for the fraud detection calculation). The ID property is inherited from the AccountOperations event.
1. Right click the Events folder, and select New > Simple Event.
2. In the New Simple Event Wizard Filename field, type CreateAccount . In the Description field, type Triggers the CreateAccount rule to create an account . Click Finish.
3. In the Simple Event Editor Inherits From field, click Browse. In the upper section of the event picker, select the Simple Event event type, and in the lower section browse to and select the AccountOperations event. Click OK. The AccountOperations event is now the parent event for the CreateAccount one.
4. In the Default Destination field, click the browse button and in the Select Destination dialog, select /Channels/HTTP.channel/AllOps . Click OK.
5. In the Properties section, add two properties:
— Balance , of type double
— AvgMonthlyBalance , of type double
6. Save and close the resource.
In any editor, you can click any label that is underlined (such as the Inherits from label in the Event editor) to open the resource selected for that setting.
TIBCO BusinessEvents Getting Started
Define the AccountOperation, CreateAccount, Debit, and Reply Events | 19
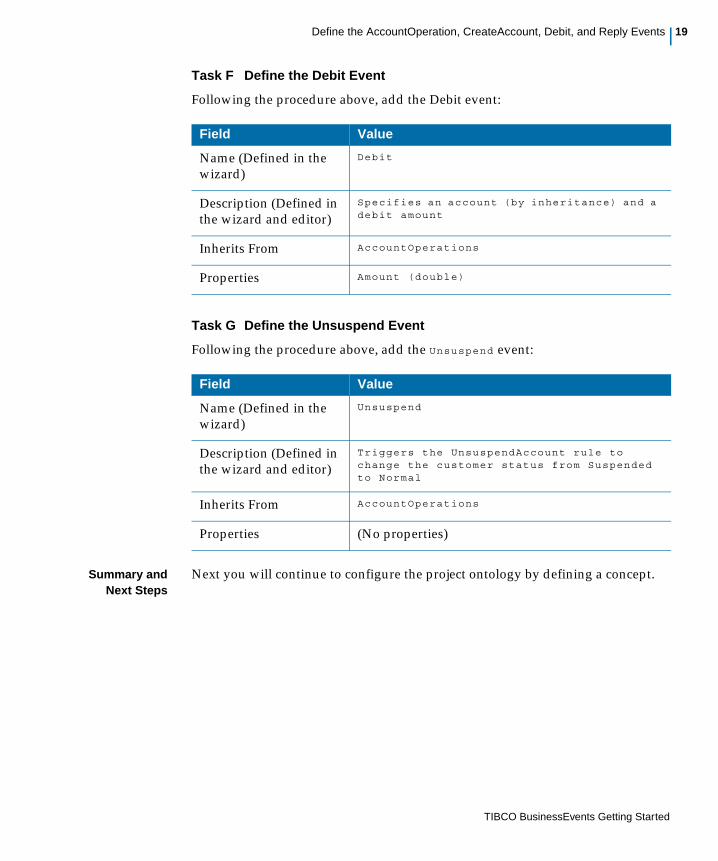
Task F Define the Debit Event
Following the procedure above, add the Debit event:
Task G Define the Unsuspend Event
Following the procedure above, add the Unsuspend event:
Summary andNext Steps
Next you will continue to configure the project ontology by defining a concept.
Field Value
Name (Defined in the wizard)
Debit
Description (Defined in the wizard and editor)
Specifies an account (by inheritance) and a debit amount
Inherits From AccountOperations
Properties Amount (double)
Field Value
Name (Defined in the wizard)
Unsuspend
Description (Defined in the wizard and editor)
Triggers the UnsuspendAccount rule to change the customer status from Suspended to Normal
Inherits From AccountOperations
Properties (No properties)
TIBCO BusinessEvents Getting Started
20 | Chapter 2 Project Design Tutorial
Define the Account Concept
In this task, you define the Account concept, which holds basic information about an account: an ID, a balance, an average monthly balance, and an account status. You also learn some useful information about concepts and how they are used.
Learning Points What is a concept? A concept type is a definition of a set of properties that represent the data fields of an entity. Concept types are like Java classes, and concept instances are like Java objects.
How are concept instances created? Concept instances are created by rules and rule functions. Information from event properties or payloads is often used to create concept instances, but other information can be used, for example, the results of a query or a calculation.
What is a database concept? A TIBCO BusinessEvents add-on product, TIBCO BusinessEvents Data Modeling, provides a feature that enables you to create concepts by importing them from a database. A set of functions enables you to update the database record to account for changes made in TIBCO BusinessEvents. Unlike regular concepts, database concept instances are not asserted to the Rete network automatically, and they don’t track history. (The TIBCO BusinessEvents Data Modeling add-on also provides a state modeler functionality.)
How can I persist concept instances? Instances of concepts (and events) are also known as "facts" and "entities." They can be persisted in various ways, generally using a cache and backing store, as determined by the business need. Later tutorials explain these features.
How is history tracked? When the History setting for a concept property is 0 (zero) the current value is stored without a date-time stamp. When the history setting is 1, the current value is stored, along with the date and time the value was added or changed. When the history value is greater than 1, TIBCO BusinessEvents tracks changes to property values up to the specified number (using a ring buffer). The Policy setting additionally determines what values are recorded, all values or only changes to the prior value.
You’ll set the Debits property history, to track "All Values," that is, TIBCO BusinessEvents records the value of the property every time an action sets the value, even if the new value is the same as the old value — a person can debit the account twice by the same amount. For a property such as "address" you might want to track only changes to the value.
More Information • Chapter 3, Concepts in TIBCO BusinessEvents Architect’s Guide.
• Chapter 11, Concepts in TIBCO BusinessEvents Developer’s Guide.
TIBCO BusinessEvents Getting Started
Define the Account Concept | 21
Task H Define the Account Concept
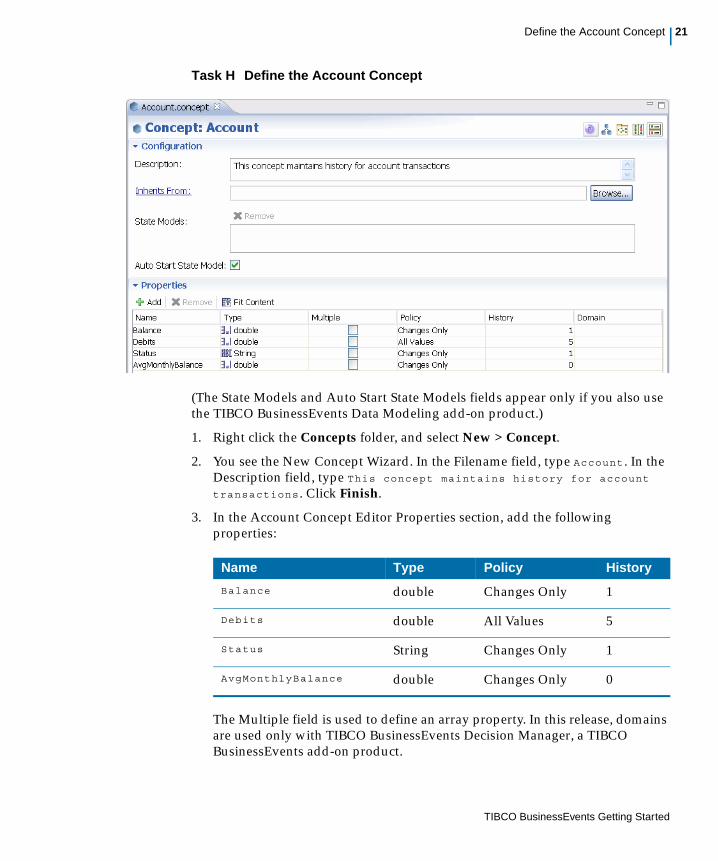
(The State Models and Auto Start State Models fields appear only if you also use the TIBCO BusinessEvents Data Modeling add-on product.)
1. Right click the Concepts folder, and select New > Concept.
2. You see the New Concept Wizard. In the Filename field, type Account . In the Description field, type This concept maintains history for account transactions . Click Finish.
3. In the Account Concept Editor Properties section, add the following properties:
The Multiple field is used to define an array property. In this release, domains are used only with TIBCO BusinessEvents Decision Manager, a TIBCO BusinessEvents add-on product.
Name Type Policy History
Balance double Changes Only 1
Debits double All Values 5
Status String Changes Only 1
AvgMonthlyBalance double Changes Only 0
TIBCO BusinessEvents Getting Started
22 | Chapter 2 Project Design Tutorial
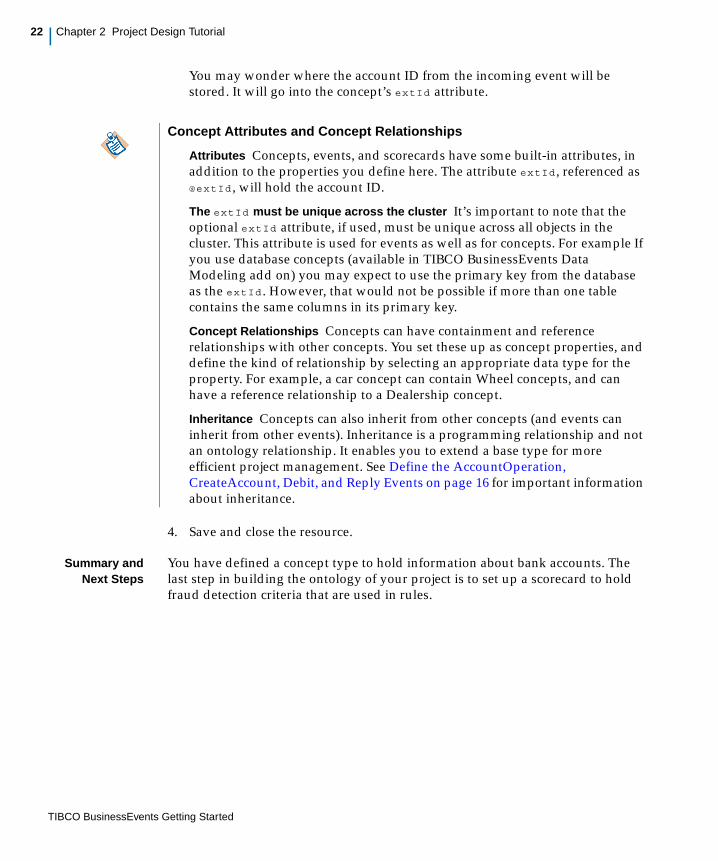
You may wonder where the account ID from the incoming event will be stored. It will go into the concept’s extId attribute.
4. Save and close the resource.
Summary andNext Steps
You have defined a concept type to hold information about bank accounts. The last step in building the ontology of your project is to set up a scorecard to hold fraud detection criteria that are used in rules.
Concept Attributes and Concept Relationships
Attributes Concepts, events, and scorecards have some built-in attributes, in addition to the properties you define here. The attribute extId , referenced as @extId , will hold the account ID.
The extId must be unique across the cluster It’s important to note that the optional extId attribute, if used, must be unique across all objects in the cluster. This attribute is used for events as well as for concepts. For example If you use database concepts (available in TIBCO BusinessEvents Data Modeling add on) you may expect to use the primary key from the database as the extId . However, that would not be possible if more than one table contains the same columns in its primary key.
Concept Relationships Concepts can have containment and reference relationships with other concepts. You set these up as concept properties, and define the kind of relationship by selecting an appropriate data type for the property. For example, a car concept can contain Wheel concepts, and can have a reference relationship to a Dealership concept.
Inheritance Concepts can also inherit from other concepts (and events can inherit from other events). Inheritance is a programming relationship and not an ontology relationship. It enables you to extend a base type for more efficient project management. See Define the AccountOperation, CreateAccount, Debit, and Reply Events on page 16 for important information about inheritance.
TIBCO BusinessEvents Getting Started
Add the FraudCriteria Scorecard | 23
Add the FraudCriteria Scorecard
In this task, you finish building the project ontology by creating a scorecard. The FraudCriteria scorecard will store the criteria used to determine fraud, not any specific data about customer accounts. In this example, you will use this scorecard in rules.
Learning Points What is a scorecard? A scorecard is a special type of concept. A scorecard serves as a static variable. You can use a scorecard resource to track key performance indicators or any other information. Unlike concepts, there is only one instance of a scorecard. You create the scorecard at design time. Its values can be viewed and updated using rules.
It is more accurate to say there is one instance of a scorecard per inference agent. This tutorial uses one inference agent. However, in the next tutorial you will deploy multiple agents, and each has its own instance of the scorecard. This enables scorecards to be used for local purposes and minimizes contention between the agents. Do not use scorecards as a mechanism to share data between multiple agents.
More Information • Chapter 12, Scorecardsin TIBCO BusinessEvents Developer’s Guide.
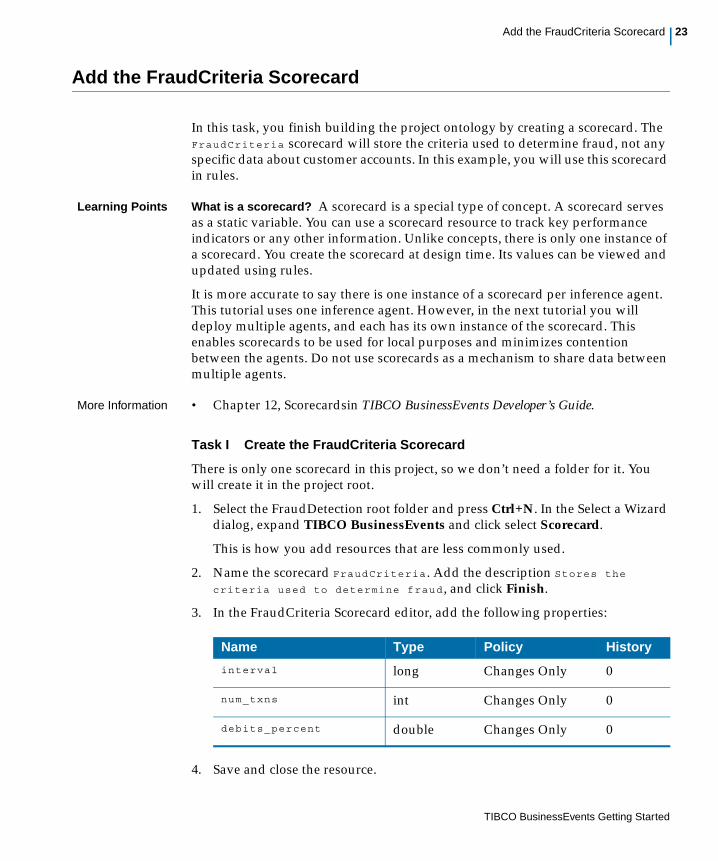
Task I Create the FraudCriteria Scorecard
There is only one scorecard in this project, so we don’t need a folder for it. You will create it in the project root.
1. Select the FraudDetection root folder and press Ctrl+N. In the Select a Wizard dialog, expand TIBCO BusinessEvents and click select Scorecard.
This is how you add resources that are less commonly used.
2. Name the scorecard FraudCriteria . Add the description Stores the criteria used to determine fraud , and click Finish.
3. In the FraudCriteria Scorecard editor, add the following properties:
4. Save and close the resource.
Name Type Policy History
interval long Changes Only 0
num_txns int Changes Only 0
debits_percent double Changes Only 0
TIBCO BusinessEvents Getting Started
24 | Chapter 2 Project Design Tutorial
Summary andNext Steps
You have now set up the ontology for the project, that is, the definitions of all the events, concepts, and scorecards that are needed to store information (facts) about possible fraud detection.
Next, you will configure a rule function that sets values for the scorecard, and one that acts as an event preprocessor — a term you will learn more about in that section.
TIBCO BusinessEvents Getting Started
Add the InitializeScorecard Rule Function | 25
Add the InitializeScorecard Rule Function
In this task, you configure a rule function that initializes values for the FraudCriteria scorecard. This rule function is used at system startup. (You’ll configure that connection later.)
Learning Points What is a rule function? A rule function is a function you write in the TIBCO BusinessEvents rule language.
How are rule functions created and used? You write rule functions using the rule editor. You can use rule functions in rules and other rule functions, in event preprocessors (which are explained in the section Add the PreProcessor Rule Function on page 28), and as startup or shutdown functions for an agent.
What other types of functions are there? TIBCO BusinessEvents provides a large library of functions for various purposes. In addition, an ontology function is automatically created for each concept and event in your project. These are constructor functions. Another type of ontology function enables you to create and schedule a time event.You can also add custom Java functions.
More Information • Chapter 4, Rules and Functions in TIBCO BusinessEvents Architect’s Guide.
• In TIBCO BusinessEvents Developer’s Guide, the following chapters:
— Chapter 15, Rules and Rule Functions
— Chapter 16, Functions
— Chapter 17, Rule Language Grammar
— Chapter 18, Rule Language Datatypes
— Chapter 19, Mapping and Transforming Data
— Chapter 20, XPath Formula Builder
Task J Add the InitializeScorecard Rule Function
1. Right click the RuleFunctions folder, and select New > Rule Function
2. You see the New Rule Function Wizard. In the Filename field, type InitializeScorecard . In the Description field, type Sets values in the FraudCriteria scorecard . Click Finish.
You can work in the Source view or the Form view, according to your preference. The tutorial uses the Form view. In the lower area, click the Form tab to switch to the Form view.
TIBCO BusinessEvents Getting Started

26 | Chapter 2 Project Design Tutorial
3. Leave the Scope area empty, because this function is used at startup. In the Body area, add the following lines to provide values to the FraudCriteria scorecard (and to comment your code):
//Intialize scorecard variablesFraudCriteria.debits_percent =.8;FraudCriteria.interval = 120*1000; /* 120 seconds */FraudCriteria.num_txns = 3;
Notice that when you type the period after FraudCriteria , a list of its properties appears so you can select a property.
• Rule Function Editor Preference To set the default mode, go to Window > Preferences > TIBCO BusinessEvents > Rules and check or uncheck the following checkbox as desired: Initially show ’Form’ tab in Rule Function Editor.
• Ctrl-click the name of a rule function used in a rule or rule function editor to bring up the editor for that rule function.
TIBCO BusinessEvents Getting Started

Add the InitializeScorecard Rule Function | 27
4. Save and close the resource.
Summary andNext Steps
You’ve set up a startup rule function. Next you’ll set up an event preprocessor rule function.
TIBCO BusinessEvents Getting Started
28 | Chapter 2 Project Design Tutorial
Add the PreProcessor Rule Function
In this task, you configure a rule function that replies to the request received from the HTTP channel. HTTP is a request-reply protocol, and this step is required so that the HTTP server is ready to process the next request from the readme.html form. This rule function executes when an event is received. (You’ll configure that connection later.)
Learning Points What is an event preprocessor? An event preprocessor is a rule function that processes incoming messages before TIBCO BusinessEvents transforms them into events. In this case the preprocessor is used to send a response to the HTTP server. In real-world applications, however, a preprocessor might filter the messages so that only certain ones are used as events, and it might do other event enrichment actions. Preprocessors are multi-threaded and you can choose from various threading and queue options, as appropriate to handle the work load. By default the threading uses the system-wide shared queue and threads. See the topic Event Preprocessors in TIBCO BusinessEvents Architect’s Guide.
More Information • Event Preprocessors in TIBCO BusinessEvents Architect’s Guide.
Task K Add the PreProcessor Rule Function
1. Right click the RuleFunctions folder, and select New > Rule Function
2. You see the New Rule Function Wizard. In the Filename field, type PreProcessor. In the Description field, type Closes requests from the HTTP server. Click Finish.
3. Click the Form tab at the bottom of the editor.
4. In the Scope section, click Add.
5. You see the Select Rule Function Scope Arguments dialog. In the Types area (at the top), select Event. Click OK.
In the Select Resource area, you could select a specific event type in the project. However, here we want any event to be in the scope of this rule function, not one specific event type.
Applications that Use Concurrency Features Require Use of Locking Locking is used to ensure that multiple concurrent RTCs (whether in the same agent or different agents in a cache cluster) do not work with the same object at the same time, or read an out of date version of the object. This is especially important if you use Cache+Memory mode. Locking is usually done in event preprocessors. See Using Locks to Ensure Data Integrity Within and Across Agents in TIBCO BusinessEvents Architect’s Guide to understand how to use locking correctly.
TIBCO BusinessEvents Getting Started

Add the PreProcessor Rule Function | 29
6. In the Alias column (in the Scope section), replace the default alias (e) with Request.
7. In the Body area, type: Event. (Event followed by a period). Notice that when you type the period (.) you see a list of all catalog functions in the Event category. Use the down arrow to scroll down the list of functions and stop at replyEvent . Its tooltip displays. Documentation for all catalog functions is provided in tooltips.
The tooltips are also reproduced in the HTML version of the product documentation, in the Online References area.
8. Click the replyEvent function to select it. Now the body looks like this:
Event.replyEvent(
As you can see, the rule function arguments are two events, a request event and a reply event.
9. To specify the request event, type Request, the alias for the scope argument you added in step 5.
10. To specify the reply event, just type request again. The reply event can be any event in this case, so we can simply reply with the request event.
Summary andNext Steps
You have configured a rule function that will send a reply to requests sent by the HTTP server (through the HTTP channel). Next you will configure rules that take action on assertion of CreateAccount and Debit events, depending on various conditions.
TIBCO BusinessEvents Getting Started
30 | Chapter 2 Project Design Tutorial
Add BadCreateAccount and CreateAccount Rules
In this task you create two rules, one called CreateAccount and one called BadCreateAccount . Both rules can fire when a CreateAccount event is asserted into the Rete network. However, the BadCreateAccount rule has a higher priority, so it will fire before the CreateAccount rule.
The BadCreateAccount rule checks whether the account ID provided in the CreateAccount event matches the account ID of any Account instance already in the Rete network. One of the two following situations must occur:
• A matching ID exists in the Rete network: the BadCreateAccount rule prints a message to the console, and "consumes" — that is, deletes — the CreateAccount event. Because that event is consumed, the CreateAccount rule cannot fire.
• No matching ID exists in the Rete network: the BadCreateAccount rule does nothing, and then the CreateAccount rule fires, and creates the Account concept instance.
Learning Points What are rules and how are they created? Rules define actions to take when certain conditions are met. Rules are written in the TIBCO BusinessEvents rule language, which is similar to the Java language. Rules are declarative and are generally narrow in scope. A rule has three parts: the declaration (declare), the conditions (when), and the actions (then). As with rule functions, you can work in a source view, which displays the Java-like code, or in a form view.
How are rules used at runtime? The rule engine checks all changes and additions to the Rete network and evaluates or reevaluates rules, using their declaration and conditions, as needed. Eligible rules are added to the rule agenda.
What is the rule agenda A rule fires when it is at the top of the agenda. The engine determines the order of firing using rule declarations and conditions, and each rule’s priority and rank (if these features are used). As the contents of the Rete network change, the engine reevaluates rules and removes any that are no longer eligible to fire. See Understanding Conflict Resolution and Run to Completion Cycles in TIBCO BusinessEvents Architect’s Guide for details.
How can you prioritize rule execution? The Priority setting is used by the runtime engine when determining the order in which rules are fired. Those with a number closer to one fire first. Within a set of rules that has the same priority, a ranking feature enables you to determine which fire before others. It uses a callback rule function that enables you to specify business logic to establish the rank. When there is no reason to force rules to execute in a particular order, leave the Priority and Rank fields set to the default and let the runtime engine determine rule order.
TIBCO BusinessEvents Getting Started
Add BadCreateAccount and CreateAccount Rules | 31
More Information • See all references provided for Add the InitializeScorecard Rule Function on page 25
• Chapter 5, Run-time Inferencing Behavior in TIBCO BusinessEvents Architect’s Guide.
Task L Add the BadCreateAccount Rule
1. Right click the Rules folder, and select New > Rule.
2. You see the New Rule Wizard. In the Filename field, type BadCreateAccount . In the Description field, type Checks for an existing account with the specified ID. Click Finish.
3. In the Form tab, set the Priority field to 3. It’s higher priority than 5, the default. You’ll set the CreateAccount rule to priority 5, so that the BadCreateAccount rule always fires before CreateAccount rule.
4. Expand the Declaration section as needed so you can see empty rows below the headings Term and Alias.
Each of the sections can be expanded and contracted as needed.
5. Drag the Account concept from the Studio Explorer tree into the first empty row in the Declaration section. You see the project path of the Account concept in the Term column, and account in the Alias column.
6. Similarly, drag the CreateAccount event into the next available row.
Declaration The Declaration provides the scope of the rule. It lists all the entity types to be used in the rule, and their aliases. By default the alias is set to the entity name in lower case letters. You can change it as desired.
7. In the Conditions panel, type the following:
//Checks whether the extId of an Account instance in working memory //matches the incoming event's account ID
account@extId == createaccount.AccountId;
Notice that when you type the At sign (@), a pick list of concept attributes appears. Attributes are built-in. You can’t add or remove attributes. The id attribute value is set internally. However you can set the external ID, extId .
8. In the Actions panel, just below the Conditions panel, type these statements:
System.debugOut("#### Account already exists: " + createaccount.AccountID;Event.consumeEvent(createaccount);
TIBCO BusinessEvents Getting Started
32 | Chapter 2 Project Design Tutorial
These actions are done only if the conditions are met. If not, then the next rule in the agenda fires — and that is likely to be the CreateAccount rule, which you’ll define next.
You are also consuming the event, so it can’t trigger any other rules.
9. Save and close the resource.
Task M Add the CreateAccount Rule
1. Right click the Rules folder again, and select New > Rule.
2. In the New Rule Wizard Filename field, type CreateAccount . It doesn’t really need a description does it? Click Finish.
3. In the Form tab, set the Priority field to 5. (This is a lower priority than the BadCreateAccount rule.)
4. Drag the CreateAccount event from the Studio Explorer tree into the first empty row in the Declaration section.
This rule has no conditions — the BadCreateAccount means there is no need. You could have combined the two rules into one. There are many ways to write rules for a project. You have to use your judgment.
In the Actions panel, you’ll use an ontology function to create the Account concept instance. You can also get to ontology functions using the function catalog.
5. From the top menu select Window > Show View > Other > TIBCO BusinessEvents > Catalog Functions. The Catalog Functions view displays on the right (unless your Eclipse IDE is configured differently — it could display along the bottom, for example).
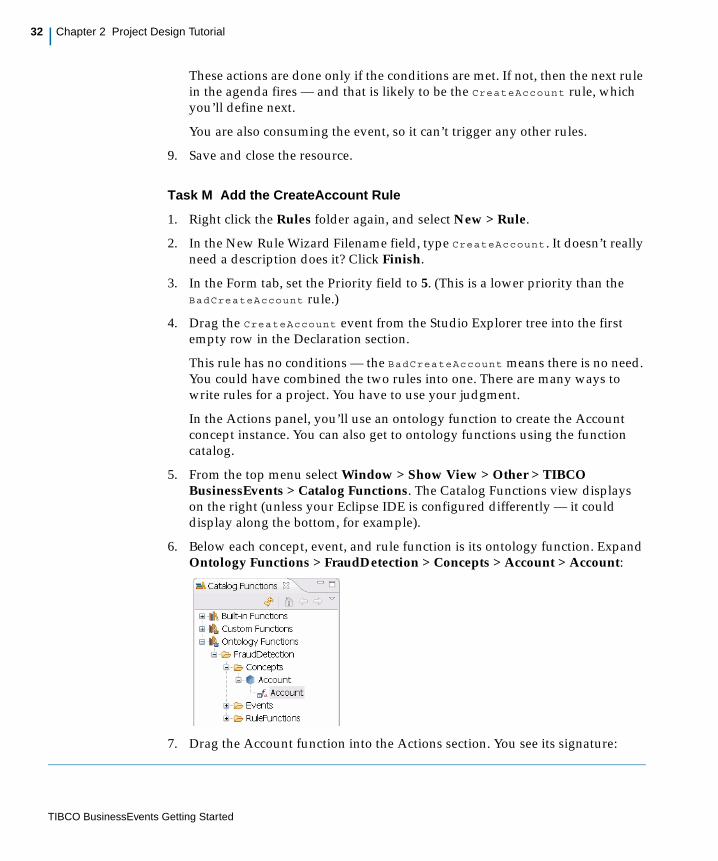
6. Below each concept, event, and rule function is its ontology function. Expand Ontology Functions > FraudDetection > Concepts > Account > Account:
7. Drag the Account function into the Actions section. You see its signature:
TIBCO BusinessEvents Getting Started
Add BadCreateAccount and CreateAccount Rules | 33
Concepts.Account.Account(/*extId String */,/*Balance double */,/*Debits double */,/*Status String */,/*AvgMonthlyBalance double */)
8. Configure the function to create the Account concept, and type the rest of the actions as follows. You can double click the tab to expand the rule editor, to make rule writing easier.
Concepts.Account.Account(createaccount.AccountID/*extId String */,createaccount.Balance/*Balance double */,0/*Debits double */,"Normal"/*Status String */,createaccount.AvgMonthlyBalance/*AvgMonthlyBalance double */);
Event.consumeEvent(createaccount);
System.debugOut("#### Created account " + createaccount.AccountID);
9. Save and close the resource.
Note that in this case it is not really necessary to consume the event. No other rules have this event in their scope. Events with time to live (TTL) set to zero (0) are consumed at the end of an RTC. However it does no harm and makes the rules more consistent, reducing chances of error.
TIBCO BusinessEvents Getting Started
34 | Chapter 2 Project Design Tutorial
Add ApplyDebit, BadApplyDebit, and CheckNegativeBalance Rules
The rules you add in this section work together as follows:
When a Debit event is asserted into the Rete network, TIBCO BusinessEvents checks rules with the Debit event in their scope.
• The ApplyDebit rule has the Debit event in its scope, and also an account ID. It’s priority 1 so it will execute before any other lower priority rule. The engine checks the rule conditions.
— If the Rete network also contains an Account instance whose ID matches the ID in the debit event, the rule executes. If the account is suspended, a message to that effect displays in the console. Otherwise, the account is debited. A message displays in the console to this effect.
— If the Rete network does not contain a matching Account instance, then other rules in the agenda — those that have debit events in their scope — are eligible to execute. BadApplyDebit is the only rule with the Debit event in its scope, so it is eligible and it executes. It sends a message to the console that no matching account is found.
• The CheckNegativeBalance rule has an Account concept in its scope. When an account is debited the Account concept is changed, and so the CheckNegativeBalance rule becomes "newly true." The effect is similar to assertion of a new entity into the Rete Network. If the debit has made the account balance negative, this rule sets the status to Suspended.
Learning Points It’s important to understand how conflict resolution and run to completion (RTC) cycles work. If you understand what triggers rules to execute, and why a rule may not execute, you can design rules more effectively. For a reminder, carefully reread Understanding Conflict Resolution and Run to Completion Cycles in TIBCO BusinessEvents Architect’s Guide.
More Information • See all references provided for Add the InitializeScorecard Rule Function on page 25
• Chapter 5, Run-time Inferencing Behavior in TIBCO BusinessEvents Architect’s Guide.
TIBCO BusinessEvents Getting Started
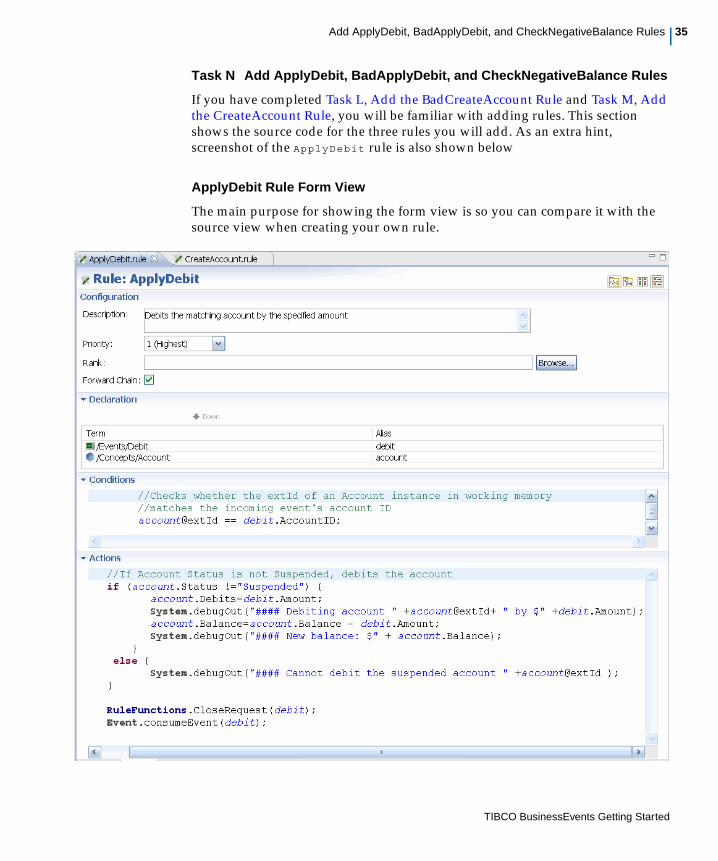
Add ApplyDebit, BadApplyDebit, and CheckNegativeBalance Rules | 35
Task N Add ApplyDebit, BadApplyDebit, and CheckNegativeBalance Rules
If you have completed Task L, Add the BadCreateAccount Rule and Task M, Add the CreateAccount Rule, you will be familiar with adding rules. This section shows the source code for the three rules you will add. As an extra hint, screenshot of the ApplyDebit rule is also shown below
ApplyDebit Rule Form View
The main purpose for showing the form view is so you can compare it with the source view when creating your own rule.
TIBCO BusinessEvents Getting Started
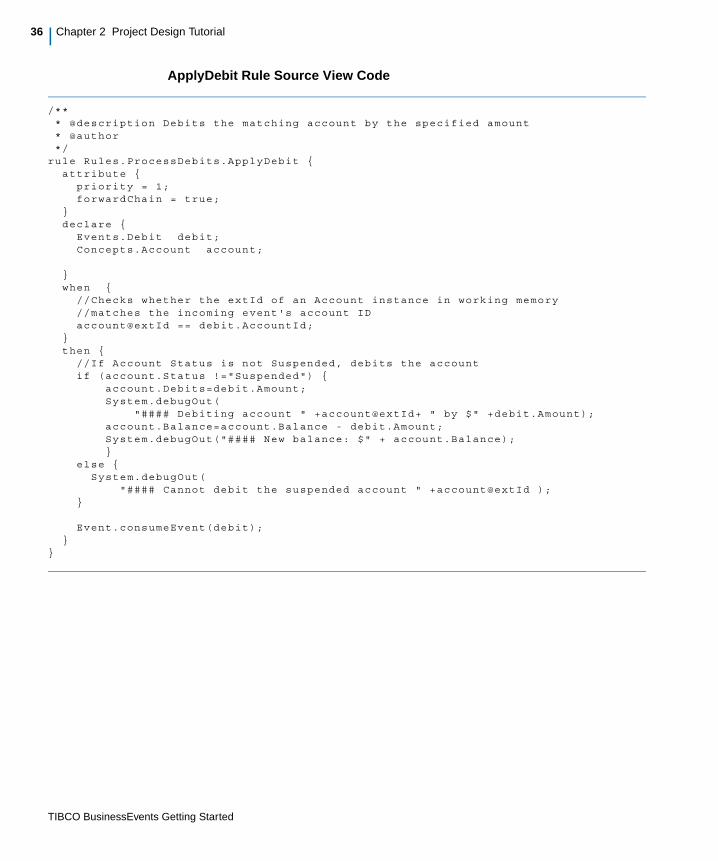
36 | Chapter 2 Project Design Tutorial
ApplyDebit Rule Source View Code
/** * @description Debits the matching account by the specified amount * @author */rule Rules.ProcessDebits.ApplyDebit {
attribute {priority = 1;forwardChain = true;
}declare {
Events.Debit debit;Concepts.Account account;
}when {
//Checks whether the extId of an Account instance in working memory //matches the incoming event's account IDaccount@extId == debit.AccountId;
}then {
//If Account Status is not Suspended, debits the accountif (account.Status !="Suspended") {
account.Debits=debit.Amount;System.debugOut(
"#### Debiting account " +account@extId+ " by $" +debit.Amount);account.Balance=account.Balance - debit.Amount;System.debugOut("#### New balance: $" + account.Balance);}
else {System.debugOut(
"#### Cannot debit the suspended account " +account@extId );}
Event.consumeEvent(debit);}
}
TIBCO BusinessEvents Getting Started
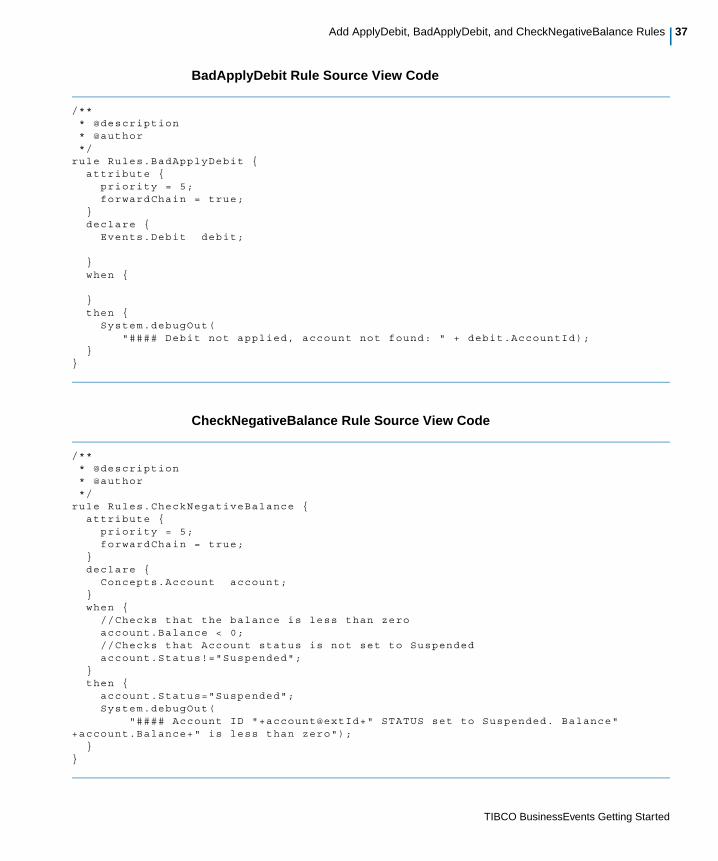
Add ApplyDebit, BadApplyDebit, and CheckNegativeBalance Rules | 37
BadApplyDebit Rule Source View Code
/** * @description * @author */rule Rules.BadApplyDebit {
attribute {priority = 5;forwardChain = true;
}declare {
Events.Debit debit;
}when {
}then {
System.debugOut("#### Debit not applied, account not found: " + debit.AccountId);
}}
CheckNegativeBalance Rule Source View Code
/** * @description * @author */rule Rules.CheckNegativeBalance {
attribute {priority = 5;forwardChain = true;
}declare {
Concepts.Account account;}when {
//Checks that the balance is less than zeroaccount.Balance < 0;//Checks that Account status is not set to Suspendedaccount.Status!="Suspended";
}then {
account.Status="Suspended";System.debugOut(
"#### Account ID "+account@extId+" STATUS set to Suspended. Balance" +account.Balance+" is less than zero");
}}
TIBCO BusinessEvents Getting Started

38 | Chapter 2 Project Design Tutorial
Add the FraudDetection Rule and Unsuspend Account Rule
You are an experienced rule builder now! Add the FraudDetection rule, typing in the Source view or Form view, according to your preference. The source is shown below.
Most of the code is in the conditions. The first condition checks whether the number of debits in the specified interval prior to the current time is greater than the specified number of debits. The interval and the number of debits are set in the FraudCriteria scorecard.
The second condition checks whether the sum of all debits in the verification interval is greater than the specified percentage of the account average monthly balance. The specified percentage is set in the FraudCriteria scorecard. The average monthly balance, for the purposes of this tutorial, is set in the Account instance created by the CreateAccount rule.
You will also add a rule called UnsuspendAccount . This is a convenience rule that allows you to change a customer status from Suspended to Normal at run-time.
Learning Points How are conditions processed? All conditions in a rule must be met, before the action is done. That is, each condition is joined by an implied AND operator.
In what order are conditions evaluated? To learn more the effect of filters, equivalent join conditions, and non-equivalent join conditions on the efficiency of a rule, see Order of Evaluation of Rule Conditions in TIBCO BusinessEvents Architect’s Guide. Understanding these points helps you design an efficient project.
How can I learn about all these catalog functions? TIBCO BusinessEvents provides hundreds of catalog functions for use in rules and rule functions. You can use functions you already know about by typing the beginning of the name and then using the completion hints that appear. To learn about more functions, you can open the Catalog Functions view and browse. To see the tooltip for a function, hover the mouse over the function name. You can then drag a function into the editor, as you did in Task M, Add the CreateAccount Rule. As a reminder, here’s how to open the Catalog Functions view: Window > Show View > Other > TIBCO BusinessEvents > Catalog Functions. The tooltips are also available in HTML form, in the Online References section of the HTML documentation for the product.
More Information • See all references provided for Add the InitializeScorecard Rule Function on page 25
• Chapter 5, Run-time Inferencing Behavior in TIBCO BusinessEvents Architect’s Guide.
TIBCO BusinessEvents Getting Started
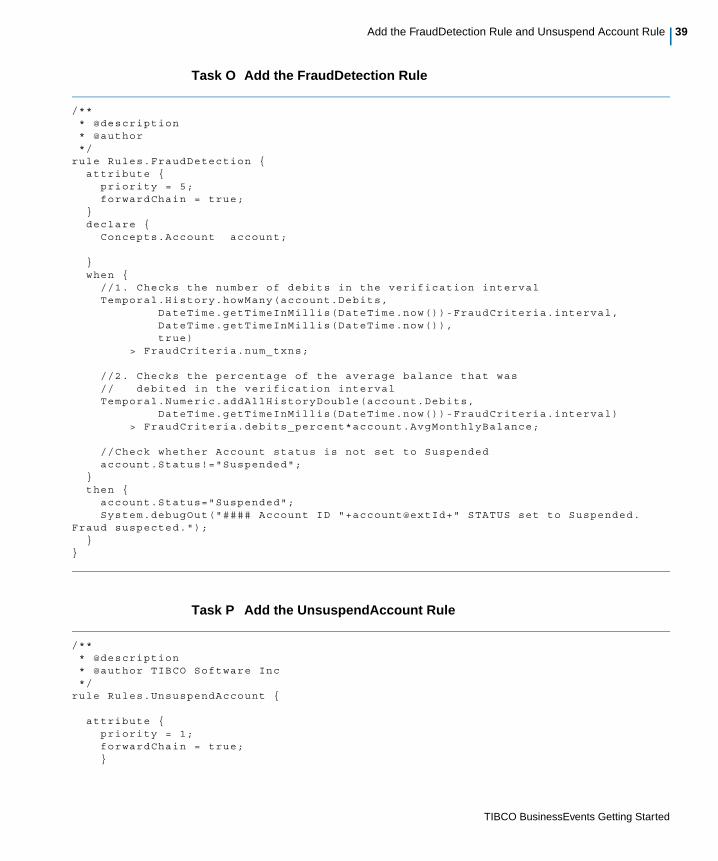
Add the FraudDetection Rule and Unsuspend Account Rule | 39
Task O Add the FraudDetection Rule
/** * @description * @author */rule Rules.FraudDetection {
attribute {priority = 5;forwardChain = true;
}declare {
Concepts.Account account;
}when {
//1. Checks the number of debits in the verification intervalTemporal.History.howMany(account.Debits, DateTime.getTimeInMillis(DateTime.now())-FraudCriteria.interval, DateTime.getTimeInMillis(DateTime.now()), true) > FraudCriteria.num_txns;
//2. Checks the percentage of the average balance that was// debited in the verification intervalTemporal.Numeric.addAllHistoryDouble(account.Debits, DateTime.getTimeInMillis(DateTime.now())-FraudCriteria.interval) > FraudCriteria.debits_percent*account.AvgMonthlyBalance;
//Check whether Account status is not set to Suspendedaccount.Status!="Suspended";
}then {
account.Status="Suspended";System.debugOut("#### Account ID "+account@extId+" STATUS set to Suspended.
Fraud suspected.");}
}
Task P Add the UnsuspendAccount Rule
/** * @description * @author TIBCO Software Inc */rule Rules.UnsuspendAccount {
attribute {priority = 1;forwardChain = true;}
TIBCO BusinessEvents Getting Started
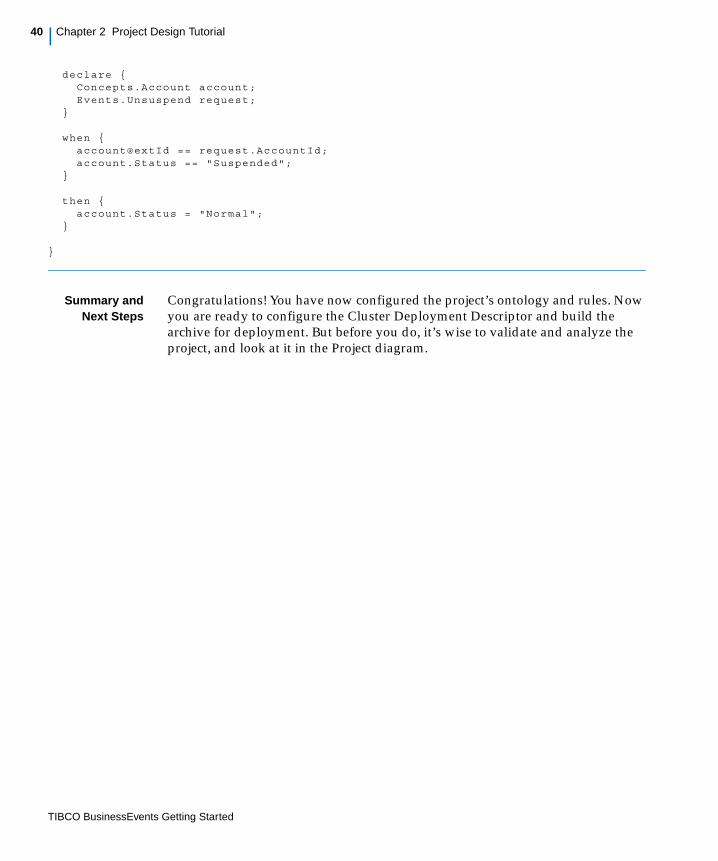
40 | Chapter 2 Project Design Tutorial
declare {Concepts.Account account;Events.Unsuspend request;
}
when {account@extId == request.AccountId;account.Status == "Suspended";
}
then {account.Status = "Normal";
}
}
Summary andNext Steps
Congratulations! You have now configured the project’s ontology and rules. Now you are ready to configure the Cluster Deployment Descriptor and build the archive for deployment. But before you do, it’s wise to validate and analyze the project, and look at it in the Project diagram.
TIBCO BusinessEvents Getting Started
Analyze and Validate the Project | 41
Analyze and Validate the Project
In this task, you check the project for errors. If you have configured it correctly, you’ll see warnings but no errors. Warnings indicate potential issues, such as absence of default events. It’s always worth checking them. In the FraudDetection project, the warnings do not indicate any actual issues.
Learning Points How can I validate that there are no basic errors in my code? To perform checks that don’t take project logic into account, use Project > Validate.
What if there are problems in my code? You can debug it. TIBCO BusinessEvents builds on the Eclipse debugger features to provide additional checks. Developers familiar with the Eclipse debugger will find it intuitive to use.
How can I analyze that the logic of my project is OK? For this kind of checking you use Project Analyzer or the Element Diagram or both. They work together to provide insights into your project. Project Analyzer is a document generated in the Problems view area. Element Diagram provides a visualization of the whole project or of selected project elements. It also shows all dependencies in a project. Project Analyzer and Element Diagram can be configured to run separately or together, using preferences.
How can I visualize different aspects of a project? TIBCO BusinessEvents provides diagrams similar to UML sequence diagrams, class diagrams, and dependency diagrams. They are modified a little from the strict UML to be more useful in the context of TIBCO BusinessEvents Monitoring and Management.
How can I change the names of project resources, or move them around? Use the refactoring features. They ensure that changes you make are reflected throughout the project (with certain limitations).
More Information In TIBCO BusinessEvents Developer’s Guide, see these sections:
• Chapter 4, Element Refactoring Operations
• Chapter 23, Testing and Debugging Projects in TIBCO BusinessEvents Developer’s Guide
• Chapter 24, Diagrams, especially Project Analyzer and Selected Entity Project Diagrams, in
TIBCO BusinessEvents Getting Started
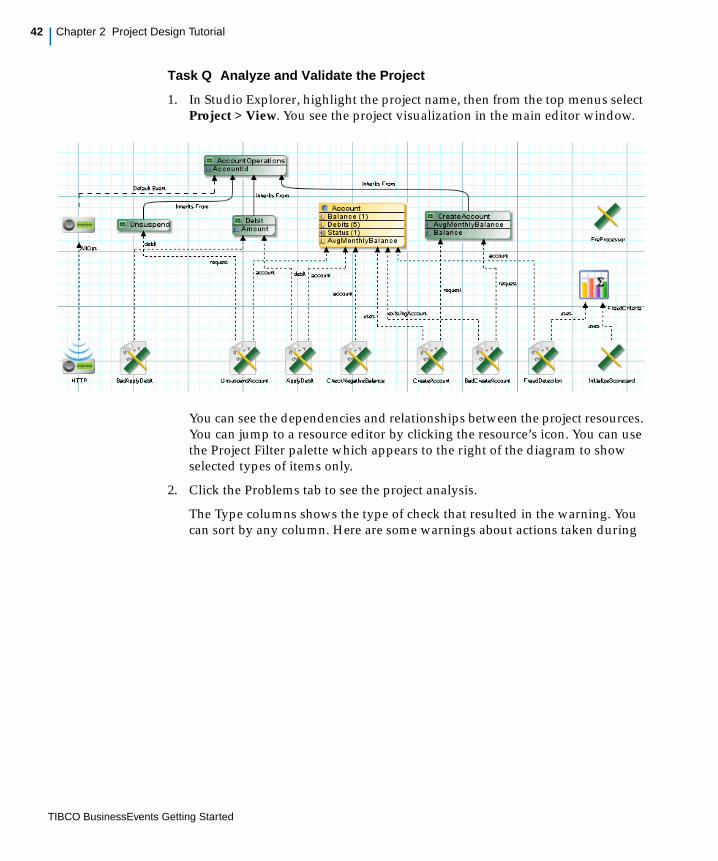
42 | Chapter 2 Project Design Tutorial
Task Q Analyze and Validate the Project
1. In Studio Explorer, highlight the project name, then from the top menus select Project > View. You see the project visualization in the main editor window.
You can see the dependencies and relationships between the project resources. You can jump to a resource editor by clicking the resource’s icon. You can use the Project Filter palette which appears to the right of the diagram to show selected types of items only.
2. Click the Problems tab to see the project analysis.
The Type columns shows the type of check that resulted in the warning. You can sort by any column. Here are some warnings about actions taken during
TIBCO BusinessEvents Getting Started
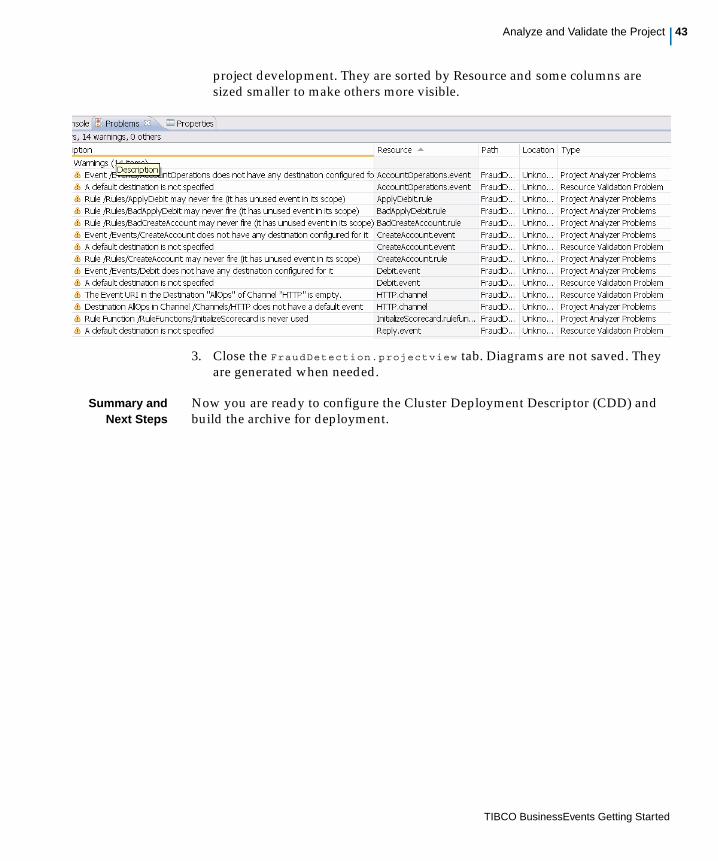
Analyze and Validate the Project | 43
project development. They are sorted by Resource and some columns are sized smaller to make others more visible.
3. Close the FraudDetection.projectview tab. Diagrams are not saved. They are generated when needed.
Summary andNext Steps
Now you are ready to configure the Cluster Deployment Descriptor (CDD) and build the archive for deployment.
TIBCO BusinessEvents Getting Started
44 | Chapter 2 Project Design Tutorial
Add a Cluster Deployment Descriptor and Build the EAR File
To deploy a project you need a CDD file and an EAR file. The CDD is not included in the project EAR. This means you can reconfigure a project’s deployment configuration without having to rebuild the EAR.
Learning Points What is an EAR The Enterprise Archive or EAR file contains details for all the resources in a project, and project global variables.
What is a CDD The project’s deployment configuration is defined in an XML file called the Cluster Deployment Descriptor, or CDD. You edit this file using the TIBCO BusinessEvents Studio Cluster Deployment Descriptor editor.
How do I set up preprocessors and startup and shutdown rule functions? The CDD is where you configure rule functions to act as event preprocessors, startup rule functions, or shutdown rule functions. Only rule functions whose Validity setting is Action are valid for these uses. Such rule functions cannot require anything to be in their scope, because they execute outside of the context of the Rete network and TIBCO BusinessEvents project resources.
What is an object management type? Object management refers to how TIBCO BusinessEvents manages the objects generated within the TIBCO BusinessEvents application at runtime. For some applications, the objects are more important than for others. This tutorial focuses on the basics, so it uses In Memory, the simplest OM type. Objects are kept in memory only, and are lost when the engine stops. Cache OM is explained in Chapter 3, Cache OM Tutorial, on page 49.
What is an inference agent? An agent does certain work within the engine. With Cache OM, different types of agents do different work. But for this simple In Memory project, you use only one agent of one type, and that is the inference agent. Inference agents listen for messages arriving at destinations, and transform them into events. The events trigger rules, using the agent’s Rete network and forward chaining, and the inference agent executes the rules.
What is a processing unit? A processing unit is deployed as a TIBCO BusinessEvents engine. It has one or more agents and it runs in one JVM. For In Memory OM, you generally don’t have to do much configuration of processing units. The default processing unit settings are usually sufficient.
More Information In TIBCO BusinessEvents Administration, see these chapters:
• Chapter 3, CDD Configuration Procedures
• Chapter 4, Cluster Deployment Descriptor Reference
TIBCO BusinessEvents Getting Started
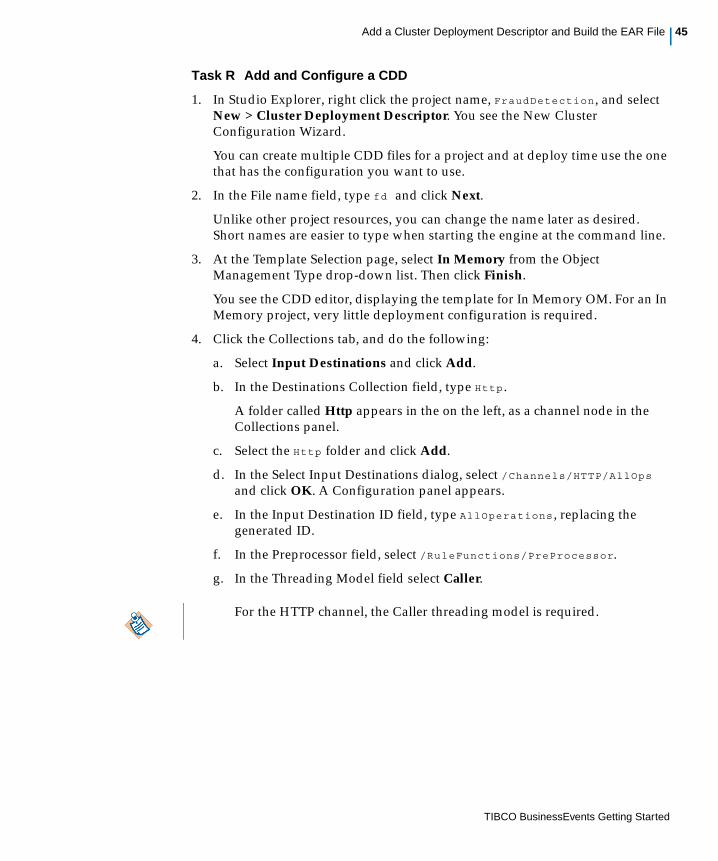
Add a Cluster Deployment Descriptor and Build the EAR File | 45
Task R Add and Configure a CDD
1. In Studio Explorer, right click the project name, FraudDetection , and select New > Cluster Deployment Descriptor. You see the New Cluster Configuration Wizard.
You can create multiple CDD files for a project and at deploy time use the one that has the configuration you want to use.
2. In the File name field, type fd and click Next.
Unlike other project resources, you can change the name later as desired. Short names are easier to type when starting the engine at the command line.
3. At the Template Selection page, select In Memory from the Object Management Type drop-down list. Then click Finish.
You see the CDD editor, displaying the template for In Memory OM. For an In Memory project, very little deployment configuration is required.
4. Click the Collections tab, and do the following:
a. Select Input Destinations and click Add.
b. In the Destinations Collection field, type Http .
A folder called Http appears in the on the left, as a channel node in the Collections panel.
c. Select the Http folder and click Add.
d. In the Select Input Destinations dialog, select /Channels/HTTP/AllOps and click OK. A Configuration panel appears.
e. In the Input Destination ID field, type AllOperations , replacing the generated ID.
f. In the Preprocessor field, select /RuleFunctions/PreProcessor.
g. In the Threading Model field select Caller.
For the HTTP channel, the Caller threading model is required.
TIBCO BusinessEvents Getting Started
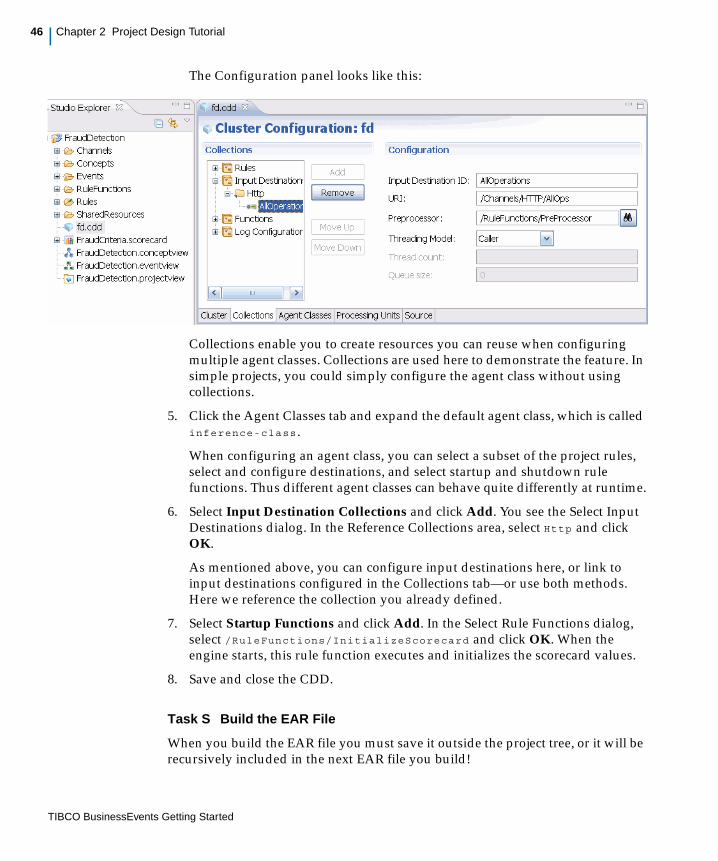
46 | Chapter 2 Project Design Tutorial
The Configuration panel looks like this:
Collections enable you to create resources you can reuse when configuring multiple agent classes. Collections are used here to demonstrate the feature. In simple projects, you could simply configure the agent class without using collections.
5. Click the Agent Classes tab and expand the default agent class, which is called inference-class .
When configuring an agent class, you can select a subset of the project rules, select and configure destinations, and select startup and shutdown rule functions. Thus different agent classes can behave quite differently at runtime.
6. Select Input Destination Collections and click Add. You see the Select Input Destinations dialog. In the Reference Collections area, select Http and click OK.
As mentioned above, you can configure input destinations here, or link to input destinations configured in the Collections tab—or use both methods. Here we reference the collection you already defined.
7. Select Startup Functions and click Add. In the Select Rule Functions dialog, select /RuleFunctions/InitializeScorecard and click OK. When the engine starts, this rule function executes and initializes the scorecard values.
8. Save and close the CDD.
Task S Build the EAR File
When you build the EAR file you must save it outside the project tree, or it will be recursively included in the next EAR file you build!
TIBCO BusinessEvents Getting Started
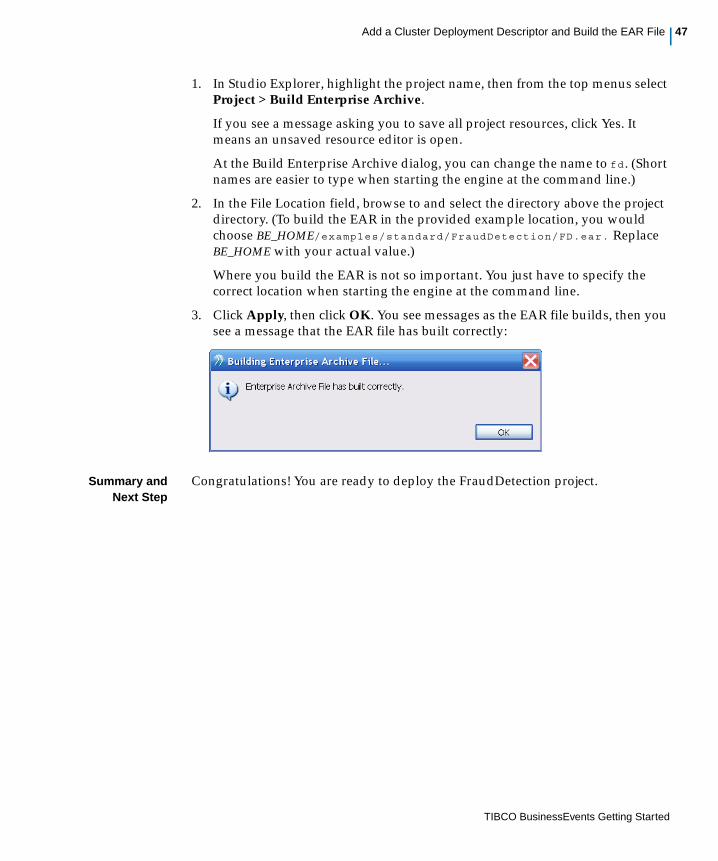
Add a Cluster Deployment Descriptor and Build the EAR File | 47
1. In Studio Explorer, highlight the project name, then from the top menus select Project > Build Enterprise Archive.
If you see a message asking you to save all project resources, click Yes. It means an unsaved resource editor is open.
At the Build Enterprise Archive dialog, you can change the name to fd . (Short names are easier to type when starting the engine at the command line.)
2. In the File Location field, browse to and select the directory above the project directory. (To build the EAR in the provided example location, you would choose BE_HOME/examples/standard/FraudDetection/FD.ear. Replace BE_HOME with your actual value.)
Where you build the EAR is not so important. You just have to specify the correct location when starting the engine at the command line.
3. Click Apply, then click OK. You see messages as the EAR file builds, then you see a message that the EAR file has built correctly:
Summary andNext Step
Congratulations! You are ready to deploy the FraudDetection project.
TIBCO BusinessEvents Getting Started
48 | Chapter 2 Project Design Tutorial
Start the Engine and Send Events
Task T Start the Application at the Command Line
For your information, here is how to start the engine, using the default locations specified for this example. If you have built the example in a different location, as is recommended, please adapt the instructions.
Open a command window and at the command prompt, start the TIBCO BusinessEvents engine using the following command. Substitute your actual value for BE_HOME:
cd BE_HOME/examples/FraudDetection
BE_HOME/bin/be-engine --propFile BE_HOME\bin\be-engine.tra -u default -c FraudDetection/fd.cdd fd.ear
The format for a command-line is as follows:
BE_HOME/bin/be-engine [-h] [--propFile startup property file] [--propVar varName=value][-p custom property file] [-n engine name] [-d] -c CDD file -u processing unit ID EAR file
For a detailed explanation of the above format see Starting a TIBCO BusinessEvents Engine at the Command Line in TIBCO BusinessEvents Administration.
Congratulations!
You have completed the tutorial and now understand the basics of project design and deployment. Next you can undertake the tutorial provided in Chapter 3, Cache OM Tutorial, on page 49.
You can simply open the example readme.html file and follow instructions there. In order to send events into the engines, you must enter information into the forms provided in the readme. Navigate to BE_HOME/examples/standard/FraudDetection and open readme.html in your browser. Follow the instructions in the readme file to start the engine and send events to the inference agent.
See Dependency of Interactive Readme File on a Higher Level Directory on page 7 to understand the requirements for using the interactive readme file.
TIBCO BusinessEvents Getting Started

| 49
Chapter 3 Cache OM Tutorial
This tutorial shows you how to add caching functionality to your project, and how to deploy two cache agents and one inference agent.
This tutorial uses the fraud detection project configured in Chapter 2, Project Design Tutorial, on page 5.
Topics
• Cache OM Tutorial Overview, page 50
• TIBCO BusinessEvents Cache Fundamentals, page 51
• Rename or Copy the FraudDetection Example (And Change Port), page 54
• Update the Event Preprocessor to Load the Rete Network, page 55
• Add a CDD File for Cache Object Management and Build the EAR, page 57
• Deploy the Inference and Cache Agents and Send Events, page 60
TIBCO BusinessEvents Express This chapter relates to Cache OM functionality and is not relevant if you are using TIBCO BusinessEvents Express edition.
TIBCO BusinessEvents Getting Started
50 | Chapter 3 Cache OM Tutorial
Cache OM Tutorial Overview
Cache OM is used in most production systems because of the additional functionality, reliability, and high availability it provides, especially when a backing store is also used to store the data generated by the system on disk.
To explore basic caching features, you will make some minor modifications to the FraudDetection project used in the Project Design Tutorial. Modifications are required to retrieve objects from cache, or to check that objects do not already exist in cache before creating them.
Then you’ll deploy two engines each with one agent: an inference agent and a cache agent. You will observe how stopping and starting the inference agent does not affect how events are handled, because the objects are stored in the cache. You can also start a second cache agent to observe how two cache agents work together. You can stop and restart one cache agent with no loss of data.
Before you begin the tutorial, take a few minutes to learn a few important points about cache object management, in the next section, TIBCO BusinessEvents Cache Fundamentals on page 51. Setting up cache OM is fairly simple. Understanding how to manage cache objects and how to design for concurrency take some thought.
Note that the FraudDetectionCache project contains a site topology file, FraudDetectionCache.st , for use in Chapter 5, TIBCO BusinessEvents Monitoring and Management Tutorial, on page 79.
TIBCO BusinessEvents Getting Started

TIBCO BusinessEvents Cache Fundamentals | 51
TIBCO BusinessEvents Cache Fundamentals
Read this section to grasp the basic ideas you need to understand and work with cache object management. For greater depth, see TIBCO BusinessEvents Architect’s Guide.
What is object management? Object management (or OM for short) refers to various ways that TIBCO BusinessEvents can manage the objects created by the actions of an inference agent’s rules and rule functions. You define the OM options in the project’s CDD file. The objects being managed of the types defined in the ontology, that is, concepts, scorecards and events. In the Project Design Tutorial, you used In Memory OM. With In Memory OM, when an engine shuts down, all its data is lost. This option is useful for a project where objects are not created or don’t have to be persisted, for example, one project that routes incoming events to other TIBCO BusinessEvents projects for handling.
What is a cache cluster? When you use Cache OM, objects are persisted redundantly in memory caches. Each TIBCO BusinessEvents engine (JVM) participates as a node in the cache cluster. The cache manager manages the objects across the JVMs.
What’s the difference between the two supported cache providers? TIBCO BusinessEvents ships with an internally provided cache provider, TIBCO BusinessEvents DataGrid. This option is simple to set up and use. If you own a licensed product, you can instead use Oracle Coherence as the cache provider. Using Oracle Coherence requires some setup, which is explained in TIBCO BusinessEvents Administration. The tutorial uses TIBCO BusinessEvents DataGrid.
What is a distributed cache? TIBCO BusinessEvents uses a preconfigured distributed cache scheme. In a distributed cache, the cached object data is partitioned between cluster nodes (TIBCO BusinessEvents engines). Each object is stored redundantly in two or more nodes, for reliability and high availability: if one engine fails, the objects are repartitioned across the remaining engines so that the configured number of backups is maintained.
What is a backing store? With a distributed cache, one or more engines can fail without loss of data (depending on the number of backups of each object). However if all engines fail, the data is lost. For this reason it is common to write the objects to a database, known as the backing store. TIBCO BusinessEvents provides tools to create the backing store for a project. When you use a backing store you can also use a limited cache and populate it as needed from the backing store, balancing performance and memory requirements as needed. To learn how to set up the backing store, see Chapter 4, Backing Store Tutorial, page 63.
TIBCO BusinessEvents Getting Started
52 | Chapter 3 Cache OM Tutorial
What are cache agents? Cache agents store and serve the cache data for the cluster. Cache agents participate in distribution, partitioning and storage of the objects in the cluster. An engine (processing unit) that runs a cache agent can’t run any other agents of any type. (For testing you can configure an inference agent to also act as a cache agent, but this is not recommended for production systems.)
What other types of agents are there? Besides cache agents and inference agents, two other types of agents can join the cluster, too. Query agents are used in the TIBCO BusinessEvents Event Stream Processing add-on. Dashboard agents are used in TIBCO BusinessEvents Views. (Add-ons are available separately from TIBCO BusinessEvents.) A single engine can run multiple agents of these types.
How do agents use cached data? The inference agents can use objects in the cache as well as those they create from data coming in through channels (or create internally using rules and rule functions). Cached concept objects are shared by all agents in the cluster, scorecards are kept local to an agent, and events are clustered between the agents.
What are modes? Each object type can use a different mode: Cache Only, Cache+Memory, and Memory Only. Cache-only is the default and that’s the behavior described in the rest of this tutorial.
With Cache Only mode, how does data get from the Rete network to the cache? At the end of each RTC, that is, each "run to completion" cycle, data is flushed from the Rete network to the cache. In this way the Rete network does not become clogged with irrelevant data. (This behavior occurs when the entities are configured to use cache-only, mode, which is the default and is strongly recommended.)
With Cache Only mode, how does data get from the cache into the Rete network? Before each RTC, you must load the relevant data into the Rete network from the cache. If you don’t then cached data that is needed by the rules triggered by incoming events is not present. For example, a request to create a new account arrives through a channel. It is important to check that no matching account already exists in the cache before you create the new account. To do so, you use an event preprocessor rule function to load any matching accounts into the Rete network. Then in the RTC rules can check for existing accounts and avoid creating duplicates.
How should I use Cache + Memory mode? With cache plus memory mode, data is not flushed from the Rete network automatically. Use this only for constants or entities that change very seldom. Concurrency management is problematic with this mode, because of the difficulty in keeping all the agent Rete networks in all engines synchronized. Instead, use cache-only mode for all or most of your needs.
How should I use Memory Only mode? Use this mode for entity types whose data is transient and does not need to be persisted.
TIBCO BusinessEvents Getting Started
TIBCO BusinessEvents Cache Fundamentals | 53
How do I change the number of backups of each object are kept? By default one backup of each cache object is maintained. Backups are maintained in different cache agents. You can increase the number of backups by changing the Number of Backup Copies setting in the Object Management area of the CDD.
How does TIBCO BusinessEvents deal with concurrency and locking? Multiple inference agents can run concurrently, sharing the same ontology and same cache cluster. Another way to achieve concurrency is to use the multi-threaded Rete feature, which also requires cache OM. With agent or RTC concurrency, you must use locking: in both cases multiple RTCs are being processed at the same time, and data must be protected as in any concurrent system. The tutorial does not demonstrate concurrency features. See Chapter 9, Concurrency and Project Design in TIBCO BusinessEvents Architect’s Guide for more details.
TIBCO BusinessEvents Getting Started
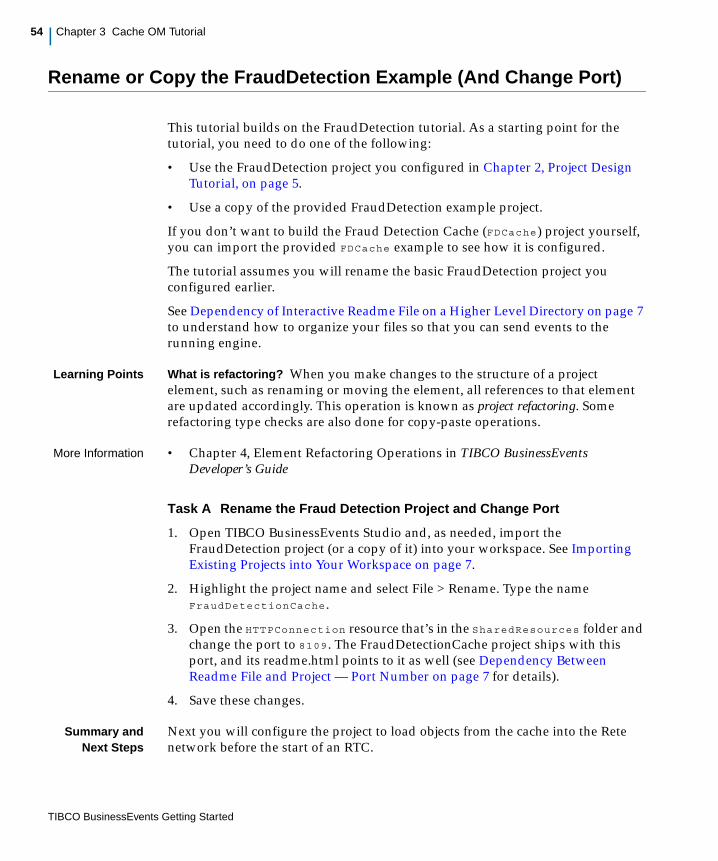
54 | Chapter 3 Cache OM Tutorial
Rename or Copy the FraudDetection Example (And Change Port)
This tutorial builds on the FraudDetection tutorial. As a starting point for the tutorial, you need to do one of the following:
• Use the FraudDetection project you configured in Chapter 2, Project Design Tutorial, on page 5.
• Use a copy of the provided FraudDetection example project.
If you don’t want to build the Fraud Detection Cache (FDCache) project yourself, you can import the provided FDCache example to see how it is configured.
The tutorial assumes you will rename the basic FraudDetection project you configured earlier.
See Dependency of Interactive Readme File on a Higher Level Directory on page 7 to understand how to organize your files so that you can send events to the running engine.
Learning Points What is refactoring? When you make changes to the structure of a project element, such as renaming or moving the element, all references to that element are updated accordingly. This operation is known as project refactoring. Some refactoring type checks are also done for copy-paste operations.
More Information • Chapter 4, Element Refactoring Operations in TIBCO BusinessEvents Developer’s Guide
Task A Rename the Fraud Detection Project and Change Port
1. Open TIBCO BusinessEvents Studio and, as needed, import the FraudDetection project (or a copy of it) into your workspace. See Importing Existing Projects into Your Workspace on page 7.
2. Highlight the project name and select File > Rename. Type the name FraudDetectionCache .
3. Open the HTTPConnection resource that’s in the SharedResources folder and change the port to 8109 . The FraudDetectionCache project ships with this port, and its readme.html points to it as well (see Dependency Between Readme File and Project — Port Number on page 7 for details).
4. Save these changes.
Summary andNext Steps
Next you will configure the project to load objects from the cache into the Rete network before the start of an RTC.
TIBCO BusinessEvents Getting Started
Update the Event Preprocessor to Load the Rete Network | 55
Update the Event Preprocessor to Load the Rete Network
After each RTC, the data created in the agent is saved to the cache and removed from the Rete network. This is because the project uses Cache Only mode. Before the next RTC, therefore, you must reload any data needed by any rules that will be triggered in the RTC. This is generally done using the event preprocessor rule function, as it is the presence of event data that triggers most rules.
Learning Points Loading data from cache into the Rete does not trigger rules At least not in the way it would if the data was newly arriving in an event. In conjunction with other data, however, the presence of the loaded data can trigger rules, in the usual way.
More Information In TIBCO BusinessEvents Architect’s Guide see the following:
• Chapter 8, Cache Modes and Project Design
• Understanding Conflict Resolution and Run to Completion Cycles
See also TIBCO BusinessEvents Cache Fundamentals on page 51 to understand more about cache modes.
Task B Update the Event Preprocessor
1. In TIBCO BusinessEvents Studio, open the RuleFunctions > PreProcessor rule function.
2. Click the Source tab at the bottom of the editor to work in the Source view. (In the Project Design Tutorial you worked in the Form view. You could stay in that view, but it’s good become familiar with both views).
3. In the Scope section, replace Event request with Events.AccountOperations request . The section looks like this:
scope {Events.AccountOperations request;
}
The reason you have to narrow the scope is that the base Event class does not have an AccountId property, so it can’t be used in the function you’ll add in the next step.
TIBCO BusinessEvents Getting Started
56 | Chapter 3 Cache OM Tutorial
4. In the Body section, add two new lines (shown in bold), just before the closing bracket:
body {// Replies to the request event, in order to close the HTTP request.// To keep it simple, uses the request event as the response. Event.replyEvent(request, request);
// Attempts to load any existing matching account.Cluster.DataGrid.CacheLoadConceptByExtId(request.AccountId, false);
}
The Cluster.DataGrid.CacheLoadConceptByExtId() function loads any matching items from the cache into the Rete network. In this case, it loads any concept whose ExtId matches the AccountId in the incoming event. The loading is done before the event is asserted, so the Rete network will contain any matching Account concepts. The BadCreateAccount rule then fires and as in the Project Design Tutorial, to prevent creation of duplicate accounts.
Summary andNext Steps
You have modified the basic FraudDetection project to load instances from the cache into the Rete network using an event preprocessor. This enables the project code to check for existing instances first, when creating new ones.
Next you will work in the Cluster Deployment Descriptor to create two agents of different types.
TIBCO BusinessEvents Getting Started
Add a CDD File for Cache Object Management and Build the EAR | 57
Add a CDD File for Cache Object Management and Build the EAR
To set up the project for cache object management, you create a new CDD file using the template provided for cache OM. The CDD template defines an inference agent class and a cache agent class, and default values for cluster level properties, so it doesn’t take much to configure an example project to work. Other configuration options are available for different situations.
Learning Points How do I cluster nodes discover each other? For the tutorial you can use the default multicast node discovery settings. You can also change the defaults as needed to avoid collisions with another cluster in the same network. Cluster discovery settings are available for different situations, such as hosts with multiple NICs. Another method of cluster discovery uses well-known addresses for situations where use of multicast is not an option.
How do I configure agents and processing units? A processing unit deploys as a TIBCO BusinessEvents engine. At a minimum, you list the agents you want to run in one processing unit. For this example, you don’t have to do any processing unit configuration because defaults will work out of the box. However, for real-world scenarios, where concurrency features are used, and perhaps add-on products, processing unit configuration requires some thought and planning. The processing unit definitions are also used in the TIBCO BusinessEvents Monitoring and Management component, for deploy-time configuration.
Number of cache agents to start For a production environment you can define how many cache agents must be started before the system startup can continue. The default is one. When a backing store is used, cache agents can preload objects from a backing store at system startup. More cache agents make the preloading phase quicker. See the Cache Agent Quorum setting in the Object Management Configuration panel.
More Information In TIBCO BusinessEvents Developer’s Guide see the following:
• Chapter 3, CDD Configuration Procedures
• Chapter 4, Cluster Deployment Descriptor Reference
Task C Add and Configure a CDD
Start with a new CDD because the provided Cache OM template sets many default values you’ll need.
1. In Studio Explorer, right click the project name and select New > Cluster Deployment Descriptor. You see the New Cluster Configuration Wizard.
2. In the File name field, type fdCache and click Next.
TIBCO BusinessEvents Getting Started
58 | Chapter 3 Cache OM Tutorial
If you click Finish instead of Next, you don’t have the opportunity to use the Cache OM template. If you accidentally click Finish, just delete the file and add a new one, and this time click Next.
By default, the CDD file name you specify is also used as the cluster name.
3. You see the Object Manager Selection dialog. Select Cache from the Object Management Type drop-down list, then click Finish. You see the CDD editor.
4. In the Cluster tab, select Properties. You don’t need to add any properties, unless you need to change the defaults for the discovery URL and the listen URL (which is used by the nodes to communicate with each other). Here are the cluster properties with their default values for your information:
be.engine.cluster.as.discover.url=tibpgm://7888/;239.8.8.9
be.engine.cluster.as.listen.url=tcp:// 0.0.0.0 /random port 3000+
For details see Configuring a TIBCO BusinessEvents DataGrid Cluster in TIBCO BusinessEvents Administration.
5. For your information, in the Cluster tab, select Object Management. You can see that TIBCO is selected as the Cache Provider, and that Number of Backup Copies is 1, meaning the distributed cache contains one copy of each entity in the cache.
Limited Cache The Entity Cache Size and Object Table Cache Size settings in the Object Management tab take effect only if you use a limited cache. By default, the cache is not limited—In Domain Objects > Default, the setting Is Cache Limited is not checked. However when you add a backing store, it is common to use a limited cache, because you can store all objects in the backing store. You can override the limited cache setting at the object level, as desired.
6. As you did in the basic design tutorial, do the following:
— Configure the inference-class agent class with the Channels/Http/AllOps destination
— Configure the RuleFunctions/InitializeScorecard rule function as the startup rule function.
For details, see Task R, Add and Configure a CDD on page 45. and complete step 4 through step 7.
No configuration is needed for the cache-agent class.
Cluster Clashes If you have clashes with other clusters running on your machine, use a different cluster name, discovery URL and listen URL from the other cluster or clusters.
TIBCO BusinessEvents Getting Started
Add a CDD File for Cache Object Management and Build the EAR | 59
7. Save and close the CDD.
8. Build the EAR file using the name fdcache . If you need a refresher on building the EAR file, see Task S, Build the EAR File, on page 46.
Summary andNext Steps
You have configured the CDD for cache cluster discovery, and you configured the processing units and agents as you did before. Now you can start the project and see how things work at runtime.
TIBCO BusinessEvents Getting Started
60 | Chapter 3 Cache OM Tutorial
Deploy the Inference and Cache Agents and Send Events
Learning Points Start cache agents first In a production environment, you would set the Cache Agent Quorum setting in the Object Management Configuration panel to ensure that enough cache agents start before other types of agents can begin processing. In general, at startup, you start cache agents then other types of agents. At system shutdown, you stop other kinds of agents, then stop cache agents.
More Information See Appendix B, Engine Startup and Shutdown Sequence in TIBCO BusinessEvents Administration.
Task D Start the TIBCO BusinessEvents Agents and Send Events
For your information, here is how to start the engines, using the default values specified for this example and using the default locations.
If you have built the example in a different location, as is recommended, please adapt the instructions.
1. Open a command window, change directory to the example directory, and at the command prompt, start the TIBCO BusinessEvents engine using the following command. This command starts the cache agent. Substitute your actual value for BE_HOME:
cd BE_HOME/examples/standard/FraudDetectionCache
BE_HOME/bin/be-engine --propFile BE_HOME\bin\be-engine.tra -u cache -c FraudDetectionCache/fdcache.cdd fdcache.ear
For example, if you are simply running the provided example, you would use this command line to start the cache agent:
c:/tibco/be/5.0/bin/be-engine --propFile c:/tibco/be/5.0/bin/be-engine.tra -u cache -c FraudDetectionCache/fdcache.cdd fdcache.ear
You can simply open the example readme.html file and follow instructions there. In order to send events into the engines, you must enter information into the forms provided in the readme. Navigate to BE_HOME/examples/standard/FraudDetectionCache and open readme.html in your browser. Follow the instructions in the readme file to start two engines and send events to the inference agent.
See Dependency of Interactive Readme File on a Higher Level Directory on page 7 to understand the requirements for using the interactive readme file.
TIBCO BusinessEvents Getting Started
Deploy the Inference and Cache Agents and Send Events | 61
2. When the cache agent has started, open a second command window, change directory to the example directory, and at the command prompt, start the TIBCO BusinessEvents engine using the following command. This command starts the inference agent. Substitute your actual value for BE_HOME:
cd BE_HOME/examples/standard/FraudDetectionCache
BE_HOME/bin/be-engine --propFile BE_HOME\bin\be-engine.tra -u default -c FraudDetectionCache/fdcache.cdd fdcache.ear
For example, if you are simply running the provided example, you would use this command line:
c:/tibco/be/5.0/bin/be-engine --propFile c:/tibco/be/5.0/bin/be-engine.tra -u default -c FraudDetectionCache/fdcache.cdd fdcache.ear
Optional Activity
Start a second cache agent. Experiment with stopping one cache agent engine then restarting it again, to see how one cache agent can operate successfully. Because one backup copy of the data is kept, and there are two cache agents, each cache agent has the complete cache contents. In a production system with more cache agents no single cache agent has all the cache data.
Congratulations—You have completed the caching tutorial!
You can now continue to Chapter 4, Backing Store Tutorial, on page 63 or to Chapter 5, TIBCO BusinessEvents Monitoring and Management Tutorial, on page 79. Now you have configured a cache, you can complete these remaining tutorials in any order.
TIBCO BusinessEvents Getting Started

62 | Chapter 3 Cache OM Tutorial
TIBCO BusinessEvents Getting Started
| 63
Chapter 4 Backing Store Tutorial
In this tutorial you add a backing store to the project you prepared in Chapter 3, Cache OM Tutorial, on page 49.
If you want to complete just the backing store tutorial, you can begin with the provided cache object management tutorial project:
BE_HOME/examples/standard/FraudDetectionCache
If you don’t want to complete the steps in the backing store tutorial, you can refer to the fully configured example project, provided here:
BE_HOME/examples/standard/FraudDetectionStore
Topics
• Backing Store Setup — Overview, page 64
• Ensure DBMS Software and Driver are in Place and Edit the TRA, page 65
• Configure the TIBCO BusinessEvents Studio Project, page 67
• Prepare the Database Schema, page 72
• Deploy and Test the Application, page 75
• Reset the Backing Store Tutorial, page 77
‘ TIBCO BusinessEvents Express This chapter relates to Cache OM and backing store functionality and is not relevant if you are using TIBCO BusinessEvents Express edition.
TIBCO BusinessEvents Getting Started
64 | Chapter 4 Backing Store Tutorial
Backing Store Setup — Overview
This tutorial guides you through the basic steps required to set up a backing store for the Fraud Detection Cache project.
Chapter 15, JDBC Backing Store Setup, in TIBCO BusinessEvents Administration. This chapter provides many more details than this tutorial and explains how to deal with various situations.
The order of some of the steps is not fixed. The tutorial organizes the steps to create a convenient flow, as follows
First, DBMS Product Setup
The tutorial explains the prerequisites in general. Refer to the TIBCO BusinessEvents readme for DBMS product requirements.
Then, TIBCO BusinessEvents Project Configuration
Some TIBCO BusinessEvents Studio project configuration can be done before or after database schema setup. Ontology-related configuration, however, must be completed before running the database setup scripts.
Ontology-related configuration may be required for special cases that you won’t deal with this example project. For example TIBCO BusinessEvents provides ways to deal with identifiers that exceed the DBMS maximum length, or that use database key words. See the section Cases That May Need Additional Setup in TIBCO BusinessEvents Administration for more details.
Ontology-related configuration also includes specifying any entity types that are not to be included in the backing store.
Cache preloading configuration refers to the ontology types, but it is not related to backing store setup, and can be configured and changed at any time.
Finally, Database Schema Setup
Schema setup is facilitated by the various scripts provided with the product. The tutorial uses default values throughout. The scripts can also be used to reset the project.
TIBCO BusinessEvents Getting Started
Ensure DBMS Software and Driver are in Place and Edit the TRA | 65
Ensure DBMS Software and Driver are in Place and Edit the TRA
Not all tasks must be done in the exact order shown in the tutorial, but following the tutorial steps ensures success.
If you are using Oracle Database, you don’t have to edit the TRA, for tutorial purposes, that is.
Task A Ensure DBMS Software and Driver are in Place and Edit the TRA
Before you begin to configure the backing store, ensure that you have done the following:
1. Install and start a supported DBMS product. See the product readme file for a list of supported products. This tutorial uses Oracle 10G Express Edition. If you use a different supported database product, adapt the instructions accordingly.
2. Copy the appropriate JDBC drivers file (for example, ojdbc6.jar) to BE_HOME/lib/ext/tpcl .
3. Restart TIBCO BusinessEvents Studio. The Test Connection feature will now work (after you run the scripts to create the database user and schema.)
4. Only if you are using SQL Server: Open the BE_HOME/bin/be-jdbcdeploy.tra file for editing. Specify sqlserver. The default value is oracle so if you are using Oracle Database you can skip this step. Do not change the other configuration properties shown:
## Base type schema/keyword files:# Valid database types: oracle, sqlserver#java.property.jdbcdeploy.bootstrap.basetype.file %BE_HOME%/bin/base_types.xmljava.property.jdbcdeploy.bootstrap.keyword.file %BE_HOME%/bin/dbkeywordmap.xmljava.property.jdbcdeploy.database.type [oracle | sqlserver]
The driver must be in the above location for run time. It is also required for the design-time "Test Connection" feature to work (as long as the database is running, of course). You can try this feature out after you set up the database.
If you want to use the tester or debugger feature in TIBCO BusinessEvents Studio, see Working with External Library and Custom Function Paths in TIBCO BusinessEvents Developer’s Guide for an additional action you must take.
TIBCO BusinessEvents Getting Started

66 | Chapter 4 Backing Store Tutorial
Summary andNext Steps
You have taken care of some prerequisite steps: ensured you can access a supported DBMS product, copied its driver file so that TIBCO BusinessEvents can access it, and checked that the backing store setup utility’s TRA file is set to your DBMS. Next step is to configure the TIBCO BusinessEvents Studio project.
TIBCO BusinessEvents Getting Started
Configure the TIBCO BusinessEvents Studio Project | 67
Configure the TIBCO BusinessEvents Studio Project
In this task you modify the Fraud Detection Cache project to support a backing store, and learn a little about the settings available to configure the backing store behavior at runtime. Except for excluding entities from the backing store, these configuration options can be configured before or after setting up the backing store and can be changed after the backing store is in place.
Learning Points Can I exclude entities from the backing store? Yes. You can configure various settings at the individual entity type level. To exclude entities, use the CDD Cluster tab > Object Management > Domain Objects > Overrides feature. Uncheck an entity override’s Has Backing Store checkbox to exclude it from the backing store. See Excluding Entities from the Backing Store in TIBCO BusinessEvents Administration for more details (including another way to exclude entities, using their Mode setting).
Which database connection pool strategy to use, JDBC or Oracle? If you use Oracle Database, you have the option of using either the TIBCO BusinessEvents internal pooling implementation, or Oracle Database’s implementation. Various pooling settings are interpreted differently depending on what strategy you choose. You can also not enforce pools, in which case all connection pool settings are ignored.
Which database write strategy to use, cache-aside or write-behind? You can choose how data is written to the backing store. With cache-aside (the default), writes to the database and cache are made simultaneously. With write behind (used if you uncheck the Cache Aside check box), writes to the cache are done first, and then the cache manager writes to the database. To understand these choices in more detail, see Post RTC Options — Cache Aside and Write Behind in TIBCO BusinessEvents Administration.
What is preloading? When you use a backing store, you can preload entity data from the backing store to the cache before the system begins processing events. If you don’t preload entities, they are fetched from the backing store as required at runtime.
Why preload handles? Entity object handles are stored in a special cache that can be preloaded or not depending on storage and performance needs. It might be more efficient in some cases to preload handles and not objects, for example. See The Role of the Object Table in TIBCO BusinessEvents Architect’s Guide for more details.
If later you want to include any excluded entities, you must change the setting and update the backing store setup as explained in Updating an Existing Backing Store Schema in TIBCO BusinessEvents Administration
TIBCO BusinessEvents Getting Started
68 | Chapter 4 Backing Store Tutorial
Preloading commonly used objects can improve performance after startup. By default, no preloading is done. You can preload all objects or objects of selected entity types, as desired. See Configuring a Cache OM Cluster — Cluster Tab in TIBCO BusinessEvents Administration for the procedure.
More Information • In TIBCO BusinessEvents Administration, see the following:
— Add a JDBC Connection Resource (Now or Later)
— Configure Backing Store Settings (Now or Later)
— Cluster Tab — Cache OM — Backing Store Settings
— Cluster Tab — Cache OM — Backing Store Properties
• In TIBCO BusinessEvents Developer’s Guide see JDBC Connection.
Task B Rename the Fraud Detection Cache Project and Change Port
1. Open TIBCO BusinessEvents Studio and, as needed, import the FraudDetectionCache project into your workspace. See Importing Existing Projects into Your Workspace on page 7.
2. In Studio Explorer, right click the project name and select Refactor > Rename. In the New Name field, type FraudDetectionStore and click Preview. You can preview the effect of this change, then click OK.
3. Open the HTTPConnection resource that’s in the SharedResources folder and change the port to 8209 .
The provided FraudDetectionStore example project ships with this port, and its readme.html points to it as well (see Dependency Between Readme File and Project — Port Number on page 7 for more details).
4. Save the changes and close the resource.
Task C Add a JDBC Connection Resource
In this task, you add a JDBC Connection resource to your project and configure it to connect to the backing store database. (You can do this before creating the database if the necessary details are known.)
Details below assume you will connect to a local instance of Oracle 10g Express Edition database. Adapt the instructions as needed for your database product.
You will specify the location of this JDBC Connection resource in the CDD, in Task D.
TIBCO BusinessEvents Getting Started
Configure the TIBCO BusinessEvents Studio Project | 69
1. In TIBCO BusinessEvents Studio, open your project (if it is not already open), right-click the SharedResources folder and select New > Other > TIBCO Shared Resources > JDBC Connection (or select the folder and press Ctrl-N as in earlier tutorials).
2. At the New JDBC Connection Wizard dialog, name the shared connection ForBackingStore , and click Finish.
You see the JDBC Connection resource editor.
3. Optionally, enter a description such as JDBC Connection for the backing store tutorial .
4. In the JDBC Driver field, you see two boxes. Select the appropriate driver for your database from the selection box on the right. The tutorial example uses oracle.jdbc.OracleDriver (thin). The driver name appears in the box on the left, and a Database URL format appears in the Database URL field just below. For the Oracle thin driver, the format is:
jdbc:oracle:thin:@<host>:<port#>:<db_instancename>
5. In the Database URL field, configure the URL with your actual values. The tutorial uses these values:
jdbc:oracle:thin:@localhost:1521:XE
Where 1521 is the default port, and XE is the default instance name for Oracle Database 10G Express. (The default instance name for Oracle Database 10g is ORCL .)
6. In the User Name and Password fields, enter the username and password of the database user you will create (in Task E, Run the Initialize Database Script as the DBA or System User, on page 72). Type the name BE_USER and password BE_USER . (The password field does not display the text.)
7. Save and close the resource.
Task D Rename and Configure the CDD, then Build the EAR
Begin by renaming the CDD from the Cache OM Tutorial, and add a few configuration details for backing store functionality: click a checkbox to enable backing store functionality, and select the JDBC Connection resource you want to use. Of course, more options are available for different needs.
The globe icons to the right of the settings in this resource type indicate that you can use global variables in the field value. To learn more about this topic, see Working with Global Variables in TIBCO BusinessEvents Developer’s Guide.
TIBCO BusinessEvents Getting Started
70 | Chapter 4 Backing Store Tutorial
1. In Studio Explorer, right click the fdcache.cdd resource and select Refactor > Rename. In the New Name field, type fdstore and click Preview. You can preview the effect of this change, then click OK.
2. Open the newly renamed fdstore CDD file in the resource editor.
3. Click the Cluster tab > General section on the left. Change the cluster name from fdcache to fdstore .
4. Select Cluster tab > Object Management > Backing Store and check the Enabled checkbox.
5. In the Database Type field, select oracle or sqlserver, depending on the type of database you are using. Oracle is the default so if you are using Oracle you don’t have to do anything.
6. Select Cluster > Object Management > Backing Store > Connection on the left and in the URI field, select the JDBC Connection shared resource you configured for the backing store (see Task C, Add a JDBC Connection Resource, on page 68).
You can optionally check that the rest of the CDD configuration is correct. Refer to Task R, Add and Configure a CDD, on page 45, in Chapter 4, Backing Store Tutorial.
7. Select Domain Objects > Default on the left.
The Domain Objects area is where you configure how objects are managed. You can set defaults, and you can override them for specific entities.
— On the right, ensure that Mode is set to Cache Only (the default for the Cache CDD template).
— Check the Preload Entities and Preload Handles checkboxes.
Preloading is not necessary for the tutorial to function, but it is a commonly used feature. See section introduction for more details.
Cluster Clashes If you have clashes with other clusters running on your machine, use a different cluster name, discovery URL and listen URL from the other cluster or clusters. See Chapter 3, Cache OM Tutorial > Task C, Add and Configure a CDD > step 4, on page 58 for details.
Projects that were migrated from an earlier version have domain object override entries for all entity types by default. This is because entity metadata properties that were configured in entity resources are configured as CDD domain object override entries in version 5.0. You can delete these entries if not needed or just leave them. For newly created projects, create overrides as needed.
TIBCO BusinessEvents Getting Started
Configure the TIBCO BusinessEvents Studio Project | 71
8. If there are overrides, check each entry in turn, and make sure that the Mode is set to Cache Only, and that the Has Backing Store checkbox is checked.
9. Save the CDD file.
10. Open the project EAR file.
— Change the Name to FraudDetectionStore
— In the File Location setting, specify a location from which you can access the EAR when you run the setup utility and when you start the engine.
— At the end of the location string, change the file name to fdstore.ear. The FraudDetectionStore example ships with this value: BE_HOME/examples/standard/FraudDetectionStore/fdstore.ear.
If you need a refresher on building the EAR file, see Task S, Build the EAR File, on page 46.
Summary andNext Steps
Now you are ready to run the scripts that prepare the backing store’s database schema.
TIBCO BusinessEvents Getting Started
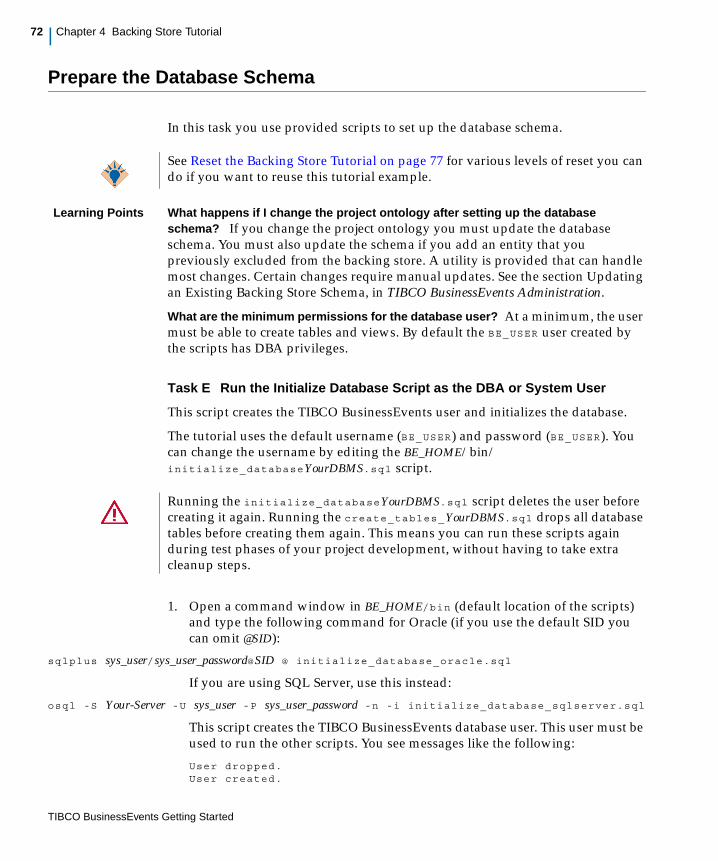
72 | Chapter 4 Backing Store Tutorial
Prepare the Database Schema
In this task you use provided scripts to set up the database schema.
Learning Points What happens if I change the project ontology after setting up the database schema? If you change the project ontology you must update the database schema. You must also update the schema if you add an entity that you previously excluded from the backing store. A utility is provided that can handle most changes. Certain changes require manual updates. See the section Updating an Existing Backing Store Schema, in TIBCO BusinessEvents Administration.
What are the minimum permissions for the database user? At a minimum, the user must be able to create tables and views. By default the BE_USER user created by the scripts has DBA privileges.
Task E Run the Initialize Database Script as the DBA or System User
This script creates the TIBCO BusinessEvents user and initializes the database.
The tutorial uses the default username (BE_USER) and password (BE_USER). You can change the username by editing the BE_HOME/bin/ initialize_databaseYourDBMS.sql script.
1. Open a command window in BE_HOME/bin (default location of the scripts) and type the following command for Oracle (if you use the default SID you can omit @SID):
sqlplus sys_user/sys_user_password@SID @ initialize_database_oracle.sql
If you are using SQL Server, use this instead:
osql -S Your-Server -U sys_user -P sys_user_password -n -i initialize_database_sqlserver.sql
This script creates the TIBCO BusinessEvents database user. This user must be used to run the other scripts. You see messages like the following:
User dropped.User created.
See Reset the Backing Store Tutorial on page 77 for various levels of reset you can do if you want to reuse this tutorial example.
Running the initialize_databaseYourDBMS.sql script deletes the user before creating it again. Running the create_tables_YourDBMS.sql drops all database tables before creating them again. This means you can run these scripts again during test phases of your project development, without having to take extra cleanup steps.
TIBCO BusinessEvents Getting Started
Prepare the Database Schema | 73
Grant succeeded.
Task F Run the Create Tables Scripts as the TIBCO BusinessEvents User
Next you log on as the TIBCO BusinessEvents user, BE_USER by default, and run a script to create non-project specific tables.
1. Open a command window in BE_HOME/bin and type the following command for Oracle.
sqlplus BE_USER/BE_USER@SID @ create_tables_oracle.sql
If you are using SQL Server, use this instead:
osql -S Your-Server –d Your-DB -U BE_USER -P BE_USER -n -i @create_tables_sqlserver.sql
You see various harmless error messages the first time you run the script, and various messages saying Table created and Index created .
Task G Generate the Project-Specific SQL Scripts
This step requires the EAR file that contains the fraud detection project ontology. Use the file you built at the end of the section Configure the TIBCO BusinessEvents Studio Project on page 67
1. Open a command window and navigate to BE_HOME\bin
2. Run be-jdbcdeploy.exe using the following command:
be-jdbcdeploy -o fdstore yourPath/fdstore.ear
where -o is the schema output file name, and the last element is the EAR file path and name.
If you are using the default example location, you would enter (all on one line):
be-jdbcdeploy -o fdstore C:\tibco\be\5.0\examples\standard\FraudDetectionStore\fdstore.ear
For certain situations, you must also specify the CDD location. However the tutorial example does not require this.
The generated scripts appear in the directory where you run the executable. If you are following the tutorial instructions, the following files appear in the BE_HOME/bin directory:
fdstore.sqlfdstore_cleanup.sqlfdstore_delete.sql
Using your database product, you can configure additional users to access the database, in addition to this user.
TIBCO BusinessEvents Getting Started
74 | Chapter 4 Backing Store Tutorial
fdstore_alter.sqlfdstore_remove.sql. fdstore.aliases
The use of these scripts is explained in Table 49, Resources Required for JDBC Backing Store Implementation in TIBCO BusinessEvents Administration.
You see messages like the following:
Using bootstrap property file: C:\tibco\be\5.0\bin\be-jdbcdeploy.traUsing jdbcdeploy property file: C:\tibco\be\5.0\bin\be-jdbcdeploy.traUsing jdbcdeploy schema file: C:/tibco/be/5.0/bin/base_types.xmlUsing jdbcdeploy keyword file: C:/tibco/be/5.0/bin/dbkeywordmap.xmlDeploying to 'Oracle' using ansi type is 'enabled'Writing schema file :C:\tibco\be\5.0\bin\fdstore.sqlWriting cleanup file :C:\tibco\be\5.0\bin\fdstore_cleanup.sqlWriting remove file :C:\tibco\be\5.0\bin\fdstore_remove.sqlWriting alter file :C:\tibco\be\5.0\bin\fdstore_alter.sql No valid Database URL/Connection information provided. No data-migration script will be generated.Writing delete file :C:\tibco\be\5.0\bin\fdstore_delete.sqlWriting aliases file :C:\tibco\be\5.0\bin\fdstore.aliases
Note that the line beginning No valid database URL/Connection information provided" refers to a routine for migrating from an older backing store implementation to the current implementation. It does not indicate a problem in your setup.
Summary andNext Step
Congratulations! You are ready to deploy the FraudDetectionStore project.
TIBCO BusinessEvents Getting Started
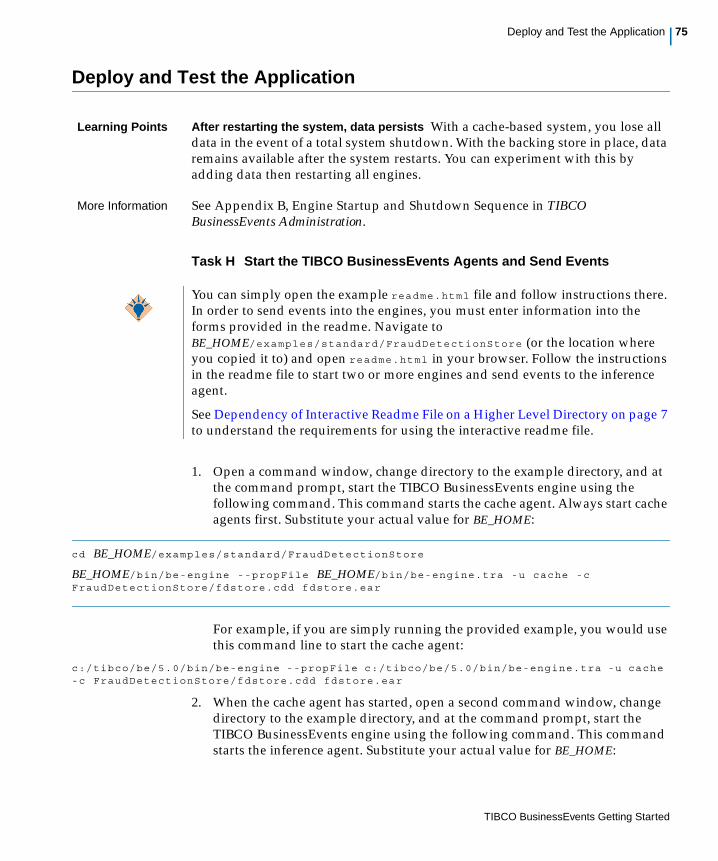
Deploy and Test the Application | 75
Deploy and Test the Application
Learning Points After restarting the system, data persists With a cache-based system, you lose all data in the event of a total system shutdown. With the backing store in place, data remains available after the system restarts. You can experiment with this by adding data then restarting all engines.
More Information See Appendix B, Engine Startup and Shutdown Sequence in TIBCO BusinessEvents Administration.
Task H Start the TIBCO BusinessEvents Agents and Send Events
1. Open a command window, change directory to the example directory, and at the command prompt, start the TIBCO BusinessEvents engine using the following command. This command starts the cache agent. Always start cache agents first. Substitute your actual value for BE_HOME:
cd BE_HOME/examples/standard/FraudDetectionStore
BE_HOME/bin/be-engine --propFile BE_HOME/bin/be-engine.tra -u cache -c FraudDetectionStore/fdstore.cdd fdstore.ear
For example, if you are simply running the provided example, you would use this command line to start the cache agent:
c:/tibco/be/5.0/bin/be-engine --propFile c:/tibco/be/5.0/bin/be-engine.tra -u cache -c FraudDetectionStore/fdstore.cdd fdstore.ear
2. When the cache agent has started, open a second command window, change directory to the example directory, and at the command prompt, start the TIBCO BusinessEvents engine using the following command. This command starts the inference agent. Substitute your actual value for BE_HOME:
You can simply open the example readme.html file and follow instructions there. In order to send events into the engines, you must enter information into the forms provided in the readme. Navigate to BE_HOME/examples/standard/FraudDetectionStore (or the location where you copied it to) and open readme.html in your browser. Follow the instructions in the readme file to start two or more engines and send events to the inference agent.
See Dependency of Interactive Readme File on a Higher Level Directory on page 7 to understand the requirements for using the interactive readme file.
TIBCO BusinessEvents Getting Started
76 | Chapter 4 Backing Store Tutorial
cd BE_HOME/examples/standard/FraudDetectionStore
BE_HOME/bin/be-engine --propFile BE_HOME/bin/be-engine.tra -u default -c FraudDetectionstore/fdstore.cdd fdstore.ear
For example, if you are simply running the provided example, you would use this command line to start the inference agent:
c:/tibco/be/5.0/bin/be-engine --propFile c:/tibco/be/5.0/bin/be-engine.tra -u default -c FraudDetectionStore/fdstore.cdd fdstore.ear
Optional Activity
Send some events such that one more debit could cause an account to be suspended. Stop both engines. Then start them up again. Send one or more events such that the threshold for account suspension is crossed. You’ll see that the account is suspended, based on data that was retrieved from the backing store as well as data you just entered.
Resetting the Data
See Reset the Backing Store Tutorial on page 77.
Congratulations—You have completed the backing store tutorial!
You can now continue to Chapter 5, TIBCO BusinessEvents Monitoring and Management Tutorial, on page 79, if you have not already completed that tutorial.Troubleshooting
TIBCO BusinessEvents Getting Started
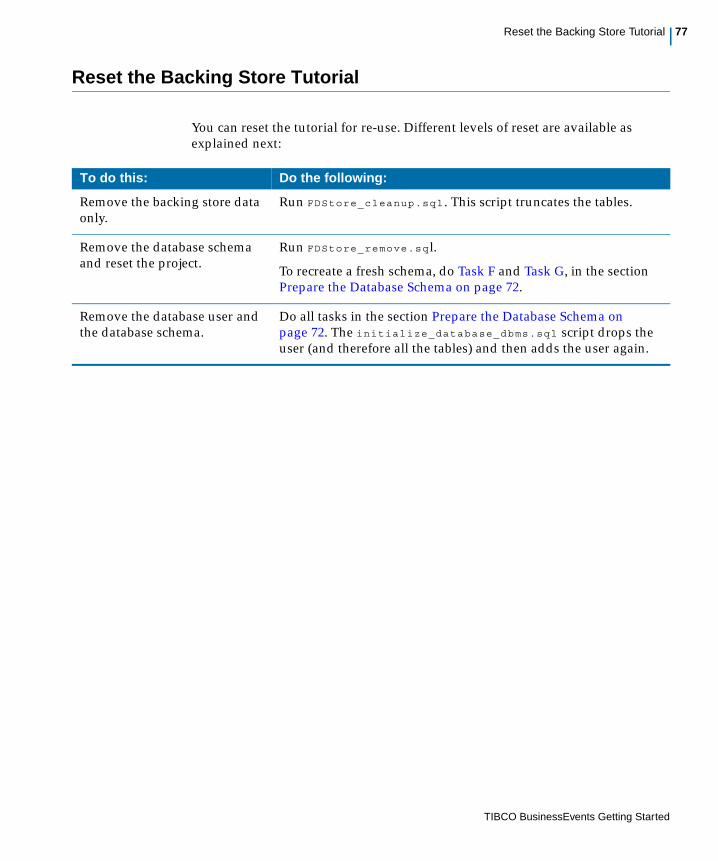
Reset the Backing Store Tutorial | 77
Reset the Backing Store Tutorial
You can reset the tutorial for re-use. Different levels of reset are available as explained next:
To do this: Do the following:
Remove the backing store data only.
Run FDStore_cleanup.sql . This script truncates the tables.
Remove the database schema and reset the project.
Run FDStore_remove.sq l.
To recreate a fresh schema, do Task F and Task G, in the section Prepare the Database Schema on page 72.
Remove the database user and the database schema.
Do all tasks in the section Prepare the Database Schema on page 72. The initialize_database_dbms.sql script drops the user (and therefore all the tables) and then adds the user again.
TIBCO BusinessEvents Getting Started

78 | Chapter 4 Backing Store Tutorial
TIBCO BusinessEvents Getting Started
| 79
Chapter 5 TIBCO BusinessEvents Monitoring and Management Tutorial
This tutorial provides all the steps required to configure TIBCO BusinessEvents Monitoring and Management (MM) to work with the Fraud Detection project, and then shows you how to start the server and MM Console, and deploy the cluster engines.
This tutorial uses the following provided project:
BE_HOME/examples/standard/FraudDetectionCache
You could also use the configured backing store project.
You can complete the Backing Store Tutorial and the TIBCO BusinessEvents Monitoring and Management Tutorial in any order.
Topics
• Configure Copssh, TIBCO Hawk, and TRA File, page 80
• Configure the Site Topology File, page 82
• Specify the Site Topology File Location in the MM CDD File, page 87
• Start MM Server and Log on to the MM Console, page 88
TIBCO BusinessEvents Express This chapter relates to the TIBCO BusinessEvents Monitoring and Management component which requires Cache OM. It is not relevant if you are using TIBCO BusinessEvents Express edition.
TIBCO BusinessEvents Getting Started
80 | Chapter 5 TIBCO BusinessEvents Monitoring and Management Tutorial
Configure Copssh, TIBCO Hawk, and TRA File
Before you begin to work with TIBCO BusinessEvents Monitoring and Management (MM) you first install a utility and configure JMX properties. For machine level metrics you must install and configure TIBCO Hawk. For the purposes of the tutorial, the TIBCO Hawk requirement is optional.
Task A Install CopSSH Software for Remote Start and Deployment
You will use the Copssh user you activate here to authenticate to the host, for example, when deploying an engine.
1. To use SSH on Windows machines, you download and install Copssh software. It is readily available for download.
2. After you install the software, Select Start > All Programs > Copssh > 01 Activate a User.
3. In the User Activation Wizard, provide the name of a user who can log on to the machine you are using for this tutorial. You can use your own credentials. Provide the user’s password as the "passphrase."
4. Click Activate. After a few seconds, you see a success message. Click OK.
5. Check that the server is running. Open the Windows Services dialog (Start > Control Panel > Administrative Tools > Services) You should see Openssh SSHD as the service name, and it should be started.
Task B Configure a JMX Property in Monitored Engine TRA Files
Running engines use JMX MBeans to expose monitoring and management information to the MM server, and for remote method invocation.
Open the BE_HOME/bin/be-engine.tra . Uncomment the jmxremote property shown next. Ensure that the value of the port property is set to %jmx_port% . You will specify the actual port value in the JMX Port field in the site topology file Processing Unit Configuration settings.
In a production system, you would do this for all TRA files for all monitored TIBCO BusinessEvents engines. When more than one PU (engine) is deployed on the same host, specify a different JMX port for each of the PUs, in the site topology file.
The Copssh user must be an actual user who can log onto the machine. You need to provide these credentials in order to deploy the engines.
TIBCO BusinessEvents Getting Started
Configure Copssh, TIBCO Hawk, and TRA File | 81
java.property.be.engine.jmx.connector.port=%jmx_port%
The property java.property.be.engine.jmx.connector.authenticate , is used only if you want to enable authentication. See Chapter 13, Configuring User Authentication in TIBCO BusinessEvents Administration for details.
Task C (Optional) Install and Configure TIBCO Hawk
For displaying machine-level metrics in MM Console, TIBCO Hawk is required. If you skip this step, you just won’t see machine level metrics for your deployed cluster.
Full instructions for this task are provided in the section Install and Configure TIBCO Hawk for Machine Level Metrics in TIBCO BusinessEvents Administration. Below are some basic points for a default setup, for the benefit of experienced Hawk users.
1. Configure a Hawk domain. Use the same Hawk domain name and Rendezvous transport for all monitored engines and for the emonitor application.
2. Import the BE_HOME/mm/project/emonitor project into your workspace and edit the MM.cdd . If you copy files into the workspace, remember to copy the MM.cdd file to the above location. In the mm-class agent properties list, add the following property to specify the Hawk domain:
tibco.clientVar.Domain=TIBCO Hawk Domain
3. In the BE_HOME\mm\bin\be-mm.tra file, set the tibco.env.HAWK_HOME property and the tibco.env.RV_HOME to point to the TIBCO Hawk and TIBCO Rendezvous installation root directories.
Summary andNext Steps
You have done the prerequisite setup for using MM. Next you will complete the main task in getting ready to deploy the project with MM: configuring the site topology for the deployed cluster.
TIBCO BusinessEvents Getting Started
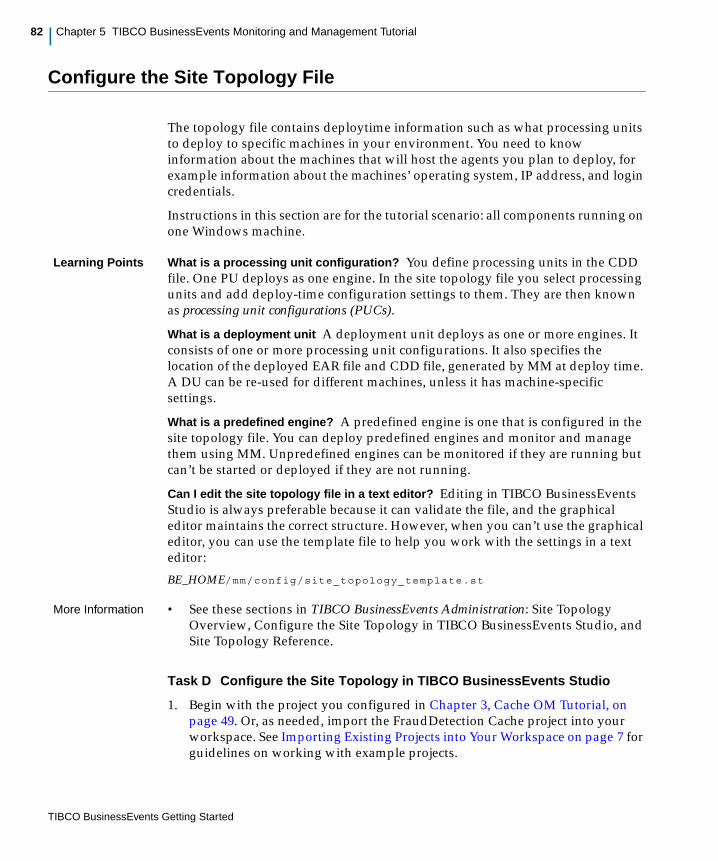
82 | Chapter 5 TIBCO BusinessEvents Monitoring and Management Tutorial
Configure the Site Topology File
The topology file contains deploytime information such as what processing units to deploy to specific machines in your environment. You need to know information about the machines that will host the agents you plan to deploy, for example information about the machines’ operating system, IP address, and login credentials.
Instructions in this section are for the tutorial scenario: all components running on one Windows machine.
Learning Points What is a processing unit configuration? You define processing units in the CDD file. One PU deploys as one engine. In the site topology file you select processing units and add deploy-time configuration settings to them. They are then known as processing unit configurations (PUCs).
What is a deployment unit A deployment unit deploys as one or more engines. It consists of one or more processing unit configurations. It also specifies the location of the deployed EAR file and CDD file, generated by MM at deploy time. A DU can be re-used for different machines, unless it has machine-specific settings.
What is a predefined engine? A predefined engine is one that is configured in the site topology file. You can deploy predefined engines and monitor and manage them using MM. Unpredefined engines can be monitored if they are running but can’t be started or deployed if they are not running.
Can I edit the site topology file in a text editor? Editing in TIBCO BusinessEvents Studio is always preferable because it can validate the file, and the graphical editor maintains the correct structure. However, when you can’t use the graphical editor, you can use the template file to help you work with the settings in a text editor:
BE_HOME/mm/config/site_topology_template.st
More Information • See these sections in TIBCO BusinessEvents Administration: Site Topology Overview, Configure the Site Topology in TIBCO BusinessEvents Studio, and Site Topology Reference.
Task D Configure the Site Topology in TIBCO BusinessEvents Studio
1. Begin with the project you configured in Chapter 3, Cache OM Tutorial, on page 49. Or, as needed, import the FraudDetection Cache project into your workspace. See Importing Existing Projects into Your Workspace on page 7 for guidelines on working with example projects.
TIBCO BusinessEvents Getting Started
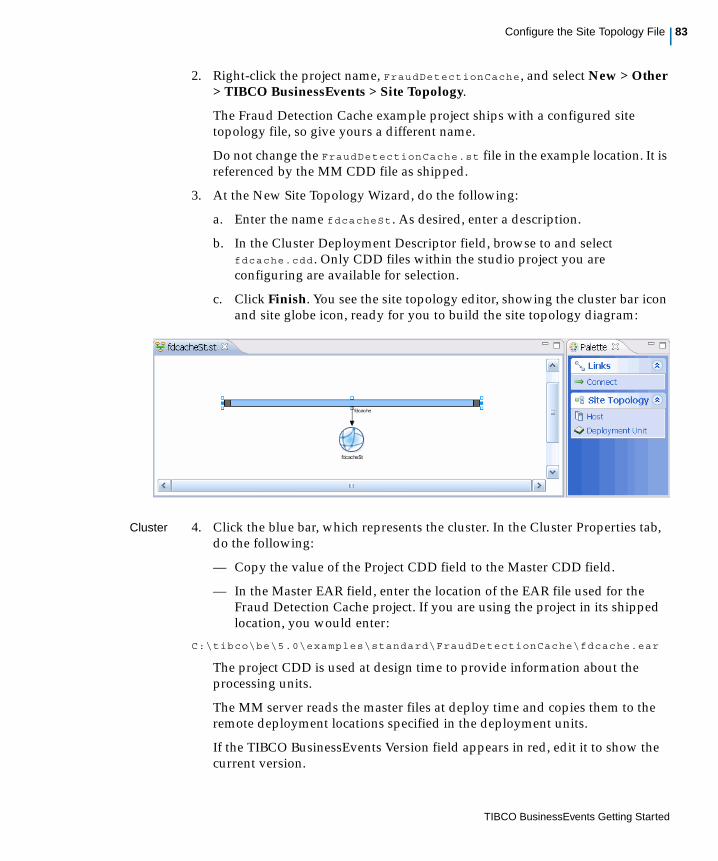
Configure the Site Topology File | 83
2. Right-click the project name, FraudDetectionCache , and select New > Other > TIBCO BusinessEvents > Site Topology.
The Fraud Detection Cache example project ships with a configured site topology file, so give yours a different name.
Do not change the FraudDetectionCache.st file in the example location. It is referenced by the MM CDD file as shipped.
3. At the New Site Topology Wizard, do the following:
a. Enter the name fdcacheSt . As desired, enter a description.
b. In the Cluster Deployment Descriptor field, browse to and select fdcache.cdd . Only CDD files within the studio project you are configuring are available for selection.
c. Click Finish. You see the site topology editor, showing the cluster bar icon and site globe icon, ready for you to build the site topology diagram:
Cluster 4. Click the blue bar, which represents the cluster. In the Cluster Properties tab, do the following:
— Copy the value of the Project CDD field to the Master CDD field.
— In the Master EAR field, enter the location of the EAR file used for the Fraud Detection Cache project. If you are using the project in its shipped location, you would enter:
C:\tibco\be\5.0\examples\standard\FraudDetectionCache\fdcache.ear
The project CDD is used at design time to provide information about the processing units.
The MM server reads the master files at deploy time and copies them to the remote deployment locations specified in the deployment units.
If the TIBCO BusinessEvents Version field appears in red, edit it to show the current version.
TIBCO BusinessEvents Getting Started
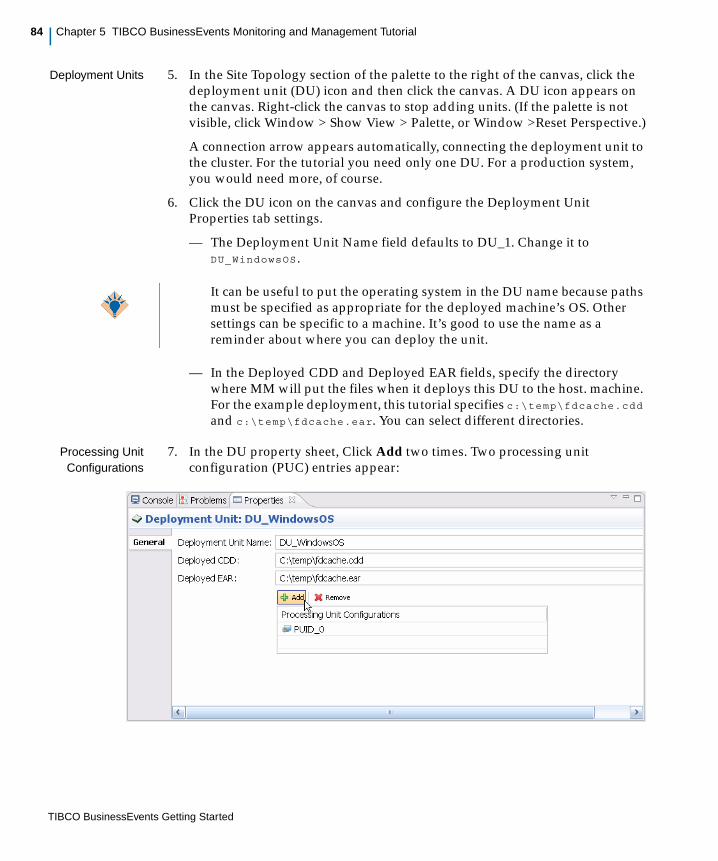
84 | Chapter 5 TIBCO BusinessEvents Monitoring and Management Tutorial
Deployment Units 5. In the Site Topology section of the palette to the right of the canvas, click the deployment unit (DU) icon and then click the canvas. A DU icon appears on the canvas. Right-click the canvas to stop adding units. (If the palette is not visible, click Window > Show View > Palette, or Window >Reset Perspective.)
A connection arrow appears automatically, connecting the deployment unit to the cluster. For the tutorial you need only one DU. For a production system, you would need more, of course.
6. Click the DU icon on the canvas and configure the Deployment Unit Properties tab settings.
— The Deployment Unit Name field defaults to DU_1. Change it to DU_WindowsOS .
— In the Deployed CDD and Deployed EAR fields, specify the directory where MM will put the files when it deploys this DU to the host. machine. For the example deployment, this tutorial specifies c:\temp\fdcache.cdd and c:\temp\fdcache.ear. You can select different directories.
Processing UnitConfigurations
7. In the DU property sheet, Click Add two times. Two processing unit configuration (PUC) entries appear:
It can be useful to put the operating system in the DU name because paths must be specified as appropriate for the deployed machine’s OS. Other settings can be specific to a machine. It’s good to use the name as a reminder about where you can deploy the unit.
TIBCO BusinessEvents Getting Started
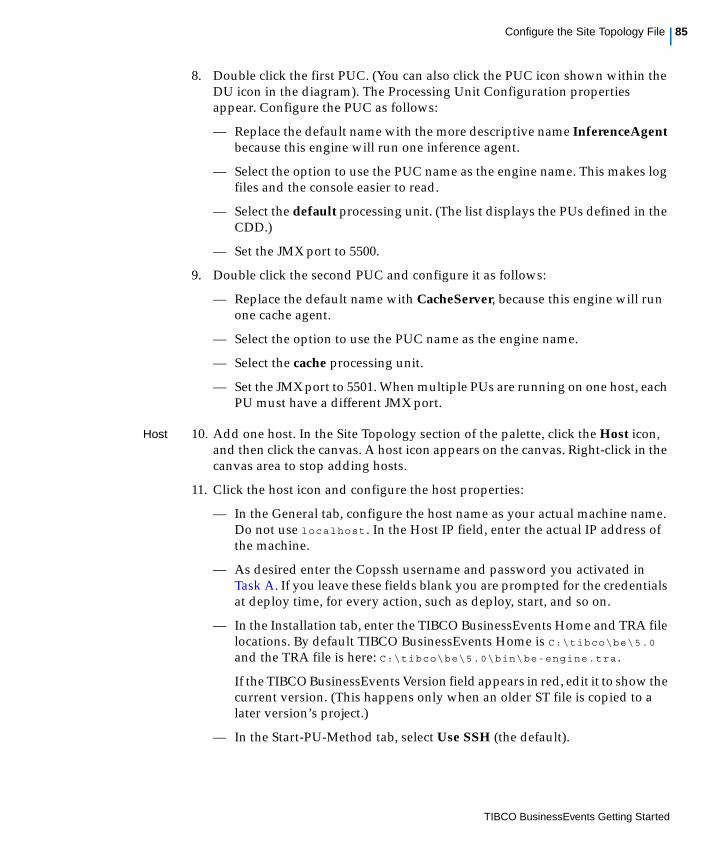
Configure the Site Topology File | 85
8. Double click the first PUC. (You can also click the PUC icon shown within the DU icon in the diagram). The Processing Unit Configuration properties appear. Configure the PUC as follows:
— Replace the default name with the more descriptive name InferenceAgent because this engine will run one inference agent.
— Select the option to use the PUC name as the engine name. This makes log files and the console easier to read.
— Select the default processing unit. (The list displays the PUs defined in the CDD.)
— Set the JMX port to 5500.
9. Double click the second PUC and configure it as follows:
— Replace the default name with CacheServer, because this engine will run one cache agent.
— Select the option to use the PUC name as the engine name.
— Select the cache processing unit.
— Set the JMX port to 5501. When multiple PUs are running on one host, each PU must have a different JMX port.
Host 10. Add one host. In the Site Topology section of the palette, click the Host icon, and then click the canvas. A host icon appears on the canvas. Right-click in the canvas area to stop adding hosts.
11. Click the host icon and configure the host properties:
— In the General tab, configure the host name as your actual machine name. Do not use localhost . In the Host IP field, enter the actual IP address of the machine.
— As desired enter the Copssh username and password you activated in Task A. If you leave these fields blank you are prompted for the credentials at deploy time, for every action, such as deploy, start, and so on.
— In the Installation tab, enter the TIBCO BusinessEvents Home and TRA file locations. By default TIBCO BusinessEvents Home is C:\tibco\be\5.0 and the TRA file is here: C:\tibco\be\5.0\bin\be-engine.tra .
If the TIBCO BusinessEvents Version field appears in red, edit it to show the current version. (This happens only when an older ST file is copied to a later version’s project.)
— In the Start-PU-Method tab, select Use SSH (the default).
TIBCO BusinessEvents Getting Started
86 | Chapter 5 TIBCO BusinessEvents Monitoring and Management Tutorial
12. Connect the host to the deployment unit:
— In the Links section of the palette, click the Connect icon.
— Click the host and then the title bar of the deployment unit, to connect them.
Right-click to stop connecting.
13. Save.
Summary andNext Steps
Now the site topology file is configured, you just have to specify its location in the MM.cdd file, to make the connection between the MM server and the cluster it will manage.
TIBCO BusinessEvents Getting Started
Specify the Site Topology File Location in the MM CDD File | 87
Specify the Site Topology File Location in the MM CDD File
You can configure the monitoring behavior of MM extensively using properties in its CDD file. In this task you will do just the minimum to connect MM with the cluster you will deploy and monitor.
More Information See Chapter 7, MM Metrics and Features Configuration in TIBCO BusinessEvents Administration.
Task E Specify the Site Topology File Location in MM.cdd
1. Import the BE_HOME/MM/project/emonitor project into your workspace and edit the MM.cdd .
2. In the mm-class agent properties list, expand the Topology group and enter the location of the site topology file you configured. The default location of the Fraud Detection Cache example’s site topology file is: C:/tibco/be/5.0/examples/standard/FraudDetectionCache/FraudDete
ctionCache/FraudDetectionCache.st
Enter a different value for the location as needed.
3. If you copied the files into the workspace, remember to copy the updated MM.cdd file to the required location, the BE_HOME/mm/project/emonitor directory.
Summary andNext Steps
Now you’re ready to start the server and deploy and start the engines.
TIBCO BusinessEvents Getting Started
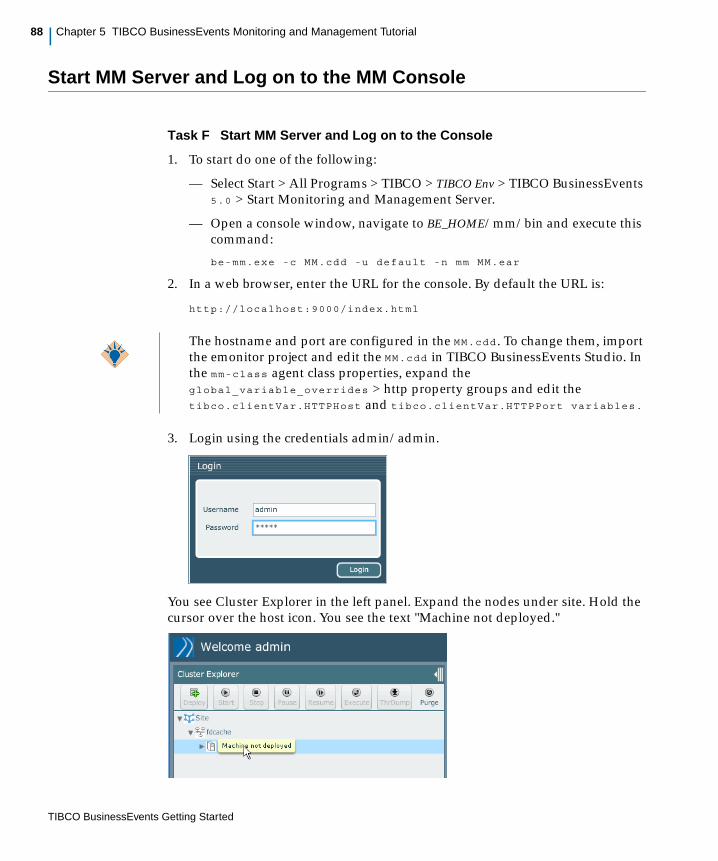
88 | Chapter 5 TIBCO BusinessEvents Monitoring and Management Tutorial
Start MM Server and Log on to the MM Console
Task F Start MM Server and Log on to the Console
1. To start do one of the following:
— Select Start > All Programs > TIBCO > TIBCO Env > TIBCO BusinessEvents 5.0 > Start Monitoring and Management Server.
— Open a console window, navigate to BE_HOME/mm/bin and execute this command:
be-mm.exe -c MM.cdd -u default -n mm MM.ear
2. In a web browser, enter the URL for the console. By default the URL is:
http://localhost:9000/index.html
3. Login using the credentials admin/admin.
You see Cluster Explorer in the left panel. Expand the nodes under site. Hold the cursor over the host icon. You see the text "Machine not deployed."
The hostname and port are configured in the MM.cdd . To change them, import the emonitor project and edit the MM.cdd in TIBCO BusinessEvents Studio. In the mm-class agent class properties, expand the global_variable_overrides > http property groups and edit the tibco.clientVar.HTTPHost and tibco.clientVar.HTTPPort variables.
TIBCO BusinessEvents Getting Started
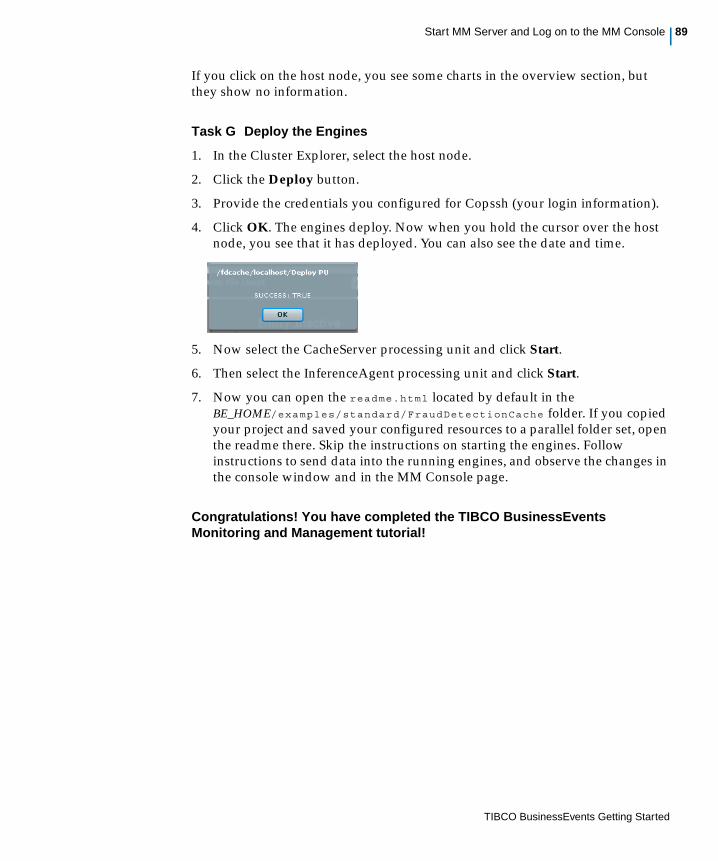
Start MM Server and Log on to the MM Console | 89
If you click on the host node, you see some charts in the overview section, but they show no information.
Task G Deploy the Engines
1. In the Cluster Explorer, select the host node.
2. Click the Deploy button.
3. Provide the credentials you configured for Copssh (your login information).
4. Click OK. The engines deploy. Now when you hold the cursor over the host node, you see that it has deployed. You can also see the date and time.
5. Now select the CacheServer processing unit and click Start.
6. Then select the InferenceAgent processing unit and click Start.
7. Now you can open the readme.html located by default in the BE_HOME/examples/standard/FraudDetectionCache folder. If you copied your project and saved your configured resources to a parallel folder set, open the readme there. Skip the instructions on starting the engines. Follow instructions to send data into the running engines, and observe the changes in the console window and in the MM Console page.
Congratulations! You have completed the TIBCO BusinessEvents Monitoring and Management tutorial!
TIBCO BusinessEvents Getting Started

90 | Chapter 5 TIBCO BusinessEvents Monitoring and Management Tutorial
TIBCO BusinessEvents Getting Started
| 91
Index
A
account concept 20add a jdbc connection resource 68
B
BE_HOME xii
C
cache cluster properties 57caching overview 50changes from the previous release of TIBCO Busi-
nessEvents Getting Started vichannels
configuring (tutorial example) 12Console view 9create a Rendezvous channel and a destination 12customer support xv
D
debit event 16deploy
the agents and cache servers 60destinations
configuring (tutorial example) 12
E
ENV_HOME xiiError Log view 9examples 2extId
must be unique 22
F
fraud detection runtime flow 6fraudcriteria scorecard 23frauddetection project 9functions documentation, accessing xi
I
initialize_database.sql 72initializeaccount rule function 25, 28
M
multi-engine overview 50
P
prepare the database 72Problems view 9Properties view 9
TIBCO BusinessEvents Getting Started
92 | Index
R
reset the backing store tutorial 77
S
simple eventsconfiguring (tutorial example) 16
support, contacting xv
T
technical support xvTIBCO_HOME xii
V
viewsConsole 9Error Log 9Problems 9Properties 9
TIBCO BusinessEvents Getting Started


