88
Two-Second Advantage ® TIBCO® Data Virtualization Installation and Upgrade Guide Version 8.1.1 Last Updated: June 6, 2019

Two-Second Adva
TIBCO® Data Virtualization
Installation and Upgrade GuideVersion 8.1.1
Last Updated: June 6, 2019
ntage®

Important Information SOME TIBCO SOFTWARE EMBEDS OR BUNDLES OTHER TIBCO SOFTWARE. USE OF SUCH EMBEDDED OR BUNDLED TIBCO SOFTWARE IS SOLELY TO ENABLE THE FUNCTIONALITY (OR PROVIDE LIMITED ADD-ON FUNCTIONALITY) OF THE LICENSED TIBCO SOFTWARE. THE EMBEDDED OR BUNDLED SOFTWARE IS NOT LICENSED TO BE USED OR ACCESSED BY ANY OTHER TIBCO SOFTWARE OR FOR ANY OTHER
PURPOSE.
USE OF TIBCO SOFTWARE AND THIS DOCUMENTATION IS SUBJECT TO THE TERMS AND CONDITIONS OF A LICENSE AGREEMENT FOUND IN EITHER A SEPARATELY EXECUTED SOFTWARE LICENSE AGREEMENT, OR, IF THERE IS NO SUCH SEPARATE AGREEMENT, THE CLICKWRAP END USER LICENSE AGREEMENT WHICH IS DISPLAYED DURING DOWNLOAD OR INSTALLATION OF THE SOFTWARE (AND WHICH IS DUPLICATED IN THE LICENSE FILE) OR IF THERE IS NO SUCH SOFTWARE LICENSE AGREEMENT OR CLICKWRAP END USER LICENSE AGREEMENT, THE LICENSE(S) LOCATED IN THE “LICENSE” FILE(S) OF THE SOFTWARE. USE OF THIS DOCUMENTATION IS SUBJECT TO THOSE TERMS AND CONDITIONS, AND YOUR USE HEREOF SHALL CONSTITUTE ACCEPTANCE OF AND AN AGREEMENT TO BE BOUND BY THE SAME.
This document contains confidential information that is subject to U.S. and international copyright laws and
treaties. No part of this document may be reproduced in any form without the written authorization of TIBCO
Software Inc.
TIBCO and the TIBCO logo are either registered trademarks or trademarks of TIBCO Software Inc. in the United
States and/or other countries
TIBCO, Two-Second Advantage, TIBCO Spotfire, TIBCO ActiveSpaces, TIBCO Spotfire Developer, TIBCO EMS,
TIBCO Spotfire Automation Services, TIBCO Enterprise Runtime for R, TIBCO Spotfire Server, TIBCO Spotfire
Web Player, TIBCO Spotfire Statistics Services, S-PLUS, and TIBCO Spotfire S+ are either registered trademarks
or trademarks of TIBCO Software Inc. in the United States and/or other countries.
All other product and company names and marks mentioned in this document are the property of their
respective owners and are mentioned for identification purposes only.
THIS SOFTWARE MAY BE AVAILABLE ON MULTIPLE OPERATING SYSTEMS. HOWEVER, NOT ALL OPERATING SYSTEM PLATFORMS FOR A SPECIFIC SOFTWARE VERSION ARE RELEASED AT THE SAME TIME. SEE THE README FILE FOR THE AVAILABILITY OF THIS SOFTWARE VERSION ON A SPECIFIC OPERATING SYSTEM PLATFORM.
THIS DOCUMENTATION IS PROVIDED “AS IS” WITHOUT WARRANTY OF ANY KIND, EITHER EXPRESS OR IMPLIED, INCLUDING, BUT NOT LIMITED TO, THE IMPLIED WARRANTIES OF MERCHANTABILITY, FITNESS FOR A PARTICULAR PURPOSE, OR NON-INFRINGEMENT.
THIS DOCUMENTATION COULD INCLUDE TECHNICAL INACCURACIES OR TYPOGRAPHICAL ERRORS. CHANGES ARE PERIODICALLY ADDED TO THE INFORMATION HEREIN; THESE CHANGES WILL BE INCORPORATED IN NEW EDITIONS OF THIS DOCUMENTATION. TIBCO SOFTWARE INC. MAY MAKE IMPROVEMENTS AND/OR CHANGES IN THE PRODUCT(S) AND/OR THE PROGRAM(S) DESCRIBED IN THIS DOCUMENTATION AT ANY TIME.

THE CONTENTS OF THIS DOCUMENTATION MAY BE MODIFIED AND/OR QUALIFIED, DIRECTLY OR INDIRECTLY, BY OTHER DOCUMENTATION WHICH ACCOMPANIES THIS SOFTWARE, INCLUDING BUT NOT LIMITED TO ANY RELEASE NOTES AND "READ ME" FILES.
Copyright © 2004-2019 TIBCO Software Inc. ALL RIGHTS RESERVED.
TIBCO Software Inc. Confidential Information


Contents | 5
Contents
Preface . . . . . . . . . . . . . . . . . . . . . . . . . . . . . . . . . . . . . . . . . . . . . . . . . . . . . . . . . . . . . . . . . . . . . . . . .9
Product-Specific Documentation . . . . . . . . . . . . . . . . . . . . . . . . . . . . . . . . . . . . . . . . . . . . . . . . . . . . . . . . . . . 9How to Access TIBCO Documentation. . . . . . . . . . . . . . . . . . . . . . . . . . . . . . . . . . . . . . . . . . . . . . . . . . . . . . 10How to Contact TIBCO Support . . . . . . . . . . . . . . . . . . . . . . . . . . . . . . . . . . . . . . . . . . . . . . . . . . . . . . . . . . . 10How to Join TIBCO Community . . . . . . . . . . . . . . . . . . . . . . . . . . . . . . . . . . . . . . . . . . . . . . . . . . . . . . . . . . . 10
Installation Requirements and Support Information . . . . . . . . . . . . . . . . . . . . . . . . . . . . . . . . . . . 11
Disk Space and Physical Memory Requirements . . . . . . . . . . . . . . . . . . . . . . . . . . . . . . . . . . . . . . . . . . . . . . . . . 12Minimum Disk Space Requirements. . . . . . . . . . . . . . . . . . . . . . . . . . . . . . . . . . . . . . . . . . . . . . . . . . . . . . . . 12Physical Memory Requirements . . . . . . . . . . . . . . . . . . . . . . . . . . . . . . . . . . . . . . . . . . . . . . . . . . . . . . . . . . . 13
Port Requirements. . . . . . . . . . . . . . . . . . . . . . . . . . . . . . . . . . . . . . . . . . . . . . . . . . . . . . . . . . . . . . . . . . . . . . . . . 13
Studio and Server Connectivity and Installer Limitations. . . . . . . . . . . . . . . . . . . . . . . . . . . . . . . . . . . . . . . . . . . . 15
TDV Supported Platforms . . . . . . . . . . . . . . . . . . . . . . . . . . . . . . . . . . . . . . . . . . . . . . . . . . . . . . . . . . . . . . . . . . . 16OpenJDK Support . . . . . . . . . . . . . . . . . . . . . . . . . . . . . . . . . . . . . . . . . . . . . . . . . . . . . . . . . . . . . . . . . . . . . 17JRE Support . . . . . . . . . . . . . . . . . . . . . . . . . . . . . . . . . . . . . . . . . . . . . . . . . . . . . . . . . . . . . . . . . . . . . . . . . . 17Operating System Support for Studio. . . . . . . . . . . . . . . . . . . . . . . . . . . . . . . . . . . . . . . . . . . . . . . . . . . . . . . 18Operating System Support for Server. . . . . . . . . . . . . . . . . . . . . . . . . . . . . . . . . . . . . . . . . . . . . . . . . . . . . . . 18
MPP Engine OS Support. . . . . . . . . . . . . . . . . . . . . . . . . . . . . . . . . . . . . . . . . . . . . . . . . . . . . . . . . . . . . 20Driver Support . . . . . . . . . . . . . . . . . . . . . . . . . . . . . . . . . . . . . . . . . . . . . . . . . . . . . . . . . . . . . . . . . . . . . . . . 20SNMP Support . . . . . . . . . . . . . . . . . . . . . . . . . . . . . . . . . . . . . . . . . . . . . . . . . . . . . . . . . . . . . . . . . . . . . . . . 21Web Service Protocols . . . . . . . . . . . . . . . . . . . . . . . . . . . . . . . . . . . . . . . . . . . . . . . . . . . . . . . . . . . . . . . . . . 21Directory Services Support for LDAP and Kerberos. . . . . . . . . . . . . . . . . . . . . . . . . . . . . . . . . . . . . . . . . . . . 21
Options and Features Supported for Use with TDV. . . . . . . . . . . . . . . . . . . . . . . . . . . . . . . . . . . . . . . . . . . . . . . . 22Web Browser Support . . . . . . . . . . . . . . . . . . . . . . . . . . . . . . . . . . . . . . . . . . . . . . . . . . . . . . . . . . . . . . . . . . 23Browsers and Kerberos Support. . . . . . . . . . . . . . . . . . . . . . . . . . . . . . . . . . . . . . . . . . . . . . . . . . . . . . . . . . . 24Directory Services Support for LDAP and Kerberos. . . . . . . . . . . . . . . . . . . . . . . . . . . . . . . . . . . . . . . . . . . . 24Supported Data Sources . . . . . . . . . . . . . . . . . . . . . . . . . . . . . . . . . . . . . . . . . . . . . . . . . . . . . . . . . . . . . . . . 25Supported Add-On Adapters . . . . . . . . . . . . . . . . . . . . . . . . . . . . . . . . . . . . . . . . . . . . . . . . . . . . . . . . . . . . . 29Supported Advanced Data Source Adapters . . . . . . . . . . . . . . . . . . . . . . . . . . . . . . . . . . . . . . . . . . . . . . . . . 29Supported Cache Targets . . . . . . . . . . . . . . . . . . . . . . . . . . . . . . . . . . . . . . . . . . . . . . . . . . . . . . . . . . . . . . . 32Data Ship Source and Target Support . . . . . . . . . . . . . . . . . . . . . . . . . . . . . . . . . . . . . . . . . . . . . . . . . . . . . . 35TDV DDL Feature Support . . . . . . . . . . . . . . . . . . . . . . . . . . . . . . . . . . . . . . . . . . . . . . . . . . . . . . . . . . . . . . . 37Supported Client Applications . . . . . . . . . . . . . . . . . . . . . . . . . . . . . . . . . . . . . . . . . . . . . . . . . . . . . . . . . . . . 38Client-Side Web Services. . . . . . . . . . . . . . . . . . . . . . . . . . . . . . . . . . . . . . . . . . . . . . . . . . . . . . . . . . . . . . . . 39Enterprise Service Buses . . . . . . . . . . . . . . . . . . . . . . . . . . . . . . . . . . . . . . . . . . . . . . . . . . . . . . . . . . . . . . . . 39Client-Side ADO.NET Driver Support . . . . . . . . . . . . . . . . . . . . . . . . . . . . . . . . . . . . . . . . . . . . . . . . . . . . . . . 39Data Sources Supported for Kerberos Token Pass-through . . . . . . . . . . . . . . . . . . . . . . . . . . . . . . . . . . . . . 40
Security Features. . . . . . . . . . . . . . . . . . . . . . . . . . . . . . . . . . . . . . . . . . . . . . . . . . . . . . . . . . . . . . . . . . . . . . . . . . 41
TIBCO® Data Virtualization

6 | Contents
Support and Maintenance Policies for TIBCO Products . . . . . . . . . . . . . . . . . . . . . . . . . . . . . . . . . . . . . . . . . . . . 41
Limitations for TDV Discovery. . . . . . . . . . . . . . . . . . . . . . . . . . . . . . . . . . . . . . . . . . . . . . . . . . . . . . . . . . . . . . . . 42
Preparing for Installation . . . . . . . . . . . . . . . . . . . . . . . . . . . . . . . . . . . . . . . . . . . . . . . . . . . . . . . . 45
Software Components for Installation . . . . . . . . . . . . . . . . . . . . . . . . . . . . . . . . . . . . . . . . . . . . . . . . . . . . . . . . . . 45
About TDV Software Patches . . . . . . . . . . . . . . . . . . . . . . . . . . . . . . . . . . . . . . . . . . . . . . . . . . . . . . . . . . . . . . . . 46
Overview of Installation Steps. . . . . . . . . . . . . . . . . . . . . . . . . . . . . . . . . . . . . . . . . . . . . . . . . . . . . . . . . . . . . . . . 46Installation Overview for New TDV Software Customers. . . . . . . . . . . . . . . . . . . . . . . . . . . . . . . . . . . . . . . . 46Installation Overview for Existing Customers Upgrading from a Previous Release. . . . . . . . . . . . . . . . . . . . 47
Preparing Your Systems for Installation . . . . . . . . . . . . . . . . . . . . . . . . . . . . . . . . . . . . . . . . . . . . . . . . . . . . . . . . 47Preparing UNIX for TDV Installation . . . . . . . . . . . . . . . . . . . . . . . . . . . . . . . . . . . . . . . . . . . . . . . . . . . . . . . 49Preparing Microsoft Windows for TDV Installation. . . . . . . . . . . . . . . . . . . . . . . . . . . . . . . . . . . . . . . . . . . . . 51
Upgrading from an Earlier TDV Release. . . . . . . . . . . . . . . . . . . . . . . . . . . . . . . . . . . . . . . . . . . . . . . . . . . . . . . . 51Documenting the Existing TDV Instance . . . . . . . . . . . . . . . . . . . . . . . . . . . . . . . . . . . . . . . . . . . . . . . . . . . 52Considerations for Upgrading to TDV 8.X . . . . . . . . . . . . . . . . . . . . . . . . . . . . . . . . . . . . . . . . . . . . . . . . . . . 53Exporting Metadata from the Existing TDV Instance . . . . . . . . . . . . . . . . . . . . . . . . . . . . . . . . . . . . . . . . . . 53Installing the New Version of TDV . . . . . . . . . . . . . . . . . . . . . . . . . . . . . . . . . . . . . . . . . . . . . . . . . . . . . . . . 54
Tracking and Documenting Your Install or Upgrade . . . . . . . . . . . . . . . . . . . . . . . . . . . . . . . . . . . . . . . . . . . . . . . 54
TDV and Business Directory Product Maintenance . . . . . . . . . . . . . . . . . . . . . . . . . . . . . . . . . . . 55
About TDV 8.x Installation. . . . . . . . . . . . . . . . . . . . . . . . . . . . . . . . . . . . . . . . . . . . . . . . . . . . . . . . . . . . . . . . . . . 55
About Hotfix Maintenance. . . . . . . . . . . . . . . . . . . . . . . . . . . . . . . . . . . . . . . . . . . . . . . . . . . . . . . . . . . . . . . . . . . 55
About Service Pack Maintenance . . . . . . . . . . . . . . . . . . . . . . . . . . . . . . . . . . . . . . . . . . . . . . . . . . . . . . . . . . . . . 56
Applying the Hotfix to TDV Server, Studio, and Business Directory . . . . . . . . . . . . . . . . . . . . . . . . . . . . . . . . . . . 57
Applying the Service Pack to TDV Server, Studio, and Business Directory . . . . . . . . . . . . . . . . . . . . . . . . . . . . . 57
Applying the Service Pack or Hotfix to Active Cluster. . . . . . . . . . . . . . . . . . . . . . . . . . . . . . . . . . . . . . . . . . . . . . 59
Rolling Back a Service Pack or Hotfix for TDV Server, Studio, and Business Directory. . . . . . . . . . . . . . . . . . . . 60
Maintaining TDV-to-Client Application Connections . . . . . . . . . . . . . . . . . . . . . . . . . . . . . . . . . . . . . . . . . . . . . . . 62Updating an ODBC Client Application . . . . . . . . . . . . . . . . . . . . . . . . . . . . . . . . . . . . . . . . . . . . . . . . . . . . . . 62Updating a JDBC Client Application . . . . . . . . . . . . . . . . . . . . . . . . . . . . . . . . . . . . . . . . . . . . . . . . . . . . . . . 62
Installing TDV, Studio, and Drivers . . . . . . . . . . . . . . . . . . . . . . . . . . . . . . . . . . . . . . . . . . . . . . . . 63
Installing on Windows . . . . . . . . . . . . . . . . . . . . . . . . . . . . . . . . . . . . . . . . . . . . . . . . . . . . . . . . . . . . . . . . . . . . . . 63Running the TDV Server Installer . . . . . . . . . . . . . . . . . . . . . . . . . . . . . . . . . . . . . . . . . . . . . . . . . . . . . . . . . 63Running the Studio Installer. . . . . . . . . . . . . . . . . . . . . . . . . . . . . . . . . . . . . . . . . . . . . . . . . . . . . . . . . . . . . . 65Installing the Drivers . . . . . . . . . . . . . . . . . . . . . . . . . . . . . . . . . . . . . . . . . . . . . . . . . . . . . . . . . . . . . . . . . . . 66
Installing on UNIX . . . . . . . . . . . . . . . . . . . . . . . . . . . . . . . . . . . . . . . . . . . . . . . . . . . . . . . . . . . . . . . . . . . . . . . . 66Installing TDV Server on UNIX . . . . . . . . . . . . . . . . . . . . . . . . . . . . . . . . . . . . . . . . . . . . . . . . . . . . . . . . . . . 67Installing Drivers on UNIX . . . . . . . . . . . . . . . . . . . . . . . . . . . . . . . . . . . . . . . . . . . . . . . . . . . . . . . . . . . . . . . 69Setting the TDV Server to Start Automatically on UNIX . . . . . . . . . . . . . . . . . . . . . . . . . . . . . . . . . . . . . . . . 69
TIBCO® Data Virtualization
Contents | 7
Installing on Amazon Web Service . . . . . . . . . . . . . . . . . . . . . . . . . . . . . . . . . . . . . . . . . . . . . . . . . . . . . . . . . . . . 71
Applying a TDV Patch or Service Pack . . . . . . . . . . . . . . . . . . . . . . . . . . . . . . . . . . . . . . . . . . . . . . . . . . . . . . . . . 71
About the Installed TDV Services . . . . . . . . . . . . . . . . . . . . . . . . . . . . . . . . . . . . . . . . . . . . . . . . . . . . . . . . . . . . . 72
Importing Metadata into the New TDV Instance . . . . . . . . . . . . . . . . . . . . . . . . . . . . . . . . . . . . . . . . . . . . . . . . . . 72
Verifying a Successful Installation . . . . . . . . . . . . . . . . . . . . . . . . . . . . . . . . . . . . . . . . . . . . . . . . . . . . . . . . . . . . . 73
Tips from an Expert if the Server Does Not Start. . . . . . . . . . . . . . . . . . . . . . . . . . . . . . . . . . . . . . . . . . . . . . . . . . 73
Where to Go After Installation . . . . . . . . . . . . . . . . . . . . . . . . . . . . . . . . . . . . . . . . . . . . . . . . . . . . . . . . . . . . . . . . 74
Silent Mode Installation . . . . . . . . . . . . . . . . . . . . . . . . . . . . . . . . . . . . . . . . . . . . . . . . . . . . . . . . . .75
Creating the Options File for a Silent Installation . . . . . . . . . . . . . . . . . . . . . . . . . . . . . . . . . . . . . . . . . . 75Running the Installer in Silent Mode . . . . . . . . . . . . . . . . . . . . . . . . . . . . . . . . . . . . . . . . . . . . . . . . . . . . 77
Installing Optional TDV Products . . . . . . . . . . . . . . . . . . . . . . . . . . . . . . . . . . . . . . . . . . . . . . . . . .81
Version Support . . . . . . . . . . . . . . . . . . . . . . . . . . . . . . . . . . . . . . . . . . . . . . . . . . . . . . . . . . . . . . . . . . . . . . . . . . . 81
Installation Requirements . . . . . . . . . . . . . . . . . . . . . . . . . . . . . . . . . . . . . . . . . . . . . . . . . . . . . . . . . . . . . . . . . . . 81Add-On Adapter Installation Requirements . . . . . . . . . . . . . . . . . . . . . . . . . . . . . . . . . . . . . . . . . . . . . . . . . . 81Active Cluster Installation Requirements . . . . . . . . . . . . . . . . . . . . . . . . . . . . . . . . . . . . . . . . . . . . . . . . . . . . 82
Installing an Optional TDV Product . . . . . . . . . . . . . . . . . . . . . . . . . . . . . . . . . . . . . . . . . . . . . . . . . . . . . . . . . . . . 83
Installing the TDV Client Drivers that are Distributed with TDV. . . . . . . . . . . . . . . . . . . . . . . . . . . . . . . . . . . . . . . 83
Importing Resources Defined in an Earlier Release . . . . . . . . . . . . . . . . . . . . . . . . . . . . . . . . . . . . . . . . . . . . . . . 84
Manage Active Cluster Security. . . . . . . . . . . . . . . . . . . . . . . . . . . . . . . . . . . . . . . . . . . . . . . . . . . . . . . . . . . . . . . 84Updating the Digital Certificate to Secure Cluster Communication . . . . . . . . . . . . . . . . . . . . . . . . . . . . . . . . 84Set Access Privileges . . . . . . . . . . . . . . . . . . . . . . . . . . . . . . . . . . . . . . . . . . . . . . . . . . . . . . . . . . . . . . . . . . 85
Uninstalling TDV . . . . . . . . . . . . . . . . . . . . . . . . . . . . . . . . . . . . . . . . . . . . . . . . . . . . . . . . . . . . . . . .87
Uninstalling TDV on Windows . . . . . . . . . . . . . . . . . . . . . . . . . . . . . . . . . . . . . . . . . . . . . . . . . . . . . . . . . . . . . . . . 87
Uninstalling TDV on UNIX . . . . . . . . . . . . . . . . . . . . . . . . . . . . . . . . . . . . . . . . . . . . . . . . . . . . . . . . . . . . . . . . . . . 87Preparing for Uninstalling on UNIX . . . . . . . . . . . . . . . . . . . . . . . . . . . . . . . . . . . . . . . . . . . . . . . . . . . . . . . . 87Uninstalling TDV On UNIX . . . . . . . . . . . . . . . . . . . . . . . . . . . . . . . . . . . . . . . . . . . . . . . . . . . . . . . . . . . . . . . 88 . . . . . . . . . . . . . . . . . . . . . . . . . . . . . . . . . . . . . . . . . . . . . . . . . . . . . . . . . . . . . . . . . . . . . . . . . . . . . . . . . . . . 88
TIBCO® Data Virtualization

8 | Contents
TIBCO® Data Virtualization

|9
Preface
Documentation for this and other TIBCO products is available on the TIBCO Documentation site. This site is updated more frequently than any documentation that might be included with the product. To ensure that you are accessing the latest available help topics, please visit:
• https://docs.tibco.com
Product-Specific Documentation
The following documents form the TIBCO® Data Virtualization(TDV) documentation set:
• TIBCO TDV and Business Directory Release Notes Read the release notes for a list of new and changed features. This document also contains lists of known issues and closed issues for this release.
• TDV Installation and Upgrade Guide
• TDV Administration Guide
• TDV Reference Guide
• TDV User Guide
• TDV Security Features Guide
• TDV Business Directory Guide
• TDV Application Programming Interface Guide
• TDV Tutorial Guide
• TDV Extensibility Guide
• TDV Getting Started Guide
• TDV Client Interfaces Guide
• TDV Adapter Guide
• TDV Discovery Guide
• TDV Active Cluster Guide
• TDV Monitor Guide
• TDV Northbay Example
TIBCO® Data Virtualization

10 | Preface
How to Access TIBCO Documentation
Documentation for TIBCO products is available on the TIBCO Product Documentation website mainly in the HTML and PDF formats.
The TIBCO Product Documentation website is updated frequently and is more current than any other documentation included with the product. To access the latest documentation, visit https://docs.tibco.com.
Documentation for TIBCO Data Virtualization is available on https://docs.tibco.com/products/tibco-data-virtualization-server.
How to Contact TIBCO Support
You can contact TIBCO Support in the following ways:
• For an overview of TIBCO Support, visit https://www.tibco.com/services/support.
• For accessing the Support Knowledge Base and getting personalized content about products you are interested in, visit the TIBCO Support portal at https://support.tibco.com.
• For creating a Support case, you must have a valid maintenance or support contract with TIBCO. You also need a user name and password to log in to https://support.tibco.com. If you do not have a user name, you can request one by clicking Register on the website.
How to Join TIBCO Community
TIBCO Community is the official channel for TIBCO customers, partners, and employee subject matter experts to share and access their collective experience. TIBCO Community offers access to Q&A forums, product wikis, and best practices. It also offers access to extensions, adapters, solution accelerators, and tools that extend and enable customers to gain full value from TIBCO products. In addition, users can submit and vote on feature requests from within the TIBCO Ideas Portal. For a free registration, go to https://community.tibco.com.
TIBCO® Data Virtualization

|11
Installation Requirements and Support Information
This topic describes installation requirements and what TIBCO® Data Virtualization (TDV) supports. It includes the following topics:
• Disk Space and Physical Memory Requirements, page 12
• Port Requirements, page 13
• Studio and Server Connectivity and Installer Limitations, page 15
• TDV Supported Platforms, page 16
– OpenJDK Support, page 17
– JRE Support, page 17
– Operating System Support for Studio, page 18
– Operating System Support for Server, page 18
– Driver Support, page 20
– SNMP Support, page 21
– Web Service Protocols, page 21
– Directory Services Support for LDAP and Kerberos, page 21
• Options and Features Supported for Use with TDV, page 22
– Web Browser Support, page 23
– Supported Data Sources, page 25
– Supported Add-On Adapters, page 29
– Supported Advanced Data Source Adapters, page 29
– Supported Cache Targets, page 32
– Data Ship Source and Target Support, page 35
– Client-Side Web Services, page 39
– Enterprise Service Buses, page 39
– Client-Side ADO.NET Driver Support, page 39
– Data Sources Supported for Kerberos Token Pass-through, page 40
• Security Features, page 41
• Support and Maintenance Policies for TIBCO Products, page 41
• Limitations for TDV Discovery, page 42
TIBCO® Data Virtualization

12 | Disk Space and Physical Memory Requirements
Disk Space and Physical Memory Requirements
TDV performance depends on processor speeds, available memory, network bandwidth, data source response times, query join types, the complexity of views, and many other implementation factors. Fast response times and support for a large active user base and large loads are achieved with:
• Fast multi-core CPUs
• Large amounts of RAM
• Ample disk space
• GB Ethernet network connections on the same subnet as the most heavily trafficked data source
If hardware configurations are less than optimal, TDV functions equally well, although more slowly, for most development tasks.
The following sections describe the minimum requirements for disk space and memory.
• Minimum Disk Space Requirements, page 12
• Physical Memory Requirements, page 13
Minimum Disk Space Requirements
TDV has these minimum disk space requirements:
• 500 MB for TDV installation
• 300 MB for the TDV repository database
Recommended disk space for TDV includes:
• 16 GB RAM
• 1 GB for cache
• 10 GB for a temp directory on the TDV installation partition
By default, TDV creates a temp directory on the same partition on which it is installed. After installation, you can reconfigure the size and partition of the temp directory to accommodate large queries. For information about those configuration parameters, see the TDV Administration Guide.
• 1.2 GB of additional free space under the TDV Version Control System (VCS) directory is the required minimum for each user who uses the VCS.
By default, TDV creates a VCS directory on the same partition on which it is installed.
TIBCO® Data Virtualization

Port Requirements |13
Different types of resources require different amounts of space to store. We recommend that you use 12KB per resource as a rough storage guideline. The following guidelines will help you figure out how to calculate your VCS directory storage needs.
– If you have 100,000 resources, we recommend 1.2GB of space available for storing resources.
– If you expect a large amount of check-ins to the VCS directory, we recommend that you allocate additional space in the VCS directory area which lives under the TDV installation (INSTALL_DIR\data\vcs).
Typically, changes within version control systems are stored as textual diffs. Textual diffs can add up over time.
Physical Memory Requirements
TDV has these memory requirements:
• 200 MB for design and development
• 700 MB for deployment
These physical memory requirements are for running TDV and Studio. Further memory might be needed for running other applications.
To increase the performance of data processing with TDV, add more RAM. The only thing to consider when adding more RAM into your TDV environment is that when garbage collection processes are run they might take longer.
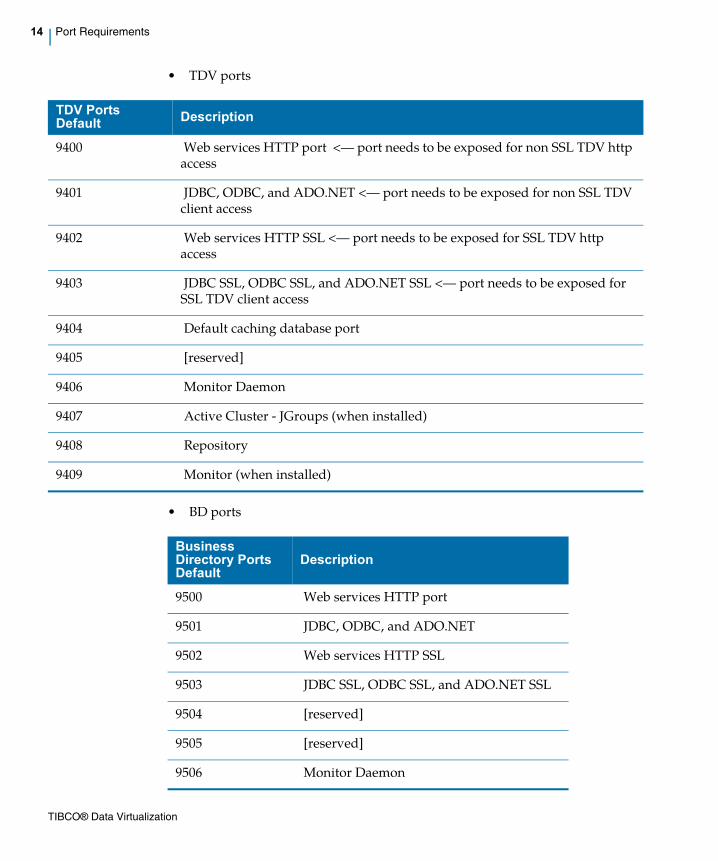
Port Requirements
By default, TDV Server listens to port 9401 for ODBC connections. The ODBC port number is always one greater than the server’s web services HTTP base port which by default, is 9400. So the ODBC default port number is 9401. If SSL is used (encrypt is set to true), the ODBC driver automatically adds 2 to the port value so that the 9403 port is used. To determine the actual ODBC port settings, see TDV Port Settings for Client Connections to TDV.
Changing the HTTP base port value also changes the value of all derived ports after the next TDV restart (with the exception of the Repository and Cache database ports, which will remain the same).
Port number availability for TDV and Business Directory:
TIBCO® Data Virtualization
14 | Port Requirements
• TDV ports
• BD ports
TDV Ports Default Description
9400 Web services HTTP port <– port needs to be exposed for non SSL TDV http access
9401 JDBC, ODBC, and ADO.NET <– port needs to be exposed for non SSL TDV client access
9402 Web services HTTP SSL <– port needs to be exposed for SSL TDV http access
9403 JDBC SSL, ODBC SSL, and ADO.NET SSL <– port needs to be exposed for SSL TDV client access
9404 Default caching database port
9405 [reserved]
9406 Monitor Daemon
9407 Active Cluster - JGroups (when installed)
9408 Repository
9409 Monitor (when installed)
Business Directory Ports Default
Description
9500 Web services HTTP port
9501 JDBC, ODBC, and ADO.NET
9502 Web services HTTP SSL
9503 JDBC SSL, ODBC SSL, and ADO.NET SSL
9504 [reserved]
9505 [reserved]
9506 Monitor Daemon
TIBCO® Data Virtualization

Studio and Server Connectivity and Installer Limitations |15
• MPP Engine ports
Note: The above ports are only active on operating systems that support MPP engine. (Refer to MPP Engine OS Support, page 20)
Studio and Server Connectivity and Installer Limitations
You can sometimes mix versions of Studio and Server as follows within a major release.
For example:
9507 [reserved]
9508 Repository
9509 Monitor (when installed)
TDV Ports Default Description
9300 Zookeeper Quorum port
9301 Zookeeper Election port
9302 Zookeeper Client Port
9303 Drill HTTP (web console) Port
9304 Drill User Port
9305 Drill Server Bit Ports
9306 Drill Server Bit Ports
Business Directory Ports Default
Description
Studio Version Server Version Support
older newer Active
newer older Not active
TIBCO® Data Virtualization
16 | TDV Supported Platforms
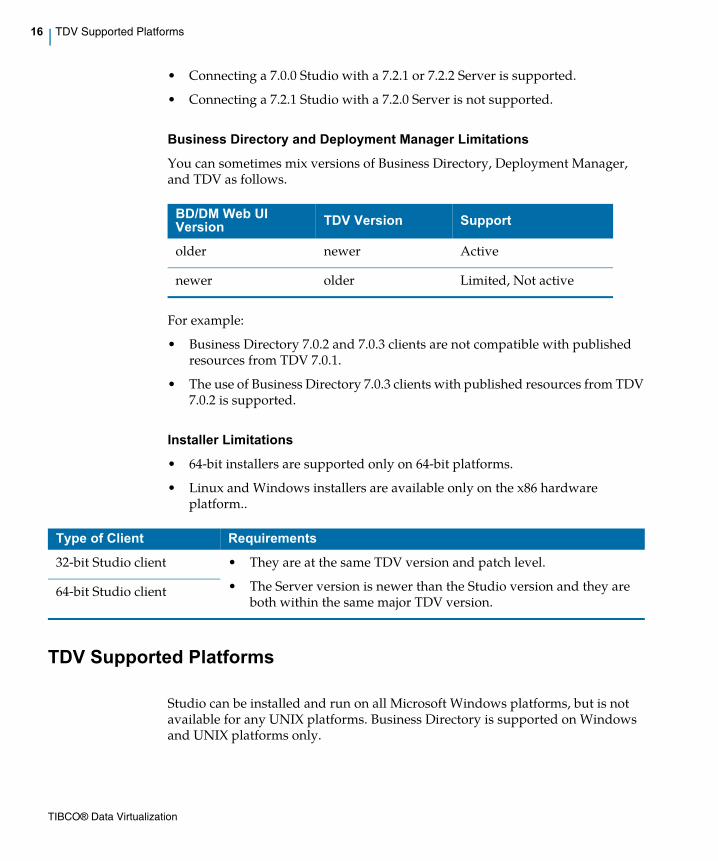
• Connecting a 7.0.0 Studio with a 7.2.1 or 7.2.2 Server is supported.
• Connecting a 7.2.1 Studio with a 7.2.0 Server is not supported.
Business Directory and Deployment Manager Limitations
You can sometimes mix versions of Business Directory, Deployment Manager, and TDV as follows.
For example:
• Business Directory 7.0.2 and 7.0.3 clients are not compatible with published resources from TDV 7.0.1.
• The use of Business Directory 7.0.3 clients with published resources from TDV 7.0.2 is supported.
Installer Limitations
• 64-bit installers are supported only on 64-bit platforms.
• Linux and Windows installers are available only on the x86 hardware platform..
TDV Supported Platforms
Studio can be installed and run on all Microsoft Windows platforms, but is not available for any UNIX platforms. Business Directory is supported on Windows and UNIX platforms only.
BD/DM Web UI Version TDV Version Support
older newer Active
newer older Limited, Not active
Type of Client Requirements
32-bit Studio client • They are at the same TDV version and patch level.
• The Server version is newer than the Studio version and they are both within the same major TDV version.
64-bit Studio client
TIBCO® Data Virtualization
TDV Supported Platforms |17
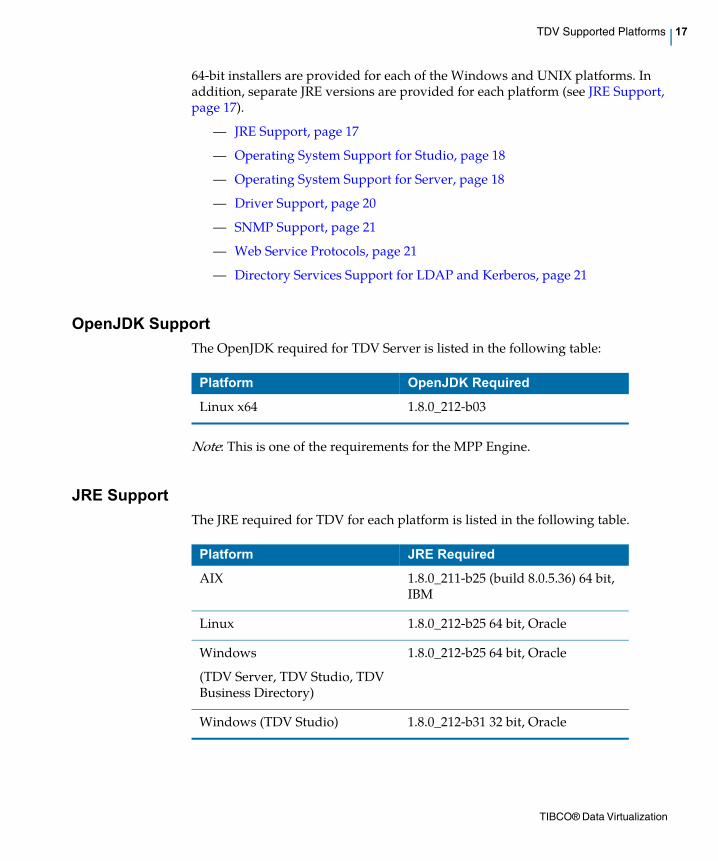
64-bit installers are provided for each of the Windows and UNIX platforms. In addition, separate JRE versions are provided for each platform (see JRE Support, page 17).
– JRE Support, page 17
– Operating System Support for Studio, page 18
– Operating System Support for Server, page 18
– Driver Support, page 20
– SNMP Support, page 21
– Web Service Protocols, page 21
– Directory Services Support for LDAP and Kerberos, page 21
OpenJDK Support
The OpenJDK required for TDV Server is listed in the following table:
Note: This is one of the requirements for the MPP Engine.
JRE Support
The JRE required for TDV for each platform is listed in the following table.
Platform OpenJDK Required
Linux x64 1.8.0_212-b03
Platform JRE Required
AIX 1.8.0_211-b25 (build 8.0.5.36) 64 bit, IBM
Linux 1.8.0_212-b25 64 bit, Oracle
Windows
(TDV Server, TDV Studio, TDV Business Directory)
1.8.0_212-b25 64 bit, Oracle
Windows (TDV Studio) 1.8.0_212-b31 32 bit, Oracle
TIBCO® Data Virtualization

18 | TDV Supported Platforms
Operating System Support for Studio
Client-platform operating system support and patch levels are listed in the following table.
There is a known limitation of Windows OS that can result in a UNC error when using TDV. The known issue is that:
• The Windows service process can't see any mapped network driver of a front end user session, because the Windows service is running under a different credential, and the mapped network driver is valid in the user session only.
• The Windows service process can see SYSTEM ODBC DSN only, any USER ODBC DSN is not visible to the Windows service.
To work around for this known issue, use the UNC path for TDV to access remote files.
Operating System Support for Server
Server-platform operating system support and patch levels are listed in the following tab
Operating System (Client) Patch TDV Support Notes
Microsoft Windows 7 Active x64 and x86
Microsoft Windows 8 SP1 Active x64 and x86
Microsoft Windows 10 Active
Operating System (Server) Patch TDV and BD Support
Notes
AIX 6.1 (PowerPC) 6100-07 or higher
Active 64-bit versions are supported. TDV deploys in native 64-bit JVM on all supported 64-bit operating systems. Not supported for Business Directory
AIX 7.1 (PowerPC) 7100-01 or higher
Active Not supported for Business Directory
Amazon Web Service (AWS) CentOS 7
Active x64
Includes a Windows installer for Studio.
Not supported for Business Directory
TIBCO® Data Virtualization

TDV Supported Platforms |19
Amazon Web Service (AWS) Microsoft Windows 2012
Active x64
Includes a Windows installer for Studio.
Not supported for Business Directory
CentOS 6.5 Active 64-bit versions are supported. TDV deploys in native 64-bit JVM on all supported 64-bit operating systems.x64 architecture. Also supported for BD.
CentOS 7 Active 64-bit versions are supported. TDV deploys in native 64-bit JVM on all supported 64-bit operating systems.x64 architecture. Also supported for BD.
Microsoft Windows 10 Active
Microsoft Windows Server 2008 R2 Enterprise
SP2 Active TDV deploys in native 64-bit JVM on all supported 64-bit operating systems.
Microsoft Windows Server 2012 Standard
Active x64.
Microsoft Windows Server 2012 R2 Standard
Active
Microsoft Windows Server 2016 Standard
Active x64
Oracle Linux 6.5 Red Hat compatibility mode
Active x64.
Red Hat Enterprise Linux v6.6 N/A Active 64-bit versions are supported. TDV deploys in native 64-bit JVM on all supported 64-bit operating systems. x64.
Red Hat Enterprise Linux v6.7 N/A Active
Operating System (Server) Patch TDV and BD Support
Notes
TIBCO® Data Virtualization

20 | TDV Supported Platforms
MPP Engine OS Support
MPP Engine is supported on Linux platforms only with the following pre-installed 3rd party software:
a. Network Security Service (NSS) Package version 3.28.4 x86_64 or higher (package name: nss).
b. CentOS/RedHat/Oracle Linux versions 6.5 or higher are supported for this feature.
c. SUSE Linux version 12 and above is supported for this feature.
Driver Support
Red Hat Enterprise Linux v7 N/A Active Red Hat provides a 64bit OS image for RHEL 7 that provides 64bit application support for TDV.
SUSE Enterprise Linux v11.3 N/A Active
SUSE Enterprise Linux v12 N/A Active
Operating System (Server) Patch TDV and BD Support
Notes
Driver Server Version TDV Support
ODBC iODBC Driver Manager v3.5.12 for AIX (PowerPC) Active
ODBC Windows Driver Manager Active
JDBC JRE v1.8 and conforms to JDBC API 4.0 Active
JDBC JRE v1.7 and conforms to JDBC API 4.0 Active
ADO.NETr ADO.NET (32-bit and 64-bit) Active Support
TIBCO® Data Virtualization
TDV Supported Platforms |21
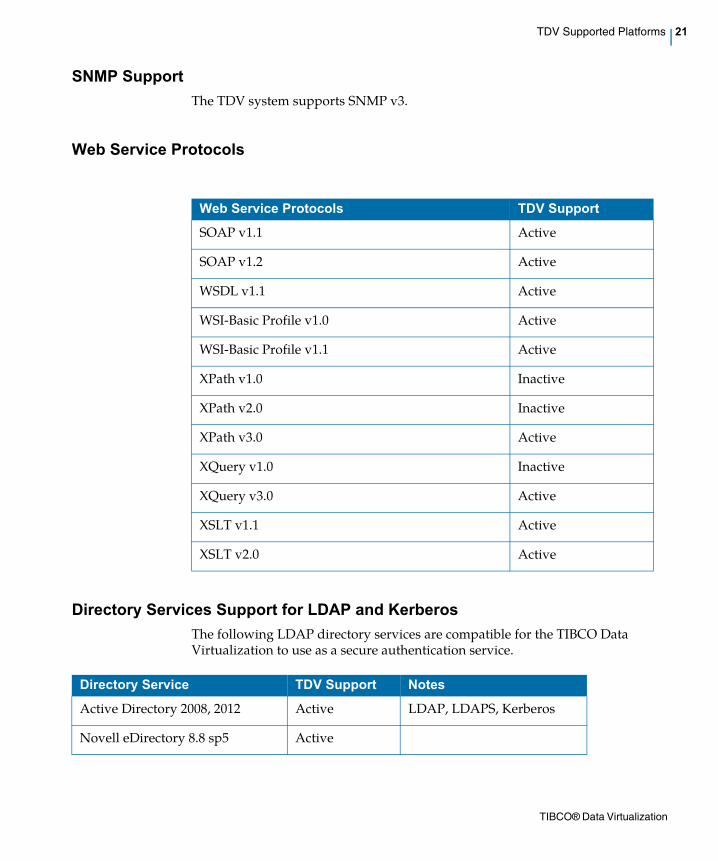
SNMP Support
The TDV system supports SNMP v3.
Web Service Protocols
Directory Services Support for LDAP and Kerberos
The following LDAP directory services are compatible for the TIBCO Data Virtualization to use as a secure authentication service.
Web Service Protocols TDV Support
SOAP v1.1 Active
SOAP v1.2 Active
WSDL v1.1 Active
WSI-Basic Profile v1.0 Active
WSI-Basic Profile v1.1 Active
XPath v1.0 Inactive
XPath v2.0 Inactive
XPath v3.0 Active
XQuery v1.0 Inactive
XQuery v3.0 Active
XSLT v1.1 Active
XSLT v2.0 Active
Directory Service TDV Support Notes
Active Directory 2008, 2012 Active LDAP, LDAPS, Kerberos
Novell eDirectory 8.8 sp5 Active
TIBCO® Data Virtualization

22 | Options and Features Supported for Use with TDV
Options and Features Supported for Use with TDV
The TDV product suite supports a large collection of data sources, connection protocols, features, and client interfaces that grows with each service pack and release. The following topics catalogs many of these items:
• Web Browser Support, page 23
• Directory Services Support for LDAP and Kerberos, page 24
• Supported Data Sources, page 25
• Supported Data Sources, page 25
• Supported Add-On Adapters, page 29
• Supported Cache Targets, page 32
• Data Ship Source and Target Support, page 35
• TDV DDL Feature Support, page 37
• Supported Client Applications, page 38
• Client-Side Web Services, page 39
• Enterprise Service Buses, page 39
• Client-Side ADO.NET Driver Support, page 39
• Data Sources Supported for Kerberos Token Pass-through, page 40
Oracle Directory Server Enterprise Edition 11.1
Active LDAP, LDAPS
Directory Service TDV Support Notes
TIBCO® Data Virtualization

Options and Features Supported for Use with TDV |23
Web Browser Support
Monitor requires a Web browser running Adobe Flash Player Version 10 or greater.
For the Monitor and Deployment Manager client web applications to function properly, the machine that is running a compatible browser must be running on a machine with Windows 7 or higher. For Windows 8, if you are using IE, then make sure all compatibility settings are enabled or specifically configure it for compatibility view for each of the TDV web based products. Occasionally the login screen for these web applications does not close automatically, you can close it and continue using the product or you can choose to run in a different browser.
For best results, when running Business Directory and Deployment Manager concurrently, use different browsers.
Web Browsers TDV Support Notes
Microsoft Internet Explorer
Active Business Directory, Deployment Manager and Web Manager support IE 11.0 on Windows 7 and IE 11.590 on Windows 10.
Mozilla Firefox Active Business Directory, Deployment Manager and Web Manager support Mozilla Firefox v62.0.3 on Windows 7, v65.0.2 on Windows 10 and v65.0.1 on macOS Sierra 10.
Monitor supports the same on Windows 10 and does not run on macOS
Chrome Active Business Directory, Deployment Manager and Web Manager support Chrome 69 on Windows 7, v 72 on Windows 10 and v72.0.1 on macOS Sierra 10.
Monitor supports the same on Windows 10 and does not run on macOS
Safari Active Not supported for web service API calls.
Business Directory, Deployment Manager and Web Manager support v12.0.3.
Edge Active Business Directory, Deployment Manager and Web Manager support v42.17134 on Windows 10.
TIBCO® Data Virtualization

24 | Options and Features Supported for Use with TDV
Online help (and long lists in Manager) might not display as expected in Chrome. You can switch to another browser to resolve the issue.
The TDV and Business Directory servers require a secure connection. So when you first connect a browser to any TDV web-based application, you might get a warning about connecting to an untrusted site.
Depending on your browser:
• You might be asked to allow the connection process to continue.
• You might want to configure it to trust the site so that warning messages no longer appear. For some site configurations this might require configuration of SSL connections for your entire TDV environment.
OAuth 2.0 Compatible Browsers
• OAuth 2.0 is compatible with the Chrome browser.
Browsers and Kerberos Support
Different browsers have different settings to enable Kerberos support. TIBCO recommends that you search the web to confirm the instructions to enable Kerberos SPNEGO authentication and credential delegation for your browser and operating system.
For example in Firefox, add the url to both network.negotiate-auth.trusted-uris and network.negotiate-auth.delegation-uris and switch network.negotiate-auth.allow-non-fqdn to true.
Directory Services Support for LDAP and Kerberos
The following LDAP directory services are compatible for the TIBCO Data Virtualization to use as a secure authentication service.
Directory Service TDV Support Notes
Active Directory 2008, 2012 Active LDAP, LDAPS, Kerberos
Novell eDirectory 8.8 sp5 Active
Oracle Directory Server Enterprise Edition 11.1
Active LDAP, LDAPS
TIBCO® Data Virtualization

Options and Features Supported for Use with TDV |25
Supported Data Sources
TDV supports these data sources.
TDV supports OAuth 2.0 for HTTP-based data sources: SOAP, REST, WSDL, and XML-HTTP. It is also available for several Advanced Adapter data sources.
For other supported data sources and applications, see these sections:
• Supported Add-On Adapters, page 29
• Supported Advanced Data Source Adapters, page 29
Select Data Source Adapter field
TDV Support Versions, Compatibility, and Notes
Apache Drill Active CAST AS functions are not supported.
Composite Active
Custom Java Procedure Active
DB2 V10.5 (Type4) Active
DB2 z/OS Version 10 (Type 4)
Active
DB2 z/OS Version 11 Active
Data Direct Mainframe Active The Shadow RTE Server (version 6.1.4.7606 or later) must be installed on the DataDirect Mainframe computer and the Shadow RTE Client (version 6.1.1.1080 or later) must be installed locally on the computer hosting the TDV Server.
File (cache, delimited, and XML)
Active For data sources that access a file share, the TDV service user account needs to have permission to read the file share.
Greenplum 3.3 Active TDV capabilities with Greenplum have been developed and tested with a single node license.
Greenplum 4.1 Active
Greenplum 4.3 Active
TIBCO® Data Virtualization

26 | Options and Features Supported for Use with TDV
HBase 0.98 (Apache Phoenix Driver)
Active Introspection of HBase databases retrieves information from the system tables. User created tables are only introspected if they have been created using the Apache Phoenix shell.
Requires installation of Apache Phoenix JDBC drivers, specifically those in phoenix-4.1.0-bin.tar.gz. For more information see the TDV Administration Guide.
HSQLDB 2.2.9 Active
Hive 1.1.0 Cloudera CDH5.3.
Hortonworks 2.2.
Kerberos is supported.
Trusted Delegation is not supported.
For Hive data sources, TDV introspects tables and columns only.
Impala 2.0 Active For Hive data sources, TDV introspects tables and columns only.
Informix 9.x Active
LDAP Active v3
Microsoft Access Active Windows platforms only
Microsoft Access (non-ODBC)
Active Windows platforms only
Microsoft Excel Active 2000
Microsoft Excel (non-ODBC)
Active 2000
Microsoft SQL Server 2008 Active Kerberos authentication is supported.
Microsoft SQL Server 2012 Active Kerberos authentication is supported with the 2008 driver.
Microsoft SQL Server 2014 Active
Select Data Source Adapter field
TDV Support Versions, Compatibility, and Notes
TIBCO® Data Virtualization

Options and Features Supported for Use with TDV |27
Microsoft SQL Server 2016 Active
MySQL 5.1 Active
MySQL 5.5 Active
Neoview 2.3 Active
Neoview 2.4 Active
Netezza 6.0 Active NPS
Netezza 7.0 Active NPS
OData Active Provides for some limited access to SharePoint data.
Oracle 11g (OCI Driver) Active 11g R1, 11g R2, Oracle RAC
Kerberos authentication is supported with thin driver version 11.2.0.4.
Oracle 11g (Thin Driver) Active 11g R1, 11g R2, Oracle RAC
Kerberos authentication is supported with thin driver version 11.2.0.4.
Oracle 12c (OCI Driver) Active Oracle RAC
Oracle 12c (Thin Driver) Active Oracle RAC
PostgreSQL 9.0 Active
PostgreSQL 9.1 Active
PostgreSQL 9.2.3 Active
REST Active Kerberos authentication is supported.
NTLM authentication is supported.
RSS Active
Redshift Active The following trigonometric functions should not be pushed to Redshift data sources, because they might return incorrect results: SIN, COS, TAN, ASIN, ACOS, COT.
Select Data Source Adapter field
TDV Support Versions, Compatibility, and Notes
TIBCO® Data Virtualization

28 | Options and Features Supported for Use with TDV
SOAP Active 1.1, 1.2
Kerberos authentication is supported.
NTLM authentication is supported.
SAP HANA SPS 09 Active Support is for on premise SAP HANA deployments.
Sybase 12 Active 12.5 ASE
Sybase 15 Active 15 and 15.5 ASE
Kerberos authentication is supported.
Sybase IQ Active 15
Sybase IQ (Type 2) Active 15.2
Teradata 14 Active 14.10
Might require installation of a Teradata 15 driver.
Support for query band.
Teradata 15 Active FastExport is not supported.
The JDBC driver does not support CLOB columns with NULL values when using TDV to cache data into a Teradata 15 target.
Support for query band.
Vertica 6.1 Active
WSDL Active 1.1
Kerberos authentication is supported.
NTLM authentication is supported.
XML/HTTP Active Flat files or over HTTP.
Kerberos authentication is supported.
NTLM authentication is supported.
Select Data Source Adapter field
TDV Support Versions, Compatibility, and Notes
TIBCO® Data Virtualization

Options and Features Supported for Use with TDV |29
Supported Add-On Adapters
Consult your vendor specific documentation for detailed documentation of the objects and fields that have changed from version to version. These SAP adapters require the SAP JCo driver. Configuration steps can be found in the TDV Adapter Guide. OLAP Cube Support–With TDV 5.1.0.1 and later, you can create dimensional OLAP views in TDV.
TDV supports the following application data sources.
For installation and licensing instructions, consult Installing Optional TDV Products, page 81.
Supported Advanced Data Source Adapters
TDV supports the following application data sources.
Adapter Version Support
Active Cluster
Oracle E-Business Suite Adapter
11.5.8, 11.5.10 , 12.1, 12.2 on Oracle 9i and 10g
Salesforce.com Adapter Version 37
You can install and use the Salesforce.com Adapter on all platforms that TDV supports. See Installation Requirements and Support Information, page 11.
SAP Adapter 5.0, 6.0, and above
SAP R/3 v4.7
SAP BW Adapter 3.5 and 7.4 SP 9
SAP BW BEx Adapter 3.5 and 7.4 SP 9
Siebel Adapter 7.7, 7.8, 8.0
Data Source Adapter Versions, Compatibility, and Notes
Active Directory LDAP v2 and v3 servers
Amazon DynamoDB DynamoDB REST API Version 2012-08-10
Cassandra Versions 2.1.7 and 3.0.0
TIBCO® Data Virtualization

30 | Options and Features Supported for Use with TDV
Couchbase Version 4.0 of the API
DynamicsCRM Windows server 2016, Windows server 2012 R2, Windows Server 2012, windows server 2008 R2 and Windows server 2008.
DynamicsGP Dynamics GP 2010, 2013, and 2015
DynamicsNAV Dynamics NAV 2013, 2015, and 2016
Eloqua Eloqua REST API and Bulk API version 2.0
Elasticsearch Version 2.0 and above
Email Standard IMAP client as specified in RFC 1730 and RFC 2060
Sharepoint Excel Services
Excel data from SharePoint 2013, 2016, and Online
Facebook Facebook Graph API 2.0, 2.1, 2.2, 2.3
Google AdWords API v201502 and v201601
Google Analytics Google Analytics Management API v3.0, Google Analytics Core Reporting API v3.0
Google Contacts API v3.0
Google Calendar API v3.0
Google Drive API V3.0
Google BigQuery Google BigQuery API v2.0
Google Sheets Google Sheets API v3.0
HBase
HubSpot HubSpot REST API
JDBC-ODBC Bridge ODBC 2.x and 3.x drivers
JSON Standard JSON format as specified in RFC 7519
Marketo Marketo REST API v1, Marketo SOAP API v2.6
MongoDB MongoDB 2.6 and 3.0
Data Source Adapter Versions, Compatibility, and Notes
TIBCO® Data Virtualization

Options and Features Supported for Use with TDV |31
Limitations:
• Sometimes, instead of returning an empty value, “Select * from table where columnname = 'value'” may throw an exception, if there is no value in the column.
• Some adapters support ORDER BY, but sometimes there are only a few objects within that data source that support ORDER BY. TDV displays a message if the tables do not support ORDER BY.
• Tables might need to be filtered with mandatory inputs for querying the contents for table scans to work as expected. For example for google apps directions, the starting location and ending location might be needed to retrieve the results.
• Sharepoint adapters support direct Kerberos authentication.
• Bulk inserts are not supported.
• GoogleSheets does not support client side filtering.
• Table names or column names with the period character are not supported.
• Eloqua data sources where the password value is entered when creating the data source will persist the password and it cannot be changed.
• For the Sharepoint Excel Services adapter, during introspection all String data types are mapped to VARCHAR.
• The DynamicsCRM, DynamicsNAV, DynanoDB, GoogleBigQuery, and SharePoint adapters do not support "is not null" syntax.
• Queries that contain "LIMIT"are not supported.
• For MongoDB, updating schema files within a running instance of TDV is not supported.
NetSuite NetSuite SOAP APIs 2011-2015
OData OData 2.0, 3.0, and 4.0
RSS RSS 2.0 feeds
SharePoint SharePoint Online, SharePoint 3.0, and SharePoint Server 2007, 2010, 2013
SparkSQL Version 1.0 and above
Twitter Twitter REST API v1.1
Data Source Adapter Versions, Compatibility, and Notes
TIBCO® Data Virtualization

32 | Options and Features Supported for Use with TDV
• Deployment Manager is case sensitive when using it with these adapters.
• Deployment Manager attributes for these adapters can cause plans to fail.
• “Ignore case sensitivity mismatch between CIS and data source” and “Ignore trailing space mismatch between CIS and data source” override the server side setting for a data source. By default these two overrides are enabled so that queries are always pushed. This is the case even when there is a mismatch and the query does not contain UPPER or RTRIM or similar options.
• Set these attributes to false or disable the push to get the consistent results as when the query is run with in the TDV.
For installation and licensing instructions, consult Installing Optional TDV Products, page 49.
For OAuth descriptions, see Configuring OAuth 2.0 for TDV Advanced Adapters, page 51.
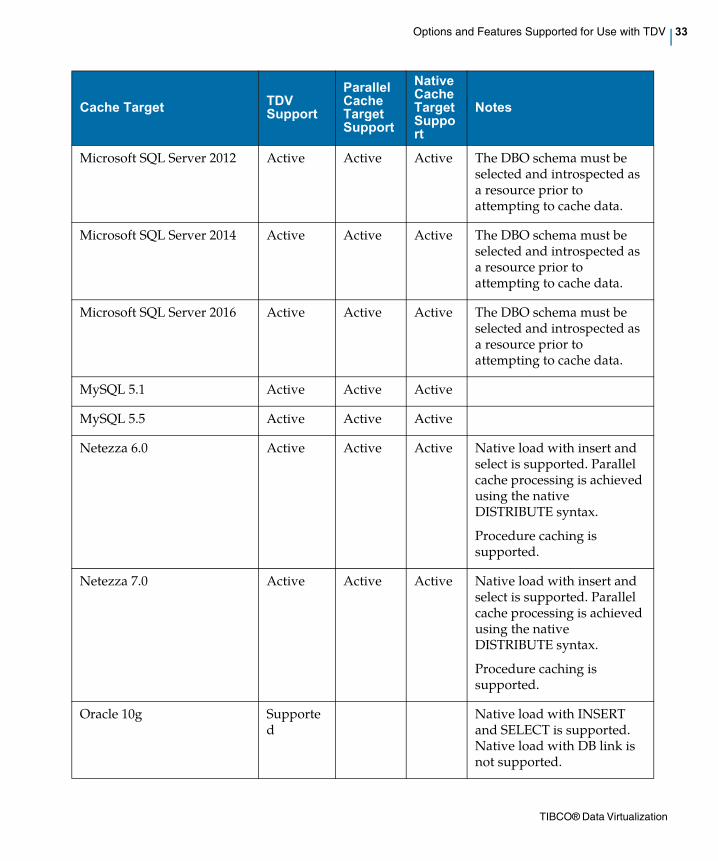
Supported Cache Targets
TDV supports the following as cache targets:
Cache Target TDV Support
Parallel Cache Target Support
Native Cache Target Support
Notes
File Active Active Typically best for demonstrations or caching of a few hundred rows.
Greenplum 4.1 Active Active Active
Greenplum 4.3 Active Active Active
HSQLDB 2.2.9 Active Active
IBM DB2 LUW v10.5 Active Active Active Native load with insert and select, and DB2 Load are supported.
Microsoft SQL Server 2008 Active Active Active The DBO schema must be selected and introspected as a resource prior to attempting to cache data.
TIBCO® Data Virtualization
Options and Features Supported for Use with TDV |33
Microsoft SQL Server 2012 Active Active Active The DBO schema must be selected and introspected as a resource prior to attempting to cache data.
Microsoft SQL Server 2014 Active Active Active The DBO schema must be selected and introspected as a resource prior to attempting to cache data.
Microsoft SQL Server 2016 Active Active Active The DBO schema must be selected and introspected as a resource prior to attempting to cache data.
MySQL 5.1 Active Active Active
MySQL 5.5 Active Active Active
Netezza 6.0 Active Active Active Native load with insert and select is supported. Parallel cache processing is achieved using the native DISTRIBUTE syntax.
Procedure caching is supported.
Netezza 7.0 Active Active Active Native load with insert and select is supported. Parallel cache processing is achieved using the native DISTRIBUTE syntax.
Procedure caching is supported.
Oracle 10g Supported
Native load with INSERT and SELECT is supported. Native load with DB link is not supported.
Cache Target TDV Support
Parallel Cache Target Support
Native Cache Target Support
Notes
TIBCO® Data Virtualization

34 | Options and Features Supported for Use with TDV
Oracle 11g and 11g R2 Active Active Active
Oracle 12c Active Active Active
PostgreSQL 9.1 Active Active Active Bulk load is supported.
Native loading is supported when the source and target are the same database. If not then Parallel loading is used.
PostgreSQL 9.2.3 Active Active Active Bulk load is supported.
Native loading is supported when the source and target are the same database. If not then Parallel loading is used.
SAP HANA SPS 09 Active Active
Sybase ASE 12.5 Active
Sybase ASE 15.5 Active
Sybase IQ 15.2 Active Active
Teradata 13 Active Active Supported, but with limitations.
Teradata 13.10 Active Active Supported, but with limitations.
Teradata 14.10 Active Active Supported, but with limitations. Might require Teradata 15 driver.
Teradata 15 Active Active Choose tables For Caching is not supported.
Cache Target TDV Support
Parallel Cache Target Support
Native Cache Target Support
Notes
TIBCO® Data Virtualization

Options and Features Supported for Use with TDV |35
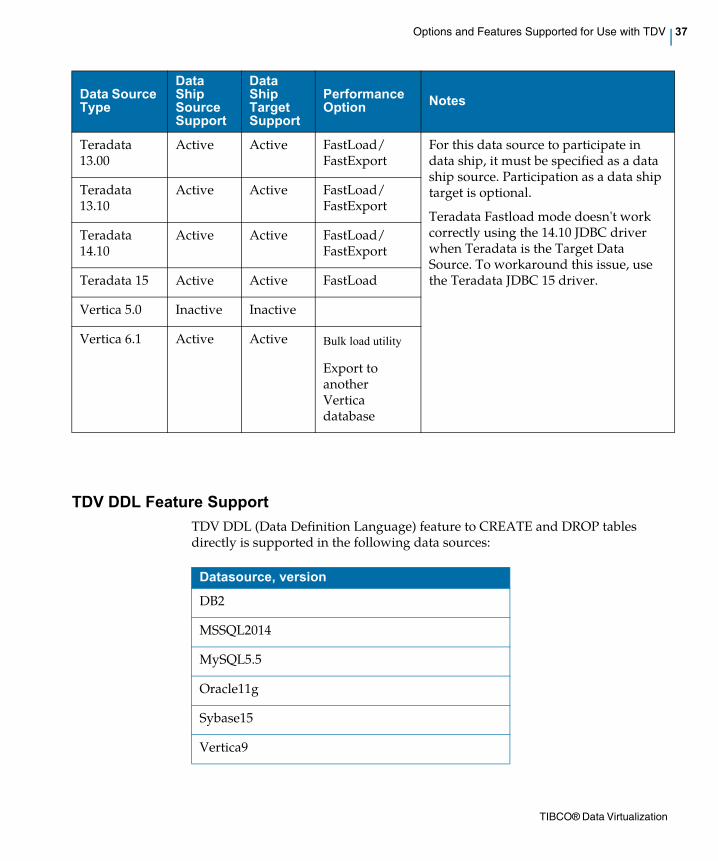
Data Ship Source and Target Support
Data ship optimization is supported for following data source types.
Vertica 6.1 Active Active Active Supports the use of native load and parallel cache load together. Native load with INSERT AND SELECT is supported.
Cache Target TDV Support
Parallel Cache Target Support
Native Cache Target Support
Notes
Data Source Type
Data Ship Source Support
Data Ship Target Support
Performance Option Notes
DB2 v10.5 Active Active Bulk Load using the LOAD utility
LUW
Greenplum 3.3
Active Active
Greenplum 4.1
Active Active
Greenplum 4.3
Active Active
Microsoft SQL Server 2008
Active Active Bulk import/export using BCP
Microsoft SQL Server 2012
Active Active Bulk import/export using BCP
TIBCO® Data Virtualization

36 | Options and Features Supported for Use with TDV
Microsoft SQL Server 2014
Active Active Bulk import/export using BCP
Microsoft SQL Server 2016
Active Active Bulk import/export using BCP
Netezza 6.0 Active Active external tables
Netezza 7.0 Active Active external tables
Oracle 11g Active Active Database Links To use an Oracle data source for data ship, the DBA must install the DBMS_XPLAN package in the database and create an area for temporary tables.
For this data source to participate in data ship, it must be specified as a data ship source. Participation as a data ship target is optional. If Oracle is both source and target, DB Link needs to be set up between the Oracle databases.
Oracle 12c Active Active Database Links
PostgreSQL 9.1
Active Active Database Links
PostgreSQL 9.2.3
Active Active Database Links
Sybase IQ 15 Active Active Location:
iAnywhere JDBC driver
For a Sybase IQ data source to participate in data ship, the QUERY_PLAN_TEXT_ACCESS database option must be set to ON.
For this data source to participate in data ship, it must be specified as a data ship source. Participation as a data ship target is optional.
Data Source Type
Data Ship Source Support
Data Ship Target Support
Performance Option Notes
TIBCO® Data Virtualization
Options and Features Supported for Use with TDV |37
TDV DDL Feature Support
TDV DDL (Data Definition Language) feature to CREATE and DROP tables directly is supported in the following data sources:
Teradata 13.00
Active Active FastLoad/FastExport
For this data source to participate in data ship, it must be specified as a data ship source. Participation as a data ship target is optional.
Teradata Fastload mode doesn't work correctly using the 14.10 JDBC driver when Teradata is the Target Data Source. To workaround this issue, use the Teradata JDBC 15 driver.
Teradata 13.10
Active Active FastLoad/FastExport
Teradata 14.10
Active Active FastLoad/FastExport
Teradata 15 Active Active FastLoad
Vertica 5.0 Inactive Inactive
Vertica 6.1 Active Active Bulk load utility
Export to another Vertica database
Data Source Type
Data Ship Source Support
Data Ship Target Support
Performance Option Notes
Datasource, version
DB2
MSSQL2014
MySQL5.5
Oracle11g
Sybase15
Vertica9
TIBCO® Data Virtualization

38 | Options and Features Supported for Use with TDV
Supported Client Applications
All other client applications are supported through the standard communication protocols that include JDBC and ODBC.
HSQLDB
Postgres
Greenplum
Netezza
Teradata14
Datasource, version
Client-Side Applications TDV Support Notes
Cognos 11 R3 Active
Cognos v10.2.2 fixpack 5 Active
MicroStrategy 9.0.2 Active TDV supports these data sources for use with MicroStrategy: Oracle 10g or 11g, Netezza 5 or 6, SQL Server 2008, and for mixed data coming from Oracle 11g and Netezza 6.
Because MicroStrategy can create and delete data directly, you must have used Studio configured one of the following as a temporary tablespace to hold the created and deleted data: Oracle 10g and 11g, Netezza 5 and 6, SQL Server 2008, Teradata 13, MySQL 5, and DB2 v9.
MicroStrategy 9.2.1/9.2.1m on Windows I-Server
Active
Tableau Desktop Professional Edition Version 7.0.13
Active
TIBCO Spotfire Active
TIBCO® Data Virtualization

Options and Features Supported for Use with TDV |39
Client-Side Web Services
Enterprise Service Buses
Client-Side ADO.NET Driver Support
The TDV ADO.NET driver can be installed, uninstalled, or re-installed. It can support 32-bit and 64-bit Windows operation systems. TDV Software supports native ADO.NET driver functionality on the following Windows operating systems.
• Windows 7 SP1 Professional
• Windows 7 SP1 Professional x64
• Windows 8.1 Professional x64
• Windows 10 v1803
• Windows Server 2008 R2
• Windows Server 2012 R2
• Windows Server 2016 R2
Client-Side Web Services TDV Support
.NET Framework v1.1 Not Supported
.NET Framework v2.0 Active
.NET Framework v3.0 Compatible
.NET Framework v4.0 Active
.NET Framework v4.5 Active
Enterprise Service Bus TDV Support
Sonic 7.5 Active
TIBCO EMS 4.4 Active
OpenMQ 4.4 Active
TIBCO® Data Virtualization

40 | Options and Features Supported for Use with TDV
The TDV ADO.NET driver requires the following pre-installed software:
• .NET Framework 2.0
TDV supports communication and use with:
• Visual Studio 2012, 2013 and 2015
Data Sources Supported for Kerberos Token Pass-through
• IBM DB2 LUW version 9
• Oracle
With these Kerberos authentication modes:
– Microsoft memory-based
– Ticket cache file-based
– Specified data source name and password
...these Oracle data sources are supported for Kerberos:
– Database version 11gR2 with an Oracle 11g driver
• Microsoft SQL Server 2008 and 2012
– For Kerberos authentication, use the Microsoft SQL JDBC driver version 4.0.
• SOAP 1.1 and 1.2
• REST
• Sybase ASE v12 and v15
• WSDL 1.1
• XML over HTTP
TDV Operating Systems Support
• 64-bit Windows Server 2008, 2010, 2012 and 2016
• 64-bit RHEL AS 6.6 and 7.0
Communication Interfaces and Protocols
• ADO.NET
TIBCO® Data Virtualization

Security Features |41
• JDBC
• OData
• ODBC
• Web Services
Security Features
Security features are discussed throughout this guide:
• Kerberos can be used when connecting to several data sources (Supported Data Sources, page 25).
• Password protection is available for operations like installing and starting TDV and registering with data sources like SAP (see Registering with the SAP System Landscape Directory, in the TDV Adapter Guide).
Support and Maintenance Policies for TIBCO Products
TIBCO provides support and maintenance for major/minor releases of TDV.
Support Policies for Third-Party Environments
All versions stated of an environment presume the initial release of a Third-party product without any need for patches, service packs or equivalent terms unless stated. Equally, unless stated, we presume that patches or service packs and minor version releases are upward compatible for our products. Whenever a new release of TDV requires deployment of a patch or service pack or is compatible only with a minor version of an environment, TDV will highlight these requirements in release notes and will require customers to install a patch or service pack or minor version to receive support and maintenance on the product.
The following classifications indicate the level of support for the current release.
Classification Description
Active All aspects (design/creation and runtime) are supported in Studio and Server.
Desupported
Not Supported
Design/creation of platform version is no longer supported, runtime will persist until the next major or minor version. OR: This platform version has not been added to TDV yet.
TIBCO® Data Virtualization
42 | Limitations for TDV Discovery
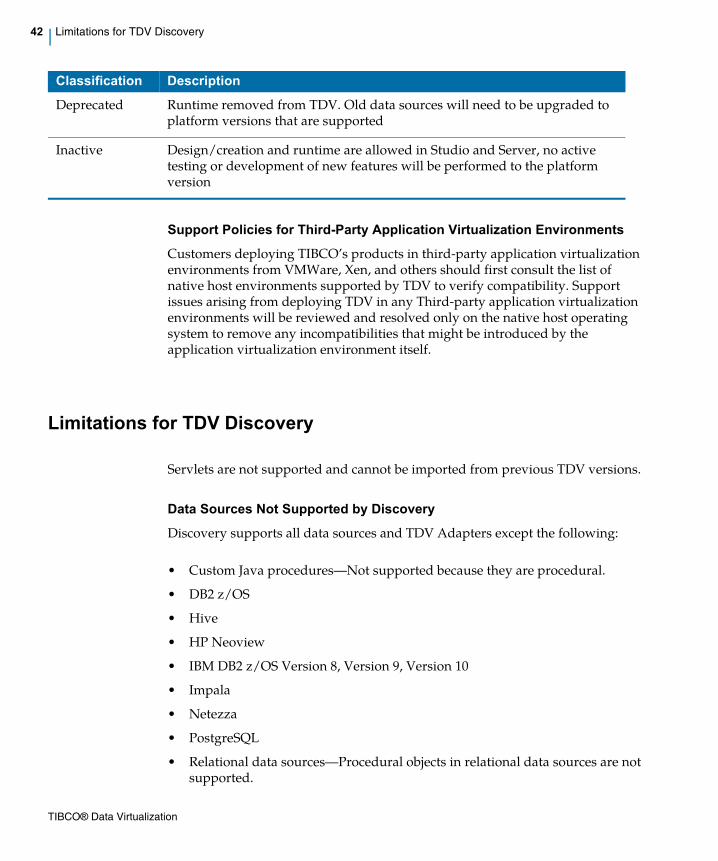
Support Policies for Third-Party Application Virtualization Environments
Customers deploying TIBCO’s products in third-party application virtualization environments from VMWare, Xen, and others should first consult the list of native host environments supported by TDV to verify compatibility. Support issues arising from deploying TDV in any Third-party application virtualization environments will be reviewed and resolved only on the native host operating system to remove any incompatibilities that might be introduced by the application virtualization environment itself.
Limitations for TDV Discovery
Servlets are not supported and cannot be imported from previous TDV versions.
Data Sources Not Supported by Discovery
Discovery supports all data sources and TDV Adapters except the following:Data Sources Not Supported by Discovery
• Custom Java procedures–Not supported because they are procedural.
• DB2 z/OS
• Hive
• HP Neoview
• IBM DB2 z/OS Version 8, Version 9, Version 10
• Impala
• Netezza
• PostgreSQL
• Relational data sources–Procedural objects in relational data sources are not supported.
Deprecated Runtime removed from TDV. Old data sources will need to be upgraded to platform versions that are supported
Inactive Design/creation and runtime are allowed in Studio and Server, no active testing or development of new features will be performed to the platform version
Classification Description
TIBCO® Data Virtualization

Limitations for TDV Discovery |43
• SAP BW
• SAP HANA
• Teradata
• Vertica
• WSDL
• XML (flat files or over HTTP
TIBCO® Data Virtualization

44 | Limitations for TDV Discovery
TIBCO® Data Virtualization

|45
Preparing for Installation
This topic focuses on preparations to install the Data Virtualization Platform, as follows:
• Software Components for Installation, page 45
• About TDV Software Patches, page 46
• Overview of Installation Steps, page 46
• Preparing Your Systems for Installation, page 47
• Upgrading from an Earlier TDV Release, page 51
• Tracking and Documenting Your Install or Upgrade, page 54
Software Components for Installation
TDV provides the following installers for the Data Virtualization software components:
Installer Included in the installer
TDV Server TDV ServerStudioDeployment ManagerRepositoryJavaMonitorDiscovery
Active ClusterSalesforce.com AdapterSAP AdapterSAPBW and BEx AdaptersOracle EBS AdapterSiebel AdapterDefault cache databaseAdvanced Data Sources Adapters
Studio Studio Java
Client ODBCADO.Net
JDBC
Business Directory Server
BD ServerBD Repository
BD web applicationJava
TIBCO® Data Virtualization

46 | About TDV Software Patches
About TDV Software Patches
TDV produces service pack patches as needed to update installed products. Patches are applied after the product has been installed. A patch is a zipped package of files that fixes known issues and which often provides enhanced functionality.
Install the most recent TDV patches on all computers running Server, Studio, and associated utilities. Specific patches might not be required for all TDV applications and services installed in a particular release. Typically, patches should be applied universally to avoid version mismatches.
You must use the Studio patch to get Studio client fixes.
For information about how to obtain and install the latest patch, see TDV and Business Directory Product Maintenance, page 55.
Overview of Installation Steps
This section includes the following topics:
• Installation Overview for New TDV Software Customers, page 46
• Installation Overview for Existing Customers Upgrading from a Previous Release, page 47
Installation Overview for New TDV Software Customers
If you are installing TDV Data Virtualization products for the first time, here is an overview of how you would proceed:
1. Review the new features and bug fixes as documented in the TDV and Business Directory Release Notes.
2. Review the information in the following topics:
– Installation Requirements and Support Information, page 11
– About TDV Software Patches, page 46
– Preparing Your Systems for Installation, page 47
3. Install TDV as described in:
– Installing TDV, Studio, and Drivers, page 63
– Silent Mode Installation, page 75
TIBCO® Data Virtualization

Preparing Your Systems for Installation |47
4. Apply the latest TDV Service Pack patch. Instructions for how to install a patch or service pack are subject to change with each service pack. For instructions, see TDV and Business Directory Product Maintenance, page 55.
Installation Overview for Existing Customers Upgrading from a Previous Release
To install a major upgrade for TDV
1. Review the new features and bug fixes as documented in the TDV and Business Directory Release Notes.
2. Review the information in the following topics:
– Installation Requirements and Support Information, page 11
– About TDV Software Patches, page 46
– Preparing Your Systems for Installation, page 47
3. Review and follow the steps in Upgrading from an Earlier TDV Release, page 51.
4. Backup all the data you want to save from the previous version of TDV.
5. Install the current version of TDV and any service packs.
6. Import the data from your previous version of TDV from the backup file.
Preparing Your Systems for Installation
To prepare your systems for installation
1. Review the new features and bug fixes as documented in the TDV and Business Directory Release Notes.
2. Review any README file included in your installation, patch, or service pack bundle.
TIBCO® Data Virtualization

48 | Preparing Your Systems for Installation
3. Review the following requirements:
– Installation Requirements and Support Information, page 11
– You must have administrator privileges on the host computer to install TDV Server.
– You can have multiple JVMs running on the installation machine.
– Server requires a block of nine ports for use by TDV and associated services. The port setting for Web services HTTP communication serves as the “base port”. By default, the base port is 9400, but you can change it after installation using configuration parameters.
4. Make sure that any LIBPATH or LD_LIBRARY_PATH environment variable that you might have does not begin with a "/" slash or end with a ":" colon. Those characters may keep the repository from starting successfully.
5. Review your firewall settings and verify that they allow access to the ports that TDV (Business Directory, Deployment Manager, and TDV) products need to use.
6. To see the current base port setting, choose Configuration from the Administration menu and navigate to Server > Web Services Interface > Communications > HTTP > Port (Current).
Note: Changing the HTTP base port value also changes the value of all derived ports after the next TDV restart. When the base port is changed, you must update all data sources with the new port information.
These example ports are reserved or are derived from the base port:9400 Web services HTTP port9401 JDBC, ODBC, and ADO.NET9402 Web services HTTP SSL9403 JDBC SSL, ODBC SSL, and ADO.NET SSL9404 Default caching database port9405 [reserved]9406 Monitor Daemon9407 Active Cluster - JGroups (when installed)9408 Repository9409 Monitor (when installed)
9500 Business Directory9502 Business Directory (reserved)9508 Business Directory
7. Stop Server if an earlier version is running.
8. Restart databases, especially those used for your caches and repositories.
9. Shut down all other application programs running on the installation machine.
TIBCO® Data Virtualization

Preparing Your Systems for Installation |49
10. Make sure you know the hostname or the IP address of the installation machine.
11. If you are installing on a Linux operating system, see Preparing UNIX for TDV Installation, page 49.
12. If you are installing on a Windows operating system, see Preparing Microsoft Windows for TDV Installation, page 51.
Preparing UNIX for TDV Installation
This section applies only if you are installing TDV on a machine running a supported UNIX operating system. Examples of valid and invalid /etc/hosts file entries are shown in the following table.
Validity /etc/hosts File Entry
Valid 127.0.0.1 localhost IP hostname.domain hostname
Valid 127.0.0.1 localhost localhost.localdomain IP hostname.domain hostname
Valid 127.0.0.1 localhost localhost.localdomain localhost IP hostname.domain hostname
Invalid 127.0.0.1 localhost.localdomain IP hostname.domain hostname
Invalid 127.0.0.1 localhost.localdomain localhost IP hostname.domain hostname
TIBCO® Data Virtualization

50 | Preparing Your Systems for Installation
To prepare your UNIX machine for installation of TDV products
1. Review the new features and bug fixes as documented in the TDV and Business Directory Release Notes.
2. Optionally for AIX, make sure that you have one of the following readline libraries installed:
– readline-6.0-1.aix5.1.ppc.rpm
– readline-6.0-3.aix5.1.ppc.rpm
– readline-6.1-3.aix5.1.ppc.rpm
– readline-6.2-5.aix5.1.ppc.rpm
– readline-6.3-5.aix5.1.ppc.rpm
– readline-6.1-1.aix6.1.ppc.rpm
– readline-6.1-2.aix6.1.ppc.rpm
3. Run the following command to determine if localhost can be resolved on the target installation machine before attempting an installation:
ping localhost
4. If the ping results look like the following, localhost is being resolved and the machine is ready for TDV installation. You can continue with the instructions in other sections.
Linux Ping Example with Valid localhost$ ping localhost PING localhost (127.0.0.1) from 127.0.0.1 : 56(84) bytes of data. 64 bytes from localhost (127.0.0.1): icmp_seq=1 ttl=255 time=0.071 ms 64 bytes from localhost (127.0.0.1): icmp_seq=2 ttl=255 time=0.063 ms 64 bytes from localhost (127.0.0.1): icmp_seq=3 ttl=255 time=0.043 ms --- localhost ping statistics --- 3 packets transmitted, 3 received, 0% loss, time 1999ms rtt min/avg/max/mdev = 0.043/0.059/0.071/0.011 ms
5. If the ping results look like the following, localhost is not correct. You must edit your /etc/hosts file.
Linux Ping Example with Invalid localhost
This example of /etc/hosts files shows where Server is unable to connect to the repository database because of the localhost.localdomain entry preceding the localhost entry (assuming the localhost entry exists at all).
$ ping localhost PING localhost.localdomain (127.0.0.1) from 127.0.0.1 : 56(84) bytes of data. 64 bytes from localhost.localdomain (127.0.0.1): icmp_seq=1 ttl=255 time=0.080 ms 64 bytes from localhost.localdomain (127.0.0.1): icmp_seq=2 ttl=255 time=0.071 ms 64 bytes from localhost.localdomain (127.0.0.1): icmp_seq=3 ttl=255 time=0.044 ms --- localhost.localdomain ping statistics ---
TIBCO® Data Virtualization
Upgrading from an Earlier TDV Release |51
3 packets transmitted, 3 received, 0% loss, time 1998ms rtt min/avg/max/mdev = 0.044/0.065/0.080/0.015 ms
6. Edit the /etc/hosts file to add a localhost entry, directly after the 127.0.0.1 entry, with the following syntax:
127.0.0.1 localhost <optional host name>
7. Save your changes and rerun the ping for localhost.
Preparing Microsoft Windows for TDV Installation
If you are installing TDV on Microsoft Windows Vista Business Edition, Windows 2008, Windows 2012 R2, or Windows 7, you must disable User Account Control before installing TDV Server. Optionally, if you run into permission issues when running the installer, you can use this procedure to attempt to solve the issue.
To disable the User Account Control
1. From the Windows Start menu, select Control Panel > User Accounts > Change User Account Control Settings.
2. Change the setting to Never notify.
Upgrading from an Earlier TDV Release
This section is a guide for customers who are upgrading to TDV from a previous version and want to migrate metadata from that version to the new version.
Note: This process is different from many other software vendor upgrade procedures, which typically modify the existing instance.
The metadata upgrade process requires installing a new TDV instance in parallel with the existing TDV instance, exporting the metadata from the old instance, and importing the old instance’s backup CAR file into the new TDV instance.
TDV recommends that you keep the older TDV instance until you are sure the new installation is stable. However, be aware that:
• If you are running two versions of TDV simultaneously, their port numbers must be different.
• If you are using Active Cluster, all servers in the cluster must be running at the same version and patch level.
• New instances of TDV can use the repository database of older instances.
TIBCO® Data Virtualization

52 | Upgrading from an Earlier TDV Release
Make sure that you have administrator privileges and perform all of the steps below as that user.
To upgrade and migrate your existing installation, follow the steps in these sections
1. Documenting the Existing TDV Instance, page 52
2. Considerations for Upgrading to TDV 8.X, page 53
3. Exporting Metadata from the Existing TDV Instance, page 53
4. Installing the New Version of TDV, page 54
5. Importing Metadata into the New TDV Instance, page 72
6. Verifying a Successful Installation, page 73
Documenting the Existing TDV Instance
Before making a backup of the existing TDV instance, document the key features of the instance. These settings are later applied to the new TDV instance to ensure the consistency of results returned from published resources.
Note: If you cannot upgrade directly from the existing TDV instance to the new version, multiple versions of TDV and multiple export and import processes might be required, so that database schemas remain compatible.
Make note of the settings in the following table.
Setting What to Record
Ports The port numbers for the existing instance, because after the installation of the new server is complete, the port numbers of the new instance might need to be changed.
Authentication mechanism
The authentication mechanism. If LDAP or another dynamic authentication is used, the same settings need to be applied to the new server. This setting determines various authentication mechanisms enabled within Server.
Users/groups The groups created in Server and the users that belong to these groups. If LDAP authentication is used, note the LDAP groups that were imported into Server.
Metadata repository The full path of the repository location and the administrator user ID and password.
TIBCO® Data Virtualization

Upgrading from an Earlier TDV Release |53
Considerations for Upgrading to TDV 8.X
During the export you performed in Exporting Metadata from the Existing TDV Instance, page 53 all of the relevant information from your old repository was captured.
During the import you performed in Importing Metadata into the New TDV Instance, page 72 all of the relevant information from your old repository was transferred into the new TDV PostgreSQL repository database.
Exporting Metadata from the Existing TDV Instance
The first step for upgrade or migration is to export the existing metadata information from the repository. This process writes out a CAR file that includes six files containing metadata, scheduling, settings, and user information.
To run the export
1. Verify that you have administrator privileges.
2. Open a command prompt window.
3. Navigate to <TDV_install_dir>/bin.
4. Perform a full backup with the options that you need:
– Using Studio. See “Using Studio for a Full Server Backup” in the TDV User Guide.
– Using the TDV backup_export utility. For more information, see the TDV Administration Guide.
5. Locate and copy the resulting CAR file to a safe and easily accessible location for use later.
Custom data sources Custom data sources that were introspected and any custom drivers that were used to introspect these sources.
External libraries Any external libraries that were referenced from the instance.
Customized settings, including JRE flags, managed and unmanaged memory
Configuration parameter settings for the existing Server instance. From the Administration menu, select Configuration and check all relevant parameter settings. The new TDV instance’s settings should match the old instance settings if you want similar results and performance.
Setting What to Record
TIBCO® Data Virtualization

54 | Tracking and Documenting Your Install or Upgrade
Installing the New Version of TDV
To install a new TDV when you are upgrading from an earlier release
1. Review the new features and bug fixes as documented in the TDV and Business Directory Release Notes.
2. Install the new version of Server as described in Installing TDV, Studio, and Drivers, page 63 or Silent Mode Installation, page 75.
3. Install the latest versions of all other TDV software that you use.
4. Set up any external libraries, including JDBC drivers, and then shut down and restart the server.
5. Deliver the upgraded drivers (the TDV ODBC driver and the TDV JDBC driver) to the dependent clients.
6. To ensure consistency in results and performance, make the configuration of the new server instance similar to the old instance.
7. Perform the instructions in Importing Metadata into the New TDV Instance, page 72.
Perform the instructions in Verifying a Successful Installation, page 73.
Tracking and Documenting Your Install or Upgrade
We recommend that you document the issues that you encounter during an upgrade and document all customizations made to your new TDV system, to help ensure that your next upgrade goes smoothly.
Before beginning your install, be aware that JRE and PostgreSQL customizations are not preserved through the installation process. After install you must remake the customizations.
TIBCO® Data Virtualization

|55
TDV and Business Directory Product Maintenance
This chapter explains the procedures involved in installing the latest service pack and the precautions that must be taken. If you are installing a base version of the products, you can skip this chapter.
• About TDV 8.x Installation, page 55
• About Hotfix Maintenance, page 55
• About Service Pack Maintenance, page 56
• Applying the Hotfix to TDV Server, Studio, and Business Directory, page 57
• Applying the Service Pack to TDV Server, Studio, and Business Directory, page 57
• Applying the Service Pack or Hotfix to Active Cluster, page 59
• Rolling Back a Service Pack or Hotfix for TDV Server, Studio, and Business Directory, page 60
• Maintaining TDV-to-Client Application Connections, page 62
About TDV 8.x Installation
After TDV 8.x is installed, you can proceed with installation of service packs or hotfixes.
If you are sent a patch to address a specific urgent issue, it is referred to as a hotfix patch. Hotfix patches have been quickly created by our engineering group for timeliness and are not for general use.
About Hotfix Maintenance
Hotfix patches are not automatically carried over through export and import processes during an upgrade or migration. They need to be reapplied if you migrate to another instance that is the same version. Hotfixes are also built for specific versions of TDV, so they should not be used for later versions of TDV than the version for which they were built.
For hotfixes, run the upgrade process for TDV and Business Directory.
TIBCO® Data Virtualization

56 | About Service Pack Maintenance
About Service Pack Maintenance
A service pack is a zipped package of files that fixes known issues and often provides enhanced functionality. All TDV Server, Studio and Business Directory software service packs are cumulative and supersede previously released service packs. A service pack should be applied on all computers where TDV products are installed, keeping them all at the same revision level. Installation of a service pack does not change configuration settings and custom functionality.
It is recommended that you keep your TDV Server and Business Directory Server instances at the same patch level.
Update, Upgrade, Downgrade, and Rollback
The following image is an illustration of a typical Update, Upgrade, Rollback and Downgrade process:
Following are the definitions of the terms used in above illustration:
• <TDV_install_dir>: The installation directory for TDV Server, Studio, or Business Directory, as appropriate.
• Upgrade: To upgrade to a higher release (for example, from 8.0.x to 8.1.x) by running the upgrade script that comes with the service pack.
TIBCO® Data Virtualization

Applying the Hotfix to TDV Server, Studio, and Business Directory |57
• Downgrade: To revert to a previous release (for example, 8.1.0 to 8.0.1, or 8.0.3 to 8.0.1) by running the downgrade script that comes with the service pack. You can downgrade from 8.2.0 to 8.1.1. You cannot downgrade to 8.0.0
• Update: To apply a hotfix within a release (8.0.x) by running an update script, which is included with every hotfix.
• Rollback: To remove a hotfix within a release by running a rollback script, which is included with every hotfix.
In the above illustration, 8 is the major version, X is a minor version (which includes new features), and Y is a service pack (which includes bug fixes).
Upgrade/Downgrade is done between minor versions (8.0.0 to 8.2.0 or 8.2.1).
Update/Rollback is done within same minor version (8.0.0 to 8.0.1 or 8.1.0 to 8.1.2).
Applying the Hotfix to TDV Server, Studio, and Business Directory
The latest hotfix, requires a clean update of your TDV Server and Business Directory environment. The optimal way to achieve the clean environment is to apply the hotfix as if it was a Service Pack.
To apply a hotfix
1. Follow the instructions in Applying the Service Pack to TDV Server, Studio, and Business Directory, page 57.
Applying the Service Pack to TDV Server, Studio, and Business
Directory
Important bug fixes and additional functionality are added to TDV with each service pack.
Service packs typically involve careful ordering of procedural steps to make sure appropriate scripts are generated and available, and backup files saved.
Notes:
• Customers using advanced data source adapters that require OAuth need to first run TDV as a stand-alone server (no Monitor Daemon), set up OAuth once, and then run TDV with the Monitor Daemon.
TIBCO® Data Virtualization

58 | Applying the Service Pack to TDV Server, Studio, and Business Directory
• Sometimes when running Manager after a service pack install an error message pops up (Unable to finish loading...). You can safely ignore this message, close, and reopen Manager.
To apply a service pack
1. Optionally, perform a full TDV and Business Directory backup. For details about backup export, see the TDV Administration Guide or the Business Directory Guide.
2. If installing on Windows, be sure to use Run as Administrator.
3. For Windows, make sure to close any open windows to the repository/jre folder.
4. If your TDV products are running, stop them, including all processes and databases used as repositories or caches.
5. Copy the service pack zip file to <TDV_install_dir>.
6. Unzip the file.
7. When asked whether to replace the existing files, reply Yes.
If you are not asked whether to replace files, the patch is being extracted to some directory other than <TDV_install_dir>. The patch must be extracted to the appropriate installation directory, and must overwrite files in that directory.
8. Run one or more of these scripts to upgrade your products:
TDV Server and Business Directory servers are restarted when the script finishes running. You can reopen the client applications, such as Studio, after the script finishes running.
9. To configure the dependency from your TDV Server to the default database cache:
a. Stop the TDV Server. For example:composite.bat monitor stop
b. Uninstall the monitor daemon. For example:
Product Directory Script
TDV Studio bin studio_upgrade_patch.bat
TDV Server bin cis_upgrade_patch.<sh|bat>
TDV Business Directory bin bd_upgrade_patch.<sh|bat>
TIBCO® Data Virtualization

Applying the Service Pack or Hotfix to Active Cluster |59
composite.bat monitor uninstall
c. Install the monitor daemon. For example:composite.bat monitor install
Applying the Service Pack or Hotfix to Active Cluster
When updating Active Cluster, it is critical that clusterid remain unchanged. Changing it can adversely affect cached data.
These instructions are guidelines developed from testing with a two node Active Cluster environment.
To upgrade with scheduled system downtime
1. Determine and note the clusterid, so that it can remain unchanged.
2. Make sure that the cluster is in sync. That is, make sure both nodes are in the cluster and are functional.
3. Disable any cache refreshes on both of the nodes.
4. Configure the load balancer to stop sending traffic to node 1.
Shutting down node 1 would cause in-flight requests to fail.
5. Remove node 1 from the cluster.
6. If your TDV products are running, stop them, including all processes and databases used as repositories or caches.
7. Apply the service pack or hot fix to node1.
8. Start up node 1, but do not re-join the cluster.
9. Configure the load balancer to send traffic to node 1 instead of node 2.
10. Remove node 2 from the cluster.
11. Apply the service pack or hot fix to node 2.
12. Join node 1 and node 2 to the cluster.
13. Enable cache refreshes on both of the nodes.
14. Verify the cluster status.
TIBCO® Data Virtualization

60 | Rolling Back a Service Pack or Hotfix for TDV Server, Studio, and Business Directory
Rolling Back a Service Pack or Hotfix for TDV Server, Studio, and
Business Directory
If you installed a service pack or hotfix and you later decide that you want to revert to the previous installation, you can roll back the service pack changes.
Precautions
It is important to understand the requirements and limitations of rollback procedures:
• You can use this process to roll back to an earlier release (for example, 8.2 to 8.1). But, you cannot use this process to roll back to a version prior to the current version (for example, 8.x to 7.x).
• The rollback scripts are only for rolling back to a previous patch. Rollback is not guaranteed to work if performed with an instance that only has one 8.0.1 or later patch or hotfix applied, in an attempt to roll back to the base 8.0 GA version. If you do this, starting the TDV server may result in error messages such as these:
– In the cs_repository.log: “Could not receive data from client: No connection could be made because the target machine actively refused it.”
– In the cs_monitor.log: “MONITOR STOP. The metadata repository was created with a newer version of the server. The server cannot continue.”
• To recover from an attempted rollback to TDV Server 8.0 GA, you need to stop TDV Server or Business Directory, reapply the patch or hotfix, and then restart the application. If you have already run the update_patch script, you do not need to run it again. (This nullifies the rollback and puts you back in the patched release level.)
• Another way to recover from an attempted rollback to TDV Server 8.0 GA is to reinstall TDV Server 8.0 GA from scratch and re-import the backup export file you saved before applying the patch.
To roll back or downgrade a service pack or hotfix for TDV Server, Studio, or Business Directory
1. If downgrading on Windows, any open windows to the repository/jre folder must be closed.
2. If your TDV products are running, stop them, including all processes and databases used as repositories or caches.
TIBCO® Data Virtualization

Rolling Back a Service Pack or Hotfix for TDV Server, Studio, and Business Directory |61
3. Stop the Monitor Daemon:composite.<bat|sh> monitor stop
You can check for a “Bye” message in cs_server.log.
4. Stop the monitor, TDV Server and repository database.
To complete the rollback for the TDV non-repository components
5. Locate and run the rollback script. For example:
6. Run the following downgrade script:
Note: If you are applying a service pack or a hotfix within the same release (8.0.1, 8.0.2, or 8.0.5), or moving back to a release that does not require an upgrade (8.0.2), you perform a rollback, but not a downgrade. For example, you would need a rollback but not a downgrade if you were moving from 8.0.5 hotfix 12 to 8.0.5 service pack10.
7. Navigate up one directory level and reapply the last service pack or hotfix. After downgrade it is necessary to apply the downgraded version of patch/hotfix before starting the server.
8. Start the Monitor Daemon.For TDV: composite.<bat|sh> monitor startFor BD: bd.<bat|sh> monitor start
In the server.log, verify that the version is the target version you intended.
9. Import backup CAR files as needed.
10. Optionally, redefine all your VCS roots and connections.
Rollback Type Command
Service Pack rollback
./rollback_TIB_tdv_<product>_<version>_all.<bat|sh>
The <product> string is server, studio, or bd (Business Directory). For example:./rollback_TIB_tdv_server_<product><version>_all.bat
Hotfix rollback ./rollback_TIB_tdv_<product><version>_HF-002_all.<bat|sh>
Downgrade Type Command
Service Pack downgrade
<product>_downgrade_patch.<bat|sh>
The <product> is cis, studio, or bd (Business Directory). For example:cis_downgrade_patch.sh
TIBCO® Data Virtualization
62 | Maintaining TDV-to-Client Application Connections
Maintaining TDV-to-Client Application Connections
This section includes instructions for how to update connections between TDV Server and your client applications in the following sections:
• Updating an ODBC Client Application, page 62
• Updating a JDBC Client Application, page 62
Updating an ODBC Client Application
To patch ODBC client applications
1. Install the ODBC patch as you would for a Studio installation, but apply the ODBC patch only to where you installed a TDV ODBC client:
– 32-bit driver: <TDV_install_dir>/apps/odbc
– 64-bit driver: <TDV_install_dir>/apps/odbc64
2. See the TDV Client Interfaces Guide for more information.
To patch ODBC client users on Windows 7
1. Locate your Windows 7 DSN entry file.
2. Recreate any custom system DSNs, using DSN tools.
3. See the TDV Client Interfaces Guide for more information.
Updating a JDBC Client Application
To patch JDBC client applications
1. If you only need to obtain the updated TDV JDBC driver for your JDBC client, you can do one of the following:
– Obtain the updated csjdbc.jar file from the server's <TDV_install_dir>/apps/jdbc/lib directory after the Studio patch is installed.
– Extract any one of the csjdbc.jar files directly from the patch zip file.
2. See the TDV Client Interfaces Guide for more information.
TIBCO® Data Virtualization

|63
Installing TDV, Studio, and Drivers
This topic describes how to install TDV on both Windows and UNIX computers and then verify that the installation was successful.
Topics include:
• Installing on Windows, page 63
• Installing on UNIX, page 66
• Installing on Amazon Web Service, page 71
• Applying a TDV Patch or Service Pack, page 71
• About the Installed TDV Services, page 72
• Verifying a Successful Installation, page 73
• Tips from an Expert if the Server Does Not Start, page 73
• Where to Go After Installation, page 74
Installing on Windows
This installation process is used to install one or more components of TDV. You install TDV for Windows using the InstallAnywhere installer wizard.
Note: If you installed TDV on Microsoft Windows Vista Business Edition, Windows 2008, or Windows 7, see Preparing Microsoft Windows for TDV Installation, page 51.
• Running the TDV Server Installer, page 63
• Running the Studio Installer, page 65
• Installing the Drivers, page 66
Running the TDV Server Installer
This installer installs the following components:
• TDV Server • Deployment Manager • Repository
• Java • Monitor • Discovery
TIBCO® Data Virtualization
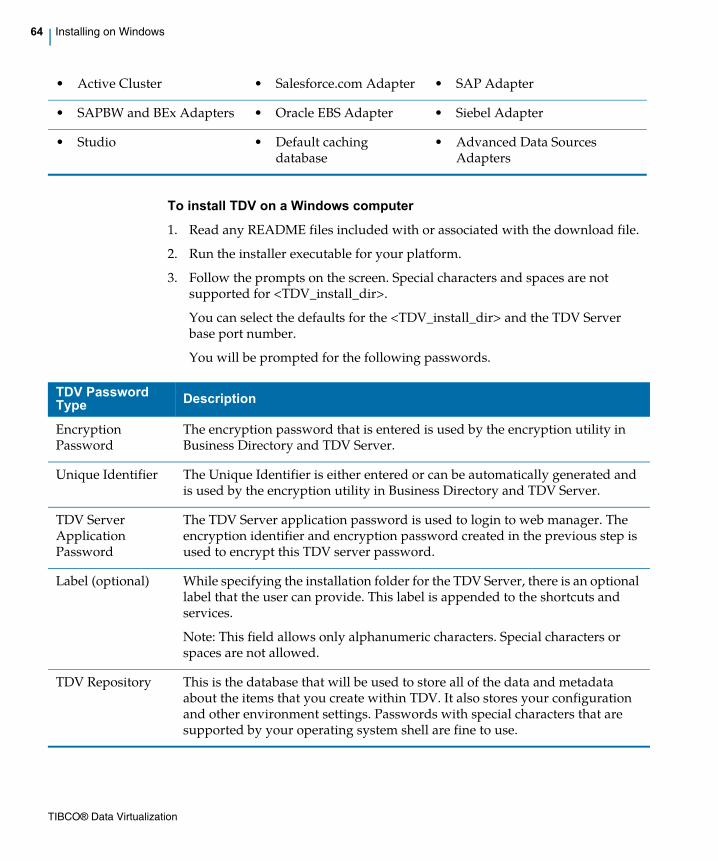
64 | Installing on Windows
To install TDV on a Windows computer
1. Read any README files included with or associated with the download file.
2. Run the installer executable for your platform.
3. Follow the prompts on the screen. Special characters and spaces are not supported for <TDV_install_dir>.
You can select the defaults for the <TDV_install_dir> and the TDV Server base port number.
You will be prompted for the following passwords.
• Active Cluster • Salesforce.com Adapter • SAP Adapter
• SAPBW and BEx Adapters • Oracle EBS Adapter • Siebel Adapter
• Studio • Default caching database
• Advanced Data Sources Adapters
TDV Password Type Description
Encryption Password
The encryption password that is entered is used by the encryption utility in Business Directory and TDV Server.
Unique Identifier The Unique Identifier is either entered or can be automatically generated and is used by the encryption utility in Business Directory and TDV Server.
TDV Server Application Password
The TDV Server application password is used to login to web manager. The encryption identifier and encryption password created in the previous step is used to encrypt this TDV server password.
Label (optional) While specifying the installation folder for the TDV Server, there is an optional label that the user can provide. This label is appended to the shortcuts and services.
Note: This field allows only alphanumeric characters. Special characters or spaces are not allowed.
TDV Repository This is the database that will be used to store all of the data and metadata about the items that you create within TDV. It also stores your configuration and other environment settings. Passwords with special characters that are supported by your operating system shell are fine to use.
TIBCO® Data Virtualization

Installing on Windows |65
The installation process might take a few minutes, during which progress windows are displayed.
4. Select a password for the default caching database.
5. Finish to exit the installer when the installation is completed.
The Server starts automatically at the completion of the installation process. You can also start and stop the services as described in the TDV Administration Guide.
Install and uninstall logs are called bitrock_installer_<number>.log while the installer is running. After installation is complete, the logs are named <product>_install or <product>_uninstall.log. The log files can be found in the following directories:
6. Optionally, download and install the latest TDV patch as described in TDV and Business Directory Release Notes.
Running the Studio Installer
This installer installs the following components:
• Studio
• Java
This installer can be run on each Windows machine that needs access to the TDV Server.
Default Caching Database
This is the database that will be created for you to hold data that you want to cache using the default caching method. There are multiple caching options. You might want to note the password for future use of this database.
TDV Password Type Description
Platform Default Location of Log Files
Unix /tmp
Windows 7, Windows 8, Windows 10, Windows Server 2008, Windows Server 2012, Windows Server 2016
C:\Users\<username>\AppData\Local\Temp
TIBCO® Data Virtualization

66 | Installing on UNIX
To install Studio on a Windows computer
1. Read any README files included with or associated with the download file.
2. Run the installer executable for Studio.
3. Follow the prompts on the screen.
4. When the installation is complete, click Finish to exit the installation program.
Studio automatically runs and prompts you for login information.
Installing the Drivers
This client distribution (driver zip) file includes the following components:
• ODBC
• ADO.NET
• JDBC
This zip file can be unpacked on each machine that has client application that needs access to the TDV Server.
To install the drivers distributed with TDV
1. Read any README files included with or associated with the download file.
2. Locate and extract the drivers zip file.
3. When installing the ODBC Win 64-bit driver on Windows 10, make sure to select Run as Administrator. Select the client EXE file, right click and select Run as Administrator. When prompted, select Yes and allow the installation to run to completion.
4. Follow the instructions in the TDV Administration Guide for details on how to complete configuration of each driver.
5. When the installation is complete, click Done to exit the installation program.
Installing on UNIX
Your TDV Server can be installed on a UNIX machine. Studio is not available for UNIX and must be installed on a Windows machine. You can then connect the Studio client to the Server on the UNIX machine.
• Installing TDV Server on UNIX, page 67
• Installing Drivers on UNIX, page 69
TIBCO® Data Virtualization
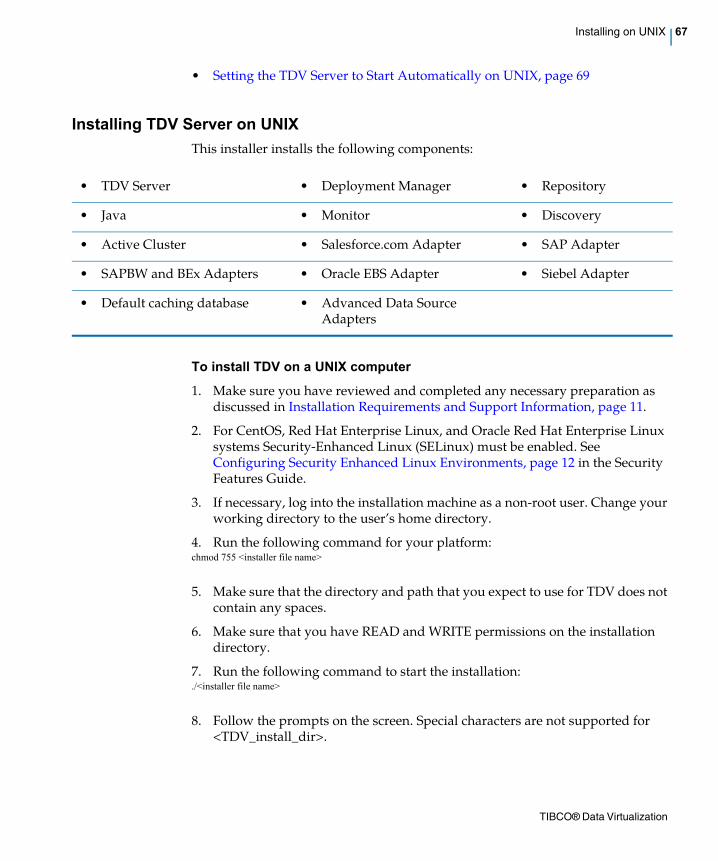
Installing on UNIX |67
• Setting the TDV Server to Start Automatically on UNIX, page 69
Installing TDV Server on UNIX
This installer installs the following components:
To install TDV on a UNIX computer
1. Make sure you have reviewed and completed any necessary preparation as discussed in Installation Requirements and Support Information, page 11.
2. For CentOS, Red Hat Enterprise Linux, and Oracle Red Hat Enterprise Linux systems Security-Enhanced Linux (SELinux) must be enabled. See Configuring Security Enhanced Linux Environments, page 12 in the Security Features Guide.
3. If necessary, log into the installation machine as a non-root user. Change your working directory to the user’s home directory.
4. Run the following command for your platform:chmod 755 <installer file name>
5. Make sure that the directory and path that you expect to use for TDV does not contain any spaces.
6. Make sure that you have READ and WRITE permissions on the installation directory.
7. Run the following command to start the installation:./<installer file name>
8. Follow the prompts on the screen. Special characters are not supported for <TDV_install_dir>.
• TDV Server • Deployment Manager • Repository
• Java • Monitor • Discovery
• Active Cluster • Salesforce.com Adapter • SAP Adapter
• SAPBW and BEx Adapters • Oracle EBS Adapter • Siebel Adapter
• Default caching database • Advanced Data Source Adapters
TIBCO® Data Virtualization

68 | Installing on UNIX
You can select the defaults for the <TDV_install_dir> and the TDV Server base port number. The value you use for <TDV_install_dir> cannot contain a space.
You will be prompted for the following passwords...
9. Finish to exit the installer when the installation is completed.
The Server starts automatically at the completion of the installation process. For information about automatically restarting TDV, see Setting the TDV Server to Start Automatically on UNIX, page 69. You can also start and stop Server as described in About the Installed TDV Services, page 72 and the TDV Administration Guide.
Install and uninstall logs are called bitrock_installer_<number>.log while the installer is running. After installation is complete, the logs are named <product>_install or <product>_uninstall.log. The log files can be found in the following directories:
Password Type Description
Encryption password
The encryption password that is entered is used by the encryption utility in Business Directory and TDV Server.
Unique Identifier
The Unique Identifier is either entered or can be automatically generated and is used by the encryption utility in Business Directory and TDV Server.
TDV Server Application Password
The TDV Server application password is used to login to web manager. The encryption identifier and encryption password created in the previous step is used to encrypt this TDV server password.
TDV Repository This is the database that will be used to store all of the data and metadata about the items that you create within TDV. It also stored your configuration and other environment settings. Passwords with special characters that are supported by your operating system shell are fine to use.
Default Caching Database
This is the database that will be created for you to hold data that you want to cache using the default caching method. There are multiple caching options. You might want to note the password for future use of this database.
Platform Default Location of Log Files
Unix /tmp
Windows 7, Windows 8, Windows 10, Windows Server 2008, Windows Server 2012, Windows Server 2016
C:\Users\<username>\AppData\Local\Temp
TIBCO® Data Virtualization

Installing on UNIX |69
10. If installing TDV on AIX, make sure that MAX_MEMORY >1500MB is in the <TDV_install_dir>/conf/server/server.properties.
The server.properties file is processed every time the server is restarted from composite.sh monitor.
11. Optionally, download and install the latest TDV patch as described in TDV and Business Directory Release Notes.
Installing Drivers on UNIX
These files contain the following driver components:
• ODBC
• ADO.NET
• JDBC
To install the drivers
1. Make sure you have reviewed and completed any necessary preparation as discussed in Installation Requirements and Support Information, page 11.
2. If necessary, log into the installation machine as a non-root user. Change your working directory to the user’s home directory.
3. Make sure that you have READ and WRITE permissions on the directory for which you want to unzip the contents of the file.
4. Locate and extract the drivers zip file.
5. Follow the instructions in the TDV Administration Guide for details on how to complete configuration of each driver.
6. When the installation is complete, click Done to exit the installation program.
Setting the TDV Server to Start Automatically on UNIX
If at any time after installing the software, you restart the UNIX installation machine, Server and the metadata repository do NOT start automatically (unlike when they start automatically after a successful installation of the software).
To configure the TDV service files cis.repository and cis.server
1. Log into the installation machine as root.
2. Change the working directory to <TDV_install_dir>/bin.
3. Run the following command as the root user:
TIBCO® Data Virtualization

70 | Installing on UNIX
cis_install_services.sh
This command prompts for a username, and other details to install and configure the service files cis.repository and cis.server.
4. Enter the name of the user to start TDV (not the root user) and the other information requested.
The script then installs cis.repository and cis.server into an appropriate location on the installation machine and configures them. The location will be printed on your screen when the configuration is successful, so make note of this location, because you need this to perform verification of the service files.
Note: Do not run the cis.repository or cis.server scripts in the <TDV_install_dir>/bin/ directory. These are template files used by cis_install_services.sh only and are not meant to be run.
Running cis_install_services.sh does not interrupt any repository or server processes that are running, but prepares the machine for automatically starting those processes during restart of the UNIX-based computer.
5. Run the following commands as the root user:cd <init_directory>chmod 550 cis.repositorychmod 550 cis.serverchmod 550 cis.cache
The value of init_directory depends on the operating system:
– Linux: /etc/rc.d/init.d or /etc/rc.d
– AIX: /etc/rc.d/init.d
To verify the TDV service files configuration
1. Go to the location noted previously from running cis_install_services.sh.
2. Enter these commands:./cis.repository restart ./cis.server restart./cis.cache restart
Now if the machine is rebooted, the monitor, server, and repository processes should automatically start once the machine is ready to go.
TIBCO® Data Virtualization

Installing on Amazon Web Service |71
Installing on Amazon Web Service
The TDV Server is supported on Windows and UNIX. Studio requires a Windows-based OS to operate.
To install TDV on a Windows-based AWS
1. Install and configure a supported version of Windows for AWS.
2. Select and install the AIM for TDV.
3. Follow the install instructions in Running the TDV Server Installer, page 63.
4. Follow the install instructions in Running the Studio Installer, page 65.
5. Follow the instructions in the TDV Administration Guide to register you TDV licenses.
To install TDV Server on a UNIX-based AWS
1. Install and configure a supported version of Linux for AWS.
2. Select and install the AIM for TDV Server.
3. Follow the install instructions in Installing on UNIX, page 66.
4. Locate the TDV Studio installer that came bundled with your AIM.
5. Move the installer file to a Windows-based AWS or another Windows machine.
6. Follow the install instructions in Running the Studio Installer, page 65.
7. Connect to the TDV Server on your Linux AWS.
8. Follow the instructions in the TDV Administration Guide to register you TDV licenses.
Applying a TDV Patch or Service Pack
After installation of TDV, you might want to apply the latest TDV patch which might be a later version than what you just installed. It is recommended that you install a patch on all computers running TDV products to ensure complete compatibility and minimize unforeseen problems.
Note: Instructions for how to install a patch or service pack are subject to change with each service pack. For instructions, see the TDV and Business Directory Release Notes.
TIBCO® Data Virtualization

72 | About the Installed TDV Services
About the Installed TDV Services
The installation process installs the following services which are TDV processes that run in the background:
• server–the TDV Server process.
• repository–the database repository used by TDV.
• monitor–a process that monitors the TDV Server and ensures that it is always running.
• cache–a process that runs the default caching database.
All processes must be running for TDV to function properly.
For more information on configuring and starting TDV, see the TDV Administration Guide.
Importing Metadata into the New TDV Instance
If your are upgrading your version of TDV from an earlier version and you have completed the instructions in Exporting Metadata from the Existing TDV Instance, page 53, then follow the instructions in this section. If you are performing a new installation, you can skip these instructions.
After the new TDV instance is successfully installed, the metadata from old TDV instance needs to be imported into the new instance. After the import is successfully completed, settings such as JRE configurations, managed memory setting and ports can be updated on the new instance.
To run the import
1. Verify that you have administrator privileges.
2. Locate the CAR file that you produced from Exporting Metadata from the Existing TDV Instance, page 53.
3. Perform a full backup import with the options that you need:
– Using the Studio Import dialog window. For more information, see the TDV User Guide.
– Using the TDV backup_import utility. For more information, see the TDV Administration Guide.
4. Validate that the TDV resources or other settings are as you expect in the new version of Studio.
TIBCO® Data Virtualization

Verifying a Successful Installation |73
Verifying a Successful Installation
To verify that your installation of the TDV software was successful, follow the steps in this section.
To verify a successful installation
1. Start Studio. Follow instructions in the TDV Getting Started Guide or in the TDV User Guide.
2. If you have just completed an upgrade from one version of TDV to a new one, then we suggest that you complete these instructions:
a. Determine a set of tests that will touch all published resources and all introspected data sources, and then apply the tests against:
– The existing instance of TDV, as a sanity check.
– The new instance of TDV, to ensure the same results are produced.
b. Configure and use the PubTest tool to test all your published resources.
The PubTest program can be configured to test all published resources using JDBC, ODBC, and Web services. Additional configuration might be required to test the ODBC and Web services. Starting with TDV 4.0, an end-to-end testing program referred to as PubTest (pubtest.java) is included with the TDV installation. This program is located in the <TDV_install_dir>\apps\jdbc directory. A PubTest.doc file in this directory provides additional documentation about using this tool.
Tips from an Expert if the Server Does Not Start
If the server does not start and the log files indicate that the cause is not enough heap memory, you can modify the default max memory setting.
The server.properties file is processed every time the server is restarted from composite.sh monitor.
TIBCO® Data Virtualization

74 | Where to Go After Installation
To modify the max memory setting
1. Stop the server.
2. Increase the MAX_MEMORY value in the one of the following locations depending on your server:
– <TDV_install_dir>/conf/server/server.properties
– <BD_install_dir>/bd/conf/server/server.properties
3. If adjusting the heap size with MAX_MEMORY is not enough to allow large CAR files to load, you can try setting the following Studio configuration parameters back to their default values:
– Default Bytes to Fetch–Default value is 100.
– Default Rows to Fetch–Default value is 1000.
4. From the process manager for your platform, shut down and restart all TDV processes (such as the TDV Server and monitor).
Where to Go After Installation
For your next steps, particularly if you are new to TDV products, see the information in the following PDFs or on-line help. You can access the PDFs at <TDV_install_dir>/docs, or from within Studio at Help > Online Help.
Book Title Description
Getting Started Guide Contains a simple example to get you familiar with the Studio application.
Administration Guide
Contains procedures for:
• Completing and configuring your TDV installation
• Licensing TDV software
• Starting and stopping TDV
• Finding and interpreting log files
• Setting up security
• Setting up JDBC, ODBC, and other drivers
User Guide Explains Studio features and how to create and publish resources
Client Interfaces Guide
Contains instructions, guidelines, and examples of how to access TDV resources through various client applications.
TIBCO® Data Virtualization

|75
Silent Mode Installation
Installations can be run without manual interactive interfaces (i.e. graphical user interface or console based). There are two ways to run the installer in silent mode: 1) using a property file with key/value pairs or 2) command line with key/value pairs.
Topics covered in this chapter include:
• Creating the Options File for a Silent Installation, page 75
• Running the Installer in Silent Mode, page 77
Creating the Options File for a Silent Installation
Optionally, when running a silent mode installation you can use an options file that has specific key-value pairs.
To create the options file for a silent install
1. In a text editor, create a options file similar to the following:
Business Directory
# Modify install directory and all port number references#mode=unattendedinstall_directory=/opt/TIBCO/BDserver_port=9500repository_admin_password=passwordbd_admin_password=passwordencryption_password=passwordunique_Id=58c9454e883ff5135f4bc55589820c36
-----------------------------------------
TDV Server
# Modify install directory and all port number references#mode=unattendedinstall_directory=/opt/TIBCO/TDVserver_port=9400repository_admin_password=passworddatabase_admin_password=passwordserver_admin_password=passwordencryption_password=passwordunique_Id=58c9454e883ff5135f4bc55589820c36
------------------------------------------
TIBCO® Data Virtualization

76 | Silent Mode Installation
2. Edit the values within the file for your installation.
The following table describes the variables in the options file:
3. Save the file as <installer.properties>.
Variable Description and Value
INSTALL_DIRECTORY Directory in which to install the software referred to as <TDV_Installdir>.
The value can be empty, or the directory can be non-existent. On UNIX, there can be no space in the directory name. Examples:install_directory=/opt/TIBCO/TDVinstall_directory=C:\Program Files\TIBCO\Studioinstall_directory=/opt/TIBCO/BD
REPOSITORY_ADMIN_PASSWORD
Password to access the repository database, which is automatically installed during the installation. PostgreSQL requires that the password you choose cannot contain a # or $.
SERVER_PORT Defaults to 9400 for TDV and 9500 for Business Directory.
DATABASE_ADMIN_PASSWORD The password used to access the default caching database, which is automatically created during installation. PostgreSQL requires that the password you choose cannot contain a # or $.
SERVER_ADMIN_PASSWORD The password used to login to the web manager and the client applications.
ENCRYPTION_PASSWORD This Encryption password is used by the encryption utility in Business Directory and Server to encrypt the password
UNIQUE_ID The Unique Identifier is also used by the encryption utility.
TIBCO® Data Virtualization

Silent Mode Installation |77
Running the Installer in Silent Mode
Running the installer via command line options
1. Option file method:
a. Create the options file. See Creating the Options File for a Silent Installation, page 75.
b. Run the installer with the following option: <instFile>.exe/bin --optionfile <OPTION_FILE>
2. Command line (no options file) method - See examples below:
Component Command Options
TDV Server • Windows Installation with all input parameters:
<instFILE>.exe --mode unattended --install_directory <TDV_Installdir> --server_port "6400" --server _admin_password "admin1" --encryption_password “admin1” --unique_id "admin1" --repository_admin_password "password" --database_admin_password "password"
Note: database_admin_password is only valid for TDV Server. BD does not use this variable.
• Windows Installation with only the required parameters:
<instFILE>.exe --mode unattended --server _admin_password "admin1" --encryption_password “admin1” --unique_id "admin1" --repository_admin_password "password" --database_admin_password "password"
This command installs TDV Server in the default directory C:\Program Files\TIBCO\TDV Server <version> on default port 9400.
• Linux/AIX Installation with all input parameters:
<instFILE>.bin --mode unattended --install_directory <TDV_Installdir> --server_port "6400" --server _admin_password "admin1" --encryption_password “admin1” --unique_id "admin1" --repository_admin_password "password" --database_admin_password "password"
• Linux/AIX Installation with only the required parameters:
<instFILE>.bin --mode unattended --server _admin_password "admin1" --encryption_password “admin1” --unique_id "admin1" --repository_admin_password "password" --database_admin_password "password"
This command installs TDV Server in the default directory /opt/TIBCO/TDV_Server_<version> on default port 9400.
Note: User should have rwx permissions on /opt
TIBCO® Data Virtualization
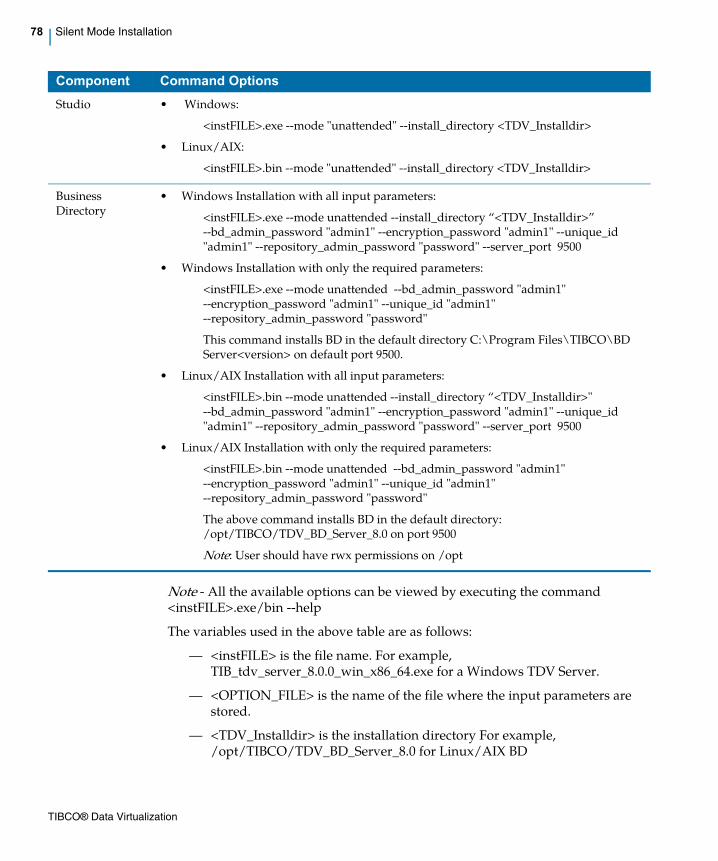
78 | Silent Mode Installation
Note - All the available options can be viewed by executing the command <instFILE>.exe/bin --help
The variables used in the above table are as follows:
– <instFILE> is the file name. For example, TIB_tdv_server_8.0.0_win_x86_64.exe for a Windows TDV Server.
– <OPTION_FILE> is the name of the file where the input parameters are stored.
– <TDV_Installdir> is the installation directory For example, /opt/TIBCO/TDV_BD_Server_8.0 for Linux/AIX BD
Studio • Windows:
<instFILE>.exe --mode "unattended" --install_directory <TDV_Installdir>
• Linux/AIX:
<instFILE>.bin --mode "unattended" --install_directory <TDV_Installdir>
Business Directory
• Windows Installation with all input parameters:
<instFILE>.exe --mode unattended --install_directory “<TDV_Installdir>” --bd_admin_password "admin1" --encryption_password "admin1" --unique_id "admin1" --repository_admin_password "password" --server_port 9500
• Windows Installation with only the required parameters:
<instFILE>.exe --mode unattended --bd_admin_password "admin1" --encryption_password "admin1" --unique_id "admin1" --repository_admin_password "password"
This command installs BD in the default directory C:\Program Files\TIBCO\BD Server<version> on default port 9500.
• Linux/AIX Installation with all input parameters:
<instFILE>.bin --mode unattended --install_directory “<TDV_Installdir>" --bd_admin_password "admin1" --encryption_password "admin1" --unique_id "admin1" --repository_admin_password "password" --server_port 9500
• Linux/AIX Installation with only the required parameters:
<instFILE>.bin --mode unattended --bd_admin_password "admin1" --encryption_password "admin1" --unique_id "admin1" --repository_admin_password "password"
The above command installs BD in the default directory: /opt/TIBCO/TDV_BD_Server_8.0 on port 9500
Note: User should have rwx permissions on /opt
Component Command Options
TIBCO® Data Virtualization

Silent Mode Installation |79
3. Verify that the installation was successful by looking for the TDV installation directory. You can also view success or failure messages in:
– %HOMEDRIVE%\BD_install.log (Windows) or /tmp/BD_install.log (UNIX)
– %HOMEDRIVE%\TDV_install.log (Windows) or /tmp/TDV_install.log (UNIX)
TIBCO® Data Virtualization

80 | Silent Mode Installation
TIBCO® Data Virtualization
|81
Installing Optional TDV Products
This topic describes the installation of optional TDV products. These topics are covered:
• Version Support, page 81
• Installation Requirements, page 81
• Installing an Optional TDV Product, page 83
• Installing the TDV Client Drivers that are Distributed with TDV, page 83
• Importing Resources Defined in an Earlier Release, page 84
• Manage Active Cluster Security, page 84
Version Support
TDV supports the versions listed in Supported Add-On Adapters, page 29 and Supported Advanced Data Source Adapters, page 29.
Installation Requirements
• Add-On Adapter Installation Requirements, page 81
• Active Cluster Installation Requirements, page 82
Add-On Adapter Installation Requirements
Individual adapters have these requirements:
• SAP BW BEx Adapter should be installed on a separate machine from the SAP GUI, to avoid possible conflict between JCo versions. See Installing the SAP Java Connector Library, in the TDV Adapter Guide.
• For Salesforce.com and SAP adapter installations, disable User Account Control.
• SAP BW can cause TDV errors similar to:com.compositesw.cdms.webapi.WebapiException: Error [sapbw-2900000]: BAPI_ODSO_READ_DATA_UC failed: Key figure 0CMPYPTAMT unknown in InfoProvider 0BP_REL
TIBCO® Data Virtualization

82 | Installation Requirements
To avoid this error, locate and install the patch listed in SAP “Note 1243987 - Extraction from DataStore object fails.” Install this patch, and use the program SAP_RSADMIN_MAINTAIN to set the parameter RSDRI_DS_NEW in the table RSADMIN to ' ' (empty or space).
Note: To upgrade from an earlier version of an adapter, install the new version and then see Importing Resources Defined in an Earlier Release, page 84.
Active Cluster Installation Requirements
This section lists the software and hardware requirements for Active Cluster. All data sources and databases that are supported with this release of TDV are supported by Active Cluster.
• TDV File Customizations, page 82
• Digital Certificates, page 82
• Supported Platforms, page 83
• Disk Space and Physical Memory, page 83
• Load Balancer Requirements, page 83
TDV File Customizations
The data source capability files and LDAP properties file are not automatically synchronized with other machines in the cluster. Therefore, if you customized the ldap.properties file or data source capability files on a TDV Server that will be in a cluster, you need to copy these files manually to all computers that are members of the cluster.
For example, if you modified the external domain configuration file and the data source capability file for DB2, you would need to copy the following files to all computers that are or will become members of the cluster:<TDV_install_dir>/conf/server/ldap.properties <TDV_install_dir>/apps/server/apps/dlm/cis_ds_db2/conf/db2.capabilities
Digital Certificates
A digital certificate ensures the identity of a particular computer and the data it transmits to another computer. Every server in an Active Cluster must have a digital certificate set up on the computer. A trial digital certificate is shipped with TDV Server but must be changed to ensure full security. See Updating the Digital Certificate to Secure Cluster Communication, page 84 for how to do this.
TIBCO® Data Virtualization

Installing an Optional TDV Product |83
Supported Platforms
See Installation Requirements and Support Information, page 11 for a list of the platforms and protocols supported by Active Cluster.
Disk Space and Physical Memory
Active Cluster requires an additional 4 MB of disk space.
Load Balancer Requirements
Although a load balancer is not required to be used with Active Cluster, it is highly recommended to achieve the maximum benefits of using Active Cluster.
Installing an Optional TDV Product
All optional TDV products are installed for you when you perform the TDV Server install.
Before you create or join a cluster, make sure that all cluster members use the same level of encryption.
Installing the TDV Client Drivers that are Distributed with TDV
This client distribution (driver zip) file includes the following components:
• ODBC
• ADO.NET
• JDBC
This zip file can be unpacked on each machine that has client application that needs access to the TDV Server.
To install the drivers distributed with TDV
1. Read any README files included with or associated with the download file.
2. Locate and extract the drivers zip file.
3. When installing the ODBC Win 64-bit driver on Windows 10, make sure to select Run as Administrator. Select the client EXE file, right click and select Run as Administrator. When prompted, select Yes and allow the installation to run to completion.
TIBCO® Data Virtualization

84 | Importing Resources Defined in an Earlier Release
4. Follow the instructions in the TDV Administration Guide for details on how to complete configuration of each driver.
5. When the installation is complete, click Done to exit the installation program.
Importing Resources Defined in an Earlier Release
If you used a previous release of the adapter and defined resources, you can use them with this release. Follow the instructions for exporting and importing the resources in the TDV User Guide.
Manage Active Cluster Security
Users who create and manage an Active Cluster must have administrative privileges. SSL is used for inter-node communications and each server in an Active Cluster must have a valid digital certificate for authentication.
All cluster members must use the same level of encryption.
• Updating the Digital Certificate to Secure Cluster Communication, page 84
• Set Access Privileges, page 85
Updating the Digital Certificate to Secure Cluster Communication
Every TDV Server ships with a trial digital certificate so SSL works right out of the box. However, the security is poor. To secure cluster communication, you must update the digital certificate on each TDV Server node in the cluster.
Updating the digital certificate entails getting a signed digital certificate from a Certificate Authority (CA) and installing it in the keystore on each TDV Server. CAs are independent vendors (such as VeriSign) that have instructions on their websites for how to generate public key/private key pairs that accompany certificate requests. The CA then returns the digital certificate back to you. After you have this information, you need to install the digital certificate on the TDV Server.
To install a digital certificate on TDV Server
1. Open Studio, and select Administration > Launch Manager (Web) from the menu to open the Manager Web interface.
2. Click the CONFIGURATION tab and select SSL.
TIBCO® Data Virtualization

Manage Active Cluster Security |85
Manager displays the SSL Management page.
3. Enter new values as appropriate for your digital certificate, and click APPLY.
Set Access Privileges
You must have administrative privileges for Active Cluster management. Refer to the Active Cluster Guide for the specific rights needed for various cluster operations. Refer to the Administration Guide for more information about setting TDV access rights.
TIBCO® Data Virtualization

86 | Manage Active Cluster Security
TIBCO® Data Virtualization
|87
Uninstalling TDV
This topic describes the process of uninstalling TIBCO® Data Virtualization (TDV) and related products for Windows and UNIX. The uninstall process is similar, regardless of whether you performed a silent or interactive installation.
• Uninstalling TDV on Windows, page 87
• Uninstalling TDV on UNIX, page 87
Uninstalling TDV on Windows
When you uninstall TDV, everything stored in the metadata repository is deleted along with the TDV software.
To uninstall TDV on Windows
1. Stop the Server and Repository if they are running.
2. Start the uninstallation process:
... > Uninstall TDV
For a silent uninstall, TDV is uninstalled without further interaction. For an interactive uninstall, go to step 3.
3. Click OK to confirm the uninstall.
4. Click Done when the uninstallation process is completed.
Uninstalling TDV on UNIX
The following tasks are described here:
• Preparing for Uninstalling on UNIX, page 87
• Uninstalling TDV On UNIX, page 88
Preparing for Uninstalling on UNIX
Before you uninstall TDV, remove the TDV service files from the installation machine, because the uninstaller does not remove these files automatically.
TIBCO® Data Virtualization
88 | Uninstalling TDV on UNIX
To remove the TDV service files cis.repository and cis.server
1. Log into the installation machine as root.
2. Change the working directory to <TDV_install_dir>/bin.
3. Run the following command:cis_remove_services.sh
Uninstalling TDV On UNIX
During the uninstallation process, all the components from the previous installation are removed. You cannot uninstall the components individually.
Note: On an HP machine, the uninstaller does NOT delete the <TDV_install_dir>, because the Java process under <TDV_install_dir>/jre has the directory locked.
To uninstall TDV on UNIX
1. Log into the installation machine as the user that installed the software.
2. Run the following command:<TDV_install_dir>/uninstall
For a silent uninstall, run ./uninstall --mode "unattended"
For an interactive uninstall, go to step 3.
3. Press the Enter key.
You will see a warning about loss of data.
4. Press the Enter key to complete the uninstallation process and leave the uninstaller.
TIBCO® Data Virtualization


